
How to Design a Logo [Step-by-Step Guide]
I think most of us can agree there are generic logos in the world that we easily forget, and then there are great logos that we’ll always be able to recognize (even without the brand’s name attached).
But what is it about a logo that makes you recognize it? What is it about the design that can elicit a memory or even a specific emotion?
If you’re in the process of creating a logo for your company, you’re in a unique position to make a powerful impact on how consumers perceive your brand.
Everything you do, say, and, display as part of your new business will tell your prospects more about your company’s identity. It’s vital to ensure from the beginning that you present a cohesive and clear statement regarding your company’s message.
And while a logo may seem quite simple to create, designing a great one isn’t always easy. It involves a lot of market research, a deep knowledge of your buyer personas, and thoughtful consideration of the principles of logo design. Often, designers find themselves creating many iterations of a single logo before getting it “just right.”
So, where do you even begin to design a logo? Right here. We’ve broken down the nine key steps (with a few tips thrown in) you’ll need to take to create a logo that not only you love, but your prospects will too.
How to Design a Logo for Free
- Start With Your Story
- Brainstorm Words That Describe Your Brand
- Sketch Ideas Based on These Words
- Test Your Top Sketches With Your Buyer Persona
- Refine Your Chosen Sketch
- Develop Your Logo’s Layout on a Free Design Platform
- Pick Versatile Color Options
- Choose a Font
- Ensure Scalability
How to Design a Business, Company, or Personal Logo
1. Start With Your Story
Companies are created to make money — it’s not the most poetic statement, but it’s the one you need to start with. And in order to make a profitable business, you need to be able to sell yourself just as well as your product. Marketers today tend to agree that buyers connect much more strongly to stories than they do to the basic facts of your product. What does this mean to you? There needs to be some story in your logo.
Before you even think about what this logo will look like, take some time asking yourself what the story behind your company is. When we look at Coca-Cola, we don’t see a brown, carbonated beverage — we see polar bears and thick, white script letters.
 Image via Coca-Cola
Step outside of what your company does and convey why you do it. That “why” is the root of your story, and it should come through in the color, shape, and typeface of your logo. If your logo were the title of a movie, what would it look like?
2. Brainstorm Words That Describe Your Brand
Now that you have your story, it’s time to take your logo draft from story to setting. Open Thesaurus.com and enter a term that best describes your product into the search bar.
For example, if you’re in the clothing industry, you might simply type in “clothing.” You’d be surprised by how descriptive the synonyms are that appear. You can even click these results to start new searches and dig deeper as you zero in on the words that best capture your brand.
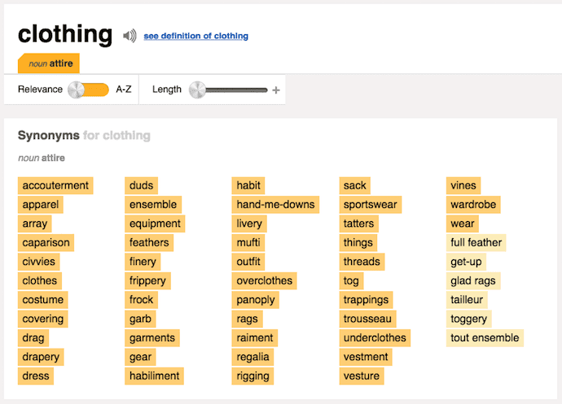 Image via Thesaurus.com
Find five to 10 words that describe not only what you do, but the why from the previous step. Each of these words can fit like pieces in a puzzle and help guide you to refining a concept.
3. Sketch Ideas Based on These Words
Armed with your why and a few keywords for direction, grab a pencil and paper and start sketching every idea that comes into your head. Allow each new concept to evolve on its own. Don’t get frustrated if the first few aren’t right — keep refining, using previous sketches to influence the outcome of new ones. You might focus these sketches on a shape, the name of your brand, or both.
As you’re sketching the concepts for your logo, keep these tips in mind:
- Keep the shape simple. If you can sketch the most symbolic components in seven seconds or less, you’re in good shape. You should absolutely avoid any popular clip-art artwork or generic symbols like a globe, star, or similar icons that people too easily identify from other places. These are easily forgotten at first glance. The more creative you are at this stage, the better your final logo. Your logo is what your consumers will remember the most. Be honest in this artwork.
- Colors can either be your best friend or your worst enemy. You need to include color with your logo, but be selective on which colors you use. Be mindful of current color trends already being used today and in your target market. As a general rule, don’t choose more than three colors. Choose a color or group of colors that will make you stand out from your competition. But please, for the love of marketing, don’t use the whole rainbow!
4. Test Your Top Sketches With Your Buyer Persona
Once you’ve got a handful of different sketches on paper, take a step back and pick the top three concepts. Don’t think too hard about this — consider the designs your eyes keep going back to, and select them to show to others.
Share these drafts with your friends, family members, and a colleague you trust. If possible, bring these sketches to someone who best fits your buyer persona — or your ideal customer profile. This gives you the most productive opinion on your artwork because it can indicate how customers will receive your brand — not just the people close to you.
Be prepared for honest feedback and don’t take any negative comments personally. These criticisms will only make your final logo better. Use their feedback to select one final concept to develop into a design.
5. Refine Your Chosen Sketch
Congratulations, you’re well on your way to having an awesome logo! Once you’ve identified a sketch to run with, it’s time to refine it and perfect the story you started with in Step 1.
To begin refining your logo, look back at the terms you identified when you first used Thesaurus.com in Step 2. Now look at your chosen sketch and ask yourself: Which terms does this sketch not yet capture? Use them to develop your sketch further, and add back the traits you liked best about the designs you didn’t end up choosing for refinement.
6. Develop Your Logo’s Layout on a Free Design Platform
Now, it’s time to get technical and turn your paper drawing into a usable digital format. To bring this design to life, you have many free design platforms available to recreate your sketch in digital format. Here are a few free solutions:
The platforms above can help you put your sketched logo in digital format, but bringing your concept to life for a business audience requires a bit of technical direction. One of the most important things to get right is the layout. Make sure all of your text and shapes are perfectly spaced and the logo itself is aligned with its surroundings.
Your logo doesn’t have to be symmetrical, but it should be aligned in different contexts. Chances are, you will encounter situations when your logo sits against different vertical and horizontal borders, and it should appear even with these surroundings no matter how you might repurpose your logo and where you might publish it.
7. Pick Versatile Color Options
Your logo’s color scheme might look great against the color of the canvas on which you designed it, but eventually, your logo will be placed on backgrounds whose colors you didn’t start with.
Let’s revisit our Coca-Cola example from Step 1. As you can see below, the company’s logo can work across any colored can it sells.
 Image by Jay Moye
Always be sure to have logo color variations for both dark and light backgrounds. That might mean only having to change the color of your font. Or, in some cases, you might have to change the color of your entire logo.
Create one of each option to make sure you’re prepared when ordering promotional products that will display your logo. T-shirts, stickers, notepads, and coffee mugs are just a few of the many items for which you’ll have different color variations of your logo.
8. Choose a Font
This is the time to combine text with imagery. If you’re chosen sketch is primarily a shape or symbol, rather than text, begin to factor in the written name of your company. Consider the typeface this text will carry if your company name ever stands on its own without the symbol.
Believe it or not, your font choice can say a lot about your business. You can choose a font that’s either serif (with stems on each letter) or sans serif (no stems) — also known as classic or modern, respectively.

Stay away from generic fonts that come standard on every word processor. Some examples of generic fonts are Times New Roman, Lucida Handwriting, and Comic Sans. These fonts will only work against you and your company by making you less memorable.
9. Ensure Scalability
Logos are meant to represent your company on multiple platforms — in print, on your website, on each of your social media business pages, and across the internet as your business grows. You want a logo that can be blown up super large for a billboard, but also scaled down for screening onto the side of a pen.
Every part of your logo should be legible, regardless of the logo’s size.
Whew — still with us? We know this might seem a little overwhelming, but take it slow and don’t rush yourself. It’s better to follow the process through to completion and end with a remarkable brand than to start over a few months later due to a design error or change of heart.
Once you’ve completed your logo, how can you tell if you scored a winner? Easy: Use our Logo Grader to assess the sustainability and effectiveness of your new logo.
Co-authored by: Rachel Begg, Julie Hruska, and Britt Schwartz

How a Visual Language Can Spell Success for Your Next Marketing Campaign
Whether you’re bingeing an original series on HBO or scanning your Instagram feed, high-quality visual content is now easier to find than ever.
Which means visual content is now an absolute necessity for marketing success.
In fact, 94% of first impressions of your brand are based on design. So if your marketing content doesn’t delight and engage your audience at very first glance, they’re likely to move on to the next thing — in a matter of seconds.
I’m willing to bet you’ve already developed a variety of visual content, ranging from videos to infographics, related to your brand.
However, if you’re following your company’s brand guidelines to the T for every marketing campaign or visual you create, you might not be reaching your full marketing potential.
While your brand guidelines are critical for providing general direction, each campaign is different, so each campaign needs its own visual language.
To help you take your visual marketing content to the next level, let’s explore what a visual language is, and how you can develop one for your next campaign.
What Is a Visual Language?
A visual language essentially serves as a set of brand guidelines for your campaign.
It’s important to note — a visual language doesn’t replace your brand’s visual identity. In fact, it keeps that identity very much in mind, but makes small changes or additions as necessary to optimize for your campaign goal(s) and target audience.
When done well, a visual language achieves three things:
- It makes sure all the visual content you produce for your campaign has a united look and feel.
- It considers the goals of your campaign, then drives the kind of visual content that can help you achieve those goals.
- It takes into account the target audience for your campaign, optimizing each piece of content to speak to and connect with that audience.
A visual language will define a number of parameters for your campaign, including:
- Illustration style
- Icon style
- Color palette
- Typography
Since every campaign is different, the visual language you use for each campaign will be different. For instance, if you plan to incorporate photography or live video footage, you’ll want to make sure to include usage guidelines.
While it might seem like extra, unnecessary work, it’s actually an incredibly useful tool for ensuring your team continues to create high-quality marketing materials.
Once your visual language is defined, it sets a standard of quality for all the materials you produce. It ensures that every piece of visual content for a campaign will be on-brand, and can help you drive higher conversions.
With all that said, it’s no easy task to ensure the visual language you create will truly be optimized for your campaign. To help you combat this challenge, let’s explore some strategies you can implement to ensure your visual language aligns with your marketing goals.
How to Create Your Own Visual Language
1. Identify your goals.
You may already have a clear idea of what you want your marketing campaign to achieve. If you do, the very first step you should take in any campaign is to write those goals down.
It sounds obvious, but you’d be surprised how many marketers either don’t define their goals clearly, or lose sight of them over the course of a campaign.
If you’re not sure what your goals should be, there’s a lot you can learn with a little market research. Take a look at what your competition has achieved in recent campaigns, or do a brand-potential analysis to define where your brand stands in the marketplace.
Keep in mind, though, that while a visual campaign can have more than one goal, each individual piece of visual content you create should have only one goal.
That’s because, when you try to achieve sometimes-conflicting goals with a single piece of content, you risk not optimizing for any of those goals.
2. Define your target audience.
Part of your goal-setting should be clearly defining the target audience for your campaign. This audience may be distinct from your brand-wide audience.
For instance, perhaps you’re working at a shoe company that makes all sorts of shoes — everything from hiking boots to high heels — but you’re about to launch a new line of running shoes. As you design a campaign around that launch, you don’t need to target the hikers who wear boots or the office workers who wear heels.
Ultimately, that means the visual content you produce for this campaign may have a very different look, feel, and tone from the other content you’ve produced in the past.
You’ll want to do some research, too, on how that audience likes to communicate. What types of visual content do they most engage with? What are their preferred platforms?
If they’re part of a particular age group, you’ll want to familiarize yourself with research on how different generations interact with content.
3. Determine the right visual language for your campaign.
Once you’ve clearly defined your goals and audience, you’re ready to define the visual language for your campaign.
As I’ve said already, every campaign is different, which means I won’t be able to make specific recommendations for design styles or other aesthetic choices here. It all depends on your brand, who you want to reach, and what you’re hoping to achieve.
Still, I can offer up an example of what a visual language might include based on one brand personality that many organizations hope to project.
For instance, imagine that you want your campaign to channel a modern, sophisticated ethos.
Here’s a mood board featuring some of the characteristics you might choose for your visual language:
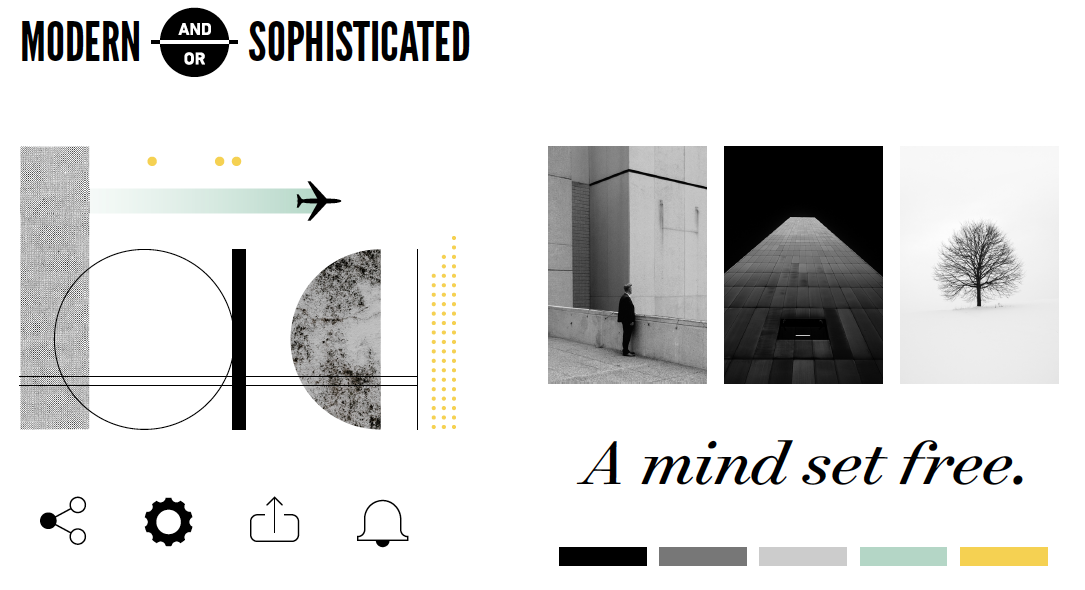
The illustrations are minimal, often abstract, and textural. Additionally, the photography and color palette are cool and neutral, with small pops of color. The typography includes a classic Serif font.
These elements communicate a brand that’s innovative and forward-thinking. This is a
visual language designed to connect with an audience of young and mid-career professionals.
If your goal is to establish thought leadership in your industry, connect with decision-makers, and/or build consumer trust in your brand, this visual language is likely to achieve all these goals.
Ultimately, a visual language ensures consistent quality and messaging across your campaign. What’s more, it saves you money by ensuring that all that planning occurs just once, rather than with every new visual asset you create for each individual campaign.

How to Make a Video: a Step-by-Step Guide
In 2019, video marketing is being used more than ever. A whopping ;87% of businesses say they use it as part of their overall inbound strategy.
Despite its success, creating a video may seem daunting if ;your company has ;never done it before.
Why are we so afraid of doing video? Most of us get ;paralyzed by the “no time, too hard” fallacy. We convince ourselves that we need fancy camera equipment and editing software to make video work — and that there’s no way that’s happening with our current budget. We’re also trying to juggle many other marketing activities. Video just seems like a luxury we can’t afford. ;
But ;creating a video doesn’t have to be hard or time consuming. If done right, videos can be made quickly and easily — all while supercharging your engagement and click-through rates.
Videos are easy to digest. They let you inject personality into your message. When it’s genuine, a video can make people smile and laugh. This makes them more likely to share your message with their friends.
To help explain why video is so crucial to your ;strategy and give you tips for getting started today, Wistia ;has teamed up with our friends at HubSpot to film the video below;
Ready to dive into your first video? There ;are five quick action items that will help you get your very first video out the door. This time next week, you could have your very first video up! So let’s dive right in.
5 Quick Tips for Producing Video
1. Define your audience.
Before you start to script or shoot anything, establish who you want to reach. Are you trying to attract certain buyer personas? New visitors or returning leads? Or are you trying to engage your evangelists, who may never buy your products at all? Knowing who you create videos for is crucial to your success down the road.
2. Define your goal — and limit yourself to one! ;
Decide whether you’re trying to bring the audience you defined in Step 1 into the top of your funnel, engage with them in the middle of your funnel, or close them at the bottom of your funnel — and then create your videos to help accomplish that goal.
3. Pick a topic that’s done well in a different content format. Then turn it into a video. ;
Repurpose content that you’ve already created, like a blog post or presentation, and turn the main ideas into a one- or two-page script.
Practice reading it out loud. As you read, look for places that don’t sound right coming out of your mouth and edit them to sound more conversational. Share the script with others and peer edit.
4. Record yourself reading your script.
Use a webcam, iPhone, or whatever tools you already have — most people will forgive production quality if you have great content.
5. ;Display the video on your blog, website, and/or social networks.
Use your analytics and get feedback from your target audience to find out what people liked and what they found confusing. Then, you can use your metrics and feedback to make your next video even better.
Realistically, you could achieve these five wins in a ;few days. Just get your first video out into the wild — then iterate your process in future videos. You’ll be a video pro in no time. ;
To learn more about Wistia and how to use it, check out this blog post.

Podcast Advertising: 5 Experts Reveal Their Secrets
Are you one of the 150 million Americans who commute to work every day? If so, I’m guessing you’ve listened to a podcast or two. You’re not alone. According to Infinite Dial, U.S. podcast audiences listen to an average of seven podcasts per week.
The podcasting industry has continuously grown since 2013. In fact, Infinite Dial reports that in 2019, 20 million more people were listening to podcasts than in 2018.
That’s why it’s important to consider podcast advertising for your brand.
Podcast ads have produced excellent results for sponsors. According to Midroll, 61% of podcast listeners say they bought something after hearing an ad, and podcast ads drive two to three times more engagement than radio ads.
Here, you’ll learn everything you need to know about podcast advertising — from top podcast advertising strategies to advertising rates and networks.
Podcast Expert Advertising Strategies
Before you get started with podcast advertising, consider this advice from the experts.
Use podcasting for brand awareness, not lead generation
Rebekah Bek: As a writer for Ahrefs, Bek was recently put in charge of podcast sponsorships. She writes her advice for podcast advertising strategies in this Medium post. Here are the key takeaways:
- Rather than being a tool for lead generation, podcast advertising is a tool for gaining exposure and brand awareness.
- It’s not always about measurable ROI.
- Organic, not scripted, mentions perform best.
Understand your audience may have eclectic tastes
Midroll: Midroll, a company that matches podcasters with advertisers, writes about their advice to advertisers. Here is the key takeaway:
- It’s wise not to adhere too strictly to a category. Don’t assume that comedy audiences aren’t also entrepreneurs or that listeners to a sports podcast aren’t interested in a comedy special. You may be surprised at how broad and eclectic your audience tastes and needs are.
Ads read by the host perform better than third-party ads
Jason Hoch: Chief Content Officer at HowStuffWorks, Hoch revealed what type of ads work best for their brand in an interview with DigiDay. Here are the key takeaways:
- Ads read by the host perform better than scripted, third-party ads placed in the podcast.
- Listeners feel like they are being shouted at with third-party ads.
- Consider producing organic mentions for better results.
Test and measure the success of your campaigns
Kurt Kaufer: Partner and CMO at Ad Results Media, a podcast advertising agency, Kaufer wrote a survival guide for podcast advertising in this Forbes post. Here are the key takeaways:
- Measurement is the key to determining success in a podcast advertising campaign. Use promo codes, custom links, and post-checkout surveys to track success.
- Be comfortable knowing not every ad will work at first and that a breadth of shows will need to be tested to figure out what works and what doesn’t.
You don’t need to sponsor the biggest podcasts, you can reach the same people on smaller shows
Sam Balter: A podcast marketer at HubSpot, Balter wrote about his podcast advertising learnings in this post. Plus, I spoke with him about his top podcast advertising strategies. Here are the key takeaways:
- Pre- and post-roll ad spots are generally cheaper than mid-roll and tend to take less time. Most ads have some sort of call-to-action that prompts listeners to go to a specific URL or use a discount code to get a discount.
- Podcast popularity and listenership will only continue to rise and so will the opportunity to connect with people in a new and novel way.
- When sponsoring podcasts, trust the host to deliver a message in their own voice.
- It’s better to go for frequency over reach. Pick a podcasts where you can purchase three to five ads versus one ad on a large podcast.
- Podcast listeners are millennials, well educated, and more affluent. You don’t need to sponsor the biggest podcasts, you can reach the same people on smaller podcasts.
Podcast Advertising Rates
The amount you pay for podcast advertising will vary depending on the length and type of the ad.
It’s also important to take into consideration that podcasts offer different pricing structures. Ads can be sold on a cost per mille (CPM) or cost per acquisition (CPA) rate. CPM is the cost you’ll pay per 1,000 impressions or downloads. CPA is the cost you’ll pay to acquire a customer. Most ads are sold on a CPM model.
During my research for this piece, I found the current average cost of podcast advertising rates is a CPM of about $25.
For example, according to AdvertiseCast, the average CPM for 30-second ads is $18, and the average CPM for 60-second ads is $25.
On the other hand, Balter concludes the CPM generally ranges from $20 to $50.
Kaufer reports CPM prices typically range from $15 to $25.
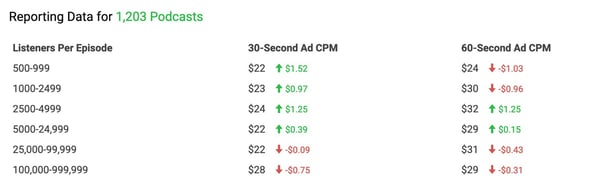
Image source: AdvertiseCast
Podcast Advertising Network
A podcast advertising network is an agency that connects companies or brands with respected podcasts on which to advertise. The goal is to take away the friction in podcast advertising by helping brands promote their products on podcasts and helping podcasters monetize their projects. A few examples include:
1. Midroll
Midroll can connect advertisers with 300+ shows downloaded more than 150 million times a month. In their advertisers portal, you have access to your campaign’s metrics and airchecks (demonstrated recordings) 24/7. For pricing information, you can contact them through their contact page.
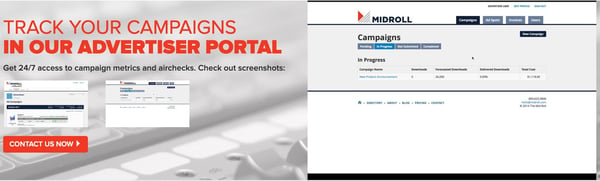
Image source: Midroll
2. Podcast One
Podcast One sees more than 2.1 billion downloads annually across 350 episodes produced weekly. They provide data on how many people hear your ad and how many times the podcast is downloaded. Raw data is downloaded from Edgecast, quantitative and qualitative data from Edison Research, and digital ad injection and verification by WideOrbit. For pricing information, you can fill out the contact form at the bottom of their about page.
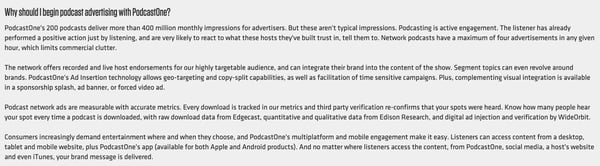
Image source: Podcast One
3. AdvertiseCast
AdvertiseCast boasts 1,500 podcast listens, a 30,000,000 monthly listener reach, and 7,500 available ad spots. They also offer an end-to-end service where they can manage your campaigns for you. In their advertising portal, you can research the shows you want to sponsor, manage your ad campaigns, and access your reporting metrics. For pricing information, you can contact them through their podcast advertising form.
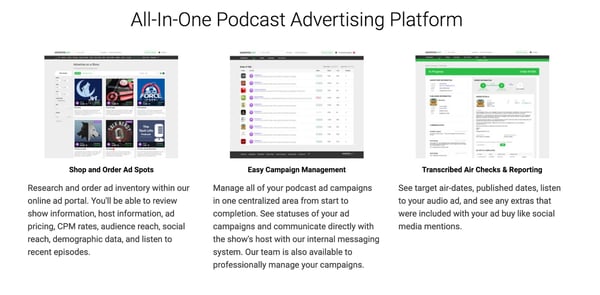
Image source: AdvertiseCast
Podcast Advertising Statistics
1. 70% of US population is aware of podcasting (source: Infinite Dial, 2019)
2. Podcast advertising revenue is forecasted to exceed $1 billion by 2021 (source: Interactive Advertising Bureau and PwC, 2019)
3. Brand awareness and branded content campaigns continue to make up a larger part of how advertisers choose to reach their audience. (source: Interactive Advertising Bureau and PwC, 2019)
4. 51% have listened to a podcast (source: Infinite Dial, 2019)
5. Host-read ads continue to be the preferred ad type, representing a little less than two-thirds of ad types in 2018. Announcer-read/pre-produced ads make up most of the other one-third. (source: Interactive Advertising Bureau and PwC, 2019)
6. Cost per thousand continues to be the dominant pricing method in 2018. Cost per acquisition is no longer significant. (source: Interactive Advertising Bureau and PwC, 2019)
7. 32% have listened in the last month (source: Infinite Dial, 2019)
8. 60-second advertising spots were the most popular spot length in 2018. 90-second advertising spots were not far behind. (source: Interactive Advertising Bureau and PwC, 2019)
Podcast advertising is a marketing tactic that is continuing to grow. As a majority of people have listened to a podcast, and engagement rates are increasing, brands can no longer ignore podcast advertising.
Want to learn more about podcasting? Check out our blog, Everything You Need to Know About Starting a Podcast in 2019.

53 Facebook Statistics to Know for 2019
As a marketer, it’s useful to keep track of social media sites by the numbers. Statistics help organize where to invest your ad dollars in content and which areas to avoid. Whether you’re interested in where to begin the buyer’s journey on Facebook or the cost of paying for ads, find the Facebook statistics you need to know for 2019.
Our Facebook stats are organized into five categories:
1. Facebook has 39,651 employees. (Source: Facebook, 2019)
2. Facebook revenue for twelve months ending in June 2019 was $62 billion. (Source: MacroTrends, 2019)
3. In 2018, Facebook had an annual growth rate of 41%. (Source: MacroTrends, 2019).
4. 56% of people visit Facebook to get information. (Source: Facebook, 2019).
We all know Facebook is big, but let’s look at exactly how expansive it is by employee numbers and growth rate. As a marketer, knowing where Facebook is and where it’s going gives you information about how your brand can fit into the ecosystem and how to best serve your customers on the platform.
1. In 2018, Facebook reported Q4 ad revenue of $16.6 million, a 30% increase from 2017. (Source: Martech Today, 2019)
2. The average price for an ad saw a 2% decrease while ad impressions grew by 34%. (Source: Martech Today, 2019)
3. 94% of ad revenue in Q2 was represented by mobile ads, a 3% increase from Q1. (Source: Facebook, 2019)
4. Facebook’s ad revenue as $16,624 million in Q2. (Source: Facebook, 2019)
5. The U.S. and Canada made up $8,115 million of Facebook’s ad revenue in Q2. (Source: Facebook, 2019)
6. There are 7 million advertisers on Facebook. (Source: Statista, 2019)
7. Facebook video ads have a low CPC, at $1.86. (Source: Fit Small Business, 2019)
8. The potential reach of advertising for Facebook is 1.9 billion. (Source: We Are Social, 2019)
9. The average cost-per-click on Facebook is $1.72. (Source: Wordstream, 2019)
10. Facebook’s total ad revenue is expected to reach $39.4 billion by 2021. (Source: Statista, 2019)
Now that you know Facebook ads by the numbers, how does your brand fit in with long-term ROI? Are you spending too much or too little?
1. 69% of Americans use Facebook. (Source: Pew Research Center, 2019)
2. Facebook is used by 51% of U.S. teens. (Source: Pew Research Center, 2019)
3. 43% of U.S. adults get their news from Facebook. (Source: Pew Research Center, 2019)
4. 74% of U.S. adults visit Facebook every day. (Source: Pew Research Center, 2019)
5. 96% of Facebook users access the app on mobile. (Source: Statista, 2019)
6. Facebook reported that 3-4% of profiles for monthly active users (MAUs) were fake and removed them in 2018’s Q1. That’s 88 million accounts. (Source: Facebook, 2018)
7. Daily active users (DAUs) on average for Q2 were 1.59 billion, an 8% increase year over year. (Source: Facebook, 2019)
8. The number of MAUs for Q2 was 2.41 billion, also an 8% increase year over year. (Source: Facebook, 2019)
9. In 2018, 35% of Facebook’s audience was under 25. (Source: We Are Social, 2019)
10. Facebook users aged 65+ is 41%. (Source: Pew Research Center, 2019)
11. In 2018, it was reported that 1.1 billion Facebook users speak English. (Source: We Are Social, 2019)
12. Facebook’s total number of desktop active users is 1.47 billion. (Source: We Are Social, 2019)
It’s important to know how much of your audience is on Facebook, to position your marketing strategy. If your target audience uses Facebook every day, consider beefing up content for lead generation. Optimizing content for desktop and mobile based on active users will also make your content more attractive to potential customers.
1. Women between the ages of 25-34 make up 13% of Facebook’s global active users. (Source: Statista, 2019)
2. Men between the ages of 25-34 make up the biggest demographic group, at 19%. (Source: Statista, 2019)
3. India is the country with the most Facebook users, with 300 million. (Source: Statista, 2019)
4. Facebook users are 57% male and 43% female. (Source: We Are Social, 2019)
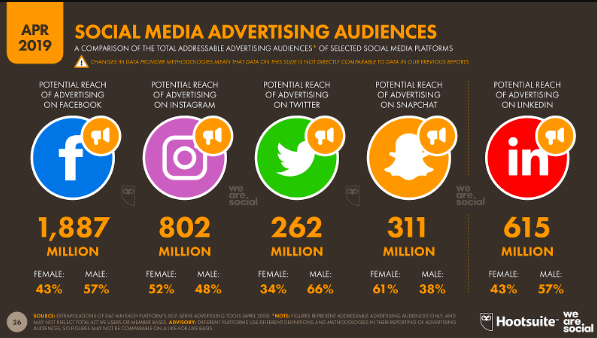
Image Source: We Are Social
5. There are 1 billion users from Asia on Facebook. (Source: Facebook, 2019)
6. There are 385 million Facebook users in Europe. (Source: Facebook, 2019)
7. Over 80% of Facebook’s daily active users (DAUs) come from outside of the US and Canada. (Source: Omnicore Agency, 2019)
8. Facebook has 2.41 billion monthly active users (MAUs). (Source: Facebook, 2019)
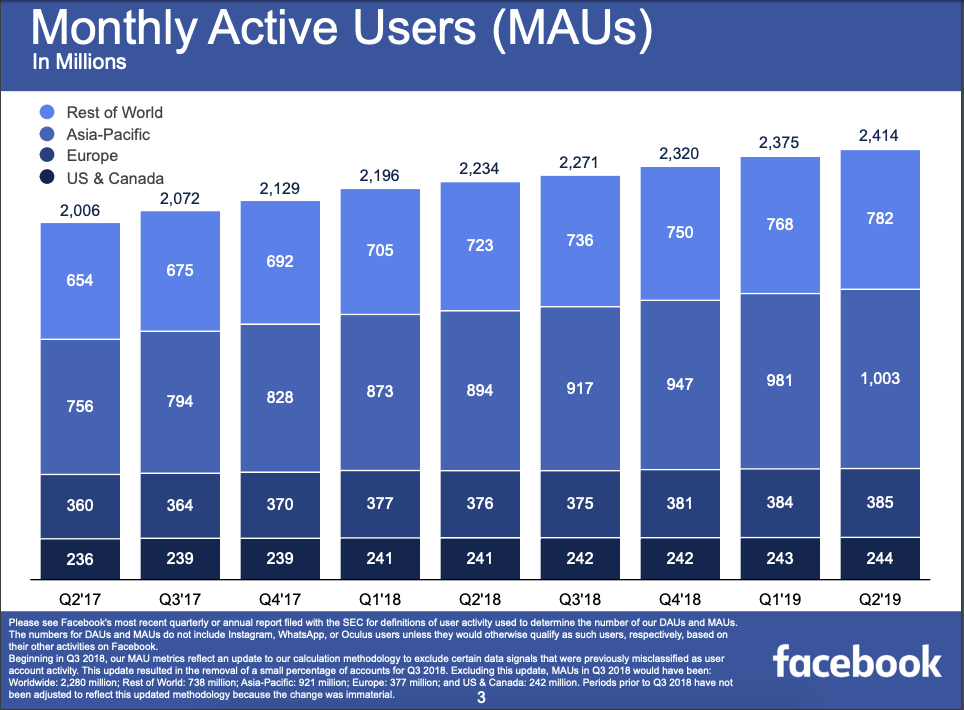
Image Source: Facebook
9. 65% of Facebook users are under 35. (Source: Statista, 2019)
Facebook’s monthly average users are climbing. That means more of your audience is continuously checking Facebook, and your potential audience of over 1.8 million is growing. Your content is seen by a multitude of other countries as well, so it’s a good idea to keep that in mind when strategizing campaigns.
1. In 2018, 78% of US consumers made purchases through discoveries on Facebook. (Source: Kleiner Perkins, 2018)
2. 93% of businesses are active on Facebook. (Source: Buffer, 2019)
3. Images make up 18% of Facebook posts. (Source: Buffer, 2019)
4. Link posts receive 76% less engagement than video posts. (Source: Buffer, 2019)
5. The median engagement rate across all industries on Facebook is 0.09%. (Source: Rivaliq, 2019)
6. The average person spends 37 minutes on Facebook. (Source: Marketing Land, 2019)
7. More than 2.7 billion people use Facebook’s family of services every month. (Source: Facebook, 2019)
8. Facebook Stories has 500 million daily viewers. (Source: TechCrunch, 2019)
9. 4.6% of marketers use Facebook video ads. (Source: Buffer, 2019)
10. 35% of marketers report successful influencer campaigns on Facebook. (Source: Buffer, 2019)
These stats provide more direction about where your strategy should head in order to earn more numbers on Facebook. For example, if you have a video of your company’s weekly Waffle Wednesday event, post that instead of the link to your blog post, which you can save for Twitter Cards.
1. In 2018, users aged 18-24 have 75% less of an attention span for video ads than users who are 65+. (Source: Facebook, 2019)
2. 75 million people use Watch at least one minute each day. (Source: TechCrunch, 2019)
3. Users are 1.5 times more likely to watch a video on their phone. (Source: Facebook, 2017)
4. 62% of people have reported being more interested in a product after seeing it on a Facebook video. (Source: Facebook, 2018)
5. Video promotions are equally as important as photo promotions. (Source: Social Bakers, 2019)
6. 81% of businesses prefer video marketing on Facebook. (Source: Buffer, 2019)
7. Facebook is the second most popular video property, behind Google. (Source: Statista, 2019)
8. Politics is the highest category of Facebook Stories, at 36%. (Source: Statista, 2019)
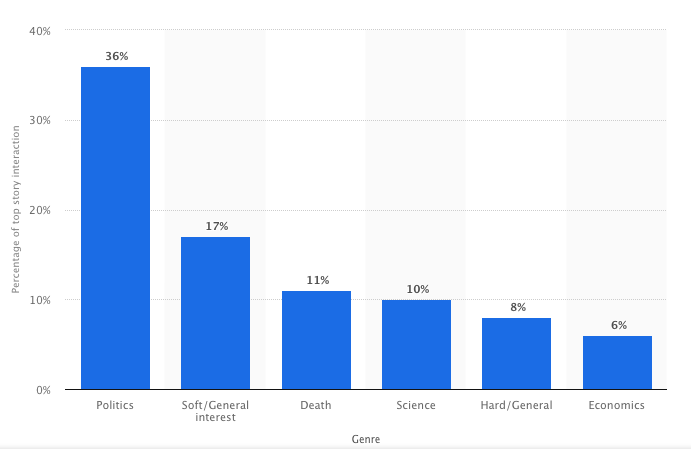
Image Source: Statista
Facebook videos are massively popular and have a large appeal to younger users of the site. If you have products to promote, videos have your back and your target audience.
Keeping up with Facebook is an important factor in planning strategy. Not only because Facebook owns other platforms, like Instagram, but they also influence more than one channel of your planning. For more information on using Facebook in your social media planning, check out our ultimate guide here.

How to Use Snapchat: A Detailed Look Into HubSpot’s Snapchat Strategy
Back in 2011, Snapchat was synonymous with risqué teen behavior. News coverage repeatedly warned parents of the damaging effects the platform might have, and as a result, Snapchat’s success wasn’t looking good.
Since then, Snapchat has evolved into something so much more. And while it’s certainly not the cornerstone of every marketing strategy just yet, the channel has earned a reputation for fast growth and innovation.
Snapchat is now known as a platform for individuals and brands — one that allows users to create quick, lighthearted, and even educational video content without using valuable production resources. For brands, this means a new opportunity to show off their company culture, share their industry knowledge, and connect with their audience in a new and exciting way.
Get our guide to using Snapchat for business here.
After reporting more than 100 million daily active users and 8 billion video views a day, we decided to give it a go: The official HubSpot Snapchat account launched in March 2016. Since then, we’ve learned a lot about executing and iterating a successful Snapchat business strategy.
To help you get started, we’ve detailed everything we’ve learned below. In this guide, we’ll go over:
- How to set up your Snapchat account.
- How to make, send, and view Snapchats.
- How to use Snapchat Lenses and Geofilters.
- How to add and acquire friends or followers.
- How to perfect your use of Snapchat for Business.
How to Set Up Your Snapchat Account
The first thing you’ll need to do is download the Snapchat mobile app — available for iOS and Android — and create an account by entering your email, a username, and a password. This will be your personal account, and you can ultimately use it to create a Snapchat Business Account.
1. Sign up on Snapchat’s home screen.
Once you’ve downloaded the Snapchat mobile app, open it and you’ll see the screen below.

Tap “Sign Up” and the app will take you to the sign-up page, starting with your first and last name.
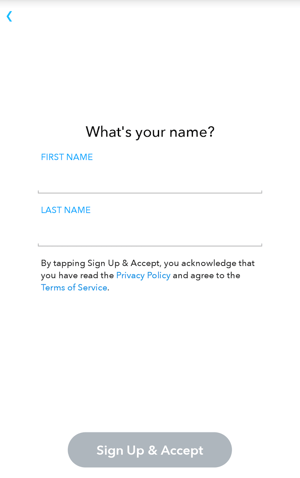
Then, you’ll enter your:
- Birthday.
- Username and password.
- Email address.
- Phone number.
- Friends to add.
Adding friends from the signup screen will help you find friends on Snapchat who are also in your phone’s contact list. You can skip this for now if you wish — we’ll talk more about adding friends in Step 4.
When creating a username, however, keep in mind that you’ve only got one shot: Snapchat does not allow you to change your username once you set it.
2. Create a profile picture using Bitmoji.
Once your account is created, you’ll want to take care of a few housekeeping things. The first is your profile picture — this picture will be how people identify you when sending and receiving snaps to and from you.
To create your profile picture, tap the  icon to the top-left of the camera screen. Then, tap “Create Bitmoji,” as shown below:
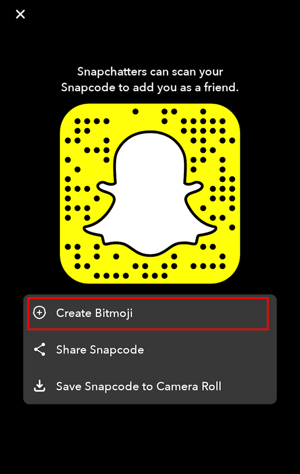
Bitmoji is a free, separate app that integrates with Snapchat and allows you to create a fun, illustrated avatar of yourself. Once you select this option through Snapchat, you’ll be able to download the Bitmoji app and personalize your profile picture. Here’s what that personalization process looks like:
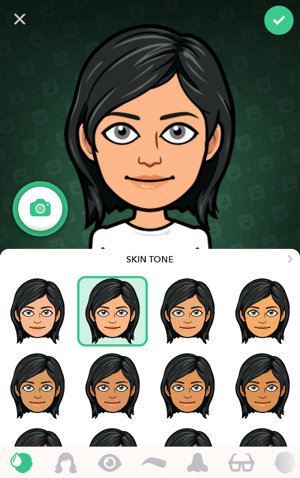
Once you’ve designed a Bitmoji that resembles you, follow the prompts to connect your Bitmoji to Snapchat. The screen below will indicate that your Snapchat profile picture has officially been set:

3. Adjust your privacy settings.
In Snapchat, tap your new Bitmoji icon at the top of the camera screen to visit your profile page. Then, tap the gear icon to access your settings in the top-righthand corner.
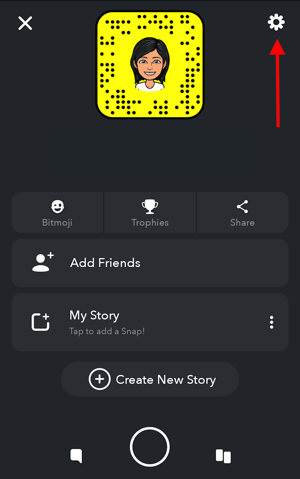
Under the “Who Can…” section, adjust your preferences accordingly. You’ll be able to modify which people can contact you, view your Story, and even see your location. In most of these sections, your options for who can do these three things are:
- Everyone, whether or not your friends with them on Snapchat.
- My Friends, indicating that only those you’ve added as a friend can see your snaps.
- Custom, where you can select specific users to include and exclude as viewers of your content.
4. Add your friends.
Adding friends in Snapchat allows you to see these users’ Stories (a feature we’ll talk about in just a minute), and alerts these users that you’ve connected with them so that they might add you as a friend in return.
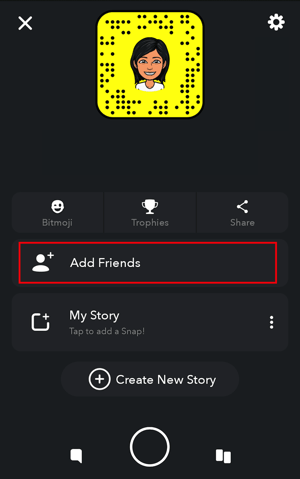
To add friends, tap your Bitmoji at the top of the camera screen to visit your profile page. Then, tap the “Add Friends” option, as shown above. From here, you’ll have the option to add friends by:
- Username. To add a friend by their username, simply type in their username using the search bar at the top of your screen.
- Contacts. To add friends based on your phone’s address book, tap the “Contacts” tab at the top of your screen and select “Continue” at the bottom. Allow Snapchat to search your contacts in Snapchat by the phone number you have saved on each person, and the app will begin pulling contacts into Snapchat for you to send friend requests to.
- Snapcode. Your Snapcode is contained in the yellow background surrounding your Bitmoji, as you can see in the screenshot above (believe it or not, those black dots embedded in the yellow frame are in a pattern that’s unique to your account). To add someone as a friend by their Snapcode, you’ll need to have a picture of this Snapcode saved in your phone’s camera roll. Once you’ve captured this photo, turn it into a Snapchat friend by selecting “Snapcode” at the top of your screen and selecting the photo.
How to Make, Send, and View Snapchats
A snap is a direct message from one account to one (or several) other accounts. These messages disappear immediately after viewing, and can contain photos, videos, or images uploaded from your phone.
To send a photo Snap, open up the camera screen and tap  or the anywhere on the screen to capture the photo. To send a video Snap, hold . By holding down the and quickly swiping left, you can run the recording without holding down the button.
How to Make and Send a Snap
Once you’ve got a photo or video, you have 10 options before you hit send. See an explanation of each numbered icon below the following screenshot.

1. Discard your snap.
Tapping icon #1, as shown above, simply returns you to the camera screen, where you can take a new snap.
2. Save the snap to your memories.
All Snapchat content is ephemeral, meaning the snap either disappears after 24 hours — if it’s added to your Story — or it’s deleted after the friends you sent it to view it. Saving a snap to your Memories, however, allows you to keep the snap permanently and view it in your own private photo gallery.

3. Add the snap only to your Story.
A Snapchat Story is a photo or video that is viewable to all of your friends for 24 hours. You can create multiple photos/videos shown in succession to create a longer story. Most brands use this feature, as it allows you to reach a larger audience.
To create a Story on Snapchat, follow the process for creating a Snap in the steps above. When you’re ready to send it, tap icon #3, as shown just above Step 1. This will present you with the option to save your snap to “My Story,” which makes it visible to just those who have added you as a friend; or “Our Story,” which adds it to a collection of Stories from other Snapchatters who are in the same location or at the same event.

4. Add text to your snap.
Tapping the “T” icon lets you add text to your snap, pulling up your phone’s keyboard where you can create a caption for your photo in any font, color, or size. Check out an example from our event, INBOUND:

5. Draw on your snap.
Tapping the pen icon provides you with a digital pen, which you can use by dragging your finger across your screen. Change the color of this pen by sliding your finger across the color meter on the top-right of your snap, as shown below:

6. Add stickers to your snap.
Tapping the notepad icon pulls up a gallery of fun, illustrated images. You can use these “stickers” to annotate your snap, as shown below:

7. Create a sticker from your snap.
Tapping the scissors icon allows you to cut out a section of your snap and paste it to this or other snaps you might take in the future. See what creating a sticker looks like below:
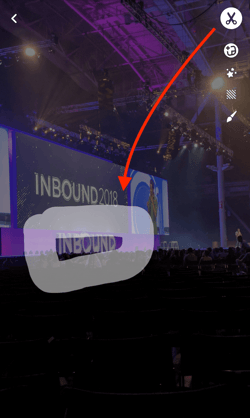
8. Attach a hyperlink to your snap.
Tapping the paperclip icon gives you a URL search bar. Type in any website’s URL, and attach this URL as a hyperlink to your snap for your friends and viewers to click on. This is a great function for businesses to use when promoting content that originates on their blog or website.
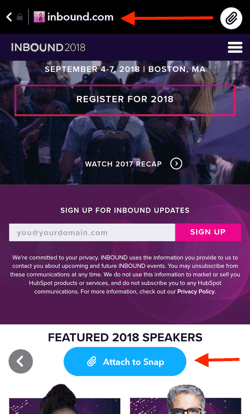
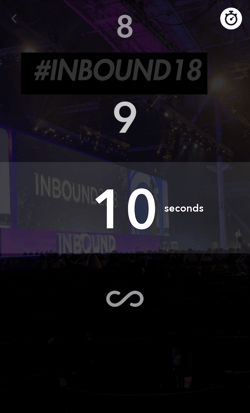
9. Change the duration of your snap.
Tap the stopwatch icon to adjust how long your snap stays on your friend’s screen (or plays if it’s a video). Your timing options range from one to 10 seconds — or infinity, which keeps the snap on your friends’ screen until they swipe away from the snap. For videos, the stopwatch icon lets you set how many times the video will loop on your friends’ screen before the snap closes.
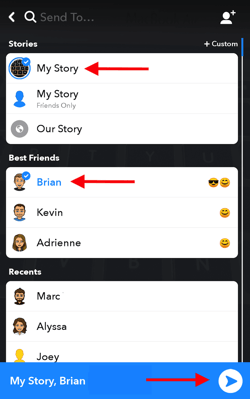
10. Send your snap to your friends.
Once you’re happy with your snap, tap the  icon on the bottom-right of your snap. This icon will show you a list of all your friends, where you can select to whom you want to directly send your snap. Then, tap the white arrow on the bottom-right of your friends list to officially deliver your photo or video. This will notify each friend you send it to that they’ve received a snap from you.
How to Add Snapchat Filters to Your Snap
Want to add filters, the time, the weather, or your current speed to a Snap? Swipe left or right on the preview screen to browse your options.
Add Lenses
Want to experiment with Snapchat Lenses? These are animations that can be overlaid on top of your selfie. To use them, simply press and hold your face with the camera directed toward you until the Lens option appears below. You can then swipe left to browse through the options, like this one:

Image Credit: Snapchat
(Note: Snapchat also offers Sponsored Lenses — like the Gatorade one featured in #4 on this list — but it’ll cost you. According to Financial Times, a Sponsored Lens could cost up to $750K in certain situations.)
Add Geofilters
You’ll also notice something called Geofilters appear as you swipe through. On-Demand Geofilters are available to businesses and individuals for purchase.
These special filters can be use for an event, business, or specific location — brand logos and trade-marks are permitted. Here’s one made for the city of Boston, which we used on a snap from our event, INBOUND 2018:

How to View a Snap a Friend Sent to You
To view a Snap that has been sent to you, swipe right on your camera screen to see your Friends list. Snaps you’ve received directly from a friend will have a red (still photo), purple (video), or blue (text message) square to the right of their name. Tap this square once to see or play the Snap. If you have several Snaps from the same friend, they’ll play like a flipbook.
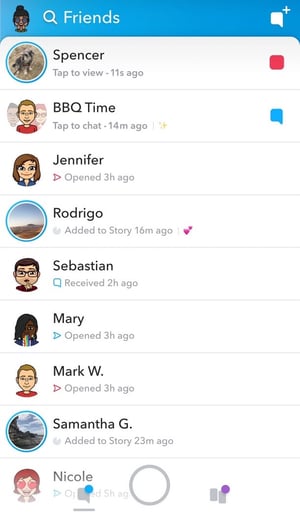
Image Credit: Elite Daily
Here are some helpful tips for viewing other users’ snaps:
- To skip a Snap, tap the screen once.
- To exit, swipe down.
How to View a Snapchat Story
There are two ways to view Snapchat Stories: from your Friends list or from your Discover page.
From Your Friends List
To view a user’s story, swipe left on your camera screen to see a list of your friends. Friends whom you recently interacted with will appear near the top. If they’ve posted a Story, you’ll see it in place of their Bitmoji to the left of their name.
Tap the circular icon next to a user’s name once to open their story. To view your own Story, tap your profile icon on the top-left on your Friends list.
From Your Discover Page
To see Stories from everyone you’ve added as a friend, regardless of your interactions with them, swipe left twice to your Discover page. Each friend who has an active story will appear at the top in a small, portrait-shaped rectangle, as shown below:
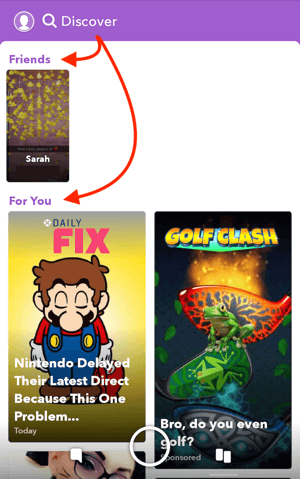
Stories are available for 24 hours (unless they are deleted). During that 24-hour period, you can watch the Story as many times as you want.
Below your friends’ Stories, you’ll see a section called “For You.” This is where you can view branded Snapchat Stories, recommended to you from Snapchat and created by companies with Snapchat Business accounts. In the section below, we’ll talk more about how businesses can use their accounts to garner the most views and appear on their customers’ Discover pages.
Here are some helpful tips for viewing others’ Snapchat Stories:
- To skip to the next Snap in a Story, tap the screen once.
- To skip to the next Story, swipe left.
- To exit, swipe down.
- To save a Story, follow the instructions here.
How to Use Snapchat for Business: 7 Tips From HubSpot’s Snapchat Playbook
1. Create a personal Snapchat account.
Before you invest in Snapchat marketing for your brand, you’ll need to create a personal account. Follow accounts your audience might follow. Add your friends and family. Just start using it. Your personal Snapchat account can help you understand the intricacies and nuances of how real people use the platform — which will ultimately help you make better decisions and create better content.
At HubSpot, we’ve found the best performing content looks and feels like the native content being created by the average Snapchat user. So use your personal account to play around with the front facing camera, explore different filter options, and dress up your Snaps with doodles and emojis. The more Snaps you send and engage with, the better your understanding of how the platform works will be.
2. Register for your Snapchat Business account.
Once you know the ins and outs of your personal Snapchat account, it’s time to create your Business account. To do this, log into Snapchat online and fill out this form.
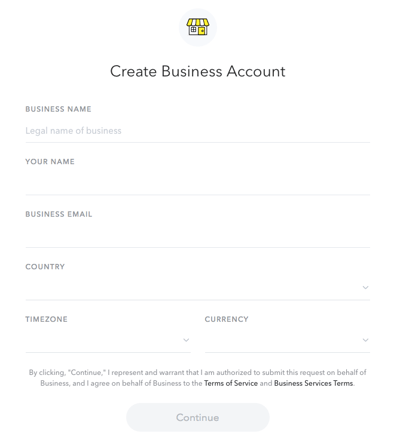
As shown above, this registration form is where you can enter your business’s name, your name, your business email, the company’s location, and its main currency (e.g. dollars, pounds, etc). Press “Continue” at the bottom and follow the prompts to tether your Business account to your personal Snapchat account and officially launch your page.
3. Create a plan for measurement.
Here’s the truth: Talk to any social media manager and they’ll tell you Snapchat analytics are a pain in the rear. At the end of the day, you’re limited to views ( ), screenshots (
 ), and replies. That’s it.
You can’t even get a total follower count: Snapchat replaces what would be your follower count with a score that reflects the sum of the messages you send and receive.
All this aside, you can use context to put things into perspective. Here are a few tips we’ve picked up along the way to help us better understand our Snapchat performance:
- Looking at your retention rate (what percentage of people watch each frame of your story) will allow you to compare stories to each other. Which are performing better? We’ve learned there’s a sweet spot around 90 seconds — any longer than that, and people start to lose steam.
- Looking at the percentage of people that dropped off after the second Snap will help you gauge general interest. If 30% of our audience dropped off after the second Snap, we probably missed the mark.
- Reviewing qualitative feedback can help you better understand your success. If people are sending you chats telling you they love your latest post, you’re probably on the right track.
Another tricky part about Snapchat analytics? In order to accurately collect numbers, you need to log in and write them down or screenshot them exactly 24 hours after you took the first Snap. Otherwise, they disappear forever. (We learned this the hard way. A few times.) You can find your views & engagements on the “Stories” screen.
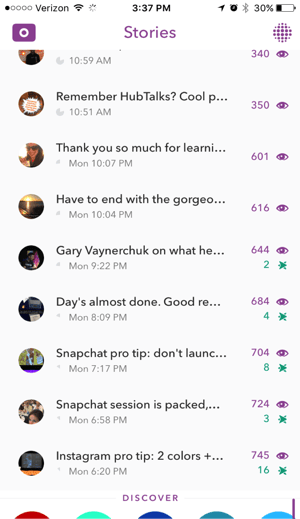
At HubSpot, we record the following information on each Story:
- Story Title: What are you calling this Story?
- Number of Snaps: How many individual Snaps are in your Story?
- Length of Story: How long is your Story from start to finish?
- Views on first Snap
- Views on last Snap
- Retention rate: What percentage of people who start your Story view through the end?
- Engagements: How many people screenshot a Snap and send a direct message in reply?
4. Source content and ideas from your team.
Finding the time to come up with creative, engaging content ideas for Snapchat can be a big challenge — especially if you’re the only person on the job.
To combat this, we turned to our collective team to gain perspective and source ideas. This is an especially interesting tip if you work at a company with global offices, as it can help you piece together interesting stories from all over the world.
Here’s how we approached this outreach:
- First, we sent out a company-wide email asking for anyone who wanted to be featured on Snapchat. This gave us a massive list of people who were interested in being on camera or creating Stories themselves.
- We then created an internal Slack channel for all those who were interested. We used this platform to ask for volunteers for specific shoots and to source general ideas.
If you’re struggling to gain internal support, you might want to consider explaining how certain teams could benefit from getting involved with the company Snapchat account. For example, our social media team is working closely with the culture team to highlight our company culture. By creating stories that showcase what life is like at HubSpot, they can get the word out about our culture, while also helping us lighten our daily content load.
5. Focus on variety.
If you want to maintain an engaged audience, it’s important that you commit to consistently posting great Snapchat content. What makes a Snap or Story great? For starters: Variety. Snapchat users like to consume stories and information in different formats, and the app provides a lot of room for creative application.
For example, here are a few ideas and formats we’re currently testing:
- Video vs. stills
- Graphics/drawing/emojis
- Selfie cam style video vs. point and shoot
- Sound vs. no sound
By testing different types of content, we can start setting up some best practices that we can share across the company. Here are some early findings:
- Short videos rule. Our highest performing videos are all under 60 seconds long.
- Pay attention to timing. Things like newsjacks or live coverage of major company events tends to perform well.
- Cast a wider net. We’ve incorporated content from our Sydney and Dublin offices, which helps us build out a global perspective. This initiative has been really well received by our Snapchat audience.
Looking for inspiration? Check out what 10 of the best brands on Snapchat are doing to engage their audience.
6. Look for creative ways to build your audience.
On most social networks, it’s easy to browse around and find stuff that might be interesting to you. For example, on Instagram you might search for a particular hashtag or look for photos tagged with a specific location. Snapchat, however, does not make “discoverability” easy. And as a result, building an audience requires you to get a little creative.
When we launched HubSpot’s Snapchat account, we leveraged other company channels — blog posts, social media, etc. — to attract followers. As a result, we got some momentum going. Trouble is, keeping that growth moving has proved to be a challenge.
To avoid stalling out once the initial excitement has faded, we recommend developing a long-term promotional plan to keep your audience up-to-date on what’s to come.
Some more tips for increasing your reach:
- Leverage partners or influencers. Invite others to be featured on your account, and ask them to spread the word to their network.
- Newsjack. We’ve done a few “HubSpot Hot Takes,” which is essentially our version of a quick reaction to industry news. This has gotten our account mentioned by people on other social platforms, which helps spread the word.
- Join the conversation. Find an opportunity to get involved in a relevant event and leverage that audience. We recently did a takeover from Social Media Marketing World, highlighting some speakers, sessions, and key learnings from the conference. In 2016, we posted about the takeover using the #SMMW16 hashtag and saw a noticeable spike in followers that day.
7. Don’t get too caught up with perfection.
This one is hard for many content creators to stomach: We like to edit, adjust, tweak until the last second. But if you’re doing Snapchat right, it’s not gonna be perfect.
Stories should feel quick, off the cuff, and not overly produced. In fact, one of our highest performing stories was just a quick video of me sitting in a chair reacting to a Facebook platform announcement in real time. I saw the press release, ran to an empty room, and fired off a few quick snaps explaining the change. That’s it.
Keep in mind that the photos won’t be professional-grade … and they don’t have to be. Your focus should be on finding a way to create authentic, compelling moments and stories, so try not to overthink it.

KPI Dashboards & How to Use Them in Your Marketing
The life of a business leader is all about juggling your priorities — and a big part of keeping everything moving is making sure that existing initiatives are on-track, while creating space for smart new strategies.
Fortunately, there’s a tool to help you succeed: KPI dashboards. KPI dashboards can help you check-in with various aspects of your business and make sure everything’s running smoothly.
Every department from sales to operations needs a dashboard, and dashboards are especially helpful when it comes to marketing. Between about a dozen online channels to consider (plus offline marketing efforts), there are countless elements that go into creating and sustaining a healthy marketing ecosystem.
A KPI dashboard helps marketers and business executives identify what’s going on with the elements of their marketing strategy that matter most, where to make changes if things start to go awry, and how to identify opportunities for new initiatives that can spur even greater success.
Getting your dashboard right takes time, but the pay-off is immense. Executives who successfully implement an effective dashboard can get better results and create a more rewarding, enjoyable work atmosphere in which the team has more room for creativity and experimentation.
Let’s take a closer look at what KPI dashboards are and what they can do to help your marketing team succeed in 2020 and beyond.
The KPIs you choose should be related to your strategy and include a mix of forward-looking and backward-looking variables.
While it’s tempting to cram every metric you can think of into these reports, that’s a big mistake. When you’re confronted with a mountain of data, it’s nearly impossible to give the most important numbers the level of scrutiny they deserve.
For that reason, the best dashboards include only five to nine KPIs. These should, after all, be your key performance indicators behind your business playbook.
If you’re not sure which data points to focus on, think of it this way: what handful of things could totally tank your business if they went south? Framing it that way can help you sort the vanity metrics, like the number of monthly social media impressions, from the things that matter, like cost-per-acquisition.
Here are a few examples of KPI dashboards in action. Notice that they’ve honed in on only the most critical metrics and are displaying the information in clear, concise, easy-to-digest visual formats.
1. Subscription Model Dashboard
Subscription-based businesses are cropping up all over the place. From razors to clothes to meal prep kits, just about anything you could want or need in your daily life can be delivered to your doorstep on a regular basis.
The subscription model is great because it guarantees businesses recurring revenue — a subscriber locks into your service for a set period of time, meaning regular monthly income for the term of service.
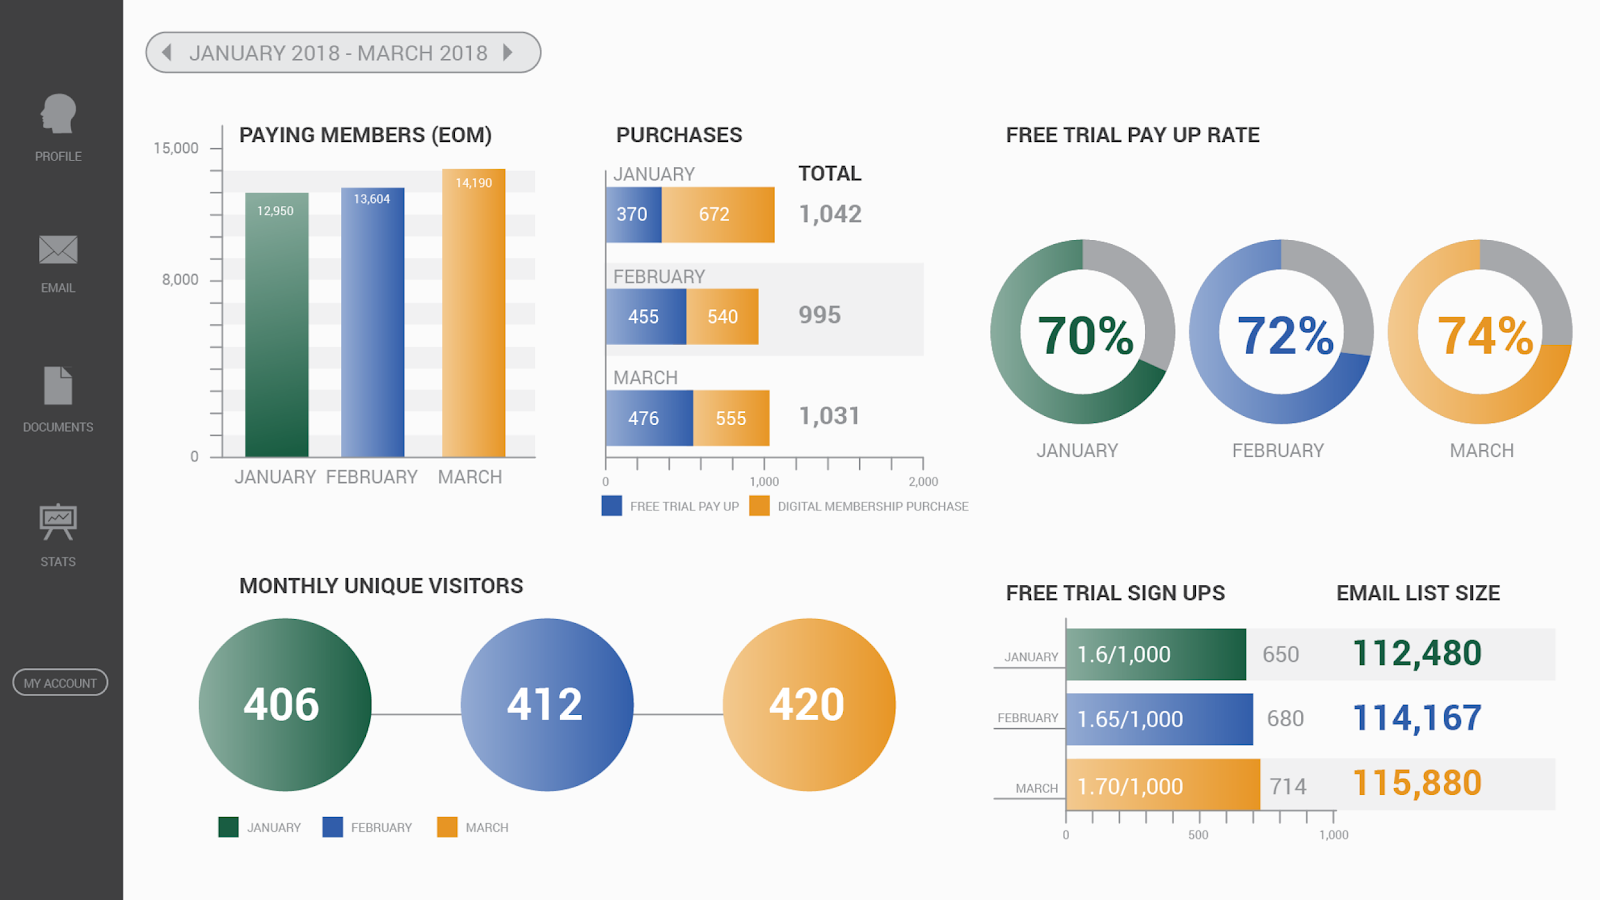
This leadership team has chosen to focus on metrics that give them a sense of how well they’re doing at attracting new attention (monthly unique visitors and free trial sign-ups), how well they’re doing at converting those newly interested parties (free trial pay-up rate), and how well they’re doing at growing their membership and retaining existing members (paying members and purchases).
The dashboard is only looking at six metrics, but from that handful of data points, leadership can easily identify any potential issues before they become mission-critical.
Say, for example, the leadership team noticed a drop the following month in paid members. That would go against the trend for the first three months of the year, where they experienced month-over-month growth. From there, they could start digging deeper. Are new member sign-ups dropping, or are retention numbers slipping? If retention is the issue, what changes could they make to entice more of their existing customers to renew their membership?
2. Large Ticket Item Dashboard
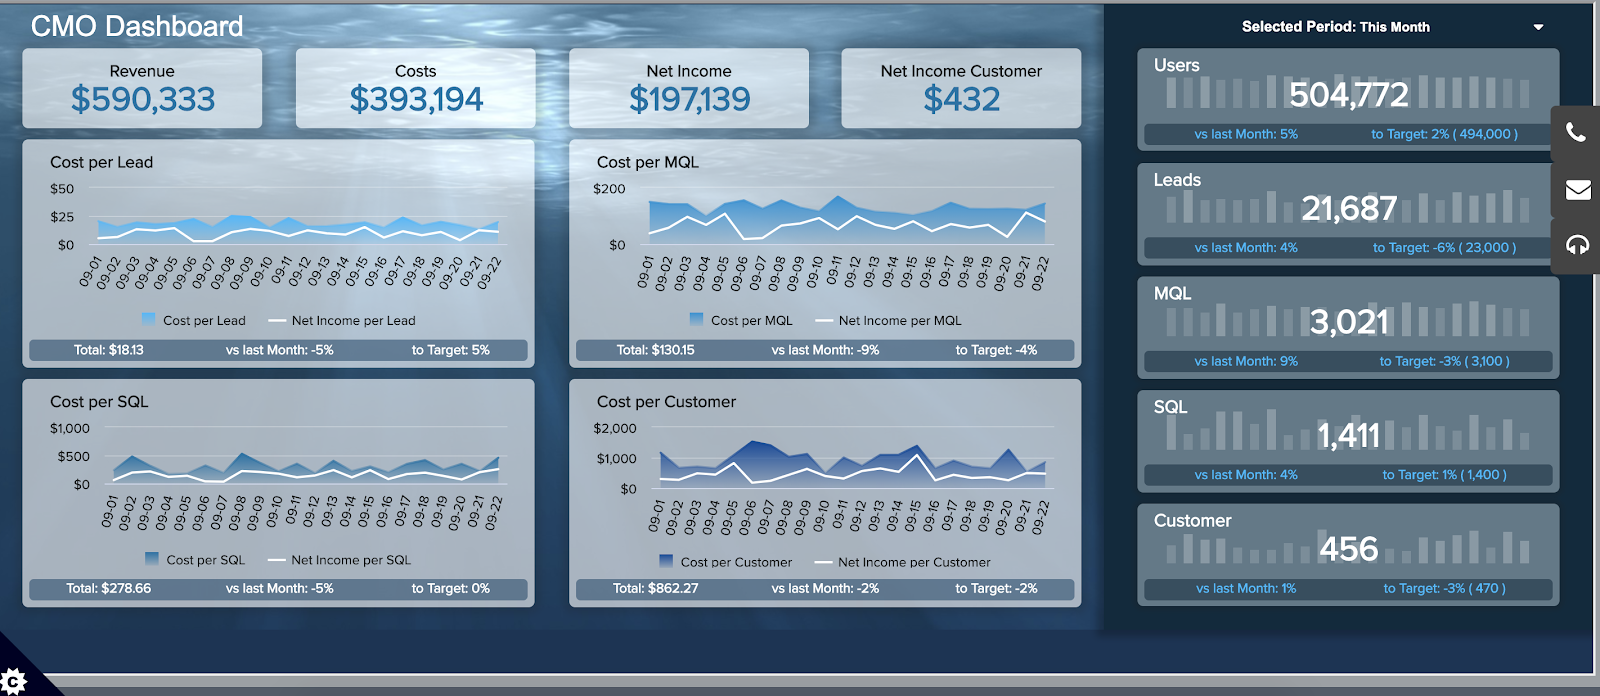
This dashboard from DataPine is the kind that could be useful to a marketing team in just about any industry that has a high price point — and, therefore, a high customer acquisition cost. Their focus is on nine of the biggest metrics that give them insight into how successful their strategy is.
Rather than focusing on granular numbers, like Twitter followers gained or number of likes on each piece of content shared on Facebook, they’re measuring numbers that are linked directly to their budget and that tie in with the sales team’s efforts.
Understanding acquisition numbers and cost-per-acquisition provides insight that’s valuable far beyond the reaches of the marketing department. Issues with poor cost-per-acquisition can be indicative of a need to cut ad spend, but they might also be hinting at a need to change the pricing structure for your offerings. Or they might mean that the sales team needs to shorten lead time in order to increase the number of acquisitions per month.
No matter what is ultimately identified as the source of the problem, having a dashboard empowers all of your teams to have informed, collaborative discussions about challenges facing your business that are backed up by actual data and numbers.
3. Deals Closed Dashboard
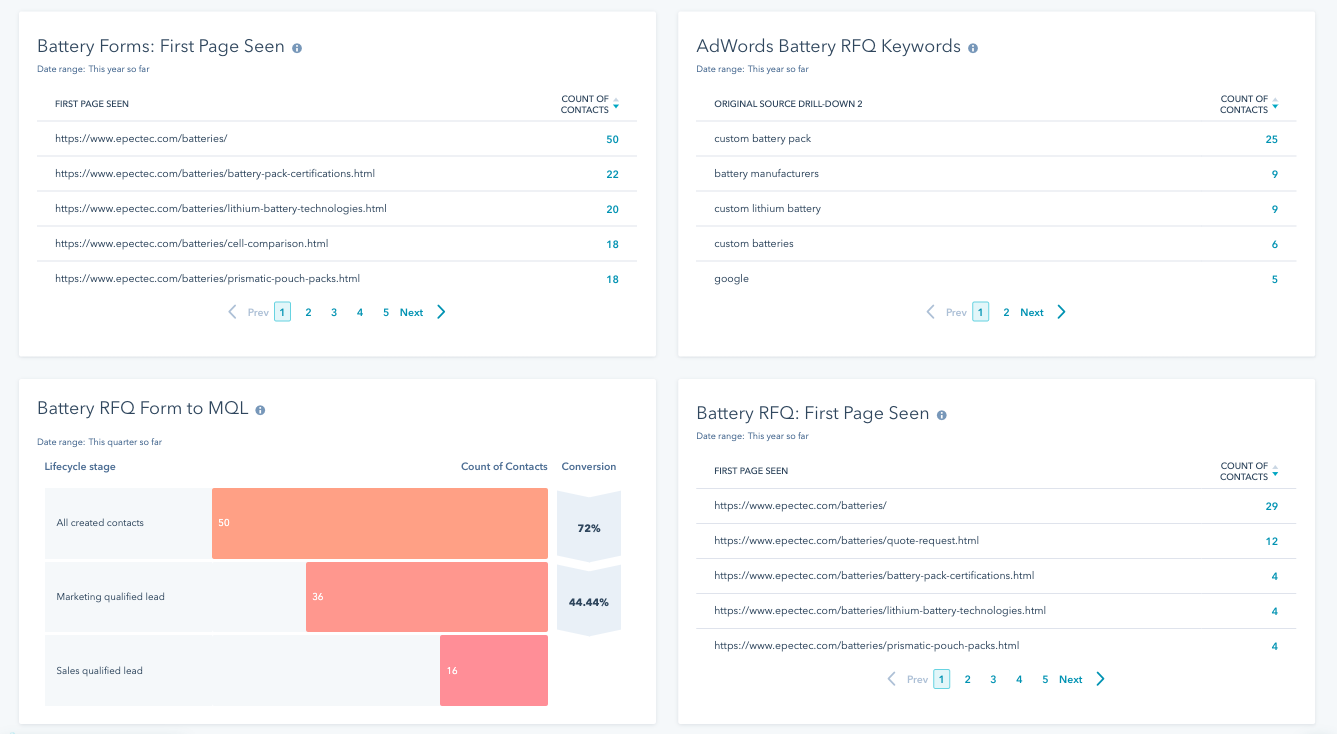
Epec Engineered Technologies uses HubSpot’s reporting features to create a sleek KPI dashboard with all the most critical information, including “Form to MQL” and “First Page Seen”.
This is an undeniably useful KPI dashboard to see whether your marketing strategy is on-target with your goals. The “First Page Seen” section shows you which pages your visitors initially interact with — if that page hasn’t been updated in a while, consider optimizing it for higher conversions.
Additionally, the “Marketing qualified lead” vs. “Sales qualified lead” categories, shown in chart-form under “RFQ to MQL”, will help you tailor your strategy and determine which leads convert at the highest percentage, and what you might do to even out any disparities.
4. Marketing Leads Template
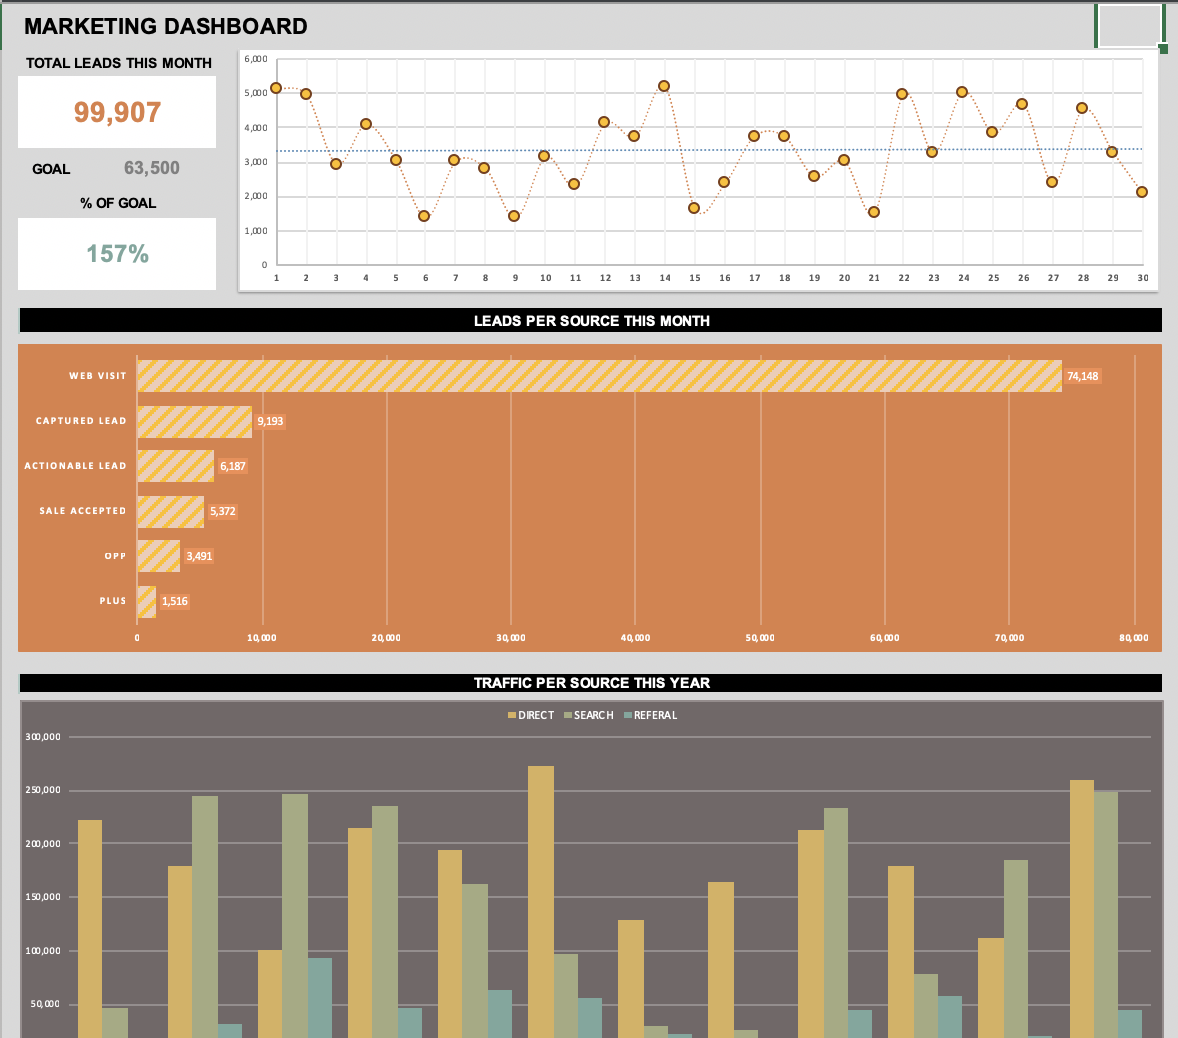
This dashboard made by Geek Dashboard is a fantastic example of how your marketing team can use a KPI dashboard to measure your team’s performance, particularly through leads and conversions.
It’s clear and concise, focusing on the major factors that matter for marketing — leads, and percent of conversions compared to goal. Additionally, the visuals help your team stay focused on the most important aspects of your strategy to ensure you’re on-track to hit your monthly or yearly goals.
KPI Dashboard Excel Templates
If you’re ready to start creating your own KPI dashboard, the good news is that there are tons of resources out there to help you get it done.
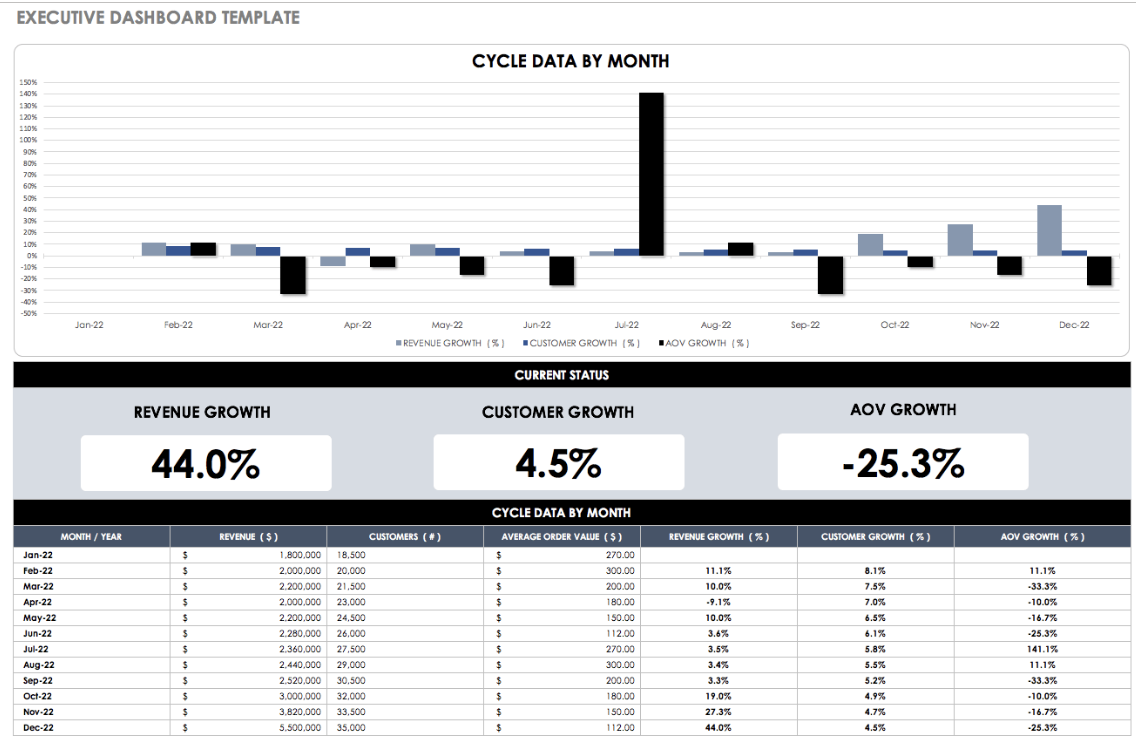
1. Smartsheet
Smartsheet provides Excel templates for a variety of marketing dashboards. Whether you’re looking for a broad template for tracking big KPIs, to more specific templates for social media marketing, Smartsheet has you covered. Best of all, the templates are free to download on their website.
2. Eloquens
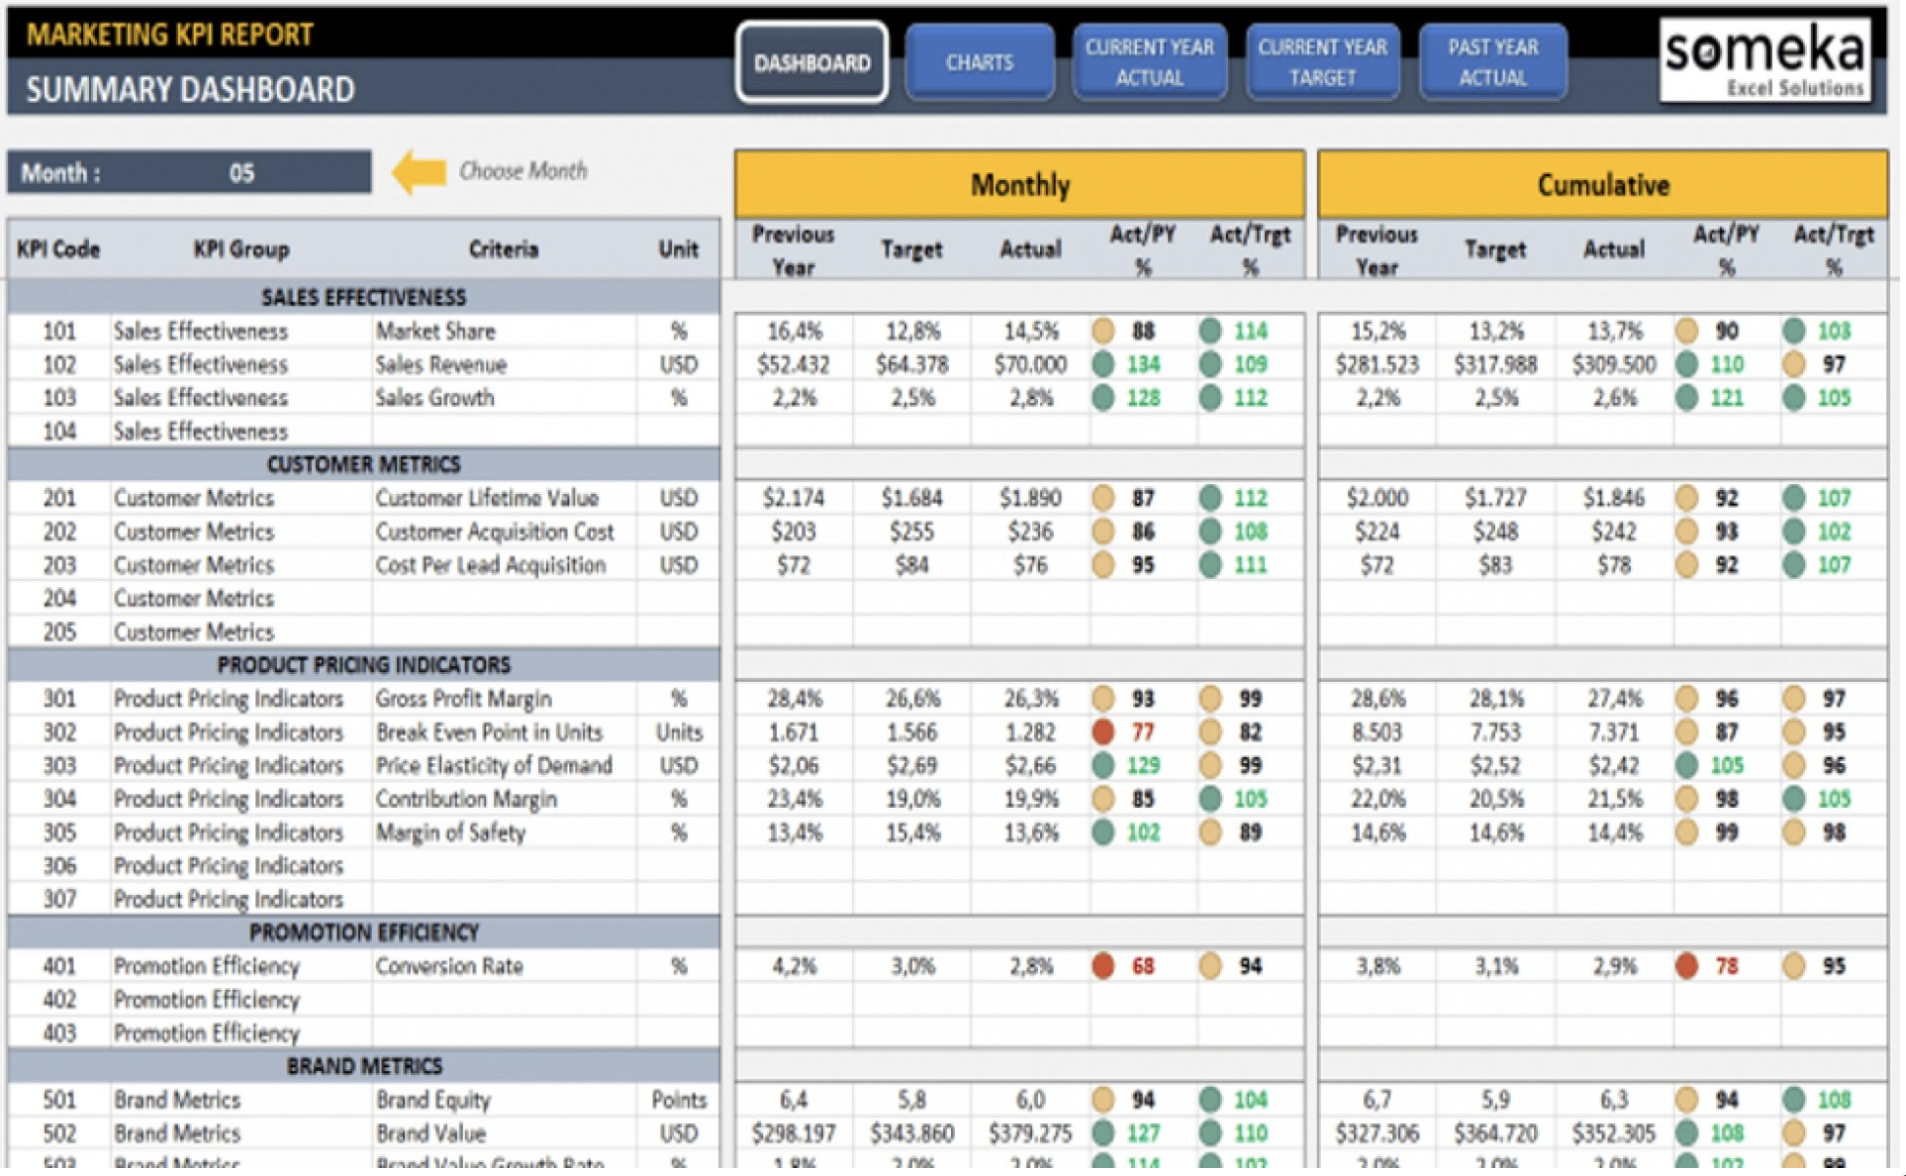
Eloquens offers a marketing dashboard template with metrics that they’ve broken down into seven major categories. These categories include sales effectiveness, customer metrics, and budget metrics, and each category has a number of KPIs that you can choose to track.
3. HubSpot
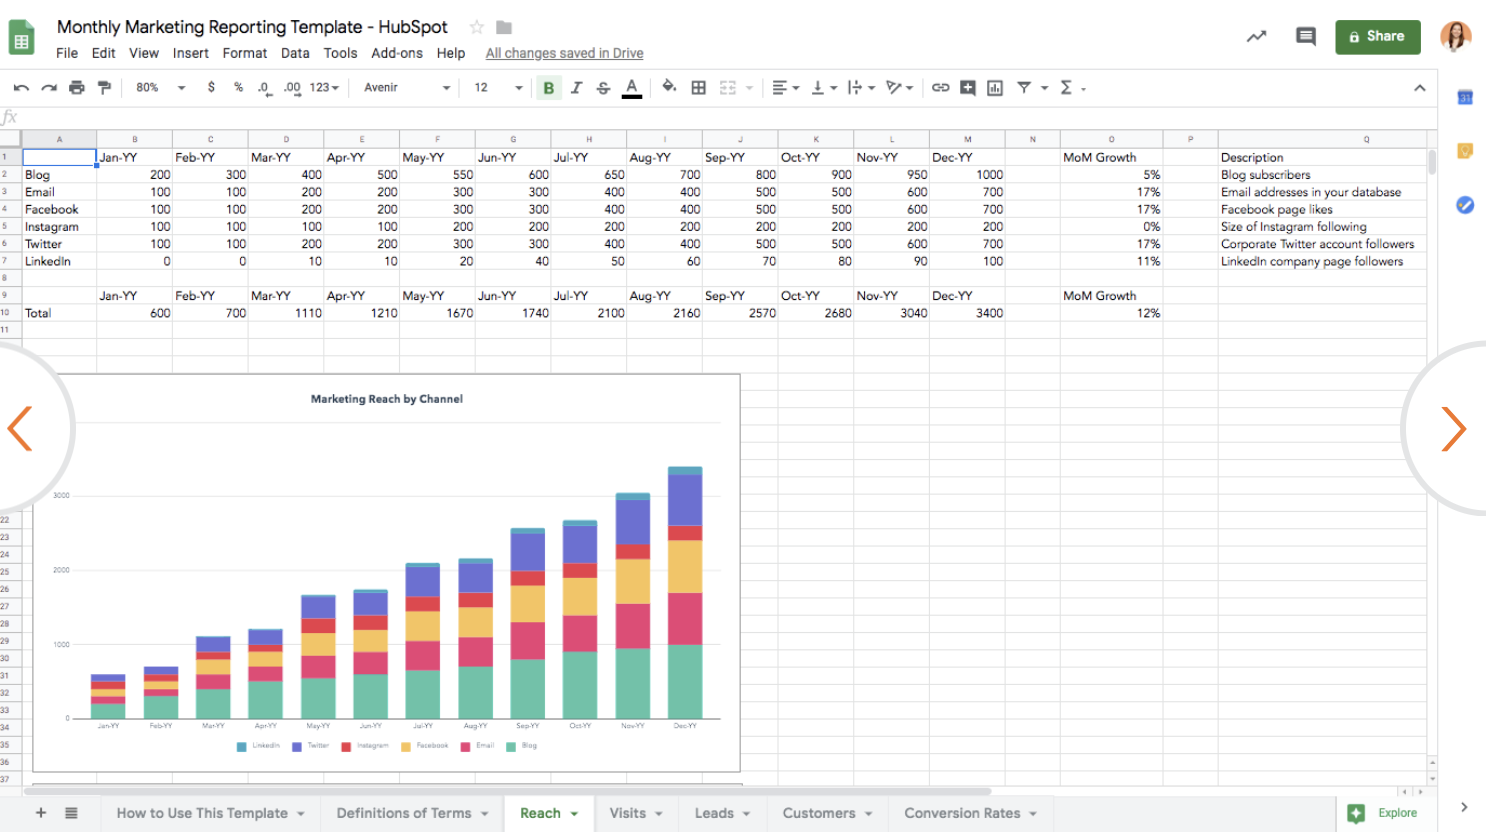
HubSpot offers dashboard templates that integrate with Excel, Google Drive, and PowerPoint, so you can easily track those all-important metrics within the program that works best for you and your team.
I Created a Dashboard, Now What?
Once you’ve gotten your first marketing dashboard up and running, the real fun begins! Start pulling the numbers on a regular basis — weekly or monthly, depending on how quickly things move in your business. Review it regularly and start to look for patterns.
When a number crops up that surprises you, it’s time to examine the cause. Having all of your marketing information displayed in this simple dashboard makes it easier to identify the source of the potential issue, and get feedback from the most relevant parties about what could be behind the startling data point.
Once you think you’ve identified the source of the change, it’s time to do some experimenting. If you missed your goal, try a new approach. If your numbers exceeded expectations, tweak things to lean into whichever existing strategies are most responsible for the high numbers.
Make changes slowly, so that you’re able to see how every shift in approach influences your results. Additionally, keep tracking those KPIs on a regular basis so that you can understand the effects of each new tactic.
No matter what, you want to keep returning to your dashboard. This document should become your North Star, guiding your shifts in strategy and providing you with the information you need to understand which strategies drive the best results.

What Are SOPs & How Do You Write Good Ones?
Imagine this: You’re a project manager at a boutique marketing firm tasked with training the new PM and getting them up to speed on how to do their job to meet expectations. To fulfill this request, you probably had to learn a series of actions already set in place. That series of actions is called a standard operating procedure (SOP), and they help to routinize job functions.
A good SOP is clearly worded and easy to read. Well-written SOPs have steps that are short and simple and are usually presented in a flow chart or clearly labeled document.
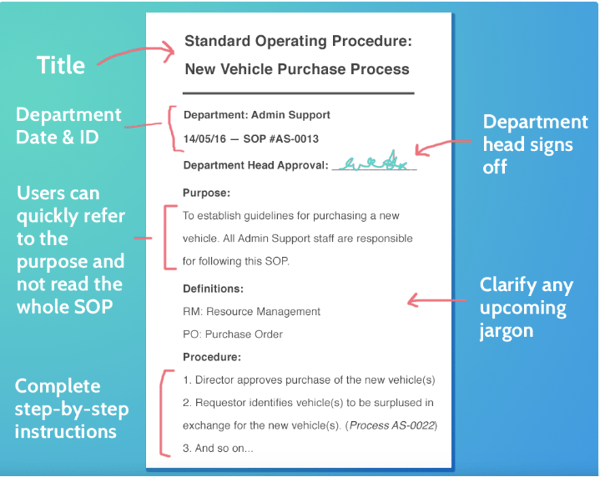 Image Source: Process.it
If you’ve never written an SOP before, take a look at how to write a great one.
1. Create a list of processes
To begin, come up with an in-depth list of functions employees perform for their jobs that need SOPs. Some departments that could benefit from SOPs include finance, legal, HR, customer service, and IT. Think about those jobs that have a strict protocol; where not missing one step is vital.
For example, a new public relations professional would need to know the processes of writing press releases and securing press for their company. This is a great reason for creating an SOP.
2. Format your process
You can get creative with how you present SOPs. As long as they are easy to understand, there are no bounds to how a workflow can be created. The most widely seen SOP formats include: Step-by-step documents, workflow diagrams, organizational charts, detailed instructions, and checklists.
What kind of format would the public relations professional best receive their SOP? Most likely a workflow diagram. This would allow them to see why they must complete one step in order to get to the next. From writing the headline at the top to including correct hyperlinks, every step would be clearly notated.
3. Communicate
Make sure the process you write is accurate. Talk to the employees who will be using it every day. Ask for their feedback and advice. If they can provide useful edits or tips that would make the SOP easier to understand, include them.
For example, a reliable source for an SOP on how to write a solid press release would likely be a senior publicist or manager at the company
3. Write
Write the SOP by using the method that works best for your situation. Think about who you’re writing the SOP for and how the information will best be presented. This is also a good time to figure out who will be responsible for updating the SOP as needed.
A public relations professional would most likely benefit from an SOP about how to write press releases that give specific directions about format. For example, “Paragraph one must be 50-60 words introducing the album, the band, and their concept for the record cycle,” and “Paragraph two must be 30-40 words and include short descriptions of 2-3 songs.”
4. Implementation
SOPs should be updated at least once a year after implementation. They should always reflect the needs of the organization at that time. Maintaining them is important so employees always have the most up-to-date information about what’s expected from their day-to-day.
SOPs aren’t the quickest or shortest guides to write. But they can become a time-consuming project. Software can help speed up the writing process, and we’ve rounded up a couple of superstars:
(was a little unsure about the formatting for the list)
1. Trello
Price: Free, $10 a month for Business Class Subscription, $20.83 per 100 users per month
Trello is a scheduling tool that allows its users to see their collaboration using “cards,” that are like virtual sticky notes for each board. Trello can be used for organization; from editorial calendars to SOPs.
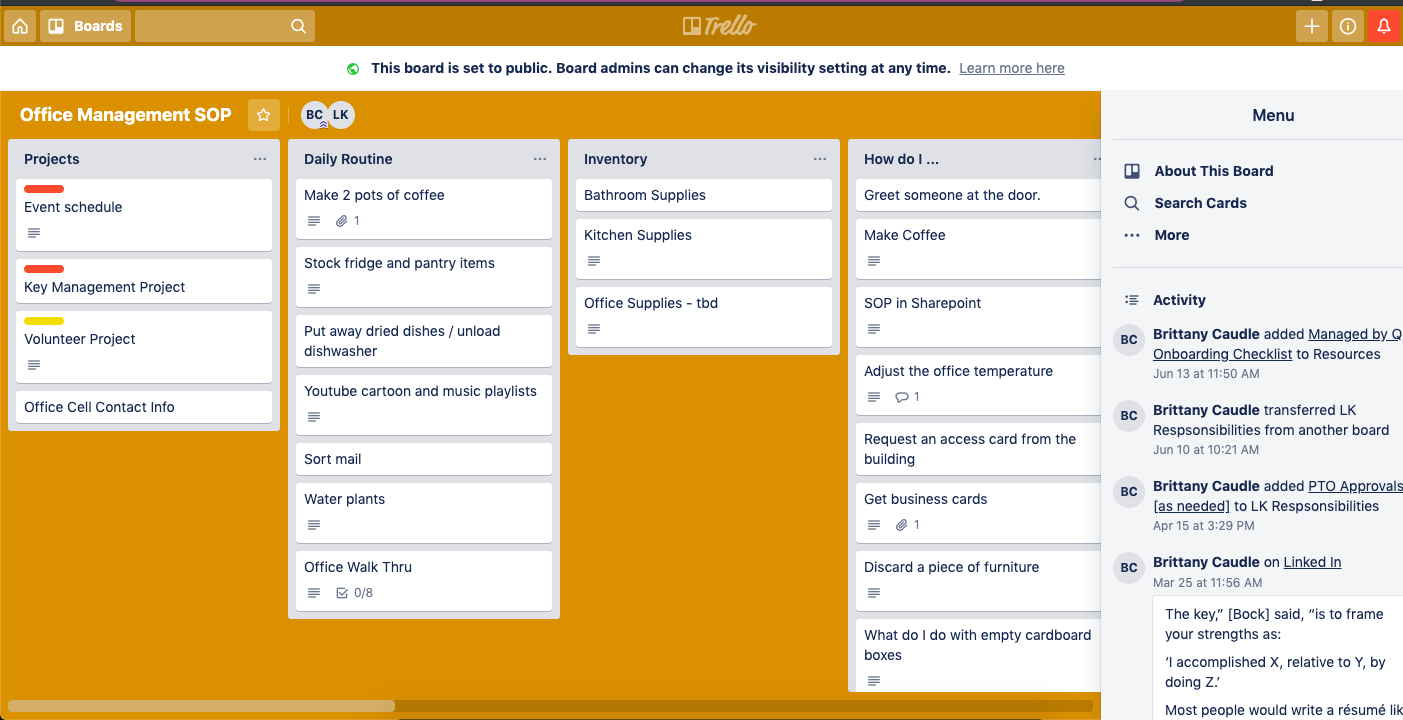 Image Source: Trello
We like Trello for its ease of having all documents in one place. If you scroll through this Office Management board, you can see a list of responsibilities for certain employees.
2. HubSpot workflows
Price: Included with Marketing, Service, and Sales Service Hubs with Professional and Enterprise subscriptions.
HubSpot’s CRM includes the workflows tool, which allows users to use marketing automation technology within their business. Workflows turn actions and/or commands into customizable flow charts.
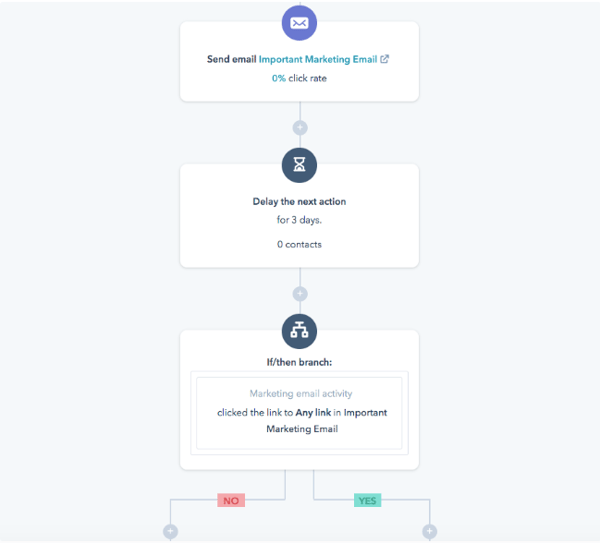 Image Source: HubSpot
We like the workflows tool for SOPs because it has the option to write out lists into a visual chart.
3. Evernote
Price: Free plan, then $7.99 per month for Evernote Premium, and $14.99 for Evernote Business.
Evernote is a popular note-taking app that lets you do a lot more than take organized notes. It offers numerous organization, collaboration, and administration functions. The app also has a number of templates, including one for SOPs.
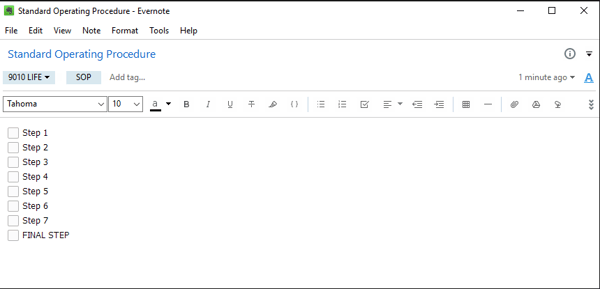 Image Source: Evernote
We like Evernote because of the compatibility with different operating systems and organization capability.
4. Pipefy
Price: Free plan, then $9 per month for Professional Plan, $18 per month for Business Plan, and contact-based for Enterprise Plan
Pipefy offers resources and tools for process management. Choose from an assortment of templates (seriously, there are so many), most of which are offered for free. There are a number of SOP templates that specify your organization’s needs, such as “Team Member Onboarding.”
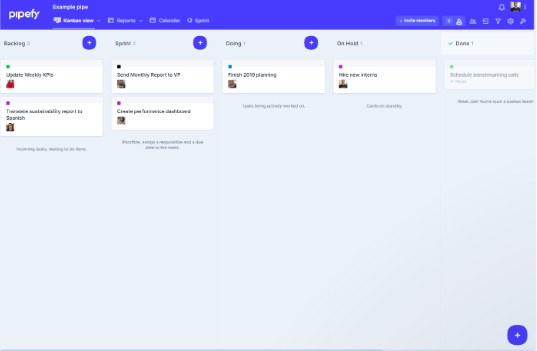 Image Source: Pipefy
We love Pipefy because of its abundance of templates available and easy-to-understand template titles.
5. SweetProcess
Price: 14-day free trial, then $82.50 per month for a team of 20 members, plus $4.17 for each additional user.
SOP writing is SweetProcess’ main jam. Their tagline is, “Who said writing SOPs have to be painful?” so you can guarantee an easy-to-follow experience.
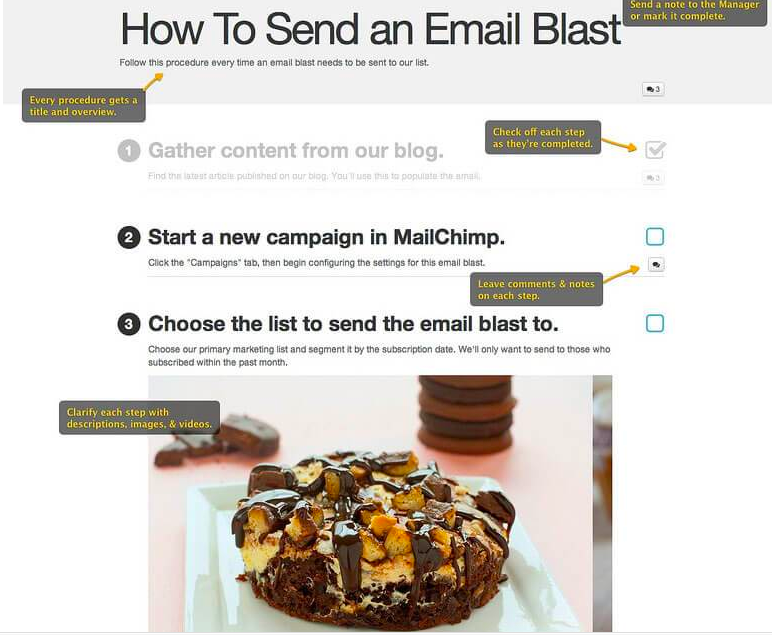 Image Source: SweetProcess
For more free inspiration, check out HubSpot’s section of easy-to-use templates.

25 Free Resume Templates for Microsoft Word (& How to Make Your Own)
No matter what industry you work in (or your experience level in that industry), a plain, black-and-white resume written in Times New Roman font can actually weaken a job application.
But just because resumes have gotten more creative doesn’t mean you need special design software to make your application stand out. On the contrary, writing your resume in good old Microsoft Word is still the perfect way to develop your personal brand, while also communicating your experience and career goals.
Read on to find out how to make your resume in word, then download one of 19 amazing resume templates that open directly in Microsoft Word.
How to Make a Resume in Word
- Open Microsoft Word on your computer.
- Select either “Basic Resume” or “Bold Resume” from the template menu.
- Fill in your name and contact information at the top.
- Draft a brief summary of your experience and goals.
- Enter your school and latest education.
- Describe each job you’ve held using the lines prompted on the template.
- List all relevant skills.
- Describe any relevant accolades and accomplishments.
1. Open Microsoft Word on your computer.
If you have Microsoft Word installed on your computer, open the program and let it load for a moment. There will be a couple of helpful options waiting for you on the first screen, specifically for resume creation.
2. Select either “Basic Resume” or “Bold Resume” from the template menu.
Once you’ve launched MS Word, a window of templates will appear. Scroll down until you see the template options designed for resumes — there will be at least two of them. Double-click the one that suits your style and personal brand, but don’t be too particular about design just yet … you can customize these templates quite a bit.
3. Fill in your name and contact information at the top.
When your resume template opens, you’ll see placeholder text for each line of your resume, starting with your first and last name at the top. Delete this header text and enter your name, as well as any contact information by which you want the recruiter to contact you.
4. Draft a brief summary of your experience and goals.
Use the first line below your name and contact info to describe who you are, what you do, and what you’re looking for in your career.
5. Enter your school and latest education.
List any relevant degrees or certificates you received through schooling. You can safely exclude secondary education if you’ve graduated from an accredited college.
6. Describe each job you’ve held using the lines prompted on the template.
Your professional experience is frequently the most important section of your resume, so feel free to rank this section above your skills and education, depending on how many jobs you previously held.
7. List all relevant skills.
If you have experience in certain software, exercises, problem-solving, or management techniques, use them to populate your skills. Your resume’s “Skills” section helps reveal what all of your previous jobs or related experiences have in common, based on what they taught you and what you provided them.
8. Describe any relevant accolades and accomplishments.
Finish out your resume with any personal accomplishments or accolades you think a hiring manager in your industry would appreciate. Although this section shouldn’t include a Most Improved recognition from little league, for example, it should definitely include your Marketer of the Month award from your last position.
19 Resume Templates You Can Customize in Microsoft Word
Of course, if you’re already employed full-time, it’s hard to find the time to apply to a new job opportunity, let alone update your resume to reflect your qualifications. Luckily, there are numerous publishers out there who’ve created incredible resume templates for quick editing and formatting in Word.
To keep you from hunting the internet for the resume templates that are both free and compatible with MS Word, we’ve listed 19 more options below for you to customize with your own information right now. Some of them come with variations so you can pick your favorite design. Four of them cater specifically to marketers.
They’re so nice, you won’t believe they open up in Microsoft Word once you download them.
1. Modern Chronological Resume Template
We’ll start with a simple one. This resume template is available from Microsoft itself, and it’s one of many free templates the company has prepared for those who depend on Microsoft Office tools to create content. Yes, it is written in Times New Roman — don’t freak out. Designs like this can borrow an old-school typeface and still impress recruiters with a clean layout and subtle use of color. You can also change the font if you wish (and the same goes for every template in our list).
Download this template here.
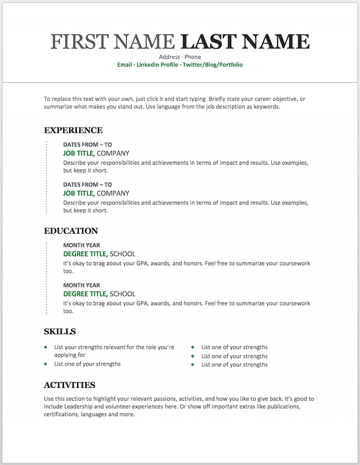
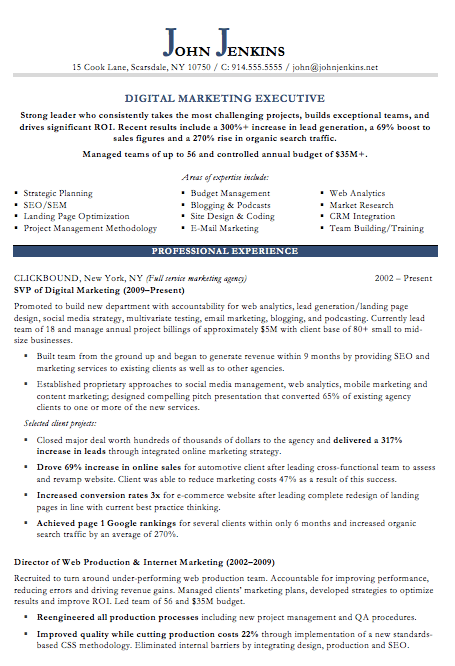
2. Digital Marketing Resume Template
The digital marketing resume below comes from our own collection of resume templates, all of which open directly in MS Word. Coming with two pages total, this sheet holds a wealth of information and offers the perfect amount of style while maintaining professionalism. Mid-level marketers all the way up to CMOs can find this template valuable.
Download this template here.
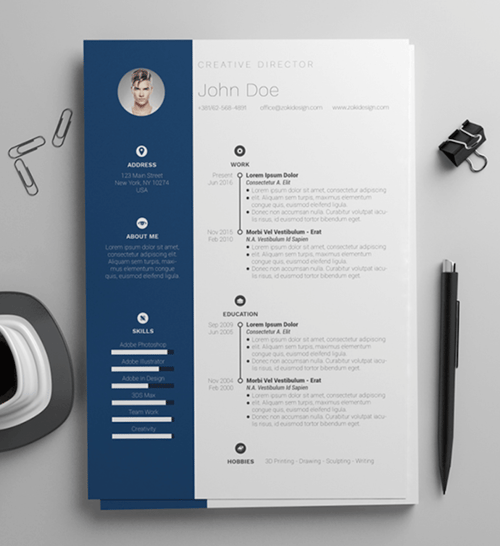
3. Simple and Clean Resume Template
This template is the perfect balance of creative and modest — best for the professional who wants to seem casual, thoughtful, but not over the top. Not only does it feature a space for a headshot on the top-left, but you can customize the color of that entire panel. Created by Zoki Design, the resume template also comes with a matching cover letter template.
Download this template here.
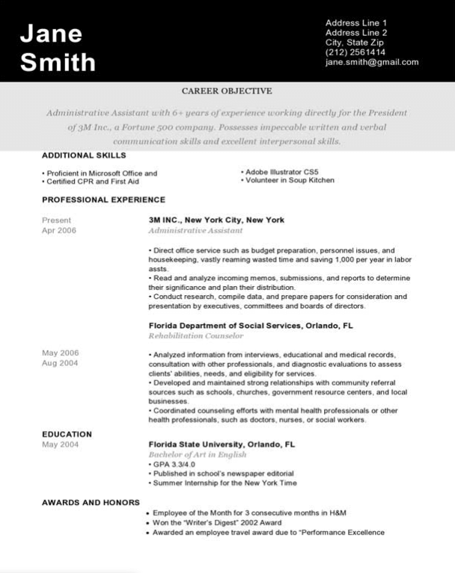
4. Black and White Resume Template
The Black and White resume template below suits professionals who prefer using color and shading to add structure to their resume. The black banner at the top contrasts the applicant’s name nicely to help make him/her more memorable to recruiters. The gray banner just below the header is perfect for a summary or career objective — it makes one’s goals known but doesn’t overpower the experience listed below it.
Download this template here.
5. Urban Development Resume Template
The illustration on the top-left of this template shows who the designers at Hloom had in mind for this resume: civil engineers. But because it’s a Word document, that graphic is easy to edit and replace with an image that represents your line of work. Are you an analytics buff? Design a clever bar or line graph icon and place it next to your name in blue (or whatever color you’d like!).
Download this template here.
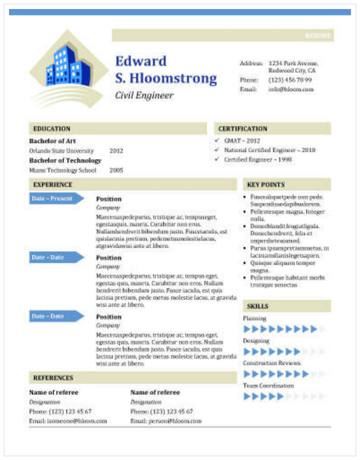
6. Email Marketing Resume Template
Red color never fails to stick out on a sheet of paper, especially if it’s included in small amounts. The resume template for email marketers, below, captures that balance. In addition to the professional title in the top-righthand corner, this template also stands out with a thin sans-serif font, helping make a lot of text easier for a recruiter to digest and read through.
Download this template here.
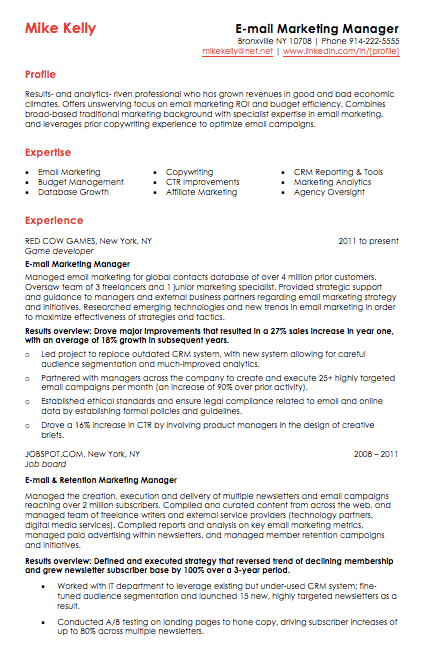
7. Info Pop Resume Template
This one, also from Hloom, gives you exactly what the name suggests: ample space for the info you need, with headers that pop just enough to get your employer’s attention. Although the template fits a ton of text, its soft color palate prevents the document from seeming overwhelming.
Download this template here.
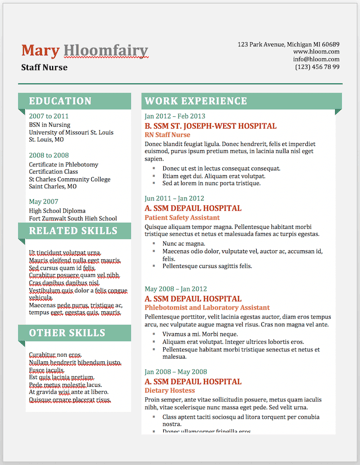
8. Dark Resume Template
Ironically, a dark background could be just the thing to ensure your resume doesn’t fall into the black hole of resumes piled on the hiring manager’s desk. Using soft, yellow font, the resume template below inverts the usual color scheme of a resume without trying too hard to be creative.
Download this template here.
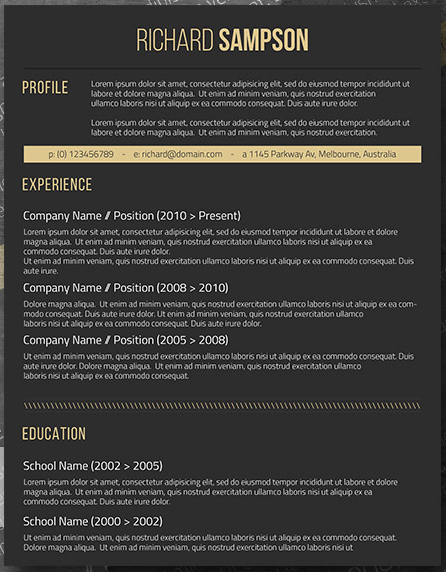
9. Neat and Confident Resume Template
Similar to the Simple and Clean template in #2, this resume design by Nowpixelse communicates a truly professional tone. The template’s muted colors work very well with the side panel layered over the top header.
Download this template here.
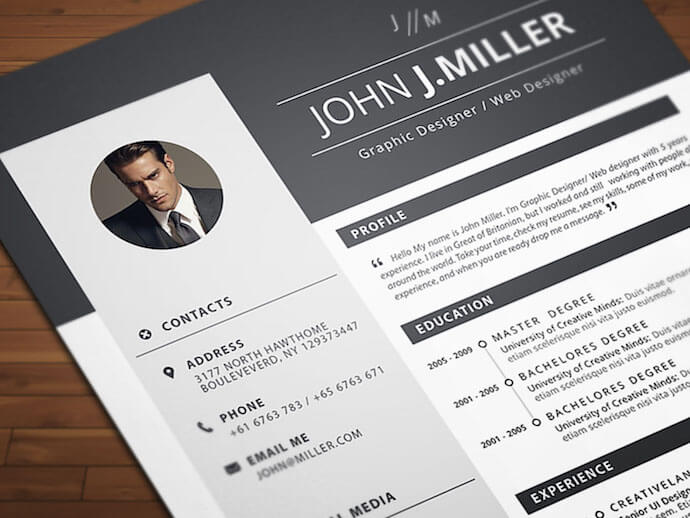
10. Inbound Marketing Resume Template
Here’s another resume template dedicated to the digital marketer. This sheet offers all the inbound marketing language you need to express your values as a passionate, brand-loyal professional. Similar to a few other templates on this list, it also uses just a dash of vibrant color in the applicant’s name at the top (where it matters most).
Download this template here.
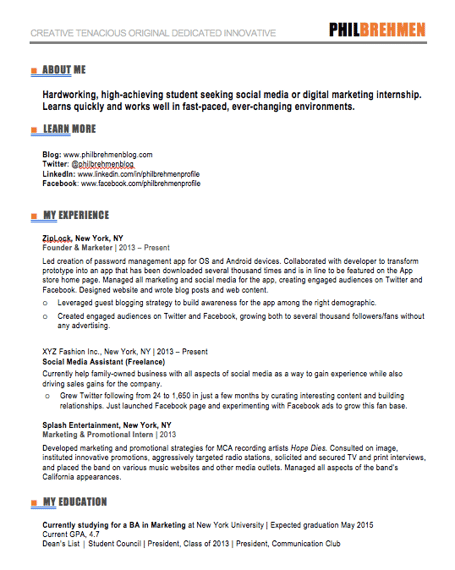
11. Smart and Professional Resume Template
This is another sharp template that offers a basic but confident design for any professional. The warm-colored panel on the right-hand side is pre-formatted for a written profile, where you can write a summary of your background or a form letter to each employer. Just be sure to personalize this messaging to each new recipient so it works for the job you’re applying to. This template is available on Freesumes, and is free to users once they share the page to Facebook or Twitter.
Download this template here.
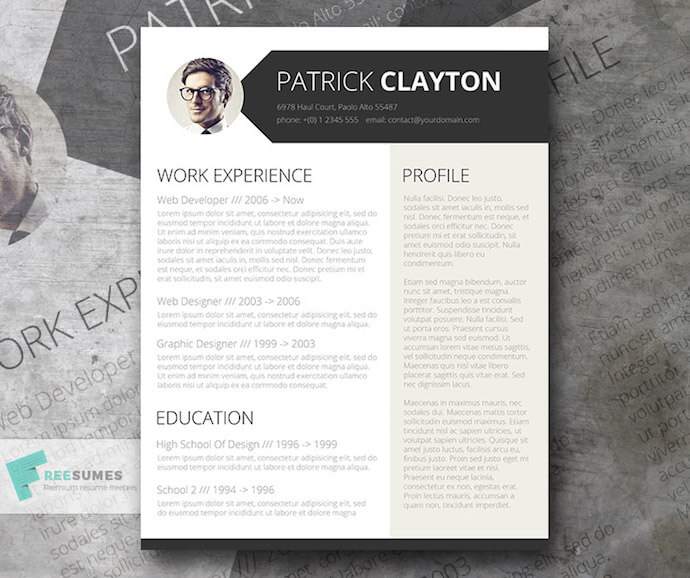
12. Spick and Span Resume Template
There isn’t a better name for the template below. The Spick and Span resume might be the cleanest-looking sheet on this list. It uses boldface, all-caps, and gray typeface to structure various headers of the document differently and maximize the hiring manager’s reading experience. And all that minimalism makes the professional headshot at the top pop off the page.
Download this template here.
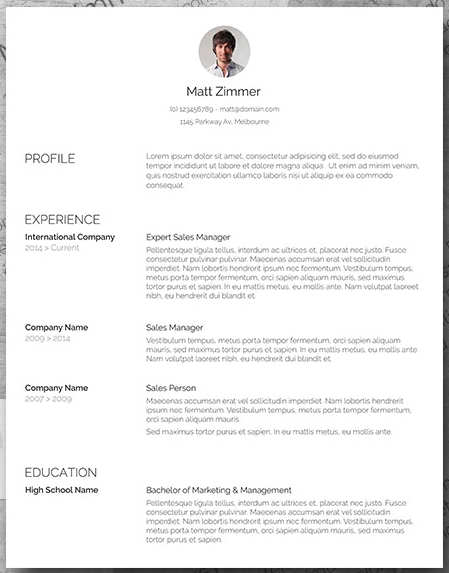
13. Timeline-Style Resume Template
Hloom’s Timeline template is a super simple but creative way to tell your story. You can convey your progression through various jobs you’ve held on one side of the vertical line, and more static elements of your background — such as skills and education — on the other.
Download this template here.
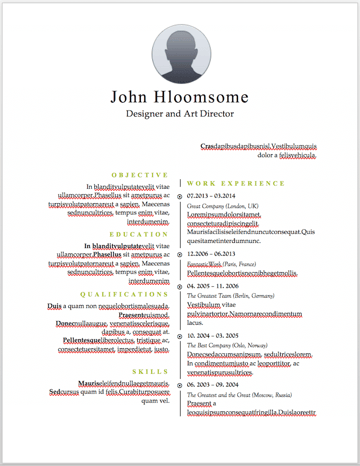
14. Content Production Resume Template
This basic resume template is suited for content producers at all stages in their career. By spreading out the header and “Skills” text horizontally, the resume below fits a lot of crucial information comfortably on one page (of course, it also comes with a second page if you need it).
Download this template here.
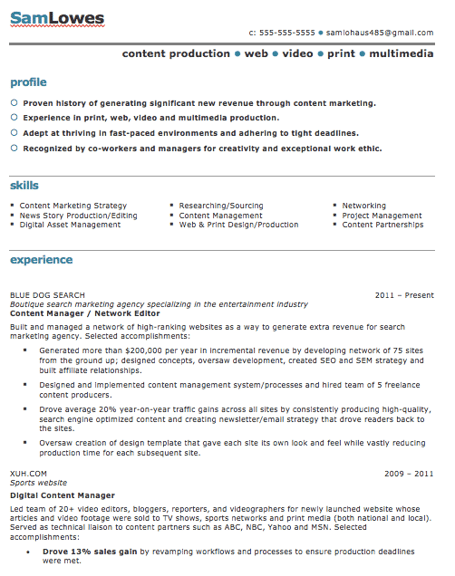
15. Fresh Resume Template
This is perhaps the most imaginative of all the Word-based resume templates on this list — with both a skills meter and a comic headshot. The template was designed by Venkata Naresh and comes with 12 different versions of the design you see below. Have you created a Bitmoji of yourself? Do you think your employer would find it creative? Match the template and add it as your photo.
Download this template here.
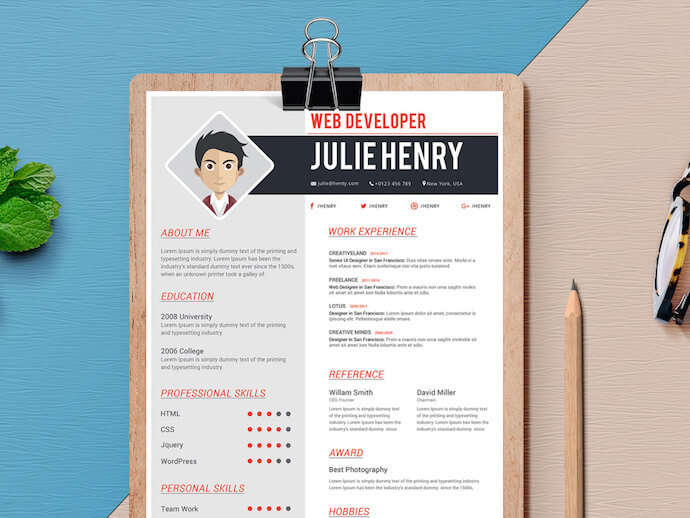
16. CV Resume Template
The curriculum vitae-style resume below flips the typical two-column resume so the basic applicant information is listed across the right side, rather than the left. Feel free to change the color of this sidebar in Microsoft Word if dark-red isn’t your thing — the template can pull off any color you wish.
Download this template here.
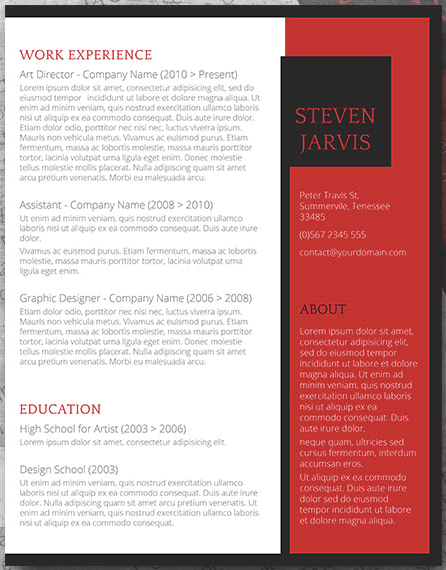
17. Goldenrod Resume Template
This template, also offered on Freesumes, dares to use yellow as the dominant color — but doesn’t sacrifice professionalism in the process. The document anchors the education section to a thick, bright banner across the bottom, but you can likely change this to a skills section with some simple editing in Microsoft Word.
Download this template here.
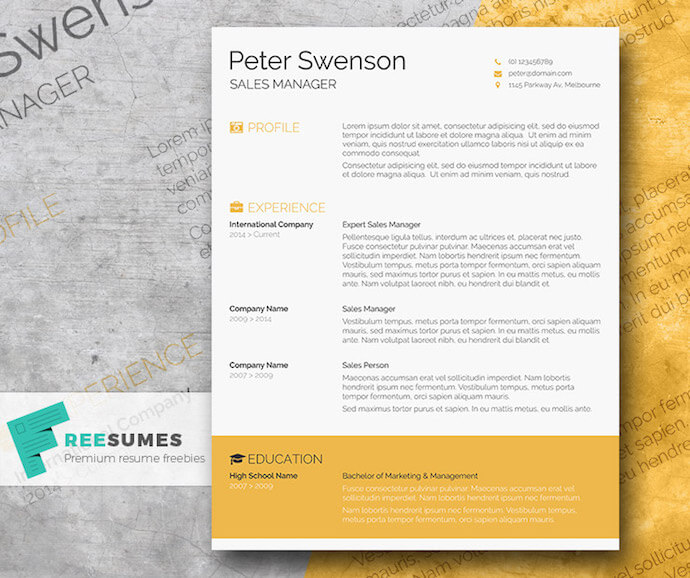
18. Resume Template With Personal Endorsements
This resume template has quite a flashy header — no photography pun intended — but it’s not just for photographers. What makes this resume unique is the space for references on the lower right-hand side. Does your field need others to vouch for your experience? This resume gives you room for three solid recommendations.
Download this template here.
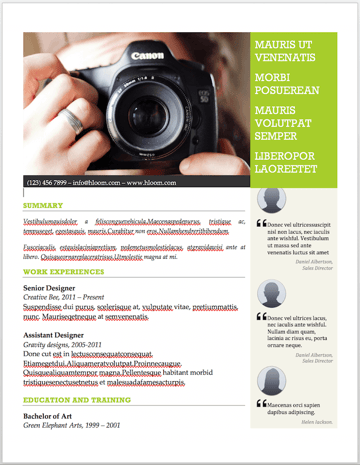
19. Creative Resume Template
This one was designed by the stationery experts at MOO and is offered for download by Microsoft. Simple but vibrant, this template hugs the text with an artistic header and footer — great for recent graduates who need to fill empty space on the page.
Download this template here.
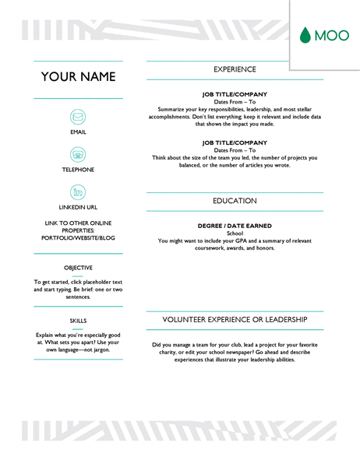
20. Modern Resume Template
This resume embraces simplicity with a slight touch of color to make things a bit more interesting. It also nicely sections off Skills and Education notes from the Work History list. With LiveCareer.com, you can generate a template with your basic information and then download it to add small details,
Download this template here.
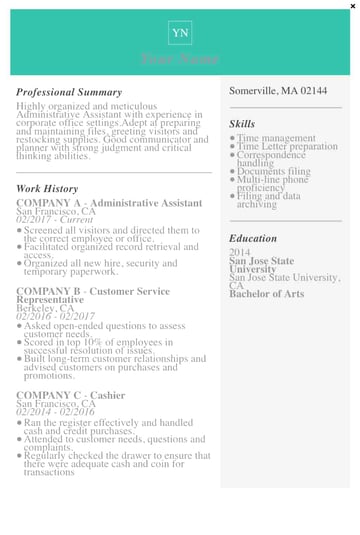
21. Functional Resume Template
This NovoResume.com template is colorful and includes a place for your headshot which could make you look both interesting and confident to an employer. A colorful format like this might be great for someone in the media or advertising industry that wants to keep their job application visually memorable to prospective employers.
Download this template here.
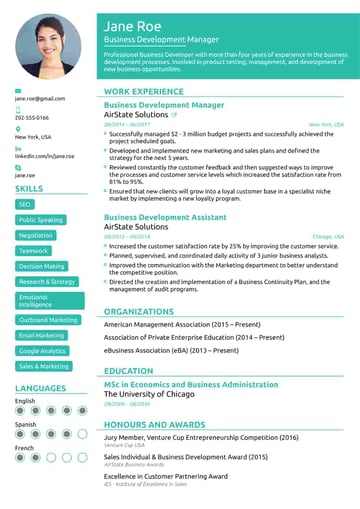 22. Elegant Resume Template
If you’re looking for simplicity and efficiency rather than something colorful, consider this Elegant Resume Template from Jofibo. With Jofibo, you can select this or other similar templates on the website, enter your information, and then download it quickly and easily.
Download this template here.
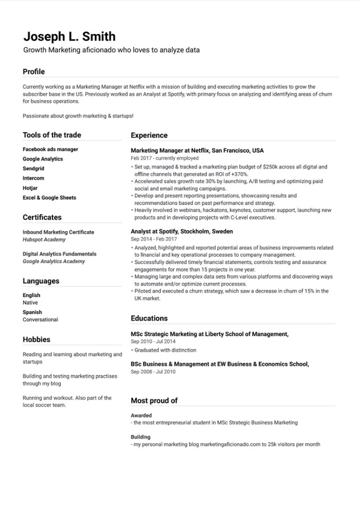 23. Blue Corporate HR Resume Template
Canva, an easy-to-use design template website, offers a few great resume templates. One of them is this simple resume with a touch of color in the background. Because of the color and image, it’s pretty memorable. But, for those who prefer a more conservative resume look, this template is fairly simple.
Download this template here.
 24. Concept Resume
This resume is great for people in the technical space because it adds a touch of color and feels more compact, which will force you to get right to the point about your key skills, certifications, and work experiences.
Download this template here.
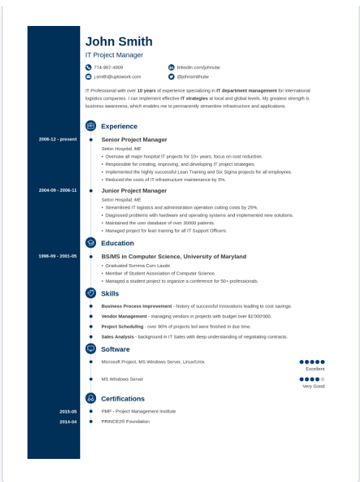
25. Cream and Green Account Executive Resume Template
This resume is also downloadable and editable on Canva. It was created for account executives but could also be great for graphic designers or people working in visual fields due to its unique, but still professional, color scheme.
Download or edit the resume template here.
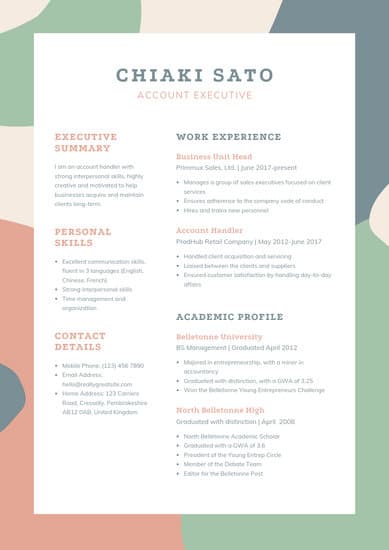
How to Save Your Resume
Remember, once you’ve finished personalizing your resume, you’re not ready to submit an application yet. To ensure your resume’s format stays the same for everyone who receives it, save the document as a PDF. Best case scenario? Even the hiring manager won’t believe your resume came from Word.

How to Use WordPress: Ultimate Guide to Building a WordPress Website
The thought of creating your own website may seem overwhelming.
You might even think this task is impossible for anyone but a developer or a person with a background in web design.
Well, I have good news for you — there’s a software out there that’s so easy to use, virtually anyone can successfully create a unique and professional-looking website for their business, blog, or portfolio. It’s called WordPress.
But how?
This ultimate guide will cover a basic step-by-step process of creating your own WordPress website as well as a list of tips and tricks to remember while working with WordPress.
But first, let’s answer the question most people have when they begin thinking about their new WordPress website: What is the difference between WordPress.org and WordPress.com?
WordPress.org vs. WordPress.com
The difference between WordPress.org and WordPress.com has to do with who is actually hosting your website.
You host your own website or blog on WordPress.org, through a third-party hosting provider. You also have to download your WordPress software, buy a domain name on a third-party site, and manage your server. It’s a much more hands-on experience than with WordPress.com. Also, your URL with a WordPress.org site will look like this: www.mywebsite.com.
WordPress.com offers to host your website for you. You also don’t need to download any software or manage a server. If you choose WordPress.com, your website’s URL will look like this: https://ift.tt/1Pt8449. However, you have the option to also upgrade your WordPress.com account and buy a custom domain from a third-party provider (meaning your URL will look like this: www.mywebsite.com).
How to Choose Between WordPress.org or WordPress.com
You may be wondering whether WordPress.org or WordPress.com would be a better fit for you. Let’s review a few more of the pros and cons that come with both options, so you can make an informed decision.
WordPress.org is ideal if you want full power over customizing and controlling your website. However, there is a lot more responsibility that comes with managing a WordPress.org website. You have to purchase and set up your own domain name, upload and install all of your custom plugins and themes, edit your website’s code, and manage your website’s security. WordPress.org is free to use, but you have to pay for everything else that goes into having a website.
WordPress.com is preferable if you’re looking for an option that has most of the hard work done for you. You’ll never need to manage your server, pay for your hosting, or buy a domain. There are also a number of customization options that come with a WordPress.com plan to help you make your website look the way you want it to.
WordPress.com has a free and paid version. If you stick with the free version, you can’t upload any custom themes or plugins, and you will have a WordPress subdomain. However, there is always the option to pay for premium upgrades and other plans that provide you with even more features and control, as well as the option to buy a custom domain through a third-party site.
WordPress for Beginners: How to Use WordPress
There are a number of ways for you to create your dream website with WordPress. Users generally find the software easy to use, but getting started can be understandably intimidating if you’re completely new to the process.
That’s why we have built this “WordPress for Beginners” guide. Below, we will cover how to start creating your website.
WordPress is one of the most popular CMS options available today according to TechRadar. Its ease of use and versatility enable the majority of users and business owners to create a website that works for their needs with the software. Here’s how you can do the same.
1. Select a WordPress plan
To begin creating your website, select a WordPress plan. As stated earlier, with WordPress.org, you only have one (free) plan option — but it requires you to buy your domain, hosting provider, plugins, themes, and everything else related to your WordPress site.
When it comes to WordPress.com, you’ll have to choose between the five plans they offer.
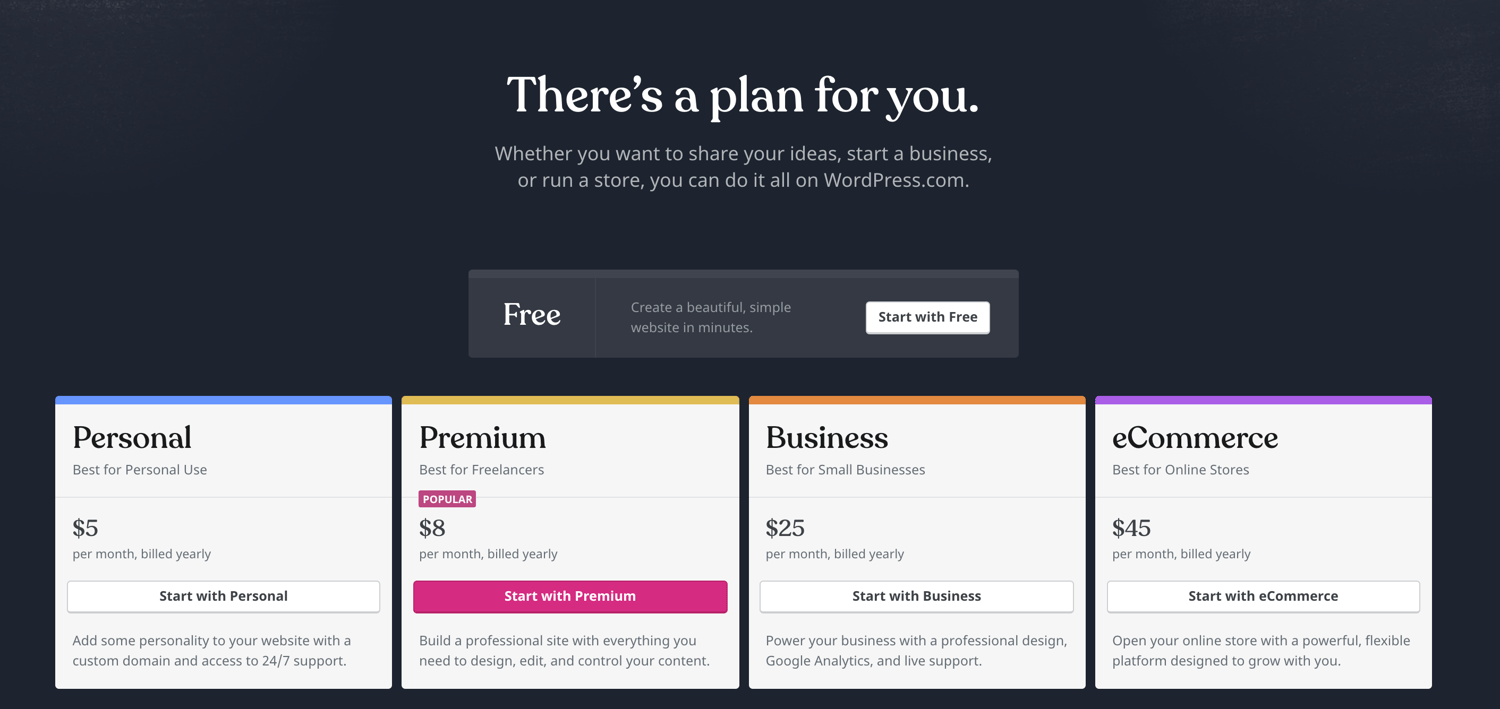
The main differences between the plans include the monthly fee, types of site customization, and access to marketing tools.
2. Set up your domain name and hosting provider
Setting up your domain name and choosing your hosting provider for WordPress typically happen around the same time in the website creation process.
Before we talk about how to complete those tasks, let’s cover the difference between your domain name and hosting provider.
Think about your domain name as your home address — it’s how your visitors are able to locate your website on the Internet. Your hosting provider is where your website is actually stored. Without a hosting provider, your site wouldn’t have space on a server to “live”.
Imagine your domain name is your home address and your hosting provider is your house. Your data files, which make up your website, are the furniture in your house.
Your domain name will look something like this: www.example.com. Examples of some of the best WordPressing hosting providers are WP Engine and Kinsta, which you can learn more about here.
Source: WP Engine
How to pick domain and hosting providers
Again, WordPress.org requires you to create your own domain and find a third-party hosting provider for your website. WordPress.com allows you to decide whether or not you want a custom domain depending on the plan you choose, but you will still have to find a third-party hosting provider.
There are hundreds of third-party hosting services, such as GoDaddy or Bluehost, that provide you with the ability to create custom domain names. Your hosting provider is important because it impacts your website’s speed, security, and reliability.
There are hundreds of hosting providers to choose from, but the good news for you is we put together a list of 19 of the best WordPress hosting providers to help you decide what will work best for your own website. All 19 of these providers meet WordPress’ three hosting requirements (listed below). If you still have an interest in looking at other hosting providers for your site, make sure they meet the following criteria:
- PHP version 7.3 or greater
- MySQL version 5.6 or greater OR MariaDB version 10.1 or greater
- HTTPS support
Side note: If you are new to WordPress.com but have already purchased and created a domain name elsewhere, no problem — you’ll have the option to transfer or map it to your WordPress website.
For the sake of this guide, let’s assume you do not have a domain or hosting provider at this point. Here’s how to start creating your website on a third-party hosting site like Bluehost.
First, head to Bluehost’s website and click “Get Started”.

From here, you’ll be taken to Bluehost’s pricing page to choose from four different plans.
Once you choose your plan and click “Select”, you’ll be taken to another page to sign up with a domain name.
Source: Bluehost
Once you select your domain name, you’ll be brought to a page to complete your account and billing information for your purchase.
After confirming your account and purchasing your domain, you will gain access to your hosting dashboard where you’ll be able to install WordPress.
3. Install WordPress
If you are using a hosting provider outside of WordPress, you’ll need to install the CMS to connect your new domain to your website.
This time, let’s use GoDaddy as an example. (Don’t worry, no matter the hosting provider you choose, this process looks similar.)
To start, log into your GoDaddy account, click “Web Hosting”, and then “Manage”. You will be brought to a screen with your account details.
Source: GoDaddy
Scroll down and under “Options & Settings”, you will see an area titled “Popular Apps”. Click on the WordPress app to begin the installation.
Source: GoDaddy
After installing WordPress, there will be a few questions to answer related to the domain you want to use, the directory where you want to install WordPress, and your admin information.
After about 24 hours, your website will be installed to your hosting account, and GoDaddy will send you an email confirmation.
Now that you have your domain set up and WordPress installed, we need to set up your “Primary Domain” within WordPress, so your visitors are see your website when they search your URL.
In WordPress, go to “My Site” and click “Domains”. Select the custom domain you want to make primary.
Source: WordPress
Then, click “Make Primary”.
Source: WordPress
Confirm you meant to make this change by clicking “Update Primary Domain”.
Source: WordPress
Verify the update was successful by looking for a green box with a checkmark that says “Primary Domain”.
Source: WordPress
Onto step four — making your website look nice.
Side note: If you choose to use a managed WordPress hosting service like WP Engine or Kinsta, you won’t need to go through this process as those services were built specifically for WordPress and will have WordPress installed for you.
4. Choose your theme
You can customize your website using WordPress’ themes and templates, which contain a multitude of layouts, formatting styles, colors, fonts, and other visual options.
WordPress automatically provides you with a default theme that looks rather plain. Sure, you can keep it, but your website visitors may not be so impressed. A custom WordPress theme, whether it’s paid or free, will make your website appealing to your buyer personas as well as ensure it looks professional.
Similar to the wide range of hosting providers available, there are also hundreds of themes and templates to choose from. That’s why we’ve put together a guide to 20 of our favorite themes and templates and categorized them by purpose. Whether you’re looking for a theme versatile enough for multiple different business types, or one suitable for your ecommerce site, portfolio, blog, or niche business, there’s a theme that will work for your specific needs. If you can’t find one that’s right for you, you can build a custom website using a tool like Elementor.
To find a theme that works best for you in WordPress.org, head to your admin dashboard. Click “Appearance” and then “Themes”.
You will then be brought to another screen to browse all available themes or search for a specific one you have in mind.
Once you discover the perfect theme, simply “Install” it to begin customizing it and adding your own content, posts, and pages. Each theme has different steps required of you during the customization process, so be sure to follow them closely. Each theme’s website (which are often accessible through the WordPress theme and template library) has helpful information as you work through the customization process.
5. Add posts and pages to your website
When you add content to your WordPress website, it’s displayed in the form of posts and pages.
Posts (or “dynamic pages”) are typically used for blogs and portfolios because they automatically place your newest website content at the top. Pages are static which is why they often appeal to business owners — the added content always remains in the same place.
Start by deciding whether you want a post or page to serve as the homepage (or any page) of your website. To add a post to your website, go to the admin dashboard, click “Posts” and then “Add New”. You can add a title for your post, insert photos, or change the format.
Source: First Site Guide
Click “Save Draft” to save your changes as a draft or click “Publish” so the post immediately goes live.
If you’re looking to add a page to your website, you’ll work through a very similar process. In your admin area, click “Pages” and then “Add New”.
 Source: The Hard Refresh
First, add a title to your page. Next, you can insert photos, embed videos, and add content. Follow the same steps to create multiple pages for your website.
Source: The Hard Refresh
Don’t forget to click “Save Draft” or “Publish”.
6. Customize your website
There are a number of ways to further customize your website. Let’s review a few of the options.
First, create static or dynamic pages under the “Settings” tab in your WordPress admin page.
Consider using a static page if you’re a business owner who prefers having content remain in one place on your website. For example, it wouldn’t make sense for your “About Us” page to contain content that moves around — you’d want that content to remain in one location for consistency. Consider using a dynamic page if you’re a blogger who prefers having your newest content appear at the top of your pages. This way your visitors can easily find your latest posts.
On the left side, click “Settings,” then “Reading.” Choose between your latest posts or a static page.
Source: WooCommerce
Your site title also can be customized — to do this, head to your admin dashboard. Under the “General”tab in “Settings”, add your website title and tagline.
Source: Softaculous
The navigation bar is customizable, too. This enables your visitors to easily find information on your website.
You can add a navigation bar by going to your admin dashboard, clicking “Appearance” and then “Menus”.
Source: WordPress

From here, you can determine how you want your bar to look, how many pages you want to include, what you want to title those pages, and what order you want them to be listed in.
Click here for more information on your WordPress site settings and customization options.
7. Install your plugins
Plugins are pieces of software that add functionality to your website. They also enhance the user experience. With over 55,000 available plugins, there are options for most every type of website and user. Some of the most popular plugins available include WordPress Contact Form, Yoast SEO, TablePress, The SEO Framework, HubSpot Conversion Tools, and Pixel Caffeine.
To begin installation, head to the “Plugins” section in your admin dashboard.
Source: SiteGround
Click “Add New”.
Source: SiteGround
Browse or search for your desired plugin and then click “Install Now”.
Source: SiteGround
Get the WordPress CRM plugin that helps you organize, track, and nurture your leads.
8. Optimize your website to increase page speed
Website performance is a critical part of the user experience. If a page takes too long to load, your visitors will move quickly to another site. So, you don’t want to frustrate visitors with slow speed times.
You can improve your website’s performance by enabling browser caching. Browser caching is storing your website’s data to your visitors’ browsers. That way, your content doesn’t need to be processed for it to appear, which increases the website speed.
To enable caching for your website, install and activate a caching plugin. There are more than 1,900 available under Plugins > Add New.
Let’s install and activate WP Fastest Cache. On the plugin’s page, click the box next to “Enable”. Then, click “Submit” at the bottom of the screen.
That’s it! This caching plugins will help increase your website’s performance.
9. Get inspiration from WordPress website examples
As you begin to customize your website, you may feel overwhelmed by all the possible options. No worries, you can grab some inspiration from other highly engaging WordPress websites.
In the example below, 99% Invisible is a popular podcast that focuses on design and architecture. Their website is a sleek, modern design. It offers easy navigation for visitors to quickly access each podcast episode.
Source: 99% Invisible
The Houston Zoo’s website displays its main attraction on the homepage. The magnifying glass icon on the top menu bar makes searching the site effortless.
 Source: Houston Zoo
Awesome Motive, the creators behind several WordPress projects, engages their visitors with a polished, yet simple website. It features subtle animation to grab people’s attention.
Source: Awesome Motive
WordPress Website Tips and Tricks
There are a number of WordPress tips and tricks to make your website as impactful and user-friendly as possible — we’ve listed 20 of them below to help you do just that.
1. Focus on the basics and create a great user experience with a WordPress theme that complements your business and website content.
2. Use dashes and not underscores when naming your files in WordPress. Google looks as underscores as joiners, meaning your file will look like one big word. That won’t help you with your SEO. Use dashes to make it obvious there are separate words. (For example, use https://ift.tt/2CWyE97, not https://ift.tt/2P8AhYz).
3. Use WordPress’ online support for any questions or concerns you may have while creating or using your website. There are a number of forums and ways to reach out to WordPress experts listed on their website.
4. Use Image Alt Text to your advantage. Image Alt Text can be used to improve your SEO and Google rankings.
5. Keep your sidebar as organized as possible. Stick to the essentials and think about what your website visitors and buyer personas really need quick and easy access to.
6. Back up your website regularly, so if you ever lose access or have technological difficulties, you have everything you need to completely restore your content. There are a number of plugins, such as Snapshot Pro, made specifically for backing up your WordPress content.
7. Learn and understand SEO basics to ensure your website is completely optimized so you can boost your conversions.
8. Create a custom homepage. As mentioned earlier, WordPress will provide you with a default homepage. Take the time to create your own with a theme that works for your business — remember, this is your visitor’s first impression of your business, blog, or portfolio.
9. Keep an eye on your website’s performance and know what is and isn’t working for your visitors. There are a number of useful WordPress plugins, as well as Google Analytics software, to help with this performance.
10. Include an “About Us” page on your website to show your visitors you’re a trustworthy person and/or business. “About Us” pages are known to be the second most-visited pages on websites (after homepages) — so introducing yourself is important.
11. Make sure your site is secure to ensure there are no hackers gaining entry. Again, there are plenty of plugins such as WP Defender to help you with security.
12. Create custom permalinks. Permalinks are the permanent URLs that you plan to keep static for the foreseeable future. They’re important because they improve user experience and enhance your WordPress website SEO.
13. Create a custom navigation bar (as we reviewed earlier) to make your site easy to use for your visitors.
14. Include excerpts on your blog posts so people don’t land on your blog page and see your entire piece at once. By only including excerpts on your blog page, you make room to list all of your blogs in one location. Visitors can then read the excerpts and click-through to read the posts they are most interested in.
15. Structure your website in a way that makes sense for your business, visitors, and buyer personas. For example, use posts if you’re a blogger and use pages if you’re a business owner.
16. Remove “Comment” and “Share” buttons from specific pages of your website. You don’t need (or want) a “Comment” or “Share” button on your “About Us” page, or any of your service pages for that matter.
17. Consider what your website looks like on mobile. It’s no secret people are searching the Internet while on their phones, tablets, and other mobile devices these days. Consider using a plugin to help you achieve a responsive, mobile WordPress design.
18. Use visuals and video content when possible to break up the text on your website pages.
19. Update your WordPress site and plugins regularly. WordPress will tell you when updates are released. This will keep your website looking fresh and working efficiently.
20. Use social proof to show your new website visitors how many other people have already subscribed to your site and content. There are plugins to help you do this in a matter of minutes.
Conclusion
Having a great website matters. It’s how you connect with your visitors and leads, create a positive first impression with new users, and boost conversions. The good news is creating your own website doesn’t have to be a daunting process … at least not with WordPress.
The easy-to-use CMS offers completely customizable plans suitable for all needs. With no prior knowledge necessary, you can start building your own site for your business, blog, portfolio, or online store immediately.
