5 Reasons to Get Excited About the HubSpot Platform in 2019
This time last year, we put a stake in the ground by announcing that HubSpot was building a centralized platform.
We believe the world has changed. We see businesses using more kinds of software, not less, that all needs to work together. To help our customers grow better in this environment, HubSpot is evolving from an “all-in-one” suite into an “all-on-one” platform.
Delivering remarkable end-to-end customer experiences is a team sport. Our goal in becoming a lovable platform is to make it easy to complement HubSpot with a rich landscape of apps built by other companies, or custom apps built uniquely for your business by an agency or your own developers.
We want to make it easy for our customers to orchestrate all of this.
In collaboration with our growing collection of platform partners, we made great progress in that mission over the past year. Here are our platform highlights from 2018:
1. We listed 94 new apps in our directory, growing our platform partner ecosystem by 70%.
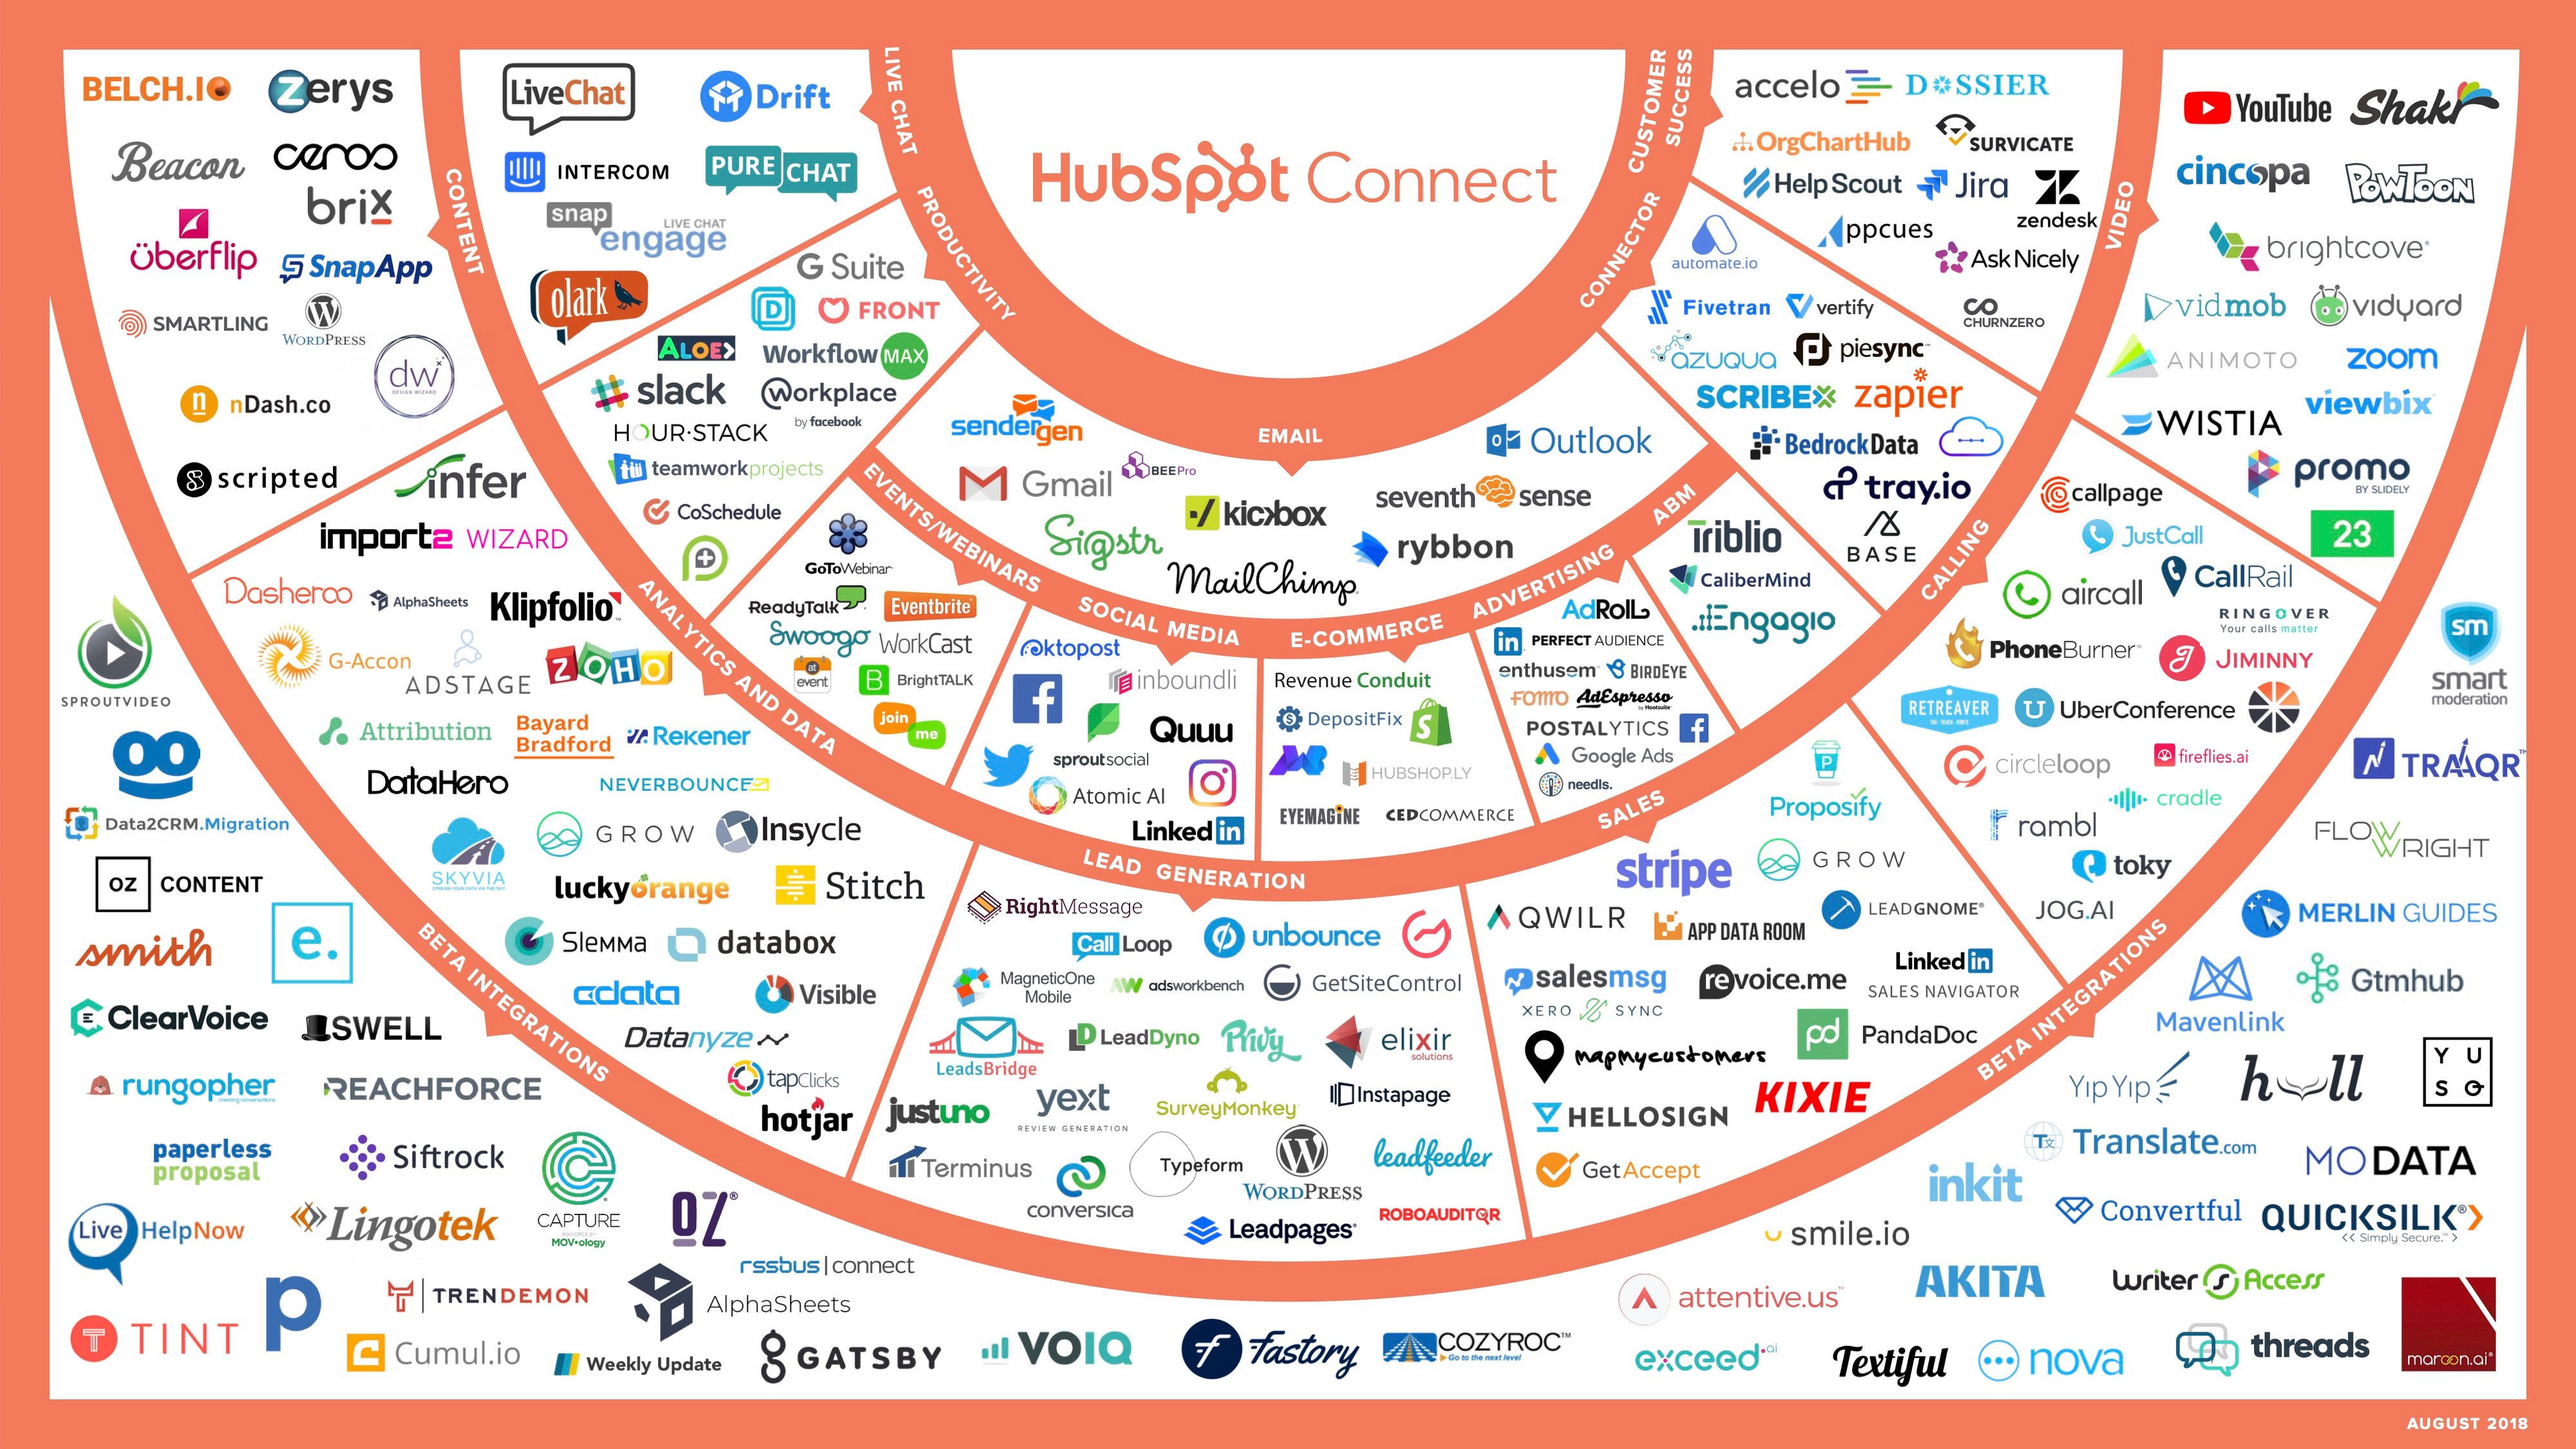
Good platforms are flywheels: More customers attract more developers, who build more apps, which attract more customers, and so on. Customers get an ever wider set of capabilities, while developers get an ever wider audience they can distribute their apps to.
That flywheel is starting to accelerate on our platform, and it’s inspiring to see the wide variety of innovative companies who are bringing new integrated apps to our customers.
We welcomed 94 new official apps into our ecosystem in 2018, bringing our integrations count to over 200 across 17 categories, that help grow our customers’ businesses.
One of the categories that grew the most in 2018 was Calling. Just within that category, you can find 21 different apps for video conferencing, integrating with cloud-based phone systems and call centers, inbound and outbound SMS, voice-powered chatbots, AI-driven analysis of phone calls, and more.
In 2018, the top 20 most popular non-native apps in our ecosystem by total number of installs were:
- Zapier — integrations automation
- Mailchimp — email and marketing automation
- Slack — collaboration hub for work
- WordPress — free content management system
- SurveyMonkey — survey collection
- Eventbrite — event management and ticketing
- Salesforce — CRM
- Databox — mobile analytics
- GoToWebinar — video conferencing
- MagneticOne Mobile — business card sync
- Automate.io — integrations automation
- Hotjar — heat mapping
- UberConference — video conferencing
- Zendesk — support ticketing and customer service software
- Shopify — ecommerce platform
- Typeform — online form and survey-building
- PandaDoc — docusigning
- Unbounce — landing page building
- Import2 Wizard — seamless data sync
- PieSync — integrations automation
As you might expect, many of these were our earliest partners, and it’s great to see their continued success. But we were also excited to see new partners quickly gain traction. The 10 fastest-growing new apps in our ecosystem last year were:
- Import2 Wizard — seamless data sync
- Typeform — online form and survey-building
- Slack — collaboration hub for work
- Zoho Analytics — informative sales reports and dashboards
- GetSiteControl — online form and survey-building
- CircleLoop — advanced calling
- OrgChartHub — organizational chart building
- Map My Customers — mapping and data visualization
- Jira — project management
- Skyvia — cloud application and database sync
Many more exciting apps are in the pipeline now and will be launching over the course of 2019.
We also built a number of native integrations last year, including Zoom, Slack, Shopify, Stripe, Youtube, and Workplace by Facebook.
We deliberately invest in a small number of native integrations relative to our ecosystem’s size. This allows us to focus our developers’ time on the handful of companies that we know will be the most valuable for our customers. For instance, we were launch partners for some of Slack’s new APIs, enabling a deep integration between our two products. We were a launch partner for Workplace by Facebook. And we built a groovy new YouTube integration for actionable video metrics.
Whenever we build an integration ourselves, we look for ways to enable other partners in our ecosystem to build off those same extension points. For instance, when we built our Shopify integration, we also created the Ecommerce Bridge API, which enables companies to sync and manipulate ecommerce data using HubSpot functionality. One of our integration partners, Unific, enables customers to connect their Magento, Shopify, Bigcommerce, or WooCommerce store to HubSpot using this API. We also recently added a tight integration with Zoom and are working to make it possible for other video conferencing providers to plug into HubSpot in the same way.
2. We added 95 new API endpoints and hosted our first annual platform partner day.
Our product teams have been enthusiastically opening more APIs and UI extension points to enable developers to build and integrate more kinds of apps on our platform.
Last year, we added 95 new API endpoints (for a total of 355), creating programmatic access to tickets, products, line items, CRM pipelines, GDPR compliance features, and more. We launched an Ecommerce Bridge API and Analytics API to facilitate deeper integrations with a wide range of partners in ecommerce and analytics categories. And we unveiled a new Workflow Extensions model that lets partners create branded, native-like actions for customers within workflows across our Marketing Hub, Sales Hub, and Service Hub products.
Last spring, we also hosted our first annual Platform Partner Day at our headquarters in Cambridge. Over 60 of our top integration partners joined us to meet with our engineering and marketing teams, learn about upcoming product releases, and discuss how we can jointly create better apps and integrations for our shared customers.
We’re now gearing up for our second annual Platform Partner Day this spring with exciting new developments to share and even greater opportunities to collaborate.
Traveling back to Seattle from inaugural @HubSpot Connect partner day. Enthused, empowered and excited to be part of program and part of @INBOUND. Looking forward to working with @HubSpotAgencies and customers. Thanks @albiedrzycki @ChristineIanni and co for a great program. pic.twitter.com/Y0hYEGuwwm
— Barney Brown (@BrownBarney)
May 10, 2018
3. Customers adopted integrations at a record pace.
There’s a positive correlation between the number of apps a customer connects to HubSpot and their growth on our platform. It makes sense: The more our customers invest in a unified experience for their customers, the more they can accomplish.
App adoption across our customer base in 2018 was record-breaking. The vast majority of our customers now have at least one other app integrated with HubSpot, and the average number of apps per customer jumped by more than more than 50% year-over-year. We’re talking hundreds of thousands of additional app installs.
We’re energized by this number, which indicates that customers are seeing benefits from our platform. But it’s also exciting for our platform partners who are seeing greater adoption among our customer base.
4. We connected our platform partners, agencies, and startups.
Some of the most valuable opportunities we can offer platform partners are connections with programs and communities across HubSpot.
For instance, our global network of thousands of agencies and consultants helps businesses leverage our software to grow better. Increasingly, these providers are adding our platform partners’ products to the solutions they’re delivering to clients. This gives their clients more capabilities, expands their own service offerings, and lays the foundation for a powerful go-to-market channel.
We’re seeing our agency partners leverage our platform in powerful and innovative ways. For example, Nextiny, a Platinum agency partner has curated a “tech stack” of apps from HubSpot’s platform ecosystem that they regularly deploy together for clients. Nextiny used this stack to overachieve on key business goals for their client, Jeeves Florida Rentals, and their success landed them a 2018 Impact Award for Integrations Innovation.
To facilitate these types of relationships, we launched the Apps for Agency Services program last spring. It provides a structured way for platform partners who qualify to help agencies sell and service their software, including sales enablement tools and a free subscription for their own internal use.
HubSpot for Startups is another thriving program partners with over 1,500 accelerators, incubators, and VC firms (like Y Combinator and Sequoia Capital) to provide startups with educational resources, event programs, and startup-friendly discounts on our software.
Last year, we enabled platform partners to provide special discounts to qualified startups to help them build relationships with new ventures.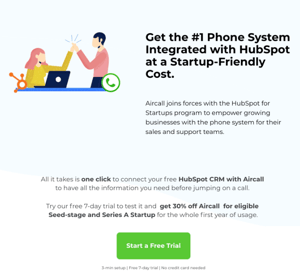
To further build momentum between our platform partners and startup community, our platform marketing team researched the most commonly used apps for startups in our ecosystem and curated collections of apps for startups and free apps (including those with a freemium offering) in our directory.
We were inspired by all the successful connections between platform partners, agencies, and startups that happened last year. We’re committed to facilitating even more of them in the year ahead.
5. We launched HubSpot Ventures and announced co-investment from Amazon Web Services (AWS) in programs to grow our ecosystem.
In addition to expanding our platform’s APIs and extensibility and creating new app distribution opportunities for partners, we also made a couple of big announcements about growing the ecosystem itself.
In December, we launched HubSpot Ventures, a new $30 million fund to invest in startups that align with our mission to help millions of organizations grow better. Some of the previous investments that we have made include Blissfully, Grow, Lorem, Privy and Terminus.
At the same time, we announced a three-year commitment with Amazon Web Services (AWS) to help startups grow better. All AWS Activate members have access to HubSpot for Startups and AWS now offers Activate memberships and credits to participants in HubSpot for Startups too. AWS will also support HubSpot’s platform partner program by co-investing to build an ecosystem for HubSpot partners, including content tailored to developers.
And, in the spirit of investing in our platform partners, we also extended HubSpot for Startups discounts to all certified platform partners who aren’t yet HubSpot customers but want to make the switch.
Onward and Upward in 2019
We’ve got big plans for our platform ecosystem in the year ahead. For customers, we’re eager to bring you more apps and integrations that will expand your business’s digital superpowers. To see the latest ones, check out the new and noteworthy category in our directory.
For partners, we’re dedicated to creating more opportunities for you to build your business on our platform. Last year, our entire executive team went on a field trip to learn from some of the best platform companies in the Bay Area. Our overarching takeaway was this credo: A platform should be measured by the success of its ecosystem. In 2018, we added three key hires to our team who are specifically tasked with helping our ecosystem succeed. Samantha Ceppos, our director of global partner and platform marketing, scales our ecosystem and ensures our partners are always looped in to changes and updates. Elizabeth Ruscitto, our director of developer relations, is leading the charge in improving our developer documentation, tools, and support. You can access our latest resources and sign up for a developer portal for free here. Hugh Durkin, our director of platform partner success, is focused on shaping our platform partner program to help partners grow their businesses within our ecosystem.
Are you interested in joining us as an app platform partner? Learn more about the program here.
We’re eager to grow better together.

How a Minority of Business Bloggers Outperform the Majority [New Data]
When Orbit Media Studios decided to research how business bloggers go about doing their thing in 2014, it wasn’t intended to be a one-and-done project. The mission was — and still is — to track how business blogging evolves.
Why? Because successful inbound marketers thrive when they master content marketing and, of course, blogging is an all-important cornerstone for most strategies.
After establishing some essential benchmarks regarding how bloggers create, format, and measure their posts in years one and two of the study, Orbit Media began probing the 1000+ bloggers that participated in the survey to learn which tactics contributed most to achieving their desired results.
For the past three years, Orbit’s been focused on correlating blogging tactics with results. As trends emerge, the story continues to get more intriguing with each passing year.
In late 2018, the father of the study, research master Andy Crestodina, put considerable effort into reporting how those that saw their efforts reap strong results differed from the pack.
The results of the survey, along with Andy’s comprehensive analysis and 25 graphs to depict the data, are presented in full here. However, this year — year five of research — me, Andy, and the data-crunchers at Orbit also set out to create a side-by-side-comparison of how the average bloggers’ tactics differ from the top 20%.
Spoiler alert — the conclusion is the more you put into business blogging, the more you get out of it.
Take a look at how above average bloggers get above average results.


The Ultimate Guide to Google Shopping in 2019
Online shopping — we all do it. Heck, it’s arguably the greatest thing since sliced bread. (Did you know you can shop online for that, too? Crazy.)
But, have you ever been looking for a product and wanted to shop among a variety of brands and labels? This can be a pretty clunky process if you’re hopping between ecommerce websites.
This is where online shopping marketplaces come in handy. Think: Amazon, eBay, Etsy, and — you guessed it — Google Shopping. While Google Shopping isn’t technically an online marketplace (it’s more of an ad platform, but more on that later), it provides shoppers the same opportunity to browse a variety of products based on their search query.
Google Shopping also benefits retailers because, when a shopper clicks on a product link, they’re sent back to the retailer’s site to make the purchase.
If you’re not advertising your products on Google Shopping, you’re missing out, my friend. We compiled this guide to help you better understand Google Shopping and get started with your first Shopping campaign. Keep reading to get started, or use the chapter links to jump ahead.
When it was released in 2002, Google Shopping was called Froogle. The service simply indexed product data based on certain search terms. In 2012, the service shifted to a paid advertising model where retailers had to pay to be featured in the Google Shopping search results.
From that point forward, Google Shopping became a “branch” of Google AdWords — yet another way for retailers and e-commerce businesses to advertise their physical products on Google. But unlike text-based Google ads that show up based on keywords, Google uses product data uploaded by merchants to display Google Shopping ads.
Why use Google Shopping?
Why use Google Shopping? In short, it works. Here’s my personal anecdote about Google Shopping.
I’m currently in the process of moving apartments here in Chicago, and my boyfriend and I are looking for a sleeper sofa — preferably a sectional — for our new apartment. I’m not loyal to a specific furniture or home goods brand, so I’ve been looking for ways to easily search for a new sofa across multiple retailers.
Enter: Google Shopping. When I Google “sleeper sectional sofa,” it pulls up lots of websites … along with the sponsored Google Shopping results. Bingo.
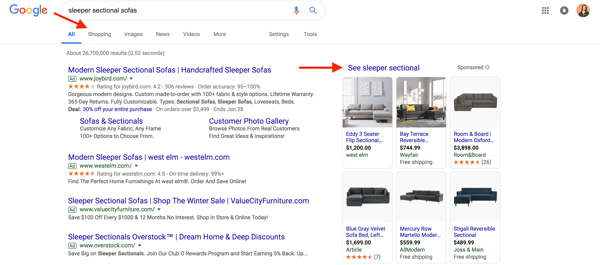
See sleeper sectional or on the
Shopping tab below the search query box, I can access a variety of sofas from different retailers. Google Shopping also allows me to filter the results by price point, size, fabric, and more.
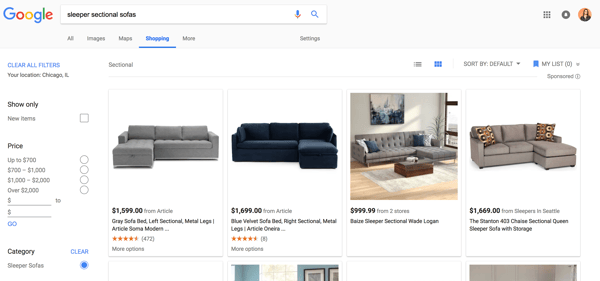
So, I’m a fan of Google Shopping. I haven’t made a purchase yet, but I do anticipate that I’ll find our ideal sofa by using this service.
Here are a few other reasons to use Google Shopping:
- Google Shopping adds a visual touch to an otherwise text-heavy searching and shopping experience.
- Google Shopping allows you to show up multiple times in Google SERPs — as a website result, a text-only PPC result, and a Shopping result.
- Google Shopping is proven to have 30% higher conversion rates than text ads.
How to Add Products to Google Shopping
- Set up a Google Merchant Center account
- Optimize your product imagery
- Collect and input your product feed data
- Link your Google AdWords account
- Create a Google Shopping campaign
- Place bids on your Shopping campaign
- Target and schedule your Shopping campaign
- Build ad groups
Let’s talk about how to get your products listed on Google Shopping. Below, we’ll walk through the steps required to manually set up your account. Tip: If you have a lot of products, this process might be easier to outsource to a Google Shopping data feed tool.
1. Set up a Google Merchant Center account
To get your products featured in Google Shopping results, you must sign up for a Google Merchant Center account.
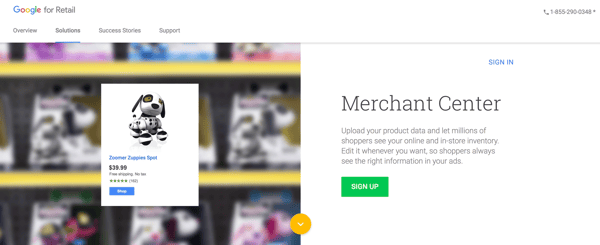
Google Merchant Center is simple to set up, is easy to navigate, and essentially serves as your home base for your products and product information. (You’ll manage your future Google Shopping campaigns through Google Ads, but more on that later.)
Read our guide to Google Merchant Center to learn more about creating and managing your account.
2. Optimize your product imagery
Google Shopping uses uploaded product feeds to index search results, but it pulls the featured images from the respective retail sites. Because of that, it’s important to optimize your product imagery and listings on your own website before you market them on Google Shopping.
Google Shopping is a highly visual experience. Your product photos are arguably the most important part of your listing, and they may be how shoppers choose which product to click and buy. Google knows this and — in the interest of providing a great shopping experience for consumers — will actually deny Google Shopping campaigns if the images are low-quality.
(If you think you can cut corners here, think again. Google does frequent quality checks and doesn’t hesitate to suspend Google Shopping accounts. Bad product imagery doesn’t just hurt sales, it can prevent them altogether.)
If you want your products to be featured on Google Shopping, we recommend following Google’s image guidelines from the start:
- Use a solid white, gray, or light-colored background
- Use clear, even lighting
- Show the product clearly being sold. (Rear views and close-ups can be used as additional images, but not as the main image.)
- Show the product at the correct scale and not too big or too small. (Your product should take up between 75% and 90% of the full image.)
- Avoid blur, noise, excessive .jpeg additions, or other image tweaks like pixelation, fringing, and fading out.
Other best practices include showing apparel products on-body, using shadows to add depth, providing multiple angles of your product, and featuring real people using it. These product image specifications are also good to master if you sell your products on other marketplaces such as Amazon, eBay, or Etsy.
3. Collect and input your product data feed
With your images optimized, it’s time to create your product data feed. Your product feed tells Google all about your products. This data is essential because it helps Google find and display your products when people search for certain product terms or attributes.
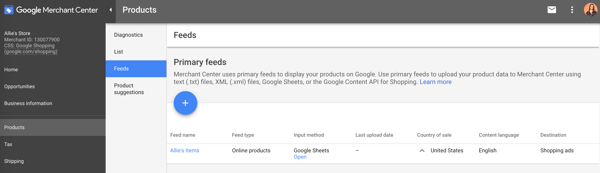
To set up your product feed, go to your Google Merchant Center account. Click Products > Feeds, and then click the blue “+” icon.
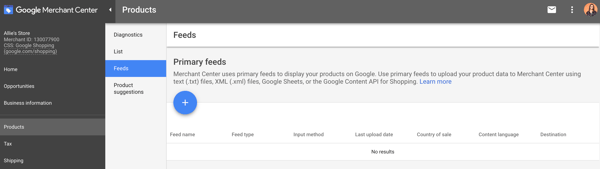
First, enter your country and language. This data determines which demographic(s) will see your products, so it’s important.
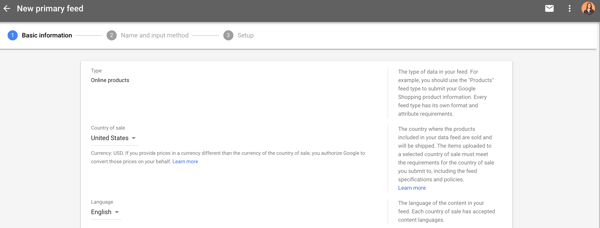
Next, name your product feed and choose how you’ll input your product information.
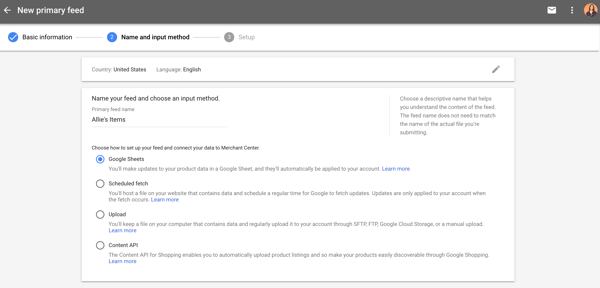
If you choose Google Sheets, you can either upload your own spreadsheet or use a template provided by Google Merchant Center. This step also allows you to create an upload schedule depending on how often you update your inventory.
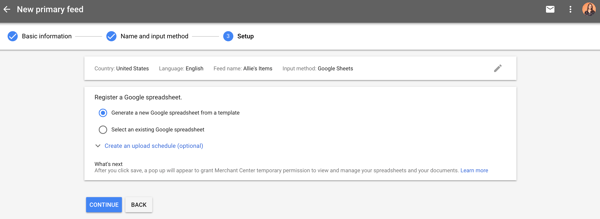
This spreadsheet is used to assemble the product attributes that Google will use to index and display your products. Below is a brief list of some required product attributes that Google uses to create your Google Shopping ads (plus a cheeky sofa example).
id — Your product’s unique identifier. Use the SKU if possible. Example: S123
title — Your product’s title. Should match the product landing page. Add any specifics that shoppers may search for, such as size, color, or style. Example: Allie’s Super Comfy Sleeper Sectional Sofa, Grey
description — An accurate description of your product. Should match the product landing page. Only include information about the product. Example: This sleeper sectional sofa was made especially for Allie’s new apartment. Made from 100% cloud-based material, this sofa is perfect for snuggling her dog, binging on Cheez-its, and watching too much Netflix. It also has a pull-out bed for when her mom comes to visit.
link — The URL of your product’s landing page. Should start with http or https. Example: http://bit.ly/2tgMPjv
image_link — The URL of your product’s main image. Should start with http or https. Example: http://bit.ly/2I4YvzI
availability — Your product’s availability. Match the availability from the product landing page. Example: In stock
price — Your product’s price. Match the price from the product landing page and the currency from the country in which the product is predominately sold. Example: $500.00
google_product_category — The Google-defined product category for your product. Include the single most relevant category. Example: Sectional > Sleeper
brand — Your product’s brand name. Provide the name generally recognized by customers. Example: Allie’s
You can find the full list of Google’s Product data specification here. We recommend you read it as we couldn’t fit the entire list of required and optional attributes in this blog post.
If you choose to use the template provided by Google Merchant Center, the spreadsheet will already reflect the product attributes as column headers.

If you choose to create your own spreadsheet, input your chosen product attributes as the column headers. Fill out the respective data with each product as its own row. If an attribute doesn’t apply to a product, leave that cell blank. When complete, simply upload the document to Google Merchant Center.
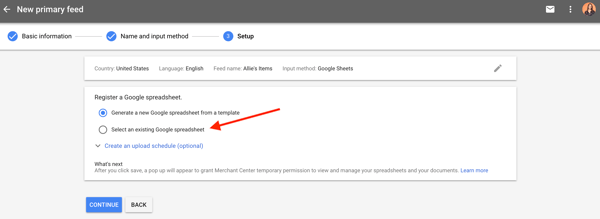
Voila! From that point forward, you can access your product feed on your Google Merchant Center account under Products > Feeds > Primary feeds.
4. Link your Google AdWords account
When you search for a product on Google, the Google Shopping results you see are actually advertisements.
That’s right — in order to get your products on Google Shopping, you have to pay. While Google Merchant Center is how Google gets your product information, Google AdWords is how consumers see your products … through Shopping campaigns, which we’ll get to next.
To get your products in front of shoppers via Google Shopping, you’ll have to link your Google AdWords account.
Log into your Google Merchant Center account. In the top right-hand corner, you’ll find three vertical dots. Click those to expand the menu, and then click Account linking.
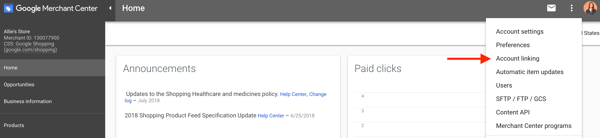
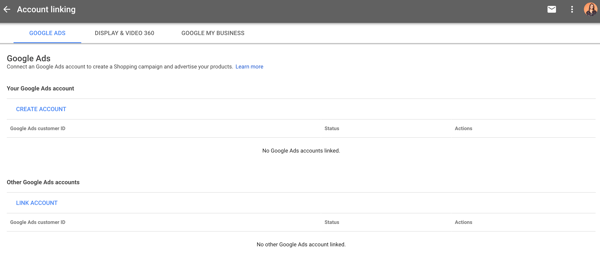
If you don’t have a Google AdWords account, you can create one from this screen. Otherwise, click Link account to enter your Google AdWords customer ID. Once you’re finished, your AdWords account should be linked.
5. Create a Google Shopping campaign
Once your Google AdWords account is linked, you’ll be able to create a Google Shopping campaign and advertise your products. There are a couple different ways to get started.
One way to create a Google Shopping campaign is through your Google Merchant Center account. After you link your Google AdWords account via the Account linking page, you should be able to access it from the same place. From there, you can simply click Create Shopping Campaign.
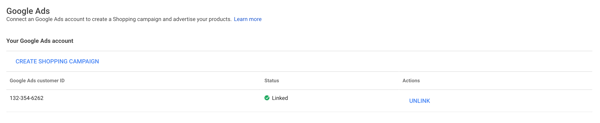
Next, insert the campaign name, country of sale, and daily budget. Once you click Create, you’ll be prompted to continue managing your campaign through Google AdWords.
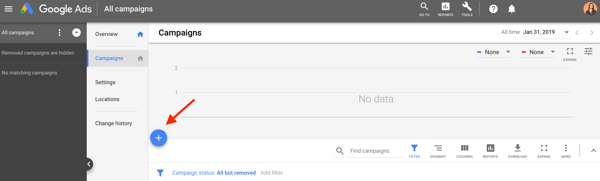
The other way to create a Google Shopping campaign is through Google AdWords. Log into your Google AdWords account. Open the Campaigns tab on the left-hand side menu, click the blue “+” icon, and choose New campaign.
First, choose a campaign goal. A Shopping campaign can have a goal of Sales, Leads, or Website traffic. (You can see the Shopping designation if you hover over the goal.)
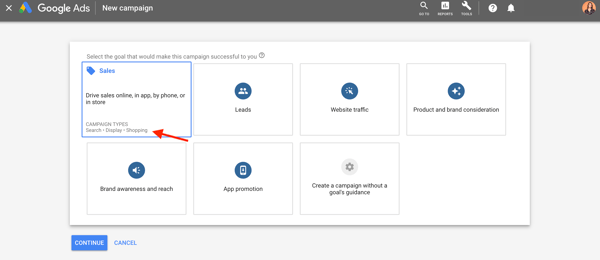
Sales campaigns drive sales online or in person. Leads campaigns gather leads and other conversions by encouraging shoppers to complete an action. Website traffic campaigns bring the right people to your website. Google tailors each campaign to align with your goal, so be sure to choose whichever one is best for your business.
After you choose a campaign goal, designate the campaign type as Shopping. Make sure your Google Merchant Center account is displayed (so Google AdWords knows where to pull your product data from) and indicate your country of sale.
Lastly, choose a campaign subtype. Note: Smart Shopping campaigns require conversion tracking so AdWords can track when your ads lead to sales on your website.
For explanatory purposes, let’s choose a Standard Shopping campaign.
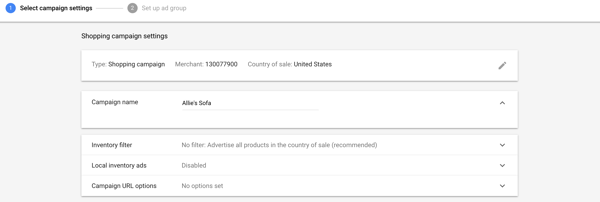
The next screen contains all your Google Shopping campaign settings. First, enter a campaign name, and click Additional settings if you want to set an inventory filter, enable local inventory ads, or change your campaign URL options.
6. Place bids on your Shopping campaign
Next, under your Google Shopping settings, you’ll be asked to select your bidding strategy and set your campaign budget.
Bidding is how you pay for people to see, click on, and interact with your ads. According to Google, “a sufficient bid and high-quality product data will earn your ad a higher rank.”
(Tip: Google has a pretty cool Bid Simulator Tool that’ll show you how bid changes might affect your ad performance. Also, GoDataFeed wrote an awesome guide to Google Shopping bidding strategies that may be helpful, too.)
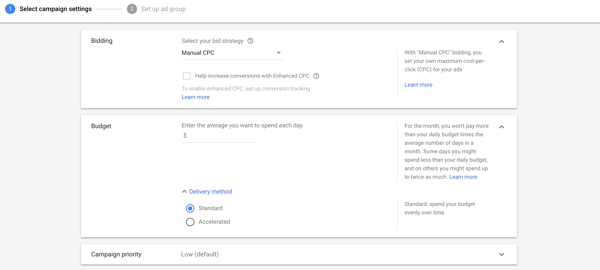
First, select your bid strategy. Manual CPC (cost-per-click) means you set your own maximum CPC for your ads. You can also set an automated bid strategy. Target ROAS (return on ad spend) and Enhanced CPC both require conversion tracking as Google uses your ad’s conversion rates to set the most efficient bid for your products.
With “Maximize clicks”, Google Ads automatically sets your bids to get as many clicks as possible within your budget. You can set a Maximum CPC bid limit to cap your spend on each ad.
Next, choose your campaign budget. This is the amount of money you want to spend on average each day … but the amount isn’t capped daily. Instead, Google manages your budget monthly: in a month, you won’t spend more than your daily budget times the number of days in each month.
For example, let’s say I set my campaign budget to $100 for the month of February. Google sees that I’m willing to spend $100 x 28 days = $2,800 in February. As it places bids on my ads, Google might spend over $100 in a day, but it’ll never spend more than $2,800 in the month.
You can also set a delivery method for your budget: Standard spends your budget evenly over time, and Accelerated spends it quicker.
Lastly, if you are running more than one campaign, you can set a campaign priority so Google knows which bid will be used.
Read more about the fundamentals of PPC advertising in our ultimate guide.
7. Target and schedule your Shopping campaign
The last section of the Google Shopping campaign settings is all about targeting and scheduling your campaign. This part is important because it dictates who will see your product ads and when.
The first two settings — Networks and Devices — shouldn’t change. They’re basically just telling you where your product ads will show up.
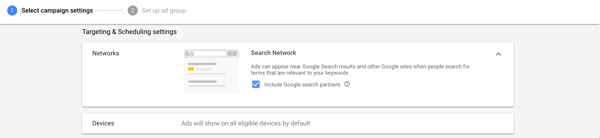
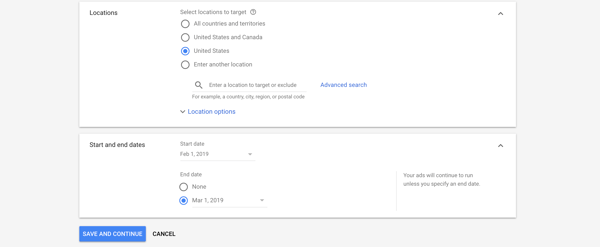
Next, select the locations that your ad will target. Make sure you only choose locations where you’re located and/or can ship to. Under Location options, you can change the Target and Exclude settings, although we recommend Google’s default choices. These options ensure that you’re marketing to the very best people: those located in your target location and those who are searching for (a.k.a. interested in) those locations, too. (The same goes for your excluded locations.)
Finally, set the start and end dates of your Shopping campaign. Your ad will continue to run unless you set an end date, so don’t forget that section.
8. Build ad groups
After you complete your Google Shopping campaign settings, you’ll be prompted to build ad groups for your campaign. Ad groups determine what type of ads you’ll run and how you’ll organize bidding for those ads.
There are two types of ad groups you can run: Product Shopping ads and Showcase Shopping ads. Product Shopping ads promote a single product. Showcase Shopping ads are a new format and allow you to advertise multiple products as part of a product or lifestyle ad that represents your brand or business.
If you choose a Product Shopping ad group, enter your ad group name and set a maximum CPC bid.
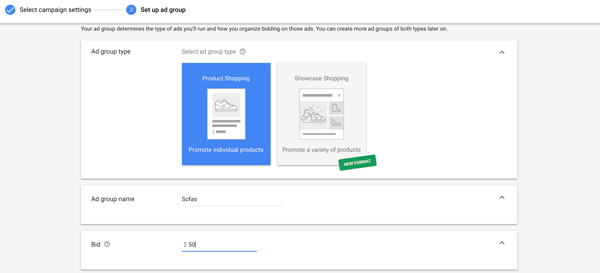
This creates one big ad group for all your products. If you wish to filter your products further, you can create separate ad groups for different categories.
If you choose a Showcase Shopping ad group, enter your ad group name and set a maximum CPE (cost per engagement) bid. (Engagement occurs when someone expands your Showcase Shopping ad and clicks on spends at least 10 seconds within the ad.) Lastly, choose what products to advertise as part of the Showcase Shopping ad.
Once you click Save, your campaign is submitted. Congratulations on completing your first Google Shopping campaign … we hope to see your products in Google Shopping results! 🎉
Conclusion
Google Shopping is a welcome change from an otherwise text-heavy online shopping experience. It’s almost like a digital mall — shoppers can enter, search for what they want, and see many different brands and types of products on one screen. For that reason, many people (including myself) prefer marketplaces over shopping for products on a standalone ecommerce site.
If your physical products aren’t being advertised in the Google Shopping results, consider adding this tool to your marketing repertoire. Not only will it boost your website traffic, but it’ll also give you leads and sales you otherwise might not have collected. Use this guide to get your Google Shopping campaign up and running, and you’ll see how it can greatly benefit your ecommerce strategy.

How The Flesch Reading Ease Test Can Help You Write Clear and Concise Copy
After writing The Old Man and the Sea, Ernest Hemingway famously said his novel was “the best I can write ever for all of my life.” To a certain extent, he was right. The Old Man and the Sea won the Pulitzer Prize for Fiction in 1953 and was specifically cited when Hemingway won the Nobel Prize in Literature the following year. Sadly, he never published a major work of fiction again.
Many critics hold The Old Man and the Sea in the same regard as William Faulkner’s short story The Bear and Herman Melville’s classic novel Moby-Dick. But unlike Faulkner and Melville, whose flowery, meandering prose is almost too poetic to follow, Hemingway crafted his iconic novel in a crisp, economical fashion — writing it at a fourth-grade reading level.
It might be shocking that one of the 20th century’s most influential writers wrote for nine-year-olds, but that’s exactly why so much of his work is considered classic American literature.
The best writing zips you across the page. If your eyes can fall down the piece and you can easily grasp the material, you’ll lose yourself in the story. But, on the surface, readability seems like a subjective measure. How can you objectively gauge it?
Interestingly enough, in 1975, J. Peter Kincaid developed the Flesch-Kincaid readability formula, which helped the U.S. Army measure the reading difficulty of technical manuals and is now used to make sure insurance companies write their policies at a ninth-grade reading level or below, in most American states.
To truly grasp the benefits of examining your content using the Flesch reading ease test, let’s go over what it is, the formula it follows, and how you can use it to craft clear and concise copy.
Flesch Reading Ease
The Flesch reading ease test is a formula that measures the readability of your writing. The higher your score, the more digestible it is. The lower your score, the more difficult it is to read.
Flesch Reading Score Formula
To calculate your writing’s readability, the Flesh reading ease test follows this formula:
206.835 – 1.015*(total words/total sentences) – 84.6*(total syllables/total words)
After calculating your score, check out the following table to match it with a corresponding reading level:
| Score | Reading Level |
| 100.00 – 90.00 | 5th Grade |
| 90.00 – 80.00 | 6th Grade |
| 80.00 – 70.00 | 7th Grade |
| 70.00 – 60.00 | 8th & 9th Grade |
| 60.00 – 50.00 | 10th to 12th Grade |
| 50.00 – 30.00 | College |
| 30.00 – 0.00 | College Graduate |
However, no one has time to calculate an entire piece’s syllables, words, and sentences. Fortunately, the Hemingway App can calculate its readability for you.

Although it doesn’t follow the Flesch reading ease test formula to grade your writing’s readability, The Hemingway App follows a similar formula — the Automated Readability Index. The Automated Readability Index will grade your writing by reading level, so if your piece receives a score of “8”, you write at an 8th-grade level. According to The Hemingway App, most people read at a 10th grade level, so try to aim for a readability score of 10 when writing content.
If you want to grip an audience, write like Hemingway.
In the content marketing industry, it’s not enough to acquire people’s attention anymore — you must hold it. But to truly engage an audience and emotionally resonate with them, showing off your intelligence and writing like an academic will only confuse your readers and disengage them from your content. Instead, write clear and concise pieces like Hemingway did. Because even though he wrote at a fourth-grade reading level, his writing style captured the imagination of the entire world.

How to Create an Email Newsletter [Checklist]
When starting an email newsletter, you’re juggling a lot of balls in the air at once.
You have to worry about proofreading the copy, creating compelling calls-to-action, designing the email to work for multiple inboxes and devices, avoiding any spam triggers, and brainstorming clickable subject lines — all while staying within the confines of email law (yes, there is such a thing).
Oh, and if you mess any of your email up, there’s no undoing it once you send it to your subscribers.

If you want to make sure you won’t miss any steps when making a newsletter, keep reading. Inspired by a blog post from former leader of HubSpot Academy, Mark Kilens, we pulled together a completely updated and comprehensive checklist for anyone looking to send an email newsletter.
If you’re sending newsletters, bookmark the following steps in your browser, or print it out and hang it up next to you. You don’t want to miss out on these crucial steps.
How to Create an Email Newsletter
Here are 12 steps to create the best email newsletter for your business or personal goals.
Step 1: Figure out your newsletter’s goal.
Before you start drafting a single word, make sure you’re fully aware of the newsletter’s goal and how it fits into your larger content strategy. (Have one in place? Go ahead, skip to the next section.)
Is your newsletter supposed to help you generate leads? Get more email contacts? Send traffic to your website? Figure out your goal and let the rest of your decisions flow from it.
Keep in mind your goal should be something beyond “how many people opened it.” Instead, it should be more closely tied to your overall business goals. Your email’s open rate can give you an indication of the newsletter’s performance, but it shouldn’t be the only number you care about each month. Here are some email marketing metrics to consider.
Step 2: Gather your content.
Once you have a goal for your newsletter, you’ll find content for it. Depending on how early you set your newsletter’s goal and how often you plan on sending this newsletter, you could be able to actively or passively find content in the time between two email sends. Active means you’re going on the hunt for content that’ll solve a specific goal. Passive means that you’ll randomly stumble on it when browsing for other content, but realize it could fit in nicely.
When I put together newsletters, I tended to do a lot of active searching … but I could’ve saved myself a lot of time if I were passive. Since I knew a newsletter needed to be sent each month, bookmarking links throughout the month would’ve been a great timesaver. Instead, I usually spent several hours clicking the “Back” button on my blog, hunting for content.
However you like to gather content is up to you, but great places to look for content are your company’s blog, social media accounts, lead-generation content, internal newsletters, and training documents.
Step 3: Design your template.
Make sure you’ve got an idea of how your newsletter will look before writing copy. That way, you’ll know exactly how much space you have to promote a piece of content — there’s few things more frustrating than trying to squeeze copy into too tight a space.
Your template doesn’t have to be flashy or anything — even newsletters with minimal text and color formatting will look great. The design just needs to make it easy for your recipients to read, scan, and click elements of the email. This means it should be mobile-friendly, too. According to data from Litmus, most people (46%) opened their email on a mobile device in 2018 — nearly 30% higher than email opens on desktop.
If you want to get some inspiration for great email newsletter design, check out this post. I’d also recommend looking into pre-made templates if you’re not familiar with designing emails — it can save you a lot of heartache down the road. If you’re a HubSpot customer, you’ll have a bunch of pre-made templates in the email tool.
Step 4: Set your email newsletter size.
Unfortunately, email newsletters don’t size themselves when you send them to subscribers. But because everyone opens their email on their device and email service of choice, how are you supposed to know what size or resolution they should be?
Most providers will default your email newsletter size to 600px wide, with email body padding another 30px wide on all sides. And when this happens, the content inside your newsletter might not survive the adjustment. Therefore, it’s important to ensure your newsletter design fits inside that universal 600px width.
What about height? Ultimately, your email can be as high (or, rather, as long) as you want it to be without the email client distorting its design. However, people are much less likely to click through to your website if the email goes on forever — and email clients with sensitive spam filters might take notice as well. As a general rule, try not to make your email recipients scroll for more than a second before reaching the end of it.
Step 5: Add in your body content.
Next up: filling in the template with words and pictures. This will be the meat of your email newsletter, so spend time perfecting it. Most people keep the copy short and sweet to encourage clickthroughs, though some notable newsletter take the opposite approach. This post can help you with email newsletter copy if you need it. Be sure to add in some images if they can help support your copy.
Don’t forget to edit your email thoroughly — maybe even send it on to one of your teammates for a once-over. Remember, once you send the thing, you can’t fix those embarrassing typos like you can with web content.
Step 6: Add in personalization tokens and smart content.
The best email newsletters I get feel like they’ve been written personally for me — like a friend actually took the time to put together a newsletter with things only I would like. I open them, I click on them, I share them … pretty much every time.
If you want your newsletters to feel that personal, you should do three things:
- Segment your emails and choose content that group of people will love.
- Add in personalization tokens. If your marketing software supports personalization, this is a really easy thing to implement that could have big results for your conversion rates. That being said, only add in a few personalization tokens — you don’t want to creep out your email recipients. 😉
- Also add in smart content. This is content that shows one thing to one part of your audience and one thing to another. An example would be a Smart CTA — your leads would see a CTA for talking to your sales reps and your customers would see one about getting tickets to a customer-only event. Neither audience would want to see the other audience’s CTA, so smart content will show only the right CTA to the right person.
Step 7: Choose your subject line and sender name.
Your audience may like different things, but we’ve found that having a sender name from a real person increased opens and clickthroughs. Try running an A/B test to see if it works for you, too. Whatever you choose, make sure it’s something recognizable so recipients aren’t confused as to why they’re receiving your email.
Subject lines are a little trickier. Lots of things can help you put together a click-worthy subject line, including brevity and an immediately actionable value proposition. That being said, some really great marketing emails have been sent with the subject “Hey.” Use the subject line best practices as a jumping-off point, then run your own A/B tests to see what your audience loves.
Step 8: Support your newsletter content with alt text and plain text.
At this point, you’ll have the email pretty much ready to go. While going through the steps above, I’m guessing you forgot two absolutely crucial things (I know I forget them almost every time I make an email): the alt text and plain text.
Alt text is the text that appears when a picture isn’t loaded. Since not all email providers load images properly, you have to make sure the alt text is there so your recipients know what they’re looking at. If you’re including a CTA that’s an image, your conversion rates will definitely suffer without alt text.
Some email clients also won’t display HTML properly, which is why you need to make sure your emails look great in plain text. Make sure the links are easy to click and that it’s clear what the email is about without the photos.
Step 9: Make sure you’re legally compliant.
Before you hit “Send,” be sure that your emails are all good from a legal perspective. The two biggest laws you need to worry about? CAN-SPAM and GDPR.
- CAN-SPAM requires that you have a footer in your email with your address and an easy way to unsubscribe from your emails if they don’t want to receive them anymore.
- GDPR is a similar but more comprehensive privacy law that passed in Europe in 2018, requiring (among other things) that email marketers only send newsletters to those people who have manually opted in to receive them. In other words, wherever on your website you collect email subscribers, you cannot automatically check the “opt-in” box for them if these recipients live in Europe. They must deliberately check this box themselves.
Step 10: Test different browsers and email providers.
Email providers don’t all read email code the same way — what looks fine on Gmail in Chrome will look terrible in Outlook, for example. So you need to test out emails in the most popular browsers and email providers.
If you have HubSpot, you can test emails for different providers in the tool. If you don’t, check out Litmus, or create a bunch of fake email accounts and test everything manually.
Step 11: Send your email.
The moment of truth! Having made sure all your email recipients have subscribed to receive this email, and your email has all the branding and legal compliance it’s worthy of, it’s time to click send. Then, wait for the data to roll in.
Step 12: Analyze and iterate.
Fast-forward a few days: The data’s in. How did your newsletter do? What do you do next?
Check to see how your email newsletter performed on the goals you set back in step one. See which parts of your email got the most clicks, and which parts of the newsletter contributed most to your goal. If you have closed-loop analytics, measuring this all will be pretty easy.
Once you have that data, you have a direction to go in for your next email newsletter send. Whether your next send is in a day, a week, a month, or a quarter, you’ll have insights to make the next newsletter even better.
What other tips do you have for creating successful email newsletters? For more inspiration, check out these awesome newsletter examples.


The Ultimate Social Media Holiday Calendar for 2019 [Template]
Whether it’s International Cat Day, Pizza Day, or Talk Like a Pirate Day, it seems like almost every day, the internet is celebrating a holiday.
Whenever I log onto Twitter, I quickly scan what’s trending on the lefthand side of the screen.
Have you ever had this experience — when you see an obscure holiday or observance day trending, and you think to yourself “Yup, I’m celebrating that”?
Some of these holidays might be simply too silly for your brand to engage with (and we certainly don’t suggest sharing content on social media and then tacking on a completely irrelevant hashtag for the sake of traffic — that’s just plain annoying). But others might not be. You could be missing valuable opportunities to take advantage of trending topics with fun and relevant “holiday” content on social media.
From food to politics to animals and everything in between, there is a plethora of observance days worldwide during which marketers can share content relevant to their industries, get involved in a movement, or simply generate more awareness.
To help you plan for trending holidays, we created a list that you can bookmark, as well as a downloadable calendar so you can get automatic reminders. The list isn’t exhaustive (there are a lot of food-specific holidays out there) and these dates and hashtags may still be subject to change. But this is a great starting point for social media marketers who want to learn more about what’s trending and how they can plan their content in a way that will be fun and engaging on Twitter and other social platforms.
Want to finish out your 2018 calendar with some upcoming holiday posts? Tap the “+” symbol in the lower righthand corner of the calendar below to add it to your own Gmail calendar.
Downloadable Holiday Calendar
National & Global Holiday Calendar: 2019-2020
- January 2019
- February 2019
- March 2019
- April 2019
- May 2019
- June 2019
- July 2019
- August 2019
- September 2019
- October 2019
- November 2019
- December 2019
January 2019
1. Tuesday, New Year’s Day #NewYearsDay
2. Wednesday, Science Fiction Day #ScienceFictionDay
4. Friday, National Trivia Day #NationalTriviaDay
5. Saturday, National Bird Day #NationalBirdDay
11. Friday, Human Trafficking Awareness Day #HumanTraffickingDay
13. Sunday, National Sticker Day #NationalStickerDay
14. Monday, Clean Off Your Desk Day #CleanOffYourDeskDay
15. Tuesday, National Hat Day #NationalHatDay
17. Thursday, Get to Know Your Customers Day (third Thursday of every quarter) #GetToKnowYourCustomersDay
20. Sunday, Cheese Lovers Day #CheeseLoversDay
21. Monday, Martin Luther King, Jr. Day #MLKDay
21. Monday, National Hugging Day #NationalHuggingDay
23. Wednesday, National Pie Day #PieDay
24. Thursday, National Compliment Day #NationalComplimentDay
25. Friday, Opposite Day #OppositeDay
28. Monday, Community Manager Appreciation Day #CMAD
28. Monday, Data Privacy Day #PrivacyAware
February 2019
2. Saturday, Groundhog Day #GroundhogDay
2. Saturday, World Wetlands Day #WorldWetlandsDay
3. Sunday, Super Bowl LIII #SBLIII
4. Monday, World Cancer Day #WorldCancerDay
5. Tuesday, Chinese New Year #YearOfThePig
5. Tuesday, Safer Internet Day #SID2019
5. Tuesday, National Weatherperson’s Day #NationalWeatherpersonsDay
7. Thursday, National Send a Card to a Friend Day #SendACardToAFriendDay
8. Friday, National Boy Scouts Day #BoyScoutsDay
9. Saturday, National Pizza Day #NationalPizzaDay
11. Monday, Inventors Day #InventorsDay
13. Wednesday, World Radio Day #WorldRadioDay
14. Thursday, Valentine’s Day #ValentinesDay
17. Sunday, Random Acts of Kindness Day #RandomActsOfKindnessDay
18. Monday, National Battery Day #NationalBatteryDay
18. Monday, Presidents Day #PresidentsDay
20. Wednesday, World Day of Social Justice #SocialJusticeDay
20. Wednesday, Love Your Pet Day #LoveYourPetDay
21. Thursday, International Mother Language Day #IMLD
March 2019
1. Friday, National Peanut Butter Lover’s Day #PeanutButterLoversDay
1. Friday, National Employee Appreciation Day #EmployeeAppreciationDay
2. Saturday, National Read Across America Day #ReadAcrossAmerica & #DrSeuss
3. Sunday, World Wildlife Day #WorldWildlifeDay
4. Monday, National Grammar Day #NationalGrammarDay
5. Tuesday, National Pancake Day #NationalPancakeDay
5. Tuesday, Mardi Gras #MardiGras
6. Wednesday, National Dentist’s Day #DentistsDay
7. Thursday, National Be Heard Day #NationalBeHeardDay
7. Thursday, National Cereal Day #NationalCerealDay
8. Friday, International Women’s Day #BeBoldForChange
8. Friday, National Proofreading Day #NationalProofreadingDay
8. Friday, National Day of Unplugging #NationalDayOfUnplugging
10. Sunday, National Pack Your Lunch Day #NationalPackYourLunchDay
10. Sunday, National Women and Girls HIV/AIDS Awareness Day #NWGHAAD
10. Sunday, Daylight Savings #DaylightSavings
11. Monday, National Worship of Tools Day #WorshipOfToolsDay
11. Monday, National Napping Day #NationalNappingDay
12: Tuesday, National Girl Scout Day #GirlScoutDay
14. Thursday, Popcorn Lover’s Day #PopcornLoversDay
14. Thursday, Potato Chip Day #NationalPotatoChipDay
14. Thursday, Pi Day #PiDay (To go the extra mile, post this at 1:59, as Pi equals 3.14159…)
15. Friday, World Consumer Rights Day #WCRD2019
15. Friday, World Sleep Day #WorldSleepDay
16. Saturday, National Freedom of Information Day #FreedomOfInformationDay
17. Sunday, St. Patrick’s Day #StPatricksDay
18. Monday, Awkward Moments Day #NationalAwkwardMomentsDay
19. Tuesday, National Let’s Laugh Day #NationalLetsLaughDay
20. Wednesday, International Day of Happiness #InternationalDayofHappiness
20. Wednesday, World Storytelling Day #WorldStorytellingDay
20. Wednesday, First Day of Spring #FirstDayofSpring
21. Thursday, International Day for the Elimination of Racial Discrimination #RacialDiscriminationDay
21. Thursday, World Poetry Day #WorldPoetryDay
22: Friday, World Water Day #WorldWaterDay
23. Saturday, National Puppy Day #NationalPuppyDay
25. Monday, Tolkien Reading Day #TolkienReadingDay
26. Tuesday, National Spinach Day #NationalSpinachDay
26. Tuesday, Purple Day #PurpleDay
26. Tuesday, American Diabetes Association Alert Day #AmericanDiabetesAssociationAlertDay
30. Saturday, Doctor’s Day #NationalDoctorsDay
30. Saturday, Earth Hour Day #EarthHour
30. Saturday, National Take a Walk in the Park Day #NationalWalkInTheParkDay
31. Sunday, World Backup Day #WorldBackupDay
31. Sunday, Transgender Day of Visibility #TDOV
April 2019
1. Monday, April Fools Day #AprilFools
2. Tuesday, World Autism Awareness Day #WAAD
3. Wednesday, Find a Rainbow Day #FindARainbowDay
3. Wednesday, National Walking Day #NationalWalkingDay
4. Thursday, Hug a Newsperson Day #HugANewsperson
7. Sunday, World Health Day #LetsTalk
9. Tuesday, Equal Pay Day #EqualPayDay
10. Wednesday, National Siblings Day #NationalSiblingsDay
10. Wednesday, Encourage a Young Writer Day #EncourageAYoungWriterDay
11. Thursday, National Pet Day #NationalPetDay
12. Friday, International Day of Human Space Flight #InternationalDayOfHumanSpaceFlight
15. Monday, National Tax Day #TaxDay
16. Tuesday, National Stress Awareness Day #StressAwarenessDay
16. Tuesday, National Wear Your Pajamas to Work Day #PJDay
17. Wednesday, Haiku Poetry Day #HaikuPoetryDay
18. Thursday, National Columnists’ Day #NationalColumnistDay
18. Thursday, Get to Know Your Customers Day #GetToKnowYourCustomersDay
18. Thursday, National High-Five Day #NH5D
20. Saturday, National Look-Alike Day #NationalLookAlikeDay
22. Monday, Earth Day #EarthDay2018
23. Tuesday, National Picnic Day #NationalPicnicDay
23. Tuesday, World Book Day #WorldBookDay
24. Wednesday, National Administrative Professionals Day #AdministrativeProfessionalsDay
24. Wednesday, Denim Day #DenimDay
25. Thursday, National Telephone Day #NationalTelephoneDay
25. Thursday, World Malaria Day #EndMalariaForGood
25. Thursday, National Take Our Daughters and Sons to Work Day #COUNTONME
26. Friday, Arbor Day #ArborDay
29. Monday, International Dance Day #InternationalDanceDay
30. Tuesday, National Honesty Day #NationalHonestyDay
30. Tuesday, National Adopt a Shelter Pet Day #AdoptAShelterPetDay
30. Tuesday, International Jazz Day #JazzDay
May 2019
TBD: Red Nose Day #RedNoseDay
1. Wednesday, May Day #MayDay
1. Wednesday, International Workers Day #IntWorkersDay
2. Thursday, World Password Day #WorldPasswordDay
3. Friday, World Press Freedom Day #WPFD2019 #PressFreedom
3. Friday, Space Day #SpaceDay
4. Saturday, Star Wars Day #StarWarsDay & #Maythe4thBeWithYou
4. Saturday, International Firefighters Day #InternationalFirefightersDay
5. Sunday, Cinco de Mayo #CincoDeMayo
6. Monday, National Nurses Day #NursesDay
7. Tuesday, World Asthma Day #WorldAsthmaDay
7. Tuesday, Thank a Teacher Day #ThankATeacher
8. Wednesday, National Receptionist Day #NationalReceptionistDay
9. Thursday, Europe Day #EuropeDay
12. Sunday, National Limerick Day #NationalLimerickDay
13. Sunday, Mother’s Day #MothersDay
15. Wednesday, International Day of Families #FamilyDay
16. Thursday, Love a Tree Day #LoveATreeDay
17. Friday, International Day Against Homophobia and Transphobia #IDAHOT2019
17. Friday, National Bike to Work Day #BTWD
17. Friday, Endangered Species Day #EndangeredSpeciesDay
21. Tuesday, National Memo Day #NationalMemoDay
24. Friday, National Scavenger Hunt Day #NationalScavengerHuntDay
27. Monday, Memorial Day #MemorialDay #MDW
28. Tuesday, Hamburger Day #NationalHamburgerDay
29. Wednesday, Paperclip Day #PaperclipDay
31. Friday, World No-Tobacco Day #NoTobacco
31. Friday, Heat Awareness Day #NoFryDay
June 2019
1. Saturday, Global Day of Parents #GlobalDayOfParents
1. Saturday, International Children’s Day #ChildrensDay
2. Sunday, National Cancer Survivor’s Day #NCSD2019
3. Monday, Leave The Office Early Day #LeaveTheOfficeEarlyDay
5. Wednesday, World Environment Day #WorldEnvironmentDay
6. Thursday, Higher Education Day #HigherEducationDay
7. Friday, National Donut Day #NationalDonutDay
8. Saturday, World Oceans Day #WorldOceansDay
8. Saturday, Best Friends Day #BestFriendsDay
14. Friday, World Blood Donor Day #GiveBlood
14. Friday, National Flag Day #FlagDay
16. Sunday, Father’s Day #FathersDay
20. Thursday, World Refugee Day #WithRefugees
21. Friday, National Selfie Day #NationalSelfieDay
21. Friday, World Music Day #WorldMusicDay
21. Friday, International Yoga Day #InternationalYogaDay
21. Friday, First Day of Summer
21. Friday, Take Your Dog to Work Day #TakeYourDogToWorkDay
27. Thursday, National Sunglasses Day #NationalSunglassesDay
27. Thursday, National Handshake Day #HandshakeDay
30. Sunday, Social Media Day #SMDay
July 2019
1. Monday, National Postal Worker Day #NationalPostalWorkerDay
2. Tuesday, World UFO Day #WorldUFODay
4. Thursday, Independence Day (United States)
7. Sunday, World Chocolate Day #WorldChocolateDay
11. Thursday, Cheer Up the Lonely Day #CheerUpTheLonelyDay
12. Friday, Malala Day #MalalaDay
15. Monday, Give Something Away Day #GiveSomethingAwayDay
17. Wednesday, World Emoji Day #WorldEmojiDay
18. Thursday, Nelson Mandela International Day #MandelaDay
18. Thursday, Get to Know Your Customers Day #GetToKnowYourCustomersDay
26. Friday, Talk in an Elevator Day #TalkInAnElevatorDay
30. Tuesday, International Day of Friendship #DayOfFriendship
August 2019
1. Thursday, Respect for Parents Day #RespectForParentsDay
2. Friday, National Coloring Book Day #NationalColoringBookDay
8. Thursday, International Cat Day #InternationalCatDay
9. Friday, National Book Lovers Day #NationalBookLoversDay
10. Saturday, National Lazy Day #LazyDay
11. Sunday, National Sons and Daughters Day #SonsAndDaughtersDay
12. Monday, International Youth Day #YouthDay
12. Monday, World Elephant Day #WorldElephantDay
13. Tuesday, International Lefthanders Day #LefthandersDay
15. Thursday, National Relaxation Day #NationalRelaxationDay
16. Friday, National Tell a Joke Day #NationalTellAJokeDay
19. Monday, World Photo Day #WorldPhotoDay
19. Monday, World Humanitarian Day #WorldHumanitarianDay
20. Tuesday, National Lemonade Day #NationalLemonadeDay
26. Monday, National Dog Day #NationalDogDay
26. Monday, National Women’s Equality Day #WomensEqualityDay
September 2019
2. Monday, Labor Day #LaborDay
4. Wednesday, National Wildlife Day #NationalWildlifeDay
5. Thursday, International Day of Charity #CharityDay
6. Friday, Read a Book Day #ReadABookDay
8. Sunday, International Literacy Day #LiteracyDay
8. Sunday, National Grandparents Day #NationalGrandparentsDay
11. Wednesday, National Day of Service and Remembrance #911Day
12. Thursday, National Day of Encouragement #DayOfEncouragement
12. Thursday, National Video Games Day #NationalVideoGamesDay
13. Friday, Stand Up To Cancer Day #KissCancerGoodbye
19. Thursday, Talk Like a Pirate Day #TalkLikeAPirateDay
21. Saturday, International Day of Peace #PeaceDay
21. Saturday, Miniature Golf Day #MiniGolfDay
21. Saturday, Civic Day of Hacking #HackForChange
22. Sunday, Car-Free Day #CarFreeDay
22. Sunday, Hobbit Day #HobbitDay
23. Monday, First Day of Fall
25. Wednesday, National Women’s Health and Fitness Day #FitnessDay
26. Thursday, European Day of Languages #EDL2019
27. Friday, World Tourism Day #WTD2019
28. Saturday, World Rabies Day #WorldRabiesDay
28. Saturday, National Good Neighbor Day #GoodNeighborDay
30. Monday, International Podcast Day #InternationalPodcastDay
October 2019
1. Tuesday, International Day of Older Persons #UNDOP
1. Tuesday, International Coffee Day #InternationalCoffeeDay
1. Tuesday, World Vegetarian Day #WorldVegetarianDay
2. Wednesday, International Day of Nonviolence #InternationalDayOfNonviolence
3. Thursday, National Techies Day #TechiesDay
4. Friday, World Animal Day #WorldAnimalDay
4. Friday, National Taco Day #NationalTacoDay
4. Friday, World Smile Day #WorldSmileDay
5. Saturday, World Teachers Day #WorldTeachersDay
7. Monday, World Habitat Day #WorldHabitatDay
10. Thursday, World Mental Health Day #WorldMentalHeathDay
10. Thursday, World Sight Day #WorldSightDay
11. Friday, International Day of the Girl #DayOfTheGirl
13. Sunday, National Train Your Brain Day #TrainYourBrainDay
14. Monday, National Dessert Day #DessertDay
15. Tuesday, Global Handwashing Day #GlobalHandwashingDay
16. Wednesday, World Food Day #FoodDay
16. Wednesday, Bosses Day #BossesDay
17. Thursday, International Day for the Eradication of Poverty #EndPoverty
17. Thursday, Get to Know Your Customers Day #GetToKnowYourCustomersDay
20. Sunday, World Statistics Day #StatisticsDay
21. Monday, Reptile Awareness Day #ReptileAwarenessDay
24. Thursday, United Nations Day #UNDay
25. Friday, Greasy Foods Day #GreasyFoodsDay
30. Wednesday, National Publicist Day #NationalPublicistDay
30. Wednesday, Checklist Day #ChecklistDay
31. Thursday, Halloween #Halloween
November 2019
1. Friday, World Vegan Day #WorldVeganDay
1. Friday, National Authors Day #NationalAuthorsDay
1. Friday, National Cook For Your Pets Day #CookForYourPetsDay
3. Sunday, National Sandwich Day #NationalSandwichDay
3. Sunday, Daylight Saving Time Ends #DaylightSavings
4. Monday, National Candy Day #NationalCandyDay
8. Friday, National Cappuccino Day #CappuccinoDay
8. Friday, Science, Technology, Engineering, and Medicine (STEM) Day #STEMDay
11. Monday, Veterans Day #VeteransDay
13. Wednesday, World Kindness Day #WKD
14. Thursday, World Diabetes Day #WDD
15. Friday, Clean Out Your Refrigerator Day #CleanOutYourRefrigeratorDay
15. Friday, America Recycles Day #BeRecycled
16. Saturday, International Day for Tolerance #ToleranceDay
17. Sunday, International Students Day #InternationalStudentsDay
19. Tuesday, International Men’s Day #InternationalMensDay
19. Tuesday, National Entrepreneurs Day #EntrepreneursDay
20. Wednesday, Universal Children’s Day #UNChildrensDay
21. Thursday, World Hello Day #WorldHelloDay
26. Tuesday, National Cake Day #NationalCakeDay
28. Thursday, Thanksgiving Day #Thanksgiving
29. Friday, National Day of Listening #DayOfListening
29. Friday, Electronic Greeting Card Day #ElectronicGreetingCardDay
30. Saturday, Computer Security Day #ComputerSecurityDay
30. Saturday, Small Business Saturday #ShopSmall
December 2019
1. Sunday, World AIDS Day #WAD2019
2. Monday, Cyber Monday #CyberMonday
3. Tuesday, International Day of Persons with Disabilities #IDPWD
4. Wednesday, National Cookie Day #NationalCookieDay
5. Thursday, World Soil Day #WorldSoilDay
6. Friday, Microwave Oven Day #MicrowaveOvenDay
8. Sunday, Pretend to Be a Time Traveler Day #PretendToBeATimeTravelerDay
10. Tuesday, Human Rights Day #HumanRightsDay
10. Tuesday, Nobel Prize Day #NobelPrize
11. Wednesday, International Mountain Day #InternationalMountainDay
13. Friday, National Salesperson Day #SalespersonDay
21. Saturday, Crossword Puzzle Day #CrosswordPuzzleDay
21. Saturday, First Day of Winter #WinterSolstice
30. Monday, No Interruptions Day – Last Work Day of the Year #NoInterruptionsDay
31. Tuesday, New Year’s Eve #NYE
Sources: National Day Calendar, Sprout Social, TrackMaven, Holiday Insights, Brownielocks, National Peace Corps Association, Sparkflow

How Using Humans And Chatbots Together Generated 182% More Qualified Leads
Prospect expectations for businesses have never been higher — in fact, according to Google, 61% of people now expect brands to deliver personalized experiences.
At the same time, the amount of people who want to reach a business through messaging continues to rise. Which means keeping up on chat can be tough, even for well-trained teams.
At HubSpot, we felt the brunt of that pain in early 2018. We have a specific sales team that handles chatting with people on our website. At the time, we’d been using live chat across most of HubSpot.com to engage with prospects in a way that felt natural.
Unfortunately, sales leadership began noticing we were losing out on valuable, high-intent prospects who were attempting to reach us via live chat. We simply didn’t have a guaranteed way of ensuring their needs were addressed by a member of our team — which meant we were losing out on potential sales, big time.
When my marketing team at HubSpot connected with the sales team to discuss the issue, we recognized live chat alone no longer suited our needs. To appropriately communicate with each prospect and create that highly personalized experience our website visitors crave, we needed to scale our sales team’s productivity with a chatbot.
Here, we’ll explore why we decided to build a chatbot, how we designed the experience, and why it might be an outstanding solution for your own business in 2019 — and beyond.
Why Live Chat Didn’t Work For Us
When the live chat sales team reached out to us, we knew we needed to make the team more efficient.
Live chat in-and-of-itself wasn’t a problem — but, unfortunately, we weren’t tailoring the conversations to the visitor and their problems. We knew sifting through each and every visitor’s inquiry was the right thing to do, since it helped solve for the customer and answer any prospect’s questions. But, since they all fell under the same bucket, it became increasingly difficult for the sales team to keep up. And for the majority of people who didn’t leave us with a way to get back in touch, they were gone forever.
At one point, over a third of the people who chatted with us
never heard anything back.
Additionally, hundreds of the chats we received each month were from users who simply needed product support. This ate part of our sales team’s valuable bandwidth, making it harder for them to get in touch with site visitors who actually needed to speak with a sales rep.
Ultimately, this poor experience added unnecessary friction for our site visitors and sales reps.
Why We Decided to Build a Chatbot
After some internal discussion, we set out to build a chatbot that would engage with visitors, triage them, and get them to the right place, sooner. This would be a win-win for both visitors to our site, and the sales team.
To figure out what this chatbot should do, we first looked at live chat transcripts. They’re an invaluable resource when doing conversational marketing, since you can hear in the prospect’s own words what they want to do. There are technical ways to classify chats (like natural language processing), but a qualitative approach is fine to start.
We then bucketed intents from live chat into three buckets — sales, support, and a catch-all “other”. To start the chatbot, we prompted people to select the topic that best matched their intent.
After speaking with our support team, we learned that getting technical help with a product while on the website can be tricky. There are rich and thorough resources better-suited for getting these kinds of answers. So, rather than keeping someone in the chatbot, we used what we know about them in the CRM to point them in the right direction. The chatbot would look at their contact record, and then serve up a contextual web page depending on the products they were using.
Even though our prospects couldn’t connect with a human right away, we set them up for better long-term success.
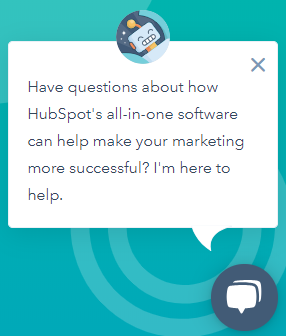
Next, we recognized a large percentage of the people who interacted with live chat did, in fact, want to talk to our sales team. But that didn’t mean trying to connect them to a human right away was efficient for either group.
We interviewed and observed the sales team to understand their experience with chat. Right away, we noticed each sales rep needed to know three key facts about the user to tailor the conversation to their business — name, email, and website.
The sales team said in an ideal world, they wanted this context before chatting with a prospect — an issue we knew a chatbot could solve. We programmed the chatbot to collect this information in a natural, contextual way.
Additionally, we knew a prospect would become frustrated if they needed to repeat themselves — in fact, NewVoiceMedia found it to be the most frustrating aspect of customer experience. To combat this issue, we again checked the CRM, and if you’d ever filled out a HubSpot form, we’d skip the questions altogether.
Collecting this information up-front enabled the sales team to spend more time selling, and less time chasing down email addresses.
Our Results
At the beginning of this project, our main goal was to deflect support-related chats away from our sales team. But, even as someone who has been building chatbots for almost four years, I’ll admit — what we saw was shocking.
When compared to live chat, 75% more people engaged with the chatbot.
Additionally, over 55% of people gave real answers to the basic qualifying questions and reached a human. While the drop-off there may seem steep, sifting out low-intent people proved incredibly helpful for the sales team.
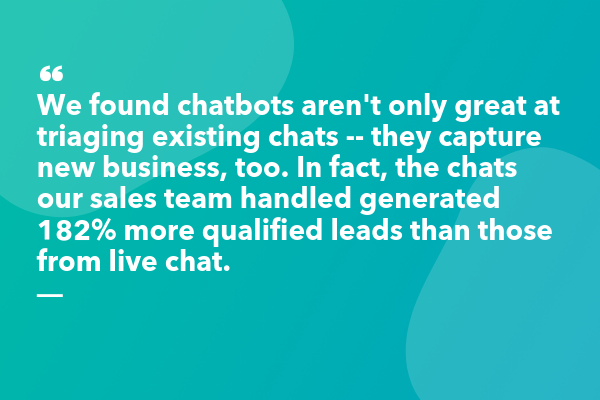 Ultimately, our chatbot’s success came in a few ways — first, the chatbot anticipated the next step of the conversation and used quick replies to drive a visitor forward. Opening up a chat and clicking a contextual button has less friction than typing in a text field — now, people didn’t need to come up with the first message themselves.
It makes sense that multiple choice options drive more engagement. Think of it this way — when you meet someone new, often the hardest part of the conversation is the beginning, when you’re trying to think of something to say. But once the conversation starts rolling, things become smoother.
The same is true for our prospects when they engage with a chatbot versus live chat.
Additionally, 9% of people who chatted with the bot needed support help — we were able to deflect those visitors away from humans in a helpful way, serving up the best place to get answers to their questions quickly.
It’s important to note when designing conversations, the hardest and most overlooked aspect is to write like a human. As consumers, we rarely process in our heads that we want to “talk to sales”. Instead, we only know we want to talk about “products I’m not yet using”. Writing with the “jobs to be done” in mind is a great philosophy for conversational design.
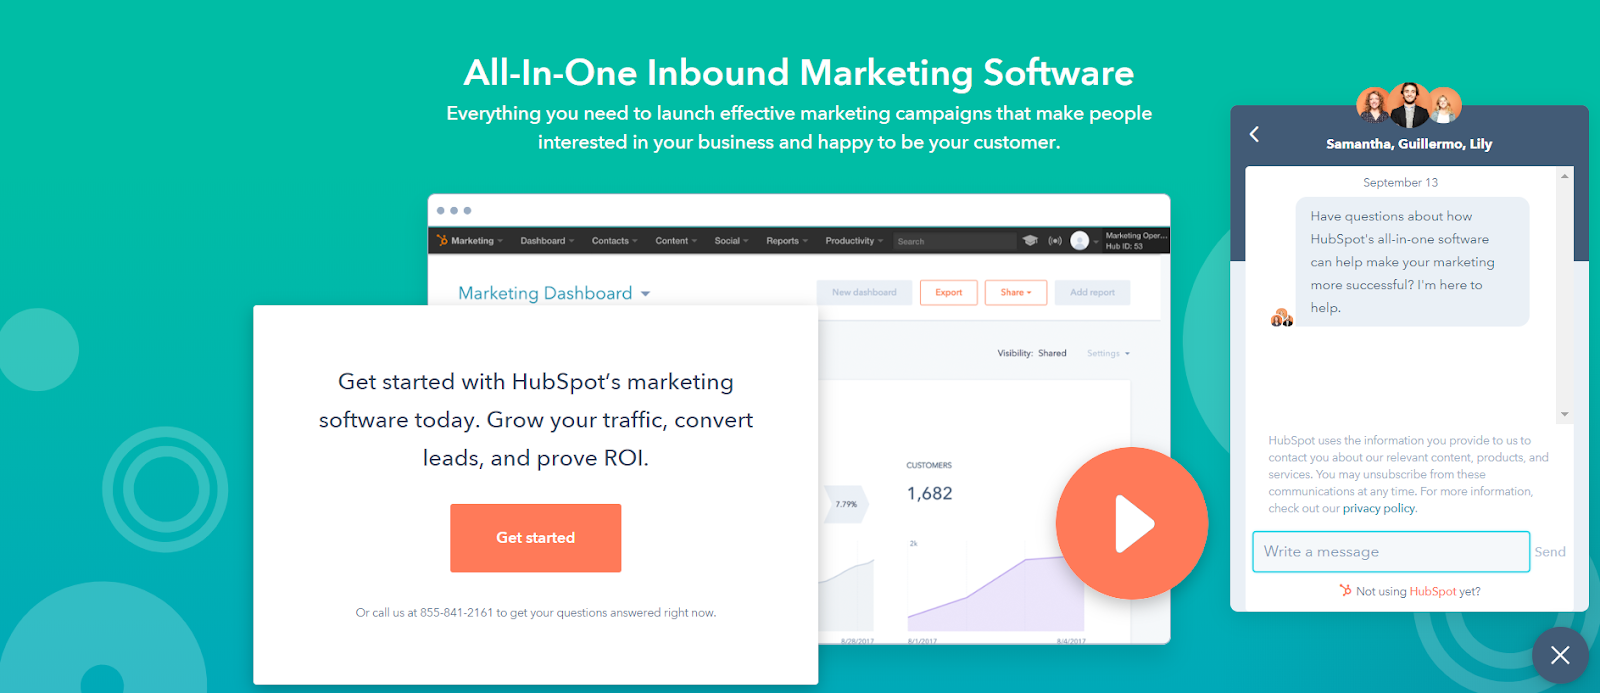
Takeaways for Your Business
At the end of the experiment, I’ve found a few takeaways that can help you and your business succeed, as well.
First, chatbots are a great opportunity to meet your visitors where they are. If you want to get started with a chatbot, look at chat transcripts, or interview your sales team to understand the types of questions people typically ask. Bucket those questions into a few critical categories.
Also, it’s critical you and your team think through and anticipate the best way to help those various buckets of people. The more you can personalize — perhaps through your CRM — the better.
Ultimately, using a chatbot to get people the help they need is a huge win for both your prospects and your business. In our case, site visitors now had the best resources for their support issues, and our sales team was able to capture more qualified leads.
The best part? Both sides did this in a frictionless, efficient way.

Guía de marketing móvil para profesionales del marketing [Kit gratuito]
Como profesionales del marketing, sabemos que el concepto de «optimización móvil» nos puede llegar a parecer tan solo otro tema de moda. Sumado a esto, el proceso para optimizar el sitio web de tu empresa puede resultar abrumador.
Con la esperanza de que el proceso sea menos intimidante, colaboramos con Localytics para ofrecerte la Guía de marketing móvil para profesionales del marketing.
En este kit de 5 secciones analizaremos las buenas prácticas del marketing móvil, te ayudaremos a decidir si tu empresa debe desarrollar una aplicación propia y te ofreceremos información acerca de la evolución de los dispositivos móviles durante los últimos años.
Específicamente, con esta guía descubrirás:
- Cuál es el estado del marketing móvil actual y por qué es importante optimizar la estrategia de marketing para dispositivos móviles.
- Cómo optimizar tu sitio web y cuáles son los aspectos clave que debes tener en cuenta al trabajar con el equipo de desarrollo web o con los trabajadores autónomos.
- Cuáles son las buenas prácticas del marketing móvil y cómo asegurarte de que tus esfuerzos resulten eficaces.
- Cómo aprovechar el ecosistema de la aplicación y por qué es importante para tu empresa.
- ¿Cómo será el marketing móvil del futuro? Qué debes hacer para mantenerte al tanto de las tendencias en dispositivos móviles y lograr que tu empresa se clasifique en las búsquedas y genere oportunidades de venta y clientes.
- *Recurso adicional* Diagrama de flujo: ¿Necesito una aplicación propia?
Descarga una copia de la Guía de marketing móvil para profesionales del marketing ahora.


An Introduction to Persuasive Advertising vs. Informative Advertising
Out of all the entertaining ads that played during Super Bowl 53, there’s only one commercial that I woke up thinking about the next morning: Pepsi’s “More Than OK”.
“More Than OK” poked fun at how Pepsi usually takes a back seat to Coke, especially at restaurants. And by featuring a star-studded cast that included Steve Carell, Lil Jon, and Cardi-B (who hilariously and fervently backed up Pepsi’s OKness) their boldness to call people out for undermining Pepsi’s quality got a lot of laughs and persuaded a massive audience to reconsider their own perception of the soft drink.
As marketers, we know that if we want to persuade an audience, we need to evoke an emotional response from them. But how do you actually do that? Below, we’ll examine six persuasive advertising techniques you can use in your advertisements, five examples you can reference if you ever need some inspiration, and three informative advertisement examples that are surprisingly just as compelling as the persuasive advertising examples.
Persuasive Techniques in Advertising
- The Carrot and The Stick
- The Scarcity Principle
- One Message Per Advertisement
- Write In the Second Person
- Give Your Audience a Sense of Control
- Use a Call-to-Value Instead of a Call-to-Action
1. The Carrot and The Stick
Humans are hardwired to move towards pleasure, like a horse towards a carrot, and away from pain, like a donkey avoids a stick. When people read or watch your advertisements, “carrots”, or promises of gain, can fill your prospects with hope and compel them to pursue that potential feeling of pleasure. “Sticks”, possibilities of loss, evoke fear in your prospects, which will compel them to flee from that potential feeling of pain.
Both tactics can pull your prospects into a narrative and evoke emotions that inspire your desired action. Carrots, like a product’s benefit, entice people to take a desired action. Sticks, on the other hand, like anti-smoking campaigns, evoke fear in people to stop doing a certain action and start doing the alternative. To better understand how to craft advertisements that feature a carrot or stick, check out these insurance copywriting examples below.
Carrot: “15 minutes could save you 15% on car insurance.” — Geico
Stick: “Get All-State. You can save money and be better protected from Mayhem like me. ” — All-State
As you can see, Geico’s ad uses a small time investment that could potentially produce big gains as a lure to get you to buy their product. Conversely, All-State’s ad uses the character “Mayhem” to evoke fear into people to stop using their “inferior” insurance and start using All-State’s.
2. The Scarcity Principle
People value objects and experiences that are rare — having something that most people want, but can’t have, boosts our sense of self-worth and power. If you use words and phrases that imply scarcity and evoke a sense of urgency, like “Exclusive offer” or “Limited availability”, you can skyrocket your product’s perceived scarcity and consumer demand.
3. One Message Per Advertisement
To immediately hook people and persuade them to read or watch the rest of your advertisement, try sticking to only one message. Spotlighting your product or offer’s main benefit or feature will make it easy for your customers to understand its value and increase the likelihood of their conversion because you’re only conveying one message to your audience: your product’s main feature will benefit your customer’s life somehow, someway.
4. Write in the Second Person
Since your prospects primarily care about how you can help them, and pronouns like “you” and “your” can engage them on a personal level and help them insert themselves in the narrative you’re creating, writing advertisements in the second person can instantly grip their attention and help them imagine a future with your product or service bettering their lives.
5. Give Your Audience a Sense of Control
According to a research study conducted by three psychology professors at Rutgers University, the need for control is a biological and psychological necessity. People have to feel like they have control over their lives.
If you want to give your audience a sense of control, you need to give them the ability to choose. In other words, after reading or watching your advertisement, they must feel like they can choose between the option you suggest or another path. If they feel like you’re trying to force them to buy your product, they’ll get annoyed and disengage from your message.
To give your audience the ability to choose, and in turn, a sense of control, use phrases like “Feel free” or “No pressure” in your advertisements, like this example from Hotwire.com below.
6. Use a Call-to-Value Instead of a Call-to-Action
Call-to-actions are crucial for getting prospects to take the next step, but a “Download Now” or “Call Now” CTA isn’t always going to convince the more skeptical prospects to take your desired action. You need to make sure your ad’s last line of copy or quip is the best of them all.
So instead of writing an uninspiring, final line of copy like “Download Now”, write one that clearly communicates your offer’s value and gives a glimpse into your prospects’ potential life if they take your desired action, like this call-to-value prompting readers to download a blogging eBook: “Click today and be a blogger tomorrow.”
Persuasive Advertising Examples
1. Nikol
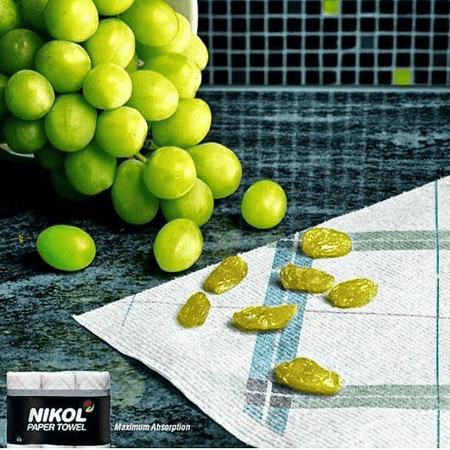
Image Credit: Brilliant Ads
Showing — not telling — your audience about your product’s benefits is one of the best ways to capture attention and get an emotional response. Obviously, Nikol’s paper towels can’t actually turn grapes into raisins, but this ad highlights the product’s absorbent powers in a such a clear and clever way, they didn’t need write a single line of copy.
2. Heinz

Image Credit: Brilliant Ads
In relation to food, the word “hot” has multiple meanings: having a high temperature and being spicy. Heinz brilliantly used the connotation of high temperature to highlight the spiciness of their ketchup, and their creative method of communicating the value of their product helped them instantly attract people’s attention.
3. Mondo Pasta

Image Credit: Brilliant Ads
With this crafty use of guerrilla marketing, Mondo Pasta perfectly aligns their copy with their creative — the guy slurping the noodle literally “can’t let go” because its a rope tied to a dock. By designing such a visual, unexpected, and literal ad with a seemingly one-dimensional prop, people’s eyes can’t let go of this ad either.
4. Bic

Image Credit: Brilliant Ads
Another example of guerrilla marketing, Bic takes advantage of an unkept field to highlight the power of their razors. By just mowing a small strip of grass on a field, this ad is an unconventional, simple, and extremely creative way to catch people’s attention and spotlight a razor’s shaving capabilities.
5. Siemens

Image Credit: Brilliant Ads
Siemens’ skillful ad shows the benefits of their product by unexpectedly placing their washers and dryers in a library to show you that they’re so quiet, even a librarian wouldn’t need to shush them.
Informative Advertising
Compared to persuasive advertising, informative advertising focuses more on the facts, and less on emotions. It highlight how your product’s features and benefits solve your customers’ problems and can even compare your product to your competitors’ product. Although this type of advertising relies on facts and figures to trigger a desired action, the ad’s message is usually framed in a compelling way.
Informative Advertising Examples
- Drink Responsibly
- Miller Lite
- Siskiyou Eye Center
1. Drink Responsibly

Image Credit: Bloggs74
Even though this ad might seem like it’s only aiming to evoke fear in its target audience, it actually leans on the facts to get their message across. If you drink and drive, your risk of crashing skyrockets 11 fold. And by focusing on this alarming reality, this ad can persuade people to get an Uber or Lyft home after a night out instead of getting behind the wheel.
2. Miller Lite
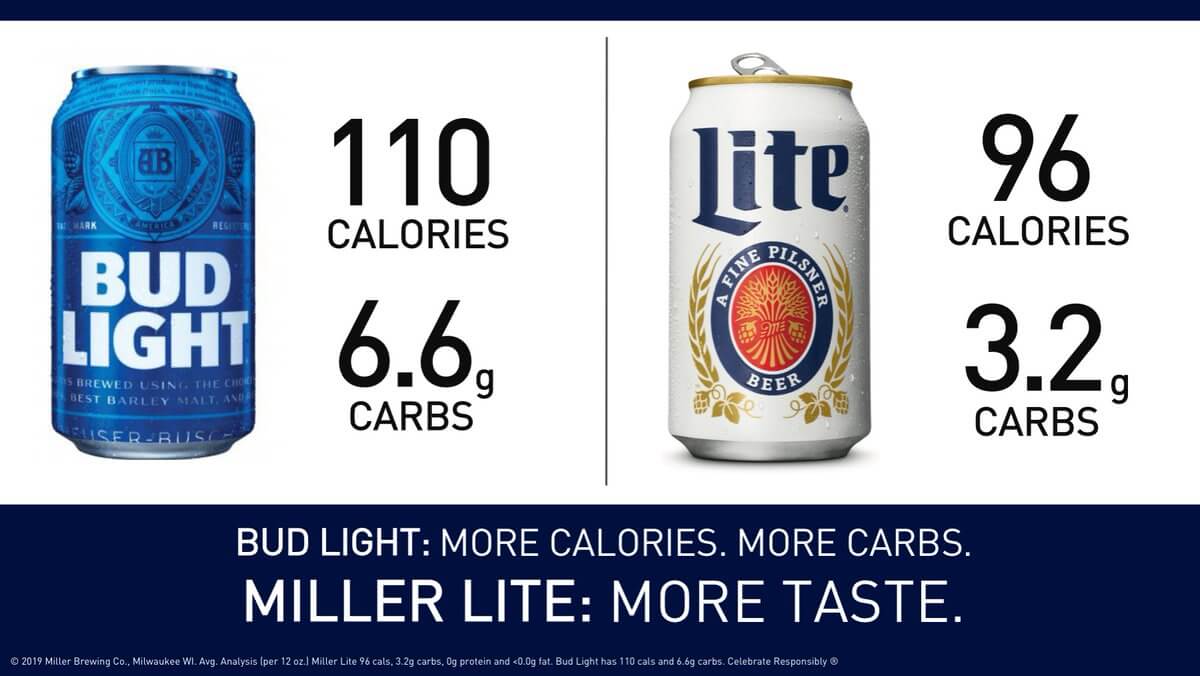
Miller Lite
After Bud Light took some jabs at Miller Lite for using corn syrup in their beer during their Super Bowl 53 ads, Miller Lite decided to throw a few punches back. A day later on Twitter, they revealed that their beer actually has less calories and carbs than Bud Light, which helped them persuade people that drinking Bud Light and Miller Lite actually have similar health benefits.
3. Siskiyou Eye Center

Entractech
There’s an old folk tale that carrots can improve your eyesight, but science has actually debunked this myth. That’s why this Siskiyou Eye Center ad is such a creative informative advertisement. While it pokes fun at this common fable, it’s still relying on the facts of carrots not being able to improve your vision and the Eye Center’s ability to provide quality treatment for your eyes to persuade people to do business with them.
Persuasive advertising vs. informative advertising: which one is better?
Persuasive advertising and informative advertising definitely focus on different aspects of persuasion, but they still aim to achieve the same goal: convincing your audience to take a desired action. So whether you pursue one advertising strategy or another, remember that if you can trigger an emotional response, regardless of the stimuli, your ad will be a success.

How to Optimize Blog Images for Social Sharing: An Intro to Open Graph Tags
We’ve all been there before. You’ve written a great blog post, and you’ve plopped a featured image in there to represent the post on social media, your blog’s main page, and so on.
Then, you hop on your social media accounts and paste the link into a new post. You’re all ready to share it with your network, but there’s just one problem.Unfortunately, the social networks are pulling the wrong thumbnail image. Or worse, they’re pulling none at all.
Not only is this annoying — you were so close to being done — but a bad thumbnail image (or no thumbnail image) could seriously hurt your post’s performance on social. Images are a key play for garnering engagement on your social pages, and data shows they help generate more likes, shares, and comments. For example, tweets that feature an image result in 150% more retweets. But that image needs to be the right image — not your logo, not a cut-off picture of your call-to-action button, and not some other image randomly pulled from the page.

So, how do you ensure each of your social networks pulls in the image you want it to? The answer lies with something called the Open Graph Protocol.
Open Graph
Open graph is a protocol first created by Facebook in 2010 for extracting the title, images, URL, and meta-information from a webpage and displaying it in a social media post. Today, Facebook, Twitter, and LinkedIn all use open graph protocol to help publishers include more content on the front of their social media posts.
When you share a website or an article on Facebook or LinkedIn, or via Twitter Cards, you’ll notice each of these social networks automatically pulls in a few pieces of information into your social post: the website’s title, an image, the URL, and a short description. This is made possible using each social network’s open graph protocol.
LinkedIn has since adopted the same protocol Facebook originally developed, while Twitter uses its own open graph system that’s based on the same conventions — although Twitter accommodates the Open Graph protocol if you already have it on your site. Also note that Twitter only automatically pulls in information from a link when you use Twitter Cards — not for regular tweets.
How to Use Open Graph Protocol
Marketers need open graph (OG) protocol if they want to post better-looking content on social media. But where does each social network find that information? That’s where open graph tags come in. When you put OG tags in the head section of a webpage, social networks have a much easier time finding the correct information for each part of the social post.
Open Graph Tags
Open graph tags are the specific pieces of information that publishers can insert into their webpages so social networks know which site attributes to pull into the social media post. Some CMS’s include meta tags automatically, while other websites need you to add them manually through the page’s HTML.
If your webpage doesn’t have OG tags in the code, they’ll take a guess on where to find the right information. Usually they’ll do OK with the title, URL, and description, but they might have trouble picking the right image. OG image tags tell social networks exactly which image to pull.
If you plan to use certain webpages or blog posts in your social media posts, there are few OG tags you’ll include most often in each page: one for the webpage title, one for the image you want displayed, one for the URL of the webpage, and one for a one- to two-sentence meta description that describes the page. Here’s what they all look like below, with placeholder text in all caps denoting where you’d customize the content of each tag to reflect what you want the social media post to display.
- <meta property=”og:title” content=”TITLE OF PAGE” />
- <meta property=”og:image” content=”URL OF IMAGE ONLY” />
- <meta property=”og:url” content=”URL OF WEBPAGE” />
- <meta property=”og:description” content=”DESCRIPTION OF PAGE” />
See that “og: … ” text describing the meta property of each line above? The text that comes after it defines the the tag category you’re using the OG tag to define. For example, the first one says “og:title” because this tag dictates the title of the webpage you want to appear at the top of your social media post. Posting a blog article? The OG title tag will probably be the title of your article.
Depending on the type of media you’re posting — image, video, infographic, or just text — you might find a need for other OG tags as well to further customize the OG that appears on your social media feed once you post your content. Here are a few of them:
- “og:image:width” — This OG tag is nested within the image tag, allowing you to define the specific width of your feature image in your social media post.
- “og:image:height” — This tag is nested within the image tag, allowing you to define the specific height of your feature image. We’ll talk more about recommended image sizes for each social network in the next section.
- “og:article” — This tag lets the social network know your post is an article, and there are several other tags you can nest inside this one to further promote the article in your social media post.
- “og:article:author” — This tag is nested within the article tag, allowing you to promote the author (or the byline) of the article in your social media post.
- “og:audio” — This tag allows you to promote and describe a playable audio file in your social media post.
- “og:video” — This tag allows you to promote and describe a playable video in your social media post.
- “og:video:series” — This tag is nested within the video tag, allowing you to promote and define a video series if your video belongs to a larger video campaign.
The list goes on for the OG tag categories available to you. Blog, game, city, book, company, hotel, and country are all categories of OG tags you can use to customize your Facebook, Twitter, and LinkedIn posts to best represent the content you’re serving to your audience.
Open Graph Image Size
Although your images look similar when posted to Facebook, Twitter, and LinkedIn, each social network’s open graph protocol has its own minimum image size requirements. Facebook, for example, recommends using images that are 1200 x 630.
Good news for HubSpot and WordPress users: If you use HubSpot for blogging, your social networks will pull in the featured image automatically — just make sure you designate a featured image in each of your blog posts. (Pro tip: Try uploading your featured images to the COS as at least 610 pixels wide, which ends up looking better on Facebook, Twitter, and LinkedIn. Although LinkedIn’s photo dimensions ask for a small image, the COS should resize it automatically.)
If you use WordPress, you’ll need to install this plugin or one like it, but then you’ll be set to go.
Ultimately, this post is for you if you don’t use a content management system (CMS), as you’ll need to do it manually for each page on your site. We’ll show you step-by-step instructions for how to manually optimize images for social posting on the top three social networks for sharing content: Facebook, LinkedIn, and Twitter.
Facebook Open Graph
Here’s what a Facebook link post looks like:
To ensure Facebook pulls the right image from your blog post into your Facebook posts, you’ll need to first optimize the image size for Facebook and then add the proper OG tags to your website.
Optimizing the Image Size for Facebook Open Graph
Required: Facebook requires you to use an image that’s at least 200 x 200 pixels.
Suggested: Although 200 x 200 is the absolute minimum, Facebook advises using an image that’s at least 600 x 314 pixels. For the best display on high-resolution devices, the company suggests choosing an image that’s at least 1200 x 630 pixels.
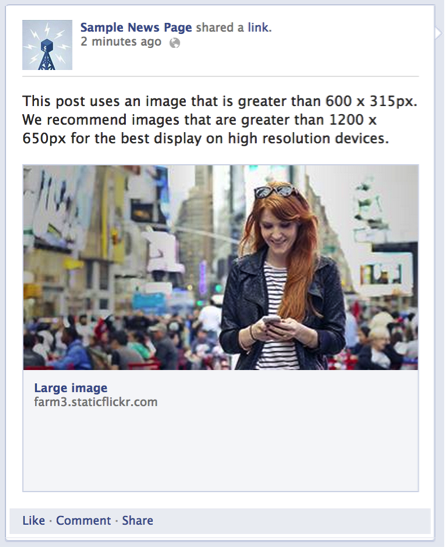
Image Credit: Facebook
If your image is smaller than 600 x 314 pixels, it’ll still display in your post, but appear as a thumbnail-sized picture. So, if your images carry a lot of important detail that would be lost in such a small frame, it’s best to set your OG image tags to 1200 x 630.
Adding the Open Graph Tags
If your page is static and you don’t use a CMS like HubSpot, you’ll need to manually add OG tags to each of the pages your blog posts are on. The tags are meta data, so you need to add them to the head section of the page your blog post is on. (If you don’t manage the code on your site, you’ll need to ask your web developer for help.)
1. Copy the meta tags below.
<meta property=“og:image” content=“http://bit.ly/1zPpzUn ” />
<meta property=”og:image:width” content=”1200” />
<meta property=”og:image:height” content=”630” />
2. Replace the placeholder text with your selected image’s URL.
Next, remove the sample image URL above, highlighted in red, with the actual URL of your image. Do the same with the height and width numbers, highlighted in green, replacing them with the correct dimensions of your image. Keep in mind Facebook’s image size requirements.
3. Copy the resulting code snippet into the HTML head section of your page.
Once you’ve filled in the code in step 1 with your own content’s image URL and dimensions, open the source code (often denoted with this icon: “<>“) and paste it into the top of the page’s HTML.
4. Enter previously shared webpages into Facebook’s Sharing Debugger.
(Don’t worry about this step if the webpage you’re working on has never been published before.)
If you’ve previously published this webpage without tags, or if you publish the page and then realize you messed the tags up and need to adjust them, you’ll need to run the URL through Facebook’s debugger once you make any changes. This is because Facebook caches its shared pages — so if you don’t refresh the cache, the thumbnail won’t be corrected.
That’s it! Now, when you post a link to your article to Facebook, the Open Graph Protocol will read the OG:image tag and display the image you point it to. (Learn more about OG tags for titles, descriptions, and more on the Facebook dev blog.)
LinkedIn Open Graph
Like Facebook, LinkedIn also uses the open graph protocol. So, when you share a link with your LinkedIn network, LinkedIn scrapes the article for a title, images, and a URL, and then uses that information to fill our your LinkedIn post. (While they don’t explicitly say they scrape for a meta description, their algorithm does pull this in as well.) Here’s an example of a LinkedIn post by HubSpot with a meta description shown underneath the page title:
To ensure LinkedIn pulls the right image from your post to use as a thumbnail, you’ll need to optimize that image’s size and then add the proper OG tags to your website, much in the same way as you did for Facebook.
Optimizing the Image Size for LinkedIn Open Graph
Required: LinkedIn requires thumbnail images to be at least 80 x 150 pixels but no larger than 80 x 110. If your image doesn’t meet these requirements, LinkedIn will automatically pull in an different image on your page that fits the right dimensions.
Recommended: LinkedIn’s sharing module has the ability to promote wide, rectangular images, which can increase your post’s clickthrough rate over a 80 x 150 thumbnail. To share an image like this, the company advises using an image that is 1200 x 627, and as close to a 1:91:1 aspect ratio as you can (i.e. rectangular, rather than square).
Adding the Open Graph Tags
Just like on Facebook, if your page is static and you don’t use a content management system (CMS) like HubSpot, you’ll need to manually add OG tags to each of the pages your blog posts are on. The tags are meta data, so you need to add them to the head section of the page your blog post is on. (Again, if you don’t have control over the code on your website, you’ll need to ask your web developer for help.)
1. Copy the meta tags below.
<meta property=“og:image” content=“http://bit.ly/1zPpzUn ” />
<meta property=”og:image:width” content=”1200” />
<meta property=”og:image:height” content=”627” />
2. Replace the placeholder text with your selected image’s URL.
Next, remove the sample image URL above, highlighted in red, with the actual URL of your image. Do the same with the height and width numbers, highlighted in green, replacing them with the correct dimensions of your image. Keep in mind Facebook’s image size requirements.
3. Copy the resulting code snippet into the HTML head section of your page.
Once you’ve filled in the code in step 1 with your own content’s image URL and dimensions, open the source code (often denoted with this icon: “<>“) and paste it into the top of the page’s HTML.
That’s it! Now, when you post a link to your article to LinkedIn, the Open Graph Protocol will read the OG:image tag and display the image you point it to.
Important Note If You Plan to Post to Both Facebook & LinkedIn
You might notice there’s a conflict in the required image sizes if you’re optimizing your webpage for thumbnail images: LinkedIn requires your featured image be no larger than 180 x 110 pixels, while Facebook requires your image be no smaller than 200 x 200 pixels.
While you could technically size your featured image as close to 180 x 110 pixels as possible without going over, that would optimize for LinkedIn while resulting in a very small image on Facebook. Remember, although Facebook requires an image size of 200 x 200 pixels or larger, they recommend you don’t go smaller than 600 x 314 pixels so the image in the post is large.
Instead, according to web developer Jay Holtslander, you can include two OG tags for the same image in two difference sizes in the head section of your page using this code (and you’d replace the code in red with the URLs of your differently sized images):
<meta property=”og:image” content=”image-180×110.jpg ” /> <!– 180×110 Image for Linkedin –>
<meta property=”og:image:width” content=”180″ />
<meta property=”og:image:height” content=”110″ />
<meta property=”og:image” content=”image-600×315.jpg ” /> <!– 600×315 Image for Facebook –>
<meta property=”og:image:width” content=”600″ />
<meta property=”og:image:height” content=”314″ />
Twitter Open Graph
Twitter uses a system similar to Open Graph tags called Twitter Card tags. (You need to have Twitter Cards already set up in order to use Twitter Card tags.)
If you already have OG tags set up on your website, the folks at Twitter made it pretty easy for you to generate a Twitter Card without duplicating your tags and data. According to Twitter’s dev blog, “When the Twitter card processor looks for tags on your page, it first checks for the Twitter property, and if not present, falls back to the supported Open Graph property. This allows for both to be defined on the page independently, and minimizes the amount of duplicate markup required to describe your content and experience.”
But Twitter Cards look pretty similar to link posts on Facebook and LinkedIn — it pulls the title, an image, the URL, and a short description. Here’s an example:
Research has shown that people perform best when they feel included—when they feel valued, empowered, and respected by their peers.https://t.co/ZfcdlULWfo
— HubSpot (@HubSpot)
January 21, 2019
To set up Twitter Card tags, you’ll need to optimize your image size and then add the proper Twitter Card tags to your website.
Optimizing the Image Size for Twitter Open Graph
Required: Twitter requires your image to be no smaller than 144 x 144 pixels and less than 1 MB in file size. The social network also says it’ll automatically resize images larger than 4096 x 4096 pixels.
Recommended: Like LinkedIn, Twitter Cards support large images as well, not just the square-shaped thumbnail. To optimize your images for this open graph, format the image you want featured in your tweet to be no smaller than 300 x 157.
Adding the Twitter Card Tags
Just like on Facebook and LinkedIn, if your page is static and you don’t use a Content Management System (CMS) like HubSpot, you’ll need to manually add Twitter Card tags to each of the pages your blog posts are on. Like the other social networks’ tags, Twitter’s tags are meta data, so you need to add them to the head section of the page your blog post is on. (Your developer can help with this if you don’t have access to your website’s code.)
Step 1: Copy this tag:
<meta name=”twitter:image” content=” http://bit.ly/1zPpzUn”>
Step 2: Replace the example image URL, highlighted in red, with your selected image’s URL.
Step 3: Copy and paste the resulting code snippet into the HTML head section of your page.
That’s it! Now, when you post a link to your article to Twitter, it’ll properly display your desired image.