7 Amazing Sample Answers to “What Makes You Unique?”
There are plenty of things that make each one of us unique.
For instance, here are a few quirks of mine — I put my phone on airplane mode every night around 9 p.m. to avoid distractions, even though plenty of my friends have pointed out that the silence button works too. I can’t sit still for long periods of time, so I regularly do laps around the office. And I can’t leave my apartment, no matter how late I am, until my bed is made.

None of which I’d admit in an interview.
The interview question, “What makes you unique?” is not an opportunity to confess weird habits or odd quirks. It’s a chance to provide the interviewer with insight into how you’d be the best candidate for a role, while proving you’re someone who can think on her feet.
Essentially, “What makes you unique” really means, “What makes you an exceptionally good candidate?”
To avoid an awkward conversation, you’ll want to be prepared to answer “What makes you unique” in an interview. Here are seven sample answers to ensure you’re proving yourself an incredibly valuable company asset.
How to answer “What makes you unique?”
- Mention skills listed in the job description.
- Provide examples from your background. Reference prior accomplishments or results from past roles.
- Avoid generic phrases like “I’m a hard worker”. Make your answer compelling.
- Include key personality traits that will allow you to deliver similar results in the future.
- Tell the interviewer how your unique skills will help the company succeed.
7 Sample Answers to “What Makes You Unique?” and Why They Work
1. “I am a very good communicator and find it’s easy for me to relate to other people.”
Consider mentioning a personality trait you feel would be a good fit for the business. After reading the job description, make a list of attributes that could make you an exceptional candidate.
Additionally, including a personality trait in your answer allows you to display how you’re a good fit for a role in which you have little prior experience.
For instance, if you’re applying for a position as a team leader, it’s critical that you demonstrate strong communication skills and an ability to connect with a diverse group of people. If you tell the interviewer, “I am a very good communicator and find it’s easy for me to relate to other people”, you’re able to match your personality to components of a successful leader.
2. “I really enjoy learning new things and am constantly seeking out new learning opportunities.”
By mentioning your passion for learning new things, you’re demonstrating you’re growth-focused and unafraid of challenges.
Additionally, answering the question in this way allows you to remind the interviewer why you’re uniquely qualified for the role — while other candidates might have more prior experience in the industry, you’re proving your desire to exceed expectations of the job quickly.
3. “My prior experience in customer service has provided me with unique technical skills that I can apply to this role.”
If you have prior experience in a role vastly different from the one for which you’re applying, you might use this as an opportunity to explain how your background uniquely qualifies you. With an answer like this one, you’re able to alleviate concerns the interviewer might have with your lack of experience in the field.
It’s critical, however, that you provide specific examples of how your prior experience has provided you with certain transferrable skills. For instance, you might say, “My prior experience in customer service provided me with technical skills and an extensive knowledge base for how our product works. As a marketer, I will be able to use this knowledge to ensure we’re meeting our customers needs with every campaign we launch.”
4. “Working at a startup gave me an opportunity to understand the ins-and-outs of the industry, and to take on tasks I might not have at a larger company. I think this experience gives me a slight edge over other applicants.”
Similar to the answer above, this answer is a good one if you’re attempting to switch industries. If you think your prior experience could deter interviewers from seeing you as exceptionally qualified, this is an optimal chance to prove them wrong. Consider how your background has allowed you to gain unique skills that others, who followed a more linear career trajectory, might not have.
For instance, if you previously worked at a small startup and now you want to transfer to a large corporation, it’s important you mention how those skills will make you successful in this new role.
5. “I’m not afraid of failure. In fact, I think it is an essential part of the experimental process that gets you to success. For example … “
This answer shows your interviewer that you’re not afraid to take risks. Of course, you’ll only want to say this if you have a positive example to reinforce the importance of failure in the workplace.
You don’t want to sound like you make mistakes all the time, but you’ll stand out if you mention how you turned a failure into a success.
For instance, you might say, “I’m not afraid of failure. In my last role, we tried to streamline our SEO process and, along the way, found we’d accidentally decreased traffic to our site. However, this initial failure allowed me to see the errors in our previous procedure. My team and I came up with a more successful strategy to avoid these mistakes in the future, and ended up increasing traffic by 20%.”
With this answer, you’re showing you’re capable of remaining flexible and open-minded when something doesn’t work right away, and you know how to take failures and use them as learning opportunities — a critical skill for any work environment.
6. “When solving problems, I apply both logic and emotional aspects in equal proportion. For instance, I’m trained in SEO and understand how to use analytics to ensure a marketing campaign is successful, but I also majored in design and know how to apply creativity to a project as well.”
If you’re stuck on deciding how to demonstrate your unique qualifications, start by thinking about how other people approach problems at your company, and how you differ.
For instance, most people are either logical and use analytics to solve problems, or emotional and use creativity. It’s rare to find someone who is both. If you truly believe you combine these two aspects, it’s an impressive ability you should highlight.
7. “I’m exceptionally organized, and at my last company, I was able to apply this skill to improve our process and increase ROI by 33%.”
Remember, when your interviewee asks “what makes you unique”, she’s really wondering “how will you help our company?” At the end of the day, it’s critical you tie your answer back to how you will solve problems for the company.
To avoid sounding like you’re bragging, consider a personality trait or skill set that helped your last company achieve results. If the results are quantitative, make sure you have the specific numbers to support your claim. However, it’s also appropriate to share qualitative results, such as, “my organizational skills led my manager to trusting me with a major project within the first two months in my role.” Ultimately, providing examples shows the interviewer you’re results-driven, and aren’t just saying generic phrases to answer her question.

The Ultimate Guide to Google Slides
Slide decks are ubiquitous in the business world. To present new findings or strategies, train new employees, and even sell your product, you’ll often use a deck to easily convey information and visually engage an audience.
One of the best tools for creating slide decks is Google Slides, which is included with your free Gmail account and connected to the cloud, so you can access all your presentations from any computer.
To help you create a presentation with Google Slides, we’ve created a handy, bookmarkable guide that’ll show you how to turn a blank deck into a compelling one. Read on to learn how.
How to Use Google Slides
- Create or import a presentation.
- Title your presentation.
- Add text to your presentation.
- Insert media, shapes, tables, charts, diagrams, word art, lines, and animation to your presentation.
- Arrange your presentation’s slides.
- Add speaker notes to help you stay on script during your presentation.
- Pick your presentation’s theme and layout.
- Share your presentation to collaborate with others.
- Present your slideshow.
- Download your presentation in other formats.
Google Slides Tutorial
1. Create or import a presentation.
To create a new presentation in Google Slides, go to your Google Drive, click new, and select “Google Slides”.

If you want to import and convert an existing presentation from PowerPoint to Slides, go to your Google Drive, click new, and select “File Upload”.

2. Title your presentation.
Click “Untitled presentation” to title your presentation.

3. Add text to your presentation.
Click each slide to add text to your presentation. Each of your text boxes’ size and placement is adjustable. To add another text box to your presentation, click “Insert”, select “Text box”, and place and size your text box however you want.

4. Insert media, shapes, tables, charts, diagrams, word art, lines, and animation to your presentation.
Click “Insert” and choose “Image”, “Video”, “Shape”, “Table”, “Chart”, “Diagram”, “Word Art”, “Line”, or “Animation” to place these elements in your presentation. You can also move, re-size, and delete these elements.

5. Arrange your presentation’s slides.
To add a new slide to your presentation, click the “+” button on the far left side of your toolbar.

If you want to move a slide to a different spot in your presentation, drag it to your preferred location. To move multiple slides within your presentation, press the “Ctrl” button on your keyboard and click the slides you want to move around.
If you want to duplicate a slide, right-click it and choose “Duplicate slide” in the toolbar. To delete a slide, right-click it and choose ”Delete” in the toolbar.
6. Add speaker notes to help you stay on script during your presentation.
In each of your slides, you can add speaker notes at the bottom of your page to stay on script during your presentation.

7. Pick your presentation’s theme and layout.
After you finish fleshing out your presentation, pick a theme and layout to make it more visually engaging and consistent. To choose a theme, click “Theme” in the toolbar and a wide selection of themes will pop up on the far right side of your page.

If you don’t like any of the themes Google Slides offers, click “Import Theme” at the bottom of the popup. You can implement the themes from any of the presentations you’ve created, edited, or viewed in the past. You can also upload themes from existing PowerPoints that are saved on your computer.
8. Share your presentation to collaborate with others.
After you finish creating your presentation, you can share your presentation with others so they can edit, comment on, or view it. To do this, click “Share” at the top right corner of your page.

If you want to collaborate with others and polish your presentation, you can comment on any element of your presentation and direct comments to specific people.
To comment on your presentation, click the comment icon, which is right next to the “Present” button at the top right corner of your page.

To address comments to specific people, press the “+” button on your keyboard and type in your colleague’s email address.

9. Present your slideshow.
When you’re ready to present your slideshow, click the “Present” button at the top right corner of your page.

If you want to look at your speaker notes during your presentation, click the down arrow and choose “Presenter view”.

Another useful feature Google Slides offers is “Pointer” — it can turn your mouse into a laser pointer during your presentation. To use it, click the “Pointer” button at the bottom of your page.

If you’re presenting on a tight schedule, it might be easier to field questions during your presentation rather than after. Fortunately, with Google Slides, you can host a Q&A during your presentation by clicking the “Q&A” button at the bottom of your page.
When you do this, a web page asking you if you want to accept questions from your audience will pop up. The questions your audience asks will also appear on this web page.

If you decide to field questions from your audience during your presentation, it’ll look like this:

Your audience can click on the link at the top of the presentation, which will direct them to a new page where they can enter their questions.
10. Download your presentation in other formats.
Once you’ve completed your presentation, you can download it as another format to send to your audience or keep for future reference. To do this, choose “File” and “Download as” to download your presentation as one of the following formats:
- Microsoft PowerPoint (.pptx)
- ODP (.odp)
- Text File
- JPEG
- PNG
- Scalable Vector Graphics (.svg)
There you have it. We hope this guide to using Google Slides will help you create and present compelling slide decks that will captivate your colleagues and potential customers. Happy presenting!

How to Create a Revenue-Generating Google Ads Campaign
No matter how many free tools crop up for ecommerce companies, a paid ad is sometimes your best bet for driving traffic to (and conversions from) your website.
The problem is other ecommerce and even brick-and-mortar competitors are using the same search terms and keywords you will. Not only do you need to know how to build a campaign through Google Ads, but you also need to know how to stand out from the crowd.

We’ll start with a few real examples of AdWords campaigns — a service now known as simply Google Ads — and then throw in some pro tips for succeeding with your own search engine marketing strategy. By the time we’re done, you’ll be an expert.
AdWords Examples
- New Breed Marketing: what is inbound marketing
- Nettitude: cybersecurity
- Rock Content: content marketing course
- Destination Canada: cheap holiday destinations
- FM Training: LEED certification online
- LeftLane Sports: hiking boots for women
1. New Breed Marketing
Search term: what is inbound marketing

Links to:
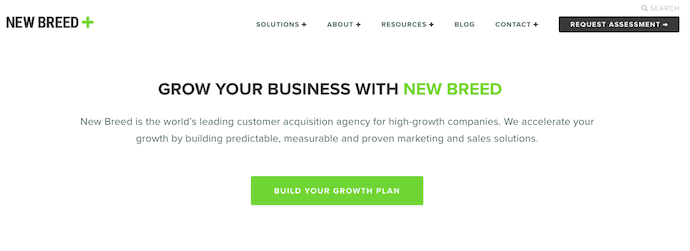
Some searchers might be ready to purchase something, but need to make sure what you’re selling is what they’re buying. That’s the thinking behind the first AdWords campaign example, above.
New Breed Marketing, an agency partner of HubSpot, is an inbound marketing service provider. But because New Breed’s customers might not know the services they want by the term, “inbound marketing,” the company sought to define the term for them — helping buyers confirm that inbound marketing is indeed what they’re looking for.
New Breed Marketing’s Google AdWords result, above, is as simple as search engine marketing gets. The meta-description is just one sentence long but indicates to searchers that inbound marketing is a “process” to be invested in.
Meanwhile, the blue link itself promises to explain inbound marketing in the form of a downloadable “guide.” This ensures those who click through to the website are prepared to submit their contact information and become a lead in exchange for that guide. Remember, AdWords campaigns cost you money every time somebody clicks on your ads — you need to get something out of those clicks.
2. Nettitude
Search term: cybersecurity

Links to:
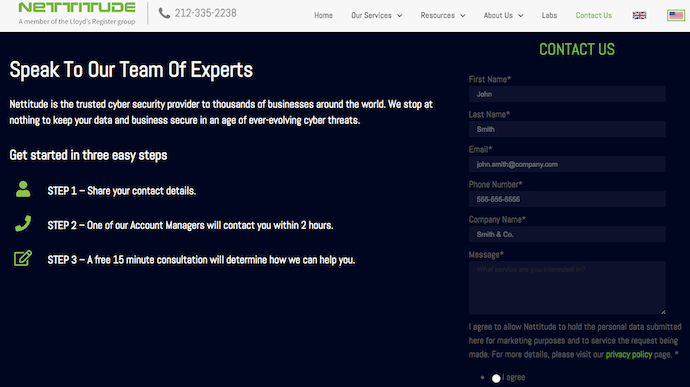
In general, the broader the search term, the less likely the searcher is to want to buy something right away (a pay-per-click concept called “match types“). In the AdWords campaign above, however, Nettitude bid on a broad, one-word search term — “cybersecurity.” While this broad search term doesn’t target a specific searcher, the details of their Google Ad ensure the link can satisfy many different types of searchers no matter what their interest was when they typed in the word.
Nettitude’s AdWords campaign, above, does two things well:
- First, its meta-description has several value propositions that most cybersecurity customers would be receptive to. This includes a “2 hour response time” and a “free initial consultation” to make a prospect’s initial outreach convenient and low-commitment.
- Second, the ad displays a phone number directly on the page. When you bid on a search term that yields such a broad, diverse group of people, getting them on the phone is often the easiest way to nurture their interest so they don’t wander off to another search result and forget about you.
3. Rock Content
Search term: content marketing course
 Links to:
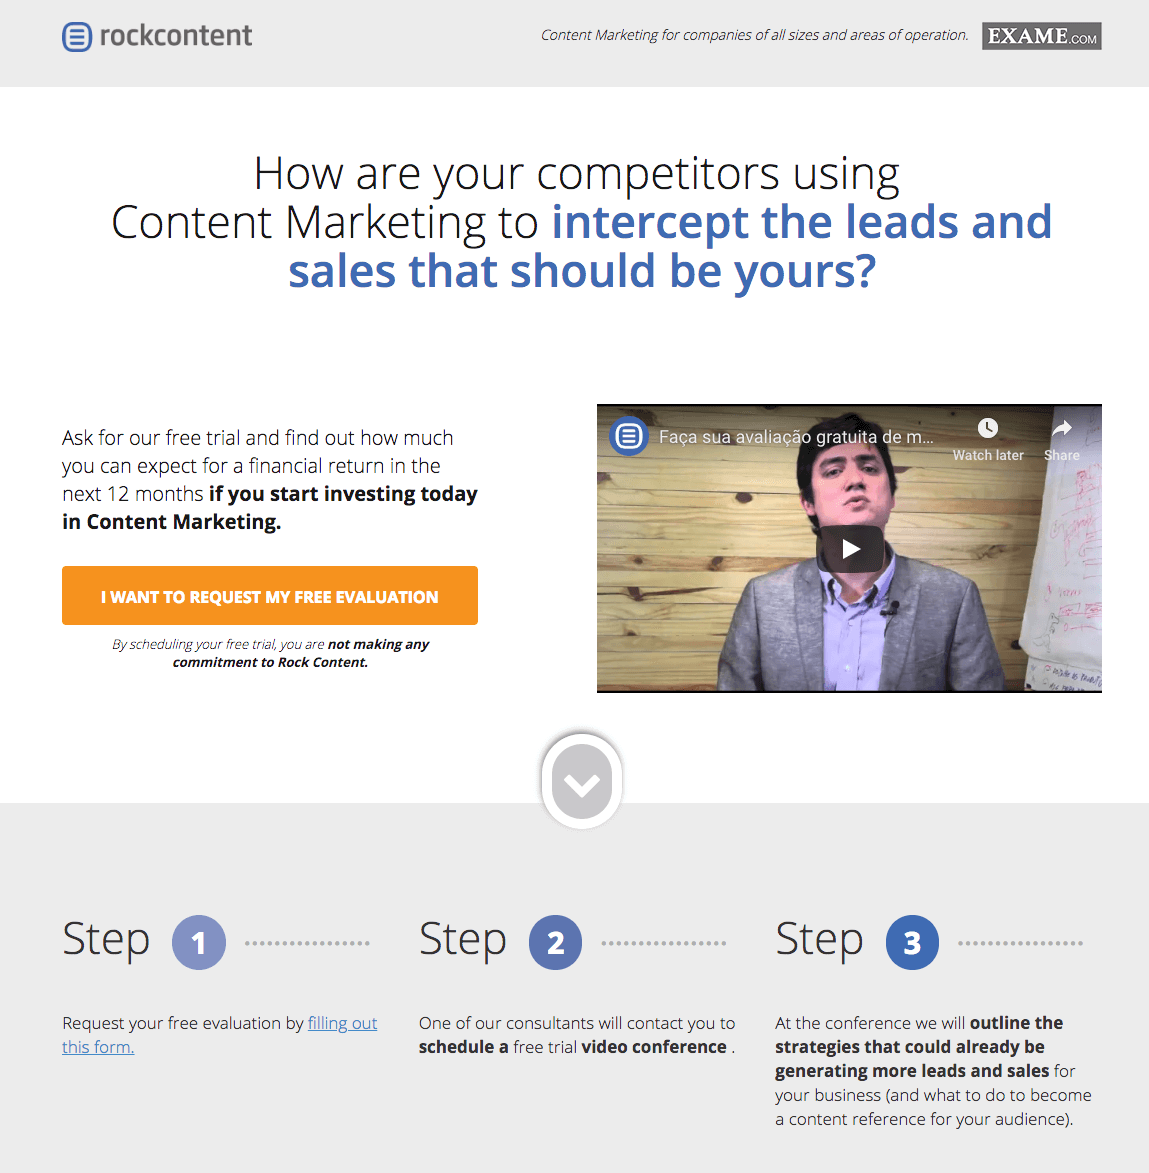
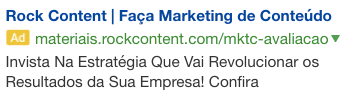
Rock Content, an agency partner of HubSpot, is a content marketing service based in Brazil. Its AdWords campaign, above, bid on a search term that’s only somewhat related to the service Rock Content is offering on its landing page. But here’s why it works.
The search term, “content marketing course,” is intent on finding classes that help marketers increase their content marketing knowledge. Rock Content looks to pivot searchers from taking a class for improving their content knowledge to entering an “evaluation” for determining how much they already know.
This evaluation might not satisfy every searcher, but it is a smart way of pivoting their interest to a related service and introducing them to Rock Content’s offerings at the same time.
4. Destination Canada
Search term: cheap holiday destinations
Links to:
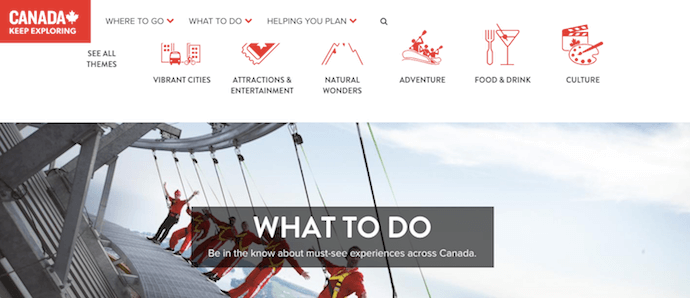 Similar to the third AdWords example on this list, this campaign example by Destination Canada pivots off of broad search term to drive value into its own offering.
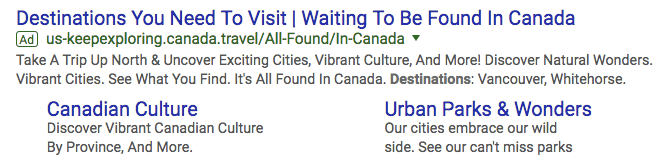
Canada Destination’s Google Ads campaign, above, uses a searcher’s general interest in taking a holiday trip to advertise all the fun parts of Canada. It’s not a casual article, but it’s also not a flight itinerary — that middle-of-the-funnel space is what makes this campaign work so well.
The link above also uses two sub-links beneath the main blue link, highlighting the key subjects covered in the website to maximize the ad’s clickthrough rate.
When people search for “cheap holiday destinations,” it can be hard to gauge their level of interest just right. When launching a Google Ads campaign, you don’t want your ad to be too broad to convert customers, but you also don’t want to be so close to the cash register that your searchers aren’t ready for what you’re offering them. Canada Destination’s digital tour of the country captures that middle ground perfectly, holding users’ interest without chasing them away with overly specific content.
5. FM Training
Search term: leed certification online
 Links to:
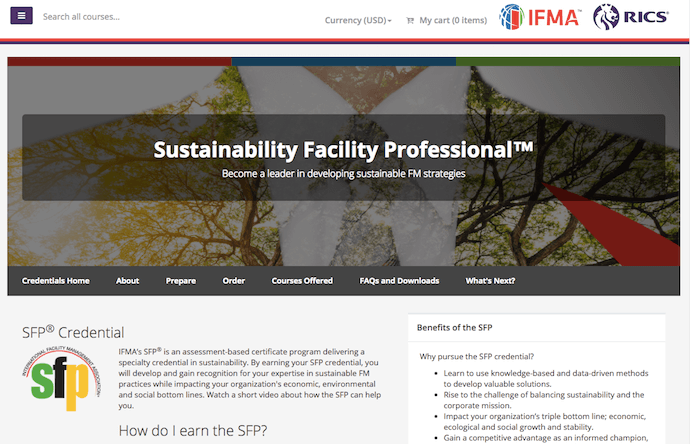
FM Training is a certification hub for facility managers (FMs), the same people who work to make their buildings facilities LEED-certified. Lots of coursework can go into earning this certification, but it can be a challenge to find curricula that caters to these professionals.
FM Training’s AdWords campaign, above, makes sure FMs know they’ve come to the right place.
While the five blue links beneath the ad help users jump directly to the information they’re most interested in, the first sentence of the meta-description is what really reaches out to this audience: “FMs …” — the audience is clearly stated in terms they’d understand — “… see a salary increase of 6% or more within 1 yr.” The ad uses the limited space it has to send a message designed to encourage clicks and make the ad worth the investment.
6. LeftLane Sports
Search term: hiking boots for women
 Links to:
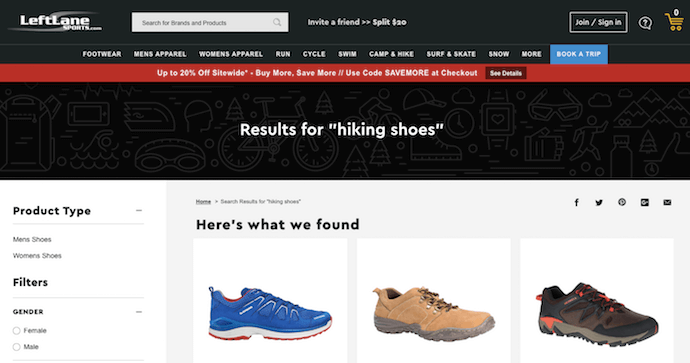
The campaign by LeftLane Sports, above, is an example of local business advertising done right. The company doesn’t even need people to click on the link to make money from it.
If searchers in the Boston area search for “hiking boots for women,” they won’t just see a paid result by LeftLane Sports; they’ll see where the brand’s nearest storefront is and how long they’re open. It’s the perfect way to drive website traffic to the appropriate product pages and promote a local presence in the process.
How to Run a Successful Google Ads Campaign
1. Get an AdWords Account
Before you can do anything, you’ll need to visit the AdWords site and sign up for an AdWords account. This involves some financial information so that Google can get paid for each click, so be ready with all your banking credentials.
Once you have an account and you’re ready to go, click the Create Your First Campaign button.
2. Choose Campaign Type
Most would suggest starting with the “Search Network only” option, but you can change this as you learn and grow. Next, you’ll want to give your campaign a name so you can track your results. It’s a good idea to start with a naming system that you’ll keep using so you don’t get confused somewhere down the line.
3. Designate Geographic Area
Being an online shop does mean you’re less concerned about geographic constraints. It’s still not a bad idea to consider where, exactly, the majority of your audience lives. If you don’t know, you may want to back up a step and consider your buyer personas first. Why spend money advertising to people in the Midwest if the bulk of your customers live in the Northeast?
You can also reach other countries if your ecommerce company serves international buyers. Just be sure you’re prepared for any of the buyers who come your way as a result of your ads. You might pay a lot of money for visitors who can’t make a purchase if you’re not careful.
4. Set Your Budget
This is a pretty important step. You want to include enough money to make a difference, but you really don’t want to break the bank. You can manually set the bids for clicks, which gives you more control. This also means your ads will stop showing once your budget is spent. That means you won’t end up with a shocker of a bill later.
Once you’ve gotten the hang of everything, you can go back and change your settings to automatic or maybe even apply for a Google credit line. These are best left to experienced users, because it doesn’t take much to completely empty a bank account just for paid clicks.
5. Write Your Ad
This is the most important aspect of your AdWords education. The copy you use is what will convince potential buyers to click. You want to attract plenty of people, yes, but you also want those people to buy. If they don’t buy, you pay anyway. So start with a great headline that uses search terms that will reach your niche. You only get 90 characters, according to Google, so make every last one of them count. You might even need to use abbreviations, or you can search for shorter synonyms.
Then you get another 90 characters for the second and third lines. Use this space to point on benefits. How will the product solve your buyers’ pain? Then on the third line you can capitalize on a feature. Be ready to change these if you notice your ad isn’t gaining a lot of traction.
6. Add Your Display URL
It’s important to notice the difference between the URLs you’ll use in your ad. The display URL is the one you want people to remember. It’s the home page to your website, the address people will type in if they visit without finding you through an ad first. This is what you want to display.
7. Add Your Destination URL
With a few exceptions — one of which you’ll see in the list of AdWords examples, above — it’s not a good idea to have a PPC ad that leads straight to your home page. You want a landing page that focuses on the products featured in the AdWords ad. If you send people straight to the home page, they’ll have to do another search for the products they want, and they’re not likely to stick around for that. This is why it’s so important to understand the difference between the display URL and the destination URL.
8. Add Your Keywords
Keep in mind you’ll be competing against many other companies for the same audience when bidding on keywords for which you want your ad to show up. Take some time to think of the keywords that will reach people who are ready to buy. For instance, instead of using “luxury shoes” in your PPC ad, you can use keywords such as “red leather heels.” Maybe you’ll miss out on people who are looking for shoes of all types, but you’ll snag those who have a particular shoe in mind. They’ll be more likely to make a purchase if your ad leads to a landing page with red leather heels, and that will more than pay for their click.
You can also use negative keywords and save a lot of money on your clicks. These tell AdWords what you don’t want your ad to show up for. In other words, you can use keywords such as red leather heels not stilettos.
9. Bid On Your Clicks
Finally, you’ll need to tell Google how much you want to spend on your clicks. Remember, you’re bidding on visibility here. Those willing to pay more for clicks will show up more often in the searches. You really do have to spend money to make money, especially in the pay-per-click game. As long as you’re manually controlling your budget, you can go all out for clicks until your cash runs out and just replenish your budget when you’re ready to go again.
10. Double Check Your Double Check
It’s always a good idea to check over everything one more time before you set your ad in motion. Is everything spelled correctly? You’ll miss out on keyword searches if you typo one of them. Did you make sure to manually control the budget? You could end up broke tomorrow if you didn’t. When you’re sure you did everything correctly, then take a deep breath and launch.
Beyond setting everything up correctly, you’ll also want to A/B test your results often. Change headlines, introduce new features, focus on different benefits — and then take note of the number of conversions. There’s always a way to make your ad perform better.

Are More People Getting Their News Online Than on TV? The Answer May Surprise You
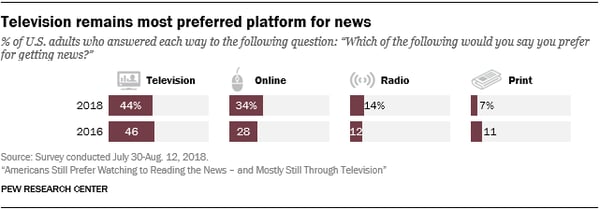
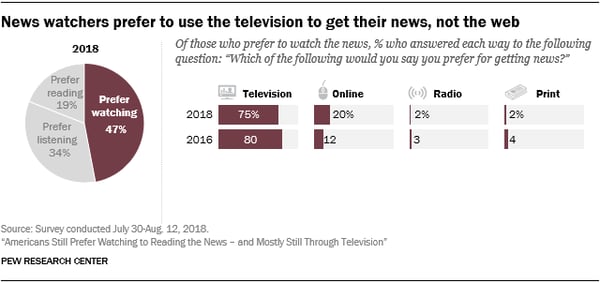
New data from the Pew Research Center says that U.S. consumers would rather watch the news — not read or listen to it — and would prefer to do so on TV, not online.
“Their viewing loyalties have yet to migrate fully to the web,” the report says. “Just over four-in-ten U.S. adults (44%) prefer TV, compared with about a third (34%) who prefer the web.”
 Source: Pew Research Center
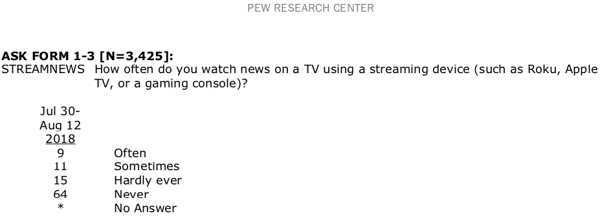
The “TV” preference accounts for news viewed on either local, network, or cable channels — and seemingly does not include those who watch televised news on such channels through a streaming device or service (like Roku or Hulu).
 Source: Pew Research Center
The report arrives in the midst of mixed reports about the health and trend of online news platforms and consumption habits. Following last week’s news of massive layoffs at online media site Mic — and how that potentially reflects the future of digital media — some, like Washington Post columnist Margaret Sullivan, wonder if the online news “bubble has burst.”
But things are not always as they appear on the surface. While this data may appear to correlate with the Mic news, it doesn’t necessarily mean that the end of digital news consumption is near — and it could, alternatively, signal that preferences will continue to dramatically change in a short period of time.
Here’s a deeper look at the data, and what it could mean for the future of news consumption.
TV vs. Web
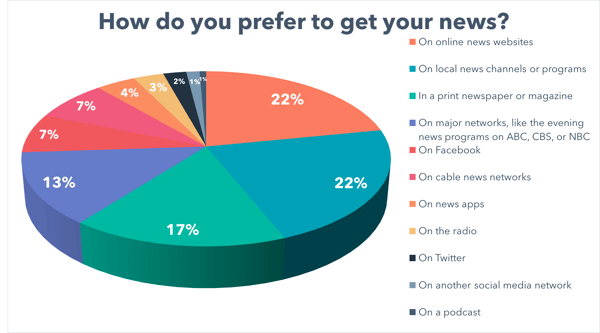
First, we wanted to see how news consumption preferences varied across different regions. Pew’s research focused on American respondents, so we decided to survey news viewers (861 of them) across the U.S., UK, and Canada — and ask them for their prefer method of consuming the news.
 Data collected with Lucid
It’s worth noting that different language was used for each region surveyed based on how television is provided in each country, and the language used to describe it.
What we might know as”major network” evening news programs in the U.S. are sometimes known as “supper-hour broadcasts” in Canada or “broadcast television” channels such as BBC or Channel 4 in the UK.
For “cable news networks,” we used the terms “24-hour cable news networks” in Canada and “pay television channel news programmes, like Sky” in the UK.
 Data collected with Lucid
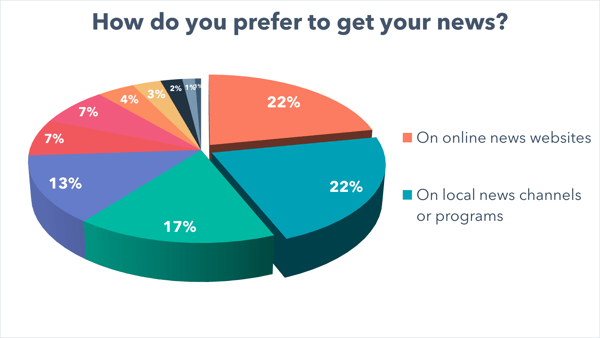
The first thing we noticed was that the highest number of respondents indicated that they prefer watching the news on online news websites. However, the same percentage of respondents said they prefer to consume news on local channels and program. Digital news media isn’t over, it seems — nor is local news.
The Gradual Shift in Preferences
What wasn’t specified, however, was the specific nature of the online news sites preferred by consumers — whether it was the online version of traditional newspapers like The New York Times, or an online-only news outlet.
In any case, it points to a “closing of the gap” between the number of consumers who prefer to get their news from TV and those who do so online. Although the preference to watch news on TV continues to outpace that of online viewing, it’s shrinking (slightly).
 Source: Pew Research Center
As per the figure above, the number of people who want to watch news on television has dropped by 5% since 2016, while the number for those who want to do so online has increased by 8%.
 Source: Pew Research Center
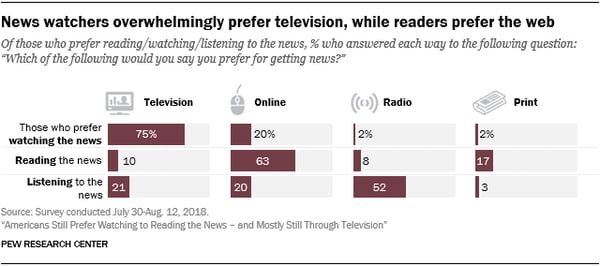
Furthermore, not everyone prefers watching the news, and according to the Pew study those who prefer to read it would rather do so online.
Looking Ahead
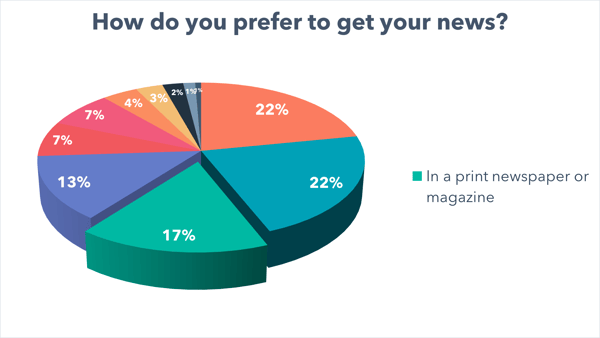
What was particularly interesting to us was the number of respondents who indicated that they prefer to read the news via print publications.
 Data collected with Lucid
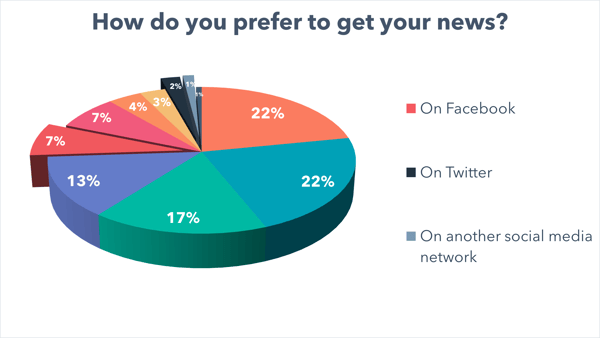
While 17% may appear to be a fairly small portion of participants, it is interesting to note that it was the third-highest response — and outnumbered the total of those who said they prefer to get their news on social media.
There are a few things that could account for these figures.
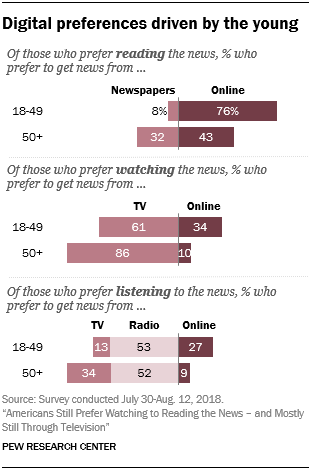
First, there are age demographics to take into account. The Pew report, for instance, found that while most consumers between 18-49 still prefer to watch news on TV — more than two-thirds of those from that age group prefer to get their news online than those who are over 50.
 Source: Pew Research Center
As sources of news and those who watch it continue to evolve and age, then, it could signal a further closing of the gap between TV and online consumption preferences.
Second, our findings (which somewhat align with those in the Pew report) could indicate what’s ahead for the likes of Facebook as a source of news — which only 7% of respondents said is there preferred method of getting this information.
 Data collected with Lucid
Over the course of 2018 — since Facebook announced in January that it would overhaul its News Feed algorithm to prioritize content from friends and family over those from pages — many businesses and outlets have observed a dropped in engagement.
Business Pages, for instance, had seen a 50% drop in engagement by August, and many news outlets struggled with Facebook’s new rules for promoted posts so much, they gave up on publishing ads to the site altogether.

Source: Buffer
“I think there’s a mix of lost trust, changing usage habits, and the level or cadence of news being so high,” says HubSpot VP of Marketing Jon Dick, “that people are looking for more curation on what matters.”
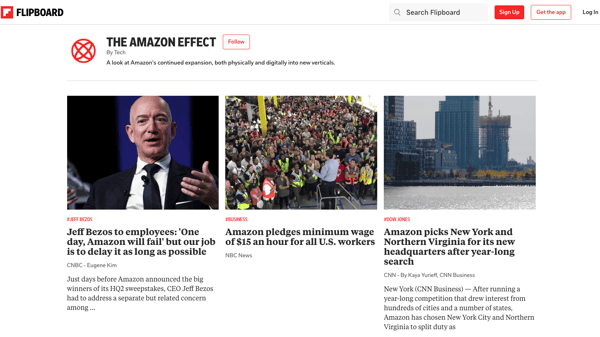
Combined with a growing preference for online news consumption, the mix alluded to by Dick could point to a future where news consumers begin to lean more heavily into specialized aggregation sites — like Flipboard, for example, where editorial and subject matter experts regularly curate news items across the web according to different areas of existence.
Stay tuned for what’s to come in 2019.

The Beginner’s Guide to Design Patterns
To fully understand the importance of design patterns, let’s start with an example — when a user uses your product, how do they save their landing page, blog post, template, etc.? Do their projects auto-save, or do they need to press a “Save” button?
Let’s say you choose auto-save. Great. Now, how much time do you have? Do you want to go into each individual page and code for the auto-save component, with a big potential for error?
Or do you want to use a design pattern to ensure each of your website pages saves the same way, without tedious effort on your part?
That’s the value of design patterns.
Here, we’ll explain what design patterns are, and provide lists of design patterns in Java, C# and .Net, so you can save valuable time and effort on your next design project.
Design patterns explained simply
At its most basic, design patterns are solutions to recurring problems.
In the UX world, then, a design pattern is a pre-prescribed solution to a common design problem. Essentially, it’s a way of saying, “Here’s how we typically solve for this problem, if you want to use our method.”
Chelsea Bathurst, a Design Lead at HubSpot, puts it this way: “Basically, components are the foundation — how does this thing look. Design patterns are how they work together.”
Design patterns are undeniably useful. They allow designers to avoid “re-inventing the wheel”, and because they are tried-and-true solutions from experienced designers, they are less risky than creating something from scratch.
There are three types of design patterns:
- Creational design patterns: Regarding object creation mechanisms
- Structural design patterns: Regarding Class and Object composition — identifying relationships and patterns between components
- Behavioral design patterns: Identifying communication patterns between Class objects
Next, let’s take a look at our lists of design patterns in java, or C# and .NET, so you can begin applying them yourself.
Design patterns in Java
- Factory Pattern
- Abstract Factory Pattern
- Singleton Pattern
- Prototype Pattern
- Builder Pattern
- Adapter Pattern
- Bridge Pattern
- Composite Pattern
- Decorator Pattern
- Facade Pattern
- Flyweight Pattern
- Proxy Pattern
- Chain Of Responsibility Pattern
- Command Pattern
- Interpreter Pattern
- Iterator Pattern
- Mediator Pattern
- Memento Pattern
- Observer Pattern
- State Pattern
- Strategy Pattern
- Template Pattern
- Visitor Pattern
Design patterns in C# and .NET
- Abstract Factory Pattern
- Builder Pattern
- Factory Method Pattern
- Prototype Pattern
- Singleton Pattern
- Adapter Pattern
- Bridge Pattern
- Composite Pattern
- Decorator Pattern
- Facade Pattern
- Flyweight Pattern
- Proxy Pattern
- Chain Of Responsibility Pattern
- Command Pattern
- Interpreter Pattern
- Iterator Pattern
- Mediator Pattern
- Memento Pattern
- Observer Pattern
- State Pattern
- Strategy Pattern
- Template Pattern
- Visitor Pattern
Once you understand the uses of each of these design patterns, you can choose which ones will best fit your needs. However, it’s critical you understand basic java, or C# and .NET programming concepts, to correctly apply these solutions. If you don’t, begin by taking an introductory course before taking any next steps with these design patterns.

5 Popular Job Boards That Will Help You Hire The Most Qualified Candidates
As a recruiter, your job isn’t just limited to finding qualified candidates to fill your company’s new roles. You also have to promote these roles and convince the best applicants to join your company. In other words, you’re not just a recruiter — you’re also a marketer and a sales person.
As a marketer of your employer’s mission and culture, you need to think like a content strategist, especially during the digital age. But instead of posting content on social media and search engines to attract the best fit customers for your company, you need to post compelling ads on job boards to persuade the most competent candidates to apply for your open roles.
But how do you do know which job boards will pull in the most accomplished applicants? To help you spend your time and recruiting budget wisely, we’ve compiled a list of the best job boards that will help you attract the most qualified candidates.
5 Best Job Boards
- Glassdoor
- LinkedIn Jobs
- Indeed
- Handshake
- Google Job Search
1. Glassdoor

As one of the most popular job boards out there, Glassdoor has over 62 million job seekers visit its website each month, giving you access to one of the largest and most diverse pool of applicants.
Glassdoor is usually the go-to resource for people to find jobs, so you’ll probably source the highest quantity and quality of applicants from the platform, which will help you hire more qualified candidates faster. According to Glassdoor’s own data, their candidates are also two times more likely to get hired and have a 30% higher retention rate than candidates on other job boards.
If you want to try out Glassdoor before you buy their premium version, they offer a free trial that lets you post up to 10 jobs and gives you job description templates. When you’re ready to pay for their premium package, the paid version lets you update and brand your company’s profile, provides robust analytics, like profile traffic, candidate demographics, and competitive intelligence, and offers sponsored job ads, which get 13 times more clicks than normal job postings.
2. LinkedIn Jobs

With a network of over 500 million professionals and nine million companies, LinkedIn naturally lends itself to connecting job seekers with employers. In fact, a hire is made on LinkedIn every 10 seconds and 90% of their users are interested in hearing about new job opportunities.
As a social media site for the working world, LinkedIn lets you search for candidates with their advanced filtering options and message them through InMail. If you recruit using LinkedIn Jobs, you’ll have access to a candidate recommendations feed and a candidate management dashboard, where you can track your candidates from application to hire.
LinkedIn also offers sponsored ad distribution through email and LinkedIn. You’ll only pay LinkedIn when people click on your job ad, so you’re paying for results, not impressions.
3. Indeed

200 million people visit Indeed’s website each month, which gives you access to the largest pool of job seekers out of all the job boards on this list.
To attract qualified candidates on Indeed, you can customize your company page to showcase your culture and pay for sponsored job ads, which get up to five times more clicks than normal job postings.
If you want to reach out to job seekers first, you can sift through over 120 million resumes in their resume database.
4. Handshake

If you offer internships and entry level jobs, Handshake is one of the best job boards for hiring exceptional college students and recent graduates. Over 14 million students and young alumni from more than 700 colleges and universities create profiles on Handshake to find internships or their first job. And along with more than 300,000 companies, every Fortune 500 Companies uses Handshake to hire their next class of interns and entry-level employees.
Handshake has such a large network of job seekers because the schools they partner with usually commit to only using one platform to help their students and young alumni find jobs, and they’ve all decided to trust Handshake with this endeavor.
To help you pinpoint your best-fit candidates out of their large pool of potential hires, Handshake lets you narrow down candidates with advanced filtering options, message students directly on the platform, and schedule on-campus interviews, informational sessions, and chats at career fairs.
5. Google Job Search

Millions of job seekers search for open roles on Google every day. But instead of making people click through to a job board and browse through openings, Google offers a service where you can post your jobs directly on their search engine.
All you have to do is integrate your website with Google Job Search or connect the job board you post open roles on to the search engine. Removing this extra step from your application process spreads awareness for more of your open roles and increases the likelihood that you’ll attract higher quality applicants.
Choosing the right job board is crucial for faster and better hiring.
There are hundreds of job boards on the internet, but not all of them are created equal. Fortunately, most job seekers trust and have found rewarding roles on these five popular job boards, giving you a deep pool of talent to recruit and hire from.

15 of the Best WordPress Newspaper Themes in 2019
Whether you’re a blogger, editorial writer, journalist, or any other type of writer, there are a number of different WordPress themes that allow you to share your content with your visitors on your website.
Newspaper WordPress themes — despite their name — work for all types of writing. No matter your content type, the layout you’re looking for, or the design you envision for your website, there are hundreds of newspaper themes to choose from. That’s why we’ve compiled this list of our 15 favorite newspaper themes for 2019 to help you find one that meets your needs.
15 of the Best WordPress Newspaper Themes for 2019
Each of the following themes contains a description and a few key takeaways to help you efficiently determine which option or options might work for your own website. If you don’t see a theme listed below of interest, you can always check out the WordPress theme library for more options.
1. News Pro Theme
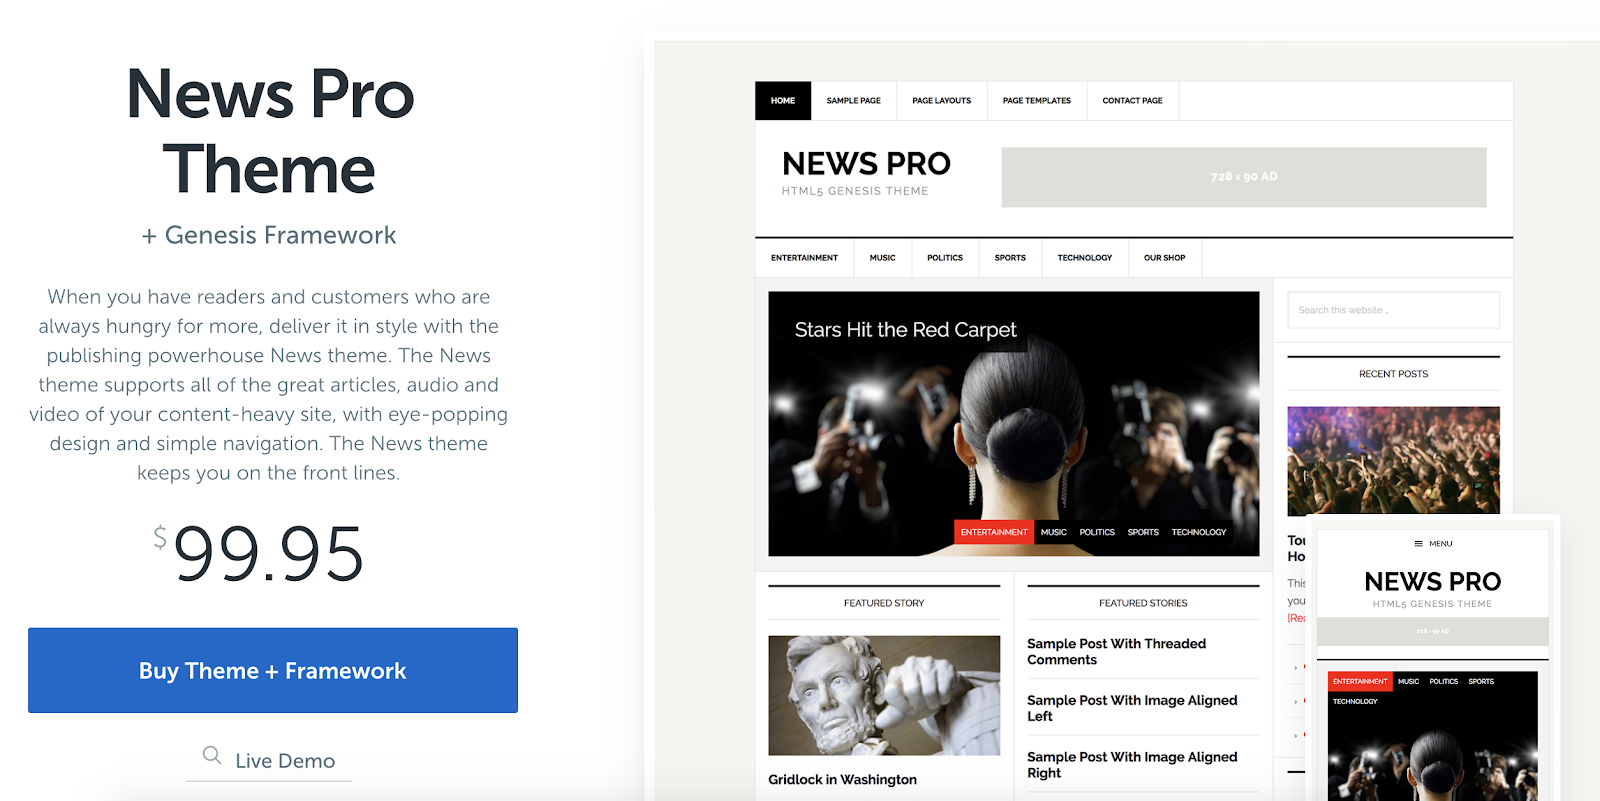
News Pro is a great newspaper theme for content-heavy websites. This theme formats your articles, photos, audio, and videos in a way that works for the story you are telling and for your website visitors. The simple navigation options also keep your content organized to ensure a great user experience. Additionally, if you’re already a WP Engine hosting plan user, you get free access to all other StudioPress themes.
Key Takeaways:
- Ideal for content-heavy websites
- Simple navigation
- WP Engine hosting plan users get access to all StudioPress themes
2. Newspaper
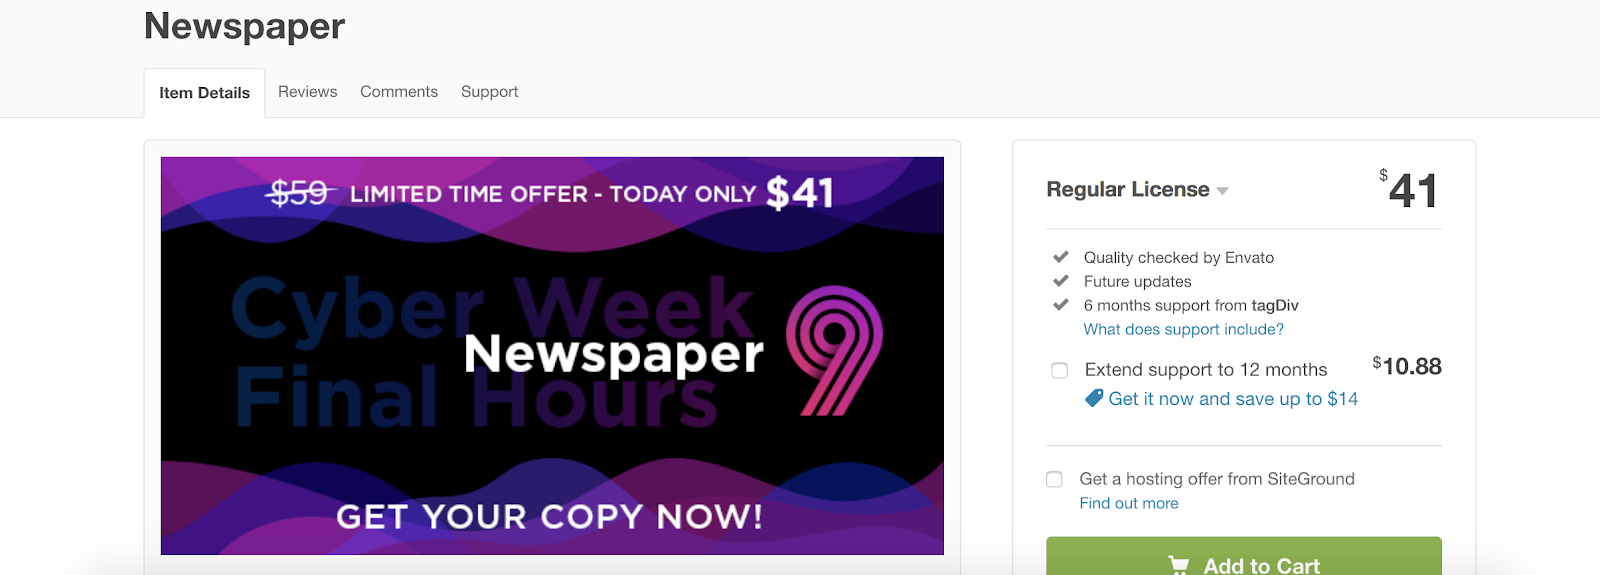
Newspaper is a WordPress theme created for writing articles and blogs in a newspaper template. The theme has several different layout options in their gallery suited for a wide range of blog types. There are also over 50 unique demos you can install in one-click to help get you started designing your website and adding your written content.
Key Takeaways:
- Created for articles and blogs
- Variety of layout options featured in their gallery
- 50 installable demos
3. Voice
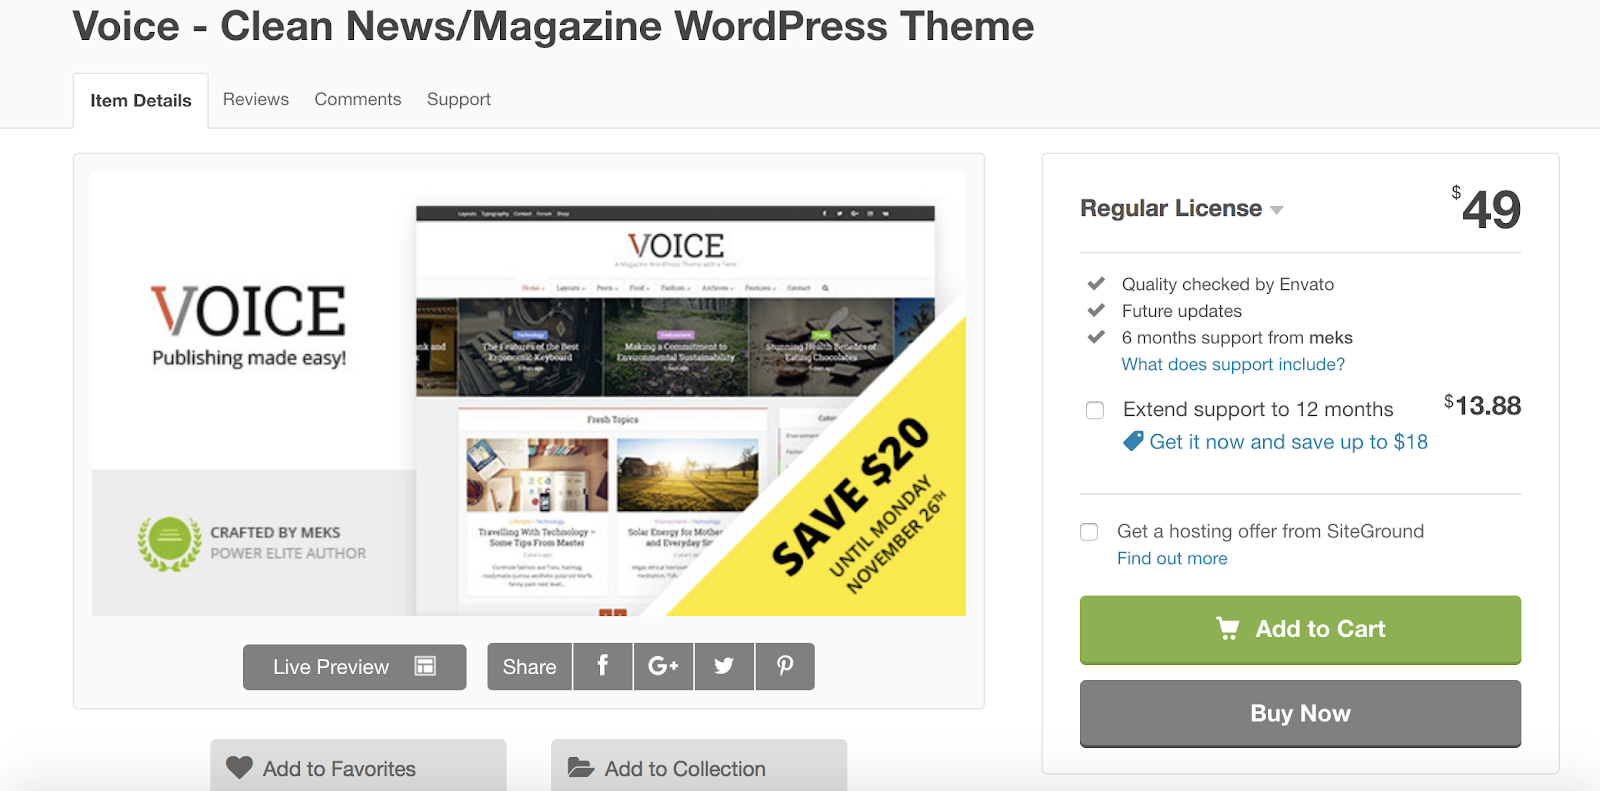
Voice is a clean and simple theme ideal for news and magazines. The theme has formatting features created for both news articles and editorial content. Voice has a wide variety of layout, color, and font options to customize your site. There are options to set multiple authors on a single post as well as add a “related posts” sections at the bottom of specific articles or pieces for visitors to continue reading on your site.
Key Takeaways:
- Ideal for news and magazines
- Can add multiple authors per post
- Related posts sections
4. Noozbeat
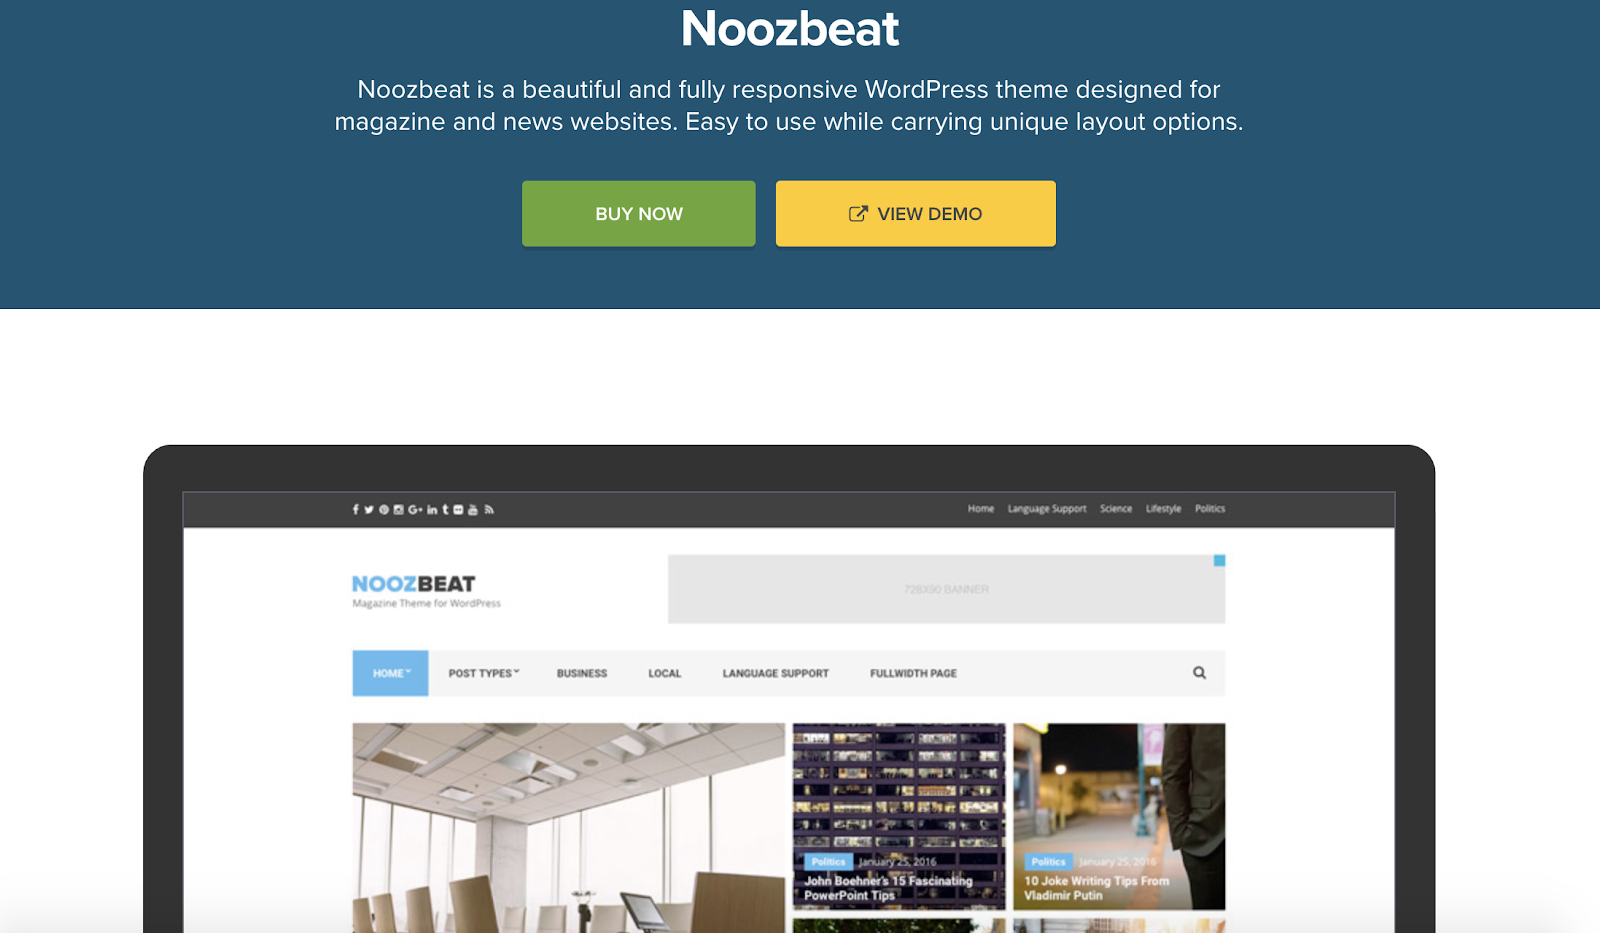
Noozebeat is a fully responsive theme, meaning visitors can move seamlessly from desktop to mobile to tablet while on your site. It’s designed for magazines and news articles and gives you the option to add advertising space, pages for your featured posts, and custom widgets to enhance your site’s user experience.
Key Takeaways:
- Fully responsive
- Created for news articles and magazines
- Custom widgets
5. Hive

Hive is a WordPress theme built for bloggers. There are a number of customizable typography options to make your written content look unique and fit your style. Adaptive layouts make your website interactive and exciting to look at — with these you can mix and match your written content with different fonts, styles, images, and more.
Key Takeaways:
- Built for bloggers
- Custom typography options
- Adaptive layouts
6. Felt
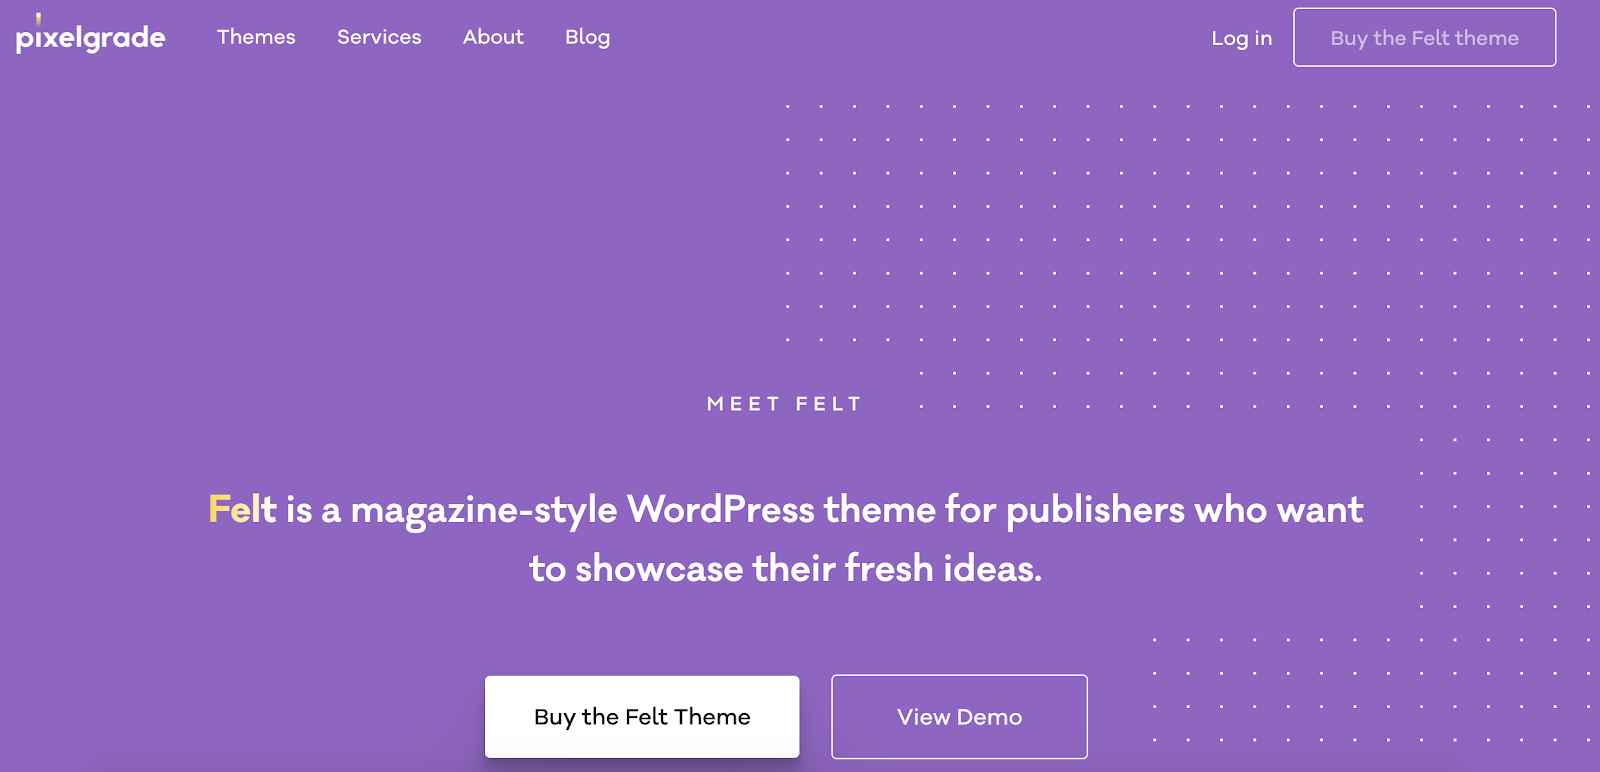
Felt is a WordPress theme ideal for publishing magazine-style content. The theme allows you to implement slideshows and carousels that automatically move visitors through a number of different images on your site. The theme also has built-in SEO features that will help you organically rank and reach more people.
Key Takeaways:
- Ideal for digital magazines
- Option to implement slideshows and carousels
- Automatic SEO features included
7. Wonderwall
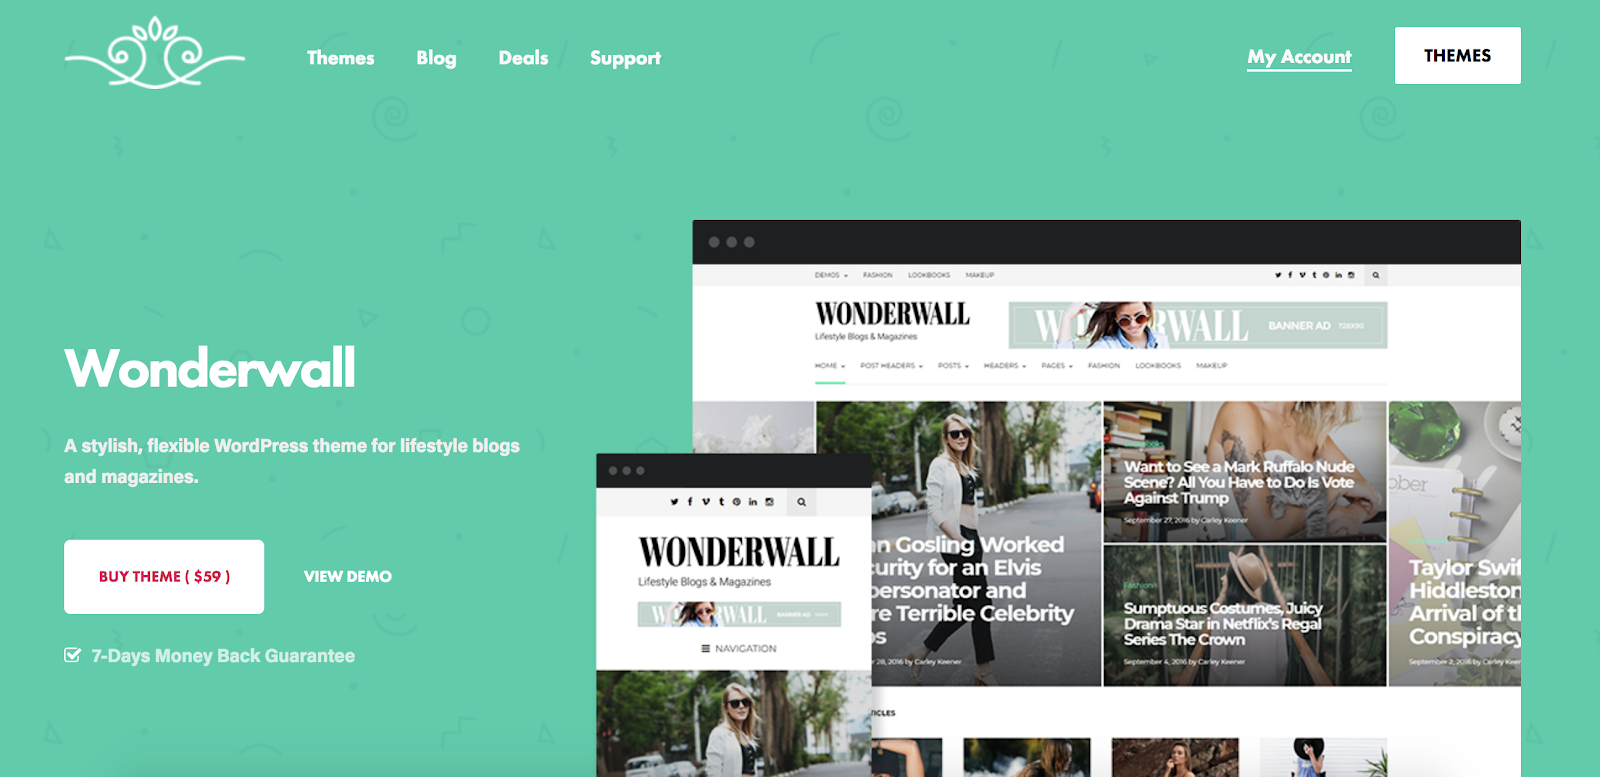
Wonderwall is a great theme option if you’re a writer for a lifestyle blog and or digital magazine. There are formatting options to display banner ads on your site and add a built-in newsletter subscription widget to quickly grow your number of readers and email list. There are also a total of nine different customizable homepage layouts to choose from for your digital publication.
Key Takeaways:
- Created for lifestyle blogs and digital magazines
- Banner ads display options
- Nine customizable homepage layouts
8. SmartMag
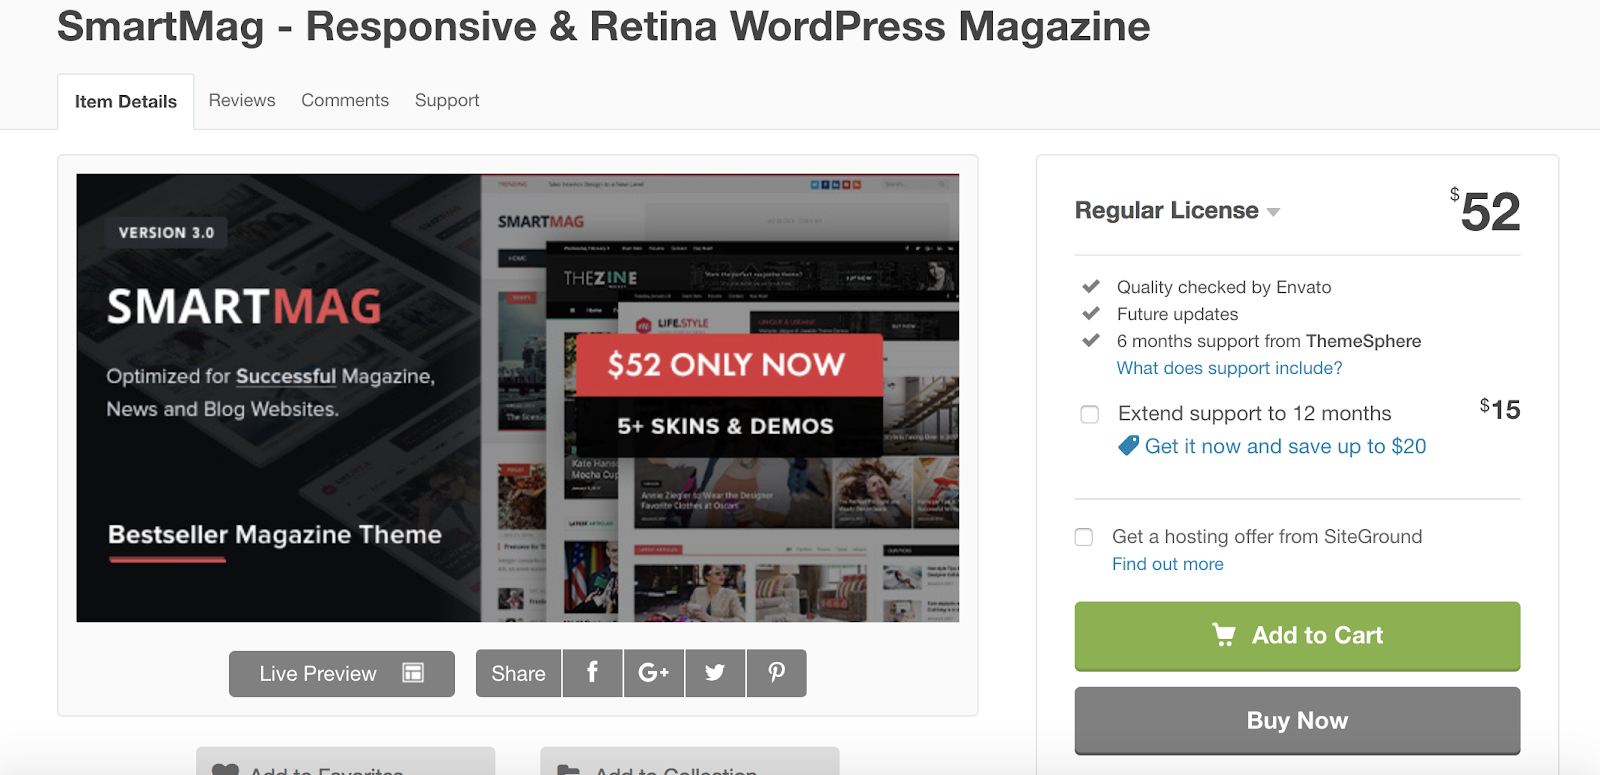
SmartMag is a multi-purpose WordPress writing theme suited for online magazines, newspapers, blogs, and review sites. The theme has a drag-and-drop page builder that allows you to easily test your content in different areas of your site, try different formats, and create your website without the need for any coding. There is also the option to add multi-content slideshows to enhance the visual elements of your website and even help you generate more ad views.
Key Takeaways:
- Multi-purpose writing theme
- Drag-and-drop page builder
- Multi-content slideshows
9. GoodLife
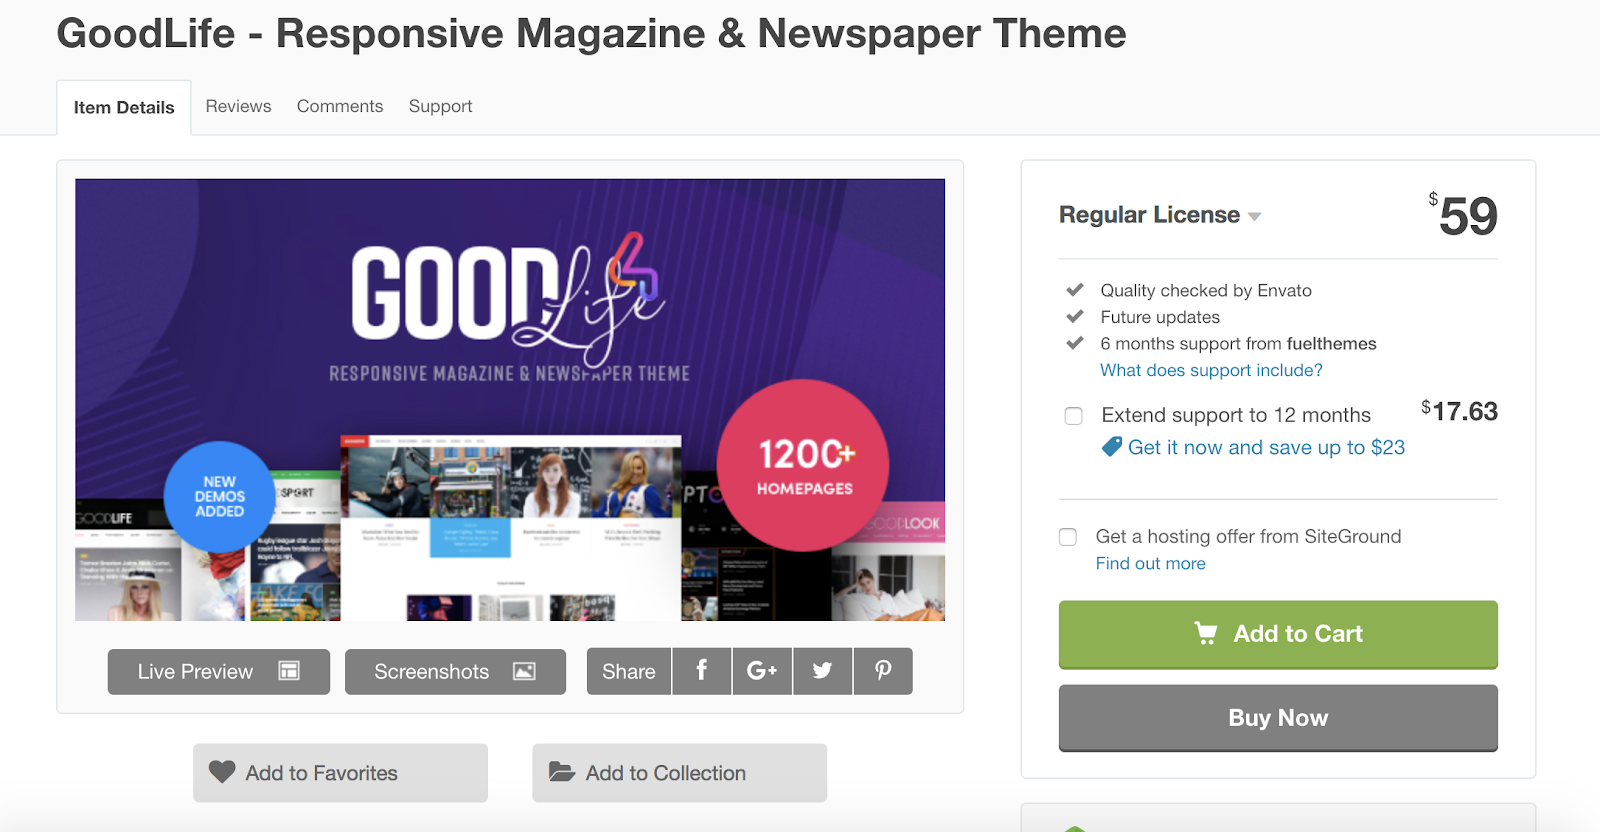
GoodLife is a newspaper and magazine theme with five different types of article and post layouts to choose from based on your content type. There are also gallery pages for those of you looking to display your photo and video content in a unique way. The theme is SEO-focused so your website will be more likely to organically rank for certain key phrases and terms.
Key Takeaways:
- Created for newspapers and magazines
- Five different article and post layouts
- SEO-focused
10. ColorMag
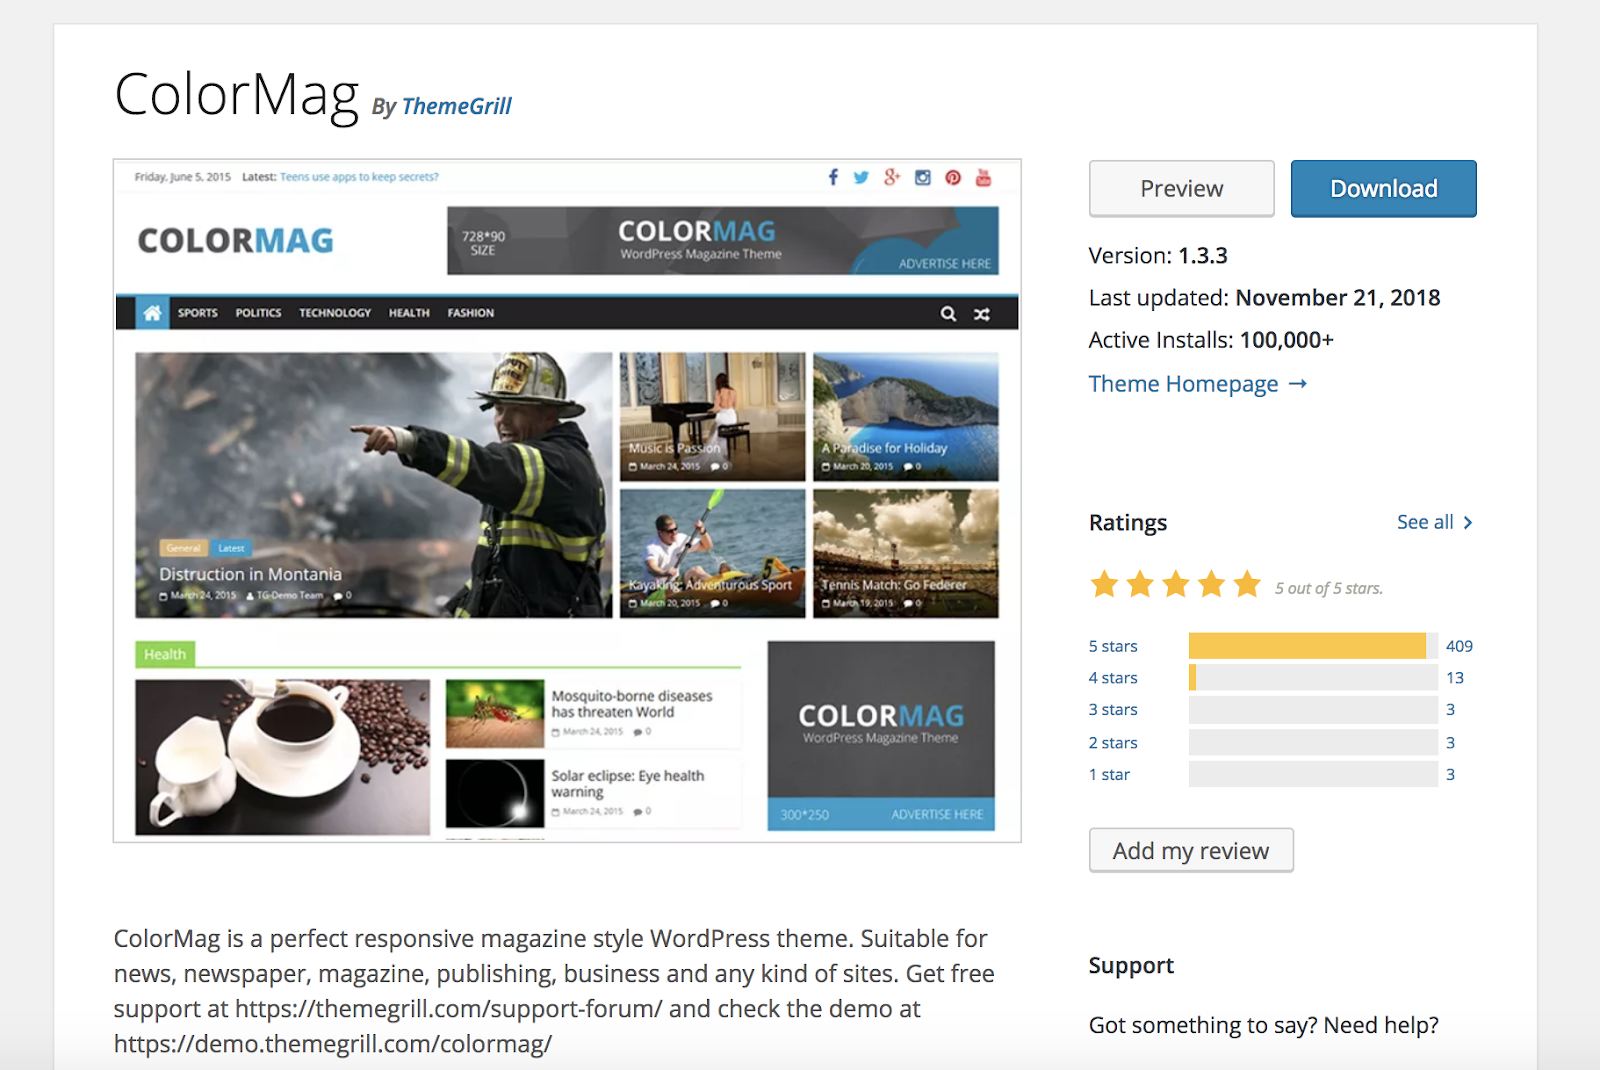
ColorMag is a magazine and blogging WordPress theme that comes with a layout for easily organizing and pairing your written content with your photos and videos. There are a number of ways to create specific pages and post types for featured and highlighted articles so they stand out to your readers and visitors. ColorMag also has a dedicated support team ready to help you if you stumble upon any issues while designing your site.
Key Takeaways:
- Magazine and blogging theme
- Featured and highlighted post types and pages
- Dedicated support team
11. The Voux
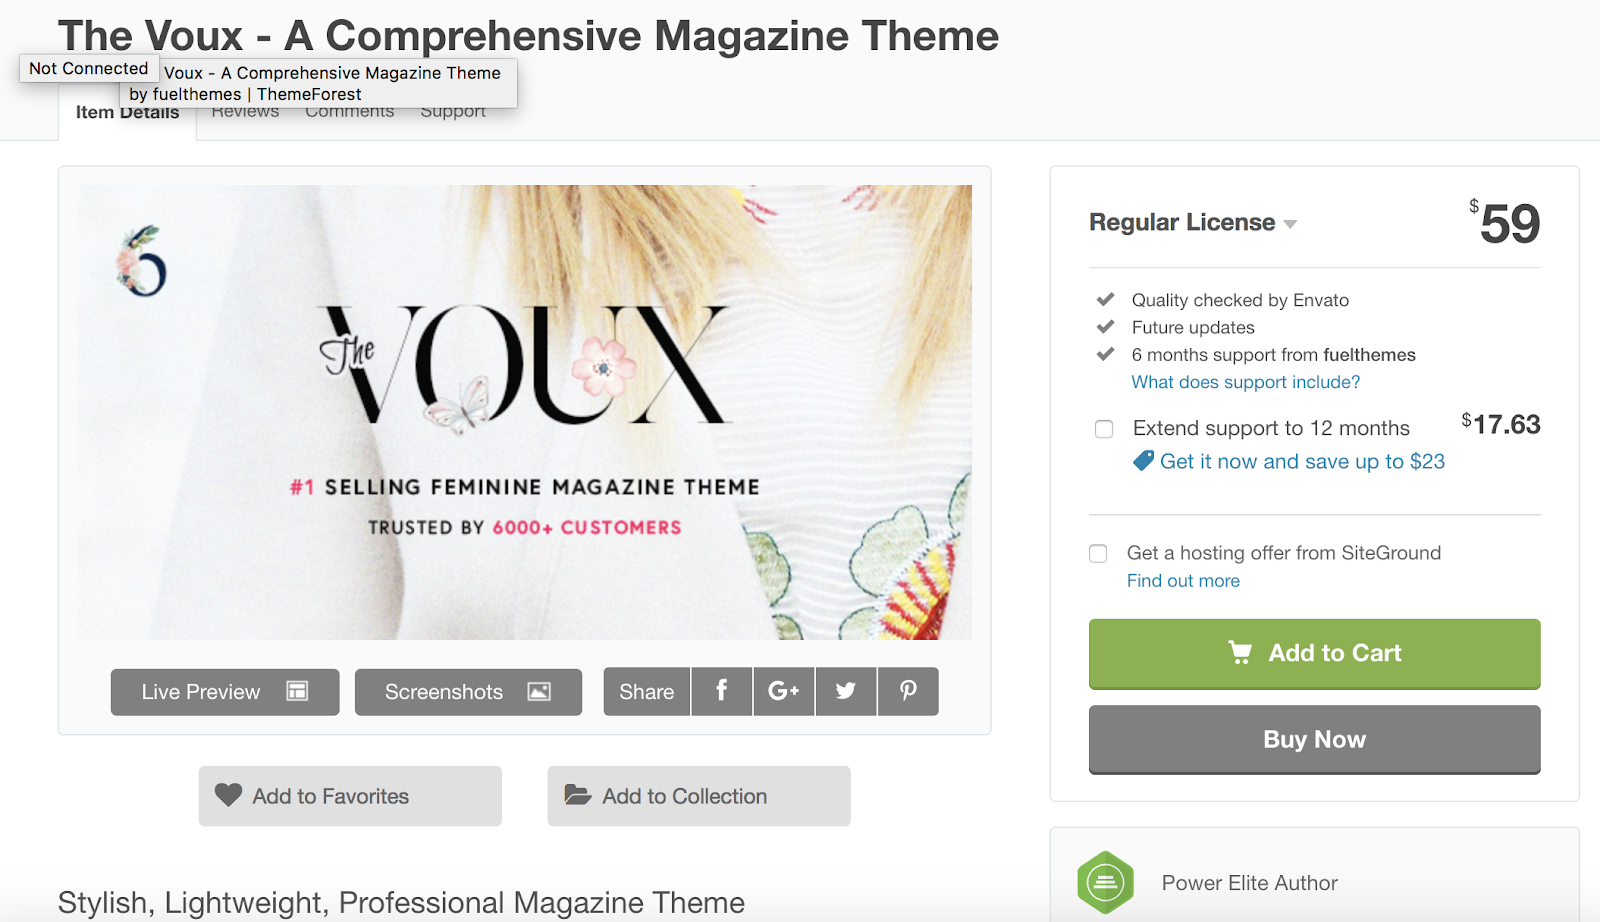
The Voux is ideal for digital magazines with layouts tailored to galleries, articles, and online shopping. You can set your images in a “lightbox” so they take up the entire width of your page and stand out with a black background for your website visitors. You can also set Image Hotspots and Shoppable Images so visitors and customers can click on certain items in your images to learn more about them, see their price, and purchase them.
Key Takeaways:
- Built for magazines
- Gallery image layout options with lightboxes
- Image Hotspots and Shoppable Images
12. NewStar
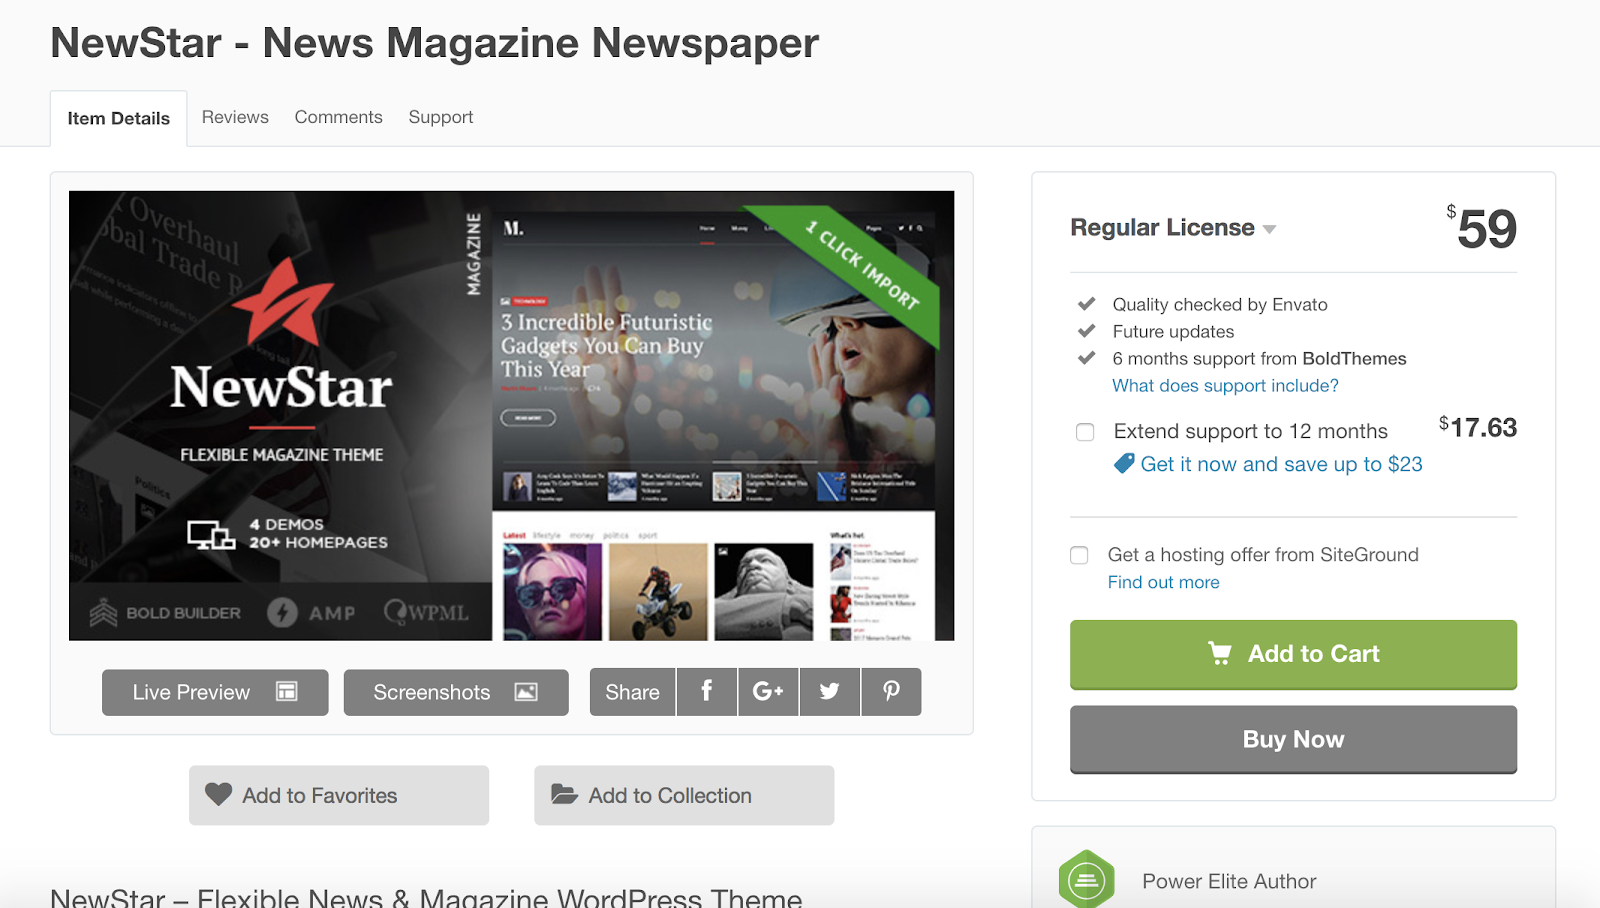
NewStar is a newspaper and magazine WordPress theme that features a one-click import tool so you can quickly select the features and layouts you want for your site and implement them immediately. The theme offers a customizable Article Teaser so you can get your readers excited about continuing to read your piece as well as neatly list multiple articles on one page. There is also plenty of ad space available in moveable banners throughout several different locations on your site.
Key Takeaways:
- Ideal for newspapers and magazines
- One-click feature import tool
- Customizable article teaser
13. MagPlus
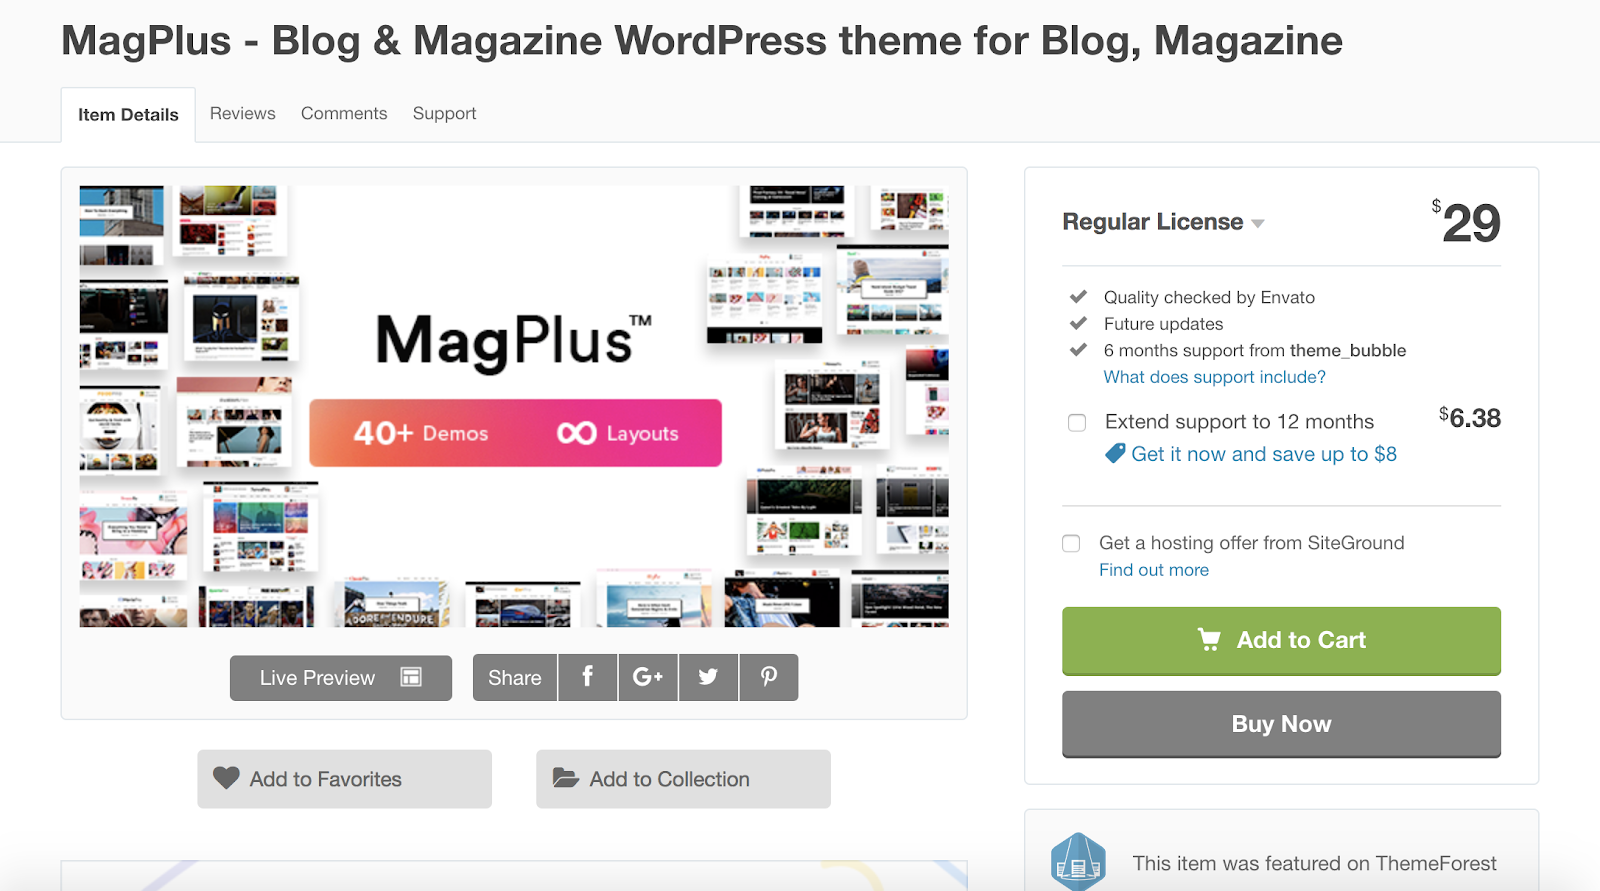
If you’re writing for a blog or magazine, MagPlus could be a great WordPress theme option for you. The theme has a Live Customizer so you can edit your website’s page designs, update their content and appearance, and see what your changes look like in real time. MagPlus is a lightweight theme so it’s speedy and efficient for your visitors. There are also 25 different layout options to help you customize the look of your site.
Key Takeaways:
- Created for blogs and magazines
- Live Customizer
- 25 customizable page layout options
14. Soledad
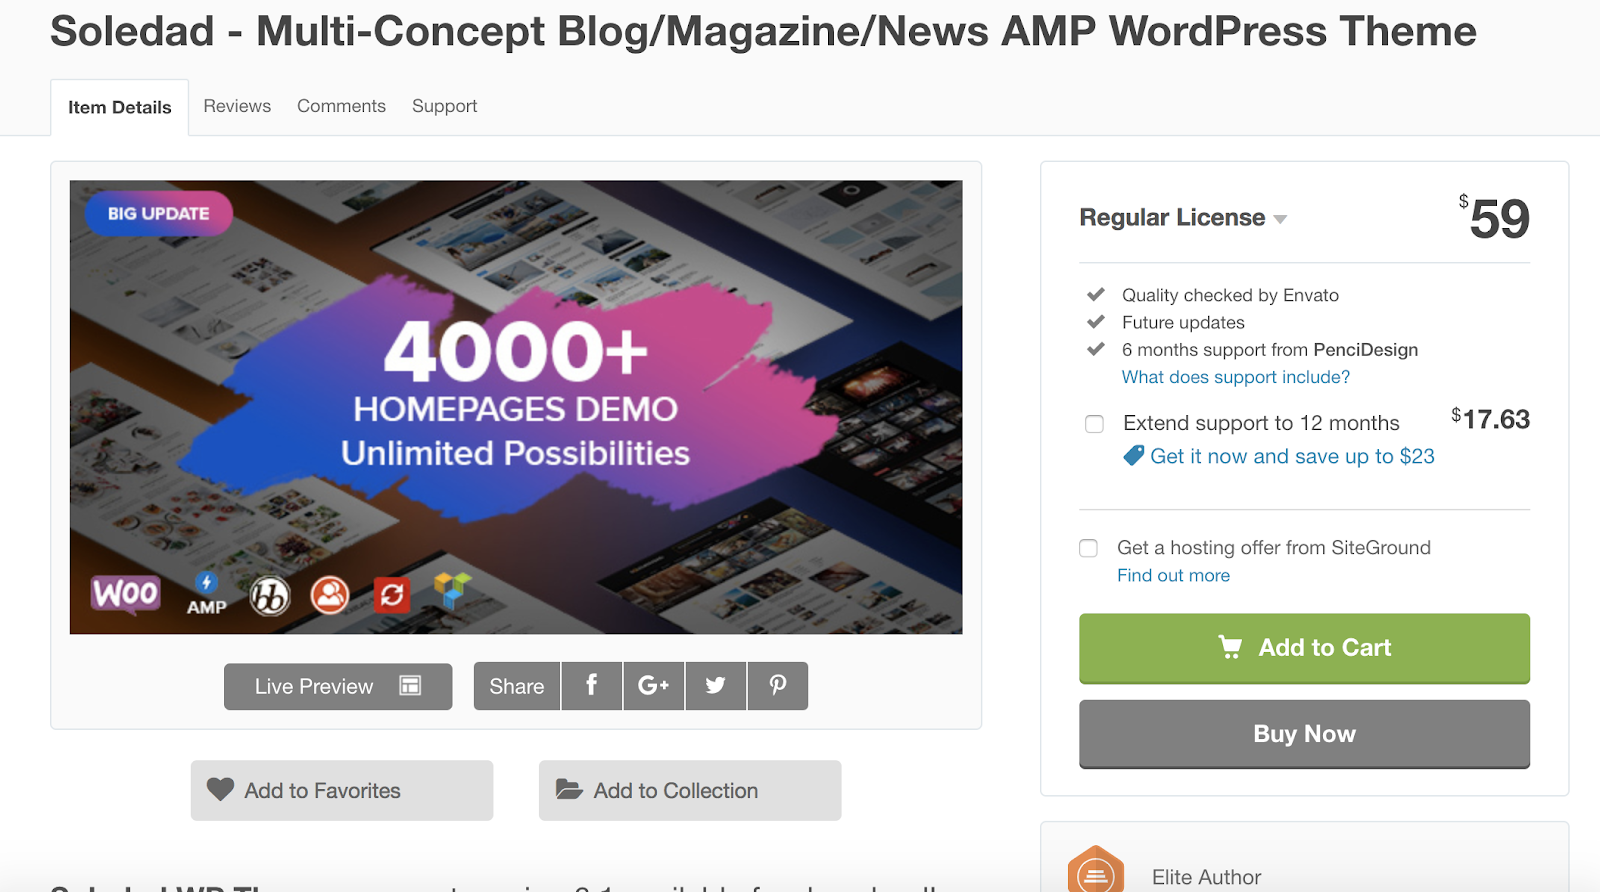
Soledad is a multi-purpose writing WordPress theme, meaning you can use it for your blog, newspaper, magazine, and other content. The theme has dozens of layouts that allow you to mix your magazine and blog content or completely separate your images, videos, and blogs. Soledad also has a White Label Tool that allows you to remove all of the Soledad logos throughout your site and replace them with your own so your theme is branded.
Key Takeaways:
- Multi-purpose writing theme
- Mix and match your written content with videos and images
- White Label Tool
15. Gridlove
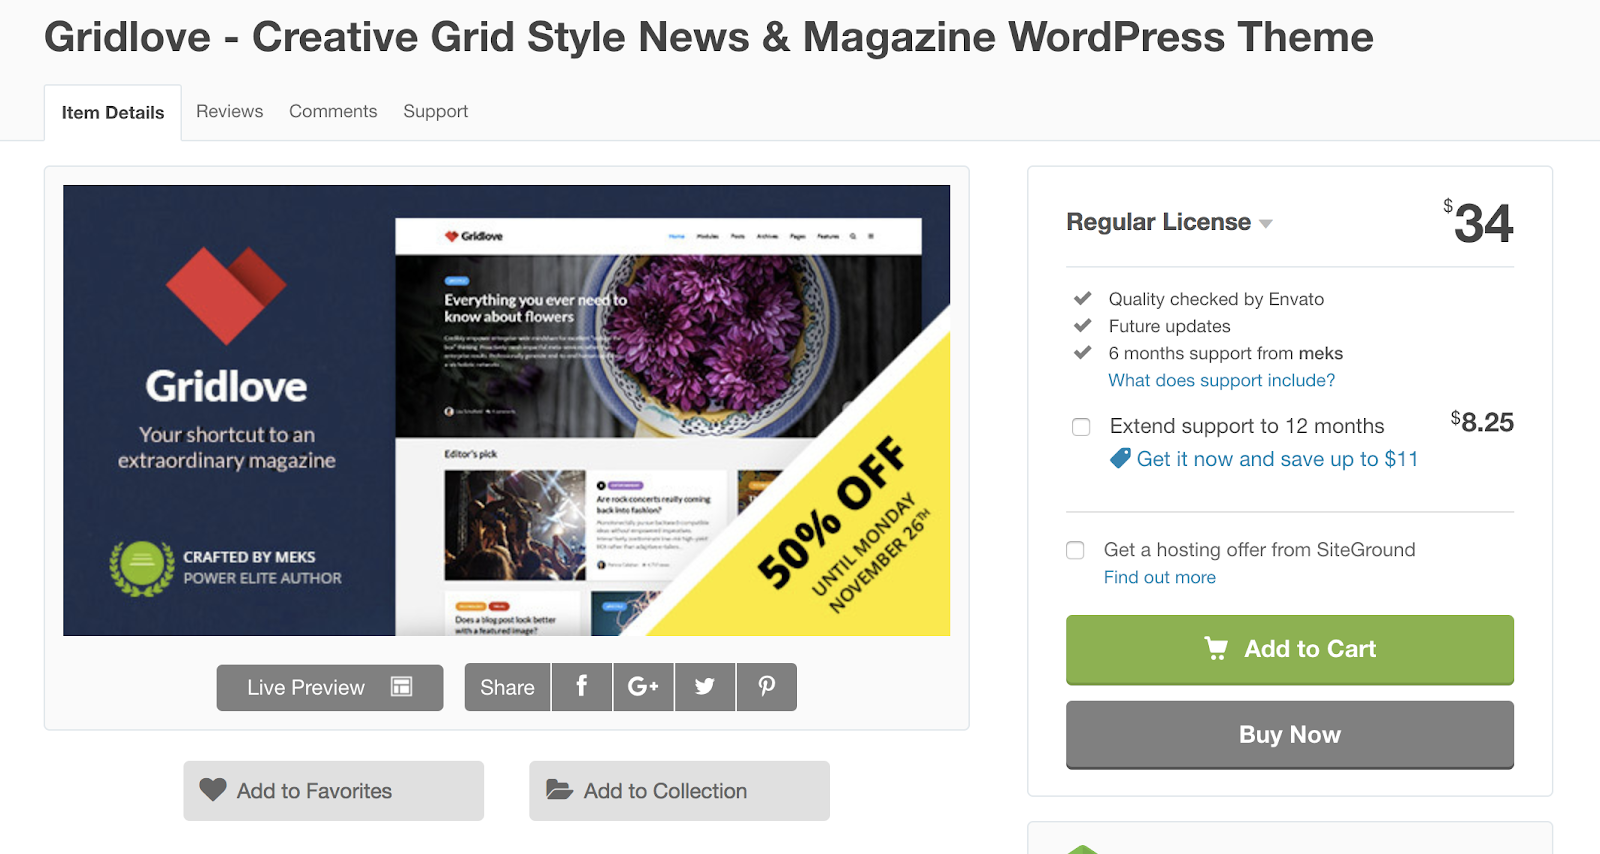
Gridlove is a WordPress theme tailored to newspapers and magazines. With no coding knowledge required, anyone can easily get started building their website with one of the hundreds of customizable, pre-made layouts and templates as well as their drag-and-drop page builder. The theme offers a flexible homepage in which you can feature any number of articles and other types of content.
Key Takeaways:
- Tailored to newspapers and magazines
- No coding knowledge required
- Hundreds of customizable layouts and templates
Back To You
These 15 WordPress newspaper themes are built to help you share all types of written content with your website visitors and customers. Whether you’re writing for a blog, magazine, review site, or newspaper, there is a writing theme tailored towards your needs. Get started and pick a theme listed above based on the type of writing you do, install it to your WordPress website, and start adding and sharing your content.

The Definition of Human Resources in 300 Words or Less
It’s likely you already have an understanding of what Human Resources does — at the very least, you probably know they have tasks that include recruiting and hiring employees, and dealing with an organization’s culture.
However, it’s a tricky term to define, particularly since HR deals with so many different aspects of a company.

Along with recruiting and hiring employees, Human Resources is responsible for compensation and benefits, on-boarding employees, training, organization development, and workplace culture — this long list of tasks can make it difficult to cleanly define HR in the first place.
Here, we’ve defined HR in less than 300 words. Whether you’re interested in pursuing a career in the Human Resources field, or simply need to know how your HR department can help your team, it’s critical you understand the term. Fortunately, we’ve made it easy.
What is Human Resources?
Human Resources is in charge of dealing with all issues related to the people within your organization. This includes recruiting and hiring people, as well as onboarding employees, but it also involves tasks required to retain employees, long-term. For instance, HR might develop wellness initiatives, provide guidance regarding disciplinary actions, or promote career development or training programs to strengthen employee satisfaction. Additionally, HR handles compensation and benefits.

How to Convert Images From PNG to JPG and JPG to PNG
When I first started my marketing career and needed to include an image in one of my articles or post a picture on social media, the image’s format didn’t matter to me. In my eyes, JPG and PNG were exactly the same.
Once I actually dug into the difference between the two, though, I realized they’re quite different. But one format isn’t necessarily better than the other — JPG is optimal for some situations while PNG is optimal for others.
In a nutshell, JPG images are best suited for social media and blog posts because they’re optimized for photography and have a smaller file size than PNG images.
PNG images are best suited for web graphics and professional photography because they maintain their quality no matter how many times you open and save them, whereas JPG images decline in quality every time you open and save them.
Fortunately, JPG and PNG images aren’t permanently stuck in their respective file format. You can convert images from PNG to JPG and vice versa in less than one minute with the help of some free online tools.
How to Batch Convert Files from PNG to JPG
1. Visit one of the free online PNG to JPG converters listed in the section below.
2. Upload your PNG images.
3. Press “Convert” to convert your PNG images to JPG images.
4. Click “Download” to download your new JPG images.
Best PNG to JPG Converter Tools
1. iLoveImg
With iLoveImg, you can convert up to 15 PNG files at a time without signing up for a free account. If you register for a free account, you can convert up to 30 PNG files at a time.
2. png2jpg.com
Png2jpg.com lets you convert up to 20 PNG files at a time. The free tool doesn’t ask for your email address.
Online-convert.com offers a free tool that lets you convert up to 20 PNG files at a time without giving them your email address. If you buy their premium version, you can convert up to 200 PNG files at a time.
How to Batch Convert Files from JPG to PNG
1. Visit one of the free online JPG to PNG converters listed in the section below.
2. Upload your JPG images.
3. Press “Convert” to convert your JPG images to PNG images.
4. Click “Download” to download your new PNG images.
Best JPG to PNG Converter Tools
1. ILoveImg
With iLoveImg, you can convert up to 15 JPG files at a time without signing up for a free account. If you register for a free account, you can convert up to 30 JPG files at a time.
2. jpg2png.com
Jpg2png.com lets you convert up to 20 JPG files at a time. The free tool doesn’t ask for your email address.
Online-convert.com offers a free tool that lets you convert up to 20 JPG files at a time without giving them your email address. If you buy their premium version, you can convert up to 200 JPG files at a time.

14 PowerPoint Presentation Tips to Make More Creative Slideshows [+ Templates]
I like to think of Microsoft PowerPoint as a test of basic marketing skills. To create a passing presentation, I need to demonstrate design skills, technical literacy, and a sense of personal style.
If the presentation has a problem (like an unintended font, a broken link, or unreadable text), then I’ve probably failed the test. Even if my spoken presentation is well rehearsed, a bad visual experience can ruin it for the audience.
Expertise means nothing without a good presentation to back it up. For starters, grab your collection of free PowerPoint templates below, and use the tips that follow to perfect your next presentation.

No matter your topic, successful PowerPoints depend on three main factors: your command of PowerPoint’s design tools, your attention to presentation processes, and your devotion to consistent style. Here are some simple tips to help you start mastering each of those factors, and don’t forget to check out the additional resources at the bottom of this post.

PowerPoint Presentation Tips
- Don’t let PowerPoint decide how you use PowerPoint.
- Create custom slide sizes.
- Edit your slide template design.
- Make sure all of your objects are properly aligned.
- Use “Format Menus” to better control your objects’ designs.
- Take advantage of PowerPoint’s shapes.
- Create custom shapes.
- Crop images into custom shapes.
- Present websites within PowerPoint.
- Embed your font files.
- Save your slides as JPEGs.
- Embed multimedia.
- Bring your own hardware.
- Use “Presenter View.”
PowerPoint Style
1. Don’t let PowerPoint decide how you use PowerPoint.
Microsoft wanted to provide PowerPoint users with a lot of tools. But this does not mean you should use them all. Here are some key things to look out for:
- Make sure that preset PPT themes complement your needs before you adopt them.
- Try to get away from using Microsoft Office’s default fonts, Calibri and Cambria. Using these two typefaces can make the presentation seem underwhelming.
- Professionals should never use PPT’s action sounds. (Please consider your audience above personal preference).
- PowerPoint makes bulleting automatic, but ask yourself: Are bullets actually appropriate for what you need to do? Sometimes they are, but not always.
- Recent PPT defaults include a small shadow on all shapes. Remove this shadow if it’s not actually needed. Also, don’t leave shapes in their default blue.
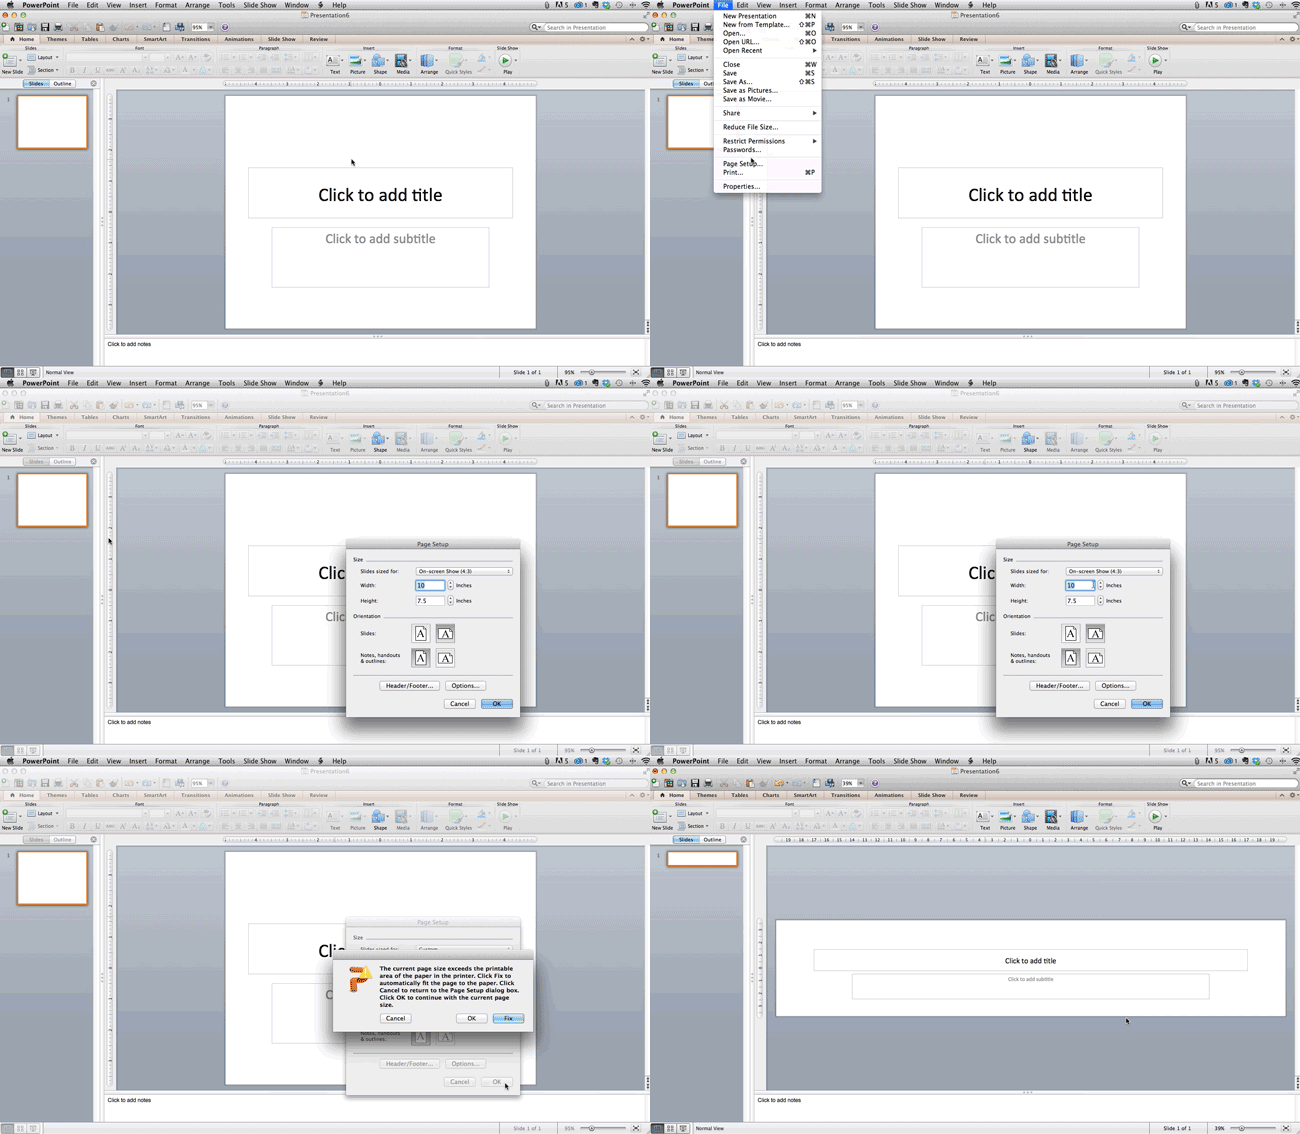
2. Create custom slide sizes.
While you usually can get away with the default slide size for most presentations, you may need to adjust it for larger presentations on weirdly sized displays. If you need to do that, here’s how.
- In the top-left corner, choose “File.”
- Select “Page Setup.”
- Type the height and width of the background you’d like, and click “OK.”
- A dialogue box will appear. Click “OK” again.
- Your background is resized!
Tip: Resize your slides before you add any objects to them or the dimensions of your objects will become skewed.
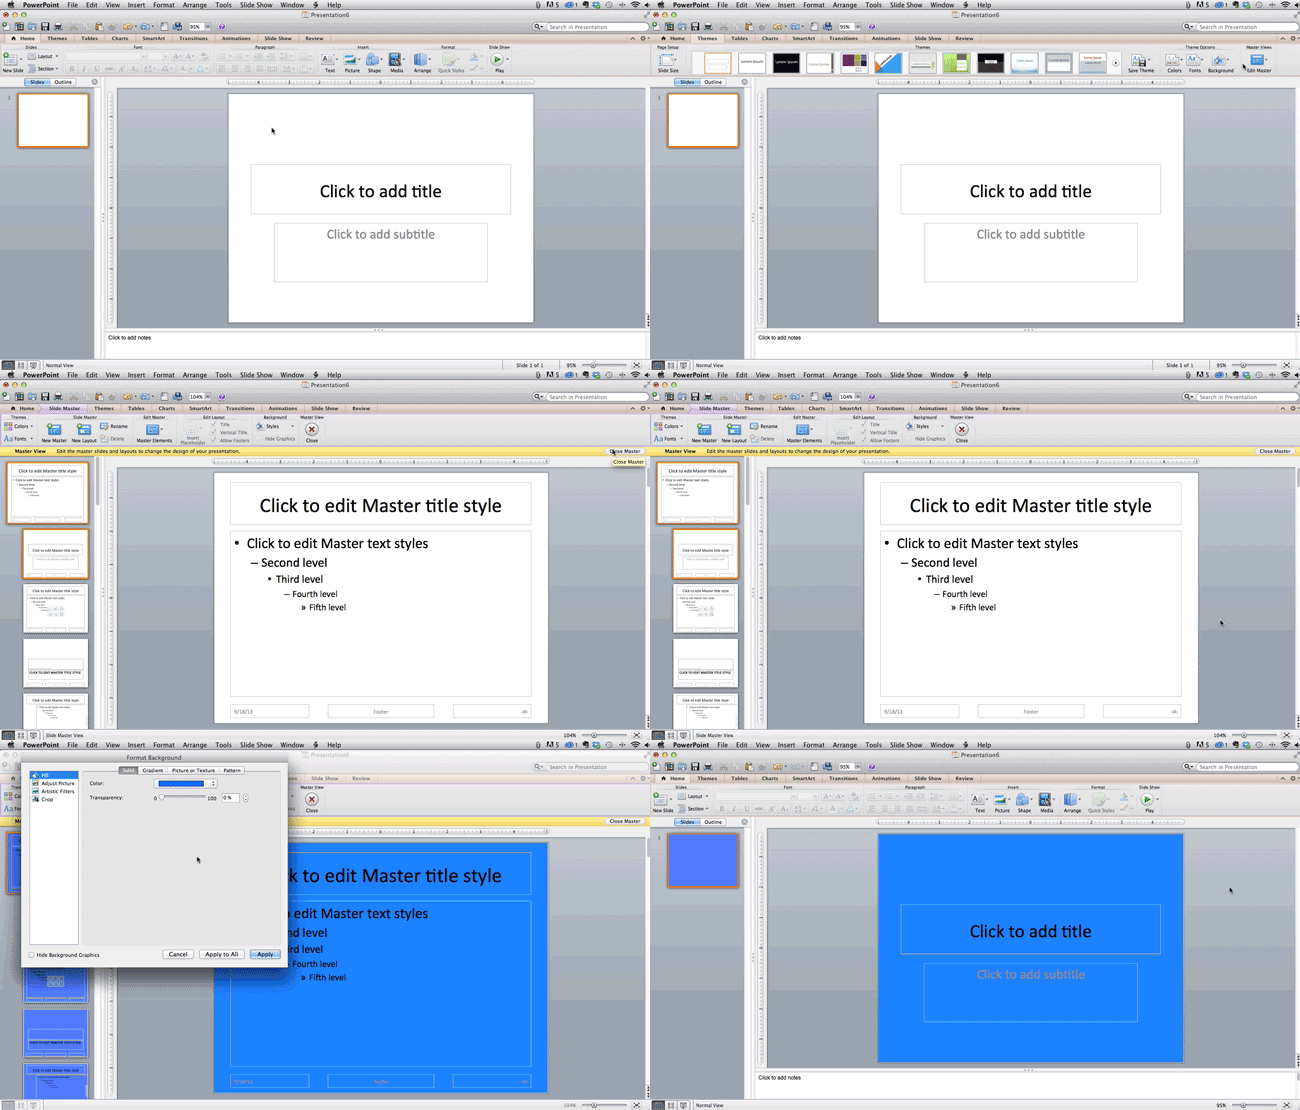
3. Edit your slide template design.
Often, it’s much easier to edit your PowerPoint template before you start — this way, you don’t have design each slide by hand. Here’s how you do that.
- Select “Themes” in the top navigation.
- In the far right, click “Edit Master,” then “Slide Master.”
- Make any changes you like, then click “Close Master.” All current and future slides in that presentation will use that template.
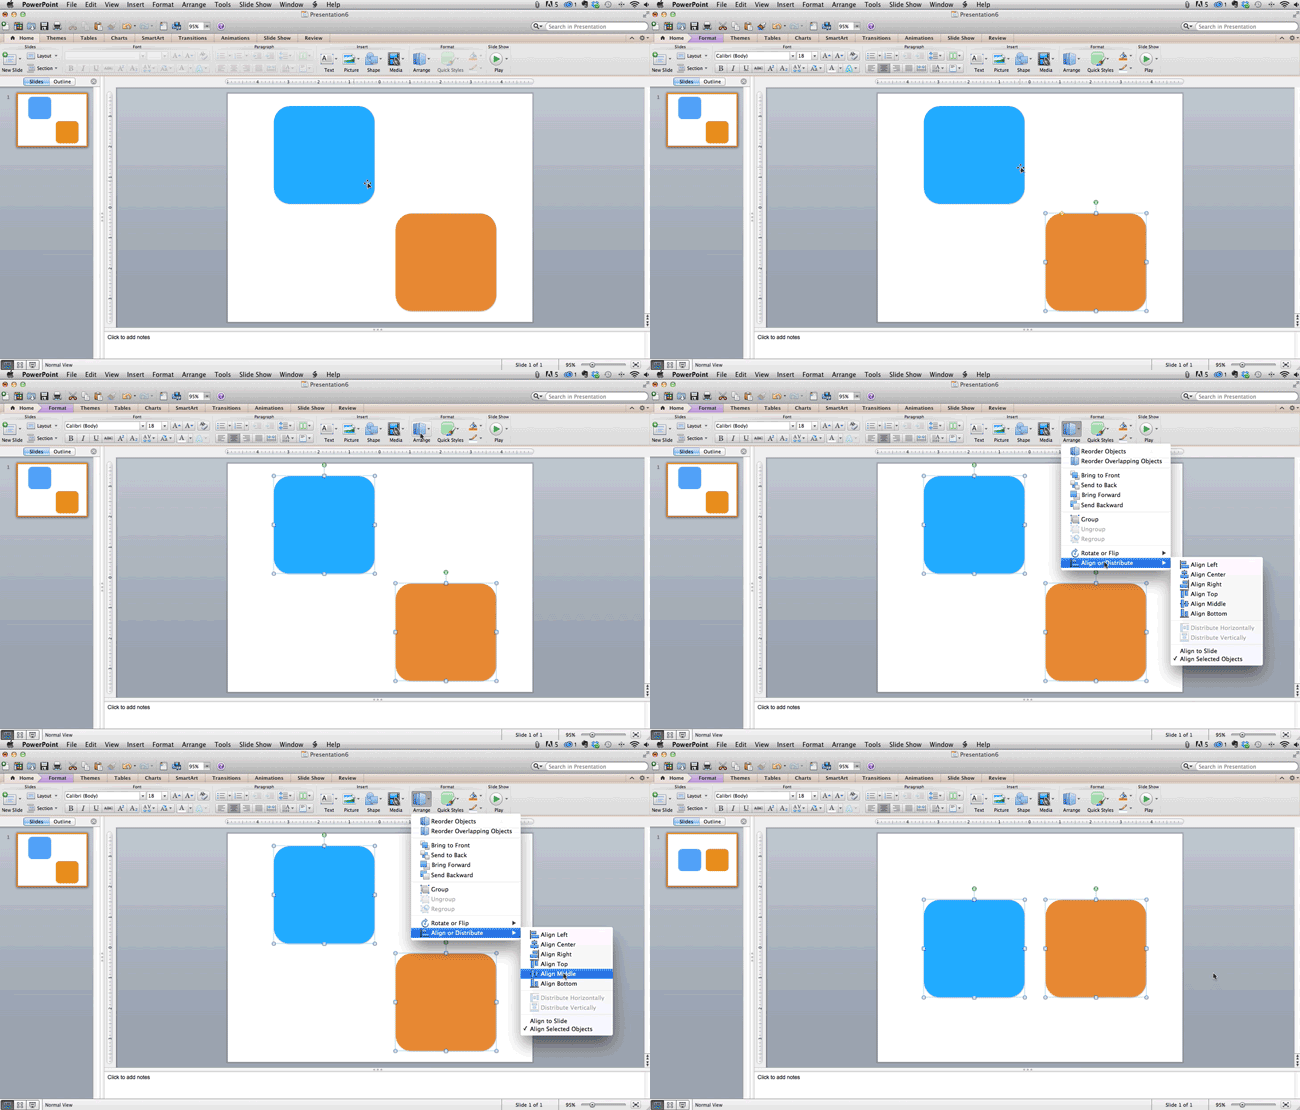
4. Make sure all of your objects are properly aligned.
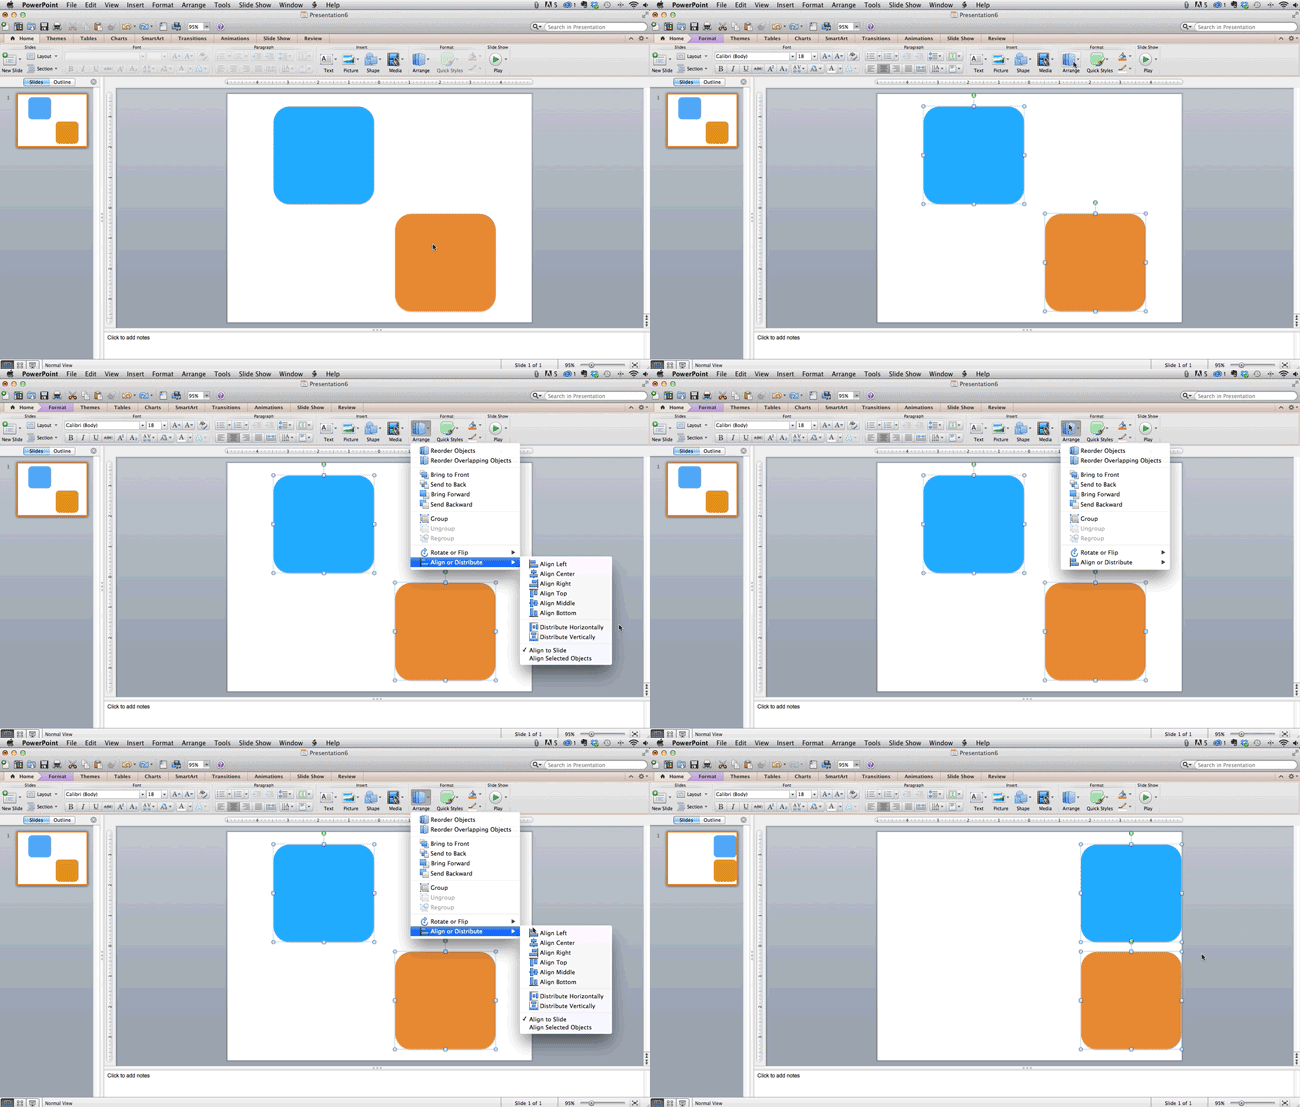
Having properly aligned objects on your slide is the key to making it look polished and professional. You can manually try to line up your images … but we all know how that typically works out. You’re trying to make sure all of your objects hang out in the middle of your slide, but when you drag them there, it still doesn’t look quite right. Get rid of your guessing game and let PowerPoint work its magic with this trick.
How to align multiple objects:
- Select all objects by holding down “Shift” and clicking on all of them.
- Select “Arrange” in the top options bar, then choose “Align or Distribute.”
- Choose the type of alignment you’d like.
How to align objects to the slide:
- Select all objects by holding down “Shift” and clicking on all of them.
- Select “Arrange” in the top options bar, then choose “Align or Distribute.”
- Select “Align to Slide.”
- Select “Arrange” in the top options bar again, then choose “Align or Distribute.”
- Choose the type of alignment you’d like.
PowerPoint Design
5. Use “Format Menus” to better control your objects’ designs.
Format menus allow you to do fine adjustments that otherwise seem impossible. To do this, right click on an object and select the “Format” option. Here, you can fine-tune shadows, adjust shape measurements, create reflections, and much more. The menu that will pop up looks like this:
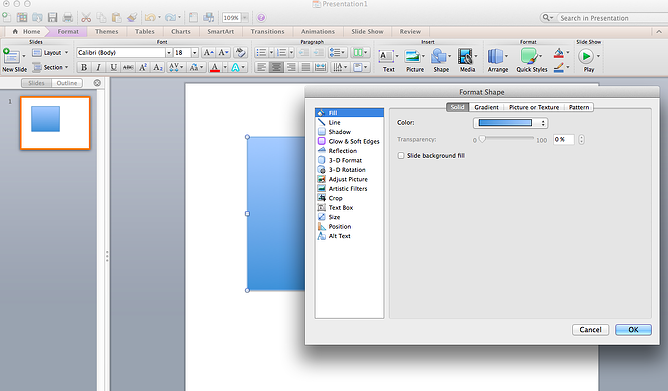
Although the main options can be found on PowerPoint’s format toolbars, look for complete control in the format window menu. Other examples of options available include:
- Adjusting text inside a shape.
- Creating a natural perspective shadow behind an object.
- Recoloring photos manually and with automatic options.
6. Take advantage of PowerPoint’s shapes.
Many users don’t realize how flexible PowerPoint’s shape tools have become. In combination with the expanded format options released by Microsoft in 2010, the potential for good design with shapes is readily available. PowerPoint provides the user with a bunch of great shape options beyond the traditional rectangle, oval, and rounded rectangle patterns, unlike even professional design programs like Adobe Creative Suite or Quark.
Today’s shapes include a highly functional Smart Shapes function, which enables you to create diagrams and flow charts in no time. These tools are especially valuable when you consider that PowerPoint is a visual medium. Paragraphing and bullet lists are boring — you can use shapes to help express your message more clearly.
7. Create custom shapes.
When you create a shape, right click and press “Edit Points.” By editing points, you can create custom shapes that fit your specific need. For instance, you can reshape arrows to fit the dimensions you like.
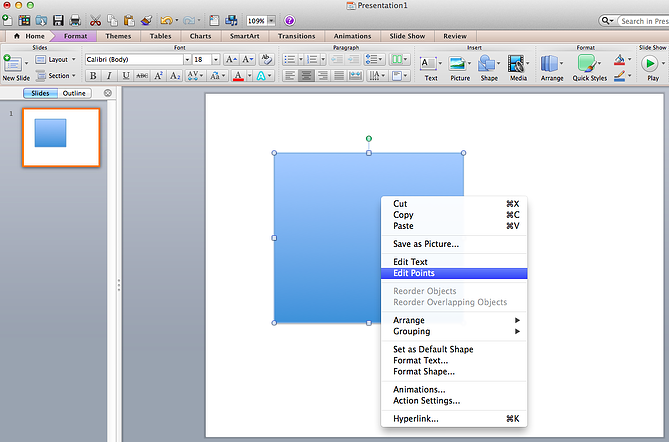
Another option is to combine two shapes together. When selecting two shapes, right-click and go to the “Grouping” sub-menu to see a variety of options.
- Combine creates a custom shape that has overlapping portions of the two previous shapes cut out.
- Union makes one completely merged shape.
- Intersect builds a shape of only the overlapping sections of the two previous shapes.
- Subtract cuts out the overlapping portion of one shape from the other.
By using these tools rather than trying to edit points precisely, you can create accurately measured custom shapes.
8. Crop images into custom shapes.
Besides creating custom shapes in your presentation, you can also use PowerPoint to crop existing images into new shapes. Here’s how you do that:
- Click on the image and select “Format” in the options bar.
- Choose “Crop,” then “Mask to Shape,” and then choose your desired shape. Ta-da! Custom-shaped photos.

Learn more about creating images for your marketing channels in the video below.
9. Present websites within PowerPoint.
Tradition says that if you want to show a website in a PowerPoint, you should just create link to the page and prompt a browser to open. For PC users, there’s a better option.
Third party software that integrates fully into PowerPoint’s developer tab can be used to embed a website directly into your PowerPoint using a normal HTML iframe. One of the best tools is LiveWeb, a third-party software developed independently.
By using LiveWeb, you don’t have to interrupt your PowerPoint, and your presentation will remain fluid and natural. Whether you embed a whole webpage or just a YouTube video, this can be a high-quality third party improvement.
Unfortunately, Mac users don’t have a similar option. Agood second choice is to take screen shots of the website, link in through a browser, or embed media (such as a YouTube video) by downloading it directly to your computer.
PowerPoint Process
10. Embed your font files.
One constant problem presenters have with PowerPoint is that fonts seem to change when presenters move from one computer to another. In reality, the fonts are not changing — the presentation computer just doesn’t have the same font files installed. If you’re using a PC and presenting on a PC, then there is a smooth work around for this issue. (When you involve Mac systems, the solution is a bit rougher. See Tip #11.)
Here’s the trick: When you save your PowerPoint file (only on a PC), you should click Save Options in the “Save As …” dialog window. Then, select the “Embed TrueType fonts” check box and press “OK.” Now, your presentation will keep the font file and your fonts will not change when you move computers (unless you give your presentation on a Mac).
11. Save your slides as JPEGs.
In PowerPoint for Mac 2011, there is no option to embed fonts within the presentation. So unless you use ubiquitous typefaces like Arial or Tahoma, your PPT is likely going to encounter font changeson different computers.
The most certain way of avoiding this is by saving your final presentation as JPEGs, and then inserting these JPEGs onto your slides. On a Mac, users can easily drag and drop the JPEGs into PPT with fast load time. If you do not use actions in your presentation, then this option works especially well.
If you want your presentation to appear “animated,” you’ll need to do a little tinkering. All you need to do is save JPEGs of each “frame” of the animation. Then, in your final presentation, you’ll just display those JPEGs in the order you’d like the animation to appear. While you’ll technically have several new slides in place of one original one, your audience won’t know the difference.
An important consideration: If your PPT includes a lot of JPEGs, then the file size will increase.
12. Embed multimedia.
PowerPoint allows you to either link to video/audio files externally or to embed the media directly in your presentation. You should embed these files if you can, but if you use a Mac, you cannot actually embed the video (see note below). For PCs, two great reasons for embedding are:
- Embedding allows you to play media directly in your presentation. It will look much more professional than switching between windows.
- Embedding also means that the file stays within the PowerPoint presentation, so it should play normally without extra work (except on a Mac).
Note: Mac OS users of PowerPoint should be extra careful about using multimedia files.
If you use PowerPoint for Mac, then you will always need to bring the video and/or audio file with you in the same folder as the PowerPoint presentation. It’s best to only insert video or audio files once the presentation and the containing folder have been saved on a portable drive in their permanent folder. Also, if the presentation will be played on a Windows computer, then Mac users need to make sure their multimedia files are in WMV format. This tip gets a bit complicated, so if you want to use PowerPoint effectively, consider using the same operating system for designing andpresenting, no matter what.
13. Bring your own hardware.
Between operating systems, PowerPoint is still a bit jumpy. Even between differing PPT versions, things can change. One way to fix these problems is to make sure that you have the right hardware — so just bring along your own laptop when you’re presenting.
14. Use “Presenter View.”
In most presentation situations, there will be both a presenter’s screen and the main projected display for your presentation. PowerPoint has a great tool called Presenter View, which can be found in the “Slide Show” tab of PowerPoint 2010 (or 2011 for Mac). Included in the Presenter View is an area for notes, a timer/clock, and a presentation display.

For many presenters, this tool can help unify their spoken presentation and their visual aid. You never want to make the PowerPoint seem like a stack of notes that you use a crutch. Use the Presenter View option to help create a more natural presentation.
Pro Tip: At the start of the presentation, you should also hit CTRL + H to make the cursor disappear. Hitting the “A” key will bring it back if you need it!
With style, design, and presentation processes under your belt, you can do a lot more with PowerPoint than just presentations for your clients. PowerPoint and similar slide applications are flexible tools that should not be forgotten.
Want more? Read 20 Great Examples of PowerPoint Presentation Design.