
How to Mine Bitcoin: A Comprehensive Guide
When I first heard the term “Bitcoin mining”, I imagined a 49er dressed in tattered western garb, swinging a pickaxe at a huge data server and yelling “BOYS, I FOUND US SOME BITCOIN!”.
Needless to say, my initial understanding of Bitcoin mining was completely off the mark (although I secretly wish it was true). Bitcoin is entirely digital, so unlike other mineable materials such as gold or coal, swinging a pickaxe at the ground won’t dig up any bitcoins. You actually have to use a mining rig, which consists of mining software and hardware.
The term “mining” is also really just a clever metaphor for the intricate proof-of-work system that gives people bitcoins in exchange for validating the cryptocurrency’s transactions. In other words, the reason why people mine Bitcoin and how they actually do it is complicated. Fortunately for you, though, we wrote an in-depth explanation of what Bitcoin mining exactly is, why people do it, and how you can mine the cryptocurrency.
What is Bitcoin Mining?
To truly understand how Bitcoin mining works, you first need to know the basics of Blockchain, which is the underlying technology for cryptocurrencies like Bitcoin, Litecoin, and Ethereum. The technology acts like a public, digital ledger of every single transaction made in Bitcoin, recording each transaction of the cryptocurrency into a database, copying the database, and sending copies to every computer, or node, in its network.
To make sure this ledger’s true state is verified and updated, each node in its network cross-references and communicates with each other to see if all the copies are the same. This publicizes and validates every single transaction of Bitcoin. It also decentralizes the cryptocurrency, removing the need for a financial middleman to verify its transactions, like a bank.
If a node notices one of the ledger’s copies isn’t the same, due to a manipulation of a transaction’s record after the fact, the network rejects the transaction. This security protocol halts people from altering the ledger to spend bitcoins more than once and prevents them from sending someone else’s digital funds to themselves.
To update a blockchain with these new, verified transactions, a new block, which is a bundle of these transactions, needs to be created and added to the chain, which is all the blocks linked together. But to create and add a block to the chain, the block needs to be validated by the answer to a complex cryptographic puzzle. So Bitcoin rewards the individuals, groups, or businesses who are first to solve the puzzle with a payout of the cryptocurrency.
These validators, who use mining software and hardware to earn Bitcoin payouts, are called miners. Once a miner figures out the correct answer to the cryptographic puzzle, which is verified by each node in the network, they earn the block reward and a new block is created and added to the blockchain. Each block has a unique code, called a “hash”, on one of its sides and the hash of the previous block in the chain on its other side, linking all the blocks together in a chronological and permanent fashion.
For Bitcoin miners, the block reward for validating one megabyte worth of Bitcoin transactions is currently 12.5 tokens. With one token’s value hovering at around $6,374 today, a successful miner could rake in approximately $79,675.
Validation methods like mining are called proof-of-work or PoW, and they’re one of the reasons why Bitcoin and Blockchain are considered so innovative. Incentivizing miners with payouts of Bitcoin to validate its transactions makes the cryptocurrency safe, secure, and trustworthy to use. Mining also releases bitcoins into circulation, which increases the odds that consumers and merchants will be more willing to adopt, accept, and trade it, boosting the cryptocurrency’s value.
But even though mining is economically beneficial to miners, consumers, merchants, and Bitcoin itself, digging for it can actually harm the environment — Bitcoin miners are predicted to consume more electricity than the entire country of Argentina by the end of the year.
Since there’s a limited supply of Bitcoin, they don’t want to issue the supply of the cryptocurrency too quickly, so they make the cryptographic puzzles that validate each block increasingly more difficult to solve. This allows them to cap the number of blocks that miners can package and link to the chain each day. As a result, the more challenging these cryptographic puzzles get, the more electricity miners have to use to mine Bitcoin.
Is Bitcoin Mining Worth It?
Despite the profit potential of mining Bitcoin, the energy costs associated with Bitcoin mining and your mining hardware’s upfront costs can actually do harm to your bank account. Picking the wrong hardware or not having access to a lot of cheap electricity could cost you more money to mine Bitcoin than the maximum number of funds you can earn.
So before you invest in a mining rig to mine Bitcoin by yourself, make sure to use a Bitcoin mining profitability calculator from websites like CryptoCompare, Buy Bitcoin Worldwide, or 99bitcoins to see if you can actually turn a profit.
If you find out you can’t make a profit mining Bitcoin by yourself, not all hope is lost. You can actually pay companies to mine the cryptocurrency for you. This service is called cloud mining and the companies who offer it own huge cryptocurrency mining facilities filled with stacks of mining rigs. All you have to do is rent a rig and they’ll start mining Bitcoin for you.
How to Mine Bitcoin
1. Hire a cloud mining company.
In the crypto community, Genesis Mining is considered the most reputable cloud mining company. Their data center is located in Iceland, so they use renewable energy sources, like geothermal energy and hydropower, to power their mining operation in a more cost-effective and cleaner way than their counterparts who solely rely on electricity.
If you want to check out other cloud mining companies, take a look at HashFlare or a cloud mining company review site, like CryptoCompare. They list most cloud mining companies’ contracts and include their length, the cryptocurrency they’ll mine, price, return on investment, profit ratio, user reviews, and ratings.
2. Pick a mining package.
After you pick a cloud mining company and sign up for a free account, you can choose between a selection of mining packages, which will all have different contract lengths, hashing power, and prices. Your package’s price depends on Bitcoin’s current market value, the cost and difficulty level to mine the cryptocurrency right now, and your preferred hash rate.

3. Select a mining pool.
Once you choose your contract, you can either mine Bitcoin on your own or mine the cryptocurrency with other Bitcoin miners in a group called a mining pool. Joining a mining pool allows you to combine your rigs together and boost your total hashing output.
You’ll have to split your block rewards with the other miners in your pool, but mining pools usually generate more block rewards for individuals than mining Bitcoin on your own. Most cloud mining companies will ask you to join a mining pool right after you choose your contract.
4. Choose a Bitcoin wallet.
To withdraw and store the bitcoins a cloud mining company has mined for you, you need to download a Bitcoin wallet, which is software that allows you to securely receive, store, and send bitcoins in the Bitcoin network.
To find the best-fit Bitcoin wallet for your specific situation, check out this blog post about the top Bitcoin wallets for 2018.

How Do People Really Feel About Amazon’s Big Announcement? Here’s What We Found Out.
In September 2017, Amazon released a public request for proposals from cities vying to become the location for its second headquarters — setting into motion over a year of events that have caused a range of emotions and responses.
By mid-October of that year, the company had received 238 bids. By January, the list of contenders had been narrowed to 20 finalists. And starting last week, rumors were swirling that Amazon had decided months ago that it would split its second quarters — commonly dubbed “HQ2” — among two cities.
Those cities, it was officially announced this week, are Crystal City, Virginia, and Long Island City, New York.
The response has been mixed. Some officials in both locations have lauded the selection.
“I’m really excited about the potential Amazon offers,” said U.S. Senator Mark Warner of Virginia in a statement.
“Welcome to Queens, #HQ2,” wrote New York City Mayor Bill de Blasio in a tweet — only to receive a range of replies, including “NOPE, NYC doesn’t want this.”
Someone needs to explain to NYC taxpayers why we’re being forced to subsidize the corporation led by the richest man in the world & pay to push out long-time Queens residents without any legislative process.
— Alex Kotch 🔥🚲 (@alexkotch)
November 13, 2018
But in a sea of tweets, praise, and outrage, we wanted to know: How does the average internet user, perhaps representing those most likely to use Amazon, really feel about this announcement?
We had questions and set out to get as many answers as possible — so we ran a survey of over 2,500 people across the U.S., UK, and Canada. Here’s what we learned.
Many Are Unfamiliar With the Amazon HQ2 Journey
Location Awareness
For every survey question we ran, between 20-50% of respondents indicated that the question was the first they had heard of HQ2 at all.
For instance, when we posed the question — “Earlier this week, Amazon announced that it would split its second headquarters — a.k.a., ‘HQ2,’ between two cities. Without looking it up, do you know which two cities were selected?” — a quarter of respondents indicated that weren’t familiar with HQ2.
Earlier this week, Amazon announced that it would split its second headquarters — a.k.a., “HQ2,” between two cities. Without looking it up, do you know which two cities were selected?

Otherwise, the highest number of respondents said they were aware of which two cities were selected, though the split among responses was fairly even.
Shock Factor
We found similar results when asking respondents how surprised they were with the HQ2 city selections. Again, close to a quarter of respondents said they were previously unaware of the Amazon location saga.
“Earlier this week, Amazon announced that it would split its second headquarters — a.k.a., “HQ2,” between two cities. Did you find this news surprising?”
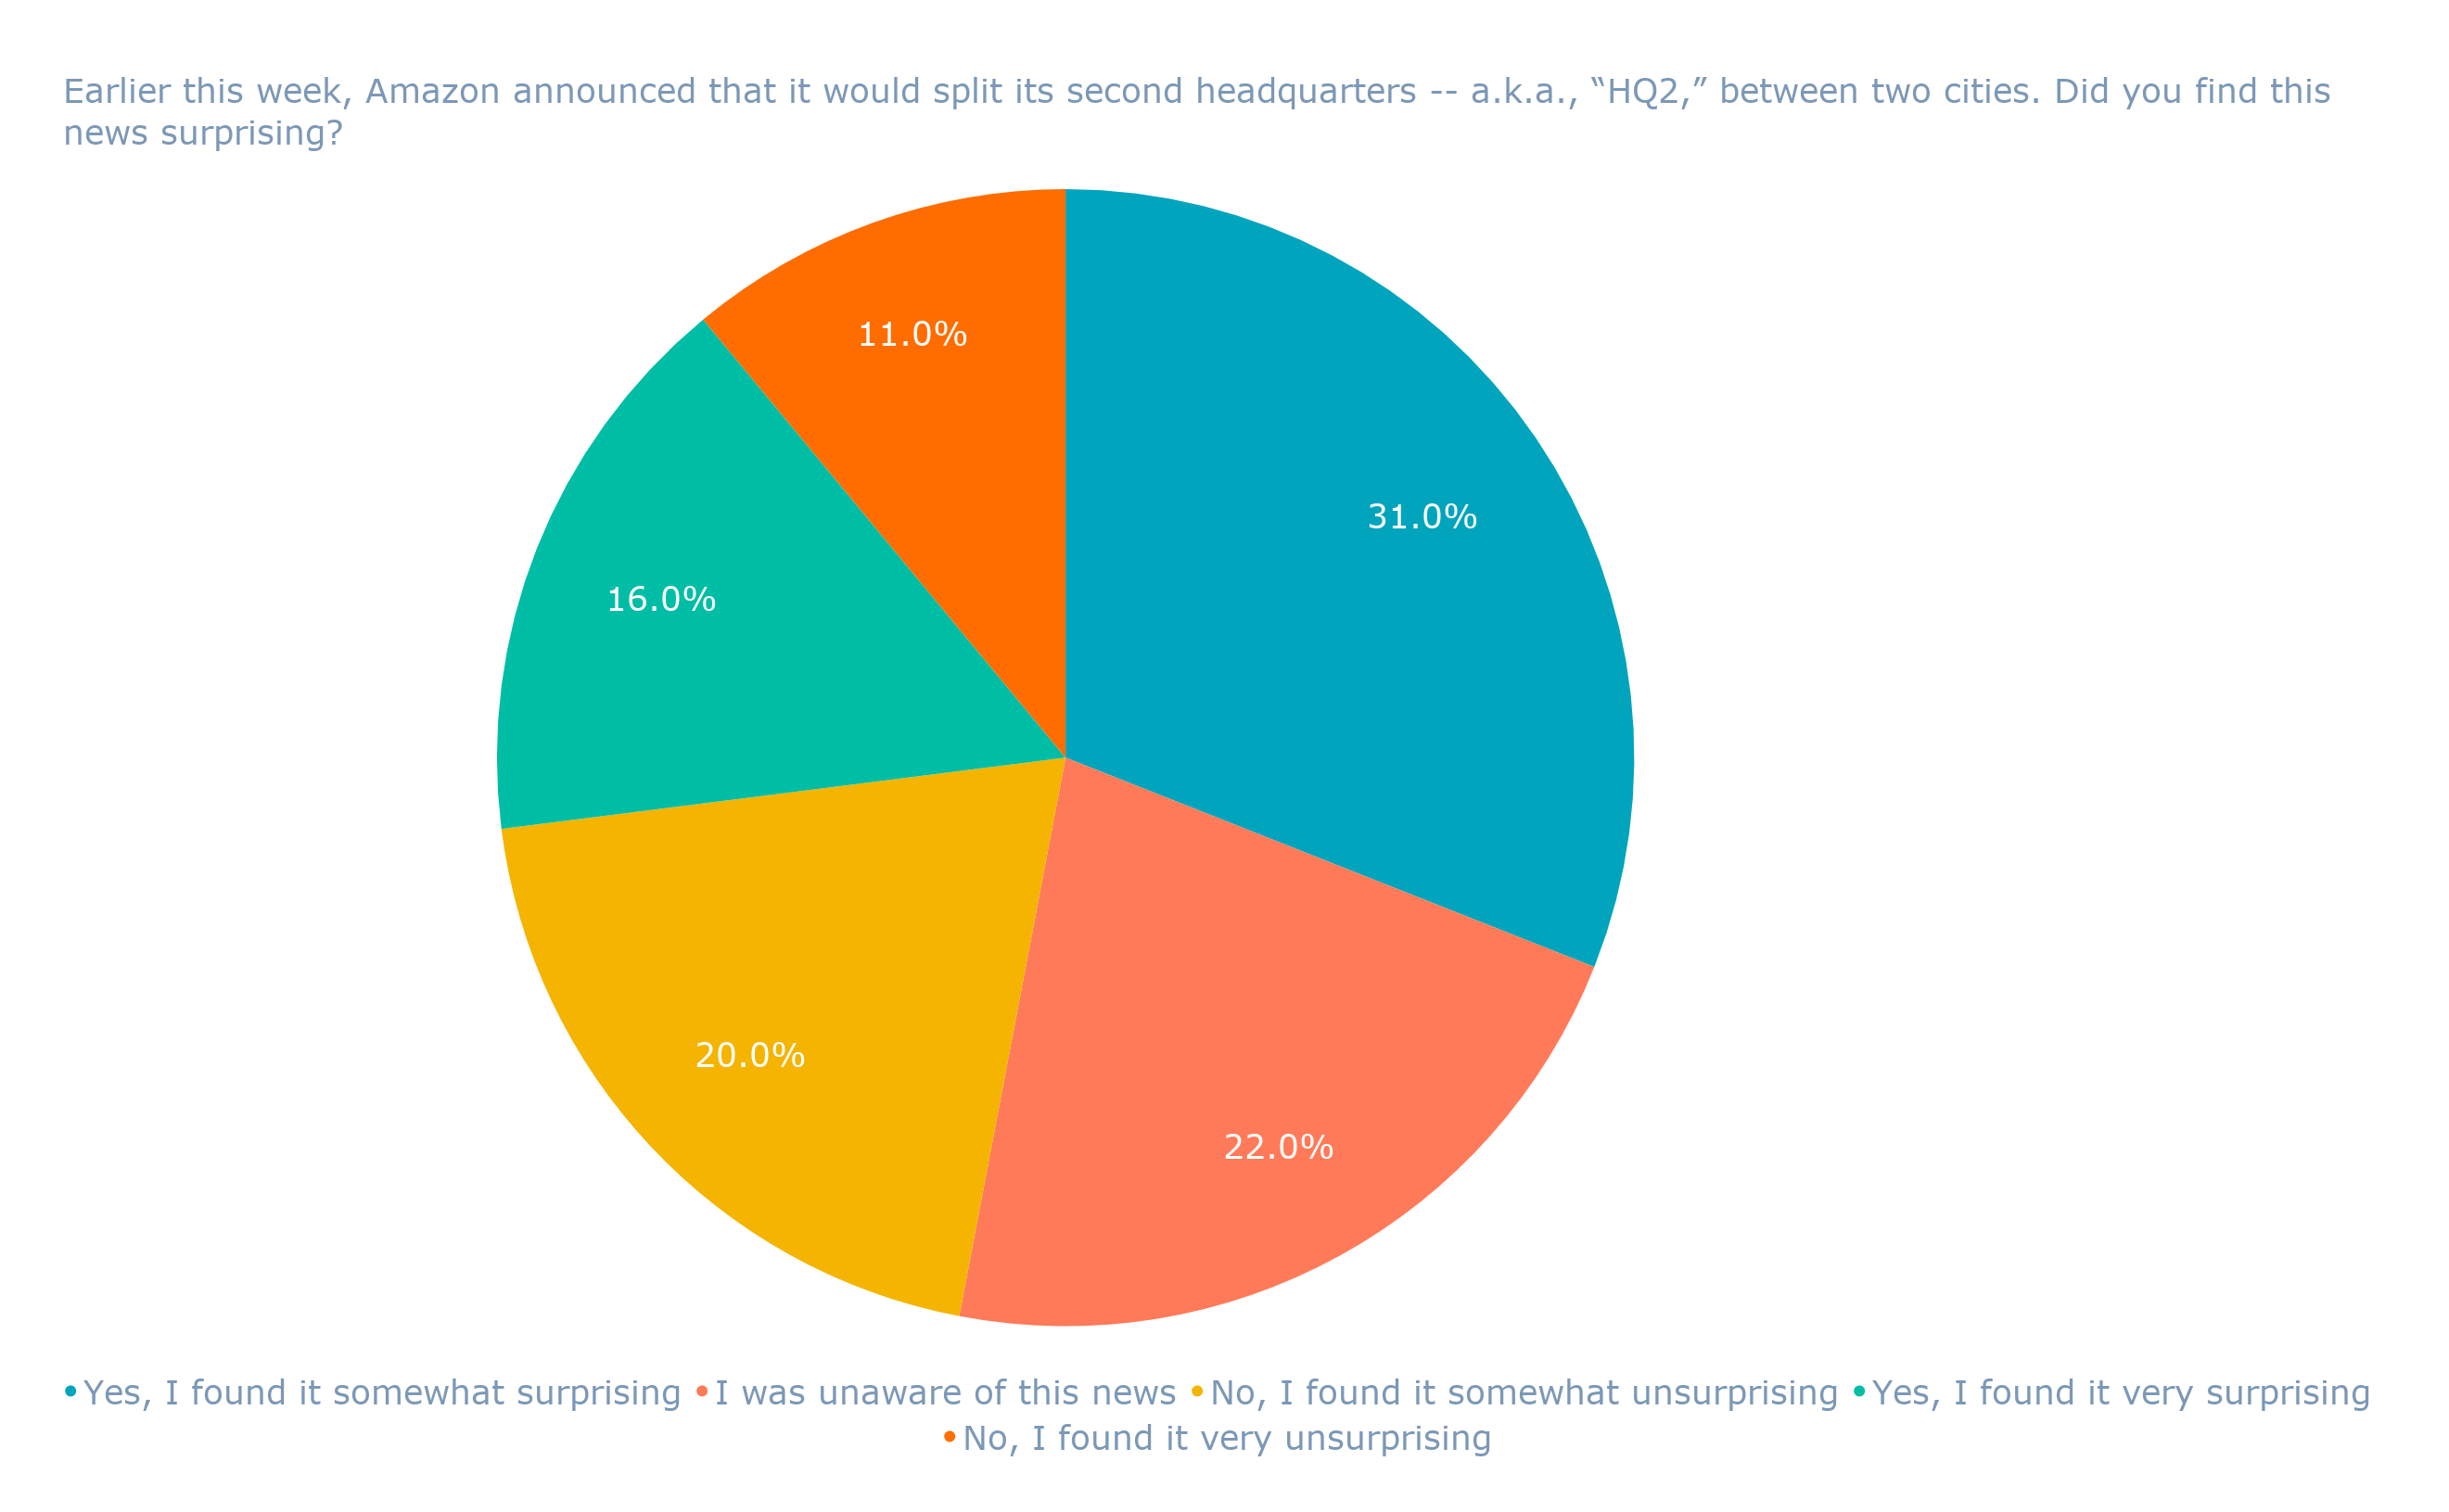
But out of those who were familiar with it, just under a third of respondents said that they were somewhat surprised by the news. Few people, it seemed, were caught completely off-guard by the cities selected for HQ2.
Location Expectations
For respondents who were surprised, we wanted to know which cities they previously thought might be chosen as the new home for HQ2.
Earlier this week, Amazon announced that it would split its second headquarters — a.k.a., “HQ2,” between two cities. Prior to this announcement, which location were you expecting Amazon to select?

Adjusting for the percentage of respondents who said they were unfamiliar with HQ2 prior to seeing this question, we found that the highest number indicated they expected Toronto to be selected.
However, that could be due to the fact that a somewhat disproportionate number of respondents from Canada — nearly 40% — selected Toronto as their answer.

Otherwise, the second-highest number of respondents said they believed New York would be chosen, aligning with the general lack of surprise we saw among respondents in previous questions.
Overall Impact
Finally, we wanted to measure how people feel about what type of impact HQ2 might have on the locations where it’s slated to be located.
First, we asked people to measure how positive or negative the overall impact of the presence of HQ2 in the cities selected could be.
Earlier this week, Amazon announced that it would split its second headquarters — a.k.a., “HQ2,” between two cities. Do you think that HQ2 will have a positive or negative impact on the locations selected?

In general, respondents indicate a positive outlook for the cities where Amazon’s HQ2 will be located, with about half answering that the impact will be beneficial in some way.
As for what the specifics of those impacts look like, we also asked respondents what sort of outcomes they expect to see as a result of Amazon moving into these locations.
Earlier this week, Amazon announced that it would split its second headquarters — a.k.a., “HQ2,” between two cities. What sort of impact, both positive and negative, do you think HQ2 will have on the locations selected?
.png?t=1542236842248&width=600&name=Earlier%20this%20week,%20Amazon%20announced%20that%20it%20would%20split%20its%20second%20headquarters%20--%20a.k.a.,%20%E2%80%9CHQ2,%E2%80%9D%20between%20two%20cities.%20What%20sort%20of%20impact,%20both%20positive%20and%20negative,%20do%20you%20think%20HQ2%20will%20have%20on%20the%20locations%20selected_%20(Choose%20all%20(2).png)
Most respondents believe that job creation will be the highest (positive) impact area, with 49% indicating that they think the opening of HQ2 will create employment opportunities across a range of skill sets and career progress.
The Impact on the Marketing and SMB World
Amazon isn’t alone, however, in its wooing of east coast talent. Not long after the HQ2 locations were announced, Google CFO Ruth Porat said at a Wall Street Journal event that the search giant would double its workforce in New York City over the next decade.
It’s a move that prompts further questions — such as, “Why all the attention at the opposite end of the U.S. from Silicon Valley?”
“Not everybody—big surprise—wants to live in Silicon Valley,” Porat said at the time, “so we want to make sure we have the opportunity to build vibrant centers across the country.”
But ask HubSpot VP of Marketing Meghan Keaney Anderson, and you’ll learn that tech talent on the east coast isn’t a new concept.
“There is a rising tide factor here. The east coast was already a magnet for tech talent,” Keaney Anderson explains. “Amazon moving here further solidifies that and could bring more people into the region.”
So how does that bode for the small-to-midsize businesses (SMBs) in the areas where these tech giants will be growing, and the marketers often responsible for crafting their messages to this increasingly competitive talent pool?
Is it a positive development, in that there’s more talent to go around? Or will it become more challenging for SMBs to attract good talent when newly adjacent to Big Tech?
It all goes back to that messaging, Keaney Anderson says.
“If you’re in Amazon’s geographical shadow, you are going to need to put some thought into your culture and what you have to offer that is unique to talent,” she suggests. “Not everyone wants to work for a giant company, even a really interesting one like Amazon. You need to decide what your differentiation is, as an SMB, to offer recruits.”
HubSpot VP of Marketing Jon Dick agrees that SMBs should lean into that variation of talent.
“Having more jobs open, regardless of where they are, does create more competition. But that can be a good thing,” he explains. “Large tech companies and SMBs attract different people.”

Unriddled: Amazon Officially Selects HQ2, an Unsend Feature Coming to Messenger, and More Tech News You Need
“Unriddled” is HubSpot’s weekly digest of the tech headlines you need to know. We give you the top tech stories in a quick, scannable way and break it all down. It’s tech news: explained.
Unriddled: The Tech News You Need
1. Amazon Officially Announces HQ2 Locations
Confirming rumors that began swirling last week, Amazon officially announced yesterday that its second headquarters — better known as HQ2 — will be split between two locations: Crystal City, VA (considered by some to be a neighborhood of Washington, D.C.) and Long Island City in the Queens neighborhood of New York.
The announcement comes as no surprise to those who were saying for months that Amazon was likely to select the Washington, D.C. area as an HQ2 location — such as NYU Stern professor Scott Galloway, who earlier this year pointed out the proximity of Crystal City to Amazon CEO Jeff Bezos’s home in the area, as well as his preexisting ownership of the Washington Post.
Amazon selects New York City and Northern Virginia for new headquarters https://t.co/VRGeYdpoBy
— Amazon News (@amazonnews)
November 13, 2018
U.S. Senator Mark Warner of Virginia also commented on the Crystal City selection.
“As a former Governor, now Senator, but also as a former technology executive, I’m really excited about the potential Amazon offers not only to Northern Virginia,” Warner said in a statement, “but the whole capital region and the entire Commonwealth.”
As for the Long Island City location, Amazon notes that its selection is related to the area’s “diverse community with a unique blend of cultural institutions, arts organizations, new and converted housing, restaurants, bars, breweries, waterfront parks, hotels, academic institutions, and small and large tech sector and industrial businesses.” Read full story >>
2. An Unsend Feature Is Coming to Messenger
Facebook has confirmed, via an iOS app store description, that users will soon be able to “remove a message from a chat thread after it’s been sent.”
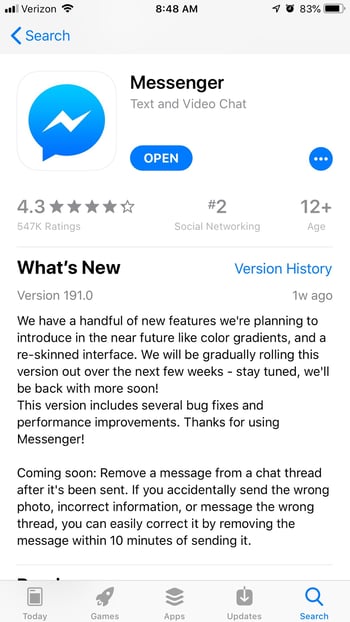
“If you accidentally send the wrong photo, incorrect information, or message the wrong thread,” the description reads, “you can easily correct it by removing the message within 10 minutes of sending it.”
This teaser of the new feature — which is said to be “coming soon” — arrives after months of speculation, and follows Facebook’s admittance that CEO Mark Zuckerberg had the option to delete messages after sending them. Read full story >>
3. Twitter Follower Counts Drop (Again)
After alerting users that their follower counts might drop in July, Twitter has once again said that, thanks to a bug, these previously “locked” followers reappeared and have once again been removed.
According to Reuters, the bug caused these accounts to be “briefly added back [to] follower accounts” for a “few accounts.”
Twitter itself lost about 7.8 million followers in the initial July purge, got 2.36 million of them back by October, and lost another 2.4 million on Friday. Read full story >>
4. Google’s AI Is Getting to Work
Distinguished Speakers
Earlier this week, it was announced that Google would open source its artificial intelligence that plays a vital role in distinguishing one human voice from another.
The formal term for this distinction, “speaker diarization,” describes the process of being able to tell different voices apart in audio where many people might be speaking at once. It’s “an important part of speech recognition systems,” the company says, playing a vital role in “solving the problem of ‘who spoke when’.”

Image source: Google
According to VentureBeat, the newly open-sourced AI can tell voices apart in this situations with up to 92% accuracy. Read full story >>
Smart Pictures
Also in the world of Google AI, The New York Times is using the company’s technology to help make its archive of photos (which date back to the 1870s) “smarter” — that is, to help recognize and translate text that describe the photos.
In other words, writes Stephen Shankland of CNET, the NYT is using Google AI to “turn a historic archive of more than 5 million photos into digital data that’ll appear in the newspaper’s features about history.” Also a future possibility, Shankland writes, is exploring AI technology for object recognition in the photos. Read full story >>
Help Me Finish That Thought
Think of it as a visual-content autofill. Google announced this week that its AI technology will also be applied to Android devices to suggest GIF images, emoji, and stickers that it believes fit into your conversation.

Image source: Google
Starting yesterday, Google said, phones using the Android operating system and the company’s Gboard will use machine learning to know which of these visuals that best fit the specific context of a conversation.
“With thousands of emoji and stickers, and an endless number of GIFs, it can sometimes take awhile to find the perfect way to say ‘I love you,’ ‘hooray,’ or anything else you’re trying to communicate,” writes Gboard Product Lead Angana Ghosh. “This makes it faster and easier to share your #feelings and your glowing personality with whoever you’re chatting with.” Read full story >>
5. Apples to Amazon
Yes — there’s more Amazon news. Last week, it was revealed that Amazon reached an agreement with Apple to carry more of the latter’s products on its website, including the latest models of iPads, iPhones, and the Apple Watch. The product selection will not, however, include Apple’s HomePod smart speaker, perhaps due to its potential competition with Amazon’s own Echo smart speaker products.
But, there’s a catch. This new product expansion means that independent vendors selling refurbished Apple products on Amazon’s marketplace will now face high restrictions. Their listings, explains CNET‘s Ben Fox Rubin, will be removed after January 4 of next year, and they’ll “have to apply with Apple to become authorized resellers on Amazon.” Read full story >>
6. Marketers, Take Note: Samsung Is Going All-In on Voice and Now Is the Time to Prepare
At last week’s Samsung Developer Conference, the name of the game was connectivity — and voice assistant Bixby is what’s tying it all together. Here’s what marketers should know about it. Read full story >>
7. Meet the People Building the TV Controlled by Your Brain
Imagine a TV that’s controlled only by the brain. Meet the people developing that technology today — and discover the future they envision for it. Read full story >>
8. The Voice Search Barometer: Where Do Users Stand? [New Data]
Studies say that more and more online transactions are taking place via voice. But what do these transactions look like — and how many users are really adapting voice? Read full story >>
9. The What, Where, and How of Video Consumption [New Data]
With new online video products popping up with increased frequency, we wanted to know how people really prefer to watch. Read full story >>
Featured image source: Amazon

9 Easy Ways to Convert Webinar Leads into Sales
A jam-packed webinar is a beautiful thing. But you know what’s better than filling your funnel with webinar leads? Converting those leads into customers.
The key to turning webinar leads into sales is giving your prospects a clear path forward. Too often, we focus on creating great webinar content and hosting an engaging webinar, which are both important, but we don’t spend enough time on the next step.
According to research from InsideSales.com, 73% of marketing and sales leaders say webinars are one of the best ways to generate high-quality leads. With this in mind, you don’t want to let these valuable leads languish in post-webinar purgatory. Here are nine simple ways to convert more webinar leads into sales.
9 Easy Ways to Convert Webinar Leads into Sales
1. Poll your audience to see who’s ready to buy.
At GoToWebinar, we always use multiple polls during our webinars. They grab attendees’ attention and prompt them to take part in the action. Poll responses provide handy insights you can use to segment your audience by need, interest level, industry, and more, too.
Polling your attendees during the webinar will also help you find out if they’re interested in learning more about your company or talking to a sales representative. Bear in mind, this technique is not suited for top-of-the-funnel webinars that are unrelated to your product. You don’t want to hit attendees with a “buy now” message when they are still in the discovery phase.
Additionally, polling your attendees during the webinar — rather than polling them in a post-webinar email — will yield a much higher response rate. If attendees respond in the affirmative, pass them to your sales team for follow-up.
If you get a lot of positive poll responses, take time at the end of your webinar to demo your product or show your attendees how they can purchase it. Those who aren’t interested can hop off and those who are interested will appreciate the extra info.
2. Send a post-webinar survey.
Sending attendees a quick survey right after the webinar is a great way to see if your content resonated with them, capture additional attendee insights, and gauge attendee interest in your product.
If you didn’t ask them these questions during the webinar, ask them who’s ready to take the next step in a post-webinar survey. You can also use survey responses to segment your webinar attendees and tailor your follow up marketing messages.
3. Involve your sales team in the webinar.
Collaboration between marketing and sales sounds like a no-brainer, but it’s easy to overlook. To involve the sales team in your webinars, make sure they know what webinars are on the calendar and what topic they’ll cover. This will help the sales team prepare more thorough follow-up communication with webinar leads and keep your marketing efforts aligned with your company’s sales goals.
At GoToWebinar, we recommend going a step further and having sales reps join the webinar. They can even help run the webinar, fielding and answering attendee questions.
By taking part in the webinar, sales reps will get familiar with the topic. They’ll also notice that most attendees are engaged, which will make them all the more motivated to follow-up. This sets the groundwork to seamlessly pass the top webinar leads from marketing to sales.
4. Follow up within 24 hours.
While it’s still fresh in their minds, send out your first email follow-up to webinar attendees and no-shows within 24 hours of the webinar. Your audience expects to receive the webinar recording and presentation slides, regardless if they showed up or not.
Prospects also love when companies include a link to a follow-up blog post that summarizes the webinar content and answers some of the top attendee questions. Sure, it takes extra planning and a quick turnaround to do this, but you’re fostering a relationship with these prospects — this type of targeted content is key to converting your audience down the line.
5. Identify hot, warm, and cold leads.
You don’t have to use all three lead categories, but at the very least, divide your leads into hot leads that are ready for sales and ones that need to be nurtured.
We’ve already discussed two ways to identify hot leads — using a poll or survey — but you also have access to a lot of other data that can help you pinpoint where leads are in their buyer’s journey.
Look at data like:
- Registration responses: go beyond only asking for name and email on your webinar registration form. Ask more probing questions that will help segment and personalize your marketing.
- Attendee interest rating: if you’re using a solution like GoToWebinar or Zoom Video Webinar, you will have webinar reports that display your attendees’ engagement level over the course of the webinar.
- Previous marketing engagement: this includes web behavior, content downloads, and prior webinar activity.
6. Send personalized follow-ups to hot leads.
Passing on your sales-ready webinar leads with specific instructions for how to follow up will increase the odds your sales team will close these prospects. You could also go a step further and provide your sales reps with a customizable email template. The easier you make their job, the more likely they’ll hit it out of the park.
This follow-up messaging should relate to the webinar content, provide value, and offer help. It’s also effective to personalize these messages as much as possible based on what you know about each prospect.
7. Nurture warm and cold leads.
Even if some of your webinar leads aren’t ready to buy today, you don’t want to waste the opportunity of closing them when they do become ready to buy. Putting warm and cold webinar leads into your existing nurture tracks based on your usual segmentation will boost the chances that they’ll contact your company when they’re thinking about purchasing your solution.
Alternatively, you can create a webinar-specific nurturing track for these leads, if you have the resources. As you develop your nurturing content, think about what stage of the buying cycle the various segments of your attendees are in and identify other key content assets you can offer in your nurturing stream that build on your webinar content.
The length of the nurturing stream will depend on your sales cycle, but four to six weeks is a good place to start.
8. Retarget your webinar leads.
Creating retargeting campaigns for your webinar leads will keep your brand top of mind. Again, you can segment these audiences based off their responses, interest level, and previous marketing engagement, but the point is to keep your leads warm and move them through each stage of the journey.
Remember, retargeting ads should complement your other marketing tactics. You don’t want to email webinar leads with a discount offer and retarget them with an awareness ad at the same time.
9. Always empower leads to take action.
It’s always better to make it easy for your prospects to take the next step in their buyer’s journey. Even if your leads aren’t quite ready to become customers, give them the ability to keep learning with additional resources and ways to engage. Whether it’s during the webinar or in your follow-up emails, including a clear call to action and highlighting its benefit will entice your audience to take the next step with your business.
Webinar leads are some of your best leads.
A recent GoToWebinar study on content engagement revealed that people are willing to spend more time with a webinar than any other type of content. These are some of your most engaged leads, so make sure you have a plan to convert them. If you’re not ready for all these tactics, just start with a couple and you could see your webinar conversions gradually take off.

The Simples Rules About How to Address a Letter
Nowadays, we communicate primarily through direct message and email, even in the workplace. In this era of fast-paced digital communication, letters often seem unnecessary and even antiquated.
But knowing how to address a business letter can go a long way when it counts — like when you’re trying to impress a hiring manager with your cover letter, or attempting to build a solid relationship with a new client. In these instances, a poorly addressed letter can signal a lack of professionalism, or even apathy.
To ensure you’re leaving the best first impression, take a look at the proper way to address a letter.
How to address a letter
A letter should include your name, address, phone number, and email. You’ll also want to provide the current date, as well as your recipient’s name, title, company address, phone number, and email. We’ll show you exactly how to format that information below.
How to Address a Letter
First Name Last Name
Your Address
Your City, State Zip Code
Your Phone Number
Your Email
Date
Contact Name
Title
Company Name
Address
City, State Zip Code
How to Address Your Recipient
It’s critical you address your recipient professionally in the letter, even if you know them well. To do so, include a Ms., Mrs., Mr., Professor, or Dr. title before their first and last name. If you don’t know their gender identity, simply include their first and last name. Additionally, include a “Dear” before their name.
If you aren’t sure who will receive the letter, do your best to figure it out. If it’s a cover letter, perhaps you can email your recruiter and ask for the hiring manager’s name, or do some research on LinkedIn. However, if you truly can’t figure out who the recipient is, simply address the letter with one of these greetings:
- To Whom It May Concern
- Dear Hiring Manager
- Dear Human Resources Manager
At the end of your letter, conclude with a “Sincerely”. If the letter is hard copy, leave a space for your handwritten signature, and then below that, type your first and last name.

How a Tiny Finance Startup Dethroned Fortune 500 Giants in Google Search
In 2009, most people would have called Tim Chen, the founder of Nerdwallet, crazy for even trying to take on the titans of the credit card industry. As the only employee at his company, that also had no funding, how could he possibly manage to garner the attention of consumers when his competition consisted of companies with billions of dollars at their disposal?
Within seven years, though, his company grew to be worth $500 million and his website, Nerdwallet.com, attracts millions of visitors per month who look for credit card information and personal finance-related content.
How was he able to accomplish such an incredible feat? The short answer? Data-driven content marketing.
This “David vs. Goliath” story may sound like a silicon valley fluke, but Nerdwallet’s content-first strategy has been replicated by other small companies in a variety of verticals, helping them achieve stunning success.
Whether it’s personal finance, home security, college admissions, student loans, travel, or any other industry, incumbents are slowly seeing one of their most valuable channels — organic search — getting taken over by these unexpected and new content players as they deliver valuable information through Google search and accumulate domain authority.
This article will investigate the specific content marketing strategy Nerdwallet used to take on the industry titans. Specifically, we’ll look at two aspects of this strategy:
- First, we’ll look at how Nerdwallet leveraged content to attract press attention and, in turn, large volumes of authoritative links.
- Second, we’ll look at how much content Nerdwallet produced and the strategies they used to make sure their content was actually valuable to searchers and prospects.
As a result, leveraging this strategy has allowed Nerdwallet to do something most would have predicted to be impossible.
Nerdwallet: From $0 to $500 million in 7 years
The credit card space has long been dominated by the major providers of credit cards themselves, like Capital One, Discover, Wells Fargo, Chase, and Bank of America.
However, in recent years, several new challengers have taken on these titans, snapping up the majority of the organic search market share of some of the world’s biggest brands.
For instance, if you search for nearly any credit card related query — especially high-intent searches — you’ll notice that more than half of the top 20 results are not credit card providers, Instead, they’re companies like, Nerdwallet.com, Wallethub.com, CreditCards.com, Credit.com, Valuepenguin.com, and Thepointsguy.com.
These sites are “information providers.” They make money as middlemen, leveraging affiliate marketing to earn a commission when people click through to their site and apply for credit cards with banks.
Nerdwallet is one of the best examples of an information provider who took over the organic search space in the credit card industry.
Founded in 2009 as a bootstrapped startup, Nerdwallet has grown at an exponential pace, from 283 users per month in 2009 to 2.2 million users per month in 2014, plus many more today.

Picture Credit: SlideShare
After some early struggles to get any traction for Nerdwallet, founder Tim Chen realized organic search was the only customer acquisition channel that had enough volume to boost his site’s awareness and eventually compete with the big players in the space. He also knew it was the only channel that could be bootstrapped and grow incrementally.
With this singular focus, Tim got to work. Below is a slide from a talk about his realization about organic search’s potential and how he became laser-focused on content as his vehicle for success.

As Tim outlines, Nerdwallet’s main strategy had a two-pronged approach.
- Create large volumes of valuable content
- Use content to attract large volumes of authoritative backlinks
Let’s take a look at how this strategy progressed.
Creating Quality Content
Attracting organic search traffic relies first and foremost on creating high-quality content that fits search queries. Generally, the more high-quality content you publish, the more opportunities there are to rank for keywords.
Tim knew this and made sure it was a core pillar of his strategy. So early on, he set a goal of creating 500 pieces of quality content per month. This was certainly a tall order, but it was necessary if he wanted to take on the entrenched behemoths in his industry.

By looking at the Archive.org view of Nerwallet’s pages over time, we can see that Tim stuck to his plan, producing up to 500 pieces of content per month between 2011-2012, and then ramping up his volume and peaking at as many as a few thousand new pieces of content per month in 2014 and 2015.

To drive organic growth, Tim needed to avoid Google’s algorithm penalties, so it’s important to note that quality was pivotal for his success. Each piece of content Tim created needed to provide as much or more value than the content currently ranking for the keywords and themes he was planning to cover.
As of today, Nerdwallet has more than 36,000 indexed pages, giving them the chance to rank for an enormous amount of longtail keywords and capture a disproportionate percentage of the search sphere for all things personal finance and credit cards. And it works.
Nerdwallet ranks for nearly three times as many keywords as their closest bank competitor. When you consider that 30-50% of these banks’ organic search traffic is brand-related keyword searches, you start to realize just how far ahead Nerdwallet has outpaced their competitors.
The number of keywords Nerdwallet and Big Banks rank for:
- Nerdwallet: 1.7M
- Bank of America: 621k
- Wells Fargo: 594k
- Chase: 428k
- Capital One: 327k
- Discover: 234k
- Citibank: 44k
Building Quality Links
For Nerdwallet, creating a high volume of great content over the past seven years was only possible if they were sure the content they produced would eventually rank at the top of SERPs.
Surely, the vast amount of content they produced helped them build domain authority — a lot of it could be considered a resource, and they naturally earned links and authority over time.
But their success with organic search can mostly be attributed to creating and promoting quality content with a specific goal and mission in mind: earning a large number of links from high authority publishers and their syndication networks.
Data-Driven Stories + Good Design + High-Touch Outreach = Press, Links, and Improved Ranking Ability
To give you a solid understanding of just how important creating data-driven, newsworthy stories was for Nerdwallet, take a look at the chart below.

We used Media Cloud to log Nerdwallet’s brand mentions over time. Above, you can see that Nerdwallet’s data-driven content stories received more press mentions than Capital One did for a period of time.
This is an incredible feat, considering the number of resources Capital One has at their fingertips and the fact that any financial announcement from Capital One is virtually guaranteed to generate press.
What Types of Content Helped Nerdwallet Build So Many High-Authority Links?
The main reason why Nerdwallet’s content attracted a significant number of Unique Linking Domains or ULDs that had high-authority link equity is because their content was rooted in data. Specifically, data analyzed by Nerdwallet themselves or existing authoritative government data they synthesized.
Using this data, they created newsworthy content that fell into several categories. “State of” studies, location studies, and tools or calculators leveraging existing or new data sets have been their bread and butter.
Together, this content is responsible for a huge majority of their high authority backlinks. Some of the best examples of their newsworthy content are provided below:
Data-Driven Studies
Credit Card Household Debt
study — 448 ULDs
- Links from: yahoo.com, cnn.com, forbes.com, washingtonpost.com, cbsnews.com, bloomberg.com, businessinsider.com, nbcnews.com, time.com, columbia.edu, cnbc.com, inc.com, fortune.com, marketwatch.com, lifehacker.com, entrepreneur.com, salon.com, fool.com.
New Grad Retirement Report — 31 ULDs
- Links from: usatoday.com, investopedia.com, dailydot.com, time.com, cnbc.com.
Millenials and Home Buying study — 11 ULDs
- Links from: theguardian.com, newsweek.com, nasdaq.com, philly.com, mic.com, brit.co.
Location Studies
America’s Most Innovative Tech Hubs — 21 ULDs
- Links from: phys.org, theconversation.com, shroders.com, bigml.com, cityam.com.
Wage Gaps for Women In Different States — 5 ULDs
- Links from: glamour.com, brit.com, hellogiggles.com, teamster.org.
Resource Tools and Calculators
Total Cost of Owning a Car — 104 ULDs
- Links from: cbsnews.com, ycombinator.com, herokuapp.com, opendemocracy.net, bigthink.com, lifehacker.com.
Cost of Living Calculator — 47 ULDs
- Links from: fool.com, mic.com, usatoday.com, bangordailynews.com, dozens of industry publications.
The chart below is a visualization of the backlinks that Nerdwallet earned over time. Their data-driven content strategy, paired with their digital public relations strategy, is the reason they were able to consistently attract a large number of backlinks.

What We Can Learn From Nerdwallet about Ranking on Google and Organic Search
With a dual approach of creating massive amounts of quality, data-driven content and attracting valuable press mentions, Nerdwallet was able to outpace and overtake all of the incumbents in their industry over a relatively short period of time.

The rapid rise of Nerdwallet is a testament to considering a new, guided approach to SEO. Through the process of creating high-quality, data-driven content and building links with this newsworthy content, Nerdwallet was able to scurry up the digital ranks.
Focusing on high volume and high quality, Nerdwallet set a new standard for digital marketers. Their results solidified the importance of creating high-quality content and intentional link-building to strengthen your brand and impact.
By committing to this strategy, Tim Chen discovered the key to his success was two-pronged: create large volumes of valuable content and leverage it to earn large volumes of authoritative links. This ultimately allowed his tiny startup, Nerwallet, to compete with and eventually overtake the credit card industry’s behemoths.

How to Use Facebook Live: The Ultimate Guide
In April 2016, Facebook launched Facebook Live, a live video streaming service that lets anyone broadcast from their mobile devices straight to their Facebook News Feed.
Since its launch, live streaming video has exploded in popularity — particularly on Facebook Live, where according to Vimeo, 78% of online audiences are watching video on Facebook Live as of 2018.
It’s no mystery why Facebook Live is so popular: Videos see 3X the engagement of traditional videos shared on Facebook, and millions of users live stream on Facebook around the world.

What is Facebook Live?
Facebook Live is a feature of the Facebook social network that uses the camera on a computer or mobile device to broadcast real-time video to Facebook. Live broadcasters can decide who on Facebook can see their video and use this content to engage their audience during the moments and events that are important to them.
Why are marketers getting so excited about Facebook Live? Because it’s a fun and fairly simple way for them to use the power of video to communicate their brand stories, and build authentic relationships with fans and followers — in real time.
However, for such a simple concept, Facebook Live has a lot of little nuances that marketers will need to learn if they want to get the most out of the platform. This guide will help you learn the best tricks that can make a big difference in how many people see your live broadcast, how they engage with it, and how it performs.
In this post, we’ll walk through the following:
- How to broadcast on Facebook Live via your mobile device
- How to go live on Facebook from a desktop
- How to analyze your live video’s performance
- Tips and tricks for getting the most out of the platform.
Click here to skip down to our Facebook Live tips.

Facebook Live started as a mobile-only broadcasting feature, but now, Facebook Pages can broadcast from either mobile devices or desktop computers. We’ll go over how to broadcast from mobile and desktop devices in the sections below.
The following instructions will teach you how to go live on Facebook mobile. To get started, get out your mobile device and open up the Facebook app.
How to Use Facebook Live
- Tap the camera icon to the left of your search bar.
- Give Facebook access to your camera and microphone when prompted.
- Switch to “Live” on the bottom of your camera screen.
- Choose your privacy and posting settings.
- Write a compelling description.
- Tag friends, choose your location, or add an activity.
- Set your camera’s orientation.
- Add lenses, filters, or writing and drawing to your video.
- Click the blue “Start Live Video” button to start broadcasting.
- Interact with viewers and commenters.
- Click “Finish” to end the broadcast.
- Post your reply and save the video to your camera roll.
1. Tap the camera icon to the left of your search bar.
Open your Facebook mobile app and visit your News Feed. You’ll see a camera icon to the left of your search bar — tap it to open your camera. You’ll have to give Facebook permission to access your mobile device’s camera and microphone in order to go live.

You can also go live on your own Facebook profile. Open up the status bar by tapping the text that reads “What’s on your mind?” Then, select the “Go Live” option from the menu, as shown below.

2. Give Facebook access to your camera and microphone when prompted.
You’ll stop receiving these prompts after the first time you use it.

Once you permit Facebook to use your mobile camera, you’ll be asked to permit use of your phone’s camera content, as shown below. This will trigger your ability to switch from using your rear-facing camera to your front-facing camera — options that will come into play in step 7 of this guide.

3. Switch to “Live” on the bottom of your camera screen.
Once you’ve given Facebook access to your mobile device’s camera and microphone, you’ll be ready to shoot. However, your Facebook camera defaults to non-live photo shooting when you open it.
To switch your Facebook camera to live video, look to the bottom of your screen for the various types of visual content you can create. On the far left, as shown below, you’ll see the setting, “LIVE.” Tap it once. (Don’t worry, you won’t go live right away.)

4. Choose your privacy and posting settings.
In the screenshot below, see how Facebook Live is set to “Only me” and “Post, Story” at the top of the screen? This means only I can see the live video — none of my Facebook friends or followers can — but it’s set to post the video as a regular Facebook post and as a Facebook Story if I want it to. You can change these settings by tapping on them.

If you’re posting for a brand, you’ll probably want to make it public so it can reach everyone in your audience who’s currently on Facebook. If you’re posting as yourself, you might want to reserve your broadcast for friends — and then set where you want to post this video, as shown below.
But if you’re new to Facebook Live and want to test it out first, or want to prepare your shot before going live, switch your video’s privacy setting to “Only Me.” You can find the “Only me” option by clicking “See More” and tapping the last bubble, per the following screenshot.

You might also see options to post your live video only to users in specific networks, such as a college or association you belong to. These options will appear below the “Only me” privacy setting.
5. Write a compelling description.
Give your broadcast a description, which will show up on people’s News Feeds like a status update above the video. To get people to tune in, write an attention-grabbing headline and help them understand what your broadcast is about.

Check out the example below from The White House’s live broadcast. As you can see, your video description appears at the top of the live video when Facebook users view it, much like a Facebook photo caption or status update.

Source: Facebook
6. Tag friends, choose your location, or add an activity.
Tap the icons at the bottom of your screen to tag people who are in the Facebook Live video, add the location from where you’re shooting, or share what you’re doing in the broadcast. These touches can add more personalization to your video, increase discoverability, and make people want to tune in.

7. Set your camera’s orientation.
Before you click “Start Live Video,” be sure your camera is pointing in the direction you want it to point. In other words, do you want to go live with your front-facing camera lens, or your rear-facing camera lens?
The background of your setup screen will show you what your camera sees. If you want to change the camera view to selfie or vice versa, simply click the rotating arrows icon in the upper-righthand corner of your screen, as shown below.

The video will be a square, so it doesn’t matter whether you hold your mobile device vertically or horizontally.
8. Add lenses, filters, or writing and drawing to your video.
Tap the magic wand icon to the left of the blue “Start Live Video” in the center of your screen, and choose if you want to add lenses to your face, change the filter of the camera, or write or draw to make the video more whimsical.
Depending on your version of Facebook mobile, some of your editing and filter options will look like the settings below.


9. Click the blue “Start Live Video” button to start broadcasting.
Once you click it, Facebook will give you a countdown — “3, 2, 1 …” — and then you’ll be live. As soon as you start streaming, your live video will appear in your News Feed — and others’ News Feeds — just like any other post.

Your broadcast can be up to 90 minutes long. Keep in mind that the longer you broadcast, the more people who are scrolling through their News Feeds on Facebook will stumble upon your post.
10. Interact with viewers and commenters.
To keep your viewers engaged, encourage them to interact with your live video (which will help your ranking in others’ News Feeds). You can also interact with them both by speaking directly to them in your video and, if you want, by having someone else respond to comments from a desktop computer elsewhere.
Where can you see these comments? While you’re broadcasting, you’ll see the time elapsed on the top left along with the number of viewers, and comments will show up live on the bottom of your feed. They’ll appear in reverse chronological order, like on Twitter, so keep in mind that the earlier ones may be farther down.

Source: Facebook Newsroom
Note: You can also block viewers during a live broadcast by tapping the profile picture next to a viewer’s comment and then tapping “Block.” You can unblock someone you’ve previously blocked, too.
11. Click “Finish” to end the broadcast.
Once you do this, the video will stay on your Timeline or Page like any other video post.
12. Post your reply and save the video to your camera roll.
Once you finish your broadcast, you’ll be met with a screen similar to the one I’ve screenshot below. If you want to post it, that will enable others to view your video once you’ve stopped broadcasting. Then, tap the download button to save the video to your camera roll so you have a copy of the original for safekeeping.

You can always go back to the post on your Timeline or Page and edit the description, change the privacy settings, or delete the video, just like you would any other post.

How to Go on Facebook Live From Desktop
If you’re an admin or editor of a Facebook Page for your brand, you can also broadcast live from a desktop computer. This isn’t as spontaneous as broadcasting from a mobile device (and, obviously, isn’t as mobile), but this could be a good option for filming more static broadcasts. For example, we recently broadcast a Facebook Live panel in celebration of International Women’s Day. The panelists and interviewer sat in place the entire time, an example of when broadcasting from a steadier device could be more effective.
1. Go to your Page and tap the “Write something” box, as if you’re writing a new post.

Tap the menu option to “See All,” and click on “Start a Live Video.”

2. Write a compelling description of your video that will appear on your Page’s Timeline and in the News Feed.
Choose a descriptive and enticing summary to draw viewers in and make them unmute your Facebook Live to start watching.

Then, click “Next.”
3. Give Facebook permission to use your computer’s camera and microphone.
You won’t be prompted for this again once you do it for the first time.

4. Check to make sure your description and video view are final before starting your broadcast.

From here, you also have the option to share live video from an external device, such as a video camera or other recording device. Tap “click here” to set up that connection.
5. Press “Go Live” to start your broadcast.
Facebook will give you a “3, 2, 1 … ” countdown before going live. Tap “Finish” when you’re ready to end the broadcast.
6. The broadcast will appear in the News Feed and on your Page’s Timeline, where you can edit it by tapping the drop-down arrow in the upper-righthand corner.
From here, you can change the description, change the date of posting, or create a new Facebook post featuring the broadcast. If you want a video to garner more engagement, you can also pin it to the top of your brand’s Page so it’s the first post visitors see when they visit.

Now that you know how to broadcast from all devices, let’s dive into how to analyze Facebook Live videos.
How to Analyze Your Live Video’s Performance
How to Access Video Analytics on a Facebook Business Page
To get started analyzing your Facebook Live broadcasts, head to the “Insights” tab at the top of your brand’s Facebook Page:

Then, head to the “Videos” section of your analytics on the lefthand side of the screen.

From there, scroll down to the “Top Videos” section, and either choose a video from that menu to look into, or tap “Video Library” to look at all of the videos your Page has ever posted.

Now, let’s dive into the nitty-gritty.
The performance analytics available for Facebook Live videos are similar to those of normal videos on Facebook, with some neat additions.
- For Pre-recorded videos: Facebook lets you analyze minutes viewed, unique viewers, video views, 10-second views, average % completion, and a breakdown of reactions, comments, and shares.
- For Facebook Live videos: Facebook lets you analyze all the metrics listed above, plus peak live viewers, total views, average watch time, people reached, and the demographics of who watched your video.

In addition to all of these static numbers, you can click into each metric to see how it changed over time when the video was live. For example, if we click into “Peak Live Viewers,” we’ll see this interactive graph of video viewers over time:

You can even see who your typical viewer was during your broadcast, based on their Facebook profile information:

Now that you’ve got the steps down, let’s get into some tips and tricks.
Facebook Live Tips
- Test out live video using the “Only me” privacy setting.
- Space out live videos with other Facebook posts.
- Keep reintroducing yourself.
- Make the video visually engaging.
- Make it spontaneous.
- Don’t worry about mistakes or stutters.
- Encourage viewers to Like and share the video.
- Engage with commenters, and mention them by name.
- Have someone else watching and responding to comments from a desktop computer.
- Subtitle your broadcast in the comments section.
- Ask viewers to subscribe to Facebook Live notifications.
- Broadcast for at least 10 minutes.
- Say goodbye before ending your video.
- Add a link to the description later.
There are a lot of little things you can do to squeeze the most out of your Facebook Live videos. Below is an example of one of the earliest Facebook Live videos from Refinery29. This was the first video of a five-part live video series called “Chasing Daylight,” showcasing a typical night out for women in five different cities around the world. My colleague, HubSpot Marketing Manager Lindsay Kolowich, tracked this one down, and we refer to it in some of the tips below.
Warning: There is some language in the following video that is not safe for work (NSFW).
1. Test out live video using the “Only me” privacy setting.
If you want to play around with live broadcasting without actually sharing it with anyone else, you can change the privacy setting so you’re the only one who can see it — just like with any other Facebook post.
To switch the privacy setting to “Only Me,” follow steps 1–4 in the instructions above.

2. Space out live videos with other Facebook posts.
Because Facebook ranks Live videos higher than other videos and other types of posts, we recommend spacing out your Facebook Live videos with other Facebook content you post to maximize your organic reach.
3. Keep reintroducing yourself.
When you first start the video, take a minute to introduce yourself and what the video’s about. But keep in mind that when you first start live streaming, you may have zero people watching. Even a few seconds in, you could only have a handful of viewers. As people find your video on their News Feeds, they’ll join in — but that means you’ll want to reintroduce yourself a second, third, and even a fourth time to catch people up.
For example, in the Refinery29 video above, the host Lucie Fink introduces herself three times in the first few minutes, and several more times after that.
One second in:
“Hello, Facebook Live! Hey! Lucie Fink here. I don’t know if we have anyone on the broadcast yet, so I’m going to wait about one minute to see who joins us.”
One minute in:
“Hello to the 309 viewers in here right now. I’m Lucie Fink from Refinery29. Just to recap what’s happening right now, this is Episode One of Refinery29’s new global initiative, ‘Chasing Daylight.'”
A few minutes in:
“Just to give a quick recap on who I am, in case you guys don’t know — I’m Lucie Fink. I work at Refinery 29. Today, I’m doing this whole new series, and this is essentially giving you guys a glimpse into the lives of women all over the world.”
15 minutes in:
“So now that we have 3.5 thousand people in this broadcast, let me just start from the top because some of you might not know what is happening. I’m Lucie Fink from Refinery29, and you might know me from some videos, you might not. Either way, it is nice to meet you. Today, we are starting a new video series on Refinery’s Facebook Live platform. It’s called ‘Chasing Daylight,’ and it’s gonna be on every night this week.”
25 minutes in:
“That’s what I think is so cool about ‘Chasing Daylight.’ For the people who are new and don’t really get why I’m sitting on my toilet, the answer is, I am Lucie Fink, and [this is] Episode One, the New York version of ‘Chasing Daylight,’ which is Refinery29’s new live Facebook series that’s starting right now.”
4. Make the video visually engaging.
You have to be visually engaging — not just at the very beginning of your broadcast (although that’ll be important for when folks view the video later), but throughout the video as more and more people join in.
The more visually engaging you can be, the more you can entice people to stick around. That means keeping the camera moving and not just sitting in one place — something Lucie did really well in that Refinery29 video.
Not only will you get more viewers this way, but you’ll also get your broadcast ranked higher in other people’s News Feeds. Facebook started monitoring signals of video engagement — like turning on the audio, switching to full-screen mode, or enabling high definition — interpreting that as users enjoying the video. As a result, they’ve tweaked the algorithm so videos that are engaged with in these ways will appear higher up on the feed.
5. Make it spontaneous.
What makes a live video special? The spontaneous, interactive nature of it. People love the ability to interact, and they love the novelty of viewing someone in a live moment when anything could happen. In many ways, it’s the new reality TV.
A big part of what makes Refinery29’s live video so great is how much Lucie and her friends embrace the “live,” spontaneous nature of it. For example, at one point, Lucie calls on her friends to reenact a scene from the Broadway show Hamilton. It was scrappy, unrehearsed, and really funny. Her other friends were laughing at her. It reminded me of a fun night with my own friends. “This is literally what we do at the office,” Lucie said about the performance through laughs.
These moments are what make live video special, and they’re exactly what differentiates it from scripted, edited, or otherwise pre-recorded videos. Embrace the platform. Banter is always, always good.
6. Don’t worry about mistakes or stutters.
Spontaneity works — even if your Facebook Live doesn’t go according to plan.
Let’s face it, we’re all human. And when humans and technology mix, there can sometimes be technical difficulties.
If you’re recording a live video, things might go wrong — your equipment could malfunction, you could lose your train of thought, or you could get photobombed by a random passerby. You can’t call “cut” if things happen — you have to roll with them and keep filming and talking.
The good news? These things help keep your broadcast human and real. If you wobble your phone while filming, laugh and call it out. If you forget what you were saying, make a joke. The key is to keep the broadcast like a fun conversation, so if mistakes happen, keep it light and keep the lines of communication open with your viewers.
For example, if you make a mistake during your Facebook Live, ask viewers to write in the comments if they’ve made the same mistake, too.
7. Encourage viewers to Like and share the video.
One of the primary ways Facebook’s algorithm ranks a post is by how many people Like and share it. The more people who Like and share your live broadcast, the more it’ll show up in people’s News Feeds.
But when people are watching a video, they may be more distracted from Liking and sharing it than they would a text or photo post. (That’s something the folks at Facebook noticed about video content early on, which is why they began monitoring other video engagement signals as well, like turning on the volume.)
In Refinery29’s video, you’ll notice Lucie explicitly asks viewers to Like and share the video many times throughout. Here are a few examples:
- “If you like this broadcast and share it right now, you guys will be part of this brand new series that’s starting right now on Refinery29.”
- “If you guys share this broadcast, you’ll be part of history. And what’s better than being part of history?”
- “Thumbs up if you like Hamilton.”
- “Thank you guys for all these Likes. My screen is absurdly blue right now because I’m getting tons of thumbs up.”
- “Share this with your best girlfriend who you think is strong and powerful.”
I like the last example the best because she’s asking viewers to share it with a specific type of person — in this case, a best girlfriend. This might prompt viewers to think, “Hey, she’s right, my friend Stacy might like this” and then share it with that specific friend.
8. Engage with commenters, and mention them by name.
The number of comments on your broadcast is another way to get Facebook to give it a higher relevancy score, making it more likely to show up on people’s News Feeds. So encourage your viewers to comment, and engage with people who are commenting by answering their questions and calling them out by name. Not only will it get more people to comment, but it’s also a fun way to include your viewers in the live experience, which could make them stick around longer.
Plus, your audience will be thrilled to hear you mention their name and answer their questions when you are live.
In the Refinery29 video, Lucie was constantly engaging with viewers and commenters. At one point, for example, she said, “We’re so excited to see you guys! Do you have any questions for someone who lives in New York City?” Then, she read a few of the comments that came in and responded to them — using commenters’ first names.
We do this here at HubSpot with our Facebook Live broadcasts, too. Check out all the chatter in the comments — we used those questions to keep our discussion going.
9. Have someone else watching and responding to comments from a desktop computer.
When you’re the one holding the camera for a Facebook Live video, it’s really hard to see the comments popping up on the mobile screen. If the comments are coming in fast, it’s especially easy to lose sight of them as they disappear below the fold. Plus, you’re probably occupied by recording and entertaining viewers.
Because of this, it’s always a good idea to have an additional person logged into the primary account to monitor the comments on a desktop computer. That way, they can take care of responding so the person recording the video can concentrate on creating a great experience.
10. Subtitle your broadcast in the comments section.
Your viewers may be tuning in and out to watch your video during the work day, or they might simply be watching your video without sound. Either way, periodically subtitling the video in the comments section is a great way to keep people engaged. This also allows people who are tuning in late to catch up on what’s going on.
Take some inspiration from Refinery29 — it captioned the video with some of the most snackable one-liners and quotes from the broadcast in the comments section:

11. Ask viewers to subscribe to Facebook Live notifications.
In addition to asking for Likes, shares, and comments, ask viewers to subscribe to live notifications. To do that, all viewers have to do is click the small, downward-facing arrow in the top-righthand corner of the live video post, and choose “Turn On Notifications.”
You can also ask them to Like your brand on Facebook, which will make it more likely that they’ll be notified of your next live broadcast. Lucie does this in the Refinery29 video.
12. Broadcast for at least 10 minutes.
As soon as you begin recording your live video, you’ll start slowly but surely showing up in people’s News Feeds. The longer you broadcast — especially as Likes, comments, and shares start coming in — the more likely people are to discover your video and share it with their friends.
Because timing is such an important factor for engagement in these live videos, we recommend that you go live for at least 10 minutes, although you can stay live for up to 90 minutes for a given video.
13. Say goodbye before ending your video.
Before you end your live broadcast, be sure to finish with a closing line, like “Thanks for watching” or “I’ll be going live again soon.”
Lucie from Refinery29 checked a few other engagement requests off the list at the end of her broadcast:
“So, we are about to sign off. It’s been such an amazing first episode of ‘Chasing Daylight.’ . . . Don’t forget to share this to your friends right now so you can always find this series and go back to it. . . . We’re so happy that you tuned into our episode in New York. . . . Goodnight from New York City!”
14. Add a link to the description later.
Once you’ve finished the live broadcast, you can always go back and edit the description, change the privacy settings, or delete the video, just like you would any other post.
Here’s where you can add a trackable link to the description in the post, which can direct future viewers to your live video series page, the site of whatever campaign you’re using the video to promote, or somewhere else.
To edit the description of a video: Find the video on your Timeline or Page and click the downward-facing arrow in the top-righthand corner of the post. Choose “Edit Post” from the dropdown menu, and edit the description accordingly.

We hope this has been a helpful guide. We’ll keep you posted with any new developments and tips for connecting with your audience in more cool ways.


The Leader’s Guide to Effective Change Management
The only constant in life is change.
[Enter any tried-and-true marketing tactic] is dead.
Winter is coming.
We’re reminded daily about how change is coming, and to succeed in business, we must remain agile. Sure, that all makes sense in theory, but in practical application, to change how we operate or serve customers is no small feat.
According to Mckinsey, 70% of change programs fail to achieve their goals, largely due to employee resistance and lack of management support.
Yikes.
This doesn’t mean employees are wrong — they simply lack understanding and buy-in.
As a leader, it’s your responsibility to guide your team through the end result and help establish this comfort and buy-in.
The good news is there are tons of change management methodologies that you can adopt and adapt to your business.
At IMPACT, we’ve gone through quite a bit of change recently. We’ve almost tripled in size in just over a year, and what was once a small core team, is now a fairly good sized-agency that requires a much different approach to implementing change than the good ol’ days (a.k.a. last year).
After struggling to implement a change to our client onboarding process, we decided to take a step back and re-evaluate our approach to change management.
Below I’ll share with you the key change management models and tools we reviewed, and how you can avoid becoming another statistic.
What is Change Management?
Change management is the systematic approach of utilizing the people within your organization to minimize resistance to and affect organizational change.
Yes, there are tools and models, which I will get to below, but at the core of any strong change management program is your people.
No model will work if you continue to let employee resistance and lack of management support sabotage your efforts.
4 Common Change Management Models
No need to dust off your old college business school books. Here are the top 4 change management models most commonly referred to when researching the “how” behind change management.
1. Kurt Lewin’s Unfreeze-Change-Refreeze Model
Picture an ice cube. The Kurt Lewin’s Unfreeze-Change-Refreeze model is exactly what it sounds like:
- Unfreeze
- Change
- Re-freeze
This sounds like the most simplistic model on the surface, but there’s a lot to unpack.
In the unfreeze stage, you are essentially breaking down the current way of doing business and noting what needs to change. It’s crucial in this stage to obtain two-way feedback of what needs to change (vs. solely top-down).
After noting and communicating the need for change, gather the key stakeholders necessary to proactively implement what needs to be done.
Once everyone has bought in, “re-freeze” in the sense that the change is institutionalized and consistently used in the new manner.
In our experience, this model focuses more on process than people. If you have a smaller team with less emotion to manage, this could be a good option.
2. The ADKAR® Model of Change
The ADKAR® model breaks down the human side of managing change.
The idea is you should work through each letter of the acronym, focusing heavily on the individuals within your company.
Awareness. Here, the goal is to learn the business reasons for change. At the end of this stage, everyone should be bought-in.
Desire. This is dedicated to getting everyone engaged and willingly participating in the change. Once you have full buy-in, the next stage is measuring if the individuals in your company want to help and become part of the process.
Knowledge. In this stage, you’re working towards understanding how to change. This can come in the form of formal training or simple one-on-one coaching so those affected by the change feel prepared to handle it.
Ability. Next, you must focus on how to implement the change at the required performance level. Knowing the required job skills is only the beginning; The people involved need to be supported in the early stages to ensure they are able to incorporate change.
Reinforcement. Lastly, you need to sustain the change. This final step is often the most missed.An organization needs to continually reinforce change to avoid employees from reverting back to the old way of doing things.
Unlike Lewin’s model, this focuses on people-side of stage. We like its idea of using reinforcement to make your changes stick and this model takes it a step further. It’s a good approach to consider if you have a larger team or more complex problem you’re trying to solve.
3. Kotter’s 8-Step Model of Change
In is 1995 book, Leading Change, Harvard Business School professor, John Kotter, lays out 8 stages all companies must go through in order to see effective change management.
- Create urgency through open dialogue that leads others in the organization to want the change as much as you.
- Form a powerful coalition of change agents in your organization. This can go beyond leadership and manager.
- Create a vision for change to reinforce the why behind it and the strategy to achieve the end result.
- Communicate the vision regularly to ease team anxiety and reinforce the why.
- Remove obstacles to pave the way for the needed changes to happen.
- Create short-term wins to keep up morale and show the team you’re moving in the right direction.
- Build on the change by analyzing what went well and didn’t go so well in your quick wins to keep pushing to the desired end result.
- Anchor the changes in corporate culture as standard operating procedure and reinforce why change is necessary and embracing it is part of your company culture.
If you have a more agile team, this model’s iterative short-term wins and building based on what you learn as you go, sync nicely with the agile methodology.
4. Kim Scott’s GSD Model
Okay so maybe this one isn’t as common yet, but it soon will be, so you might as well get ahead of the curve!
Kim Scott outlines the GSD model (get stuff done) in her bestselling book, Radical Candor, which is a process of the following steps:
- Listen: Listen to the ideas of your team and create a culture where they listen to each other.
- Clarify: Make sure these ideas aren’t crushed before everyone has a chance to understand their potential usefulness.
- Debate: Create an environment where it’s okay to debate and make the ideas even better.
- Decide: Select the idea that will best solve the issue.
- Persuade: Since not everyone was involved in the listen-clarify-debate-decide stages, you have to effectively communicate why it was decided and why it’s a good idea.
- Execute: Implement the idea.
- Learn: Learn from the results, whether or not you did the right thing, and start the whole process over again.
We included this in our mix at IMPACT because of how much it focuses on obtaining ideas from the frontline. People buy into what they help create and Kim Scott’s GSD model provides a framework to make that happen.
Now, there are many more models for you to choose from than just these four, but realize there may not be just one model that fits your organization best.
If you’re anything like us at IMPACT, you may want to take a page from several of these models to improve your communication and effectiveness in times of change.
A Change Management Plan in Action
Below is a real example of how my team approached a major change and the change management steps we took to ensure everyone was on the same page and moving in the same direction.
Step 1: Determine What Needs to Change and Craft the Message
In the course of 3 months, IMPACT completely restructured the agency-side of our organization. In March, our agency team looked like this:

This structure worked for us in 2017, but as we came into the new year with an even larger team, our quarterly team survey results told us a different story.
For the first time in several years, not everyone could see their future at IMPACT.
Some had no idea what was going on or why certain decisions had been made. And what stung the most is we had a few happiness scores below seven, which we haven’t had since 2015.
Ouch.
In our February leadership team meeting, we debated for hours why some in the company were feeling this way.
After several ideas, we all determined one area we should focus on was our structure. We were setting our managers up for failure with competing responsibilities and in doing so, we made it extremely difficult for them to effectively communicate with their teams, coach them in their careers, and ensure they could see their future at IMPACT.
The ones who did better in this area suffered in others, like client results and retention.
It was a huge issue that needed to be solved immediately.
This leadership team meeting was the beginning of step 1 in our change management plan:
Determine what needs to change and craft the message.
In our monthly all-hands meeting following that leadership team meeting, our CEO, Bob Ruffolo, explained the why behind our decision that we needed to make a structure change — the what.
He explained the survey results, our thought process, and everything that led to the conversation.
Then, he explained that we had outgrown our current structure, placing too much responsibility on our current managers. We inadvertently set up our teams to fail and that wasn’t ok. — the message.
In order to improve this situation, we needed to create a structure that scales.
Planting the seed for a change is seriously just the first step. After this meeting, we knew there would be fear and confusion, so we got to work on step 2.
Step 2: Identify Your Stakeholders and How to Manage Them
We knew that a complete structure change would not go well if it was strictly a top-down initiative. We needed help and a core coalition to get it off the ground.
However, not every single person would need to know every single detail of what was going on.
While all teams were involved, most were focused with how they would personally be affected in a day-to-day sense, as well as in relation to how they work with other teams.
To keep communication clear, and to ensure everyone had a voice and a chance to enact Kim Scott’s debate stage, we needed to identify stakeholders across the agency team.
In this case, our stakeholders were the managers of our teams. We were essentially changing their job responsibility, so it was prudent to include them in the conversation.
Although we created a committee of stakeholders, what we failed to do was take our communication a step further by managing the other agency team members more closely.
The matrix below outlines a way to segment your team and your communication with each segment so you can better communicate across the board.
We only had our managers involved, and we updated the rest of the team all at once in our monthly all-hands. Next time, we will definitely create a strong communication plan based on this matrix.

Image from Mindtools, which adapted from Mendelow, A.L. (1981). Environmental Scanning – The Impact of the Stakeholder Concept,’ ICIS 1981 Proceedings, 20.
Once we identified our key stakeholders, we met with each one and some of their teams to get their feedback, pushback, concerns, and ideas about the structure change.
In full transparency, not all these meetings were fun. There was high emotion and rigorous debate, but, at this point, we had not zeroed in on our exact plan, and they helped us understand the team’s concerns and ideate on the best way to structure for scale — together.
Step 3: Systematically Communicate
This is an area we got wrong in this scenario.
In step one, we announced at a company meeting a pretty earth-shattering idea. Our managers felt blindsided and not all the team members were convinced a structure change was needed.
We learned the hard way that surprising people in a company meeting was not the way to go.
Our intention was to be transparent about what was discussed in our leadership team meeting, but there was definitely a better way to do that had we been more systematic in how we communicated to the team.
After identifying key stakeholders, this is the path we are focusing on now:
CEO/Leadership team (if it’s a leadership decision) > communicates to the next level management > who then communicate to the frontline managers and key stakeholders >who then communicate to the the rest of the team.
Managers can communicate to their own teams in a style that they know will resonate and create shared understanding. They can also help identify issues and concerns so we can all co-create a solution.
This eliminates group-think and reduces the timeline to extinguish fear.
Although our path was a little messier here, once we received all team feedback, we all agreed to what our new agency structure should be:

Then we moved onto Step 4.
Step 4: Get Organized With Incremental Steps
At this stage, everyone knew a change was coming, but no one knew how we were going to make it happen.
This was the time to get organized and get buy-in on the “how” of change management.
Now that we knew what our new structure would be, we developed a project plan with the incremental steps to get us there by the end of the quarter.
We created a video explaining the structure and project plan for all teams to review in their weekly meeting.
Our managers and key stakeholders were involved and accountable for different parts of the plan, and in our all-hands meetings, we updated on the progress of the plan so everyone could stay informed.
In our plan, we also mapped out some “quick wins” in the first month so the team could feel major progress was happening.
In our case, this was selecting new team managers for those teams whose Principal Strategist moved over to the Strategy team.
We interviewed internally and selected our new managers within 3 weeks of rolling out our initiative, which was exciting for our new managers and exciting for the team to see we’re already making huge steps.
Step 5: Equip Your Managers to Handle Emotional Response to Change
It’s one thing to have great communication and a solid-looking plan — but change is hard.
Everyone responds in their own way, but what we didn’t think about was this concept of The Change Curve. Ok, let’s be honest — we didn’t even know this existed.

Image from Insights.com, Kubler Ross The Change Curve
After our initial all-hands meeting, we had people all over the Curve. We then in essence said, “Managers, figure it out!”
As we went through the process, we learned another lesson the hard way: We needed to adapt our communication and management style for each individual based on where they were in responding to change.
The graphic below by Expert Program Management shows how you change your response along The Change Curve to gain buy-in sooner and give better coaching to your managers.

By meeting team members where they are at, our managers could adapt their communication style to coach each team member through the process, allowing for more personalized, effective transition.
Note: This doesn’t have to be advice just for managers. Our teams operate in scrum, and in their team retrospectives, a shared understanding of this tool could have facilitated more understanding and stronger conversations and problem solving within the team.
Step 6: Manage by OKRs
In order to stay focused throughout the quarter, we created an objective and corresponding key results (OKRs) for our structure change.
The objective was essentially “make the structure change happen” and we measured by tracking the milestones from our project plan.
Each all-hands, we would update the team on how we were doing on our objective and show the percentage complete so they could see visible progress. (We use 7Geese as a way to continually check in and measure our key results.)
This was also a time for those working directly on the project plan to celebrate and give themselves a pat on the back. There was a ton of work involved, and they deserved to be recognized for crushing it.
By breaking down exactly what needed to happen, we were able to keep the team focused and motivated to reach our goal.
Step 7: Continue to Communicate like Crazy
As I mentioned in step 1, discussing the idea is seriously only the first step. To keep everyone motivated, organized, and informed, we had to communicate like crazy.
There three types of communication we focused on: motivational, informational, and two-way.
Our motivational communication often came from our CEO to continually reinforce the why behind this major change.
Informational communication came from updates on our OKRs in our all-hands meetings, as well as one-off videos from the team working on the project plan to update on progress.
The most important one that we focus on the most now, however, is two-way communication. We started off slow in this area, but after getting feedback in our Q2 team survey and from individuals on the team, we doubled down on this much more in the last month of the transition.
By ensuring you have a regular cadence of two-way communication, you ensure the team understands what’s being shared, but you also learn and address if there’s underlying dissent or miscommunication.
Although I put this as the last step, this is the most crucial.
Communication must happen throughout your entire initiative or you’ll risk falling short and potentially damaging company morale in the process.
If you focus on the 3 types of communication above, you will reach your goals faster with a happier team to boot.
Change is Cyclical
The reason I included Kim Scott’s GSD model is it most relates to our company culture. We are always looking for ways to improve, which means we have a lot of change going on all the time.
There is rarely a beginning and a clear-cut end like the more traditional models. I’m sure we’ll discover more tweaks we need to get our structure right, and that’s okay.
The point is change really is constant, and developing a model that works for your business is the best way you can manage the people-side of change and set everyone up for success.
As a leader, you can choose a model, or a mix of models like what we do at IMPACT, to help organize effective, lasting change in your organization.
By incorporating your team via the communication methods outlined above, you can empower and enable your team to take action — and have pride in the change they helped make.
Change isn’t easy and it isn’t going anywhere, but when you can figure out a model that works best for your company, you and your team have no limits.

The 17 Best Photoshop Tutorials & Ideas for Anything You’re Trying to Accomplish
There’s no doubt that Photoshop is an incredibly powerful tool for marketers. Photoshop has thousands of features, tools, settings, and shortcuts that have drastically changed and shaped graphic design and photo editing over the last few decades.
With the sophistication of today’s design capabilities, however, comes the hassle of learning and staying up-to-date on Photoshop’s features.
Whether you’re a Photoshop wiz, a self-taught intermediate designer, or someone just starting out, there will always be more tricks and hacks to learn.

Luckily, we’ve compiled a list of 11 video tutorials for Photoshoppers at various levels to speed up your workflow. Some videos are better suited for beginners, while other videos are tailored towards people with more experience. So take a look, find the tutorials that are best suited for you, and use them to learn some helpful new tips and tricks.
17 Useful Photoshop Tutorials That’ll Speed Up Your Workflow
1. Photoshop Basics Tutorial — Adobe
Time: 46 min
Many of you likely recognize the value of Photoshop and other design software skills, but when it comes to self-teaching a new skill like Photoshop, it’s hard to know where to begin. Luckily, this 46-minute tutorial is a great way to get started.
Created by the Adobe Photoshop team, this tutorial feels more like a free webinar class: You have a friendly teacher who shows you the basics of how Photoshop works with Adobe Bridge, and then shows you ten basic techniques to get you going.
Tips in this video include removing blemishes in photos, working with Photoshop’s layers, cropping, editing image colors, removing parts of an image, and more.
2. Photoshop Painting Tutorial — PiXimperfect
Time: 31 min
There’s more than one way to “paint” in Photoshop. Often the prettiest illustrations that brands show off today were created using Photoshop’s many digital paintbrushes. PiXimperfect’s Photoshop tutorial shows you, in detail, how to make a photo actually look like a painting.
For painting in Photoshop, your host in this tutorial recommends using a physical pen or stylus, rather than your computer mouse. A stylus best simulates the physical motions of painting, and helps you maintain hand control as you gradually transform your photo.
Throughout the tutorial, you’re taught how to use the many digital brushes in Photoshop to match the details of the photo you’re starting with. The host also shows you various brush strokes for adding, correcting, and enhancing the image. Watch it in full, below.
3. Design Tools and Workflow Tips — Adobe
Time: 7 min
There’s no better teacher than the maker, right? This second tutorial, hosted on Adobe’s Helpx site, gives quick basic tips for a better workflow. If you’re a self-taught designer, I highly recommend this video for a simple brush up.
The teacher starts out by taking you through quick grids and explaining how to maximize efficiency in your workspace. Then, he gives you helpful tips on placing elements (smart objects, linked files, etc.) and using clipping masks.
The best part of the tutorial is the way it quickly and visually touches on how Photoshop interacts with other Adobe products such as Typekit and Illustrator. The teacher quickly produces a magazine page on the screen by showing you different elements of Illustrator and Photoshop, making it easy to follow and easy to generate design ideas from.
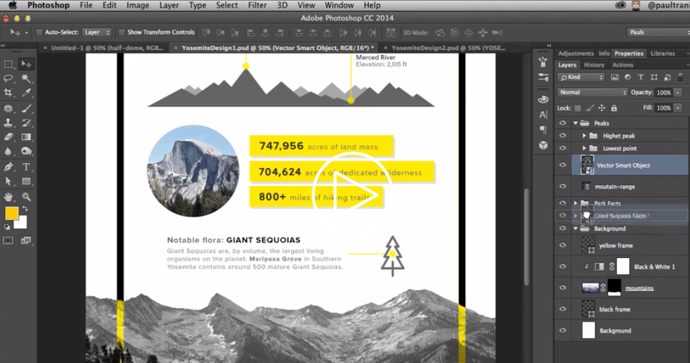
4. Photoshop Text Tutorial — Pixel & Bracket
Time: 3 min
There are lots of ways to incorporate text into a photo or design using Photoshop. And there are just as many fonts and stylings to choose from. The video tutorial below is a high-level overview of how to add text to your Photoshop canvas.
Your host, Spencer, shows you the two basic types of text you can add to a Photoshop canvas: boundless text and a text box. Both types of text give you different levels of freedom to move, rotate, and wrap your text around the other contents of your design.
Watch the brief tutorial, below.
5. Top 10 Photoshop Keyboard Shortcuts — Graphics Geeks
Time: 3 min
Part of speeding up your process is simply knowing and using the multitude of keyboard shortcuts available for the Photoshop software.
Luckily, Graphic Geeks put together this handy tutorial featuring their top 10 photo editing shortcuts in action. It covers toggling through layer blending modes, creating inverted masks, using clipping layers, transforming layers, resizing brushes, zooming in and out, previewing soft selections, duplicating layers, fading brush strokes, and sampling colors directly on the canvas.
Want even more tips and tricks? Check out this blog post for a list of 66 Photoshop keyboard shortcuts.
6. Photoshop Coloring Tutorial — PHLEARN
Time: 19 min
Recoloring a drawing or illustration is easy. Adding new color to a live-action photo, on the other hand, is another story. This tutorial shows you how to do it in Photoshop.
Photos have extremely intricate color compositions — they have way more colors than they appear to have at first glance. For this reason, it can be quite difficult to color a photo differently and ensure it looks natural in the end. Aaron Rice of the Photoshop resource, Phlearn, shows you how to use the “Colorizer” tool in Photoshop to isolate and change the color of certain parts of any photo.
The course teaches you how to apply a “layer mask” to your photo so you can reveal all the right details of the photo before “colorizing” it. As a result, you’ll be able to change your subject’s color without sacrificing quality. Watch the tutorial, below.
7. How to Use the Crop Tool — Lynda.com
Time: 5 min
There are plenty of ways to crop images on Photoshop, and if you compare your cropping method to someone else’s, you might realize they do it differently than you do. Part of this is because Photoshop’s crop tools have changed throughout its different versions.
If you want to learn how to use the latest crop tool (as of Adobe CC) — which allows you to hide cropped pixels instead of permanently deleting them — this tutorial walks you through it.
This tutorial serves as part of a series by Lynda.com — an excellent resource for extended Photoshop lessons.
8. Photoshop Background Tutorial — Adobe
Time: 3 min
If you work with visual content long enough, you’ll eventually be in a situation where you want to separate a photo’s foreground subject from its background. The problem is, removing a photo’s background can distort the subject you’re trying to isolate in the process.
The following Photoshop tutorial comes from Adobe itself, and shows you how to add a transparent “skin” to your photo and “paint” the subjects you want to separate from the background. The result? A foreground subject that you can layer onto any new background you wish. Learn how to do it by clicking on the link below.
9. How to Use the Undo/Redo Tool, Steps, and History — Sterling Teaches
Time: 5 min
If you’ve worked with Photoshop much at all, you’ve probably already realized that the undo/redo features don’t quite work the same way as they do in programs like Word, Illustrator, or InDesign. Instead, Photoshop’s undo/redo feature automatically sets to only undo one step. To go back through multiple steps, you have to use the history panel, and even the history panel is limited in the number of steps it remembers.
Photoshop is capable, however, of going back through older steps — it just doesn’t always seem like it at first. This tutorial walks you through how to use Photoshop’s undo/redo tools, and how to set up your history panel to remember more steps than it does automatically.
10. Double Exposure Photoshop Tutorial — Adobe Creative Cloud
Time: 45 sec
In my opinion, double exposure is one of the coolest visual effects available to you in Photoshop. This effect blends two different photos together so the texture of one image can fit into the shape of another image. And according to the tutorial below, pulling it off is easier than you think.
In the Photoshop tutorial below, Adobe Creative Cloud teaches you how to apply a double exposure using two images by lowering the images’ opacity. Then, you can layer one image on top of the other in a creative way. The result is incredible.
Watch the tutorial, below.
11. How to Use the Rotate View Tool — Creative Bloq
Time: 2 min
Ever been working on an image that you just wish you could flip upside down like you could a sheet of paper? If you didn’t know already, with Photoshop, you can!
This two-minute tool tutorial by Creative Bloq walks you through this simple tool and shows you how to use it practice.
Don’t forget to browse through other videos on Creative Bloq’s “Two-Minute Tool” series to quickly increase your capabilities with tools you may not have used previously! Creative Bloq keeps their tutorial videos clear, quick, and straight to the point so you don’t have to waste time searching for the information you want to know.
12. 3D Photoshop Tutorial — Tutvid
Time: 31 min
You don’t have to work for Disney Pixar to add a third dimension to an otherwise flat photo or design.
The 3D workspace in Photoshop sets you up in a gridded environment where you can add a three-dimensional object — many of which come standard in Photoshop — and create a 3D work of art using that basic object.
Photoshop’s 3D workspace, according to your host Nathaniel from Tutvid, enables you to change your view of your Photoshop canvas so you can examine the sides, top, and bottom of your object and edit it from any angle.
Shapes, letters, and numbers are all available in 3D form using Photoshop. In the video below, however, pay close attention to the system requirements in the introduction. 3D in Photoshop is a beautiful thing, but you can only play in this space if your computer is equipped with the right graphics card.
13. How to Sharpen Images — Kelvin Designs
Time: 16 min
As a photo editing and graphic design tool, it makes sense that Photoshop has hundreds of ways to sharpen, edit, change, and manipulate the look and feel of images. But it also means you may not know the best way to edit an image while maintaining the best quality.
This mid-length tutorial by Kelvin Designs takes you through the basics of sharpening images and why some ways are better than others. Your teacher will also give you tips on maintaining the quality of the images while explaining which tools work better for certain types of images.
As an added bonus, Kelvin Designs linked the source files used in the video for you to download and follow along on your own computer. If you’re more of a hands-on learner, this might be a great tutorial for you.
14. How to Use Step & Repeat Patterns — Phlearn
Time: 15 min
For many graphic designers, creating and using patterns is a fairly frequent task. While there are multiple ways to create patterns — one of which is by hand — Photoshop actually has a simplified trick for making pattern building much easier than measuring, copying, pasting, and repeating over and over again.
In this video, the teacher — Aaron Nace — takes you through the basics of building patterns. Nace has tons of tutorials for Photoshop and Lightroom, so make sure to check them out.
(Pro tip: This video has a pretty long introduction, so skip to 1:37 if you want to cut to the chase.)
15. Photoshop Actions Tutorial — Phlearn
Time: 8 min
Ever wish you could just record a series of steps in Photoshop and apply those steps to a bunch of different files? Like cropping images to a certain size or a building a customer filter to use on lots of images? As it turns out, with Photoshop’s Action tool, you can.
In the second Phlearn tutorial featured in this post, Nace how to batch edit photos using the Action tool. What I love about this tutorial is that he gives you ideas for other ways to use the Action tool even as he uses it primarily to set a custom filter for a group of wedding photos.
16. How to Create a Custom Brush — Larry Lourcey
Time: 5 min
There are numerous times when designers have to place a watermark, logo, or some other standardized feature on images repeatedly throughout their work. While placing the image into the document as a layer works just fine, it’s helpful to have those features already loaded into your workspace.
That’s where creating custom brushes for things like logos and watermarks is a super handy way to speed up your workflow. In this tutorial, Larry Loucey from PhotoEducationOnline.com teaches you how to create custom brushes so you can load logos, watermarks, etc. into your workspace.
Doing this allows you to easily transform and place your logos/watermarks from your brushes panel onto your designs without having to search through your computer files each time.
17. Photoshop Masking Tutorial — Tutvid
Time: 3 min
Layer masks tend to play a big role in many graphic design processes. Essentially, a layer mask allows you to apply something — a color, shape, etc. — to a specific part of an image, rather than the entire thing.
In this speedy tutorial, Tutvid.com dives into not only what masking is, but how to do it quickly. He uses the example of a car to show how a mask can be used to manipulate the car’s color from red to green.
If you haven’t already given masking a try, definitely check out this tutorial.


The What, Where, and How of Video Consumption [New Data]
Since late last week, the topic of online video has worked its way into a few headlines.
First, it was announced that Facebook has launched Lasso: a short-form video app seemingly designed to compete with TikTok, which is a similar app allowing users to upload quick videos that are usually powered by a musical background.
For example:
Our favorite cover of “Stand by Me.” 😍 pic.twitter.com/qcVTwiPvI5
— TikTok (@tiktok_us)
October 22, 2018
The same day Lasso’s launch was announced, Giphy — known as a database of short, animated GIF images — announced that it, too, would launch its own short-form video platform.
But almost as soon as this new battle for the favored short-form video platform began to break out, new information emerged that other platforms are embracing long-form video — and by “long,” we mean upwards of 75 minutes, in some cases.
So we wanted to know: When it comes to online video consumption, where do users really weigh in? How familiar are they with these short-form video platforms, how much time do they really spend watching online video?
We post these questions — and others — to over 6,500 people across the U.S., UK, and Canada to see what we could learn about the what, where, and how of online video consumption. Here’s what we found.
People Are Fairly Unfamiliar With Short-Form Video Platforms
First, we wanted to measure awareness of these short-form video platforms, starting with TikTok.

Over half of respondents — 54.6% — indicated that they are not familiar with TikTok.
Then, we posed the same question about Giphy.

Data collected with Lucid
Here, an even higher percentage of users — 61.3% — indicated that they’re unfamiliar with Giphy.
It poses the question of how well Lasso — whose parent company, Facebook, made no major announcement of its launch and has no dedicated website — will fare in a market that’s becoming more crowded without much awareness.
People Have a Mixed Relationship With Facebook Video
Next, we posed the question: What do you use Facebook for?

Data collected with Lucid
Here, we found that less than a third of respondents — 28.7% — say that their primary use for Facebook is to watch videos.
Instead, most people indicated that they mostly use Facebook for keeping up with friends and family — followed by those who said their primary purpose is getting the news.
However, when we asked survey respondents — Not including streaming TV and movies, where do you watch online video? — over half of them said they do so on Facebook.

Data collected with Lucid
However, Facebook didn’t quite beat out video hosting platform YouTube, where just over 70% of respondents say they watch online video.
Instead, it took the lead in user posting preferences, with 61.8% of respondents indicating that they prefer to share video on Facebook over other platforms.

Data collected with Lucid
Most People Watch Online Video on a Mobile Device
We also wanted to know which devices people were using to consume online video.

Data collected with Lucid
Just over 87% of respondents said that they watch online video on a mobile device, with over half of them indicating they do so via a smartphone.
The high rate of online video consumption via mobile could indicate potential growth for short-form video platforms like TikTok — even though 2.8% of respondents listed it as their primary app for watching (and .3% saying they prefer to share video there).
Where these apps could possibly see a faster rate of growth is in integrations with apps that are a bit more native mobile users, such as with Messages app extensions on iOS devices.
But, People Say They Aren’t Enamored With Super-Short Videos
When we posed the question — Not including streaming TV and movies, what would you estimate is the longest online video length that could hold your attention? — the results were mixed.

Data collected with Lucid
The lowest number of respondents — only 7% — said they could only maintain attention for a video that was less than five minutes long.
In fact, the highest percentage indicated the opposite, with over 20% saying that they believe a video over 75 minutes long could hold their attention.
That could explain the popularity of YouTube in earlier questions, where videos that are 20 minutes or longer appear to be gaining in favorability among creators and viewers alike.
At the same time, people seem to downplay the amount of time they spent watching online video each day.

Data collected with Lucid
Although a decent amount claim that they could sit through a feature-film-length video, most also say they spend less than an hour watching online video each day.
For now, it seems that the trajectory of short-term video is ambiguous at best. Snapchat, for instance — which some call a pioneer in the area of short, ephemeral videos — has actually shown to be shrinking, not growing.
“Making short, shareable videos designed to appeal to the broadest audience possible has given way to something,” writes Wired‘s Emma Grey Ellis, “not only longer, but more niche.”
That could explain why platforms like Facebook and Instagram are launching platforms dedicated to longer-form videos (Watch and IGTV, respectively) — because, it seems, our preferences could be leaning toward video content that is more enriched and in-depth.
This potential growing preference should be observed by marketers and those creating video on behalf of their businesses. While it may not be wise to entirely invest in 75-minute videos, it could be worthwhile to ask: What kind of story would my audience like to see and hear with this amount of time?
As always — stay tuned.
Want more data? Reach out on Twitter to let us know what news and trends you’d like us to ask questions about.
