
5 Ways Augmented Reality (AR) Is Transforming Retail
For the past few years, augmented reality (AR) has been discussed as a useful but far-fetched solution, particularly in retail.
However, partially due to the launches of Apple’s ARKit and Google’s ARCore, augmented reality is no longer a future possibility for retail — it’s here. In fact, 75% of consumers now expect retailers to offer an augmented reality experience.
Brands that take advantage of augmented reality will be the brands that satisfy more customers long-term.
While there are many ways AR will transform retail in the upcoming years, we’ve honed in on five in particular. Take a look at how AR is transforming retail, and then consider how you can incorporate AR into your own retail strategy.
1. Virtually Try On 3D Products
If you’re anything like me, a store packed with customers can deter you from trying on products, even if you really need a new pair of sneakers.
A few brands are using AR to combat this challenge. For instance, Lacoste’s LCST Lacoste AR app allows customers to virtually try on shoes — since its release, over 30,000 users have interacted with the products within the app.
 Image courtesy of Engine Creative.
Sephora, meanwhile, created a Virtual Artist App with Modiface to show Sephora app users how makeup products will look on their face via their phone’s camera.
By the end of 2018, it’s estimated mobile devices will account for 27% of all U.S. retail ecommerce sales. As holiday season approaches, busy shoppers will turn to brands like Lacoste and Sephora to ensure they like the look of a product before making an online purchase. By offering a comparable alternative to the in-store experience, you’re able to appeal to a larger demographic.
2. Look at 3D Products In Home
Oftentimes, an in-store experience doesn’t help customers visualize how products will fit and look in their homes. One of the biggest ways AR will transform retail is by offering customers the opportunity to see products in home before purchase.
For instance, Magnolia Market partnered with Shopify’s AR team to create an app that allows customers to see how the brand’s products will look in their homes. Augmented reality helps customers visualize Magnolia Market’s products to decide if the products match the existing furniture, or fit well in the room.
 Image courtesy of Shopify.
Similarly, Home Depot released their Project Color app in 2015, which allows users to see how a paint color looks in a room. The AR technology considers lighting, objects, and shadows in the room, so you can get a realistic portrayal of how the paint color will look in real life.
Both Mangolia Market and Home Depot’s AR apps allow users to send images through text or on social media to get a friend’s opinion before making a purchase.
As more home improvement retail stores offer AR apps, it will become harder to compete without one. If you had the option of seeing one brand’s couch in your home before purchasing, or purchasing from another brand without knowing how it would look, which would you choose?
3. Gather In-Store Information
Nowadays, nearly 60% of shoppers look up product information and prices while using their mobile phones in stores. Augmented reality could provide a critical solution to meeting those shoppers’ needs.
There’s certain product information a shopper can’t ask a sales associate — questions like, “What do other customers think of this product?” AR can fill this gap. For instance, American Apparel created an AR app that allows customers to scan signs in-store and pull up product information, including customer reviews, color options, and pricing.
 Image courtesy of AmericanApparelTech.
Additionally, app users can watch videos of models wearing American Apparel products, or send products to a friend if they think the friend would like it.
While users are likely able to find this information online without an AR app, augmented reality helps bridge the gap between offline and online shopping, creating a more cohesive experience. To help your customers find what they need more effortlessly, you might consider using AR in-store.
4. Use Virtual Fitting Rooms
Fitting rooms, particularly during a busy shopping season, can be a deterrent for shoppers. Sometimes, a shopper might buy an item, try it on at home, and return it just to avoid the fitting room line. Other times, shoppers might decide the item isn’t even worth the hassle.
If you’re going to use AR, you’ll want to brainstorm how to make the lives of your customers easier. Topshop, for instance, partnered with AR Door and used Kinect motion sensing technology to create a virtual fitting room for customers in their Moscow store. By standing in front of the camera, customers were able to see how clothing items looked on their bodies without physically trying anything on.
 Image courtesy of ARDOORMoscow.
Similarly, Timberland created their own virtual fitting room in Moktow Gallery in 2014. Using Kinect, Timberland’s fitting room allowed customers to see how their bodies looked in certain outfits.
Ideally, AR can help you appeal to more customers, including shoppers who are rushed or frustrated by the crowds. To satisfy more people, you might consider incorporating virtual fitting rooms into your store.
5. Build Brand Awareness
Even though augmented reality is becoming increasingly mainstream, it’s still unique and surprising.
Retail stores that use AR in 2018 set themselves apart as especially innovative and modern.
For instance, Airwalk used geolocation and AR to create an “invisible” pop-up shop, promoting the limited-edition relaunch of the Airwalk Jim. To purchase the shoe, customers needed to download Airwalk’s app and go to a virtual pop-up store location.
Airwalk’s unusual and fun shopping experience resulted in $5 million in earned media, and the ecommerce store’s busiest weekend yet. Additionally, the campaign proved Airwalk as a relevant and forward-thinking brand. By understanding their core demographic, Airwalk was able to successfully build brand awareness using AR.
 Image courtesy of LS:N Global.
Ultimately, it’s important you consider how AR would best-suit your customers’ needs. To create a sustainable long-term strategy, you’ll want to avoid using AR simply for flair — consider how the technology can enhance your customer’s shopping experience, and you’re more likely to find lasting success.

How to Use Google’s Website Builder to Create a Free Site for Your Small Business
Even though the majority of consumers research, discover, and purchase products on the Internet, 60% of small businesses didn’t have a website last year. A lot of small business owners just don’t have the time or resources to develop their own websites.
Fortunately, in June 2017, Google decided to help out the backbone of the global economy by giving every business with a Google My Business account access to a free, intuitive single-page website builder. The tool is fully customizable, automatically updates with the account user’s GMB listing information, and works with AdWordsExpress.
If your small business wants to build a simple yet striking site in less than an hour, here’s a quick rundown on how to use Google’s website builder to create and customize your new site.
How to Make a Website for Free on Google
- Fill out a free Google My Business Listing.
- Once you’ve filled out your GMB listing, click the “Website” option on the left sidebar.
- Customize your website.
- Press “Publish”.
- Buy a domain.
Customizing Your Free Google Website
Google’s website builder will automatically generate an initial website for you, pre-populated with your business’ name, location, hours, contact information, posts, catalogue, and photos.
The initial website is a template, so you can customize the theme, copy, photos, and language. Here are some screenshots and information about each element.
Theme

With eight themes to choose from, your website’s font and color scheme are fully customizable.
Copy

In the edit tool, you can choose from a variety of CTAs to place on your website. You can also edit your website’s headline, description, summary header, and summary body. In the summary body, you can bold, italicize, underline, hyperlink, number, and bullet any of your text.
Photos

In the Photos tool, you can upload up to nine photos, product images, or other pictures to the section on your website directly below the summary body. You can also upload your own cover photo to your website.
Language
You can write your website’s copy in over 60 different languages.
Section Order
Unfortunately, you can’t change your website’s section order, but your site will be laid out in a logical and engaging fashion.


With their free website builder, Google has helped millions of small business owners bypass the challenges, time, and costs that hindered the development of their own websites and, ultimately, their business. If you’re looking for a free and simple way to grow your online presence, Google’s Website Builder can help you too.

How to Use Creative Commons to Find Free Images
Many beginning bloggers turn to the image search in Google. But pictures found in this way are almost always subject to restrictive copyright terms.
Creative Commons was created as an alternative to restrictive copyright laws, and allows authors and creators (of images, animations, music, and more) to license their works for distribution and further use.
In this blog post, we’ll explain what each Creative Commons license means, how to search for images under these licenses, and how to attribute images that were published under one of these licenses to the original author.

What is Creative Commons?
Creative Commons is a not-for-profit organization that allows photographers and visual artists to properly label their content for reuse by others. There are seven different creative licenses artists can use, each one permitting a different level of sharing and reuse by the end user.
So, what do these Creative Commons licenses look like, and what types of permission do they give to those who want to reuse or republish a licensed image?
Creative Commons Licenses
If you choose to use a Creative Commons-licensed image on your blog, be sure to check the terms of the license. Most images require only that you attribute the work to the original author, but some licenses include additional restrictions.
Here’s a quick breakdown of the different types of Creative Commons licenses available to publishers.
Attribution
This Creative Commons license offers the most opportunity for sharing and republishing. Under this license, you are allowed to redistribute, modify, and build upon the original work as long as you attribute the work to the image’s original author (learn how to properly attribute images to their respective authors further down in this article).
You must also be careful not to imply that the original author has endorsed you in any way through your use of their item.
ShareAlike
Under the ShareAlike license, you can redistribute, modify, and build upon the original media as long as you attribute it to the original author and publish it under the same license — in other words, the ShareAlike license.
The image must not be placed under any different or more restrictive terms for re-use than those established by the original author.
NoDerivs
The NoDerivs license is short for “No Derivative Works.” Under this Creative Commons license, only exact copies of the work may be used and shared, but no derivative or altered versions of the work.
In other words, there is no modifying, remixing, or building upon the original media under this license.
NonCommercial
The NonCommercial license allows you to modify and build upon the original media, but it cannot be redistributed for commercial purposes.
Business bloggers: Pay attention to this license. Although blogs by themselves are not a revenue stream, they can serve to support a revenue-generating business. Therefore, it’s best to avoid media under this license if you’re publishing to a company blog, unless the media’s author says otherwise.
NonCommercial-ShareALike
This hybrid license carries the rules of the NonCommercial and ShareAlike licenses at the same time.
When reusing these types of Creative Commons images, you can redistribute, modify, and build upon the original media as long as it’s not for a commercial purpose, you attribute the media to the original author, and you republish the image under the same NonCommercial-ShareAlike license as the original.
NonCommercial-NoDerivs
NonCommercial-NoDerivs is the most restrictive license an artist can use on their work. Under this license, you’re not allowed to modify, remix, or build upon the original work nor publish it for commercial purposes.
If you’re publishing a NonCommercial-NoDerivs image to a personal website, you’re required to display the media as you found it and attribute it to the artwork’s original author.
Licenses for images and other works might be designated as simply Attribution-Noncommercial” href=”http://creativecommons.org/licenses/by-nc/3.0/”>Attribution-NonCommercial, Attribution-ShareAlike, or some further combination of license terms. Always check the terms of the work you are planning to use just to be certain that you’re complying with the specific wishes of the author.
How to Give Creative Commons Attribution
As you can tell from the license descriptions above, more often than not you’re required to attribute the original image to its author.
1. Identify the license on your chosen image.
To do so, start by typing in a search term that describes the image you want. When you find one, take a moment to learn what the terms of the license is for the image and insert it into your post. For images on Flickr, you’ll see this license labeled on the bottom-righthand corner of the image, as shown below (this is the Attribution license).

Image by: Emmanuel Huybrechts
2. Note how this work was redistributed.
Unless otherwise stipulated by the image’s author, there are two ways to appropriately attribute him or her to your redistributed version:
- “Image by [name of author].” If you haven’t modified or built upon the original image, this phrase — or something like it — is all you need to give proper credit.
- “This image was modified from [origin of image] by [name of author].” If you have modified the image from its original version, it’s courtesy to say so in your attribution note.
3. Link back to the origin of the image.
Once you’ve identified the license of your image and written out an attribution line that reflects it, all you have to do is hyperlink the author’s name or the origin of the image to the landing page from which you first downloaded it.
How to Use Creative Commons Search
Images that have been made available for use through a Creative Commons license can easily be found on Flickr or Wikimedia Commons.
You can also search Google for images that carry a Creative Commons license by configuring your advanced search settings the following way:
- Navigate to Google Images and select “Tools” on the right, just below the search bar.
- In the options that appear, click “Usage rights.”
- In the dropdown menu that appears, select the license that suits your needs.
Google makes it easy to filter your image results by each of the licenses described above. In Google Images, you have four options:

“Labeled for reuse with modification” generally produces images under the Attribution and ShareAlike licenses. “Labeled for reuse” produces every license. “Labeled for noncommercial reuse with modification” produces the NonCommercial license, and “Labeled for noncommercial reuse” produces the NoDerivs license.
If you’ve read this far, we have one last gift for you: Creative Commons Search. This handy database allows you to set the platform in which you want to conduct an image search and automatically filter by Creative Common license.
Now that you have everything you need, get to searching! The author of your next republished image is counting on you.
Beth Dunn is a member of the Inbound Marketing Consultant team at HubSpot. Beth also blogs at www.bethdunn.org and An Accomplished Young Lady.

Why We All Need to Pay Attention to Amazon Advertising
Digital ads have been discussed quite a bit over the past year, and not always in a positive light.
Ads, for example, were at the foundation of the Cambridge Analytica scandal, when a voter profiling firm was charged with improperly harvesting and using Facebook users’ personal data in order to sway votes in political elections. That data was allegedly used to create ads that would influence voters.
And yet, the advertising business is booming. Case in point: Amazon.
At day two of Code Commerce — a conference that centers around ecommerce and retail — Andrea Leigh and Ben Winters of Ideoclick — a company that works with manufacturers to optimize online sales — spoke to the rapid growth of Amazon’s advertising platform.
According to Winters, Amazon advertising has quickly become the third-largest digital ad platform (sponsored product ads began appearing in 2012), behind Facebook and Google. And while it hasn’t yet surpassed the later, Winter says, Amazon’s ad revenue is growing at 5X the rate as Google’s.
So what does this mean for advertisers? We dug into what Amazon advertising looks like today, what it could look like in the future — and what retailers advertising on Amazon or thinking about it should do to optimize their efforts.
What Amazon Advertising Looks Like Today
Users may have seen evidence Amazon’s growing ad platform while browsing the site. According to Recode — as well as Leigh and Winters — the company is “stuffing” its search results with ads.
Consider that 54% of product searches on the internet take place on Amazon, according to Winters. Now, the first three listings that appear in those search results — “which take up the whole screen above the fold — everything visible before you scroll,” as Recode‘s Roni Molla writes — all consist of ads.
And it makes sense why Amazon would give advertisers this plum real estate. People are more almost certain to buy something that appears on the first page of results, Leigh says — so much so, “you could bury a dead body on the second page, because nobody goes there.”
Let’s look at what happens, for example, when we search for “dog food”:

As Molla pointed out, there’s nothing visible before scrolling down that isn’t an ad.
And this means that there’s precious little organic real estate on that first page, and a lot of competition for it — leading to what Leigh calls a “pay to play” situation.
“This is a bad time to be a manufacturer on Amazon,” Leigh adds. “The squeeze is there.”
In fact, she even asserted that Amazon is sometimes “predatory” in its advertising practices. That limited real estate we mentioned earlier? Amazon uses some of it for its own private label ads, withholding the space from advertisers and sometimes going so far as displaying these ads on product detail pages for competing products.
The Data Game
And regardless of whether facets of Amazon’s ad strategy is “predatory,” , Winters says it makes sense for Amazon, considering the amount of data it has on user preferences and buying behavior. It knows where to display those ads to get the most return.
As for user data, Amazon is also expanding its collection methods, in part with its Go stores. The store’s “walk-out technology,” enables customers who have downloaded the Go app to add the items they want to a bag and leave, with the help of sensors.
My video tour of Amazon Go …no tills ‘just walk out’ shopping… #shopping pic.twitter.com/5S9SIbGe0N
— Keith Weed (@keithweed)
September 17, 2018
But here’s the thing about that sensor technology: Not only does it read what you’re putting in your bag to buy, it also measures which products you pick up, observe, and then put back — mimicking the ecommerce browsing experience, but in real life.
And this powerful hybrid of on- and offline behavioral user data could make Amazon’s ad targeting even more powerful in the future — both for advertisers and its own purposes.
The Bottom Line
So what does this mean for marketers and SMBs — especially those who don’t necessarily have the ad spend available to “pay to play”?
If you ask Leigh — which we did — it turns out that advertising may not be the end all, be all for smaller manufacturers. Not at first, anyway.
To figure out how to make Amazon advertising work for them eventually, she advises manufacturers to look at where they have a larger or engaged audience.
“If you have a social following, or do a lot of events, you can send that audience to Amazon,” she says. “We call that ‘juicing the flywheel.’”
There are also some lessons to be learned from search optimization here, especially when it comes to knowing what your target buyers are searching for on Amazon.
Keywordtool.io, for example, has its own resource specifically for finding Amazon search keywords, and can help retailers understand what their target buyers are searching for.
Once you do find the right keywords — and garner an ad spend — Leigh recommends being as specific as possible.
“The majority of searches on Amazon are very specific, like ‘probiotic for elementary-aged children’,” she says. “And they have a really high conversion.”
She was firm that an ad budget isn’t a prerequisite to success on Amazon.
“You don’t have to buy advertising on Amazon to be effective,” she says. “I think there are other ways to grow on Amazon, especially if you have a good following.”

The Ultimate Guide to Storytelling
An art.
Not a process, method, or technique. Storytelling is described as an art … the “art” of storytelling.
And — like art — it requires creativity, vision, skill, and practice. Storytelling isn’t something you can grasp in one sitting, after one course. It’s a trial-and-error process of mastery.
Sounds like a lot of work, right? It is, and rightfully so because storytelling has become a crucial component of the most successful marketing campaigns. It sets apart vibrant brands from simple businesses and loyal consumers from one-time, stop-in shoppers.
It’s also the heart of inbound marketing.
Storytelling is an incredibly valuable tool for you to add to your proverbial marketing tool belt. That’s why we’ve compiled this guide, to help you discover and master storytelling and weave gorgeous, compelling tales for your audience.
Pick up your pen, and let’s dive in.
While this definition is pretty specific, stories actually resemble a variety of things. This graphic from ReferralCandy helps outline what stories are and are not.

Storytelling is an art form as old as time and has a place in every culture and society. Why? Because stories are a universal language that everyone — regardless of dialect, hometown, or heritage — can understand. Stories stimulate imagination and passion and create a sense of community among listeners and tellers alike.
Telling a story is like painting a picture with words. While everyone can tell a story, certain people fine-tune their storytelling skills and become a storyteller on behalf of their organization, brand, or business. You might’ve heard of these folks — we typically refer to them as marketers, content writers, or PR professionals.
Every member of an organization can tell a story. But before we get into the how, let’s talk about why we tell stories — as a society, culture, and economy.
Why Do We Tell Stories?
There are a variety of reasons to tell stories — to sell, entertain, educate or brag. We’ll talk about that below. Right now, I want to discuss why we choose storytelling over, say, a data-driven powerpoint or bulleted list. Why are stories our go-to way of sharing, explaining, and selling information?
Here’s why.
Stories Solidify Abstract Concepts and Simplify Complex Messages
We’ve all experienced confusion when trying to understand a new idea. Stories provide a way around that. Think about times when stories have helped you better understand a concept … perhaps a teacher used a real-life example to explain a math problem, a preacher illustrated a situation during a sermon, or a speaker used a case study to convey complex data.
Stories help solidify abstract concepts and simplify complex messages. Taking a lofty, non-tangible concept and relating it using concrete ideas is one of the biggest strengths of storytelling in business.
Take Apple, for example. Computers and smartphones are a pretty complicated topic to describe to your typical consumer. Using real-life stories, they’ve been able to describe exactly how their products benefit users … instead of relying on technical jargon that very few customers would understand.
Stories Bring People Together
Like I said above, stories are a universal language of sorts. We all understand the story of the hero, of the underdog, or of heartbreak. We all process emotions and can share feelings of elation, hope, despair, and anger. Sharing in a story gives even the most diverse people a sense of commonality and community.
In a world divided by a multitude of things, stories bring people together and create a sense of community. Despite our language, religion, political preferences, or ethnicity, stories connect us through the way we feel and respond to them … Stories make us human.
TOMS is a great example of this. By sharing stories of both customers and the people they serve through customer purchases, TOMS has effectively created a movement that has not only increased sales but also built a community.
Stories Inspire and Motivate
Stories make us human, and the same goes for brands. When brands get transparent and authentic, it brings them down-to-earth and helps consumers connect with them and the people behind them.
Tapping into people’s emotions and baring both the good and bad is how stories inspire and motivate … and eventually, drive action. Stories also foster brand loyalty. Creating a narrative around your brand or product not only humanizes it but also inherently markets your business.
Few brands use inspiration as a selling tactic, but ModCloth does it well. By sharing the real story of their founder, ModCloth not only makes the brand relatable and worth purchasing, but it also inspires other founders and business owners.

Source: ModCloth
What Makes a Good Story?
Words like “good” and “bad” are relative to user opinion. But there are a few non-negotiable components that make for a great storytelling experience, for both the reader and teller.
Good stories are …
- … entertaining. Good stories keep the reader engaged and interested in what’s coming next.
- … educational. Good stories spark curiosity and add to the reader’s knowledge bank.
- … universal. Good stories are relatable to all readers and tap into emotions and experiences that most people undergo.
- … organized. Good stories follow a succinct organization that helps convey the core message and helps readers absorb it.
- … memorable. Whether through inspiration, scandal, or humor, good stories stick in the reader’s mind.
According to HubSpot Academy’s free Power of Storytelling course, there are three components that make up a good story — regardless of the story you’re trying to tell.
- Characters. Every story features at least one character, and this character will be the key to relating your audience back to the story. This component is the bridge between you, the storyteller, and the audience. If your audience can put themselves in your character’s shoes, they’ll be more likely to follow through with your call-to-action.
- Conflict. The conflict is the lesson of how the character overcomes a challenge. Conflict in your story elicits emotions and connects the audience through relatable experiences. When telling stories, the power lies in what you’re conveying and teaching. If there’s no conflict in your story, it’s likely not a story.
- Resolution. Every good story has a closing, but it doesn’t always have to be a good one. Your story’s resolution should wrap up the story, provide context around the characters and conflict(s), and leave your audience with a call-to-action.
Now that you know what your story should contain, let’s talk about how to craft your story.
The Storytelling Process
We’ve confirmed storytelling is an art. Like art, storytelling requires creativity, vision, and skill. It also requires practice. Enter: The storytelling process.
Painters, sculptors, sketch artists, and potters all follow their own creative process when producing their art. It helps them know where to start, how to develop their vision, and how to perfect their practice over time. The same goes for storytelling … especially for businesses writing stories.
Why is this process important? Because, as an organization or brand, you likely have a ton of facts, figures, and messages to get across in one succinct story. How do you know where to begin? Well, start with the first step. You’ll know where to go (and how to get there) after that.
1. Know your audience
Who wants to hear your story? Who will benefit and respond the strongest? In order to create a compelling story, you need to understand your readers and who will respond and take action.
Before you put a pen to paper (or cursor to word processor), do some research on your target market and define your buyer persona(s). This process will get you acquainted with who might be reading, viewing, or listening to your story. It will also provide crucial direction for the next few steps as you build out the foundation of your story.
2. Define your core message
Whether your story is one page or twenty, ten minutes or sixty, it should have a core message. Like the foundation of a home, it must be established before moving forward.
Is your story selling a product or raising funds? Explaining a service or advocating for an issue? What is the point of your story? To help define this, try to summarize your story in six to ten words. If you can’t do that, you don’t have a core message.
3. Decide what kind of story you’re telling
Not all stories are created equal. To determine what kind of story you’re telling, figure out how you want your audience to feel or react as they read.
This will help you determine how you’re going to weave your story and what objective you’re pursuing. If your objective is to …
- … incite action, your story should describe a how a successful action was completed in the past and explain how readers might be able to implement the same kind of change. Avoid excessive, exaggerated detail or changes in subject so your audience can focus on the action or change that your story encourages.
- … tell people about yourself, tell a story that features genuine, humanizing struggles, failures, and wins. Today’s consumer appreciates and connects to brands that market with authenticity and storytelling is no exception.
- … convey values, tell a story that taps into familiar emotions, characters, and situations so that readers can understand how the story applies to their own life. This is especially important when discussing values that some people might not agree with or understand.
- … foster community or collaboration, tell a story that moves readers to discuss and share your story with others. Use a situation or experience that others can relate to and say, “Me, too!” Keep situations and characters neutral to attract the widest variety of readers.
- … impart knowledge or educate, tell a story that features a trial-and-error experience, so that readers can learn about a problem and how a solution was discovered and applied. Discuss other alternative solutions, too.
4. Establish your call-to-action
Your objective and call-to-action are similar, but your call-to-action will establish the action you’d like your audience to take after reading.
What exactly do you want your readers to do after reading? Do you want them to donate money, subscribe to a newsletter, take a course, or buy a product? Outline this alongside your objective to make sure they line up.
For example, if your objective is to foster community or collaboration, your call-to-action might be to “Tap the share button below.”
5. Choose your story medium
Stories can take many shapes and forms. Some stories are read, some are watched, and others are listened to. Your chosen story medium depends on your type of story as well as resources, like time and money.
Here are the different ways you can tell your story.
- A written story is told through articles, blog posts, or books. These are mostly text and may include some images. Written stories are by far the most affordable, attainable method of storytelling as it just requires a free word processor like Google Docs … or a pen and paper.
- A spoken story is told in person, like a presentation, pitch, or panel. TED talks are considered spoken stories. Because of their “live”, unedited nature, spoken stories typically require more practice and skill to convey messages and elicit emotions in others.
- An audio story is spoken aloud but recorded — that’s what sets it apart from the spoken story. Audio stories are usually in podcast form, and with today’s technology, creating an audio story is more affordable than ever. (For a great story-driven podcast, check out The Growth Show!)
- A digital story is told through a variety of media, such as video, animation, interactive stories, and even games. This option is by far the most effective for emotionally resonant stories as well as active, visual stories … which is why it’s also the most expensive. But don’t fret: video quality doesn’t matter as much as conveying a strong message.
6. Write!
Now it’s time to put pen to paper and start crafting your story.
With your core message, audience objective, and call-to-action already established, this step is simply about adding detail and creative flair to your story. Read more about our storytelling formula to help you with this step.
7. Share your story
Don’t forget to share and promote your story! Like with any piece of content, creating it is only half the battle — sharing it is the other.
Depending on your chosen medium, you should definitely share your story on social media and email. In addition, written stories can be promoted on your blog, Medium, or through guest posting on other publications. Digital stories can be shared on YouTube and Vimeo. While spoken stories are best conveyed in person, consider recording a live performance to share later.
The more places you share your story, the more engagement you can expect from your audience.
Storytelling Resources
Storytelling is a trial-and-error process, and no one tells a story perfectly on the first try. That’s why we’ve collected these resources to help you fine-tune your storytelling skills and learn more about the different ways a story can be told.
For a written story
For a spoken story
For an audio story
For the digital story
Over To You
Storytelling is an art. It’s also a process worth mastering for both your business and your customers. Stories bring people together and inspire action and response. Also, today’s consumer doesn’t decide to buy based on what you’re selling, but rather why you’re selling it. Storytelling helps you communicate that “why” in a creative, engaging way. Plus, isn’t storytelling more fun?

7 Free Career Aptitude Tests You Can Take Online Today
Whether you’re a recent graduate or someone considering a career change, career aptitude tests can offer unique insight regarding jobs best-suited for your skillset and personality.
Best of all, the career aptitude tests are objective measures of your interests — so you can avoid awkward career conversations at family parties like, “My neighbor Bill is hiring for a financial analyst. I know you want to be a writer, but it’s a start.”
Here, we’ve compiled seven of the best career aptitude tests you can take online for free, so you don’t waste time applying for jobs you wouldn’t enjoy. If you feel unfulfilled in your current role, or if you’re tired of hearing what you “should” be doing at family parties, read on.
Best career aptitude tests
- 123 Career Test
- Princeton Review Career Quiz
- My Next Move O*NET Interests Profiler
- MyPlan.com
- MAPP Career Test
- Career Strengths Test
- PathSource
1. 123 Career Test
It’s important to find a job that suits your personality and makes you feel passionate about what you do. Occasionally, you might feel tempted to take a job for money or status, rather than truly considering if your personality would fit well in the work environment or job itself.
123 Career Test is a simple, five-to-ten minute assessment of your career personality. You simply look at pictures of people doing work-related tasks, and choose “yes” or “no” in regards to whether you could see yourself enjoying that task. 123 Career Test is based on Holland Code personality types, and will tell you which work environments and occupations best suit your career personality.

2. Princeton Review Career Quiz
Similar to 123 Career Test, Princeton Review’s Career Quiz offers examples of people doing tasks, and asks you to choose which one you’d rather do. However, while 123 Career Test shows you pictures, Princeton Review’s test offers phrases such as “I would rather be a tax lawyer” or “I would rather be a newspaper editor”. If you’d prefer words over images, this test is the better option for you.
The test consists of 24 questions. At the end of the test, you’ll be assigned a color based on your perceived interests and style — then, Princeton Review offers potential careers well-suited for people in your color category. While not as diligent as some of the others in this list, the results are nonetheless useful indicators of potential paths you might take.

3. My Next Move O*NET Interests Profiler
Sponsored by the U.S. Department of Labor, the O*NET Interests Profiler asks you 60 questions regarding various work activities. After you provide a level of interest for each task, ranging from “strongly dislike” to “strongly like”, the tool identifies your career interests and suggests potential career paths.
Best of all, the O*NET Interests Profiler allows you to filter your career path search based on how much preparation is necessary, so you can find jobs for which you’re currently qualified.

4. MyPlan.com
A company is only a good fit if it matches your values — but sometimes, particularly if you’ve never worked in a corporate environment, it’s hard to identify those values. MyPlan.com offers a free values assessment that identifies your work values, which can help you narrow your search when it comes to both positions and companies.
The test separates work values into six separate clusters. Once you’ve completed the test, you are assigned one of those clusters — then, you’re shown a list of 739 occupations, ranked by how well each position matches your personal values. If you’re unsure which industry best suits your values, this test might offer some useful initial insights.

5. MAPP Career Test
The MAPP Career Test (Motivational Appraisal Personal Potential) provides you with insights regarding your career motivations, and then offers you a list of ten industries best-suited for you. Additionally, the MAPP Test matches you with specific careers in their database of over 1,000 roles, helping you narrow your job-hunting scope.
The MAPP test has been taken by over 8 million people since 1995, and is offered in six different languages. The test has undergone reliability testing by psychologists, and results are correlated to the Strong Interest Inventory®. While some of the other tests in this list offer general personality or value assessments, this one matches you with specific roles. If you’re interested in more literal or concrete advice, this is a good test to take.

6. Career Strengths Test
Searching for jobs requires a certain level of self-awareness, but oftentimes, it can be difficult to remain open-minded and unbiased when considering your own strengths and weaknesses. The Career Strengths test, a collection of assessments developed by the Johnson O’Connor Research Foundation for Oprah, evaluates your strengths when it comes to skills varying from numerical reasoning to concept organization.
After completing the four quick tests, you’re given a list of multiple jobs that require your skills. This is a good test for identifying your job strengths, and limiting your career search to roles best-suited for your skills.

7. PathSource
PathSource created a free career assessment app for those of you who prefer using your smartphone over a desktop. Once you input personality characterists and interests, PathSource provides you with a list of potential career options, and includes information such as lifestyle and income expectations for each potential role. Additionally, the app offers 2,600 informational interviews, showcasing an insider’s view from people in various professions.
PathSource also provides a database of careers related to various academic majors. If you’re a recent graduate and are unsure which career paths you can pursue with your major, this is a helpful tool.


Network Effects: How Growing Your User Base Can Increase the Value of Your Product or Service
When the World Wide Web launched in 1991, most people thought it would fizzle out in a few years. Experts considered it to be a shiny, new fad that no one was really using — six countries in the world had more than one Internet user per 100 people.
But when the development of various web browsers like Netscape, Internet Explorer, and AOL enabled easier and simpler Internet use in the mid-90s, the web boomed in popularity.
In fact, 28 million online users sent or received email at least once every few weeks and businesses like Amazon.com and eBay opened online stores.
By the early-to-mid-2000s, internet technology vastly improved, allowing more people to access the web at faster speeds and letting them connect on social media and collaborative websites like Wikipedia. And once people could access the internet with mobile phones in the late 2000s, there was no looking back — the web had become mainstream. To communicate, connect, research, and buy things, the internet was starting to become the most widely-used platform.
You might think the evolution of the internet’s capabilities was what grew its user base. But it was actually the evolution of its network. When more people started using the internet, connecting with each other, and buying products on it, the web became necessary to do everyday things, making the platform more valuable for current users and non-users.
A product’s or service’s increase in value due to a surge in usage is called a network effect. And companies can leverage this phenomenon to make their own product or service so valuable that it becomes essential for their entire target market to use.
Below, we’ll delve into the economic benefits of network effects and the most common examples to help you apply them to your own business model. But first, let’s go over what a network effect exactly is.
Network Effect Definition
A network effect is when new, additional users signing up for a product or service increases its value and utility for current and future users. If a product or service has a network effect, its value and utility will increase as its user base grows.
The telephone and social networks are good examples of how network effects can impact a product or service. As more people started using these technologies, they became necessary for communication, boosting their value for existing and future users, which weakened the alternative’s value.
For instance, when everyone started communicating with landline phones, it became the most popular way to talk to people, increasing the telephone’s user base, necessity, and value while simultaneously diminishing the need for the telegraph.
Similarly, when the majority of people and businesses started connecting on Facebook, it became the most popular way to communicate with your entire network, increasing its user base, necessity, and value while simultaneously reducing MySpace’s value.
As you can see, leveraging network effects can greatly increase the size of your user base, your company’s market share, and your product’s or service’s value. But if you’re in the SaaS space, it can also boost your business’ profitability.
The Economic Benefits of Network Effects
From a pure accounting perspective, your SaaS company’s variable costs only consist of hosting and servicing your product. These costs are much lower than than your software’s price, so the profit from selling your product is a lot higher than the cost of producing it.
Your variable costs also don’t increase at the same rate as the rate you sell your software at — like physical products — because you already built the software. The more users you can attract and retain with network effects, the faster you’ll generate the revenue to cover your fixed costs and the faster you’ll start earning a profit.
But any company that wants to leverage network effects will also face the high hurdle of attracting a sufficient amount of users to produce enough momentum for a network effect to even take place.
This threshold is called the critical mass point, where the product’s value becomes greater than its cost, which is what ultimately attracts new users.
Before hitting the critical mass point, though, the cost of signing up for a product is greater than the value of signing up for it. To incentivize early adopters to sign up for their product, brands usually use discounts or referral benefits to lower the product’s price to the point where the value of subscribing is higher than the cost of subscribing.
Once companies can attract enough early adopters and users to surpass the critical mass point, they can start leveraging network effects. But they can’t just coast from that point on. Businesses must be able to sustain their network’s growth, and to avoid congestion or saturation, they must align the growth of their staff and capacity with the growth of their user base.
For instance, if a ridesharing app, like Uber or Lyft, has too much consumer demand and not enough cars, its prices will skyrocket, congesting the app and providing less value to its users. This is called a negative network effect. And brands who want to leverage network effects must make sure they can satisfy their growing user base before it even hits its critical mass point.
But if they’re successful at it, they’ll be able to use network effects to their full advantage and depend on a more reliable and cheaper way to grow their business than developing and shoving countless product updates into their prospects’ faces.
The Three Most Common Examples of Network Effects
There are three main types of network effects that can increase your product’s user base and, in turn, value: direct, two-sided, and local. We’ll go over and give an example of each of them below.
Direct Network Effect
A direct network effect is when an increase in usage and users leads to a direct increase in the product or service’s value for other users.
The App Store is a good example of having a direct network effect. For example, the more people who use iPhones, the more app developers will build apps for the App Store, making the iPhone more valuable for current users, which attracts new users. This ever-growing user base also prompts even more developers to build apps for the App Store, which boosts the iPhone’s value even more.
On the other side of the coin, though, iPhone app developers don’t reap nearly as many benefits as iPhone users do. They have to heavily depend on the App Store’s direct network effect to generate app downloads. And with an ever-growing user base of iPhone users who only have one place to download apps, developers who build IOS apps can garner the most attention for their products in the App Store. But developing IOS apps also becomes a necessity for their business to survive.
Two-Sided Network Effect
A two-sided network effect is when the value of the product or service equally increases for both buyer and seller. This usually happens because the entrance of new sellers and buyers into a service like a marketplace or platform entices even more sellers and buyers to join the service.
Marketplaces like eBay are a great example of the two-sided network effect in action. eBay has a lot of buyers bidding on auctions, which increases demand and prices, attracting more sellers to the marketplace. When more sellers join the platform, though, supply increases and prices decreases, which attracts more buyers to the marketplace.
This constant increase in the marketplace’s supply and demand oscillates its products’ prices, making the site valuable to its buyers during certain times and sellers at others.
Platforms like social media can also have a two-sided network effect. But to leverage the effect to its full potential, social networks need to maintain their user quality to keep attracting more valuable users in the future.
For instance, Facebook started out with an extremely specific user base: students at Harvard University. Next, they slowly opened their platform up to more colleges around the world, then to high schools, and eventually, to everyone.
To convince the entire world to join their platform, Facebook had to be highly-dedicated to deleting spam accounts and making sure the majority of their users were real people. This way, users could connect and communicate with their entire social circle on the website, which also attracted most advertisers — almost every brand’s entire target audience was and still is on Facebook.
Good growth, not just growth, is what lead to Facebook’s lasting expansion. That’s why they exploded in popularity while Myspace nosedived into irrelevance.
Local Network Effect
Every major social network’s user base is actually made up of a bunch of smaller, local networks. And the strength of each local network is what boosts the size and engagement of the social network’s entire user base.
Social media platforms like Instagram aren’t valuable to you because you can communicate with over one billion other users. They’re valuable because all your friends are on it, and you can easily connect with them on the platform. Referencing inside jokes or personalizing your posts is socially acceptable because your following usually understands the context of your posts. This lets you express yourself in an environment you truly feel comfortable in.

21 Brand Style Guide Examples for Visual Inspiration
When it comes to building a memorable brand, it’s all about consistency.
When you’re shopping for your favorite cereal or coffee at the grocery store, you want to be able to spot it from a mile away.
The best brands stick in our brains because their presence is defined by the repetition of the same logo, fonts, colors, and images. Once we see them enough, they become instantly recognizable, bringing us a clear sense of reliability and security.

Developing a consistent brand starts with creating a brand style guide. These branding rule books help graphic designers, marketers, web developers, community managers, and even product packaging departments all stay on the same page, and present a unified vision of the brand to the public.
We’ve compiled a list of some awesome brand style guides to use as inspiration for your next branding project or website redesign. Check them out below.
What are brand guidelines?
Brand guidelines, often contained in a brand style guide, govern the composition, design, and general look-and-feel of a company’s branding. Brand guidelines can dictate the content of a logo, blog, website, advertisement, and similar marketing collateral.
Picture the most recognizable brands you can think of. Chances are, you’ve learned to recognize it because of the consistency across of the messaging — written or visual — that brand broadcasts. The same brand colors are reflected across them. The language sounds familiar. It’s all very organized and, while not rigid, it’s cohesive.
Here are a few types of guidelines you’d find in a brand style guide and which parts of a brand they can influence.
Mission Statement
By reputation, you might think a mission statement is in its own category of importance to a business. And it is. But your business’s mission statement is also compass for your brand style guide. A mission statement ensures every piece of content you create for your brand is working toward the same goal — and, ideally, strives to solve the same problem for your customer.
Your mission statement can guide your:
- Blog content.
- Paid/sponsored content
- Ad copy.
- Visual media.
- Slogan or tagline.
Buyer Persona
By definition, a buyer persona is a fictional representation of your ideal customer. It can include details related to your customer’s age, gender, job title, and professional challenges. For this reason, your buyer persona should also appear in your brand style guide. Your buyer persona is your target audience, and therefore stipulates for whom your brand publishes content.
Your buyer persona can guide your:
- Blog content.
- Ad copy.
- Visual media.
Color Palette
A color palette, you’ll correctly assume, will guide every piece of visual content you create on behalf of your brand. Your color palette can be as simple or as elaborate as you want, so long as your brand doesn’t deviate from the colors you choose to include.
Color palettes that feature multiple colors often dedicate specific colors to specific types of marketing content. While the first two colors of your color palette might govern your logo, for example, the next two colors might support your website and blog design. Another two or three colors might be the basis for all your printed branding material.
No matter what colors you use for your color palette, make sure you identify their HEX or RGB color codes. These codes consist of numbers and letters to help you recall the exact shade, brightness, contrast, and hue you want associated with your brand, so your colors don’t gradually drift in appearance as you create new content. You can find color codes using most photo-editing or design software that comes standard on your computer. Learn more about finding and committing to color codes in this blog post.
Your color palette can guide your:
- Logo.
- Website design.
- Printed advertisings.
- Event collateral.
Editorial Style Guide
Nowadays, an editorial style guide is the bread and butter of an authoritative brand. This component of your brand style guide can have strong implications for your PR team, as well as the people who write articles, scripts, blog posts, and website copy for your company.
An editorial style guide’s main job is to commit to an editorial stylebook (such as Associated Press or Chicago), how to phrase certain products, topics the brand can and cannot write about, and even other companies the brand can and cannot mention. However, a brand’s editorial style guide can also go into much deeper detail about your buyer persona: what they like to read about, where they read it, their general reading level, etc.
Your editorial style guide can guide your:
- Blog content.
- Video scripts.
- Website copy.
- Landing page copy.
- Public relations talking points.
- A knowledge base supported by your customer service team.
- Paid/sponsored content.
Typography
Typography is another visual element of your brand style guide, but it isn’t just the font you use in your company logo. Typographic guidelines can support your blog design — which font you publish articles in — the links and copy on your website, and even a tagline to go with your company logo.
As you can see, the purpose of the brand style guide is to form and maintain all of the various elements of a company that, when combined, spell out the entire brand as it’s recognized.
Intrigued? Check out 21 of the best ones we could find.
Style Guide Examples
- Medium
- Wolf Circus Jewelry
- Ollo
- Skype
- Barre & Soul
- Spotify
- Jamie Oliver
- Herban Kitchen
- Urban Outfitters
- Love to Ride
- Barbican
- I Love New York
- Cisco
- University of the Arts Helsinki
- NJORD
- Espacio Cultural
- Alienware
- Netflix
- Scrimshaw Coffee
- NASA
- New York City Transit Authority
1. Medium
Medium emphasizes both typography and color in its brand style guide. Its guide also include details related to the company’s “Purpose” and “Product Principles.”
See the full brand guide here.


Source: Behance
2. Wolf Circus Jewelry
Wolf Circus Jewelry’s product is all about appearance. Naturally, the company’s style guide is too. The brand’s style guide includes the company’s mission statement, product details, typeface, logo variations, a color palette, and a separate set of guidelines just for advertisements.
See the full brand guide here.


Source: Issuu
3. Ollo
Ollo is so into color and typography, it turned its style guide into a game. Click the link below to see how much you can manipulate the brand. It’s the perfect way to show content creators how creative they can get but also still adhere to Ollo’s specific typeface and color codes.
See the full brand guide here.


Source: Bibliothèque Design
4. Skype
Everyone’s favorite video chat platform also has a squeaky-clean style guide for its brand. Skype, now owned by Microsoft, focuses primarily on its product phrasing and logo placement.
See the full brand guide here.

Source: Microsoft
5. Barre & Soul
Barre & Soul’s brand style guide includes variations of its logo, logo spacing, secondary logos, supporting imagery, and a five-color color palette.
See the full brand guide here.


Source: Issuu
6. Spotify
Spotify’s style guide might appear simple and green, but there’s more to the brand than just a lime green circle. Spotify’s color palette includes three color codes, while the rest of the company’s branding guidelines focus heavily on logo variation and album artwork. The style guide even allows you to download an icon version of its logo, making it easier to represent the company without manually recreating it.
See the full brand guide here.

Source: Spotify
7. Jamie Oliver
Jamie Oliver has an extremely thorough brand style guide, covering logo placement across all of its kitchenware products. The company also includes a large color palette with each color sorted by the product it should be shown on.
See the full brand guide here.


Source: Issuu
8. Herban Kitchen
Herban Kitchen has both a color and texture palette in its style guide. These guidelines help to show not just how the brand’s logo will appear, but how the company’s various storefronts will look from the outside to potential customers.
See the full brand guide here.


Source: Issuu
9. Urban Outfitters
Photography, color, and even tone of voice appear in Urban Outfitters’ California-inspired brand guidelines. However, the company isn’t shy to include information about its ideal consumer and what the brand believes in, as well.
See the full brand guide here.


Source: Issuu
10. Love to Ride
Love to Ride, a cycling company, is all about color variety in its visually pleasing style guide. The company’s brand guidelines include nine color codes and tons of detail about its secondary logos and imagery.
See the full brand guide here.


Source: Issuu
11. Barbican
Barbican, an art and learning center in the United Kingdom, sports a loud yet simple style guide focusing heavily on its logo and supporting typefaces.
See the full brand guide here.


Source: Issuu
12. I Love New York
Despite its famously simple t-shirts, I Love New York has a brand style guide. The company begins its guidelines with a thorough explanation of its mission, vision, story, target audience, and tone of voice. Only then does the style guide delve into its logo positioning on various merchandise.
See the full brand guide here.


Source: Issuu
13. Cisco
Cisco’s style guide isn’t just a guide — it’s an interactive brand book. The company takes website visitors page by page through its brand’s vision, mission, strategy, and even its promise before showing users their logo and allowing them to actually type using their proprietary typeface, “CiscoSans.” Where’s Cisco’s color palette, you ask? The business has a separate webpage for just that.
See the full brand guide here.


Source: Cisco
14. University of the Arts Helsinki
The style guide of the University of the Arts Helsinki is more of a creative branding album than a traditional marketing guide. It shows you dozens of contexts in which you’d see this school’s provocative logo, including animations.
See the full brand guide here.


Source: Behance
15. NJORD
NJORD’s minimalist style guide gives you everything you’d need to know to design using the brand’s logo and color palette for both web and print.
See the full brand guide here.

Source: Behance
16. Espacio Cultural
This cultural center in Argentina has a color palette that’s as elaborate as the artistic workshops it hosts. Nonetheless, the brand does a fantastic job of breaking down every last color code and logo placement you can find — from the building itself to the advertisements promoting it.
See the full brand guide here.


Source: Behance
17. Alienware
Video gamers know Alienware from its game-friendly computers, but the rest of the world knows it by the brand’s sleek aesthetic. The company organizes its brand style guide into four basic parts: voice, design, photography, and partner. The latter describes (and shows) how the brand interacts with partner brands, such as Star Wars.
See the full brand guide here.


Source: Issuu
18. Netflix
As far as its public brand assets are concerned, Netflix is focused primarily on the treatment of its logo. The company offers a simple set of rules governing the size, spacing, and placement of its famous capitalized typeface, as well as a single color code for its classic red logo.
See the full brand guide here.

Source: Netflix
19. Scrimshaw Coffee
Featuring a five-code color palette, this “laid back,” “friendly,” and “modern” brand has a number of secondary logos it embraces in various situations.
See the full brand guide here.


Source: Issuu
20. NASA
NASA’s “Graphics Standards Manual” is as official and complex as you think it is. At 220 pages, the guide describes countless logo placements, color uses, and supporting designs. And yes, NASA’s space shuttles have their own branding rules.
See the full brand guide here.


Source: Standards Manual
21. New York City Transit Authority
Like NASA, the NYCTA has its own Graphics Standards Manual, and it includes some fascinating typography rules for the numbers, arrows, and public transit symbols the average commuter takes for granted every day.
See the full brand guide here.


Source: Standards Manual
Want more? Read How to Create a Writing Style Guide Built for the Web [Free Template].



The Many Sides of — and Reactions to — Storefronts
It was quite a day for Recode — a digital tech news site owned by Vox — to kick off its annual Code Commerce event.
The morning’s headlines were crowded. Marc and Lynne Benioff (the former of whom is CEO of Salesforce) announced plans to purchase Time Magazine. The Adbusters Media Foundation unveiled its plans for #OccupySiliconValley, a day of efforts to take down Big Tech. And Amazon — perhaps the biggest name in (online) retail, which is at the core of Code Commerce — had its own news.
First, the ecommerce giant said it would be looking into allegations that some of its employees were involved in trade deals with independent merchants selling on the site. The way it worked, the story goes, is that in exchange for internal sales data and the deletion of negative reviews, these employees would receive a financial reward ranging anywhere between $80 and $2,000.
Our series exposing Amazon seller scams:
Employees are leaking internal data for bribes https://t.co/ufshdIQLtS
Inside click farms, reviewers-for-hire and other scams https://t.co/8tkz8WoJBh
How counterfeiters hijack small brands https://t.co/dedpvCMwpt pic.twitter.com/WOWkZaddP8
— Scott Austin (@ScottMAustin)
September 16, 2018
It may not have been a coincidence, then, that Amazon announced only hours later that it would launch Storefronts: “a new store for customers to shop exclusively from U.S. small and medium-sized businesses selling on Amazon.”
Storefronts, Amazon says, will make efforts to highlight small businesses — by highlighting a “Storefront of the Week”: a small U.S. business that Amazon features through a video that talks about its products or services, and the people behind them.
Remember that for later — because people, it turns out, are key to this story.
Putting a Face to a Purchase
Code Commerce kicked things off with a talk from NYU Stern Marketing Professor Scott Galloway, who — if the name doesn’t ring a bell — is the same guy who predicted that Amazon would acquire Whole Foods in May 2017, a good three months before it was announced. (For the record, he predicted today that Amazon’s HQ2 location will be somewhere in the D.C. metropolitan area.)
He was blunt. “”It’s impossible to compete with Amazon,” he said.
This observation isn’t unfounded. After all, just have a look at its market capitalization figures:
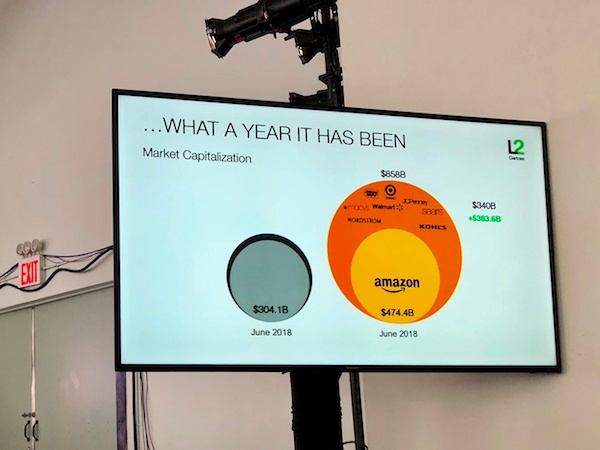
That’s a visual representation of how much, in terms of the value of other retailers, Amazon’s market capitalization has grown over the past year. Simply put — its absorbed the value of Target, Best Buy, Nordstrom, Macy’s, and a handful of others.
The perception that it’s “impossible to compete with Amazon” is quite possibly part of the drive behind Storefronts — as The Verge puts it, the company is “trying to convince you that it isn’t putting small businesses out of work.”
But maybe there’s some truth to it — that Amazon isn’t really trying to put an end to small businesses. As glib as Galloway’s remarks may be — he didn’t paint a picture of Amazon as a mortal enemy to smaller, local retailers. He even pointed out examples of some retailers who have continued to succeed not just among Amazon’s seeming overtaking of commerce, but also, among rumors of artificial intelligence (AI) replacing the jobs of store employees in the not-so-distant future.
So what does it take to be successful as the mom and pop business alongside the likes of Amazon? Here’s a brick-and-mortar success secret that Galloway let us in on: it boils down to making big investments in technology, keeping an eye on AI, and “organic intelligence.”
That last phrase refers to the people working in the store — the ones who many speculate could be replaced by AI. Amazon has been dipping its toe into AI-operated stores with its cashier-less Go stores.
Just walked into Chicago’s new @Amazon Go store. No cashiers. Felt odd just tossing things into my bag. pic.twitter.com/AhAhJHtGo5
— Charles Rotblut, CFA (@CharlesRAAII)
September 17, 2018
In contrast, Galloway floated the example of Sephora: a store where passionate associates — cast members, as the company calls them — seem to show genuine enthusiasm, as he put it, “about helping a 52-year-old with a tea extract.”
“People go to stores for people, not products,” he continued — and replicating that with AI might not only be a tall order, but ultimately detrimental to retailers.
@profgalloway tells #codecommerce people go to stores for people, not products, warns retailers not to see tech as a way to replace humans in stores pic.twitter.com/vUUHDp7YQA
— Phil Wahba (@philwahba)
September 17, 2018
And considering that many of the sellers using Amazon’s platform are small-to-midsize business (SMBs), featuring the humans behind the online purchases could be another driver behind Storefronts.
“It makes sense that Amazon would want to spotlight small businesses on the platform. Every indication we have shows that trust is at an all-time low when it comes to purchase behavior and more so, customers will pay a premium for a company they know, trust and respect,” said HubSpot VP of Marketing Meghan Keaney Anderson. “Putting a face to the thousands of SMBs already on Amazon not only gives buyers that outlet, it arguably makes Amazon feel like a more familiar and trustworthy place.”
Can Amazon Truly Feel Like a “Storefront”?
Shopify CEO Toby Lütke, who claims to have started his business to make entrepreneurship accessible to everyone, had this to say about the ecommerce giant’s newest venture: It “feels like a trap to me.”
Amazon’s new small business product, Storefront, ‘feels like a trap’, says Shopify’s CEO https://t.co/WBsQGJoycr pic.twitter.com/kIzeKo9eqn
— Recode (@Recode)
September 17, 2018
“Amazon’s worldview is that merchants don’t matter,” Lütke summarized.
Others assert that Amazon simply can’t replicate the unique benefits of shopping from a smaller business. For one, the sense of community.
It’s something that HubSpot CMO Kipp Bodnar pointed to earlier this year when he wrote about building an ecommerce business. Building a community that rallies around a certain product, he said, is “something Amazon simply can’t do for every single category they occupy.”
Jen Rubio, co-founder of luggage company Away, expressed a similar sentiment.
“Samsonite could recreate our product overnight,” she said. “But our brand and community, that’s what they can’t build overnight.”
Distribution vs. Customer Experience Control
Whatever your opinion of Storefronts, Amazon is an unarguably unparallelled distribution channel for SMBs. But in exchange for that distribution channel, business owners are faced with the decision to cede control over the customer experience.
“You will never have control of the full buying experience selling your products on Amazon, but you will get reach,” Keaney Anderson pointed out. And “the impact of that reach could be an absolute game changer for your business.”
However, she also pointed out that that sometimes reach can be achieved without an intermediary.
“You don’t have to lose control to gain reach,” she said. “Companies like Glossier and The Cactus Store have achieved remarkable traction and loyalty because of their decision to sell direct to consumer and have creative control over the entire customer experience.”
So, it’s not necessarily an either-or situation. For some retailers, a channel like Amazon might make sense — but it’s not the end-all, be-all of raising brand awareness.
“If you’re already selling through a marketplace or retail outlets for the sake of reach, it makes complete sense to also lean into Amazon – particularly now that they’re putting such a spotlight on SMBs,” Keaney Anderson said. “But know that it’s not the only way to grow.”
We’ll be back for day two of Code Commerce tomorrow — where we’ll share more experiences, insights, and takeaways.

The Ultimate Guide to Video Marketing
Brands need a video marketing strategy — this idea isn’t new. What has changed is how important video has become on every platform and channel.
It’s no longer just one piece of your overall marketing plan. It’s central to your outreach and campaign efforts … especially your social strategy.
Video has absolutely dominated social. According to a recent HubSpot Research report, four of the top six channels on which global consumers watch video are social channels. In addition, a Facebook executive recently predicted that the platform will be all video in less than five years.

Why is this important? Well, if you aren’t creating video, you’re likely falling behind. But, don’t fret. For most videos, the more simple and raw it is, the more authentic the content seems … and that’s what really matters to your audience.
Better yet, video production is more cost effective than ever — you can shoot in high-quality, 4K video with your smartphone.
So … video is cheaper and easier than ever. But, between camera equipment to lighting to editing software, the topic of video marketing can still seem pretty complicated. That’s why we compiled this guide.
Continue reading learn everything you need to know about video marketing, or use the links below to jump to a specific section.
Why You Need to Focus on Video Marketing in 2018
2016 saw a surge in the popularity of video as a content marketing format. 2017 saw video rise to the top of your marketing tactic list.
What has 2018 seen? In short, 2018 has transformed video from a singular marketing tactic to an entire business strategy.
Video as a tactic was likely centralized with your creative team as an one-to-many awareness play, with lots of focus on expensive production and little analysis to show for it.
Video as a strategy is quite the opposite. It’s produced by all teams, in a conversational, actionable, and measurable way. Video as a strategy is the future.
According to a report from HubSpot Research, more than 50% of consumers want to see videos from brands … more than any other type of content.

Video is useful for more than entertainment, too. Video on landing pages is capable of increasing conversion rates by 80%, and the mere mention of the word “video” in your email subject line increases open rates by 19%. 90% of customers also say videos help them make buying decisions.
But video hasn’t only transformed how businesses market and consumers shop; it’s also revolutionized how salespeople connect with and convert prospects and how service teams support and delight customers. In short, video is incredibly useful throughout the entire flywheel — not just to heighten brand awareness.
Video can be versatile tool for salespeople throughout the entire customer buying journey, and it can do much more than increase engagement. Backend analytics also help salespeople qualify and prioritize cold or unresponsive leads.
The options are also endless for service teams — onboarding videos, knowledge-based videos, meet the team videos, support video calls, and customer stories are just a few ways that video can create a more thorough, personalized customer support experience.
Lastly, 2018 has brought about a penchant for the authentic and raw. According to HubSpot Research, consumers and customers actually prefer lower quality, “authentic” video over high-quality video that seems artificial and inauthentic. What does this mean for you? That video is within reach for businesses of virtually any size — team and budget, alike.
The 12 Types of Marketing Videos
Before you begin filming, you first need to determine the type of video(s) you want to create. Check out this list to better understand your options.
1. Demo Videos
Demo videos showcase how your product works — whether that’s taking viewers on a tour of your software and how it can be used or unboxing and putting a physical product to the test.
2. Brand Videos
Brand videos are typically created as a part of a larger advertising campaign, showcasing the company’s high-level vision, mission, or products and services. The goal of brand videos is to build awareness around your company and to intrigue and attract your target audience.
3. Event Videos
Is your business hosting a conference, round table discussion, fundraiser, or another type of event? Produce a highlight reel or release interesting interviews and presentations from the gathering.
4. Expert Interviews
Capturing interviews with internal experts or thought leaders in your industry is a great way to build trust and authority with your target audience. Find the influencers in your industry — whether they share your point-of-view or not — get these discussions in front of your audience.
5. Educational or How-To Videos
Instructional videos can be used to teach your audience something new or build the foundational knowledge they’ll need to better understand your business and solutions. These videos can also be used by your sales and service teams as they work with customers.
6. Explainer Videos
This type of video is used to help your audience better understand why they need your product or service. Many explainer videos focus on a fictional journey of the company’s core buyer persona who is struggling with a problem. This person overcomes the issue by adopting or buying the business’s solution.
7. Animated Videos
Animated videos can be a great format for hard-to-grasp concepts that need strong visuals or to explain an abstract service or product. For example, we created the following video to promote a key (intangible) theme from the 2017 State of Inbound report.
8. Case Study and Customer Testimonial Videos
Your prospects want to know that your product can (and will) solve their specific problem. One of the best ways prove this is by creating case study videos that feature your satisfied, loyal customers. These folks are your best advocates. Get them on-camera describing their challenges and how your company helped solve them.
9. Live Videos
Live video gives your viewers a special, behind-the-scenes look at your company. It also draws longer streams and higher engagement rates — viewers spend up to 8.1x longer with live video than with video on-demand. Live-stream interviews, presentations, and events, and encourage viewers to comment with questions.
10. 360° & Virtual Reality (VR) Videos
With 360° videos, viewers “scroll” around to see content from every angle — as if they were physically standing within the content. This spherical video style allows viewers to experience a location or event, such as exploring Antarctica or meeting a hammerhead shark. VR allows viewers to navigate and control their experience. These videos are usually viewed through devices such as Oculus Rift or Google Cardboard.
11. Augmented Reality (AR) Videos
In this style video, a digital layer is added to what you are currently viewing in the world. For example: You can point your phone’s camera at your living room and AR would allow you to see how a couch would look in the space. The IKEA Place app is a great example of this.
12. Personalized Messages
Video can be a creative way to continue a conversation or respond to someone via email or text. Use HubSpot Video or Loom to record yourself recapping an important meeting or giving personalized recommendations. These videos create a delightful, unique moment for your prospects and can drive them further down the purchasing funnel.
The Video Creation Process
Before you set up, record, or edit anything, start with a conversation about the purpose of your video. Why? Every decision made during the video creation process will point back to your video’s purpose and what action you’d like your audience to complete after watching it.
And, of course, without a clear purpose agreed upon by your team, you’ll find yourself in a whirlwind of re-shooting, re-framing, editing … and wasting a lot of precious time.
There are typically a lot of players when making a video. How can you ensure they’re all aligned?
Create a questionnaire using Google Forms or SurveyMonkey and pass it along to the stakeholders of the project. This way, you can ask the same questions of everyone and aggregate your answers in one place.
- Who’s your target audience? What buyer persona are you targeting? This may be a segment of your company’s typical buyer persona.
- What’s the goal? Is it to increase brand awareness? Sell more event tickets? Launch a new product? Ultimately, what do you want your audience to do after watching the video?
- Where’s the video going to live? On Facebook? Behind a landing page form? You should begin with one target location — where you know your audience will discover the video — before repurposing it for other channels.
- When’s it due? Always start with a timeline. A video on which you have a few months to work will have very a different budget and creative scope than a video needed in a few days.
- What’s the budget? Video can be expensive, but it doesn’t have to be … if you set a budget. Do your research and set realistic parameters, especially before you answer the next question.
- What are the creative requirements? With your budget, skills, and resources in mind, think about the creative roadblocks that might arise. Do you need a designer to create lower third graphics? Are you going to create an animated video or a live action video?
- What will constitute success for the video? Choose several key performance indicators that correspond with your video goals — or hop down to the chapter in this guide on measuring and analyzing video.
Step One: Scripting Your Video
There’s a time and place for videos to be off-the-cuff and completely unscripted. You have tear-jerking documentaries, vlogging rants, and, of course, the holy grail: cat videos.
That being said, most business videos need a script.
If you skip this step, you’ll find yourself editing more than you need to, releasing a video longer than it should be, and probably losing your audience along the way.
Start writing your script the way you would begin a blog post — with an outline. List out your key points and order them logically.
Do all of your drafting in Google Docs to promote collaboration and real-time commenting. Use the “Insert > Table” function to adopt one of television’s traditional script writing practices: the two-column script. Write your audio (script) in the left column and insert matching visual ideas in the right column.

Don’t make the viewer wait until the final seconds to understand the purpose of your video … we promise, they won’t stick around. Similar to a piece of journalistic writing, include a hook near the beginning that states the purpose of the video, especially for educational and explainer videos.
Notice, in our example below, that we don’t let the audience get past the second sentence without understanding what the video will be about.

As you begin creating videos, you’ll notice a key difference between scripts and your typical business blog post — the language. Video language should be relaxed, clear, and conversational. Avoid using complex sentence structures and eloquent clauses. Instead, connect with your audience by writing in first person and using visual language. Keep the language concise, but avoid jargon and buzzwords.
Following the “Little-Known Instagram Hacks” example, note how a section from the original blog post could be transformed for video by using less words and relying on visuals.
- Blog Post Version: “When someone tags you in a photo or video on Instagram, it’s automatically added to your profile under “Photos of You,” unless you opt to add tagged photos manually (see the next tip). To see the posts you’ve been tagged in, go to your own profile and click the person icon below your bio.”
- Video Script: “The bigger your following gets, the more people will tag you in their posts. You can find all of these under the “Photos of You” tab on your profile.”
Most video scripts are short … probably shorter than you think. Keep a script timer handy to check your script length as you write and edit. For example, a 350-word script equates to a video that is nearly 2 minutes long.
Words on paper sound a lot different than they do when read out loud. That’s why we encourage organizing a table read of your script before you start filming. The point of a table read is to smooth out the kinks of the script and nail down inflection points.
Have a few people (writer and talent included) gather around a table with their laptops and read the script multiple times through. If you accidentally say a line different than what the script prescribes, think about why and consider changing the language to make it sound more natural.
Step Two: Understanding Your Camera(s)
Too often the fear and uncertainty of equipment keeps businesses from trying out video marketing. But learning to shoot video doesn’t have to be overwhelming.
It’s likely you have a great, easy-to-use camera right in your pocket: your iPhone.
Shooting with Your iPhone
Before filming with your iPhone, ensure your device has enough storage. Also, don’t forget to enable your iPhone’s Do Not Disturb feature to avoid distracting notifications while filming.
Once you open the iPhone’s camera, flip your phone horizontally to create the best possible viewing experience. Then, move close enough to your subject so you don’t have to use the zoom feature — it often makes the final video look pixelated and blurry.
Your iPhone might do a great job of focusing on the subject when you take photos, when when it comes to video, the camera will continue adjusting and re-adjusting as you move around the scene. To solve this problem, lock the exposure before you press record. Hold your finger down on the subject of the video until a yellow box appears with the words “AE/AF Lock”.

Shooting with Prosumer and Professional Cameras
While iPhones are great for filming on the fly or becoming acclimated with video, at some point you may feel ready to graduate up to the next model. With all the digital cameras on the market, there are a ton of choices to pick from. Below we’ve identified a few options to simplify your search.
The first choice you make will be between purchasing a “prosumer” camera and a professional camera.
Prosumer cameras are considered the bridge between basic compact cameras and more advanced cameras. They’re perfect for someone interested in creating more video but want the option to just press record. Most have a fixed lens to keep things simple.
Professional cameras, like DSLRs, give you fine control over the manual settings of shooting video and allow you achieve the shallow depth of field (background out of focus) that people rave about. While they’re primarily used for photography, DSLRs are incredibly small, work great in low light situations, and pair with a wide range of lenses — making them perfect for video. However, DSLRs do require some training (and additional purchases) of lenses.
If you’re interested in going the prosumer route, take a look at the Canon PowerShot ELPH 340. The GoPro HERO5 is another fun option for adventurous shoots with lots of movement.
Considering the expense of a DSLR camera, research your options and read plenty of reviews. Top of the line options (from most expensive to least) include the Sony Alpha a7SII, Nikon D810, and Canon EOS 5D Mark III. For a more cost-effective option, check out the Canon EOS 7D Mark II, Canon 80D, Nikon d3300, or Canon EOS Rebel T6.
Understanding Your Camera’s Manual Settings
If you choose a DSLR, there are a few settings you need to understand before your first shoot: frame rate, shutter speed, ISO, aperture, and color balance. Definitely keep your camera nearby as you read — manual settings can seem quite abstract without testing them for yourself.
But before we dive in, we want to stress that this is a high-level overview of each setting. If you find yourself wanting more, dive in and do some of your own research. There’s plenty to learn about how to manipulate these settings and use them together to create different looks.
Lastly, there will be a different method for adjusting these settings based on your specific camera. Always refer to your camera’s instruction manual.
Frame Rate
As with video concepts, there are tons of customization options. The most basic customization option when it comes to frame rate is shooting your video at 24 frames per second (fps) or 30fps.
Video experts often credit 24fps with a more “cinematic” look, while 30fps is more common, especially for videos that need to be projected or broadcasted. A good rule of thumb is to ask the end user of your video what his or her preferences are and shoot based on that. Then, be sure your resolution is at least 1920 x 1080 to maintain quality footage.
Aperture
Once you’ve set your frame rate and resolution in your camera’s settings, it’s time to determine your aperture, shutter speed, and ISO. Be sure to turn your camera to manual mode to control these settings.
(While we’ll define each of of these individually, know that these three variables are meant to work in tandem with each other. In fact, many photographers use the term Exposure Triangle to describe how they relate to light and how it interacts with the camera.)

Aperture refers to the size of the opening in the lens. Like a human eye, a len opens and closes to control the amount of light reaching the sensor. Aperture is measured in what’s called an f-stop. The smaller the f-stop number, the more open the lens is, while a larger number means the lens is more closed.

What does aperture mean for your video? When a lot of light comes into the camera (with a low f-stop number), you get a brighter image and a shallow depth of field. This is great for when you want your subject to stand out against a background. When less light comes into the camera (with a high f-stop number), you get what’s called deep depth of field and are able to maintain focus across a larger portion of your frame.

Shutter Speed
To understand shutter speed, we first have to talk about photography. When taking a photo, shutter speed refers to the length of time the camera’s sensor is exposed to light. Think of it as how quickly or slowly the camera blinks.
If you’ve seen a perfectly timed photo of a hummingbird seemingly frozen in time, you’ve witnessed a very fast shutter speed. Meanwhile, an image of a rushing river with the water blurring together was probably taken with a slow shutter speed.
Shutter speed is measured in seconds, or in most cases, fractions of seconds. The greater the denominator of the fraction is, the faster the shutter speed. So, 1/1000 would be faster than 1/30.
But what does shutter speed mean for video? We won’t go too deep into the science of shutter speed, but to pick the adequate setting, you’ll have to do a little math. First, multiply your frame rate by 2. So if you’re shooting in 24fps, that would be 48. This number becomes the denominator of your shutter speed fraction.
Since shutter speed is only available in a few increments, you’ll need to round 1/48 up to the next closest setting: 1/50. Here are some common shutter speeds and how to calculate them:
- At 24fps, 24 x 2 = 48, equalling a shutter speed of 1/50
- At 30fps, 30 x 2 = 60, equalling a shutter speed of 1/60
- At 60fps, 60 x 2 = 120, equalling a shutter speed of 1/20
Remember, this process is just a guideline for choosing shutter speed. Traditionalists stick to these calculations, but there’s always room to tweak shutter speed slightly to achieve a desired effect. In the case of video, rules can be broken — as long as you have a good enough reason.
ISO
Last in the Exposure Triangle is ISO. In digital photography and videography, ISO measures the camera sensor’s sensitivity to light. On your camera, you’ll see the settings referred to with numbers in the hundreds or thousands (e.g. 200, 400, 800, 1600, etc).
The higher the number, the more sensitive your camera is to light … the lower the number, the less sensitive. ISO also affects the graininess of the image. Low ISOs produce a crisp shot, while high ISOs create a more noisy, grainy shot.
When choosing an ISO, consider the lighting. If your subject is well-lit (for example, if you were outside), you can get by with a lower ISO, ideally around 100 or 200. If you’re indoors in a low-light situation, you’ll need bump up the ISO — just be careful of how grainy it makes your shot.
This is where you can begin to see how the three factors of the Exposure Triangle work together. When you have a low-lit situation, for example, you may choose a lens that can shoot with a low f-stop to let more light into the camera and avoid making the shot too noisy with a high ISO.

If you’re just starting out with manual video settings, don’t be overwhelmed. Understanding the ins and outs of the Exposure Triangle takes time and a lot of practice. Here are two tips to beat the learning curve:
- Start with photos. By switching your camera off video mode, you’ll be able to see the relationship between aperture, ISO, and shutter speed. Take a ton of photos and change each setting incrementally. Over time, the numbers will be less intimidating and switching between settings will make more sense — and become easier to apply to video.
- Form a process. Every videographer has their own method, but we suggest setting your shutter speed first according to the math described above. Then adjust aperture according to the depth of field you want to create. Then, ISO. Finally, circle back to shutter speed for any fine adjustments.
White Balance
While aperture, shutter speed, and ISO may be the three main pillars of manual photography and videography, there is a fourth piece of the puzzle that’s just as important: white balance.
White balance tells your camera the color temperature of the environment you’re shooting in. Different types of light have different colors. For example, incandescent bulbs (like what many people put in a lamp) have a very warm color. The florescent lights (if you’re reading this in an office, look up) are a little bit cooler. Daylight is cooler yet. Before you begin shooting, you have to adjust your camera’s white balance according to your setup.
The exact settings on your camera will depend on your model, but there’s likely an auto option, a bunch of presets (daylight, cloudy, tungsten, etc.), and custom. Avoid auto white balance at all costs and opt for a preset or custom instead. If you have a top-of-the-line DSLR, there may also be an option to manually set the color temperature of the room, measured in Kelvin.

To help you understand the importance of setting your white balance, consider the difference between these two photos. The environment is lit with yellow fluorescent lights. You can see how the appropriate setting looks natural, while the daylight setting adds a blue tint to the scene.

Focus
Focus isn’t one of the key settings of shooting, but it’s definitely important to keep in mind. With a DSLR, you have the option to shoot with autofocus or manual focus. It depends on the camera and lens you have, but typically autofocus is not the most accurate.
Instead, flip your lens to manual focus. Use the (+) and (-) buttons to enlarge the viewfinder and move in close to your subject’s face. Then, adjust the focus on the lens. For shooting a stationary setup like an interview, make sure the subject’s eyelashes are in focus — that way, you can be certain your footage is clear and sharp.
Step Three: Setting Up a Studio
When you begin building your in-office studio, the purchases can add up quickly. Not only do you need a camera, but the more you read, the more you realize you need tripods, lights, microphones, and more.
Take a breath. With a little bit of know-how, building your studio doesn’t have to be overwhelming. There are plenty of cost-effective choices and DIY hacks to make sure your videos look top-of-the-line.
Basic Equipment
Always shoot with a tripod. It should go without saying, but the handheld method you use for your Snapchat story isn’t going to cut it. Tripods will ensure you maintain a steady shot and not break any expensive equipment in the process.
Tripods range tremendously in price, and the quality of your tripod should depend on the level of camera and lens you have. If you’re shooting with your phone, you can get by with a table mount like the Arkon Tripod Mount or a full-size tripod like the Acuvar 50” Aluminum Tripod. For a DSLR, Manfrotto makes a variety of trustworthy tripods starting with the Manfrotto BeFree and increasing in quality and price from there.
Along with the tripod, stock up on camera batteries and SD cards. Recording video will cause you to run through both much quicker than taking photos.
Audio Equipment
If you’ve begun testing out your camera’s video capabilities, you’ve probably noticed that it has an internal microphone to record audio … don’t use it.
If you set up your camera at a reasonable distance from your subject, you’ll quickly learn that the internal microphone isn’t powerful enough to adequately record audio. Instead, you should begin investing in a few pieces of quality sound equipment.
When you’re shooting with your iPhone, there are a ton of microphone options that are all easy to use and decently cheap. For example, the Movo MA200 Omni-Directional iPhone microphone will give you a plug-and-play solution for capturing audio on the fly.
Opinions vary greatly among sound engineers on the best method and equipment for recording audio with a DSLR. You’ve likely seen many videos that use a lavalier microphone — the small piece that clips below the collar of the talent’s shirt. Lavaliers come in both wired and wireless options. However, lavaliers can be a bit obtrusive both for the talent (who has to have a wire threaded down his or her shirt) and for the viewer (who has to see a microphone for the whole video).
Instead, if you know you’re recording in a controlled environment (like a conference room in your office) we suggest recording with a shotgun mic. They’re reliable, remain out of the shot, and record background noise in a natural sounding way.
To create a shotgun mic setup in your office studio, you’ll need a shotgun mic like the Sennheiser ME66, a shotgun clip, light stand, XLR cable, and Zoom H4N recorder. The Zoom recorder will allow you to record audio separately on an SD card and adjust the gain for the environment you’re shooting in.

We admit, these audio purchases may sound like a lot. But a shotgun mic setup is a worthy investment that will last for years. If you’re looking for a more cost-effective solution, look into the Rode VideoMic that mounts on top of your DSLR and plugs right into the camera body.
Lighting Equipment
You have a camera. You have audio. Now, let’s talk about lights.
To outfit your studio without breaking the bank, head over to your local home improvement store. Pick up extension cords and a few clamp lights with bulbs. You’ll also need three light stands, which are available on Amazon.
The traditional setup of video lights is known as three-point lighting. As you might guess, it involves three lights placed strategically around the subject, wrapping them in light and creating appealing shadows on their face.
First, you’ll need a key light. Place this at a 45-degree angle to the left or right of the subject. Lift the light above their head and aim it downwards. As the name suggests, this is the key light and should be bright enough that it could be the only light in the scene … if it had to be.
Next, place the fill light at a 45-degree angle on the other side and lift it close to or just above eye level. The purpose of the fill is to soften the shadows created by the key, but without getting rid of them completely. Therefore, the fill should be dimmer than the key light. If you have to use the same type of light for both, scoot the fill back and diffuse it by clipping a clear shower curtain onto the clamp light with clothes pins.
Finally, the backlight will add a third layer of dimension. Scoot your subject away from the background. Lift a light above the subject’s head and place it behind them and off to the side so it’s out of the frame. The light should be aimed at the back of their head, creating a subtle rim of light and separating them from the background.

Setting Up Your In-Office Studio
Now that you have all of your equipment, you’re finally ready to build your office studio. While you could always grab a closet to store your equipment in, let’s go a bit bigger and claim a conference room.
By having a designated studio, you’ll save loads of prep time for each shoot. Just make sure the conference room isn’t too empty. If you have to, bring in a couch, chairs, or blankets to minimize the echos in the room.
Speaking of sound, pay special attention to the hum of the air conditioning. Find a room with minimal noise or turn down the fan during recording. Consider purchasing photography paper to create a background that’s a little more appealing than a white conference room wall.

When it comes time to shoot, clear out unnecessary people from the room and turn off the overhead lights. With your three-point lighting setup, there will be no need for those harsh fluorescents. When — and only when — everything is set up, call in your talent. There’s nothing worse than being nervous, and then having to anxiously watch as lights are turned on and the camera is tested.
Step Four: Preparing Your Talent
If you have experienced, confident actors in your company, you’re lucky. Video talent is a rare resource. But with a little bit of coaching (and a fair share of nervous laughter), you can help your teammates thrive in front of the camera.
No matter if it’s your first video or your fiftieth, remember that getting in front of the camera is scary. Schedule plenty of time and give your talent the script early — but make it clear they don’t need to memorize it.
Instead, place a laptop below the eye-line of the camera. Break the script into short paragraphs and record it section by section until you capture a great take of each. If you plan in advance when the final video will show b-roll (supplementary footage or screenshots), you can have your talent read those lines directly off the laptop like a voice over.
During the shoot, your job goes beyond pressing record. First and foremost, you need to be a coach. Balance critical feedback with support and be quick to give encouragement after each take. This is why conducting a table read during the scripting process is so important: It’s easier to give feedback when there’s not a camera in the room. Remember, be a little silly during the shoot or your talent will be on edge and uncomfortable — and it will show in the footage.
But while you’re maintaining the fun level on set, remain vigilant. It’s your job to pay attention to the little things, like making sure all of the mics are on or noticing if the lighting changes. Record each section many times and have your talent play with inflections. When you think they’ve nailed the shot … get just one more. At this point, your talent is already on a roll, and options will help tremendously during editing.
Finally, circle back to the beginning of the script at the end of your recording. Chances are your subject got more comfortable throughout the shoot. Since the beginning is often the most crucial part of the video, record that section again when they’re feeling the most confident.
Composition Basics
There are some films that are simply beautiful. It’s not the story or even the picturesque setting. In fact, the scene might take place in the dingiest of sets, but somehow each shot just feels right.
That’s the power of composition. When objects appear where they should in the frame, the quality of your video increases exponentially.
For video, the rules of composition are similar to what you may have learned in a photography or art class. First, consider the rule of thirds — the idea that you can create a sense of balance by imagining the canvas with two horizontal lines and two vertical lines. Key elements should occur at the intersection of these lines.

For example, if you are shooting an interview or a how-to video, the subject’s eyes should align with the top horizontal line around one of the two intersections. For this “talking head” shot, you can also improve your composition by leaving enough (but not too much) head room. This is the empty space above the person’s head.

Image Credit: Hubspot Customer Success Story Featuring Parlor Skis
One of the best ways to improve the look of your video is to include b-roll. B-roll is the supplementary footage included as a cutaway. This might include shots of a customer service rep talking on a phone, a designer editing your website, visuals of your office, or even screenshots of your product. The key with b-roll is to make sure each and every piece enhances the story.
When you’re collecting b-roll, include a mix of shots from varying angles and distances. In fact, film professionals use different names to describe these variations.
- Establishing shots: Wide shots that allow the viewer to see the entire scene. These are great to use when introducing the scene at the beginning of a video.
- Medium shots: Tighter shots that focus on the subject or a portion of the scene. Your classic interview shot could be considered a medium shot.
- Close ups: Tightly cropped shots zoomed in to show detail. These might feature someone’s hands typing on a keyboard or pouring a cup of coffee.
As practice, try telling a story with your b-roll and planning out a shot sequence. For example, your subject might open a door from the hallway, walk into their office space, sit down at their desk, open their laptop, and begin typing. Seems simple, right? But a shot sequence showing this 10 second scenario might consist of six or more different b-roll clips.
Here’s where the final lesson of composition comes in: continuity. Continuity is the process of combining shots into a sequence so that they appear to have happened at the same time and place. A key part of continuity is making sure any ancillary objects in the scene — for example, a cup of water on a desk — stay in the same place (and have the same amount of water) throughout all of the shots.
The other part of learning continuity is match on action. For the scene described above, you’d want to record the subject opening the door and walking in from both inside and outside the room. In post-production, you could then flip between the clips at the exact right time to make the cut seamless.

Step Five: Shooting for the Edit
When it comes to video, some are better at shooting while others are better at editing. Whatever side you claim, you should understand the process and pain points of each.
For instance, as the person behind the camera, you may believe you collect ample footage and ask all the right interview questions. But to the editor, you may actually be shooting too much of one type of shot and missing out on some that would make their job easier.
Filmmakers teach a valuable lesson here: shoot for the edit. By remembering that the footage you record will be edited later, you can make smarter decisions and save countless hours in the editing room.
The first step in adopting a shoot-for-the-edit mindset is remembering to leave a buffer at the beginning and the end of each clip. There are called handles and can save editors from the headache of cutting too close to an important shot.
In the section on preparing talent, we discussed how to record your script in short sections. If the editor were to stitch these sections together side-by-side, the subject’s face and hands might abruptly switch between clips. This is called a jump cut, and for editors, it poses an interesting challenge. Thankfully, this is where b-roll comes in handy, to mask these jump cuts.

Example of a jump cut
As a producer, your job is to capture plenty of b-roll to make sure your editor never runs out. Create a shot list of more b-roll ideas than you think you’ll need and mark them off as you record them.
To mask jump cuts, you can also shoot with two cameras, especially if you’re recording an interview without a script. Camera A would be the traditional, straight-on shot. Camera B should be angled 30 to 45-degrees to the side and capture a distinctly different shot. The editor could then flip between these two views to make the cut appear natural.

Example of switching between interview angles
A note about shooting with two cameras: Your editor will need to sync the footage between the different views. To help them do this, clap your hands loudly in the view of both cameras right before you ask the first interview question … yes, just like an old fashion clapboard. Modern editing software has auto-sync features, but this loud clap will help you initially line up the clips.
Finally, mark your good clips. Even if you’re recording a scripted video, you might have to record each section 10 or more times. Once your subject nails the take, wave your hand in front of the lens. That way, the editor can scrub directly to this visual cue and save time on footage review.

Step Six: Organizing Footage
Yes, file organization is boring. But when video editing, it just might save your project.
Capturing video will force you to take a hard look at your computer and file organization habits. If you’re one of those people who work off a cluttered desktop — you know who you are — you’ll find yourself in a world of hurt.
First, video files are incredibly large, so it’s very unlikely you’ll want to store any of them on your internal hard drive. You’ll quickly run out of storage, and your computer’s processing speed will begin lagging under the weight.
Instead, invest in an external hard drive like one of the Lacie Rugged models. External hard drives come in a variety of sizes and port options (Thunderbolt, USB 3.0, etc.). Multimedia creators will use the phrase “working off of an external” to describe storing all of their project files on this hard drive. This method also makes it easier to collaborate with teammates because you can easily share the drive.
Second, video editing programs are very particular about where you keep your files. If you don’t stick with the original file structure, you may find yourself buried in error messages. (We’ll cover software options and best practices in the next section.)
On your external hard drive, you should create a separate top-level folder for each project. Within this folder, there should be a prescribed set of “buckets” to store your video footage, audio, design assets, and more. Create a template project folder that you can copy and paste for each project using the image below as a guide.

When you import your footage from your camera, place it in the “footage” folder on your hard drive.
For both the project folders and your editing files, follow a consistent naming structure. For example, you could start each name using YRMODA (year-month-date). So a video on Instagram Hacks might be named “180625_instagram_hacks” if it was started on June 25, 2018.
Even with a perfectly organized external hard drive, you’re not yet out of the weeds. You need to backup your files (and maybe even back up your backup files). It’s not uncommon to have an external hard drive for everyday work, another external for backups, and a third set of backups in the cloud via Dropbox or Google Drive.
Step Seven: Editing and Editing Tools
Okay, you’ve filmed your video footage. Congrats — you’re halfway there!
Now it’s time to talk about editing. We get it, video editing can be confusing. It’s easy to feel overwhelmed at first, especially when you see software price tags! Luckily, there are many options for video editing based on your skill level, operating system, and budget. There are even free programs and mobile apps! Let’s go over a few options.
Intermediate: Apple iMovie
iMovie is Apple’s video editing software. Compatible with Macs and other iOS devices, iMovie is simple, user-friendly, and free on all Apple products. iMovie allows you to create and edit your videos by cutting together clips, adding titles, music, sound effects, basic color correction, filters, and special effects.
The program even provides helpful templates that simplify the editing process. The platform supports high-quality clips like 4K video footage and makes it easy to share your work directly to a video hosting platform. Limited access to advanced color correction and editing features mean it isn’t commonly used by professionals, but iMovie is still a great option if you’re just starting out.
Advanced: Adobe Premiere Pro
Adobe Premiere Pro is a leading video editing software program used by amateurs and professionals alike. With a customizable interface and numerous advanced editing tools, the platform is often called the industry standard for video editing and has been used to edit major Hollywood movies like Gone Girl and Deadpool.
Premiere makes it easy to collaborate with other editors, organize your material, and sync with other programs in the Adobe suite like After Effects and Photoshop. The platform supports high-quality footage (4K and higher) and includes advanced, built-in color correction and grading tools that set it apart from cheaper or free options like iMovie.
The only downside to Premiere is the cost. A year long subscription to the latest Premiere Pro CC comes in around $240. If you’re new to video editing, you may want to experiment with a cheaper option like iMovie or Adobe Premiere Elements before investing in the Premiere Pro. On the fence? Check out some Adobe Premiere Pro tutorials here.
Step Eight: Choosing Music
What’s the first thing that comes to mind when you think about video? I’m guessing the actual video footage. While it’s important to concentrate on your video footage, don’t forget to factor music into your overall plan and budget.
Music is a powerful tool that can alter your video’s mood and tone — just watch the videos above! Choosing the right music often makes the difference between an amateur project and a professional piece of content. When used properly, it can help keep your viewer’s attention, evoke emotions, and define your overall editing style.
Before your start filming, set a music budget and research your local copyright laws. Copyright law can be very difficult to decipher, especially when you’re dealing with digital content. Bottom line: Most music isn’t free. If you use another artist’s music without permission or proper licensing, you risk video removal and legal action. In order to avoid copyright infringement, you’ll need to find royalty free tunes or pay a composer to create an original score. Royalty free songs aren’t free to use; they’re quality songs available for a single flat fee. This means you don’t have to worry about paying additional licensing fees or royalties in the future. YouTube, Pond5, and PremiumBeat are all great sites to find royalty free music.
Next, consider your audience and the overall mood for your production. Are you targeting a small audience that will appreciate the newest, underground hip-hop track, or do you need something that will appeal to many demographics? Are you creating a practical product tutorial or an upbeat event recap? Be sure to choose music that enhances the overall tone of your video.
In addition to considering your audience, be sure to contemplate the purpose of the music. Do you need background music or something with real impact? Will you be narrating or speaking in the video? If so, don’t let the music get in the way of your content. Sometimes the best music is the music you don’t remember at all.
After you’ve determined the type of music you need, it’s time to start analyzing potential songs. Consider the song’s pacing. Songs with a steady rhythm are easy to change to suit your video style. Hoping to include your favorite, Top 40 hit? Popular, radio songs are usually structured in 4-5 parts and can be difficult to transition. Try to choose simple songs that are easy to loop. If you’re looking for an instrumental song, be sure to find something that was recorded with real instruments. Songs made with digital samples can make your video feel unprofessional and out of date.
Finally, consider adding intro and outro music. Intro and outro music, or bookends, can serve as a theme for your content. These are a great choice if you don’t need music throughout your entire video. Bookend music can help set the tone for your video, naturally split your content into chapters, and leave your viewers feeling they had a complete experience.
While some videos feel unfinished without background music, others just need a few tunes to tie the project together. Pay attention to videos that have a similar style to see how others utilize music.
Step Eight: Recording Voice Over
You have your video footage and music — now it’s time to chat about voice overs. A voice over is the separate video narration that’s not spoken by the speaker on-camera. Voice overs are an effective tool that can help make your content more relatable, emotional, and fluid.
It’s important to remember that video audio is just as important as video visuals. The good news is that you don’t have to be the next Don LaFontaine or hire a professional to record a great voice over. Below are a few tips to capture audio on a budget.
- Find a Location. Decide on a spot to record. If you can’t go to a professional studio, try to pick a quiet room away from distracting external sounds like sirens, opening and closing doors, and people talking on the phone. Read your script aloud, and pay attention to the room’s acoustics. Does your voice echo or sound muffled? If so, consider recording in a different space or adding furniture to fill in the room.
- Prepare. Practice makes perfect! Before you record, read through your script a few times and take note of any difficult pauses, transitions, and words. On the big day, be sure to stay hydrated and avoid wearing noisy clothing or jewelry. Also, use a stand, laptop, or teleprompter while recording so you aren’t rustling through a printed script.
- Test and Listen. Think you can record the perfect voice over in just one take? Think again! Invest in a good pair of headphones and keep an eye on your audio quality throughout the recording process. It’s easier to get a new take of audio than trying to fix it during the editing process. We recommend running through your script a few times, especially the first few paragraphs, to ensure that your voice is fully warmed up. If you hear popping or hissing sounds, try standing further away from the mic or invest in a pop filter.
- Relax! Be sure to read slowly, pause, and take breaks while recording your voice over. Sometimes all you need is a sip of water to get back on track.
Step Nine: Hosting Your Video
Alright, you’re ready to publish your video. You shot the footage, edited it together, added music and a voice over, and exported it for the web. The next step is to get your video online so your audience can start viewing and sharing it. You have several options for hosting videos online, and in this section, we’ll talk about some of the best ones.
YouTube
When you ask your friends which online video platform they use, the answer you probably hear the most is YouTube. YouTube is the largest video hosting platform, the second largest search platform after Google, and the third most visited website in the world. Every single day, people watch over five billion videos on YouTube. It’s also free to upload your videos to YouTube and optimize them for search.
In addition to their massive audience, YouTube offers several other features that make the platform a good option for hosting your video. Because YouTube videos are hosted on individual channels, the platform allows you to build a dedicated audience of subscribers. Users who follow your channel are more likely to see additional videos you upload.
Within your channel itself, you can also organize videos into playlists, making it easy for your audience to search within your content. As a social platform, viewers can engage with your videos by liking and commenting on them, providing you another chance to interact with your audience. YouTube also offers a variety of advertising options for more sophisticated targeting.
Although YouTube offers the benefit of reaching a large audience with no cost to upload and host videos, there are several downsides to the platform. While video ads can be a great tool for promoting your own content, the amount of ads on the platform from other advertisers can detract from your viewer’s experience.
YouTube is also (surprise, surprise!) highly addicting. Once viewers are on the platform, they usually stick around to watch another video … or 20. This can make it difficult to drive traffic back to your site from the platform. Despite these barriers, YouTube is a great platform for hosting videos and growing your audience.
Vimeo
If your friends didn’t answer your earlier question with “YouTube” then they most likely responded with Vimeo, the second largest video hosting platform. Vimeo’s audience is significantly smaller (715 million monthly views) than YouTube’s, but there are still many benefits that make it a favorite for content creators and viewers alike.
Among these are a simpler, cleaner, user interface that makes it easier to navigate the platform. Unlike YouTube, Vimeo has very limited ads and commercials that would otherwise detract from your viewers’ experience. Videos on Vimeo also tend to be higher quality than on YouTube, and the audience on the platform is likely to be more professional.
Vimeo offers several different premium account options to better suit businesses. The premium accounts provide additional storage, advanced analytics, customer support, player customization, access to lead generation tools, and much more. In additional to premium accounts, Vimeo also partners with businesses to produce quality marketing content.
If you’re looking to showcase high quality, artistic content, Vimeo might be the platform for you. Its engaged audience and beautiful aesthetic make it a great place to host creative videos. However, if you’re focused on quantity over quality and increasing your reach, you may want to explore other platform options.
Vidyard
Vidyard is a video hosting platform built specifically for businesses. It’s not just another option to store and manage your videos; instead, it allows you to become a fully video-enabled business. Here’s what we mean.
These days, we know posting your video to YouTube isn’t enough. You need channel-specific video content for Facebook and Instagram, not to mention for your website. Enter: Vidyard. The platform allows you to publish and update to all of these places from a central location.
From this portal, you’ll find all sorts of viewer insights. Discover what types of video content your audience likes and how they watch their videos. Then, channel those insights directly into your marketing automation software or CRM. For example, if that prospect you’ve been monitoring views your latest case study video, you’ll be notified straightaway.
One of coolest features of Vidyard is the ability to personalize videos with the the viewer’s name or company directly in the video design. This is a creative addition as you begin working video into your bottom-of-the-funnel marketing and sales strategies.
How to Use Video Throughout the Funnel
Too often, companies jump at the opportunity to create their first video. They spend tons of money on an explainer video for their homepage, but as soon as the project is complete, all future video ambitions screech to a halt.
On the other hand, plenty of businesses churn out a slew of social videos. But since they’ve simply replicated fads they’ve seen, their videos hardly consider their audience’s challenges or habits.
Considering the time, money, and resources involved, video marketing can’t be an impulsive guessing game. Instead, you need to create a comprehensive video marketing strategy that s the length of your marketing and sales funnel. This means thinking in the context of the inbound methodology.
The inbound methodology is the marketing and sales approach focused on attracting customers through content and interactions that are relevant and helpful. Each video you create should acknowledge your audience’s challenges and provide a solution. Looking at the big picture, this content guides consumers through the journey of becoming aware of, evaluating, and purchasing your product or service.

In the following sections, we’ll cover the types of videos you should create for each stage. To start, plan to create at least two videos for each. Don’t forget to include call-to-actions to help lead your audience down the funnel. Over time, you can improve based on conversion rates and the content gaps you discover.

Attract
The first step of the inbound methodology is to attract — or turn strangers into visitors. Consumers at this stage are identifying their challenges and deciding whether or not they should seek out a solution. Therefore, the videos you create should empathize with their problems and introduce a possible solution in your product or service.
Ultimately, the goal of a top-of-the-funnel (TOFU) video is to expand reach and build trust. Because you are looking to garner shares for your video, it’ll likely be more entertaining and emotion-evoking than educational. But, you should should still provide enough information to associate yourself as an authority on the topic.
Examples of videos in the “attract” stage include snackable social videos that show off your brand’s personality, thought leadership videos that establish you as a source of industry news and insight, brand films the share your values and mission, or explainers and how-to videos that provide relevant tips for solving your audience’s pain point.
For any TOFU video, avoid speaking too much about your product. Instead, let your brand values and personality be your north star(s). Finally, because these videos can live on a variety of channels, keep in mind the strategies of each platform. For example, a Facebook video might have a square aspect ratio and text animations for soundless viewers.
Convert
Now that you’ve attracted video viewers and website visitors, the next step is to convert these visitors into leads. With most inbound marketing content, this means collecting some sort of contact information via a form. Video can aid this process by visualizing a solution to the buyer’s problem, whether that’s before the form on a landing page or as the offer itself. Overall, the goal of a middle-of-the-funnel (MOFU) video is to educate.
Convert videos may include a webinar filled with tactical advice, product demos sent via email, landing page promotional videos, case studies, or more in-depth explainer and how-to videos. For example, while a TOFU video might provide a quick tip for nailing a sales pitch, a MOFU video could be an animated explainer video that breaks down the inbound sales methodology.
Close
You’ve attracted a new audience with your videos and converted the right visitors into leads. Now’s the time to close these leads into customers. Yet, as important as this stage is, bottom-of-the-funnel (BOFU) videos are often the most overlooked by marketers and salespeople.
At this point, the consumer is weighing their options and deciding on the purchase. Therefore, the goal of a BOFU video is to make your audience visualize themselves using your product or service — and thriving. There’s a reason 4X as many customers would rather watch a video about a product than read about it. Videos are able to display functionality and leverage emotions in ways a product description never could.
Great BOFU videos include testimonials of customers with relatable stories, in-depth product demos, culture videos that sell viewers on your quality of service, or even personalized videos that explain exactly how your product could help their business
Delight
A purchase may have been made, but there’s still a lot video can do to leverage the post-conversion stage of your funnel. During the delight stage of the inbound methodology, your goal is to continue providing remarkable content to users in hopes that they’ll tell their connections about their experience or upsell themselves. Therefore, the goal of a “delight” video is encourage your customers to embrace your brand and become brand evangelists.
Your first opportunity to delight comes directly after the purchase. Consider sending a thank you video to welcome them into the community or an onboarding video to get them rolling with their new purchase. Then, build out a library of educational courses or product training videos to cater to consumers who prefer self-service or simply want to expand their expertise.
Defining Your Goals and Analyzing Results
At this point, you know how to create a video and where to host it. You’re ready to get started, right? Not quite. Before you dive in, you need to define your video goals and identify the best metrics for determining whether you’ve accomplished those goals.
Before launching any marketing campaign, it’s important to determine your primary video goal. This could be to increase brand awareness, engagement, or even conversions for a free trial. It’s crucial to pick out just one or two goals for each video. When you define more than that, your video will seem unfocused, making it difficult for viewers to determine what they should do next.
When thinking of your goals, be sure to keep your buyer persona and target audience in mind. How old are they? Where do they live? What are their interests? How do they typically consume media? What stage of the buyer’s journey are they in?
All of these questions can help determine what type of video you should make and where you should post it. For example, if your target audience is not familiar with your company, you probably want to make a video that focuses on brand awareness before producing an in-depth, product video. You’ll also want to host your video on a site that already has a large reach, like YouTube.
Next, let’s talk about metrics. Understanding these will equip you to define and measure your success and set your goals. When you post a video, it’s easy to get obsessed with one metric — view count. While view count can be an important metric, there are many others that may be more relevant to your campaign.
Below are some popular metrics you’ll see when you publish and track video.
- View count: View count is the number of times your video has been viewed — also referred to as reach. This metric is great to track if your goal is to increase brand awareness and have your content seen by as many people as possible. However, it’s important to remember that every video hosting platform measures a view differently. For example, a view on YouTube is 30 seconds while a view on Facebook is only 3 seconds. Be sure to read the fine print before reporting on your video view count.
- Play rate: Play rate is the percentage of people who played your video divided by the number of impressions it received. This metric helps determine how relevant or appealing your video is to your audience. If thousands of people see your video, but only a handful of people play it, it’s probably time to optimize your content.
- Social sharing and comments: If you’re on social media, you’re probably familiar with sharing and commenting. Social shares and comments are good indicators of how relevant your content is with your target audience. If a viewer watches your video and takes the time to share it with their network, you probably created a great piece of content. Social shares are also important because the more times your video is shared, the more it’ll be viewed. If your goal is to reach to reach a lot of people, social shares is good metric to track.
- Video completions: If you took the time to make a video … you probably want people to watch the whole thing, right? A video completion is the number of times a video is played in its entirety. This metric can be more reliable than view count when trying to determine your video’s success.
- Completion rate: Completion rate is the number of people who completed your video divided by the number of people who played it. Completion rate, and other engagement metrics, are a great way to gauge a viewer’s reaction to your video. Do you have a low completion rate? Are people all dropping off at a certain point? This might be a sign that your video content is not resonating with your target audience.
- Click-through rate: Click-through rate (CTR) is the number of times your call-to-action (CTA) is clicked divided by the number of times it’s viewed. CTR is a great indicator of how effective your video is at encouraging people to take your desired action. If your CTR is low, consider revising the design or copy of your CTA.
- Conversion rate: Conversion rate is the number of times visitors completed your desired action divided by the number of clicks on your CTA. If your goal is to have your viewers complete an action like signing up for a free trial, try adding a video to your landing page to see if your conversion rate increases.
- Bounce rate and time-on-page: Are you thinking about adding a video to a web page? Take note of the page bounce rate and the amount of time people spent on the page before you add the video. Be sure to check the metrics after you place the video to see if changes the way people interact with your other content.

Conclusion
I’m guessing you’re feeling a little overwhelmed right now. Don’t worry, you’re not alone. Video editing and marketing can seem daunting at first, but with a little practice and patience, you can easily produce high-quality content that is unique to your brand.
With 71% of consumers watching more video online than they were a year ago, brands can no longer ignore its growing popularity. Thankfully, creating great content has never been easier!
Try turning a written blog into a video or create a product tutorial. Using video to showcase information in a new, interesting way is sure to interest and delight your audience. Pick up a camera, start filming, and watch your engagement levels increase. It’s time to make video a key part of your marketing strategy!
