
5 Recurring Themes From Mark Zuckerberg’s Senate Hearing
Facebook CEO Mark Zuckerberg appeared this afternoon before a joint hearing held by the Senate Judiciary and Commerce, Science, and Transportation Committees.
The hearing, officially titled “Facebook, Social Media Privacy, and the Use and Abuse of Data,” was created largely in response to March revelations that voter profiling firm Cambridge Analytica improperly obtained and misused personal user data. The data was obtained when University of Cambridge researcher Dr. Aleksandr Kogan developed an app, “thisisyourdigitallife,” that scraped the personal data of myriad Facebook users.
Among other pieces of information to emerge today, Zuckerberg confirmed that Kogan actually sold this data to other firms beyond Cambridge Analytica, including Eunoia Technologies: the company founded by whistleblower Chris Wylie, who once worked for Cambridge Analytica but left to start this company.
But the data breach, as it was largely dubbed today, wasn’t just limited to those who downloaded the app — many friends of users who did also had their personal data scraped, which amounted to Facebook’s total estimated 87 million people whose information was improperly obtained. Facebook began alerting affected users this morning with in-app displays.
Well, I’m one of the 87 million. pic.twitter.com/Tq8ITHQy78
— Sarah Frier (@sarahfrier)
April 10, 2018
It was the first of two Congressional hearings for Zuckerberg this week, with a second scheduled to take place tomorrow morning with the House Energy and Commerce Committee.
Here were the key points made in today’s hearings.
5 Recurring Themes From Mark Zuckerberg’s Senate Hearing
1. Mea Culpa
For anyone who’s been following the story so far, much of what was discussed at today’s hearing was not exactly new. Zuckerberg’s opening remarks appeared to be borrowed directly from the written testimony submitted for tomorrow’s House hearing, and many of his responses seemed to be rooted in a handful of key themes that have recurred throughout Facebook’s response over the past three and a half weeks.
Among these is an ongoing self-admittance of wrongdoing on Zuckerberg’s part, with him stating at one point, “I started Facebook, I run it, and I’m responsible for what happens here.”
“I am committed to getting this right. This begins with the … responsibility to protect people’s data, which we failed to do with Cambridge Analytica.” – Zuckerberg
— Amanda Zantal-Wiener (@Amanda_ZW)
April 10, 2018
But this apology and acceptance of accountability set the tone for many of the Senators’ questions today, including Senator Cortez Masto who bluntly told Zuckerberg, “Stop apologizing. Let’s make the change.”
While many of the joint committee members weren’t quite as tough on Zuckerberg as might have been expected, many of them attempted to base their queries on flaws made in the explanations and statements that have emerged since the Cambridge Analytica story first broke. Senator Kamala Harris, for example, asked Zuckerberg if he was part of the decision not to notify users that their data may have been compromised when it first learned of the possible misuse in 2015.
Zuckerberg could not provide a clear answer to that question, stating that he does not remember such a conversation. When Harris further pressed him to clarify whether that conversation never took place at all or if he simply wasn’t part of it, he still was unable to directly answer, further blaming a lack of memory of any such discussion.
Zuckerberg continues to imply that he just doesn’t remember, but admits that a mistake was made. https://t.co/jrvYgW8ljC
— Amanda Zantal-Wiener (@Amanda_ZW)
April 10, 2018
Members of the press also identified gaps in Zuckerberg’s claims and statements made today. For example, he repeatedly claimed that one change Facebook would make is further clarifying its terms and conditions to make it more concise, because he didn’t think most users would take the time to ready such a lengthy document. (More on that below).
But as Slate reporter Will Oremus was quick to remind, Facebook already has the capacity to measure exactly how long Facebook users spend looking at any given post — raising the question of why it doesn’t know (or reveal) how long users look at the terms they’re asked to consent to.
But I guess knowing whether Facebook users actually understand what they’re consenting to isn’t as important as knowing exactly how much time they spend looking at every post: https://t.co/1Aclr1MLz7
— Will Oremus (@WillOremus)
April 10, 2018
2. “Facebook Does Not Sell User Data”
Zuckerberg vehemently emphasized today that Facebook does not sell data to third parties, which he has been doing throughout many statements made since the Cambridge Analytica data misuse was first revealed.
However, Facebook’s monetization of data continued to be a key point among the questioning Senators, with many of them pushing Zuckerberg for an answer on how Facebook will be able to continue to be profitable without it.
ZUCK: We don’t sell user data to advertisers.
Sen. Cornyn: Well, you certainly rent it.— Amanda Zantal-Wiener (@Amanda_ZW)
April 10, 2018
But no one, including Zuckerberg himself, seemed to have a clear answer on how to strike a balance between Facebook’s monetization model of creating targeted ads using non-identifiable personal user data, while also regulating user privacy. That led to the discussion of statements made in recent interviews with Facebook Chief Operating Officer Sheryl Sandberg — where she indicated that a payment model might roll out to allow users to completely restrict their data from being used in this way, for a fee.
Today, Zuckerberg did not provide an explicitly clear message on whether or not users will have to pay to opt out of having their data used to create targeted ads or an otherwise personalized experience.
3. The Terms of Service
Many questions arose during the hearing about ways to keep users better informed about how their data is collected and used, along with the general, overall clarity of Facebook’s policies.
Facebook recently rewrote many of these policies and terms with the intention of making them clearer and easier to both understand and read, while also including the “nuances” of legality that Zuckerberg spoke to earlier today. In fact, Zuckerberg mentioned more than once that he does not believe most users read the entire Terms of Service [TOS] document.
For that reason, many Senators said, there’s a fear that users don’t exactly understand what, exactly, they’re volunteering or opting into as a result to agreeing to these terms. It could be argued that this phenomenon is an underlying cause to the Cambridge Analytica scandal: that most users didn’t completely understand that, by agreeing to the TOS, they were also granting permission to third-party apps to collect their personal data.
Sen. Graham: Do you think the average user understands what they’re signing up for?
ZUCK: I don’t think the average consumer reads that entire document.— Amanda Zantal-Wiener (@Amanda_ZW)
April 10, 2018
But one other item came up: that the terms of service for Kogan’s app were in direct contradiction of Facebook’s own terms, which the network seems to have overlooked at the time. To visualize this, Senator Richard Blumenthal displayed these contrasting terms in large print within the hearing room, calling this oversight “reckless.”
Sen. Blumenthal is displaying TOS from Kogan’s app that conflict with the FTC consent decree, and calls Facebook’s oversight of it “Blindly reckless.” pic.twitter.com/BvmkHZvZUQ
— Amanda Zantal-Wiener (@Amanda_ZW)
April 10, 2018
4. Regulation
The moments when Zuckerberg seemed legitimately caught off-guard were few. One came when Senator Dick Durbin attempted to make a point about privacy and how much personal information people want to reveal, including Zuckerberg himself, when he asked the Facebook CEO if he would tell everyone where he was staying while in D.C.
Sen. Durbin: Mr. Zuckerberg, would you feel comfortable telling us which hotel you stayed in last night?
ZUCK: Uh … uh … no.— Amanda Zantal-Wiener (@Amanda_ZW)
April 10, 2018
The topic of regulation also came up a number of times, and at certain moment sparked debate, with more than one Senator asking Zuckerberg if he thinks that the European Union is moving in the right direction with the General Data Privacy Regulation (GDPR) coming into force next month.
Many of the tougher moments for Zuckerberg also came when asked about the regulation of Facebook. Zuckerberg repeatedly blamed Facebook’s origins of having “started in my dorm room” on its reactive nature to such crises as weaponization and data misuse. It fell into that habit, he said, because AI tools weren’t available at that time to combat many of the underlying problems, forcing Facebook into a vicious cycle of being less than proactive.
In previous interviews and closes sessions with the press, Zuckerberg has provided mixed answers to questions about his take on the GPDR, ranging from agreeing with it “in spirit” to subsequently remarking, “if we are planning on running the controls for GDPR across the world … my answer [is] yes.”
Today, Zuckerberg continued to give equally wavering responses to questions about the GDPR. When asked by Senator Lindsey Graham is he believes the European Union “got it right,” he tentatively answered, “I think they get things right.”
But there was some concern expressed about the possible impact of widespread regulation on smaller, emerging companies, from both certain Senators and Zuckerberg himself. When Senator Dan Sullivan expressed fears that such laws would “stifle … the next Facebook,” Zuckerberg responded, “That’s the problem with regulation”: that as a big company, Facebook has the resources to manage it, while more fledgling companies might not.
5. Dorm Room Origins
Much of the conversation around regulation stemmed from the repeated talk of Facebook’s humble roots, into which Zuckerberg continuously leaned by reminding the joint committee members numerous times that he started the company “in my dorm room.”
And at more than one point, he blamed these origins on Facebook’s reactive nature to emerging crises — the weaponization of it to spread divisive and false information, possibly influence elections, and other incidents leading up to the Cambridge Analytica revelations.
The lack of AI tools available during Facebook’s earliest days, Zuckerberg said, is part of what prevented Facebook from being able to detect many issues proactively. That not only includes the aforementioned weaponization, but also such problems as online bullying, promoting false advertising, and hate speech.
That caused Facebook to fall into a pattern of reactivity instead, said Zuckerberg, as well as his own misunderstanding of the company’s role and responsibility as the network exponentially grew.
ZUCK: “The broadest mistake we made here was not taking a broad enough view of our responsibility. … The big mistake we made, looking back on this, was viewing our responsibility as just building tools” and not making sure they’re used for good.
— Amanda Zantal-Wiener (@Amanda_ZW)
April 10, 2018
But now, with the help of the AI tools that Zuckerberg frequently said Facebook has come to rely upon, that proactivity is more feasible and becoming more ingrained. It was with the help of machine learning, for example, that Facebook accomplished many of its successes in combating weaponization following the 2016 U.S. presidential election, such as removing IRA accounts and other sources of misinformation leading up to elections in France and Alabama.
Hate speech, however, is a much bigger hurdle for which Zuckerberg does not see an immediately sustainable fix. Because this language is very “nuanced,” the AI tools to detect it are not quite sophisticated enough to determine what’s abusive or hate speech, and what’s a strong statement of opinion.
The rollout of that sophisticated AI, Zuckerberg predicts, could feasibly become available within the next five years.
Some problems “lend themselves to AI tools more than others. Hate speech is one of the toughest. … Contrast that with an area of something like battling terrorist propaganda,” says Zuckerberg, listing the times Facebook has successfully done the latter.
— Amanda Zantal-Wiener (@Amanda_ZW)
April 10, 2018
Looking Ahead
Zuckerberg is due back on the Hill tomorrow for a hearing with the House Energy and Commerce Committee, where I expect to hear more about how he views the role of Facebook in the context of regulation and the purpose that the company serves. Its core nature as a business came up more than once today, with many wondering where exactly it falls: Tech, information aggregation, or media.
Sen. Sullivan: Are you a tech company, or are you the world’s largest publisher? I think that’ll go into the regulation you face.
Zuckerberg: Senator, that’s a really big question. … I consider us a tech company. … We’re responsible for the content, but we don’t publish [it].— Amanda Zantal-Wiener (@Amanda_ZW)
April 10, 2018
But today was a long day, and for anything that wasn’t mentioned here, feel free to check out my Twitter account of the day’s events.
I’m back on the Hill again tomorrow, too, and will continue to bring you these ongoing live developments.
Featured image credit: AP Photo/Andrew Harnik

The Ecommerce Guide to Flash Sales (With Examples)
In 2012, J.C. Penney stopped promoting sales and offering coupons. Instead, they advertised new “everyday low prices” — which seems like a pretty good idea, right? Except, in 2012, sales for J. C. Penney actually dropped 25%.
J.C. Penney found they actually made more money when they raised the prices of their products and then arbitrarily lowered them, calling these “last-minute deals.” People were more likely to buy when they felt like they were getting a special deal, instead of an “everyday low price.”
While the example of J.C. Penney might seem bizarre, it makes sense for people like Ms. Fobes, a blogger who runs Penny Pinchin’ Mom. Ms. Fobes told The New York Times she stopped shopping at J.C. Penney when the discounts went away, because, “For someone like me, who’s always looking for a sale or a coupon — seeing that something is marked down 20 percent, then being able to hand over the coupon to save, it just entices me … It’s a rush.”
If you relate to Ms. Fobes’ discount thrill, you’re not alone. The rush of finding a deal can often entice shoppers to make more purchases. And, luckily for ecommerce sites, the psychology behind discounts doesn’t just exist for brick-and-mortar shops — it extends to online shopping too with flash sales.
What is a flash sale?
A flash sale is a short-term discount or promotion on products offered by ecommerce stores, typically lasting for less than 24 hours. The goal of a flash sale is to entice online shoppers to impulse buy, increase brand awareness and customer loyalty, and compel shoppers to check out other non-sale products listed on the site.
Flash sales generate an average 35% lift in transaction rates. Along with increased revenue, flash sales can help your ecommerce business get rid of excess inventory and stabalize your existing inventory. Most importantly, flash sales often drive a large audience to your site and incentivize viewers to purchase non-sale products, as well.
To feed your audience’s thrill-seeking appetite and grow your online presence, we’ve created a list of seven easy steps to run a flash sale, along with examples of successful ecommerce flash sales to kickstart your own strategy.
How to Run a Flash Sale in Seven Easy Steps
1. Determine the goal of your sale:
Flash sales enable you to accomplish a bunch of different things, and focusing on a goal can help you measure your success. So let’s narrow it down: do you have excess quantity in one specific product that isn’t selling? Do you want to stabalize your inventory by encouraging buyers to focus on different products? Or, do you want to escalate traffic to your site by providing a discount on a high-quality product? Focusing on a goal can help you pick which products you want to use for the flash sale.
2. Choose the right product for your ideal market:
While this might seem like a contradiction to step one, it’s important to note you can’t just choose any product you want to get rid of — the product you choose must align closely with your target audience. If you want long-term customers, you need to put a discount on products that encourage the right people to click on your site.
3. Promote sale ahead of time:
People like to do research and read reviews on products ahead of time, so it’s wise to give your shoppers a heads up before your flash sale is live. This is also a chance to broaden your reach on social media and through email by creating fun countdown emails and social media posts.
4. Word it correctly:
It’s critical that your discount stand out: saving $5 on a $100 purchase probably won’t attract as much attention as you want, so consider how to phrase your offer for optimal reach. There are two different directions you can take with your wording: “Get $$ off,” which emphasizes achieving a gain, and “Save $$,” which emphasizes avoiding a loss. While this depends on your target audience, in general, people are more motivated to avoid pain, and missing out on a good discount definitely feels like pain.
5. Keep time-frame short:
The reason a flash sale works is because it spurs impulse purchases and, to quote Ms. Fobes, a “rush.” Make your audience feel the pressure: Three-hour flash sales have the highest transaction rates at 14%, and ideally, your flash sale won’t exceed 24 hours.
6. Check your inventory:
To get the most out of your flash sale, make sure you have enough of your discount products in stock. Use a logistics company to determine how much you’ll need. You don’t want to sell out of the discount product too early, leaving people with a negative experience of your brand.
7. Prepare for shipping and delivery:
It will be hard to retain your newfound customers’ loyalty if it takes a month for them to receive the products they purchased. In today’s ecommerce world, where same-day and next-day shipping are typically expected, you’ll want to prepare ahead of time for mass shipping and delivery so you can offer a seamless experience, start to finish.
6 Examples of Great Flash Sales
1. J. Crew
This flash sale works because J. Crew ties it into a very specific, niche audience: people who sail. If you’re into sailing, this flash sale will incentivize you to check out J. Crew’s discount sailing clothes. It’s a smaller audience, but it’s also more likely to be an engaged one.

2. Loft
This flash sale works because of its mystery component. The bright purple call-to-action button compulses buyers to click to find out how much of a deal they’ll get, and more than likely, once they see what they’ve “won,” they’ll check out Loft’s products to use their discount.

3. Hype
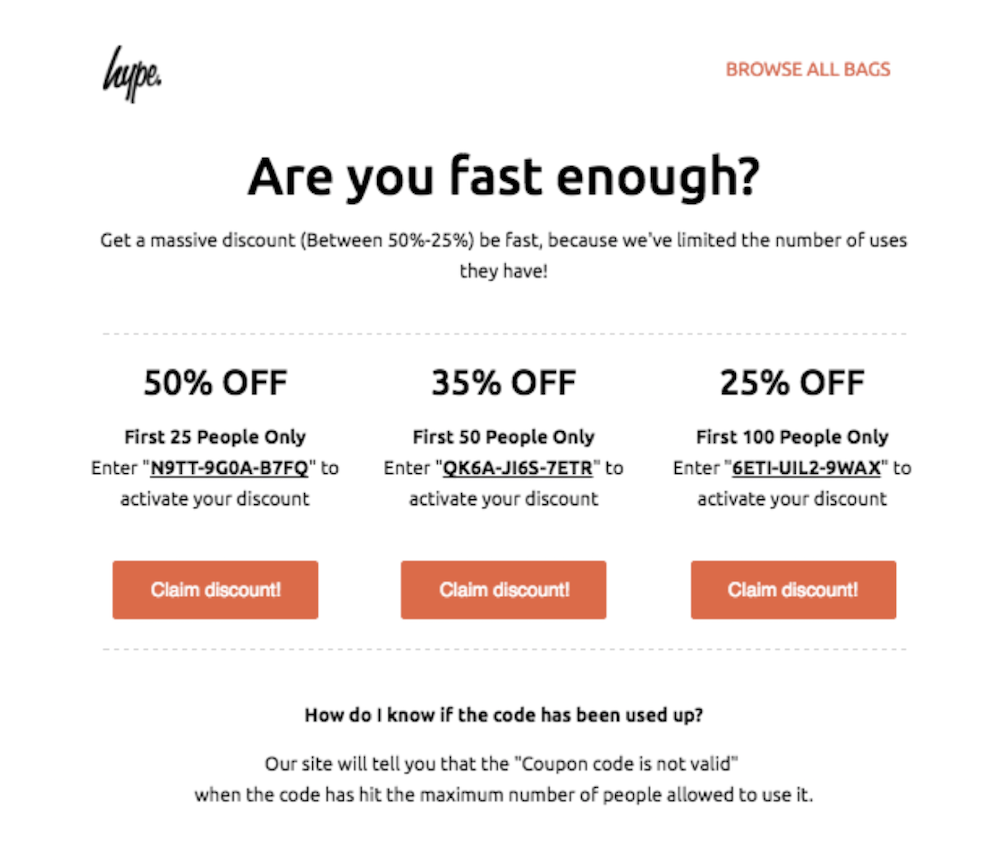
By offering discount tiers — the earlier you claim your discount, the more money you save — Hype supplies an intense feeling of urgency (Oh, will I be one of the first? Let’s try!). Making your flash sale feel like a competitive game can be very effective.
4. Auchan Retail
Auchan Retail, a French international retail company, shows multiple children in their flash sale advertisement, indicating there will be a lot of items for sale. This flash sale encourages online shoppers to check out all the products they could get half-off.

5. Pottery Barn
This flash sale uses the wording “select dressers,” to increase the desire to click to find out which dressers Pottery Barn means (What if I happen to love one of the discount dressers? I should check, just in case). It also shows an adorable boy sitting on a dresser, inspiring the viewer to imagine their own child using this dresser.

6. JetBlue
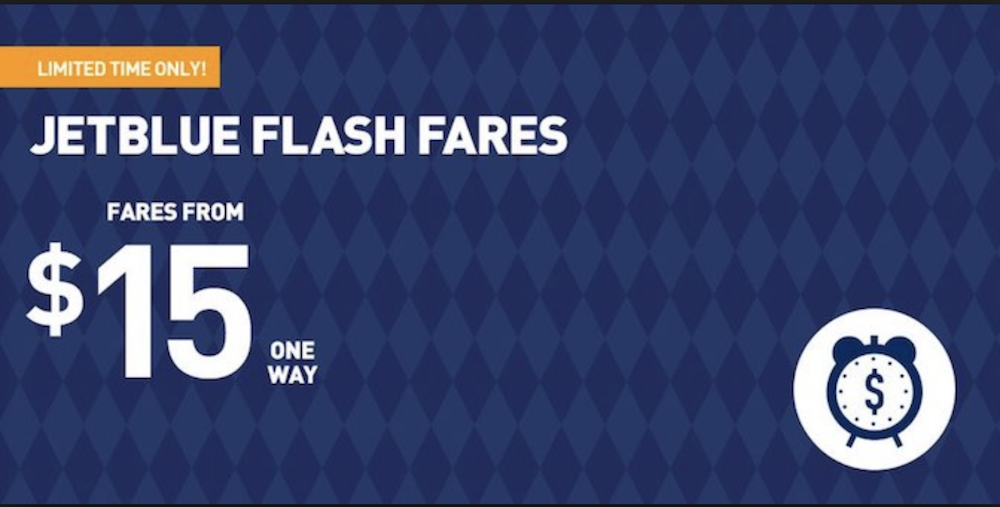
When I see this offer, I’m so shocked by the great deal I don’t even worry about where the discount one-way ticket is sending me. The low $15 offer probably isn’t a flight to Paris, but it draws viewer’s attention and provides that much needed rush of thinking, Wait, where can I fly for less than $20? I love to travel, might as well check it out!

The Beginner’s Guide to Product Photography [Tutorial + Examples]
If a picture is worth a thousand words, a stunning product picture is worth a thousand website visits.
I don’t have data to back up that statement (yet). Nevertheless, product photography can become this valuable to your ecommerce website strategy.
According to Trellis, 51% of Americans with internet access prefer to shop online, and that segment of buyers is poised to keep growing. But that also means 49% of Americans might still be more comfortable buying certain things in the store — where they can see, touch, and demo the product before handing over their money.
The convenience of ecommerce isn’t everything to every customer; being able to browse merchandise from the living room couch is just one part of what makes an internet storefront successful. To reach the 51% of people who do prefer buying online, you also need to give your audience clear, eye-catching photos of your products, or these visitors aren’t likely to have confidence in your offerings — confidence they can get by walking into a store and seeing the item in person.
But product photography isn’t as simple as pointing and shooting. Even the most basic products need the correct equipment, lighting, and space to produce beautiful images that sell shoppers right from the purchase page.
Don’t worry, your shopping list isn’t as big as you think. Some items you already own!
Here’s an easy list of tips and tools to get you started, along with real examples of product photos that demonstrate this advice.
6 Product Photography Tips (and Examples) for Taking Pictures That Sell
1. Don’t Be Afraid to Use Your Smartphone Camera
This is the part where I’m supposed to convince you to invest in a high-end, 50-megapixel (MP) camera with a 100-millimeter screw-on lens. But I’m not going to do that. If you already own a camera that fits this description, take advantage of it. But for many types of products, it’s completely acceptable to shoot product photos on a smartphone.
Some of the earliest smartphones had cameras that operated on fewer than 4 megapixels, which made it difficult to capture important visual elements of products where detail matters.
But newer smartphones such as the iPhone 7, Google Pixel, and Samsung Galaxy S4 boast 12MP and 13MP lenses along with numerous “temperature” settings to optimize your shots for the different types of light you might shoot in (we’ll talk more about light in just a minute).
Here’s a product photo you won’t believe was shot with just an iPhone 4s and clever desk lamp placement:
 Image by Andrew Griswold
2. Shoot From a Tripod for Photo Consistency
Before explaining tripods, I’m obligated to start with a cardinal rule: Don’t prop your phone against something sturdy to aim your lens toward the subject. It’s just too easy for this makeshift setup to slide around during the shoot and cause inconsistencies in your photos’ appearance. If you rest your camera on, say, a stack of books, just be sure this arrangement doesn’t change over the course of the shoot.
There’s no harm in holding your camera yourself when shooting just a few product photos for your ecommerce website. But as your business grows, and you take more photos of more products, it can be difficult to standardize the product’s orientation in each photo when shooting handheld.
To ensure consistency across your products, you’ll need a tripod. And luckily, buying one isn’t always the big, industrial-sized investment it used to be. Here are two types of tripods to consider and one accessory you’d need when shooting on a smartphone:
Traditional vs. Flexible
 Images via AmazonBasics | Sunpak
The one on the left is a traditional, extendable tripod stand, and the one on the right is a shorter but flexible mount with legs you can bend to achieve the camera angle you want.
(You can’t tell from the two photos, but the mount on the right is roughly a foot high — considerably shorter than a traditional tripod, which can extend to more than five feet high.)
Mobile Grip
You’ll notice a screw on the top of both products. This screws into your camera and holds it in place when you’re shooting from the tripod. The underside of most professional-grade cameras has a screw hole just for this purpose, but smartphones can use the following adapter:
 Image via Vastar
The adapter grips the sides of your smartphone, and can screw into either type of tripod, allowing you to operate the camera controls with the phone screen facing outward and toward you. Once you determine which mount you’ll need, set it up in front of your product, and consider putting three pieces of tape on the ground to mark where you’d like to keep each leg of your tripod over the course of the shoot.
3. Natural Light vs. Artificial Light: Choose One
Never underestimate how certain types of light can improve (or hinder) your product photography. Remember, buyers get the best look at an item in person, where they can see everything they need to before purchasing. The right lighting arrangement helps you reveal those critical decision-making product features when all website visitors have to go on is a photo.
A single lighting setup might not work for every single product — a lighting arrangement that works for some products might weaken the appearance of others. There are two types of light you can choose as your main light source:
Natural Light
Natural light refers to sunlight — simple as that. It’s also known as “soft light” because the sun casts a larger, softer range of light than, say, a lamp shining directly on the product. Ecommerce product shots thrive in natural light if:
- The product is shot outside or meant to be used outside.
- The product is used by, worn on, or shot with a person (people tend to look better in natural light).
- You’re trying to emphasize the product’s surroundings, rather than specific attributes of the product.
Below is an appealing product photo taken under natural light. The sun coming in from the left lights the briefcase perfectly, while casting a gentle shadow on the legs of the man carrying it to emphasize the product.
 Image via WP Standard
Artificial Light
Artificial light includes candles, fire, and more commonly, light bulbs. It’s also referred to as “hard light” because it produces a smaller but more focused light surface. This type of light caters to products with physical details that need to be highlighted to impress an online shopper.
Here’s an appealing product photo taken under artificial light, where the watch’s texture and clock face design are its main selling points.
 Image via Modahaus
As a general rule, you should stick to just one type of light per photo — natural or artificial. Adding natural light to an artificially lit photo can soften a product that’s meant to look sharp, and adding artificial light to a naturally lit photo can sharpen a product that’s meant to look soft. You don’t want to get in your own way.
4. Fill or Bounce Your Light to Soften Shadows
Whether you use natural light or artificial light, you’ll need to lessen the shadows any potential hard light casts on the opposite end of a product. There are three ways to do this:
Fill Light
Include another, less-intense light source to supplement your main light. This additional light is called your fill light, and is used as a counterbalance to soften the natural shadow your main light produces behind an object. To do this, place your fill light opposite your main light so your product sits between both light sources.
Flashbulb Bounce Card
A bounce card, or reflector card, is a small card that “reflects” or “bounces” the main light back onto the surface beneath your product to reduce shadows.
Some bounce cards attach to the flashbulb of a professional camera lens to diffuse the light from the camera’s flash. This card splashes a softer light onto the subject from above your set — rather than straight at it — so you don’t have long shadows trail behind the object you’re shooting. See two versions of this item below — both white (left) and foil (right) screens can diffuse the flash.
 Image via Andoer
Standalone Bounce Card
If you’re shooting from a smartphone, a flashbulb bounce card isn’t an option, since you don’t have a physical flash you can attach it to. Instead, make your own standalone bounce card positioned opposite your main light source. For beginners to product photography, this bounce card can effectively replace your fill light, which counters the hard light from the camera flash or lamp that’s facing toward the front of your product.
See a standalone bounce card below, set up behind the miniature horse:
 Image via Photojojo
No matter which type of light counter you use, your goal is to reduce shadow while still highlighting the qualities of your product that make it valuable to website visitors. If shot just right, you’ll see a huge difference:
 Image via GetMeAShop
5. Use a Sweep or Portrait Mode to Emphasize the Product
There isn’t one right way to position your product, lights, and bounce cards – they can change dramatically depending on your background. But don’t choose a background based on what’s easiest to create. Backgrounds should resemble how you want your buyers to perceive your product when viewing it online.
Consider first whether you’d like a white background or a more dynamic, real-world background. There’s an easy way to achieve each one.
White Background: Sweep
For white backgrounds, it’s not as simple as setting up a table against white drywall. Even smartphone cameras can pick up little blemishes on a white wall that you wouldn’t notice with the naked eye. To capture a perfect white background with no corners or blemishes, use a sweep.

A sweep is a large bendable sheet of paper, whose bottom acts as the surface beneath your product and then curves up into a white wall behind the product. On camera, the sweep’s curve is invisible, emphasizing key product details and allowing the item to own all of a website visitor’s attention. Here’s a side-by-side comparison showing why a sweep matters:
 Images by Taylor Mathis
Real-World Background: Portrait Mode
Dynamic, real-world backgrounds are very appealing when shooting products that have a specific use or are being modeled by a person — as you saw in the picture of the briefcase earlier in this guide. But, it’s easy for a real-world background to steal the focus of the photo, making it unclear which item in the photo you’re actually selling.
Give your product depth and emphasis with portrait mode, a picture setting on most professional cameras and also available on many new smartphones. This setting blurs the background so the context of the product is clear but not competing against the product itself.
Below is a super awesome photo of a HubSpot pen taken in portrait mode on a Google Pixel 2 (I took this picture myself). You can tell the pen sits on a desk with a computer behind it, but the pen is still the focal point for viewers:

“It’s such an incredible photo, Braden. I totally want my own HubSpot pen now.” Get one here!
6. Shoot a Variety of Images
My last ecommerce photography tip to you is to not stop at one photo per product. Just as your customers look, hold, use, and even try on merchandise in a store, your website should shoot a variety of images to simulate this very experience.
If you’re shooting clothing, for instance, capture the garment of clothing alone — that is, spread out on a white surface — as well as on a mannequin whose color contrasts the color of the product. Then, for additional photos, have the clothing modeled on a person, allowing you to take pictures of the product from the person’s different poses and angles.
Don’t feel obligated to invest in every tip and piece of equipment at once. Apply these product photography tips gradually to see what makes your store look the most presentable, and change your approach as your photography chops get better.

4 Key Questions We Have for Mark Zuckerberg
It’s official: Mark Zuckerberg has landed in Washington.
As the Facebook CEO prepares to face back-to-back Congressional hearings this week, more information continues to flow from the company — from admitting guilt, to ongoing plans for how Facebook will better maintain user privacy.
Zuckerberg’s appearance before lawmakers comes after revelations made in late March about political consulting firm Cambridge Analytica improperly obtaining and misusing Facebook personal user data.
Today, Facebook began issuing notifications to users whose information was jeopardized, which the company has said it conservatively estimates to have impacted 87 million people.
In fact, earlier today, the text of Mark Zuckerberg’s official testimony for Wednesday’s hearing with the House Energy and Commerce committee was released. The text reads somewhat like a synthesis of the apologies, statements, and plans of actions declared over the past three weeks.
How much this satisfies the members of the Committees he will be facing is yet to be determined. But what’s fairly certain is that they’ll have questions — and we have questions, too.
As I prepared for my travels to D.C., where HubSpot’s Social Campaign Strategy Associate Henry Franco and I will be on the ground to cover Zuckerberg’s hearings, I thought about what some of those questions are. Then, I asked my colleagues:
If you were a member of Congress, what would you ask Mark Zuckerberg? And what are you hoping lawmakers ask him?
Here are the questions we have for Zuckerberg, going into this week’s hearings.
1. What is the right balance leveraging user data to improve the experience, versus marketing and selling to them?
The prioritization of ad revenue and protecting the user continues to hang in the balance as Facebook responds to and makes changes following the Cambridge Analytica revelations. Facebook has significantly modified its advertising policies to, among other things, require all advertisers on Facebook to become verified.
But beyond new policies and requirements, Zuckerberg has taken a hard stance on the user experience and what it’s supposed to look like on Facebook. This began in January when the News Feed algorithm was changed to prioritize content from users’ friends and families. That was part of the response to the weaponization of Facebook by foreign actors to spread misinformation and influence the 2016 U.S. Presidential election.
“My top priority has always been our social mission of connecting people, building community and bringing the world closer together,” remarks Zuckerberg in his written testimony. “Advertisers and developers will never take priority over that as long as I’m running Facebook.”

Source: U.S. House of Representatives
But some, including HubSpot Chief Marketing Officer Kipp Bodnar, wonder if Facebook is in such depths of building its advertising Platform that it’s too late to re-focus on Zuckerberg’s social mission.
“Have they gone too far?” Bodnar asks.
At this point, with the arguably reactive onslaught of policy changes, it’s easy to question if Facebook even knows what the right balance between a personalized experience and marketing might look like — and how to achieve it.
2. What information is off-limits in ad targeting?
While Facebook has indicated that advertisers will have to go through a comprehensive verification process, the question on the mind of HubSpot VP of Marketing Jon Dick is this: “What information is off-limits in ad targeting?”
Zuckerberg noted in his written testimony that Facebook won’t wait “for legislation to act” before working to address the issue-based advertising that was largely used in the spread of misinformation and divisive content leading up to the 2016 U.S. presidential election.
And yes, Facebook is rolling out several protocols to help add greater context to ads — including who paid for it, the organization or Page associated with it, and an Ad Archive described in the video below.
But what hasn’t been explored is the subject matter of those ads. Based on what has been unveiled so far, no subject matter has been named as prohibited beyond what Facebook’s terms of service and policies already dictated.
As the company continues to reshape and respond to the increasing scrutiny it has faced in recent months, that could change.
3. What about the other brands and apps owned by Facebook?
In the current storm of quickly emerging updates on both Facebook and Zuckerberg himself, it’s easy to forget the breadth of the company’s entire portfolio. Facebook also owns Instagram, WhatsApp, Messenger, and Oculus. So, says HubSpot VP of Marketing Meghan Anderson, it raises the question: “What are Zuckerberg’s plans for those brands, as well?”
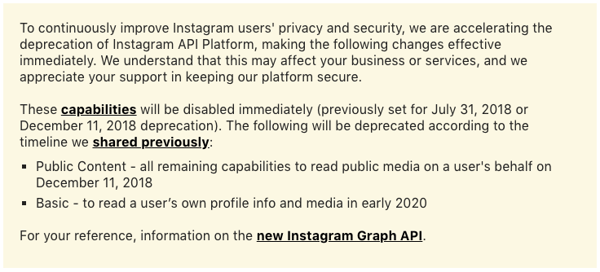
Instagram recently shuttered its APIs for follower lists, relationships, and commenting on public content, limiting the amount of data developers can access (and the frequency with which any information can be accessed, according to initial reports from TechCrunch).
Source: Instagram
But beyond that, how will Facebook (and Zuckerberg) extend these new efforts and policy changes to its other products? For instance, when I wrote about the experience of downloading sifting through my data file archive, I discovered that it included details of my Messenger interactions, including the full text of conversations and any media exchanged throughout them.
And that raises even more questions. For instance, asks Dick, “How will [Facebook] ensure that user privacy is protected in messaging apps?”, including Messenger and WhatsApp, as well as direct messaging features within Instagram.
4. What about the GDPR?
Zuckerberg’s hearings come at an interesting time, when the General Data Privacy Regulation (GDPR) is just over a month away from coming into force on May 25, 2018. According to HubSpot Web Developer Dmitry Shamis, it poses the question: “Should we extend GDPR rules beyond Europe?”
It’s hardly the first time the question has come up, as Zuckerberg spoke to this possibility in an interview with Reuters and a call with several members of the press. In the former, he agreed “in spirit” to a new law in the European Union that will renovate online privacy standards across Europe. In the latter, he remarked, “if we are planning on running the controls for GDPR across the world … my answer [is] yes.”
As we enter the hearings this week, we expect lawmakers to raise the issue of regulating Facebook and its Big Tech counterparts. In fact, in the early days of the Cambridge Analytica revelations, there were rumors of Zuckerberg not appearing before Congress alone — and that the CEOs of Google and Twitter had been invited to testify, as well.
Reporter: Would you like to see executives from Google and Twitter and other tech companies come testify?
Nelson: Absolutely. It’s not just Facebook. [Zuckerberg] happens to be the point of the spear. https://t.co/Tv2CrkYp77 pic.twitter.com/iwB1BxRZEB— CBS News (@CBSNews)
April 9, 2018
It’s feasible that the hearings scheduled for this week will not be the last of their kind, and that Zuckerberg could be asked to return to Washington to provide further testimony alongside his Big Tech counterparts.
For now, we’ll keep you posted on the questions that do come up this week. Questions? Feel free to weigh in on Twitter.

How the HubSpot Content Team Overcame the “Pivot to Video”
You’ve probably heard. 2017 was the year of the “Pivot to Video.” Publishers decreased or entirely scrapped their written editorial operations to focus on creating video. And right on cue, the internet erupted with opinions (and a fair amount of panic) on the shift.
People began asking: Are writing skills still worth it? Will this shift to video last? And how hard is it to learn video anyway?
Some of the panic was warranted. Talented writers from MTV News, Vox Media, and the like were losing their jobs. Meanwhile, publishers were scrambling to find their next viable business model.
The motivation behind the movement was two-fold: money and time. Publishers can charge more for video advertising than banner ads in text-based articles. It’s simple math. But it’s also about where and how people spend their time online. According to HubSpot Research, 54% of consumers want to see more video from businesses and brands. With more consumers turning to video, media outlets and social networks began prioritizing content that kept viewers on-site.
The Post-“Pivot to Video” Reality
So now that this “pivot to video” buzz has largely subsided (at least until the next major Facebook algorithm change, am I right?), where does the future of content stand? One thing is certain, consumers are not abandoning written content completely. While people may be consuming more video content than ever before, the popularity of video content and written content aren’t mutually exclusive.
But that doesn’t mean we should ignore this “pivot to video” either.
Here on the HubSpot content team, we wanted to take on the shift, responsibly. We had a dream to create high impact, editorial videos to (1) make our campaigns more interesting, and (2) create content in the format people were increasingly consuming.
So, over the the past year we did just that: Demystify the “pivot to video” by transitioning a small team of writers who enjoyed consuming great multimedia content into a team that actually created that content.
So, how’d it go?
Not bad. While the past year has had it’s fair share of trashed scripts and late-night tutorial binging, our content team was able to create some of the highest performing videos for HubSpot in 2017. Overall, we created 30+ videos and brought in over a million views … and that’s just on YouTube.
How did we do it? After a year of refining, here’s our playbook for creating a high-ranking YouTube video that complements our written content strategy, not replaces it.
HubSpot’s “Pivot to Video” Playbook
It’s no surprise there’s a lot that goes into making a video. Days or even weeks of work often translate to mere seconds. While crafting those sort of knock-your-socks-off, creative videos is the ultimate goal, there was a major hurdle we needed to tackle first: process.
Here’s what that looks like today:
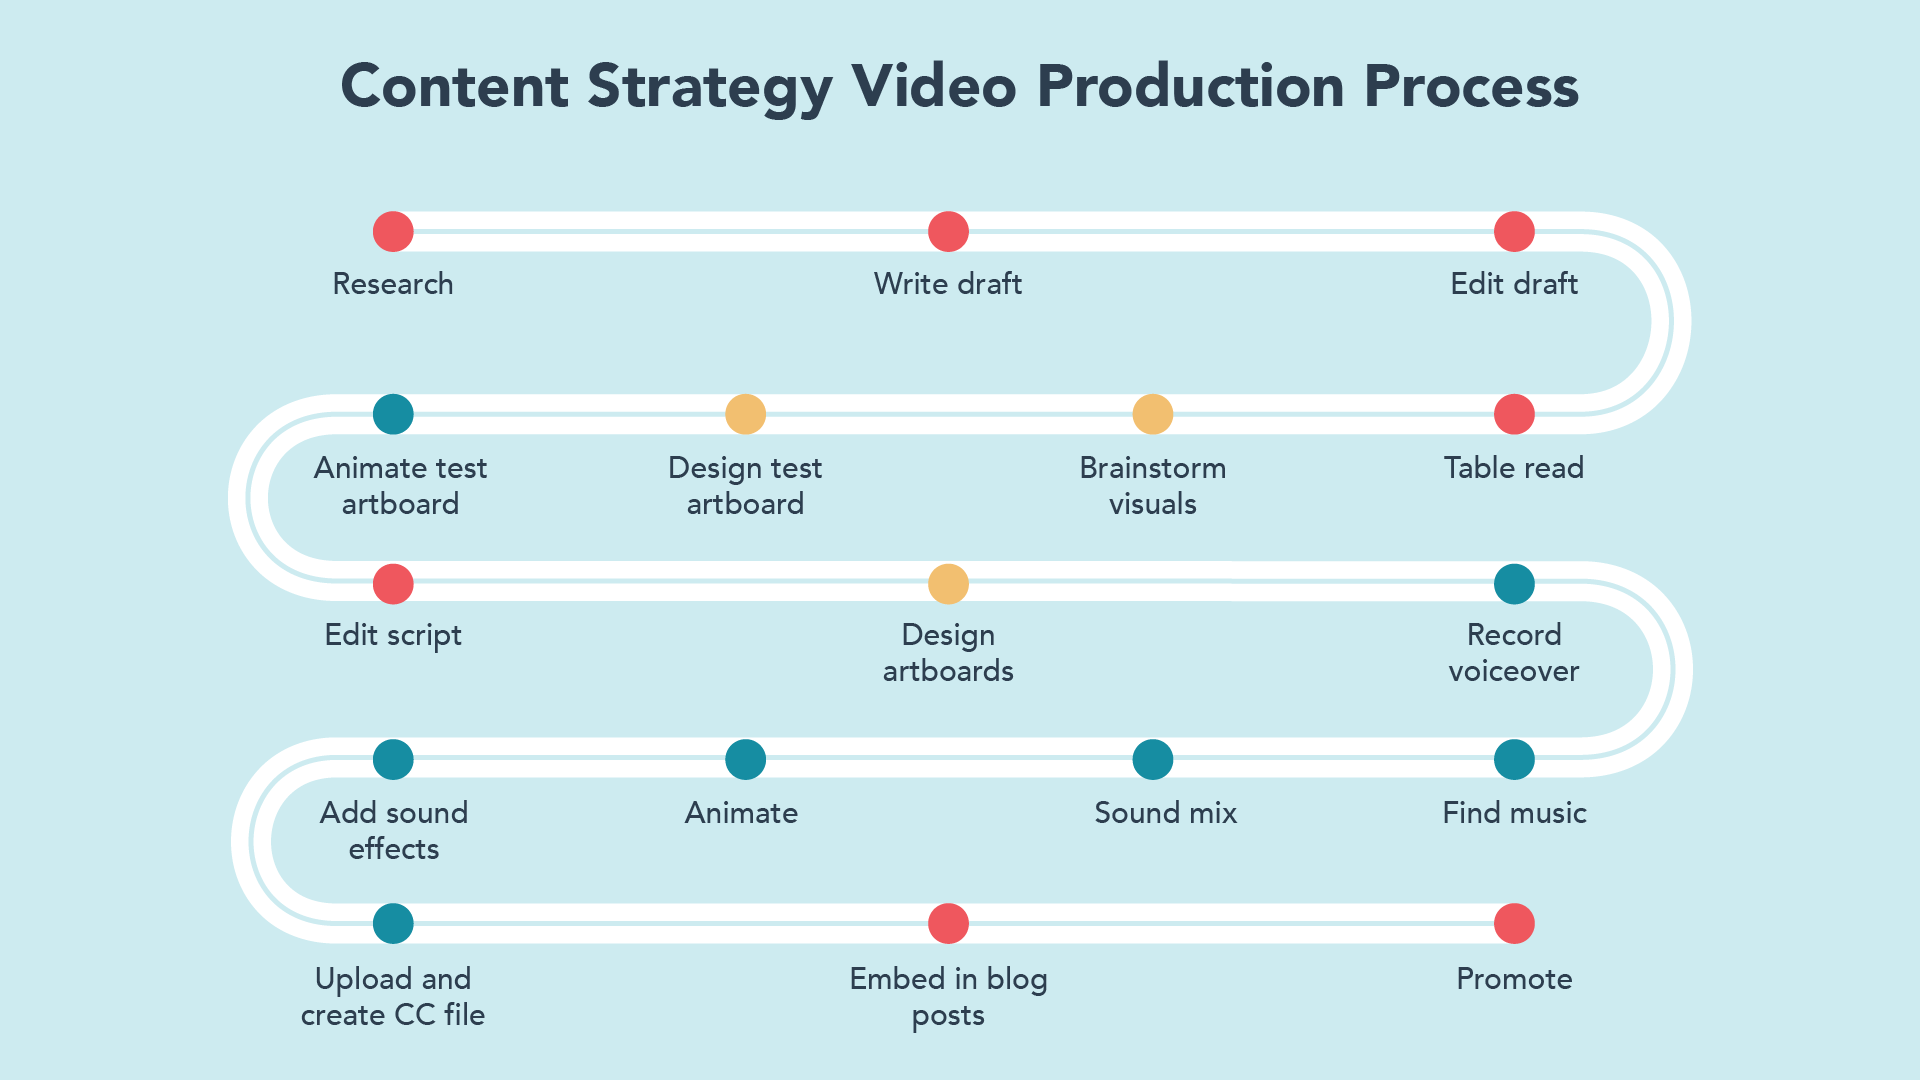
Sure, it’s pretty involved, but we’ve found that the secret to making a high-preforming video in the least amount of time is having all parties involved from the beginning. No matter if you’re a writer, designer, or producer, you’re in it from the start finalizing the point-of-view, brainstorming graphics, and revising the final animations.
With this spirit of collaboration established, we generally break our video process down into five key stages.
1. Research
Not all topics warrant videos and it’s important to only dedicate video resources towards the ones that do. Therefore, our first step in the video process (and one that’s consistently ongoing) is to identify content gaps.
Run through your high performing blog posts to find topics that could be good candidates for videos. Next, go through both Google and YouTube search results to see what information and content already exists for a topic of interest. If the topic has high search volume and is a good fit for your audience, consider making a video.
Consider our “What is Artificial Intelligence (or Machine Learning)?” explainer video. A quick keyword search for “what is artificial intelligence” told us the topic was growing in popularity fast. And after scouring the existing videos on YouTube, we began to brainstorm a storyline that would differentiate us from the pack, and ultimately, rank near the top of the list for the term.
2. Writing
Writing for video is drastically different than writing long-form copy. Of course, you can and should use existing research or blog structures to get your script started. But with video, shorter is usually better. We try to keep scripts around 500 words.
You’ll also need to hook your audience in the first 5 seconds. If a viewer makes it through the first 5 seconds, they’re more likely to stick around and have a longer watch time. Longer watch times give your videos higher authority which leads more views and more views lead to a higher ranking.
For example, see how our video on “The Power of Advertising Slogans” grabs the viewers attention before they have a chance to bounce.
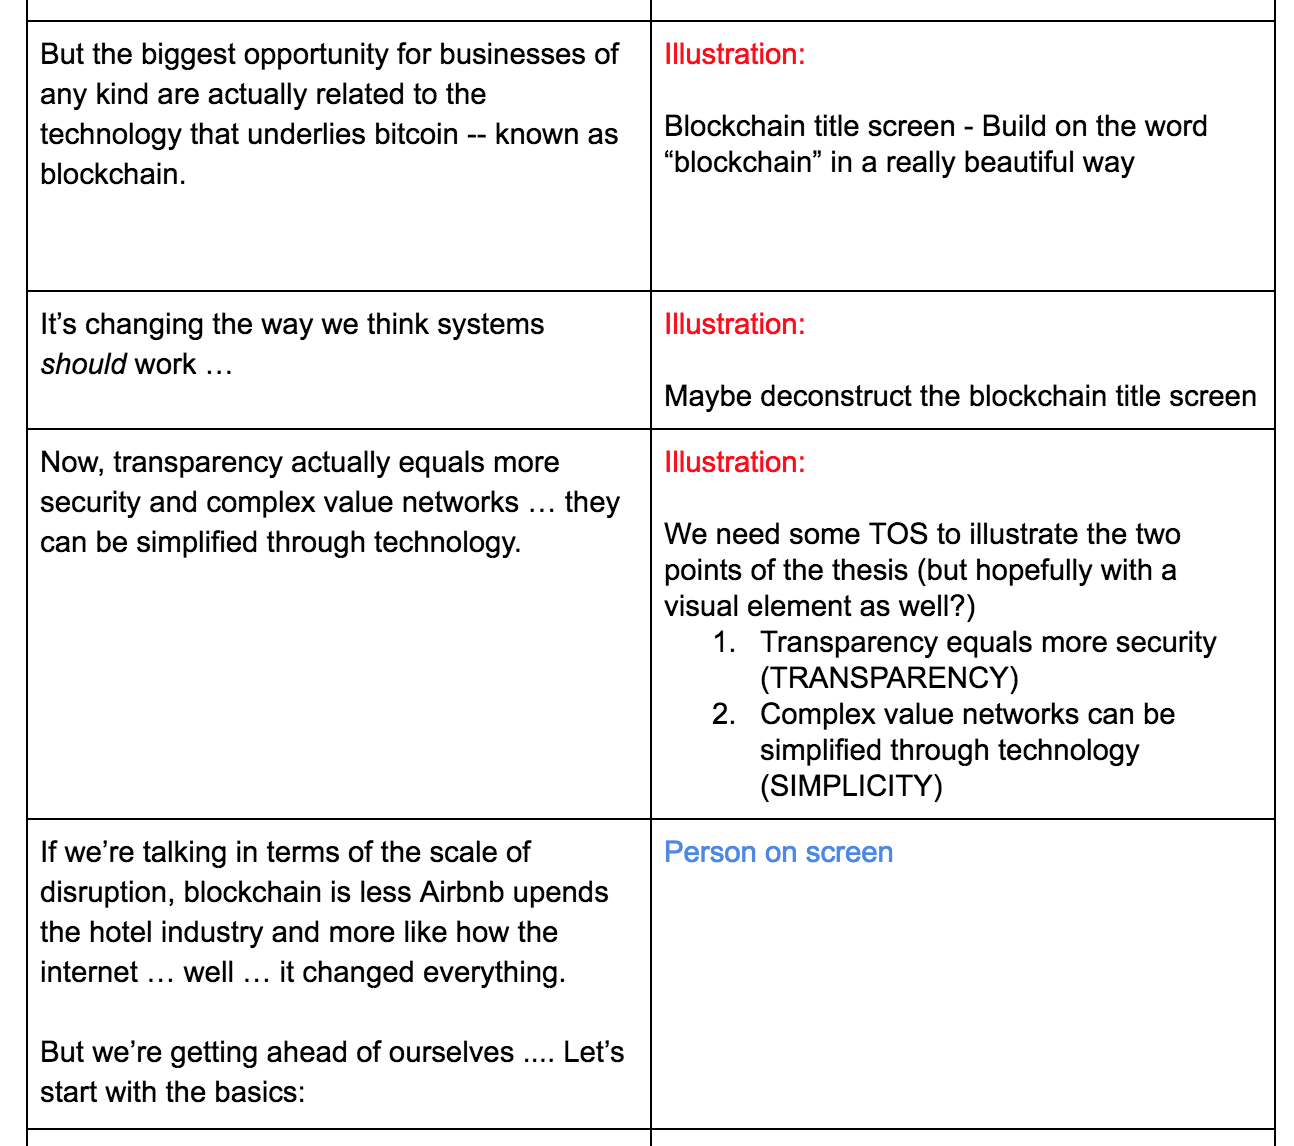
We recommend writing scripts in Google Docs for easy collaboration with other team members. This also allows for later steps, like art direction, to begin earlier on in the process. We break our scripts into two columns with the actual script on the left and the art direction on the right.
3. Production
With the words on paper and art direction generally set, we move on to production. The time and work required for this step can vary greatly between videos.
Typically, the main decision we need to make is if the video will be a talking head video or an animated video. If we want to create a video to complement a blog post, we typically stick with a talking head. These are low-budget quick wins and generally can be completed in a day or two. On the other hand, animated videos can take multiple weeks to create, but lend themselves well to more complex topics that need to be explained with visuals.
Talking head videos are filmed in our studio with the help of a three-point lighting setup and an iPad teleprompter. Don’t have a dedicated studio? Be sure to check out our Ultimate Guide to Video Marketing for some unexpected tips, including transforming that spare conference room into an ideal video production room.
For animated videos, we start by spending a day or two on art direction. Here, visual ideas get added to the right column of the script. Our designer can then take those ideas and design out a set of artboards using Adobe Illustrator or Photoshop.
Meanwhile, we record a voiceover of the script. All you need is a basic microphone, your laptop, and a few deep breaths to calm the nerves. Remember, it’s best to remain conversational as opposed to sounding to sales-y.
Although video requires a large time commitment, we can assure you that you don’t need a Superbowl ad budget to get started. Check out this chart for equipment you can buy on any budget:
| $ | $$ | $$$ | |
|
Camera |
iPhone | Prosumer camera – Canon PowerShot ELPH 340, GoPro HERO5, Canon EOS 7D Mark II, or Canon 80D. | Professional camera – Sony Alpha a7SII, Nikon D810, and Canon EOS 5D Mark III |
| Audio | Movo MA 200 Omni-Directional iPhone microphone | Rode VideoMic | Zoom setup – Sennheiser ME66, a shotgun clip, light stand, XLR cable, and Zoom H4N recorder. |
| Lighting | Good natural light | Extension cords, three clamp lights with bulbs, and three light stands | LED lights |
| Misc. | Music, editing software, training | Music, editing software, training/freelancer | Music, editing software, training/freelancer |
4. Post-Production
You have your footage, audio, and designs. Finally, it’s time to bring everything together. For talking head videos, use Adobe Premiere Pro, iMovie, or another equivalent video editor to cut and arrange the footage.
If you’re looking to take on animated videos, this stage will claim most of your time. We bring our videos to life with the help of Adobe After Effects and Animate, a process that can take one to three weeks. If you have a dedicated video editor or animator on your team, you’re all set! If not, you’ll need to invest in freelance talent or training up your own willing colleague with the help online tutorials. We’ve found great success of School of Motion, Lynda, and Skillshare.
More and more we are combining the talking head and animated videos to solve for efficiencies while keeping our creative standard high. Check out our explainer video on the Internet of Things to see how we split up an engaging script between talking head footage and quirky animations.
5. Promotion
Once video production and editing starts wrapping up, it’s time to come up with a promotional strategy and get your video ranking on YouTube. Including relevant keywords in your video title, uploading closed captions, and including your script in the description box are easy ways to optimize your video for search.
We also embed our videos in relevant blog posts and site pages to help drive organic views. If you need to boost your views, consider putting money behind your video. A few hundred dollars can go a long way on YouTube. Finally, be sure to promote your videos on your other social channels to help drive engagement.
Although video production requires some upfront costs and can have a steep learning curve, we don’t see this trend disappearing any time soon. Businesses that wish to drive engagement should consider making video a part of their marketing strategy.

These Emojis Can Increase Click-Through Rates, According to New Data
Emojis can be powerful tools that help your messages stick with your audience: a study found that participants who were sent messages with emojis scored higher on memory than those who were sent messages without emojis, indicating that emojis can make your message more memorable.
That same study also found that emojis can help portray your business as friendlier: participants who chatted online with an expert who used emojis rated the expert as both friendlier and more competent, compared to participants who chatted with an expert who did not use emojis.
From a marketing standpoint, emojis are undeniably useful. Emojis in a tweet can increase engagement by 25.4 percent, and emojis in a Facebook post can increase the number of likes by 57 percent and the number of comments and shares by 33 percent. If emojis can so drastically increase the likelihood of engagement, there’s no reason you shouldn’t be using them.
But with all that said, there are still 2,666 emojis to choose from. So which ones increase engagement the most? Which ones incentivize people to click your link? Which ones should you avoid?
We wanted to answer those questions for you, so we studied 19,617,281 of our own HubSpot published posts across all social platforms: LinkedIn, Facebook, Twitter, Google Plus, and Instagram (Instagram was studied for a shorter duration). Here’s what we found.
The Top Ten Most Popular Emojis
- 👉
- 👇
- 😉
- 🎉
- 🤔
- 👏
- 🚀
- 🔥
- 🎄
- 👀
These ten emojis are the most popular across all the social media platforms we support. I was initially surprised that the pointing finger outranked the winking face (and that the rocket even made the list) until I considered intent. Most marketers are writing content to direct you somewhere else, so if a pointing finger can playfully articulate “click here,” why not use it? Most of these emojis are useful year-round, but some, like the Christmas tree, are likely effective on a more seasonal basis. Some of them, like the winking or contemplative emoji, are probably popular because they convey your sense of humor or curiosity.
The Top Ten Emojis Most Likely to Increase Engagement
- 🙆
- 🍒
- 🐠
- 💃
- 🌤
- 💘
- 😔
- 💕
- 😢
- 💓
For our purposes, we’ve defined engagement as likes, comments, and shares. You’ll notice that none of the top five emojis are faces. This could mean it’s productive to use less popular emojis in your marketing strategy, for the novelty factor, which is what I suspect is driving engagement. At least, novelty is the only conclusion I can draw from the cherry emoji … unless people like cherries more than I think?
The bottom five emojis all look related to Valentine’s Day. The fact that we ran this study in February around Valentine’s Day might have something to do with their popularity in this study, but we also wonder if posting a tear or sad faced emoji encourages people to give sympathy likes and engage more actively.
It certainly feels more urgent to respond to a crying face than a smiley face (in real life, too).
The Top Ten Emojis Most Likely to Encourage Click-Through
- 🐙
- 🐴
- 👖
- 🍒
- 🚂
- 🏳
- 🌉
- 🆓
- 👇
- 🎟
The above ten emojis lead to the most link clicks. None of these are faces, and with the exception of the down arrow, they are not the most popular or most frequently used (I can assure you, I’ve never used the jeans emoji). In fact, some of them are just insanely random — why the octopus is in first place, we’ll never know, unless most of our followers are marine biologists. You’ll see the cherries in this list again (still not sure why those are so popular), and then some other emojis, like the train, which I can almost guarantee aren’t often used elsewhere.
It resembles an absurd game of pictionary, but perhaps randomness is what catches the viewer’s eye. Straying from the pack might lead to big advantages when you’re trying to attract attention to your link.
What now?
Hopefully, this data can help you humanize your brand and convey more meaning and emotion in your content. Emojis, even the octopi and horses … actually, especially the octopi and horses … encourage interaction from your audience, higher click-through rates, and better messaging from your brand.
But use them sparingly! Fill your content up with all the fishes you can find, and it’ll begin to look like an aquarium, not a business link.
Special thanks to Chris Sabanty for collecting the data used in this article.

The Ultimate Guide to Instagram Hashtags for 2018
Did you know an Instagram post with at least one hashtag averages 12.6% more engagement than a post with no hashtags?
Hashtags are powerful. They can help your posts reach a target audience, attract followers in your niche, increase engagement, and develop a more positive and recognizable brand image.
Here’s the thing, though: with great power comes great responsiblity (#spiderman).
Hashtags can skyrocket your business to new heights, but if used too frequently or without a clear strategy in mind, they become pointless and inefficient, e.g.: #happy #superhappy #ecstatic #jumpingforjoy #whatsanothersynonym.
We want your business’s Instagram posts to receive optimal engagement, so we’ve put together an ultimate guide for using Instagram hashtags in 2018. With this guide, you won’t just attract followers — you’ll attract the right followers.
Why Hashtags Are Important
Hashtags are essentially Instagram’s sorting process. With around 95 million photos posted on Instagram every day, it’s difficult for Instagram to efficiently deliver the right content to the right people. Hashtags help your post get discovered by viewers most interested in seeing it.
Krystal Gillespie, HubSpot’s Social Media Community Manager, explains the importance of hashtags this way: “Hashtags are like a funnel. For instance, #marketing is incredibly broad and attracts all types of posts. We’ve found #digitalmarketing or #marketingmotivation gives us a more specific, targeted reach. The audience searching for these hashtags are also trying to narrow their search to what we offer related to Marketing, so we’re actually reaching more of the right people.”
Essentially, hashtags are a better way to categorize your posts. They help you reach a target audience, and more importantly, they help your target audience find you. These users are more likely to engage with your post because your post is exactly what they wanted.
Top Instagram Hashtags
- #love
- #instagood
- #me
- #cute
- #tbt
- #photooftheday
- #instamood
- #iphonesia
- #tweegram
- #picoftheday
Adding one of the most popular Instagram hashtags to your post doesn’t necessarily mean you’ll see more interaction. Since the hashtags above are so popular, they are being used by millions of people, so your post will most likely be obscured by the competition. Narrowing your hashtag topic is important, but we’ll get to that next.
How to Use Hashtags for Your Business
1. Keep Your Hashtags Organized
To create an efficient hashtag system, you can use Excel or an Instagram analytics tool. If you choose an excel sheet, you’ll need to manually keep track of which hashtags you use, how often, and which ones correlate to your most popular posts. Over time, you’ll see relationships between certain hashtags and your most popular posts, and this can help you decide which hashtags work best for your brand.
If you have a more advanced social media team, you might want to consider a tool like Iconosquare, which automatically stores top hashtags and provides reports on which hashtags reach the most people.
For smaller businesses with limited budgets, Krystal Gillespie says that, “an excel sheet is the best way to start. Once you get more advanced I would highly recommend using a tool to track the data. A manual system can get overwhelming when you’re posting three times a day and using about 20 hashtags per post.”
2. Figure Out Your Magic Number
Most top brands — 91% of them, to be exact — use seven or fewer hashtags per post, so it’s easy to assume that’s the magic number for everyone … right? Krystal explains that this isn’t always the case: She told me HubSpot has been more successful with hashtags ranging in the low 20s.
The point is, you can’t know how many hashtags work best for you until you test it. For HubSpot, it took the team several months to find a number that worked best, and during our trial period, we ranged from seven to 30. Give yourself the same flexibility for trial and error.
3. Narrow Your Hashtags
There are two big reasons more specific, smaller-volume hashtags are better for your brand: first, you can compete in a smaller pool. HubSpot, for example, doesn’t typically use the hashtag #marketing because it’s too broad. If you search #marketing, you’ll find pictures of restaurants, inspirational quotes, before-and-after hair style pictures, and memes.
The randomness of #marketing leads me to the second reason specific hashtags are a good idea: as a user, I’m more likely to find what I need if I search for something specific, and when your business comes up for my specific search request, I’m more likely to be happy with what I found.
Krystal explains: “Keeping a hashtag close to the interests of your brand really helps. We try to use hashtags tailored for a specific topic and then narrow it down further — for instance, we’d use #SEOTips if our marketing post was mostly about SEO.”
Think of it this way: #dogs is more popular, but it has a wide demographic. If I search #goldenretrieverpuppies and I find your post, I’m more likely to engage with it because it’s exactly what I wanted.
4. Research What Other People are Hashtagging
An easy way to generate hashtag ideas is to make a list of your followers or competitors and research what they’re hashtagging on their own photos. It can also be particularly helpful to research what influencers in your industry are hashtagging — by definition, influencers are people with a large social media following, so they must be doing something right.
5. Test Out Related Hashtags
When you type a hashtag into Instagram’s search bar, Instagram shows you related hashtags in the scroll-down menu. Instagram also delivers related hashtags on the next page after you click on a hashtag. This is a simple way to create a longer list of hashtags to try out.
6. Follow Your Own Hashtag
Another way to use Instagram hashtags for your marketing purposes is to follow your own hashtag. Krystal explains, “On Instagram I actually follow the hashtag #hubspot so I can find anyone who talks about us and connect with them. As long as your account isn’t private, people will be able to find you via the hashtag.”
Following your own hashtag is an effective way to engage with other people talking about your brand and develop better relationships with them.
7. Create a Brand Campaign Hashtag
This is the trickiest item on the list, but if done successfully, it can pay off big time. Some businesses have successfully attracted followers by creating their own campaign hashtag. A campaign hashtag needs to be funny, clever, or at least memorable in order to work.
Campaign hashtags are particularly useful for promoting a new product or upcoming event, or even just inspiring people. Red Bull, for example, encouraged followers to post Red Bull pictures with a #putacanonit hashtag (see what I mean about clever?). LuLuLemon, rather than running a more traditional ad campaign, developed a positive connotation for their brand by asking followers to post real, active pictures of themselves with a #sweatlife hashtag.
How to Use Instagram Search Within the App
Now that we’ve covered the importance of using Instagram hashtags for your business, you might be wondering how to search for Instagram hashtags within the app, or how to use the search function to find related ideas. If you’re unsure of the technical process for hashtag searching, here’s how:
How to Search Instagram Hashtags:
- Tap and enter a general search term
- Scroll through related terms
- Choose hashtag that has decent search size and relates to your post
- Look at related hashtags that Instagram serves you on the hashtag’s page
- Click on a top trending photo for that hashtag
- Check out related hashtags on that post for more inspiration

How to Create a Pivot Table in Excel: A Step-by-Step Tutorial (With Video)
The pivot table is one of Microsoft Excel’s most powerful — and intimidating — functions. Powerful because it can help you summarize and make sense of large data sets. Intimidating because you’re not exactly an Excel expert, and pivot tables have always had a reputation for being complicated.
The good news: Learning how to create a pivot table in Excel is much easier than you might’ve been led to believe. But before we walk you through process of creating one, let’s take a step back and make sure you understand exactly what a pivot table is, and why you might need to use one.
What Is a Pivot Table?
A pivot table is a summary of your data, packaged in a chart that lets you report on and explore trends based on your information. Pivot tables are particularly useful if you have long rows or columns that hold values you need to track the sums of and easily compare to one another.
In other words, pivot tables extract meaning from that seemingly endless jumble of numbers on your screen. And more specifically, it lets you group your data together in different ways so you can draw helpful conclusions more easily.
The “pivot” part of a pivot table stems from the fact that you can rotate (or pivot) the data in the table in order to view it from a different perspective. To be clear, you’re not adding to, subtracting from, or otherwise changing your data when you make a pivot. Instead, you’re simply reorganizing the data so you can reveal useful information from it.

How to Use Pivot Tables
If you’re still feeling a bit confused about what pivot tables actually do, don’t worry. This is one of those technologies that’s much easier to understand once you’ve seen it in action. So, here are two hypothetical scenarios where you’d want to use a pivot table.
Scenario #1: Comparing Sales Totals of Different Products
Say you have a worksheet that contains monthly sales data for three different products — product 1, product 2, and product 3 — and you want to figure out which of the three has been bringing in the most bucks. You could, of course, look through the worksheet and manually add the corresponding sales figure to a running total every time product 1 appears. You could then do the same for product 2, and product 3, until you have totals for all of them. Piece of cake, right?
Now, imagine that monthly sales worksheet of yours has thousands and thousands of rows. Manually sorting through them all could take a lifetime. Using a pivot table, you can automatically aggregate all of the sales figures for product 1, product 2, and product 3 — and calculate their respective sums — in less than a minute.
Scenario #2: Combining Duplicate Data
In this scenario, you’ve just completed a blog redesign and had to update a bunch of URLs. Unfortunately, your blog reporting software didn’t handle it very well, and ended up splitting the “view” metrics for single posts between two different URLs. So in your spreadsheet, you have two separate instances of each individual blog post. In order to get accurate data, you need to combine the view totals for each of these duplicates.
That’s where the pivot table comes into play. Instead of having to manually search for and combine all the metrics from the duplicates, you can summarize your data (via pivot table) by blog post title, and voilà: the view metrics from those duplicate posts will be aggregated automatically.
How to Create Pivot Tables in Excel
Now that you have a better sense of what pivot tables can be used for, let’s get into the nitty-gritty of how to actually create one.
Step 1: Highlight Your Cells to Create the Table
If you’ve already entered data into your Excel worksheet, highlight the cells you’d like to summarize in a pivot table, click “Insert” along the top navigation, and select the “PivotTable” icon. You can also click anywhere in your worksheet, select “PivotTable,” and manually enter the range of cells you’d like included in the PivotTable.
This will open an option box where, in addition to setting your cell range, you can select whether or not to launch this pivot table in a new worksheet or keep it in the existing worksheet. If you open a new sheet, you can navigate to and away from it on the bottom of your Excel workbook. Once you’ve chosen, click “OK.”
Alternatively, you can highlight your cells, select “Recommended PivotTables” to the right of the PivotTable icon, and open a pivot table with pre-set suggestions for how to organize each row and column.
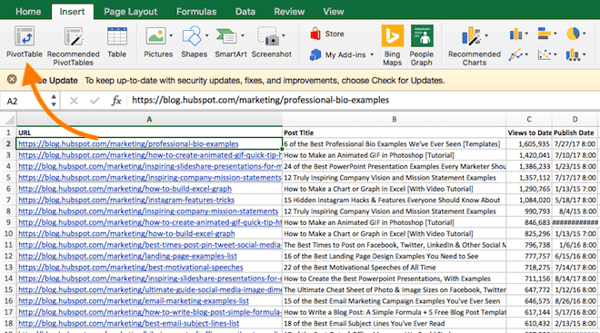
Note: If you’re using a version of Excel earlier than Excel 2016, “PivotTables” may be under “Tables” or “Data” along the top navigation, rather than “Insert.” In Google Sheets, you can create pivot tables from the “Data” dropdown along the top navigation.
Step 2: Drag and Drop a Field Into the ‘Row Labels’ Area
After you’ve completed Step 1, Excel will create a blank pivot table for you. Your next step is to drag and drop a field — labeled according to the names of the columns in your spreadsheet — into the “Row Labels” area. This will determine what unique identifier — blog post title, product name, and so on — the pivot table will organize your data by.
For example, let’s say you want to organize a bunch of blogging data by post title. To do that, you’d simply click and drag the “Title” field to the “Row Labels” area.
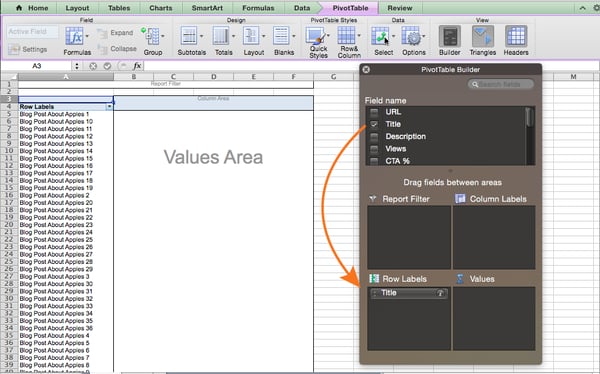
Note: Your pivot table may look different depending on which version of Excel you’re working with. However, the general principles remain the same.
Step 3: Drag and Drop a Field Into the ‘Values’ Area
Once you’ve established what you’re going to organize your data by, your next step is to add in some values by dragging a field into the “Values” area.
Sticking with the blogging data example, let’s say you want to summarize blog post views by title. To do this, you’d simply drag the “Views” field into the Values area.
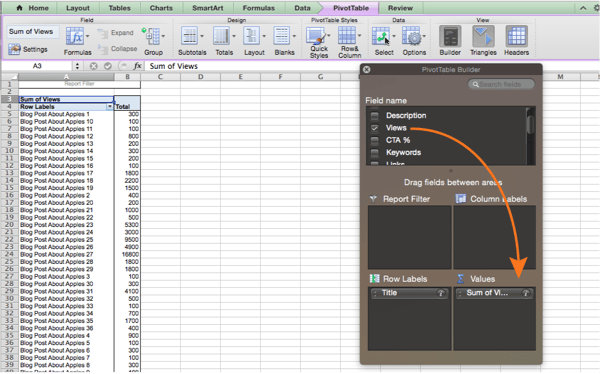
Step 4: Fine-Tune Your Calculations
The sum of a particular value will be calculated by default, but you can easily change this to something like average, maximum, or minimum depending on what you want to calculate.
On a Mac, you can do this by clicking on the small “i” next to a value in the “Values” area, selecting the option you want, and clicking “OK.” Once you’ve made your selection, your pivot table will be updated accordingly.
If you’re using a PC, you’ll need to click on the small upside-down triangle next to your value and select “Value Field Settings” in order to access the menu.
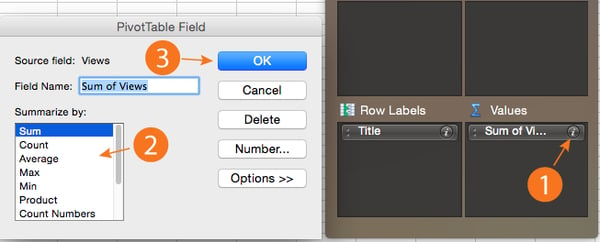
Digging Deeper With Pivot Tables
You’ve now learned the basics of pivot table creation in Excel. But depending on what you need your pivot table for, you might not be done.
For example, you may notice that the data in your pivot table isn’t sorted the way you’d like. If were the case, Excel’s Sort function can help you out. Alternatively, you may need to incorporate data from another source into your reporting, in which case the VLOOKUP function could come in handy.
To take a deeper dive into the world of Excel and learn about its various functions, download our comprehensive guide, How to Use Excel.



The Best Time to Post on Instagram, Facebook, Twitter, LinkedIn, Pinterest, and Google+ [Infographic]
Social media is one of the best ways to amplify your brand and the great content you’re creating. But it isn’t enough to just post content to social whenever you feel like it. Some times are better than others.
So, what are the best hours to post on each social media channel?
Unfortunately, there’s no perfect answer. People browse each social network differently, and businesses may find different days and times work best for them. For example, while Twitter sees tweets perform well at hours like 3 p.m., Instagram sees certain posts perform well as late at 2 a.m.
These aren’t your only (or best) times, though. Good post timing depends on the platform you’re using, as well as on how your target audience interacts with that platform, the regions and corresponding time zones you’re targeting, and your marketing goals (e.g., clickthroughs versus shares).

However, there is ample data out there on the best time to post on Instagram, Facebook, Twitter, LinkedIn, and Pinterest. The great folks at CoSchedule recently looked at a combination of its own original data and more than a dozen studies on this very topic — from the likes of Buffer and Quintly, just to name a couple — and compiled it into the infographic below.
Bookmark this post as a go-to set of guidelines, and refer to it next time you need to find the optimal posting times for your business.

The Best Times to Post on Social Media
With many businesses facing a growing global audience, varying time zones have become a growing concern, especially when it comes to the best times to post.
To start, let’s take a look at the U.S. About half of the country’s population is in the Eastern Time Zone, and combined with the Central Time Zone, that accounts for over 75% of the total U.S population.
Given that sizable share, if you’re targeting a U.S. audience, try alternating posting times in Eastern and Central Time Zones — we’ll get into those specific times in a bit.
If you’re targeting users outside of the U.S., conduct some research to find out where they live and which social media channels they’re using. That kind of data is available through studies like Smart Insights’ Global Social Media Research Summary, or We Are Social’s annual Digital Global Overview.
1. Best Time to Post on Instagram
Instagram is meant for use on mobile devices. Half of its U.S. users use the app daily, though it would appear that many engage with content more during off-work hours than during the workday.
- In general, the best times to post on Instagram are on Monday and Thursday, at any time other than 3-4 p.m.
- The best time to post videos is 9 p.m.-8 a.m., on any day.
- Some outlets have reported success on Mondays between 8-9 a.m., correlating with the first morning commute of the week for many.
2. Best Times to Post on Facebook
People log in to Facebook on both mobile devices and desktop computers, both at work and at home. How it’s used depends heavily on the audience.
- On average, the best time to post is 1-4 p.m., when clickthrough rates have shown to be at their highest.
- Specifically, 12-1 p.m. is prime time on Saturday and Sunday.
- During the week, the same goes for Wednesday at 3 p.m., as well as Thursday and Friday between 1-4 p.m.
- The worst times are weekends before 8 a.m. and after 8 p.m.
3. Best Times to Post on Twitter
Like Facebook, people use Twitter on both mobile devices and desktop computers, both at work and at home. How it’s used also depends heavily on audience — but people often treat it like an RSS feed, and something to read during down times like commutes, breaks, and so on.
- Good times to tweet average around 12–3 p.m., with an apex at 5 p.m. — which makes sense, given that it correlates with the evening commute.
- Weekdays tend to show a stronger performance, though some niches might have more active audiences on the weekend.
- If your goal is to maximize retweets and clickthroughs, aim for noon, 3 p.m., or 5–6 p.m.
4. Best Times to Post on LinkedIn
Roughly 25% of U.S. adults use LinkedIn, largely for professional purposes, during weekdays and the work hours. It’s used with slighly less frequency than some of the other channels on this list, with more than half of users visiting less than once a week.
-
Aim to post toward the middle of the week, between Tuesday-Thursday.
-
When aiming for a high clickthrough rate, post on these days during times that correspond with the morning and evening commute — roughly 7:30-8:30 a.m. and 5-6 p.m. — as well as the lunch hour, around 12 p.m.
-
Some have also seen a positive performance on Tuesdays, between 10–11 a.m.
5. Best Times to Post on Pinterest
Pinterest users skew heavily female, and 25% of users are active on this channel daily.
- Interestingly enough, Saturday evenings are said to be the best time to reach users, especially between 8-11 p.m.
- Some have also seen a strong performance on the later side of Friday afternoon, around 3 p.m.
- Contrasting many of the other channels we’ve listed here, evening commutes tend to be some of the worst times to post to Pinterest. That could be due to the fact that it’s not as “browseable,” with many pins requiring navigation away from the channel.
6. Best Time to Post on Google+
People love to debate whether or not Google+ is a social media channel worth investing in — though according to my colleague Chris Wilson, some marketers have experienced success with it.
But if you’re going to use it, you might as well do so effectively — which includes posting at the optimal times.
- People seem to be most active on Google+ during the start of the workday, between 9-11 a.m.
- That’s especially the case on Wednesdays, around 9 a.m.
- Some marketers have also seen success during the lunch hour, posting between 12-1 p.m.
There you have it, folks. Happy posting, tweeting, and pinning.



Even More Requirements for Facebook Advertisers
Within the past several months, before news first broke of voter profiling firm Cambridge Analytica improperly obtaining and using personal user data, Facebook said it would be making a large degree of changes as to how it handles advertisements.
Those promises came when it was first revealed in 2017 that the social media behemoth had been weaponized by foreign actors to spread misinformation and influence the 2016 U.S. presidential election. Since then, Facebook has made incremental changes to the way it ranks and provides context around content appear in users’ News Feeds.
In January, that was a shift in the algorithm to focus more on content from friends and family. But then, the Cambridge Analytica story broke — and since then, Facebook has swiftly instituted sweeping changes to its data, content, and privacy policies. The latest of those changes came today, when it announced that more changes would be made to the transparency of all ads on its site, and not just political ones.
Here’s what Facebook says that’ll look like.
Issue-Based Ads Will Require the Same Verification as Electoral Ones
Last October, before the Cambridge Analytica news broke, Facebook said it would only allow authorized advertisers to run electoral ads on Facebook or Instagram — that is, ads for candidates, for example. Today, wrote VP of Ads Rob Goldman and VP of LOcal & Pages Alex Himel, the same will be required of any parties who wish to publish ads related to the issues that often come up during elections season.
That’s important, because it was that type of ad that allegedly played a role in the aforementioned efforts to share divisive content on Facebook (and other social networks) that could ultimately influence the 2016 U.S. presidential elections. And to help combat that, Facebook says, the company is partnering with “third” parties to comprehensively determine what all of those issues are — an ongoing effort that the announcement says will be fine-tuned as the efforts proceed.
This authorization will work similarly to the verification efforts Facebook identified in recent weeks when Product Management Director Rob Leathern spoke to a new ad review and verification process that will require all Page admins to submit government-issued IDs and provide a physical mailing address before they can publish any promoted content.
Now, any advertisers will have to verify their identities and locations in the same way and won’t be able to run any political ads until that process is complete.
To further those efforts, these ads will all contain a “Political Ad” label, including information about who paid for it. According to this announcement, this verification process has already been tested this week, and users can expect to see these labels later on in the spring.
Machine learning will also play a role here, to help Facebook identify existing advertisers that should have been put through this verification process, but weren’t, for whatever reason — and users can weigh in by tapping the three dots at the top right corner of the ad and selecting “Report Ad.”
“This is the clearest approach to labeling political ads that they’ve put forth thus far,” says Henry Franco, HubSpot’s social campaign strategy associate.
Searchable and Archived Ads
Here’s another feature that Facebook alluded to last week when it held an overview of upcoming efforts to protect election security: View Ads, which has been tested in Canada and will be rolled out globally this summer. As the name suggests, it allows users to view any ads the Page is running under its “About” section.
That functionality will be available to all Facebook users, even if they don’t follow a given advertiser Page, and will roll out on a global scale in June — the same month when Facebook says it will also launch its public, searchable archive of political ads.
That archive will store the full text and imagery of any and all ads with the aforementioned “Political Ad” label, as well as the number of impressions it received and demographic information about the audience it reached. And according to previous statements from Facebook, the archive will keep this information for up to four years after the ad ran.
Here’s what this archive could look like:
No Pages Left Behind (for Verification)
Finally, Facebook said that any Page with a “large” following — what precise amount that entails is unclear — is subject to verification, regardless of its categories. And until the administrators of these Pages complete that process, they will not be permitted to post anything from it.
While that could carry some implications for any marketers or advertisers with a large following — if for no other reason, than elongating the process of being able to publish content — Facebook also says that this change will make it much more difficult for fake accounts to thrive. For reference, these “fake” accounts already violate Facebook’s policies.
“It might be a bit of a headache to verify your page,” says Franco, “but it will also increase the legitimacy of your postings, and make the Facebook community a safer, more transparent place.”
These Pages will also come with additional context, like any historical name changes it’s gone through — which bears a resemblance to recent efforts announced by Facebook to display more details alongside any stories appearing in the News Feed.
That’s slated to include such information as any “official” Wikipedia entry on the publisher of the story, in addition to related articles on the same topic. It will also display where and how many times that story (from that publisher) has been shared on Facebook, as well as a “More From This Publisher” feature, allowing users to see what other stories the publisher has recently posted.
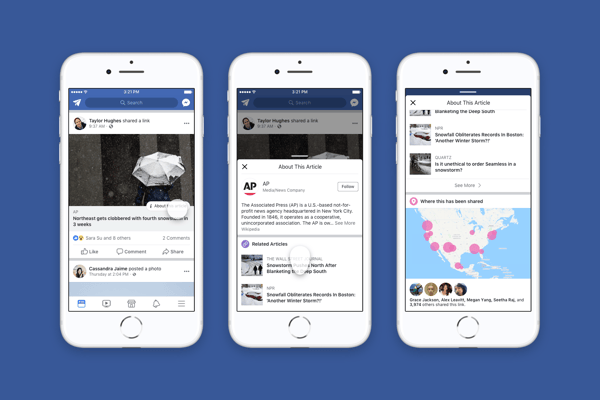
Source: Facebook
With Facebook CEO Mark Zuckerberg to make two appearances before Congress next week — a joint hearing with the Senate Judiciary and Commerce Committees on Tuesday, and the House Energy and Commerce Committee on Wednesday — it would appear that the recent onslaught of changes announced by Facebook is at least in part the result of preparation for this testimony before lawmakers.
Earlier today, Zuckerberg published a post on this latest round of changes on his official Facebook Page:
Facebook has also been releasing announcements on its accomplishments in this space, perhaps to build a repertoire of successes and progress to bring to Congress for next week’s hearings. This week alone, that includes significant plans to restrict data access, as well as the removal of 70 Facebook accounts, 65 Instagram accounts, and 138 Facebook Pages that were controlled by the Russia-based Internet Research Agency (IRA).
We’ll be on the ground in Washington, DC to report on these hearings next week. Questions? Feel free to reach out on Twitter.
