
Don’t Freak Out, but Facebook Added a New Kind of Feed
When Facebook makes any change to its algorithm or News Feed, the standard response is that it’s cause for panic.
For example, you may have recently heard some speculation around the channel’s recent “Explore Feed” rollout: an alternative News Feed designed to help users discover content outside of their existing networks, like friends and Pages they already follow. Hence, the name — it allows users to “explore” new content, without leaving Facebook.
That, of course, is likely Facebook’s main motivator here, and aligns with its growing efforts and modifications that encourage marketers to create content exclusively for this particular channel, rather than linking to content that requires users to navigate elsewhere.
But here’s our take on the matter: It’s definitely not cause for panic. In fact, it could actually help your brand.
Let’s start with the fact that this alternative feed has actually been available to mobile users for quite some time now, under the “More” menu that you find in the navigation options toward the bottom of the app.
Now, it’s been rolled out to desktop users on the navigational sidebar, which Facebook confirmed in a statement to TechCrunch:
“We are beginning to roll out a complementary feed of popular articles, videos, and photos, automatically customized for each person based on content that might be interesting to them. … We’ve heard from people that they want an easy way to explore relevant content from Pages they haven’t connected with yet.”
But what does this mean for the marketers and brand managers who rely on Facebook to maintain a presence and grow awareness?
At this point, it appears that the Explore Feed is not replacing the News Feed, which will still be the main landing navigation for Facebook users. And that makes sense — there would likely be quite an uproar from users who were suddenly flooded with content from brands they haven’t actively followed, rather than their existing networks of friends, family, and followed brands.
So fear not: Users who have already Liked your page will still see your content, with the caveat that in 2015, it was reported that organic reach fell to 2.6% (you can read more about why that happened and how to work with it here).
Users have to voluntarily navigate themselves to the Explore Feed, which means that they have to actively choose to discover new content there. How that will ultimately perform, we can’t be sure. But, according to my own scrolling experiment, it doesn’t contain any paid ads or sponsored content — yet.
Which indicates that, like so much else in the realm of a social media feed, the Explore Feed is based on an algorithm that curates content based on what you’ve liked and shared in the past. Admittedly, I don’t use Facebook for personal purposes much, so the algorithm seems to be trying to figure out what I might like — though, judging from the number of food- and dog-related posts appearing there, it could be well on its way.
But furry friends and food porn aside, the Explore Feed provides an opportunity for users to discover your brand if they’ve liked or shared similar content in the past. That presents an opportunity: If you’re inspired or motivated by a certain brand or its audience, for example, you can use that to guide the content you create for Facebook with the goal of growing and attracting a similar audience. Be original, though — you want your own content to offer something helpful and unique that users won’t find elsewhere.
“Take the opportunity to be present and engage more personally with your followers,” advises HubSpot Academy Social Media Professor Crystal King. “Spend more time developing quality content that your followers will be excited to share.”
The desktop rollout is in its earlier stages, so it’s likely to evolve and undergo modifications as users adapt to it. As always, we’ll be keeping an eye on it.
Featured image credit: Facebook
25 Last-Minute DIY Halloween Costume Ideas for Tech Geeks & Marketers
Halloween is a fun holiday, and it doesn’t get the attention it deserves. It doesn’t have recognizable songs or vacation days associated with it, and it falls on a busy time of year for most people in the workforce.
But that doesn’t mean you should skip the festivities at your office Halloween celebration. How many days of the year are you encouraged to dress up and goof around at work? Probably zero.
We want you to have fun this Halloween, so we’re taking the work out if it for you. We’ve compiled a list of DIY Halloween costume ideas that are easy to put together, inexpensive, and work appropriate. As a bonus, many are marketing and technology-themed, so even if your family and friends don’t get your costume, your colleagues definitely will.
25 Last-Minute Office Halloween Costumes for Marketers & Tech Geeks
Evergreen Office Costumes
1) Alt Text
This was HubSpot Director of Offsite Content Corey Wainwright‘s office Halloween costume a couple of years ago. It’s great because you don’t even look dressed up if you have a casual office dress code, so you can just blend in.
All you need is to dress in 90s alternative garb — she went with black jeans, combat boots, and a flannel — and tape a piece of paper to yourself that says something like img2017.jpg. Or if you want to follow best practice for good alt text, you can put something more descriptive, like “alt_text.” Your choice, you SEO rebel, you.
2) SEO Ninja
Speaking of dorking out on SEO, you could be everyone’s favorite LinkedIn title — the SEO ninja. Dress in all black, put on a black ski mask (kinda creepy if you already have one, but we don’t judge here), and tape keywords all over yourself.
3) Mobile App
Wander around holding an appetizer — candy, cheese and crackers, chips and dip … whatever you have on hand. Boom. You’re a mobile “app.”
This costume also doubles as a great way to introduce yourself and make friends at a party.
Source: Opportunity Max
4) Instagram
Another way to turn handing out food into a costume: Dress up like a hipster and hand out graham crackers.
5) Ghostwriter
Grab a white sheet and cut a hole for your head and arms. Dob some black ink spots on the sheet, get a book and one of those feather quills (or just get a feather, I suppose), and you’re a ghostwriter.
6) Whitespace
Dress in all white — add white face paint and a white wig if you’re ultra-committed. Then add a hint of color somewhere on the outfit, like a colored tie or scarf, or even a paint splotch. That color splotch will make the white space more prominent, transforming you into “whitespace.”
7) Error 404 Page
You’ve most likely encountered a funny error 404 page before, and you can make it a funny costume, too. Grab a sheet of paper, write “Error 404: Costume Not Found,” and tape it to your outfit.
8) (Monty) Python
If you’re into programming code, British comedy, and low-effort costumes, being (Monty) Python is perfect. Dress up in anything remotely snakelike in your closet: olive green clothing, snakeskin accessories, and fake vampire teeth that can serve as your fangs.
Then, to amp up the dork factor on this costume, add two coconuts or a gold chalice to embody Monty Python on his quest for the Holy Grail.
9) Facebook
Grab face paint or eyeliner and write “book” across your cheeks. Just like that, you’re the world’s biggest social network for Halloween.
And for your sake, we hope your colleagues actually get it:
Source: AndPop
10) Unicorn
Here’s another tech-friendly, double-entendre costume: Be your own version of a tech unicorn. Here at HubSpot, we love this tech icon, and you can easily make your own version of a unicorn horn with help from this article.
Source: WikiHow
11) Phishing Emails
Phishing emails are nothing to joke about — they can seriously threaten your technology and data security. But on Halloween, you can dress up as a play on phishing emails for an easy DIY costume. All you need are a stick, a piece of string, and an envelope. Bonus points if you own a bucket hat and vest to complete the ensemble.
12) Copycat
Here’s a technology spin on a classic Halloween costume. All you’ll need are cat ears, eyeliner-drawn whiskers, and a sheet of paper. Write “Control + C” on the paper, tape it to your outfit, and you’re a copycat.
Source: BuzzFeed
13) Fully Vested
If you work in a company where people would get the joke, put on a bunch of vests (at least three, but even more is encouraged), and that’s about it. You’re fully vested.
14) Nerd
What I love about the nerd costume is that it’s effortless and always unique — there are many ways to be a nerd in this day and age. Are you a tech nerd, a video game nerd, or a book nerd? The sky is the limit with this costume. Show up wearing glasses with your favorite accessories, such as a magic wand, book, or lightsaber, to complete the effect.
Topical Office Costumes
15) The 2017 Solar Eclipse
This summer, the solar eclipse took over the internet — and the country. As millions of people flocked to the path of totality to (hopefully) catch a glimpse of this rare event without burning their corneas, millions more made jokes about it on social media.
For this costume, you’ll need a work pal to dress up as the sun and the moon with you. One of you wears black, the other wears yellow, and you both wear dark sunglasses. Then, at the Halloween party, the one dressed in black spends the whole time standing in front of the one in yellow.
Source: CBS News
16) The ‘Evil Kermit’ Meme
If you haven’t heard of this mega-popular meme this year, you’ve probably seen it somewhere: It features Kermit the Frog, face-to-face with his evil twin, Evil Kermit. Evil Kermit looks identical, except for the black cloak.
For this costume, you and a coworker can keep it simple: You both wear green shirts, and one of you wears a black hoodie or jacket on top. If you really want to commit to the costume, you’ll spring for some green face paint to complete the ensemble. Walk around the party together, facing one another, for maximum effect.
17) Eleven from Stranger Things
Eleven from Netflix’s hit series Stranger Things is universally beloved, and it’s a bonus that her signature look is a comfortable and easy-to-assemble costume. Rock your best Eleven with a dress, a denim jacket, and a box of Eggo Waffles.

Source: Business Insider
18) Pokémon GO Trainer
Pokémon GO had roughly 45 million people walking around in cities glued to their phones last summer (and I was among them). To pay homage to the explosion of this tech trend, you’ll need a t-shirt that’s red, yellow, or blue. Using fabric paint or permanent marker, write Valor (for red), Instinct (for yellow), or Mystic (for blue) on your shirt. Spend Halloween walking around pointing your phone at objects, and you’re the spitting image of a Pokémon GO trainer.
Gotta catch ’em all, right?
Group Office Costumes
19) Google Algorithm Update
Find a couple of office buddies for this one — one panda, one penguin, and one pigeon. You might be thinking, “what the heck is the pigeon algorithm update?” 1) It’s a thing, and 2) we checked Amazon for hummingbird costumes and there aren’t any cheap ones available.
Source: Opportunity Max
20) Black and White Hat SEO
This is another SEO-related costume, and I think you can figure this one out on your own. I recommend wearing a black hat for one, and a white hat for the other, and having “SEO” embroidered on each one — which you can easily custom order.
21) Dancing Girls Emoji
If you’re the owner of one of the nearly more than 1 billion Apple iPhones sold worldwide, you’re probably familiar with the dancing girls emoji:
Source: Brit + Co
The easiest version of this costume is to find a buddy and dress all in black together. If you’re committed to emoji authenticity, buy black bunny ears to complete the look.
22) Series A Round of Funding
Get a bunch of people together, write the letter “A” on your shirt, and line up. (You could do subsequent funding rounds using the same principle, too.)
23) Snapchat Filters
Here’s another group costume idea that pays tribute to Snapchat’s filters feature.
There are numerous options that you and your team can choose from to embody this costume. You could dress up as vomiting rainbows, cat and dog ears, a flower crown, or a face swap, and this could be as DIY or store-bought as you’re interested in pursuing. For example, here’s some inspiration for a couple of the dog filters:
Source: PopSugar
24) Snapchat Ghosts
Put a marketing spin on a classic Halloween costume by arriving as a Snapchat ghost. You’ll all need a white sheet and to pick which ghost you like the most.
Source: YouTube
25) Instagram Filters
For this group costume, you’ll need white t-shirts and fabric markers. Draw an Instagram photo frame on the front of your shirts, and each team member can write a different Instagram filter‘s name inside the photo frame. Or, create frame props with different filters on them like the group did below:
Source: Nails Magazine
Are Amazon ‘Sponsored Products’ Ads Worth It?
Say you’re in the market for a new pair of headphones or a new guitar tuner. Where would you start your search? Google, right?
Not so fast. According to a 2016 survey of 2,000 consumers, 55% of people actually skip Google altogether and start their online shopping searches directly on Amazon. Google still remains the top search tool for B2B purchases and services, but Amazon is steadily overtaking them in the B2C market.
Need help getting started with inbound ads on Amazon, Google, LinkedIn, or Facebook? Book a free meeting with The Center for Inbound Advertising here.
So what does this mean for you, the advertiser?
When you’re thinking about your online advertising strategy, you want to meet your consumers where they are. And if you’re a B2C company, that place is — more likely than not — Amazon.
Google and Facebook still command the biggest slice of the pie in the online ad market, generating respective revenues of $80 billion and $27 billion in 2016. But the two tech giants only control around 20% of the market, leaving plenty of room for a new player (say, Amazon) to emerge.
Experts estimated that Amazon earned around $1 billion from ads in 2016, but some say that number will surpass $2.5 billion in 2017. They’re on the fast track for exponential growth in the coming years, but since they’re still not officially a major player in the online ad business, there’s an incredible opportunity for advertisers to get in early and score better ad positions at a lower cost than more established properties like Google AdWords.
Who can benefit the most?
If you are an e-commerce company, advertising on Amazon is something you should definitely explore. B2B companies, consulting firms, lawyers, others will still see better ad returns on more established properties like Google, LinkedIn, and Facebook at the moment.
Getting Started With Amazon Ads
Amazon has several advertising programs to chose from, but the best one to get started with is Amazon Sponsored Products. The Sponsored Product ads are really just image ads — similar to display ads in Google Adwords — but the cool thing is that they appear in search results on Amazon right next to the searched products. So when I do a search for “guitar tuners” in Amazon I get this:
The only visible difference between the sponsored and the non-sponsored results is the gray “Sponsored” tag that appears above the product title. You’ll also see sponsored products can appear in the sidebar.
The same search in Google yields this:
The process for Amazon Sponsored Products is very similar to advertising on Google AdWords: you select keywords, and your ad will show up when someone searches for them. Like AdWords, you pay only for the clicks you receive on your ad.
And when someone clicks on your Sponsored Product Ad, they’re sent to your landing page, which would typically be your Amazon product detail page. You could also send them outside to a page on your website if you choose.
You Might See Better Results on Amazon vs. Google AdWords
A major difference between Google AdWords and Amazon ads is where people current sit in the purchasing process when they search on each platform.
People searching on Google are more likely to be at the beginning of the buyer’s journey, i.e., they just began their search and or are currently just browsing for solutions/products. But when someone begins their search on Amazon, that person is usually more prepared to make a purchasing descision.
Building Your Amazon Ad
Amazon provides a complete introduction to getting started you can see that here.
But just to highlight the process:
- You will need to have an active seller account on Amazon.
- You need to have active product listings in at least one of Amazon’s product categories.
- You need to have Buy Box.
The Buy Box is the box on a Amazon product detail page where customers can begin the purchasing process by adding items to their shopping carts.
Some Nuts and Bolts: Keywords, Ad groups, and Bidding
Just like Google AdWords, Amazon sponsored products uses keywords to trigger your ads. You can choose automatic targeting — letting Amazon choose your keywords for you (this is the right choice for new advertisers), or you can choose manual targeting — where you choose your own keywords (a good choice after you have accumulated some data from a running campaign).
There are three types of keyword matching: broad, phrase, exact.
Ad groups are used to group SKUs together for automatic or manual targeting.
Reporting in Amazon Ads
Amazon will also provide advertisers with data about searches for particular keywords. Similar to Google AdWords, you have to be an advertiser to get access to this informative data. The data includes which search terms are working and performing the best, enabling you to add new keywords and refine the performance of your campaigns.
For each keyword, the search terms report will include data on:
- Campaign
- Ad group
- Impressions
- Clicks
- Click thru rate
- Cost per click
- Conversions/number of orders placed
- SKU for the sale
- And more
The Dollars Make Sense
While Google and Facebook (and even LinkedIn) dominate the marketplace in online advertising, that dominance comes with a corresponding higher cost-per-click. According to content26.com, “the average CPCs on Amazon Marketing Services was about 38% lower than Google Adwords”.
Why is this? Google AdWords has been around for over 15 years, and originally cost-per-click was not very high. But with increased visibility and popularity of the platform, CPC rates have continued to rise along with the number of advertisers. This means more and more advertisers are competing for the same amount of space.
Amazon is just getting into the game, having only been around advertising-wise for about five years. The number of advertisers seeking space on the platform is much lower than Google, which means less competition. In addition, the advertising on Amazon is only focused on products, which means less competition from related services like you see regularly on Google AdWords.
All of this implies a lower cost-per-click for advertisers of products on Amazon.
Plus, while Amazon uses past performance and sales on Amazon to determine positioning, sponsored content on Amazon can turbocharge newer and smaller companies and get them more consumer attention. You can use sponsored content to help push your listing to the top of the search results.
Get In Early
If you have a product to sell, now is the time to consider using Amazon sponsored products ads. You can get in relatively early, at a lower cost-per-click, and have a chance to promote new products at the top of an Amazon search. It’s still very early days for Amazon advertising — this creates a big opportunity.
For more information about inbound advertising on Amazon or any of the other platforms – AdWords, LinkedIn, or Facebook you can arrange a meeting with me here — there is no charge for these meetings.
Which Social Media Network Makes Us Feel the Worst? [New Data]
I cannot tell you the number of times I’ve deactivated Facebook, re-joined, and deactivated again, only to repeat the process.
It began last fall, where much of social media was full of contention and — as it was later revealed — dripping with promoted political content with links to Russia.
Everyone was digitally screaming at each other, loathing and lamenting until, come November, I thought to myself, “Enough already. I’m outta here.”
Sound familiar to anyone?
If so, you’re not alone, and you certainly aren’t limited to being joined by experience. After running a consumer survey in Australia, the UK, and the U.S., we discovered that out of six social networks — Facebook, Twitter, LinkedIn, Snapchat, Instagram, and YouTube — 43% percent of respondents said that Facebook makes them feel the worst.
So, why is this happening — besides the personal reasons listed above? And for marketers who rely on Facebook to maintain and build an audience, what are you supposed to do with this information?
Hey. We’ve got you. Let’s take a look at some of our additional data, and see what you can do from here.
Facebook Makes Us Feel the Worst: What That Means and What to Do About It
The Data
So, we hate to break it to you, but while Facebook might make us feel worse than other social media networks, it seems like these digital communities are making us generally unhappy.
On average, about a third of respondents say that they “feel awful,” or close to it, after visiting social media sites — remember, this is across the board, not just Facebook. While that may not seem like too much more than the average 12% who say they “feel great,” it’s still not exactly an encouraging number.
After all, our optimism dictates that these networks weren’t created to divide, even if that’s how some groups have leveraged them within the past two years. Rather, they were created to keep friends and family connected, and eventually evolved as platforms to promote shareable content.
But as these networks have evolved, so has the content distributed on it — 62% of U.S. adults consume news primarily through social media, 66% of whom do so via Facebook. So, is that what’s making us miserable? If I’m being honest, it would appear that bad news has been taking the lead lately.
That could be why, when we asked respondents which type of content stands out most to them on Facebook, the primary response was “posts from friends and family.” Whether that content makes them feel good or bad isn’t clear — but I imagine that, among the noise and ads (which an average of 45% of respondents say they “really dislike”), content from familiar faces might be welcome for consumption.
What to Do With This Information
I know — this data is kind of a downer. After all, if people start to stray from Facebook because it makes them so unhappy, then it might not be of much use to your brand.
But it’s not all bad news, if you’ll excuse the pun. People are still using Facebook — after all, just look at this user data:
In a way, our findings create an opportunity for marketers on Facebook. You can modify your brand’s presence to stand out among the content that could be making users unhappy, and instead, draws them to your page and makes them want to share your content. And no, that doesn’t mean you have to shift your Facebook strategy to dog videos and riddles — although, if someone could get on that, I certainly wouldn’t mind having a look.
However, it does mean that you can revisit the idea of what drew your audience to your brand in the first place. You can build upon the more positive elements of the answer to that question to provide content that stands out among the more negative noise.
But what does that content look like? Here are three key characteristics to start with.
1) Relevant
While it’s tempting, you don’t have to pretend that bad things don’t happen and that unhappiness doesn’t exist. However, you can address it on your Facebook Page in a way that emphasizes and encourages optimism.
Do you have employees who are volunteering to help with hurricane relief efforts? Are you donating a portion of your proceeds to an organization that does so? You can draw attention to those things without bragging about them by emphasizing a sense of solidarity. After all, there’s a reason why these Pages and networks are sometimes called “communities”: They’re groups of users that share a common interest.
2) Helpful
That said, you still have to maintain relevance to your brand and the product or service it provides, as well as the world-at-large. One of the primary tenets of inbound marketing is to create content that is both aligned with your product or service, and answers the questions that your audience is likely to have. Don’t abandon that. Rather, continue to establish yourself as an authentic, helpful Page that, despite all of the other less-than-awesome stuff that appears on Facebook, stands out as an oasis with resources that serve and assist.
3) Familiar
Remember those data points about content from friends and family standing out the most? In a way, that goes back to the idea of your Page serving as a community of people with a shared interest. Again, what drew this audience to your brand in the first place? How do they feel when they see your name or your other creative assets? You may need to ask these questions of your users to truly know how you’re perceived, but in these troubled times, it can pay to maintain consistency and stability in the type of content you distribute, and the way you do so. Keep that in mind as you create the copy that you share with Facebook posts, like videos or images.
And, if all else fails, don’t be afraid to check in with your audience. Try something like, “It’s Friday! How’s everyone doing?” It’s neutral, friendly, and conveys that you care.
So, how does everyone feel now? Tinker around with these ideas and see how they go.
Oh, and about those dog videos …
Did Samsung Just One-Up Apple on Its Cool Factor?
Let’s cut right to the chase: At this week’s Samsung Developer Conference, the event’s namesake announced a bunch of really cool new stuff.
And we’ll get to it — I promise.
But before we do, I want to point out what really resonated with me — perhaps even more than all of the neat new products and features: the emerging topics and trends.
These are things that many of we marketers, in our day-to-day work and responsibilities, don’t give much thought to. Things like, say, a virtual-assistant-equipped refrigerator, or the latest and greatest software development kits (SDK).
But it’s time that we do. Think about some of the pieces of technology or up-and-coming topics that, maybe five years ago, we thought had nothing to do with us. Those of us who ignored them quickly fell behind the curve. And so, over the next few weeks, I’ll be dissecting the following topics and breaking down why they’re important for marketers to keep an eye on.”
So let’s stay ahead of it. In addition to the below summary of everything that was announced at the Samsung Developer Conference, over the next few weeks, I’ll be dissecting the related topics — breaking down why they’re important for marketers to keep an eye on.
Here Are the Samsung Announcements You Missed
1) Bixby
To put Bixby in context, some describe it as Samsung’s version of Siri, Alexa, or Google Assistant. It is, in fewer words, Samsung’s own virtual assistant, and it’s becoming increasingly built into a range of the brand’s products to create what it calls an “intelligent ecosystem.”
Bixby isn’t exactly new — but Bixby 2.0, which took center stage at the opening keynote and subsequent breakout sessions, is. One of the biggest differentiators for 2.0, said Vice President and Service Intelligence Team Leader Brad Park, is that it’s open, which essentially means that its code is available to developers to use, modify, and redistribute by way of something original that they use it to build. That availability will begin with a private beta program and become available to the general public in 2018.
The process, he said, was to “make everything voice-first … and then, see what the user wants.” That’s important — remember, this event is first and foremost designed for developers. Within the context of that remark from Park, that’s why w the open source nature of the Bixby SDK is so important. By making it open, developers will be able to personalize the technology in a way that helps determine how users actually want to, well, use it.
And as marketers, that’s where we potentially play a vital role. It’s our job, in large part, to understand and reach the end user — and now, we have a greater opportunity than ever to partner with developers to reach these users in an innovative way.
The other main emphasis, however, was on Bixby’s availability across a number of devices — like Samsung Smart TVs and the Family Hub refrigerator — which is where the ecosystem comes into play. That’s where another key differentiator of Bixby 2.0 — the aforementioned “voice search” approach, which gives it better natural language capabilities that can help it distinguish between users.
That was one of the biggest early issues that users took with Alexa, for example, illustrating the growing influence of a demand for personalization. But it goes beyond voice recognition — Bixby uses machine learning, too, to anticipate what individual end users will ask it to do.
2) The Internet of Things
First, a brief vocabulary lesson. The Internet of Things (IoT) is the technology that uses internet connectivity to allow in-home devices and appliances — like your lights, security system, or refrigerator — to be controlled remotely by devices like our phones. In other words, it’s the thing that allows you to turn your lights on or off from your phone when you’re out of town.
Okay, back to that “intelligent ecosystem” and where Bixby plays a role within it. Previously, Samsung had a handful of fragmented IoT platforms: SmartThings (a suite of products that would help “smartify” the otherwise disconnected or “dumb” things in your home), Samsung Connect (the automation system that allowed users to actually execute the smart technology), and ARTIK (the platform that connects and adds security to all of the pieces of a user’s IoT experience).
But during the opening keynote, Samsung announced the cohesive SmartThings Cloud, which brings all of the above under a single hub that allows all of these previously fragmented IoT pieces under one, central “touchpoint.”
Here, again, is where the ability for Bixby to be broadly applied and personalized becomes crucial. Within the announcements pertaining to these new IoT initiatives came the unveiling of Project Ambience: a noticeably small dongle that can be plugged into home objects and devices — like an everyday speaker, for example — and turn them into “smart,” connected devices that are equipped with the Bixby experience.
So, why does that matter to you? Think about it: as the technology to turn anything into our homes into something that’s “smart” and connected, not only will it become increasingly easier for users to request and receive information, but the demand for quick solutions will also continue to grow. We’ll get into the specifics of how marketers can leverage these developments in future posts, but for now, it’s certainly an area to watch.
3) An AR Partnership With Google
If you read the previous section and thought, “Sounds like Samsung might be trying to play on Google’s playing field,” you’re not alone. I had the same thought — and then came the announcement of a partnership.
Surprisingly, there weren’t any explicit product announcements about virtual reality, which came as a personal surprise given the heavy presence of the Samsung Gear at last week’s Oculus Connect event. But to continue its progress within VR, Samsung implied, it has to also focus on building an augmented reality (AR) presence.
And that makes sense. Throughout last week’s Oculus Connect keynote, for example, numerous speakers spoke to the importance of making VR accessible, but failed to identify the tangible and incremental steps they would take to make it so. AR, which will be available on a significant number of recent phone models from a variety of manufacturers, is something of a gateway to VR, particularly when it comes to an untethered (not requiring connection to a larger piece of hardware) experience.
Now, Samsung has partnered with Google for yet another open source initiative. Developers will have access to Google’s ARCore SDK to create AR experiences that will be available on such Samsung devices as the Samsung Galaxy S8, Galaxy S8+, and Galaxy Note8.
Pardon the pun, but this move seems, well, smart. It could be interpreted as a response to Apple’s ARKIT, which provides developers with open source code to create AR experiences for Apple devices — namely, the iPhone and iPad.
Here’s another opportunity for marketers to leverage this information availability to create immersive experiences for their audiences. Not ready to build a full-blown VR experience? Start with AR. It will likely be available to a larger pool of users (after all, they can access it right from their mobile devices), and allows them to integrate your product or service into their respective environments, just by downloading an app.
I mean … I’m excited. As both a marketer and a journalist, these developments are huge. And if you take advantage of them now, I might even consider you a trailblazer — and your peers likely will, too.
But there’s still about half a day left of the Samsung Developer Conference, so feel free to follow along with all of the cool stuff I’m learning about here on Twitter, or let me know if you have a question about it.
How to Understand Facebook Insights for Social Video
Hi. I’m Nick, and I’m new to the HubSpot Marketing Blog. But I’m not new to HubSpot.
I’ve been working at HubSpot for over a year now, and in that time, I’ve created more than 50 videos for HubSpot’s Facebook page.
And over the last year, we’ve grown our organic Facebook video views by nearly 250%. We used a lot of different content creation strategies to change our approach to Facebook videos, and knowing specifically what to track — and why — was a critical part of measuring our success and growth.
Enter Facebook Videos Insights: Facebook’s metrics panel that tells you anything and everything you’d want to know about how your videos are performing on the platform. In this post, I’ll take you through why you should be creating videos for Facebook (if you aren’t already), what the different metrics mean in Facebook Insights, and which five metrics are the most important to measure.
Why Use Facebook to Create Videos?
1) Bigger Audience
At more than two billion users, Facebook is used by almost one-third of the world’s population. That kind of audience isn’t anything to sneeze at, and you should take advantage by publishing video content on the platform.
What’s more, Facebook users spend more than 100 million hours per day watching videos on the platform — almost as much as Netflix. Facebook has a huge audience that’s engaged in video content consumption — so why wouldn’t you post videos on the platform?
2) The News Feed Algorithm
The algorithm that dictates what content is served up in users’ News Feed heavily favors video content — especially if it’s produced live, or if a lot of users are engaging with it (more on that later). Videos on Facebook are more likely to get surfaced to users unfamiliar with your content — thereby growing your audience and leading to more video views.
3) It’s Easy … ish
It’s easier than ever to create and publish video content on Facebook. You can start broadcasting using Facebook Live with the press of a button, and you can even record high-quality videos with a smartphone. With numerous free editing software options and a video camera in your pocket, there’s no reason to wait to start filming for Facebook.
11 Key Facebook Video Metrics to Understand
To access these metrics, navigate to the “Insights” tab on the Facebook Page you manage.
From this tab, scroll down to the “Videos” section on the left-hand side, and click on the video post you want to analyze.
1) Video Views
“Video views” represents the number of users who watched your video for three seconds (or more).
2) 10-Second Views
This metric is the number of users who watched your video for 10 seconds (or more). This number is typically smaller than the number of three-second video views, but ideally, the number is close — indicating that users started watching your video and stayed for at least seven more seconds to keep watching.
3) Minutes Viewed
“Minutes viewed” is the total amount of time users have spent watching your video (in aggregate).
4) Video Average Watch Time
This metric is the average amount of time each user spent watching your video. It’s calculated by dividing the total minutes viewed of your video by the number of video views.
5) Average Percent Watched
“Average percent watched” represents what percentage of your video the average user watched.
6) Audience Retention
“Audience retention” represents how well you’re able to maintain your video’s audience by visualizing where during your video viewers dropped off.
7) Reach
“Reach” represents how many users saw your video somewhere on Facebook — in other words, how many users your video reached.
8) View Rate
Your video’s view rate isn’t a metric provided by Facebook, but it’s a good number to calculate on your own. Divide the number of video views your video earned by the total reach. That will indicate how many users actually decided to watch your video, out of the number of users who saw it.
9) Volume On
This metric indicates how many users viewed your video with the volume turned on or muted. This number is particularly valuable because, as recently as last year, 85% of Facebook users watched videos without sound.
Last month, Facebook began auto-playing News Feed videos with sound, so we’ll be interested to see how this percentage evolves. Here at HubSpot, we’ve started creating videos that are volume-agnostic, or indicating with captions and graphics that the user should turn on the volume to get the full effect of the content.
10) Reactions, Comments & Shares
This engagement metric includes likes, reactions (like anger, sadness, and laughter), comments, and shares of your video. These are indicators that your video is resonating with — or at least provoking — your audience, and this engagement helps your video rank higher in the Facebook News Feed algorithm.
11) Clicks
Clicks to Play
The “clicks to play” metric indicates the number of users who clicked on your video to watch it.
Link Clicks
The “link clicks” metric indicates the number of users who clicked on the link in your Facebook video post.
The Best Facebook Insights to Measure
1) Reach
It doesn’t matter how many followers you have if they aren’t seeing your posts. And since Facebook switched to an algorithm-based News Feed, reach has become more important than ever.
Since Facebook started down-rating posts from brands and publishers in the News Feed, make sure you’re optimizing your organic reach by posting on Facebook no more than three times per day.
2) 10-Second Views
This metric is more meaningful than three-second views because a user could be scrolling, and not even really be watching. In fact, Facebook had a controversy with that earlier this year, when they were found to be inflating video view numbers using this metric.
3) View Rate
This metric represents how many people are watching your video relative to your total reach, and it tells you how relevant or catchy your topic is — or if it’s not resonating with your audience.
4) Shares
This is the ultimate engagement metric, and it’s another measure of relevancy. As a bonus, shares earn you more organic reach when you get free exposure to users’ friend circles.
5) Average Watch Time
This metric tells you how engaging your video is. What’s more, Facebook cares about this metric and provides greater organic reach for more engaging videos in the News Feed.
So, there you have it. Make sure you’re focused on the right metrics — and not just vanity metrics — when you publish your next video on Facebook so you can keep iterating on what works to better engage with your audience.
18 Fun Corporate Team-Building Activities & Outing Ideas Everyone Will Enjoy
Starting to notice some droopy shoulders around the office? Sounds like it’s time to plan a team outing.
Team outings are a great way to facilitate bonding with your team members, reduce employee stress, and give them the chance to get to know one another outside of the office.
And, you know, they’re really fun.
But how do you find ideas for a great team outing? Maybe you start with a Google search for “team outing ideas” and stumble upon an article that suggests “field trips” and “professional development activities.” Sounds like a starting point, but where’s the real excitement?
Next time you plan an outing for your team, cut the trust falls and get one of these ideas on the calendar instead.
Corporate Team-Building Activities, Games, and Exercises for Work
1) Scavenger Hunt
Find a beautiful day, break everyone out into groups, and have a scavenger hunt around the city. You can organize one yourself, or use an app like Stray Boots. Your team will feel nice and rejuvenated after some fresh air and fun challenges. Be sure to take plenty of silly pictures — you can even have a slideshow when everyone regroups at the end.
2) Cook-Off
Here’s a culinary team-building activity that could end in dessert or disaster — in a fun way. Creating new dishes together requires creativity and will require everyone to put their team and leadership skills into action. Divide your team into smaller teams, pick a food category, and challenge each team to whip up something delicious. The category could be anything from ice cream, to salsa, to pizza.
One fun twist you could add? Pick a single ingredient that all teams must use, like maple syrup or Oreos. Or, have each team get creative with the shape of its food — you can make pizzas into almost any shape.
Source: Teambonding.com
3) Improv Workshop
Comedy and improv events are fun, interactive experiences that’ll have your employees roaring with laughter while teaching them useful communication and soft skills, like focus and trust. Depending on your budget, you could do anything from simply playing improv games with your employees to bringing in professionals to run competitive, fast-paced activities.
Source: Al-Jazeera
4) Board Game Tournament
Here’s one way to spark your team members’ competitive sides without having to leave the office. Organize a team-wide board game tournament. Especially if your team is pretty big, it might be easiest to pick a single game, then have people sign up for specific time slots when they’re free to leave their desks and spend some time playing the game. Some great games with reasonable play times include Boggle, Jenga, or even games using good ol’ playing cards. Don’t forget to incentivize with prizes for first, second, and third place.
Source: Glassdoor
5) Professional Development Workshop
Want to encourage your employees to bond while providing them with an opportunity to learn and further their career? Offer a shared learning experience either at your office, or at an off-site workshop or conference. The activity could be specifically related to your employees’ jobs, or it could be something broader, like a negotiation or leadership skills workshop.
Company Outing Ideas
6) Volunteer
Giving time to support a good cause isn’t just good for the soul; it’s also a great way for your team members to bond. Place-based volunteering ideas include things like volunteering at a local soup kitchen, helping build a Habitat for Humanity house, or delivering gifts to children’s hospitals during the holidays. Skill-based volunteering is a cool way to stretch your employees’ expertise: It’s when your team volunteers its time and uses its professional skills — anything from marketing to app development to writing — to help a nonprofit.
Try VolunteerMatch.org for either type of volunteering opportunities, and Catchafire.org for skill-based volunteering opportunities.
Source: VolunteerSpot
7) Mystery Dinner
Mystery dinners are one of the most beloved traditions here at HubSpot. On a single night, you send a group of folks from different teams within your company to dinner somewhere in your city (or at someone’s house). The dinner is hosted by one of your company’s leaders and paid for by the company. These dinners allow random groups of people from the same company to spend an evening chock full of good food and conversation together.
What makes them a mystery dinner? The only thing participants should know about the dinner ahead of time is the date and time. Then, on the afternoon the dinner is supposed to take place, send each group an email with the name of the restaurant they’re going to and who they’ll be going with, so they can arrange transportation together.
Optional: Give every dinner host the name of a restaurant or bar to invite everyone to congregate at once the dinners are over.
8) Room Escape Games
Here’s a great bonding activity that requires leadership skills, teamwork, logic, and patience. Room escape games — Escape the Room, Puzzle Break, AdventureRooms, etc. — have become a wildly popular team-building exercise for groups around the globe.
Here’s how it works: A group of people gets “locked” in a room for one hour. During that one hour, they have to find hidden objects, solve puzzles, and figure out clues to locate the key that will set them free. And it’s not easy: Only 20% of players actually make it out before the hour is up.
Source: Escape the Room St. Louis
9) Kayaking/Canoeing
Nothing says “let’s work together” quite like trying not to end up in the water. Want to take advantage of the outdoors? Grab a paddle and head down to the closest river for a great spring or summer outing.
Many public rivers and ponds have boat houses where you can rent kayaks and canoes — and you can encourage folks to rent multi-person ones and pair up with people they don’t usually work with.
10) Trampoline Parks
Hey, who says trampolines are just for kids? Take your team to a trampoline park for some jumping fun and a chance to work off the day’s stress. Many cities have local places with trampoline activities — if you’re in the Boston area, check out Skyzone for trampoline dodgeball and basketball games.
Source: Mustbeart
11) Karaoke Night
What better way to get your employees to break out of their shells than to have them get up and sing some karaoke? You can even have a contest for best group karaoke performance. Bonus points if there are feather boas and cowboy hats involved. This works best for a more extroverted group, so if your team isn’t into strutting their stuff on stage, consider an idea on this list that caters more toward those personalities.
Source: derekgavey
12) Something Touristy
Embrace your city! Pick a hot tourist destination and go as a team. You can even do a Segway tour. (Fanny packs: optional.) It’ll be fun to laugh at how silly it feels to be a tourist in your own city, and you might even learn something new.
Source: Wikimedia
13) Kart Racing
Nothing like a little competition to bond a group together. An adrenaline-pumping event like kart racing is a great way to get employees to interact with one another in a totally new and fun way. Just make sure everyone pays attention during the safety lecture.
14) Laser Tag
Another great way to get your adrenaline pumping? A good old game of laser tag. Not only is it great fun, it’s also an opportunity for employees to exercise their strategy and logic skills, as well as teamwork skills. Bonus: Determine teams ahead of time and have people dress up.
15) Painting Class
If you’re looking for a slightly more relaxing activity, take a group painting class. Paint Nite hosts painting classes by local artists at various bars throughout major cities for painting on canvases, wine glasses (like in the picture below), and so on. It’s a great way to let your team members unwind, catch up over some drinks, and express their creativity.
16) Cooking Class
In the mood for something a little more… culinary? Change up the usual outing to a bar or your local restaurant, and try a cooking class. Through a service such as Kitchensurfing, you can hire a professional chef to come cook a fancy meal for you in your home or office kitchen. Between the multiple courses prepared before your eyes, your team will have plenty of time to strike up a conversation and enjoy the delicious aromas.
17) Explore a New Place
Few things more fun than getting out of the city and exploring for a day. So, why not do it with your team?
For bigger events — maybe on a quarterly basis, when you have more budget to use for outings — charter a bus and take your team to a new place. You can all take a historical tour of the new place, grab lunch at a restaurant serving the town’s finest, or take in a local attraction together.
18) Sports Game
Round up the team and head out to a sports game. What a fantastic way to rev up team spirit while combining both competition and camaraderie.
Source: Wikimedia
Now you’re ready to show your team a great time while increasing their happiness and creating a great company culture. And hey, you might just be the “cool boss” now. How cool would that be?
A Beginner’s Guide to SSL: What It Is & Why It Makes Your Website More Secure
Have you ever noticed that some URLs start with “http://” while others start with “https://”? Perhaps you noticed that extra “s” when you were browsing websites that require giving over sensitive information, like when you were paying bills online.
But where’d that extra “s” come from, and what does it mean?
To put it simply, the extra “s” means your connection to that website is secure and encrypted any data you enter is safely shared with that website. The technology that powers that little “s” is called SSL, which stands for Secure Sockets Layer.
In this post, I’m going to break down what SSL is, an updated version of Google Chrome that will soon flag websites which are not secure, and how you can evaluate and get SSL.
What is SSL?
First, let’s start with a definition from SSL.com:
SSL is the standard security technology for establishing an encrypted link between a web server and a browser. This link ensures that all data passed between the web server and browser remain private.”
Let’s break that down.
When you land on a website page that has a form, after that form is filled-in and you hit ‘submit’, the information you just entered can be intercepted by a hacker on an unsecure website.
This information could be anything from details on a bank transaction, to high-level information you enter to register for an offer. In hacker lingo, this “interception” is often referred to as a “man-in-the-middle attack.” The actual attack can happen in a number of ways, but one of the most common is this: A hacker places a small, undetected listening program on the server hosting a website. That program waits in the background until a visitor starts typing information on the website, and it will activate to start capturing the information and then send it back to the hacker. Scary stuff that is no longer just is sci-fi movies.
But when you visit a website that’s encrypted with SSL, your browser will form a connection with the webserver, look at the SSL certificate, and then bind together your browser and the server. This binding connection is secure so that no one besides you and the website you’re submitting the information to can see or access what you type into your browser.
This connection happens instantly, and in fact many suggest is now faster than connecting to an unsecure website. You simply have to visit a website with SSL, and voila: Your connection will automatically be secured.
Everything You Need to Know About Chrome 62 and SSL
Google is getting ready to release a new version of their popular Chrome browser, version 62, which will begin to indicate that a page is not secure if it contains a form, but does not have SSL-enabled. Chrome has approximately 47% browser market share, so when this update is rolled-out a significant number of websites will be affected almost immediately.
According to recent HubSpot Research, up to 85% of people will not continue browsing if a site is not secure. In January 2017, Google rolled out a similar update that only applied to sites collecting sensative information such as passwords or credit card numbers. With that in mind, users are now familiar with seeing this “not secure” warning, and per the research below will often leave a site because of it.
If you utilize incognito mode in your browser, Chrome will always indicate a page is not secure if it does not have a valid-SSL certificate installed. If you use Chrome outside of incognito mode then this “not secure” warning will only display when starting to enter information into a form.
Image credit: 9to5Google
This means that wherever you host content that contains a form, even if it’s just asking for an email address, you should enable SSL. Keep in mind that if you have content hosted in different platforms, it will be important to talk to each of them and ensure SSL is setup before this Google Chrome update is live. In reality, if it’s not cost prohibitive for you, it’s best to enable SSL across your entire website regardless if a form exists on the page because it can have SEO benefits that we’ll cover in the next section.
Is SSL good for SEO?
Yes. While the primary purpose of SSL is securing information between the visitor and your website, there are benefits for SEO as well. According to Google Webmaster Trends Analysts Zineb Ait Bahajji, SSL is now part of Google’s search ranking algorithm:
Over the past few months we’ve been running tests taking into account whether sites use secure, encrypted connections as a signal in our search ranking algorithms. We’ve seen positive results, so we’re starting to use HTTPS as a ranking signal.”
In addition, Google has publicly stated that two websites which are otherwise equal in search results, if one has SSL enabled it may receive a slightly rank boost to outweigh the other. As a result, there is a clear SEO benefit to enabling-SSL on your website, and across all your content.
How can I tell if my website has SSL?
When you visit a website with SSL, there are a few distinct differences that display within the browser.
Check your site for SSL with our free tool.
1) The URL says “https://” and not “http://”.
It looks like this:

2) You’ll see a little padlock icon in the URL bar.
It’ll show up either on the left- or right-hand side of the URL bar, depending on your browser. You can click on the padlock to read more information about the website and the company that provided the certificate.
3) The certificate is valid.
Even if a website has the “https://” and a padlock, the certificate could still be expired — meaning your connection wouldn’t be secure. In most cases, a site that displays as https will be secure, but if you encounter a site that asks for a lot of personal information it may be worth double-checking to be sure the certificate is valid.
To find out whether the certificate is valid in Chrome, go to view > Developer Tools. From there you will need to navigate to the security tab and you can see if the SSL certificate is valid, or expired. If you click the “View certificate” button you will be able to see more information about the SSL certificate and the specific date it’s valid through.
How can I get an SSL certificate for my website?
The first step is to determine what type of certificate you need. For example, if host content in multiple platforms (on separate domains/subdomains) it may mean that you need different SSL certificates.
For most, a standard SSL certificate will cover your content, but for companies in a regulated industry — such as finance, and insurance — it may be worth talking with I.T. because there are specific requirements within your industry that specify the type of SSL certificate you need.
The cost of SSL certificates vary, but you can get a free certificate or pay a few hundred dollars per month to obtain a custom certificate. On the free side — Let’s Encrypt offers certificates at no cost but I would strongly recommend that you have someone knowledgable about the DNS and technical setup of your website to help with this. These certificates will also expire every 90-days, so you’ll need to make sure they stay up to date.
Many other domain providers will sell SSL certificates that generally range from $50 to obtain a certificate for one domain, up to a few hundred dollars for multiple-domains. This process will be easier than using Let’s Encrypt, but does have a cost associated with the certificate.
(HubSpot customers: If you’re hosting content on HubSpot, SSL is available for free within this promotion. To find out more, contact your Customer Success Manager, or visit our SSL page.)
One of the other key considerations is the validity period of a certification. Most standard SSL certificates that you purchase are available for one to two years by default, but if you’re looking for longer-term options, then look into more advanced certificates that offer longer time periods.
WordPress Plugins To Help Install SSL
If you utilize WordPress to host your content and website, depending on your domain provider, you may need to obtain an SSL certificate and then install it. Here are a few plugins that can help you:
- Really Simple SSL. Purchasing your SSL certificate is just the first step. This plugin helps you install it across your all your WordPress content. There are premium versions available to help you install it across sites, and verify there are no warnings on your website. Premium versions run from $20 up to $145 for a full-service configuration and optimization of SSL.
- Insecure Content Fixer. Once you have an SSL certificate and it’s installed, your not quite done yet. If your website is built with any hard-coded references to “http”, such as an image file, then it will show a warning when trying to load that securely. This plugin can help you find and fix anything coded that way so your site displays properly, and securely for visitors.
- WP Force SSL. Ok, now that you’re done obtaining SSL, installing it, and fixing any errors, it’s time to make sure all your traffic sees the secure version of your site. This plugin will force all traffic to HTTPS so it only loads securely. I strongly recommend that you check for insecure content (also known as mixed content) before enabling this. Without checking for mixed content first your site may appear with warnings because of those insecure files.
(HubSpot customers: All files hosted within HubSpot File Manager are automatically encrypted with SSL, and in one-checkbox you can force all visitors to utilize the secure version of your site, no plugins required. To find out more, contact your Customer Success Manager, or visit our SSL page.)
10 Easy Ways to Measure the Effectiveness of Your Content [Infographic]
The most effective marketers have their content strategies firing on four cylinders:
- Planning
- Content creation
- Content promotion
- Analytics
The list I just presented is the order in which effective content marketing gets done, but it’s NOT a priority list. Each tactic is vital. And they are dependent upon each other for success.
In other words, three out of four won’t do.
Put it down to fear, or laziness, or lack of knowledge, resources or tools, but number four — analytics — is the most neglected.
Need proof? Just take a look at this …
Last year, Orbit Media’s annual blogger research indicated that less than 32% of bloggers always check their analytics. If that number seems low to you, it’s actually a up a few notches from years prior.
Not good.
Content marketing metrics-phobia? Is that an actual thing?
It must be. But here’s another thing …
You can get over it. Easily. Right now. An advanced degree in statistics is not required. As the infographic below — which I developed with Orbit Media — explains: “Let’s stick the calculators in the desk drawer and look at 10 easy ways to detect if your content is cutting it.”
You’ll find no reasons to fear these simple approaches to analytics. And when you get in the habit of evaluating your content marketing efforts, you’ll also find yourself extracting the insights you need to get perpetually better.
How to Edit Instagram Photos: A Step-by-Step Guide to Using Instagram Filters & More
Have you ever looked through your Instagram feed and wondered how some people make their photos look just so good with just a smartphone and a free app?
Whether I’m looking at mouth-watering photos posted by food brands or adorable photos of cuddly Instagram stars with four legs, I’ve had my share of photo envy.
When it comes to posting on Instagram, photo quality is everything. And if you take great photos and edit them exquisitely, I promise: you will be much closer to amassing the thousands of followers you’re hoping for.
But we have good news for you: Editing photos well on Instagram doesn’t take a whole lot of time, and it doesn’t require you using a fancy camera or software. It’s all about taking great photos and learning which filters work for which types of photos — all within the Instagram app.
In this post, we’ll help you turn unedited photos — like the one on top of a Peruvian desert — into ones that are much more compelling, like the one below:
How To Edit Instagram Photos: A Step-by-Step Guide
1) Start with a great photo.
No amount of editing will fix a photo that wasn’t shot well in the first place. When it comes to posting something awesome on Instagram, it’s all about photo quality — and that starts with a photo that’s great even before you adjust it in the app.
You don’t need to be a photographer to take great photos for Instagram. All you really need is a smartphone and the willingness to learn some key tips for how to use it. Start by reading through these 18 tips for taking great photos with your smartphone. This blog post will teach you how to line up your shots using the rule of thirds, find perspective, and take advantage of symmetry, patterns, and more.
2) Upload your photo to Instagram.
Now that we have a photo we’re ready to work with, it’s time to upload your photo to the Instagram app. To do this, open the Instagram app and click the plus sign at the bottom center of your screen.
From there, select the photo you’d like to edit from your photo album. By default, it’ll go into “All Photos,” but you can click the downward arrow next to “All Photos” at the top of your screen to open a particular album if your photo is located somewhere specific.
Pro Tip: Instagram will crop your photo as a square by default, but if you want to change it to its original width, simply press the “Expand” icon (two outward facing arrows) in the bottom left-hand corner of the photo once you’ve selected it.
Click “Next” to begin editing the photo.
4) Pick a filter.
Here’s where it gets fun. Now that you’re in editing mode in the Instagram app, the first thing you should do is pick a filter. Usually, I click through onto each and every filter, in order, and take note of which ones I like. Then, I’ll go back and forth between the ones I like until I settle on one of them. How’s that for scientific?
While slapping on a filter because it looks good is one way to do it, it is helpful to play around with each filter and get an idea of its specific purpose. From Lark to Crema to Valencia to Nashville, each filter has its own personality and hues that drastically changes the photo — not only how it looks, but how it feels. Take a look at these examples to see what I mean:
Here are a few of my favorite Instagram filters and how they change the look and feel of a photo:
- Lark: A filter that desaturates reds while pulling out the blues and greens in your photos, thereby intensifying it. Great for landscapes.
- Moon: A black-and-white filter with intense shadows that’ll give your photos a vivid, vintage look.
- Crema: A desaturated filter that gives your photos a creamy, vintage look.
- Valencia: A filter that warms the colors of your photo, giving it kind of an antique look without washing out color completely.
- X Pro II: A high contrast filter that makes colors pop and adds vignette edges, giving photos sort of a dramatic effect.
- Lo-Fi: This filter adds high saturation, rich colors, and strong shadows to your photo. Great for photos of food.
- Hefe: This filter adds a vintage look to your photos with a darker border, and the yellow tone makes landscapes appear dramatic and other-worldly.
Everyone has their favorites, so as you use Instagram for marketing more and more, keep experimenting and learning about your own filter preferences for every type of photo you take, whether they’re landscapes, close-ups, portraits, or something else.
Pro Tip: As you begin learning your filter preferences, you can reorder your filters and even hide the ones you don’t use. To do either of these things, scroll to the very far right of your filters options and click “Manage.”
To reorder your filters, simply hold your finger down on the three grey lines on the far right of the filter you’d like to move, and drag it to reorder.
To hide filters you don’t use, deselect them by tapping on the white check mark to the right of the filter.
5) Adjust the lux.
The what? If you’ve ever edited a photo on Instagram, you’ve likely used the lux feature before, even if you weren’t sure what it’s called. It’s a feature that makes your photos more vibrant and brings out the smaller details.
Once you’ve selected a filter, turn lux on by tapping the sun icon above your photo:
Then, use the slider to adjust the lux, which will adjust the contrast and saturation of your photo. I usually slide it up and down until I settle on what looks best. Tap “Done” when you’re finished and it’ll take you back to the filters page.
6) Use the simple editing tools.
Next, open up Instagram’s simple editing tools by tapping the wrench icon below your photo on the right-hand side.
From here, you can adjust a number of settings, including alignment, brightness, contrast, structure, warmth, saturation, highlights, shadows, and sharpness. I usually go through each setting one by one until I’ve adjusted the photo to my liking.
To adjust each of these settings, click on the icon at the bottom of your screen, use the slider to find a “sweet spot,” and then tap “Done” when you’re done. If you adjust the slider and realize you don’t want to make any changes, simply tap “Cancel” and it’ll exit from that setting without saving any changes.
Once you’ve made all the changes in Instagram’s tools that you’d like, click “Next” in the top right-hand corner of your screen.
7) If you’re uploading an album on Instagram, edit each photo individually.
If you’re using Instagram’s handy new feature that allows you to upload up to 10 photos in a single album, make sure to be aware of a quirk that can come up when you start editing your photos.
Say I wanted to post not one, not two, but three photos of my adorable cat. I’d select one to upload to Instagram as usual, and then tap the album icon to select multiple photos at once:
Choose the photos you want to use, then tap “Next:”
You might be tempted to dive in and start picking a filter and editing from the list of filters at the bottom, but wait just a moment — because if you pick a filter from the menu below, you’ll apply it to all of your photos (shown below), and if you’ve learned anything in this blog post, it’s the importance of editing photos individually.
Tap the Venn-diagram icon in the corner of each photo to edit it individually.
From there, you can choose a filter and edit your individual photos using the tools detailed above.
When you’re done with one photo, tap “Done,” and you can choose another photo in your album to edit.
8) Either post your photo immediately, or save it to post later.
At this point, you have two options.
Option 1: Post your photo immediately.
If you’re ready to post your photo now, then go ahead and post it by adding a caption, a geotag, tagging any relevant Instagram users, and clicking “Share.”
Option 2: Save it to post later.
If you’re not ready to post it now, but you wanted to get a head start on editing it so you could post it in a pinch, then you can save the photo with the edits you made in Instagram without posting it — thanks to a little hack.
Ready? To use Instagram as a photo editor without posting anything, all you need to do is publish a picture while your phone is on airplane mode.
First, you’ll have to be sure you have “Save Original Photos” turned on in your settings.
Then, turn on airplane mode. Here’s how to do that:
- To turn on airplane mode on an Android device: Swipe down from the top of the screen. Then, swipe from right to left until you see “Settings,” and then touch it. Touch “Airplane Mode” to turn it on.
- To turn on airplane mode on an iPhone/iPad: Swipe up from the bottom of the screen and click the airplane icon. Or, go to “Settings” and then “Wi-Fi,” and switch “Airplane Mode” on.
Then, go back to your editing screen and press the “Share” button at the bottom. An error message will appear saying the upload failed, but rest assured the photo will be saved automatically to your phone’s photo gallery.
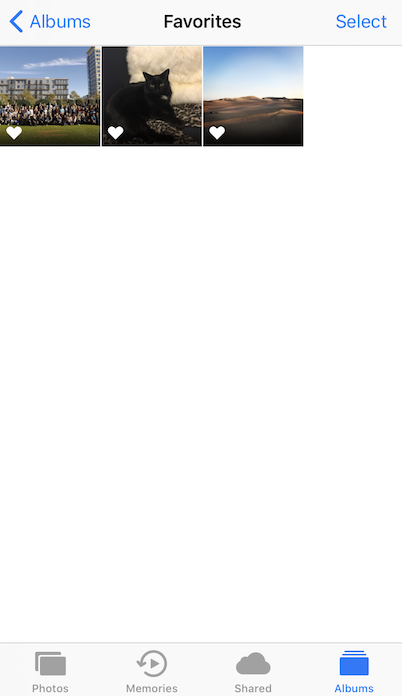
Pro tip: If you want to edit a whole bunch of photos ahead of time so you can upload them later without much effort, one way to organize your edited photos so you can find them easily later is to add them to your “Favorites” folder on your iPhone.
To add photos to “Favorites,” you’ll need to “heart” the photo. Here’s how it works: When you’re scrolling through your photos, tap the heart icon at the bottom of your screen.
The photo will be added to a photo album called “Favorites” in your iPhone’s folders, which you can access easily and at any time. Since Instagram doesn’t let you schedule posts in advance, this is a great place to store edited photos so you can upload them when you need them.
And there you have it! By now, you should be able to edit your Instagram photos on a pretty basic level. For more tips and tricks to take your Instagram game to the next level, check out these 15 hidden hacks and features.