Why CRM and Marketing Automation Need Each Other
Turning prospects into loyal customers is a multi-step process requiring the combined efforts of cross-functional teams. Thankfully, there are different types of technologies available to make the task more organized and easy — like customer relationship management software (CRM) and marketing automation.
But it’s not just about how much easier it makes your job. When the two software work together, it can become a more streamlined process that can potentially convert more prospects into qualified leads quicker and more effectively.
And more businesses are seeing the value in integrating the two. In fact, 52% of marketers prioritize implementing marketing automation platforms that can integrate into other solutions to enhance their marketing efforts.
In this post, we’ll review what marketing automation and CRM software do, and why they need each other to better help your business.

CRM and Marketing Automation
Before we dive into why marketing automation and CRM should be integrated, we need to understand their specific functions.
What is marketing automation software?
Marketing automation software helps marketers promote and streamline content without manual application. This includes automating the distribution of content and reporting analytics derived from how prospects interact with it. It pulls data from when leads visit your website, open an email, fill out a form, or read a blog, and makes the data easily accessible for the business to build its strategy.
Ultimately, the goal is to streamline the process of taking a lead, nurturing them, and moving them to a sales-qualified lead. Essentially, it’s all about lead generation and personalization.
Some of the best marketing automation software include HubSpot, MailChimp, and Marketo.
What is customer relationship management software?
On the other hand, customer relationship management (CRM) is software for sales and service teams to manage their pipeline and lead qualification processes. It historically tracks customer data, including dates and notes of phone conversations, past purchase records, and email interactions as they proceed through the buyer’s journey.
Essentially, with this software, your salesperson can see the full picture of who a prospect is, their history with your company, and their journey to becoming a customer.
Best CRM for Marketing Automation
HubSpot is one of the best choices for CRM marketing automation tools because the HubSpot Marketing Hub includes the foundational CRM functionalities, so you have both software in one.
And for seamless CRM integration, users can manage both their sales and marketing strategies in the HubSpot Marketing Hub and advanced Sales Hub together for more sophisticated features in marketing automation and CRM.
If you’re interested in using HubSpot for your marketing automation needs, but need some guidance on assessing your marketing automation strategy, use our Simple Guide to Smart Automation.
Now that we’ve discussed what each software does and how they can help your team, we can address the big question, “Why do these need to work together?”
CRM and Marketing Automation: Why You Need Both
When marketing automation and CRM software work together, they provide a seamless journey for your customers as they go from visitor to customer. Integrating the two software will give your sales reps the full picture of a prospect’s interaction with your company. Your sales rep will know the marketing history of their prospects.
Let’s go through a tangible example of how the two software can work together.
Example of Marketing Automation and CRM Integration
To start, let’s say a marketer attracts a lead through a blog post, much like this one.
Perhaps they found the content insightful and decided to download a lead magnet and fill out a form. Once that happens, the marketing team starts nurturing the lead through an email marketing campaign.
These actions evolve this reader into a marketing-qualified lead (MQL). After a while of engaging with more content, when the lead requests a demo of the product, they then turn into a sales-qualified lead (SQL). Once this happens, the sales rep who’s responsible for the demo goes to the marketing automation and CRM software to gather information on their interactions with the company.
Sales can then look through what offers the prospect has downloaded, what blogs they’ve read, who they are, and what company they work for and use it in their strategy for the demo call. So now they’re prepared to answer the right questions and personalize the sales call to better connect with the qualified lead and nurture them into a sale.
So we’ve taken the prospect all the way through the funnel, and now they’ve made the purchase. Keep reading to see how CRM and marketing automation contributes to that success.
Benefits of Integrating Your CRM with Marketing Automation
Building off of the progression of the example, the integration of CRM and marketing automation software has the ability to:
Offer Better Visibility to Marketing and Sales Teams
This allows both teams to know where they are in the process and what their next actions should be in the future.
Shorten the Sales Process
Without marketing automation used in conjunction with CRM, it potentially takes a much longer time to source leads. Both software makes the process of taking prospects through the sales funnel with
Provide Consistent Messaging
The marketing and sales professionals that affect the customer’s experience can be aligned when engaging in client-facing communication. It’s not as much of a challenge to provide consistent messaging when you have all the contextual information available in cross-functional software.
Unify Your Data Management
With the software already working together, salespersons don’t have to go out of their way to request customer profile information and instead were readily able to prepare to sell based on unified data management.
Enhance Pipeline Management
Both teams in the process have a process that involves observing and tracking the step-by-step progression of a lead.
Minimize Human Error
If you might have an outdated system or process in place for lead tracking, it’s probably a manual process that comes with human error and prospects slipping through the cracks. You can’t scale a system like that.
Your marketing automation and CRM should be connected so your sales team has the right tools to close a deal.
Combine Your CRM and Marketing Automation Efforts
Integrating these systems should help you understand the gaps and friction points in your marketing and sales process. It can help you discover why leads aren’t moving from MQL to SQL or why prospects aren’t closing. CRM and marketing automation can make your marketing team, sales team, and customers happier by streamlining the marketing and sales process.
Editor’s note: This post was originally published March 2020 and has been updated for comprehensiveness.

The Ultimate Guide to Google Data Studio in 2020
Having the ability to visualize data helps you unlock invaluable insights for better decision-making in your business and gives you a serious advantage when it comes to getting competitive opportunities.
While many tools can help you visualize data, none compare to Google Data Studio, which is entirely free and accessible to all (even if you don’t have any data of your own!). Like most Google tools, Data Studio can be hard to master, but it’s well worth it. Once you’ve gotten comfortable with its features, you can use it to create stunning and informative reports for your clients, coworkers, or leadership team.
This guide will walk you through the most useful Data Studio tools. We’ll start with the basics before moving into the intermediate features. Finally, we’ll go over the advanced options.

1. Log into Data Studio
To log in to Data Studio, you’ll need a Google account — I recommend using the same one as your Analytics, Search Console, and/or Google Ads account.
You’ll land on the Data Studio overview page. Click the “Home” tab to view your dashboard.
2. Explore the Data Studio Dashboard
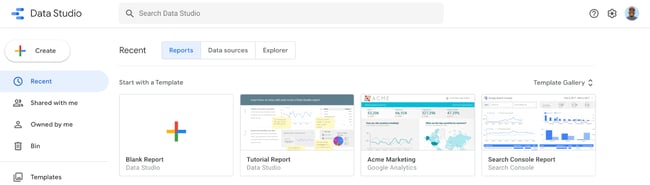 If you’ve used Google Docs, Sheets, or Drive before, this dashboard should look pretty familiar.
Reports
Here’s where you can access all of your reports (equivalent to a workbook in Tableau or Excel).
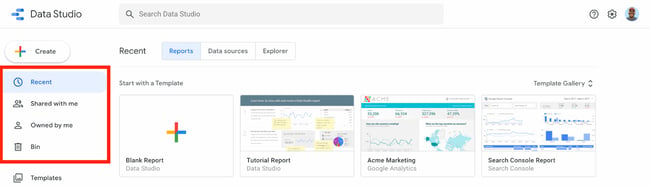
Notice that you can filter by who owns the report:
Data Sources
Data sources list all the connections you’ve created between Data Studio and your original data sources.
Data Studio currently supports 500+ data sources. Below are the most popular sources:
If you’re using Google Analytics and/or Search Console (which I highly recommend), you’ll need to individually connect each view and property, respectively.
So if you have three GA views for three different subdomains, you’ll need to set up three separate data sources.
Explorer
Explorer is an experimental tool that lets you experiment or tweak a chart without modifying your report itself.
For instance, let’s say you’ve created a table in Data Studio that shows the top landing pages by conversion rate. While looking at this table, you think, “Huh, I wonder what I’d find if I added average page load time.”
You don’t want to edit the chart in the report, so you export it into Labs — where you can tweak it to your heart’s content. If you decide the new chart is valuable, it’s easy to export it back into the report. (Jump to the section where I explain how.)
Report Gallery
The report gallery is a collection of templates and examples you can use depending on your business needs.
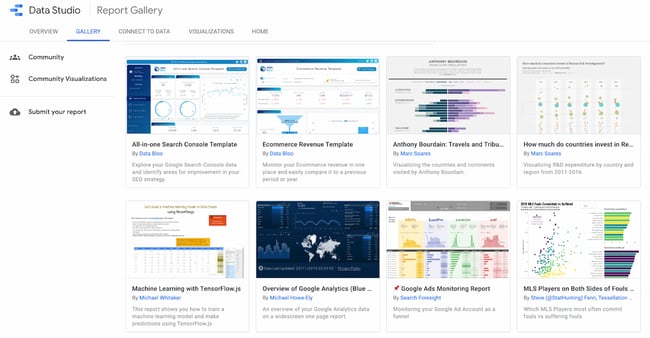
For instance, if you run an ecommerce store, the ecommerce revenue template would be very useful.
Connect to Data
And here’s where you add data sources. (You can also add sources within a report itself.) Let’s add our first source.
How to Connect Data Sources to Google Data Studio
Here’s a step-by-step guide on how to connect data sources to Google Data Studio.
1. Start with Analytics or Search Console.
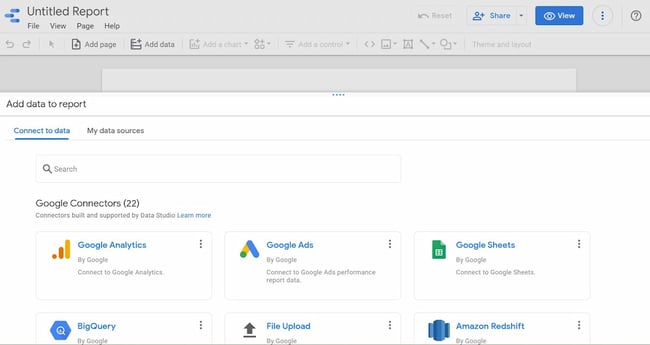
In this example, I’ll connect Analytics — however, the process is nearly identical for other sources.
If you want to follow along exactly with what I’m doing, connect the Google Analytics Demo Account for the Google Merchandise Store.
You’ll be prompted to authorize the connection. Once you’ve done that, you’ll need to select an account, property, and view.
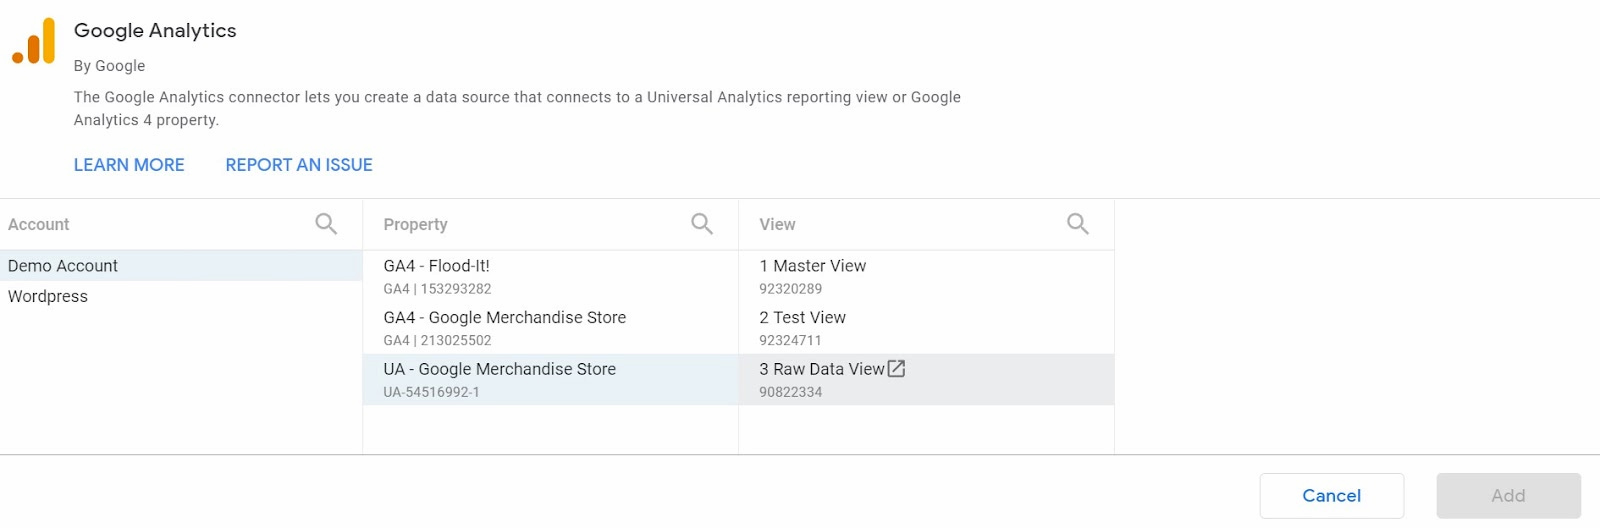
You’ll be presented with something like the view below: a list of every field in your Analytics account (both the standard ones and the ones you’ve added).
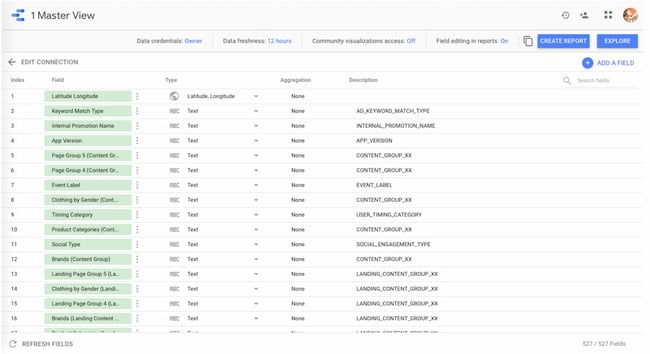
Does this feel overwhelming? Yep, same here.
We could do a lot in this step — add new fields, duplicate existing ones, turn them off, change field values, etc. But, of course, we could also do all those things in the report itself, and it’s much easier there. So let’s do that.
2. Click “Create Report” in the upper right.
Data Studio will ask if you want to add a new data source to the report; yes, you do.
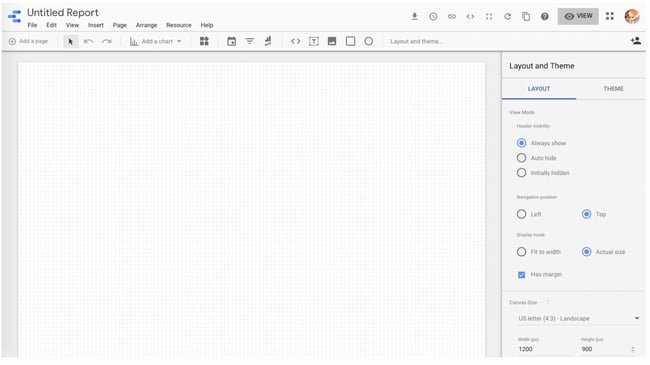 Here’s what you’ll see. It’s pretty spartan, but not for long!
3. Click “Add a chart” in the toolbar.
It’s time to add your very first chart. The good news is that data Studio makes it easy to compare chart types with some handy illustrations.
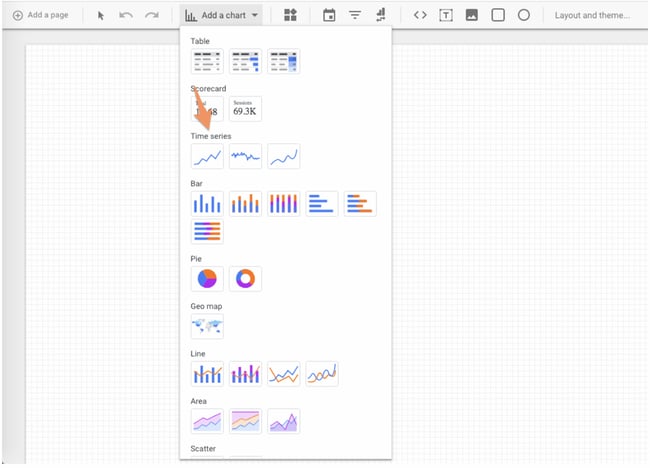
4. Choose the first option under “Time series.”
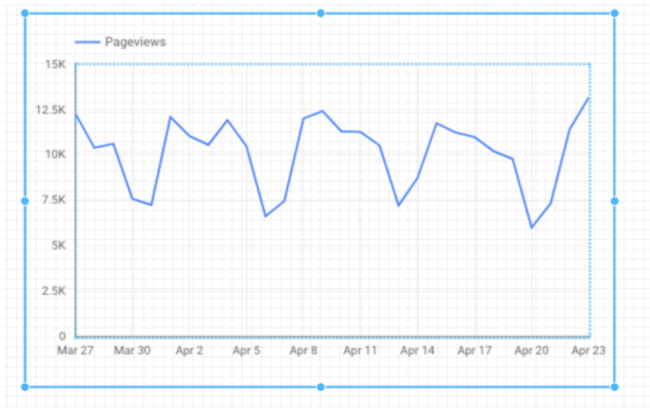
For the purpose of this tutorial, we’ll start with a “Time series” chart. This chart type shows change over time. Once it appears on your report, the right-hand pane will change. Here’s what you should see:
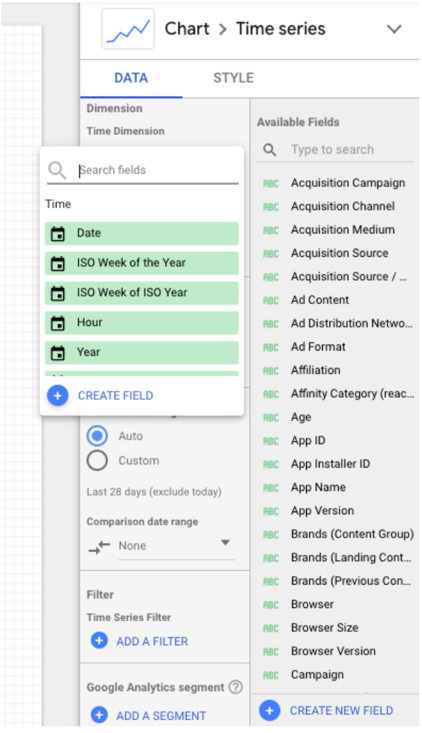
By default, the dimension is “Date”; you can change this to any of the time-based dimensions, including “Year,” “Hour,” etc.
I will stick with “Date” because the Demo Account doesn’t have a lot of historical data.
Data Studio will automatically select a metric (i.e., what’s displayed on the Y-axis) for you. Feel free to change this; for instance, it defaulted to “Pageviews” for me, but I’d rather see “Revenue per user.”
5. Add another metric.
First, make sure you’ve selected the chart, so you see the pane on the right:
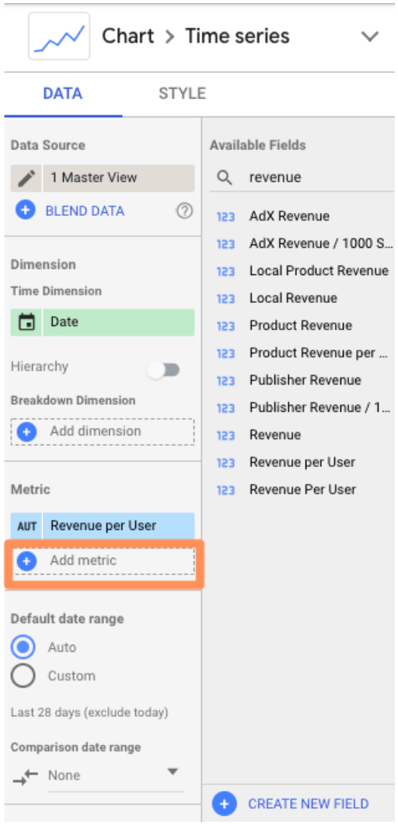
You have two options for adding a metric (or dimension).
You can click the blue plus-sign icon — which will bring up a search box so you can find the field you want — or you can drag a field from the right into the metric section.
To delete a metric, simply hover over it with your mouse and click the white “x” that appears.
6. To add a table, choose the third option under “Add a chart.”
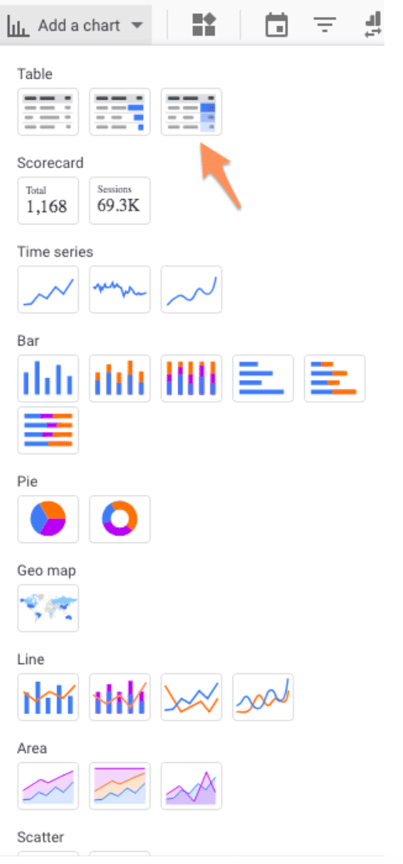
My chart defaults to Medium (for dimension) and Pageviews (for metric), so I change it to Product and Unique Purchases.
And I think this table’s formatting could use some work.
Change the “Rows per page” from 100 to 20 (much easier to read) and check the box for adding a Summary row.
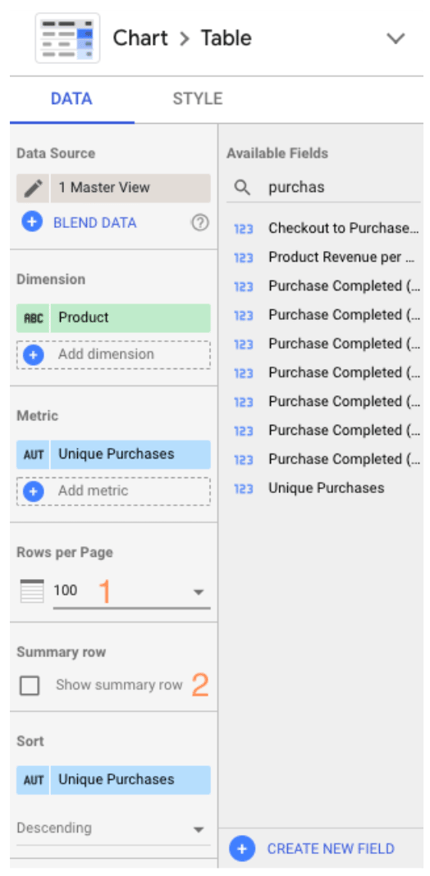
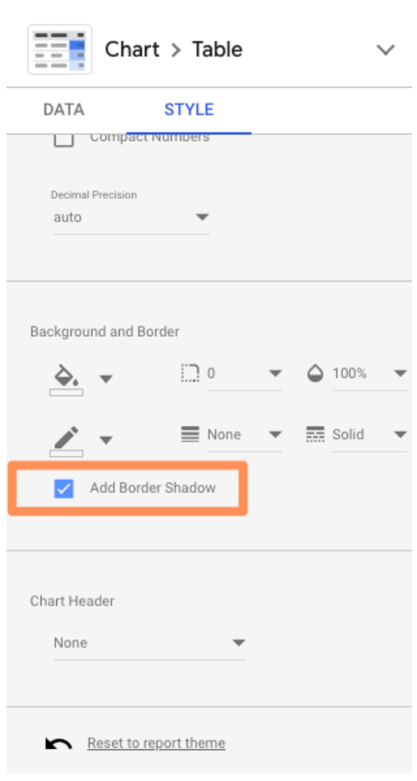
7. Finally, click “Style” to go to the style tab.
Scroll down and select “Add border shadow.” This is one of my favorite ways to make a data visualization pop off the page.
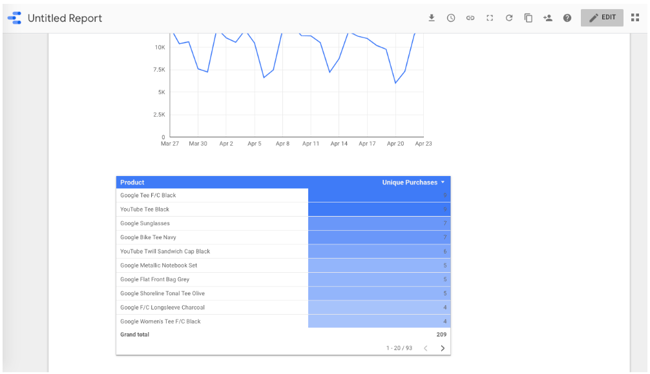
8. To see the finished product, click “View” in the top corner.
This transitions you from Editor to Viewer mode.
Voila!
9. Click “Edit” to finish up and name the report.
Double-click the title (right now, it’s “Untitled Report”) to change it.
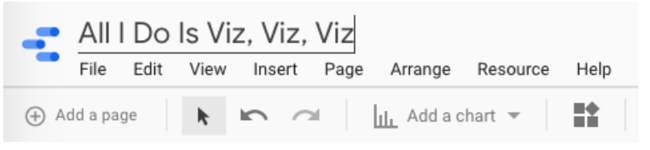
And with that, the first report is officially done. Click that familiar icon above the Chart Editor and add some email addresses to share your report.
Okay, don’t share the report just yet because I’m about to reveal the secrets that’ll help you seriously upgrade it.
Google Data Studio Tutorial
- Use templates.
- Publish your report.
- Connect to 150+ sources.
- Create your own report theme.
- Embed external content.
- Send scheduled reports.
- Download reports.
- Embed reports.
- Add a date range.
- Add filter controls.
- Create interactive chart filters.
- Add data control.
- Add a dimension breakdown.
- Use Data Studio Explorer (Labs).
- Create report-level filters.
- Create blended fields.
- Blend your data source with itself.
- Create a basic calculated field.
- Creating an advanced calculated field.
- Create a calculated blended field.
Beginner Google Data Studio Tips
1. Use templates.
There’s no need to reinvent the wheel. If you’re not sure where to start with Data Studio, I recommend browsing through their templates for inspiration.
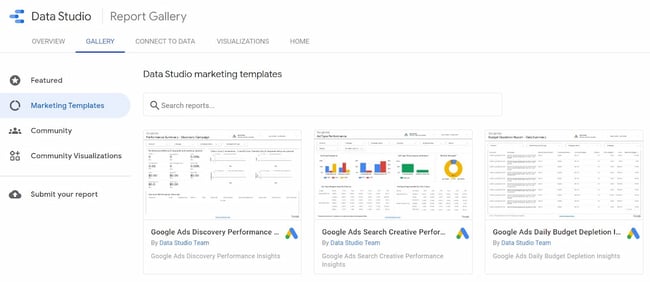
Pay attention to the report’s creator. Many templates were built by the Data Studio team; you can find them all in the “Marketing Templates” section. But there are also 45+ user submissions located in the “Community” section. A few of my favorite templates:
- GA Behavior Overview: This dashboard pulls out the most relevant information from the Behavior section of Google Analytics
- Paid Channels Mix Report: Use this template to understand how your ads are performing on Facebook, Twitter, LinkedIn, search, and more.
- Website Technical Performance Indicators: Get a quick overview of how your site is performing in real-time, including JavaScript and 404 errors and page load times.
There are also a bunch of fun, non-marketing templates in the gallery (found in the “Featured” section), like F1: How Important Is the First Race? and Star Wars: Data from a galaxy far, far away. Definitely take a look if you’re curious to see the full potential of GSD unleashed.
2. Publish your report.
Want to show off your superior analytics and data visualization skills to the world? Submit your report to this gallery using this Google form.
Read over the full instructions at this link, but here’s what I’d keep in mind:
- Don’t share sensitive information. I recommend creating a report with publicly accessible data, so there’s absolutely no chance you get in trouble for sharing data you don’t own. (Pro tip: recreate one of your existing company reports with dummy data from one of Google’s sample data sets!)
- Make it awesome. The public reports are impressive, so don’t hold back with design, features, and so on.
- Add context. Provide on-page explanations of what you’re measuring or monitoring with captions, instructions, maybe even a video of you walking through the report.
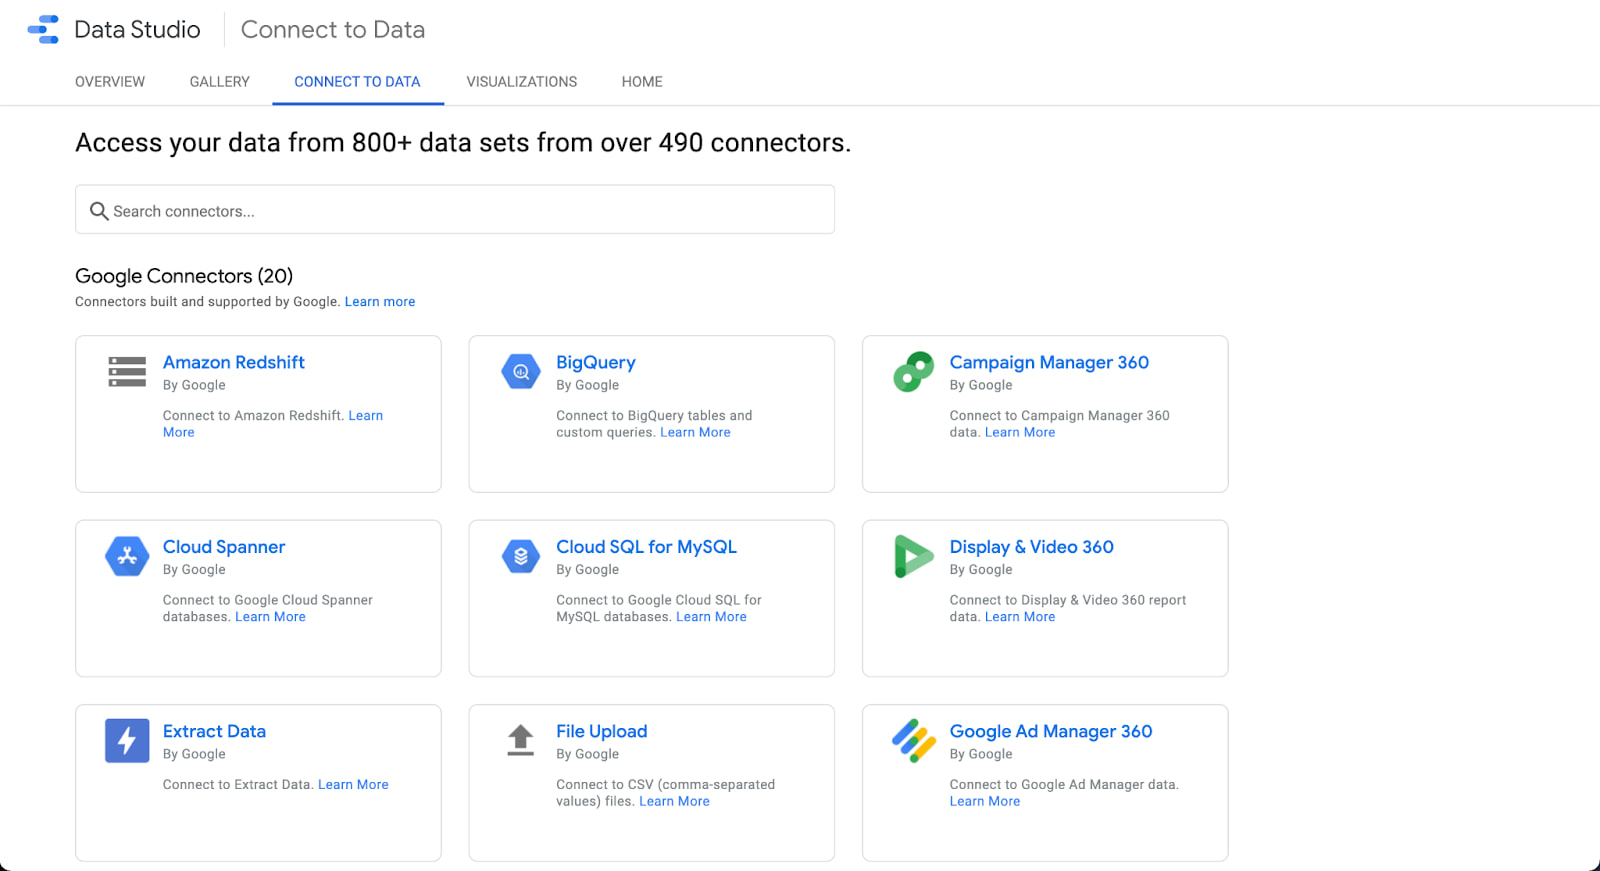
3. Connect to 150+ data sources.
As I mentioned, you can bring data from Google-owned sources into Data Studio, including Search Console, Google Ads, YouTube, and Campaign Manager.
But that’s just the tip of the iceberg. There are also more than 120 partner connectors — essentially, third-party bridges between Data Studio and platforms like Adobe Analytics, AdRoll, Asana, Amazon Ads, and AdStage (and that’s just the As).
Check out all the options here.
4. Create your own report theme.
Whether your report is meant for internal stakeholders, like the leadership team, or external ones, like clients, it’ll be more effective if it looks good.
To adjust the report’s style and formatting, click the Layout and theme option in the toolbar.
Any changes here will apply across the report—meaning you only need to pick fonts, colors, etc., once versus every time, you add a new module to the report.

Data Studio comes with two built-in themes: simple and simple dark. But it’s easy to create your own — and the results are way more impressive.
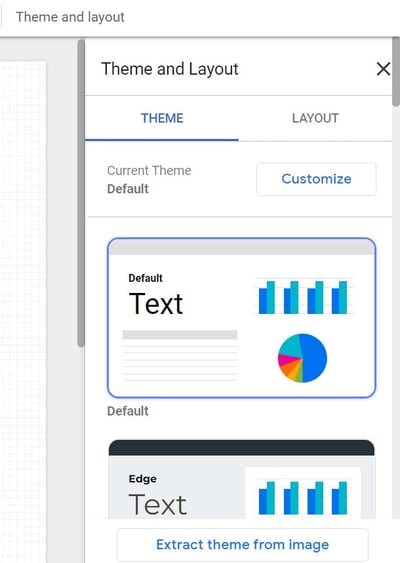
Click on “Customize.”
Use your brand style guide to choose primary and secondary colors, fonts, and text color. You might need to get creative here; HubSpot uses Avenir Next, which Data Studio doesn’t offer, so I went with its cousin Raleway.
If you’re creating a report for a client and don’t know their hex codes, Seer Interactive’s Michelle Noonan has an excellent tip: use a free color picker tool to identify what they’re using on their website.
You can also create a custom chart palette in this tab and edit the border and background settings.
5. Embed external content.
Just like you can bring your report to the wider world, you can also bring the wider world to your report.
You can insert Google Docs, Google Sheets, YouTube videos, and even live webpages with the URL embed feature. Embedded content is interactive, so it’s far more powerful than a screenshot.
Click “URL embed.” in the navigation bar to add content.

From there, simply paste the URL. Next, you may need to resize the box that appears to fit your content’s entire length and width.
The options here are pretty endless. One of my favorite ways to use this feature is to embed a Google Form gauging how helpful the report was for my audience:
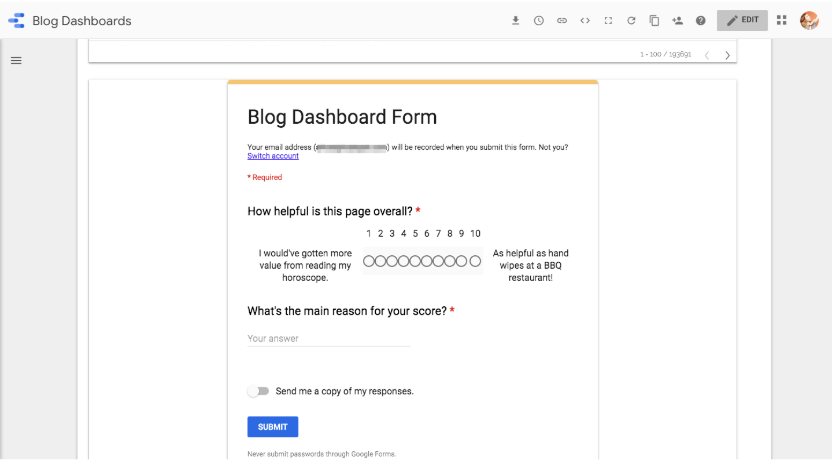
If a section of the report needs extra context (or my viewers aren’t that technical), I’ll add a short video explaining what they’re looking at and how to interpret the results.
To personalize a report for a client, I’ll add the URL of their website, blog, and/or whatever pages they hired me to create or improve.
And for the HubSpot blogging team, I’ll add the latest version of the Search Insights Report so they can compare our progress to the results.
6. Send scheduled reports.
If you have a group of stakeholders that need to see your report regularly, consider using Data Studio’s “scheduled report” feature.
Click on the drop-down menu beside the “Share” button and select “Schedule email delivery.”
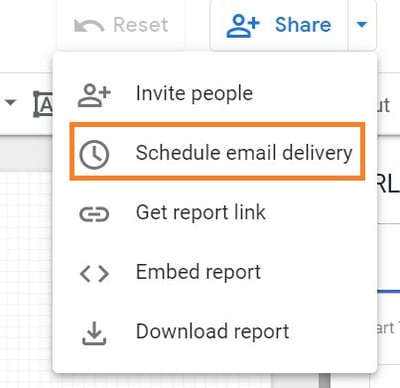
First, enter your recipients’ email addresses, then choose a schedule, whether daily, every Monday, or every month.
This is particularly handy when working with customers, since you may not want to give them access to the live report.
7. Download the report as a PDF.
Alternatively, you can download your report as a PDF. This is helpful for one-off situations, like if your boss asks for a status report or your client wants to know how an ad has performed so far this month.
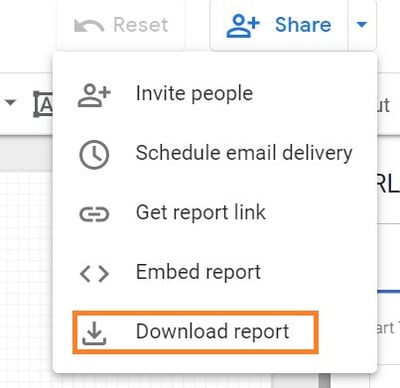
To download the file, click “download” on the drop-down menu.
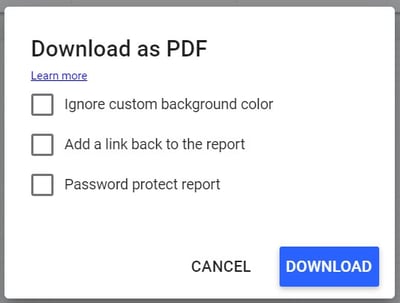
 Data Studio gives the option of downloading your current page or the entire report. You can even add a link back to the report so your audience can dig in deeper if they’d like and add password protection to ensure your data stays safe.
8. Embed reports.
You can even display your report on your company website or personal portfolio—which can be a great way to highlight the results you’ve gotten for a client or project.
Click the brackets icon in the upper navigation bar.

This box will pop up:
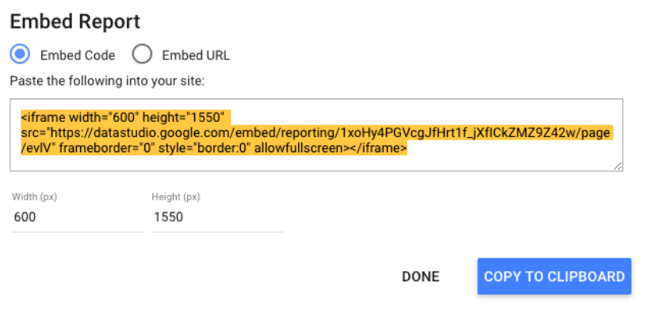
Adjust the width and the height as needed, and you’re good to go.
Intermediate Google Data Studio Tips
9. Add a date range.
Give your viewers more freedom by letting them select which dates they’d like to see information for.
For example, my reports always default to the last 30 days, but if one of HubSpot’s blog editors wants to see how their property performed in the previous calendar month, the date range controls let them adjust the report.
They can choose from predefined options, like “yesterday,” “last seven days,” “year to date,” etc., or pick a custom period.
To enable this, first navigate to the page you want to give users date control. Next, click on the drop-down menu by “Add a control.” Next, click “Date range” from the toolbar.
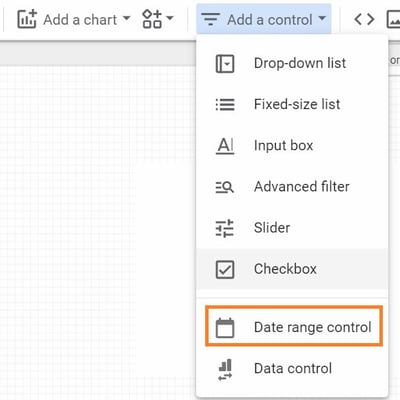
A box will appear on your report. Drag it into the position you want — I recommend somewhere in the upper right or left corner, so your audience sees it first — and adjust the size if necessary.
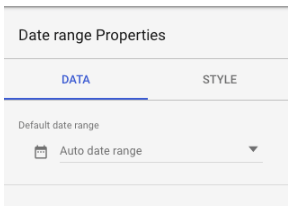
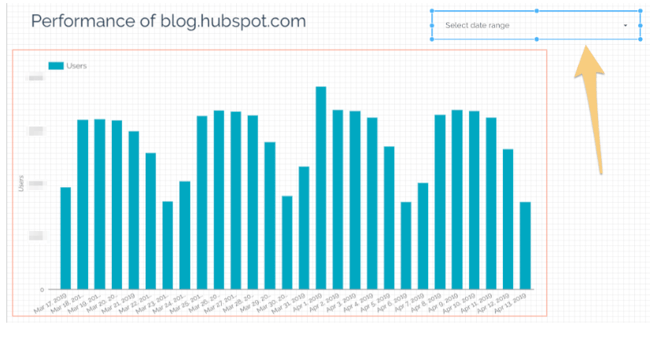 Clicking this module will bring up a panel to the left of your report called Date Range Properties. Set the default date range to “Auto date range,” if it isn’t already.
If your viewers select a date range using the date range widget, every report on the page will automatically update to that period.
There are two ways to override this:
- Set a time period within a specific chart. That time period will always supersede the date range control.
- Group the charts you want to be affected by the date range control with the module. Select the chart(s) and the box, then choose Arrange > Group.
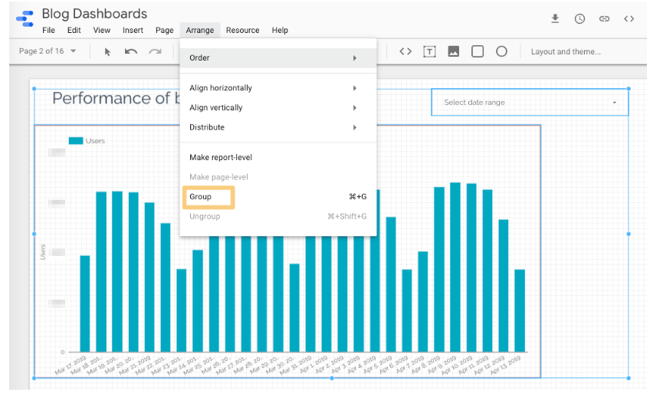
Now, only the chart(s) in this group will update when someone adjusts the date range.
Make sure this setting is clear to your viewers — otherwise, they’ll probably assume all the charts they’re looking at on their current page are using the same time period.
10. Add filter controls.
Give your audience even more flexibility with filter controls. Like the date range control, a filter applies its settings to every report on the page. So if, for example, someone filtered out everything besides organic traffic, all the reports on that page would show data for organic traffic specifically.
Add a filter control by clicking this icon in the toolbar.

The filter will appear on the report page. Resize it and drag it into the position you want. While it’s selected, you should see a panel on the left-hand side:
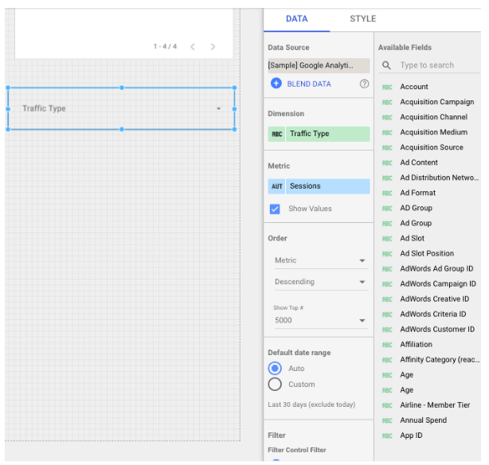
In the data tab, pick which dimension you want viewers to filter. These dimensions come from your data source — in this example, I’ve chosen Traffic Type.
The metric part is optional. If it’s checked, viewers will see the values for each dimension sub-category in the filter. (This will make more sense once you see the screenshot below.) They can sort by these values, but they can’t filter by a metric.
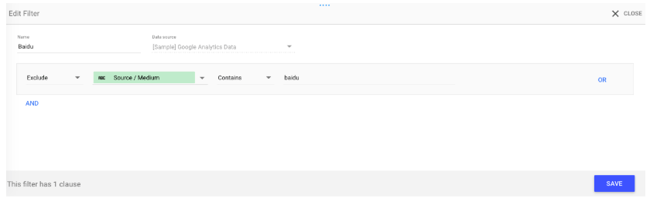
You can add an additional filter to your filter control. For example, if you’ve added a filter for Source / Medium, you may want to exclude the “Baidu /organic” filter, so your viewers don’t see that as an option.
 Customize your filter control’s formatting and appearance in the style tab. You have a few options: list/check all that apply filters, like this one:
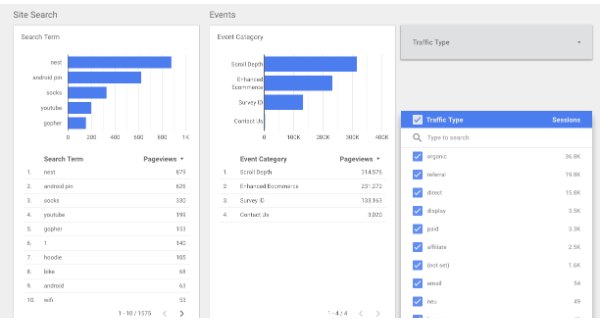
Or “search all” filters, which allow your viewers to search by numeric and text terms using operators like >=, and <, or “equals,” “contains,” etc., respectively.
This can be a hassle for the people reading the report—plus, they need to be somewhat comfortable with search operators. So, unless your filter dimensions have 10,000 values (unlikely), stick with the list filter.
11. Create interactive chart filters.
Want to make it even easier for your audience to filter the charts in your report? Create responsive chart filters.
This sounds fancy, but it simply means selecting a dimension in a chart will filter all the charts on that page for that dimension.
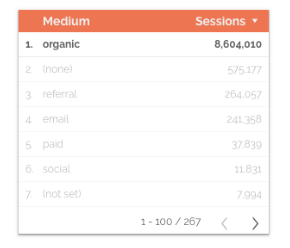
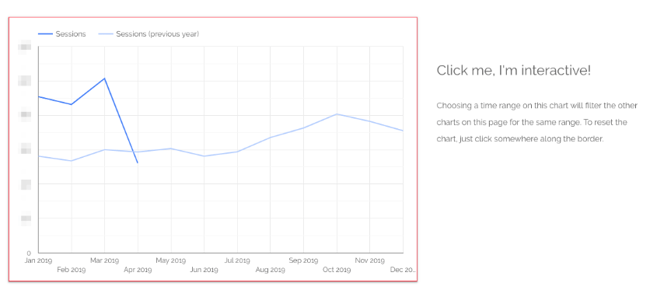
For instance, if you click on “organic” in this chart, the other charts on the page will update to show data for organic traffic only — just like you’d applied a traditional filter control.
You can also create chart controls for time, line, and area charts. For example, if a user highlights say, January through March on a time chart, the other charts on the page will show data for January through March as well — just like date range control.
And also, just like filter controls, you can group chart controls.
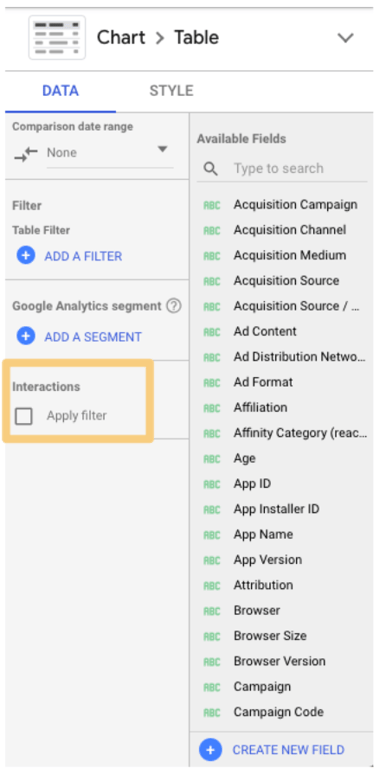
To enable chart control, select the appropriate chart. In the right-hand panel, scroll to the bottom and check the box labeled “Apply filter.”
 Add a caption next to charts that support interactive filtering, so your viewers know it’s an option:
12. Add a data control.
Data controls may just be one of the coolest Data Studio features, full-stop. Place one of these bad boys on your report, and you’ll give viewers the ability to choose the source of the data being piped into your charts.
This is a game-changer for anyone managing a complex property or working with multiple stakeholders.
For instance, imagine you’re the admin of HubSpot’s Google Analytics account. You create a Data Studio report monitoring key website performance indicators, like average page speed, number of non-200 response codes, number of redirect chains, and so on.
You share this report with the blogging team, who has access to the Google Analytics view for blog.hubspot.com. (Need a refresher on how views and permissions work? Check out our ultimate guide to Google Analytics.)
You also share the report with the Academy team, who has access to the GA view for academy.hubspot.com, and the Leads Optimization team, who has access to offers.hubspot.com.
To see this report populated with the relevant data, these teams simply need to select their view from the “data source” drop-down, and voila — all the charts will update automatically.
Pretty nifty, right?
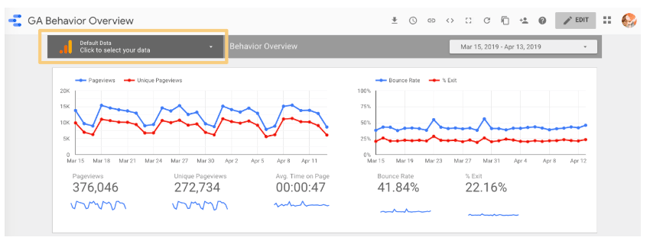
Not only does this save you from rebuilding the same report for different groups, but it also means you don’t need to worry about accidentally sharing sensitive or confidential information. Each viewer can only select data sources they’ve been granted access to.
You can include multiple data controls in a single report.
Add the data control widget to your report by clicking this icon:
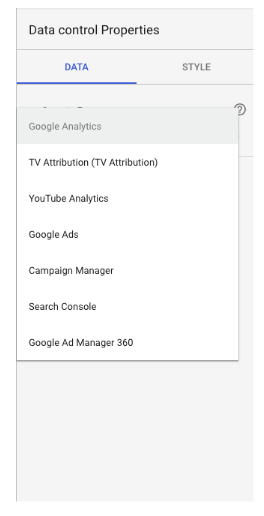
 Then choose which primary source you’d like viewers to pull from:
13. Add a dimension breakdown.
Instead of telling you what a dimension breakdown is, it’s easier to show you how it works.
Suppose we want to see users by source. To find out, we create a simple bar chart.

This is interesting — yet there’s some context missing. For example, is all of that organic traffic coming from Google? (Since this is U.S. data, probably, but imagine creating the same chart for China or Japan, where Baidu and Yahoo have a far greater presence.)
What about referral traffic? Clearly, we’re getting a significant number of users from referral links; is a single source driving most of them, or is it distributed fairly equally across a wide variety of sources?
We could create separate bar charts for each source — first filtering by medium and then making the dimension “Source” and the metric “Users.”
Or we could click a single button and have Data Studio do it for us.
Under Breakdown Dimension, click “Add dimension.”
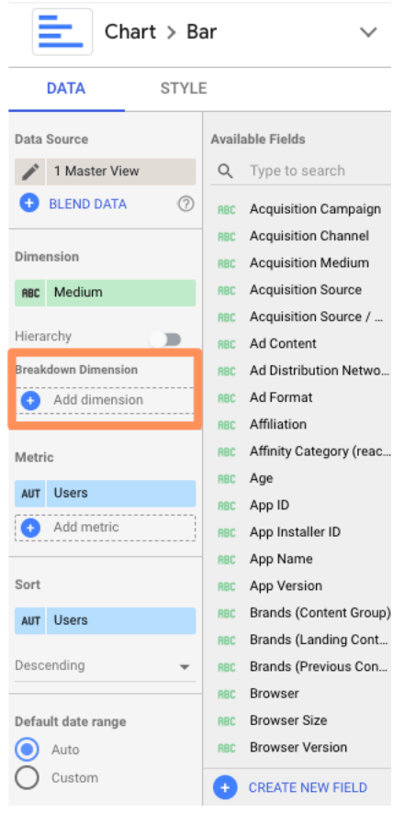
Add “Source.”
Here’s what you should see:
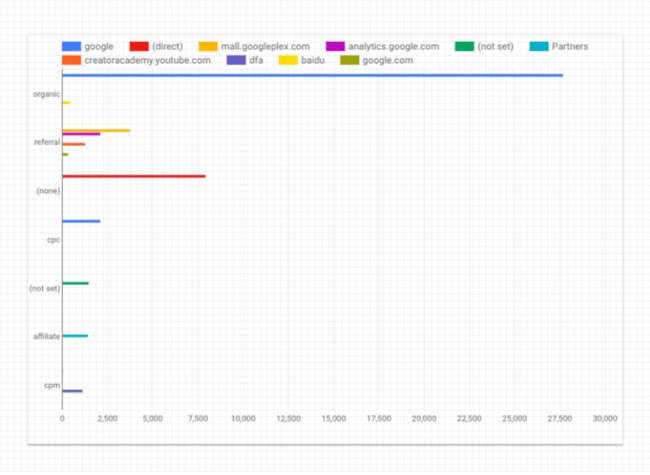
Pretty sure my former Data Analytics professor would cry if he saw this. But don’t worry, we’re not done yet.
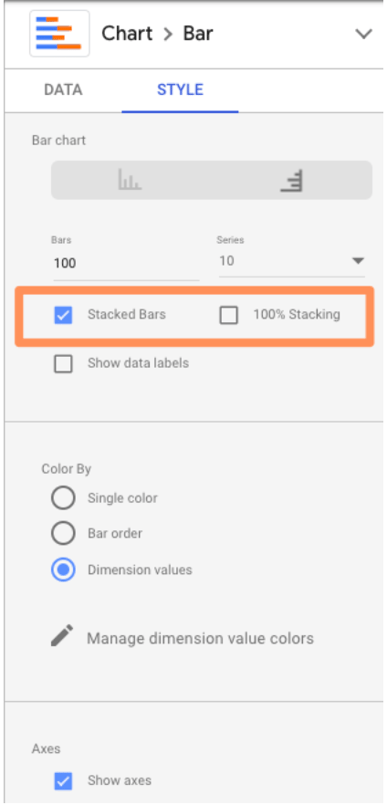
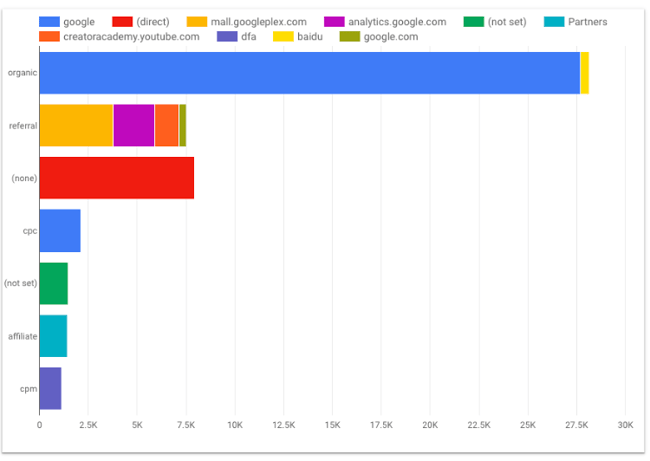
Jump over to the “Style” tab and check the box “Stacked bars” to turn your regular bar chart into a stacked bar chart (you should see the chart type update accordingly).
Data Studio will automatically make your bar charts “100% stacking,” meaning that every bar will go to the top of the chart. However, this style is misleading — for example, here, it suggests every medium drove the same number of users.
Uncheck this box.
 Now check it out:
14. Use Data Studio Explorer (Labs).
To bring any chart into Explorer, mouse over the space next to its top-right corner. You’ll see three vertically-stacked dots appear; click them.
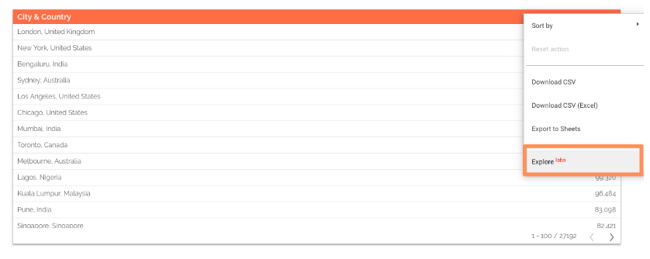
Select “Explore (Labs).”
You’ll see something like this:
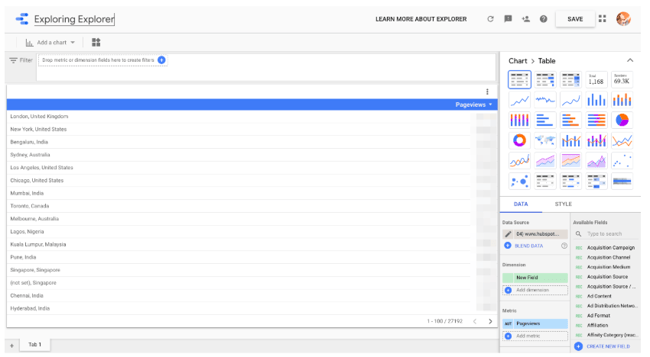
You can toggle between different visualizations; add and remove dimensions and metrics; change the date range, and apply segments.
Note: Unlike every other Google tool out there, Explorer does not automatically save your work.
To preserve your chart, click the “Save” button on the top nav bar (to the left of your profile icon). Once you do that, your Explorer “report” will be saved in the Explorer section of your dashboard. In addition, every change you make will be saved by default.
Speaking of that dashboard, if you prefer, you can also start with Explorer (rather than a Data Studio report). Go to your Data Studio dashboard and select “Explorer (Labs)” in the left-hand menu.
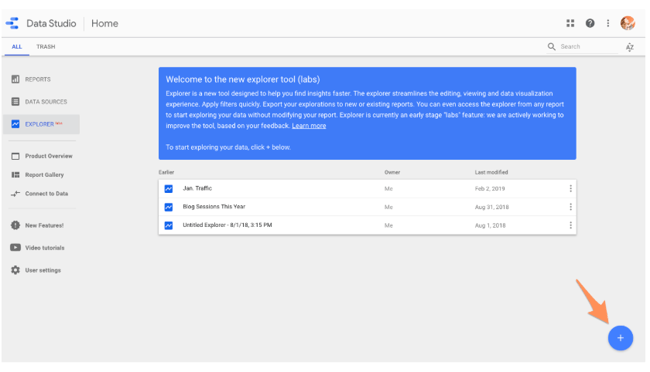
Add a new data source by clicking the blue button in the lower right corner.
At first, Explorer confused me. It feels very similar to the core Data Studio — what was the point of having both?
However, after spending some time in Explorer, I’ve come to appreciate its unique value.
Unlike Data Studio, any modifications you make to a chart in Explorer are temporary. That means it’s a great place to dig into your data and try out different ways of visualizing it without making any permanent changes. Then, once you’re happy with your chart, simply export it back into Data Studio.
To do this, click the small sharing icon in the top navigation bar.
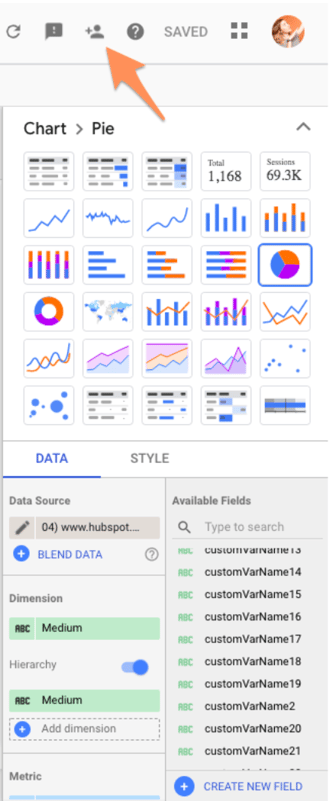
Then choose whether to add your Explorer work into a new or existing Data Studio report.
Advanced Google Data Studio Tips
15. Create report-level filters.
By default, a filter applies to every chart on that page. But what if the viewer goes to the next page? The filter won’t go with them.
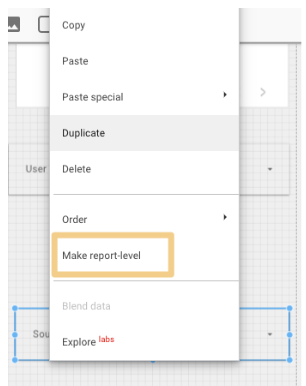
This is confusing for non-technical folks and inconvenient for data-savvy ones. To bring a filter up from page-level to report-level, simply right-click on it and select “Make report-level.”
16. Create blended fields.
Data Studio is powerful because you can bring in 400+ sources of data into a single report. But, thanks to a new feature, blended sources, it just got even mightier.
Heads up: this will get a little technical. Stay with me, and I promise it’ll be worth it.
If you’re familiar with JOIN clauses in SQL, you’ll understand data blending right away. No idea what SQL is? Not a problem.
The best way to think about blending data is with a Venn Diagram. You have two data sets. Each data set has unique information — e.g., such as the data living in the green and blue areas.

But they have (at least) one data point in common: the information in the blue-green overlap section.
This shared data point is known as a key. If your data sets do not have a key, they’re not blendable.
For example, suppose you want to compare how users behave on your website versus your app. The key is the user ID, a custom dimension you’ve created in Google Analytics that your app analytics software also uses. (Note: The key doesn’t need to have the same name in both data sources; it just needs to have identical values.)
You blend your website behavior report from GA with your app usage report. This gives you all the records from the first report along with any matching ones from the second; in other words, if a user has visited the site and used the app, they’ll be included.
However, if they only used the app but didn’t visit the site, they will not be included in the new blended data.
This is known as a LEFT OUTER JOIN. (To learn more, check out this W3Schools primer.) Why do you care? Because the order of your data sources matters.
Put your primary data source first — e.g., the one where you want all the values, regardless of whether there’s a match in your second source.
Now that we’ve gotten all that out of the way, let’s set up a blended field.
First, add a chart to your report.
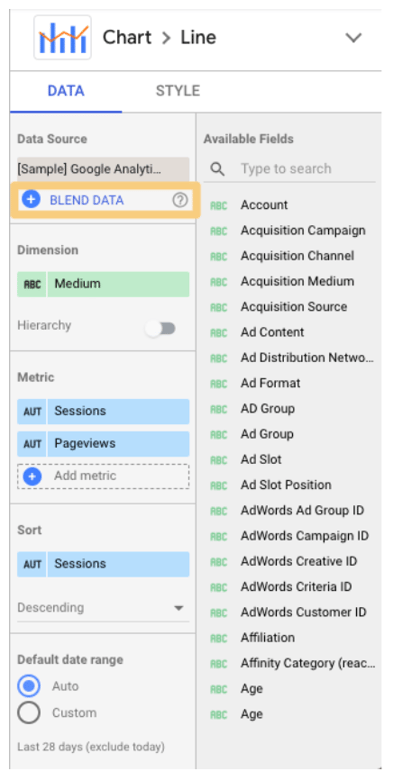
Click on “Blend Data.”
This panel will pop up:
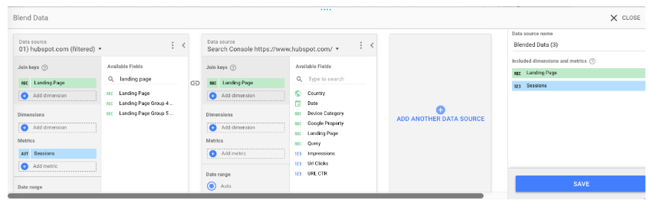
Select your first data source on the left. Remember, this is the primary data source. Then add your second data source. Data Studio lets you add up to five data sources in a chart, but let’s stick to two for now.
Now pick your join key(s). If the field exists in both sources, it will turn green. If it doesn’t exist, you’ll see this:
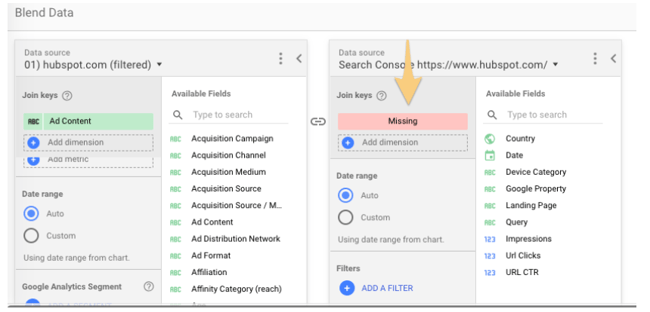
Remember that the key acts as a filter for the second data source. So in this example, only records that match the landing page from the GA view for hubspot.com will be pulled from Google Search Console.
Choosing multiple keys will further limit the number of records pulled from the second data source.
Once you’ve picked your join key(s), the rest of the process should feel familiar.
Pick the dimensions and metrics you want to see for your first data source. Then do the same for your second.
You can also limit the results by adding a filter or date range (or for GA sources, segments). Filters, date ranges, and segments applied to the left-most data source will carry over to the other data sources.
Once you’ve finished customizing the report, click “Save.” Congrats: you just created your first blended data chart!
If you find it easier to create two separate charts and then combine them, Data Studio offers a great shortcut.
Just select both charts, right-click, and choose “Blend data.”
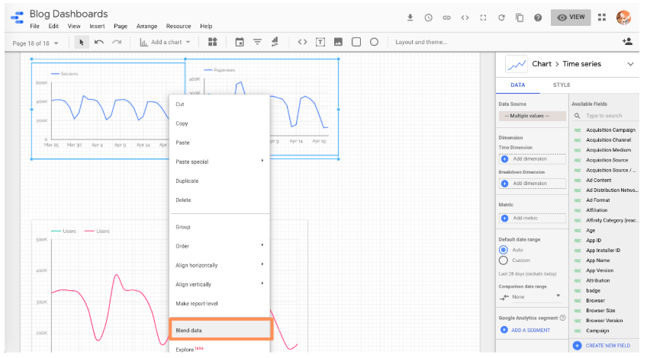 Unfortunately, Data Studio can get confused pretty quickly, so I’d still make an effort to learn how to blend data using the right-hand pane.
17. Blend your data source with itself.
Try this workaround if you’re bumping into limitations with your data source connectors: blend a data source with itself.
To give you an idea, the GA data connector only lets you add one “active user” metric to a chart, so there’s no way to see 1 Day Active Users, 7 Day Active Users, and 28 Day Active Users on the same chart… unless you blend your Google Analytics data source with itself.
Follow the same instructions as above, but instead of picking a new source for your second data source, just select the first one again.
And since all of the fields are identical, you can pick whichever join key you’d like.
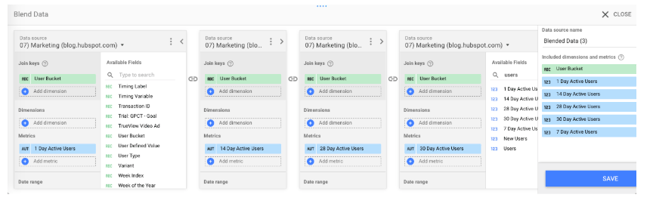
This option is also perfect when comparing trends across two-plus subdomains or segments.
For instance, I wanted to look at organic users for the HubSpot Blog (blog.hubspot.com) and primary site (www.hubspot.com) at the same time.
This helps me figure out if we’re growing search traffic across the board. It’s also helpful when traffic decreases — have rankings dropped site-wide, or just for the blog (or the site)?
However, you can’t add two separate “user” metrics to a chart at once… unless, of course, you’re blending data.
Create a new blended data source (following the same process as above) to set this up.
Add your first view to the left-most column, your second view to the following column, and so on.
Note: Make sure you’re choosing views with mutually exclusive data. In other words, I wouldn’t want to use “blog.hubspot.com” as my first source and “blog.hubspot.com/marketing” as my second source because all the data for the blog.hubspot.com/marketing view is included in the blog.hubspot.com one.
Because of that overlap, we wouldn’t be able to spot trends clearly.
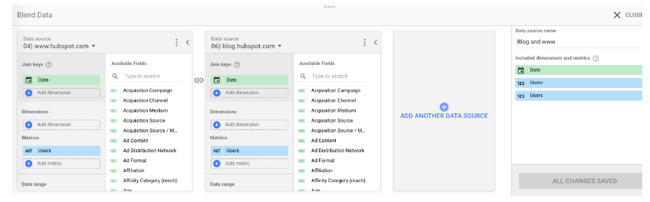 Use “Date” as the join key.
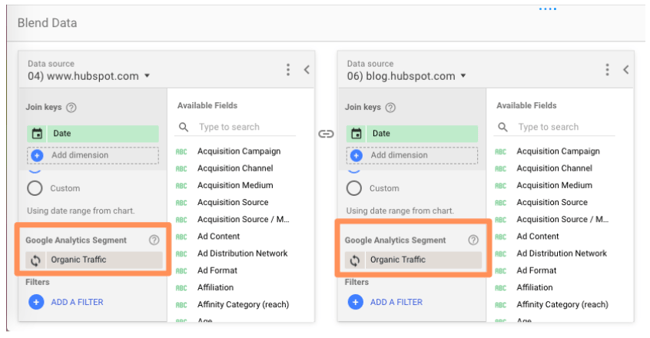
I added the organic traffic segment to both sources, but you can choose whichever segment you’re interested in (paid traffic, social traffic, etc.) Or leave it off entirely! Tons of possibilities here.
In fact, here are some additional ideas for blending a source with itself:
- Compare two-plus custom segments
- Compare two-plus landing pages
- Compare two-plus goal completions
18. Create a basic calculated field.
When your existing data doesn’t give you enough information, it’s time to create a calculated field.
Calculated fields take your data and, as their name suggests, makes calculations.
It’s probably easiest to explain with an example.
Let’s say you want to look at the average number of transactions per user. You can create a calculated field that takes the metric “Transactions” and divides it by the metric “Users.”
Once this field has been created, it’ll be updated automatically — so you can change the chart’s time range, dimensions, etc., and the average transactions per user data will update accordingly.
There are two ways to create a calculated field.
Create a data-source calculated field
This option makes the field available in any report that uses that data source.
It’ll also be available as a filter control or in new calculated fields (like calculated field inception).
Obviously, this is a good option if you plan on using this custom metric more than once. The only caveat — you must have edit rights to the original data source. You also can’t use a data source calculated field with blended data.
To create a data-source calculated field, add a chart to your Data Studio dashboard, then choose the data source you want to derive your new field from.
Click “Add a new field” in the lower left-hand corner.
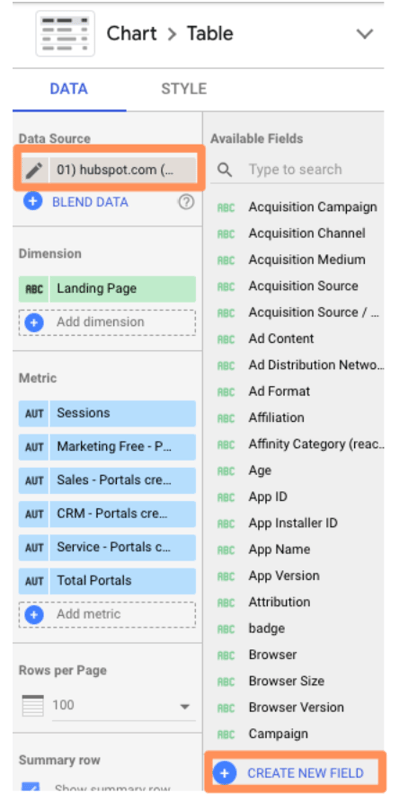
(You can also do this by clicking the pencil next to the data source and then selecting “Add a field” in the upper right corner of your field menu.)
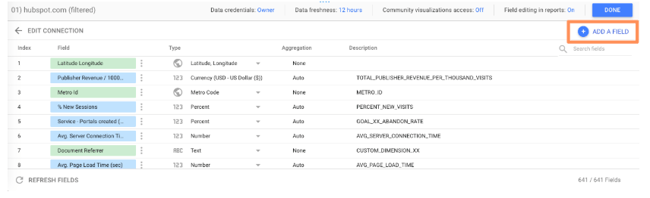
Use the left menu to search for the metrics you need; click one to add it to the formula.
If the formula has an error, a notification will appear in red underneath the editor explaining where you went wrong.
If your formula works, you’ll get a green checkmark.
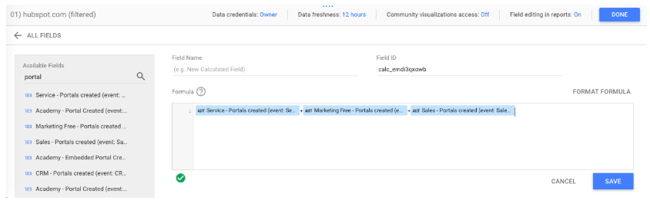
Click “Save” to add your new field to the data source.
And don’t forget to name yours — which I forgot to do. 🙂
Now you can add this calculated field to any chart just like a regular field.
Create a chart-level calculated field
For this option, you’ll only be able to use the field for that specific report.
This option is a little easier because all the limitations of the other type are reversed.
While you can’t use a chart-level calculated field in another chart, filter control, or additional calculated field, you don’t need edit rights to the original data.
You can also use a chart-specific calculated field for data blending, which we’ll cover in the next step.
To create a chart-level calculated field, simply click “Add a field” underneath the existing dimension(s) and metric(s) you’ve selected.
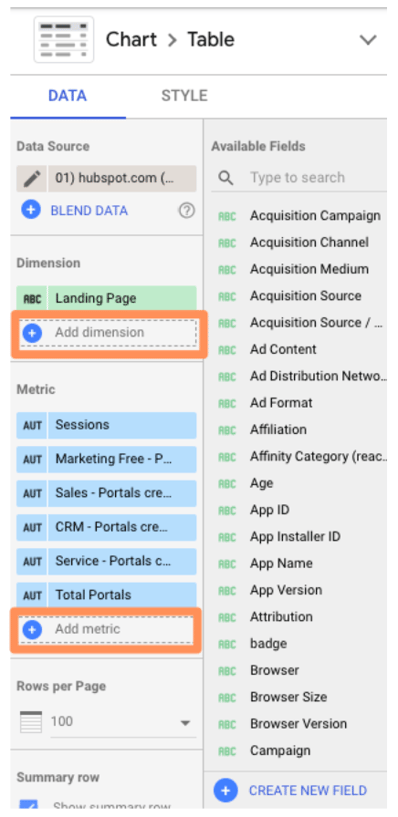 When you choose to add a new field, this pane will pop up:
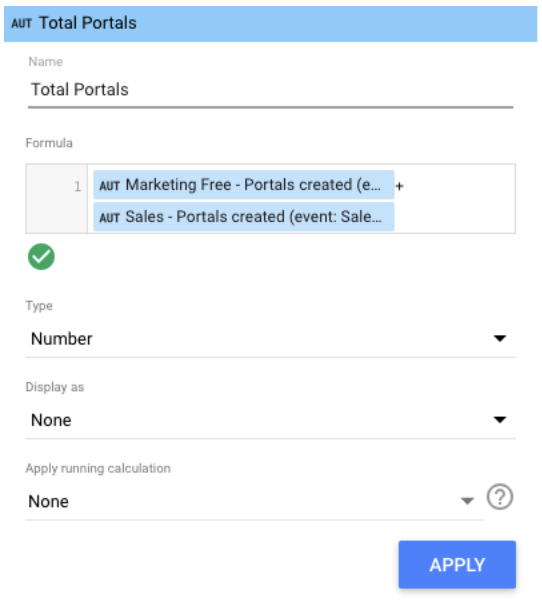
From here, enter the formula for your new field — simply typing in the name of your desired metric will trigger a menu of options — and click “Apply.”
Your new field will be added to the chart.
Loves Data’s Benjamin Mangold has an excellent round-up of sample calculated metrics, including:
- Average goal completions per user
- Non-bounce rate
- Pageviews per transaction
- Value per session
You can check it out for inspiration.
If you want a little practice before you start going to town on your own data, Google offers a handy sample exercise.
19. Create an advanced calculated field.
Okay, so there’s a lot you can do with simple algebraic calculated fields. But there’s even more you can do once you introduce functions and RegEx.
Don’t be scared off! We’ll walk through these step-by-step.
If you’re comfortable with Google Sheets and/or Excel functions, you already know how to use functions in Data Studio.
For instance, let’s say that you majored in English, and it’s always bothered you that “Source” in Google Analytics is lower-case.
You can use the UPPER function to transform Source into all upper-case.
Simply click “Add dimension” > “Create new field.”
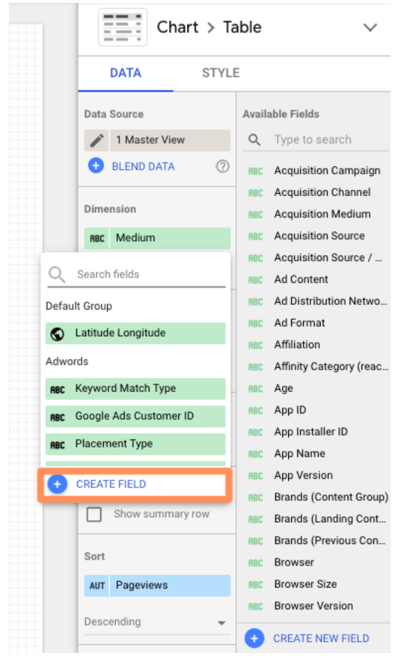 Then enter the UPPER formula:
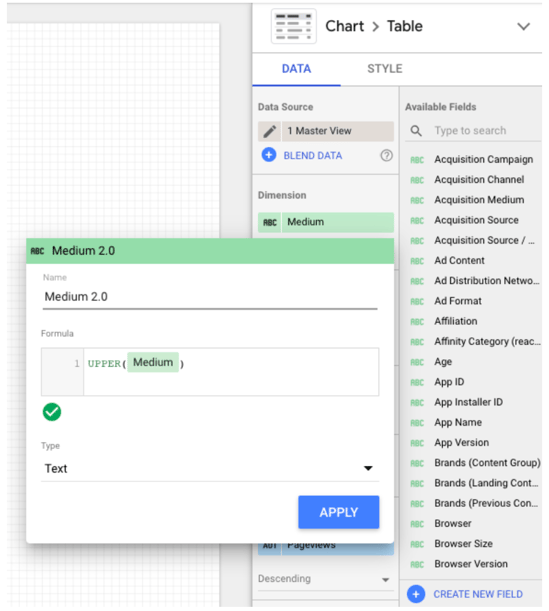
As Google Sheets expert Ben Collins points out, this trick will also standardize any custom naming; for example, if some people on your team used “chat” for a campaign, and others used “Chat,” the UPPER function will aggregate both together.
Perhaps you want to create a new field for city and country.
Just click “Add dimension” (since city and state are categorical, not quantitative, variables) > “Create field.”
Then use the CONCATENATE function to smush together the City and Country fields.
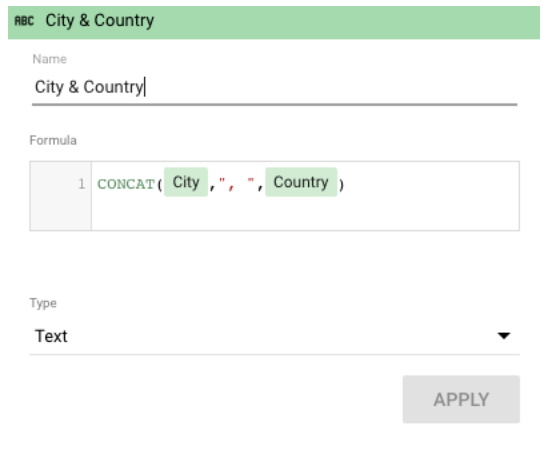
Check out the complete list of functions Data Studio supports.
One of the niftiest is CASE. If you’re unfamiliar, it’s essentially an IF/THEN statement. This function lets you create custom groupings.
For example, let’s say you’re looking at the table we created in the last step:
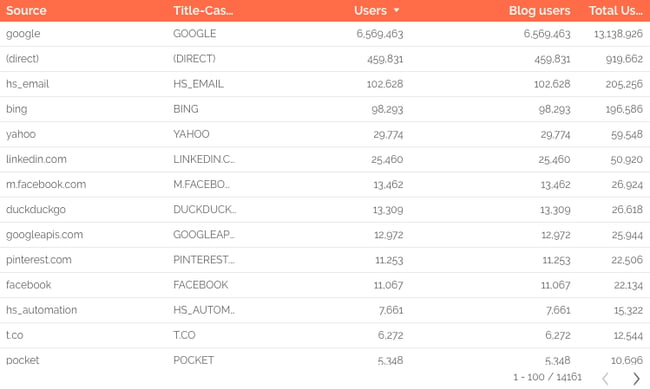
Here, Data Studio is treating Facebook mobile traffic (m.facebook.com) and desktop traffic (Facebook) as two different sources. There’s also l.facebook.com — desktop traffic coming via a link shim, which Facebook implemented in 2008 to protect users from potential spam. What if you want to combine all Facebook traffic into a single source?
A CASE formula solves this issue neatly. Here’s the formula:
CASE
WHEN condition THEN result
WHEN condition THEN result
ELSE result
END
You can have one condition (like the example below) or several. The ELSE argument is optional, so feel free to leave it out if you don’t need it.
Here’s the formula we’ll use to group Facebook traffic:
CASE
WHEN REGEXP_MATCH(Source,”^(l.facebook.com|m.facebook.com|facebook.com)$”) THEN “Facebook”
END
This formula tells Data Studio, “If the source matches l.facebook.com, m.facebook.com, or facebook.com, call it ‘Facebook.’”
To add a CASE formula, you must be able to edit the data source.
Click the pencil icon next to your source to bring up the data field editor.
Then click “Add a new field” in the upper right corner.
Enter your formula.
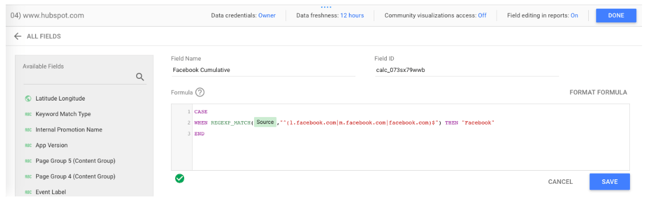
If the formula works, you’ll see a green checkmark. Give your new field a name and click “Save.” Now you can add this field to any chart or data viz that uses this data source.
You might be thinking, “Okay, great, but was that formula written in Klingon? How do I come up with my own?”
Don’t know RegEx? No problem! This blog post has five formulas to get you started.
20. Create a calculated blended field.
This is the pinnacle of Data Studio mastery, requiring all the skills you’ve already learned and a hefty dose of luck — just kidding, it’s super easy.
Create a blended data source per usual.
In this example, I blended together the GA views for www.hubspot.com and blog.hubspot.com.
Then click “Add metric” > “Add new field” as you would to create a normal calculated field.
Enter your formula.
I wanted to see “Total Users” (i.e., users from www.hubspot.com plus users from blog.hubspot.com), which is a simple calculation:
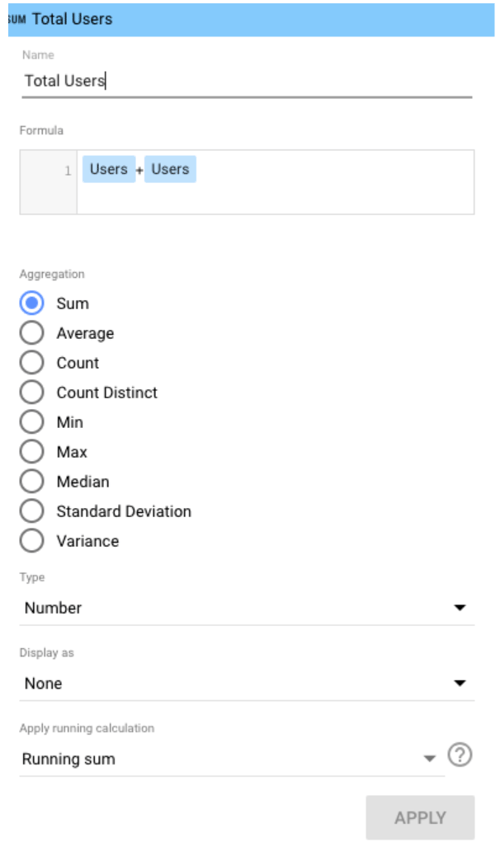
Note: It can get a bit hairy here if you’re using two different fields with the same name, as I’m doing here. Sometimes Data Studio is smart enough to recognize the difference, and sometimes it’s not.
If you run into issues, I recommend editing the name of one or both fields in the original data source(s), which you can do at any time by clicking the pencil next to the blended data source.
Then click the pencil next to the field name you want to change.
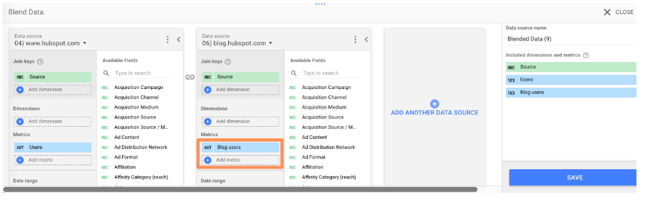 This pane will appear; edit the title accordingly.
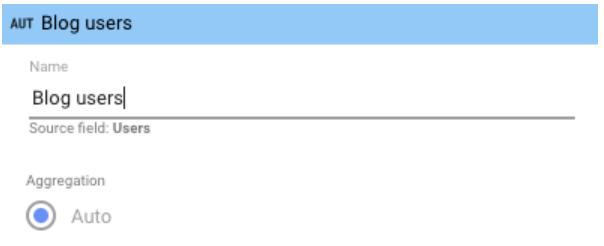 Then click “Save” and go back to your calculated field to update the formula:
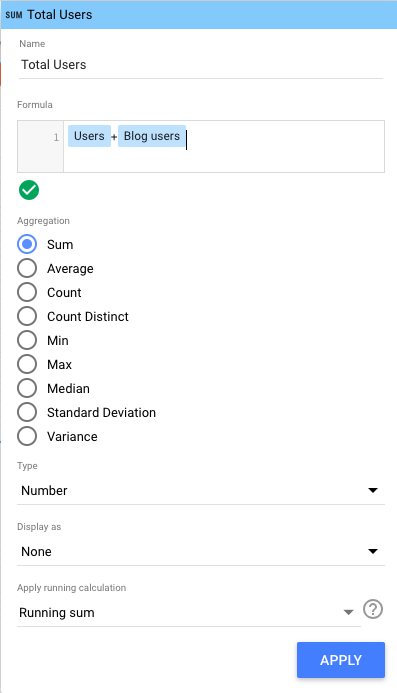 Done! I can now see both in my report.
Google Data Studio is the Best Way to Visualize Your Data
Now that you know Data Studio inside and out, you’re well-prepared to create stunning interactive reports for your coworkers, clients, and executives. Use the tips I shared above to make the most of it and successfully show the ROI of your marketing efforts.
Editor’s note: This post was originally published in October 2018 and has been updated for comprehensiveness.


The HubSpot Blog’s 2022 Instagram Marketing Trends Report
If you’ve been on Instagram lately, you’ve probably noticed that the app looks a bit different every time you log on.
The heart-shaped notification button seems to move with a mind of its own, IGTV has disappeared, and the addition of the Reels and Shop buttons has completely changed the way we interact with the platform.
While these changes seem arbitrary, they’re the crucial next steps in Instagram’s evolution into a video-centric social shopping platform.
In 2022, Instagram will continue to prioritize video, expand on social shopping tools, make it easier for creators to monetize their content and partner with brands, and rework direct messaging (DM) interfaces.
While these shifts align with the trends we saw in our Social Media Trends survey, we decided to dive even deeper by asking another 580 Instagram marketers about how they’ll approach marketing on this changing platform in 2022.

Top Instagram Marketing Survey Findings
Based on our results, most Instagram marketers are already ahead of the game:
- 79% have leveraged Instagram Shopping tools and one in three plan to use them for the first time in 2022.
- 82% post video content on the platform and the content formats they use most are video-based.
- Instagram Live has the highest ROI of any content format. It is also the most effective for gaining followers, gets the most shares, and will see the most investment from Instagram marketers this year.
- Content that reflects your brand’s values and showcases your products/services have the highest ROI on Instagram.
- The best strategies to grow your following on Instagram are posting interactive and engaging stories, engaging with other users, and partnering with influencers.
- Instagram marketers will prioritize fostering relationships with their customers in 2022 by focusing on interacting with their audience and creating content that encourages engagement.
- 35% use the app for customer service and see high ROI.
- 30% work with influencers (or creators) and 42% plan to start this year.
- 84% say Instagram marketing was effective for their company last year.
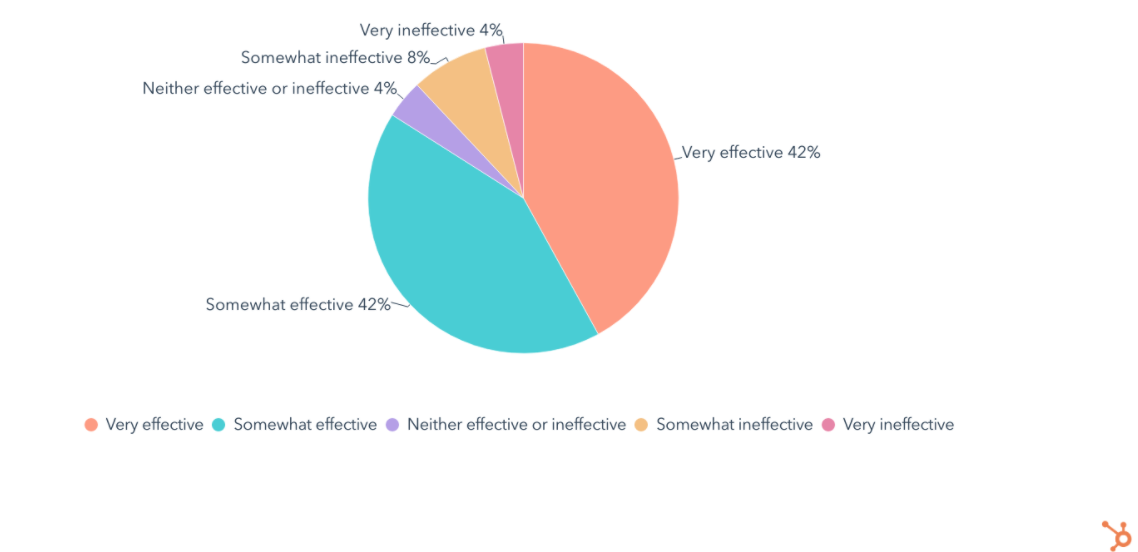 Now that we’ve given you a taste of our survey findings, let’s dive deeper and take a look at some Instagram benchmarks to help you see how your brand’s account stacks up against the competition.
If you’re looking for some specific insights, click below to jump to the section you’d like to read first.
- Instagram Marketing Benchmarks
- Instagram Marketing Strategies
- Instagram Content Types
- Instagram Audience Growth Benchmarks
- Effective vs. Ineffective Instagram Marketing
Instagram Marketing Benchmarks To Know In 2022
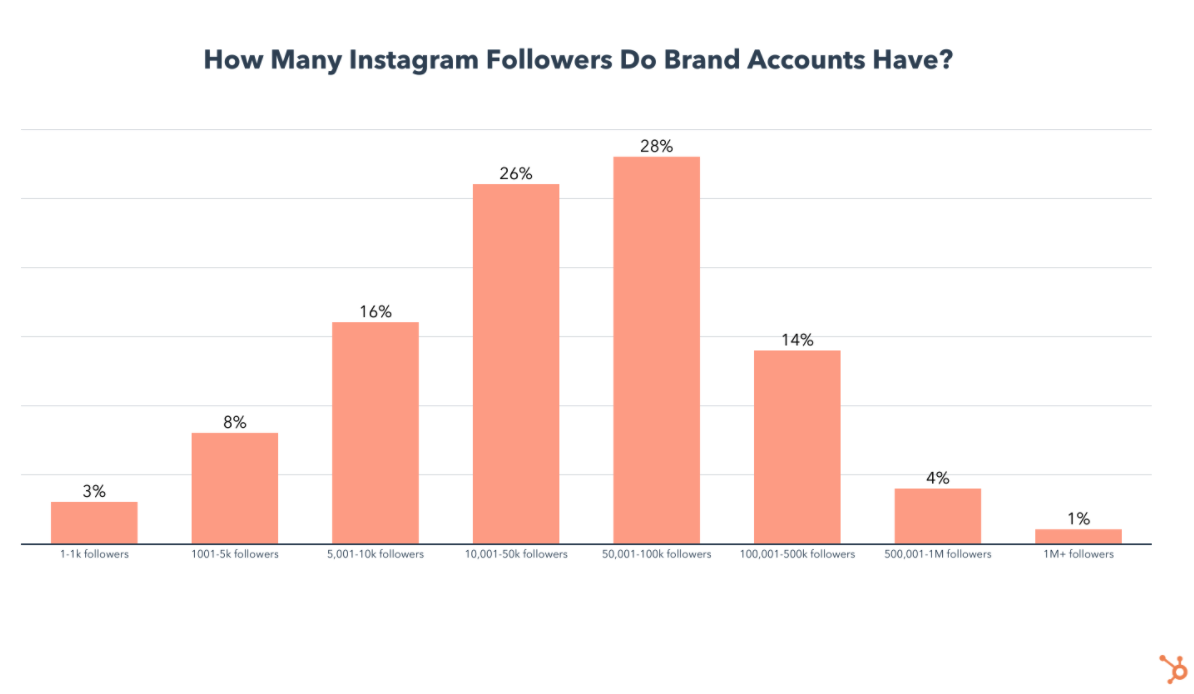
1. Over half of branded Instagram accounts have between 10K-100K followers.
More than a quarter, or 27%, of branded accounts have under 10,000 followers, while 19% have over 100K. Regardless of the size of your community, stay tuned for a breakdown of the top strategies for growing your Instagram following.
2. Impressions can come from anywhere on the platform.
Hashtags, Explore, and Profile, are all tied at 19% for the top Instagram impression sources, but Home and Location are just slightly behind.
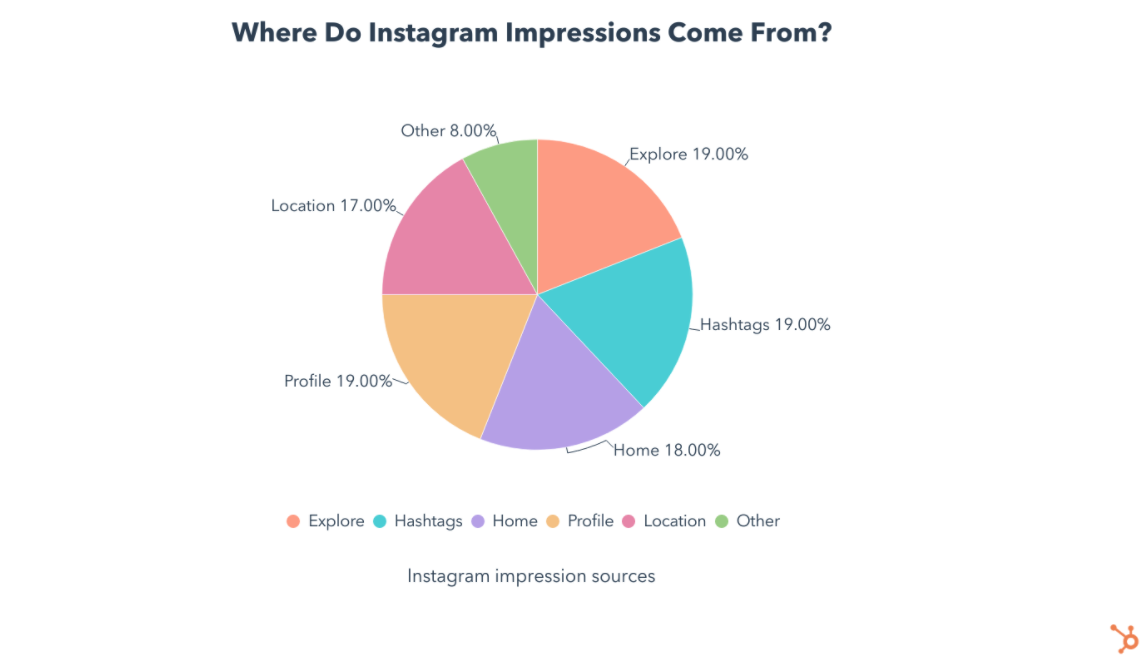 Hashtags and Profile are more easily discoverable by search, so make sure your handle and hashtags are search-optimized.
Some posts may do exceptionally well due to a certain combination of hashtags you used, or thanks to the algorithm suggesting your content on the Explore page. Take a look at where the impressions came from on your top posts and keep an eye out for any patterns you can turn into a consistent strategy to re-create your success.
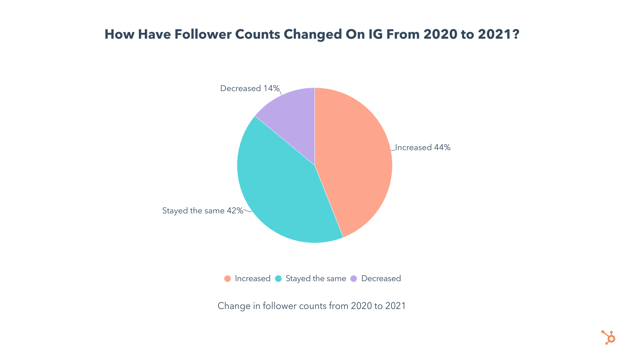
3. Less than half of business accounts have major YoY follower growth.
But, this doesn’t mean brand accounts are dramatically losing followers. In reality, only 14% report a loss while 42% have a stagnant following.
Now that we’ve gone over some benchmarks, let’s talk about goals and strategies.
Instagram Marketing Strategies
Top Strategies and Goals of Instagram Marketers
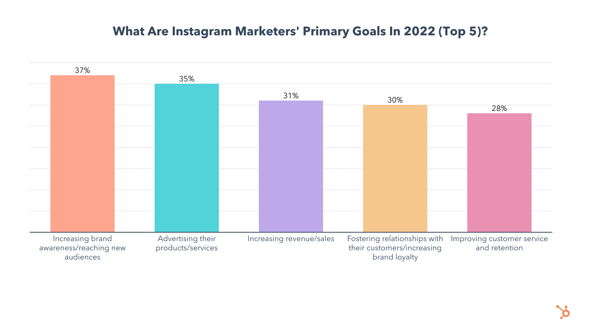
With all the changes coming to the platform, marketers’ goals on Instagram are also shifting.
The top goals Instagram marketers have for 2022 are increasing brand awareness/reaching new audiences, advertising their products/services, increasing sales, fostering relationships with customers/increasing brand loyalty, and improving customer service and retention.
Let’s talk about each of these goals in terms of how they relate to Instagram’s changing platform.
1. Spreading Brand Awareness with Content Like Videos
Instagram has made clear that its focus is turning away from photos and toward video content. Not only does this indicate that Instagram users are more interested in seeing video content, but we can assume that video content will be more likely to be suggested to users by Instagram’s algorithm.
But which type of videos should you be making?
If the amount of Reels present on your Instagram feed and explore page didn’t give it away, Instagram also added a dedicated tab for Reels in the navigation bar to drive the point home — Reels are taking over.
And it’s not just Instagram — our social media trends survey found that short-form video is the most popular and effective format across all social platforms.
So to reach the widest audience on Instagram this year, focus on videos, especially Reels.
2. Driving Leads and Conversions With Instagram Advertising.
Advertising products/services is another top goal for Instagram marketers, and they will accomplish this by creating content showcasing their products/services and leveraging Instagram’s new shopping tools.
Content centered around a brand’s products/services is the second most popular type of content among Instagram Marketers and has the second-highest ROI of any content type.
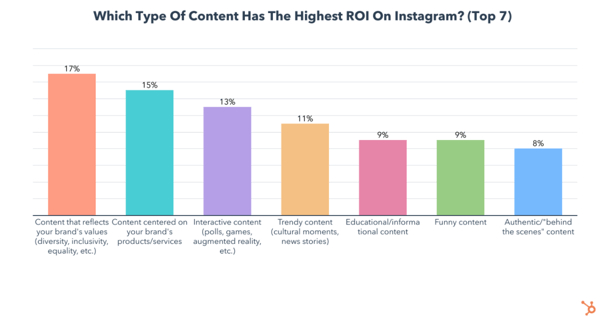 My survey also found that marketers who leverage this type of content are 13% more likely to say their Instagram strategy was effective last year than those who don’t.
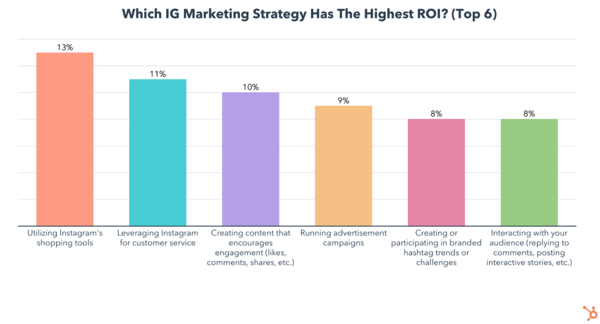
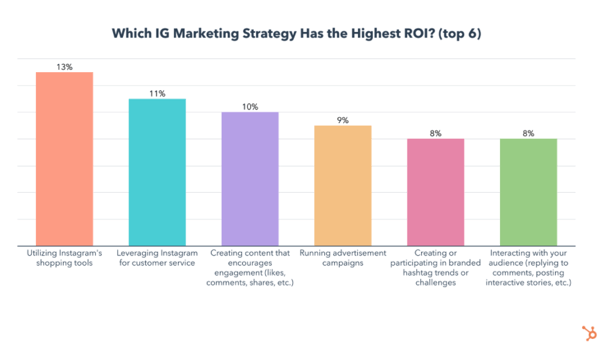
However, the most popular and most effective Instagram marketing strategy is leveraging the app’s shopping tools. But with a handful to choose from, let’s take a look at which ones perform the best.
3. Gaining Revenue With Instagram Shopping Tools
Although Instagram Shopping tools are still rather new and evolving, Instagram Shopping strategies offer the highest ROI and are already used most by Instagram marketers.
While just 37% currently use the app’s shopping tools, 94% of them will increase or maintain their investment this year. On top of that, one in three plan to use Instagram shopping tools for the first time this year.
Also, marketers who leverage Instagram’s shopping tools are 15% more likely to say their Instagram strategy was effective last year than those who don’t. So which tools perform best?
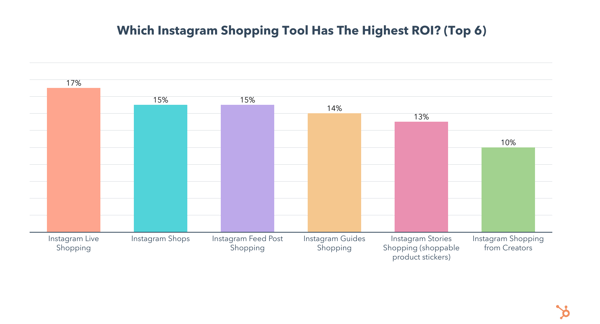
Of the shopping tools, Instagram Live Shopping and Instagram Shops have the highest ROI and are the most leveraged.
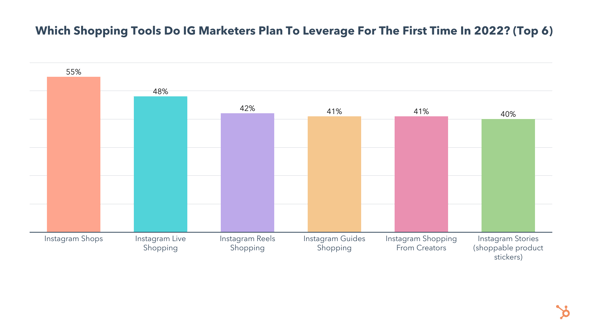
Additionally, the use of both will grow significantly in 2022, with 55% planning to try Instagram Shops and 48% planning to use Instagram Live Shopping for the first time.
Instagram feed shopping posts, Instagram Stories Shopping, and Instagram Guides Shopping are all used by over one in three marketers and are just behind Instagram Shops and Instagram live Shopping for ROI.
Reels Shopping has the lowest use and ROI, however, 42% of Instagram marketers plan to use Reels Shopping for the first time this year, the 3rd highest of any Instagram shopping tool.
Is selling on Instagram right for you? And, what are the biggest benefits and challenges you could see when using it? Stay tuned for a deep dive on even more data that we’ll be sure to link to this post.
4. Building Customer Relationships and Community
The ability to foster meaningful relationships with customers is one of the biggest benefits of having a brand presence on social media platforms, so it’s no surprise that this is a top goal for Instagram marketers that will become even more of a priority in 2022.
Marketers will accomplish this by investing in interacting with their audience and creating content that encourages engagement.
The Importance of Interacting With Your Audience
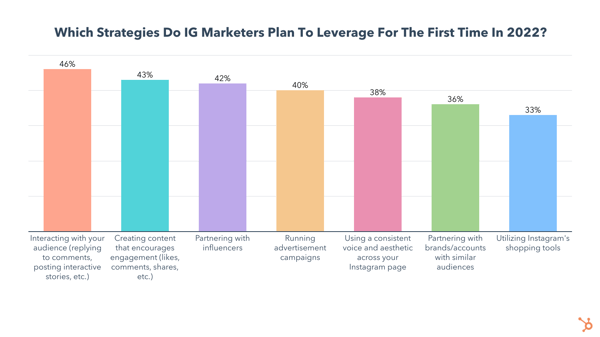
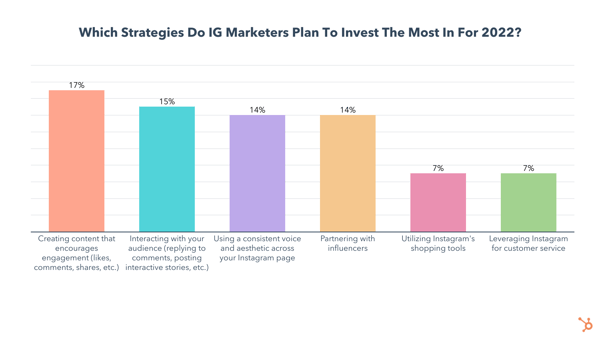
Audience interaction is the #1Instagram strategy marketers plan to leverage for the first time in 2022, with 46% planning to try it this year. On top of that, 15% of marketers plan to invest in it more than any other Instagram marketing strategy.
 Instagram offers a wide variety of ways to interact with your audience, from simple reactions to comments and DMs. Taking the time to engage with your followers can make them feel special and strengthen their bond with your brand. But interaction is a two-way street, so you’ll also want to create content that encourages engagement.
5. Putting Engaging Content Before Other Tactics
Creating content that encourages engagement is the strategy Instagram marketers plan to invest the most in for 2022, with 17% planning to invest more in it than any other strategy.
Additionally, 43% plan to use it for the first time in 2022, the second-highest of any Instagram marketing strategy, and it has 3rd highest ROI of any strategy.
 Encouraging engagement can be as simple as ending your video with a question that your followers can respond to in the comments, running a poll on your story, or going live and having a conversation with your viewers.
Going out of your way to connect with those in your digital community, especially when you aren’t trying to sell them anything, can help foster a deep relationship between them and your brand.
But there’s another great way to leverage Instagram to help serve your customers and keep them coming back – using the app for customer service.
6. Embracing Customer Service
Being a marketer doesn’t mean you should toss good customer service opportunities aside on Instagram. 28% of Instagram marketers say improving customer service and retention is among their top goals in 2022, and with good reason. Leveraging Instagram for customer service is the 2nd most used Instagram marketing strategy and has the 2nd highest ROI of any strategy.
To make the case for providing customer service on the app even stronger, I found that marketers and brands who leverage Instagram for customer service are 17% more likely to say their Instagram strategy was effective last year compared to those who don’t.
7. Leveraging Hashtags
Hashtags have been around on Instagram since 2011, and 82% of Instagram marketers continue to leverage them, with 85% following a documented hashtag strategy. But are they effective?
80% of Instagram marketers say hashtags were effective for their Instagram strategy last year. Furthermore, marketers who leverage hashtags when posting on Instagram are 23% more likely to say Instagram marketing was effective for their brand last year. That number goes up to 30% when looking at those with a document hashtag strategy.
We also found that marketers who use a mix of niche and general hashtags are 20% more likely to say Instagram marketing was effective for their brand in 2021.
Make sure to leverage a few specific hashtags like #Dachsunds along with more popular ones like #Dogs for the best results.
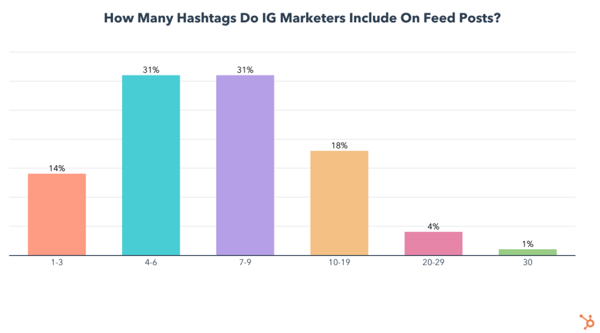
How Many Hashtags Should You Use on Instagram?
Our survey shows that 62% of Instagram marketers use 4-9 hashtags, and only 1% use the maximum of 30.
Also consider using a branded hashtag when posting on Instagram, such as #CocaCola, for example.
53% of marketers say most of the brands they work for use branded hashtags, which can be great for creating a community around your brand and offer an easy way to find posts from or about your brand in one place.
Next, let’s talk about which call-to-action is most effective on Instagram.
8. Including Calls to Action in Content
We asked Instagram marketers whether asking followers to “like,” “share,” or “save” their content is most effective at triggering the algorithm to promote their content, as these are known to be the top metrics Instagram monitors. Here are the results:
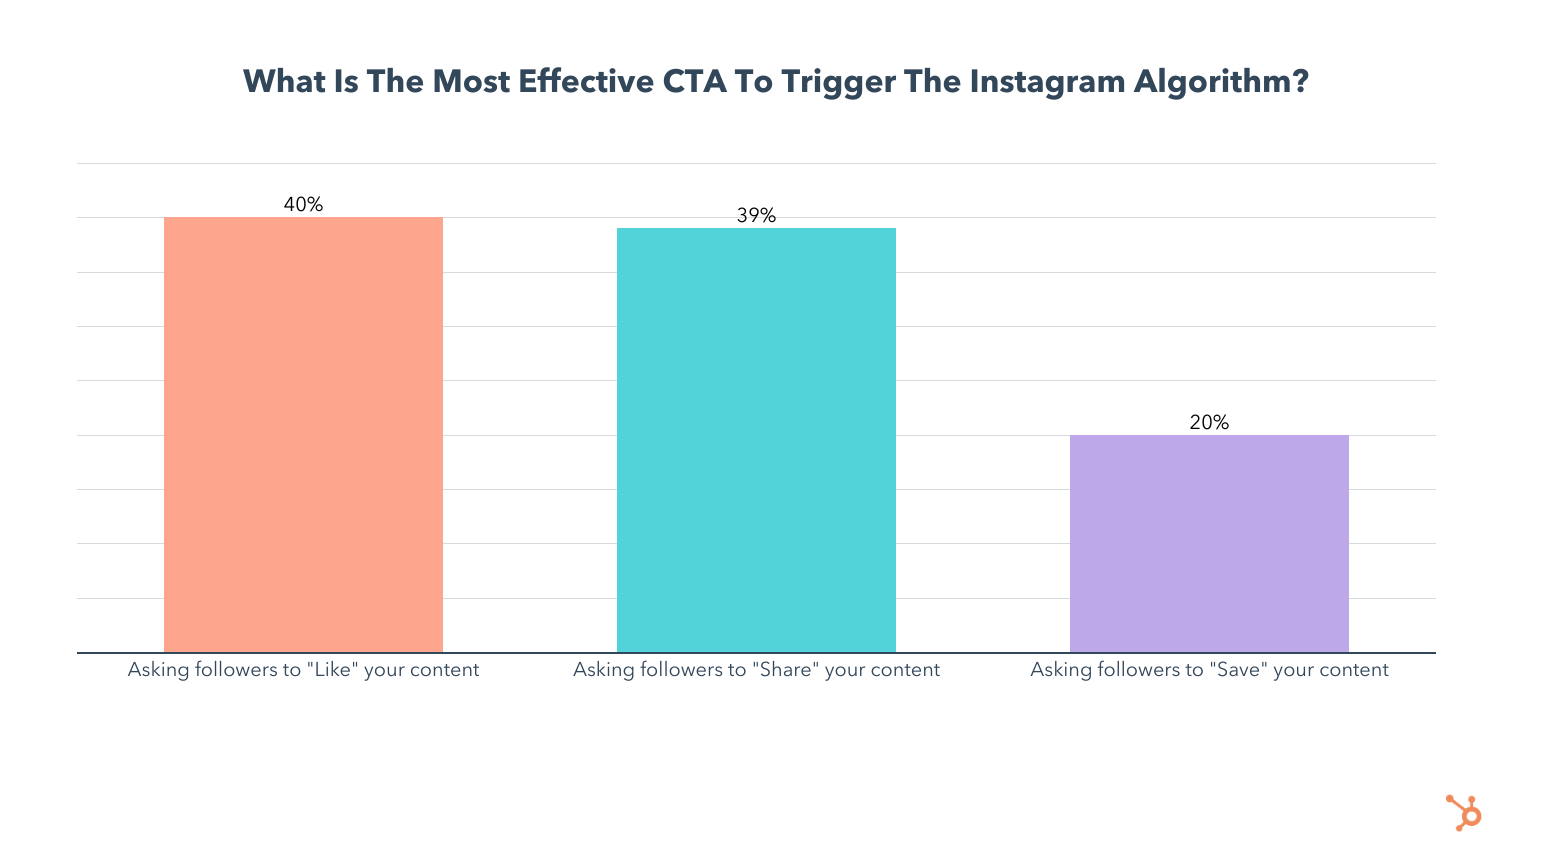
While Instagram marketers rank likes at #1, shares second, and saves last, I would argue that this is backwards.
To explain why, consider your behavior when on Instagram. If you’re like me, you probably give out likes mindlessly while scrolling through your feed, but how often are you sharing content to your story or in chats with friends? How often are you saving posts to look at later? Those pieces of content are probably much more carefully selected.
When we share posts on Instagram, we are telling others that we found the content so valuable that we couldn’t help but share it with them – the algorithm picks up on this. Sharing also gets bonus points because it inherently exposes more people to a piece of content.
Similarly, when saving content, we tell the algorithm that we found it so valuable that we want to bookmark it for future reference.
So while all three of these are the most important metrics Instagram tracks, I would prioritize saving, sharing, or even commenting in your call-to-actions ahead of asking for likes.
Strategies Marketers Aren’t Using in 2022
User-generated content, contests or giveaways, and affiliate marketing have low usage, ROI, and are the least likely to be leveraged on Instagram for the first time in 2022.
While these strategies can still be successful and valuable to some brands, marketers we surveyed say they are not as effective as the other strategies we asked about.
If you’re having difficulty building an effective UGC, affiliate marketing, or giveaway plan, consider alternatives, like partnering with influencers in your niche who can generate authentic content for your brand to establish social proof and spread awareness. Our marketing trends survey found influencer marketing to be the most popular and most effective trend, with the highest ROI.
Now that we’ve gone over Instagram marketers’ goals and strategies in 2022, let’s talk about which formats are most effective on the platform.
Which Instagram Formats Are Most Effective?
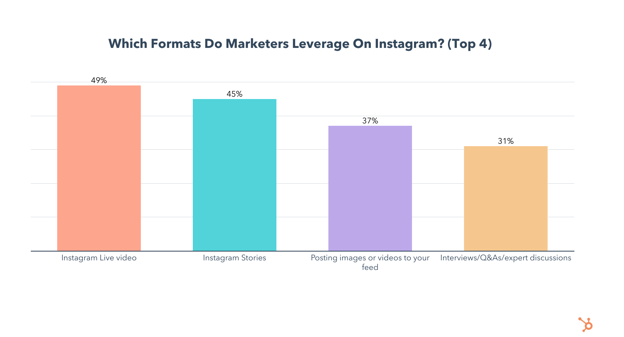
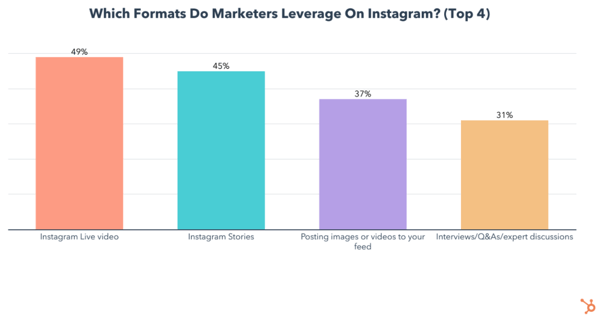
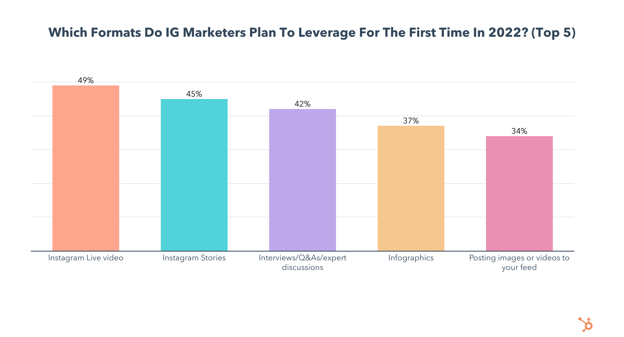
The formats Instagram marketers leverage most are live, stories, and interviews/Q&A/Expert discussions. Let’s take an in-depth look at each of them.
Instagram Live
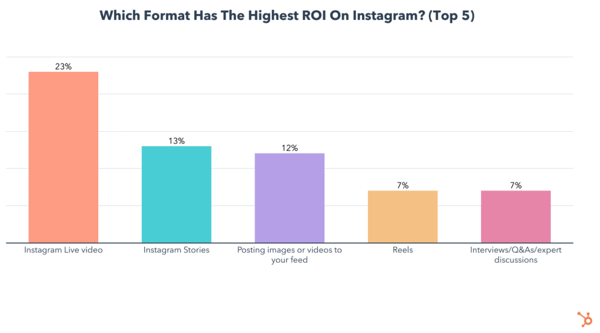
Instagram Live has the highest ROI and use will grow significantly in 2022 as 49% of Instagram marketers will invest in Instagram Live for the first time and 22% will invest more in Instagram live than any other format.
 We also asked Instagram marketers which format is most effective for gaining followers, and Instagram Live came out ahead there as well, though closely followed by stories and feed posts.
Instagram Stories
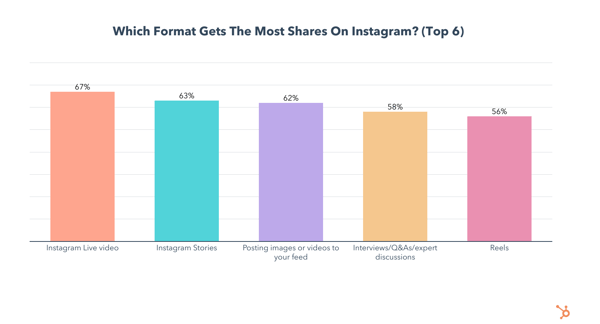
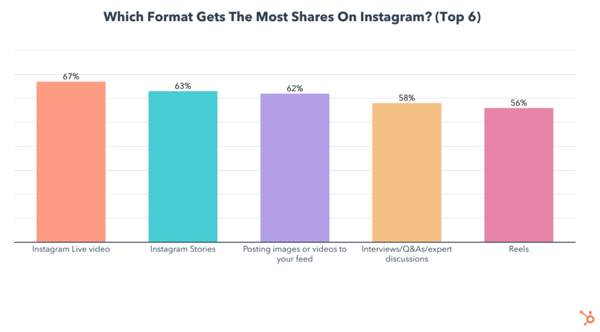
Instagram Stories have the 2nd best ROI and are leveraged by 45% of Instagram marketers. Of those who don’t use it, 45% plan to leverage stories for the first time in 2022, the 2nd highest of any format. Instagram stories are also the #2 format for gaining followers and getting your content shared on IG.
Interviews, Q&As, and Expert Discussions
Interviews/Q&As/Expert discussions are used by 31% of marketers, with 42% planning to try them for the first time in 2022 and 10% planning to invest more in them than any other format.
Instagram Reels
Only one in four Instagram marketers use Reels and just 29% of Instagram marketers plan to leverage reels for the first time in 2022.
While Reels fall in the middle of the pack across all metrics, we believe that this is feature is greatly underutilized and could actually provide unique and new opportunities for brands.
In fact, brands and influencers who have focused on it have seen major benefits to leveraging it. For example, we recently spoke with Kar Brulhart, who has organically grown her Instagram account from zero to 45,000+ viewers in under 10 months using Reels. She told us about the incredible opportunity Reels presents for Instagram marketers:
“I went from less than 2,000 followers in February 2020 to over 15,000 the next month through Reels, because Instagram is pushing Reels to new audiences. And 75% of the people who find my account are coming from Reels — compared to Stories and posts.”
Considering the popularity of short-form videos and the emphasis Instagram is placing on Reels, Instagram marketers may want to give Reels a shot as they are relatively easy to make and can provide a boost in exposure.
Now that we’ve gone over the top formats, let’s take a look at which content types are most popular on Instagram.
Which Types Of Content Perform Best On Instagram?
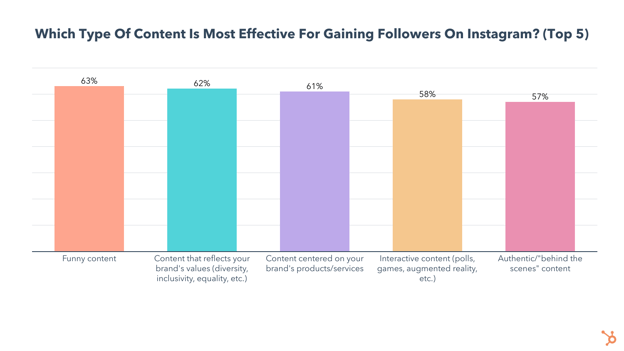
The top Instagram content types reflect a brand’s values, are centered around a brand’s products/services, are interactive, authentic, and funny. Let’s take a look at what makes each of these content types so popular among Instagram marketers.
Content That Reflects Brand Values
Content that reflects a brand’s values was the #1 content type in our social media trends survey and that is also true for Instagram marketers, 44% of whom use it.
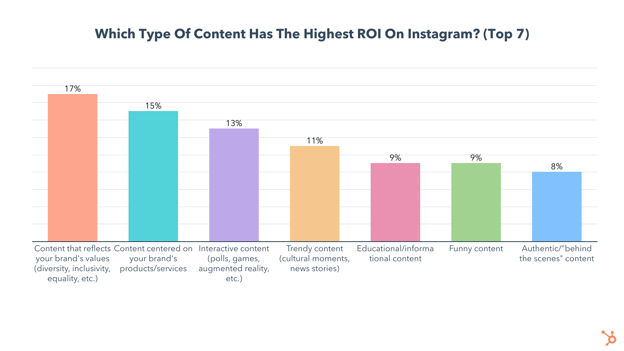
Instagram marketers say it has the highest ROI of any content type. Additionally, 45% say they will invest in it for the first time in 2022, the highest of any content type, and 11% will invest more in it than any other type of content.
Content Centered Around A Brand’s Products/Services
Content centered around a brand’s products/services is leveraged by 39% of Instagram marketers and has the 2nd highest ROI. 39% will leverage this type of content for the first time in 2022.
 Interactive Content and/or Authentic/Behind-the-Scenes Content
Interactive content and authentic/”behind the scenes” content are both popular among Instagram marketers and will grow in 2022.
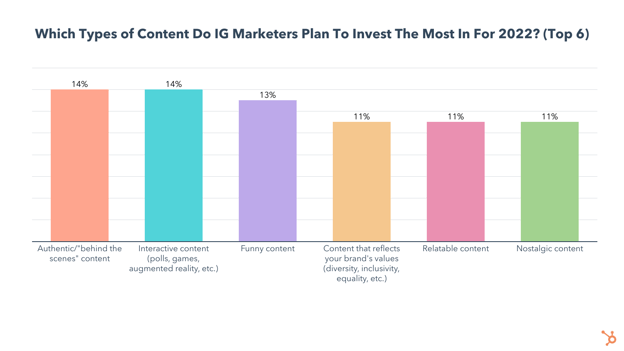
44% of Instagram marketers plan to leverage interactive content for the first time in 2022, followed by Authentic/”Behind the scenes” content at 40%. Both are tied at the #1 spot for the content type marketers plan to invest more in than any other in 2022.
Funny Content
Funny content is the most effective for getting followers, shares, and engagement on IG.
Now that we’ve gone over the different Instagram formats and content types, let’s dig into the top strategies for growing your following on Instagram.
Instagram Audience Growth Benchmarks
How Brands Grow Instagram Audiences
To grow your following on Instagram, the top 3 strategies are posting interactive and engaging stories, engaging with other users, and partnering with influencers.
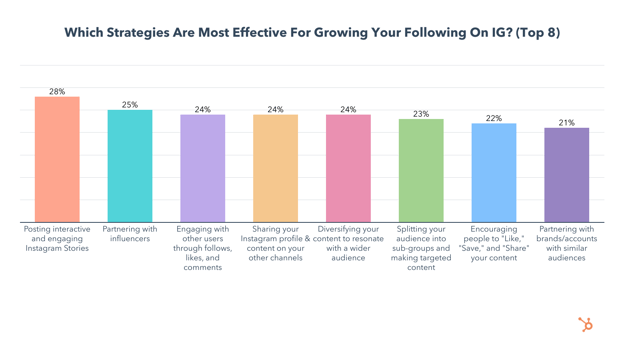
At #4, sharing your Instagram page and content on various channels, like other social media platforms or your website, is also important for growth.
The next most popular strategy is diversifying your content to resonate with a wider audience, but you’ll also want to study your audience for trends and make targeted content to attract others with similar interests.
Another powerful growth strategy is adding a simple call-to-action to “like,” “save,” or “share” your content at the very end of your captions – if someone read it all the way through, they probably got value from your content and will be inclined to comply. If users take these actions, it will give your content a boost in the eyes of the algorithm and put it in front of more people, who may end up following you.
Lastly, you can also get a boost in growth by partnering with brands or accounts in a similar niche, as their audiences will likely be interested in your content as well.
These are the best strategies to grow your following in general, but we also asked marketers about the top strategies they used to reach their first thousand followers, and the results show some key differences.
How To Get Your First 1,000 Instagram Followers
Earning your first 1,000 followers on Instagram is a massive milestone, and 78% of Instagram marketers have been part of growing an account to 1k followers. According to them, creating shareable content and captions, as well as using relevant hashtags are key to reaching your first 1k followers.
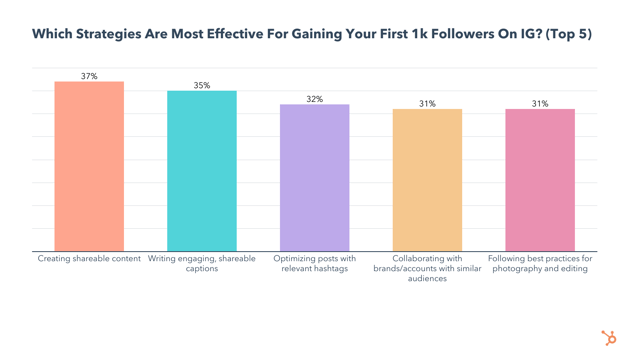
Remember that the formats most effective at getting shares are live video, stories, and feed posts, while the top content types for shares are funny, interactive, and reflective of your brand’s values.
Now that you know how to reach 1,000 followers, you may be wondering how long it might take.
How Long Does It Take To Reach 1,000 Followers On Instagram?
Around 1 in 4 Instagram marketers reach 1,000 followers in 1-3 months, while 39% say it takes 4-6 months. Only 13% were able to reach the 1k milestone in under a month, and just 1% took over a year.
But just as you gain followers, it’s also possible to lose them. Let’s take a look at what has caused Instagram marketers to lose followers, so you can avoid those mistakes.
What Causes Instagram Marketers To Lose Followers?
Not posting enough and being too “sales-y” are the top culprits when it comes to losing followers. 1 in 3 Instagram marketers also report losing followers from posting too often and not being consistent with their brand voice or aesthetic.
Lastly, using “banned” hashtags can result in your posts being hidden. You can check if a hashtag is banned by searching it on Instagram and looking at the top or most recent posts — if those sections come up empty, it’s likely banned. 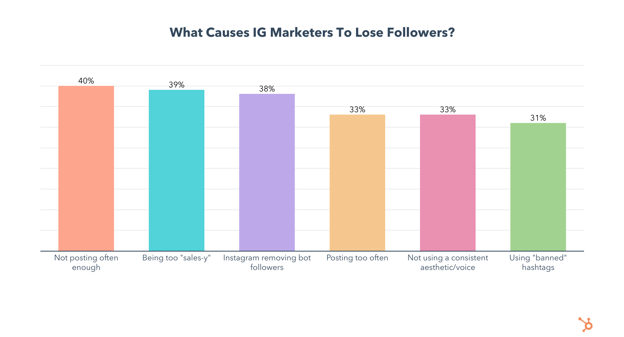
Speaking of hashtags, we asked marketers how many they use, and whether broad or niche hashtags perform better. Let’s take a look at the results.
Instagram Video Features
In line with Instagram’s video-centric changes, 82% of Instagram marketers currently post videos on the platform, and those who do are 16% more likely to say Instagram marketing was effective for their brand last year.
The most popular video formats among marketers are Instagram Live, posting videos to their stories, posting videos to their feeds, and Instagram Reels.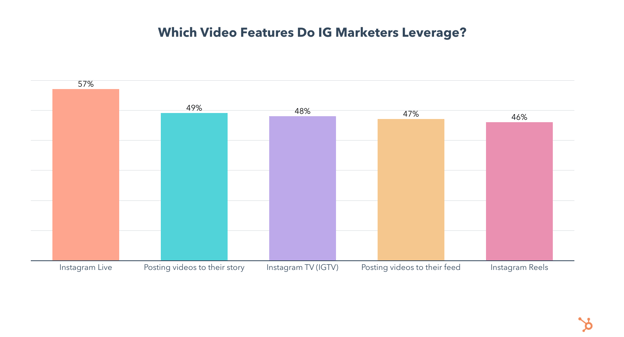
So let’s take a look at some feature-specific data on each of these.
Instagram Live
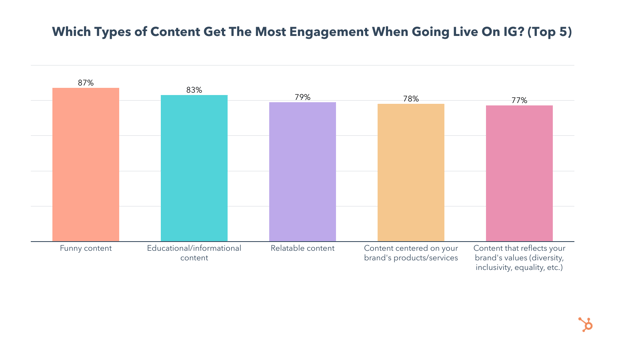
Instagram live is not only the most leveraged video feature, but marketers who use it are 22% more likely to say that Instagram marketing was effective for their brand last year. Here are the content types that get the most engagement when going live on Instagram:
Instagram Stories
78% of Instagram marketers leverage stories, and those who do are 23% more likely to say that Instagram marketing was effective for their brand last year.
But how often should you be posting stories? 43% post stories multiple times a week, while 26% post multiple times a day, and 23% post daily.
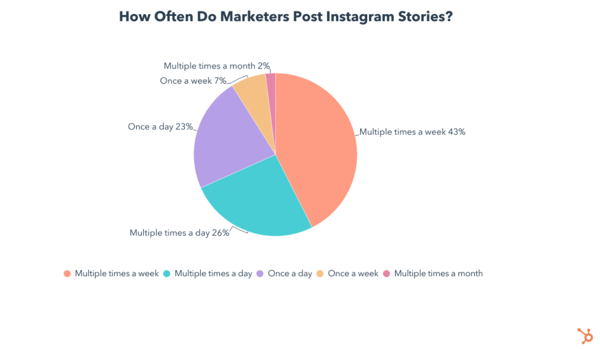 Another common question is how long stories should be. 75% of Instagram marketers who leverage stories say their audience watches 4-9 story pages before dropping off, with only 7% saying their audience watches the entire story regardless of length.
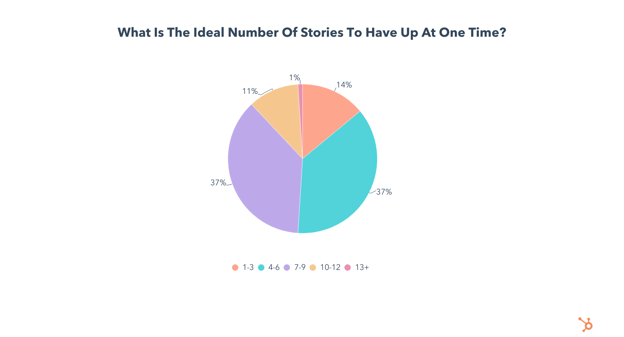
We also asked about the ideal number of stories to have up at once – 74% of Instagram marketers say 4-9 stories is best:
Curious about which story types are most engaging? Check out this post.
Instagram Feed Posts
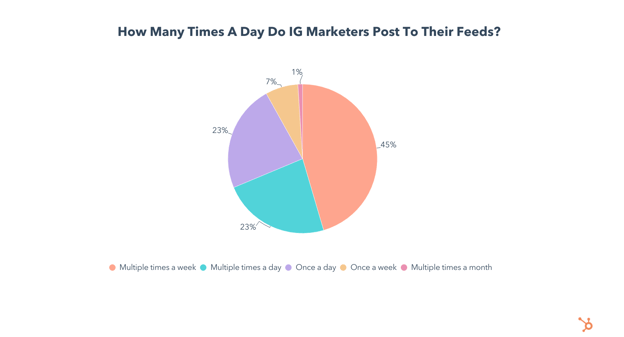
Though not exclusive to video, the modern Instagram feed is dominated by video content. 80% of marketers post to their feeds in their marketing role, but the frequency of their posting varies, with 45% posting multiple times a week, 23% posting once a day, and another 23% posting multiple times a day.
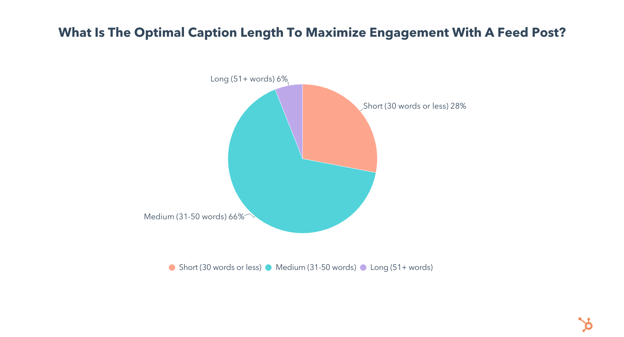
You may also be wondering about how long your captions should be when posting to your feed. 2 in 3 marketers say the optimal caption length to maximize engagement with a feed post is medium (31-50 words).
For a deeper dive on this, check out this post on instagram video formats.
Next, let’s take a look at whether Instagram marketers are leveraging organic or paid media on the platform, and which performs better.
Organic vs. Paid Instagram Content
Among those who use a mix of paid and organic content, paid content is somewhat more effective for reaching business goals and for gaining followers.
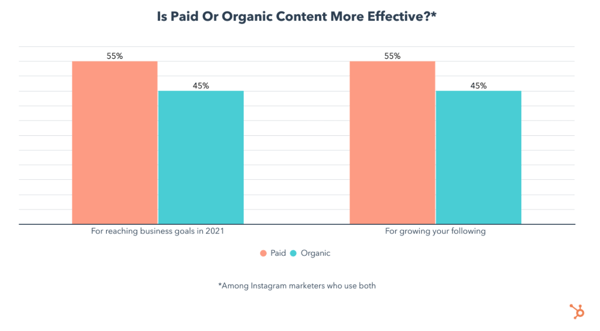 However, effective marketers are 20% more likely to leverage both organic and paid content compared to those who described Instagram as ineffective for reaching their business goals in 2021.
Speaking of effective and ineffective marketers, let’s end with a look at what sets the two groups apart.
Setting Effective and Ineffective Instagram Marketers Apart
Lastly, we asked Instagram marketers whether Instagram marketing was effective or ineffective in 2021, and looked at the data by the two separate groups. Here are some of the biggest differentiators: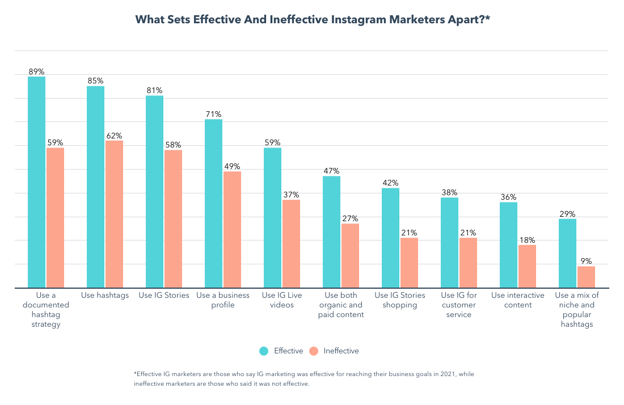
As we end this post, here are a few themes we’ve picked up from the chart above, and the overall results of our survey:
- Video is key: Instagram is constantly evolving to welcome more and more video formats. While you don’t need to create a large live video event, consider starting small with Reels as it is being favored by consumers and the Instagram algorithm.
- Engage constantly: Whether you’re responding to their comments, exchanging DMs, or creating content that sparks a conversation – it’s important to ensure that your Instagram strategy caters to your audience and meets them where they are.
- Social Shopping is the future: Shopping on social media is the future of e-commerce, and Instagram is the best place to do it. With a handful of shopping tools to choose from, there is no better time to get started.
- Use Instagram for customer service: Using Instagram for customer service is a quick and convenient way to answer customers’ most pressing questions, and marketers who use it see high ROI.
- Hashtags aren’t going anywhere: Hashtags are highly searchable, make your content more discoverable, and most marketers who use them plan to continue doing so. While you shouldn’t go overboard with too many hashtags, consider how you can leverage them creatively within upcoming content or if there are ways you can participate in hashtag trends on the platform.
More of Our Instagram Marketing Research
Check out these posts for a deeper dive as well as tips and tricks related to our Instagram marketing data.
- The Top Instagram Marketing Challenges
- The Top Reasons Brands Lose Followers
- Do Brands Use Instagram Shopping Tools? [Data from 500+ Marketers]
- Which Instagram Story Formats Really Engage Viewers [New Research]
Interested in learning even more about Instagram marketing and engagement from some of our expert partner brands? Be sure to download the free resource below.

TikTok Is Exploring Stories & Long Videos: Will Marketers Even Care?
When TikTok went viral in 2019, pulling in millions of global users nearly overnight, almost every major social media channel quickly pivoted attention to short-form videos.
While Instagram – which notably innovated on Snapchat Stories – launched Instagram Reels, YouTube – known for its longer-form videos – launched YouTube Shorts.
Now, TikTok seems to be taking on its biggest social media rivals yet again by exploring two familiar — but still surprising — features: TikTok Stories and 10-minute video capabilities.

If you love the short-form, in-feed, and non-ephemeral nature of TikTok’s platform, you might be surprised that they’re now launching features that other platforms are famous for – rather than continuing to make their own unique offerings.
You also might wonder, “Will these features make TikTok a more applicable channel for my brand?” Or, “Will TikTok’s Stories and long-form content go unnoticed and eventually be discontinued – just like Twitter Fleets?”
To help marketers try to determine if these features will make a difference in their TikTok or social media strategy, I’ll highlight how they work, why TikTok’s launching them, and if they pose any opportunities for brands.
We’ll discuss TikTok Stories first. But, if you’re just interested in long-form video instead, click here to jump down to that section of this post.
TikTok has expanded its Stories feature pilot after initially testing the feature in a few select countries like Brazil in Q1. While TikTok has not yet published a press release about Stories or pilot results, U.S. users began to see a notification announcing the feature on apps throughout the past month.
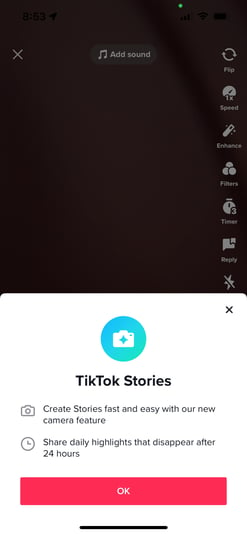
As many marketers already know, this pilot comes after most major social media platforms including Facebook, Twitter, Instagram, and even LinkedIn have launched or explored their own version of this feature.
What’s the Story with Stories?: A Quick History
At the HubSpot Blog, the evolution of Stories features across social media platforms has taught us one thing: When one platform develops a viral feature, other major platforms will follow suit with an incredibly similar option.
Stories began on Snapchat, the first well-known ephemeral app where users could create a series of videos or pictures on their profile – or a Snapchat Story – that would only show up for 24 hours. Users could also send “Snaps” or a series of disappearing Snaps to other users who could only see them when they opened their message.
Soon after Snapchat attracted millions of users with ephemeral content, Instagram launched Stories as a key part of its platform. Then, soon after that Facebook, LinkedIn, and even Twitter launched Story or Story-like features. While Facebook, LinkedIn, and Instagram still host Stories today, Twitter has disbanded its version – called “Fleets” and Snapchat has steadily lost interest from consumers and brands.
How to Publish a TikTok Story
If you are in the U.S. or another country where the feature is now available, creating a story is very similar to creating standard TikTok content.
1. Open TikTok’s Post tool.
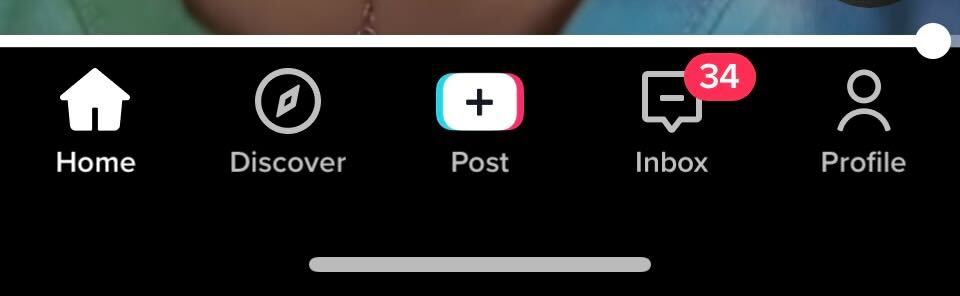
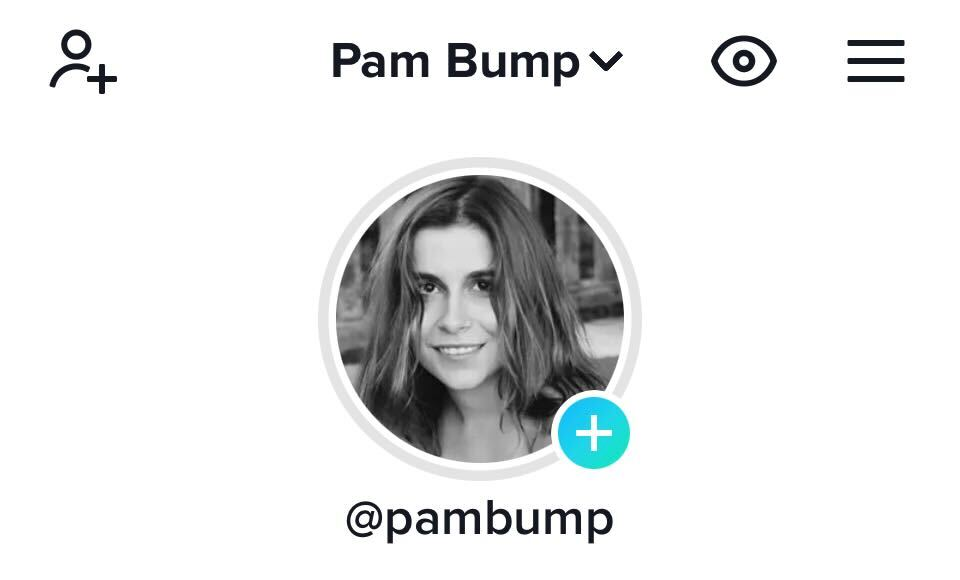
First, you go to your profile and press the turquoise plus (+) on your profile picture, or go to your feed and press the Post button. You can also find a post button in the center of TikTok’s bottom navigation.
2. Make your content.
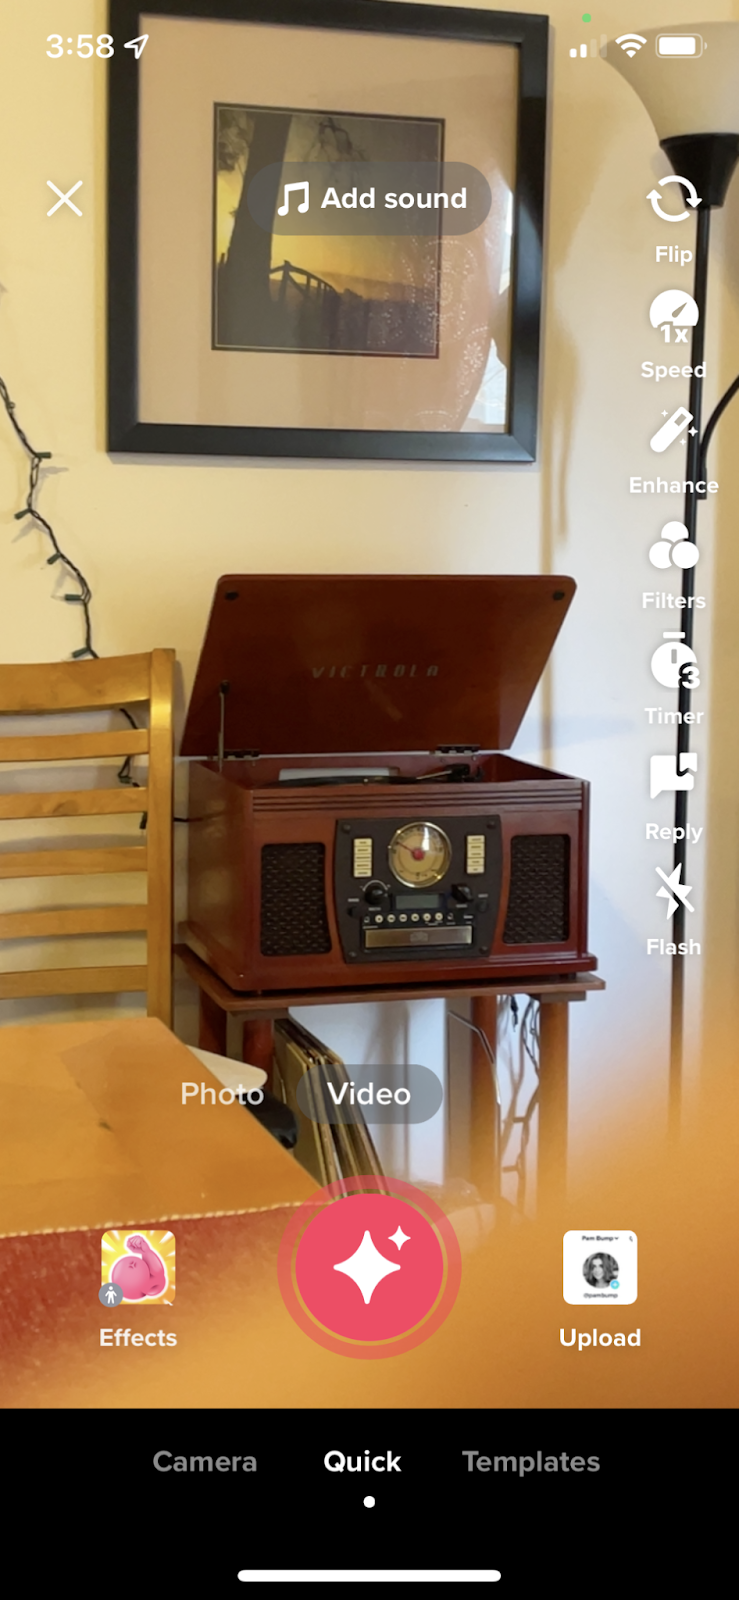
Create a video, or upload or take a picture. Then add any background music, text, or effects as you would with any TikTok video.
3. Determine if your content is a Story or TikTok.
When you’re done recording or selecting a photo, you’ll see two options: Post to Story and Next. Tapping Post to Story will automatically send it to your Story and For You feeds of other users.
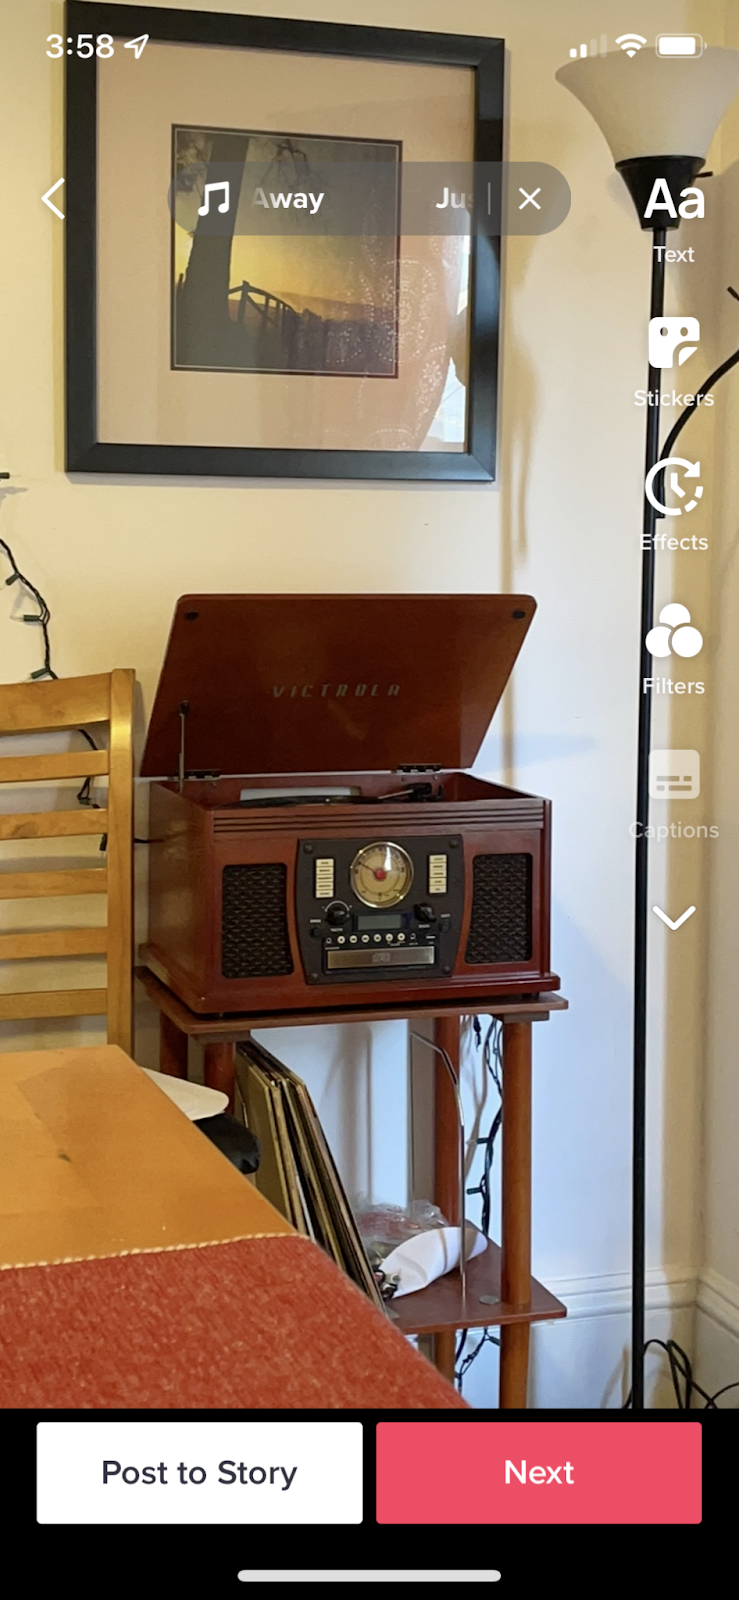
One thing worth noting is that if you post a photo to your story, you’ll want to select a piece of music to go with it. Otherwise, TikTok will choose music automatically. In my case, this image was posted to my first test Story with an auto-selected Bruno Mars song.
If you tap “Next,” and don’t post the content to your Story, you’ll be sent to the last page you usually see before posting a permanent TikTok, which allows you to add a description to TikToks while also adding privacy and sharing preferences.
Because Stories are ephemeral, it seems that TikTok doesn’t allow you to add a description, hashtags, or privacy settings when you publish, which is important to keep in mind if your brand requires extra settings on your content.
Viewing a Story
There are three ways to view Stories. All are a bit tricky and sometimes rely on happenstance.
1. Sit back and swipe into new Stories.
Stories from people you follow or accounts you might be interested in will show up in the For You page feed of the TikTok app along with standard TikTok videos. While they might not have a hefty description, you can still follow the account that posted it or “Like” the content like a regular TikTok video. However, some features, like video replies, will be disabled because this content is meant to be ephemeral and will disappear after 24 hours.
2. Find Stories through “For You Page” navigation.
Open up TikTok and go to your For You page (a.k.a. your main feed). As you swipe through, pay attention to the engagement and sharing navigation buttons on the right of each video. When you see a profile picture with a turquoise ring around it, tap it to see the account’s story.

3. Find Stories on TikTok Profiles
Go to a profile of a TikToker you enjoy and look at their profile picture. If the ring appears around that profile picture, you can tap it and be sent to their story.
Should You Leverage Stories?
The jury is still out on whether Stories will become a hit on TikTok. From a simple swipe through my feed, it was pretty hard to find people who were actively using them already. However, this feature is still very new and could grow in use as more people become aware of it.
Additionally, when accounts do use Stories, it essentially feels like a temporarily published TikTok video. It’s also not clear yet if posting a series of videos to your Story will be as effective as posting permanent TikTok videos with a “Part 2” link in the comments.
For example, the screenshot below shows a TikToker linking a follow-up video in the comment thread of another TikTok video where she demonstrates how to use a STEMPLAYER to isolate the vocals in Adele‘s music.
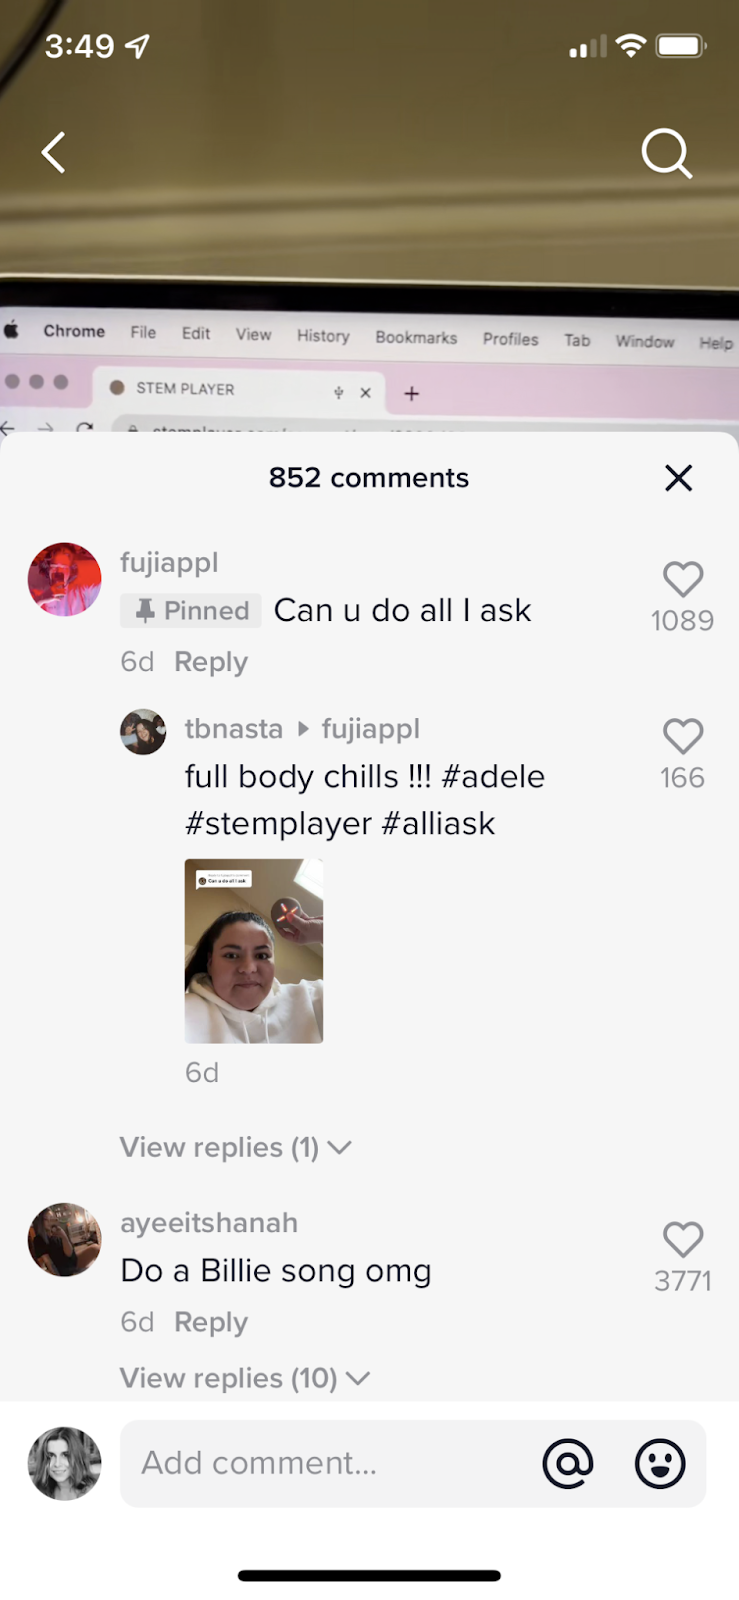
Because of the engagement of Stories compared to linking permanent TikTok content together, some TikTok users might be more interested in growing their following and evergreen views with more permanent content.
Aside from lower usage, one thing that could also hold TikTok Stories back is the features barriers to discoverability on the platform. However, while it might not be as easy to find Stories right now because it is still in the pilot phase, this could change if the app fully embraces them with a Stories page or search features as Instagram has.
At this point, Stories shouldn’t be the reason your brand decides to go on TikTok. You’ll ultimately want to look at its entire assortment of features, audience, and consumer behavior to determine if your brand is a good fit.
However, if you already have a TikTok following and have time for light experimentation, posting a light-lift, on-brand test story likely won’t hurt your following. It’s possible that unconfirmed TikTok algorithms might even give you a boost.
Multiple high-performing TikTokers I follow say they expect to see TikTok Stories get a discoverability lift in various TikTok feeds as the algorithm might favor or push content that leverages new features. While TikTok hasn’t spoken about this at length or publicly, here’s some example of advice from a user with over 350,000 followers.
If you do experiment with TikTok Stories, here are a few things to keep in mind:
- Cater your Stories to TikTok’s audience and platform: Stories should be fast-paced, value-packed, or interesting in another way to the TikTok audience.
- Stories will need promotion: It can be incredibly easy to miss Stories because there is not a designated location for them on the app. Users primarily know a Story is available when a profile image is outlined on the right navigation of a TikTok video. If you have a story you want people to see, consider making a TikTok that goes over the topic and encourages people to watch that story.
- Determine if views or followers are most important: One way many accounts gain followers is when users click the plus sign on the profile icon that appears in video navigation. But, when you publish a story or launch a live event, tapping the profile picture just leads to this content. This is important to keep in mind if you want to gain followers quickly.
Long-Form Video on TikTok
In 2022, TikTok enabled all users the ability to add videos that were up to 10-minutes long. The company began exploring long-video features in the summer of 2021 by allowing just a select group of users to use them first. In its initial announcement of the long-video pilot, TikTok explained that the move aimed to give creators more tools and flexibility.
“Creative expression brings people together. It’s how we connect with our communities. It’s how we entertain, educate, inform, and inspire each other. This is also why we’ve focused on providing our community with a range of tools to help unleash their creativity – longer videos are now one more tool people can use to captivate the community with their creative expression,” read the statement.
Since then, the feature eventually rolled out to all users – who can now create videos that are up to 10 minutes long. And, to many of us, this continued rollout is still a bit surprising.
When TikTok began to go viral as a host for 1-minute videos, it seemed like an answer to Vine, a once viral and notably discontinued short-form video app. Even as viewership grow, TikTok still kept videos short by only eventually allowing a max of three-minute videos. Not only has TikTok strayed away from long-form in the past, but the platform’s virality led many brands and social media channels to recognize how consumers were shifting to short-form video consumption.
While a post from TikTok explains that videos over one minute long have driven more than 5 billion global views, the platform still seems driven by short-form content, aside from occasional live streams that appear in the For You feed.
Why is engagement so important? While TikTok might give an unconfirmed initial boost to creators who use its new features, the company has shared that its algorithm is partially driven by engagement. Content with lower engagement will be deprioritized in its feed. Thus, if someone posts a video that feels too slow to start, boring, or too long, they could swipe to the next video in the feed before it ends, avoid liking or commenting on it, and might not follow the account holder. As a result, the content could be deprioritized.
While this shouldn’t necessarily discourage you, it shows that you should still be strategic about what you’re posting on TikTok’s fast-paced platform and how long it really needs to be to grab attention and engagement.
Should You Post Long TikToks?
While slightly longer TikTok videos or even TikTok Live could be a great way to engage your TikTok while also potentially getting an algorithmic boost from the app, keep in mind that much of TikTok’s audience tends to prefer things short and sweet.
If you do want to test out a longer video, you can simply go to create a TikTok and film or upload content that’s up to 10-minutes long.
Ultimately, you’ll receive solid engagement and memorability on fast-paced apps like TikTok if your videos quickly and concisely pull viewers into the action and give them all the key information they need. If you do go beyond three minutes, your content will need to be incredibly interesting. Otherwise, the second a user loses interest, they’ll move on to the next video with just a quick swipe of their finger.
TikTok Pivots: Desperation or Competitive Maturity?
When TikTok first went viral, it was the go-to app for short-form videos. But now, as it matures at the top of app store and website charts, it’s starting to become a go-to platform for all things video.
And, while TikTok expanding to Stories and long-form videos might seem like a surprising play, the brand isn’t necessarily wrong to test these popular social media features.
Ultimately, once virality has been reached, platforms need to expand to have sustainable growth. Why? Because older competitors will likely copy or innovate on the unique features of smaller or newer platforms.
In 2019 and 2020, TikTok was in that situation. Although the app was viral and getting huge attention from brands, competitors like Facebook, Instagram, YouTube, and Twitter quickly began testing short-form video features. Yet, TikTok’s successfully kept growing and competing with these channels because of its continuous pivots, pilots, and evolutions. Essentially, TikTok is doing exactly what its competitors have done to capitalize on its features.
While TikTok was once that cool, edgy app that some had ever seen anything like before, it’s maturing into a channel that millions of people use daily. Sometimes, remaining relevant as you grow means you must release and test both never-before-seen and competitive features.
Is TikTok Right For You?
While some brands aren’t the best fit for TikTok and others still need to learn more about the platform to leverage it, this platform isn’t going away any time soon and it’s constantly growing and changing. Even if long-form content and Stories don’t become a hit on the app, the platform might still be relevant for your brand one day and is worth keeping on your radar.
It’s ultimately up to you to decide whether these features will intrigue your TikTok audience or if TikTok is even right for you. For more help on that front, download the free resource below.


How to Turn a Case Study into a Customer Success Story [+ Tips from HubSpot Marketers]
Expression, passion, style, persuasion, authenticity.
These five elements encompass a customer success story — a transformation from a regular case study to an enticing piece of content that encourages a reader to explore what your company has to offer.

When people think about writing a case study, they might feel a daunting rise of tediousness, or perhaps writer’s block. In this article, we’ll dive into each step you need to take to create an engaging customer success story and convert leads.
Why should you tell a customer success story?
Case studies are more than proving your company’s achievements. Through eloquence and thoughtfulness, you can demonstrate your product or service’s power by telling a real story.
Think about it: Real customers use your product. Real employees deliver successful projects. Real customers, real professionals, real people.
What does that look like? Well, it’s educating a prospect through a thoughtful perspective, and answering the following questions:
- How did the client feel at the beginning versus the end?
- What struggles did the project manager face?
- How did they feel when they overcame them?
These questions will help you pull the key sections of your story and craft together a compelling piece of content.
Turning a Case Study into a Customer Story
1. Find the right client.
To get started, ask your project management or sales team about their latest projects and which one stood out.
You’re looking for a client with a uniquely knotty problem, one that your company was able to solve. The more complex the project, the more you can show off your company’s skills.
If most of the projects seem standard, pick the client that was the most hands-on and the most responsive. The more involved the client, the more likely they are to give you more information in their interview.
Send an Enticing Email
Before you begin, get permission from the client and inquire about their interest in participating in a case study. You can incentivize them through social media publication, tagging their company on all social platforms, and including a link to their website at the end of the case study.
Here’s an example from Trujay that you can use to write an enticing email to your client:
Hi [Name],
My name is [Your Name], I’m a [Job Title/Position] here at [Company Name]. I’m so pleased to hear your experience with us was worth it! We’re glad we could make all the needs of your project happen and hope you continue to enjoy the results.
Since your project was such a success, I wondered if you would be interested in participating in a case study. We like to inquire about this opportunity to only a few select customers because we find some projects have a compelling story. Yours happens to be a particularly special project, and we’d love to promote your brand by showcasing the results.
All you would have to do is answer six questions about your experience of working with us. You may answer them directly in response to this email, or we can have a phone or video call. Whatever way you’d prefer! Most of our clients like to copy and paste the questions in response and simply fill in the answers.
If you would like to interview over [Zoom, Google Meet, Skype, Other], let me know a good time and date that works for you. The call shouldn’t take more than 30 minutes.
I’ve attached a few examples of previous success stories to get a feel for the final product. We also conduct a social media campaign so you and your company can get as much exposure as possible.
We thank you for using our services and wish you the best of luck in your future endeavors! Should you ever need our services again, know that [Company Name’s] got your back. We hope you find interest in participating and look forward to hearing from you.
Warmest,
[Email Signature]
Once you have permission, let your project management or services team know that a case study is underway.
2. Create interview questions for both project manager and client.
You’ll want to create two sets of questions — one for the project manager, and one for the client. These questions will give way to both sides of the story, enlightening you on the experience from both ends.
Client Questions: The Background
The formatting of the client interview questions is essential. You want to get as much detail as you can without overwhelming the client with loaded questions.
Client interview questions are straightforward and relate to a customer’s company, goals, passions, and plans. You want to find out how your company solved a significant problem through the clients’ perspective. What did the project management team accomplish, in their eyes?
First, get four pieces of standard information:
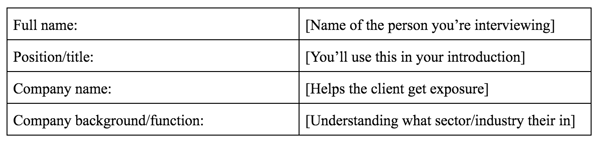
Here’s an example of how you’ll use this information in your introductory piece and throughout the success story:
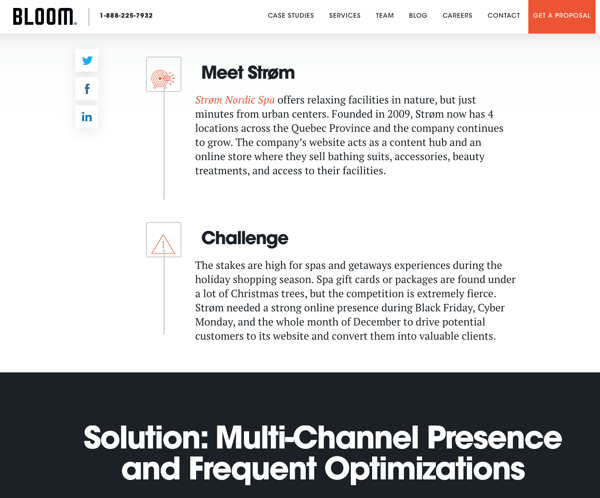
Once you introduce the interviewee and their company clearly and thoughtfully, the client interview questions will shape the rest of your story.
Client Questions: The Real Story
First, you want the client to describe what their previous experience was. What didn’t they like about it? What did it do to cause friction in their business process? And most importantly, how was their previous experience not serving their company’s needs?
Next, you want to get the facts. What was the name of their previous service provider, and what made them switch? How did they find your company? Was it a referral, a Google search, or something else?
By knowing how the client found your company, you’ll know which of your marketing efforts are working and which need improvement. For example, if the client found your company through a keyword search, that means your SEO strategy is working. Alternatively, if the client found your company by referral, that means your reputation is credible by word-of-mouth.
Below are six questions you can ask your clients:
- What company and/or product were you previously using, and what were the issues?
- What special requirements did you have that the previous company lacked in delivering?
- Which solution did you switch to, and what made you choose it?
- How did you find the new company/solution?
- What was your experience throughout the project? (Orientation, beginning stages, experience with your account manager, understanding the tech if applicable, etc.)
- How were you satisfied with the results, and what was your favorite part? (Could be anything from communication to a more technical logic.)
Project Manager Questions
The project manager questions should inform you of the entire technical and onboarding process. These questions aim to prove technical savviness and expertise, showing the reader that your product or service works excellently.
Below are four interview questions you could ask the project manager or technician in charge of the account:
- What were the challenges the client was facing? Is there a main one in particular? Be as detailed as possible over what problems the client had, including but not limited to their project experience, current issues, and dislikes.
- What were the biggest challenges of this project, and what did you find most challenging in solving the problem? Were there complications you have or have not seen before? Be descriptive.
- What did you recommend, and how did you know to suggest that plan? Was there anything peculiar about their use case, or was it pretty standard? How do you know what actions to take for a specific project, precisely the one in question?
- What was the execution plan, and how did you use it to satisfy the client’s needs?
Make sure you’re interviewing the team leader of the project and other colleagues who worked on it. You’ll want to do this to make sure you get the whole story and the perspectives of everyone involved. The more information you have, the easier it will be to write the story.
When interviewing the project management team, analyze their responses in a marketable way. What about their answers gives appeal, and where is the sweet spot for authenticity?
Every project is unique, even if there is a standard method in place. It’s the client’s problem that makes the project unique, and how the services team solved that very problem to the fullest extent.
Below is an example from Trujay of how you can integrate the project manager’s responses into a well-written overview of the problem and its challenges:
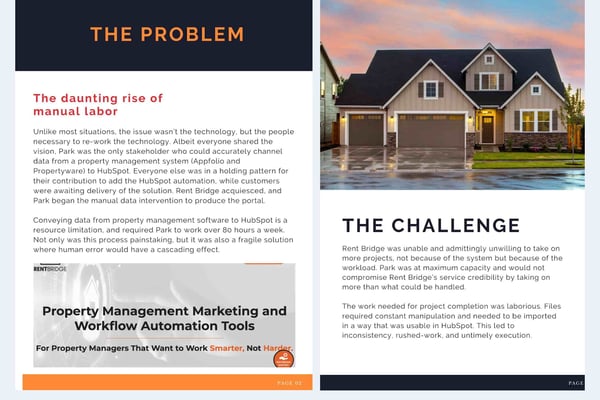
3. Tell the story using a standard outline.
The responses to your interview questions don’t necessarily need to be in a particular order. You can either start with the project manager or client questions.
Let’s say you get the client’s responses first. What are you looking for, exactly?
You’re looking for the message behind their words. Some call it reading between the lines. I call it the sweet spot of authenticity. What about their responses jumps out at you? Here is an excellent place to know your buyer personas and identify what kind of client they are.
After reviewing both sets of interview responses, try telling the story to yourself from beginning to end using the questions below. In your own words, speak the story out loud. Doing so will turn fact into fiction and organize your written outline.
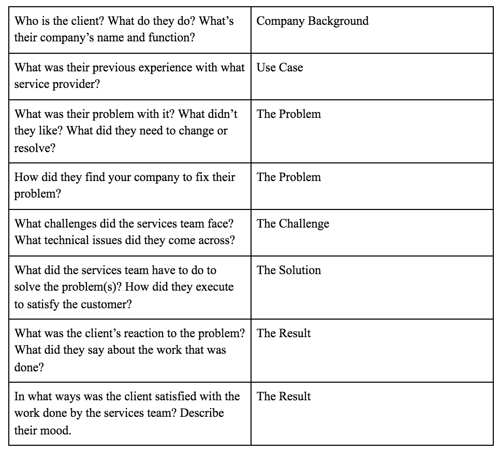
Place Quotes in Your Outline
Quotes from the client are paramount. Words that come directly from the source are vital to proving your company can achieve results and make customers feel cared for. The more quotes you have, the better you can showcase your customer’s achievements.
Quotes of high-quality give prospects significant confidence in choosing your services — almost as much as referrals.
Ask for Video Testimonials
If and when possible, getting video testimonials from your client can make your story go above and beyond. If the video content editing is just right, you can move your readers in a heartfelt way. That might sound odd, so take a look at the video below. It could very well be the beacon of your success story and the element that sets it apart, like this example from HubSpot, below:
Testimonials of this kind of caliber make your success story real. Additionally, consider placing quotes in various and relevant areas of your success story — you can have a quote for each one of the aspects that make up a standard, outlined case study.
4. Use concise, clear language to tell a story.
You don’t need to use fancy jargon to create a compelling customer success story — in fact, it’s preferred that you don’t. You’ll want to make it so the reader can clearly understand how your company helped solve a client’s problem, which doesn’t require superfluous language.
Here’s an excerpt that’s written clearly, and without jargon:
James felt that [company 1] had way more “bells and whistles,” which can be extremely healthy for some companies. In James’s case, however, he was only using a fraction of the features. Sometimes, too much of anything is never a good thing. Just because a system has more features doesn’t mean it will serve a specific company to its highest degree. Sometimes, less is more, and for James, “it was time to change.”
We recommend using case study templates to help turn your customer story into a coherent, well-organized publication.
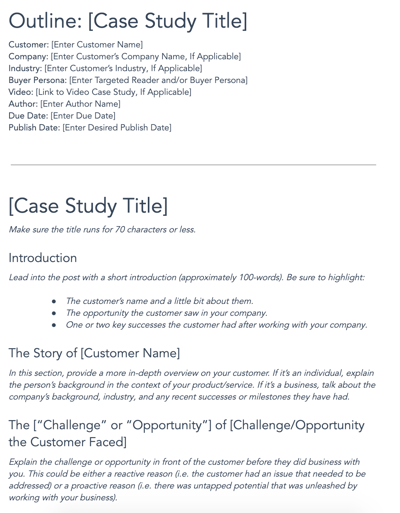
5. Design your story for visual appeal.
Ultimately, visuals are powerful opportunities to support and strengthen your story.
If you want to persuade prospects that your company is the right choice for them, you’ll want to have a well-written story, but you’ll also want to create visually-appealing materials to help support the story.
Design applications like Canva are great for combining text with imagery. Create beautiful and eye-catching case study e-book covers, or create designs to highlight quotes throughout the piece. Alternatively, consider using images related to the client and company — with permission, you might even consider using clients’ LinkedIn photos to put a face to the text.
Here are some examples of customer success stories with a design for visual appeal:
1. CoSchedule: UMass Memorial Health Care
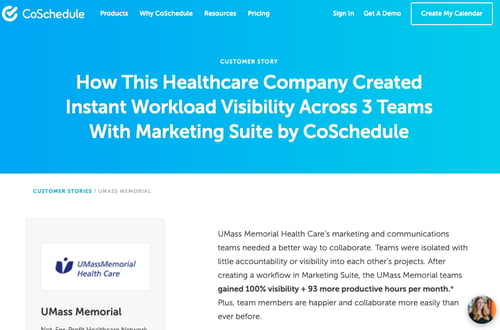
2. Lightico: A1 Comms
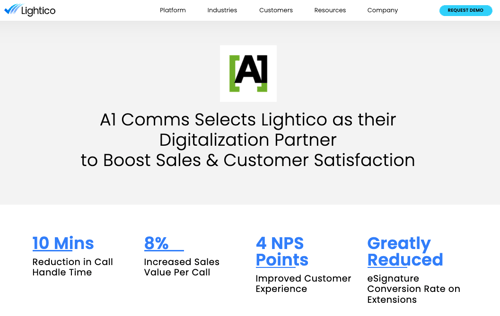
3. Hourly.io: Izzy’s Brooklyn Bagels
What do they all have in common? When you get to these landing pages, key details are immediately prominent: The issue the company was facing and/or the results they generated.
This is a great way to hook in the reader and get them interested to read on.
By showing the results, you highlight the benefits of using your brand. By emphasizing the problems, you can help prospects identify issues and understand why you’re the solution.
Both strategies can generate positive results, it’s just a matter of figuring out which method converts best with your audience.
How to Leverage Customer Success Story on Social Media
1. Figure out which case studies will translate well.
The “right client” will vary from brand to brand.
Samuel Mironko, associate marketing manager on the HubSpot brand marketing team, says that this is what they look for: brand recognition, buzziness, and relationship.
The bigger the brand, the more buzz it can create to share its story. This doesn’t mean that you should only highlight stories from recognizable brands. However, it could be a way to prioritize them.
The second is buzziness – how much interest will this story generate? Is the brand in a booming industry? This is another plus for you.
Lastly, and perhaps the most important according to Mironko, is your relationship with the customer. Building a customer story requires a lot of collaboration between the two companies. If your relationship with the client isn’t solid, you may face several obstacles as you attempt to deliver the product.
“You get a better story knowing more about the customer. You know what questions to ask, how to guide the story, and more details,” said Natalie Gullatt, marketing manager on the HubSpot customer marketing team. “The customer tends to trust you more if you have a relationship with them so it makes the process better for both parties.”
To narrow down a list of options, you will likely need to work with customer advocacy and/or customer success teams at your company to connect you with the clients.
They can also offer some insight into the problems that the company faces and the issues they were able to solve with your product/service.
2. Write a script.
Once you narrow down your list, it’s time to write the script for your social media campaigns.
While you follow the same format as the case study, you have to adjust it for social media – taking only the key details that will help you tell a story in an engaging but concise way.
Mironko says that this format works well for customer success stories because it tells a story. You leave knowing the problems the company faced before, how they attempted to solve the issue, their new experience, and how that has addressed their main pain points.
3. Get feedback from the client.
Once you have a draft, you’ll need to send it to the client for approval.
They may provide feedback on anything from the visual design to the way they’re portrayed.
We are delighted to launch our customer success story series with @GaryWidger, Head of Change at @mercuryeng – about how Mercury leveraged #nocode/#lowcode technology to connect their people through shared knowledge.
Read more here: https://t.co/BDvRjRxVgd#innovation #tech pic.twitter.com/9qe7dmEART
— Kianda (@KiandaBPM)
March 30, 2021
Because this is a collaborative process, it’s essential that both parties are satisfied with the end result.
“Make sure to have the customers approve the drafts before publishing – that’s so important,” says Gullatt. “Customers may have to ask their marketing teams, legal teams before they say certain things publicly so you don’t want to burn bridges.”
This is why having a good relationship with the customer is key – this will make addressing issues with the content so much easier.
Gullatt adds that flexibility is key.
“Be flexible even when it’s inconvenient because customers doing stories is a favor to you and your organization,” she says. “Making it easy for them and being patient goes a long way.”
4. Post and measure success.
Once the content is finally ready and published on social media, you’ll want to track its success.
How are people responding? Are they engaging with the content? Did it help you generate more leads?
Establishing KPIs before publishing on social media allows you to gauge your success accurately. From there, you can review the data to assess improvements for future success story campaigns.
Case studies work to showcase a company’s function to the fullest degree. They represent the facts of what happened, who was involved, and what the outcome was.
The main goal of a case study is to earn prospective customers’ trust and motivate them to choose you over your competitors.
Turning a case study into a customer success story is done through a meticulous and investigative process.
Now that you have everything you need to get started, design a visually appealing piece of content that gives the reader more than just words, but sparks their imagination of what it would be like to work with your company. They’ll want to reap the benefits of your services — and may even become the star of your next customer success story.
Editor’s Note: This post was originally published in Oct. 2020 and has been updated for comprehensiveness.

B2B & B2C Instagram Marketing Trends of 2022 [Data from 500 Marketers]
When it comes to social media, there are a lot of differences in which channels B2C and B2B brands prioritize.
According to HubSpot Blog Research surveying 500+ marketers in 2021, 75% of B2B businesses currently leverage Facebook compared to only 66% of B2C.
60% of B2C businesses leverage YouTube, 24% more than B2B businesses. For Twitter, the same is true – it’s more popular among B2C brands than B2B businesses.
When we narrow it down to Instagram, how do they compare? Let’s dive into the key differences between B2C and B2B brands on the social platform.
B2B Trends and Tactics
Better Success with Influencer Marketing
When it comes to influencer marketing, B2B companies are reporting much higher return on investment than B2C companies. In fact, 25% of B2B marketers say it’s the marketing strategy they plan to leverage the most in 2022, compared to only 10% of B2C marketers.
When asked to rank the ROI of partnering with influencers, 70% of B2B marketers say it offers high ROI compared to only 51% of B2C marketers. Most B2C brands report average ROI from this strategy.
As a result of this, 68% of B2B marketers plan to increase their investment in influencer marketing in 2022.
However, when we look at partnering with brands and accounts with similar audiences, things shift.
B2C marketers are having better luck – 51% report high ROI, 12% more than B2B marketers.
More Branded Hashtag Trends and Challenges
While the research shows that both B2C and B2B brands are leveraging hashtags at the same rate, B2B brands seem to be getting better results.
12% of B2B marketers say this strategy has resulted in the biggest ROI, compared to only 7% of B2C marketers.
In addition, roughly 96% of B2B marketers plan to continue or increase their investment in branded hashtag trends and challenges.
A Focus on Educational and Authentic Content
When asked to rank their top-performing strategies on Instagram, most B2B brands ranked educational content pretty low. It fell behind most strategies including IG shopping tools, creating engaging content, audience interaction, and ad campaigns.
Only 4% of B2B marketers say it offered the highest ROI.
Despite this, 68% plan to increase their investment in creating educational or informative content.
Meanwhile, 46% of B2C marketers plan to do the same. This is likely because, for many B2C brands (27% specifically), 2022 will be the first time they leverage this strategy.
Authentic, behind-the-scenes content is another big play for B2B brands. They plan to leverage this content type 16% more than B2C brands, according to our research.
We know why – 16% of B2B marketers say this content type has resulted in the biggest ROI in 2021, compared to only 6% of B2C marketers.
So, while most B2B marketers (63%) plan to increase their investment in this content type, 10% of B2C will be decreasing it. In fact, it’s the content type with the highest divestment percentage for B2C brands.
B2C Trends and Tactics
Higher Priority on Customer Service
B2C brands are leveraging Instagram for customer service more than B2B brands – 14% more to be exact.
Wondering why? Two reasons.
The first is that it aligns with their business goals. Roughly 27% of B2C marketers say improving customer service and retention is one of their primary goals on Instagram and will continue to be in 2022.
The second reason is that this strategy is paying off.
44% of B2C marketers say leveraging IG for customer service offers high ROI and 51% say average ROI.
More Use of Shopping Tools
In 2022, 34% of B2C brands are focused on advertising their products and services, compared to only 22% of B2B brands.
Knowing this data, it makes sense that Instagram’s shopping tools are more popular among B2C brands.
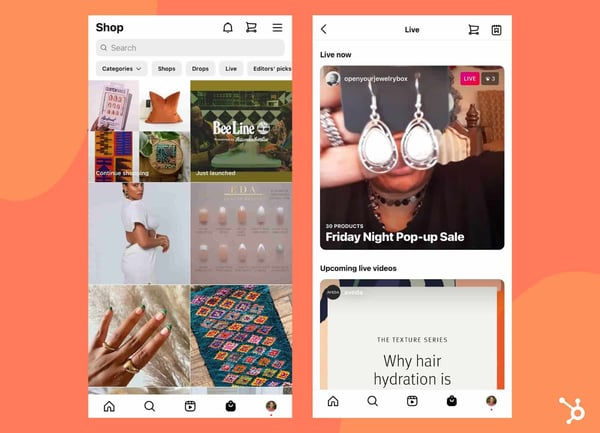
In addition to aligning with their goals, 48% of B2C marketers say it offers a high ROI. In fact, y it’s their best performing Instagram strategy along with leveraging the platform for customer service.
Despite these promising numbers, not all B2C brands have been trying out this strategy. For 37% of B2C marketers, 2022 will be their first time doing so.
Another reason why these shopping tools aren’t more popular with B2B brands is the revenue. 48% of B2B marketers say the biggest challenge they face is that it doesn’t generate enough sales.
An Emphasis on a Consistent Brand Voice
Thirty-six percent of B2C brands say a lack of a consistent aesthetic or voice has caused them to lose followers – 10% higher than for B2B brands.
42% plan to leverage this for the first time in 2022. However, those who use it say it’s the second-highest performing marketing investment behind creating content that encourages engagement.
In addition, 16% of B2C marketers say it’s the marketing strategy they’ll invest the most in, compared to only 9% of B2B brands.
Although B2B and B2C brands mostly intersect in their top goals, how they use the platform differs greatly.

40 Clever 404 Error Pages From Real Websites
Running a successful website means staying alert for errors like broken pages or slow performance. However, sometimes there are problems that you just can’t avoid, and 404 errors are one of them.
A 404 occurs when a user requests a page on your website that doesn’t exist, thus throwing a 404 error page prompting users to return to the right place. No matter how many resources you put into ensuring your website never goes down … there’s always a chance that users could end up here.
It’s inconvenient, but a fact of life. And the reaction of visitors when they land on a nonexistent page can range from “taking it in stride” to “totally losing their minds.”
While there’s nothing you can do about the latter, you can make things a little less of a pain by having a creative error 404 message. This can do wonders to make your website visitors crack a smile in an otherwise frustrating situation.
To get your website design juices flowing, this post will showcase some of our favorite website error pages. Hopefully, you’ll be able to take away a few ideas to snazz up your own 404 message.

What is a 404 Error?
A 404 error is a standard HTTP error message code that means the website you were trying to reach couldn’t be found on the server. It’s a client-side error, meaning either the webpage was removed or moved and the URL wasn’t changed accordingly, or the person just typed in the URL incorrectly.
For the most part, you can configure your server to create a customized 404 error page. (If you’re a HubSpot customer, click here to learn how to customize your 404 page in HubSpot.)
Some customized 404 error pages include a hero image, witty description, site map, search form, or basic contact information.
The Best 404 Web Page Examples
Over the years, websites have found different ways to inform visitors of a 404 error and channel them back to the right place, some simply, some creatively, and some hilariously. Let’s start by looking at some creative 404 pages, then check out some funny examples that are sure to delight anyone who comes across them.
Page Not Found: Creative 404 Error Pages
1. Pipcorn
While a 404 page can easily stick out from a website, Pipcorn’s error page aligns perfectly with the rest of the site’s branding. There’s a nice animated background, a friendly text prompt directing visitors to search the website (complete with a clever pun), and a piece of popcorn used as the “0” in “404.”
2. Spotify
Music streaming giant Spotify has covered its bases with a clever 404 page. With a witty pun off Kanye West’s album “808s and Heartbreak” and a record animation, the website briefly entertains and then sends visitors back to the page they came from.

3. Genially
One simple way to ease the tension on your 404 page is to add a quick “Oops!” message — it helps your site feel more personable as you guide users back to the right place. In the case of Genially’s site, the page also includes a nifty illustration paired with some playful copy.

4. Adobe
As you would expect, Adobe’s 404 error page is both useful and visually pleasing. It lists out popular links that visitors might want alongside some cool digital artwork serving as a visual metaphor for a broken or lost page. Honestly, websites should use visual metaphors more often.

5. Clorox
The 404 page for Clorox cleaning products rotates between three lighthearted photos to signal to visitors that they’ve made a misstep. It’s a smart use of branding to add a brief delight moment while helping out lost users.
6. Duma Collective
Other times, you might not need a witty blurb — just tell visitors that there’s no page at the address and let them move on. Entertainment consulting agency Duma Collective does just this with its error page, though it’s complemented by a background image for some minor flair.

7. Chillhouse
Speaking of flair, self-care brand Chillhouse has put in the extra work to reroute its visitors in style. The 404 page is branded appropriately and even takes visitors on a little journey through a few image stills before they go back to the homepage.

8. Bitly
If you enter an incorrect Bitly link, you’ll be taken to Bitly’s 404 page. We assume this happens a fair amount, which is why the 404 page gets straight to the point. It explains what might have gone wrong and prompts users to visit the Bitly homepage if that’s what they’re after.
9. Ikea
Ikea’s 404 page is similarly minimalist but still manages to sneak some smart branding in there. This example shows that your error pages don’t need to be elaborate to get the point across, but there’s nothing wrong with injecting some fun either.

10. Moxie Design Co.
Sure, “blew up the Internet” might be a bit hyperbolic, but it tells visitors that Moxie Design Co. doesn’t take itself too seriously with small slip-ups like this one. Also, a search bar is conveniently placed at the bottom to send you on your way.

11. McKissack & McKissack
Ah, the classic “we lost the page” trick. Again, an easy way to present a 404 without alienating your audience. If you’re an agency like McKissack & McKissack that manages many client interactions, clear and concise copy is essential for all of your site’s pages, including error pages.
12. CSS Tricks
Ever ripped away a website’s wrapping to see what’s underneath? That’s the concept that CSS Tricks was going for in their 404 error page. This is both witty and reminiscent of what the website is all about: smart use of page styling.
13. Good Old Games
For other websites, you unwrap the front end and there’s … just the vast emptiness of space. This page is a clever reference to GOG Galaxy, which is Good Old Games’ native video game client. Thankfully, a little video game character is there to give visitors a place to report an error if they want.

14. Canva
For something a little different, check out Canva’s 404 page. It includes not just an error message, but a nifty tile puzzle visitors can play for some brief entertainment. There’s no harm in letting your visitors slack off for a couple of minutes, right?

15. Innotech
Similar to Canva’s approach, Innotech features a Pong-esque game on its 404 page to provide some brief entertainment. Chances are you’ll remember a website like this. Plus, the fun detour complements a truly impressive website — seriously, when you’re done playing, head to the home page and take it all in.

16. Myriad
Video agency Myriad has opted for a quirky, on-brand 404 page design that mimics the classic SMPTE color bars that appear on old tapes and TVs. It’s a funny throwback to older technologies while representing the more modern problem of a nonexistent web page.

17. KonMari
Known for her popular cleaning and organization methods and brand, Marie Kondo has brought a similar feel to her website’s 404 page. The copy briefly and humorously harkens back to her tidying philosophy — a small but well-branded detail that fans will recognize.

18. BrandCrowd
Not only is the illustration on this error page detailed and engaging — the copy is clever, too. We love the reference to the Semisonic song “Closing Time”: “You can click anywhere else, but you can’t click here.”

19. Hot Dot Productions
Hot Dot’s error page stays true to its tagline, “the intersection of new technologies and design.” The page is animated by hundreds of tiny dots that change direction in response to where you move your cursor. It’s mesmerizing and a great showcase of the agency’s design capabilities.

20. OrangeCoat
If you’re going to give an error message, why not entertain the user for a few seconds while you help them out? Following a friendly greeting, OrangeCoat offers a flowchart that actually helps users figure out why they reached an error page in the first place.

21. Ervin & Smith
This 404 page does more than redirect users back to active pages. Instead, Ervin & Smith’s 404 page invites you to scroll down and learn why you need a digital marketing agency, and why to choose Ervin & Smith in particular, capped off with a contact form. True to its mission, this agency shows that any page can be a conversion opportunity.

22. DayCloud Studios
… or, your 404 can just be a place to waste time for a minute, as can be seen on the website for DayCloud Studios. Moving the cursor around the screen reveals a 404 message illuminated by lasers shooting from a cat’s eyes. Because why not?

23. Headspace
Another instance of a website smartly incorporating its brand messaging into a 404 page — guided meditation app Headspace makes the effort to calm users, encouraging us to take a deep breath, then return to the main site.
24. Wildwood Bakery
Some websites thus far have integrated clever branded copy in their pages, while others have hosted full-blown online games on theirs. But, there’s nothing wrong with a brief push back in the right direction. Wildwood Bakery’s exquisite site keeps things short and sweet (literally).

Page Not Found: Funny 404 Error Pages
25. Astuteo
Design agency Astuteo’s 404 page is a perfect balance of elegant visuals, humor, and helpfulness. The minimal layout gives users the information they need alongside another amusing visual metaphor, a sinking cargo ship and a fleeing figure.

26. LEGO
There’s few words needed on LEGO’s 404 error page — the character’s expression makes everything clear. Plus, fans of the LEGO movie franchise will enjoy the fun reference in the copy.

27. Magnt
In this funny error message, Magnt pokes fun at the fact that, yes, they could have broken something — or, you just can’t type. The visual serves as a quick way to quickly illustrate their point.

28. IconFinder
IconFinder’s error page is simple but delightful. The company’s mascot wearing a robe and appearing weary is a relatable nod to lost visitors. No worries though, since the site lists some of its links to visit down below.

29. Sweet Dreams
Apparently, the team at sleep aid company Sweet Dreams took too many of its products according to the website’s 404 page. Not only is this page humorous — it also blends well with the rest of the site’s front-end aesthetic and messaging for a cohesive feel.

30. GitHub
The line “These aren’t the droids you’re looking for” refers to Obi-Wan Kenobi’s Jedi mind trick on Stormtroopers in Star Wars Episode IV, and it’s become a well-known phrase used to tell someone they’re pursuing the wrong course of action. GitHub plays on this famous line in their 404 error message.

31. Patagonia
Patagonia’s custom 404 page captures the brand’s vibe perfectly, complete with a boomerang video of a frisbee twirler, a clever pun combining “404” and “aloha,” and links to its product pages. It’s a friendly and funny way to greet visitors who wound up in the wrong place.

32. Cloud Sigma
Check it out: Cloud Sigma’s letting us in on some behind-the-scenes action. Their 404 error page pretends to be a “junior developer’s homepage” — that junior developer being, well, a cat.

33. AMC Theatres
You might have been to an AMC movie theater before, but you’ve hopefully never seen their website’s 404 page. The website makes use of a quick, funny, and relevant one-liner before it sends you back to the right place.
34. Bruno
It’s no coincidence that creative agencies are great at coming up with cool 404 pages. Here’s another one from the creatives at Bruno that plays off the 2000 cult comedy classic Dude, Where’s My Car? No, it has nothing to do with the company or website, but it’s sure to get a chuckle.

35. NPR
At first, NPR’s error page seems like nothing special. But keep reading and you’ll see how they cleverly link to some of their great stories about lost people, places, and things, like a piece on Amelia Earhart and one on Waldo. This might just make lost users feel a little less alone.
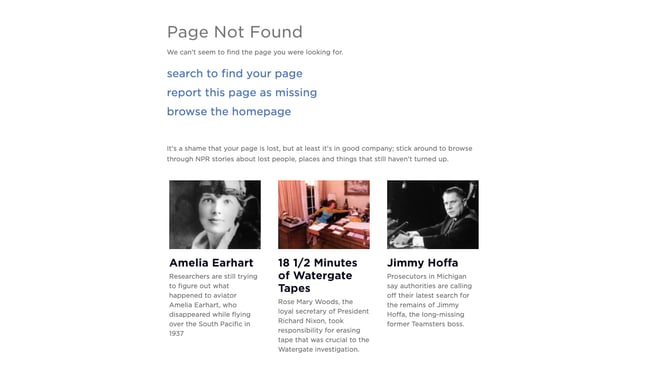
36. Medium
Medium takes a similar approach to NPR’s 404 page, recommending articles about getting lost and losing things. Check these articles out if you have time — they’re quite good reads.

37. HomeStarRunner
HomeStarRunner.com, home to a Flash-animated cartoon series, has had a series of hilarious 404 error pages over the years. The most recent features characters from the cartoon series in a scene that could’ve come straight out of one of their episodes. If you turn the sound on when you load the page, you’ll hear their character Strong Bad — known for yelling phrases out loud — saying, “404’d!”

38. Blizzard Entertainment
Here’s a simple idea that ends up looking slick: Blizzard Entertainment’s 404 page features an animated character lost in an actual blizzard and some humor that World of Warcraft fans will appreciate.

39. Hello Big Idea
A quick trip around marketing and social media experts Hello Big Idea’s website will tell you what you need to know about its bold and blunt style of copy. And, of course, its 404 error page is no exception.

40. HubSpot
It happens to us, too! This is the message we put up to tell our site visitors that there are some website issues. Our goal was to stay true to HubSpot’s brand voice by being as lovable, empathetic, and helpful as possible.

Turn a 404 Error Page Into a Delight Moment
Nobody wants to land on a 404 page — they’re annoying and unexpected. However, you can’t really avoid them, so it’s always a good idea to have a 404 page to fall back on for your website.
And, from a user experience perspective, your 404 page should be a small speed bump, not a brick wall. The right design can be the difference between a frustrated bounce and a possible conversion, so why not make it fun?
Editor’s note: This post was originally published in December 2015 and has been updated for comprehensiveness.


8 Virtual Interview Tips to Help You Get The Job
If you’ve landed on this post, it’s likely that your resume has impressed the hiring manager(s) at the company you’re applying to work for, and you’ve now been invited to a virtual interview. That’s a huge accomplishment.

 If you’re looking for video interview tips, tricks, and best practices — or just want to know what in the world an automated interview is — you’ve come to the right place.
- What is a virtual interview?
- How to Prepare for Virtual Interviews
- Virtual Interview Tips
- Automated Virtual Interview Tips
How to Prepare For Virtual Video Interviews
There’s something about remote interviews that can make the interview process more daunting. For some, it’s the risk of technical difficulties. For others, it’s the inability to read full body language.
However, virtual interviews can actually be better than face-to-face meetings. For one, you don’t have to travel, giving you more time to prepare and get yourself ready. Secondly, you can have some notes on your screen to help you hit some key points during your conversations.
Just like a traditional interview, a video interview is your moment to sell yourself to the interviewer and put a personality behind your amazing resume.
In fact, it’s what Shavon Bell, former executive recruiter at HubSpot, looks for when speaking with candidates.
“I recognize it can be challenging for a senior leader to fit all of their experience into a two-page document, so don’t leave anything to be assumed during exploratory conversations or an interview, tell your story the way you want it to be told — transparency is key,” she says.
Telling your story is what will set you apart from others – but that’s not all. It’s also important to know the story behind the company you’re interviewing with.
For Kate Kearns, one of HubSpot’s campus recruiters, showing that you’ve done your research on the company will make you stand out.
“Take some time to make sure you are prepared to answer questions testing your knowledge of the company and role,” she says.
Think about what hiring managers want to know about you during your short time talking. It’s not as easy to make a connection virtual, so finding ways to do so naturally will likely raise your interview score.
For example, explain how the role will help you reach your professional and personal goals. Identify what you can add to the company, and mention those superstar qualities about your talent that will make the hiring manager go to bat for you.
Next, we’re going to go over some tips you can follow for video interviews, but if you would like more information about preparing for an interview, check out this interview kit.
8 Virtual Video Interview Tips
It’s the big day. Or, as those in the theater call it, opening night.
The task at hand: sell yourself. Don’t let the screen interrupt the purpose of the interview. You know you have what it takes to land that role, and with these tips, you’ll knock that interview out of the park.
1. Dress to impress your interviewer.
As The Office character Michael Scott says, “I’m not superstitious, but I am a little stitious.”
That’s where my lucky interview blazer comes in. Every time I have a video interview so does my blazer: I never start one without it.
Even though your interview will be through a screen, dressing for the interview communicates to the interviewer that you still know how to maintain professionalism in a virtual setting.
So, even though you might be in your bedroom, or sitting at your kitchen table, make sure you’re in your business best. This can be a button-down shirt, a blazer, a suit, or simple jewelry.
2. Keep your notes accessible.
If you’re someone who finds it helpful to refer to notes when interviewing, keep them in front of you.
For me, it’s helpful to have my LinkedIn profile and resume open in another window, with sections I know I want to mention highlighted or bolded. This helps to make a quick reference.
Why it works: By already having those reference points accessible, you won’t forget anything important.
3. Test your technology beforehand.
You will be notified of the software you need to have in order to successfully complete your interview well in advance. Maximize this time, download the software if you haven’t already, and make sure you understand the basics of how it works.
This is also a great time to test how your webcam interacts with the software. No two video technology services are the same. So, you’ll want to test:
- Microphone
- Lighting
- Camera
Pro-tip: Frame your camera so that the interviewer can see your face down to your shoulders and that there are a few inches of room above your head.
4. Maintain eye contact with your interviewer.
Remember: The only difference between a video interview and a traditional interview is that you aren’t in the same room as your interviewer. That said, be sure to maintain eye contact with your interviewer.
You might have other distractions, things that are unavoidable when working from home, such as family or roommates. The best way to maintain professionalism regardless of the outside environment is to keep eye contact and make sure the interviewer knows you are engaged. After all, they will be keeping eye contact with you.
Pro-tip: If you’re using two monitors, be sure to talk and look at the screen with the camera. Otherwise, the interviewer will look at your profile and be wondering what else you’re looking at.
5. Minimize possible distractions.
Even though there might be uncontrollable distractions, there are distractions that you can control. For instance, keep your phone away from you. Turn it over and put it on silent or in another room.
Additionally, if you plan to conduct your interview outside of an office setting, like a kitchen or a bedroom, be sure there’s nothing distracting in the background like a mess or people walking by.
Be sure to clean up your background so that the focus stays on you or use a background blur filter if your software allows.
Lastly, inform any roommates that you will be in a meeting during the time so that you’re not interrupted.
6. Set up proper lighting.
Because you won’t be meeting your interview in person, it’s important that they can clearly see you on video.
When you’re testing your technology, this is the perfect time to also test your lighting. Ideally, you can sit in front of a window to benefit from natural lighting.
If that’s not possible, you may need to buy a desk lamp to help illuminate your full face.
Pro-tip: When using a desk lamp, don’t aim the lamp right on your face. Instead, direct it to the wall and let the light reflect back to your face. This will give you more natural, diffused light instead of a harsh light with hot spots.
7. Be early to each round.
This is a chance to go over notes and take a few deep breaths to stay calm and motivated. It makes a big difference to go into an interview calmly and composed, rather than rushing to join the video call after a quick bathroom break.
This doesn’t mean that you have to sit around on Zoom or Skype 20 minutes prior to your interview start time. However, do try to be five minutes early for each interview round.
8. Speak loudly and clearly.
If you have a soft voice, be mindful of speaking loudly enough so your microphone will pick up your voice. Video interviewers have a little less to go from, and if they can’t hear you, they won’t be able to assess your answers.
To prepare for this, record yourself saying the lyrics to your favorite song with the video software you will be using. Take time to separate the words, and listen back for volume control.
In essence, a traditional video interview is one that you can complete from your own space. Fixing up this space to be interview-ready can be a challenge, but you don’t have to completely alter the functionality of the room. Just be sure you’re communicating yourself and your professionalism.
Now, what if your interview doesn’t include an interviewer? That means it will likely be automated. Let’s go over what that means, and provide tips on how to master them.
These interviews take an in-person interviewer out of the equation. Instead, your interviewer will be a series of questions that you’ll have an allotted amount of time to read and comprehend. Then, you will record your responses via video or text, depending on the instructions.
How do you successfully complete one? Let’s cover some best practices.
When the interviewer is merely represented by words on a screen, it can be an unnerving experience trying to prepare for the interview questions. But don’t fear, these tips will help you make sure you have all your bases covered to ace your automated interview.
1. Test your technology in advance.
When you receive your automated interview invitation, make sure you have the correct software needed. For instance, if your automated video is hosted using a third-party app that you have to download, make sure you have it beforehand.
Additionally, test your tools:
- Is your webcam working?
- Is your microphone turned on?
- Is your keyboard properly working?
- Is your face illuminated or do you need better lighting?
All of these questions will be imperative to your success in an automated interview — there’s nothing worse than realizing something’s wrong once the timer starts.
2. Do a trial run beforehand.
Think about the questions you might be asked during the interview. Then, record yourself answering them on a time limit. Note: this will feel weird and unnatural.
However, timing your answers and analyzing your body language will help avoid those intrusive interview thoughts of, “Will I have enough time?” and “How am I coming across?”
Treat the trial as if it’s a real interview: dress for the occasion and rehearse earnestly.
3. Speak steadily and concisely.
My biggest fear when I was interacting with my first automated video interview was having enough time to get all of my thoughts out. My advice is to trust the time limit. Chances are, most of your in-person interview responses take the same amount of time the automation allows.
That said, you’ll have more than enough time to speak steadily. When you practice, take note of your sentence flow and be mindful of how fast you’re speaking.
On the other hand, your answers should get to the point — avoid fluff so you can get to all the points of the question.
4. Be cognizant of body language.
During in-person interviews, you’re likely hyper-focused on body language. Automated interviews should be no different, especially if you are recording your answers with video.
Remember to treat these interviews as if they’re with another person (More often than not, real people will be assessing your answers.)
Make eye contact with the web camera or the screen in front of you and maintain a professional posture.
5. Don’t overthink the interview.
Automated interviews usually provide clear instructions and more than enough time to answer the question.
In fact, automated interviews can be quite fun; you’ll have the opportunity to present yourself in a new way, and to do so within the comfort of your own space.
6. Make sure you understand the prompts.
Once you receive your prompts, take the time to read, comprehend, and form your answer before you record.
You won’t be able to ask the prompt for clarification and you may not be able to re-record your answer once you send it in. With this in mind, don’t rush into recording. Take the time to ensure you understand the question and know how you will deliver your answer.
However, just like in in-person interviews, mistakes happen. If you flub a word, misspeak, or want to change your answer mid-way, it’s not the end of the world. Continue on confidently.
You’re human and the person reviewing your interview is too.
7. Give it your best shot.
One of the biggest mistakes you can make during an automated interview is not answering a question. Even if you are unsure of what the question is asking, take your best shot. You can always restate what you believe the question is asking in the interview to clear up confusion.
If the prompt asks you to detail a situation you’ve never been in before, instead of leaving the answer field blank, or answering the question by saying, “I don’t know, I’ve never encountered that,” explain how you would approach the situation instead.
It looks way better hiring managers for an answer to start with, “I’ve never come across this situation in particular, but if I had, this is how I would approach it,” other than no answer at all. Remember, these situational questions are to demonstrate your problem-solving skills in a work environment.
Overall, take a deep breath. Your resume has already impressed the company, and the purpose of the interview is to make sure you can back up your experience. Give the interviewer, whether automated or in-person, a chance to get to know you, your personality, and your professionalism.
Good luck!
Editor’s Note: This post was originally published in May 2020 and has been updated for comprehensiveness.

The Ultimate Guide to Viral Campaigns
“He once ran a marathon because it was on his way. Sharks have a week dedicated to him. Mosquitoes refuse to bite him purely out of respect.”
Have you heard of him before? Yes, he’s “The Most Interesting Man in the World”— a fictional character that drinks Dos Equis beer and stars in the company’s viral commercials.
The commercials — which make me laugh every time — are part advertisement, part comedy skit and have a similar theme so fans always know when they’re watching a Dos Equis advertisement.
The company targets its audience of sophisticated beer drinkers in an engaging, creative, and humorous way through TV, social media, and YouTube. The unique campaign created fans around the world that helped spread it across multiple platforms, so much so that people even dress up as the commercial’s main character for Halloween.
Dos Equis may not have been 100% sure that their campaign would take off the way it did, but they had a good idea about its potential popularity.
While there is no guaranteed way to ensure your content goes viral, there are certain steps you can take to give your marketing campaign the best chance at success. Read on to learn everything you need to know about viral marketing.
What is a viral marketing campaign?
A viral marketing campaign is, well, a marketing campaign that goes viral.
Unfortunately, there is no A+B+C formula that makes viral marketing efforts pay off, and it is often unknown what the exact cause is until the virality steps in. Many marketers hope for a campaign to go viral — meaning it’s recognized, widely accepted, and influential.
However, if you think about some of your favorite viral marketing campaigns, you’ll notice some common features. Marketers wanting to reach a bigger audience should keep these attributes in mind when creating their next campaign.
1. Appealing to a target audiences.
A successful viral marketing campaign considers the target audience. For any campaign to go viral, it needs to resonate with the audience and make them feel so strongly about your content that they decide to share it with their family, friends, and followers.
Determine who your target audience is in the earliest stages of your campaign creation. To achieve this, ask questions such as: Who do I want to connect with? What content would they feel passionate about? What are their hopes, dreams, and values? Why would they care about my campaign? What will can I do to make them want to share my content with their social network?
2. Leverage strong visuals.
Viral marketing campaigns require a visual strategy — this guides potential customers to understand your brand through the use of images.
A campaign should tell a story and that story is best told using visual elements that resonate with your audience. Your visual strategy needs to be compatible with your brand and target audience — it should be interesting, informative, and contain some element of intrigue, such as humor or hope.
3. Champion creativity.
Think about your favorite viral marketing campaign. What sets it apart from others?
Marketing campaigns don’t go viral unless they have a unique, interesting, and innovative idea behind them — your campaign needs to be something new and attention-grabbing.
4. Make emotional appeals.
Have you seen the Dove Real Beauty Sketches campaign? It makes you feel frustrated, insecure, strong, and confident in just a few minutes.
Each commercial shows a person sitting behind a curtain describing their appearance while an artist — who cannot see them — draws their portrait. After the individual is done describing his or her features and the portrait is complete, the curtain is removed. The artist then draws a second portrait of the individual based off what they actually see.
After the second portrait is finished, the artist places the two drawings next to each other. As you can probably imagine, the portrait derived from the individual’s self-description is less attractive than what the artist draws in the second portrait.
In fact, in each video throughout the campaign, the portrait that the artist creates is a much brighter and more realistic depiction of the individual. This is a message about self-esteem and the beauty within all of us.
The campaign went viral because of its relatability and emotional appeal. You need to make your audience feel something — otherwise, why would they want to share your content?
5. Ensure content is easily shareable.
Thanks to the internet and social media, sharing and promoting your content with the rest of the world is pretty simple. You don’t need huge sums of money to produce successful photo or video content that can be consumed by the greater population.
For something to actually go viral, it needs to be shared over and over again. This means you and your company need to share the content first in as many places — and in as many ways — as possible. Then, you need to make it easy for your audience to share it as well.
Enable sharing, embedding, and downloading capabilities on all of your content so your viewers can tag their parents on Facebook, message their best friends on Instagram, or download your video so they can easily turn your content into a memorable GIF. Create calls-to-action or elements that encourage people to send it to their friends.
Think about asking a celebrity to promote your content if an influencer would fit with your overall message and add value to your campaign. For example, viewers may find your insurance commercial more entertaining and share-worthy if Peyton Manning or Brad Paisley are singing.
6. Share your content at the right time.
You should also consider the date and time that you share your content. Marketers use major holidays — such as Christmas — as well as major events, like the presidential race and the Super Bowl, to their advantage.
More people are scrolling through their social media feeds, watching TV, and keeping up with current events during these times which causes marketers to spend more money on their campaigns.
Similarly, anyone who uses a platform like Instagram knows what I’m talking about when I say the date and time of your posts matter.
For example, if you post on a Saturday at 8 p.m., most people are out at dinner, seeing a movie, or just hanging out with friends — meaning they are most likely not browsing their newsfeed … at least not as much as they do on Tuesdays.
After all of this sharing and promoting, you need to wait and see whether or not people latch onto your content. If so, you could have created a viral campaign. If not, you may have to try again.
Read this blog to learn about the reasons why some older campaigns stand the test of time.
The Advantages of Viral Marketing Campaigns
Creating a viral marketing campaign isn’t an easy or predictable achievement. But if your campaign does go viral, it can mean thousands or even millions of new people being introduced to your brand and buying your products — money in the bank!
For example, the Dollar Shave Club’s campaign video went viral, which made them a household name. They were then acquired by Unilever for $1 billion — not bad.
Here are a few more advantages of producing viral content:
1. They can build your brand.
When a marketing campaign goes viral, your audience automatically learns about your company, products, services, and brand. This includes people who may not have ever heard about your company otherwise. This is how some small companies make their “big break” and how large companies stay relevant.
2. They don’t require a large budget.
Some of the most successful viral content is created on a low budget. These days, individuals and companies of any size can film high-quality video and take professional-looking photos all on an iPhone.
Many content creators, or people who simply upload a random video, have found themselves become famous almost overnight. It’s not about the resources and budget — it’s all about what catches the attention of the internet. Marketers don’t always need a large-scale production with a celebrity to make their campaign funny, surprising, relatable, or informational.
Fun fact:Jonathan Goldsmith, the man behind the “Most Interesting Man in the World” commercials, had only done a few gigs prior getting his big break when the campaign went viral.
3. They get your brand in front of a new (and larger) audience.
Campaigns are considered “viral” when they have a large reach. Companies may experience an increase in sales, greater engagement on social media, and a boost in conversation about their brand and products.
This is exactly what happened for Smart Water when they brought Jennifer Aniston on board for their campaign in 2012. The video has over 6 million views on YouTube, and their humorous campaigns have done so well with the public that Aniston was featured in them through 2017.
Viral Marketing Campaign Examples
Now that we have reviewed the features of successful viral campaigns and how to launch one yourself, let’s dive into some of the most popular viral campaigns ever created.
1. Popeyes Chicken Sandwich
In August of 2019, Popeyes released a chicken sandwich. Consumers immediately drew comparisons to Chick-fil-A’s chicken sandwich, which caused widespread uproar online.
Popeyes harnessed the viral energy that consumers had created and launched its own viral marketing campaign to advertise its new sandwich. Most specifically, it participated in online discussions that pitted its sandwich against its competitor to spark more debate and attention. For example, Popeyes’ Twitter account humorously responded to a tweet Chick-fil-A made.
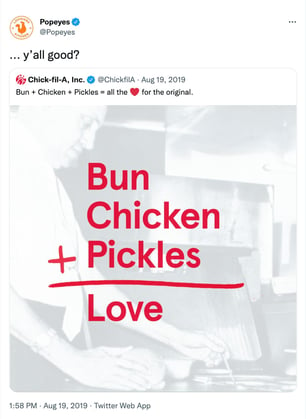
The popularity of the charade led Popeye’s to sell out of the sandwich for over two months. What could’ve been a disaster instead allowed them to make a viral marketing move to re-launch the sandwich. It was relaunched on a Sunday in November, which is an explicit nudge to Chick-fil-A being closed on Sundays.
The video below is the advertisement it created to mark the relaunch.
2. Spotify Wrapped
Spotify Wrapped is a yearly program that began in 2016 where Spotify users get an overview of their listening activity for the year, like top artists, favorite songs, and the total number of minutes they spent listening to audio over 12 months.

Year after year, without fail, Spotify users share their personal Spotify Wrapped on different social media channels. Spotify doesn’t have to do much in terms of making the content go viral, but they ensure it does by incorporating new, unique elements every year for users to look forward to.
Year after year, Spotify Wrapped also increases Spotify’s mobile app ranking in app stores, and, in 2020, it increased app downloads by 21%, and over 90M+ engaged with Wrapped in 2020.
Its popularity and virality are displayed in the Tweet below, where a user shared a popular internet meme to display how they’re patiently waiting for their 2021 wrapped to come out. As of April 2020, the Tweet has 50.5K likes.

3. Old Town Road by Lil Nas X
Rapper Lil Nas X is an expert viral marketer, as proven by the success of his song Old Town Road.
He knew that jump starting his career meant he needed to go viral. As a result, he created a song that was short, catchy, meme-able, and danceable (a significant pillar of virality due to the rise of TikTok). Before the full song was released, he created a short video of a cowboy dancing to a snippet of Old Town Road and posted the clip on Twitter.
He also posted snippets of himself dancing to the song.
Releasing the small snippets of his song created buzz and hype, as people took to how catchy it was. People who liked the song eagerly awaited the full version. Once it was released, it became one of the best-selling singles of all time, and country music star Billy Ray Cyrus was featured on a remix.
The country-rap vibe of the song was also unique, which sparked additional debate online that fed into the virality of it all. People who enjoy traditional country music said the song was not country, but others insisted that he was introducing a new genre of country music to the mix.
The song is certainly Lil Nas’ most significant viral marketing success, but he continues to use the practice. For example, he leveraged the hate he got online for classifying Old Town Road as a country song and created billboards that said “Do you hate Lil Nas X? You may be entitled to financial compensation,” with instructions to visit welcometomontero.com. As you can guess, the website did not provide financial compensation but instead promoted his freshman album.

4. #eyeslipsface Challenge
Cosmetics company e.l.f., which stands for eyes lips face, created a viral marketing campaign on TikTok that featured a song specifically made for the brand. With the song, it encouraged app users to post videos of themselves doing their makeup with the song as a backing track along with the hashtag #eyeslipsface.
According to moversshakers, #eyeslipsface was, at the time, the fastest-growing TikTok campaign to reach 1 billion views, and the first-ever ad to hold the #1 trending spot on TikTok.
Its viral marketing was successful because the brand took the time to create a unique, branded song and a corresponding related, leveraging how most things go viral on TikTok. Celebrities also joined in on the trend, many of them unpaid, which increased excitement for TikTok users who could take part in a trend their favorite celebrity took part in as well.
5. Old Spice: “The Man Your Man Could Smell Like”
Old Spice found that women are the ones to purchase men’s personal hygiene products, so they created an ad that spoke directly to this audience.
The “Old Spice Man” talks directly to the audience in a bold, confident, and humorous way. He tells women that anything is possible when your man uses Old Spice — all while he sails the ocean shirtless, turns sports tickets into diamonds, and rides a white horse on the beach.
This campaign went viral because … well … humor works. It was so successful that it even increased sales for the brand. The commercial has received over 55 million views on YouTube, won an Emmy for Outstanding Commercial at the Creative Arts Primetime Emmy Awards, and won the Film Grand Prix at the Cannes Lions International Advertising Festival.
6. ALS: “Ice Bucket Challenge”
The ALS Ice Bucket Challenge began four years ago and was created to raise awareness for the debilitating disease. For the challenge, you had to pour ice cold water over your entire body and then nominate a friend to do the same. This became a movement that raised $115 million in the summer of 2014 alone. Because … who doesn’t want to watch a family member or friend pour freezing cold water on their head?
Celebrities from around the world started participating, challenging their famous friends, donating, and raising awareness. There was an Ice Bucket Challenge hashtag that gained popularity allowing for the videos to spread easily over multiple social media channels.
Most importantly — the challenge is fun and makes participants feel like a part of a bigger movement, which is why it remains relevant years later.
7. Always “#LikeAGirl”
Always’ #LikeAGirl video became a major hit because it directly addressed how phrases that are so commonly used can be detrimental to someone’s self image and confidence. In the video, various men, women, and young boys are asked to “run like a girl” or “fight like a girl”. Then young girls are asked to do the same, with a very different approach: They show strength and confidence in their movements.
It made viewers recognize how quickly we use female-oriented phrases as insults, and that doing something #LikeAGirl should be seen as inspiring and brave.
The original TV commercial that came out in 2014 has over 65-million views on Youtube, and the hashtag — #LikeAGirl — remains popular today.
For more great examples of viral video marketing campaigns, check out this blog.
Over To You
There is no roadmap for making your content “go viral.” You can review what has been successful in the past and try to emulate this, but ultimately, it’s about creating great content that connects with your audience and makes them want to share it. Do this, and you just might find that your brand is the one everyone is talking about.

How to Optimize Your 404 Error Page for SEO & Conversions
In an ideal world, you would never need a 404 error page. Links would never break, resources would stay in one place, and visitors would seamlessly navigate around your website by clicking on links. Despite best efforts, however, 404s still happen.
This error is the most common one that your site’s visitors will encounter. It basically means that the page the visitor was trying to reach cannot be found. This could be because the page has moved to a new URL or because it’s been removed from the website.

While you should take steps to correct these errors on your site when you find them, it is also important to create a 404 error page that helps visitors find what they’re actually looking for in the event that they encounter this error. Done right, 404 pages can even be used to increase SEO and boost conversions. Here’s how.
Customers don’t want to see 404 pages, and companies don’t want broken links since both cases result in reduced sales opportunities.
But it’s not all bad news. With the right approach, businesses can optimize their 404 pages to provide value. Here are 12 ways to create better 404 error pages.
1. Position your products.
First up? Use your 404 page as an opportunity to effectively position your products. Show visitors a curated selection of some of your most popular offerings, along with links to each product. While potential customers may not be looking for these specific items, this approach provides a way to get visitors from your 404 page onto active site pages.
One thing that’s important to note: Always include images. While links to products are better than nothing, links with images are far more effective at getting customers to click through.
This image from fashion accessory company Steve Madden shows the product approach in action.
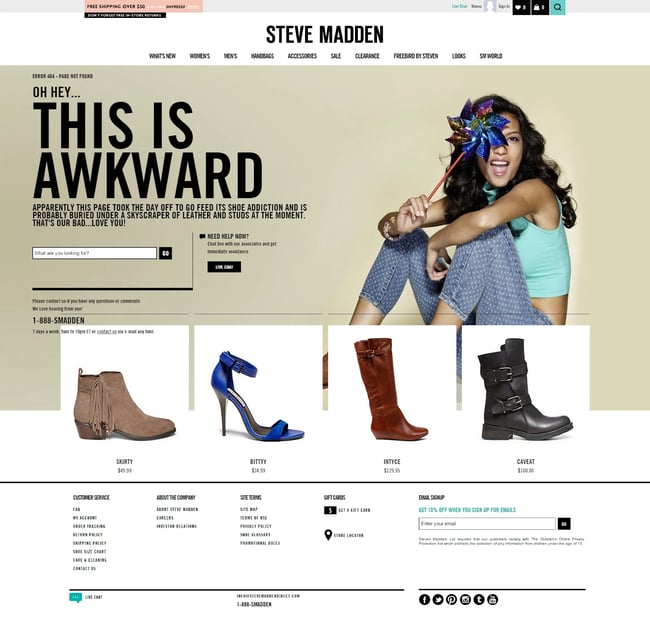
2. Serve up user reviews.
You can also improve your 404 pages by including user reviews of your products or services. Here’s why: When users land on 404 pages they’re naturally frustrated. They’re not sure what went wrong, but they do know that they didn’t find what they were looking for. As a result, they’re already annoyed, reducing their likelihood of buying anything you’re selling.
By adding a few well-chosen customer reviews, however, you can lessen the sting of the 404 page and get customers to the page they want to see (and back on the road to conversion.)
3. Capture new customers.
Starting your 404 page off with an apology is a solid tactic, but you can improve on 404 operations by generating new leads. Here’s how it works: Along with the “we’re sorry this doesn’t work message”, offer a way for customers to get in contact with you or offer a free demo of your product or service.
Create a simple one-line hook that asks users to submit their email addresses and you’re on the way to cultivating new connections, just like HubSpot in this example:
4. Make an impression.
If you can’t make them stay, at least make them laugh. From a joke at your own expense to a funny video that may (or may not) have anything to do with your brand, humor can both create a positive impact and help customers remember your brand.
Consider a visitor that lands on your 404 page, watches your funny video clip, and has a laugh. The next time they see ads for your brand on social media, chances are they’ll remember the positive impact of your funny 404 rather than the frustration of landing on the wrong page — and they might just come back and visit you again.
5. Point Them in the Right Direction
While you may not know exactly what customers were looking for when they landed on your 404 page, you can make educated guesses. By using data collected from your customer relationship management (CRM) and analytics tools, you can create a set of common customer search terms that can help inform your 404 design.
For example, if you’re an outerwear ecommerce brand and your most popular searches are for “winter coats”, “rain jackets” and “waterproof boots”, put links to all three of these categories on your 404 page to help point customers in the right direction.
6. Offer value.
If you can’t find what customers want, offer them something of value. One option? Exit-intent popups.
Although it’s true that as a general rule, people don’t like popups, this approach offers an exception: By creating popups that appear before users leave your 404 page and offer discounts or sales pricing with a code, you can convince users it’s worth making a trip back to your homepage to find what they were originally looking for — or to purchase something else.
7. Keep it simple.
When it comes to 404 pages, don’t overthink it. Sure, explain in basic terms what went wrong and offer a potential path to help solve the problem, but don’t write paragraphs of text explaining the problem and asking for customers’ goodwill.
Why? Because they won’t read it. Instead, streamline your apology and then add a list of common links (that actually work) to your site, such as your homepage, search page, and help pages.
8. Provide Interaction
What if you could make 404 pages more fun? Some brands have opted to create mini video games that give customers a few minutes of fun and then provide links to other site content. This is a great way to put a positive spin on an otherwise negative experience. By letting customers blast aliens, you can lessen the sting that comes with landing on a 404 page.
Kualo does this with its 404 page. By pressing the spacebar, visitors can shoot aliens in space as they move across the screen in the shape of the brand’s logo.

9. Leverage keywords.
404 pages can also help boost your search engine optimization. Here’s how: Instead of simply putting up a brief message and apology for your 404 page, add a few of your most popular keywords along with relevant links. This helps add value to an otherwise broken page by making it something that can help users find what they’re looking for.
Let’s say you’re a company that offers drop-off pet care. You could include keywords like “doggy daycare” or “pet service” on your 404 page along with links. In practice, this means adding a few lines of text after the 404 message such as “Looking for our doggy daycare page? Click here”, or “Need best-of-breed pet service? See what we have to offer.”
10. Put your app front and center.
Another option to help boost the impact of your 404 page is adding a link to download your mobile app. Sure, it’s a bold move — visitors might not want anything to do with your app after they land on your 404 page, but if you position it in the right way, it might just work.
For example, you could highlight how your mobile application won’t return 404 pages, or make it clear that it’s easier for customers to find what they want using the app. Even if you don’t generate a substantial amount of downloads, every app installation is another customer on the road to potential purchase.
11. Create Connection
If you can connect with customers, you can keep them coming back. One way to do this is by leaning into their frustration. Technology company Emailcenter did this by creating a “pick who to fire” page that let visitors decide who should get the blame for the 404 page they’re seeing. While it’s just a funny interactive joke, it helps create a connection between customer and company that can keep them coming back.
12. Get social.
Last but not least? Offer up links to all your social media sites on your 404 page. In effect, this opens the door for customers to voice their concerns, but also sets the stage for companies to kickstart a relationship.
If you’re able to quickly respond to visitor comments as they appear, you can get past the initial 404 disappointment and get customers back on-side by providing them links to specific product pages, forms to offer feedback, or even special discounts.
Making Marketing Focused 404 Pages
Looking to increase your marketing efforts? Solid options for 404 pages include:
Search Bar – One great feature is to have a search bar that is featured prominently on the page. Your visitor was clearly looking for something , and while they may not have found it on their last click, a quick search should send them in the right direction.
Navigation Menu – You also probably want to include a site navigation section, so that visitors can continue browsing your site immediately, without having to go back a page.
Fun – Some websites like to include quirky apologies in their 404 pages. These aren’t totally essential from a usability standpoint, but they can go a long way to calm a visitor who might otherwise be frustrated.
Bottom line? While it’s impossible to completely avoid the dreaded 404 page, it is possible to turn this not-found function into an asset.
By considering what customers may be looking for, leveraging relevant marketing data, and making sure your 404 page reflects your brand positioning, you can shift 404 pages from simple placeholders to SEO and marketing performers.
This post was originally published in February 2011 and has been updated for comprehensiveness.