
Typography Tutorial for Beginners: Everything You Need to Learn Typography Basics
Like many of you, I’m a trained marketer and more of a “do-it-yourself” designer.
Sure, I read through The Marketer’s Crash Course in Visual Content Creation and learned some sweet PowerPoint and Photoshop tricks that have helped me a lot with my content marketing job. But I really wanted to take my design skills to the next level.
So I asked all my designer friends what my next step should be — and every single one said to take a course on typography.
Why typography? Turns out that while the importance of typography is often overlooked, it plays a critical role in strengthening your brand, creating interest in your product, and highlighting your central message. Knowing that, I decided to sign up for a typography course at the Massachusetts College of Art and Design. Couldn’t hurt to learn how to identify a good font from a bad one, right?
I learned a lot more than that. I realized that paying attention to even the littlest details of type can make all the difference in the world when you’re laying out an email, ebook, or image for social media.
This is why I wanted to write this post: to share the most important learnings and resources with my fellow marketers.
So, what do you say? Are you ready to take your DIY design skills to the next level? Let’s get started.
Click on a section header below to jump to that section:
- What Is Typography?
- Why Is Typography Important?
- Typography Definitions & Terms
- Type Classifications
- Type Families
- Typography Fonts: Resources & Examples
What Is Typography?
Before taking this course, typography — to me, at least — was more the art of scrolling through a dropdown menu until I found a font that looked like it could work. But it turns out there’s a lot more to it than that.
Typography is the art and technique of arranging type, type meaning letters and characters.
Notice that it’s about more than just the design of letters and characters; the arrangement of those letters and characters is just as big a part of it all. That refers to the selection of point size, line length, and spacing, both on a single line and throughout an entire page or piece of work.
Image Credit: Designspiration
To understand where the importance of arrangement comes in, I like to think back to Johannes Gutenberg’s printing press. At one point in time, people practiced typography using printed materials — meaning they were literally taking letters and characters and arranging them in physical space.
Today, thanks to computers, open source fonts, and scalable computer typography, it’s a lot easier to arrange letters and characters. But that physical piece remains important, even in the digital sphere.
Why Is Typography Important?
Typography is absolutely everywhere. Just look at your phone, a billboard, your coffee cup, or even the different styles used in this blog post. Every font, letter, and character arrangement plays a part in determining how a message is conveyed.
Sure, it might seem trivial at times, but even the smallest of type adjustments can impact the look and feel of your work. For example, back in June, Facebook tested a new font on its users called Geneva. While the new font was only slightly thinner and lighter than the original, Helvetica, it made a noticeable difference to some.
“The overall effect is a lighter, more modern looking block of text,” explained Chris Mills for BGR.
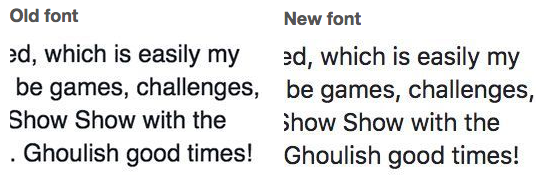
Image Credit: Mashable
Same goes for when Apple changed its default font from the dramatically thin Helvetica Neue to one they developed in-house called San Francisco.
“The differences between Helvetica and San Francisco are subtle, even to the trained eye, but they’re there,” wrote Liz Stinson for WIRED. “While still an austere sans serif, San Francisco is bolder and friendlier than Helvetica Neue. Based on the German typeface DIN, San Francisco gives characters more breathing room, which will make it easier to read on relatively tiny mobile screens. Tall and skinny, San Francisco is space-efficient, like Google’s custom typeface Roboto, which you could consider a close cousin to Apple’s font.”
The takeaway here? The little details do matter.
In fact, one of the only college courses Steve Jobs took was on calligraphy and typography, which he believed played a critical role in the success of Apple. As he once said in a Stanford University commencement speech, “If I had never dropped in on that single course in college, the Mac would have never had multiple typefaces or proportionally spaced fonts.” Can you imagine a world where Apple products didn’t have a focus on beautiful design? I certainly can’t.
Once you realize how much thought goes into carefully selecting a typeface, it becomes much easier to recognize the differences between typefaces and understand why they might’ve been chosen in the first place. Take a look at some of the examples below to get a better sense of what I mean …
Image Credit: Awwwards
Image Credit: Awwwards
Image Credit: Awwwards
Image Credit: Awwwards
Ready to move on to some typography terminology? Let’s go.
Typography Definitions & Terms
Typefaces vs. Fonts
If you thought these two words were interchangeable, you’re not alone. But they actually mean two different things.
Typographer, Nick Sherman, once used a great analogy to explain the differences between the terms “typeface” and “font.” He suggested comparing these typography terms to the musical terms “song” and “mp3.” When you’re explaining how much you enjoy a particular tune, you say, “I love this song!” You wouldn’t say, “I love this mp3!” The song is the work of art, whereas an mp3 file is just the delivery mechanism.
The same rules apply in typography. You should use the word “typeface” when describing the creative work (i.e., what you see). This is a more abstract design term used when referring to the way a specific collection looks or feels. For example, Helvetica is a typeface.
If you’re describing the physical embodiment of the collection of letters and characters, you should use the term “font.” It refers to what you use — whether that’s a file on your computer or a case full of metal letters. This is the tangible representation of that collection of letters and characters. For example, Helvetica Bold and Helvetica Light Oblique are fonts.
Here’s how you could use these two terms in a sentence:
-
“Wow. The typeface you chose really pulls this design together.”
-
“I’ll change the font size to 12pt so it fits in the box.”
The Anatomy of a Typeface
It’s way easier to communicate with designers when you actually speak their language, which is why it’s important to understand the anatomy of a typeface.
Each part of a letter has its own special term, similar to bones in a human body. Below, you’ll see three diagrams that explain the makeup of individual letters, how these elements interact with each other, and how they sit on a line.
For example, let’s take with the word “Faulty” as it’s shown in the picture below.
Here’s how each of the terms here are defined:
- Baseline: The line where the letters sit.
- Cap height: The distance from the baseline to the top of the capital letter.
- X-height: Located in between the baseline and the cap height, it’s the height of the body of the lowercase letter. (In this case, it’s the letters ‘a,’ ‘u,’ and ‘y.’)
- Bowl: The curved part of the character that encloses the circular or curved parts of some letters, like ‘d,’ ‘b,’ ‘o,’ ‘D,’ and ‘B.’ (In this case, it’s that round shape sticking off the letter ‘a.’)
- Serif: The slight projection finishing off a stroke of a letter in certain typefaces. (In this case, it’s that little foot sticking off the letter ‘l.’)
- Descender: The longest point on a letter that falls beyond the baseline.
Now, let’s look at the word “flash”:
Here’s how these terms are defined:
- Ligature: The stroke that joins adjacent letters. (In this case, you’ll notice the ‘f’ and the ‘l’ smush together to form one character.)
- Stem: The base of a letter, similar to the stem of a flower.
- Spine: The curvy body of the letter ‘s’ — and only the letter ‘s.’ It gets its own term because the spine can be almost vertical or mostly horizontal, depending on the typeface.
- Ascender: The portion of a letter that extends above the mean line of a font — i.e., is taller than the font’s x-height. (In this case, you’ll also notice the letter ‘h’ is actually taller than the x-height.)
Still with me? Just a few more here. Let’s take a look at the word “Beef”:
Here’s how these terms are defined:
- Cross bar: The bar that goes across the inside of the letter and connects one side to another. (In this case, it’s the bar inside the capital letter ‘B.’)
- Counter: The empty space in the middle of letters such as ‘B’, ‘O’, or ‘A.’
- Finial: The tapered end of letters such as ‘e’ or ‘c.’
- Terminal: A type of curve that you see at the top of the letter ‘f’ or the end of the letter ‘j.’
Good work. Now that you know the anatomy of letterforms, let’s get into the terms related to spacing: kerning, tracking, leading, and hierarchy.
Kerning
Kerning is the modification of the space between two letters. For example, check out the image below:
Here, I used Franklin Gothic Medium to showcase the natural space you see between two letter T’s. It looks a little too snug, right? By customizing the spacing between just these two letters, you’ll be able to increase readability.
Tracking
Similar to kerning, tracking deals with a modification to letter spacing. However, instead of adjusting the spacing between just two letters, tracking is an adjustment to the spacing between all letters an entire word. See the difference below:
For this example, I chose to make an extreme adjustment to the tracking. Typically, you’d want to apply tracking in small increments to avoid causing readability issues.
Leading
Remember in high school when you had to double-space your essays? Well, the terms “single-space” and “double-space” can also be called “leading,” which is the distance between the baselines. See leading in action:
You can choose to increase your leading, creating more space between the baselines, or decrease your leading, which pushes your lines of text closer together. The reason high school teachers asked for essays to be double-spaced was because it’s much easier to read, and they could make corrections to the text more easily.
Hierarchy
As you read through this blog post, you’ll notice certain words stand out more than others. That’s what designers would call creating a hierarchy. You can use different weights (bold, regular, light), styles (italic), and sizes to create a sense of order within your text. Not only does this help create a legible flow, but it helps the reader see what the most important points are.
Here’s an example of what hierarchy looks like:
In most cases, you want people to read the title first. That’s why you’ll see most titles are much bigger and bolder than the body text. Call-out quotes and descriptive sentences can also stand out above the rest of the text using techniques such as bolding and italicizing.
With effective hierarchy, the reader should be able to jump from one section to the next to identify the most important points.
Got all these typography terms down? Cool. Let’s move on to how typography is organized with type classifications and type families. (Takes you back to biology class a little, doesn’t it?)
Type Classifications
The two main type classifications you see are called serif and sans serif. Other classifications include slab serif, blackletter, script, modern, and decorative. Let’s start with the most common two, and then touch on just a few others to give you an idea of what they’re all about.
Serif
Remember when I pointed out the little foot in the word “Faulty?” Typefaces with feet like that are called serif. You can see where I highlighted these little feet below:
Common serif typefaces include Times New Roman, Georgia, and Garamond. If you’re reading a novel, you might notice the body text is a serif. That’s because a serif is much easier to read in long, printed works due to the distinctiveness between letters.
Sans Serif
In French, the word “sans” means “without.” So the term “sans serif” literally means “without serif.” In the image below, you’ll notice the words lack serifs, as I pointed out with the red arrows.
Common sans serif typefaces include Arial, Verdana, and Futura. You’ll see a lot of sans serifs being used in blog posts and documents on the web because it feels more modern and looks great even at lower screen resolutions.
Blackletter
Blackletter typefaces, also referred to as Gothic, Fraktur or Old English, are known for its dramatic thick and thin strokes and its elaborate swirls on the serifs. These typefaces are based on early manuscript writing — in fact, blackletters were used in Gutenberg’s Bible, one of the first books ever printed in Europe. They were much more popular before 1500 than they are today.
Image Credit: SitePoint
As you can tell, blackletters are pretty hard to read, which is why they’re not typically used for body type. You’ll usually see them in headers, logos, posters, and signs — like on newspaper nameplates (New York Times’ logo, anyone?), or on the headers of certificates, diplomas, or degrees. Common blackletter fonts include Cloister Black, Deutsche Zierschrift, and Germanica.
Image Credit: SitePoint
Script
Script typefaces are based upon the varied and often fluid strokes created by handwriting. As scalable computer typefaces, characters in these scripts can now string together with one another automatically so they convincingly mimic handwriting, rather than users having to manually pick and choose which letters go after which — which you can imagine was a painstaking process.
Under the umbrella of a script typeface, there are two basic classifications: formal and casual. Formal scripts are often reminiscent of the handwritten letterforms common in the seventeenth and eighteenth centuries, and they’re used for elegant designs like invitations and diplomas, not for body copy.
Image Credit: Deciduous Press
Casual scripts, or informal scripts, are just that: less formal script typefaces that look more like everyday handwriting
Image Credit: Font Haus
Those are just a few examples of type classifications to give you an idea of how they work. But, since this is a blog post, not a typography course, let’s move on to type families.
Type Families
The term “type family” or “typeface family” is used to describe a range of designs that are all variations of one basic typeface.
For example, you’ll see that Proxima Nova has variations such as bold, extra bold, black, regular, light, light italic, and regular italic:
Sticking to a single type family will help add variation to your designs, while keeping it consistent and uniform.
Designers might use various fonts within one family to create a sense of hierarchy — designing so that the most important elements, such as headlines and quotes, stand out above the rest of the text.
Typography Fonts
Before we wrap up here, I figured I’d leave you with a few great resources for where to find free fonts to download from the web, along with eight free ones I handpicked from these resources to get you started.
Great Resources for Free Fonts
- “35 of the Best Free Fonts You Should Download“: A HubSpot blog post curating 35 of the best free fonts on the internet.
- Google Fonts: Hundreds of free, open-source fonts from Google that are already optimized for the web.
- Behance: A great resource for finding beautiful design work, including unique fonts that are free to download.
- HypeForType: Over 25,000 typography designs from top designers, many of which are available to download for free.
8 Cool Fonts That Are Free to Download
1) Crimson Text
Here’s one that’s great for body copy. It was meant for book production, according to Google Fonts, so it’s easy to read. But at the same time, there’s a lot to it that makes it special: old-style figures, small caps, fleurons, and math characters and the like. It comes in three styles — Regular, Light, and Bold — along with the italic styles of those weights.
2) Harmattan
Harmattan is a typeface on Google Fonts that was actually originally intended to suit Arabic scripts, but it also looks great on Latin characters — and would love attractive in either headline or body copy.
3) Torcao
Torcao is a unique combination of letters that are “half square, half circle,” robust and technical while at the same time, light-hearted and inviting. It a great headline typeface, but it still quite legible in longer text. The family comes in nine weights (slender to black) and has both condensed and extender selections for a complete set of forty-eight fonts.
4) King Basil
This free brush font posted on Behance is great for commercial materials like social media images and flyers. It’s a Lite version of the designer’s “Full King Basil,” and it contains many swashes and connecting letters that make for a beautiful, script-like font.
5) Merriweather
Merriweather was designed to be a typeface that’s pleasant and easy to read on screens, making it perfect for a web asset like your homepage or blog. It’s an evolving project on Google Fonts and will be updated, but right now, you’ll find four styles — Regular, Light, Bold, and Black — along with the italic styles of those weights
6) Poiret One
Poiret One is a long-time favorite of mine. It’s described on Google Fonts as “a fresh, decorative, geometric grotesque with a hint of Art Deco and constructivism.” It’s sleek, simple, decorative, and great for short texts. Try it on large signs, labels, posters, T-shirts, titles, or headlines.
7) True North
A vintage-inspired headline typeface from HypeForType with sixteen different styles and a monoline script. It also includes free labels and extras like wild animals, numbers, symbols, tools, and other icons. True North comes with labels, extras and free banners. Extras include wild animals, catchwords, numbers, symbols, tools, maple leaves and trees. True North is a headline font with alternate capitals.
8) Bravery
Here’s a cool free font posted on Behance created by a professional font creator who was kind enough to accompany the free download with the mockups below. These mockups show folks how they can play around with the font in their own designs. It comes in capital letters and numbers only, and is great for headlines or social media images like the ones below.
Of course, there’s always more you could learn when it comes to typography. When graphic designers get a degree, they usually have to go through several rounds of typography courses to become a professional.
But now you know some key terms to get you started and — at the very least — you’ll be able to sound super smart when talking to your designer friends.
What other design lessons would you like to learn? Let us know in the comments.
Editor’s Note: This post was originally published in June 2014 and has been updated for freshness, accuracy, and comprehensiveness.
How to Measure Your Sc hool’s Marketing Funnel
Your school has already been publishing some content to start capturing email addresses from potential students and parents. Perhaps you’re even seeing a boost in enrollment already. It’s working! It must be working – right?
The beauty of digital marketing is you can actually connect the dots all the way through your enrollment funnel. You can discover where it’s strong and where it’s weak. If you’re seeing enrollment numbers go up — that’s great. But you still don’t want to leave success to chance. You want to know what’s happening at each stage of your enrollment funnel. You want to plug the leaks, and fix the broken connections — before your lose momentum.
Breaking Down the Enrollment Funnel
Your enrollment funnel is made up of five stages. Prospects are people visiting your school’s blog, website, or social media pages. Leads are prospects who have made themselves known to you. They downloaded a special report and provided their email address. Or perhaps they liked your Facebook page. This is the top of your funnel. You’re getting people’s attention.
Not getting enough traffic yet? Check our our ebook, SEO Do’s and Don’t for Schools >>
In the middle of your funnel, you have inquiries, people who have actively reached out to some part of your school. These leads have signed up for a campus tour, or sent Admissions a question, or requested a meeting with an academic counselor. Their interest in your school is growing. They’re narrowing their focus. The more inquiries a lead makes, the more certain you can be that your school will make it to their short list.
Last is that slim percentage of prospects who ultimately apply to your school and, if accepted, then enroll. The bottom of the funnel is where you ‘close the deal.’ DePaul University in Chicago shared its rate of return through to matriculation in 2014 – less than 1%. For a school that brings in 2,500 students with each enrollment class, that means they start with 300,000 leads.
The only way to find your funnel’s weak points is to first look at the numbers.
Identifying and Fixing Your Funnel’s Leaks
A healthy funnel is in large part about the numbers. There’s definitely a “quality” component too. But even that will only get revealed by first looking at the numbers.
You should already have some target numbers set for each stage. If you don’t, you can still look at the numbers as they are in your funnel. However, you won’t know if you’re on track to meet your enrollment goals without having set them in the first place. So go set some goals!
The clue to look for is large swings in numbers between stages.
Let’s Start at the Top with Prospects
In digital terms, you can measure this as traffic to your website or school’s blogs. If you’re not generating enough traffic, you’re putting the rest of the marketing funnel and admissions team under a lot of pressure to squeeze out a full enrollment class from a smaller than desired pool of prospects.
If your site visits are low, perhaps you need more content geared toward someone who is starting to wonder about what school is like, or what to consider when choosing a school. Are you putting out enough content that answers the questions of people beginning their research? Is it closely tailored to speak to your personas?
If you think the topics are strong, then it may be a distribution issue. Do you merely publish a blog post and hope people find it? Take a look at your social media and paid advertising programs to see where they can promote your top of the funnel content better. Are you on the right social media channels? Are you posting the kind of information your personas want? Are you responding to people on those channels in a timely manner? Are you making it fun? Are you being helpful?
Mid-Funnel Problems
1) First mid-funnel problem: the email addresses aren’t coming in.
Let’s say you’re getting good traffic, but nobody is downloading your premium, gated content. Not good: you’re not collecting email addresses. If your premium content downloads are low, then you’re not gating the right content. Or perhaps the titles aren’t the most appealing.
“You gotta give to get.” You have to give away a lot of great content to attract prospects. To turn them into leads, you need to make them an offer of content that’s irresistible. Say, a report on starting salary averages for common jobs that your graduates have been successful in finding a match for their skills, knowledge, and passions. Or a checklist of “10 things you need to know about any school’s graphic arts program” before you apply. Meaty content. Rich content.
Take a closer look at your gated content that’s converting poorly to determine if the topic isn’t right or your headline isn’t doing it justice. It could be that you’re asking for too much information on the download form. You can use progressive profiling to start by just asking for a name and email. Once you turn a prospect into a lead and get their email address in your database, you can gather more intel on them when they download future content.
In fact, this is one spot where you can identify some quality issues behind the numbers. If you see that people who downloaded a certain piece of content don’t return to download more, that may be a flag that this piece of content needs to be reworked.
2) Second mid-funnel problem: ‘One-and Done’ Downloaders
If people are generally only downloading one or two pieces of your content and then disappearing, this drop-off will show up in the difference between the number of leads vs. inquiries. It’s usually not any one piece of content that’s not working. It’s more likely that not many of your leads are taking a more pro-active step to contact your school.
In this case, you should look at your lead nurturing process (we’ve got a guide to help here). Are you offering enough content and calls-to-action (CTAs) that gently nudge leads down the funnel. Do you have email drip campaigns that share alumni videos with a CTA to schedule a call with an admissions counselor or current student ambassador?
Your nurture emails need the right CTAs that give them impetus and opportunity to make a pro-active inquiry. Analyze all your CTAs in emails and reports that are intended to move the lead along, first to inquiry then on to application. Which ones are working better than others? Learn from what works; discard what doesn’t.
Don’t Forget the Last Mile
Do your funnel numbers drop off after the application gets downloaded? Don’t ignore this critical last mile.
Continue nurturing potential applicants with informative emails, posts, and other content that warms them up for admissions. Make sure you’re passing along all the great intel you’ve gathered on applicant to Admissions so they can approach him in the most effective way. Even after acceptance, both Marketing and Admissions can keep the nurturing going until enrollment.
At HubSpot, we call all this the waterfall. A strong flow of traffic should cascade down through each stage of the funnel to meet your enrollment goal. Obviously there’s fall off the farther you get down the funnel. But find the points in your funnel where numbers nose dive. Those are your leaks. Now — go fix ’em.
8 Mistakes That’ll Totally Derail Your Business Pitch
In the last six years, I’ve done more than 100 pitches all across this country.
I’ve enjoyed many victories, including raising $30 million in venture capital from institutional investors. But I’ve also suffered some defeats — it would be just awesome if I never see another rejection letter.
Needless to say, my successes and failures have taught me several important lessons that I’d like to share with you. You can use these lessons to help you craft a stronger overall pitch — whether that means pitching your business idea to a room of investors or simply pitching a blog post idea in a meeting with your coworkers.
Whatever the case may be, here are eight mistakes you’ll want to avoid at all costs.
8 Mistakes That’ll Totally Derail Your Business Pitch
Mistake #1: Not Doing Your Research
Pitches are won and lost long before the actual pitch even takes place. To avoid wasting your audience’s time (and your own), you should spend some time getting to know the people you’re pitching to.
If you’re pitching to a room of VCs, you’ll want to:
- Look at their past investments. Do they invest in SMBs? Generally, investors focus on companies of a certain size. Pitching your small or medium-sized business to a VC who only invests in larger companies is a mistake.
- Make sure your potential investor isn’t investing in one of your competitors. It’s unusual for investors to make two bets in the same industry or niche. If they do take a pitch, it might just be they’re trying to find out what the competition (you!) are up to. Avoid this huge mistake.
If you’re pitching to your coworkers, boss, or a different department at your company, you might:
- Customize your presentation. Find out what their goals are. Check out their latest tweets. Pull some information from their social profiles. Finding a way to incorporate some of their interests into your pitch will help you grab their attention and keep it.
Mistake #2: Failing to Address Concerns
If the people you’re pitching to address a concern, it’s not the end of the world. If they mention it twice, it might just be a coincidence. But hearing about the same issue three times? Uh oh, we have a trend.
If you hear the same objection three (or more) times, stop pitching immediately and address those issues. Continuing to pitch with known issues is just wasting the time and patience of your audience.
Mistake #3: Being Too Defensive
It’s important to think of every possible reason that people could reject your pitch. And while stopping to address concerns is important (as I mentioned above), figuring out how to address them in a non-defensive way is also crucial to your success.
When someone disagrees with you, your first reaction might be to say something like, “I don’t agree with you.” Saying this out loud, however, is one of the worst mistakes you can make when delivering a pitch.
Instead, put some thought into your response. Try to see things from their perspective before you start justifying your perspective.
Mistake #4: Being Boring
Most pitches are super boring and forgettable. That’s why for every successful pitch presentation there are probably 50 to 100 that fail to win over a reluctant audience.
When making a pitch, try to be more memorable. Use content marketing tricks to help your pitch be remarkable in some way.
Mistake #5: Projecting the Wrong Image
You can tell people a lot without saying a word. So always be intentional about what you’re projecting when you pitch, whether it’s through your body language or what you wear.
When I was pitching, my strength was software engineering, so I dressed the part. I didn’t want to project, through what I wore, that I was some kind of financial wizard with years of experience.
If you want to sabotage your chances, projecting the wrong image will surely lead to failure.
Mistake #6: Not Reporting on Your Progress
Your pitch failed. Your idea got rejected you. And you kept getting the same type of feedback. Eventually, though, you got past your own ego. You finally understood why you failed, and you decided to do something about it: you acted on their recommendations.
Now it’s a year later. Failing to follow up with investors or those you share your idea with to report on your progress is a mistake. Following up tells people two important things:
- You’re able to listen and valued their recommendations.
- You’re a dedicated, hard-working person who can get important things done.
Mistake #7: Relying Only on Formal Pitches
Let’s say you’re pitching an idea to an investor. Believe it or not, not all your funding will come from formal business pitches. In fact, you can raise quite a bit of money by talking to investors informally — and using just a little bit of reverse psychology.
For example, when meeting with an investor you might say, “Hey, I have this idea. I’m not really looking to raise money, but I need your advice.” Or, maybe you could say, “Hey, could you point me in the direction of an investor who likes to make big bets on proven idea with high risk and high returns?”
In both of these cases, the goal is to make the investor think, “Hey, I want to do that! What about me?”
Mistake #8: Not Addressing Deficiencies
Failing to be honest with your audience will only lead to rejection. If you know your idea has obvious deficiencies, be up front about them in your pitch.
By addressing any issues, you’ll basically inoculate yourself from any criticism. Or, at the very least, show that you’re open and willing to discuss them.
Think Before You Pitch
Now you know the reasons why your pitch will fail, and what it will take to help get it right next time — whether you’re standing in an office with your boss or on a stage before a panel of judges at pitch-off event, like the one taking place at INBOUND this year.
Yup, that’s right: Real startups. On stage. At INBOUND.
I’ll be there (speaking about content promotion hacks for Facebook and Twitter), and I can’t wait to see what the startups bring to their live pitches. I hope to see you up on that stage, or taking notes in the audience. I’ve got a feeling it’s going to be super valuable.
Editor’s Note: This post was originally published on Inc.com and has been modified for republishing here.
15 Creative Examples of Branded Pop-Up Shops
Marketers spend a lot of time trying to nail down abstract concepts. They’re tasked with turning brainstorming sessions and comments sourced during focus groups into campaigns that sum up everything about a brand’s identity in a neat, tidy, and most importantly, interesting way.
But what if a consumer could walk into a room and fully experience your brand with all their senses? Pop-up events offer just that — the chance for consumers to get up close and personal with their favorite companies in a truly immersive setting.
In their simplest form, pop-up events are temporary retail spaces that give companies the opportunity to sell their products in an environment completely designed and controlled by them. Since they’re temporary, they offer a relatively low-cost and low-commitment way for companies to take creative risks, generate buzz, and introduce their brands to new audiences.
Consumers love the lure of exclusivity, and brands love the unmatched opportunity for experimentation. To inspire your next branded experience, we’ve curated a list of 15 innovative and visually stunning pop-up events.
15 Examples of Next-Level Pop-Up Events
1) COS Los Angeles
Experimental architecture firm Snarkitecture was inspired by mirrored surfaces and simple silhouettes when designing this temporary retail space for LA-based fashion label COS. The folks at Snarkitecture transformed an empty industrial space into two identical, monochromatic rooms — one white and one pale pink — leaving the focus on two racks of minimal clothing. The reflected space “creates an unexpected and altered world for visitors to experience and share.“
Image Credit: Snarkitecture
2) BarkShop Live
Shouldn’t your dog be able to shop for his own toys? Bark & Co, the ecommerce company behind BarkBox, certainly thinks so. For one week in June 2016, the dog-centric retailer set up shop in Manhattan, inviting dogs and their owners to try out their squeaky, bouncy, and chewy offerings in-person. The lucky pups in attendance were fitted with RFID-enabled vests, which tracked the toys they played with the most. Owners were then able to view and purchase their dogs’ favorite playthings directly from the event’s custom mobile app.
Video from Digiday
3) Glossier Summer Fridays Showroom
In Summer 2015, online makeup and skincare brand Glossier styled a floor of its Manhattan headquarters as a temporary retail showroom — the closest thing to stepping into its beautifully curated Instagram feed. The space offered Glossier products for sale, but as founder Emily Weiss explained, selling tubes of moisturizer and lip balm wasn’t necessarily the pop-up’s top priority. “It’s not really just a store,” Weiss said in an interview with Racked. “It’s almost like this is a giant mood board for the company we’re hoping to build.”
Created under the direction of set designer Marguerite Wade, the penthouse featured custom floral arrangements by Meta Flora and an installation by multi-media artist Grace Villamil.
Image Credit: Glossier
4) Fast Food Aid
Creative directors Ikkyu and Junya Sato of Kaibutsu design studio noticed that young adults in Harajuku had a serious fast food problem — and they decided to do something about it. To promote organic food chain Dohtonbori, they launched Fast Food Aid, a pharmacy-inspired vitamin pop-up that offers a selection of health supplements aimed at junk food lovers. And all it will cost you is a receipt from a fast food place.
After a guilty indulgence, exchange your receipt for a customized bottle of supplements that will replenish the nutrients missed at your last meal. Each canister is aimed at a particular junk food — ramen, pizza, hamburger, etc., — to make sure your system gets what it needs.
Although Dohtonbori isn’t actually selling anything for profit at the shop, its been able to educate visitors about health and wellness, hopefully driving them to opt for healthier food options in the future — like Dohtonbori’s own restaurant.
Image Credit: Fast Food Aid
5) Pantone Café
What does color taste like? If anyone knows the answer to that question, it’s Pantone. The world’s most well-known color company has been running a pop-up café in Monaco for the past two summers, selling a minimal menu of pastries, lunch options, coffees, and fresh juices — all branded with Pantone’s signature color swatches.
So does this mean Pantone is permanently branching out into cuisine? Not quite. The seasonal eatery is perfect Instagram-bait, and it has successfully generated a ton of buzz in the press. It’s a perfect example of a pop-up event enabling a company to take creative risks with its brand by stepping outside of its typical business model.
Image Credit: Pantone Café
6) Real Life At Work
To offer passersby a glimpse into its world, London-based ad agency Wieden+Kennedy invited graphic artist Emily Forgot to transform the front window of its office into an imaginative, cartoon-inspired pop-up workspace. Using exaggerated monochrome imagery, Forgot crafted a whimsical office scene from paper, complete with a typewriter and a clock that ran backward.
For a few weeks, real agency employees took turns “working” in the window. The whole thing was then broadcast live via webcam on the agency’s website for anyone who was curious enough to watch. The pop-up was a unique way for W+K to shrug off the stereotype of the ad agency that takes itself too seriously — plus it was a creative chance for the team to engage with the community.
Image Credit: Wieden + Kennedy London
7) Früt
How do you make inexpensive, packaged underwear appeal to high-end consumers? Just create a “luxury” lingerie pop-up with a fake, fancy-sounding name. CP+B Boulder helped client Fruit of the Loom open up an intentionally pretentious and ludicrously over-priced boutique for its underwear, complete with colorful intimates hanging from over-the-top tree displays. Früt sold only Fruit of the Loom undergarments, but shoppers who usually wouldn’t deign to buy the brand were lured in by the high-end guise.
Image Credit: Wieden+Kennedy London
8) Organic Valley Coffee Shop
In a clever shot aimed at the artisanal coffee movement, creative branding agency Humanaut opened up a pop-up cafe to promote its client Organic Valley’s new coffee creamer. The temporary Manhattan storefront adhered to all of the typical hipster tropes — a minimal logo featuring arrows and X’s, modern glass mugs, and trendy sizes — Lil Bit, Double, and Lotta. And they cast a real Organic Valley farmer as the shop’s folksy proprietor.
There was one catch: The shop only sold measured portions of half-and-half. You ordered your creamer at the counter from a barista and added your coffee separately. The spoof was a major success. Unperturbed by the irony, New Yorkers lined up to order shots of plain cream for $2 a pop. “No one had a problem paying $2 for a pour of organic half-and-half,” said Humanaut’s creative chief David Littlejohn. “In the end, the idea wasn’t as crazy as we thought it was.”
Video Credit: Organic Valley
9) 5-Minute Internship
Solve, a Minneapolis-based creative agency, wanted to re-vamp its summer intern hiring process to attract recruits who can really think on their feet. So naturally, they created a portable, small-scale replica of their office — complete with a receptionist-staffed micro lobby — and set off on an epic college-campus road trip.
Students at participating campuses were given a 5-minute challenge based on their area of interest — and those who performed the best were invited to interview on the spot. The pop-up event tripled the amount of applications the agency received to its internship position.
Image Credit: Adweek
10) The Picture House
Capitalizing on the Instagram food photography craze, Birdseye opened up a temporary restaurant in London where diners could settle their bill with an Instagram post — all they had to do was take a snap of their meal and add the hashtag #BirdsEyeInspirations. The event was a creative social media experiment that helped generate free publicity for the frozen food company’s Inspirations line of products. Branding agency Slice was behind the world’s first pay-by-picture pop up.
Image Credit: Slice
11) The Period Shop
For one weekend, Kotex launched a pop-up in New York aimed at alleviating negativity and spreading love for women during their periods. The store, which was developed by ad agency Organic, featured ice cream, manicures, chocolate, comfy clothing, and Kotex U products for sale. Women were invited to browse the brightly colored offerings and share their experiences. And it was all for a good cause, too. Proceeds were donated to a women’s homeless shelter.
Image Credit: Adweek
12) Birchbox’s Tour
Pop-ups give online retailers the chance to show off their goods in person, interact directly with their fans, and take their brand to the next level. Birchbox — which sells subscription boxes of curated beauty products — went on a national tour in 2015, opening up temporary brick-and-mortar stores in multiple cities. In addition to selling beauty products, they offered manicures and astrology readings to entice beauty-lovers inside.
Image Credit: Racked LA
13) Fendi Spring/Summer 2016 Flower Shop
The mobile flower shop that botanical designer Azuma Makoto created for Fendi is proof that not all pop-ups need to be large scale productions. The artist adorned a three-wheeled Italian vehicle with an intricate floral display and outfitted the side of the truck as an open storefront. The vendor/driver sold limited edition Fendi bags and vases of Makoto’s floral arrangements to promote the fashion label’s 2016 Spring/Summer collection.
Image Credit: My Modern Met
14) Arnsdorf
What’s a designer to do when they’re facing a tight budget? Experiment with creative materials. This pop-up retail space for Australian clothier Arnsdorf was created by using 154 pairs of neutral-colored pantyhose, and the effect is otherworldly.
Image Credit: Fast Company
15) The Poundshop
This design collective is a recurring pop-up platform for artists to offer their goods for affordable prices. “The aim of The Poundshop is to spread design to a wider audience by making it accessible through price and engagement,” the website explains.
The pop-up shops are just as visually interesting as the art they sell.
Image Credit: The Poundshop
Sales And Support: Why Everyone On Your Team Should Have A Role In Both
There are 15 people on our team at Drift.
Like most businesses, we all have different roles and responsibilities — there are frontend engineers, backend engineers, designers, marketers, a product manager, a customer success manager, and a sales rep.
And while each one of our roles is very clearly defined, there are two things that we all have in common regardless of what our job descriptions say on paper: we all do sales, and we all do customer support.
The Power Of 1:1 Conversations With Prospects And Customers
This might seem counterintuitive, right? An engineer probably isn’t going to be great at sales and a marketer won’t make the best support rep. But here’s why we do it anyway:
In order to really understand what our customers want, we need to hear their pain, see their frustrations, and understand their challenges first-hand.
An internal wiki post with notes from a product manager who just spent all week talking to customers is great. But reading that feedback can’t compare to having a real-time, 1:1 conversation with someone on our website who can’t figure out our pricing. Or talking to a new customer that’s lost inside of our app — while they’re lost inside of our app.
Getting this 1:1 feedback outweighs any lack of sales or support experience that any one of us might have.
And because this feedback is so powerful, we don’t want to relegate talking to customers to one person or one department. Talking to customers should be part of everyone’s job today.
This is especially important in today’s world. There’s a fundamental shift happening in business right now: helping is the new selling, and customer experience is the new marketing. As a result, whoever understands the customer best will be the one that wins their business and earns their money. At Drift, we call it the customer driven revolution. All of the power in business has shifted into the hands of the buyer.
Still not convinced that everyone on your team should have a sales role and a support shift? Here are three reasons why this can have a huge impact on your company’s growth.
How All Hands Sales And Support Will Help You Grow Faster
It keeps everyone close to customers. Everyone says they are customer-driven. Everyone knows the importance of talking to customers. But here’s the standard line you hear from most companies when it comes to actually doing it: “I know. I know. I need to make the time to get out there and talk to more customers. I’ve just been so busy.” This will always be the case until you make it part of everyone’s job. When you give everyone on your team a dedicated shift, this guarantees that people are spending time that week talking to customers. We set up a shared Google Calendar and the whole team gets reminders in Slack about their support shift each day to help hold everyone accountable:
Problems get solved faster. Problems. Bugs. Unclear copy. Whatever it is, it gets fixed faster when the people with the power to fix those problems are the ones talking to customers. A few months ago, we launched a new integration with Slack on Product Hunt. As a result of being on Product Hunt, hundreds of people signed up within the first few hours. But shortly after launch we kept getting the same question: “Hey, where do I connect Drift to Slack?” Even though we had a step in the onboarding flow to hook up Slack, it wasn’t obvious to most people. One of our UX designers was working her support shift during this launch, and instead of generating a support ticket, creating a new Trello card, or adding something to a future roadmap, she just grabbed one of our engineers and within two minutes, shipped a quick fix — a link to take people directly to Slack. Giving everyone on your team a support shift will help make UX, design, product, messaging, and pricing issues painfully obvious — and that’s a good thing.
You create real relationships with people. Putting everyone on the front lines ensures that your team is always having one to one conversations and connecting with people — from people who are thinking about buying from you, to people who are already paying customers, to people who just wanted to write in and say that they enjoyed that blog post you wrote.
How You Can Make 1:1 Work For Your Company
Now that we’ve talked a little about the value of 1:1 conversations, here is the ultimate question: how can you make it work at your company?
There’s one question that comes up anytime someone talks about the topic of 1:1 conversations with prospects and customers, and it goes something like this:
“I like the idea. And I get the value and the power of having 1:1 conversations, but it doesn’t really scale.”
And I totally hear you.
Smaller companies or early stage startups like Drift can make 1:1 work because we need to talk to everyone at this stage. But traditionally, 1:1 conversations have been designated for support.
Sales and marketing don’t want to waste time dealing with support questions and talking to leads who aren’t qualified. That’s why marketing qualified leads (MQLs) and sales qualified leads (SQLs) were created in the first place.
But here’s the truth about 1:1 conversations with prospects and customers: this approach doesn’t require as much change as you might think. You don’t have to completely overhaul the way you do sales and marketing today or give everyone a support shift like we do at Drift. Here are a few small changes you can make right now to start having more 1:1 conversations with your prospects and customers.
Just ask. This one is the most obvious and the most effective. Sometimes, you just have to ask. One of my favorite examples of “just ask” comes from Groove CEO Alex Turnbull. In 2014, his team started to notice a spike in customer churn, and they weren’t really able to figure out why by just looking at the data. So Alex got right to the point — he sent a personal email to every single customer and asked for 10 minutes of their time to talk. And here’s what happened:
As a result, he spent more than 100 hours talking to 500 Groove customers and ended up with feedback that helped him right the ship and fix their churn problem.
100 hours to change the course of your business? Seems worth it to me.
Now in Alex’s case, he decided to reach out to everyone at once — and that produced hundreds of responses. If you don’t think you’ll be able to block off the time to address that many responses, then it’s easy to approach this differently. You could simply create an on-going campaign that is designed to get customer feedback one by one so you don’t have to find the time to manage it in huge chunks. Sending an email blast to every customer is certainly one way to get feedback, but you can also use your customer data to create relevant segments.
And often times, talking to just 15-20 customers will give you the majority of the feedback you need (venture capitalist Jason Lemkin has something called the 20 interview rule that is similar to this). You’ll notice that after you start talking to five, six, seven customers, the same issues keep popping up. Alex chose to talk to everyone because it had been a while since he went in-depth on customer feedback.
Switch up your welcome email. While every business might not be having 1:1 conversations with prospects and customers right now, there is one thing I’m confident that everyone business does have: a welcome email. Whether it’s an email that gets triggered after someone signs up for your newsletter, requests a demo, or starts using your product, you’re probably already sending a welcome email. But there’s a huge mistake that most people make with those welcome emails — they don’t send them with a purpose.
Too many people treat their welcome email as a throw away, or something that gets written at the last minute as a finishing touch to onboarding. And the reason that’s a huge mistake is because your welcome email is the single most important email that you will send to your customers and subscribers.
These people are brand new. They just signed up. This is when they are the most engaged. It’s rare that you’re ever going to get this level of attention and engagement from someone again without putting in a ton of effort, so make sure to write your welcome email with a purpose.
Yes, it should be smart, funny, and welcoming – but it should also be designed to get a response. Ask new users why they signed up, what they are looking to accomplish, what they’re struggling with, or what brought them to use your product or service. This is the best opportunity you will have to strike up a conversation with a new customer or subscriber. We recently switched up our welcome email at Drift to this:
And the result has been nothing short of game changing: over the course of 12 days after making the change, we received 75 direct replies from real people telling us how they found Drift, why they signed up, and what they’re working on.
But does it scale? The truth is, I can’t think of a better way to spend the first hour of every day than having conversations with real people who are interested in our business — and that’s now how I start my day off every single morning.
Start showing your face. On our quest to automate everything we can in marketing and sales over the last five years, we’ve started to forget about the most important aspect of doing business in the first place: people. And because the majority of businesses operate this way, there’s a huge opportunity to stand out by showing your prospects and customers that you’re a real person. One of the easiest ways to do this is by giving everyone that comes in touch with your business a way to say hello (think of it like showing your customers that you’re always open for business) — and putting that person’s real face out in public.
One of my favorite examples of this is what Jon Westenberg does with the articles he writes on Medium — he shows his face and gives his email address to every single reader:
This can also be as simple as showing your face on your website’s live chat. Go to any business’ website, and there’s a good chance you’ll be able to chat with them — but are you talking to a real person? Putting your face on live chat is one of the easiest ways to show you’re a real person — and as a result — start having better conversations:
You’d be surprised at how many deals you can win and customers you can delight just by saying hello, making small talk, and proving you’re a real person. It works in real life right? So why wouldn’t you take advantage of that for your business on your website.
At the end of the day, having more 1:1 conversations starts with a change in philosophy and a commitment to being more human. And from Slack to Trello to Buffer to Shopify, this is something that the best modern businesses all have in common today.
And while this change might not happen for you overnight, there are a few small changes that you can make right now to start having more conversations with your customers and people who are interested in your business.
If your company can make this work in one form or another — even if it’s only for a few hours a week manning live chat — the impact being this close to your customers can have is one of the best things you can do for your team, regardless of what stage your company is at.
This is what we’re focused on at Drift — helping your business have 1:1 conversations with prospects and customers at scale.
Learn more about leveraging sales and support tactics from Drift.
How to Be Creative When You’re Not Naturally Creative
“Everything’s already been thought of.”
“I don’t even know where to start.”
“I’m just not a creative person.”
We’ve all had those frustrating moments when when we’re expected to come up with a brilliant new idea, but no matter how much we squint at our computer screens, we just can’t seem to think of anything good.
That’s when we tend to look over at our peers who are “creative types” and wonder why we didn’t inherit any creative genes ourselves.
But it may be that were looking at it wrong. In fact, many psychologists argue that creativity isn’t something people are born with; it’s actually a skill that can be learned. And, as with any other skill, you can only get better at it with practice. The brain is like muscle that needs to be developed — in this case, using cognitive exercises.
So what can we do to exercise that creative muscle when we’re struggling to come up with new ideas? Everyone has their own ways they like to get “in shape.” To get you started, here are 11 different ways to jog your creative thinking.
11 Ways to Jumpstart Your Creativity
1) Start with a morning freewrite.
We all have days when walk in to the office in the morning and all we can think about is all the stuff we have to get done. But this can stress us out and cause us to lose perspective on our own thinking.
On days like this, one way to refocus is by doing a morning freewrite. According to a study from Harvard Business School Professor Teresa Amabile, regular workplace journaling allows you to rediscover your perspective and become more productive.
So instead of jumping right into your projects when you get into the office, block off ten minutes for a digital detox and grab a notebook and paper to just write. Unlike a blog or some other public-facing piece of content, a physical journal is your own personal compilation of thoughts that don’t need to make sense to anyone but you. Writing in a more freeform style will allow your creative juices to flow, while also forcing you to put your thoughts into written words.
Don’t know where to start with freewriting? Check out Twords‘ prompt library, or subscribe to Daily Page to get a writing prompt emailed to you every morning, which you can share or keep private. Here are some more prompt ideas from my colleague Megan Conley:
- Recently, I’m struggling with …
- If I had more time in the day, I’d use it to …
- Today, I’ll relieve stress by …
- I feel out of my comfort zone when …
- My work is motivated by …
- This week, I’m thankful for …
- Today, I should avoid …
- I feel fulfilled at work when …
- From my team, I’m proud of …
- I work best when …
2) Take a creative course.
If you’re the kind of person who prefers more instruction, taking a creative course could be the right way to guide your creativity.
Creative courses could be anything from creative writing to photo and video to music, art, or design. Regardless which course you take, you’ll be exposed to different ways of thinking and approaches to working that you can apply to your own work. Plus, it may help you uncover some of your strengths and work on your weaknesses.
It’ll also surround you with other people who have a similar goal of developing their creative skills. You can learn from your peers and have the chance to review each other’s work to get a fresh perspective on your own ideas. And if you’re someone who is too nervous to ask for help in the office, a classroom setting could give you the opportunity to open up to others in workshop style critiques. By sharing your ideas with others, you’ll be forced to find ways to formulate your thoughts into words and visuals, while learning to handle critique from others.
A few free online courses to start with include Creative Live, MIT OpenCourseWare, Creative Writing Now, and Stanford OpenEdEx.
Courses may not be for everyone — especially if you feel like structure is a hinder to your creative flow. But if you feel like you’re lacking direction in your thinking, it may be worth a try.
3) Brainstorm while you exercise.
If you feel like you’re working your brain hard and coming out empty-handed, try pushing yourself physically for thirty minutes or so. Research shows that exercise can be linked to more creative thinking. One study that focused on how moderate exercise influences participants’ performance on different thinking tasks found that exercising regularly may train your cognitive thinking and creativity in a healthy way.
“Much more of the brain is devoted to movement than to language. Language is only a little thing sitting on top of this huge ocean of movement,” says Neurologist Oliver Sacks.
So take 30 minutes out of your day to go for a run, do an energizing yoga flow, or practice some deskercises. It’ll benefit both your body and mind.
4) Travel to other places.
Since your creativity is related to how your brain is wired, it’s important to keep your mind stimulated by new sights, sounds, tastes, smells, and experiences. Keeping your sense sharp allows the synapses in your brain to think in new ways. Expose yourself to an entirely different point of view through a new cultural experience.
“Foreign experiences increase both cognitive flexibility and depth and integrativeness of thought, the ability to make deep connections between disparate forms,” says Adam Galinsky, a professor at Columbia Business School, whose research focuses on the cognitive connection between international travel and creativity.
He emphasizes the importance of not just going to different places, but also immersing yourself into their culture. By engaging with the local art, cuisine, and people, you allow yourself to really learn new ways of thinking that you can apply to your own ideas.
5) Channel your inner child.
Children are considered “naturally creative” only because they know no limits to their creativity. Since children are willing to go in any direction with their creative, they don’t hold back. Channel this mentality, especially when it comes to taking a completely different direction with your work. Instead of being concerned or self-conscious that your work isn’t good enough, be willing to take risks to push your creative limits.
Most importantly, have fun with your work. A child sees everything as an adventure and makes the most of every moment. Instead of being concern about all your responsibilities at once, focus all your energy into one project at a time so you can put your best foot forward.
6) Join a coworking space.
A study at University of Michigan found two key ways coworking spaces create unique opportunities for creativity: flexibility and autonomy. A lot of it has to do with the physical setup of the space: The flexibility to control your space to suit your personal preference encourages creativity. Some studies have shown that have the ability to customize your workspace leads to higher levels of productivity. Your creative funk may be because you’re not in an environment that is conducive to your personal style of work.
Plus, the proximity to others means ample opportunity for collaboration. Collaboration can be a catalyst for innovation, and coworking spaces are great ways to throw yourself into a new environment with like-minded, innovative people.
Not sure where to find coworking space near you? Start by entering your city into DeskSurfing.net to do a local search.
7) Incorporate breaks into every work day.
Ever noticed that some of your best ideas come to you at the most random times, like the car or the shower? There’s a reason for that: These breaks allow your mind to continue to work on these ideas without getting stuck in a funk where you can’t organize your thoughts.
Adrian Furnman, Ph.D describes in a Psychology Today article, Adrian Furnman, Ph.D says it’s important to give your thinking “incubation time” once you’ve been actively working on an idea for some time.
Brian Halligan, HubSpot’s own CEO and co-founder, is a big advocate for naps at the workplace. He actually finds his best ideas come to him when he just falling asleep or just waking up. In an interview with the New York Times, he said he pushes to make the office into an environment where employees can “work less and think more” by providing nap rooms to encourage folks to take a break. This, he says, will help spark creativity.
Make sure to allow yourself to block off designated break sessions in your calendar so you don’t lose that time after being scheduled for endless, back-to-back meetings.
8) Connect with creative people.
When you’ve hit a wall with your own ideas, it may be time to tap into the creativity of others. Surrounding yourself with people with whom you can share and get feedback on your ideas and opinions is not only good for your creativity, it’s good for your career. These different points of view can act as fresh perspective on a project you’ve been staring at for too long.
Not only can creative people give you feedback on your projects, their own drive will keep you motivated to do your best work. A healthy dose of competition could be just what the doctor ordered when you need to force yourself to really channel your inner creative spirit.
This rings especially true when these connection challenge your way of thinking. If you surround yourself with like-minded people, you could fall into the trap of confirmation bias where you never see the faults in your own work because everyone already agrees with you. Although it could be hard to take this critique, it’ll force you to think in ways you never thought of before.
To start networking with other creative minds, you can explore people’s work in platforms like Behance or Instagram. If you’re looking to connect with people in person, attend conferences and networking events related to both your industry and your interests.
9) Keep a doodle journal at your desk.
Are you a visual thinker? If so, you might find it hard to find a direction with your ideas when you’re limited to the four corners of your screen. Change your routine and grab a pencil and paper to let your ideas free form in a more physical outlet. A blank sheet of paper or whiteboard may just be the best outlet to allow you to organize your thought process into one space.
According to Sunni Brown, author of The Doodle Revolution, “Even if you’re just scribbling in the margins, you’re lighting up different networks in your brain and when you do that, you’re engaging different information.”
Creating visual maps of all your different thoughts allows you to see the relationship between your ideas. Physically writing it down takes your ideas a step further and forces you to put them into words and physical shapes. If you can see your thought process, it will be easier to understand the direction you’ll want to go in.
10) Unwind by watching funny content.
Have you hit the point in your creativity block that you’re spending hours watching cat videos? Good news: This may actually be a good thing. Research shows there’s a strong correlation between humor and creativity. A laugh can actually bring you closer to those moments of inspiration. Humor also puts you in a better mood, allowing you to think more freely and better solve creative problems.
If you look at your project from a more lighthearted perspective, you’ll allow yourself to have a fresh perspective on the problem at hand. Start with this list of funny tweets and social media posts that real brands have posted for inspiration.
11) Listen to music while you work.
Need a way to hone in on your work without zoning out? Although there’s been a lot of debate over whether listening to music will actually increase your intelligence over time (a theory often called the Mozart Effect), there are still productivity benefits to tuning in. Listening to music can help you focus on whatever task you’re currently doing. It can also put you in a better mood, and even calm your nerves if you’re feeling anxious.
Certain forms of music can help channel your creativity better than others and tune out the noises of the office. While music with extreme changes of pace or lyrics can be distracting, ambient music can help increase processing levels and and promote creative thinking.
Everyone has their own taste in music, but some of the most work conducive genres include classical, electronic, and even video game soundtracks. Be sure to check out HubSpot’s own list list of recommended productive playlists.
One new practice can work for you differently over time if you start to get bored of it. If you ever start to feel a practice has become too routine for you, revisit this post to try out another idea.
What else do you do to channel your inner creativity? Share with us in the comments.
How to Win More Proposals by Interviewing Your Prospects
I’ve been writing proposals for over a decade, and it’s probably fair to say that I loathed the entire process for the longest time. I worried that I was just “making it all up.” I’d second guess every word I wrote, and of course, I was petrified of the inevitable rejection. Unfortunately, many creative folks feel the same: “If I’m not a veritable Shakespeare with the quill and ink, then I don’t stand a chance”.
Fortunately, this simply isn’t true.
Over time I came to realize that my writing prowess wasn’t the deciding factor in winning projects. Actually, 90% of my proposals were accepted because of something much simpler: prospect interviews.
Proposals Start Way Before You Propose
I still remember getting those “dear designer” emails. You know the type: The ones where the sender swaps out your name before sending to another 20 agencies. Upon receiving one of these, I’d get over-excited and jump straight into proposal mode. After all, I had all the information I needed in their initial email: They needed a website!
Of course, this is a poor way to find great clients and an even worse way to win meaningful work.
To consistently win projects, you need to invest time in learning about your clients and their problems. But this creates a dilemma: Should you invest time upfront before writing a project proposal? That all depends on if the payoff will be worth it.
If you’re going to spend the time writing the proposal, then you should commit to spending the time to discover what your clients really want.
Why You’re Not Winning Enough Proposals
So let’s take a quick look at some of the reasons a project proposal might fail in the first place:
- You were one on a list of many, and the client was just looking for the best price. (This is not a good client anyway.)
- You only spoke about your skills and all the great things you’ve done with them. You failed to mention how you can specifically help the client. This can loosely be seen in many proposals as: web design = $15,000. Where’s the value?
- You sent off a veritable novel of a proposal. No one is ever going to read your 50-page masterpiece. Ever. During the past two and a half years of growing Nusii, we’ve seen that more than 80% of accepted proposals contain between 5 and 8 sections or pages. That’s a quick read in anyone’s book.
- You wrote a shoddy proposal. It happens; you’ll get better.
- You didn’t relate to the client’s business. To them, your services just seemed like “total costs,” not added value.
Anyone with a decent command of language and the desire to work with better clients can write a winning proposal.
Why You Should Interview Your Prospects
Instead of jumping at the next email from a random prospect, take the time to build a relationship — even just a minor one — before even thinking about a writing a proposal.
Some say you should never do anything for free. But you’re not going to work for free, and you’re not going to tell your client how to move ahead without you. You are going to find out as much about their business as possible to see whether you can actually help. Why? The more you know, the more value you can provide, and the more value you can provide, the greater your chances of winning that project.
But before you set up an interview with a potential client, you should do your due diligence by qualifying them as a lead. You don’t want to jump on a call with any Tom, Dick, or Harry. You want to talk to someone at the company with the power to make decisions.
Once you’re convinced that your potential client would be a good fit for your services, ask them if they would like to set up a time to chat — either in-person or using a product such as Skype. If they’re not keen or they downright refuse, then your decision on whether to move forward with a proposal has just been made for you.
So what questions should you ask your prospect to determine if they’re a good fit? Here are a few suggestions based on a typical website redesign, which you can adapt to suit other project types as well.
1) Why do you need your website redesigned?
Fail to ask this question, and you will most likely fail to write a compelling proposal. You should dig deeper, and get to the root of the website redesign request. Personal insecurities — such as the launch of a trendy new competitor — are not the same as deeper operational issues, e.g., “We’re losing sales to a poor checkout system that was designed 10 years ago.”
Best case scenario? You win the project, but leave the client disappointed because all they got was a sharp looking website. This is not a long-term win if you want to build a name for yourself. None of your client’s personal or business goals can be reached if you don’t know what they are.
2) How will not working with us affect your business?
This is kind of a presumptuous question, but let’s put it another way: If your client was to leave their website as it is, what would it mean for their business? The answer will give you an idea of how much value you can potentially provide.
Many clients will be a little vague with their answers: “We’ll continue to lose money,” or “Sign-ups will continue to drop.” That’s OK. Once they give you the glossed-over version, dig deeper. If sign-ups are an issue, ask where they’re dropping and by what amount. Do they have any thoughts on why this is happening?
You can be sure that very few agencies will be as thorough. Asking this question can set you up as a serious contender for the contract.
3) How will you know if working with us has been a success?
More ego-inflating questions, right? Wrong. One way or another, everything you do for your client needs to be quantifiable. Why? Because you both need to know whether you were a cost or investment. Let’s face it: Sometimes creative services are seen as a risk.
Ask about their goals for the project. What will a home run look like? An increase in trial sign-ups? More time spent on page? A reduction in email bounce rate? The more specific the better since you can focus on their specific goals in your proposal.
Knowing what a win looks like will give you something clear to aim for in your proposal, and at the risk of sounding icky, it will also give you something to sell.
4) What do you like about your current website design?
If it ain’t broke, don’t fix it. Designers like to leave their mark (I’m allowed to say this). This is normal. However, sometimes in our desire to tear everything down and make it pretty, we fail to take into account that sometimes certain stuff already works. You may be here to fix a poor checkout experience, but that doesn’t mean that everything else is garbage.
Ask your potential client if there’s anything about their current website that works well. If they can give you an example, ask why it works.
I’m sure you can see a pattern emerging with these questions — what initially seems like a broad question can lead to another more focused one (and another, and another).
It’s very hard to do this sort of thing via a written questionnaire or a form. You’ll miss out on facial expressions, specific language used to describe a problem (that you can later use in your proposal), and of course, the hope of any kind of relationship. Email isn’t the best place to make friends.
5) If your website could only do one thing, what would it be?
This is all about priorities. No doubt your client will have an idea of how they want their business to improve. But by asking this question, you are asking them to — once again — dig deeper.
If your client doesn’t have a primary goal for their project, this question will help them define what’s important and what’s not. This will help you make informed design decisions down the line.
Interview to Win More New Business
Client interviews are an important but often overlooked part of the proposal process. To make sure you’re winning the maximum number of proposals, go the extra mile and discover what your client really needs to improve their business. Ask questions that others are afraid to ask, and don’t work with people whom you can’t truly help. Discuss design as a vehicle for solving problems, not the solution. And remember to keep your proposals concise and based around how you can provide value to the prospect and increase trust.
You won’t always get what you need from one conversation with a prospective client. If after reviewing your notes and listening back to your interview, you decide you still need more information, jump on another call. Don’t write or send the proposal until you are confident there’s no better choice than your agency.
How to Use Social Media at Every Stage of the Funnel [Free Guide]
Consumers turn to social media when making a purchase — that much we know. They might search for information prior to purchasing and then again, post-purchase, for customer service and company updates.
Knowing this, it’s imperative that your company is there, providing them with the resources they need to choose your product over your competitor’s.
The best way to do this is to break down the customer lifecycle into four stages: Attract, Convert, Close, and Delight. This makes it much easier to create content according to each customer’s mindset. For example, you might focus on shareable, engaging content to attract new customers, or you might try out a loyalty program for delighting your current customers.
No matter what stage your customers are in, social media is a great tool to nurture them through the funnel. That’s why HubSpot and Bitly joined forces to bring you How to Use Social Media at Every Stage of the Funnel.
Download this free guide to receive:
- A high-level overview of the inbound methodology as a whole.
- A breakdown of the buyer’s journey and the different lifecycle stages a customer goes through when making a purchase.
- How to use social media to attract, convert, close, and delight customers.
- The different metrics to measure your success with social media at each different stage of the funnel.
- Real examples of companies using social media successfully.
- Much more about using social media to nurture customers through the funnel!
Download your copy today by clicking here.
CRO for Inbound Marketing: 6 Conversion Optimization Initiatives to Implement Today
Conversion rate optimization (CRO) and inbound marketing go together like peanut butter and jelly. After all, nobody is more concerned with (and obsessed with) conversion rates than the inbound marketer.
But many inbound marketers find themselves navigating a new world of CRO with a sense that there’s so much to test, and they’re not quite sure where to start. Here are 6 CRO initiatives you can undertake today to help give your conversion rates—and inbound marketing performance—a boost.
1) Start learning with visitor heatmaps
In 2016, there’s really no excuse for running an inbound program without also running heat mapping software on your site’s core conversion pages. There’s just no substitute for seeing, with real tracking data, how site visitors are making their way through your conversion funnel. Simply put, the best and only true source of data is the experience of visitors themselves while they use your site.
A heatmap delivers an aggregate picture of the click activity on a page, giving you insight into the elements of the page design that are attracting attention and driving action. Here are a few examples of what to look for as you conduct your first visitor heatmap tests:
Confusing Page Elements
Are there elements on the page that get a lot of clicks but aren’t actually clickable? It might surprise you how many visitor clicks are wasted. You can often get a solid conversion rate bump just by making an element that visitors are telling you they want clickable, actually clickable.
Desired Content
Are visitors’ click patterns telling you what content they actually want to see? No matter how user-focused you might think your site design is, visitors sometimes have a way of telling you what’s really important. Is there a tab that’s hidden on page load that the majority of page visitors click to surface? You may want to make that the default page state. Is there a piece of content further down the page that seems to get an inordinate amount of visitor attention? You may want to test a version of the page that presents this information closer to the top of the page.
Misplaced Priorities
Sometimes your heatmap test will reveal that an area of page that you put a lot of focus on is actually being ignored by site visitors. If you have a homepage carousel, this is a key area to watch in your first heatmap test. Are people actually using the carousel? The majority of homepage carousels we have tested simply do not convert beyond the content featured on the first slide, with first slide clicks often accounting for over 90% of total carousel engagement. If your test turns up similar results, it’s probably time to redesign that part of your homepage and ditch the carousel in favour of a well-designed CTA.
2) Try a different button color
Insignificant as it may seem, the color of your call-to-action (CTA) buttons on your site could be holding back your conversion rate. The good news is that testing it is easy, and doing so is a great way to get started with CRO.
Most conversion rate optimization platforms, such as Visual Website Optimizer, make split testing button colors incredibly simple—no developer or designer required.
There are plenty of articles singing the praises of red or orange buttons as top performers. Don’t believe the hype—our testing has shown that contrast is typically a more important determinant of success than any red or orange rule-of-thumb.
Start by testing complementary button colors that sit opposite of your site’s primary palette on the color wheel. Often, that extra contrast is exactly what’s needed to lift the page’s conversion performance. We’ve seen conversion rate lifts of over 25% simply from changing the color of a CTA button, which is well worth the minimal cost of testing.
3) A/B test your PPC landing page headlines
All right, sure—you could test headlines on any landing page. But I chose PPC landing pages for a reason: you’re paying to send people there, so you should try to get the most out of that traffic.
Most CRO platforms offer the ability to easily test landing page headlines. The harder part is coming up with the right headlines to test. As you build out your headline options, a quick Google search will reveal countless headline formulas that you can take for a test drive. And by all means, go ahead and give ‘em a try.
One bit of advice on headline writing: learn from the best. David Ogilvy’s copywriting genius is well-documented. And when you look at his bestselling headlines, you’ll notice that there isn’t a clear plug-and-play formula for success. There is, however, a lot of wisdom to be found in those timeless advertising headlines.
In developing my headline testing options for PPC landing pages, I like to generate a range of options that loosely fit within the following categories:
Benefits-focused: Headlines that communicate the benefit of the product or service offering. e.g. “Get more leads faster with Inbound Marketing”
Descriptive: Headlines that tell you what the product or service is. e.g. “Conversion Optimized Inbound Marketing Services”
Emotional: Headlines that attempt to appeal to the reader on an emotional level, often describing a feeling they may get by purchasing a product or service. e.g. “You’re going to love being a better marketer”
Match the Ad: Particularly with PPC conversion funnels, many marketers have found their best results when there is symmetry between the search term someone uses, the PPC ad headline, and the landing page headline. For example, to capture people searching for “inbound marketing services”, you would make “Inbound Marketing Services” the headline for both the PPC ad AND the PPC landing page.
4) Split test your most visited landing page
It is important to draw a distinction between Split Testing and A/B Testing. While often used interchangeably, a helpful distinction is to use the term Split Testing when you’re testing designs that vary greatly from each other, while using A/B Testing to refer to when you’re testing two versions of a specific page element (e.g. testing 2 headline options on a landing page).
Armed with new insights into how your visitors are experiencing the page and the headlines that are resonating best, you’re ready to create and split test a fresh landing page design.
In addition to translating learnings from earlier tests into your new design, consider taking this opportunity to answer additional key questions that leads might have, or testing a new conversion-focused design element (like, say, the old directional photo looking at the CTA button trick).
. "Directional-Cue-CTA.png")
As you might expect, successful landing page tests often lead to even bigger gains as winning changes are duplicated elsewhere across the site. We reversed that scenario somewhat here at Kula Partners in an effort to test a new site design.
Earlier this year, using the landing page of one of our most downloaded content offers (the Executive’s Guide to Inbound Marketing), we started testing our new site design. Getting a sense of how people were interacting with the new layout and monitoring how well it converted proved extremely valuable in evolving the design and optimizing its flow.
And, while choosing your most-visited landing page for the test might not be the best approach in all instances, for many brands the benefit of getting statistically significant test results faster will outweigh the perceived risks of testing a highly visited page.
5) Mix up your email subject lines for improved open rates
Subject lines are the headlines of email. To once again borrow from Ogilvy, once you’ve written your headline (or email subject line, in this case), you’ve already spent 80% of your marketing investment.
It always surprises me how some people can spend countless hours in meetings nailing down the specifics of a promotion, only to hit send on the email with an atrocious, ill-considered subject line. It’s pretty simple—your message has to be opened to be actioned, and it’s the subject line that determines whether or not it gets opened.
Beyond the typical headline writing formulas, there are number of different subject line approaches to test. For example, while you have to be careful to not overdo it, adding personalization to your email subject lines is often a great way to boost open rates. Just make sure you’ve accounted for any contacts who do not have complete personalization data in your contact database.
While they aren’t right for every brand, using emojis in your subject lines has also been shown to deliver a nice open rate lift.
So test early and test often—there are real gains to be made by getting those subject lines right and getting more emails opened.
6) Try a radically different lead nurturing sequence
This tip assumes you have some experience in inbound marketing, and you’ve already implemented a lead nurturing sequence. Unfortunately, too many inbound marketers treat their lead nurturing sequences as a set-it-and-forget-it exercise—quickly turning their attention to some of the, shall we say, sexier aspects of inbound.
If it’s been a while since you’ve reviewed your lead nurturing sequences, now might be the time to take a fresh look. Chances are, you know more as a marketer (and about the business you’re marketing) now than you did when you created the nurturing sequence. Moreover, you probably have more content to draw from now than when you started. Step back, ask the hard questions about the objections and curiosities that your leads have at various stages in the customer journey, and craft a new lead nurturing sequence from scratch.
Don’t feel like you have to adhere to the structure (number of emails, timing, etc.) of your current lead nurturing sequence. Take this opportunity to start with a clean slate. I’ve found that many inbound marketers’ first lead nurturing sequences have too few messages that are spaced too far apart. If that sounds like you, try integrating some recent blog posts or case studies into your nurture sequences to increase the number of messages you’re sending by 50% or more.
Today’s the second best time to start
If you’ve made it this far in the post, it’s safe to say that you’ve been thinking about CRO for a while now. Like a lot of things, the best time to start with CRO was probably years ago—and the second best time is now.
To recap (or to provide a TL;DR version for those of you who skipped right to the bottom), the 6 CRO initiatives you can implement today are:
- Start learning with visitor heatmaps: gain real user data to track and analyze behavior throughout your funnel
- Test button colors that sit opposite of your site’s primary palette on the color wheel
- A/B test the headlines on your PPC landing pages
- Split test your most-visited landing page to measure the success of design changes
- Take a critical look at your email subject lines, and try something different
- Radically overhaul your email lead nurturing sequence.
Optimizing your conversion rates will pay immediate dividends while giving your future inbound marketing efforts their best chance at success. So give these 6 tests a try, get comfortable with CRO, and get ready for better inbound marketing results.
Want to learn more about CRO for Inbound Marketing? Download a free copy of The Inbound Marketer’s Quick Start Guide to CRO
A Step-by-Step Guide to Advertising on Instagram
With 500 million active monthly users, Instagram offers a unique opportunity for marketers to reach their target audiences through ad campaigns.
The other perk of advertising on Instagram? The ads can look almost no different than regular posts, making them much less invasive than other ad types.
But setting up ads on any platform requires a lot of thought: What should your target audience look like? What should your copy say? What image should you use? Not to mention, the more technical aspects like what size your image needs to be or how long your ad should run for.
To simplify the process, we’ve put together a checklist to help you set up a campaign, one step at a time.
How to Create Instagram Ads: A Step-by-Step Guide to Advertising on Instagram
If you’ve ever set up a Facebook ad, you’re about 75% of the way there. After Facebook acquired Instagram back in 2012, the platforms conveniently merged, making setting up Instagram and Facebook ads merely the difference of a couple clicks. So even though your intent is to run ads on Instagram, all of the ad setup, budgeting, scheduling, and creation is done through Facebook’s platform.
To start, log in to your company’s Facebook portal and select the account you wish to use. (Note: To run ads on Instagram you’ll need to use a Facebook Page. Pages are specifically for businesses, brands, and organizations, while regular Facebook accounts are for personal use.)
1) Select an editor and create your campaign.
You can create Instagram ads using a few different tools:
When choosing which tool to use, you’ll want to consider both your company size and the number of ads you plan to run at once. If you’re managing a large number of campaigns, or you’re looking for really precise control over your campaigns, you might want to lean towards the Power Editor. However, the Ad Manager suits most marketers’ needs, so that’s what we’ll use for the sake of this article. (For more on the Facebook Ads API option, check out this page.)
Once you’ve selected an editor, you’ll see an option to either view all campaigns, or create a new one. To get started with an Instagram ad, you’ll want to create a new campaign.
2) Choose an objective.
You’ll notice that there are several different campaign objective options to choose from here. However, in order for your ad to be eligible to appear on Instagram, you’ll have to choose from a slightly shorter list:
- Boost your posts
- Send people to your website
- Increase conversions on your website
- Get installs of your app
- Increase engagement in your app
- Get video views
For this article, we’re going to select: “Send people to your website.”
When you select this option, you’ll be prompted to name your campaign. This may seem like a simple task (and it is) but it’s a good idea to have some sort of naming convention or set process within your company. This will make it easier for you to keep campaigns straight as you continue to create them.
Here at HubSpot, we like to name them in this format:
Company Department | Content/Offer/Asset Being Advertised | Date | Name of Creator
3) Choose your audience.
If you’re just starting out with Instagram advertising, odds are you won’t know exactly which audience you want to go after. This will come with time, and you may just have to play around with it at first. (If you want tips to help you choose the right audience, check out this page.)
During this step, you’ll find that the platform’s built-in targeting can be as simple or as extensive as you need it to be, with options such as:
- Location
- Age
- Gender
- Language
- Relationship
- Education
- Work
- Financial Status
- Home
- Ethnic Affinity
- Generation
- Parents
- Politics (U.S. only)
- Life Events
- Interests
- Behaviors
- Connections
You can create what’s called a custom audience to reach people who’ve already interacted with your business, or a lookalike audience to reach new people on Facebook who are similar to your most valuable audiences.
The ads platform also allows you to save the audience you create to be used again at a later time, which can be good if you’re experimenting and want to remember the exact audience you used for certain campaigns.
In terms of the objective we selected — “send people to your website” — we’ll want to target a more specific group of people: the type of people that are actually going to be interested in the content we present.
To do this, you’d jump down to the “Detailed Targeting” section, and search for different demographics, interests, or behaviors that apply to your target audience. Here’s an example of a (very small) audience, just to show you the different ways you can target certain people:
To give you a sense of the audience you’ve chosen, Facebook provides an “audience definition gauge.” This gives you immediate feedback on how narrow or broad your audience is, as well as the estimated reach number of your ad. Since we didn’t add very much criteria to our targeting, you’ll notice that the audience appears “fairly broad.”
4) Set your placement.
This step is the biggest differentiator between setting up Facebook ads vs. Instagram ads. To move forward with the Instagram ad, you’ll want to uncheck all the boxes except for “Instagram.”
5) Set your budget and schedule.
You have the option to select either a daily budget or a lifetime budget for your campaign. The difference is this:
- Daily budget sets your ad up to run continuously throughout the day, meaning that the algorithm will automatically pace your spending per day. Keep in mind that there is a minimum daily budget depending on different factors in your campaign, usually around $1.00.
- Lifetime budget sets your ad up to run for a specified length of time, meaning the ads algorithm paces your spending over that entire time period.
The other aspect to setting your budget is setting your schedule. You’ll need to choose exactly when you want your campaign to start and finish running, down to the minute. There are also options to set parameters so that your ad runs only during certain hours of the day or during specific days of the week. You can find these options in the “Ad Scheduling” section.
Set your optimization for ad delivery.
Here you have three options that will influence who sees your ads:
- Link Clicks (which is what the platform recommends): Your ads will be delivered accordingly to get the most clicks to your website at the lowest cost. This is all based on the platform’s algorithm.
- Impressions: Your ads will be delivered to people as many times as possible. Ever see the same ad on your newsfeed all day long? That company is most likely using this option.
- Daily Unique Reach: Your ad will be delivered to people up to once a day. People may see your ad multiple times, but at least not multiple times a day.
Set your bid amount.
This determines how effectively your ad is delivered. When you look “behind the scenes,” you’re competing with other advertisers trying to reach a similar audience in a constant auction.
You can choose either Manual or Automatic. Automatic leaves it up to Facebook’s algorithm to deliver your ad — ideally getting you the most clicks for the lowest cost. Manual allows you to set a price for link clicks. If a link click is worth a lot to you, try setting a higher than suggested bid, and your ad will be displayed over a competitor with a lower bid.
You can choose to pay based on impressions or link clicks. This is up to you.
Set your delivery schedule.
You have two options for the delivery of your ads:
- Standard: shows your ads throughout the day.
- Accelerated: helps you reach an audience quickly for time-sensitive ads.
(Note: the accelerated delivery option requires manual bid pricing.)
Name your ad set.
This step is for internal purposes. Simply give your ad set a name so that you can identify it later.
6) Set your ad creative.
Choose your format.
This is where your creativity comes in. Here you’ll decide what you want your ad to look like, which will depend on your original objective, of course.
On Instagram, you have a couple different options for your ad:
Single image, video, or slideshow.
Image Credit: Marketing Land
Multiple Images (also called “Carousel”).
Up to 5 images for the viewer to scroll through, at no extra cost.
Image Credit: Instagram
We actually ran some tests to see which type of ad performed the best for different purposes. Check out the results in here.
Once you pick your ad type, click on it and you’ll be prompted to browse and upload your imagery, whether that be images or a video.
Upload your media.
For any ad type, the Facebook ads platform recommends you don’t include more than 20% of text. Previously, an ad with over 20% of text wouldn’t even be approved to run, but it has recently changed to more of a suggestion than anything. Learn more about the rules and guidelines here.
Some requirements for Instagram ad imagery:
File Type
- .jpeg
- .png
Text/Caption
- Recommended: 125 characters
- Maximum: 2,200 characters
For square of video Instagram ads …
- Recommended Image Size: 1080 x 1080 pixels
- Minimum Resolution Accepted: 600 x 600 pixels
- Image Aspect Ratio: 1:1
For landscape image or video Instagram ads …
- Recommended Image Size: 1200 x 628 pixels
- Minimum Resolution Accepted: 600 x 600 pixels
- Image Aspect Ratio: 1:1
7) Set your page & links.
Connect your Facebook Page and Instagram account.
Select the Facebook Page of the account you want your ads to come from, even if you’re not planning on running them on Facebook. (If you’ve made it this far in the Ads Manager, you are already logged into a Facebook account.)
However, since our intent is to post ads on Instagram, you’ll need to connect your Instagram account to your Facebook ad account. To do so, click “Add Account” (you’ll need your Instagram username and password to do so).
If your business doesn’t have an Instagram account, you can still run ads on Instagram — they’ll just come from your business’ Facebook Page instead. In other words, your Facebook Page name and profile picture will be used to represent your business within your ad as it runs on Instagram.
Add the website URL.
Next is a very important step: putting in the website URL to which you’re trying to drive more traffic. If you’re using marketing automation software, be sure to create a unique tracking URL with UTM parameters for this to ensure that you’ll be able to keep track of traffic and conversions from this ad.
(HubSpot customers: Learn more about creating a tracking URL here.)
Add a headline.
This is not usually displayed to viewers of your ad on Instagram, but it’s always a good idea to complete it just in case. Enter a brief headline describing where people will visit.
Create a caption.
You have up to 2,200 characters — but don’t go crazy. Facebook recommends you keep your text under 125 characters, which is the amount that’s displayed without needing to click “more.” (Read this for tips on how to write good Instagram captions.)
Select a Call-to-Action.
There are several different options for your CTA button, depending on what the page you’re taking visitors to looks like. You can choose to have no button, or select any of the following:
- Learn More
- Apply Now
- Book Now
- Contact Us
- Download
- Hope Now
- Sign Up
- Watch More
For our sake, we’ll stick with “Learn More,” as we’re just driving people to our website.
Once your image is uploaded and your text is set, check out the preview of your ad to make sure everything looks right.
At this point, you’ll have the option to edit the “Advanced Options,” but only if you wish to. Advanced Options include adding tags, changing your display link, entering URL parameters, setting up sponsors, and opting in or out of pixel tracking.
8) Place the order.
Once everything is all set, you’re ready to place your order. Doing so is pretty easy: Just click the big green button in the bottom left corner.
As always, be sure to check over everything — especially since your ads have the potential to be seen by a large audience. If you want someone else on your team to take a look at them before they go live, set your schedule to include a delay, but still place your order.
You run the risk of losing all the work you’ve done if you don’t place the order right away so we’d encourage you to place it first, and then go back and adjust the timing if need be.
9) Report on the performance.
Once your ads are up and running on Instagram, it’s important to keep an eye on how they’re doing. You can go back in and tweak most aspects of the ad, so if you catch a mistake you made or your image isn’t doing as well as you’d like it to, you can go in and alter these things.
You can look at results of your ads in two places:
- The Facebook Ads Manager
- Your marketing software
In the Ads Manager:
There’s a sophisticated and extensive dashboard that provides users with an overview of all their campaigns. Without customizing any settings, you’ll find data on reach, cost per result, and amount spent.
In the upper right-hand corner, you’ll see a button that says “Columns: Performance.” If you click the drop down menu, there’s an option to customize columns, which allows you to choose the specific data you want to see. There’s data ranging from CPC or CTR, to things much more specific like “Adds to Cart” for ecommerce stores.
Here are the categories that the available metrics fall into:
- Performance (reach, results, frequency, etc.)
- Engagement (post likes, post comments, post shares, etc.)
- Videos (video views, average percent of video viewed, etc.)
- Website (checkouts, payment details, adds to cart, etc.)
- Apps (installs, engagement, cost per app engagement, etc.)
- Events (event responses, cost per event response, etc.)
- Clicks (unique clicks, social clicks, CTR, CPC)
- Settings (start date, end date, ad set name, delivery, bit, ad ID, and objective)
With your marketing software:
With so many metrics to track, it can be easy to lose sight of the big picture. To truly track your success, take advantage of your marketing software and the UTM codes you used in your ads to measure your ads’ full-funnel effectiveness.
Looking at the specific tracking codes through your marketing software will help you keep track of how many leads (or better yet, customers) you actually generated through your Instagram advertising campaign. This ROI information can then be used to inform other campaigns down the line.
If you’re a HubSpot customer, you can create unique tracking codes for your Instagram campaign by following the instructions here. All you’ll need to do is plug in the URL, attach a campaign, and choose the source you want the URL to be attributed to in your Sources Report.
Once your ad launches and you start getting traffic and conversions to your website, you’ll be able to easily track how many visits, contacts, and customers you’re generating.
Have you seen success with Instagram ads? Let us know in the comments section below.