
How to Motivate Yourself When You’re Absolutely Exhausted
Off days. We all have them from time to time.
Maybe you didn’t sleep well the night before, or perhaps you’re working on a project that isn’t particularly exciting. Or maybe there’s no viable explanation at all, and you’re just straight up not feelin’ it that day.
First of all, that’s OK. We can’t be on all the time. Motivation is an ebb and flow: We all have periods of high energy where productivity comes easily, as well as periods of low energy where your work doesn’t come so easily.
But alas … unless we’re physically ill, we’re all expected to show up at work and get our work done regardless of how tired we are or how “meh” we’re feeling.
It’s times like these when we need to find that motivation within ourselves. The next time you’re feeling exhausted, unmotivated, or lethargic at work, try one or a few of these 10 ways to get motivated again.
10 Ways to Get Motivated When You’re Exhausted
1) Just get started.
Have you ever found yourself faced with a deadline or a looming task, only to realize that was the perfect time to clean your house or start a new season of 24? Turns out, that’s your brain playing tricks on you.
A study by Dr. John Bargh, an award-winning psychology researcher, showed that, before we start on a big project, our brain attempts to simulate real, productive work by focusing on small, mindless tasks. The result? We don’t get started on the tasks that are most meaningful. And the longer we procrastinate, the more anxious we feel.
Thankfully, once you get over that hump of just starting already, you’re more likely to work ’til it’s done. That’s a phenomenon called the Zeigarnik Effect, which is best defined as “the tendency to experience intrusive thoughts about an objective that was once pursued and left incomplete.”
That’s why, sometimes, we don’t need a particular thing to motivate us — we just need to get started, and a more focused and productive mental state will follow.
2) Make or rework your to-do list. (The right way.)
When your energy is low, it can be hard to get in that get-stuff-done mindset. So when you feel yourself dragging, stop what you’re doing and take a few minutes to either make a new to-do list or rework the one you already have.
After all, studies show that when we write down our goals, we’re more likely to achieve them. This small step can not only help your productivity, but it can also help get rid of that uncomfortable, anxious feeling you get when you procrastinate.
There are a lot of different ways to make a to-do list — and what works for you may not work for your neighbor. But it turns out there is one similarity to how most of us write our to-do lists: We tend to start with the easier tasks first, and save the daunting tasks for last. That way, we can cross items off the list faster … and feel good about it.
But according to Charles Duhigg, saving the harder stuff for last increases stress and other negative emotions. To more effectively motivate yourself with a to-do list, Duhigg suggests:
- Thinking of your stretch goal for the day.
- Writing down this goal at the top of your piece of paper or worksheet.
- Breaking down your goal into actionable, measurable, and manageable steps.
To get started, think about what part of that broken-down task you can accomplish right now or today, and begin working on it with the more manageable and achievable goal in mind.
3) Commit publicly.
Accountability works. None of us likes to look bad in front of others. Chances are, if you’ve promised to do something publicly, you’ll be more likely to achieve it. That’s why so many people do things like create public blogs or Instagram accounts to hold themselves accountable for fitness and weight loss goals.
You don’t have to go public with your goals to reap the benefits of accountability. You can do it with coworkers, or with friends and family.
For example, here at HubSpot, the blogging team holds a daily standup meeting where we come together in the morning to list out what we plan to get done that day. If we find ourselves repeating the same task over a series of consecutive days, it becomes clear to ourselves and our colleagues that we either need to prioritize that task to get it done, or reevaluate whether it really needs doing in the first place. (You can also use collaborative to-do list apps like Trello or Wunderlist to share tasks with others digitally.)
Simply recruiting a reliable friend to become your accountability buddy can help, too. Psychology professor Dr. Gala Matthews conducted a study on goal achievement in the workplace worldwide. She found that more than 70% of the participants who sent weekly updates to a friend either completely accomplished their goal or were more than halfway there. Compare that with 35% of those who kept their goals to themselves without even writing them down.
4) Change up your location.
According to Duhigg’s research, your physical environment is one of the most powerful drivers of our habits and behaviors.
Take the six-month study published in The American Journal of Public Health, for example. The scientists that ran the study found that by changing the environment and the way food and drinks were displayed in a large hospital cafeteria, they could get people to eat and drink healthier — without even thinking about it. Just by moving bottled water closer to the cashier and moving soft drinks away from it, the number of soda sales dropped by 11.4%, while bottled water sales increased by 25.8%.
Similarly, where you work can affect your motivation levels. Duhigg says this might be because we mentally assign behaviors, habits, and routines to particular locations, like bed for sleeping, desk for working, couch for relaxing. (Another reason taking your lunch break away from your desk can do wonders for your productivity.)
Need to really focus? Step away from your desk, move to a workspace with no distractions, and hone in on whatever it is you need to do. That’s what Amanda Sibley, a demand generation manager at HubSpot, told me works for her: “If there is something I must get done in a day — a deck due to our CMO, for example — then I turn off email and shut myself in a room for an hour or so until it’s done.”
5) Listen to pump-up music.
Music motivates us. Think about it: Why do people listen to music when they go to the gym? Because it gives us energy.
We don’t just have an emotional reaction when we listen to music; we also have a physical reaction. Music engages our bodies’ sympathetic nervous systems. Our airway opens, our heart accelerates, and our muscles become primed for movement. When the speed, intensity, or volume of the music rises, our pulse quickens and our breathing accelerates.
This is great for physical exercise, of course. But it’s also great for reenergizing you when you’re feeling tired or bored. Not only will it help refocus you, but studies have shown that music can help draw our attention away from the negative aspects of whatever task we’re doing.
“During my training and races it became obvious that even in really horrible weather conditions, or when I was physically suffering, that I could use music (and my imagination) to create a parallel universe that had little to do with reality,” said Jacob Jolij, an athlete and researcher from the University of Groningen in the Netherlands. “I used music to stay optimistic and see the glass as perpetually half-full while doing ultra-endurance races. You can use music as a tool when you work out or in your daily life the same way. “
So the next time you’re tackling something that doesn’t quite thrill you, consider putting on some happy tunes. If you need some music ideas, try one of these science-backed productivity playlists.
6) Meditate.
Listening to pump-up jams not your cup of tea? Perhaps meditating is.
It’s funny: We rest our aching muscles after a tough workout without a second thought, and yet we expect our brain to work hour after hour, day in and day out. It just doesn’t make sense. Burnout is real, folks.
Taking ten or twenty minutes out of your workday to meditate is a great way to use a break time — especially when you find your attention and motivation wavering. According to one study, intensive meditation can help you focus and sustain your attention — even during the most boring of tasks. It also helps boost your mood: A 2012 study found that people who mediated “stayed on tasks longer and made fewer task switches, as well as reporting less negative feedback after task performance.”
Never meditated before? You don’t need any experience to enjoy the benefits of meditation — especially with the many apps out there that offer guided meditations. Next time you feel disconnected or unmotivated at work, try using one of these free apps:
- Headspace: This app gives you 10 free guided meditation sessions. If you end up getting hooked, you can sign up for a monthly subscription.
- Calm: This app offers over two-dozen guided meditation session for you to choose from that range from a few minutes long to about 30 minutes long.
7) Talk to a coworker. (Or talk to yourself.)
Sometimes, taking a short break to talk with a colleague can be enough to reenergize you for several more hours. In a study of call center workers, those who talked to more coworkers in between calls actually got through calls faster and felt less stressed — all while having the same approval ratings as their peers.
If you just need a break from the task at hand, grab a coworker and talk a short walk. If you need some inspiration, choose that coworker wisely, and use the time to bounce ideas off of them. If you’re really struggling, try asking them for advice on how to refocus or reprioritize.
If you’re working from home or no one’s available, leave your current workspace (see tip #4: change up your location) and interact with someone — anyone. “Go outside and find a human to interact with — ordering your coffee, running an errand, whatever,” suggests my colleague Corey Wainwright.
Or, give yourself a pep talk. Giving yourself advice and encouragement in the second-person voice actually works, according to a study on self-motivation from the University of Illinois at Urbana-Champaign.
“People are used to receiving and giving advice in the second-person, and they seem to prefer using the second-person pronoun to psych themselves up before engaging in action,” study coauthor Dr. Sanda Dolcos told The Huffington Post. “Self-advice expressed using ‘You’ probably enables people to adopt a broader perspective, considering how a significant other might view the event, and to reproduce the kind of encouragements previously received from others.”
8) Eat an energy-boosting snack.
Food is fuel for our brains and our bodies. What we eat — and when we eat it — has a direct impact on our performance at work. Recent studies show that willpower is a limited resource and depletes throughout the day, but may be strengthened by the food we eat.
To function at its best, your brain needs a constant supply of glucose and fat that come from the right nutritional sources — i.e., not junk food. Our brains work best with about 25 grams of glucose circulating in our blood stream, which is about the amount found in a banana. So when we’re feeling sluggish, snacking on a banana between meals can actually help us reenergize our brainpower.
On the other hand, if we were to snack on something high in sugar, like a handful of M&Ms, then we risk a much higher blood sugar spike followed by a crash. While we may feel energized for a short period of time, we’ll ultimately enter into a slump. The result? Low energy and low productivity.
The same is true for coffee, which only gives us short caffeine bursts. (If you love coffee, though, try bulletproof coffee, which has a longer-lasting, positive effect on your energy levels.)
Healthy snacks that’ll supercharge your brainpower and help you gain energy when you’re tired include bananas, yogurt, blueberries, avocados, olive oil, salmon, broccoli, eggplant, and dark, leafy greens. (Check out our infographic on “the productivity diet” to learn why these foods help you focus.)
9) Move your body.
Whether it’s spending some quality time at the gym or simply going for a short walk between meetings, regular exercise can do wonders for your health, your happiness, and your productivity and energy levels at work. In fact, researchers have found that people who exercise during normal working hours are actually more productive at work, even if they technically log fewer hours.
Another study out of the University of Georgia examined whether exercise can be used to treat fatigue. It showed that even low-intensity exercise can significantly help feelings of fatigue.
“A lot of people are overworked and not sleeping enough,” said Patrick O’Connor, co-director of the university’s exercise psychology laboratory. “Exercise is a way for people to feel more energetic. There’s a scientific basis for it, and there are advantages to it compared to things like caffeine and energy drinks.”
Here are 10 ideas for sneaking in exercise at work without looking silly, from taking short “active breaks” to replacing your desk chair with a stability ball.
10) Take a power nap.
Another way to unleash your brain’s natural energy? Take a power nap. Researchers have found there are clear benefits to napping, including increased alertness after your nap. The key is doing it right. In other words, napping for the right amount of time, and at the right time of day.
According to Sleep Expert Dr. Phyllis Zee of Northwestern University, the best naps are between 1 p.m. 3 p.m. and last between 20 and 40 minutes.
That afternoon timing is best for your body clock, whereas napping later in the day can affect how well you sleep that night. Taking a nap longer than 40 minutes can cause your brain to slow-wave (deeper) sleep, which’ll leave you waking up in a state of confusion — the opposite of what you were trying to solve for.
Then, once you’re up from your nap, get back to it.
What if it doesn’t work?
If you’ve tried some of these tactics and none of them are helping you refocus and reenergize, be careful: You might be burned out.
Burnout is defined as a state of chronic stress that leads to physical and emotional exhaustion, cynicism and detachment, and feelings of ineffectiveness and lack of accomplishment. Although people experience burnout differently, a telltale sign is when you’re experiencing the trifecta of exhaustion, cynicism, and inefficacy all at once.
Remember: It’s OK to take your foot off the gas pedal every once in a while and to adjust your work output to your current motivation level.
But if you’re feeling the symptoms of burnout, take care to dedicate specific time for unplugging and relaxing — and even take a vacation if you can. It’s good for you, and even your boss would agree: 91% of business leaders believe their employees return from vacations recharged and ready to work more effectively.
How do you get motivated when you’re tired? Share with us in the comments.
Increasing Audience ROI with Personalization
Traditional monetization channels are getting tougher and tougher for publishers to tap into. The reason? Consumer behavior is fundamentally changing, and now more than ever before, attention spans are scatterbrained.
With every moment spent on smartphones, tablets, or computers at work, readers find themselves exposed to more content options that they have time to process. That’s why it’s critical that media companies invest in quality vs. quantity: if you want to attract a high-value audience, your content needs to be high-value too.
This perspective is the ‘smoking gun’ that publishers need to build new, high value revenue channels. Just as much as you don’t like fighting against noise for your audience’s attention, your audiences don’t like to deal with media brands that are clamoring for their time.
That’s where personalization enters the picture. When your content is tailored and relevant to the audiences you’re trying to reach, you’ll see a strong lift to your media brand–and you’ll be well-positioned to provide value to your advertisers too. Here’s how personalization can help media companies carve out new, lasting monetization channels.
>> Download our latest Media Ebook – Personalize or Perish >>
More Engaged Email Lists
Personalization will open doors to a wealth of email marketing and monetization opportunities
When audiences like what you have to offer, they’ll find a way to keep your company on their radars. They’ll ‘like’ your content on Facebook, follow your account on Twitter, or subscribe to at least one of your targeted newsletters.
But many newsletters are irrelevant to audiences, which is why subscribe rates for companies are often low. The best way to change this behavior? It’s to change yours—create email campaigns that are tailored to what your audience wants to read about and learn.
The chain of events is clear: personalization of a strong value proposition will yield higher sign-up rates to your newsletters. And with higher sign-up rates for your newsletters, you’ll have more engaged lists of subscribers. In turn, you’ll be able to deliver more value to your advertisers.
Invest in your email marketing strategy, and your value as a media brand will grow, overall. You can send more targeted email campaigns, on behalf of your advertisers, to your readers, for instance—the possibilities are truly limitless.
Personalized Calls to Action (CTAs)
Want your readers to take action on the ads and offers that you’re sharing with them?
The most efficient path forward is to optimize your CTAs: choose value propositions that speak to their unique interests, needs, and goals. The answer is personalization.
As a media company, you’re in a unique position to become a true innovator in the personalization space. You’re likely already collecting a wealth of audience data in terms of the content they’re reading and taking action upon.
Why not align your CTAs to this data that you’ve been generating?
The B2B, corporate world has been creating what it calls ‘smart CTAs’ for years. The idea is simple: rather than communicating a one-size-fits all cue, craft value propositions for the specific audiences that you’re reaching. Speak to their needs and pain points. You’ll see higher conversion rates and position your media brand to provide higher value to advertisers, too.
For a step-by-step guide to creating personalized CTAs, check out this guide from 2013.
Getting Started
The first step to getting started is to organize your database: you need to make sure that your customers’ information is in the right place (so you can take action upon it). As you build your lists, give careful thought to the data you’re collecting and whether you have the right form fields in place to keep this information organized. This unified data perspective will help you shortcut the process of and increase the impact you make when you target your audiences on an individual level. Here’s how to collect information for personalization:
- Define what exactly you should be collecting and how this information aligns to your overall campaign goals
- Understand what information will be available on a personal level and what may remain anonymized
- Figure out how you’re going to collect information (through lead gen landing pages, for instance)
Once you have your ducks in order and you start gathering data, start fueling your personalization engine:
- Create audience segments based on areas of interest, subscription type, or geographic location, so you can personalize reader experiences at different levels
- Build out content and conversion paths to match each customer segment. Use a blend of qualitative and quantitative research to guide your early decisions (Don’t worry about being perfect, as your strategy will likely continue to change over time)
- Test out your ideas with the expectation that you’ll refine and iterate upon your results
- Iterate on your personalization strategy by reinvesting your learnings into new campaign ideas.
Any media company, of any size, can get started. Just start doing some research into the systems that already exist, so that you can develop a strong sense of your company’s assets. Use this platform as a starting point to explore the world of opportunity that awaits. Instead of seeing personalization as a daunting, far-fetched task for your team to accomplish, take smaller steps instead.
Think about your best friendships: they’ve been strong because you’ve learned about one another over time. A relationship with your best readers should be no different. The more you learn about them, the more effective your marketing programs will be.
Why Your Ecommerce Promotions Fail
When planning giveaways, discounts, coupons, promotional events, and any other special pricing for your ecommerce company, you’re probably already counting your profits in your head. Then, you run across a blog like this one that says ecommerce promotions just don’t work. What are you supposed to believe?
Well, let’s first consider what you want to get out of your latest promotion. If you’re just looking for a high number of sales conversions, then you’re set. If you’re looking for loyal customers who will come back time and again, then you’re setting yourself up to fail. Why? Let’s consider a few facts.
Lowering the Perceived Value
When you can lower the price of a product just to get it out the door, your customers start to wonder just how valuable that item is. For instance, if you can slash your prices to 50% on a particular handbag design, only to jack the prices back up two days later, anyone who encountered the lower price will forever more believe that’s what your product is worth.
If you can’t show that your products are worth the price tag, then you haven’t done your job. Discounting just to get those items out the door will only confirm to consumers that your products were never as valuable as you said they were.
Bad First Impression
Once you’ve tanked your own prices, there’s no going back. You may not lose all those customers who made a purchase at the lower price, but they won’t buy again until you have another sale. Anyone who wasn’t swayed by your lower prices the first time may keep an eye out for special deals, but they certainly won’t be fool enough to pay full price once the specials are over.
If no one’s buying until you lower your prices, then you might as well set the prices lower to begin with. But if you start with lower prices, what will you do when it’s time to run promotional deals?
Poor Substitute for Service
If you’re counting on lower prices or discounts on future purchases to keep your customers happy, then you’re missing a big piece of the ecommerce puzzle. Service after the sale is what makes a buyer loyal to your brand. The problem with running promotions all the time is that you’re too busy counting conversions to worry about who needs your help.
Instead of constantly slashing your prices, spend some time with your buyers. Provide the information they need to make their choices, and guide them toward smart purchasing decisions. They’ll return next time, full price in hand, and ready to make their next purchase.
Breeding Mistrust
So, yeah, you’ve gotten quite a few new customers through the door with your big price cut. Those buyers may hang around for the next time you lower your prices, so you’re cool there. Maybe you’ll catch a few more people after you raise the prices again—you know, the ones who didn’t know you offered a discount yesterday. Everything sounds great, right?
Well, what about those customers who bought your product at full price just before you bottomed the price out? Are you willing to go back to everyone who bought at full price and offer them a refund on the difference? If you’re not, then you’re going to have some pretty angry people on your hands. No one wants to feel like a fool after buying into your full-price items, only to discover later that you don’t really think they’re worth that much after all. And that’s what you tell them when you slash your prices.
No Place for Sales and Discounting in Your Marketing?
No. But you should think wisely about how you’re using these types of promotions. If you’re only trying to get the conversion, you should be hesitant. You’ll be undercutting yourself and risk running to the bottom on discounting if you aren’t careful. If you’re hoping to build lasting relationships with your buyers, to build a brand that invokes trust and fuzzy feelings, then be careful with those promotions. There’s are smarter ways to build loyalty.
How to Customize Your Facebook Page: 7 Tips and Tricks
As the hub of your business presence on a (nearly) 1.6 billion-person social network, your Facebook Page has the potential to be a valuable marketing asset. From educating prospective customers to sharing company updates and educational resources with your existing customers, you can use your Facebook Page to target nearly every stage of your marketing funnel.
But in a world where 40 million+ small businesses have Facebook Pages, simply creating a Page won’t guarantee you much in the way of results.
In order to attract and engage your target audience, you need your Facebook Page to stand out from the sea of sameness.
Download our free guide here to learn more about how you can customize your Facebook Page.
To help you get started, we put together this list of seven tips and tricks you can use for customizing your company’s Facebook Page.
7 Ways to Create a Custom Facebook Business Page
1) Claim Your Custom URL
First things first: If you haven’t already, head to the URL http://ift.tt/nkGzdY and create a custom URL for your Facebook Page that’s short and easy to remember. HubSpot’s, for example, is facebook.com/hubspot. Not very imaginative, but the goal is to create alignment between your brand and the Page.
As you can see in the screenshots below, you first need to choose your Page from a dropdown menu, then you’ll be able to see if the URL you want is available.
Keep in mind that you’re only allowed to change your Facebook Page URL once. So if you’re going to update it, choose your new URL wisely.
2) Control Who Gets to See Your Page
Head to the Settings menu (via the link on the right side of your Page’s top nav), and you’ll be able to unlock a host of customization options. Perhaps the most important: The ability to restrict the visibility of your Page, which you can control under the “General” settings tab.
Are there certain countries your company doesn’t sell to? You can prevent your Facebook Page from appearing there. Sell a product (e.g., alcohol) that has legal restrictions and/or that is otherwise geared toward an adult audience? You can restrict the visibility of your Facebook Page according to age.
By fine-tuning these visibility settings, you can help make sure your Page is reaching the right audience.
3) Control What Content Appears on Your Page
While you’re in the General Settings menu customizing your Facebook Page’s visibility settings, you might also want to consider customizing what content will be allowed to appear on your Page. Specifically, you can control who’s allowed to post content to your Page, as well as what types of content (e.g., videos and/or photos) people are — or aren’t — allowed to post.
Worried about bad language or inappropriate topics popping up in posts and replies on your Page? Adjust your Page Moderation settings to block the use of specific words, and turn on (or increase) your Page’s Profanity Filter. FYI: There are three Profanity Filter settings, “Off,” “Medium,” and “Strong,” which are based on the words and phrases that Facebook users have most frequently deemed offensive.
4) Add a Call-to-Action Button
It’s a little tweak that can make a big impact: Setting up a call-to-action (CTA) button on your Facebook Page. The best part is that it only takes a few seconds to do.
If you haven’t already created a CTA for your Page, you’ll see an “Add Action Button” button where your future CTA will appear. (And yes, I realize how meta it is to be clicking on a CTA that’s telling you to create a CTA. Welcome to the weird world of online marketing.)
Once you click that button, you’ll be taken to a menu where you can select the CTA you want and preview it across different devices.
The CTA you choose should depend on the specific goals you’re trying to accomplish. Facebook gives you 11 different options:
- “Contact Us”
- “Book Now”
- “Call Now”
- “Send Message”
- “Use App”
- “Play Game”
- “Shop Now”
- “Sign Up”
- “Watch Video”
- “Send Email”
- “Learn More”
In addition to having your Page CTA redirect to a webpage, you can specify that it sends mobile visitors to your app or a mobile version of your site. Sure, it’s a minor adjustment, but the end result is a better experience for your visitors.
However you end up configuring your CTA, remember to use tracking links when redirecting people to one of your other properties. That way you can monitor how successful your CTA has been at generating traffic and leads.
5) Customize Your Page’s Tabs
You can customize your Facebook Page’s tabs at a basic level by navigating to the “More” tab and selecting “Manage Tabs” from the dropdown menu. From there, you’ll be able to re-position the order in which your Page’s tabs appear.
Clicking that “Add or Remove Tabs” link at the bottom of the Manage Tabs menu will take you to Facebook’s Apps menu, where you can install new apps. Once you install the app — like the Notes app, for example — you’ll be able to feature it as a tab on your Page.
To create an entirely unique, non-Facebook-app-related tab for your Page, there’s a bit of a development rabbit hole you’ll need to go down. While it’s not impossible to do, it’s definitely tricky.
The good news: A coworker wrote a post that walks you through steps in excruciating detail: “How to Create Custom Tabs for Your Facebook Business Page.”
6) Use Custom Images
Facebook recommends “adding big, beautiful photos and images” to your Facebook Page. In a perfect world, this would entail having a photographer take some high-quality shots — or having a graphic designer create some custom images — that highlight your company’s products, services, branding, culture, and so on.
You could also go the Patagonia Facebook Page route and combine photos with design work, like you see in the examples below.
If resources are limited, you can always turn to our collection of free stock photos to find the perfect visual.
Regardless of the types of images you end up using, make sure you stick to Facebook’s recommended image dimensions. Here they are:
- Profile picture: 180 x 180 pixels (at least)
- Cover photo: 851 pixels wide x 315 pixels tall (JPG file format / less than 100KB file size)
(Check out this post for more recommended social media image dimensions.)
7) Add Ratings & Reviews to Your Page
Know how some Facebook Pages have those little rating and review widgets with the stars?
Those will only appear if you’ve designated your Page as a local business during setup and have entered your full business address. If you’re creating a new Page, don’t worry: this option is hard to miss.
If you already have a Facebook Page and want to make the switch to the local business setting, head to the About tab, choose Page Info, and then hover over the Category section. Click on the little pencil icon that appears and you’ll be able to switch your page to the “Local Businesses” category.
Assuming you have your business’s full address already entered in, Facebook’s Ratings & Reviews functionality should soon become available on your Page.
Know of any other Facebook Page customization tips and tricks? Share them in the comments section below.
Editor’s Note: This post was originally published in September 2011 and has been updated and for freshness, accuracy, and comprehensiveness.
A Simple Guide to Writing a Memorable Speech [Infographic]
You know what an “average” speech looks like. You’ve seen tens, maybe hundreds of them in your lifetime. Chances are, you’ve given a few of them yourself. They’re good, and they’re useful, but they’re not awe-inspiring.
You might also know what an amazing speech looks like — one that’s engrossing, captivating, and inspires action. These speeches grab your attention from the very beginning and imprint us with something memorable by the end. Sometimes, they feel like magic.
While a lot of credit should go to a person’s oratory skills, there are elements of great, memorable speeches we can bring into our own practice.
Want to create a truly memorable, persuasive speech of your own? Check out the infographic below from PapersMaster to learn the elements of a great topic, how to structure your speech to achieve the best response, how to construct the body to support your claim, how to prepare to give your speech, and tips for a successful delivery. (For more detailed public speaking tips, read this blog post on the science of a great TED talk.)

What Happened to Our Metrics After We Stopped Sending So Much Email
Last fall, my teammate, Pamela Vaughan, and I made a terrifying and exciting decision. We were on a big mission to reduce our graymail, and we decided to do something drastic.
We created a workflow that initially unsubscribed 250,000 people from our emails — which was roughly half of our list — and would continue to unsubscribe unengaged people over time. Plus, we completely eliminated the option to receive instant notification emails from us.
Though we had done some preliminary number crunching to estimate the impact of these changes, we weren’t 100% sure how it would go. Soon after we announced the changes, we got some great pieces of qualitative feedback, such as:
You’re fabulous. Thanks for giving me some breathing room. And yes, I can use it.”
And this:
I think this is a good move. I like HubSpot, and think that you provide a great product/service, but I’m feeling very bombarded by you guys to be honest.”
But only time would tell how this whole plan would affect our numbers.
So we waited. And waited.
Today, the waiting is over. Today, we have our answer.
Quick Refresher: A Visual Recap of What Changed
Before we enacted these changes, here’s roughly how our blog email subscriptions worked.
You signed up to get email notifications from us on an instant, daily, or weekly cadence. We’d send you those emails until you decided to manually unsubscribe. The end.
We did this for years. So our list was big … but had a large portion of old email addresses that didn’t work anymore and overwhelmed subscribers who simply just tuned us out. Not only is that a really bad experience for our subscribers, but it’s also not good news for the health of our email deliverability.
Now, here’s how it works.
You sign up to get email notifications from us on a daily or weekly cadence. We send you emails for six months. If you click on an email in those six months, you stay subscribed. If you don’t, we send you an email letting you know we’re going to unsubscribe you. No harm, no foul. (And any time in this process, you can also manually unsubscribe from our emails.)
The goal with the changes was to reduce our graymail and stop bombarding our subscribers with emails. But it turns out, this new strategy had a big impact on our metrics, too.
What Happened to Our Metrics After We Stopped Sending So Much Email
1) Traffic from our email notifications increased.
Despite sending fewer emails, traffic from our email notifications went through the roof — views grew by 21% between October 2015 (a record traffic month for us and the month before we implemented the changes) and Jan 2016 (when traffic is usually back to normal after the holidays).
This means our emails are working better, right?
Well … kind of. Traffic to the blog from our email notifications gives us an indication of how these emails are doing, but it’s not a full picture of how well our emails themselves are doing.
For that full picture, we had to turn to opens and clicks (and their corresponding rates) for our blog notification emails.
2) Our blog email notification opens, clicks, open rates, and clickthrough rates (mostly) increased.
To gauge the health of our blog notification emails, I pulled the following numbers for all daily and weekly emails sent between October and February:
- Opens per email send
- Clicks per email send
- Open rate (opens/delivered) per email send
- CTR (clicks/delivered) per email send
- The number of emails delivered
To reduce the variability in the day of the week that the daily emails are sent, I averaged all the stats for the daily emails in a given week. (The weekly email subscriptions didn’t need the same treatment — they’re sent the same day every week.)
Then, I compared the stats of daily and weekly emails sent in early October to those sent in early February. Here’s what we found.
Note: In the graphs below, I’ve added the dotted line at the date we implemented those changes so you can better gauge the effects.
For the daily email notifications, our opens, open rates, clicks, CTRs, and emails delivered all went up.
- Number of Emails Delivered: +6.9%
- Number of Opens: +24.1%
- Number of Clicks: +43.4%
- Open Rate: +16.1%
- CTR: +34%
Our weekly emails’ metrics, on the other hand, experienced some mixed results. The number of emails delivered and opened went down, but the rest were much higher than before (especially our CTR).
- Number of Emails Delivered: -48.2%
- Opens: -18.8%
- Clicks: +45.7%
- Open Rate: +57.4%
- CTR: +177.3%
So what do these metrics tell us? Did this strategy actually work?
Is This Strategy Is Working?
In short: yes.
Most of our metrics are up and to the right, but I’d like to draw your attention to two of the most important: Clicks and CTR.
Because both of these metrics are higher than before for both email types, we’re doing something right here. If we only increased CTR, it could simply be because we’re delivering to fewer people. Seeing that the volume of clicks also grows between October and February despite having way smaller list sizes than before means that we’re sending the right people the right content at the right cadence.
No longer are we padding our metrics with vain, inflated subscribers who ultimately harm our deliverability and email performance. Instead, we’re keeping our email list smaller, but way healthier and more effective.
But I know what you’re thinking: What about the huge drops in opens and delivers on the weekly email subscription? Aren’t you worried about that?
Truthfully … I’m not.
Delivers is down because we unsubscribed way more people from this list when the workflow first kicked off. And the reason why we unsubscribed more people from this list is because the way most people become subscribers is through a checkbox on our landing pages. It’s effective at acquiring new subscribers, but may not be great at acquiring engaged subscribers.
As for opens, I also attribute that to the unsubscribe campaign, too. We used clicks as a way to measure engagement (it’s more reliably tracked than opens), so it’s very possible we unsubscribed people who opened our emails but never clicked on them.
All of those things considered, I am optimistic that this new approach is better — but as always, we’re going to keep an eye on this and make changes if necessary. We’ll keep you posted. 😉
What’s Next?
The unsubscribe workflows are here to stay, and our instant list is going to stay firmly in the trash.
That said, we aren’t going to stop trying to find better ways to keep our subscribers in the loop on what’s been published. These changes are only the beginning to building a smarter, more lovable blog subscription strategy.
How to Be Happier: Tips for Developing an Optimistic Outlook on Life [Infographic]
Whether you tend to see the glass half full or half empty, there’s plenty of research that suggests optimistic people experience a number of physical, social, and emotional benefits.
For positive folks, it’s easy to tune out negative news, embrace life, and welcome new social connections. But for those who find themselves leaning towards a more pessimistic demeanor, it can be tough to silence that inherent level of negativity and skepticism.
This presents an especially interesting workplace dilemma, as it’s easy to give up on challenging obstacles when you don’t see the light at the end of the tunnel. But is it possible to train yourself to turn your frown upside down? Sure is.
In fact, Happify put together the following infographic to bring to light some helpful tips and tricks for becoming more optimistic — both personally and professionally. Check it out.
How to Photoshop Your Coworkers Into Any Situation: A Step-by-Step Guide
As someone who dabbles in Photoshop, I often get odd requests from coworkers asking if I can take person A and insert them into situation B. Usually, it’s for an internal slide deck, or a Wiki post, or for a Slack-related practical joke.
And while there are usually a bajillion more important things I could be doing when these requests come in, I nearly always say yes — with the caveat that I’ll spend a maximum of 15–20 minutes working on it.
Given enough time, you can make any Photoshop job look both beautiful and believable. And when you’re working on something for an actual campaign or other outward-facing project, that’s exactly what you should do. (Or better yet, you should get a professional designer to do it.)
But for those smaller, goofier projects? Getting the job done adequately in 20 minutes definitely beats getting it done flawlessly in two days.
In the steps to follow, I’ll walk you through my quick-and-dirty approach to Photoshopping coworkers (or anyone or anything, really) into any situation.
Step 1: Find the Perfect Photo
For the purposes of this exercise, I’m going to be using the above photo of my coworker Brittany. I chose this photo for three, distinct reasons:
- Because it’s from one of our free stock photos bundles.
- Because I think Brittany’s expression in the photo will make for some fun Photoshopping.
- Because I’m (fairly) confident Brittany won’t be mad at me once she sees this post.
Pro Tip: When selecting a photo for your Photoshop project, try to make sure that the subject of the photo doesn’t blend in with any of the background elements. For example, if your subject is dressed all in white and is standing in front of a white wall, separating that subject from the background will be a tricky task. Not impossible, but tricky.
Taking a closer look at the photo I’ve chosen, I’m slightly worried that Brittany’s sweater is getting lost in the background in some spots — but we can address that in the next step.
Step 2: Remove the Background
Now that you’ve found the perfect photo, you’ll need to open it up in Photoshop in order to remove the background. (Note: You can also complete this step in PowerPoint, but Photoshop offers more functionality and opportunities for fine-tuning.)
Speaking of functionality, Photoshop has several different tools that you can use for removing backgrounds, including the Background Eraser Tool, the Lasso Tool, the Magic Wand Tool, and the Quick Selection Tool. Let’s start with the aptly named Background Eraser tool because it’s the simplest option available.
Using the Background Eraser Tool
See that eraser icon on the left sidebar? Click on it, and a mini-menu will pop up. Choose “Background Eraser Tool” from the menu, and voila: You’re ready to erase.
As you click and drag around the background of your photo, you’ll start to see a grey-and-white checkerboard pattern emerging underneath. That’s a good sign: That grey and white checkerboard is how Photoshop displays transparency.
But as you can see in my example above, the Eraser Tool is only removing a few pixels of background at a time — not very efficient.
The solution? Head up to the top navigation bar and click on that glowing dot next to Background Eraser Tool icon.
From there, you an increase the size of the Eraser Tool’s path so it clears away more background with each stroke.
See? Definitely making more progress.
From here, you could keep simply going and remove the whole background. For the tighter spots, you’d just need to size the Eraser Tool back down again.
Fair warning, though: Using the Background Eraser Tool is probably the most time-consuming way to remove a background from a photo, and depends a lot on your own precision. For those reasons, I recommend exploring these other options.
Using Selection Tools
When using the Lasso Tool, the Magic Wand Tool, or the Quick Selection Tool for removing backgrounds, you’re not erasing like you were with the previous tool. Instead, you’re creating — and deleting — entire selections.
In order to do this, you’ll first need to prep your photo, which you can accomplish in one of two ways:
First way: See that mini version of your photo in the Layers panel (with the lock icon next to it)? You can right click there and choose “Layer from Background.” Then, when prompted, enter a new name for your layer (optional) and click “OK.”
Second way: Alternatively, you can go to Layer > Smart Objects in the top navigation bar and then choose “Convert to Smart Object.”
Next, head back to the Layer menu in the top navigation bar and choose Rasterize > Smart Object.
IMPORTANT NOTE: If you don’t prep your photo using one of the two options above, the following tools aren’t going to work!
The Lasso Tool(s)
See the lasso-like icon on the left sidebar? Click on it, and a mini-menu will pop up that offers three different lasso tools.
Using the standard Lasso Tool, you can click and drag to draw a selection around your subject.
For more precision, you can use the Polygonal Lasso Tool. Using this tool, you can click to set a point, move your cursor, and then click to set another points, and all the points of your selection will be connected by straight lines.
Of course, when working with a photo that doesn’t have perfectly straight lines, the Polygonal Lasso Tool isn’t necessarily that helpful. The better option is the Magnetic Lasso Tool, which combines the precision of the Polygonal Lasso Tool with the flexibility of the standard Lasso Tool.
With the Magnetic Lasso Tool, you can click once and then drag your cursor along the edge of what you’re selecting. The tool will automatically detect and be attracted to the edges of your selection, generating points along the way. (Note: for added control, you can click to add points manually).
Regardless of which version of the Lasso Tool you use, your next step after making the selection is to head to the “Select menu” in the top navigation bar and choose “Inverse.”
From there, just hit the delete key and the background will go bye-bye.
The Magic Wand Tool
If you’re fortunate enough to be using a photo that has a single, solid color as the background, the Magic Wand Tool could be super helpful.
To use it, you simply click on the background and the tool will automatically select other parts of the background that look visually similar. To add to your selection, hold the shift key and keep clicking. Then, once you have the entire background selected, hit delete.
But as you can see in my example photo, the Magic Wand Tool is having trouble distinguishing between the background and the subject in some places. Not to worry: the Magic Wand’s cousin — the Quick Selection Tool — has got us covered, and is generally a much better option than using the Magic Wand.
The Quick Selection Tool
The Quick Selection Tool is located in the same place on the left sidebar as the Magic Wand Tool.
Once you’ve selected it, all you have to do is click inside of your subject and drag the cursor around. The tool will automatically detect the edges, and within a few seconds, you’ll have a selection like the one you see below:
But wait, what about that background space between her elbow and her torso? That shouldn’t be selected.
To deselect areas, simply hold the Option key (Mac) or ALT key (PC), and your Quick Selection Tool will become a Quick De-Selection Tool. You can further refine certain parts of your selection by zooming in and selecting/de-selecting as needed. For even more precision, head up to that glowing circle icon in the top nav and reduce the brush size.
That’s how I was able to go from what you see above to what you see here:
One more trick for improving quality: From the “Select” menu in the top navigation bar, choose “Refine Edge.”
From there, you can add feathering and other effects to make the edges of your selection appear more natural.
Once you’re happy with how the selection looks, head to the “Select” menu in the top navigation bar, choose “Inverse,” and hit your “Delete” key on your keyboard. Here’s what you’ll end up with:
Step 3: Save Your Edited Photo as a PNG
At this point, you could start dragging some background photos into Photoshop and playing around. But I recommend saving the (now background-less) photo of your subject as a PNG first. That way you’ll always have a copy of it for to use in later projects.
Using the PNG format is important here because it will preserve the transparency. Just go to File > Save As in the top navigation bar and choose “PNG” from the dropdown menu.
Step 4: Find the Perfect Background Photo(s) and Insert Your PNG
Now comes the fun part: Finding awesome situations into which you can insert your coworkers. (Pro Tip: NASA’s website and the National Geographic website are excellent resources for this.)
Once you’ve got a great background photo lined up, download it and then open it in Photoshop. From there, you can simply drag-and-drop your PNG from wherever you saved it directly on top of the background in Photoshop.
Next, click and drag to re-position your PNG. You can also hold shift and drag the corners of your PNG to scale it up or down.
When you’re happy with how it’s sitting, double-click on it, and the box surrounding your PNG will disappear.
(Note: From this point on, if you want to re-size your PNG, you’ll need to go to the “Edit” menu in the top navigation bar and select Transform > Scale.)
Step 5: Save, Share, Repeat
Once your masterpiece is complete, save it as a PNG and share it with the world … or maybe just your office. And, of course, don’t be afraid to get creative with new backgrounds. The hard part is really creating that first PNG of your subject.
After that, the sky’s the limit. Or actually, maybe it isn’t …
Thanks for following along! Remember: This was a quick-and-dirty guide to Photoshopping. If there’s interest, I can do a follow-up where we explore more tools and get into more detail.
Have any Photoshop tips you’d like share? Sound off in the comments section below.
The 9 Best Keyword Research Tools to Find the Right Keywords for SEO
Let’s get right down to it: The key to successful SEO is concentrating on long-tail keywords.
Although these keywords get less traffic than more generic terms, they’re associated with more qualified traffic and users that are typically further down their path of intent.
The good news is that choosing the right long-tail keywords for your website pages is actually a fairly simple process — one that’s made all the more simple and quick when you use the right tools to perform your keyword research.
Download our free SEO template here to organize your keyword research into an actionable plan for your site.
In this post, we’ll cover the nine best tools out there for performing keyword research for your website content. Before we get started though, let’s briefly go over two important things to consider as you do your research: relevance and (if applicable) location.
Keyword Relevance
Relevance is the most important factor to consider when choosing the right keywords for SEO. Why? Because the more specific you are, the better.
For instance, if you own a company that installs swimming pools, it’s likely that you’d attract more qualified prospects by targeting a keyword such as “fiberglass in-ground pool installation,” rather than “swimming pools.” That’s because there’s a good chance that someone searching for “fiberglass in-ground pool installation” is looking for information on installation or someone to perform the installation … and that could be you!
Sure, optimizing for “swimming pools” has its place. But there’s no doubt that this keyword will attract a much more generic audience that may not be looking for what you have to offer. Go for the relevant, long-tail keywords instead.
Location-Based Keywords
Another major factor to consider when optimizing for the right keywords is location-based searches. When looking for contractors and services in their specific area, search engine users will usually include their location in the search. So, “fiberglass in-ground pool installation” becomes “fiberglass in-ground pool installation in Boston, MA.”
If you operate in one geo-location, you may want to consider adding location-based keywords to all of your pages, since traffic from other locations isn’t going to be very much help to you. If your business operates in several geo-locations, it is also a wise choice to create a separate web page dedicated to each location so you can make sure your brand is present when people are searching for individual locations.
Now, how do you choose the right keywords for your business? We certainly don’t recommend guessing, for obvious reasons. Instead, there are many ways to research and find long-tail keywords that are right for your business.
Here are nine awesome free and paid keyword research tools you can use to quickly and easily identify strong long-tail keywords for your SEO campaign.
Free Keyword Research Tools
1) Google Keyword Planner
Google has a few tools that make it easy to conduct keyword research, and their free AdWords tool called Keyword Planner is a great place to start — especially if you use AdWords for some of your campaigns. (Note: You’ll need to set up an AdWords account to use Keyword Planner, but that doesn’t mean you have to create an ad.)
When you input one keyword, multiple keywords, or even your website address into Keyword Planner, Google will spit out a list of related keywords along with simple metrics to gauge how fierce the competition is around each one and how many searches it gets on both a global and local search level.
It’ll also show you historical statistics and information on how a list of keywords might perform — and it’ll create a new keyword list by multiplying several lists of keywords together. Since it’s a free AdWords tool, it can also help you choose competitive bids and budgets to use with your AdWords campaigns.
Image Credit: Google
Unfortunately, when Google transitioned from Keyword Tool to Keyword Planner, they stripped out a lot of the more interesting functionality — but you can make up for it somewhat if you take the information you learn from Keyword Planner and use Google Trends to fill in some blanks.
Which brings me to the next tool …
2) Google Trends
Google Trends is another free tool from Google. It lets you enter multiple keywords and filter by location, search history, and category. Once you enter that information in, it’ll give you results that show how much web interest there is around a particular keyword, what caused the interest (e.g., press coverage), and where the traffic is coming from — along with similar keywords.
The best part about Google Trends is that it doesn’t just give you static keyword volume numbers like most keyword research tools. Instead, it generates colorful, interactive graphs that you can play with, download, and even embed on your website. It’ll also give you more dynamic insight into a keyword with information like relative popularity of a search term over time.
Interestingly, its data doesn’t include in repeated queries from a single user over a short period of time, which makes results cleaner. It also groups together searches that it infers to mean the same thing, like misspellings.
One way to use Google Trends? If you’re trying to decide between two keyword variations for your latest blog post title. Simply perform a quick comparison search in Google Trends to see which one is getting searched more often.
3) Keyword Tool.io
Keyword Tool is pretty rudimentary online keyword research tool, but if you’re just looking for a list of long-tail keyword suggestions related to one you already have in mind, then it can be useful. It’s also totally free — to use the most basic version, you don’t even need to create an account.
What Keyword Tool does is use Google Autocomplete to generate a list of relevant long-tail keywords suggestions. The search terms suggested by Google Autocomplete are based on a few different factors, like how often users were searching for a particular term in the past.
This type of suggestion tool can help you understand what people are searching for around your topics. For example, bloggers might use a tool like this to brainstorm blog post titles that’ll do well in search.
Again, all the free version does for you is generate other keyword suggestions in alphabetical order — it doesn’t tell you anything about search volume or cost-per-click (CPC). To get that information, you’ll have to upgrade to Keyword Tool Pro. The Pro version will also let you export the keywords and use them for content creation, search engine optimization, CPC/PPC, or other marketing activities.
Paid Keyword Research Tools
4) Term Explorer
Price: $34/mo. for Basic; $97/mo. for Pro; $499/mo. for Agency
Term Explorer offers probably the deepest research reports of any keyword research tool on the market. From one single seed term, you can get over 10,000 keyword variations.
Best of all, the tool does a great job of keeping the results as relevant as possible and pulling through lots of supporting metrics with them.
It’ll give you data for all the results on page one of search engine results pages (SERPs), including the number of results, link strength, trust score, and keyword difficulty. To help you get a handle on your competitors, you can use the tool to research domain age, page ranking, and links, as well as the word count, page rank, links, outbound links, and the number of keyword occurrences in title, URL, and headers for individual webpages. You can also export all this data into a CSV for your own analysis.
Image Credit: Term Explorer
Note: If you only plan on using it a few times a day, there is actually a free version of this tool that’ll do five tiny keyword jobs and five keyword analyses per day, with no queue priority.
5) Moz’s Keyword Difficulty Tool
Price: $99/mo. for Standard; $149/mo. for Medium; $249/mo. for Large; $599/mo. for Premium
The keyword difficulty tool from Moz is one of the most useful components of their paid suite. It’s a fantastic resource for analyzing the competitiveness of a keyword and for unearthing low-hanging fruit.
When you input a keyword into this tool, it’ll find the top 10 rankings for that keyword. Then, it’ll assign that keyword a “Difficulty Score” based on the pages that currently rank for that word. You can look at search volume data for your keywords, then pull up the SERP to see the top 10 results for each term.
Image Credit: Moz
Want to do some competitive keyword analysis? You can use the tool to see who else is ranking for your targeted keywords, along with information like each site’s page authority and the number of root domains linking to their page.
You can also export all this data into a CSV for your own analysis.
6) SEMrush
Price: $69.95/mo. for Pro; $149.95/mo. for Guru; $549.95/mo. for Business
SEMrush is a competitive research tool that lets you keep an eye on on your competitors’ keywords to find opportunities to bump them out for a top position in Google’s and Bing’s organic search results. You can compare a number of domains against one another to evaluate the competitive landscape, including their common keywords and positions in Google’s organic, paid, and shopping search results.
Position tracking is kind of like a sophisticated version of Google Trends, letting you see a keyword’s position in SERPs and analyze the history of rises and drops. Their colorful, visual charts are also super helpful for more quickly understanding trends and analyzing results.
Image Credit: SEMrush
7) Ahrefs
Price: $99/mo. for Lite; $179/mo. for Standard; $399/mo. for Advanced
Position Explorer is similar to SEMrush, but with some added bonuses — and a much more intuitive design.
For example, the Site Explorer part of the tool will let you find the URL rating and domain rating for any website you put in there, along with number of backlinks, number of referring domains, and social metrics for Google+, Facebook, and Twitter. It’s also great for finding link targets: You can use it to get a quick analysis of a site, and you can also use its extensive index when you want to do a deeper dive.
Ahrefs’ user interface is a big plus. It’s not just black-and-white tables filled with numbers; instead, you’ll get colorful, interactive charts of things like number of indexed pages, internal and external backlinks, new vs. lost backlinks — all over time.
Image Credit: Ahrefs
Brian Dean, founder of Backlinko, say that Ahrefs is his #1 go-to tool for backlink analysis: “I’ve tested over 25 link analysis tools and none come close to Ahref’s in terms of index size, freshness, and overall usability.”
The Position Explorer part of the tool lets you find keyword opportunities where your competitors are ranking, while also giving you a ton of extra link metrics that help you determine keyword competitiveness. And the Content Explorer lets you browse through the most shared content for any topic.
8) Accuranker
Price: $19.95/mo. for Beginner; $29.95/mo. for Pro 300; $44.95/mo. for Pro 600; $74.95/mo. for Pro 1K
Accuranker is a keyword rank tracking tool with a key differentiator: It’s lightning fast while being extremely precise. So if you’re used to spending hours monitoring the rank progression of your keywords, this’ll end up saving you a ton of time.
Other advantages of this tool? It has built-in proxies to get a quick glance at whose ranking within the SERPs for any given keyword. If you plan to report keyword metrics to your manager or your team, you’ll like its scheduled weekly reports feature.
Image Credit: Accuranker
It’s also one of the best rank trackers out there that offers highly localized search engine rankings for your keywords. So if you’re marketing your business to an international audience, it’s a great tool for analyzing which pages are ranking in different countries.
Finally, it has integrations available with Google Analytics, Google Search Console, Social Monitoring, and YouTube so you can keep an eye on statistics and estimated search traffic for your keywords straight from your AccuRanker dashboard.
9) HubSpot’s Keywords Tool
Price: $200/mo. for Basic; $800/mo. for Pro; $2,400/mo. for Enterprise; (Free Trial Here)
HubSpot also has its very own Keywords Tool within the software. The Keywords Tool helps you research keywords, identify the best keywords for optimizing your site, and track results from each one. This tracking feature allows you to see which keywords are actually driving traffic and leads, so you can use this information to continue optimizing your keywords over time.
The tool will also show you how your competitors rank for specific keywords, and help you monitor and build high quality inbound links.
(HubSpot customers: You can access the Keyword Tool in HubSpot by clicking here or going to Reports > Keywords.)
Now that you know about all these great tools, get out there and start discovering your best keywords for SEO.
What tools and methods do you use to find long-tail keywords? Share your favorites with us in the comments below.
Editor’s Note: This post was originally published in August 2011 and has been updated and for freshness, accuracy, and comprehensiveness.
Koozies, Spatulas & Guacamole Bowls: 12 Pieces of Presidential Campaign Swag You’ve Got to See
Pens, t-shirts, water bottles, baseball caps, lanyards … so many lanyards.
Welcome to the wonderful world of swag, where — in a tremendous display of humanity’s technological prowess — we prove that we can stamp a logo or catchphrase on just about anything.
In politics, candidates don’t just use swag to raise money. They use it to learn more about their supporters. As Vanessa Friedman of The New York Times reported, “The choice of a product can reveal whether you are a beer drinker, a sports fan or what cellphone you use. It can suggest that there are a lot of joggers headquartered in a specific region of the country, indicating that a campaign may want to direct its health communications to that state.”
Candidates are essentially using swag sales data to help build out their buyer personas. (Or, in this case, voter personas.) Using the insights they glean, candidates can tailor their messages to the different regions they’re campaigning in.
But what kinds of products are candidates actually stocking in their swag shops? And what can candidates hope to learn from selling some of the more ridiculous items you’re about to see on this list? Let’s take a closer look.
12 Pieces of Presidential Campaign Swag You’ve Got to See
1) The Obligatory Beer Koozie
As a presidential candidate in the U.S. of A., you’re expected to do three things on the campaign trail:
- Kiss babies
- Eat hot dogs (no fancy mustard allowed)
- Drink beers with fellow, good ole-fashioned, beer-drinking Americans
To showcase just how beer-friendly they are — and to keep the hands of their suds-sipping supporters from getting cold — many presidential candidates sell signature beer koozies in their online campaign stores.

I chose to highlight Hillary Clinton’s and Ted Cruz’s koozies in the image above since their campaigns took the extra effort of making (terrible?) puns.
2) Candidate Coolers
Of course, a koozie is only useful when you’re carrying around a single beer. To carry around several beers, you need a cooler. Fortunately, the Cruz campaign store has got you covered. President Barack Obama’s campaign store sold a cooler back in 2012 as well, and John McCain’s 2008 campaign store sold one too — although McCain opted for an embroidered, soft-sided cooler as opposed to a hard plastic one.
3) Something With Overtly Millennial Messaging
The first two items on this list may have helped candidates identify who among their supporters were beer drinkers. But with the two pieces of swag pictured above, it’s likely that the Marco Rubio campaign (suspended March 2016) and the Hillary Clinton campaign are trying to target millennial supporters. Rubio’s “bae” sticker and Clinton’s “yaaas” t-shirt both highlight some very recent additions to American vocabulary.
And while we can’t help you in the “yaaas” department, we do have a flowchart that will teach you when it’s appropriate to use the term “bae” in your marketing.
Bonus: This 404 error page from the Jeb Bush campaign website.
4) A $75 Guacamole Bowl
FYI: I discovered that 404 error page from Jeb Bush’s campaign site while searching for his headline-grabbing $75 guacamole bowl. (Since dropping out of the 2016 presidential race in February, Bush’s campaign store is no longer operational.)
From a data standpoint, this one’s a no-brainer: Supporters who buy a $75 guacamole bowl from your campaign website must LOVE guacamole. You can use the sales data to make sure you’re serving guacamole at campaign events in the regions where guacamole popularity is at its highest. Note: These findings can also help to inform your campaign’s overall policy on guacamole and other snack-related issues.
5) A Commander-in-Chief Cutting Board
While we’re on the subject of presidential candidate-branded kitchenware, here’s a $20 cutting board from President Obama’s 2012 campaign. Can I prove that this $20 cutting board helped President Obama win the 2012 election? No, I cannot. But I also can’t prove that it didn’t help …
6) Star-Spangled Spatulas
Just kidding, these grill spatulas aren’t really spangled with stars, but they do incorporate the candidates’ campaign logos — in this case, President Obama’s campaign logo from 2012 and Ted Cruz’s campaign logo from 2016 — in a pretty nifty fashion. Have a hankering to know if your supporters are BBQ fans? Selling spatulas could be the secret recipe.
7) The Same. Darn. Water Bottle.
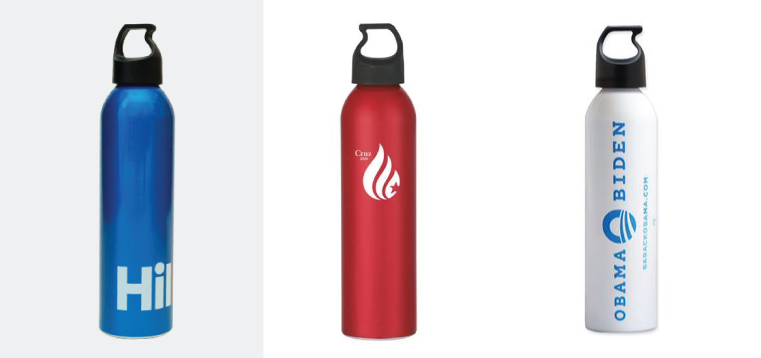
Hillary Clinton’s campaign store sells one ($15). Ted Cruz’s campaign store sells one, too ($15). And back in 2012, President Obama’s campaign store sold the same one for — you guessed it — $15. Sales of such bottles, no doubt, have helped candidates figure out which of their supporters are fans of water.
To be serious for a second, when you see items like water bottles being sold in conjunction with, say, yoga pants, and other athletic items, you can start to identify supporters for whom health and fitness are a priority.
Speaking of yoga pants …
8) Yoga Pants
Here’s another example of swag that’s aimed at fitness- and health-focused supporters: yoga pants. On the left are the Ted Cruz campaign store’s pants, which sell for $40. On the right are the pants from President Obama’s 2012 campaign, which sold for $35.
9) Specialty Shirts & Jerseys
There’s a lot of presidential candidate apparel out there, and most of it is pretty boring: just a logo and/or slogan printed on a t-shirt or cap. But in some cases, campaign stores take the design up a notch …. or down a notch, depending on your particular fashion sensibilities.
The first example above is from the Bernie Sanders campaign store, and it’s a t-shirt that was designed by street artist Shepard Fairey ($30). Next is an “ugly sweater” from the Ted Cruz campaign store, which features the candidate’s likeness ($65). Finally, we have a basketball jersey from President Obama’s 2012 campaign store.
10) Baby Swag
Yes, the legal voting age in the U.S. is 18, but that hasn’t stopped candidates from targeting the next generation with baby-sized swag. Also, sales of such swag can help candidates identify who of their supporters have youngsters in their families.
Pictured above: a “Make America Great Again” onesie from the Donald Trump campaign store ($18); a “Bernie 2016” bib from the Bernie Sanders campaign store ($15); and a onesie from the Marco Rubio campaign store that reads, “My parents love me, so they are voting Marco Rubio 2016” ($25).
11) Phone Cases

Lots of candidates are selling phone cases in their campaign stores nowadays. But back in 2012, Mitt Romney straight up owned the branded phone case game: All six case styles you see above are from his 2012 campaign store. They sold for $40-a-pop.
12) Swag Bundles
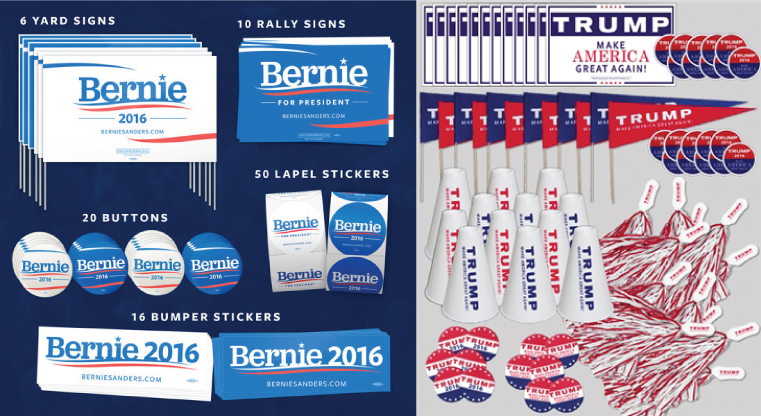
How do candidates identify their most ardent supporters, the supporters who are going to show up at rallies and help spread the campaign message like wildfire? It’s possible they look at the folks who are purchasing massive bundles of swag from their campaign shops. These bundles can include bumper stickers, pins, signs, flags, and more.
Pictured above: The “Organizing Pack (Large)” from Bernie Sanders’ campaign store ($80) and the “Rally Pack (for 12)” from Donald Trump’s campaign store ($250).
Know of any other awesome (or awful) examples of candidate swag? Let us know in the comments section below.