
How to Market Matching Gifts in the Donation Process
If you haven’t experienced the pure joy of a buy one, get one free sale, you’re missing out. You go into a store looking for the perfect pair of jeans, and you come out with twice as much denim as you paid for!
Matching gifts are almost exactly like those sales. While matching gifts won’t bring your organization twice as many designer denim pants, you can double the amount of donations that you’re already receiving by effectively marketing matching gifts to your donors during the giving process.
What Are Matching Gifts?
Matching gifts are contributions that employers, or other parent companies, make to eligible nonprofits after an employee has made a donation on their own accord. They can be a great way to give your nonprofit’s fundraising a boost with little effort on you or the donor’s part.
While there are many ways to market matching gifts to your donors, one of the best ways is to capture their attention with matching gift information during the donation process or in tangent to other donation promotions. Donors who are already giving to your organization (or at least considering it) obviously care about your cause. Use that opportunity to convey how matching gifts can help donors maximize their impact.
Here are four of the top ways to market matching gifts in the donation process
1) Market Matching Gifts in Solicitation Emails
Solicitation emails are one of the most common ways to encourage donors to give to your organization, and can also play a crucial role in your matching gift marketing strategy.
When you let donors know about matching gifts upfront in your solicitation emails, you are giving them an even more exciting reason to donate to your organization, because their impact will be much greater than an individual contribution alone.
However, you shouldn’t send out the same solicitation email to every single donor. Personalization can go a long ways to make email recipients feel valued, which in turn can even further increase the likelihood of a donation.
You can use prospect research to determine which of your donors should be getting which message. Prospect research can help you identify regular givers as well as relatively new contributors. With this information, you can better tailor your solicitation emails to different donors.
You can use the following tools for prospect research:
- Information gleaned from form submissions during previous conversions on your websites (for example, a webinar or content offer)
- The Foundation Center (they have nearly 1,000 filings for nonprofits)
- The Chronicle of Philanthropy
- Guidestar
- And many more resources
This research can help guide you when it comes to donor communications as they relate to matching gifts for different donor groups. To begin with, the message should be different for regular donors versus first-time givers. For matching gifts in particular, you may be able to use more complex messaging for donors who have given in the past, and are already familiar with your cause.
Goodwill of Southwestern Pennsylvania offers a great example of an email that is tailored to a regular donor. The second paragraph states, “As a valued donor of Goodwill of Southwestern Pennsylvania, you know that your gift supports more than 50 programs and services … We encourage you to take advantage of the matching gift program.” The email also incorporates an eye-catching CTA and useful links that lead donors to more information.
By sending out this type of email to regular donors, your nonprofit can reap the benefits of matching gift programs and receive twice as many donations from your donors and their employers.
2) Market Matching Gifts on Donation Forms
Just like you need to provide different donors with unique solicitation emails, you’ll want to make sure that your donors are receiving distinct donation experiences on your forms as well.
If you know that a donor has submitted a matching gift request before, then you’ll want to reflect that on your website. Additionally, if a donor is either donating to your organization for the first-time, or if they’ve donated before but have never submitted a matching gift request, you’ll need to treat their donation experience differently than a regular donor who has their gifts matched.
For instance, when a regular donor makes another donation, remind them of their past matched contribution on the thank you page. The reminder can help encourage donors to have their donations matched again without discounting their past efforts.
Provide first-time donors or givers who haven’t had their donations matched in the past with information on the donation form so they can immediately look into having their contribution matched.
The Girl Scouts of Greater Atlanta provide donors with a way to check if their donation to the annual fund can be doubled right on the donation page. The space above the donation levels section is used for matching gift information, while the link helps donors find out if their company will even match their donation.
By providing donors with different experiences during the donation process, you can more efficiently inform or remind donors about the power of matching gifts.
3) Market Matching Gifts With Smart Content
When donors visit your website, they want to feel welcomed. One of the ways to ensure that users stay on your site and eventually come back, donate, and submit matching gift requests is to personalize the experience that they receive through the use of smart content.
When donors read blog posts and other articles on your website, add calls-to-action that are suited for each user—based on their previous online actions.
Instead of offering the same promotion to everyone, customize your donors’ experience depending on:
- The type of device they’re using
- The geographic area they are visiting your site from
- How they reached your website (social, search, email)
- Their previous donations or downloads
- Their company or parent organization
Additionally, customize users’ experiences depending on where they are in the lifecycle stage. For instance, the message that first-time visitors to your site receive should be different from the content that regular users encounter.
When it comes to matching gifts, this step is crucial. You don’t want to beat regular donors over the head when they have already had several of their donations matched. However, if a first-time donor or a contributor who has never had their donation matched visits your site, you’ll want to make sure that you’re covering your bases.
4) Market matching gifts in acknowledgement emails
You should always be thanking donors after they make a donation. But acknowledgement emails can also be a great way to let donors know about making their donations go a little further.
Most companies have deadlines for submitting matching gift paperwork. While some deadlines are at the end of a calendar year, some are as short as 3 months from when the donation is made. Sending an email to a donor shortly after they make a contribution can help you capture more matching gift requests.
However, you shouldn’t be sending the same thank-you email to all of your donors. Customizing and segmenting donors according to the size of their contribution, the frequency at which they donate, and whether they’ve previously submitted matching gifts is crucial to achieving matching gift success.
The Hereditary Neuropathy Foundation’s thank-you email highlights the importance of matching gift programs while letting donors know that they appreciate their contributions. They even thank donors in advance for checking to see if their employers offer a matching gift program!
While the HNF’s thank-you email could be used for first-time donors who have never submitted a matching gift request before, it wouldn’t be the best fit for donors who regularly submit matching gifts. For those donors, consider sending a thank-you email once their employers submit the matching donation.
NC State lets donors know when their employers’ matching gift donations are received and thanks them for taking the extra time to submit a matching gift request. An email like this can be a great way to continually remind donors that their donations can be matched throughout the year.
Getting Started With Matching Gifts
Marketing matching gifts to donors should take place across your website and communications, but it should also occur within the donation process. Whether a donor is a first-time contributor or has regularly donated and had their gifts matched, you can tailor the steps of the donation process to fit each donor’s needs.
And then based on the responses from your donors and website visitors to your different content and communications you can tailor your messaging to everything from additional contributions to skills-based volunteering opportunites, to additional ways to get involved with your nonprofit. Just like the matcheddonations, you’re sure to see your marketing efforts compound on themselves over time.
How to Have More Productive Group Brainstorms: 10 Tips to Get Everyone Involved
How many times have you uttered the phrase, “I wish I’d thought of that”?
It often seems that certain people have the power to formulate creative, inspired ideas, but the truth is, you and I are just as capable as the next person.
Sure, unleashing your creativity isn’t always easy — especially when you’re brainstorming in a group setting.
In order to keep your business competitive and have more productive brainstorms, you need to account for different personality types, points of view, and preferred ways of learning.
To help you hold more meaningful group brainstorms, embrace the following tips and tricks. From icebreakers to games to free tools, you’re sure to find an approach that gets the wheels turning for your team.
How to Have More Productive Group Brainstorms
1) Allow people to submit ideas anonymously.
It’s a paranoia shared by all human species: What will other people think?
When it comes to brainstorming, sometimes our wildest, craziest, most unrealistic ideas happen to be our best ones. Unfortunately, many of them never see the light of day, as we are often plagued by our unproductive obsession with what might happen if we speak up.
Best defined by the concept of evaluation apprehension, this all-too-common anxiety can suck the innovation right out of your group brainstorm. To combat it, consider asking members of the group to submit ideas anonymously before the meeting.
If you’re looking for a handy tool to help simplify collecting anonymous suggestions, check out Free Suggestion Box. This easy-to-use website lets you set up a suggestion box, share the box’s unique URL with your teammates, and collect their honest feedback without revealing their identities. Check it out:
2) Ask people to come prepared.
While it may seem obvious, often times people come to brainstorms without having put much thought into the topic at hand. This can lead to a lot of awkward silences and a lot less creative thinking.
The solution?
“What the most creative companies do is tell the members of the group to come up with lists of ideas before they come to the brainstorming session. What the group is really powerful for is exchanging ideas and then having ideas bump up against one another and merge in surprising new ways that any one person might not have thought of on their own,” notes creativity expert Keith Sawyer.
In other words, by asking group members to bring a few ideas to the table, you create a launching point for more ideas to surface. To enforce this, you might want to pass around a spreadsheet for collecting ideas prior to the meeting.
3) Gamify it.
Move over brainstorming, there’s a new technique in town: Gamestorming.
This new way of looking at brainstorming opens up an opportunity for people to have fun while surfacing results. It’s visual, messy, loud, and innovative … just like brainstorming should be.
Interested in trying it out in your next group brainstorm? Here are a few exercises:
- Squiggle Birds: Want to stretch your visual thinking muscles? This activity will help you do just that. [Learn How to Play]
- Draw Toast: Need a fun way to get people warmed up and thinking systematically? Ask them how to make toast. [Learn How to Play]
- Carousel: If you’re looking to come up with a fresh solution to a problem, this quick exercise will help you gather and share insight from all points of view. [Learn How to Play]
4) Start with an icebreaker.
When you’re jumping from meeting to meeting, getting in the right frame of mind to think creatively can be challenging. You’re thinking about your social media engagement, budgeting issues, and unanswered emails, all while also trying to bring something constructive to the table.
Depending on the focus of your brainstorm, there are a ton of interesting icebreakers you can kick off your meeting with. For example, if you’re brainstorming idea for a particular demographic, PR Daily suggests that you ask the group to pretend that they are planning a party for the audience you’re looking to reach. They should determine specific details — venue, playlist, menu, theme, etc. — in order to get in the mindset of the group you’re targeting.
Another option? Word association. Help your group start thinking about the bigger picture by creating a word web of terms that relate to your challenge or promotion. From here, you can identify patterns and trends that will prove useful when developing ideas.
5) Invite an outsider.
There are a ton of cognitive biases that influence the decisions we make, and failing to recognize your own biases is a bias in itself — it’s called blind spot bias.
Considering it’s much easier for people to recognize cognitive and motivational biases in others than it is to identify them in oneself, it’s a good idea to brainstorm and come to decisions with the help of a group. But not just any old group will do …
In an effort to take a step back from the situation, try inviting someone from a different team, department, or level of the organization to join your brainstorm. By having an outsider in the room, it’ll be easier to minimize biases, as this person can serve as a devil’s advocate for your ideas.
6) Host the brainstorm online.
Whether some of your team members work remotely or you sit side-by-side, choosing to hold an online brainstorm could be the solution you’ve been looking for.
A study on electronic brainstorming and group size found that larger groups were able to come up with more unique, high-quality ideas when they used electronic brainstorming versus verbal. Not to mention, members expressed more satisfaction when participating in this format.
Why? The research concluded that electronic brainstorming has the ability to reduce production blocking, in which waiting your turn interferes with the cognitive process of generating ideas.
7) Set a fleeting deadline.
As many of us know all too well, sometimes all it takes is the looming threat of a deadline to ignite action.
Much like leveraging the Pomodoro Technique — in which you work in brief, 25-minute stints with breaks — limiting the time you spend on a group brainstorm could serve as a helpful kick in the pants for all involved.
Rather than giving yourself too much time and space to come up with ideas, creative Nicole Steinbok suggests you hold a 22-minute meeting. The way Steinbok sees it, this limited deadline typically provides just enough time to accomplish an intended goal — without having to deal with all the banter. Here’s a look at how the ideal 22-minute meeting should play out:
8) Opt for a change of scenery.
The New York Times, our brains make subtle associations between what we’re focusing on and the background sensations at the time. For example, a 1978 experiment found that students who studied 40 vocabulary words in two different rooms performed better than students who studied the words twice in the same room.
9) Avoid letting the leader start.
Having a brainstorm with a mix of executives, upper management, and their reports? It’s often best to ask management to save their suggestions until others have had a chance to toss around some ideas.
“Participants who are easily intimidated will hitch their wagons to the boss’s ideas, probably at the expense of their own creativity. And more rebellious participants won’t come near the boss’s ideas, even though those ideas might indeed have merit,” explains Sam Harrison, author to several books on creative ideas.
It’s also important to note that anchoring bias — our tendency to rely heavily on the first piece of information offered — also plays a role in this type of scenario. If you allow the leader to speak first, it can become difficult for other group members to look beyond their initial judgment, and ultimately hold them back from offering new ideas.
10) Provide visual tools.
Considering approximately 65% of the population are visual learners, it’d be limiting to reserve brainstorms for just verbal communication.
Some ideas require a diagram or a doodle. Others require an elaborate map that stretches from one side of the white board to the other. In order for everyone in the group to truly understand one another’s ideas, it’s important that you provide the means to explain things visually.
Don’t have access to a room with a white board? Create a kit that can be used whenever someone at your company holds a brainstorm. This can be a box filled with paper, markers, scissors, clay, string, wire, Legos, tape, etc.
Sure, it sounds a lot like arts and crafts, but these types of tools allow for hands-on brainstorming — which could be the key to unlocking your team’s creativity.
How does your team approach brainstorming? Share your favorite tips and tricks in the comments.
How Homebuilders Can Leverage Houzz, Pinterest and Instagram to Generate More Business
The odds are you or someone you know has searched for a home recently. Something magical happens when you find the right one. Your heart starts racing, your palms get clammy. Are you about to buy a house?
You may not realize it from the consumer side of this deal, but there is an enormous amount of heavy-lifting that comes from the homebuilder side, especially with the availability of social media at consumers’ fingertips.
Imagine the complexity behind drawing in people from all walks of life who are about to make one of the largest purchase decisions of their lives. Maybe they’re newlyweds, looking for their first home purchase ever. Maybe they found out their family is growing and they need a bigger home, but they’re conscious of the energy efficiency and want to be near particular landmarks. Maybe they’re retiring and are looking to downsize or buy a vacation home in another state.
How can homebuilders speak to all of these people at once effectively? Social media done right.
Houzz is an increasingly effective tool to speak to home buyers
There are several aspects of Houzz that allow a homebuilder to communicate directly with interested home buyers. For example, homebuilders can post pictures and statistics of projects they are working on or have completed. This gives the home buyer a taste for what a project could look like when the idea of building a new home seems very daunting.
Homebuilders can also use what Houzz refers to as Ideabooks, allowing them to collaborate with home buyers online. They can post images of their own designs, décor, or floor plans allowing a potential client to transition from collecting their own ideas to actually seeing what options could be viable.
Houzz also allows the home builder to accumulate comments and reviews, encouraging past customers to engage with potential clients who are in the process of looking. According to a Zendesk survey, 90% of customers say buying decisions are influenced by online reviews, making this aspect of Houzz undeniably critical.
Pinterest can be used in innovative ways to aid homebuilders in selling
At conception, Pinterest seemed to be the land of fitspiration, recipes, crafting, DIY ideas, and other visually motivating ideas. Now, Pinterest is accessible to anyone, including people like me who end up with dyed skin or glitter stained clothes just by looking at a crafty project. For homebuilders, Pinterest is an avenue to reach those who are searching for specific keywords related to their industry and then engaging this audience with related boards.
Pinterest allows for users to invite other users to share a board and “pin” ideas to it together. While similar to the Houzz Ideabook function, Pinterest takes this interaction to the next level by allowing “pinners” to add their own information, including images and blogs from their website.
Pinterest also creates the opportunity to build boards and pin trending topics, catching any viewers who may be interested in related topics but are currently searching trends. For example, plenty of home-makers could be interested in remodeling their kitchens, but as the holidays are approaching they are more interested in searching for “creative table settings for Christmas.” By building a board around “decorating for the holidays,” a homebuilder could catch the eye of anyone who is looking for ideas on how to decorate their own homes for the holidays.
While building SEO through social media and gaining credibility for resonant and relevant posts a homebuilder can greatly increase traffic and potentially sales on their website. In a world where 88% of pinners purchase something they have pinned and 49% purchase 5 or more products they pinned, homebuilders must join the movement.
Instagram offers more than just pretty pictures for homebuilders and home buyers
Instagram has a lot more to offer than initially meets the eye. Its initial use was as a platform for pushing pictures with relevant and trending hashtags to sort conversations. Those discovering these pictures through hashtags can then like the pictures and, in a sense, organize the feed they subscribe to with certain images that they want to see.
Now, Instagram is an opportunity for homebuilders to follow up on those who are interested in their posts and then to follow them and see what else they are interested in. Using information like this and collecting personas can be very helpful data in the long run. Discovering, from lead to customer, what a typical BUYER persona is on social media can greatly alter the strategy a homebuilder can use to target the right audience.
Instagram also offers the unique opportunity to post short video clips. For example, new home builders can use this option to give a tour of a new build or a walk through a construction zone as led by the president of the company herself. These kinds of insider looks help build integrity and emotional connections with those who are serious about their home buying search and are evaluating their options of brands. It is a well-known fact that “[people] are not thinking machines…[but] are feeling machines that think” – so cater to the emotional side of a big decision.
Are you more likely to buy a new home from a builder who has a 10 second video of a woman buying a new house, getting help from the builders to make it just right, and then ending with a soldier in uniform walking up to the door finally seeing his new home or from a brand that isn’t even on Instagram?
These three social media channels have changed the strategy of selling over the past couple of years. Cold calls won’t cut it when your competitor is researching buyer personas based on trends on their own social media sites and is interacting directly with interested consumers from the comfort of their own homes and smartphones.
It’s time to change your strategy and find what works for you. The biggest risk you can take in 2016 is to keep doing what you were doing in 2015.
The Anatomy of an Optimized Marketing Email [Infographic]
For email marketers, the inbox is a battlefield.
Chances are, the folks on your email lists are receiving promotional emails not just from you, but from a lot of different businesses. Whether they open your emails depends on a lot of things, including your subject line, how well they liked your past emails, and so on.
But with 91% of consumers checking email every day, it’s still one of the best places to reach your target audience. To inspire them to open and click through your emails, you’ll need to make sure you’re consistently sending great marketing emails that warrant your recipients’ time and attention.
So, what does a great marketing email include? Check out the infographic below from QuickSprout to learn the anatomy of an optimal marketing email, including how to optimize your subject lines, body content, and calls-to-action.
Download our free guide here to learn how to create awesome email newsletters of your own.

How to Use Photoshop: The Ultimate Photoshop Tutorial for Beginners
When you open Photoshop for the first time, it’s easy to click around in confusion for a minute and then reach for your freelancer’s phone number instead. Trust us, you’re not alone in this.
It’s an incredibly powerful design software with a lot going on, including a wealth of tools that can seem overwhelming at times. But Photoshop isn’t just for the professionals.
With a little help, you can easily teach yourself how to use it to create beautiful, compelling graphics. All it takes is an introduction to core elements — in plain English.
To get you started, we’ve picked 12 of the most useful tools in Photoshop and explained what they do, where to find them, how to use them, and a few tips and tricks for getting the most out of them. We’ve also included some great resources in there in case you’d like to learn about a tool in more depth.
Click here to download our free guide for more do-it-yourself design tips.
Table of Contents
Click on a section name to scroll automatically to that section.
How to Use Adobe Photoshop: A Photoshop Tutorial for Beginners
1) The Layer Tool
What It Does: A layer can be used for an image, text, brush strokes, background colors, patterns, and filters.
I like to think of layers as sheets of glass stacked on top of one another that you’ll use to create a final product. Each sheet can be modified individually without affecting the project as a whole, which can save you tons of time when making edits to individual elements of your graphic.
Image Credit: StackExchange
Layers are by far the most important element of Photoshop — and, in my opinion, they’re one of the reasons many people throw their arms up in frustration. But once you understand how they work, I promise they’ll make your life much easier.
Where It’s Located: It has its own module on the bottom right-hand corner of your Photoshop screen, by default. You can also access it by clicking “Layer” in the top menu bar.
Pro Tip: Always name your layers. Keeping them organized will help keep you sane, especially if you find yourself working on a project with a large number of layers.
To add or delete a layer:
From the top menu bar, choose Layer > New > Layer…
To select a layer:
The selected layer is highlighted in blue. To edit a specific part of your image, you’ll need to select that specific layer.
You’ll also notice there’s an “eye” symbol next to each layer: Click that symbol to turn the eye on and off, thereby toggling the visibility of that layer as you work.
To duplicate a layer:
First, select a layer or group in the Layers panel. Next, either drag the layer or group to the Create a New Layer button, or right-click the layer to choose “Duplicate Layer” or “Duplicate Group.” Enter a name for the layer or group, and click OK.
Pro Tip: You can do all sorts of cool things with layers — and believe it or not, making animated GIFs is one of them. Check out our step-by-step tutorial here.
To learn more about adding, deleting, and duplicating layers in Photoshop, check out this video tutorial.
2) The Color & Swatches Tool
What It Does: The Color and Swatches tool lets you use, modify, copy, and save custom colors for your content. While this may seem like a pretty self-explanatory element, it actually has powerful features that will keep your visual content vibrant and unify your color schemes.
Where It’s Located: It has its own module on the top right-hand corner of your Photoshop screen, by default.
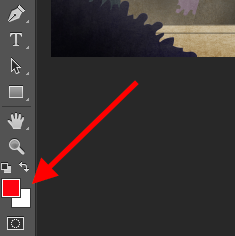
Another place to find the Color tool is at the bottom of the toolbar on the left, indicated by two overlapping boxes:
To create your own custom color:
Open the Color Picker by double-clicking on the top box either in the Color module, or in that menu on the left.
From there, you’ll see a vertical spectrum of color with a slider on it, which you can adjust to create your own custom color. Alternatively, if you already have a specific color of which you know the hex value (i.e. #1fb1ee), then enter it in the appropriate box to find that color automatically. You can also select your color swatch based on RGB or CMYK values.
Any colors you create can be added to your “Swatches” if you click “Add To Swatches.”
Pro Tip: Take your company colors and save them as “Swatches” so that you can reference and reuse them whenever you’re designing your visual content.
3) Custom Fonts & The Text Tool
What It Does: The Text tool lets you add custom fonts to your database, and it gives you access to advanced font settings that give your text some serious style.
Where It’s Located: The toolbar on your left, near the bottom.
Once you click the Text tool icon, all of the settings and font options will pop up at the top of your screen. These settings let you change the font, font size, and spacing between characters, height, width, color, and style. Be sure to select the layer of your desired text to edit it.
To add text to your graphic:
The text tool works like any other text tool you’ve used. Click the “T” icon on the left side bar, drag the text box over any particular area you want text to appear, and you’re set to go.
Whenever you create a text box, Photoshop will generate a layer for it. You can choose the color, size, stroke, font style, and a variety of other options to switch things up.
Pro Tip: While Photoshop offers a wide variety of fonts, you can also install your own fonts. Read this blog post for a list of 35 beautiful fonts you can download for free, and then read this post to learn how to install your new fonts in Photoshop so you can get to using ’em.
To learn more about fonts and the Text tool, check out this video tutorial.
4) Custom Brushes & The Brush Tool
What It Does: Just as with fonts, you can add your own, royalty-free, custom brush tips. With the brush settings, you can change the size, shape, and transparency of your brush strokes to achieve a number of different visual effects.
Brushes are a great way to add some visual accents to your content. Photoshop starts you off with a nice selection of brush tips that you can use to clean up your graphics and create some basic visual effects.
Where It’s Located: The toolbar on the left.
Once you click the Brush tool icon, all of the settings and brush options will pop up at the top of your screen. These settings let you change the brush size, opacity, flow, and so on. You’ll find a variety of pre-installed brush tips, as well as any custom brush tips you install to Photoshop. (You can find royalty-free brushes at www.brusheezy.com if you want to get really creative.)
To use the brush tool:
The brush tool is perfect for adding design accents to your content content. When using the brush tool, I always suggest adding a new layer to work with so you don’t paint over any of your other elements. You can choose colors from your library of swatches, or use a custom color.
Changing the brush settings can give your brush a drastically different look and style. Don’t be afraid to play around a bit with all of your custom brushes.
5) The Select Tool
What It Is: When used correctly, this tool will let you select individual elements, entire graphics, and determines what is copied, cut, and pasted into your graphics.
Where It’s Located: The toolbar on the left.
The Select tool is known as one of the most basic, yet frustrating tools to use in Photoshop. The first thing you should know is that it’ll only work if a layer is highlighted. So, if I want to cut or copy a piece of Layer 4, Layer 4 must be highlighted in my Layer’s tool bar. Highlighted areas are indicated by a flashing dotted line.
Once you remember to pay attention to which layer you are working with, the Select tool becomes much easier to use.
First, highlight your area of choice. Then, simply right-click and decide what you’d like to do from the pull-out menu. For example, you can cut out objects from a current layer and create a layer of your own.
How to select an image to insert into your graphic:
Open the image you’d like to use in Photoshop, and use the Select Tool to determine how much of the image you want to copy. Once you’ve selected the area of the image, simply copy the area.
Next, open the tab for your current project and paste it in as a new layer. Highlight the layer of the object(s) you’d like to select. You can move multiple objects at once by highlighting multiple layers.
Then, right-click your selection, and then you have a few options, including:
A) Choosing “Layer via Copy” to copy the object(s) from this layer and create a layer of its own.
Pro Tip: To select your entire graphic and include all layers, highlight all layers and then use the Select tool. Once you’ve determined the area to copy, use the menu bar at the top and click “Edit” > “Copy Merged.” This will copy the entire graphic so you can paste it as its own layer.
B) Choosing “Free Transform” to scale, rotate, move, and flip your selections. (Refer to the Move tool in the next section of this post if you need more help on this.)
Pro Tip: One really nifty trick you can do with “Free Transform” is to overlay screenshots of a PDF to make a 3D-looking image, like the one below for our introductory Pinterest ebook. You can find a visual overview of the steps below, but read this blog post for the step-by-step tutorial.
To learn more about all the Selection tools available in Photoshop, check out this video tutorial.
6) The Move Tool
What It Does: This is a fairly basic tool that allows you to move individual elements of your graphic.
The Move tool works on individual layers, and on the graphic as a whole — if (remember how to do this?) you highlight all of your layers. It comes in handy when you’re trying to reposition images, text, and other design elements.
Where It’s Located: The toolbar on the left, at the top.
To use the Move tool:
Click the Move Icon from the left hand menu bar and simply drag the object(s) you would like to move. To move all objects in one layer, simply highlight the layer and use the Move tool. You can also right click the object for additional options.
To scale, rotate, move, and flip things:
The Free Transform tool lets you scale, rotate, move, and flip any element in your select layer or layers. Use the shortcut CTRL + T or Command + T (for Macs) to initiate Free Transform, and check out the options that pop up at the top of your screen. Hold the SHIFT key while transforming to maintain the proportions of your elements.
7) The Zoom Tool
What It Does: The Zoom tool lets you zoom in close to certain areas of an image, and zoom out to get more of a bird’s eye view of what’s happening.
Where It’s Located: In the top menu bar, choose View > Zoom In or View > Zoom Out.
To use the Zoom tool:
Either select the zoom options from the “View” menu (as shown above). To use the keyboard shortcut, hold ALT (PC) or Command (Mac) and press + to zoom in, and ALT (PC) or Command (Mac) and press – to zoom out.
8) The Eraser
What It Does: The Basic Eraser functions a lot like the brush tool. You can change the size and hardness of the eraser tip to achieve a variety of effects, like blending and fades. The Background Eraser uses differences in color to help you erase unwanted background areas from your images.
The eraser is one of the most useful tools in Photoshop. Yes, I understand it’s technically just an eraser, but you’ve never used an eraser like this.
Where It’s Located: The toolbar on the left.
To use the Basic Eraser:
Once you click the Eraser icon, all of the settings will pop up at the top of your screen. These settings let you change the eraser size, hardness, and other aspects of the tool.
Like most tools in Photoshop, the eraser works only on a specifically selected layer. Make sure you’ve got the layer you want selected before you start erasing.
To use the Background Eraser:
This tool is a time-saving wonder. You can see how easily it eliminates background colors from images. This is especially helpful if you need an object with a transparent background.
To use the Background Eraser, click and hold the eraser icon until the slide out menu appears. Choose “Background Eraser.”
Now you’re ready to do some serious erasing. Adjust the size of the Background Eraser, and simply click the color you would like deleted from the selected layer. Remember to select the layer you want to erase on.
Pro Tip: Don’t be afraid to use an oversized eraser tip for the Background Eraser. Since it works by removing particular colors from the image, it won’t erase colors that aren’t selected.
To learn more about how to remove the background of a photo in Photoshop or PowerPoint, check out this step-by-step tutorial.
9) The Crop Tool
What It Does: The Crop tool lets you crop an image. It works like any crop tool you’ve ever encountered: Simply choose your area and crop it out.
I know this is a basic tool, but you’ll find yourself using this just as often as any other tool in Photoshop, especially when you’ve completed your graphic and need to clean up some of the free space around the edges.
Where It’s Located: The toolbar on the left.
To use the Crop tool:
Select the icon indicated in the screenshot from the side menu bar, and drag the box over the area you would like to crop. To adjust the crop box, simply click and drag the small anchor boxes on the sides and corners of the crop box.
Pro Tip: You can make your canvas size larger than it needs to be so that you can give yourself more room to move your design elements, and crop it down to the proper size afterwards.
Read this blog post to learn how to crop images in Photoshop to a specific ratio. If you want to learn some cropping tricks — like how to rotate an image using the Crop tool — then check out this article from Digital Photography School.
10) The Fill Tool
What It Does: The Fill tool, formerly the Paint Bucket tool, fills any solid area with the color of your choice. It’s great for solid backgrounds or coloring large areas. It can also be used to apply patterns to your images. The Gradient tool within the Fill tool lets you create a nice, faded background effect of the color of your choice.
Where It’s Located: On the top menu bar, choose Layer > New Fill Layer. From there, you have the option to choose “Solid Color,” “Gradient,” or “Pattern.”
To fill a solid area with a color:
First, select the layer you’d like to fill with a solid color. Then, from the top menu bar, choose Layer > New Fill Layer > Solid Color… From there, a “New Layer” window will pop up and prompt you to name the new color fill layer. Don’t worry about choosing the color you want right then and there — simply name the layer and press “OK.”
Next, the Color Picker window will pop up. Here, you can choose which solid color you’d like to fill. Since I’d selected my background layer to fill in (i.e. the color of the sky in my graphic), the color I select in the Color Picker dictates the color of the sky:
To apply patterns to your images:
These patterns can be manually created if you have the time and patience, or you can find a variety of royalty-free patterns available for download through a basic Google search.
To apply a pattern, first select the layer you’d like to fill with a pattern. Then, from the top menu bar, choose Layer > New Fill Layer > Pattern... From there, a “New Layer” window will pop up and prompt you to name the new color fill layer. Don’t worry about choosing the color you want right then and there — simply name the layer and press “OK.”
Next, you’ll see the “Pattern Fill” window pop up. From there, you can choose the pattern and its scale. Since I’d selected my background layer to fill in (i.e. the color of the sky in my graphic), the pattern I select in the Pattern Fill changes the sky:
To use the Gradient tool:
To apply a gradient, first select the layer you’d like to fill with a pattern. Then, from the top menu bar, choose Layer > New Fill Layer > Gradient... From there, a “New Layer” window will pop up and prompt you to name the new color fill layer. Don’t worry about choosing the color you want right then and there — simply name the layer and press “OK.”
Next, a “Gradient Fill” window will pop up. Play around with these options, including the style, angle, and scale. To choose a different gradient than the one offered by default, click the arrow on the right-hand side of the default gradient to open the Gradient Editor, shown below:
11) The Eyedropper
What It Does: This handy little tool lets you extract and use any color from any image in Photoshop.
Where It’s Located: The toolbar on the left.
To use the Eyedropper tool:
Select the icon from the sidebar. Next, locate that color you would like to extract, and simply click that area to clone the color.
Once you’ve extracted the color, you’ll see it indicated both in the Color module at the top right of your screen, as well as the bottom of the left sidebar. You can double-click that color box to bring up the advanced color picker, where you can then adjust and save the color to a swatch for future use.
12) Blending Options
What It Does: Blending options include quite a number of features to enhance the look or your graphic. For example, you can use the “Outer Glow” effect to make letters appear like they’re glowing. Or you can use the “Drop Shadow” effect to add a shadow to your letters. Take some time to play around with all the layer effects and find out which ones tickle your fancy.
Where It’s Located: From the top menu bar, choose Layer > Layer Style > Blending Options… You can also double-click any layer to bring up the options for that particular layer.
To use Blending Options:
First, select the layer you want to apply your blending options and effects to. Then, open up your blending options and choose the one you’d like to apply. With the variety of options available, you can achieve a number of great effects to finalize your graphics. Have fun with these and experiment on different layers, images, and texts. Here’s a look at what’s offered:
For example, in the image below, I selected my text layer and chose “Bevel & Emboss.” Looks pretty cool, eh?
Before we send you on your way, it’s worth noting that if you’re working with a limited budget and a tight schedule, you can save yourself tons of time and money by using free, royalty-free stock photos. Here’s a list of 17 of the best free stock photo sites you can look through.
Also, Photoshop offers a number of really helpful keyboard shortcuts for things like zooming in and out, changing canvas size, creating a new layer, and so on. Check out this blog post for a full list, including shortcuts for some of the tools mentioned above.
Now, it wouldn’t be realistic to guarantee that you’d be a Photoshop wiz at this point — but that isn’t what this guide designed to do. We hope we’ve provided you with the understanding you’ll need to use the powerful tools in Photoshop in a timely, efficient, non-hair-pulling manner, so that you can elevate your visual content game, like, today.
Happy Photoshopping!
What other Photoshop tips do you have to share — whether they’re for beginners, for more advanced users, or anywhere in between?
Editor’s Note: This post was originally published in January 2013 and has been updated for freshness, accuracy, and comprehensiveness.
Conquering the Free Shipping Conundrum: How to Make Money Without Forfeiting Margins
Millennials are discount-hungry. Blame it on the economy in which they launched their careers or attribute it to their digitally savvy shopping habits. Either way, a new report from Mindshare North America shows that this generation will do just about anything to buy goods at the lowest possible cost. Just look at these stats for proof:
- 47% of millennials will purposely leave items in their shopping cart in hopes that the retailer will reach out with a promotion.
- 39% of millennials clear their online search history to get better prices from online sellers.
- 26% of millennials have purposely entered a fake birth date to receive a discount.
- 70% of millennials search for promo codes online before purchasing.
Another study conducted jointly by Forbes and Elite Daily mimicked similar findings, and found that 57% of millennials report they will not change their spending habits.
Millennials Move Towards Mobile
But there’s more: Millennials are also depending on their mobile devices as necessary comparison tools when shopping both in-store and online. Continuous access to the internet allows 59% of shoppers to simultaneously search competitor’s product listings or even access barcode scanner apps to find the same product for the cheapest possible price online. And, with 66% of millennials using new mobile payment services, the process of mobile purchasing isn’t only seamless — it’s becoming commonplace.
This shift in consumer shopping habits (increasingly ecommerce, and even within that segment, increasingly mobile), has forced many retailers to pivot their pricing and marketing strategies. And top of the list for most online stores is free shipping –– and the ability to offer it, or not.
The Free Shipping Question
For many retailers, free shipping simply cuts too far into their margins, eliminating any possibility of profitability. Even Amazon is among those –– the company reported net shipping costs were more than $1 billion per quarter in 2014. Amazon made a strategic decision to subsidize shipping heavily as part of their growth strategy.
And in the ecommerce industry, when one behemoth brand does something the consumers like, most others must follow suit. Indeed, consumer perception of shipping costs now weighs heavily on their purchasing decision. Pitney Bowes published their 2015 Holiday Shipping Survey and it makes for an interesting read. Here are some of the more relevant and poignant points:
- 93% of consumers say shipping options are an important factor in their online shopping experience (up a massive 24% from 2014)
- 88% said that free shipping with 5-7 day delivery time is more attractive than paying a fee for 1-2 day faster delivery
- 3 in 5 consumers have increased their total spend in the past to qualify for free shipping
- 68% have used a free shipping coupon code
In all, free shipping has essentially become a marketing tactic to help you close sales. Below are tips from shipping expert Karen Baker on how you can use free shipping as a marketing channel, while still maintaining your margins.
1) Consider Your Industry
As a merchant, you need to think about your market sector, your competition and the space in which you play. You might not need free shipping. This is especially true in the B2B space, where what might be more important is accurate dimensional based pricing.
If you have loyal customers, they will appreciate you passing on your negotiated rates to them and giving them the choice over urgency of delivery. If you are competing based on product price, then it may be that you have no ability to absorb free shipping costs. It’s all about information accuracy, and using multiple carriers where required so you can offer the best and cheapest service.
Be transparent, be honest. Customers appreciate it.
2) Offer Free Shipping to Limited Regions
As a starter, in the U.S. you should limit free shipping to the U.S. 48 contiguous states. Alaska, Hawaii, Puerto Rico –– sorry, you are out of luck. People in those places expect to pay extra for shipping.
APOs and PO Boxes are other areas for which you can switch off free shipping. If you take a look at Jet.com, they follow this policy. Copy it.
3) Surcharge Your Expedited Rates
We know how this works. We go to a store advertising free shipping. We shop. Then, we get to checkout and find out it’s going to take 10 days to deliver. Amazon is the master of this. They will purposely hold the shipment back for a few days if its free.
The reasoning is that, by this point, we are committed to the sale. We’ll then think, “Oh, another $10 bucks I could get this faster.” This is where your opportunity lies. Surcharge the expedited. There will be a segment of customers (especially as the holidays get closer) that will pay extra to get it faster. This surcharge can offset the free shipping you are offering other customers.
4) Take a Monthly View
Some merchants want to look at every single order and ensure they make a profit. In some cases, that’s necessary. In most cases, taking a monthly view is a better option.
You win some, you lose some. It’s an iterative process. You should understand your shipping rules and be able to correlate what’s happening with your charges against your own policy. At the end of the month –– are you happy with the results?
5) Show Delivery Time
People are becoming more and more impatient. And, more and more used to having readily available information. Having an estimated number of delivery days, or an expected delivery date, is becoming more important.
Once you have that, you can then have more leverage around upselling faster services. Remember: people are much less tolerant now, and they have greater choice to shop elsewhere.
6) Offer Free Shipping After Conditions Met
Try pushing up your minimum order price to qualify for free shipping. Does it affect sales? Maybe. Run an A/B test to see what the impact is.
You can advertise free shipping on your site, but qualify that it only applies on your small goods, a certain category or maybe you want to just offer it on your big ticket items. Free shipping on your site doesn’t have to be universal.
7) Use Promotions
We all love a promotion. Does it need to be free shipping? Maybe you publish list rates for UPS, but then offer 20% shipping discount to your returning customers via an email campaign. Or, just charge shipping on the highest value goods. For example, if I buy a kayak, I might pay shipping for that, but any other goods in the store ship for free. There are many, many combinations you can do here which give customer reward and encourage a higher dollar price.
The New York Times Gives Us a Lesson in Community-Building
When you read an article on the New York Times, the experience doesn’t stop at the end of the article. Keep scrolling down, and you’ll find some of the most thoughtful comments that you’ll ever see on a news site.
Since the publisher’s earliest days online, The New York Times has been well-known for its robust online community. It’s one of the few news sources known for sparking rich conversations—and where audiences care enough to chime in and share their thoughts.
In terms of building a digital community, few publishers have ventured into territory that The New York Times has. Many media companies will install a commenting plug-in–and leave their community strategy at that.
But an online community is more than just a ‘feature.’ As The New York Times example reveals, an on-site community can quickly become a core part of your brand’s experience. It’s also something that you can monetize, grow, and utilize to build your long-term revenue strategy.
Why?
The heart of community is engagement, and media companies that are able to inspire just that will have a competitive edge in tomorrow’s landscape. Here’s what we can learn from the New York Times—one of the earliest pioneers in digital community-building.
Loyalty Pays Off in the Long Run
A competitive advantage that the Times has is that its readers are loyal. While many media companies focus on attracting as many unique visitors as possible, The New York Times has created an on-site experience that emphasizes engagement. In addition to high-quality content, the site’s community and commenting features are a core part of this experience.
What’s interesting to note is that, as of 2015, the Times has surpassed 1M paid digital subscribers, and 12% of its readers deliver 90% of its digital revenue. This number represents a stark contrast to the media industry at large: data from HubSpot’s recent Benchmarks report points out that only 10.9% of surveyed media companies cite subscriptions as their greatest source of revenue.
You can download the full report here >>
With this foundation, growth remains an important priority for the Times. Rather than doubling down on attracting more eyeballs, the company is focused on on bringing new audiences into the community. Loyalty has and will continue to play an important role in the media leader’s monetization strategy.
User Experiences Need Upfront Planning
The importance of mobile in digital publishing is self-evident. But few companies have a strategy in place to deliver a comprehensive, cohesive mobile-experience. This article in AdAge has a good discussion on the topic and challenge and cites the Times as an example case study.
According to ComScore, mobile constituted 60% of time spent on digital, representing a 53% increase in 2013. At the Times, for instance, more than half of its digital audience comes from mobile, but only 10% of its digital ad revenue comes from these devices.
Like many companies in the media industry, the Times still has a long way to go. But the company has realized that a strong community-experience will be important to the solution. Just take a look at the company’s ‘new subscribers’ landing page as inspiration: the #1 value proposition that the media leader emphasizes is its cross-platform capabilities. Readers can create their own personalized journalism from any device. Even more importantly, readers can chime into and actively steer conversations on the site.
The Times has taken careful time to research the needs of its audience base and map out a user experience that meets those needs, exactly. Its community plays a central role in that vision.
Experimentation Is Crucial
What does the strong community features of the New York Times have to do with your own monetization and growth strategy?
This question is tough to answer. According to HubSpot’s recent Digital Publishing Benchmarks report, media companies are dealing with extreme option overload, with media companies making a range of investments in different marketing practices.
The key takeaway from this trend is that publishers are still deciding where to dedicate their efforts. Publishers who have stuck to the status quo are now re-evaluating their monetization streams and advertiser value.
Now is a better time than ever to experiment. With the publishing industry in flux, the smartest minds in the space are carving out new revenue opportunities. The most important trend that’s surfacing? Everyone is on equal footing to find their own, potentially game changing, opportunities.
In Keeping With The Times…
When building your own digital communities, don’t be afraid to think out of the box and test opportunities that are unique to your unique audience and media ecosystem. A crucial first step is to understand what your audiences care about and find example communities that they’re engaging in. Are they B2B readers who are spending time on Inbound.org, as an example? What features are they using, and what features are they passing over? This research will be crucial to the success from your future campaigns.
Take a lesson from the New York Times, and don’t be afraid to build a completely new solution from the ground up. Be patient, and commit to change for the long-haul.
The Secrets to Becoming a Radically Honest, Passionate & Audacious Leader [Podcast]
Kai Kight doesn’t have a typical career path.
He began learning violin at just three years old. Because of his incredible talent and dedication, he went on to perform all over the world in places like the White House and the Great Wall of China.
Then, he decided to pivot.
He earned an engineering degree from Stanford University’s d.school, where he was entrenched in the entrepreneurship community of Silicon Valley.
Today, he’s used these diverse experiences to build a new career: teaching people at top companies like Disney and Coca-Cola how to become better leaders and managers.
On this episode of The Growth Show, we sit down with Kai to learn his secrets to becoming an insanely honest leader, building (and sticking to) healthy habits, and growing a career around your passions.
Click the play button below to listen to this episode in your browser, or subscribe on iTunes to download episodes directly to your phone:
Check out the latest recaps of The Growth Show episodes by clicking here.
Linking Instagram to Your Company Facebook Page [Quick Tip]
Visual content garners the most interactions on social media, so being able to share this content across multiple platforms is a must.
One of the best ways to achieve this is by linking your Instagram account to your company’s Facebook Page. Let’s jump into how you can accomplish this connection for your social media accounts.
Posting from Instagram to Your Company Facebook Page Timeline
On Instagram, sharing your posts with your company Facebook Page rather than your personal profile is a matter of changing your settings. By default, Instagram shares images with your personal Facebook profile when you connect Facebook to your Instagram account.
Your first step is to go to Instagram account on your phone (in this case, an Android) and select the profile icon in the lower right corner. Then select the 3 vertical dots in the upper right corner to get to the Settings area.
From there, scroll down to the Linked Accounts section.
Then, you will see the social accounts that you have linked. Select Facebook.
You’ll be able to select either your personal profile or any page that you are an administrator of. Your selection will be the place you want your Instagram pictures to go when you select Facebook in a post. In this case, we are selecting to use the company’s Facebook page.
Now, whenever you take a picture and select Facebook, it will go to your company page instead. Here we selected TSL Marketing.
Remember that if you only want SOME pictures to go to your company page and others to go to your personal profile, you have to toggle back and forth every time. You can also set up a specific Instagram account for your company.
You’ll follow the same steps to link the accounts. If you have a personal account and a company account on Instagram then you’ll need to log in and out to post to one or the other.
And that’s it! Now, you can go back to your Share Settings and confirm that the business page you selected is now the appropriate page that you wanted to post to.
Choosing to link Instagram to a Facebook business page allows you to bring strong visuals to multiple platforms with a few simple clicks. It can also give you the opportunity to showcase a little bit of the personal side of your business, which can go a long way with engaging your target audience.
How to Launch a New Product: A 7-Step Checklist for Nailing Your Next Launch [SlideShare]
Like a tree falling in the woods, if you launch a product without spreading the word … will anyone use it? Will anyone even want it?
Probably not. Whether you’re launching something huge, something small, or you’re updating a current offering, you’ll want to start your preparation well in advance of the launch date. This includes nailing down your positioning and messaging, sharing that with key teams and stakeholders, listing out all the launch activities, creating assets and content, prepping everyone involved in the launch, and so on.
There are a lot of moving parts here. To help you make your next product launch successful, Drifft created the SlideShare below. It includes a checklist covering everything from the very beginning stages of customer research, all the way to the launch date itself. Check it out to learn how you can drive demand for the products you launch.