What is a Media Mix & The Most Effective Types [HubSpot Blog Data]
I’m willing to bet that today, the typical campaign at any brand uses a media mix.
This refers to the process of using multiple channels to meet marketing goals. The question is, how exactly does it help brands better plan campaigns?

Let’s dive into how it works, review some stats, and see some brand examples.
A media mix is another term for an overview of the channels businesses choose to execute their marketing strategies on. Ultimately, media mix optimization is the process of analyzing the performance of those channels.
Think about the last campaign you saw from one of your favorite brands. What did they do differently that really clicked with you? By incorporating a media mix into your yearly planning, you can narrow down what resonates with your audience.
Media Mix Example
To see how a media mix works for a campaign, let’s use makeup brand The Lip Bar’s latest campaign: “Something BAWSE is coming.”
To build anticipation around its latest product launch and celebrate its 10-year company anniversary, The Lip Bar launched a multi-channel campaign that reached audiences both online and offline.
First up, website.
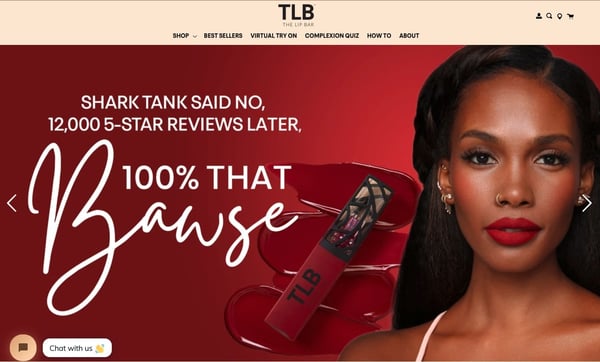
When you land on the brand’s homepage, you’ll see an image of the CEO with the following sentence “Shark Tank said no, 12,000 5-star reviews later, 100% that bawse.”
Upon clicking on the image, you’ll arrive at a landing page that has a timeline of the brand. From launching in 2012, to opening its flagship store in 2019, then expanding to 1500+ stores in 2021. Once you get to 2022, you see the tagline “Something Bawse is Coming.”
As you continue scrolling, you reach a section that offers a launch date and time for the brand’s newest product.
The second digital channel the brand leveraged for this campaign is YouTube, publishing a 45-second video showing the CEO’s journey over the last 10 years.
Moving offline, the brand also published billboards in five cities to continue the campaign.
Note how the billboard didn’t use the tagline we saw on social media platforms.
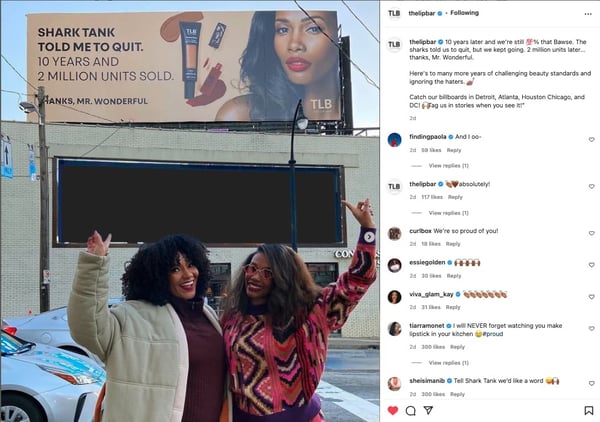
The benefit of using a media mix is to leverage different strategies to see which tactics work and lead to better conversions.
The Lip Bar’s latest campaign is a great example of how any brand can leverage channels differently to reach the same marketing goal.
Media Mix Stats in 2022
In January 2022, we surveyed over 600 media planners to discover their strategies, goals, and challenges. Here are some interesting findings:
- 84% of media planners surveyed leverage a mix of organic and paid media.
- Email marketing is the most leveraged media channel, used by 1 in 2 media planners.
- 41% of media planners surveyed will change their media mix in 2022, while 45% will keep it the same.
- 14% of media planners currently leverage non-fungible tokens (NFTs) while 16% plan to use them for the first time in 2022.
- 39% of those who use NFTs in their media planning say they have the best ROI of any channel in their media mix.
- 39% of marketers surveyed say determining the most effective media mix is the biggest challenge of media planning.
Media Mix Optimization
Media mix optimization provides businesses with an understanding of how their messages are coming across to customers. It allows a brand to invest more time and money into marketing strategies that are best suited for their audiences.
Marketers might consider optimizing their media mix if they want to gain some helpful insight into what time and capital is needed to target their audience in a way that gives customers a personalized experience.
But, while media mix optimization is a powerful opportunity for methodizing data collection online, it’s not the best strategy for marketers who employ a lot of traditional marketing techniques, since you can’t really measure the success of a billboard or newspaper ad.
However, to make guided decisions such as what font to use in creative design, when to publish social media posts on various channels, or where to invest resources, this method can be helpful.
Optimizing a media mix means looking at the analytics and ROI of various marketing strategies. This can be anything from engagement data of social media platforms to views on the newest commercial.
That’s where media mix modeling comes in. If media mix optimization is the “what,” modeling is the “how.” Every model can (and should) look different, depending on your marketing and broader business goal.
Media mix models can be used to analyze the relationship between a dependent variable and an independent variable.
For instance, let’s say a business has a question like, “How did paying for a sponsored tweet affect overall blog traffic?” The business’s media mix model should then accurately depict how a dependent variable – like overall blog traffic – relates to an independent variable, such as investing in Twitter.
For businesses still deciding if a media mix optimization is a good idea for them, we’ve put together key tips to guide you when creating a media mix model. Let’s explore those, next.
Tips for Optimizing Your Media Mix
1. Collect personal level data.
The goal here is to find and focus on analytics that will help provide an accurate picture of how customers engage with your media mix.
Analytics software is expansive and offers an array of tools for use. If you’re in the market for one, the HubSpot Marketing Hub is a great place to go.
Having too many metrics can be confusing and lead to inaccurate data. The best plan is to have an idea of which metrics need to be tracked so they can be right at the beginning.
A normal media mix optimization process can take anywhere from a few months to a year. So, collecting the right information at the beginning contributes to getting the most accurate information overall.
2. Have a robust reporting process.
When using a media mix, you often combine online and offline strategies. With this in mind, it can be more difficult to measure the impact of a billboard compared to a paid social ad.
That means you’ll have to think outside of the box when evaluating your media mix. For instance, while an online ad will have clear conversion rates you can find, a billboard may require some creative tracking.
Perhaps, you can track the uptick in branded search volume or improved brand recall.
This requires having a robust reporting process that accounts for the events you’ll be tracking – both online and offline.
3. Choose the right platform.
Marketing teams that use CMS or analytics software are already ahead of the game. Software like this is essential to optimizing a media mix because it can give you numbers that would otherwise take some time to figure out manually.
A brand can analyze its media mix with the use of platforms that collect engagement data in real-time and compile that data into tracking reports.
Look for a platform that can give a holistic view of results across the board, so results will maintain consistency. It’s also good to choose software that specializes in the marketing channels being used at the time.
Because optimizing is measuring a lot of different data at once, stick to as few systems as possible.
For businesses that are in the market for a CMS, HubSpot offers tools that are easy to use for brands of any size.
4. Analyze the data.
We’ve been talking a lot about the kind of data and analyzing that needs to be done in a media mix optimization, but another important factor is being able to interpret and understand that data.
It’s no secret that in the marketing world, there is an abundance of processes and acronyms floating around. While first getting into the groove of understanding them and what they mean can be intimidating, it’s important to know the data being collected and how to use it to your advantage.
For instance, if a marketing team had especially high click-to-open rates for weekly newsletters, that’s useful information to infer that the next campaign could benefit greatly from an email-marketing rollout. Alternatively, if a marketing team has no idea what a click-to-open rate is, those numbers aren’t going to be helpful — just a little confusing.
Reading data to understand its usefulness is just as important as collecting it.
5. Consider public perception.
Knowing how the public perceives your brand can help fill in some interpretation gaps during the modeling process. In the media mix model, think about how to fit in customer opinion. That way, the numbers will have some customer opinions to define them.
There are a couple of ways to do this.
To better understand your brand perception, monitor your brand mentions on social media. Take note of the positives, the negatives, and the questions. You can also create a survey to know how your customers feel about your company and its services and use a net promoter score.
An NPS asks customers how likely they are to recommend a business to a friend. Knowing this will aid in figuring out how a business fares among the competition in the market. It will also assist in future marketing endeavors.
For instance, if customers fill out your survey and ask for more personalized Instagram stories, your team could take that knowledge and include it in your next campaign.
This method ultimately gives the media mix optimization reigns to the customer.
Media mix optimization can help your marketing team figure out which distribution channels will best promote an upcoming campaign, and can ultimately help strengthen your marketing strategy as a whole.
Editor’s Note: This post was originally published in Feb. 2020 and has been updated for comprehensiveness.

3 Instagram Video Formats You Should Leverage in 2022 [Data from 500+ Marketers]
As a marketer, you’ve probably wondered which Instagram video format would perform the best for your audience.
To help you, we asked consumers what type of video formats they watch the most. Plus, we surveyed marketers to discover their Instagram marketing strategies.

You’ll also learn what video format users like to watch on Instagram as well as the size, length, and aspect ratio you should be using.
How Marketers are Leveraging Video on Instagram
In 2021, we surveyed over 1,000 global marketers to understand which trends they currently (and plan to) leverage.
The first thing that stood out to us is that marketers who leverage video content on Instagram are 16% more likely to say their Instagram strategy was effective last year.
We also found that 82% of marketers post video content on Instagram and the content formats they use most are video-based.
The main difference we see in how marketers use video versus other content formats on Instagram is that they use humor more in video and market products and services less.
As for the platform’s features, marketers surveyed say posting videos offers the highest engagement level and the highest ROI, more than images and live streaming.
We know that short-form video is at the peak of its popularity on platforms like Instagram and TikTok and that could play a role in how popular video is. In fact, 85% of marketers say short-form is the most effective video style they leverage.
With that said, only one in four marketers use Reels. At the time marketers were surveyed, they said it offered one of the lowest ROI. However, it’s still a feature they plan to invest in this new year.
Now that we know how marketers are thinking of video, let’s switch to the consumer perspective.
Best Video Format for Instagram
Currently, Instagram offers three video formats:
- In-feed
- Reel
- Stories
Back in June 2021, we surveyed more than 300 consumers to discover which video formats they watch the most. 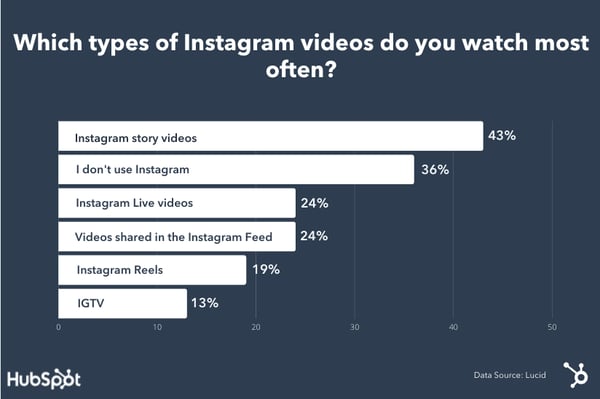
Ultimately, Instagram Story videos were the most popular video format to watch on the social media site, with 43% of those surveyed watching this type of video content the most.
Besides survey respondents who didn’t use Instagram, the next highest video format to watch were live videos and then videos shared directly in the feed.
The least popular video format was IGTV, which was discontinued in October, a few months after this survey.
Now that we know how consumers and marketers are behaving, let’s find out how you can post the best video content on Instagram.
This is the proper video quality for a post on the Instagram feed. It will look something like the screenshot below.

For an Instagram Story or Reel, the video should be 1080 x 1080 pixels, with an aspect ratio of 9:16. The maximum file size should be 250MB.
It will look something like this:

While these are the main types of videos to upload on Instagram, you can explore other spec requirements on the Instagram site.
While all these stats are important, one of the ways to keep file size down is to shorten the video. You can’t just upload 24 hours of video content on the platform.
Now you might be wondering, “How long can my Instagram videos be?” Let’s dive in below.
How Long Can Instagram Videos Be?
Instagram videos are a great way to reach Gen Z or millennial audiences. However, it’s important to think about the type of video content that performs best on the platform.
Additionally, knowing the right size and video specifications before filming your videos can help you reach success quicker.
Editor’s Note: This post was originally published in June 2021 and has been updated for comprehensiveness.


How to Be an Amazing Mentor in 10 Ways, according to HubSpot Managers
Take a minute to think about the best mentor you’ve ever had. It could be your manager, a colleague, a parent, a friend, a coach, a college professor.
Then, you reach a point in your life where you have the chance to do the same for someone else. It can be both exciting, and a little confusing.

In this article, you’ll get tips from both mentors and mentees on what it takes to foster this successful relationship.
What does it mean to be a mentor?
At its core, being a mentor is being a trusted advisor. It all boils down to making yourself available to support and advise someone when they need it, delivering that support in a way that makes sense to them, and always keeping that person’s best interests in mind.
So, what value does a mentor bring? It depends on who you ask.
For Vrnda LeValley, customer training manager at HubSpot, it’s a shift in perspective.
“My mentor provides a perspective that isn’t riddled with the same self-doubt and stereotype sensitivities that I desperately want to avoid and handicap me,” she says, “and a broader view of the implications of action versus inaction because they have a better vantage point from their upstream position within the company.”
She adds that her mentor has been able to step in and correct narratives that muddy her ability to make the most strategic decisions.
For Legal Specialist at HubSpot Jason Perry, one of the benefits of mentorship is the opportunity to extend your network.
“I most value the trust and confidence they extend to me by granting me access and recommending me to their broader networks,” he said.
Beyond that, there’s a certain freedom that comes with having a mentor.
“I think it allows for an open space to be vulnerable with someone who is more senior in their career but does not have direct control over your career growth,” said Chloe Washington, chief of staff to the CMO at HubSpot. “You can be more transparent and ask questions you may not feel comfortable asking your manager or another co-worker.”
With that said, the mentorship doesn’t just benefit the mentee, it’s a two-sided relationship.
“I am constantly inspired by what my mentees are doing, their ambition, and their goals,” Washington said. “It motivates me as I continue along my career journey. It also allows me to form relationships with people that I may have not otherwise been able to speak with as much or as often.”
1. Understand what you want out of the relationship.
As we’ve mentioned, mentorship isn’t a one-way relationship. This means that just like the mentee, you should know the type of relationship you’re seeking and what you want to gain.
Charlene Strain, marketing manager at HubSpot, serves as a mentor and suggests asking yourself these questions to get started:
- Do you view it as a two-way street, player-coach relationship where you learn from them as much as they learn from you or something else?
- How can you sharpen your area of expertise?
- Do they have connections or gaps of knowledge for you as well?
- How does taking on a mentorship role strengthen you as a leader in your personal and professional life?
Knowing these answers will help you frame your mentorship strategy and start with clear intentions.
2. Set expectations together in the very beginning.
Once you know what you want out of the relationship as a mentor, setting expectations is the next natural step.
Every mentor-mentee relationship is unique. So, when you first start out, discuss expectations with your mentee and determine if you’re ready for that commitment.
“Everyone works and receives feedback differently, so it’s important to understand if the relationship is a fit for both parties [based] on what they’re looking for,” said Strain.
Here’s what Strain recommends discussing:
- Is there a time limit on when the mentorship ends?
- How often should you meet, and why?
- What resources can the mentor provide for the mentee to do some work on their own?
- What metrics are being used to measure success?
- How hands-on should the mentor be?
You should come to these answers as a duo and it’s OK if it takes a little bit to figure it out. The time you put in at the beginning will pay off in the long term.
Some expectations are pretty straightforward, Perry says: professionalism, punctuality, clear communication, and organization. However, some expectations will be shaped by the mentee.
“A mentee should be able to tell me as the mentor exactly what they’d like me to do for them, whether it ‘s to provide information, make an introduction, write a recommendation or provide advice,” says Perry. “The relationship is theirs to shape and build and that starts with a clear, direct ask of some sort.”
When Washington works with mentees, her first session focuses on goal setting, setting up a meeting cadence, and discussing ground rules.
“For example, if there is a big topic to discuss, I request that they give me a heads up a few days before so that I can come fully prepared to discuss my point of view and not waste their time formulating my thoughts on the fly,” she said.
From there, she creates a running agenda doc to keep track of notes and have a place they can refer back to once the mentorship ends.
3. Take a genuine interest in your mentee as a person.
A mentor/mentee relationship is a very personal one.
You can give mediocre advice without really knowing a person, but to stand out as an amazing mentor, you’re really going to have to get to know your mentee on a personal level.
You probably have some of the more career-oriented questions down: what their working style is, their dream job, goals for their current job, and so on and so forth. But what about the stuff that makes them … them?
Getting to know your mentee on a deeper level will help you build a strong relationship, and it’ll also help you understand who they are as a person and how they interact with others, and so on.
One great way to get to know someone? Become an active listener. This is easier said than done: It means making a conscious effort to really, truly pay attention to what your mentee is saying, instead of thinking about what you’re going to say next.
“Two traits that are helpful for someone to be a successful mentor are good listening skills and the ability to connect like-minded people,” said Strain. “Our professional lives are not in a silo, they’re a web. So, anyway I can truly listen to a mentee’s goals, their journey, and where they see themselves will help me connect them with other people or businesses with the same mission.”
You might worry that you need to come up with something helpful right away, when in fact, the best thing you can do for your mentee is to listen closely to what they’re saying, ask open questions to dig deeper and act as a sounding board.
4. Build trust.
In the last section, we stressed the vulnerability that comes with mentorship. To continue fostering a safe environment in which your mentee can share their concerns and challenges, you need to build trust.
That can happen in a few different ways. For Solutions Engineer at HubSpot Jeremy Sagaille, it’s transparency.
“I feel like I can really be myself in front of my mentor and I don’t feel like I have to do the typical corporate political BS,” he said, “which is something that I’ve definitely had to tiptoe through in the past and haven’t done well with.”
For LeValley, it’s the ability to see beyond the circumstance to assess the core issues, challenges, and opportunities.
“Those can get cloudy when you are on the road to a destination you have never visited before,” she says. “It makes all the difference when avoiding pitfalls and finding solid shortcuts.”
She adds that truth-telling is another valuable trait in a mentor.
“Many people haven’t been given the hard messages required for growth, due to lack of investment or lack of courage from those around them,” she says. “Personally, the best thing my mentor told me was to check in with my growth mindset and read a book. Not what I wanted to hear but it was 100% what I needed to hear.”
Once you build trust with your mentee, your relationship will be able to go that much deeper.
5. Know when to give advice.
When you’re mentoring someone, you might feel pressured to give them advice straight away. But not all feedback is helpful feedback, and knowing the difference is key.
A good mentor knows when to hit ‘pause’ during a conversation, says Rebecca Corliss, former director of marketing at HubSpot.
“If you don’t have the right information, experience, or emotional state to react to a scenario properly, hit ‘pause,” she said. “That will give you a chance to get more information, talk to your resources, and come back with a clear and valuable response.”
Here’s what that might look like in a real conversation.
“Thanks for sharing this with me. I’m going to take some time and give this some serious thought before we continue. It’s important to me that I’m giving you the best possible solution. Why don’t we continue talking about it [tomorrow/next week/next time we meet]? I’ll book some time.”
6. Don’t assume anything about your mentee – ask.
Biases cloud our judgment whether we realize it or not. While we can work to uncover and dismantle them, some are so ingrained that they peak out without us realizing it.
To combat this issue with your mentee, breakthrough common assumptions by asking questions and digging deeper. This is especially important if you’re mentoring someone who’s in the early stages of their career
Say you’re mentoring someone who’s having trouble getting through to their manager. Instead of launching into a story about a time you had communication issues with a manager of yours, spend time asking questions that draw out the important details of their problem.
“Your job is to facilitate advancement and movement, not just chat,” says LeValley. “Your words can change their lives so you must choose them carefully.”
Only once you’ve gotten an honest background on a problem can you share helpful, relevant feedback – without making decisions for your mentee.
7. Share your journey.
Being open to sharing your own mistakes and failures is one of the best gifts a mentor can give.
Not only is it helpful information for problem-solving purposes, but it also builds trust and strengthens the relationship.
“Junior employees don’t always feel comfortable owning up to a mistake or admitting that they’re struggling in a certain area,” says former Managing Director at HubSpot Emma Brudner. “If you cop to your failures and struggles, you make it OK for them to chime in and help them share with you.”
Sagaille says that before his mentor, he often thought the struggles he faced were unique. However, he was reassured by his mentor, who had experience in his exact role.
“I’m just excited that I have a window into the future a little bit because she’s dealt with similar issues and she’s had some setbacks because of those issues,” he says, “so, she’s able to steer me in the direction so I can avoid those pitfalls.”
Leslie Ye, content designer at HubSpot, suggests reflecting on the roadblocks you faced when you were in your mentee’s stage in life or career.
“Hearing how someone else approached a challenge is always helpful for someone going through it for the first time,” she says. “Even if you don’t solve problems the same way as your mentee, it’s always useful to hear multiple perspectives.”
Perry echoes this sentiment.
“Take time to tap into your own story,” he says, “Especially for Black mentors, it’s important to relate and establish an interpersonal bond that fosters real talk – be a true resource in all facets.”
He adds that adversity of any kind our response to them is a foundational way to create relatability. Strain agrees, pointing to her non-traditional tech background before transitioning to the B2B Saas space.
“I’m extremely transparent about my own journey with a mentee. As I climb up the ladder as a Black woman in tech, it’s important for me to continue reaching back down and helping others up as well,” she says. “If it wasn’t for some of my own incredible mentors throughout my career, I wouldn’t be a mentor now as well.”
8. Celebrate their achievements.
Because people often look for or call upon a mentor to help them with tough situations, many mentorship conversations revolve around the stressful stuff.
When you take the time to highlight and even celebrate your mentee’s successes and achievements, you’re also building your mentee’s confidence and keeping them motivated.
“I’ve worked in a lot of places in the past that were very reserved with positive feedback and very lavish with constructive or negative feedback,” said Sagaille. “So I think that’s something my mentor does really, really well – it’s a nice balance.”
Some mentees also seek approval from their mentors. Acknowledging their success is a way to satisfy that psychological need for recognition.
If you’re wondering how to celebrate their achievements, consider asking them what their love languages are. Those aren’t just helpful for personal relationships, they also work for professional ones as well.
For instance, you may want to congratulate your mentee on a win by sending them a gift. However, if they value words of affirmation more, that’s the better way to go.
9. Seek out resources to help your mentee grow.
Great mentors look for situations – and some even create situations – to help their mentees get closer to their goals.
It can be anything from connecting them with someone with experience in their dream job to recommending a conference they might be interested in. Take note of the areas in which your mentee wants to grow, and always be looking for opportunities to point them in the right direction.
If you work at the same company as your mentee and have some involvement in their experience, Corliss suggests introducing new projects to them over time as a way to build a strong foundation.
“First, start with something that gives context. This could be something that requires research and is genuinely valuable,” she says. “Then, handoff something small that you normally do for your intern or mentee to own. This will help your mentee learn how to develop ownership over something, including how to execute and reach a goal on his or her own. Then, build upon that foundation.”
10. Be sure you have the bandwidth.
LeValley believes mentorship is best when it’s approached as a calling instead of a task. With that in mind, it’s important to consider if you have the bandwidth to take it on.
“Be honest with yourself about what extent you are willing to give of your time and expertise,” Strain says. “This will help you manage your own workload and personal life easier without guilt or stretching yourself too thin.”
Washington echoes this sentiment and adds that it’s OK to bow out if you realize you don’t have the bandwidth.
“The relationship needs to be mutually beneficial and if you feel like you would be burdened by taking on the relationship, then be respectful to your prospective mentee and tell them that you’re not able to take on the relationship,” she says. “It’s better to be upfront than to waste anyone’s time.”
At the end of the day, being a great mentor takes practice and patience. The more you work with a given mentee, the more you’ll learn a lot about them: their communication style, how they process feedback, how they go about pursuing their goals.
The best part? It will likely be as rewarding an experience for you as it will be for your mentees.
Editor’s Note: This post was originally published in Jan. 2016 and has been updated for comprehensiveness.

31 Instagram Features, Hacks, & Tips Everyone Should Know About
Did you know you could schedule your Instagram posts in advance? Or optimize your bio to appear in the Explore tab?
There are countless lesser-known Instagram features, settings, hacks, and search options to help take your Instagram game to the next level. And we’ve compiled them all, here.
Whether you’re a recruiter looking to showcase your company’s culture, a marketer in the e-commerce industry, or an individual who’s just looking to use Instagram in the best ways possible, there are Instagram tips and features here for you.

Note: Before getting started, make sure you’re operating on the latest version of Instagram. At the time of publishing this guide, the latest version is 15.1.1 on iOS and on Android. Please also note that although this article might demonstrate each tip below using an iPhone or Android device, all items on this list are available for both operating systems and can be enjoyed using the same step-by-step instructions.
Table of Contents:
- Instagram Account Features
- Instagram Design Features
- Instagram Optimization Features
- Instagram Stories Features
- Instagram User Preferences Features
- Instagram User Search Features
31 Hidden Instagram Hacks, Tips, and Features
Instagram Account Features
1. Add and manage multiple accounts from the same device.
Have a separate account for your dog? Don’t be embarrassed; stand by your puppy profile. In fact, whether it’s a pet account or a business account, you can add and manage this one right alongside your personal account.
Here’s how:
- From your profile, tap the gear icon. To find this icon on an Android device, you’ll first need to tap the three horizontal lines to the top right of your screen.
- Scroll to the very bottom and tap “Add Account.”
- Add your other account by username and password, and you’re all set.
To toggle between both profiles, hold down your profile picture in the navigation bar to view all connected accounts. You can also switch to a different account through the Settings page mentioned earlier. See what this screen looks like in the next Instagram feature, below.
2. See all the posts you’ve liked.
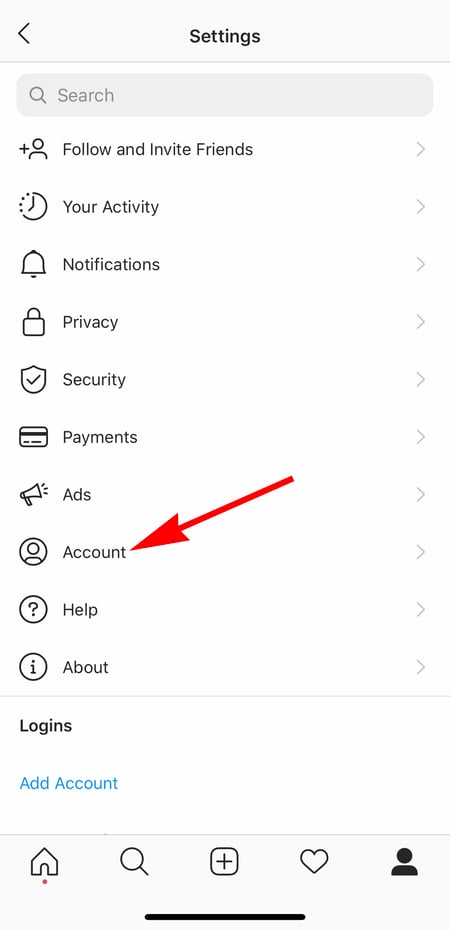
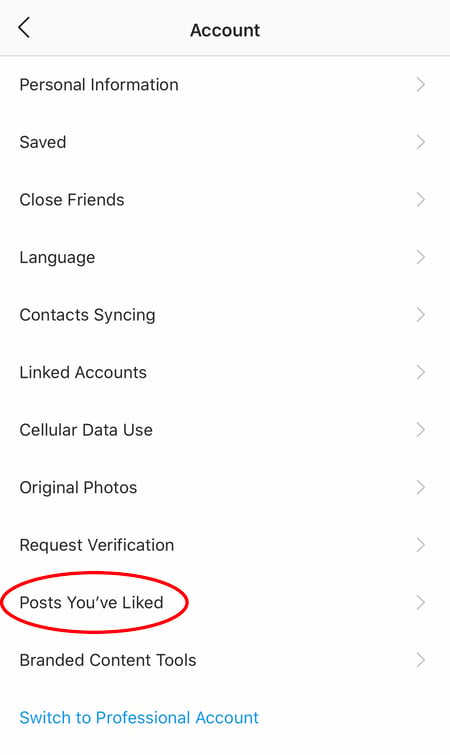
Ever wanted to see the posts you’ve Liked, all in one place? All you have to do is go to your own profile and click the “Settings” button in the top right — a gear icon on iPhone/iPad, and three dots on Android — then, click “Account”, and finally “Posts You’ve Liked.”
To un-Like any of the posts you’ve Liked, simply go to the post and deselect the “heart” icon below it. Don’t worry — the user won’t be notified that you’ve un-Liked the post.
3. Hide, delete, or disable comments on your posts.
Twitter may carry a more “anything goes” culture of commentary, but your Instagram is your domain — and it’s much easier to control who says what on your content. This is especially important if you manage a business account.
To Filter Comments by Keyword:
In the Instagram mobile app, navigate to “Options” and select “Comments.” From here, you can toggle on “Hide Inappropriate Comments” and even enter specific keywords you’d like the app to police within each comment.
To Delete Comments:
Tap the speech bubble icon below the comment you’d like to delete, and swipe lightly to the left over this text. Select the garbage can icon that appears to delete this post. You can also do this to your own comments.
To Disable Comments Entirely:
To clarify, you can’t turn off comments across your entire profile; you can only disable them for individual posts.
To do so, start posting an image on which you’d like nobody to comment. When you reach the page to add a caption, tags, and location, tap “Advanced Settings” at the very bottom. This will open a screen where you can easily switch on an option labeled “Turn Off Commenting.”
4. Clear your Instagram search history.
We swear — this blog post isn’t all about how to convince people you’re not an Instagram creeper. But many of us can relate to the desire to clear our online search history everywhere, including on this particular social channel. Luckily, you can.
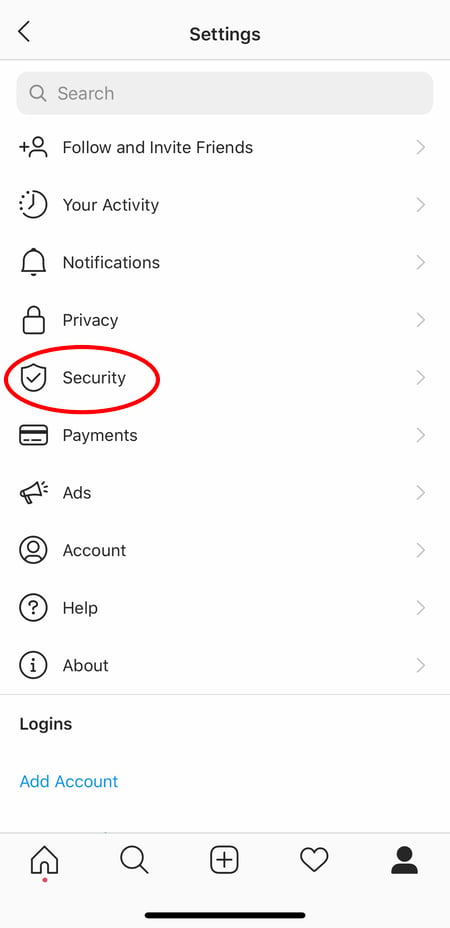
To clear your Instagram search history, go to your own profile and click the “Settings” button (a gear icon on iPhone/iPad and three dots on Android). Scroll down and click “Security”:
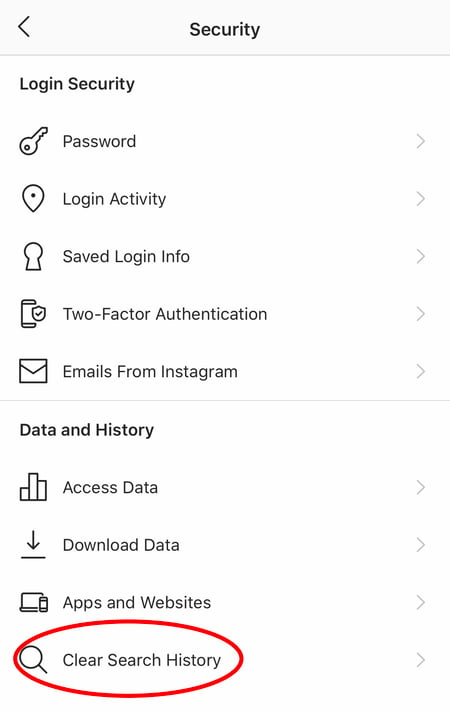
Then, select “Clear Search History” at bottom of the screen, and then confirm by clicking the blue link, “Clear Search History”.
5. Add another Instagram account to your bio.
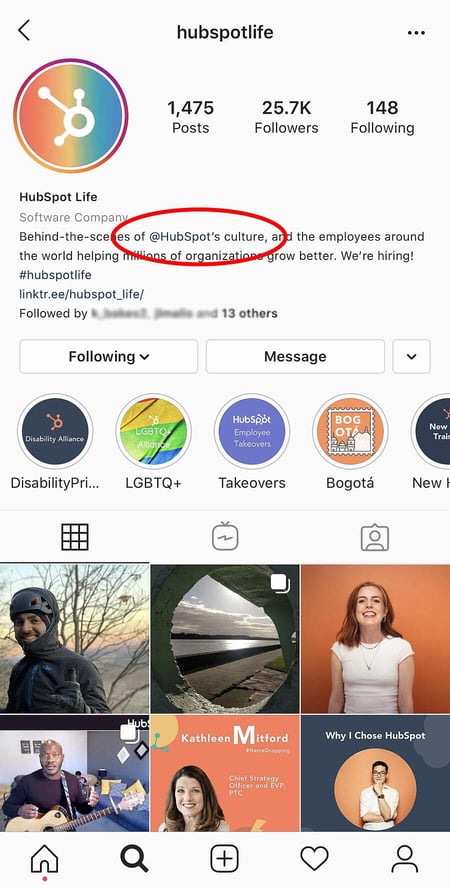
Perhaps your company has more than one Instagram account for different aspects of your brand. For instance, HubSpot has a verified HubSpot account, a HubSpot Life account, a HubSpot Academy account, and a HubSpot Partners account.
To draw awareness back to its main company page, then, HubSpot links to the @HubSpot account in its other account bios, like in @HubSpotLife’s account:
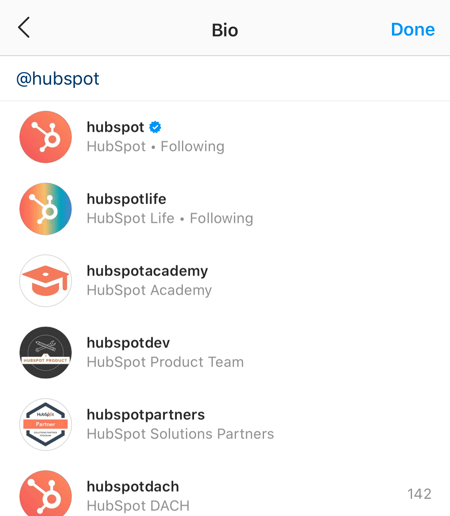
Fortunately, you have the option to include another Instagram account in your Instagram bio. To do so, simply type the “@” sign into your Bio, and then select the account you’d like to tag. Then, click “Done”.
Instagram Design Features
6. Add special fonts to your bio.
Here’s an Instagram bio hack that can truly make your profile stand out. You can already add emojis to the bio beneath your profile photo, but your keyboard limits your creativity right there.
Using a couple of basic third-party websites, you can copy over some more special fonts not often found in the Instagram community. Here’s how.
To Add a Special Font to Your Bio via Mobile:
Add a new font to your Instagram bio via your mobile device using a website like LingoJam. Open the site on your phone, type your desired bio text in the lefthand text box, and you’ll see the same bio text in different typefaces appear on the right.

Carry your chosen font over to your Instagram bio by tapping it and selecting “Copy.” Then, open your Instagram app, navigate to your profile, select “Edit Profile,” tap the “Bio” section and paste your chosen font into the empty field.
To Add a Special Font to Your Bio on Desktop:
If you’re editing your Instagram profile on your laptop or desktop, Font Space has a library of fonts you can download and copy into your bio in seconds. To do so, Find a font you like and select “Download” beneath the font’s sample image, as shown below.
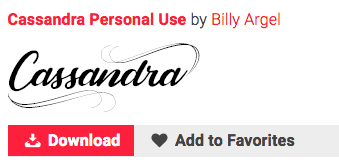
Downloading this font will open a folder on your desktop where you can pull a “.ttf” file that carries the various versions of this font. The file will look something like the screenshot below.
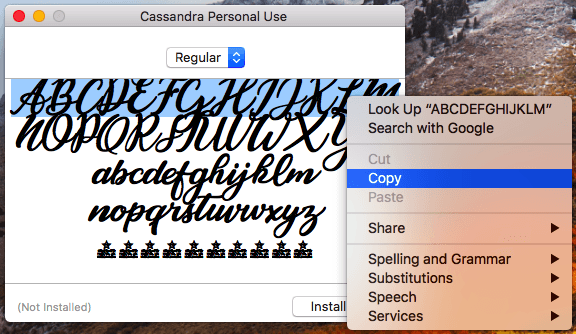
Once you have this font copied to your computer’s clipboard, open your internet browser and log onto Instagram.com. Select “Edit Profile” and paste your downloaded font into your bio field. You can then edit the sample text that came with your font to write your new bio as you see fit.
7. Add special characters to your bio.
Not only can you customize your bio with a special font, but you can also add atypical characters that distinguish you or your brand — but that you wouldn’t find on your smartphone’s normal keyboard. These include §, †, or even ™ if your Instagram name features a trademarked product name.
To Add Special Characters From Mobile
Using your mobile device, install a free mobile app like Character Pad, which catalogs nearly every character and symbol you might need but won’t find in the 26-letter English alphabet.
Open the app and find the character you want to add to your Instagram bio. In Character Pad, you’ll simply double-tap the picture of your chosen symbol to paste it into a text box, as shown below. Then, copy this character to your phone’s clipboard. (For our purposes, I double-tapped the half moon icon.)
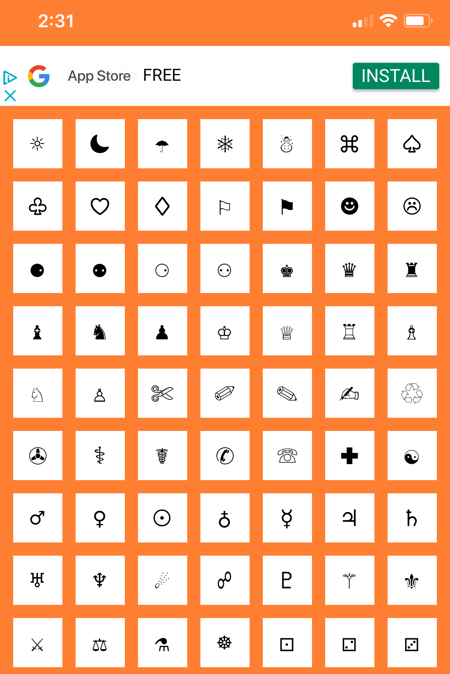 Once you have your symbol copied to your clipboard, open Instagram, navigate to your bio, and tap “Edit Profile.”
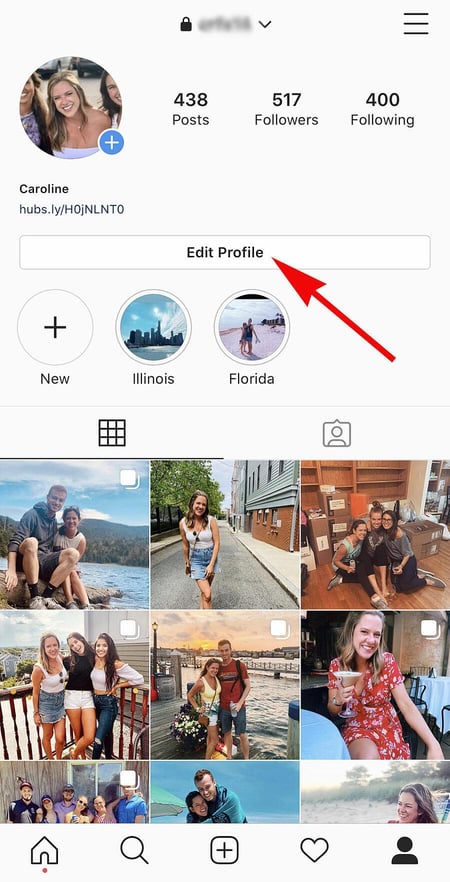 Hold down your finger on the field of your bio you want to insert your special character until “Paste” appears as an option, as shown below. Tap “Paste” and then “Done” you’ll be all set.

To Add Special Characters From a PC
You can also insert special characters and symbols through Instagram’s web client on a desktop or laptop computer. The easiest way is to use Microsoft Word’s “Symbol” insertion icon, as shown below.

Select your desired symbol or character and copy it to your computer’s clipboard. Then, navigate to Instagram.com and follow the steps above to paste your character into a particular part of your bio.
You might be tempted to simply Google search the special character you want, and at times it might work just as well as the steps above. But keep in mind not all special characters you copy from the internet are “clean” when you paste them into Instagram — some of them might become corrupted or not show up correctly.
8. Reorder filters to set your favorite filters at the front.
If you use Instagram a lot, chances are, you have a few favorite go-to filters, and others you never touch. To make editing photos easier, you can reorder the filters in your editing window.
To reorder filters, add a new post and begin editing it. When you get to the filters page, hold down on a filter you’d like to move, and then drag it to your preferred location.

9. Use Instagram as a photo editor (without having to post anything).
Perhaps you love Instagram’s filters and editing capabilities, but aren’t quite ready to post the photo to your account — right now, or ever. To use Instagram as a photo editor without posting anything, all you need to do is publish a picture while your phone is on airplane mode.
First, be sure you have “Save Original Photo” turned on in your Instagram settings.
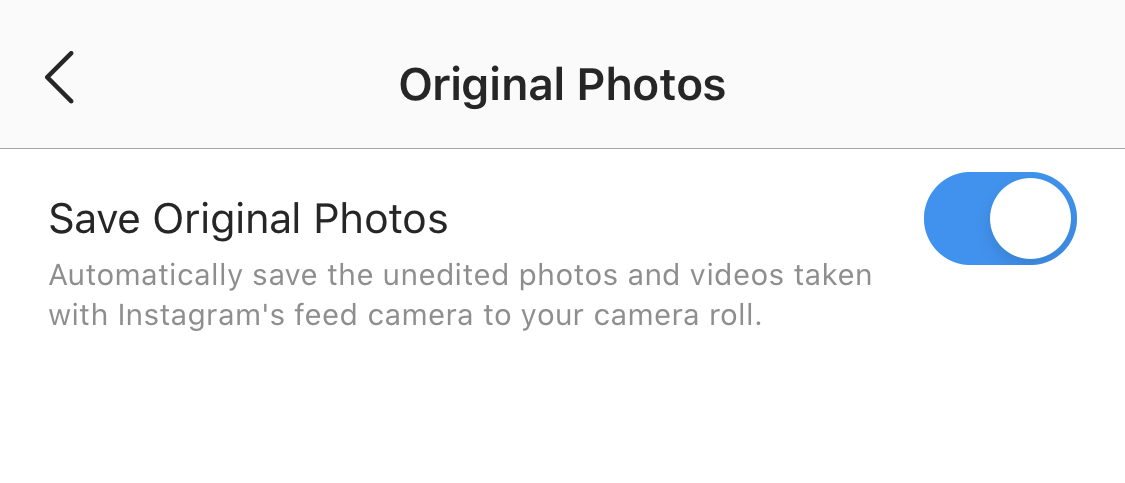
Then, turn on airplane mode — see instructions in #5.
Next, follow the normal steps to post a photo to Instagram: Upload the photo, edit it, and press “Share.” An error message will appear saying the upload failed, but you’ll be able to find the edited image in your phone’s photo gallery.

10. Insert line breaks into your bio and captions.
When you write a caption in Instagram, you’ll see the keyboard doesn’t give you an option to press “Enter” or “Return.” The same is true for your bio. So how do all those people put line breaks in there?
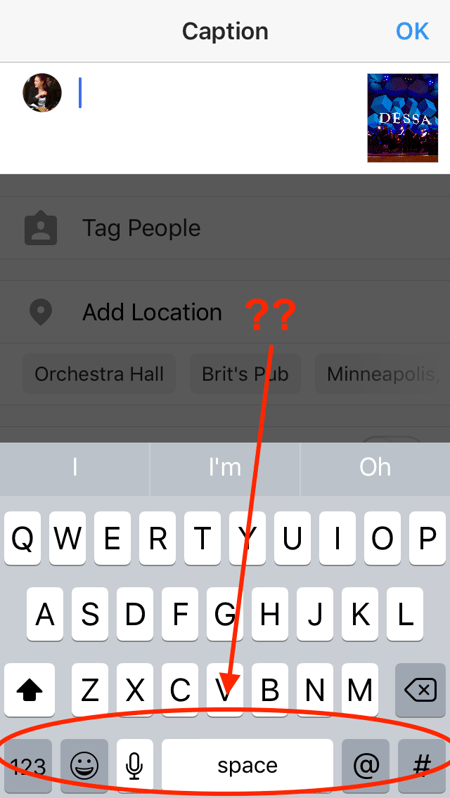
It turns out that all you have to do is press the “123” key in the bottom lefthand corner of the keyboard, and the “Return” key will appear on the bottom right.
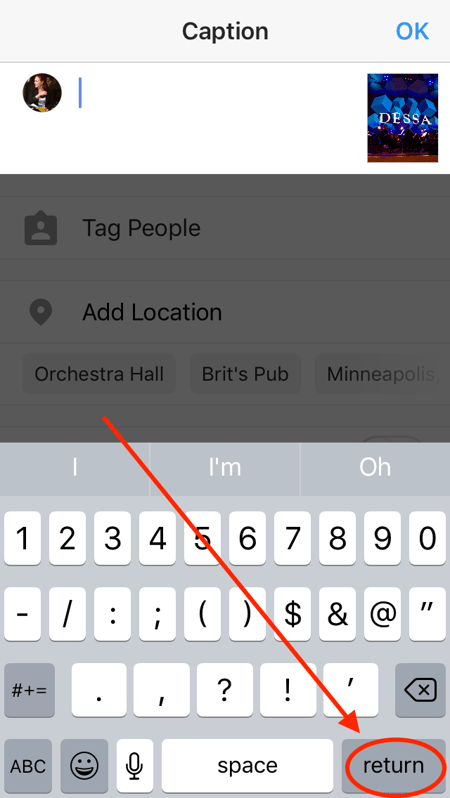
I know this tip sounds simple, but a lot of people miss it — myself included, until a colleague clued me in. We’ve seen some elaborate solutions out there for hacking through this problem, like writing the caption copy in another app, then copying and pasting it into Instagram. Thankfully, it’s much simpler than that.
Instagram Optimization Features
11. Optimize your Instagram bio to appear in the Explore tab.
Your friends, family, and coworkers might be your first group of Instagram followers, but growing your audience takes more than the people who already know you. One key way to do this is to get your profile to appear in Instagram’s Explore page.
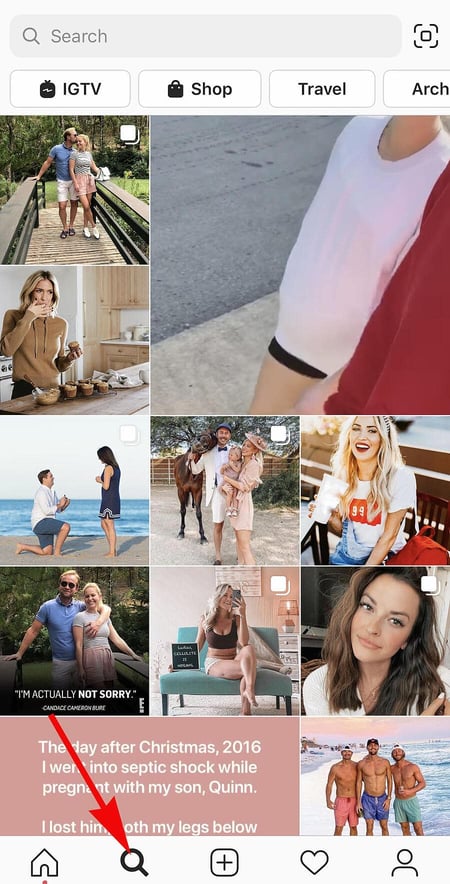 The Explore page, accessible using the magnifying glass icon shown above, is a browsing page that sorts the entire Instagram community by topic and keyword. These include “Fitness,” “Style,” “Science,” and more.
Hashtagging your posts with these words can expose your content to the people browsing these topics, but you can also use them in your Instagram name and bio to promote your profile.
If Jane Doe is a marketing consultant, for example, she might want to make her Instagram name “Jane Doe Marketing,” rather than simply “Jane Doe.” Then, in her bio, she can include all of her specialties, such as “SEO,” “blogging,” “email marketing,” etc.
12. Drive traffic to an external website.
One of the biggest frustrations people have with marketing on Instagram is that clickable URLs aren’t allowed anywhere except the single “website” box in your bio. If you put a URL in a photo caption it’ll appear as plain text, meaning users would have to painstakingly copy the URL, open a web browser, and paste or type it in there.
One sneaky way to get people to visit your Instagram profile, which is where that one clickable URL is allowed, is to use your photo captions to encourage people to visit your profile for a link. Then, update that URL frequently to point to your latest blog content, YouTube video, product, or offer.
Check out the example from food magazine Bon Appétit below. This photo’s caption provides a text call-to-action to visit the user’s profile so you can click the link related to the post.
Then, in Bon Appétit‘s profile, you’ll see the link itself. Update this link frequently to point to your latest content or offer.
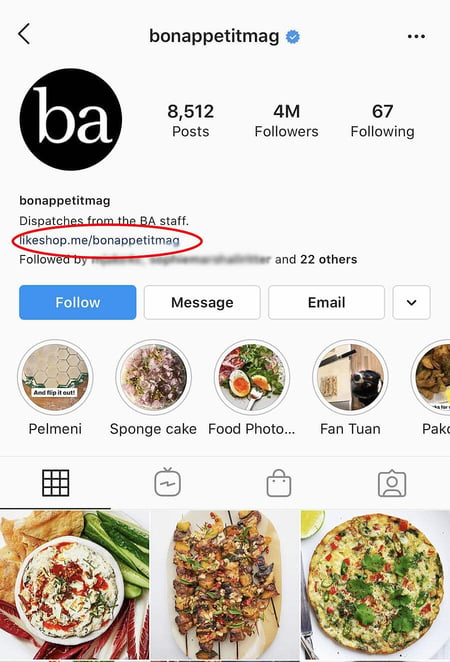 Plus, if you have a verified Instagram account, you can also add links to your Story. Read more about this feature here.
13. Sell products from Instagram using Shoppable Posts.
You might already know you can tag people in your Instagram posts as (or after) you post new content. Now, you can tag products — and direct your viewers to a product page to buy what they saw.
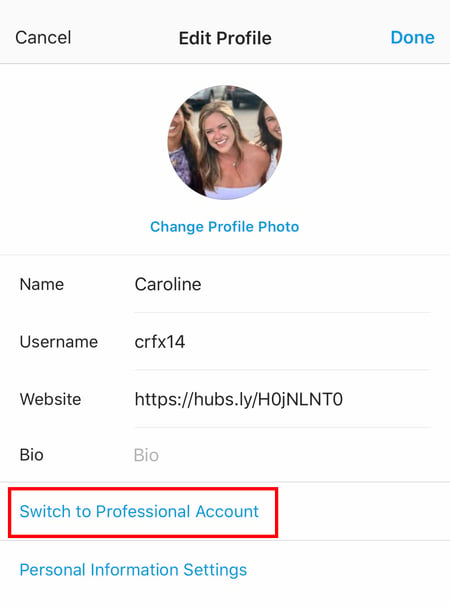
To Add an Instagram Business Account
You’ll need an Instagram Business account to publish shoppable posts. You can get one by selecting “Edit Profile” on your Instagram profile and tapping “Try Instagram Business Tools,” as shown below.
To Tag a Post With Products
Once you’ve launched an Instagram Business account, you’ll need to enable product tags to use them on a post that depicts a product. Navigate to your settings using the gear icon from your profile page, and select “Products.” Tap “Continue” and follow the prompts to connect a “product catalog” to your business profile.
With product tags enabled on your Instagram Business account, you can now upload new posts and tag your photo with products you find from your product catalog. Here’s what a shoppable post can look like:
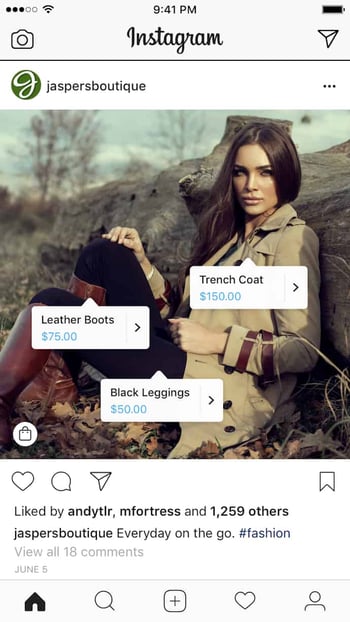 Image via Instagram
14. Create an auto-complete quick reply for standard responses.
Responding to user comments and questions is incredibly timely, but fortunately, there’s a hack to streamline the process and make it more efficient. (Note: This only works on Instagram Business accounts.)
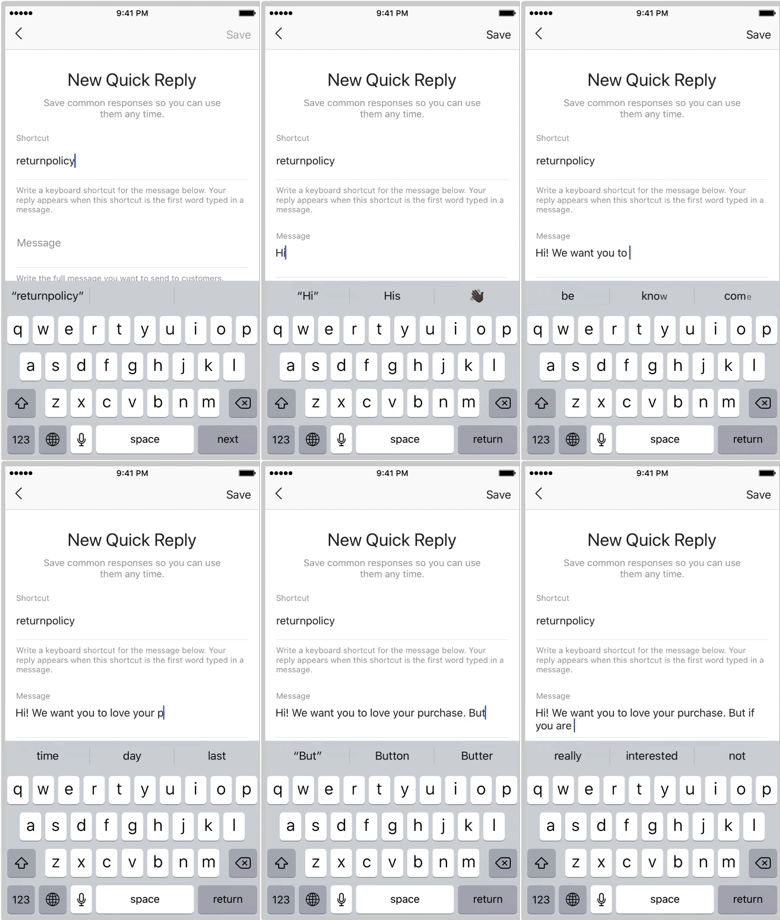
You can simply create a one-to-two word phrase that can act as your shortcut to a longer standard response you might send often. To do this, click “Business” in your Settings, and then “Quick Replies” — or, click the three-dot chat bubble icon on bottom of screen, and then click “New Quick Reply”.
Add a shortcut you can enter for the response. For instance, you might type “returnpolicy” as the shortcut for a longer response, i.e.: “Hey there. We’re sorry you don’t love your purchase. Fortunately, we permit 30-day returns, no questions asked. Please send us your order confirmation number to get the process started.”
Once you’ve added a shortcut, you can either type the shortcut “returnpolicy” into the comment box when you want it to auto-generate, or you can tap the three-dot chat Quick Replies bubble icon at the bottom of your screen to choose from a response you’ve created. (Read more about Quick Replies here.)
15. Pin your Instagram post to Pinterest.
Instagram doesn’t have a natural integration with many social networks (except Facebook, its parent company) for publishing Instagram posts to other social accounts.
But with respect to Pinterest, image-loving platforms stick together. Here’s a backdoor way to Pin your latest Instagram Story to Pinterest:
On the Instagram mobile app, tap a post to view it in full, then tap the three dots to the top-right of the image. Select “Copy Share URL” to attach the picture’s link to your clipboard.

Open the Pinterest mobile app — or download it; you’ll need it for this step — and navigate to your profile page. If you have the latest version of Pinterest downloaded, it might ask you as soon as you open the app if you’d like to produce the image from your clipboard.
If not, select the “+” icon to the top right to add a new pin, and you’ll see a menu of options where you can add your “Copied Link” to a new Pin or board on your profile.
Instagram Stories Features
16. Create a collection of saved posts.
In addition to being able to view all of the posts you’ve liked, Instagram also has an option to save or bookmark certain posts in collections that you create.
Start by going to your profile, and tapping the “Settings” icon at the top-right of your screen, and then select “Saved”:
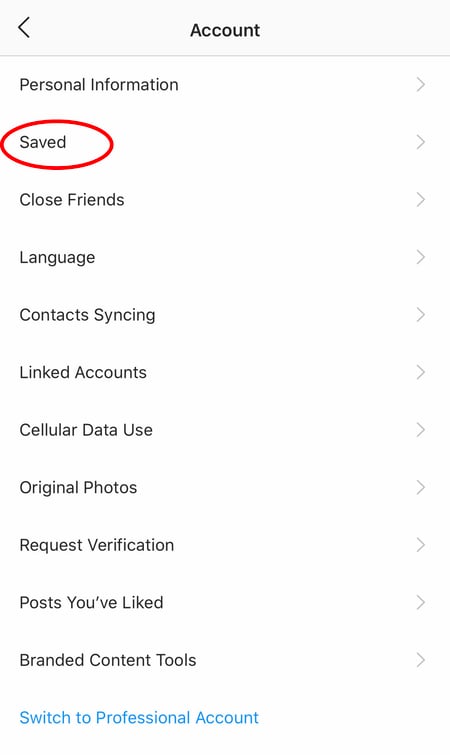
Next, press the “+” button and name your new Collection. 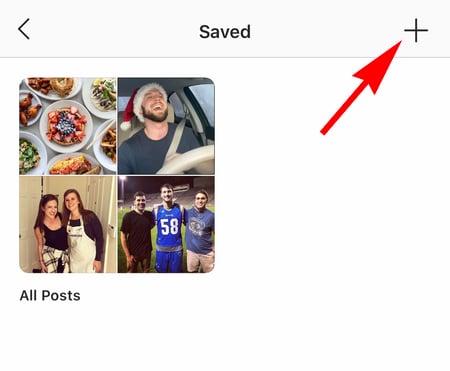
Click “Next”, and select images from your “Saved” section.

To save photos for future collections, tap the bookmark icon below the post you want to add, as shown below:
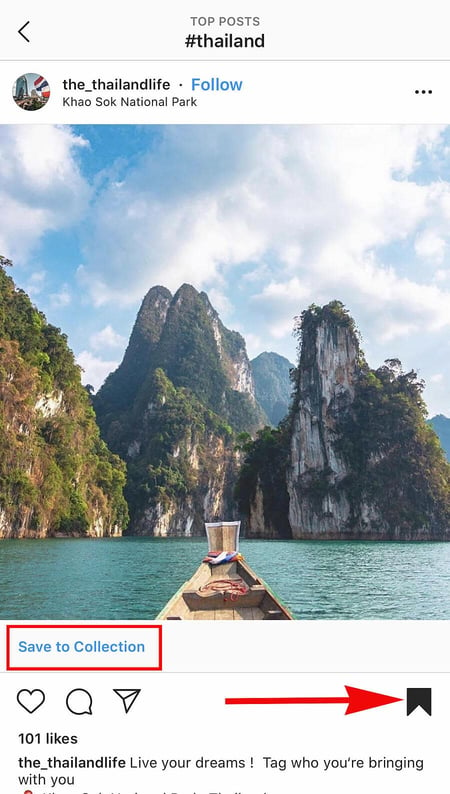 Then, go back to your saved photos by following the previous steps.
You’ll see the photos you’ve saved — to add them to your Collection, select the Collection you want to add to, and tap “Add to Collection.” From there, you can add any of your saved photos.

17. Create Stories Highlights to show Stories for longer than a day.
Like in Snapchat, posts to your story only stick around for your followers to see for 24 hours. But sometimes, you have a story that deserves more daylight to be told.
That’s where Stories Highlights comes in, a feature by Instagram that allows you to save stories together in the same space on your profile page. If you ever wondered what that “New” button with the “+” icon was below your profile image, this explains it.
To make a Stories Highlight, tap this New option and select any number of past stories in your album:

Image via
Instagram
Then, give it a cover photo and a name to display as its own Instagram Story on your profile page. You can remove Stories Highlights at any time by tapping and holding down this story.
18. Reorder Instagram Stories highlights.
The Highlights on your Instagram feed act as your brand’s portfolio — you can use Highlights to demonstrate your company’s values, showcase new products or services, or categorize various topics you post about frequently.
For instance, The North Face uses its Highlights section to highlight various initiatives that are important to the brand, including a section labelled “VOTE”, “Global Climbing Day 2020” and “Summer Basecamp”:
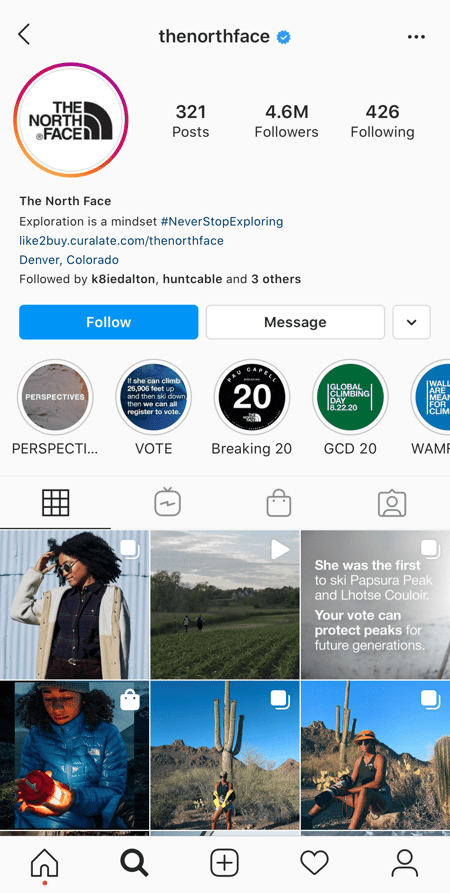 Since a user can only see the first four highlights when they first come across your feed, you’ll want to ensure your first highlights are the ones you’re most proud of. To do this, simply follow this trick:
1. Hold down the highlight you’d like moved to the front of this list and click “Edit Highlight” when the slide-up appears.
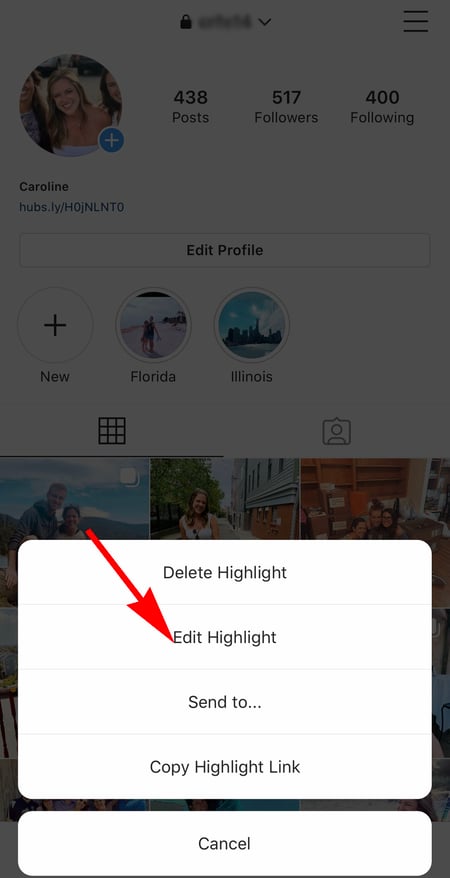
2. Next, find an image or video you’d like to add to the highlight. (Don’t worry — you’ll be able to delete this within 30 seconds, so you don’t need to choose one that will stay on the highlight.)
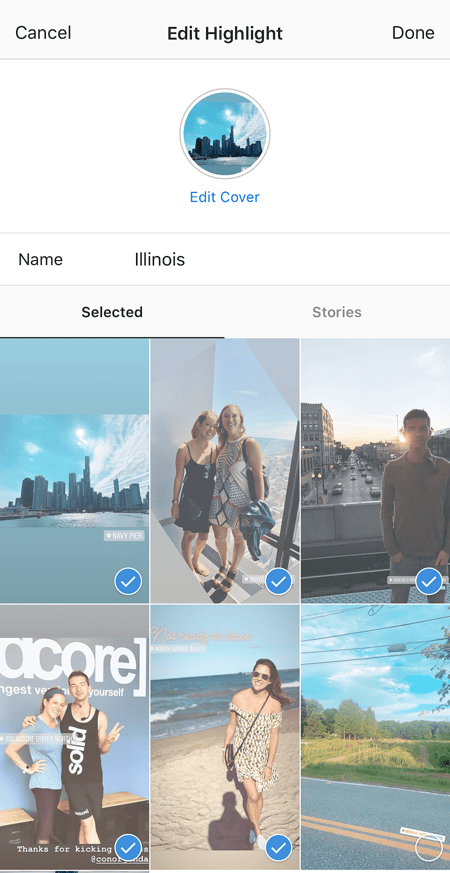 3. Click “Done” in the top right corner.
4. Now, your Highlight will be first in the list. To remove the image or video you just added, follow the above instructions and simply un-check the image you added. Your highlight will remain at the beginning of the Highlight reel.
19. Change your Instagram Highlights Icon without publishing it to your feed.
The image you choose for each Highlight should accurately depict what type of content users can expect to see if they tap the Highlight, so you’ll want to choose a compelling, engaging image.
However, if you have a design, logo, or image you’d like to use that isn’t in your Instagram feed, it’s still possible to make it the Highlight Icon.
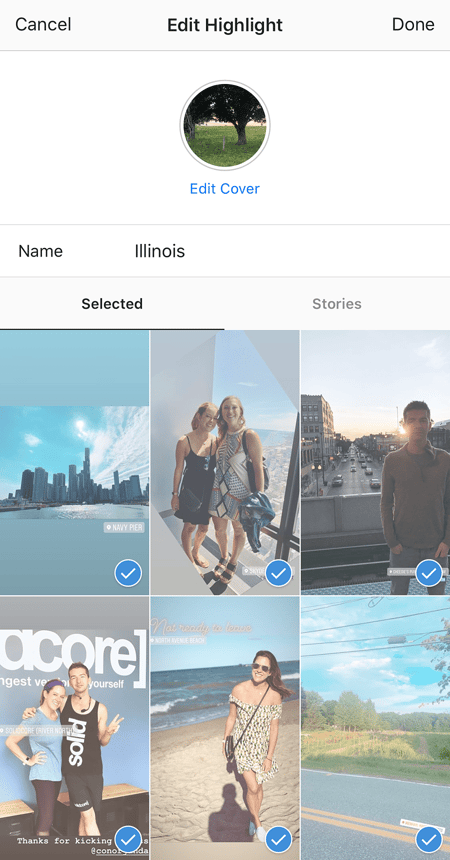
To do this, click “Edit Highlight” (same as the step above):
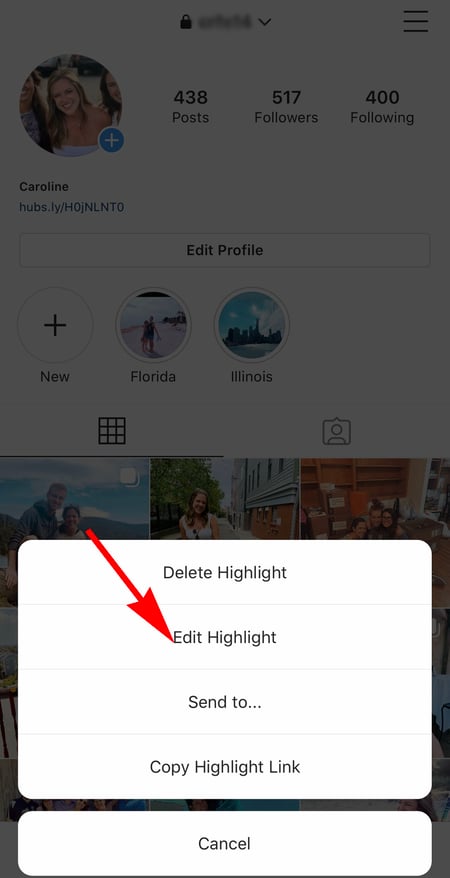 Next, click “Edit Cover”. Scroll through your camera roll to find an image you like.
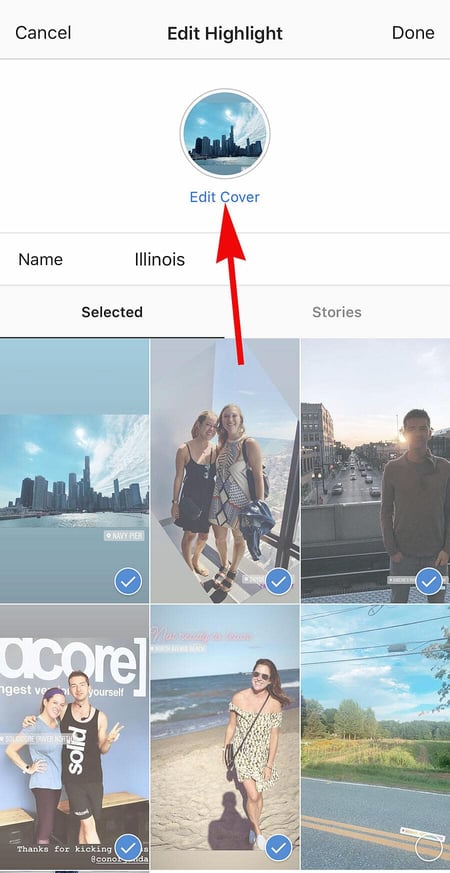
 Once you choose an image from your camera roll, click “Done”. Your Highlight cover image is now an image you’ve never posted on your Instagram account:
20. Schedule posts in advance.
Instagram being a mobile app, you’re probably in a routine of taking photos and posting them to your Instagram Story on the fly. But, you can also pre-post them from your computer for a set day and time in the future.
This feature is available with a social media scheduling tool, as well as HubSpot if you have an Instagram business account. If you have this business profile, switch to it via the Instagram mobile app and follow the prompts to connect it to Facebook.
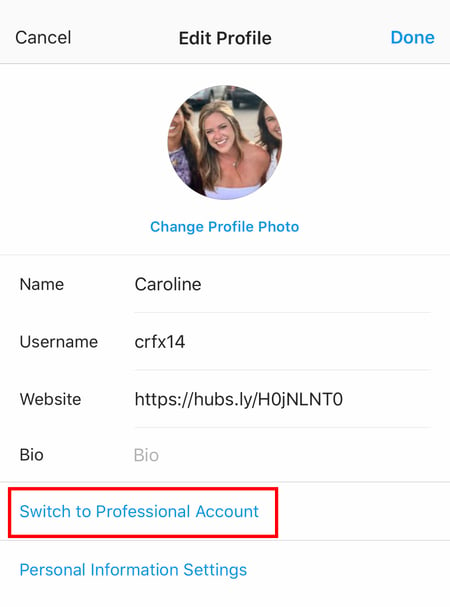
Depending on the social scheduling tool you use, you might not include this step. Once you’ve toggled to the right account, however, you’ll launch your scheduling tool, navigate to your current connected profiles, and see Instagram as an available integration.
21. Use ‘Type Mode’ to enhance your Instagram Stories.
Instagram Stories is a feature of Instagram that allows you to post ephemeral photos that show up separately from your profile and only last 24 hours. It’s a great function for helping like-minded users discover your profile on Instagram’s homepage.
But since its beginning, Stories have become quite creative, and it takes more than a pretty filter to stand out to your audience. Enter “Type Mode,” an option similar to Snapchat that gives you the power to caption Stories that need extra context to resonate with someone. Here’s how to use it:
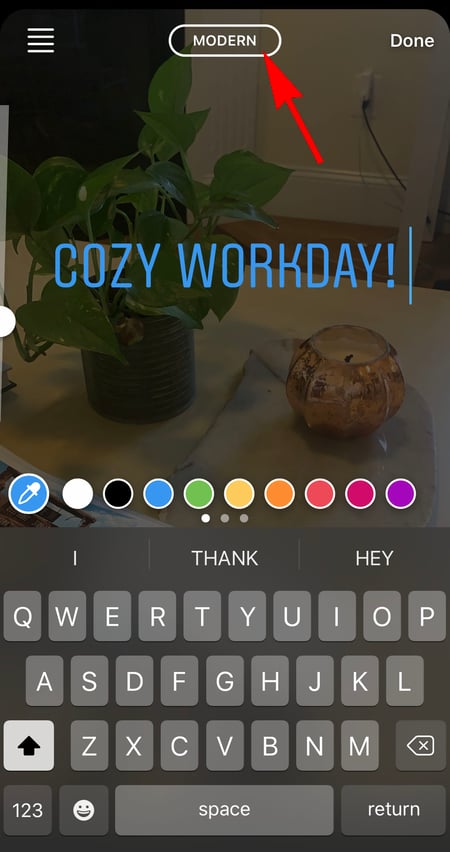
1. Open Instagram Stories by swiping right from your Instagram feed. This will launch your smartphone camera. Then, take a photo or video and press the “Aa” icon to the top-right of your screen, as shown below:

This “Aa” icon will open Type Mode, where you have five fonts to choose from: Modern, Neon, Typewriter, Strong, and Classic. Here’s what a sample Story looks like with Modern font:
22. Post content from other users to your Instagram Story.
Although Instagram Stories are a great way to give your content exposure on your followers’ homepages, you might not always have something Story-worthy. In those times, you can share an inspiring post from someone else through your Instagram Stories. Here’s how:
1. Find a post you want to share in your Instagram Stories and tap the paper airplane icon, as shown below.
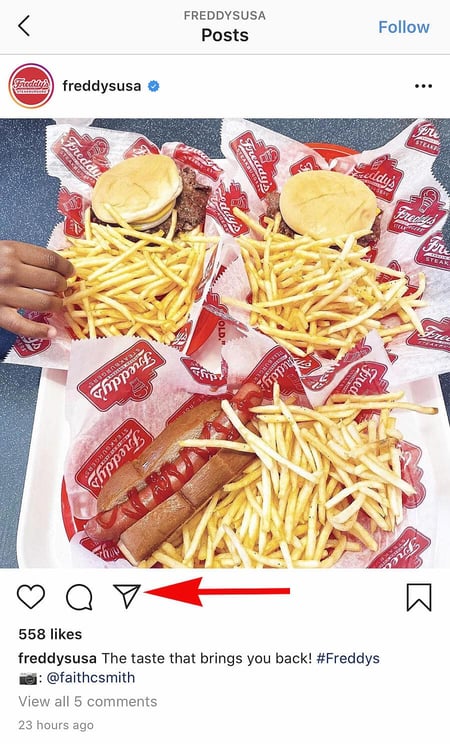
Instagram Account: @Freddysusa
This icon will open a screen allowing you to send this post to specific followers, or add to your Story. Tap the latter option, as shown below.
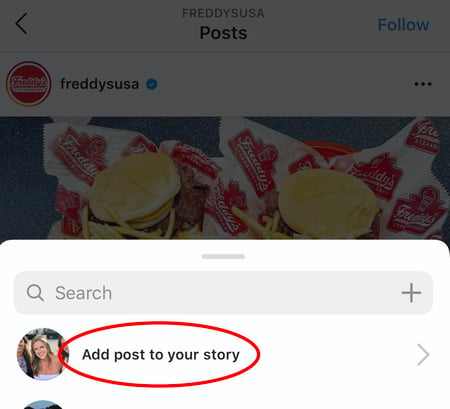
Tapping this option will automatically turn the post into an Instagram Story, which you can edit and design to your liking the same way you would any other Instagram Story.
Instagram User Preferences Features
23. Get notifications when your favorite people post.
Never want to miss an Instagram post from your favorite influencers again? You can choose to get a notification every time a specific user posts a new photo. All you have to do is turn on notifications for each user individually.
To turn on these notifications, visit a user’s profile, click the three dots in the upper right-hand corner of the post, click “Notifications” from the menu, and finally toggle on notifications for either posts or stories from the menu that appears.
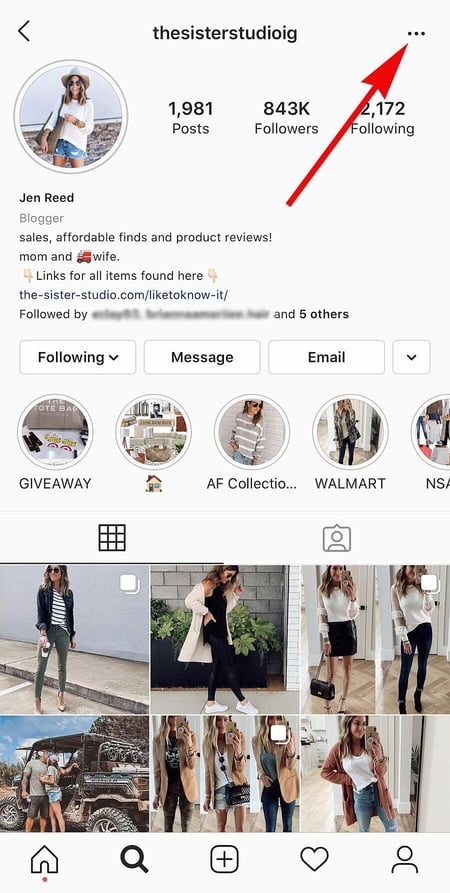
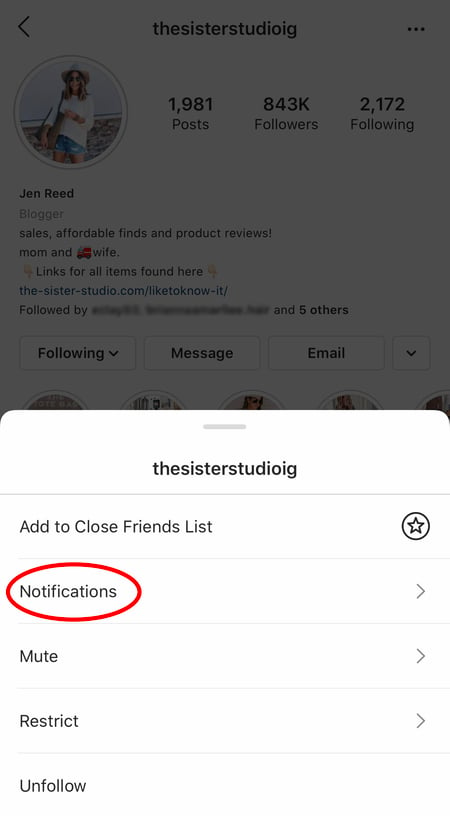
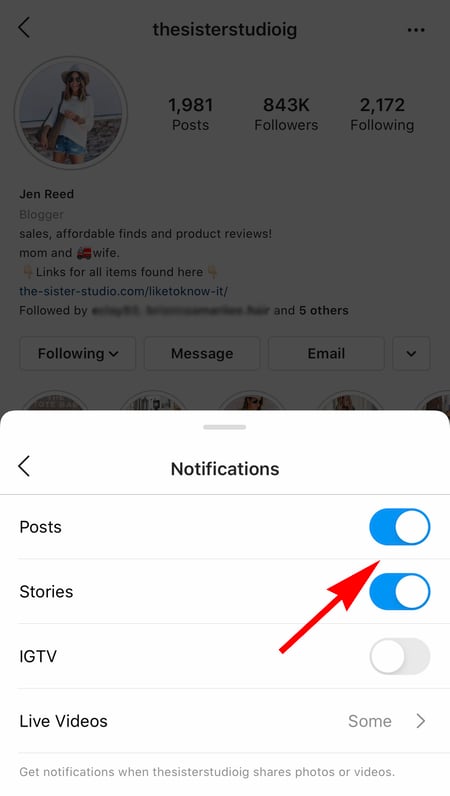 Instagram Account: Jen Reed @thesisterstudioig
Want to turn post notifications off? Just follow the same steps. It’s important to note that you must enable notifications from the Instagram app in your phone’s settings — here’s how.
- To allow notifications on iPhone/iPad: Go to “Settings,” then “Notifications.” Choose “Instagram” and then turn on the setting to “Allow Notifications.”
- To allow notifications on Android: Go to “Settings,” then choose “Apps,” then “Instagram.” Select the option to show notifications.
24. Hide Photos You’ve Been Tagged In
When someone tags you in a photo or video on Instagram, it’s automatically added to your profile under “Photos of You,” unless you opt to add tagged photos manually (see the next tip).
To see the posts you’ve been tagged in, go to your own profile and click the person icon below your bio.
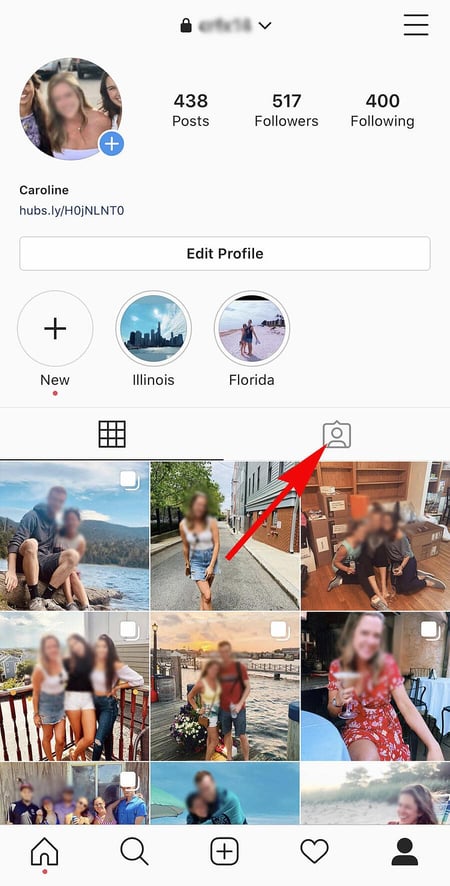 Next, click on an individual post (any in the group of tagged photos) and click “Edit” in the top right. Then, click “Manually Approve Tags”:
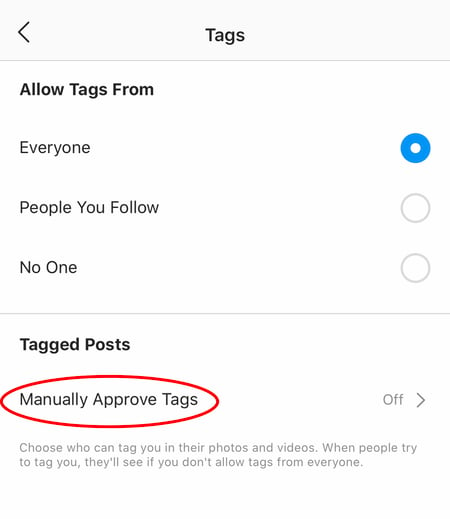
Then, to hide the posts you’ve been tagged in from other users, select the posts you’d like to remove from your profile, and when you’re done, tap “Hide Photos” at the bottom of your screen. When prompted, tap “Hide From Profile.”

This won’t remove the posts themselves from Instagram, but it will remove them from your profile, so you and others can’t access them.
25. Adjust your settings to approve tagged photos before they show up in your profile.
As we mentioned in the previous step, when someone tags a photo or video of you on Instagram, it’s usually added to your profile automatically. But, you can change your Instagram settings to enable manually selecting which photos you’re tagged in that show up on your profile.
To add tags manually, follow the same steps above to get to the photos in which you’ve been tagged, and click “Edit” at the top right of your screen. Tap “Tagging Options,” and select “Add Manually.”
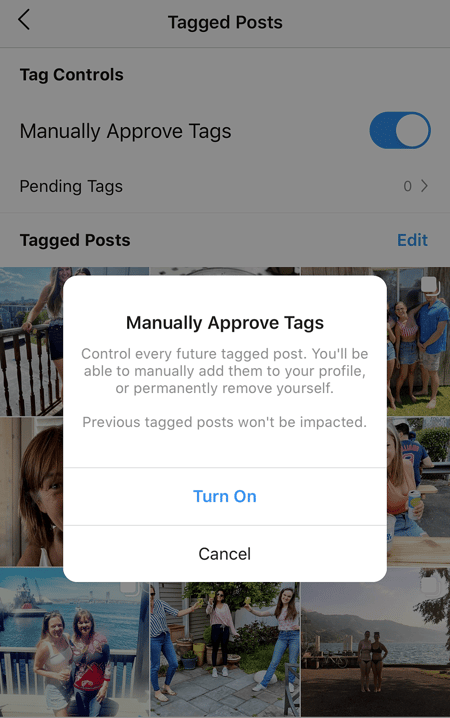
You’ll still be notified when someone tags you in a photo. Once that happens, to manually add a tagged photo to your profile, tap the photo you were tagged in, then tap your username and select “Show on My Profile.” And if you’d rather it not be visible, choose “Hide from My Profile” instead.
26. Hide ads you don’t find relevant.
Instagram tries to show you ads that are interesting and relevant to you. You might see ads based on people you follow and things you Like on Instagram, or the third-party websites and apps you visit.
If you see sponsored posts you don’t find relevant, though, you can let Instagram know and slowly teach its algorithm what you like and don’t like to see.
To hide ads on Instagram, tap on the three dots to the right of a post labeled “Sponsored,” and choose “Hide This.”
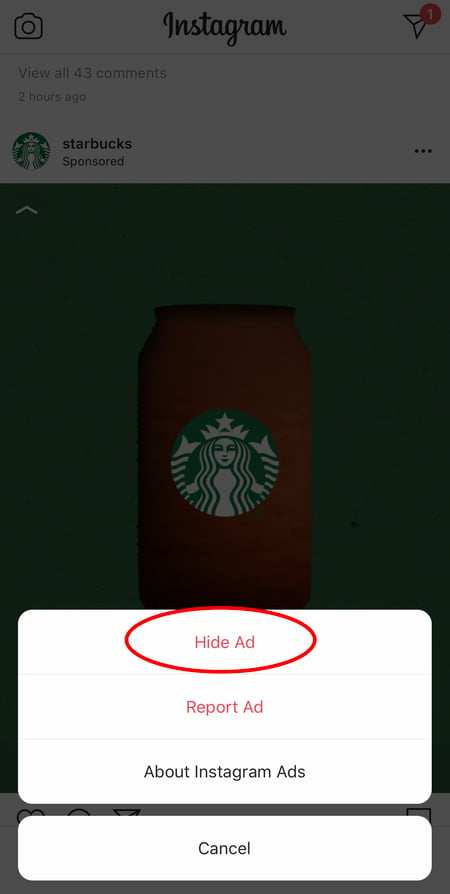
From there, it’ll ask you to share why you don’t want to see the ad anymore.
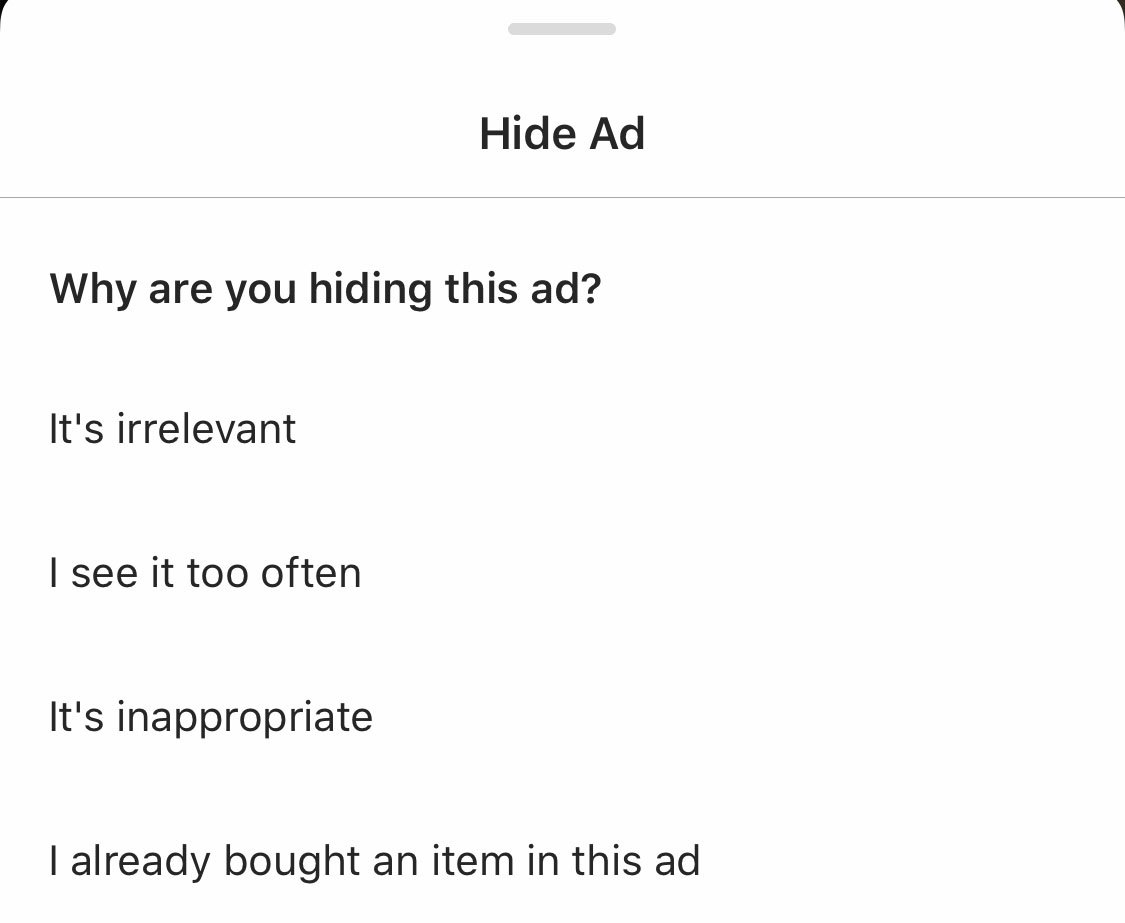
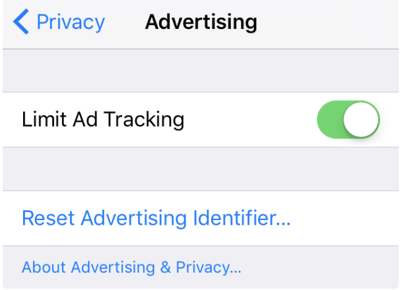
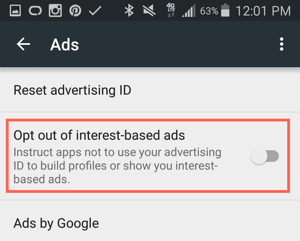
You can also opt out of seeing ads based on sites and apps off of Instagram and Facebook from your device’s settings. Note that even if you choose to opt out of seeing these types of ads, you’ll still see ads based on your Instagram and Facebook activity.
- To limit ad tracking on an iPhone/iPad: Go to “Settings” and choose “Privacy,” then “Advertising.” From there, choose the option to “Limit Ad Tracking”
- To turn off interest-based ads on Android: Go to “Google Settings,” then “Ads.” From there, choose the option to “Turn off interest-based ads.”
27. Send photos privately to your friends.
Posting photos with all of your followers or with the public isn’t the only way to share content on Instagram. You can also share them with individual or multiple users, kind of like a Facebook message or group text message.
You can either send a new photo to friends, or send a photo that you or someone else has already posted.
To send a new photo privately, upload a photo and begin editing it, as you would when editing a new post. When you get to the “Share” page, tap the top where it automatically says “New Post,” but when prompted, select “Direct Message.” From there, you can pick and choose whom you’d like to send the photo to.
You can access your direct messages at any time by clicking the mailbox icon at the top right of your homepage.
To send an existing photo privately, start by opening the post you want to share — it can be your own or someone else’s, as long as the latter has a public account. Next, click the paper-airplane-like icon below the post, then select who you want to receive it when the “Send to” box appears.
User Search Features
28. Search Instagram users without an account.
As much as Instagram would like to see you ultimately create an account for yourself or your business, you can peruse the beautiful brands, people, and dogs that are waiting for you without an account to see if it’s worth signing up.
There are two ways to search for people on Instagram without logging in:
Entering a Username at the End of the Instagram URL
The first way to search users without an account is by using an Instagram username you already know, and adding it to the end of “www.instagram.com/.”
For example, if you were to start with our Instagram username — which is simply “HubSpot” — you can enter the following into your browser’s address bar: www.instagram.com/hubspot. This will bring you to our Instagram profile as well as the elusive search bar at the top of the page:
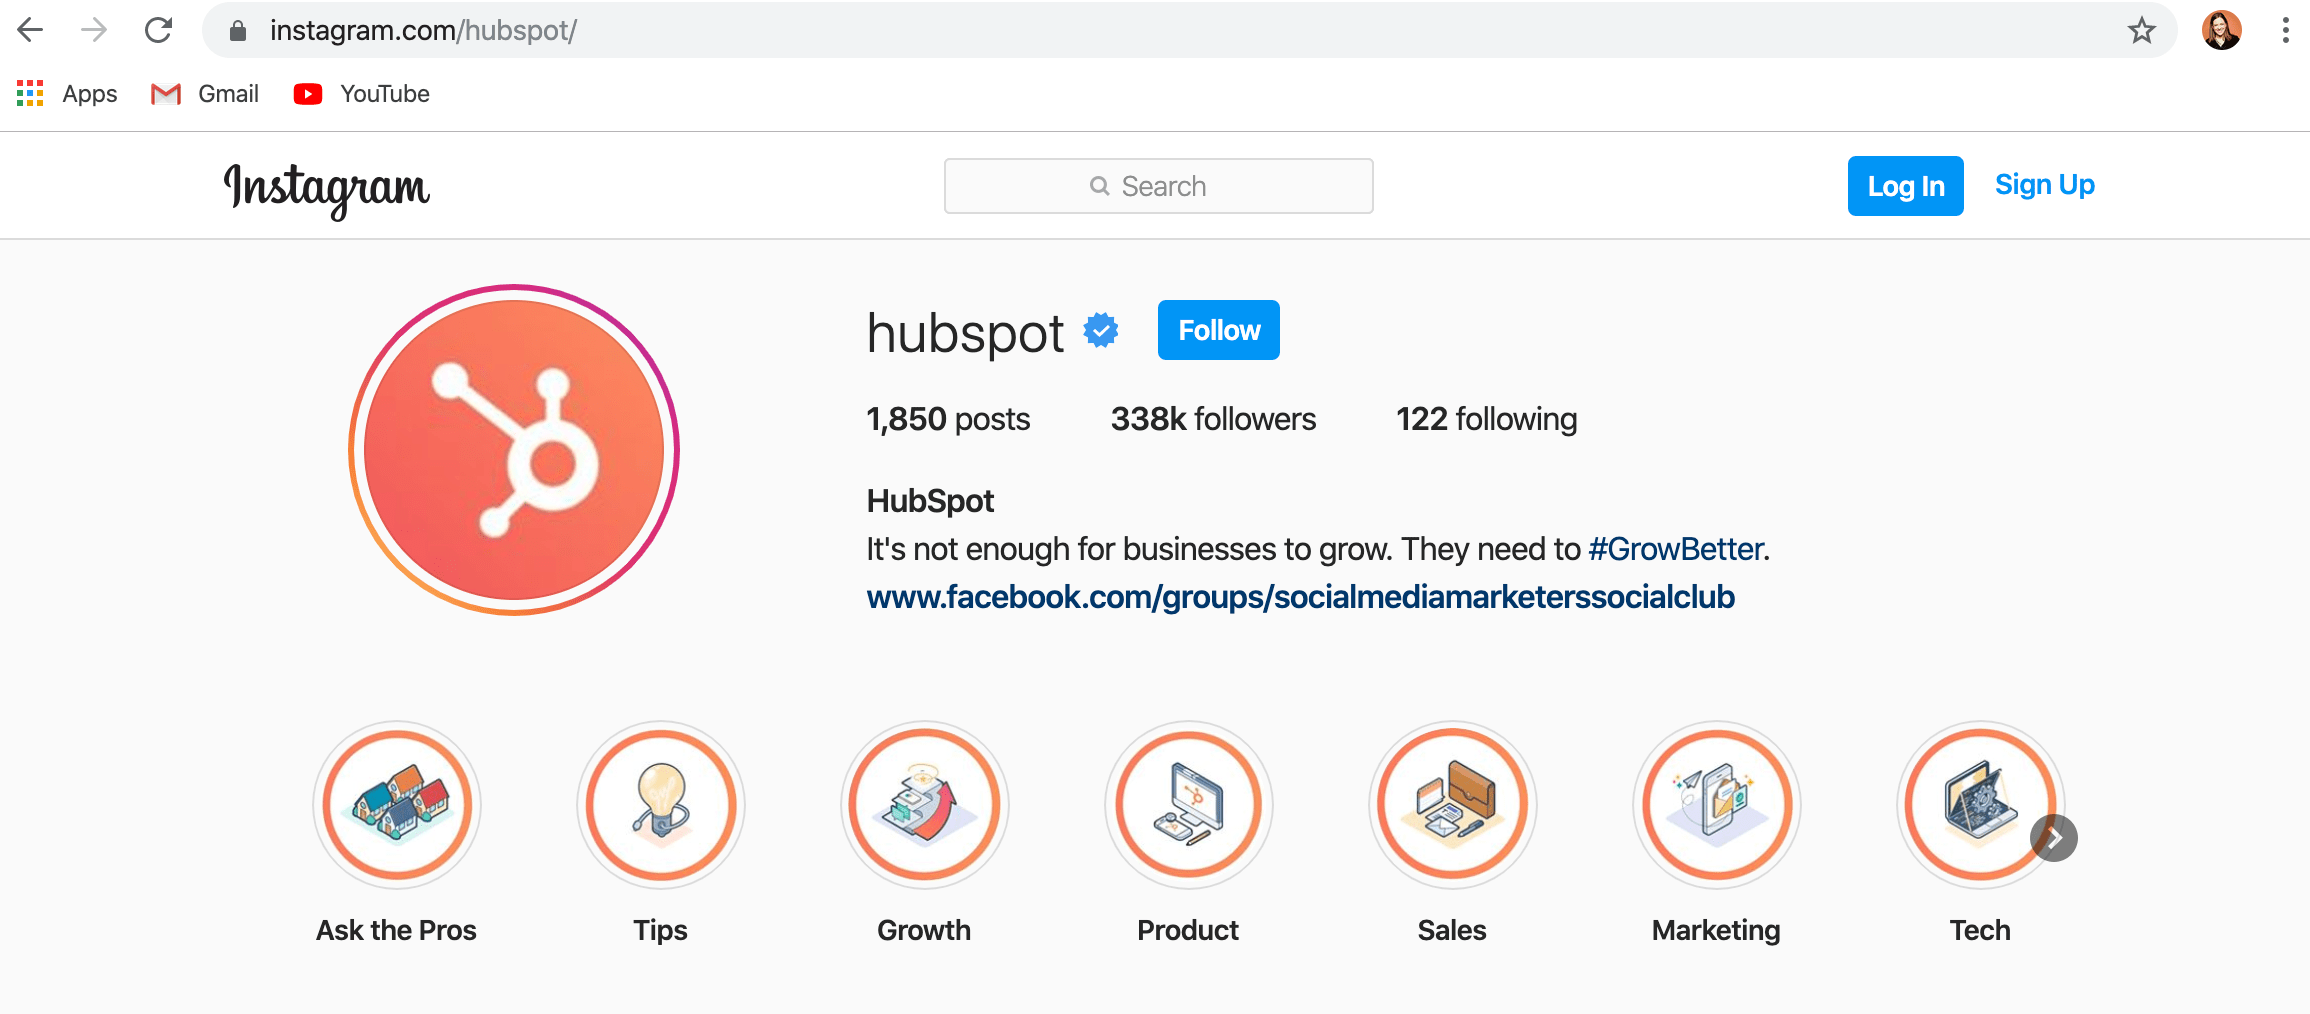
Once you’ve reached this page, you can use the search bar to the left of the “Sign Up” button to browse users who are already active on the platform.
Googling Them in an Instagram Site Search
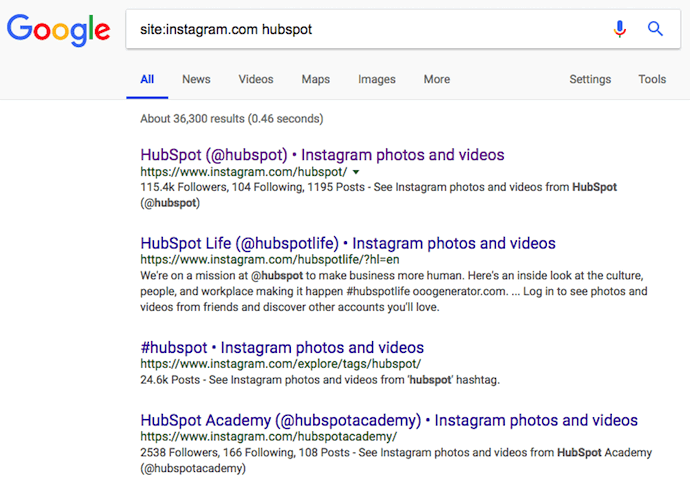
A slightly “hackier” way of looking up users without an Instagram account of your own is to simply search their name in a Google site search. This means telling Google to only look up search terms on a website of your choice (in this case, Instagram).
To site search a user, open a Google search and type the following: “site:instagram.com [name of user].”
By keeping all the text prior to the brackets in your search bar, you can shuffle through names of people and businesses and Google will produce results that live only on Instagram. Here’s what a site search looks like for HubSpot, below. As you can see, Google produces our main profile, our culture-focused HubSpot Life profile, Instagram posts that include the #hubspot hashtag, and our HubSpot Academy Page.
29. Upload and browse video content on IGTV.
IGTV is one of the biggest new features by Instagram to date. This acronym, as you might assume, stands for “Instagram TV,” and it’s basically an Explore page just for users’ video content. The main benefits of IGTV? You can upload videos more than 60 seconds long, and you can create your own channel with, perhaps, a video series that can be broadcast across other video platforms like YouTube.
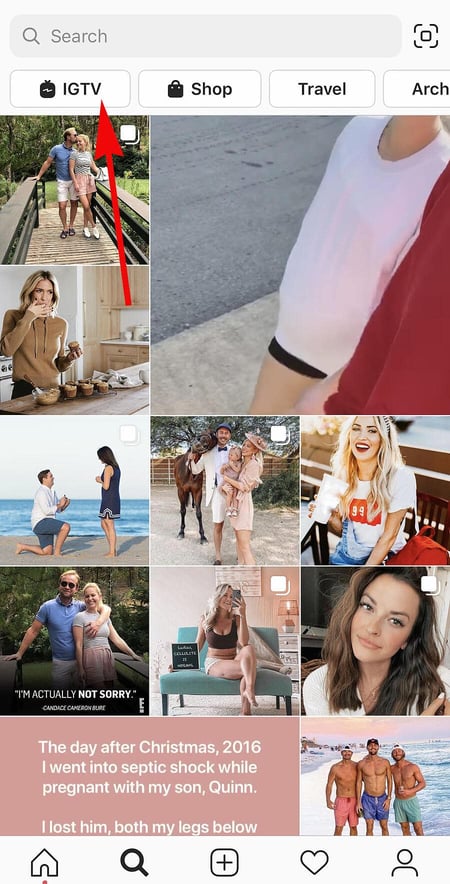
Navigate to IGTV by going to your Explore page and selecting “IGTV” at the top, as shown above. A page will appear featuring topics and videos by some of the most prolific IGTV video creators on the platform today.
As you view more videos, the topics you see on the IGTV homepage will begin to adapt to your interests and serve you more content around those interests. And, naturally, the same goes for your target audience.
Create an IGTV channel by tapping the “+” icon to the top right of your screen, as shown below:
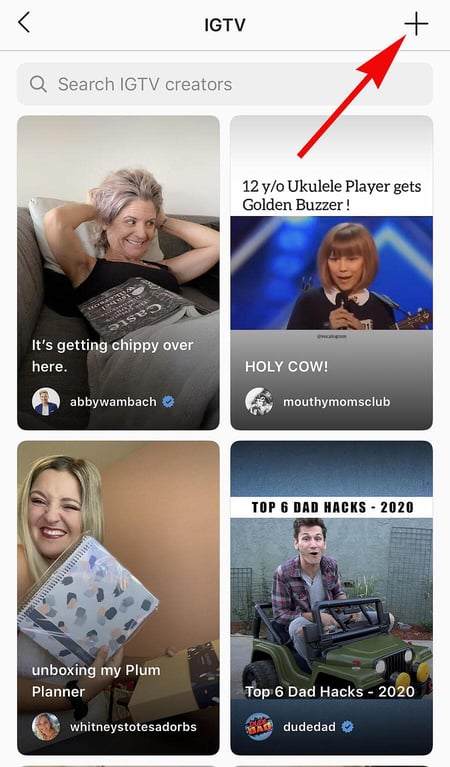
With an IGTV channel created, you can then upload videos directly from your smartphone’s camera roll to your channel.
30. Look through pictures without accidentally liking them.
It’s pretty easy to learn how to like something on Instagram — so easy, in fact, that people do it accidentally: It’s just a quick double tap of the photo once you’ve entered its full view.
The thing is, it’s so easy to do quickly by mistake.
So, here’s a quick Instagram cheat for you: To look through someone’s photos without “double-tap paranoia,” scroll through Instagram feeds with your phone set to airplane mode. Without internet access, you won’t be able to Like a photo, even if you accidentally double-tap it.
The pictures won’t load in the first place if you start on airplane mode, though. You’ll have to go to the feed first to load the posts, then turn on airplane mode, then start scrolling.
When you reach the end of the first rows of posts and want to load more, simply turn airplane mode off, let more load, and then turn it on again. Cumbersome? Maybe a little, but it could be worth the paranoia mitigation.
- To turn on airplane mode on an iPhone/iPad: Swipe up from the bottom of the screen and click the airplane icon. Or, go to “Settings” and then “Wi-Fi,” and switch “Airplane Mode” on.
- To turn on airplane mode on an Android device: Swipe down from the top of the screen. Then, swipe from right to left until you see “Settings,” and then touch it. Touch “Airplane Mode” to turn it on.
31. Browse posts from certain locations.
One fun thing you can do on Instagram is browse photos and videos from a specific location, or taken near your current location. I like to do that when I’m planning a trip somewhere, or want to check out a new restaurant and scroll through the pictures taken there.
Here’s how to do both of these things.
To Browse Posts From at a Specific Location:
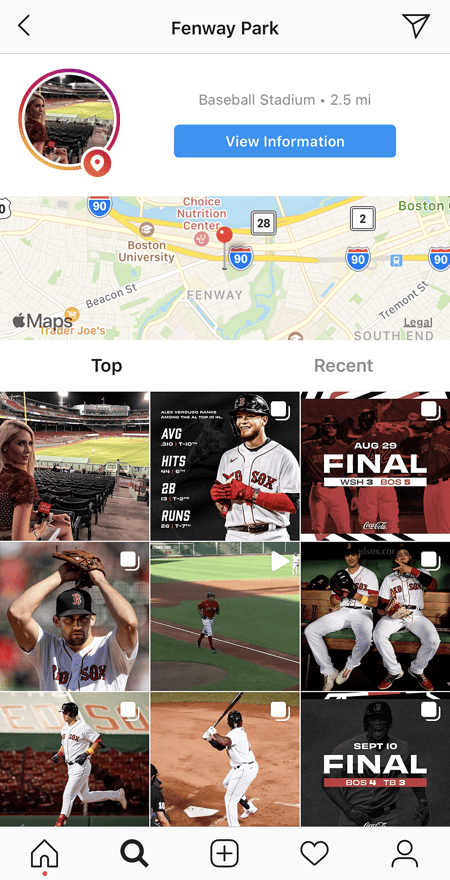
You can either search for a specific place, or you can click into a geotag on an existing photo.
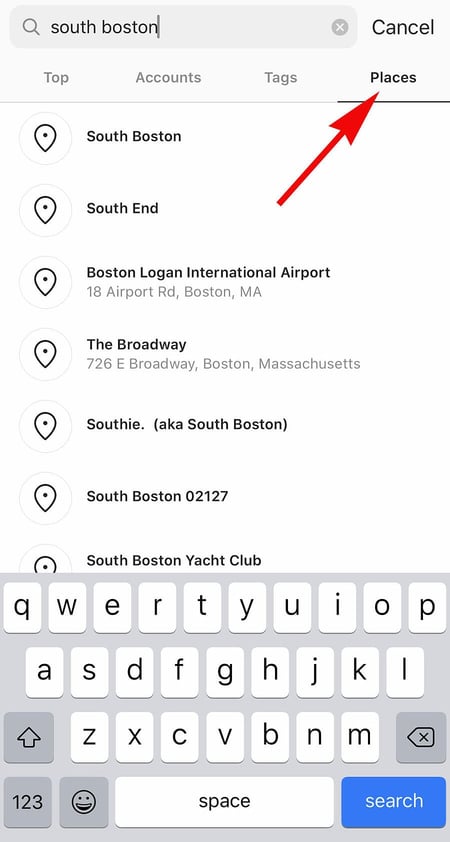
To search for a specific place: Tap the magnifying glass icon at the bottom of your home screen, which will bring you to the general search page. When you click into the search bar at the top, four tabs will appear. Choose “Places,” and type in the name of a place. When you press “Search,” it’ll show you all the top and recent posts that were geotagged with that location.
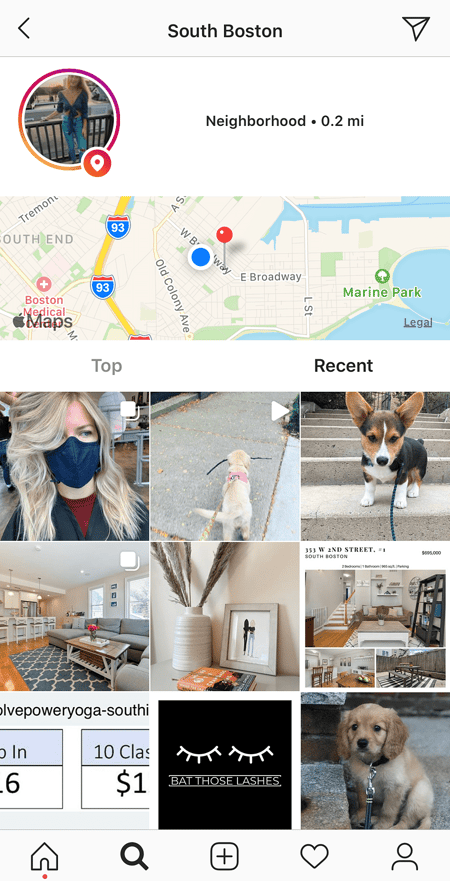 To look at posts with a certain geotag: Go to the photo that’s geotagged with that location, and click the geotag. It’ll show you all the top and recent posts that were geotagged with that location.

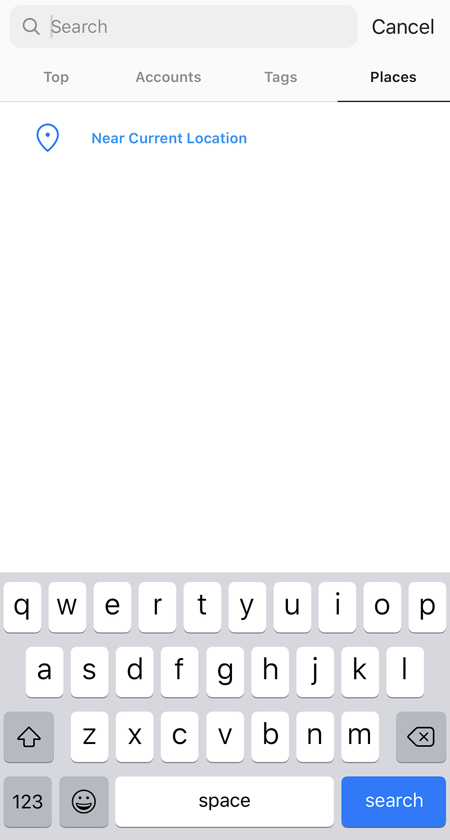
Browse Posts Near Your Current Location:
Follow the same instructions above to get to “Places.” Tap the search bar, and select “Near Current Location.”
Choose which geotag you’d like to browse from the options that appear. Let’s say I chose to browse posts with the Museum of Science geotag. When I click “Museum of Science, Boston” on the menu, I’ll see the top and recent posts that were geotagged at that location.
How to Get Verified on Instagram
A verified badge (the blue check beside a celebrity or brand account name) tells users that you’re, in Instagram’s words, “the authentic presence of a notable public figure, celebrity, global brand or entity it represents”.
For instance, there are plenty of “Reese Witherspoon” fan pages on Instagram, but there’s only one real Reese Witherspoon account, as verified by the blue badge:
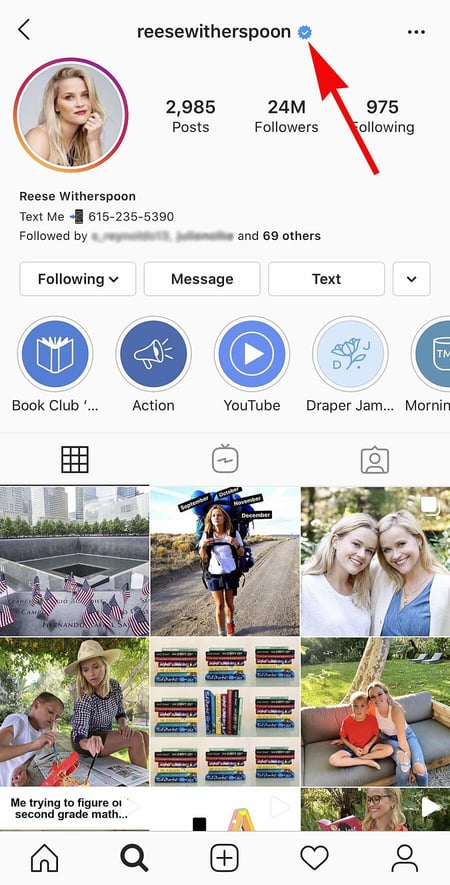
To request a verified badge, you must be a public figure, celebrity, or brand and meet certain requirements. If you’ve determined you fit Instagram’s criteria for verification, follow these steps to request a badge:
- Go to your profile (the person icon in bottom left corner).
- Tap the three lines in the top right corner.
- Click “Settings” > “Account” > “Request Verification”
- Fill out the form, including username, Full Name, Known As, Category, and government-issued phoot ID.
- When you’ve filled out all form fields, click “Send”.
It’s important to note, you won’t necessarily receive a verified badge if you request one. Learn more about what happens after you request a verified badge.
Instagram Features & Hacks
I might be biased, but Instagram is one of the most fun (and visually appealing) social apps around. And now, with these tricks, you can use it to an even fuller extent.
Plus, many of these features can help to enhance your brand’s presence on Instagram. Now, you know how to use the app more efficiently, to make sure you’re only tagged in photos you want to appear on your profile, and have even more ways to engage with the people by whom you’d like to be discovered.

How Market Intelligence Will Make Your Marketing Team More Agile
When I was younger, my dream was to open a cheese store with my family. My mom, brother, sister, and I — we’re all obsessed with cheese.
So anytime I see a cheese store, I’ll go in and sample everything … for research, obviously.
Although I’d never thought about it this way before, I was already thinking in terms of market intelligence and market research (two different concepts, but more on that below).

I was thinking about the product and its competitors.
As a marketer, market intelligence is important because it can help you understand your position in the market, evaluate your product, know your target audience, and conduct competitive analysis.
With this information, your marketing team will be better equipped to position your company in the marketplace. For companies that prioritize intelligence data, decision-making can be five times faster.
Feeling hesitant to rely on intelligence data? Gartner reports over one-third of organizations will rely on decision intelligence by 2023, making data intelligence a must for remaining competitive.
Below, let’s review what market intelligence is, how it’s different from market research, and the intel tools that can facilitate the process.
Market intelligence is used to learn about the existing market, customers, problems, competition, and growth potential. Businesses can gather this information through internal and external sources such as sales logs, surveys, social media, news websites, manufacturers, clients, or distributors.
For instance, companies can gather general demographics and spending habits of their consumers to write better, more targeted social media ads. Additionally, market intelligence can help a company make decisions on product development and establish a stronger brand.
How to Gather Market Intelligence
So, what type of information should you collect? Generally, market intelligence can be divided into four main categories of information:
Competitor Intelligence
This is the process of learning more about your competitors. To do this, you might conduct a SWOT analysis, so you can look at the competition’s strengths and weaknesses. The goal is to uncover why customers would choose competitors over your product or service.
Product Intelligence
Once you’ve analyzed how you compare to your competitors, look inward at your own product or service. The goal is to learn about its quality and performance and identify opportunities for improvement.
If you have a physical product, you should also analyze your manufacturing process. Are you building your product in the most efficient way? This information should help you improve the user experience and improve your product.
Market Understanding
To truly understand how your product is performing, you’ll have to look at the various markets where it’s available. Could you expand your product to other markets? Are there other markets that could benefit from your product or service?
Ultimately, this information should help you understand where your audience is and what gaps exist, so you can fill them.
Customer Understanding
Understanding your customer helps to increase your product or service life cycle. That’s because it’s usually more expensive to gain a new customer than to keep an existing one.
For this reason — and many others — you have to know your audience. Why do your customers buy from you? What challenges do you help them resolve? The goal here is to gather the information that can help your marketing team come up with targeted campaigns.
Overall, gathering market intelligence should answer questions like:
- Where should we devote more resources?
- What markets can we enter next?
- What are our customers purchasing patterns?
- What audiences should we market to?
Now, you might be wondering, “How do I gather this information?”
To conduct market intelligence, you’ll use internal and external sources of data, such as:
- Surveys
- Polls
- Forms
- Focus groups
- Interviews
- Observation
- A/B tests
- Competitor tracking analytics
Depending on the analytics you have available, a lot of this information can be found on your content management system (CMS) or customer relationship management (CRM).
However, before we jump into the software you can use to find this information, I know you’re probably thinking, “How is this different from market research?” Let’s dive into that below.
Alternatively to market intelligence, market research focuses on learning more about the buyer’s research process and what influences their buying decisions.
Example of Market Intelligence
Let’s walk through an example of how a fictional company could use market intelligence to create a competitive advantage.
JKL Podcasting Co offers online software podcasters can use to record, edit, and distribute their podcast to major streaming platforms. As marketers at JKL look to expand the company’s user base, they performed an in-depth analysis of the market for podcast recording software.
In this analysis, they covered four areas:
- Competitor landscape — They identified the top-ranking podcast recording software companies to understand their product features, pricing model, sales funnel, marketing tactics, and customer demographics.
- Product — After gathering competitor information, they worked with their product team to gain a deep understanding of their own product including key features, how it was like competitor products, and what differentiated it from competitor products. They also learned about up-and-coming features launching later in the year.
- Market analysis — Next, the team did research to understand the overall valuation and growth potential of the podcast recording software market. They learned podcast listenership has grown over the past decade and is expected to grow more in coming years, which could lead to more podcasts being produced. With seeing growth and investment in the podcasting space, along with increased interest in people wanting to start podcasts, marketers at JKL learn there is a potential market for new, or up-and-coming podcasters who want easy-to-use software.
- Customer base — Finally, the JKL marketing team reached out to a focus group of their current customers to understand their relationship to the product. The customers walk them through their podcast production workflow using JKL software and share what features they love, along with what new features or changes they would like to see.
After going through this exercise, JKL has gained valuable insight into their competitive landscape, product features to highlight, market growth opportunities, and ways to keep their current customer base engaged and using the platform.
You’re probably wondering, “How do I gather this information?” Below, let’s review what tools and software you can use.
Market Intelligence Tools
For market intelligence to be useful, companies need to conduct research and sort through their collected data for analysis. A lot of this can be done through your CRM software.
To start, many CRMs allow you to create competitor profiles in which you will track your competitors’ products, price points, organizational updates, social media activity, and more.
You’ll likely also find battle card templates in your CRM, making it easy for your sales reps to access the information they need during their calls to combat objections and persuade prospects.
In addition, you can conduct regular win/loss analysis with your sales team to determine strengths and weaknesses in your sales and/or marketing strategy. You’ll want to know:
- What factors are contributing to your wins and losses?
- What other company was the prospect considering for the sale? Why?
- Which competitors are you beating and which ones you are losing to?
If you don’t already have a CRM, there are many out there that cater to businesses ranging from small to enterprise-level. Pricing is usually structured on a monthly basis and can range anywhere from $20/month to $1200+.
If your team would rather focus on specific tools, there are several online options to help you achieve your goals. Below are a few we recommend, divided into sections depending on your goals. Additionally, if you’re a HubSpot user, many of these tools integrate with HubSpot.
Competitor Intelligence
1. HubSpot’s Marketing Hub
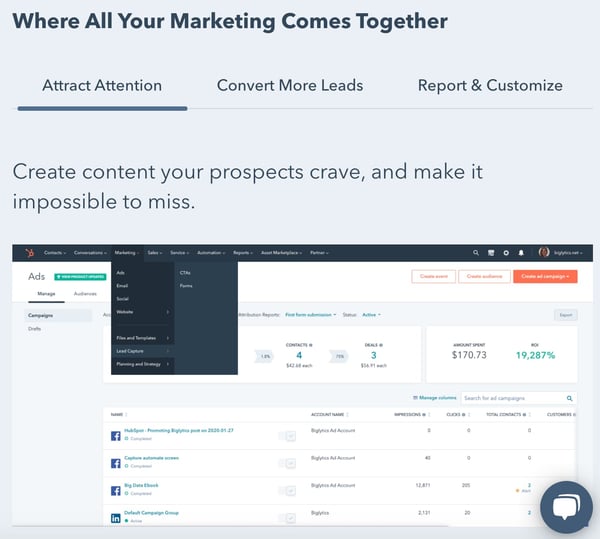
HubSpot’s Marketing Hub has extensive tools to help marketing teams manage, track and scale their efforts. The platform offers both free and premium subscription plans ranging from $45 to $3,200 a month.
2. Crayon
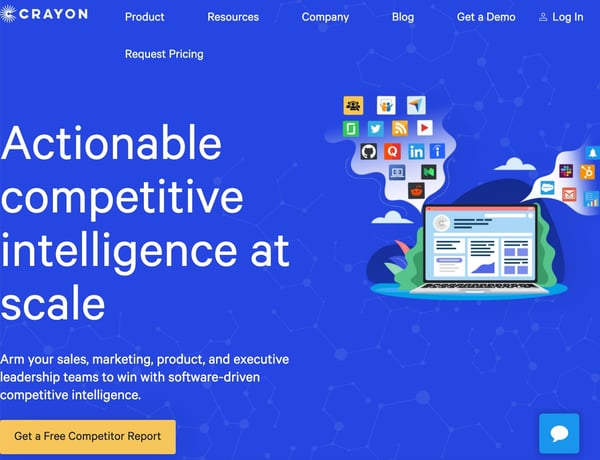
Crayon is one of the leading competitive intelligence (CI) tools in the industry. Its software can fetch and categorize data from over 300 million sources.
The platform also makes it easy for sales and marketing teams to find the intel they need, through battle cards, email digests, and a centralized dashboard.
For pricing information, you must contact the company.
3. SEMrush
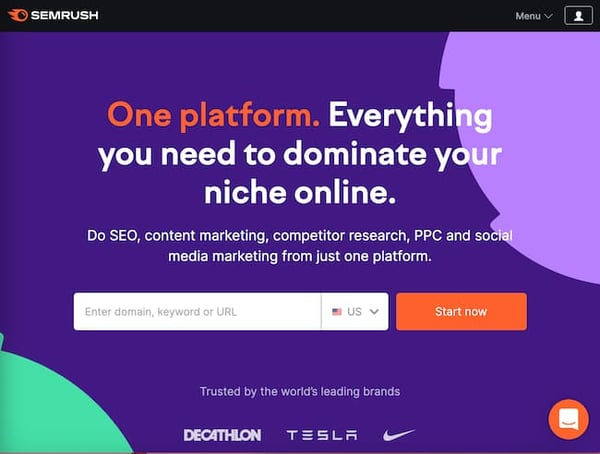
If you want to track your competitors’ SEO performance, SEMrush is a great place to start. The platform has extensive tools, including keyword research, domain overview, and keyword difficulty. This will give you more insight into your competitors’ strategies and how their efforts are performing.
Similar to HubSpot, SEMrush offers a free version of its platform. It also offers premium subscription plans ranging from $119 to $449 a month.
Product Intelligence
1. SurveyMonkey
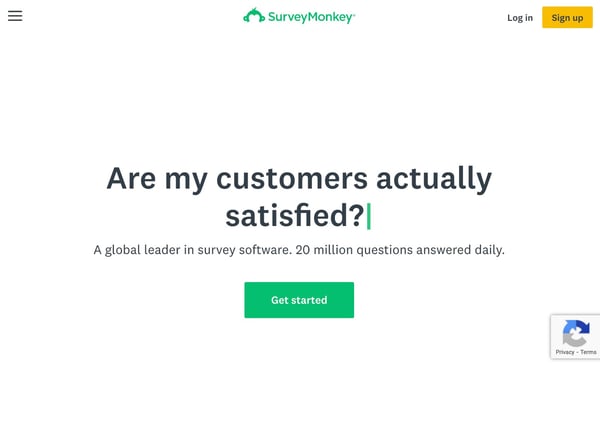
Surveys are one of the best ways to learn more about how customers are responding to your products. Survey Monkey allows you to customize your survey to get the insights you need. Beyond a wide range of survey features like advanced survey logic and pagination, the platform also has tools to promote team collaboration.
Access to Survey Monkey starts at no cost, but their premium versions begin at $25/month.
2. InMoment

InMoment, formerly Wootric, an analytics platform that helps you learn more about customer sentiment. You can gather real-time analytics, which arms your team to make decisions quickly.
The platform also has many integrations for easy team collaboration, including Slack, Zapier, and HubSpot.
For pricing details, you must contact the company.
3. Metadata
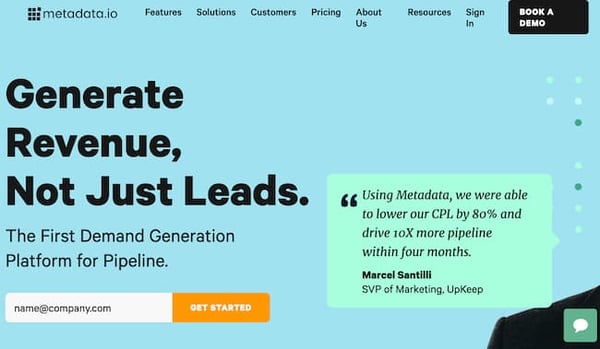
Metadata is a SaaS company that helps B2B brands generate demand for their products and/or services. On the platform, you can identify audiences, conduct experiments, and track the full sales journey.
Pricing starts at $3,950 for growing companies, with custom plans available for enterprise-level businesses.
Customer Understanding
1. Google Forms
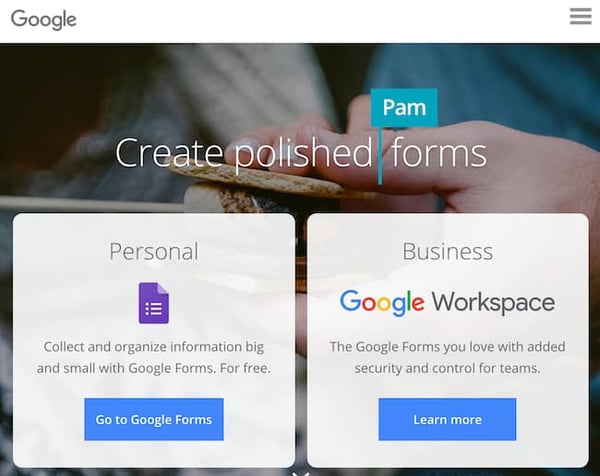
The stand-out feature on Google Forms is the simple and easy-to-use interface. In just a few minutes, you can have a survey ready to send out to your audience to collect data. You can receive alerts every time someone answers your survey and add collaborators.
The best part? It’s free for individuals and included in your plan if you have a Google Business account.
2. CallTrackingMetrics
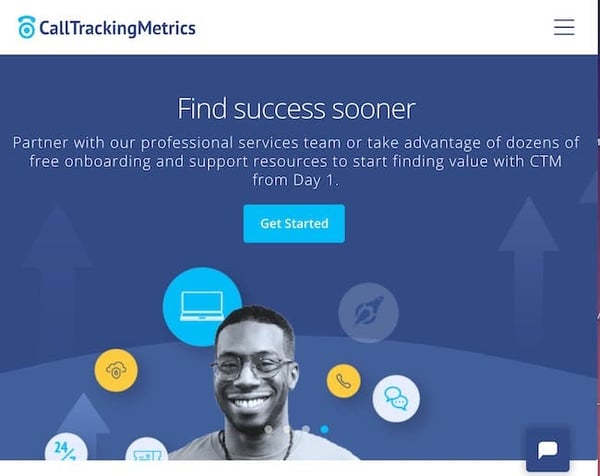
Too often, there’s a disconnect between sales and marketing teams – CallTrackingMetrics helps solve that. The platform offers a robust analytics tool that can identify which marketing campaigns are driving conversions, automate call processes for smoother interactions, and provide analytics — all in one place.
Pricing ranges from $39/month to $299/month, with custom plans available.
3. Google Analytics
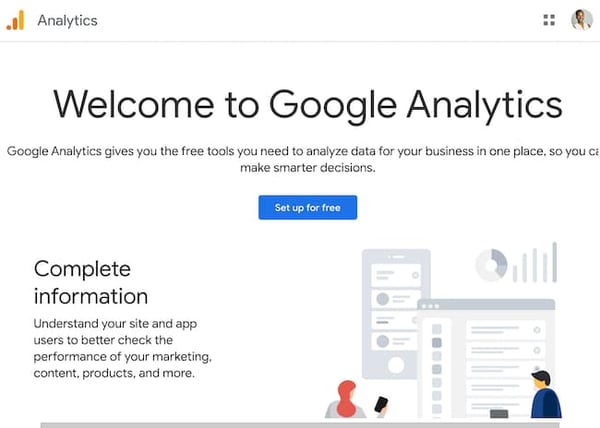
Google Analytics is a website analytics tool with powerful reporting capabilities to understand how users are behaving on your site. It’s a great software for brands that are already using other Google products, such as Google Ads or Google Business, as they work together seamlessly.
On the platform, you can get detailed reports by goal: acquisition, retention, engagement, and monetization. The visual dashboard also allows you to get a snapshot of your site is performing.
The standard version is free and ideal for small to medium-sized companies. Entreprise-level businesses must contact sales for pricing.
How To Leverage Market Intelligence Data
Once you start collecting data, unpacking it is the next step.
But before you dive in head-first, come back to your goal. What do you want to learn and why? Use that to steer your approach.
Having a clear direction is essential during this stage to narrow down what data to focus on. You’ll be compiling a lot of data, and not all of it will be relevant to your main objective. Knowing which will be most impactful will save you so much time and allow you to use your resources efficiently.
Now that you know what to focus on, start organizing and reviewing your data. You’ll want to look for patterns. During this step, keep an open mind. Confirmation bias (the tendency to interpret information to support a pre-existing idea or belief) can greatly impact how you interpret data, so it’s important to consider all perspectives.
Once you identify a theme or trend, dive deeper to answer the 5Ws. When did it start? Who or what is influencing this? Why is it happening? Where else is this trend identified?
From there, it’s time to strategize. Based on what your data is telling you, you can develop an action plan and make recommendations to key stakeholders.
For instance, let’s say your latest intel revealed that consumers are unaware of a key feature in your product line, which is steering them toward your competitors. Your recommendation could be to launch a marketing campaign that highlights that feature, create stronger messaging on your website product pages, and adjust the sales team’s scripts to place more emphasis on this feature and how it’s better suited for your customers than a competitor’s.
The formula is easy: collect, organize, identify, and recommend. Understanding your market is key to entering the market and maintaining your place in it. But if you want to stand out among your competition, you’ll need to leverage market intel.
Market intelligence can give you a holistic view of the market, improve customer retention, boost your efficiency, and give you a competitive advantage. So, I’m not being hyperbolic when I say market intelligence is vital for your company to succeed.

7 Steps to Create a Complete Marketing Strategy in 2022
The truth is, keeping up with marketing trends could be a full-time job.

In 2022 alone, we’ve seen a major shift to short-form video content; the rise and fall of new platforms (looking at you, Meta); and the continuing impact of the global pandemic. In short, what worked for your marketing strategy in the past might not fly today.
To succeed in the fast-paced marketing world — and maintain a sense of relevance with your audience — it’s vital to stay ahead of the curve.
To help ease some of that uncertainty, we’ve created this guide to show you step-by-step how to create a marketing strategy that leaves no stone unturned.
Let’s dive into the critical components of a complete marketing strategy in 2022, followed by some examples for inspiration.
The Importance of Customer-Driven Marketing Strategy Steps
A robust marketing strategy will reach your target audience – this includes those who have never heard of your brand all the way to repeat customers.
Without a defined strategy, you’ll essentially be throwing things to the wall to see what sticks. And it’s costing you cost, time, and resources.
A marketing strategy will:
- Align your team to specific goals.
- Help you tie your efforts to business objectives.
- Allow you to identify and test what resonates with your target audience.
There are seven key steps to crafting a successful marketing strategy: Build your marketing plan, create your buyer personas, identify your goals, select the tools, review your existing resources, audit and plan media campaigns, and lastly, execute your strategy.
Let’s get into the details of each step in the next section. Or you can jump to the section you’re most interested in.
1. Build a marketing plan.
Wait, I have to make a plan for my strategy? What’s the difference?
Your marketing strategy provides an overview of the reasons why your marketing team will need certain resources, take certain actions, and set certain goals over the year. Your marketing plan is the specific actions you’ll take to achieve that strategy.
Not sure where to start? This free marketing plan template can help.
The right template can help you build a marketing plan that identifies your budget for the year, the initiatives your marketing organization needs to tackle, and the marketing channels you’ll use to implement those initiatives.
Plus, it’ll tie everything back to a business summary, to keep you aligned with overarching company goals.
2. Create buyer personas.
If you can’t define who your audience is in one sentence, now’s your chance to do it. A buyer persona is a snapshot of your ideal customer.
For example, a store like Macy’s could define a buyer persona as Budgeting Belinda, a stylish working-class woman in her 30s living in a suburb, looking to fill her closet with designer deals at low prices.
With this description, Macy’s Marketing department can picture Budgeting Belinda and work with a clear definition in mind.
Buyer personas have critical demographic and psychographic information, including age, job title, income, location, interests, and challenges. Notice how Belinda has all of those attributes in her description.
You don’t have to create your buyer persona with a pen and paper. In fact, HubSpot offers a free template you can use to make your own (and it’s really fun).
You can also use a platform like Versium, which helps you identify, understand and reach your target audience through data and artificial intelligence.
Buyer personas should be at the core of building your strategy.
3. Identify your goals.
Your marketing strategy goals should reflect your business goals.
For example, if one of your business goals is to have 300 people attend your annual conference in three months, your goal as a marketer should be along the lines of boosting online registration by 10% at the end of the month to stay on track.
Other marketing goals might be to increase brand awareness or generate high-quality leads. You might also want to grow or maintain thought leadership in your industry or increase customer value.
Whatever your goals, identify what they are and how your marketing organization can work to achieve them over the next year.
4. Select the appropriate tools.
Once you have your goals identified, make sure you have the right tools to measure the success of those goals.
Online software like social media schedulers gives you analytics to help you keep track of what your audience likes and doesn’t. Alternatively, you might consider Google Analytics to measure blog and web page performance.
Additionally, make your goals SMART – to do so, take a look at How to Write a SMART Goal [+ Free SMART Goal Template].
Here are a few tools that can help you track and measure the success of your marketing goals:
HubSpot Marketing Hub
The Marketing Hub allows you to consolidate all of your marketing tools into one centralized platform.
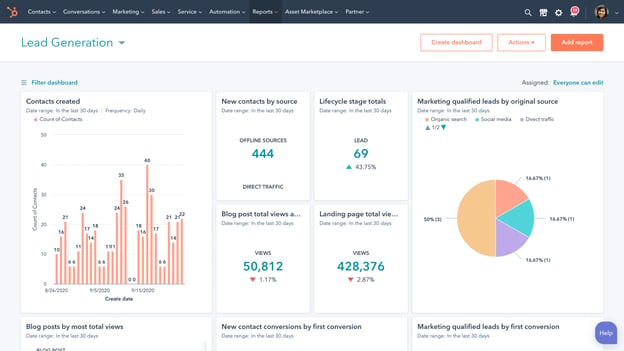
Too often, you’ll find a tool that’s powerful but not very easy to use. With this tool, you can attract users with blogs, SEO, and live chat tools. You can then convert and nurture those leads through marketing automation, the landing page builder, and lead tracking features.
With custom reporting and built-in analytics, you can analyze your data and plan out your next move. Plus, HubSpot Marketing Hub integrates with over 500 tools.
Pricing: Free; Starter, $45/month; Professional, $800/month; Enterprise, $3,200/month.
Trello
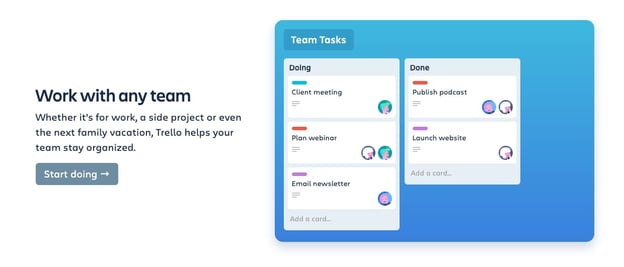
Trello keeps your marketing team on track and openly communicating about the projects they’re working on. Create boards for individual campaigns, editorial calendars, or quarterly goals.
Built-in workflows and automation capabilities keep communication streamlined, and simplicity keeps your marketing team focused on the work that matters.
Pricing: Free; Standard Class, $5/month; Premium Class, $10/month for 100 users; Enterprise, $17.50/month for 250 users.
TrueNorth
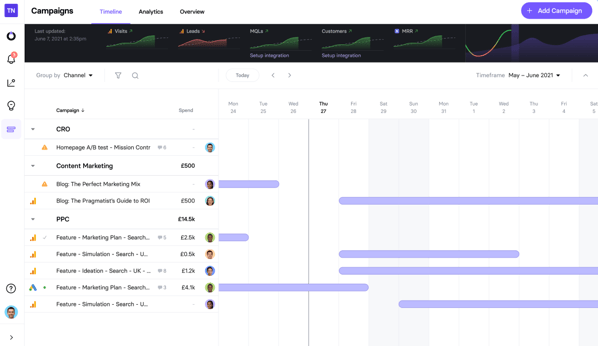 TrueNorth is a marketing management platform built to help you hit your marketing goals. Built specifically for marketing teams, TrueNorth turns your marketing strategy into a visual projection of your growth, which is used to create monthly milestones that help you stay on track.
One of the key benefits of TrueNorth is that it centralizes all of your ideas, campaigns, and results in one place, with everything tied back to your goal.
Pricing: $115/month (free for 30 days).
Monday.com
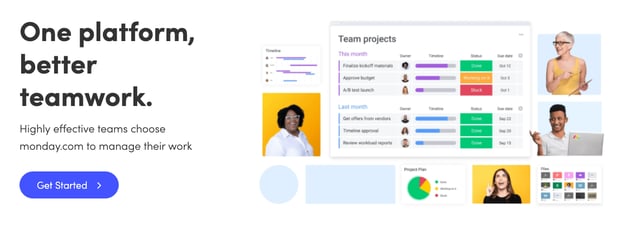 Everything on Monday.com starts with a board or visually driven table. Create and customize workflows for your team and keep groups, items, sub-items, and updates synced in real-time.
You can also transform data pulled from timeline and Gantt views to track your projects on Monday.com and ensure deadlines have been met. Plus, with more than 40 integrations — from SurveyMonkey to Mailchimp and, of course, HubSpot — you can visualize your data and ensure your whole company is collaborating.
Pricing: Basic, $8/month/seat; Standard, $10/month/seat; Pro, $16/month/seat; Enterprise, contact for pricing.
SEMrush
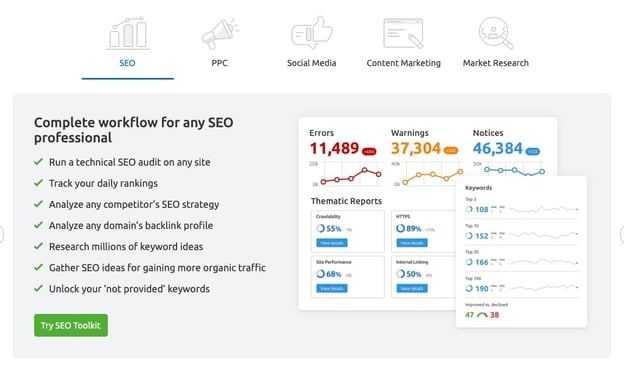 SEO continues to be a huge factor in the successful ranking of your website.
SEMrush allows you to run a technical SEO audit, track daily rankings, analyze your competitor’s SEO strategy, research millions of keywords, and even source ideas for earning more organic traffic.
But the benefits don’t stop at SEO. Use SEMRush for PPC, building and measuring an effective social media strategy, content planning, and even market research.
Pricing: Pro, $119/month; Guru, $229/month; Business, $449/month.
Buzzsumo
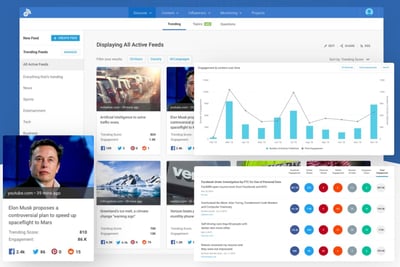
BuzzSumo allows you to analyze data to enhance and lead your marketing strategy, all while exploring high-performing content in your industry.
Use the platform to identify influencers who may help your brand reach, monitor comments, and find trends to make the most of every turn.
As your needs evolve, you can also leverage their crisis management and video marketing tools.
Pricing: Plus, $179/month; Large, $299/month; Enterprise, contact for pricing.
Crazy Egg
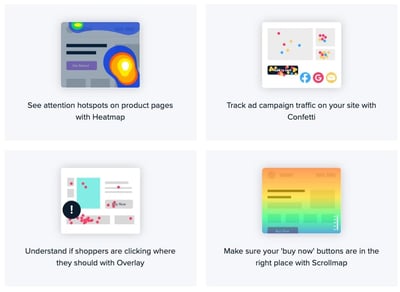 Need to optimize your website this year? Consider getting started with Crazy Egg. You’ll be able to identify “attention hotspots” on your product pages, track ad campaign traffic on your site, and understand if shoppers are clicking where you want them to.
You can even make sure your “Buy Now” buttons are in the best place.
Crazy Egg also offers recordings, A/B testing, and more to help ensure your website is offering the best user experience.
Pricing: Basic, $24/month; Standard, $49/month; Plus, $99/month; Pro, $249/month; Enterprise, contact for pricing.
5. Review your media.
Decide what you already have in your arsenal that can help you create your strategy. To streamline this process, think of your assets in three categories – paid, owned, and earned media.
- Paid media means any channel you spend money on to attract your target audience. This includes offline channels like television, direct mail, and billboard to online channels like social media, search engines, and websites.
- Owned Media refers to any of the media your marketing team has to create: pictures, videos, podcasts, ebooks, infographics, etc.
- Earned media is another way to say user-generated content. Shares on social media, tweets about your business, and photos posted on Instagram mentioning your brand are all examples of earned media.
Gather your materials in each media type and consolidate them in one location to have a clear vision of what you have and how you can integrate them to maximize your strategy.
For example, if you already have a blog that’s rolling out weekly content in your niche (owned media), you might consider promoting your blog posts on Twitter (paid media), which customers might then reTweet (earned media). Ultimately, that will help you create a better, more well-rounded marketing strategy.
If you have resources that don’t fit into your goals, nix them. This is a great time to clean house and identify gaps in your materials.
6. Audit and plan media campaigns.
Cleaning house segues straight into this step. Now, you must decide which content is going to help you.
Focus on your owned media and marketing goals. For instance, will updating the CTAs at the end of your blog posts help you increase RSVPs to your event?
Next, look at your buyer personas. Let’s say you work for a video editing software company. If one of your persona’s challenges is adding clean sound effects to their videos but you don’t have any content that reflects that, make a 15-second demo video for Instagram to show how great your product is at solving that challenge.
Finally, create a content creation plan. The plan should include topic clusters, goals, format, and channel for each piece of content. Be sure to include which challenge it’s solving for your buyer persona.
For ideas on content creation or a more in-depth look at how to create a content plan, check out our post, The Ultimate Guide to Content Creation.
7. Bring it to fruition.
At this point, your market research and planning should help you visualize how your strategy will be executed – and by which teams.
The final step is to bring that all together and assign actions to your plans.
Create a document that maps out the steps you need to take to execute your campaign. In other words, define your strategy.
Think long-term when creating this document. A standard strategy document is 12 months. This structured timeline should be the home base for your strategic marketing efforts.
To paint an example, let’s go back to the video software company.
Maybe in January, you will launch a software update that improves the exportation process for users. In April, you want to publish an ebook that explains editing terms to your buyer personas, and in September, you plan to launch an integration with other software.
Remember, your digital strategy is unique to your business, so the document should be as well. As long as the strategy includes the pertinent details outlined in previous sections, you’ll be set.
Now that we’ve explored the critical steps of a complete marketing strategy, let’s look at some “Why didn’t I think of that?” strategies to inspire your own.
Examples of Successful Marketing Strategies
1. Regal Movies
Digital strategy: Owned media
Regal Movies took the Halloween spirit to a new level, even renaming its Twitter account to reflect the spirit of the season. This “Monster Madness” poll is a fun, interactive way to get followers invested in Regal’s content:

Regal’s tweet is an example of owned media because the company was in full control of the answers followers gave (and, apparently, American Werewolf didn’t stand a chance).
Regal effectively kept true to their brand by using only classic movies in their poll while still putting a modern spin on it.
This is also a good example of how retweets don’t necessarily equal success. While four retweets aren’t that big of a deal, check out the votes: 461. That means there were over 400 interactions with a single tweet.
2. La Croix
Digital strategy: User-generated content, earned media
User-generated content is one of the best ways to gain traction in your strategy.
It demonstrates your appreciation for loyal customers, builds community, and also incentivizes other users’ to promote your products for the chance at a similar shout-out.
Plus, sometimes the content your brand loyalists create is really, really good.

In this case, the consumer is praising the brand’s product. Doesn’t get better than a fantastic review like that.
3. Small Girls PR
Digital strategy: Event marketing
Wait, is that Keke Palmer?

Small Girls PR is a boutique PR company based in New York, and one of the company’s talents is throwing amazing events for their clients, like Olay. This event recap carousel on Instagram is an effective event marketing example, as it boosts awareness for your brand and offers social proof by featuring a public figure.
4. Superside
Digital strategy: Paid media
Design agency Superside launched an Instagram ad to promote a lead magnet: Their digital ad design guide. While the brand may have created the guide specifically for paid promotions, it’s also possible that they repurposed a high-performing blog post into a downloadable ebook.
In this case, all they had to do was repackage their current content, build an ad around it with creative assets, and run it.
In previous sections, we discussed the power of leveraging multiple forms of media in your marketing strategy. This is a great example of it.
5. Target
Digital strategy: Paid media, Twitter cards
If you’ve got the budget for paid media, take full advantage of it.
Paid media is when you pay social channels, like Twitter, to promote your content on their site. By doing this, your content reaches new audiences you might not be able to reach organically:

This inclusive ad from Target about fall shopping uses Twitter cards to promote the brand and make shopping easy with the click of a button.
More social channels are offering ways for shoppers to purchase in-app or close to it, driving sales and boosting exposure for brands.
What to Expect After Following Your Marketing Process Steps
Ultimately, creating a complete marketing strategy isn’t something that can happen overnight. It takes time, hard work, and dedication to ensure you’re reaching your ideal audience, whenever and wherever they want to be reached.
Stick with it (and use some of the resources we’ve included in this post), and over time, research and customer feedback will help you refine your strategy to ensure you’re spending most of your time on the marketing channels your audience cares most about.
Editor’s note: This post was originally published in October 2019. It has been updated for freshness and accuracy.

The Ultimate Guide to Writing a Cover Letter
Nowadays, companies have a computerized system that puts resumes through an online scanner which will automatically reject some applicants and push other applicants through depending on their qualifications.
So, What does this mean for you as a job seeker? Well, the cover letter attached to your application is more important than ever.

We’ve crafted this ultimate guide to cover letters. You’ll find out how to write one that gets read, what to include, and browse tons of templates to gain inspiration.
You can dive straight in, or jump to the section you’d like to read.
How long should a cover letter be?
OK, so you’re all fired up and ready to craft the cover letter of the hiring manager’s dream. But how do you manage the fine balance between in-depth and overwhelming?
A good cover letter is long enough to communicate why the recruiter should pick you but not long enough to bore them.
One page is usually enough to cover everything you’ll need to include, without losing the recruiter’s attention. Let’s go into those items in more detail:
Your Name and Address
Kick-off your cover letter by adding your name and address to the document.
This step is pretty self-explanatory, but it allows the recruiter to easily connect your cover letter to your resume (especially if they’re being printed).
Your name and address also make it easier for the recruiter to get in touch with a job offer. And that’s the aim of our letter, right?
Their Name and Address
Similarly, you should add the name and address of the company or person you’re writing to.
This shows you’ve done your research and allows the hiring manager to receive your letter if it’s sent to a generic company email address.
The Date of Writing
Make it easier for the hiring manager to file your application by including the date on your cover letter.
Even if you’re not successful this time around, the company might store your letter and refer back to it when they’re hiring for another position.
Why You’re Writing the Letter
We know that the aim of a cover letter is to persuade the hiring manager you’re the best fit for their job.
Before you get to the good stuff, be sure to highlight the role you’re applying for, as that can get lost.
Something like this will usually do the trick:
“I’m writing to discuss the content strategist role at HubSpot.”
Why You’re a Perfect Fit for the Job
The next section of a cover letter structure is the fun part. It’s where you’ll convince the hiring manager they should hire you.
In this section, answer these questions:
- Why should this company hire you?
- What skills do you have that will help complete the job better than anyone else?
- What makes you a good employee?
- What qualifications do you have that are relevant to the role?
Once you’ve answered these, the recruiter will have a solid understanding of who you are, and (hopefully) be convinced to bring you on for an interview.
What You Can Offer the Company
Have you ever heard the advice to “always sell yourself in a job application”? That concept can be applied to cover letters as well.
Businesses measure success in terms of results. The company looking for a new employee will want to know what they bring to the table and how you fit into their business goals. New candidates are rarely brought on board solely for the soft skills listed in their resume.
That’s why this part of your cover letter structure is arguably the most important.
In two paragraphs or less, show the business what you can do — and provide examples of how you’ve done it before.
Not only does this give you the opportunity to show off your skills, but the company can picture the success you’ll bring to their business by hiring you.
Your Availability
In the marketing world, we’re always told the importance a call-to-action can make.
Great cover letters end with a brief section on the candidate’s earliest start date.
How to Format a Cover Letter
How to Address a Cover Letter
Earlier, we mentioned the importance of addressing the hiring manager by their name and address. This proves you’ve done your research and ensures the cover letter lands in the right place.
Personalized letters will always outperform generic ones, so including the first name of the recruiter can go a long way.
But in a world where privacy is held close to our chest, you might need to do a bit of digging before finding the hiring manager’s name.
Luckily, you can use the power of the internet to do this.
How to Find a Hiring Manager’s Name
Head over to LinkedIn and find the company’s profile page.
You can do this by entering their name into the search bar or searching for a link to their LinkedIn page on their company website.
Then, click the number of employees to see all employees who are on LinkedIn:
You’ll then see a list of all employees along with their titles. Simply work your way through this list to find the most relevant contact.
Keep in mind that some employees do not have LinkedIn profiles, so you may not find them using this tactic. If you’re unable to track down the hiring manager’s name, a simple “Dear Hiring Manager” will work.
How to Open a Cover Letter
After you’ve addressed the cover letter to the most relevant person, you’ll want to:
- Introduce yourself.
- List the role you’re interested in.
- Explain your interest.
Here’s an example:
“Dear Hiring Manager,
As an avid reader of the HubSpot Blog for the past five years, I am thrilled to submit my application for the content strategist role. I believe that my five years of experience working for B2B SaaS companies have equipped me with the skills needed to thrive in this role.”
In the next two paragraphs, highlight your relevant experience and include key details from each role.
How to Close a Cover Letter
Once you’ve covered
Here are some great options:
- Looking forward to hearing from you
- Sincerely
- Best Regards
Then, sign the cover letter with your full name.
Should you include salary requirements?
The cover letter should focus on why you are a good fit for the role. Discussing salary requirements doesn’t fit at this stage of your application.
Instead, it’s best to wait until you speak to a recruiter or someone from HR to discuss your expectations.
Are cover letters necessary?
Today, in many industries, cover letters are listed as optional. The question is, should you include one if it’s optional?
The answer isn’t exactly clear-cut.
Some research would suggest that cover letters may not hold the same weight as they once did. However, a cover letter can help you stand out among the competition.
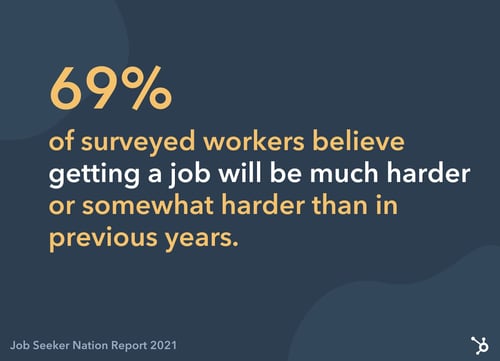
In a 2021 Job Seeker Nation Report by JobVite, 69% of surveyed workers believed getting a job will be much harder or somewhat harder than in previous years. With this in mind, adding a cover letter to your application is a great way to stand out.
Writing a cover letter will allow you to:
- Communicate with the hiring manager.
- Rely on more than just bullet-pointed lists in your resume.
- Build your personal brand.
In short: Cover letters aren’t absolutely necessary, but they do have stark advantages. If there’s an option to upload one when applying for any job, do it — even if it’s not required.
How to Write a Cover Letter
Writing a cover letter can be tricky. Even the best writers can struggle with communicating their skills in the right manner, but these tips will help you create a job-winning document.
The structure of your cover letter is arguably the most important thing about writing one.
Not only does a good structure help you to organize your points effectively, but it can help a hiring manager to quickly review the details you’re sharing.
Featured Resource: 5 Free Cover Letter Templates
Download these free cover letter templates to write a stand-out cover letter.
7 Tips for Writing Great Cover Letters
So, you’ve crafted a cover letter and you’re almost ready to hit send.
Before attaching to your resume and hoping for the best, use these seven tips to make sure your cover letter is as great as can be.
1. Keep it succinct.
Earlier, we mentioned how the best cover letters strike the perfect balance in their length.
Our best tip for writing cover letters is to avoid adding fluff that fails to add value. Every line should highlight why you’re the best fit for the role.
In addition, cut the jargon and corporate-speak that hiring managers have heard before.
Yes, professionalism is important, but be harsh and critical when editing your cover letter. If a sentence doesn’t add value, get rid of it.
2. Tailor it for the company and position you’re applying for.
The one-size-fits-all approach doesn’t fit well with cover letters.
You’re applying for different roles at various companies, but don’t let a change in name and address be the only updates you make.
Remember that a cover letter should explain why you should be hired for a specific role instead of anyone else. It’s highly unlikely that multiple companies will hire for exactly the same position, so take some time to personalize your cover letter for every position you’re applying for.
3. Don’t repeat what’s on your resume.
Although cover letters are submitted along with resumes, be wary of making them carbon copies of one another.
Instead, use the documents to compliment each other by:
- Including new skills.
- Elaborating on how your qualifications would help you in the role.
- Sharing how specific experience gives you an advantage over other candidates.
If you need to include the same thing in both documents, add “as listed in my resume …” rather than copy and pasting the same content.
4. Include data-backed examples.
When referencing experience from your resume, use your cover letter as an opportunity to explain in detail — with examples.
Examples allow the company to picture the success you could bring if they hired you, rather than the person next in their resume pile. But, data-backed examples give an extra edge.
Let’s use an example. Which of these options is more impressive?
- I increased leads for the company.
- I increased leads by 35% in one month through a single blog post, which became the company’s highest lead driver.
It’s option B, right? That’s because it’s descriptive and shows results.
5. Tell a story.
Following on from the previous step, you could elaborate on your data-backed examples by telling a story.
Storytelling helps with relatability and gives a hint of your personality in a cover letter. It also makes the recruiter remember your cover letter amongst a sea of other one-page documents in their review pile.
However, this cover letter tip comes with a warning: Don’t overdo it and make sure it’s relevant.
6. Get a second pair of eyes on it.
Even the best writers make mistakes, but they can leave a negative first impression.
That’s why our sixth cover letter tip is to get a second pair of eyes on it.
Email it to a friend or ask a family member to glance over it before you hit “send.” Ask them to highlight any spelling mistakes or suggestions to improve how you’re communicating with the person reading it.
You never get a second chance to make a first impression. Seeing as though a cover letter is one of the first documents a recruiter sees, try to make it perfect.
7. Be unique.
Finally, make your cover letter unique.
If you’re applying for a creative role, experiment with colors, subheadings, and layouts.
If you’re applying for more of a traditional role, be wary. Not everyone is a fan of bright, bold cover letters, but you can scope your limits by getting a feel of their company culture.
Are they strict and professional, or does the company like to have fun? (You can usually get a feel of this from their website or social media profiles.)
Testing the level of uniqueness can be a case of trial and error. If you’re not getting great reactions from your cover letter, revise and try again.
Cover Letter Examples
We understand that inspiration can go a long way. That’s why we’ve created a one-stop-shop for cover letter examples, which are available to view here.
You’re also free to browse our collection of cover letter samples for extra inspiration on formatting your cover letter and learning from those who’ve helped to land dream jobs.
Now you’re fully equipped to write a cover letter that will help you get your foot in the door.
Editor’s note: This post was originally published in September 2018 and has been updated for comprehensiveness.

How to Write a Press Release [Free Press Release Template + Examples]
In today’s world, brands have to generate their own buzz. Consumers aren’t waiting for the daily newspaper anymore to get their news. Instead, they’re scanning headlines on Twitter, Facebook, and other social media platforms.
One way to control the narrative surrounding your brand is through press releases. Whether it’s sharing a new product release or changes in your organizational structure, a regular cadence of meaningful news can help a company stand out and build mindshare with journalists over time.

In this post, we’ll discuss:
- What is a press release?
- Types of Press Releases
- Sample Press Release Format
- How to Write a Press Release
- Press Release Template
- Press Release Examples
- Tips for Publishing Press Releases
What is a press release/news release?
A press release is an official statement (written or recorded) that an organization issues to the news media and beyond. Whether we call it a “press release,” a “press statement,” a “news release,” or a “media release,” we’re always talking about the same basic thing.
While the heading should contain action verbs, the first paragraph should answer the “who,” “what,” “why,” and “where.” The press release should also contain understandable language and a quote.
Most press releases are succinct at just a page long – two pages tops. Ultimately, companies want to provide enough information so that news outlets have sufficient material for publishing their own stories about whatever the company is announcing in the release.
One thing to remember is that press releases live in the public domain, which means your stakeholders and customers can see them.
So, instead of thinking of a press release solely as a ticket to earning news coverage, consider it as a valuable piece of marketing content.
While there’s no cut-and-dried formula for what a press release should include, here are a few types of occasions to help you carve out a focus for your press release and determine what content would help you broadcast your news in the best way:
Product Launches
The product launch type of press release is valuable to get the word out about the new solutions your organization is offering to consumers.
It should emphasize the product’s specs, pricing, availability, and any other details that may be valuable to consumers.
Mergers and Acquisitions
Organizational change is noteworthy enough to warrant a press release, especially for informing current and future stakeholders about the growth and trajectory of a company.
To announce an acquisition or merger, include details about all organizations involved, information about the merger or acquisition, and quotes from the leadership teams.
Product Updates
Similar to a new product launch, product updates and expansions are also ripe for promotion. Explain what the change is, why it was made, and how it benefits the user.
Events
Press releases are an important component of event marketing to attract promotion from news outlets and other media sources.
You’ll want to include:
- What the event is about
- Who should consider attending
- When and where it will be held
- Pricing
Grand Openings
Whether you opened up a new office, relocated, or are opening for the first time, announce the details with a grand opening press release.
Announce the date and location the grand opening will be held, who is involved, how the grand opening is being celebrated, and the reason for the move (if applicable).
New Partnerships
Similar to mergers and acquisitions, a press release announcing new partnerships is a mutually beneficial marketing tactic.
To effectively execute this type of release, be sure to write a summary about each company, why the partnership was created, who benefits, and any additional important details for current and future stakeholders.
Rebranding
Rebranding is a difficult thing for any business to do, and it can occasionally result in confusion and awkwardness.
One way to make the transition smoother is by announcing the rebrand with a press release, including details on what is changing, the reason for making the change, dates the changes go into effect, and quotes from the leadership team.
Executive Team Changes
Executives often serve as faces of the company, and a press release functions to kick off this role.
It may include biographical information to establish their credibility along with a photo and other pertinent details.
Awards
When it comes to business excellence, it’s OK to brag. Press releases about awards and accomplishments serve to cement your organization as an authority in your space.
Such a press release includes information about the company and why they were given the award, information about the award itself, and details about the ceremony (if applicable).
When formatting a press release, you want to write it in a newsy, straightforward way so a journalist who might write about it can imagine it as an article on their news site.
To start, here are the basics every press release should include:
- Your contact information located on the top left corner
- The phrase “For immediate release” located on the top right
- A headline that quickly explains the announcement
- Your business location in the first sentence of the press release
- A quick bio about your company at the end of your press release.
You also might want to include “###” or another signifier to show the journalist that the release has ended. In the past, this prevented busy journalists from waiting or flipping the page for more information when there was no more news. However, this tradition is still adopted and highly-respected today.
Now, onto the body of your press release:
- Your first paragraph should state what the announcement while providing some context around your business and what it does.
- The next two to three paragraphs should include quotes from a company spokesperson or business executive to explain the “why” behind this announcement.
- Your last paragraph should be an “About Us” section that explains what your company is and what it offers.
In this example, Catbrella Inc., a fictitious ad agency that just gained its 10th Twitter follower after two years of paid social media efforts, announces its achievement in a press release.
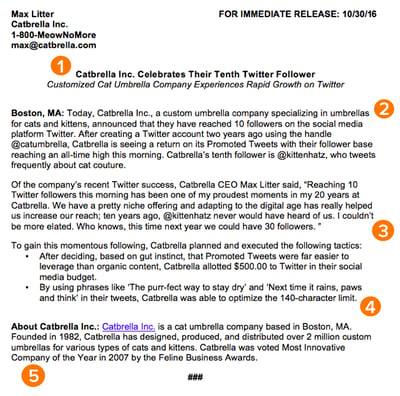
*Disclaimer: HubSpot is entirely responsible for the silliness of this faux announcement.
Writing a press release to break important company news can help businesses grow better, but doing it right is just as important. Here’s how to write a press release, like the one above, step-by-step.
1. Write a compelling headline.
You’ve got your announcement in mind, and now it’s time to get it down in words to share with your community, industry, and followers.
Just like writing the perfect blog post title, setting up your press release for success starts with your headline. You only have one line to work with, which can seem scary, but consider your words carefully to make your headline captivating.
Here are some tips to make your headline stand out:
- Use action verbs.
- Be specific.
- Keep it short.
Most importantly, make it interesting: Keep in mind that reporters get dozens, if not hundreds, of releases each day, so invest the time to write a compelling headline.
Consumers, on the other hand, see news stories all over their timelines. As such, your headline needs to be interesting enough to reel them in.
2. Convey the news value to the press.
If you want your press release to be newsworthy, you have to give readers a reason to care.
A good way to ensure this is by using the reverse pyramid formula when writing your press release: Going from the most important information to the least important.
While the first paragraph of your release should explain the who, what, where, the second paragraph should cover the why.
Reporters don’t have a ton of time to sift through details and fluffy background information — they just need the facts that’ll help them tell your story to someone else from a position of authority.
There shouldn’t be any new, crucial information covered after these sections because the readers could potentially miss them.
3. Offer a tempting quote.
Once you’ve set the scene, it’s time to bring your details to life with a quote that reporters can use for context around your announcement and help paint a picture of how your news affects the given industry, customer base, and landscape.
Ideally, quotes will be from key stakeholders in your company including your executive team, project leads, or those directly impacted by your announcement.
Quoting key figures and authorities underlines the importance of your development. The chosen quote should shape your narrative and emphasize the core of the announcement.
Don’t ask everyone in your office for a comment or feel compelled to quote all 25 people included in the acquisition. Pick one or two critical spokespeople and focus the quotes around their unique perspective.
4. Provide valuable background information on the subject.
In this last paragraph, keep in mind that the reader should already have key details they need regarding your announcement.
Offer details here that strengthen your narrative, like creative or noteworthy ways your company developed the project or announcement at hand. Or, when applicable, comment on the future implications of your announcement.
Another good way to add value to your press release is by using newsjacking. A process of relating your press release to something currently going on to make it more valuable to the journalist and reader.
5. Summarize the “who” and the “what” in a boilerplate.
Twitter is chock-full of reporters lamenting press releases or pitches that don’t clearly explain what the company does or what the announcement is actually about.
Describe what your company does in clear, plain language and include a link to your company’s website early on.
If you cite data, include a reference link for the data source, and make sure every name in the release has an associated title and company as well.
To keep yourself honest on this front, ask a colleague to read the release without context and ask them to relay the information back to you. If they can’t recall the who, what, or why get back to the drawing board.
Press Release Template
This template includes press release templates based on the type of announcement your company wants to make, whether it’s a new product, a partnership, or a change within your organization.
Download This Press Release Template for Free
This template also offers creative replacements for the traditional press release and a guide on how to create a comprehensive promotional plan. You’ll have exactly what you need to drive brand awareness and stand out among your competitors.
Press Release Examples
Many people think press releases have to be chock full of buzzwords and branded terms.
“Big data,” anyone? Five-syllable words you have to look up on Thesaurus.com? Quotes from every executive on the planet that go on for pages? We’ve seen it all. Unfortunately, so have reporters – and they are not fans.
Instead of stuffing your next release with industry jargon, take a page out of our book (OK fine, ebook), The Newsworthy Guide to Inbound Public Relations, and brainstorm some creative approaches for your next announcement.
Can you include new data? A remarkable graphic or video? A shareable SlideShare? If so, a creative angle can help carry your content and increase the likelihood of social sharing.
Now, to get you thinking on the right track, take a look at some creative press release examples below, the type of news each one is reporting on, and what makes the release unique:
1. Microsoft
Type of press release: Acquisition
The first thing that stands out in this press release is the headline. It tells a full story without being too long: It covers who’s involved (Microsoft and Activision), what’s happening (an acquisition), and why it matters (to bring the joy and community of gaming to everyone).
Throughout the press release, you get quotes from leaders in both organizations, helping explain the benefit of this acquisition and how it will move the industry forward.
Toward the bottom of the press release, you get additional context surrounding each company’s market share and how this acquisition will impact the industry.
2. Flourish
Type of press release: Team and office expansion

Organizational changes can seem relatively boring. One way to generate some interest is to include visual elements to add more dimension to the story.
In this press release announcing a team and office expansion, venture capital firm Flourish shares photos of some new hires right at the top, immediately drawing readers in.
The release dives into the reason behind the expansion and the key areas of focus moving forward. Then, we get a quick bio for each hire featured in the image, which can help build excitement surrounding the brand’s future.
The key takeaway here is: Don’t be afraid to use visual elements in your press release, as they can help draw readers in.
3. SuperCom
Type of press release: Event
As the shortest press release in the bunch, SuperCom shows that less is often more.
In this release, security solutions company SuperCom announced its participation in an upcoming conference.
When it comes to events, the most important details are date and location. As long as you have those key pieces, everything else is a bonus.
One thing that would’ve elevated this release is a quote on who can benefit from attending this event and why, as a way to reel in potential attendees.
4. HubSpot
Type of press release: Program launch
We’ve also crafted this comprehensive, easy-to-follow press release template complete with a promotional plan and considerations for your next announcement. We use these same guidelines when writing and formatting our releases here at HubSpot, and created a faux, sample release to illustrate what content goes where and why.
Tips for Publishing Press Releases
Writing a press release is really only half the battle. Once you’re finished with production, it’ll be time to focus on distribution.
Of course, we’re all familiar with the traditional distribution levers we can pull, which include publishing the press release on our website/blog as well as sharing the press release with our followers/subscribers via social media and email.
To get the maximum amount of distribution possible, here are some tips you can follow.
1. Reach out to specific journalists.
Instead of blasting a press release out to every journalist you can find an email address for, focus on a few journalists who have experience covering your industry (and company, hopefully) and send them personalized messages.
Connect the dots. Show why what you wrote connects to what they write.
2. Send the release to top journalists the day before.
Give journalists some time to craft a story around your press release by sending it to them — under embargo — the day before it officially goes live.
“Under embargo” just means they aren’t allowed to share the information in the press release until the time you specify.
3. To avoid competition, don’t publish your release on the hour.
If you’re publishing your press release on a distribution service like PR Newswire or Business Wire, avoid publishing it on the hour (e.g., 1 p.m., or 3 p.m., or 5 p.m.).
The reason? Most companies schedule their releases to go out on the hour, which means if your release goes out on the hour too, it’s more likely to get lost in the shuffle.
Instead, try going with a more distinct time (e.g., 1:12 p.m., or 3:18 p.m., or 5:22 p.m.).
4. Share your media coverage.
If all goes according to plan, and your press release gets picked up by the media, your job still isn’t finished.
To keep the buzz going, you can release a “second wave” of distribution by sharing the specific stories that news outlets write based on your press release.
You can also share the news on your digital channels, like social media and email, to bring awareness to your announcement.
How To Stand Out In The News
The key to keeping your PR strategy new school is forgetting preconceived notions of what public relations is and instead focusing on creating highly remarkable content. Traditional press releases can still be really valuable when executed well.
Instead of ditching releases as a tactic, give them a modern makeover to make them more useful for your marketing.
Think about how you’ve used inbound methods to transform your marketing strategies to be more personalized, approachable, and build relationships. Those same principles apply to your PR strategy: Create content to craft your own story and use tactful outreach to get the media familiar with (and excited about) your brand.
Editor’s note: This post was originally published in November 2019 and has been updated for comprehensiveness.

How Conversion Funnels Create a Better Customer Journey + How to Optimize Yours
Conversion funnels are a fundamental concept in sales. Personally, I like to visualize the funnel as that big scary slide you wanted to try as a kid. You saw your friends whizzing down, which sparked your interest. You watched how much fun they were having, doing your research. And then the benefits of having fun outweighed your fear, so you climbed up and flew down.
Customers take a similar journey through your company’s conversion funnel when evaluating whether or not to buy from you. You have to pique their interest, build trust, and encourage them to take action.

In this post, I’ll explain what conversion funnels are and how they impact your customer journey. Then, you’ll learn how to optimize your funnel to increase the number of people who make it to your conversion point at the bottom.
All leads begin at the top of the funnel. As they learn more about your business, they move down and get closer to purchasing your product or service. This conversion process is called a funnel because companies often have more leads than they do customers, making the top of the funnel a larger pool of people than the bottom.
Understanding how people flow through your conversion funnel is essential to being an effective marketer or salesperson because it helps you engage leads, answer questions about your business, and address concerns. It also lets you organize leads into categories and create customer touchpoints that can entice each group to convert.
That’s why every funnel should be designed for how your customers buy, not how you sell. The focus is on providing such a great experience within the customer journey that you convince them to convert.
Before diving into the details of how to analyze and optimize your funnel, we need to talk about an important aspect of this process: the customer journey.
Customer Journey
The customer journey complements the conversion funnel, but it’s not the same thing. Unlike the generalized, linear conversion funnel, customer journey maps show the individual and circuitous paths people take from the moment they discover your brand to the time they make a purchase.
Let’s say you’re a food blogger who sells cookbooks. Here’s how your customers’ journeys can differ.
-
Customer A sees and clicks on your banner ad, visits your blog, reads an article, signs up for your newsletter, gets a discount email, and purchases a cookbook.
-
Customer B sees your cookbook in a bookshop, buys it, makes the recipes, visits your blog, and subscribes to your newsletter.
The outcomes for Customer A and B are essentially the same, but the journeys and touchpoints are different. So if you know the different ways people enter your funnel, you can optimize for those entry points. That way, you can meet potential buyers where they are and entice them to convert.
That said, most funnels have similar points that ultimately lead to conversion. Let’s take a closer look at each stage of this process.
Conversion Funnel Stages
The top-middle-bottom funnel is a classic model used by sales teams, which focuses on sparking interest, informing potential customers, convincing them to purchase, and building loyalty so they become repeat buyers.
Traditional Conversion Funnel Stages
-
Top of the funnel (TOFU): This is the awareness phase. A potential customer enters the TOFU when they engage with your brand, oftentimes through your website, an ad, an email, or social media.
-
Middle of the funnel (MOFU): This is the consideration phase. The potential customer knows about your brand and engages with it in order to learn more. They may sign up for your email newsletter, follow you on social media, or download guides and templates.
-
Bottom of the funnel (BOFU): This is the conversion phase. A prospect is here right before they purchase, which means you’ve given them good information and relevant touchpoints. Help them convert by making it easy to purchase, offering a trial, outlining pricing, or sending a discount for their abandoned shopping cart.
Let’s see what this looks like visually in the examples below.
Conversion Funnel Examples
HubSpot started off with the traditional conversion funnel structure, using marketing efforts to serve as the top of the funnel. Those leads were then passed further down the funnel to the sales team.
While some conversion funnels are simple, others can be incredibly complex. There are several conversion models you can use to suit your business needs, ranging from a simple three-stage funnel for smaller operations to complex, multi-stage sales funnels for enterprise-level companies. Let’s explore some of the most common models.
Three-Stage Marketing Funnel
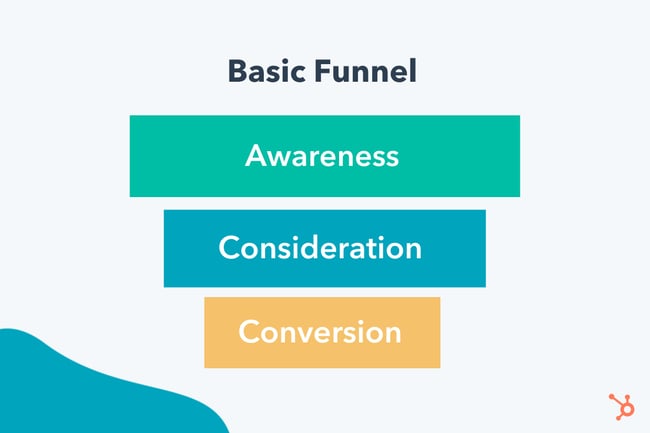
-
Awareness: Get visitors to your website. Attract them with quality blog posts or through social media.
-
Consideration: Use that great content to entice your new visitors to sign up for your newsletter.
-
Conversion: Now that prospects are familiar with your brand, persuade them to make a purchase by offering a discount code for first-time buyers.
AIDA Funnel
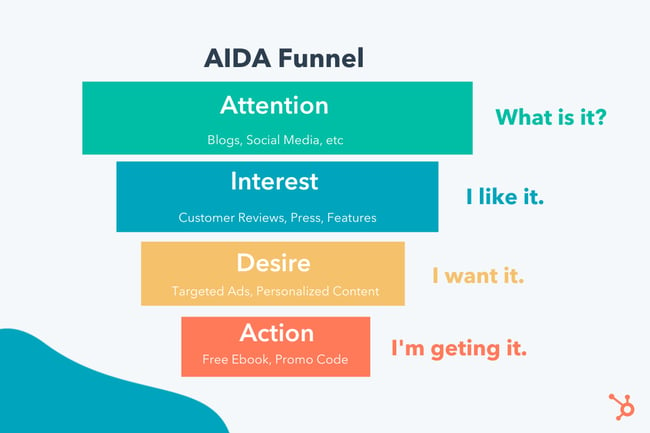 Sometimes called a “purchase funnel,” the AIDA model expands on the basic three-stage structure.
-
Attention: In addition to blog posts and social media, you can use targeted ads to draw visitors to your website.
-
Interest: Pique the prospect’s interest in your product by showcasing the goods. Use case studies to show how your product has helped other businesses. Have notable press mentions? You’ll want to showcase those as well.
-
Desire: Your prospects like you, now you must make them want you. Gain their trust and create an emotional connection. Continue to serve them content that helps them visualize how your product would fit into their lives and why they need it.
-
Action: Now’s your chance to get them to convert. One way is to offer a free ebook, trial, or tool that’s only accessible if they fill out a form with their contact information. If your goal is to get them to purchase a product, you could give them a promotional offer to persuade them to buy.
The detail of your funnel depends on your sales process — the longer your sales cycle, the more complex your funnel. If you have a short sales cycle, your funnel tends to be simpler.
Think about how long it takes to sell $2,000 B2B software versus a $20 t-shirt. The software purchase usually requires months of sales calls, marketing materials, FAQs, and demos. Each of those is a specific point in your conversion funnel. But potential buyers may only need five minutes to figure out that the t-shirt is the right color and fit before purchasing. The touchpoints required here are taking it off the rack and trying it on.
To figure out how complex your funnel is, you can look at the data and perform an analysis. This will help you flush out each part of your customer journey to create a unique visual representation of your funnel.
Conversion Funnel Analysis
Funnels are full of barriers and friction. Analyzing your funnel helps you visualize the flow of potential customers across each point.
You can see key traffic sources and high-exit pages to get a feel for how people end up in each stage of the funnel.
It’s also a way to discover barriers that cause people to leave a page before they convert. If you see a high drop-off rate on one page, for example, you’ll know to prioritize that as you work toward optimizing your funnel.
To understand your funnel, follow these steps for in-depth analysis:
1. Look for high-traffic pages with high drop-off and conversion rates.
High-traffic pages hold a plethora of useful information. Not only are these the pages people see the most, but they’re also where people decide to stay or go. Look at the pages where people drop off (aka leave) and where they convert (take your intended action). Some metrics to collect are:
- Cost Per Acquisition (CPA)
- Customer Lifetime Value (CLV)
- Drop-Off Rate
- Conversion Rate
- Number of Marketing Qualified Leads (MQLs)
- MQLs to Customer Conversion Rate
- Conversion Rate Per Channel (i.e., social, email, and paid search)
2. Discover where your best customers come from.
Not all leads are the same. Some people drop off near the top of the funnel while others make it all the way down. That’s why tracking leads is so important. When you know where your high-quality leads come from, you can analyze that touchpoint or channel to see what you’re doing right. Ask yourself:
- How is this touchpoint different from other touchpoints?
- What information is resonating with people?
- What are the barriers or friction (if any)?
- How many steps do people have to go through before converting?
Identifying what you’re doing right in your funnel is just as important as figuring out what you’re doing wrong. If you need help digging into the data, check out these sales funnel tools or look into heatmap and session recording tools for information on how people navigate your pages.
3. Create an optimization plan.
After you figure out where people are dropping off and converting, it’s time to make an optimization plan. This should include the goals you want to focus on (i.e., more leads, newsletter signups, demos, or software purchases).
Goals let you determine what you want from each touchpoint within your funnel so you can measure whether it’s working or not.
After your funnel analysis, you’ll have a list of priority touchpoints that need to be optimized. Make sure to focus on the areas with the biggest drop-off rates first.
Conversion Funnel Optimization
Every part of your conversion funnel can be optimized to increase the number of people who turn into customers. Think of conversation funnel optimization as finding out what motivates, blocks, and persuades people so you can give them the best experience possible on their unique journey.
To optimize effectively, you need to think about how to give each customer what they want at each phase of the funnel. Using the phases outlined above, here’s what to consider at each step along the customer journey.
1. TOFU: Awareness
Issues at the top of your funnel? Take a look at how you attract new leads. Compare every channel that brings in customers (i.e., social media, search engines, your blog, and paid ads) to see which attracts the most people.
If you’re unsure how customers found you, send out a survey to ask. Look for trends in how people find new brands and put more effort into your best channels. Just make sure you’re attracting the people in your target audience.
2. MOFU: Consideration
Potential customers made it to the middle of your funnel, but it’s your job to keep them moving toward the bottom.
If you’re having trouble with this phase, look at how people learn about your business and engage with your site. Is it easy for people to navigate your site? Or sign up for your email list? Do you have relevant, rich content? Do you offer pricing and product information? Is it easy to get questions answered?
Depending on your barriers, consider these ideas for improvement:
- Product videos and photos
- FAQ page
- Whitepapers, case studies, or blog posts
- Filters and search options
- Newsletter capture
- Discounts
- Check pages for loading speed and broken elements
3. BOFU: Conversion
As the final stop for potential buyers, this is the phase to turn them into customers. You should remove as much friction as possible and encourage people to take the final steps to convert.
Some ways to optimize this final part of your funnel is to make sure product or service pages are fully built out with interesting descriptions, videos, and photos. Consider your checkout process to see if people have issues with payments or abandoned carts. Make it simple for people to compare pricing and clearly outline all product features. You can also send specific BOFU emails or create ads to remind people of their desire to convert.
Think your job is done once a customer converts? Wrong. While you may have pulled a customer through your conversion funnel, there are plenty of opportunities to re-engage them. Not only is customer retention essential for growing your business, but it’s five times more expensive to acquire a new customer than to retain a current customer.
So, once your customers make it through the funnel, invite them to sign up for a new webinar series, download additional templates, send promotions, join a loyalty club, or follow you on social media.
Conversion Funnels Shouldn’t Be Business Models
While conversion funnels are very effective for demonstrating the customer journey for a one-time purchase, they are not a substitute for creating a holistic business model. Relying on a funnel as your business model creates a lack of alignment between each stage of the customer experience.
HubSpot transitioned to thinking of the customer journey as less of a funnel and more of a flywheel — building more momentum as customers move through it.
With the flywheel model, the momentum of your happy customers is used to drive referrals and repeat sales. It’s not a linear beginning and end, but rather a continuous cycle that allows you to generate more business.
Tailor Your Funnel to the Customer
While the customer journey is more complex than my slide analogy, understanding how conversion funnels work can improve this flow. It can help you optimize your funnel, attract more leads, convert them to customers, and boost your bottom line. But all that requires reducing as much friction as possible.
Find what makes sense for your particular sales cycle and use your existing content and channels to stay in touch. Make sure customers value your business and want to come back because you never know who they’ll introduce to the top of that funnel.
This article was originally published May 5, 2021, and has been updated for comprehensiveness.

The Top 16 Best Email Marketing Services in 2022
Email marketing continues to be a critical strategy for marketing (and sales teams) across an array of industries and business types, and an email marketing platform is one of the first additions to a marketer’s tool belt — and for good reason.
Email marketing remains a quick and effective way to engage and nurture leads into loyal customers. It’s also extremely cost-effective — some studies show an ROI of up to 4,400%. Simply, email marketing services exist to make the process of email marketing simpler — they have features and capabilities that enhance and streamline email communication (among other things) to help you identify qualified leads, nurture those leads, and close more deals.
Many of these tools not only offer email support, but they may also help you organize and store contact information in your CRM. But with so many email marketing tools available today, where should you start? We’ll answer those questions and more in this guide to email marketing services — let’s dive in.
What is an email marketing service?
Email marketing services and software streamline all of your email marketing efforts. They have a wide range of features depending on the service you choose — however, they often have functionality related to automation, subscription, general email communication, notifications, monitoring, campaigns, integration with other marketing, sales, and service software, and analytics.
Why is an email marketing service important?
Today, email marketing services continue to be an integral, strategic tool for businesses of all sizes across all industries — they help businesses build strong relationships with prospects and customers all while moving them through the buyer’s journey and maintaining strong communication throughout.
Not to mention, as ESPs continue to develop, features like A/B Testing, automation, and personalization have made the tools even more valuable to a marketer looking to engage with an increasingly fragmented audience.
Now let’s look at some of the best email marketing services today — one of which you might choose to implement at your company.
For each of the following services, we’ve listed notable features as well as pricing details but we still recommend reviewing the service’s product and pricing pages for greater detail.
1. HubSpot Email Marketing Software
Best for email marketing that’s powered by CRM data.
 HubSpot’s free email marketing software is easy to use, has an extremely high deliverability rate, plus all the bells and whistles you’d expect to see within an ESP.
HubSpot Email Marketing Software Features
When creating an email, you can pick from one of many drag-and-drop email templates, or you can craft a custom template tailored to your brand. Once you’ve got your template, incorporating content is simple and intuitive.
You can also personalize and preview your emails for different recipients based on device type, country, or list inclusion — or use a simple personalization token to ensure that each email includes content that’s specific to each recipient.
When it comes time to send an email, using the smart send feature will ensure recipients receive your messages at an ideal time. Additionally, you can run A/B tests to compare different versions of an email to understand which one resonates the most with your audience. You also won’t have to worry about deliverability — HubSpot maintains a 99% deliverability rate across the network for all marketing email sends.
Outside of the email marketing functionality, HubSpot offers a wide range of reports on your email’s performance, letting you judge what’s resonating with your audience so you can optimize your strategy accordingly.
For instance, you can report on something as broad as your overall email performance in Q1 or you get granular and see how one particular lead is interacting with your emails.
Lastly, HubSpot’s automation platform makes it easy to scale your email marketing strategy, which will help you quickly turn leads into loyal customers.
HubSpot Email Marketing Software Price
Hubspot’s Email Marketing Software (and CRM for small to enterprise companies, for that matter) is free forever. However, if you need enhanced capabilities, it may be worth paying for one of the upgraded Marketing Hub plans.
2. Moosend
Best for creating automations and sending multimedia, interactive emails.
 Moosend is an email marketing and marketing automation platform that offers a variety of features at an affordable price.
Moosend Features
Moosend’s platform allows you to create email newsletter campaigns, landing pages, and subscription forms in a fast and reliable way.
With the drag-and-drop editor, you can either create an email newsletter from scratch, using interactive elements like videos, or use one of the ready-made templates. You can create specific campaigns for segments of your audience by using the advanced automation features. You can use one of the ready-made workflow recipes or create your own with the drag-and-drop builder.
The reporting and analytics tools give you measurable results, allowing you to make informed, data-backed decisions.
Moosend Price
Moosend’s pricing model is subscriber-based and consists of three tiers. The free trial includes most features and allows users to send unlimited email campaigns. The Pro plan starts at $7 per month, billed annually, and includes up to 1,000,000 subscribers. For more advanced functionality and additional support, the Enterprise plan is based on custom pricing.
3. Omnisend
Best for creating custom workflows.
 Omnisend is an easy-to-use platform that offers automation workflows for any stage of the customer journey.
Omnisend Features
What separates Omnisend from other email marketing tools is the omni-channel functionalities, which offer greater control over how and where you connect with your audience. In the automation workflow, you can add email, SMS, push notifications, Facebook Messenger, WhatsApp, and more.
If you’re trying to reach a specific audience that might not respond well to traditional email communication, using a tool like Omnisend can help you build and manage more customized, targeted communication workflows. This doesn’t just help you connect with your audience better — it also provides a less disruptive, more personalized experience for your contacts.
Omnichannel features combined with user-friendly segmentation mean you can send the right message to the right person, at the right time, on the right channel.
Omnisend also offers templates for email capture, campaigns, and automation workflows so you can get started quickly.
Omnisend Price
Omnisend has three pricing plans — one of which is free with very limited capabilities as well as a customizable pro plan. Their plans come with a free trial so you can experiment with the service to determine what works best for you.
4. Pabbly Email Marketing
Best for delivering bulk emails.
 Pabbly Email Marketing is an email marketing software that enables you to send bulk emails either by connecting via SMTP or external SMTP.
Pabbly Email Marketing Features
Pabbly provides access to SMTP routing, workflow automation, email scheduling, and much more without any restrictions. With the help of marketing automation and autoresponders included in the tool, you can schedule emails in advance and create triggers to avoid manual follow-up responses.
Additionally, Pabbly offers responsive email templates and a drag-and-drop email editor for easy customization. The email tracking feature allows you to track data such as bounce rate, open rate, and click-through rate so you can improve upon your email marketing and campaigns.
Pabbly Email Marketing Price
Pabbly offers multiple plans based on your number of subscribers. They offer a free plan — which allows you to send unlimited emails to up to 1,000 subscribers — as well as an advanced plan tailored to websites with large audiences.
5. SendinBlue
Best for sending automated nurturing and text message campaigns.
 SendinBlue is an email marketing platform that helps customers send a total of over 30 million automated emails and text messages every day.
SendinBlue Features
On top of email, SendinBlue also has a forms tool that allows you to collect new leads, which you can then segment into specific lists and enter into email nurturing campaigns.
Not sure how to kick off your email nurturing campaign? No problem. SendinBlue has workflows that give you access to a number of pre-made automation campaigns tailored to your specific goals.
If you want to run a more nuanced email nurturing campaign, you can always create a campaign from scratch to meet your specific business needs.
SendinBlue Price
SendinBlue has four main plans, one of which is free, two of which range in price between $25 and $65 per month, and one that is enterprise and requires you to get a customized quote. The plans vary in cost based on the number of emails sent per day/ month.
6. SendX
Best for offering visual email marketing performance data.
 SendX is an intuitive, affordable, and feature-rich email marketing software for marketers and business owners.
SendX Features
With SendX, you can send unlimited emails to opted-in subscribers, across all pricing plans. You get charged per subscriber – not per emails sent – no matter how many lists, tags, or segments you have them in.
You can optimize your email campaigns based on 30+ parameters, including past open behavior, time zone, domain name, email client, ISP, etc. You can automate your email marketing with a rule-based interface and send the right message to the right user using email drip sequences and audience segmentation.
SendX can also help you grow your email lists with forms and popups. You also get pre-built email templates which you can further design with the drag and drop email editor, without HTML.
The tool also features a heatmap report for different types of campaigns to give you a quick visual overview of which CTAs are working and which links people are clicking.
SendX Price
SendX’s pricing is based on the number of subscribers you have. For 1,000 subscribers, plans start at $7.49 per month for the annual subscription (or $9.99 for a monthly subscription). They also offer a 14-day free trial.
7. Constant Contact
Best for creating email drip campaigns and easy-to-use templates.
 Constant Contact is a popular email marketing service that works well for many industries.
Constant Contact Features
The service comes with over 100 email templates that you can either use as-is or customize. Once your email looks good, you can easily schedule it to send to your contacts at any time you choose.
In addition to drip email campaigns, you can also have emails go out at a regular cadence to celebrate specific events — for example, you could have a regular email go out on each customer’s birthday.
Once an email contact list is uploaded, bounces and unsubscribes are automatically updated for you. Constant Contact also has “Plus” features that allow you to execute specific types of campaigns such as coupon offers, donation collections, or surveys.
Constant Contact Price
Constant Contact has two plans depending on the features you need that start at $20 and $45 per month. The price differentiation is related to your number of contacts. They offer a free trial so you can experiment with the service prior to committing to it.
8. Campaign Monitor
Best for building personalized emails.
 Campaign Monitor prides itself on providing powerful, personalized email marketing tools that are simple and easy to use.
Campaign Monitor Features
Their drag-and-drop email editor is intuitive, and the included analytics make it simple to optimize your email strategy and create targeted customer segments.
Personalization is key for campaign monitor. It uses data to increase personalized content and inform your list segmentation to boost your engagement. They also offer a visual marketing automation tool so you can create a unique customer journey at scale.
Not to mention, Campaign monitor has an extensive library of resources available to help you become an email marketing pro.
Campaign Monitor Price
There are three major plans you can choose from with Campaign Monitor ranging from $9 up to $149 per month. You can choose to pay annually rather than monthly and take advantage of the option to pay per campaign if that schedule works better for your needs.
9. iContact
Best for customer service and support.
 iContact has been providing one of the top-choice email marketing services since 2003, as it has an easy-to-use email marketing tool that helps you and your team see results fast
iContact Features
While iContact doesn’t necessarily stand out from competitors in terms of features, their customer support and service teams set them apart. Customers are paired with a strategic advisor to create an effective email marketing strategy right with the tool.
They also have Social+ marketing consultants who help boost your entire online presence through creative social posts that drive traffic to your site.
iContact Price
iContact offers a free plan for up to 500 contacts, and an advanced plan starting at $20 per month. You can choose to pay monthly or annually depending on your needs.
10. MailChimp
Best for actionable data insights to improve your email marketing strategy.
 Over the years, MailChimp has added landing pages and various ads tools to their capabilities but, their email marketing service remains their claim-to-fame.
MailChimp Features
MailChimp has millions of customers in over 175 countries and they use the data they collect off those customers to provide you with actionable insights to improve your email strategy. The tool is flexible enough for an enterprise company, yet simple enough for someone just getting started with their startup’s email marketing strategy.
Best of all, MailChimp has over 300 integrations that help you customize the tool to your business. By using these integrations to further personalize your marketing, you’ll get the most out of your email strategy.
MailChimp Price
MailChimp has four plans to choose from that range in price from free to $299 per month. Aside from the free plan, depending on the option you go with, your monthly payment increases with the number of contacts you have.
11. AWeber
Best for small businesses and entrepreneurs just starting to build their email lists.
 Aweber is an email platform built specifically for small businesses and entrepreneurs.
AWeber Features
The goal of AWeber is to make it simple for those who are just getting started with email marketing to segment their contacts, design a professional email, and start nurturing leads. Customers have praised AWeber for its deliverability — AWeber’s deliverability team monitors their servers around the clock to ensure your campaign consistently reaches the’ inboxes of your recipients.
Aweber Price
AWeber offers two plans: free and pro. The AWeber Pro plan starts at $16.15 per month, and increases in price depending on the size of your list. You can also choose to pay on a quarterly or annual cycle if that’s preferred over monthly billing.
12. ActiveCampaign
Best for segmentation and live chat options.
 ActiveCampaign is a marketing automation platform that offers live chat and a CRM service in addition to email marketing capabilities.
ActiveCampaign Features
By adding a CRM to their functionality, ActiveCampaign can help surface the right leads to your sales team using features like lead scoring. The service also allows you to share dynamic content in your emails — this allows you to provide different experiences to your contacts based on the way you segment them.
ActiveCampaign Price
ActiveCampaign has four plans which you can choose to pay for monthly or annually. Their plans vary based on the number of contacts you have and range in price from $9 to $259. You can experiment with the service before buying it with a free trial, as well.
13. AutoPilot
Best for collaborative email marketing teams.
 Autopilot differentiates themselves from the competitors with their visual marketing tools.
AutoPilot Features
Everything from AutoPilot’s email editor to their automation tool is set up to work via a drag-and-drop interface, making the system intuitive and easy to use.
AutoPilot offers collaborative tools to help your team work together effectively — it allows you to quickly share your work with your team, ensuring everyone is on the same page before you launch a campaign. And with the “annotate & collaborate” feature, you can quickly mark-up a customer journey and ask your team for feedback and assistance.
AutoPilot Price
AutoPilot offers three plans which range in price between $49 and $249 that vary based on your number of contacts. There are three types of billing cycles including monthly, monthly with an annual commitment, and annual.
14. GetResponse
Best for global email marketing audiences.
 GetResponse is a marketing automation service that’s available in over 20 languages.
GetResponse Features
On top of email marketing and automation, GetResponse also offers a CRM, landing pages, and a complete webinar solution.
The service offers over 500 templates to help you get started with email marketing and integrates with Shutterstock, giving you access to a creative library at your fingertips. Also, their drip campaign tool is managed through a calendar interface, allowing you to see exactly when you will be reaching out to your leads.
GetResponse Price
There are four GetResponse plans that you can choose from ranging in price from $15 to $99 per month (plus a customized enterprise-level option that requires you to reach out for a quote). Pricing varies based on your list size and you can pay monthly or annually. Each plan offers a free trial so you can test out the service before investing.
15. Ontraport
Best for creating detailed email marketing campaigns.
 Ontraport offers a full suite of marketing automation tools including ecommerce functionality for businesses with online stores.
Ontraport Features
Ontraport’s visual campaign builder allows you to create detailed campaigns to engage your audience. You can create a campaign from scratch or tap into the marketplace where they offer dozens of the most common marketing campaigns to choose from, including abandoned cart nurturing or webinar sign-up and follow-up.
The service also provides insight into detailed reports so you can gain insight into your pipeline, traffic sources, and conversion timelines.
Ontraport Price
Ontraport offers four plans that range in price between $79 and $497 per month. No matter which plan you choose, you’ll receive one-on-one onboarding. The plans differ in price based on your number of contacts. You can cancel your monthly plan at any time and if you choose to pay annually, you’ll benefit from a discount.
16. Flodesk
Best for creating visually appealing emails and landing pages from easy-to-use templates.
Flodesk is an affordable email provider that makes creating beautiful branded emails simple and easy.
Flodesk Features
Flodesk’s email building tools are intuitive and easy to use for beginners and email marketing experts alike. For those with creative businesses or strong visual brands, Flodesk works like a design tool to craft on-brand emails and landing pages.
Flodesk also offers tagging and workflow options that make creating email automations a straightforward process, and integrations with tools such as Zapier and Shopify to streamline the different areas of your business.
Flodesk Price
Flodesk offers one plan with unlimited emails and contacts for a flat fee of $38 per month. For annual subscribers, Flodesk costs $418 per year. Users can try Flodesk for free for 30 days.
Choose Your Email Marketing Service
Most email marketing tools offer the essentials needed to craft a basic email newsletter, but there are fewer options if you want a range of top-notch features such as complete customization, available support, and data analysis.
Not to mention, as a marketer, you might want to consider combining your email marketing service with a CRM to give you even greater functionality that can impact your email marketing as well as other marketing sales, and service efforts. But. ultimately, the best email marketing tool for you depends on your team’s goals and particular needs — so, review the options above as well as the services’ product and pricing pages to get started.
Editor’s note: This post was originally published in April, 2019 and has been updated for comprehensiveness.