Welcome to My Blog
9 Simple Ways to Optimize Your Website for Lead Generation
Optimizing your website to generate leads is a no-brainer. But it’s not as simple as throwing a “click here” button on your home page and watching the leads pour in (unfortunately).
Instead, marketers and designers need to take a more strategic approach. In this post, we’ll go over some quick ways that actually work to optimize your website for lead generation.

To understand how to optimize our website, we’ll have to first gain a basic understanding of the lead generation process. What components are at play when a casual website visitor turns into a lead? Here’s a quick overview:
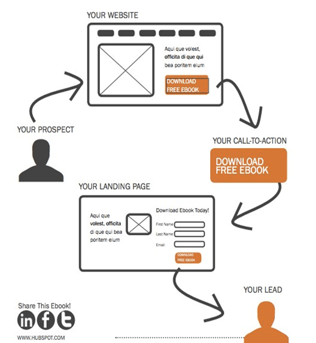
The lead generation process typically starts when a website visitor clicks on a call-to-action (CTA) located on one of your site pages or blog posts. That CTA leads them to a landing page, which includes a form used to collect the visitor’s contact information. Once the visitor fills out and submits the form, they are then led to a thank-you page. (Learn about this process in more detail in this post.)
Now that we’ve gone over the basics of lead generation, we can get down to the dirty details. Here are 10 simple ways to optimize your site for lead generation.
1. Add Forms to the Pages That Get the Most Traffic
It’s important to benchmark your current state of lead generation before you begin so you can track your success and determine the areas where you most need improvement. Some of your pages might make excellent lead generators and you don’t even realize it.
To start, conduct an audit of where most of your online traffic and outreach comes from. Here are some common places a business might get visitors:
- Email Marketing: Traffic might come from users who click through to your website from one of your emails.
- Social Media: Traffic might come from users who engage in a campaign through one of your social media profiles.
- Live Chat: Traffic might come in the form of users who reach out to your customer service team through a live chat window on your website.
- Blog Posts: Traffic might come from your highest-performing blog posts.
Once you identify where your leads are coming from, you’ll want to make sure the pages they’re landing on are doing everything they can to nurture a visitor’s interest.
For example, if, through your analytics tool, you realize most of your potential leads are clicking on inbound links to your website from your Facebook page, your next step is to update the pages they’re visiting with content that keeps them on and engaging with your website. On your most visited website pages, add longer-form content that visitors can access through forms that solicit their contact information.
2. Measure Each Lead Generator’s Performance
Test how each of your existing lead generators is contributing to your business using a tool like Website Grader, which evaluates your lead generation sources (including landing pages and CTAs) and then provides feedback on ways to improve your existing content.
You can also compare landing pages that are doing well with landing pages that aren’t doing as well. For example, let’s say that you get 1,000 visits to Landing Page A, and 10 of those people filled out the form and converted into leads. For Landing Page A, you would have a 1% conversion rate. Let’s say you have another landing page, Landing Page B, that gets 50 visitors to convert into leads for every 1,000 visits. That would be a 5% conversion rate — which is great! Your next steps could be to see how Landing Page A differs from Landing Page B, and optimize Landing Page A accordingly.
Finally, you could try running internal reports. Evaluate landing page visits, CTA clicks, and thank-you page shares to determine which offers are performing the best, and then create more like them.
3. Optimize Each Step of the Lead Generation Process
If your visitor searched “lawn care tips” and ended up on a blog post you published called, “10 Ways To Improve Your Lawn Care Regimen,” you’d better not link that blog post to an offer for a snow-clearing consultation. Make sure your offers are related to the page they’re on so you can capitalize on visitors’ interest in a particular subject.
As soon as a visitor lands on your website, you can start learning about their conversion path. This path starts when a visitor visits your site, and ends (hopefully) with them filling out a form and becoming a lead.
However, sometimes a visitor’s path doesn’t end with the desired goal. In those cases, you can optimize the conversion path.
How? Take a page out of Surety Bonds‘ book. They were struggling to convert visitors at the rate they wanted, so they decided to run an A/B split test (two versions of a landing page) with Unbounce to determine which tactics were performing better on each page. In the end, they ended up changing a link to a button, adding a form to their homepage, and asking different questions on their forms. The result? A 27% increase in lead generation.
If you want to run an A/B test on a landing page, be sure to test the three key pieces of the lead gen process:
The Calls-to-Action
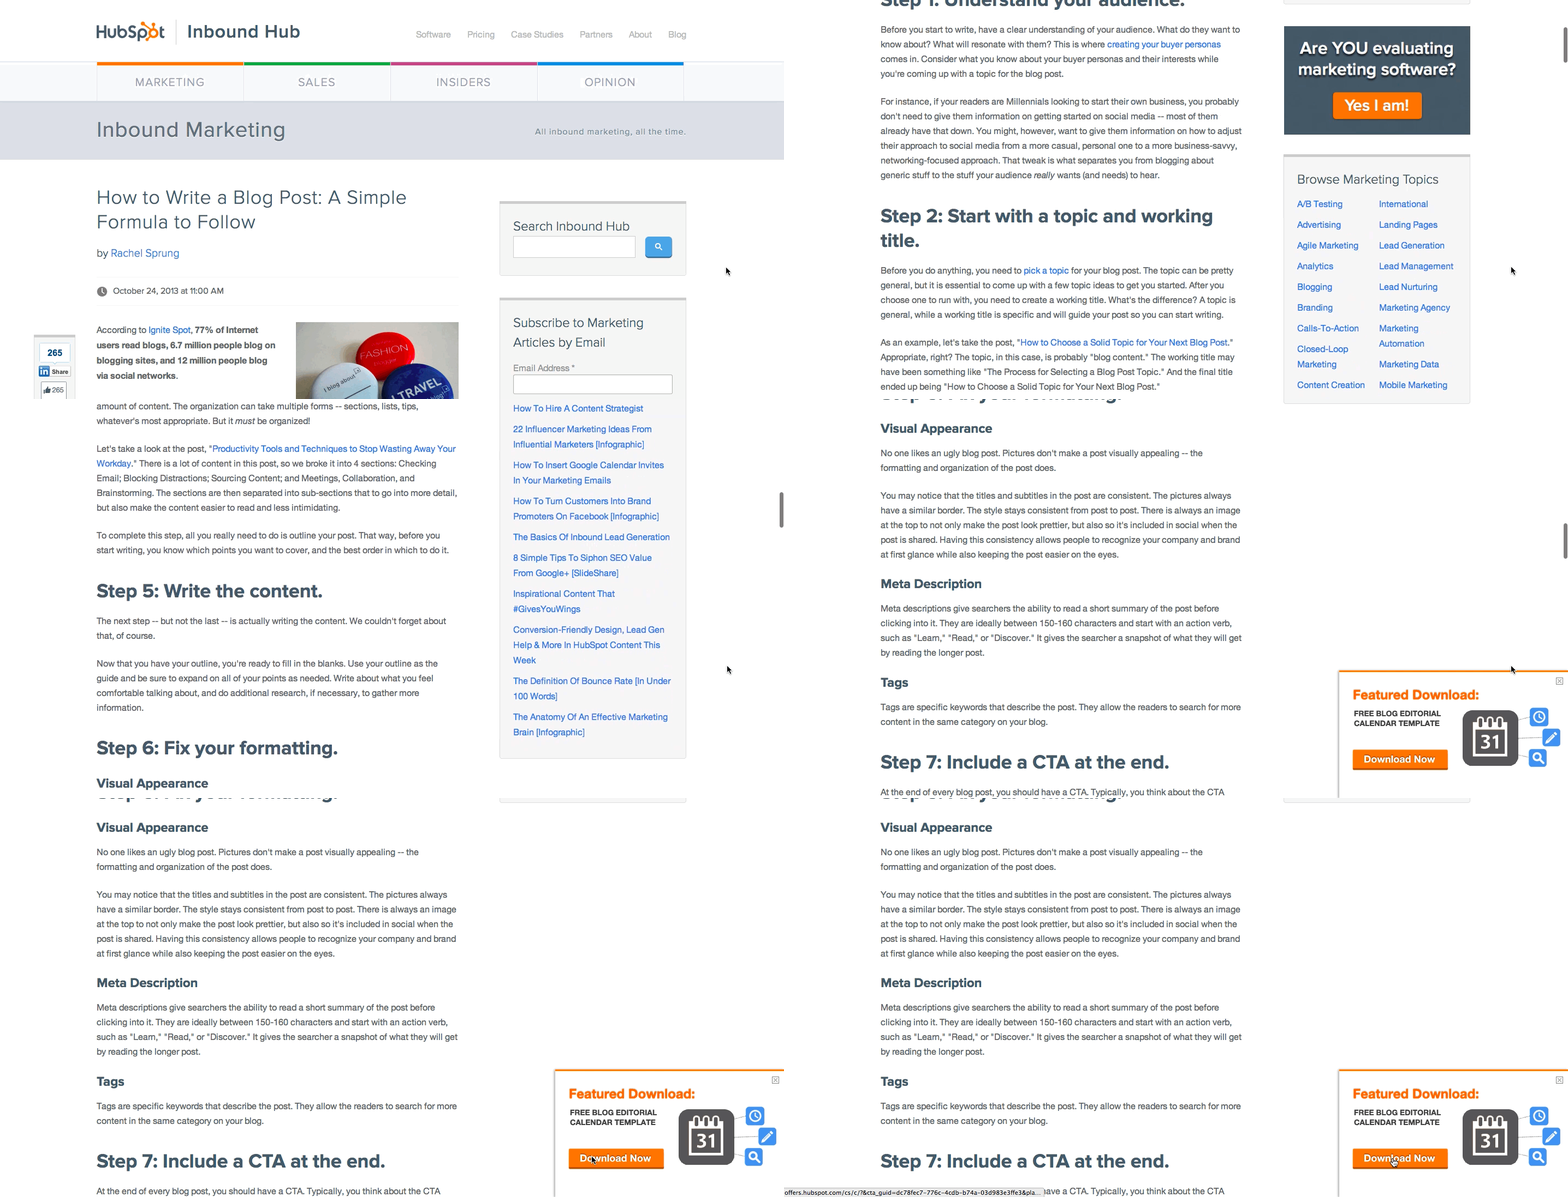
Use contrasting colors from your site. Keep it simple — and try a tool like Canva to create images easily, quickly, and for free. Read this blog post for ideas for types of calls-to-action (CTAs) you can test on your blog, like the sliding CTA you see here:
The Landing Pages
According to a HubSpot survey, companies with 30+ landing pages on their website generated 7X more leads than companies with 1 to 5 landing pages.
For inspiration, here are 15 examples of well-designed landing pages you can learn from.
The Thank-You Pages
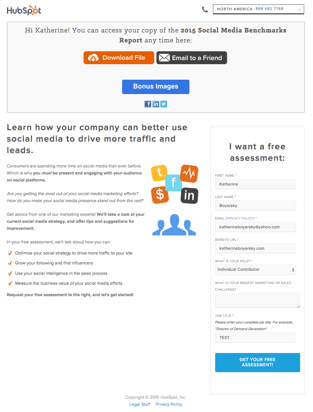
Oftentimes, it’s the landing pages that get all the love in the lead generation process. But the thank-you page, where the visitor is led to once they submit a form on the landing page and convert into a lead, shouldn’t be overlooked.
Along with saying thank you, be sure to include a link for your new lead to actually download the offer on your thank-you page. You can also include social sharing buttons and even a form for another, related offer, as in the example below:
Bonus: The Kickback Email
Once a visitor converts into a lead and their information enters your database, you have the opportunity to send them a kickback email, i.e. a “thank-you” email.
In a study HubSpot did on engagement rates of thank you emails versus non thank you emails, kickback emails doubled the engagement rates (opens and clickthroughs) of standard marketing emails. Use kickback emails as opportunities to include super-specific CTA and encourage sharing on email and social media.
4. Start with a Basic CTA on Your Homepage
If your homepage’s design is what catches a person’s attention, the CTA is what keeps it. However, don’t bombard your visitors with an invitation to see the longest or most complex content you have.
Your homepage sits at the top of the marketing funnel, and should therefore offer either a free trial or subscription to a recurring campaign, such as a newsletter. Consider including one of the following CTAs on the front of your website:
‘Subscribe to Updates’
In general, consumers want their browsing experience to be as non-invasive as their buying experience. Oftentimes they’re not ready to make a purchase when they first find your website.
To teach them about you with no effort or commitment on their part, invite them to subscribe to an email that notifies them of industry trends and product updates. Personally follow up with the ones who opt to stay on this mailing list to gauge their interest and eventually turn them into marketing qualified leads (MQLs).
‘Try Us for Free’
Free trials and demos are a growing company’s bread and butter. They allow you to generate demand in your business and create a contact list of leads who are currently piloting your product.
On your homepage, have your product available to try for free for a limited time using a CTA and form where you can collect their names and email addresses. At the end of each active product demo, follow up with the user to see what they thought of it.
5. Offer Ebooks for Download on Specific Blog Posts
Another non-invasive way to generate interest in your business is to create blog content that promotes an ebook or whitepaper, wherein your website visitors can learn more about the same topic they just read about on your blog.
This is where lead generation meets search engine optimization (SEO).
Blog content is your way of developing the page authority needed to rank your website on Google. Organic visitors who come from Google are often more intent on finding solutions to a problem you can solve — making this form of lead generation quite valuable.
To start, conduct keyword research on a topic that’s relevant to your industry, and create a group of blog posts around this topic. Then, draft a report that delves much deeper into this topic. Package this report into a PDF that your blog readers can download using their name, company, and email address.
Using the three-part conversion path described in tip #2 above, email each person their downloaded resource, following up with them through a kickback email that retains each lead’s interest in the content you’ve provided them.
6. Develop a Live Chat Service for Your Website
Live chat services are increasing not just in their sophistication, but in how many people expect them when learning about vendors they might want to buy from. This means you could be missing out on a major lead generator.
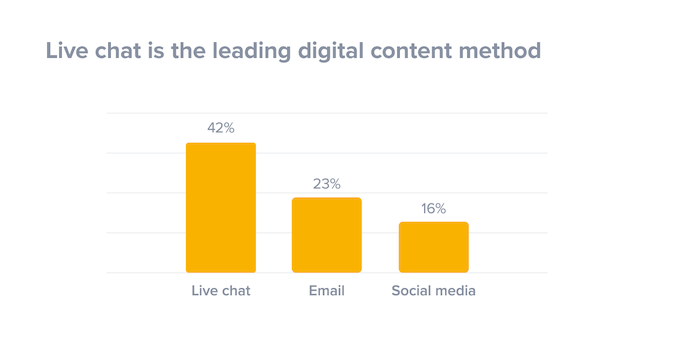 Image via SuperOffice
To generate leads though live chat, audit your website to see which pages your visitors spend most of their time on. With the right development resources, you can install a live chat tool on the pages where customers need the most assistance or information. This allows you to casually collect and log insight on their product needs while answering their questions.
Depending on who starts the chat and the questions your visitors have, you can even integrate your customer service team with your live chat feature. This ensures every website visitor has their needs addressed no matter where the conversation goes.
7. Personalize Your Calls-to-Action
Dynamic content lets you cater the experience of visiting your website to each, unique web visitor. People who land on your site will see images, buttons, and product options that are specifically tailored to their interests, the pages they’ve viewed, or items they’ve purchased before.
Better yet, personalized calls-to-action convert 42% more visitors than basic calls-to-action. In other words, dynamic content and on-page personalization helps you generate more leads.
How does it work? Here’s an example of what your homepage may look like to a stranger:
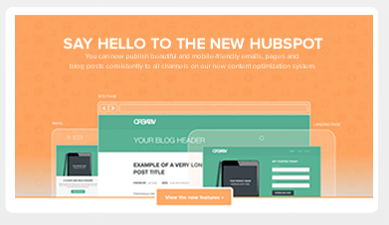
And here’s what it would look like to a customer:
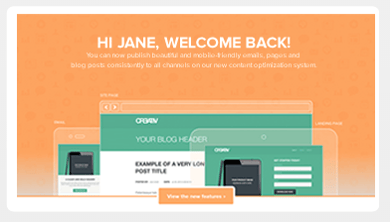
Notice the “Welcome Back” header? Visitors who see website pages that remember them from an earlier date a more inclined to stick around and start a conversation with you.
To get dynamic content (or “smart content”) on your site, you’ll need to use a tool like HubSpot’s Content Management System.
8. Test, Test, Test
We can’t stress this part of the process enough. A/B testing can do wonders for your clickthrough rates.
For example, when friendbuy tried a simple A/B test on their calls-to-action, they found a 211% improvement in clickthroughs on those calls-to-action. Something as simple as testing out the wording of your CTA, the layout of your landing page, or the images you’re using can have a huge impact, like the one friendbuy saw. (This free ebook has fantastic tips for getting started with A/B testing.)
9. Nurture Your Leads
Remember: No lead is going to magically turn into a customer. Leads are only as good as your nurturing efforts.
Place leads into a workflow once they fill out a form on your landing page so they don’t forget about you, and deliver them valuable content that matches their interest. Lead nurturing should start with relevant follow up emails that include great content. As you nurture them, learn as much as you can about them — and then tailor all future sends accordingly.
Here’s an example of a lead nurturing email:
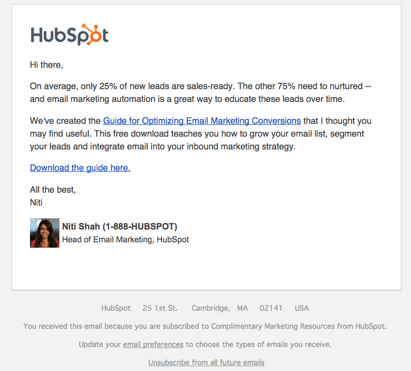
This email offers the recipient some great content, guides them down the funnel, and gets to the point. According to Forrester Research, companies that nurture their leads see 50% more sales ready leads than their non-nurturing counterparts at a 33% lower cost. So get emailing.
You depend on leads to close sales and grow your business. Using the tips above, you can take advantage of every opportunity without letting unsatisfied website visitors slip away.

Mary Meeker’s Internet Trends Report highlights stagnate smartphone shipments, more

Mary Meeker today shared her annual Internet Trends Report at Recode’s Code Conference in California. The report serves as a great tool to analyze some of the year’s most notable trends, and this year is no different…
Apple looking to hire 3D UI engineer, likely for rumored augmented reality glasses

Apple is continuing its hiring efforts related to augmented reality and virtual reality, according to a job posting discovered by 9to5Mac. The company today has posted a new job listing for a 3D UI Frameworks Engineer, and signs point to the position being related to Apple’s ongoing work on an augmented reality headset…
Apple continues expansion in Santa Clara with yet another office, report says

According to a new report from The San Jose Mercury News, Apple is further increasing its presence in Santa Clara, California. The report, citing public records, says that Apple has leased a 62,000-square-foot building and is heavily renovating the space…
Unofficial WWDC app for macOS gets major update with iCloud sync, related sessions, more

Following the update of Apple’s official WWDC app for iOS, the unofficial app for macOS has been updated to version 6. WWDC for macOS allows both attendees and non-attendees to Apple’s Worldwide Developer Conference, which starts next week in San Jose, to access live-streams, videos, and session information during the conference and as a year-round developer resource.
Another very useful feature of the app is the ability to stream live videos and recorded sessions to Chromecast devices.
Apple begins decorating McEnery Convention Center in San Jose as WWDC nears

iPhone: See how much time you’re spending in apps

Whether you’d like to get an idea of how much time you’re spending in various apps or would like get a better idea of how your kids are using their iPhones, follow along for how to easily breakdown your screen time.
How to turn off iPhone X

iPhone X is arguably the most innovative iPhone Apple has ever created. With that, the company has made several changes in terms of interacting with iPhone, including turning off iPhone X.
9to5Mac Daily 084: May 30, 2018

Listen to a recap of the top stories of the day from 9to5Mac. 9to5Mac Daily is available on iTunes and Apple’s Podcasts app, Stitcher, TuneIn, Google Play, or through our dedicated RSS feed for Overcast and other podcast players.
HomeKit Weekly: Replacing your keys with Siri, Control Center, and automation

HomeKit Weekly is a series focused on smart home accessories, automation tips and tricks, and everything to do with Apple’s smart home framework.
In our seventh installment, we’re exploring how smart locks work with HomeKit. 9to5Mac has also teamed up with our sponsor August Home to give away Apple’s latest 64GB (PRODUCT)RED iPhone 8 and August’s Smart Lock Pro + Connect Wi-Fi Bridge this month (a value of over $1,000 USD). Enter here.
Apple TV lineup adds ‘Dickinson’ comedy with Pitch Perfect 3 star Hailee Steinfeld

Apple has placed a straight-to-series order for a new comedy show called Dickinson, starring Hailee Steinfeld.
Apple releases tvOS 11.4.1 beta for Apple TV, macOS 10.13.6 beta for Mac

In addition to fresh watchOS and iOS betas today, Apple has released new beta versions of tvOS and macOS as well. tvOS 11.4.1 beta 1 for Apple TV is now available alongside macOS 10.13.6 beta for Mac.
watchOS 4.3.2 beta 1 for Apple Watch now available

After releasing one bug fix update for Apple Watch yesterday, Apple is back with another today — at least for developers. watchOS 4.3.2 beta 1 is now available for developer testing on all Apple Watch models.
Apple releases first iOS 11.4.1 developer beta

Apple has released the first iOS 11.4.1 beta to registered developers for testing on iPhone, iPad, and iPod touch. iOS 11.4.1 likely focuses on bug fixes to any issues created by yesterday’s iOS 11.4 release.
9to5Toys Lunch Break: 9.7″ 2018 iPad 128GB $400, AirPods from $135, 13″ MacBook Air $900, more

Keep up with the best gear and deals on the web by signing up for the 9to5Toys Newsletter. Also, be sure to check us out on: Twitter, RSS Feed, Facebook, Google+ and Safari push notifications. more…
Apple Music’s new boss makes first big move with new publishing division

Apple Music has seen its first major internal change after Oliver Schusser was named the new head of the service last month with the creation of a new music publishing division.
Messages in iCloud arrives with iOS 11.4, here’s how it works

Messages in iCloud is finally here as part of this week’s iOS 11.4 release, but the long-awaited feature isn’t totally straightforward without a little help. Turning it on, knowing how it works everywhere, saving important messages, and knowing what benefits it actually offers aren’t made obvious by Apple, but we’ve got it figured out for you:
How to Create Infographics in Under an Hour [15 Free Infographic Templates]
Wouldn’t it be great if creating infographics was as simple as writing regular ol’ text-based blog posts? Unfortunately, the reality is that making visual content like this usually takes a lot more time, effort, and let’s face it — skill — than the written word. Usually.
But considering the popularity and effectiveness of visual content in marketing today, you can’t just afford to throw in the towel.
That’s why we decided to take all the pain and suffering out of infographic creation. Seriously — don’t give up just yet. You, too, can create infographics that are professional-looking, high-quality, and completed in under an hour. I’m going to prove it. First things first:
Download our 15 free infographic templates here.
Then, all you have to do is provide the content to use inside them. Easy as that. In fact, I’m going to show you just how easy it is to make your own infographic by demonstrating with one of our 15 infographic templates in PowerPoint (pictured above). Then, I’ll explain exactly what I did so you get a sense of how easy it really is.
How to Create Infographics
- Collect Your Content and Relevant Data
- Choose Your Desired Infographic Template
- Download Your Template to PowerPoint
- Customize Your Infographic
- Include a Footer With Your Sources and Logo
- Add an Embed Code and Pinterest Button, and Publish It
Would you rather watch this tutorial instead of read it? Check out the video below:
How to Create Infographics for Free in Under an Hour
Step 1: Collect Your Content and Relevant Data
Your first step is to organize all the content and data you’ll use in the infographic. You can either collect third-party data or use your own original data. If you use third-party data, just be sure you properly cite your sources — just like in any other good piece of content.
To keep your infographic uncluttered by a ton of different source URLs, a great way to cite your sources is to include a simple URL at the bottom of your infographic that links to a page on your site. You can also list the individual stats used in your infographic, and their sources — such as the landing page to the full offer on which you’re basing this free infographic. I’ll show you what this citation looks like in a minute.
That way, your infographic looks clean and professional, yet people will still be able to access the sources no matter where the infographic gets shared or embedded. It may also even drive visitors back to your site.
Step 2: Choose Your Desired Infographic Template
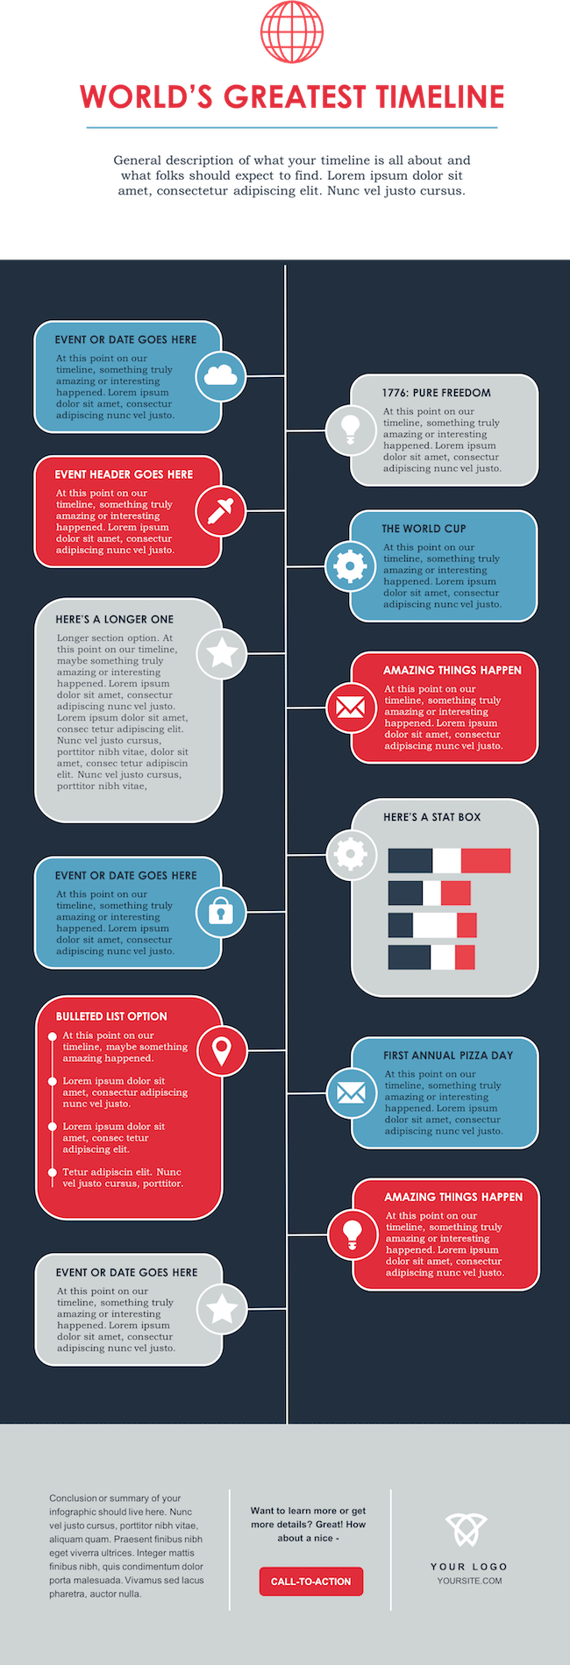
Your next step is to choose an infographic template appropriate for representing that data. The important thing is to choose a template that specifically works for the type of data set/content you want to present. As you saw pictured above, you can download our 15 infographic templates in PowerPoint and choose whichever template you’d like. Some of your template options here include a timeline, flowchart, side-by-side comparison, and a data-driven infographic.
Step 3: Download Your Template to PowerPoint
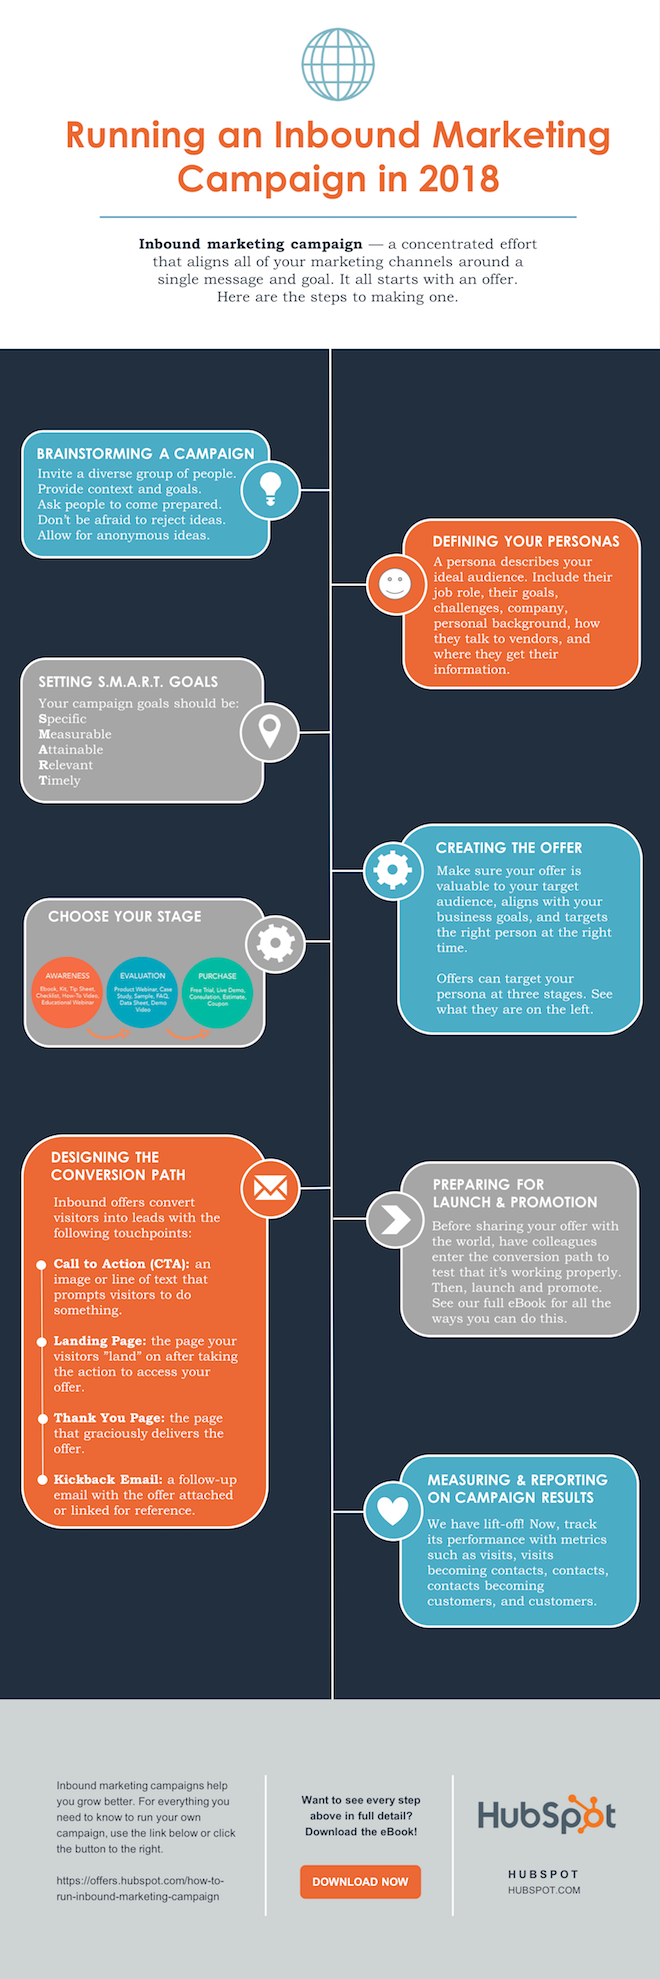
For the sake of time (remember, our mission is to create an infographic in under an hour), I’m going to create an infographic based on a compilation of steps and best practices we’ve put together in our new guide, How to Run an Inbound Marketing Campaign in 2018. For this, I’ve picked the “World’s Greatest Timeline” infographic template from our collection of infographic templates, which is helpful for my data set since it outlines each step of the campaign creation process in order.
The timeline infographic template is pictured below, and full of opportunities to make it your own:
 Step 4: Customize Your Infographic
Obviously, this is the most time-consuming part — but it’s also the most fun! Simply come up with a catchy title, plug in your data/content, and adjust your font sizes and formatting. Feel free to switch up the graphics and colors, too, so they’re relevant to your brand and the data you’re providing. For other templates, you can use the simple graphs and charts provided by PowerPoint to create things like the bar graph or the pie chart. (Note: Download our free infographic templates for a cheat sheet for using PowerPoint’s various features and tools.)
To customize the look of the infographic even more, you might add or change up the colors or font styles.
Step 5: Include a Footer With Your Sources and Logo
Finally, I included a link to my source (which can be found here), as well as the HubSpot logo so people know who created the infographic if it gets shared in social media or embedded on other websites — which is definitely something you want, since one of the main benefits of creating infographics is their shareability.
That’s it! This whole thing took me under an hour to put together — much shorter than it would’ve taken me if I’d started from scratch (not to mention more professional looking … and less expensive than hiring a designer). Here it is:

Share This Image On Your Site
<p><strong>Please include attribution to blog.hubspot.com with this graphic.</strong><br /><br /><a href=’https://ift.tt/2Hw9RZq src=’https://ift.tt/2oi2Lio’ alt=’free_infographic_template_custom-1′ width=’660px’ border=’0′ /></a></p>
Step 6: Add an Embed Code and Pinterest Button, and Publish It
The only thing left to do is to publish and promote your awesome new infographic. As I mentioned earlier, we recommend using your blog to publish it (including your list of sources), including a Pinterest button for visitors to easily “pin” your infographic on Pinterest, and create and add an embed code for visitors to share it on their own websites and blogs, as we did above.
Want more? Read How to Create Top-Notch Visual Content in PowerPoint [Tutorial].