Welcome to My Blog
How to Decline a Job Offer
Before you decline a job offer, ask yourself some key questions:
- Why are you no longer interested in the job?
- Are your reasons for losing interest short-term, or longer-term reasons that you can’t change?
- If you don’t accept the offer, will you regret turning it down?
If you’ve answered all of these questions and still feel like you want to decline, read on to discover the different ways to decline a job offer.

Know exactly what you need? Jump to one of the following sections:
- How to Decline a Job Offer Due to Salary
- How to Decline a Job Offer via Email
- How to Decline a Job Offer Over the Phone
- How to Decline a Job Offer You Already Accepted
How to Politely Decline a Job Offer
Politely declining a job offer focuses on three key things: being prompt, showing appreciation, and giving a brief reason. We’ll discuss each further below.
1. Be prompt.
Let the hiring manager, recruiter, or relevant individual know as soon as you know you won’t accept a job offer. Putting it off can cause inconvenience, and they may have other candidates that they want to notify of their acceptance to fill the position as soon as possible.
2. Show your appreciation.
It’s essential to show your appreciation to the hiring manager or team responsible for interviewing you and the time they’ve spent communicating with you throughout the process. Showing this gratitude goes a long way in terms of expressing appreciation, and doing this can leave a positive impression if your paths ever cross in the future.
3. Give a reason, but keep it brief.
There’s no need to go into incredible detail about why you’re declining an offer, but it can be valuable to give a brief reason as to why you’re moving on. So, for example, you can say something like:
“At this time, I don’t think I should leave my current position,” or, “After some thought, I don’t think this position matches my current career goals.”
It’s also not necessary to give a reason all the time, especially if it’s due to something like red flags you noticed in the boss or if you didn’t like the company. If you have a reason like this, it’s best to simply express thanks and say you won’t accept the offer.
How to Decline a Job Offer Due to Salary
Sometimes you’ll decline a job offer because the salary offered is lower than your expectations, which is a valid reason for looking elsewhere.
Follow the tips mentioned above about politely declining a job offer and, when giving your reason, you can specify that it is about salary. Without going too in-depth, you can be short and to the point and say that the salary does not meet your desired expectations. Here’s an example of how you can note salary as a reason when declining a job offer:
“While this position excites me, I, unfortunately, must decline the job offer as the salary doesn’t meet my desired expectations. I appreciate the opportunity, and thank you for taking the time to consider me for the position.”
How to Decline a Job Offer Over the Phone
There is debate about the best medium for declining a job offer. While some may prefer one medium over the other, the most important thing is that you’re expressing appreciation. Below we’ll go over declining a job offer over the phone.
- First, call at an appropriate time where you can reach the correct person, like when they’re less busy, like right when a workday would begin or after a lunch break.
- Try to speak to an actual person versus leaving a voicemail, but if you can’t get through, you can leave a voicemail asking them to call you back.
It may seem nerve-wracking to decline a job offer over the phone as you have to speak to the direct individual, but it shouldn’t bring too much trouble if you follow this template. Also, it’s likely the hiring manager or responsible interviewer won’t want to spend a significant amount of time on the phone, especially if you clearly state your reason.
“Hi, this is [Your name]. I was hoping to speak with [Name of the hiring manager or DRI].
I’m calling today because I wanted to let you know that I won’t be accepting the job offer due to [Reason]. I appreciate the time you took to interview and consider me for the position and extend an offer. Thank you!”
The hiring manager or responsible person may ask questions, so be prepared for the possibility of more conversation.
If you choose to leave a voicemail, here’s a sample template:
“Hi, this is [Your name], hoping to reach [name of responsible individual]. I’m calling regarding the job offer and wanted to let you know that I can’t accept the offer at this time due to [Reason]. I appreciate the time you took to interview and consider me for the position and extend an offer. Thank you!”
Please note that you don’t have to give a reason; you can simply say you can’t accept the offer.
How to Decline a Job Offer Over Email
Declining a job offer over email follows the same practices: be prompt, express appreciation, and give a brief reason. Also, if you’re using email because you made a phone call but couldn’t get through, mention that and say something along the lines of “I hoped to get in touch with you over the phone, but wasn’t able to get through.”
Here’s a sample template:
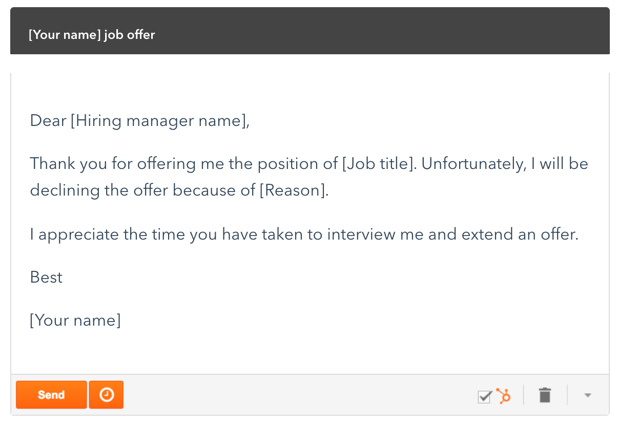 Depending on your reason for leaving, you can input your information. For example, if you accepted a job somewhere else, or you’re simply just not ready to leave your company.
How to Decline a Job Offer You Already Accepted
Declining a job offer you’ve already accepted can be a bit tricky, so here are some tips.
The most important thing to do is read the contract you signed to see if there is a clause or statement that dictates how you should decline the offer. For example, some contracts state that you need to make people aware of this within a specific time frame.
The best way to decline the offer is over the phone, so you can speak to someone and clearly explain yourself. State the reason you’re going back on your acceptance, express appreciation, and say thank you.
Be aware that you may put the business in a challenging situation so that the conversation may be extremely brief.
Here’s a sample template that you can use over the phone or via email:
“Hi [Hiring manager or DRI], this is [Your name]. Unfortunately, after giving it a bit more thought, I will have to decline this offer. I’ve realized that [Reason], and I’m sorry for any inconvenience this may cause your business. I’m thankful for the time you spent interviewing me and extending my offer.”
Over to You
Whatever your reasoning is, declining a job offer can be nerve-wracking. If you use our templates and can be prompt and appreciative, you may find that it’s not so bad, and you may even end up developing relationships that can help you with your career further down the line.

What’s an Instagram Handle? (+4 Ideas to Help Create Your Own)
Did you know Instagram has over 1 billion active users? With so many on the platform, it can be challenging to find one particular person or business. Enter the Instagram handle.

You can think of a handle as the address to your Instagram page. It’s also what people search to find you. An effective handle quickly identifies you while being memorable.
Here, we’ll discuss how to find and change a handle, ideas for creating your own, and whether it deserves a spot on your business card.
It’s easy to confuse an Instagram handle with your Instagram name. However, they both serve different functions. The biggest difference is that an Instagram handle is unique — once you choose it, no one else can claim it. An Instagram name, however, can be the same amongst multiple users.

An Instagram handle has several purposes — first, it’s what people use to tag you in photos, videos, and stories. For example, HubSpot’s handle on Instagram is @HubSpot, which users can type to mention the user in posts.
Second, it creates a link to your profile. If you change your handle, the URL to your profile also changes. Keep in mind that when you pick a new handle, you can’t switch back to your old one until 14 days have passed.

How to Find an Instagram Handle
When you sign up for an Instagram account, you will be prompted to create a handle. While you can let your creativity take the wheel, there are some rules you need to follow:
- Your handle can’t exceed 30 characters
- It can only contain letters, numbers, and periods
- It can’t contain symbols or punctuation marks
- It needs to be unique
The hardest task is the last one — and may take some trial-and-error. To help, we’ve included four Instagram handle ideas to get you started.
Instagram Handle Ideas (+ Examples)
1. Keep it simple.
For businesses, a good rule is to keep it simple — usually by picking a handle with the name of your business. But if your business name is unavailable, you may need to do some finessing.
For instance, suppose you run a print shop, Mint Prints. The handle @MintPrints is the ideal option — but if it’s already claimed, you can alter it without changing its meaning. For example, you could add your location (@MintPrintsBrooklyn) or a word that describes your business (@MintPrintsDesign).
Later, we’ll discuss more variations to try if your first-choice handle is unavailable.
2. Relate the handle to your niche.
Whether you’re into fitness, photography, travel, dance, or art, a great tip for creating a handle is to include words that relate to your niche. This also adds personality and interest to an otherwise static profile.
Check out the example below from food author Lizi Heaps:

3. Avoid using extra characters and symbols.
When a user performs an Instagram search, it pulls up a list of profiles with the most relevant handles. Therefore, adding extra characters or symbols to your username could make it harder for others to find your profile.
Although handles have a 30-character limit, keeping it short and concise is better. Long handles are difficult to remember and harder to discover via search. For instance, which handle below is easier to remember?
Option 1: @SophiasFoodBlog
Option 2: @SophiasFoodBlogNYC5746
4. Add “The” or “I’m” in front of your handle.
As we discussed above, sometimes your ideal Instagram handle has already been taken. Luckily there are different variations you can try to craft another one.
One variation is to add “The” in front of your handle. For example, Faire Plaisir, a vintage homeware company, uses the handle @TheFairePlaisir on Instagram. This minor modification allows the brand to still use its company name, which helps with discoverability.

Another variation is to add “Im” in the front of your handle. For example, actor Angela Bassett has the handle @im.angelabassett. This modification is better suited for individual or personal accounts than businesses ones.

How to Change an Instagram Handle
Before you pick a new Instagram handle, it’s important to understand what does and doesn’t change once you make the switch.
For one, your handle is a key part of your profile’s URL. If someone bookmarks or saves a link to your profile with your old username, they will be redirected to a page that reads, “Sorry, this page isn’t available.” The same goes for every tagged post, comment, and “like” from your old username,
Also, if you link your Instagram handle in an email signature, blog post, website, or business card, it’s essential to update this information — which can be a hassle.
If you’re starting to get cold feet about changing your handle, fear not — Instagram gives you 14 days to change it back. That said, there are valid reasons for changing your handle, such as rebranding.

Here are four steps to change your handle:
- Navigate to your profile and click “Edit Profile.”
- Click on your username.
- Delete your old handle and type a new one.
- Click “Done.”
After you complete these steps, Instagram will automatically update your profile with your new handle.
Should I include my Instagram handle on my business card?

While social media was once a way to connect with friends and family, it now doubles as a networking tool. So much so, a number of professionals reserve a spot on their business card for their social media accounts.
But is this the best option for you or your brand? Let’s consider the benefits:
- It builds and expands your network. Building your brand often goes hand-in-hand with building your network. Putting your Instagram handle on your business card encourages prospects to find and engage with you.
- It puts a face to the name. Providing your Instagram handle gives prospects a chance to know you beyond the surface-level details. Having an online presence is also important to gaining trust and credibility.
- It provides an additional communication channel. Having social media info on your business card lets prospects know that you’re open to communicating in different ways and contexts.
Of course, you also run the risk of crowding your business card with too much information — which is why I recommend linking Instagram only if it’s a platform that you actively engage with.
Final Thoughts
Although picking an Instagram handle may feel like a minor detail, it’s a key component of your digital brand. And with millions of users on Instagram, it’s essential to pick one that’s searchable, memorable, and relevant to you.

20 Ways to Effectively Increase Your Conversion Rate
Have you ever heard the term “analysis paralysis”? It’s the concept that too many choices can inhibit a person’s ability to make a decision. Visitors to your website can experience this too if there are too many places to look or if there’s a confusing design.
When this happens, visitors won’t convert. Therefore, increasing your conversion rate is beneficial to lowering your cost per acquisition.

Below, let’s review how to increase your conversion rate for both your desktop website and mobile site.
How to Increase Conversion Rate on Your Website
1. Use a CRO planner.
Getting started with conversion rate optimization can seem like a daunting task.
The first step to improving your conversion rate? Use a CRO planner.
With a CRO planner, you’ll be able to analyze and develop a strategy for increasing your conversion rate.
For example, with HubSpot CRO planner, you’ll find instructions on how to conduct a site audit, identify areas to improve your conversion funnel, understand users on your site, and go through the process of A/B testing and experimentation.
CRO planners can be helpful because they take through the entire process from A to Z.
2. Shorten your forms.
One reason that users don’t convert is because there’s friction in the process. For example, if you have a long-form, visitors might be hesitant to fill it out.
It’s your job to eliminate hesitation, not create it. By shortening your forms, you’ll create trust among your audience. Plus, it takes less time to fill out so users are more likely to complete it.
3. Include social proof.
Did you know that 89% of consumers check online reviews before making a purchase? The Canvas8 study commissioned by Trustpilot also found 49% of consumers consider positive reviews one of their top three purchase influences. Without a doubt, your reputation and online presence impact your conversion rate. That’s why you should include social proof on your site.
You can link to your Yelp or any other directory page where customers have left reviews.
Additionally, you should also add testimonials and reviews right on your site so visitors don’t have to go to a third-party site.
It should be apparent that your customers have enjoyed using your product or service. If it isn’t, your conversion rate will suffer.
4. Track how people interact with your site.
It’ll be hard to improve your conversion rate if you don’t understand how users are interacting with your site.
But how can you see where visitors are getting tripped up? With website analysis tools, you can see screen recordings of users on your site. You’ll see what they click on, if they skip over an offer, or if they stop filling out a form in the middle.
Additionally, these tools should include heat maps of your site, so you can see what elements stand out and what draws the eye.
A tool like Crazy Egg or HubSpot’s website grader can help you see what you’re doing well and diagnose what areas of your site you need to improve. You should also calculate your conversion rate and analyze why visitors aren’t converting on your site.
5. Add live chat.
When a web visitor doesn’t convert, they might have a question or concern about your product or service.
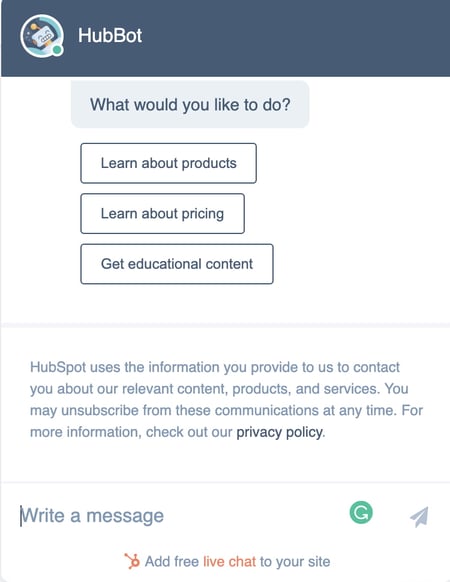
To avoid losing potential customers, you should consider adding live chat to your site.
With live chat, your customer service or sales employees can alleviate concerns of prospects who are on the fence.
6. Test your offers.
Sometimes it can feel like you’ve checked everything — you’ve written a strong copy, included social proof, and have optimized your forms … but you still aren’t converting.
When this happens, it’s time to check your content offers. Do they align with your audience? Are they creative and compelling? Do the offers make sense for the page they’re on?
Think about your current offers and answer those questions.
For example, offering a free trial or consultation is fairly generic. Instead, you could offer something like HubSpot’s Website Grader. With this offer, the customer is getting a lot out of it. They’re getting actionable advice, for free, and they don’t need to clear out time on their calendar to get it.
Tangible and compelling offers always perform better than a generic offer. To improve conversions, you need to analyze and test your content offers.
7. Conduct A/B testing.
It’s not always easy to know what’s working and what isn’t. When that happens, you should conduct A/B tests.
See what types of headlines, colors, copy, layout, and CTAs work for your audience. Get creative with your experiments.
For example, you can try testing an entirely new type of CTA or completely changing the format of your copy.
8. Increase trust and remove friction.
Users don’t convert if they don’t trust your brand or experience friction in the process.
So, how can you increase trust?
You can use several tactics, including money-back guarantees, updating your site content regularly, avoiding spammy links, and making the site easy to use.
If it looks like you haven’t posted a blog in two years or there are a lot of broken links — that’s friction and it creates distrust.
Additionally, you can include team bios so your audience knows who they’re getting information from.
9. Create abandoned cart email campaigns.
Have you ever been on a site, added something to your cart, but decided not to check out? We all do it and that means it’s probably happening on your site too.
You shouldn’t forget about those potential customers. If someone abandons their cart, they should receive an abandoned cart email campaign.
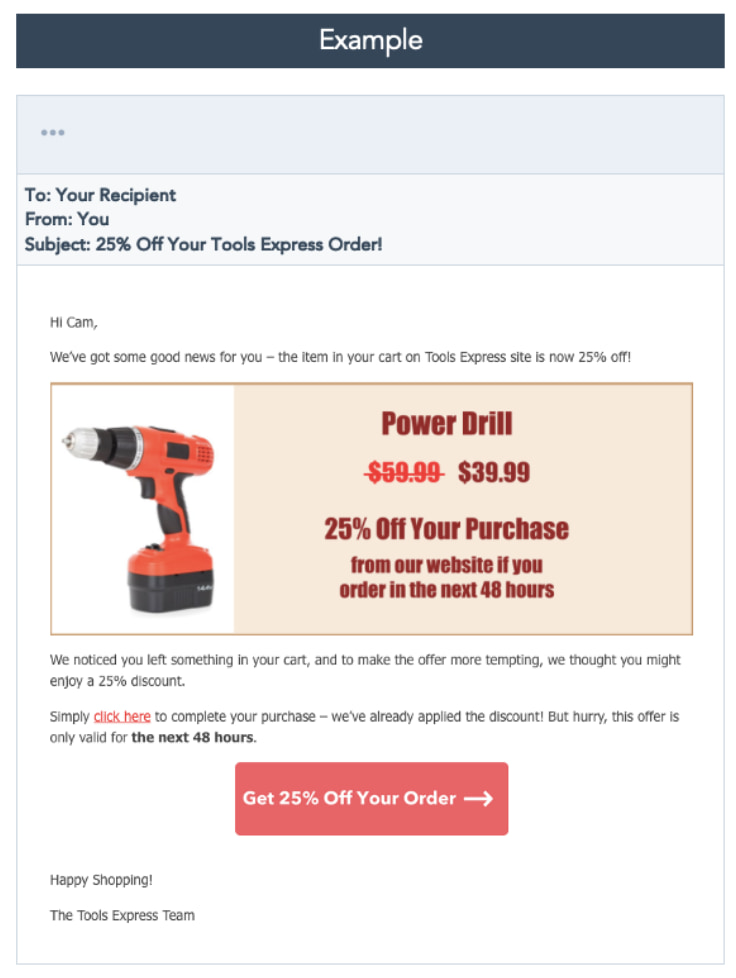
With this type of email campaign, you’ll email users a reminder about the products in their cart, send a follow-up, and then perhaps include a discount or offer.
If you don’t send this email, you’re losing out on conversions.
How to Increase Landing Page Conversion Rate
10. Communicate your value proposition.
On any landing page, your value proposition should be clearly communicated. To do this, you need to have a solid understanding of who your audience is and your buyer persona.
Write your copy specifically for your target audience. For example, you can address their goals, motivations, and pain points.
Additionally, you should discuss the benefits of your product or service over the features. Benefits will help your potential customers imagine their life with your product, while features are easy to skim and ignore.
Your copy should communicate how your product or service can solve your audience’s problem. If you aren’t converting, you should check and see how well your copy is written.
11. Incorporate multimedia elements into your landing pages.
Have you ever ordered something at a restaurant and when it came out, it looked completely different than what you imagined?
You don’t want this to happen when people download your content offers. To avoid this, include images and videos of your product or service on your landing pages.
Multimedia elements make your site feel more trustworthy. Plus, it’s the preferred way of consuming content.
To improve your conversion rate, try adding images of graphs and charts, or video testimonials to your site.
12. Write strong CTAs.
A huge component of conversion is your call-to-action (CTA). Your CTA could be to download an offer, share a post on social media, or subscribe to your email newsletter.
Whatever it is, you need to include CTAs throughout your website and landing pages. Usually, this means that they’re clear and easily accessible.
“Marketers need to take a Goldilocks approach when it comes to placing CTAs since sometimes, one placement isn’t enough,” explains AJ Beltis, HubSpot’s Senior Marketing Manager. “But it’s very easy to have a CTA appear so often as to appear spammy to website visitors.”
Typically, each landing page will only have one call to action but be incorporated several times on a page. For example, this blog post has three CTAs that lead to one offer. One at the bottom of the page, one in the text in the introduction, and one that pops up after scrolling down the page.
Typically, the sooner a CTA can appear on a page, the better, Beltis says. Otherwise, you run the risk of visitors who don’t scroll down far enough missing the conversion point entirely.
The important thing to note is that you can access the CTA no matter where you are on the page. Removing risk for the visitor (like offering a guarantee) and communicating that message clearly in your CTA will encourage them to take action.
13. Eliminate unnecessary distractions.
Speaking of CTAs … it’s important to remove anything on your landing page that would detract from visitors taking a preferred action. Get rid of any unnecessary links, pop-ups or navigation options that could potentially divert a visitor’s attention away.
A busy or cluttered page is less likely to convert visitors. You only have a few seconds to win them over, and a page that’s hard to navigate will discourage them from sticking around.
Design a page that encourages visitors to click your CTA using visual hierarchy to your advantage.
14. Meet your audience’s expectations.
When someone clicks on your site after reading your meta description on Google or seeing your search engine ad, your landing page needs to follow through.
You have to deliver on the promises that were made in that copy. For example, if a user sees this post in Google, they’re going to expect to find strategies to improve their conversion rate. If they clicked through and this page only had pictures of puppies, they’d be confused.
If a landing page doesn’t deliver on what a user thought they were getting, they won’t convert. That’s why you need to think about the entire process from seeing an ad, going to your landing page, and downloading an offer.
If a landing page isn’t converting, review your social media posts and search engine descriptions to see if you follow through on the promises you made.
How to Increase Mobile Conversion Rate
15. Improve your page speed.
When it comes to mobile conversion, a huge obstacle is page speed. This is the time it takes for your content to appear on the screen.
Did you know that 40% of people abandon sites that take more than 3 seconds to load? On mobile specifically, a one-second delay in page response can result in a 7% reduction in conversions.
If your mobile page isn’t converting as well, analyze your page speed with Google’s PageSpeed tools. This will test your mobile page speed.
To improve your page speed, images need to be smaller and compressed. Additionally, your site should be responsive and optimized for mobile.
16. Optimize for mobile.
Since Google switched to mobile-first indexing, mobile optimization has been more important than ever. If you don’t optimize for mobile, your Google rankings might be impacted, which could reduce conversions.
You might be wondering, “How do I optimize my site for mobile?”
Before you begin, it’s important to remember that mobile and desktop experiences are different.
You can use Google’s mobile testing tool to see if your site is mobile-friendly. With this tool, you’ll get recommendations for how to improve your site’s mobile performance.
For example, you might need to increase your font on mobile, compress your images, or improve page speed.
17. Enhance the purchasing process.
Making a purchase on your phone should be a simple process.
That means you shouldn’t have too many steps in your checkout process and your payment buttons should be easy to see and click.
Additionally, try to remove restrictions on online forms where you gather payment information. Personally, I’m always stopped on mobile forms because the name of my city is too long (22 characters).
Users should be able to check out as a guest and use whatever payment method they want, whether that’s Google Pay, Apple Pay, or PayPal.
Ultimately, this process should be easy and pain-free. A complicated checkout process will reduce mobile conversions.
18. Be creative with your mobile marketing.
When you want to increase your mobile conversion rate, that doesn’t just mean you need to adapt your site to the mobile experience.
You can also start to get creative and run mobile-only marketing campaigns.
For example, maybe you can start an SMS text message campaign, or you can use push notifications on your app.
These creative, out-of-the-box techniques can help increase your mobile conversion rate.
19. Make adjustments to your mobile site.
Since the mobile and desktop experiences are different, your mobile and desktop sites should be different.
For example, your email subscriber form might be smaller or nonexistent on your mobile site.
Additionally, you’ll probably use different CTAs on your mobile site. For instance, when you read this blog, the website and mobile have different types of CTAs. While the offer is the same, the button and the way to access the CTA aren’t.
On mobile, less is more. Your mobile site should be simple and eliminate distractions. This can mean you have simplified navigation and use a hamburger menu so it’s easy to get around your site.
20. Localize your content.
Mobile users are usually on your site because they’re looking for contact information, want to know your location, find directions, or look up reviews.
That’s why you should optimize for local marketing. This means adding location pages to your website, managing your online directory listings, and creating local content.
To improve your mobile conversion rates, consider localizing your content so you perform better in local searches.
Before I sign off, I want to remind you that many of the tactics for improving your website’s conversion rate can be applied to mobile CRO.
Empathize With Customers
At the end of the day, we’ve all been consumers before. Take a step back, look at the bigger picture, put yourself in your customer’s shoes, and think about whether you would make a purchase off your site.
This article was originally published May 25, 2020, and has been updated for comprehensiveness.

The 20 Best Video Editing Apps for 2022
Using a video editing app is critical for creating a winning video marketing strategy. And if you’re reading this blog post, chances are you already know you should incorporate more video content into your marketing, especially after the rise of remote work.But like most new strategies, you’ll need to prove its ROI before you get a budget. And that can be tricky because to make a great video, you need a few things — like a camera and editing software. You might already have a high-quality camera built into your smartphone, but editing your raw footage and preparing it for publication requires a third-party mobile app. You might even need to hop on the computer for the more extensive post-production projects.
![→ Access Now: Video Marketing Starter Pack [Free Kit]](https://no-cache.hubspot.com/cta/default/53/8f27c677-d952-4663-8787-bf65c6a1ecf2.png)
The good news: There are several free and inexpensive video editing apps you can download that run the gamut from super simple to Hollywood-level powerful. In this post we will delve into the best video apps for every device and click one of the links below to jump to a specific type of app, or keep reading to learn about them all.
- Instagram Video Editing Apps
- Top Free Video Editing Software
- Best Video Editing Apps for YouTube
- Video Editing Apps for Android
Editing Apps for Videos: Standard Features
Every editing app will be different, but there are a few features you’ll want to look for. Because most apps will have a free and paid version, it’s important to know what’s essential and what might be worth an upgrade.
For every video app whether paid or free, it will include:
- Scrubbing through video as you edit.
- Choosing an aspect ratio that fits with your target platform (Instagram, Youtube, Facebook, TikTok, etc.).
- Adding text and shapes along with professional transitions throughout the shots.
- Exporting video with at least 480p quality with high definition exports up to 4k.
- Adding music to the video via stock music or your library.
The following solutions can help you make video magic — whether your video is meant for Instagram, YouTube, or a similar channel where your audience is hungry for content.
Instagram Video Editing Apps
The following apps allow you to edit and quickly upload beautiful videos to Instagram. None of these apps are limited to Instagram but are known for their support of this social network.
1. Magisto
Price: Starts at free | Platforms: iOS, Android, Online
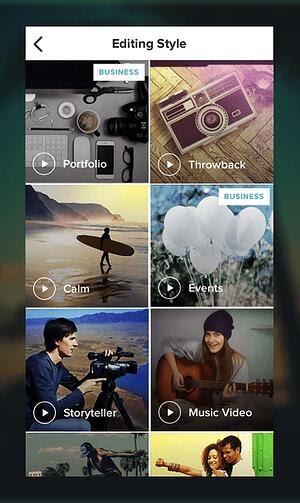
Video automation is here — in the form of the Magisto video editor.
Owned by Vimeo, Magisto allows you to make incredible videos without ever leaving your smartphone in three easy steps: First, you’ll choose your video editing style (the type of story you’re telling), then you’ll choose the photos and video clips you’d like included, and lastly, you’ll pick your music from Magisto’s built-in music library.
Using artificial intelligence (AI), this intuitive app helps organize your footage in a video that best delivers the message you have in mind. Why not stop at the free version? Upgrade to Premium or Professional for a small monthly fee and make longer movies with more of your own content.
Pros
- Easy-to-use templates for hassle-free creation
- Intuitive, beginner-friendly interface
- Online version available for creating both on Windows and macOS laptops
- Professional and Business plans come with a free Vimeo Pro subscription
Cons
- The “Created with Magisto” watermark will be visible unless you upgrade to premium
- No multi-track editing or 4K exporting
- Ideal for very short social media videos (< 3 minutes long)
- Stock videos are only accessible with a Professional plan
2. Hyperlapse
Price: Free | Platforms: iOS
Hyperlapse is an app created by Instagram itself that condenses videos into brief, hyper-speed videos that you can upload to Instagram or Facebook.
You can choose among a few different speeds, and the app will show you how long the hyperlapse video will be for every speed in comparison to the length of the video in real-time. (So a 40-second video in real-time will become roughly a 7-second video in Hyperlapse at 6X speed.) It’s a cool way to capture something that usually lasts a while — like a sunset or an event setup.
See what happened when I used Hyperlapse to film daybreak at 12X in the video above.
Pros
- It’s an easy way to speed up process videos.
- Use a minimal layout that’s nearly identical to the iPhone camera.
- You can capture videos straight from the app.
- No sign-in is required to get started.
Cons
- It only has one capability: speeding up videos
- You can’t import already-filmed videos into the app
- The video saves to your camera roll, taking up storage space
- No multi-track editing, 4K exporting, or other features typically associated with apps for video editing
3. Wondershare Filmora
Price: Starts at free on mobile | Platforms: iOS, Android, macOS, Windows
Wondershare Filmora (formerly Wondershare Video Editor) is the perfect option if you want to start with basic video editing functionality with the opportunity to get more advanced as you go. The app is perfect for Instagram but can create audience-ready videos for numerous platforms.
Filmora is available for Windows and Mac computers, whereas the company’s FilmoraGo mobile app is free to download for both iOS and Android devices.
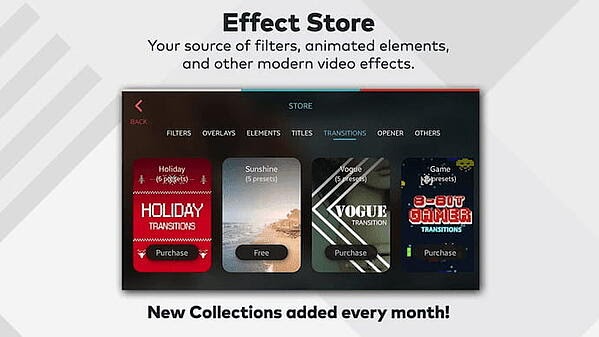
Filmora’s “Easy Mode” strips away the complexity so you can drag and drop video clips, add some music, and produce a finished video in a matter of minutes. The FilmoraGo app has many of these features, plus an Effect Store where you can incorporate preset intros, themes, and transitions into your video creation.
Sounds too good to be true? Well, you’re right: The free version of Wondershare Filmora adds a watermark to your videos that you can only remove through upgrading to their paid service.
Pros
- This app is a powerful option for both beginner and advanced video editors.
- The desktop version offers multi-track editing and more traditional video editing capabilities.
- The mobile version includes easy-to-use effects, stickers, and filters.
- You can layer music and different sounds in the mobile app.
- Relatively affordable (starting at less than $50 per year for Filmora X, and free for the mobile app) compared to competitors such as Adobe.
Cons
- The desktop apps are not free, but a trial is available.
- Videos are watermarked with the Wondershare branding unless you upgrade to a premium plan.
4. InShot
Price: Starts at free | Platforms: iOS, Android
There are times when you just want to edit a video — no fancy collages and no splicing. For that, there’s InShot, a handy app that lets you trim, speed up, or add music and filters to video. It’s pretty fundamental, but with that comes a high ease of use. You can also add a background if you like, though we think it’s pretty cool to have an overlap of images — like we did with the video above.
I took a simple video of a tranquil beach scene, but enhanced it with InShot’s “warm filter” and added a fitting musical track to it — a song called “Pikake Stream,” by Kalani. (I recommend viewing the video in its entirety with headphones, especially if you’re having a stressful day.)
Pros
- It’s a great app for beginners and marketers who don’t have a lot of time for intensive video editing.
- Built-in music library with royalty-free options.
- You can add voice-overs and your music.
- The app has a 4.8-star rating on the Apple Store and over 1M ratings.
Cons
- There’s no desktop app available.
- Filters and stickers are only available with a paid subscription.
- Your video will be watermarked unless you upgrade to the paid version.

Top Free Video Editing Software
The following tools are the most versatile mobile apps of all the free software listed in this article.
1. WeVideo
Price: Starts at free | Platforms: iOS, Android, Chrome OS
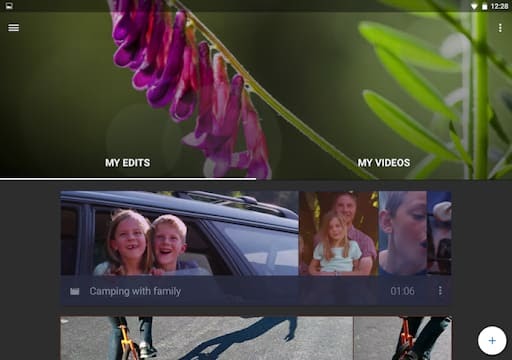
Cloud-based video editing software (i.e., software that you access via a browser instead of downloading directly to your hard drive) is growing more and more popular. One of the programs leading the charge is WeVideo.
WeVideo offers some advanced features and functionality, including audio editing capabilities, a library of commercially licensed music, and the ability to share videos in 4K resolution. However, the free version of WeVideo isn’t without its limitations.
One major downside is that you’re only given 10GB of cloud storage. If you’re making a one-off video, this is fine. But if you’re planning to edit multiple videos, you’ll need more space. The free version also puts a WeVideo watermark on your videos, which isn’t ideal.
WeVideo is also available as a desktop computer product and comes with free and paid plans. For a complete breakdown of the differences between these plans, check out WeVideo’s pricing page.
Pros
- You can access your videos from any device
- Paid versions are relatively cheap (starting at $4.99 for the Power version)
- 4K exporting available
Cons
- Only 10GB of storage and 5 minutes of published video are available on the free version
- The maximum resolution is 480p on the free subscription
- Your video will be watermarked with WeVideo’s branding unless you upgrade
2. Splice
Price: Free | Platforms: iOS
Splice allows you — as the name suggests — to splice together different video clips on your phone to create a moving collage.
We had a lot of fun playing with this one, especially since Splice even contains a library of musical tracks that can be used as a background for your finished product. You can also use the app to trim and edit the different pieces of video and customize transition lengths from one scene to the next.
My colleague, Amanda Zantal-Wiener, experimented with Splice by compiling the above 15-second video of her dog — using only an iPhone 6.
Pros
- Easy and intuitive to use
- Familiar user-friendly interface
- Multi-track and timeline editing with layers and masks
- No sign-in required
- No watermark, even for free subscribers
Cons
- Subscription starts at $2.99/week, or $12.97/month, which is pricier than other alternatives
- Effects and music are only available for paid subscribers
3. Adobe Premiere Rush
Price: Free | Platforms: iOS, Android
Adobe’s popular video editor, Premiere, isn’t just available on your mobile device — it’s free.
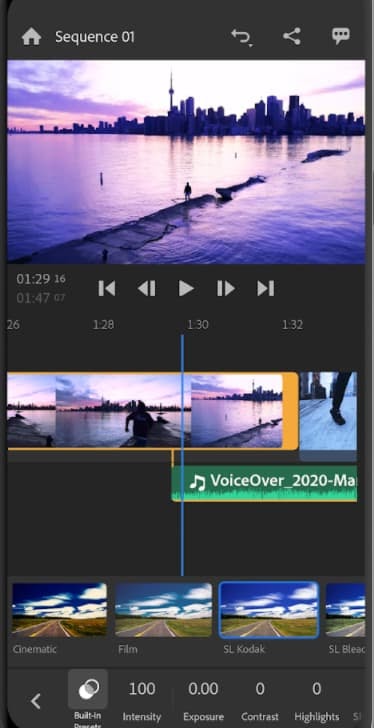
Melissa Stoneburner of Examiner.com calls this app a “gateway” into the full Adobe Premiere Pro video editor for desktop, and we can see this for ourselves. Similar to Magisto (the first video editor on our list), Adobe Rush automatically sets your video to the music of your choice (using Premiere Rush’s library or your own), and offers a Freeform editor that allows you to customize your edits further after this initial audio sync.
Premiere Rush’s equally robust video editing features help you trim, drag, and drop multiple video and image clips — right from your mobile device’s photo and video album — in the order you’d like.
Then, just add proper lighting, manipulate the speed of the video, and share your final product directly on Facebook, Twitter, or YouTube.
Pros
- It’s a natural choice for current Adobe users.
- Premiere rush offers a familiar video editing interface for those with experience and an easier learning curve for beginners.
- The paid version supports 4K exports.
Cons
- Some users report exporting and crashing issues on the Android version.
- Limited storage capabilities (<100GB) for free users
4. PicPlayPost
Price: Free | Platforms: iOS, Android
We’ve already covered the coolness of photo collages. But what if you could make a video collage? PicPlayPost is a simple app that lets you do exactly that. Just remember that the sound from both videos will play at the same time, so be sure they won’t clash with one another.
There are many uses for a video collage app, but my colleague, Lindsay Kolowich, particularly likes the way fitness professional Melissa Made uses it on her Instagram account. She posts video collages with her performing a workout on one side, while she explains the workout out loud on the other.
Pros
- You can create alternative formats such as gifs and live photos
- 4K exporting available
Cons
- Most valuable features are available on the paid version only
- You can’t paste text from another app
- Video will be watermarked with the PicPlayPost branding unless you upgrade
Best Video Editing Apps for YouTube
Although the video editing services below do not offer mobile versions, they do offer easy-to-learn functionality at minimal cost. These apps are the best for sitting down at your computer and editing amazing video content for your YouTube channel.
1. Blender
Price: Free | Platforms: Windows, macOS, Linux

The open-source program Blender is more than just a video editor: It’s a full-blown 3D animation suite, which allows for modeling, rendering, motion tracking, and more.
On the video editing side, there are a ton of features, including transitions, speed control, filters, adjustment layers, and more. There are also 32 slots available for adding video clips, audio clips, images, and effects, which means you can produce some incredibly complex video.
For the amateur video editor, all the options can be a bit overwhelming. But if you’re looking to produce truly professional-quality video — without having to deal with watermarks — Blender is a solid option. The best part: “You are free to use Blender for any purpose, including commercially or for education,” according to its website. For the fine print, check out its licensing info.
Pros
- Blender has a long history of use across multiple platforms.
- You can render, model, sculpt, and animate using this app.
Cons
- There’s a steep learning curve for beginners.
2. Lightworks
Price: Free | Platforms: Windows, Mac, Linux

Like Blender, Lightworks is definitely on the more advanced (and powerful) end of the video editing software spectrum. In fact, it’s a program that’s been used to edit some well-known and award-winning films, including Pulp Fiction, The Wolf of Wall Street, and The King’s Speech.
There are two different licenses you can choose from with Lightworks: “Free” and “Pro.” (The latter of which, as you might have guessed, requires that you cough up some cash.) The main difference between the two licenses is that the Pro version offers more features, including stereoscopic output and advanced project sharing. But the free version is still quite powerful, providing 100+ effects and supporting multicam editing.
Pros
- Like Blender, Lightworks has a long history of use across multiple platforms.
- You can access royalty-free videos and audio from the desktop app.
- You can export up to 4K.
- Multi-track editing and timelines, even in the free version.
- You can buy a lifetime license for $437.99 and never worry about renewing a subscription.
Cons
- There’s an extremely steep learning curve for beginners.
- Limited options for creating titles and subtitles.
- Users have reported formatting issues when importing video clips.
3. Shotcut
Price: Free | Platforms: Windows, macOS, Linux

Shotcut is another open-source video software — and it’s completely free. It’s possible to use Shotcut to create professional-looking videos, but the interface is tricky to use. Perhaps that’s because it was originally developed for the Linux platform, which looks and feels a lot different from the typical Windows or Mac UX.
With dedication — and time spent in the Shotcut frequently asked questions and how-to guide sections — it’s possible to use this software to create and export high-quality videos, completely for free.
Pros
- It’s completely free—you never have to upgrade, ever.
- The diverse list of features rivals those of paid apps.
Cons
- Shotcut could be difficult to get the hang of at first.
- Some users find the UI difficult to navigate.
- It’s less intuitive compared to other apps such as Premiere Pro and FinalCut, even for experienced editors.
4. VSDC Free Video Editor
Price: Free | Platforms: Windows Only
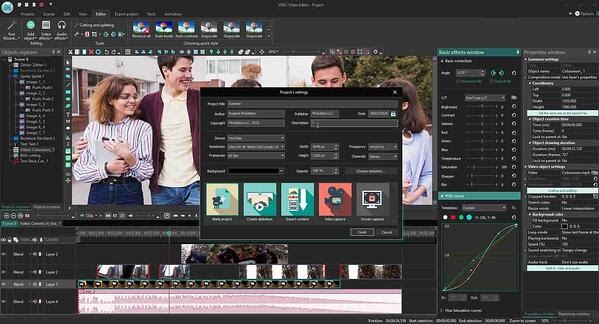
In experienced hands, the VSDC Free Video Editor can produce professional-looking videos. In addition to supporting nearly every major video format, the program offers advanced video effects, including object transformation and color correction, as well as advanced audio effects like volume correction and sound normalization. And unlike WeVideo, the VSDC Free Video Editor is truly free. You can use the program’s full feature set without having to deal with pesky watermarks.
Unfortunately, there is one catch. If you want technical support, you need to pay. (And because there is a bit of a learning curve, there’s a good chance you’ll need assistance.) Support for the VSDC Free Video Editor costs $9.99 for one month and $14.99 for one year.
Pros
- The free version is packed with typically premium features such as masking, blending modes, and 4K exports.
- You can share your video directly from the app to YouTube, Vimeo, and other platforms.
Cons
- You have to pay for support if you’re using the free version.
- Not as user-friendly as other alternatives.
- Users have reported a steep learning curve.
5. Machete Video Editor Lite
Price: Free | Platforms: Windows Only

At the simple end of the spectrum is Machete Video Editor Lite, a free program allowing you to cut, copy, and paste different sections of video. As the Machete website puts it, Video Editor Lite was “designed for quick and simple ‘slicing’ of your video files.”
The program’s intuitive interface means you won’t have to waste time shuffling through technical support documents. And because Video Editor Lite doesn’t re-encode your video files when you slice them, you don’t have to worry about losing video quality.
The main downsides to the program? It only supports the AVI and WMV video formats, and it doesn’t allow for audio editing. Still, if you have zero video editing experience and only need to make simple edits, it’s a great option.
Pros
- This app offers simple but powerful slicing and editing capabilities.
- It’s an incredibly simple and user-friendly interface; simply download and go.
Cons
- You can only export AVI and WMV files.
- You can’t edit or replace the audio.
- The website is outdated with limited support documents.
6. Avidemux
Price: Free | Platforms: Windows, macOS, Linux

Like Machete Video Editor Lite, Avidemux allows you to do basic video editing (no audio editing) without having to worry about losing video quality. But Avidemux also has a few more tricks up its sleeve.
For starters, the program supports multiple video formats, including AVI, DVD, MPEG, QuickTime, and MP4. What’s more, Avidemux comes with several filters that allow you to perform a host of different functions, from flipping and rotating clips, to adding subtitles, to adjusting colors and brightness levels.
And while the learning curve for Avidemux is slightly steeper compared to Machete Video Editor Lite, the upside is that there’s an extensive Avidemux wiki that covers everything you need to know.
Pros
- Supports multiple file formats such as AVI, MPEG, MP4, and Microsoft’s proprietary ASF
- Simple interface that’s best for tasks such as cutting and splicing footage
- Easy learning curve; simply download and start using
Cons
- Limited capabilities compared to other apps (especially mobile apps)
7. HitFilm
Price: Starts at free | Platforms: Windows, macOS

HitFilm Express is a free video editing and visual effects software — which means you can use it to add more than 180 special effects to your videos, including 3D editing.
Possibly the coolest HitFilm feature is its wealth of tutorial videos — users can practice applying special visual effects in movie tutorials based on Star Wars, Westworld, and more.
Of course, upgrading to HitFilm Pro grants access to more visual effects, better high resolution and 3D rendering, and better audio syncing between audio and video files. It costs $300, but if you’re not ready to fully invest, HitFilm Express users can purchase lower-cost expansions to use more tools in their software.
To see the complete list of differences between HitFilm Free and Pro, check out their “Compare Versions” page.
Pros
- Powerful capabilities such as mask rendering, export queues, and unlimited tracks and transitions
- Built-in voice recorder for easy voice-overs
- Has been described as a mix between Adobe After Effects and Adobe Premiere Pro
Cons
- Beginners may experience a learning curve.
- Some users have reported crashing issues.
Video Editing Apps for Android
These video editing apps are particularly appealing for Android mobile users, though some of them are compatible with more than just the Android operating system.
1. VideoShow
Price: Free | Platforms: Android, iOS

VideoShow allows you to edit video content in many creative ways beyond cutting and pasting scenes together. The award-winning app, which has more than 400 million users, allows you to include text overlays, stickers, music, filters, and sound effects in your footage. Because of these features, it lends itself to video producers who want to add a bit more creativity to a vlog series, where the video is primarily of one person speaking directly to the camera.
Pros
- Easy-to-use yet powerful, with HD exports available for free users
- Expansive music library
Cons
- Your video will be watermarked with VideoShow branding if you’re not on the paid version
- You can’t export the video without upgrading to the paid version
2. PowerDirector
Price: Free | Platforms: Android, Windows, macOS
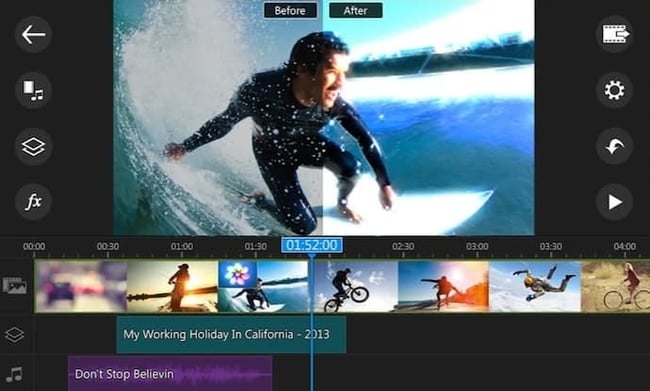
This robust video editor has a suite of creative design tools just for Android and desktop users. Developed by CyberLink, the app can help you create 4K-quality videos from footage taken with numerous devices. Special features include motion tracking, which helps you focus on specific subjects in each frame; video collages, which help you piece together numerous photos into a motion video; and video stabilization, allowing you to remove moments of “shaky camera” in your footage. PowerDirector can also help you add voiceovers and creative sound effects using chroma key.
Many of PowerDirector’s features are completely free in the Android app. For a more advanced suite of editing tools, you can invest in one of CyberLink’s paid products starting at $99.
Pros
- Powerful features such as green screen editing, motion graphics, and keyframe controls
- Incredibly low price compared to competitors such as Adobe
- Multi-track editing and timelines
- The company constantly adds new graphics and templates for users to choose from
Cons
- Some users have reported that it can be buggy
3. Quik
Price: Free | Platforms: Android, iOS, macOS, Windows

Quik is a video editing tool developed by GoPro, making it the software of choice for people who are editing footage from their GoPro camera. But yes, it can edit content from any source.
The app can manage up to 75 photos and video clips in one project, and can even comb through this content to help you make smart editing decisions based on what the app detects in the footage. From time-lapses to panoramic pieces, Quik can manipulate your media in lots of creative ways. The app has more than 20 preset themes to choose from and supports eight common file types.
Pros
- Easy-to-use and intuitive app
- Automatically imports photos from your camera
Cons
- This software no longer receives updates from its manufacturer
- You only have access to the cloud when you upgrade to GoPro PLUS
4. KineMaster
Price: Free | Platforms: iOS, Android, ChromeOS

KineMaster is a super-versatile video editing tool that allows you to edit videos on “multiple layers.” What does that mean? Content creators can add an unlimited amount of text overlays, images, audio, and even free handwriting onto their footage for the artistic detail they or their brand needs. You can also blend multiple pieces of footage and use double-exposures to customize the background in a load of creative ways.
For simpler editing tasks, of course, this app offers intuitive trimming and splitting features to make your video progress just the way you want it to.
Pros
- Powerful features such as multi-track editing, layers, and blending modes
- Over 3M reviews on Google Play and an average rating of 4.5 stars
- You can share on YouTube, Instagram, and Facebook straight from the app
- 4K exports available
Cons
- Your video will be watermarked with the KineMaster branding if you don’t upgrade to Premium
- Limited access to assets on the free version
5. VivaVideo
Price: Free | Platforms: iOS, Android

VivaVideo makes professional-level edits easy for content creators. Free for all mobile devices, the app allows you to trim, merge, speed up, slow down, and reverse clips and images in a short amount of time. The app also comes with a simple collage- and slideshow-maker and offers a variety of camera lenses to capture new, edit-ready footage directly in the app.
Pros
- Fun on-trend filters, templates, and effects
- Expansive music library with hundreds of clips to choose from
- Multi-track editing allows you to layer voice clips and music
Cons
- The five-minute time limit for videos
With most people working from home, the importance of video can’t be overstated. But unless you get the right app for video editing, you’ll run the risk of publishing videos that look unprofessional and unpolished.
With these apps, you’ll be sure to create a video that attracts, converts, and delights your audience. The sooner you download one, the sooner you can sharpen your audio/video creation skills and attract more people to your brand.
Create Better Videos for a Higher ROI
Online video content isn’t just watched more — it’s expected more. Luckily, you have the video editing tools to help you delight your audience and improve conversion rates across your social media accounts. Grab the guide below to make the video learning curve easier and to jumpstart your video marketing efforts.
Editor’s note: This post was originally published in March 2019 and has been updated for comprehensiveness.

Best Goal Setting Worksheet to Help You Plan & Achieve
Accomplishing your goals is an incredibly gratifying feeling.
However, it can sometimes be challenging to get that feeling, since achieving goals takes time, effort, and a structured process.
This is why it’s important to create plans of action for meeting the goals that will help you stay motivated and ensure you’re on the right path.
In this post, we’ll go over three goal-setting worksheets created by HubSpot to help you outline your goals with the SMART framework and create a plan for achieving them.
The template is broken down into relevant sections to help you through the process, and if you download it, you can follow along throughout the post.
Download your free marketing goal-setting template here.
Goal-Setting Template
When it comes to setting a goal, there’s power in writing it down. Research shows that writing aids in retention and recall — and helps to clarify our goals.
This is essential when planning your next week, month, quarter, or year. By keeping a clear goal in mind, you’ll be able to see how far you’ve progressed and stay on track.
However, even when we know what we want to achieve, it can be hard to know where to start. Enter HubSpot’s goal-setting template.

In this template, you’ll find a:
- Goal-setting worksheet
- Goal-calculation worksheet
- Goal-evaluation worksheet
Let’s walk through each step in the template — setting a SMART goal, calculating numerical targets to hit, and evaluating any roadblocks standing in your way.
Goal-Setting Steps
1. Identify your initial goal.
The first step of the process is to simply identify what your goal is. It doesn’t have to be convoluted, just merely the objective you’re hoping to achieve. For example, if you’re hoping to grow your website, your baseline goal could be “I want to generate more site traffic.”
2. Define your SMART goals.
The second step in the process is to use the SMART framework to elaborate your goals to ensure that they’re clear, measurable and that the process will help you get there. Here is what each of the element in the acronym stands for:
- Specific: A specific goal clearly outlines what you’re hoping to improve. If you share your specific goals with your team, it should be clear what your intention is.
- Measurable: Making your goal measurable means attaching numbers to your objective that will help you understand what you have to meet, track your progress, and see how long it will take you to reach your end goal.
- Attainable: Making sure that your goals are attainable means that they are realistic and that you have a chance of achieving them. Your goal is not too out of left field or so unrelated to your current practices that you wouldn’t be able to succeed.
- Relevant: Ensuring that your goal is relevant involves answering the question of “Why are you setting the goal that you’re setting?” Your goal should directly relate to your business’ needs and help your business grow.
- Time-Bound: The final aspect of your goal-setting process is to set a timeline. It helps you understand what your schedule should be and stay on track in terms of achieving your ultimate goal.
Using the goal-setting worksheet, fill out your initial goal and follow the steps to make it SMART.
Goal-Setting Worksheet Example
Let’s suppose your goal is to increase your blog’s website traffic. Following the steps in our goal-setting worksheet, here’s how you can turn this into a SMART goal:
- Specific: I want to increase my blog’s traffic.
- Measurable: I want to increase blog traffic by 5%.
- Attainable: I can hire a freelancer to increase my posting frequency by 1-3 posts per week.
- Relevant: Increasing blog traffic will contribute to my objective of boosting brand authority.
- Timebound: I want to reach this goal in six months.
Smart goal: To boost my blog’s website traffic by 5% in six months. I will do this by increasing the publishing frequency per week.

3. Calculate your goal outcomes.
The most challenging part of your plan might be coming up with numerical targets that coincide with achieving your goals. You can just say, “We want to increase blog traffic by 5%,” but what would the 5% increase look like in numerical form? Specify the number of views you need to have to reach this goal.
When you have these numbers, you can set milestones for yourself and monitor your progress and make changes along the way if necessary.
Goal-Calculation Worksheet Example
Let’s say your average 1,000 blog views per month. Since you want to increase your traffic by 5% in six months, you need to know your monthly traffic target.
Using the goal-calculation worksheet, you input the following information:

From the calculations, you can see 1,340 is your recommended monthly traffic target.
4. Evaluate your SMART goals.
The template’s final step is to evaluate your goals, which helps you anticipate possible roadblocks and develop action plans for dealing with them. If you have multiple goals, aim to ask these questions for each one that you have:
- What is your SMART marketing goal?
- Do you feel that this goal is realistically attainable in the time frame you’ve set?
- How many hours per week can you dedicate to achieving your goal/your goal process?
- What is the biggest challenge preventing you from achieving this goal? What are possible challenges you may face in achieving this goal? What is the biggest roadblock(s) to achieving this goal?
- What three steps can you take to reduce or remove that challenge and succeed in reaching this goal?
Goal-Evaluation Worksheet Example
Using the goal-evaluation worksheet, you evaluate your SMART goal. You discover two challenges that could hinder your success — hiring freelancers and organizing a new editorial content calendar.

With this in mind, you can begin to brainstorm ways to minimize or eliminate these obstacles. For example, you could create a new content calendar using tools like Monday.com or Trello.
All in all, following this framework makes your goals explicitly clear for yourself and helps you communicate their importance to all necessary stakeholders, so everyone is on the same page. To get started, download our template for free and start achieving your goals.

How to Run a Focus Group for Your Business
When you’re developing or launching a new product, service, or business, you’ll want to have a general sense of how receptive your target market will be to it.
Typically, this is done through extensive market research — and one key component of the research process is running a focus group.
In this article, we’ll define what a focus group is, give you an agenda to follow when conducting on, explain how to run a focus group step-by-step, and help you plan your questions with a focus group questionnaire.
![→ Download Now: Market Research Templates [Free Kit]](https://no-cache.hubspot.com/cta/default/53/6ba52ce7-bb69-4b63-965b-4ea21ba905da.png)
What is a focus group?
A focus group is a small group of people, typically representative of your target market, with whom you share ideas and ask questions about your product, service, or business. The individuals who make up the focus group should be a mix of current customers and people who’ve never made a purchase but might in the future. The ideal outcome is a stronger understanding of how the subject of the focus group would be received by a wider audience, and what changes (if any) should be made before the formal roll-out.
Now you may be asking, is information gathered from focus groups really important? And is it a good strategy to gather information?
Focus Group Strategy
Focus groups can provide your business with priceless information if the participants are a reflection of your target audience.
The data you collect from them is important because it can help you build successful strategies by:
- Collecting more accurate needs assessments from customers.
- Pulling meaning behind facts and numbers obtained from more general surveys.
You can take this information and apply it to how you choose to market your product or service, adjust the features to better suit your customers’ pain points.
Now that we understand the importance of focus groups to your operation, you have to have a focus group agenda to follow before you bring in your own participants.
Focus Group Agenda
To get started with your focus group, you’ll need an agenda to stay on task during the meeting. Here are the main points to follow when making your own.
1. Welcome the focus group participants.
First, you’ll want to welcome the participants in the focus group and introduce yourself and other researchers who may be present. This step is important as it establishes rapport with the group and builds trust.
2. Have the participants introduce themselves.
This does a few things: it continues building rapport among the group members, and it confirms the pronunciation of everyone’s names — you don’t want to spend the next hour or more together saying everyone’s names incorrectly!
3. Establish some ground rules for the group.
Before asking questions, establish some ground rules for the group. Take this moment to clarify any concerns such as:
- If a topic could become controversial, let that be known and set boundaries for how far a discussion can go.
- If you’ll be asking for information that isn’t normally shared in a group setting, assure the cohort that the findings won’t have names or identifying data attached to the responses.
- If your company is reimbursing expenses or providing payment to the focus group participants, let them know how and when they’ll receive their disbursements.
Once these are clarified — as well as any others they may ask during this portion of the session — you can begin asking the questions about your product, service, or business.
4. Ask questions methodically.
Now, here’s the fun part. Although you may have one broad topic to discuss during the focus group, you’ll likely have several subtopics that need to be addressed separately. Structure your questions in such a way that the flow of the conversation makes sense. This could be by theme, chronological order, or the current-future state of your business.
5. Wrap up final thoughts.
Once you’ve reached a stopping point during the conversation, wrap up any lingering questions and ideas within the group. Finally, thank everyone for their time and end the session.
If you need those steps organized in a handy agenda, we’ve got you covered. Download the PDF below and save it for your next focus group.
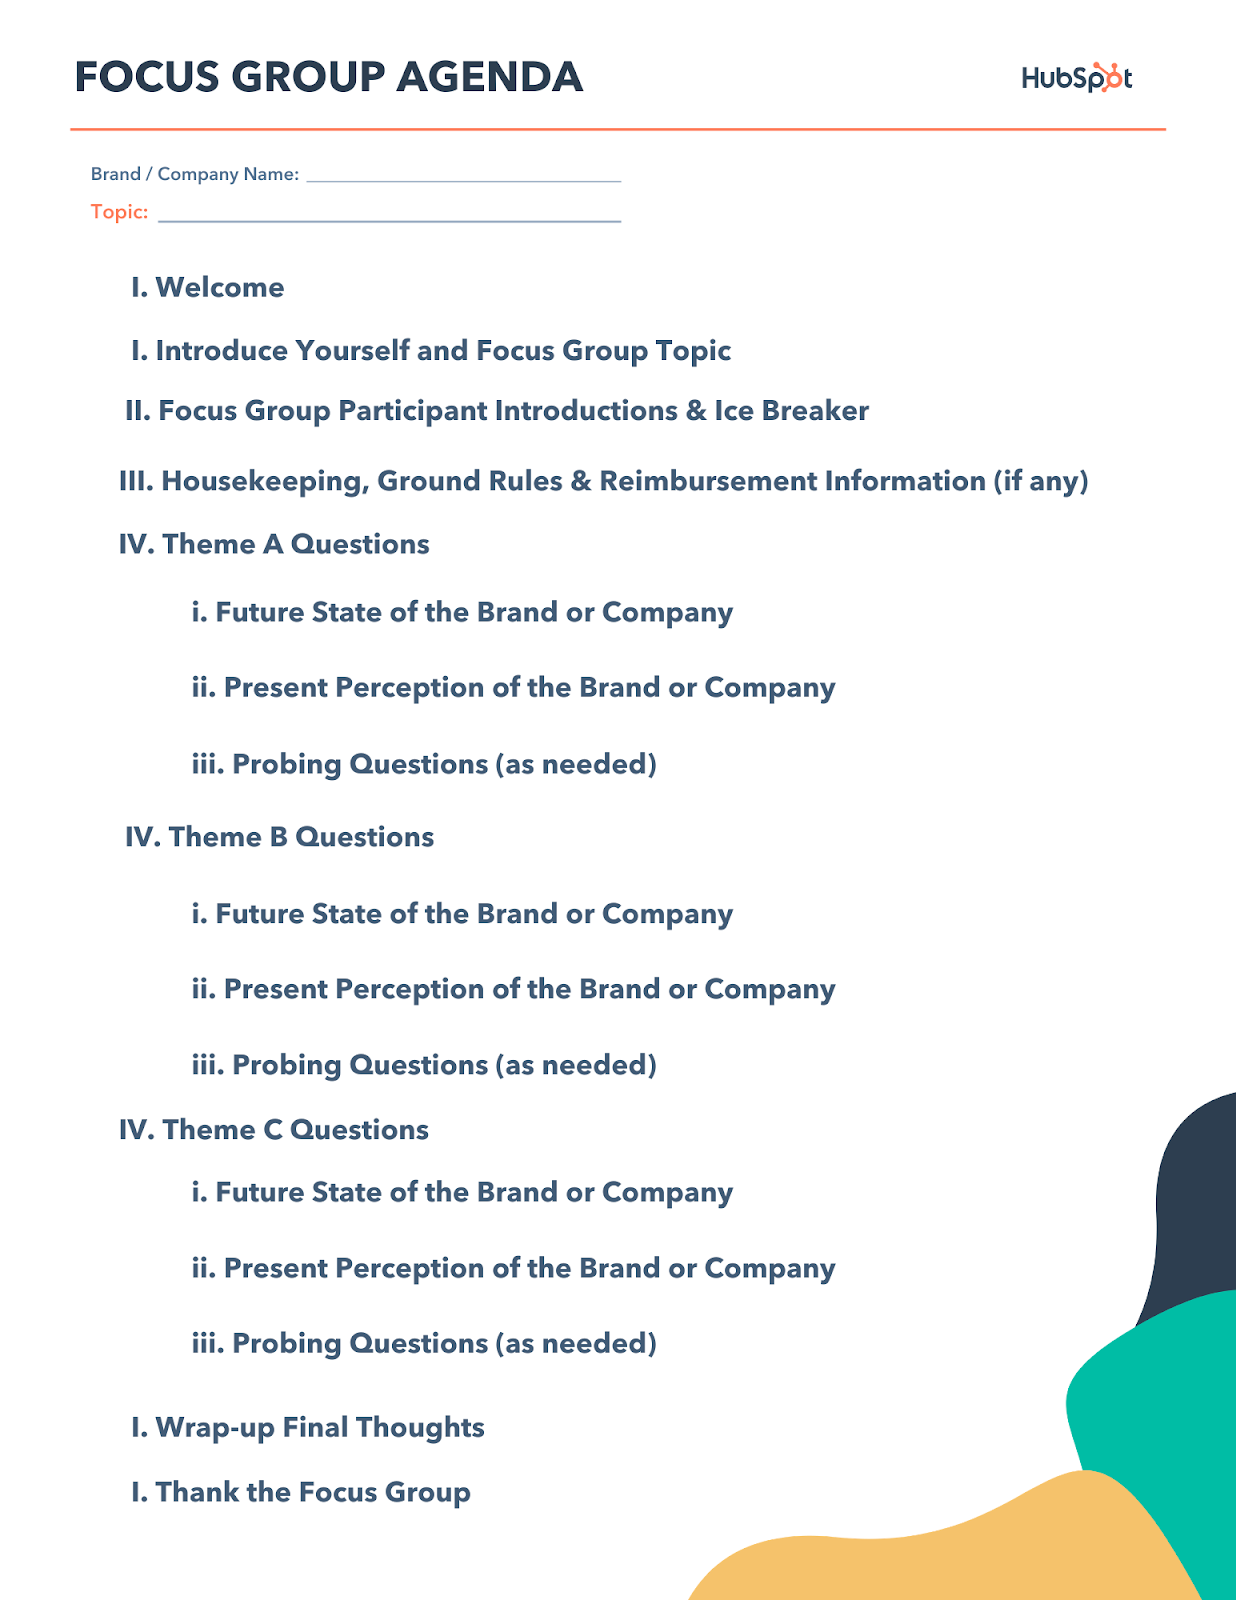
Now that you have an understanding of how to conduct the session, let’s dive into what it takes to run a successful focus group from the very beginning.
Follow Along With a Free Focus Group Questionnaire Template
HubSpot’s Market Research Kit includes everything you need to run an effective round of market research, including a focus group questionnaire and a guide on how to run focus groups. Download the kit now to incorporate the steps in this post into your focus group strategy.
1. Choose your topic of discussion.
Going into a focus group, your discussion should be narrowed down to one or a few topics. Keep in mind that you won’t be able to thoroughly address every area you want to discuss in one short focus group session.
Because of this, it’s not uncommon for companies to run multiple rounds of focus groups around different topics. For example, if you’re launching a new product, you could center one focus group around the product’s marketing and brand positioning, and another one around the usability and functionality of the product itself.
2. Choose your questions or discussion prompts.
Once you determine the topic of discussion for your focus group, create a list of questions and discussion prompts that will help you gather the data you need.
Let’s return to the product launch example from above. If you’re running the product marketing focus groups, you could ask questions like:
- What do you think of the packaging design?
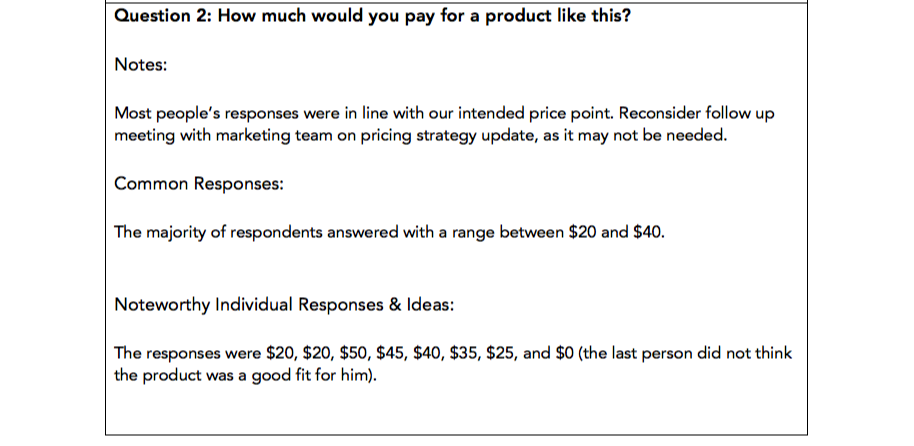
- How much money would you spend on a product like this?
- What other companies do you think of when you see a product like this?
Meanwhile, for a focus group about the product itself, you’ll want to ask about the product’s functionality, ease of use, and perceived favorability.
Also, remember to ask open-ended questions — “Do you like the product?” and “What do you think of the product?” may seem similar in nature, but the latter will produce more detailed results.
3. Prepare your focus group questionnaire.
After you’ve chosen your questions and discussion prompts, organize them on a focus group questionnaire. Be sure to leave enough space on the questionnaire for overall notes, a list of common responses, and one or two noteworthy responses that really stood out.
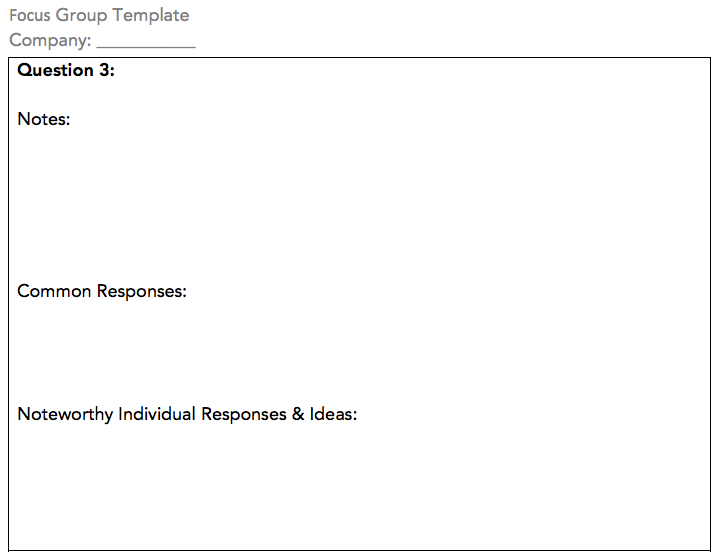
Download this Template for Free
4. Appoint a notetaker.
Your focus group discussion should be facilitated by at least one person while another person on your team should be a designated notetaker.
Why? The facilitator’s job is to facilitate — to guide the discussion and foster new ideas from participants. This task can get easily derailed if the facilitator also needs to pause the discussion to write down big, bold ideas and reactions from participants.
To avoid this possibility of disruption, appoint a notetaker before going into the focus group who can focus solely on jotting down the general consensus from the group, unique and noteworthy individual responses, and the key takeaways for the business.
5. Recruit and schedule participants.
One of the most challenging parts of running a focus group is getting people to actually show up. After you select a time and a place, you’ll want to start spreading the word to participants.
Here are a few ways to find them:
Reach out to existing customers.
If you’re doing market research for an existing company, reach out to your customers through account managers or an email database. Since current customers will likely be the first to use what you’re launching, this will be the perfect opportunity to gauge early reactions for the official launch.
For incentives, you could offer free or discounted services or reward them on a customer advocacy program likeInfluitive.
Advertise on social media.
Looking for middle-aged males or senior citizens in the greater Ann Arbor area? No problem! Social media advertising offers advanced targeting options for you to reach your target market.
You should also think about which sites are most used by the people you want in your focus group. If you’re interested in surveying middle-aged working professionals, you’ll probably have better luck on LinkedIn than you would on TikTok.
Try location-based promotion.
If you’re hyper-targeting a location, supplement your recruiting efforts with advertisements that will only be seen by those in your area. A few examples include:
- Location-based social media campaigns (Location targeting ads)
- Public Transit-Based Ads (Trains, Busses, Taxis, etc.)
- Ads in Local Publications and Newspapers
- Billboard Ads
Be prepared to offer incentives.
People rarely do anything for free. In your advertisements and promotional assets, highlight the incentive you’re prepared to offer — which could be cash, a gift card, or a discount on whatever you’re selling.
If you’re strapped for cash, consider hosting a raffle or giveaway for participants. That way, if you host a focus group of eight people, you could offer a chance at a $100 gift card (rather than a guaranteed $25 per participant) to save you $100.
6. Get consent and start the discussion.
Before you start your focus group discussion, remind participants of the purpose of the group and hand out a consent form. The consent form should reiterate the purpose of the event, outline the participants’ rights, identify the compensation, list the facilitators’ contact information, and prompt participants to sign.
After everyone signs off, it’s time to run the focus group.
7. Have everyone introduce themselves.
To break the ice and get people talking, start the discussion off by introducing yourself and inviting the participants to do the same.
This is another chance for you to learn more about your target market. In addition to having participants say their names, consider asking them to share their industry or interests to get a more personal understanding of how your product, service, or business could play a role in their everyday lives.
8. Ask your questions.
Remember, this is not an interview! Before the focus group begins, you should prepare a list of five to 10 questions.
That being said, it can be easy to tie yourself to your list of questions or discussion points, but sticking too closely to this can hamper natural and effective conversations. If the group takes a slightly different turn than you were expecting, don’t be afraid to allow the conversation to veer off-course if it seems productive.
The point of a focus group is not just to confirm information you think is true, but also to uncover what you don’t know.
So long as it’s not too far off-topic, allow the conversation to happen naturally and use an agenda as a guide rather than a point-by-point checklist of topics to cover.
Additionally, you may not ask every question on your list, depending on the direction of the conversation. Make sure you ask the most important questions first, and follow up on certain discussion points to keep things flowing rather than hosting a pure question-and-answer forum.
9. Seek equal representation from the group.
Your session involves an entire group of people, so you have to make sure you hear from each and every one of them! That may seem obvious, but a focus group can quickly turn into an interview of one or two of the most talkative members.
If you run into this problem, be ready to jump in when someone has been quiet for too long by thanking the most active participants for their input and re-opening the floor to the other participants. Say something along the lines of “Isabella, what’s your input here?” or “Raheem, what do you think about what Isabella said?” for the rest to chime in.
10. End the meeting in a reasonable amount of time.
Exhaustion and the law of diminishing returns are real, so keep them in mind when planning the time frame for your focus group.
At the start of the session, in your advertisements, and/or on your consent form, you should specify how long the focus group will last. It’s your responsibility to moderate the discussion in a way that ensures the time frame is not exceeded.
Now, if the exercise lasts for an hour and five minutes and you promised an hour focus group, that’s acceptable. However, if you promised a 45-minute session and it goes well over an hour, your attendees could be resentful and less likely to offer valuable feedback.
When the discussion is over, thank your attendees for their time and deliver the promised incentive, if applicable. Additionally, remind them of your contact information if they decide they have more feedback or comments they’d like to provide.
11. Analyze and incorporate feedback.
Ideally, your focus group has provided you with plenty of responses, unique angles, and actionable ideas to help your business thrive. After all of your focus groups have taken place, have your team compile and analyze the commonalities of the ideas presented and what changes, if any, are applicable to the product, service, or business in question.
You have a step-by-step guide for conducting a focus group, let’s take a look at a real-world application of one.
Focus Group Example
This recent focus group study follows most of the guidelines we’ve recommended and derived useful information for real-world application.
Post-Election Focus Group
Georgetown University Institute of Politics and Public Service conducted a focus group with first-time voters after the 2020 election. It could have been very easy for this focus group to get off track and into political affiliations; However, you’ll notice in this example that the researcher had a topic in mind — the first-time-voter experience — and didn’t deviate from that topic. She asked probing questions and sought out a variety of perspectives from the group.
Watch this focus group to get a better understanding of how to start these conversations and keep them going to get the insights you need.
The information can now be studied for political research thus helping guide future campaigns for first-time voters.
Run a Successful Focus Group
Taking this methodical approach to running a focus group can produce better and more insightful feedback from your participants. To keep your questions, thoughts, and responses organized, we developed a focus group template, which you can use to run a better focus group. Download it for free now to get the most out of your marketing research.
Editor’s note: This post was originally published in September 2019 and has been updated for comprehensiveness.


The Ultimate Guide to Google Sheets
Google Sheets is one of the best tools you can use to store data, track performance metrics, and create dashboards and reports.
But while it’s a wondrous tool with countless features and functionalities, it can be hard to grasp for beginners — especially if you need to create a marketing report or dashboard, fast.
Not to worry. If you’re looking to get started with Google Sheets, you’re in the right place. In this guide, we’ll be looking at the benefits of Google Sheets and walking you through some of the basics so you can get up to speed quickly and efficiently.
![→ Access Now: Google Sheets Templates [Free Kit]](https://no-cache.hubspot.com/cta/default/53/e7cd3f82-cab9-4017-b019-ee3fc550e0b5.png)
Benefits of Google Sheets for Marketing
Saying that marketers are data-centric people is an understatement. Between return on investment, cost per acquisition, and more, they’re always looking at different metrics and reporting on progress.
It can be tricky to keep all of those numbers straight, though. That’s where spreadsheets come in handy. With a well-organized spreadsheet, marketers can quickly analyze robust data sets and make smarter, more informed decisions about their efforts.
Originally introduced by Microsoft in 1987, Excel was the go-to tool for years for building spreadsheets. But when collaborative, cloud-based tool Google Sheets was introduced in 2012, many users made the switch over to this new (free!) resource.
Let’s talk about the benefits of using Google Sheets for marketing purposes before we discuss more traditional options (like a standard Excel spreadsheet).
- It’s cloud-based. Cloud-based spreadsheets are automatically saved, stored, and maintained via a remote server. That means that you can access it online from anywhere, any time. Plus: Google Sheets is also available offline.
- It’s free. No expensive software required — Google Sheets is always 100% free.
- It works across devices. Modern marketers switch between devices throughout the day — and Google Sheets accommodates that behavior. You can access and edit Google Sheet data from a wide variety of devices (like your smartphone, tablet, and computer).
- Add-ons are available. We’ll get into the specifics of add-ons for Google Sheets a bit later, but the increased functionality and flexibility of these additional features makes this spreadsheet tool even more versatile and powerful.
You might be wondering: What’s the difference between Google Sheets and Excel? The short answer is: price, collaboration, and flexibility.
While Excel requires a software subscription (which costs about $130), Google Sheets is free for all Google account holders. In terms of collaboration, Excel requires you to save and send a new version when edits are made, while Google Sheets automatically updates a single shared file for all team members. And lastly, because Google Sheets has the ability to accommodate many different integrations, it’s often more flexible than a standalone software solution like Excel.
Common Google Sheets Terms to Know
Next, let’s get familiar with some of the language and common terms used when referencing data within Google Sheets.
- Column: Columns are vertical cell sets.
- Row: Rows are horizontal cell sets.
- Cell: Cells are the single data points within a Google Sheet.
- Range: Range refers to a selection of cells across a column, row, or both.
- Function: Function refers to built-in operations for the Google Sheet that can be used to quickly calculate values, to manipulate data, and more.
- Formula: Formulas combine functions, rows, cells, columns, and ranges to generate a particular end result.
How to Use Google Sheets
Now we’re ready to dive into the more advanced how-to’s and lessons on using Google Sheets.
Understanding the Google Sheets Toolbar
One of the very first things to do is master the icons located in the Google Sheets toolbar. Doing so will help ensure you’re getting the most out of its abilities and that you’re saving time with shortcuts. Take a look at the screenshot below to identify some of the basic icons and their purposes within the toolbar.
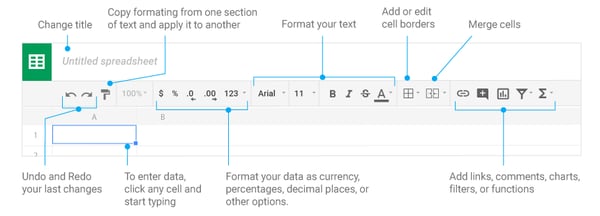
How to Create a New Spreadsheet
When you’re ready to create a new spreadsheet, you’ll just need to follow a few quick steps to get started. Open Google Sheets and click “File” > “New” > “Spreadsheet”.
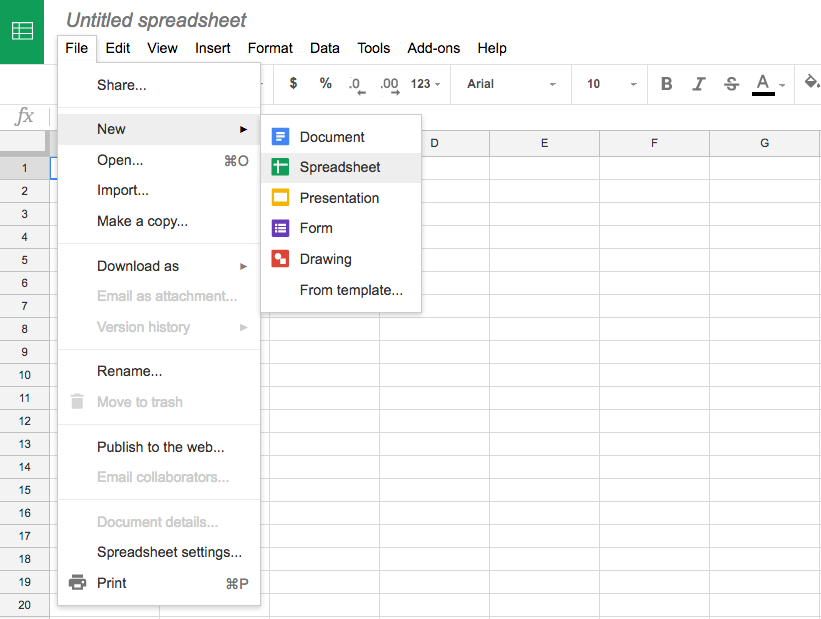
Once you create your new spreadsheet, you can start adding data. If you want to work with an existing spreadsheet from Excel instead, you’ll need to import that data into your new Google Sheet.
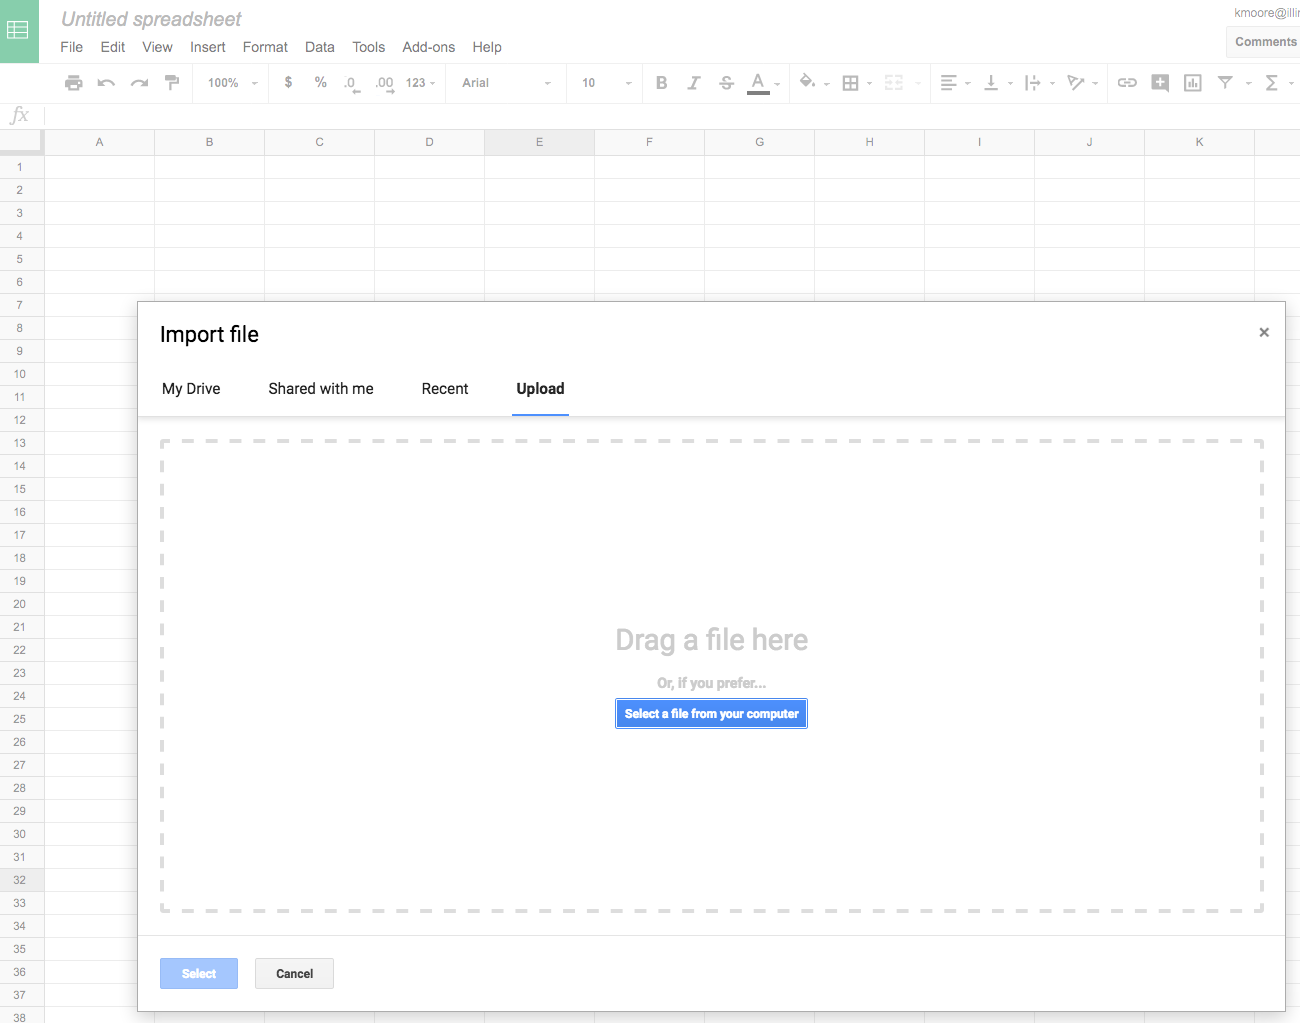
From there, your file will be uploaded and automatically converted into a Google Sheet.
Sharing and Protecting Your Data
Once your Google Sheet is set up and populated, you’ll want to think about how to share and protect your data. Data is automatically saved, so you don’t need to worry about that part. You can select who you share your file with and whether they have edit, comment, or view permissions. You can also protect specific data within your sheet so that those who have access can only edit certain cells.
To share a file:
- Go to “File” > “Share” (or just click the blue Share button in the top right corner)
- Enter the email address of who you’ll be sharing the spreadsheet with
- Assign permission levels (such as “View only” or “Can edit”)
- Click “Advanced” and select any additional privacy conditions needed
To protect data:
- Navigate to “Data” > “Protected Sheets and Ranges”
- Choose “Range” or “Sheet” (to protect an entire sheet)
- Select the data you’d like to protect
- Click “Set Permissions”
- Choose to show an error warning to anyone who attempts to edit or customize editing permissions for certain people.
Organizing Data in Google Sheets
Google Sheets is a powerful tool that can hold a ton of data. That means the more data you have, the harder it becomes to find it — that’s when filtering comes in handy. Google Sheets has several filters that allow you to select the data you want to see and hide what you don’t.
How to Hide Data
Google allows you to hide entire rows or columns. This becomes useful when you want to restrict views for sharing, or when you’d like to control the amount of data you’re viewing at any given time. To hide a column, right-click the column you want to hide, then select “Hide Column”. When you hide a column, two arrows will appear on the previous and subsequent columns. Click these to restore the column to full view.=
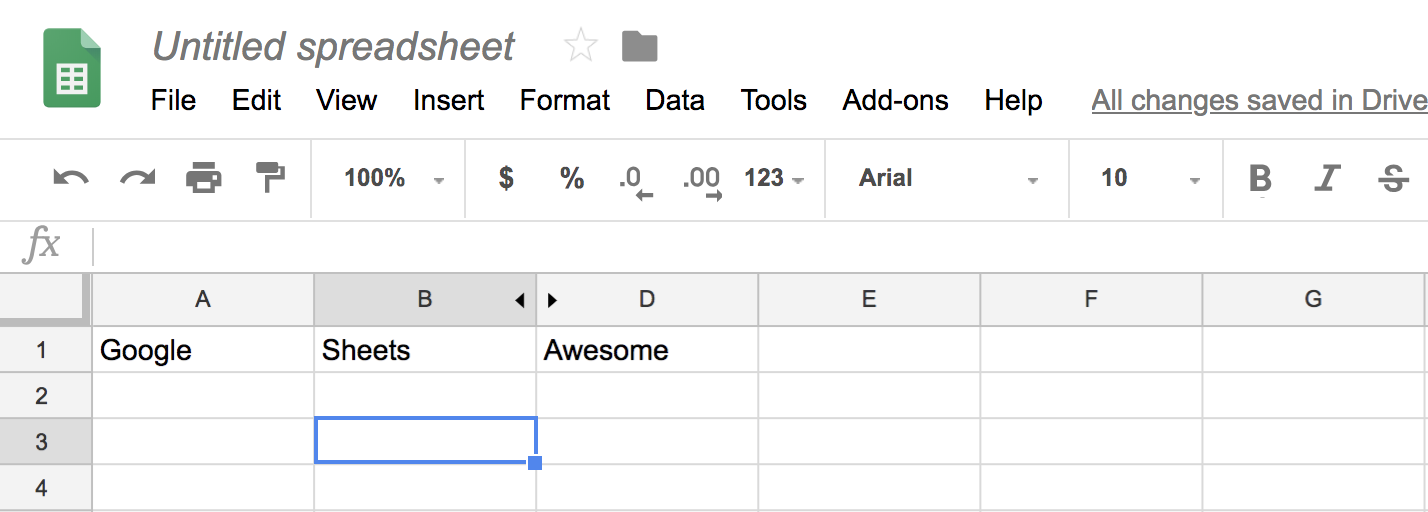
How to Freeze Rows and Columns
Freezing will create a floating row or column as you scroll and keeps the data in those fields within your line of sight. For example, if you use the first row to label your columns, you can freeze that row so you don’t have to remember what each column is as you scroll.
To freeze a row, select “View” > “Freeze” > “1 row” (or up to X rows).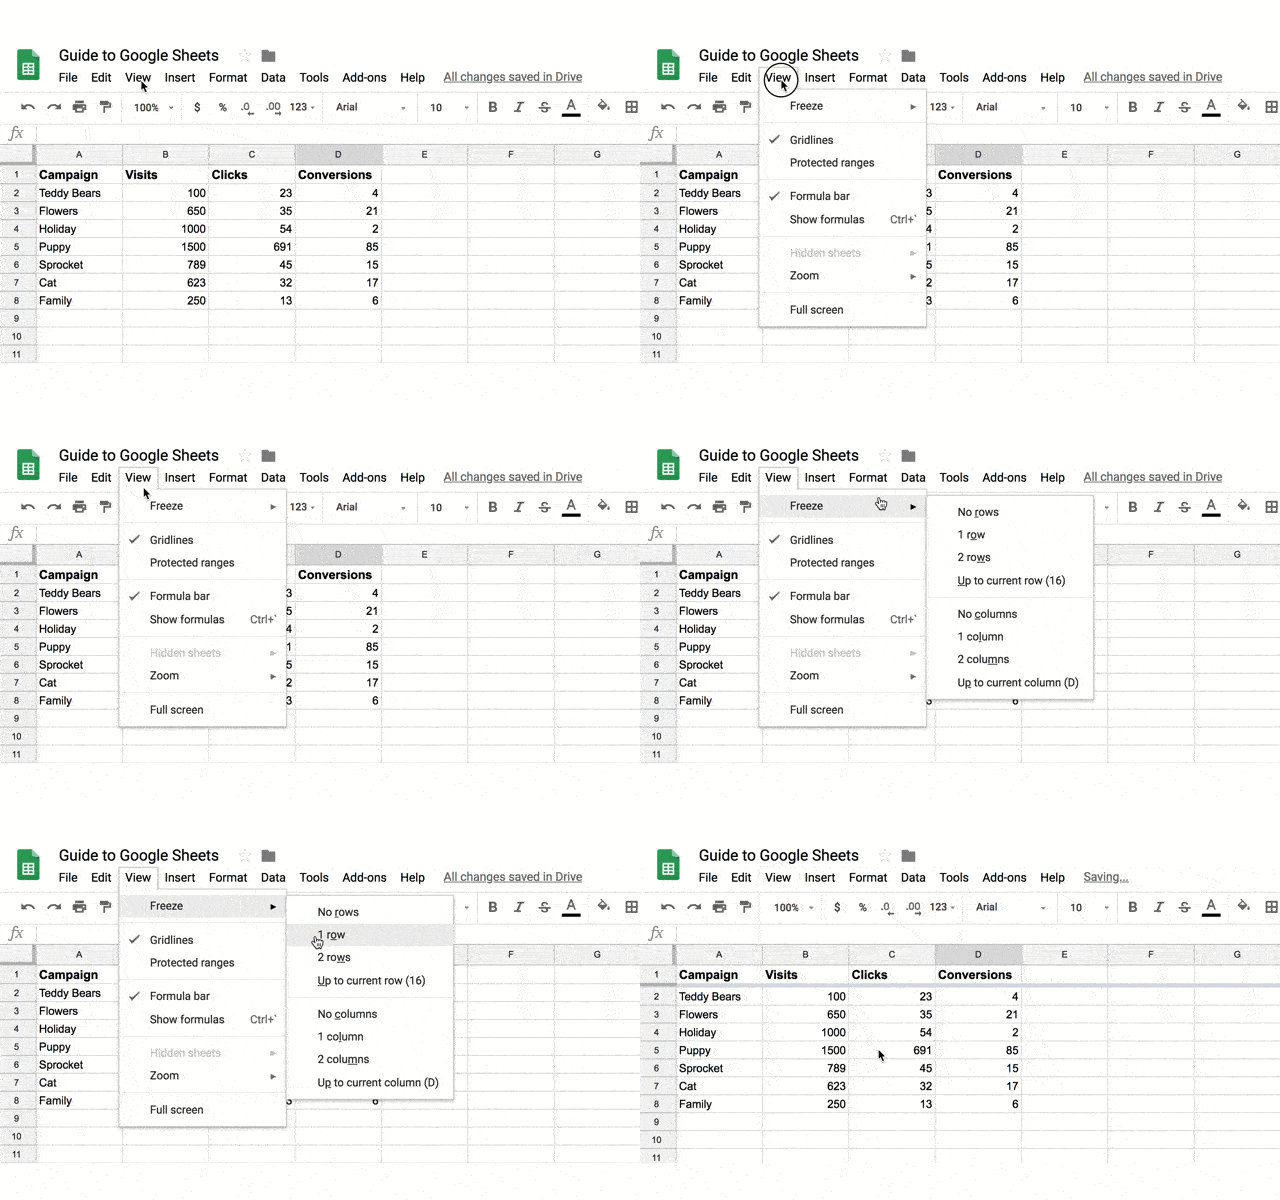
How to Filter Data
What if you’d like to view all of the data in a single column that fits a certain criteria? Apply a filter. Filters allow you to select a criteria and how that criteria applies to your data. For example, you can filter your ‘Site Visits’ column to show all values greater than 1000, or filter your sheet for all cells that have the word “cat”.
To set up a filter, select “Data” > “Create a Filter.” Click the funnel icon that appears in the column, then choose to filter by condition, value, or alpha or numeric order. Your sheet will only display data that satisfies your criteria.
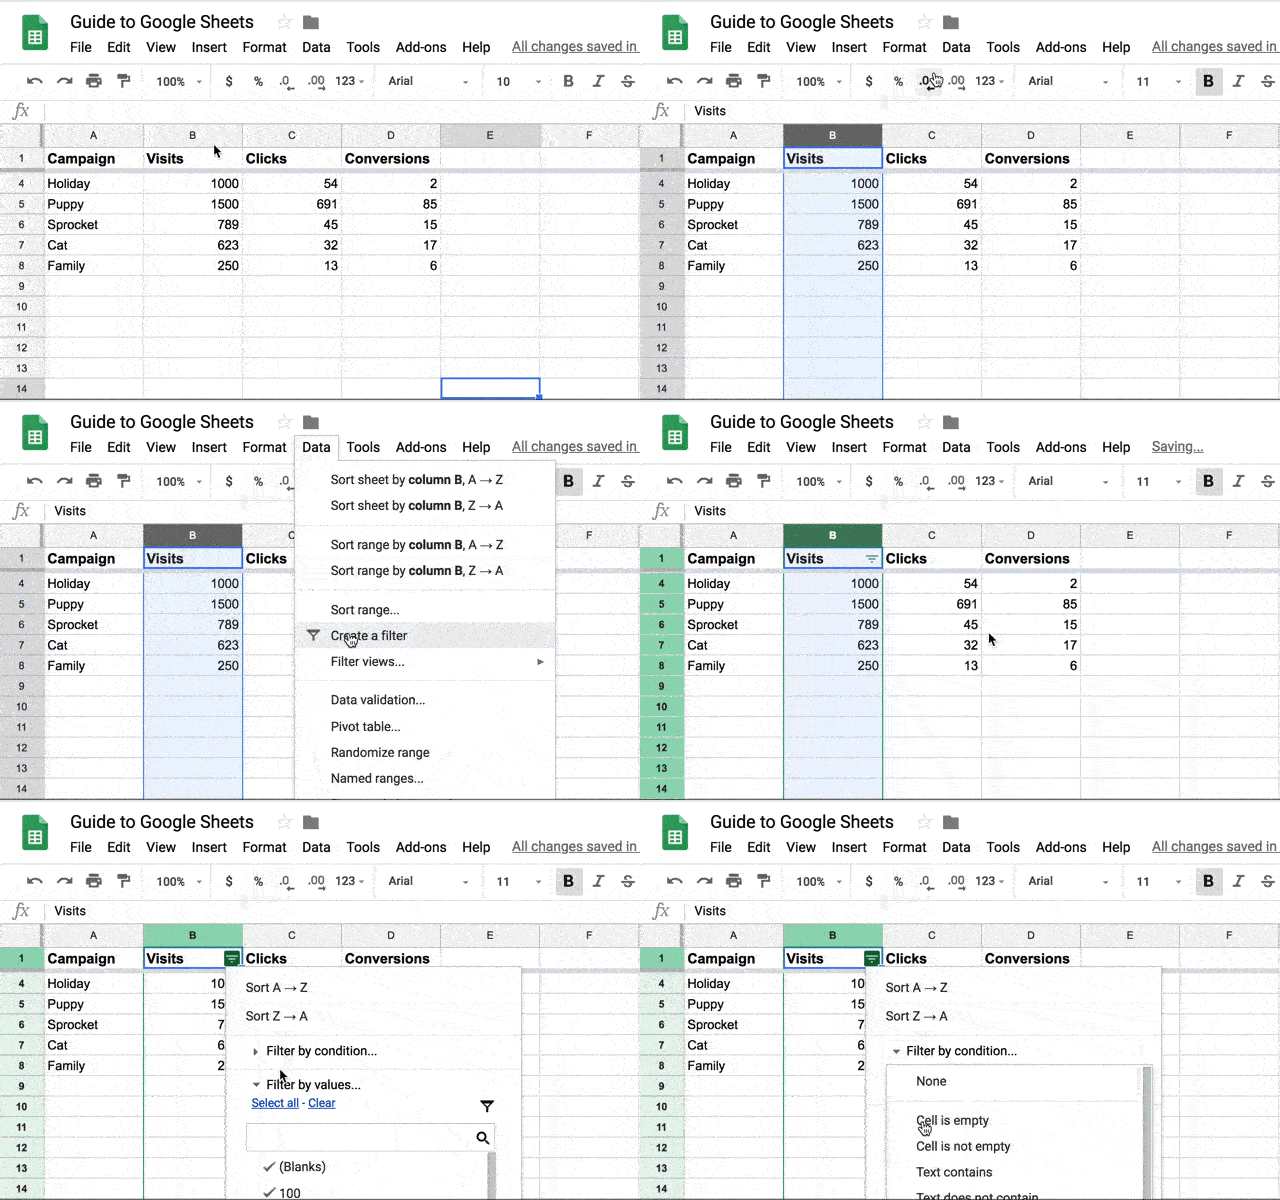
Learn about other filtering options below.
How to Setup and Use Google Sheets Offline
If you need to use Google Sheets offline, just follow the steps outlined here to turn on offline access to your spreadsheets.
Keep in mind:
- You must be connected to the internet.
- You’ll need to use the Google Chrome browser (don’t use incognito mode)
- You’ll need to install and enable the Google Docs Offline Chrome extension.
- Make sure you have enough free space on your device to save all your files.
From there:
- Open Chrome and make sure you’re signed in.
- Go to drive.google.com/drive/settings.
- Check the box next to “Sync Google Docs, Sheets, Slides & Drawings files to this computer so that you can edit offline.”
- To work on files offline from a computer, learn how to install Backup and Sync.
Advanced Google Sheets Tips
Now that you understand the basics of Google Sheets, let’s get into some advanced tips so you can start using Sheets like a pro. These tips are helpful to have in your back pocket … even if you don’t need them just yet.
Conditional Formatting and Heatmaps
Conditional formatting will automatically apply formatting to a cell based on a preset condition. For example, you can select to highlight a cell in red if the value entered is below 100 or reads “Error”.
Heatmaps work similarly in that they apply a color scale to cells based on a median criteria (values greater than the median will appear darker while values lesser will appear lighter). This helps you view values on a gradient and identifies areas of concern on which to focus your attention.
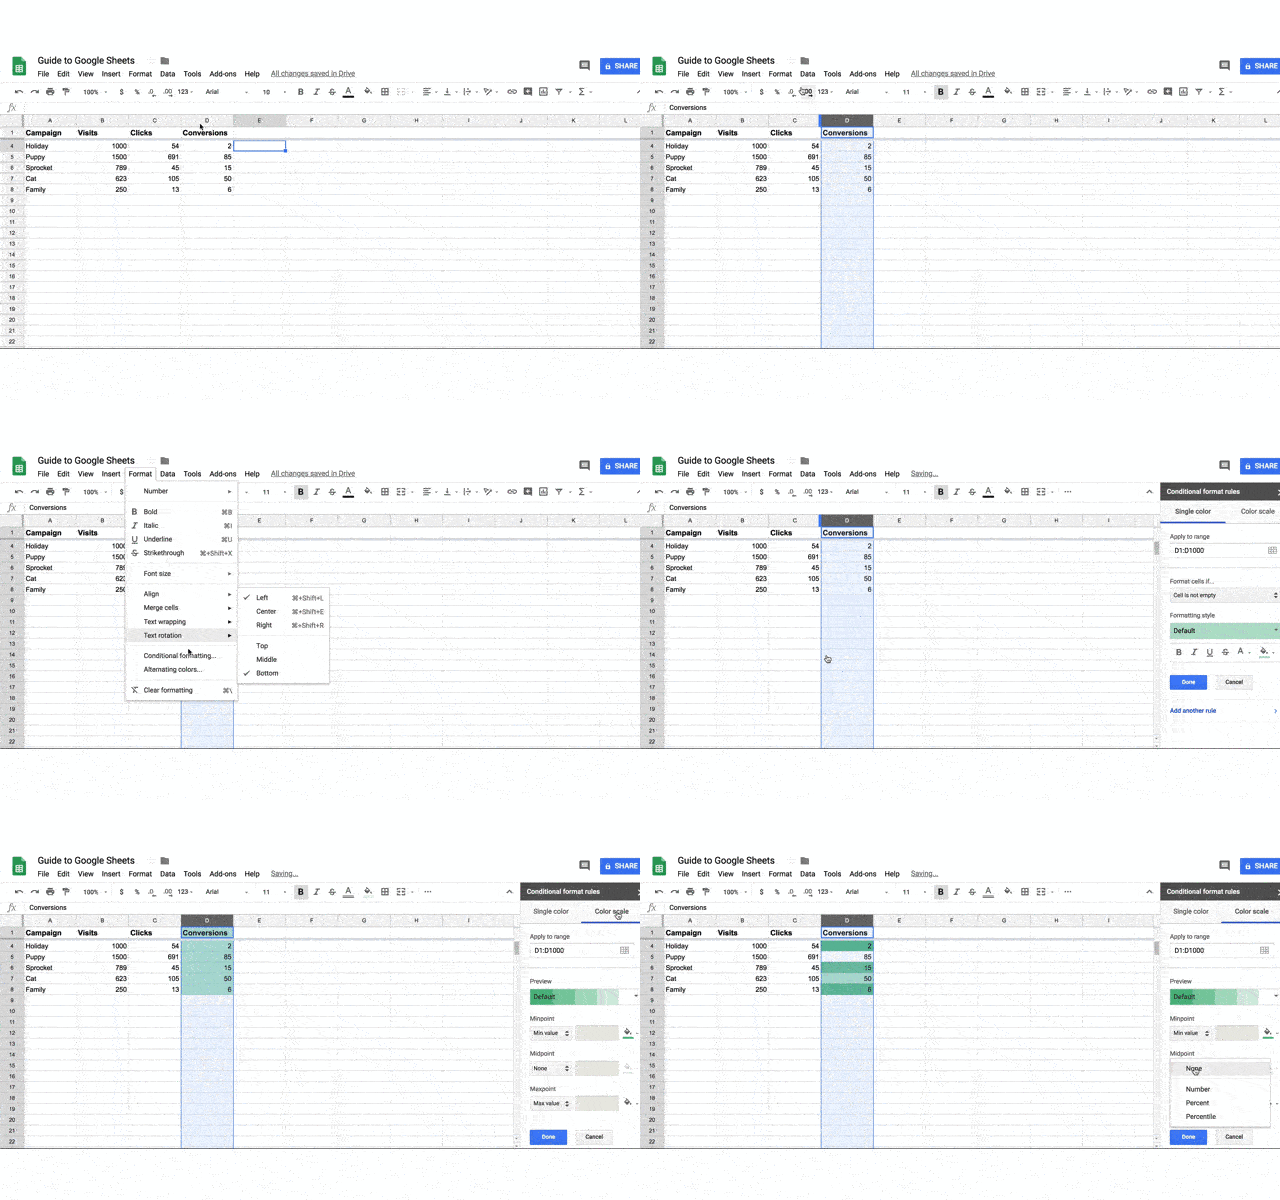
Array Formulas
Array formulas can perform multiple calculations at once and output a value based on those calculations. Whereas most formulas require you to perform each step independently (e.g. sum one row then add it to the sum of the subsequent row), arrays make calculations much more efficient. This helps when working with large amounts of data.
Macros
The Macros feature records a series of steps that you’d like Google Sheets to repeat on command. For instance, if you work with a new data set each month, and need to manipulate that data in the same sequence each time, then you can record a Macro, and have Google do the work for you.
10 Must-Know Google Sheets Formulas
When you’ve entered your data and you need to do some quick number-crunching, basic formulas can help you find the answers you need. Here are a few commonly used Google Sheets formulas to speed up your data analysis.
1. SUM
This formula adds all values within a selected range.
=SUM(range)
2. AVERAGE
This formula calculates the average of values within a range.
=AVERAGE(range)
This formula returns a filtered version of the source range, returning only rows or columns which meet the specified conditions. This is helpful when segmenting data by year or month.
FILTER(range, condition1, [condition2])
4. FIND
This formula returns the position at which a string is first found within the text. The Find formula is case sensitive.
FIND(search_for, text_to_search, [starting_at])
5. COUNTIF
This formula returns a conditional count across a range.
=COUNTIF(range, criterion)
6. CONCATENATE
This formula allows you to combine values of multiple cells into one cell, e.g., first and last name.
=CONCATENATE(Value1, “ ”,Value2)
7. VLOOKUP
This stands for vertical lookup. This formula searches down the first column of a range for a key and returns the value of a specific cell in the row found.
=VLOOKUP(search_key, range, index, [is_sorted]).
Learn how to do a VLOOKUP in less than a minute.
8. SPLIT
This formula divides text around a specified character or string, and puts each fragment into a separate cell in the row. Use this when you want to break up first names from last names in a list of customers or prospects.
=SPLIT(text, delimiter, [split_by_each])
9. SUBSTITUTE
This formula replaces existing text with new text in a string. For example: You could replace a product name with a new one in a sheet of ad copy.
=SUBSTITUTE(text_to_search, search_for, replace_with, [occurrence_number])
10. PROPER
This formula edits text within a cell to title case so you don’t have to format each entry manually.
=PROPER (text)
For more formulas you can use in Google Sheets, use the search tool on the spreadsheet functions list and find the one you need.
Google Sheets Functions & Skills You Should Know
How to Create a Pivot Table
- Select the cells with source data you want to use in your pivot table. Note: Each column will need a header.
- In the menu at the top, click “Data” > “Pivot table.” Click the pivot table sheet (if it’s not already open).
- In the side panel, next to “Rows” or “Columns,” click “Add” and then choose a value. Note: Sometimes you will see recommended pivot tables based on the data you’ve selected. To add a pivot table, under “Suggested,” select a pivot table.
- In the side panel, next to “Values,” click “Add”, then choose the value you want to see over your rows or columns. You can change how your data is listed, sorted, summarized, or filtered.
- Next to what you want to change, click the down arrow.
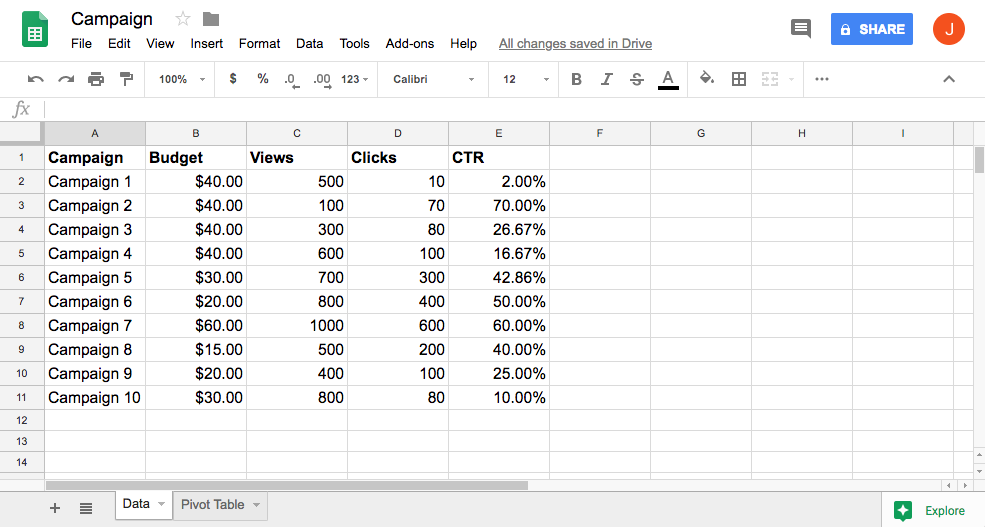
How to Remove Duplicates
- Select the cell in which you’d like to remove the duplicated info.
- Enter the function =UNIQUE(
- Select the cells you would like to pull data from
- Close the parentheses. Your function should look something like this: =UNIQUE(A:A)
How to Create a Drop-Down List
- Next to “Criteria,” choose an option:
- Click “Data” > “Data validation”.
- Select the cell or cells in which you want to create a drop-down list. List from a range: Choose the cells that will be included in the list.
- List of items: Enter items, separated by commas and no spaces.
- The cells will have a down arrow. To remove the arrow, uncheck “Display in-cell button to show list”.
- If you enter data in a cell that doesn’t match an item on the list, you’ll see a warning. If you want people to only enter items from the list, choose “Reject input” next to “On invalid data”.
- Click “Save”. The cells will show a drop-down list. To change the color of a cell based on the option, use conditional formatting (refer to section above).
How to Make a Graph
- Select the cells you want to include in your chart. To label your chart, add a header row or column.
- Click “Insert” > “Chart”.
- In the side panel, click “Data” > under “Chart type,” choose a chart.
- To edit your chart, click “Customize.”
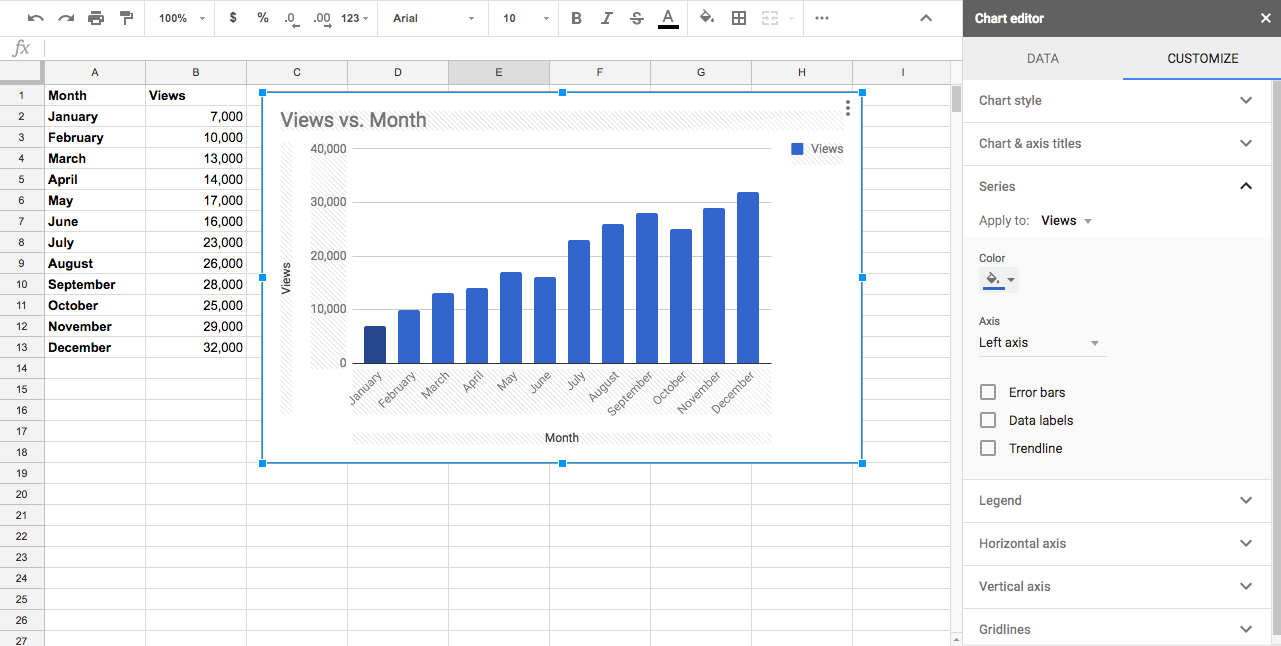
How to Merge Cells
- Highlight or select a range of cells.
- Right-click on the highlighted cells and select “Format Cells”.
- Click the “Merge” button in the toolbar, then select the merge option you need.
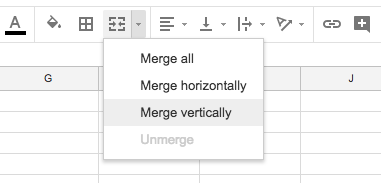
How to Download Google Sheets
If you want to use Excel or another tool for analyzing data sets with your file, you can easily export the file. Go to “File” > “Download as”. Then decide which format you need.
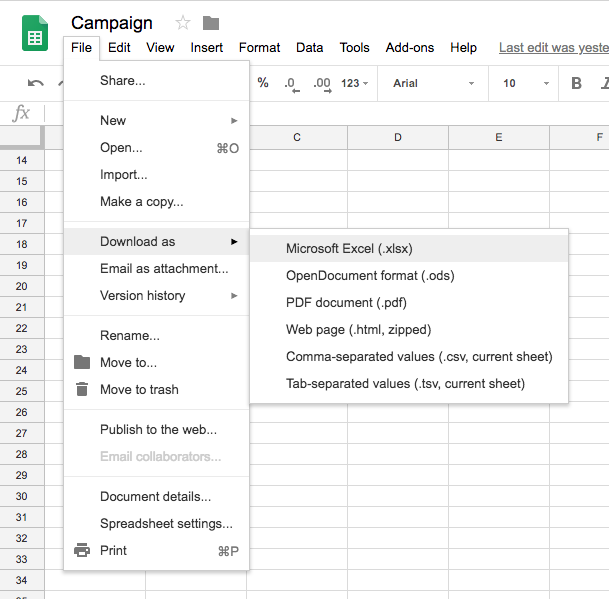
If you need more help getting started, the quickest way to get a crash course in using Google Sheets is to access the free Google Sheets Cheat Sheet, which outlines the basics on:
- Customizing spreadsheet data
- Working with rows, columns, and cells
- Sharing/collaborating within your spreadsheet
- Saving and protecting your information
- Utilizing key functions
You can also access the Tips Library for more advice on using Google Sheets.
Where to Find the Best Google Sheets Templates
Building new spreadsheets from scratch can be extremely time-consuming, so don’t reinvent the wheel if you don’t have to. Instead, look for pre-existing Google Sheets templates that you can customize and use for your own efforts. Let’s look at a few different places where you can find ready-to-use templates for your marketing efforts.
1. HubSpot
HubSpot’s library of Google Sheets templates is a gold mine of resources for the professional who needs to set up a spreadsheet quickly. In this library, you’ll find a template for any type of document you might need, including a business budget, competitive analysis, expense report, marketing dashboard, and more. You only have to plug in the numbers and personalize the fields. This option is a great fit if you’re looking for an individual template.
Otherwise, you might enjoy downloading HubSpot’s free template kits. The below bundles contain Google Sheets templates designed to supercharge a high-functioning marketing team.
- Free Google Sheets Template Bundle: Don’t want to look through an entire library and download templates one-by-one? Download this starter kit to jumpstart your spreadsheet creation process.
- Free Marketing Budget Templates: These customizable marketing budget templates are ideal for tracking your spending on product marketing, content, paid advertising, and more.
- Free Editorial Calendar Templates: You don’t need expensive software to start planning your publication calendar. Use these templates to get started. They also sync with Google Calendar so that no post goes unpublished or accidentally passed over.
- Email Marketing Planning Template: This email marketing planning template helps you conceptualize, refine, and schedule your campaigns to increase ROI and optimize your results.
2. Google Template Gallery
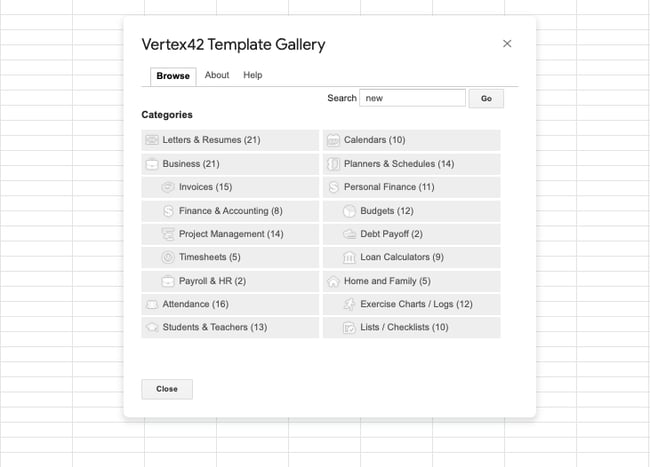
This free Google Sheets add-on gives you access to dozens of different templates right within Google Sheets. There’s no need to download an external document or make a copy from a publisher you might not trust. In this tool, you can access templates for project management, timekeeping, and budgeting. The only downside is that it’s hard to look at the previews of the templates, because the thumbnails are quite small.
3. Template.net
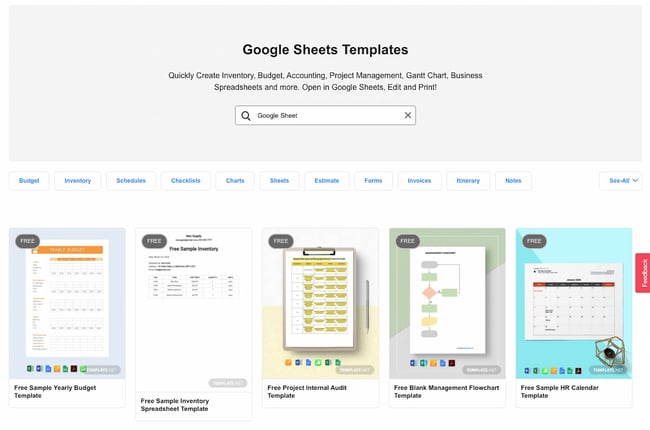
Template.net has a vast library of Google Sheets templates that you can easily preview and customize for your needs. While the library is not as marketing-specific, it still offers plenty for marketers to track their campaigns’ ROI, such as this social media marketing budget template. We recommend spending some time digging through this resource to find a template that works for you.
4. Blockspring
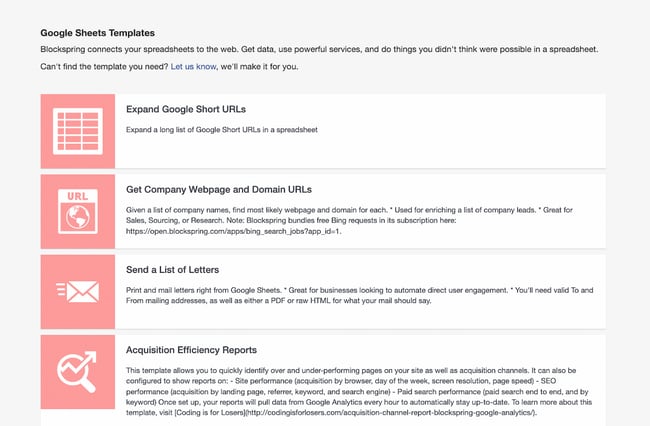
Out of all the resources in this list, this one is the most unique. Why? Because these aren’t plain old templates where you can plug in the numbers and go. Blockspring’s templates are connected with third-party services to pull data into your spreadsheet. Instead of you having to manually link your spreadsheet to these third-party services, Blockspring’s templates do it for you.
For example, the template titled “Get content ideas on a topic using ‘Skyscraper’ analysis” uses data from Moz and Bing to get you a list of content ideas right on the spreadsheet — without you having to actually use either Moz or Bing. You only have to place the topic into the appropriate field, and the spreadsheet will populate on its own.
The only downside to using Blockspring’s templates is that you have to take a few extra steps for them to work. You have to download the Blockspring add-on onto Google Sheets, and then follow a few simple instructions to get the template up and running.
Haven’t found the Google Sheets templates that work best for you? Check out a few roundups we recommend:
- HubSpot’s Roundup of the Best Google Sheets Templates: Didn’t find what you were looking for in HubSpot’s library of templates or in one of our template kits? This post curates a template for every need. You’ll also learn where to find templates within Google Sheets.
- Buffer’s Google Sheets Templates for Marketing: In this post, Buffer lists a variety of “report card” style templates for Google Sheets that can help track your marketing efforts on different social media channels like Twitter, Facebook, and others.
- Smartsheet’s Google Sheets Templates for Scheduling: Smartsheet also offers free templates, like a project schedule template, that can help you better plan your blog posts and monitor results.
The Best Google Sheets Add-Ons
To boost your efficiency in Google Sheets, consider using add-ons. Here are a few suggestions:
TapClicks
Pull your paid search and social advertising data into one spreadsheet, and turn them into beautiful reporting dashboards you’ll be proud to show your team managers and directors. This is a paid tool that starts at $29/month.
Google Apps Script
Google Apps Scripts offers a way to extend the functionality of your Google Sheets workspace beyond the basics. The cloud-scripting language allows you to create, edit, and read your Google Sheet through an integration with other Google apps. Recommended for advanced users and developers. Check out the documentation here.
DataEverywhere
Share data between Excel, local databases, Salesforce, and Google Sheets, without importing or exporting any files. That means that if you’re using Excel and want to automatically sync the data with Google Sheets, you can do so without needing to re-upload the document into Sheets.
XLMiner Analysis ToolPak
Do statistical analysis with functions. Because Analysis ToolPak was originally a Microsoft Excel add-on, this is a great tool for you if you’re getting into Google Sheets after being an Excel user.
Power Tools Add-On for Google Sheets
Streamline routine operations, such as clearing out duplicates and searching for specific values. You can also compare sheets, which is highly useful if you’re working off of two similar spreadsheets. This is a paid tool that starts at $29.95/year.
SuperMetrics
Create a business reporting system for SEM, SEO, web analytics, and social media. Not only does SuperMetrics turn a large amount of data into a more digestible format, but it also carries out automatic refreshes — so there’s no need to manually pull in the data every time you want to see a summary of your performance.
Clearbit Sheets
Create targeted email lists and qualify leads quickly. This add-on is a great option if you’re already familiar with a tool such as LinkedIn Sales Navigator. It fulfills a similar role, only the data lives on your own private spreadsheet, so there’s no need to sign in to LinkedIn every time you want to see prospect data.
Google Sheets is a Must-Have for Every Team
This quick guide to Google Sheets should help you get a running start as you leverage it for your marketing efforts. From more efficient tracking of different metrics to better planning around your content to easier collaboration with your team, this tool can help you make smarter, more data-backed choices that drive meaningful results for your brand.
Editor’s note: This post was originally published in October 2018 and has been updated for comprehensiveness.

How to Create a Location on Instagram (+ Reasons Why You Should)
Adding your location on Instagram is often an underrated feature for brands.
For brands, there are two main reasons to use it: Share your business location with your followers for increased discoverability or show some personality with fun location names.
Whatever your goal is, learn how to create your own custom location on Instagram in a few simple steps.
1. Check in on your Facebook app and create a post.
.jpeg?width=270&name=How%20to%20Create%20a%20Location%20on%20Instagram%20(+%20Reasons%20Why%20You%20Should).jpeg)
2. Select “Check In.”
-Jan-20-2022-03-30-39-08-AM.jpeg?width=250&name=How%20to%20Create%20a%20Location%20on%20Instagram%20(+%20Reasons%20Why%20You%20Should)-Jan-20-2022-03-30-39-08-AM.jpeg)
3. Allow Facebook to use your location or select one on the map.
-3.jpeg?width=250&name=How%20to%20Create%20a%20Location%20on%20Instagram%20(+%20Reasons%20Why%20You%20Should)-3.jpeg)
4. On the search bar, type in the name of your new custom location and click on the + symbol at the bottom. Even if someone has already created a location with the same, you can still create your own.
-2.jpeg?width=250&name=How%20to%20Create%20a%20Location%20on%20Instagram%20(+%20Reasons%20Why%20You%20Should)-2.jpeg)
5. Add in your custom location name and location details, then click “Save Custom Place.”
-1.jpeg?width=250&name=How%20to%20Create%20a%20Location%20on%20Instagram%20(+%20Reasons%20Why%20You%20Should)-1.jpeg)
6. Your new location is now available on Facebook and Instagram. -Jan-20-2022-03-30-39-36-AM.jpeg?width=250&name=How%20to%20Create%20a%20Location%20on%20Instagram%20(+%20Reasons%20Why%20You%20Should)-Jan-20-2022-03-30-39-36-AM.jpeg)
When you create a custom location, it automatically creates a business profile page. If you’re having trouble seeing your newly created location, here’s what may have happened:
- Your location is taking a few hours to show up on Instagram.
- Facebook does not recognize your new location as valid due to the limited details provided.
- You have not claimed your business profile page.
Can you create a location on Instagram without Facebook?
Currently, there is no way to create a new location on Instagram without relying on its parent app, Facebook. The only locations you can access are the ones already available on the app.
However, that’s not necessarily a bad thing. So many brands and individual users have done the hard part for you, creating fun and relevant custom names that you can use on your posts.
For instance, this brand used the “Coffee Time” location name to add to an image featuring various coffee beverages.
-4.jpeg?width=250&name=How%20to%20Create%20a%20Location%20on%20Instagram%20(+%20Reasons%20Why%20You%20Should)-4.jpeg)
In this case, the location name serves as another signal of what the post is about and can create some more interest in your brand.
Some brands and users also use location tagging as another branding opportunity.
Take The Bearded Marketer.
-Jan-20-2022-03-30-38-45-AM.jpeg?width=250&name=How%20to%20Create%20a%20Location%20on%20Instagram%20(+%20Reasons%20Why%20You%20Should)-Jan-20-2022-03-30-38-45-AM.jpeg)
He created a custom location name to add to his Instagram posts, which can help with brand recall.
How to Add Your Location to Your Instagram Story
-
Swipe left to post a Story and click on the emoji icon.
-Jan-20-2022-03-30-38-82-AM.jpeg?width=250&name=How%20to%20Create%20a%20Location%20on%20Instagram%20(+%20Reasons%20Why%20You%20Should)-Jan-20-2022-03-30-38-82-AM.jpeg)
-
Search for the “Location” feature.
-Jan-20-2022-03-30-37-87-AM.jpeg?width=250&name=How%20to%20Create%20a%20Location%20on%20Instagram%20(+%20Reasons%20Why%20You%20Should)-Jan-20-2022-03-30-37-87-AM.jpeg)
-
Search your location name or address.
-Jan-20-2022-03-30-37-57-AM.jpeg?width=250&name=How%20to%20Create%20a%20Location%20on%20Instagram%20(+%20Reasons%20Why%20You%20Should)-Jan-20-2022-03-30-37-57-AM.jpeg)
-
Click on your location and place it where you want on your Story.
-Jan-20-2022-03-30-38-19-AM.jpeg?width=250&name=How%20to%20Create%20a%20Location%20on%20Instagram%20(+%20Reasons%20Why%20You%20Should)-Jan-20-2022-03-30-38-19-AM.jpeg)
So whether you’re looking for a new way to connect with your audience or want to enhance your store’s discoverability, these tips will help you easily create a location on Instagram.

Media Planning: The Ultimate Guide
Today’s digital landscape is a competitive one. For any business to find success today, it must create and share media content (such as images, videos, written content, and podcasts) with its audience.
Publishing new media is how you boost brand awareness, engagements, conversions, and revenue for your business. Not to mention, media content helps you stand out from competitors.
Over time, though, it can become confusing to keep track of, plan, organize, distribute, and analyze all that media content.
The best way to combat these issues is through media planning.

Media planning has many moving parts, and the process can be difficult to get right.
By working through the media planning steps as well as implementing media planning templates, you’ll keep any media-related challenges at bay.
Benefits of Media Planning
Media planning aids with parts of content creation and distribution, including:
- Getting to know your target audience on a deeper level so you can effectively reach them through your media content
- Deciding which media channels and platforms on which you’ll share your content
- Determining the timing and frequency of the media and content you publish and share
- Keeping up with the latest media trends and technology
- Sticking to your budget as you work to create, publish, and share high-quality and engaging media content
- Conducting analyses to measure the success of your media planning process
Now that we’ve discussed the benefits of media planning, let’s review the steps in the media planning process so you can begin developing your business’s strategy.
As you work through the following media planning steps, keep in mind that how your business applies the results and conclusions derived from each step will be unique based on your audience and needs.
1. Conduct market research.
The first thing you’ll want to do when developing your media planning process is conduct market research. Market research will allow you to tailor the content you create and the media plan you implement to your target audience and customers.
Start by creating (if you haven’t already) and studying your buyer personas as well as developing an understanding of who your target audience and current customers are.
With this information, you can determine what media will reach, resonate with, and convert your audience. Additionally, it’ll help you decide what platforms and channels through which to share your content.
Featured Resource: HubSpot’s Market Research Kit + Templates

2. State your media planning objective.
When developing your media plan, keep a goal (or a few) in mind to help you effectively navigate the process. Moreover, goals can help you know what content types and platforms you can say “no” to.
Here are some examples of media planning objectives you might have:
- Strengthen cross-team collaboration (e.g. content, graphic design, animation, video, blog, social media) while creating and sharing media.
- Enhance and streamline the publication and distribution processes for all media.
- Improve media distribution timeline to ensure our content is shared efficiently so it’s relevant to our target audience.
- Amplify the success of our media content by allowing for ample time to analyze its impact and reach our audience.
For instance, say you’re looking to create a media plan for your Facebook and Instagram social content. Your objective may be to streamline the content creation process in a timely fashion and then schedule posts on both platforms in advance.
This way, you ensure your posts are relevant to your audience so you can boost engagement and stay top of mind.
3. Create your media plan using a template.
Now it’s time to make your media plan, but before jumping into templates, let’s go over what exactly a media plan is.
It’s not enough to simply do the planning and then assume everyone else is on the right page. You need to outline your strategy into a media plan document, you’ll be able to ensure alignment on your team and keep all parties accountable.
Other media plans are standalone strategies that detail how organizations plan to leverage media (written, video, audio, etc.) to connect with followers and customers.
Media planning templates ensure you stay efficient and effective while working on all aspects of your media content. They keep your media content organized while publishing and sharing it among your audience members.
Due to the variety of templates available for different types and parts of the media planning process, the templates you incorporate will be unique to your business. Don’t be afraid to experiment with or combine different templates.
For example, if your business is looking to create a media plan for your Facebook and Instagram social media, you might choose to implement a social media calendar template.
This type of template will help you coordinate your content across both channels, boost engagement, and improve productivity among your team members — and therefore, achieve the objective you set in step two.
4. Implement your media plan.
Ensure all parties who should be aware of the plan have the necessary details to help you execute accordingly.
Additionally, share the contact details of the media-planning point person at your company in case anyone has questions or comments.
To get a better understanding of what I mean, let’s refer back to our example in the above step about your social media plan for Facebook and Instagram.
If you implement a social media calendar template as part of your media plan, ensure everyone who will be working on or creating the content and publication schedule for both platforms has access to it.
5. Evaluate your success.
Whether your media plan revolves around individual posts on Instagram or a month-long, company-wide campaign, be sure to measure the success of your plan.
Ask yourself and your team questions like, “Did this media plan help us achieve our specific goals?” and “Did the media planning templates and tools we used add value to our media creation and publication processes?”
The way you evaluate your media plan’s success should be directly tied to your business’s specific goals regarding your media and content, the teams who create the media, and the value you hope to derive from the media (e.g. boost conversions, engagements, revenue, etc.).
Let’s look back at our example from above one last time. Think about whether or not your social media content plan and the calendar template you implemented have helped you reach your target audience and achieve the objective you set.
Ask yourself whether or not your media plan helped you boost engagement on the social platforms you focused on as well as collaborate and coordinate more effectively to increase team-wide productivity.
What to Consider for Your Media Planning Strategy
There are a few additional things to consider when crafting your media planning strategy.
First, what’s your media planning budget?
Media Planning Budget
If you’re aiming for free media, you can disregard this question. But if part of your media planning involves media buying (as we discussed above), you’ll need to sit down with your marketing leadership to understand what funds you have to work with.
Set this budget before you start researching platforms and creating content. You don’t want to start formulating a campaign that you can’t afford down the road.
Second, consider the key messaging points you want your media to communicate.
Media Planning Messaging
You don’t have to pre-write all your media content, per se, but you should establish the main themes at the beginning so all media is consistent and on theme.
These messaging points will come from your audience research and may also influence what content types and platforms you pursue, so be sure to establish these early on.
With these points in mind, let’s walk through how to create a media plan of your own.
How to Create a Media Plan
1. Target your buyer personas.
As a marketer, you don’t want to advertise to just anyone. You want to attract the type of buyer that has interest in the media you’re creating — otherwise known as your buyer personas.
A buyer persona is a semi-fictional representation of your ideal customer based on market research and real data about your existing customers.
When you know exactly the type of buyer you need to target with your media plan, you’ll be able to attract the most valuable customers to your business.
When making your buyer personas, center them around these important attributes:
- Demographics: Age, income, location, or identity
- Background: Job, career path, and lifestyle
- Identifiers: Communication preferences and social media platforms
- Goals: Primary, secondary, personal and professional
- Challenges: Their roadblocks preventing them from achieving their goals
2. Define your SMART goals.
You want to write out SMART goals for your media plan. The SMART acronym (Specific, Measurable, Attainable, Relevant, Time-Bound) is a framework that will enable you to better track and drive greater impact from your proposed plan.
It’s important to determine these goals before jumping into your work so you have a media plan that sets a clear direction for you and your team members, and ensures you’re able to celebrate the wins when they occur.
Some examples of SMART goal-setting in media planning could look like:
- Specific: “We want to generate a greater number of qualified leads for my business.”
- Measurable: “We want our media plan to gain my business 2,000 followers across Twitter, Metaverse, and Instagram.”
- Attainable: “We previously reached 70% in customer engagement online over the past quarter, so we’re aiming for 75% in the next.”
- Relevant: “We want to achieve more positive customer engagement to better the brand’s reputation and gain more fans.”
- Time-Bound: “We want our media plan to gain my business 2,000 followers in the next three months across Twitter, Metaverse, and Instagram.”
Once you’ve determined your goals, you can begin looking at resources to assist you in reaching them.
3. Find the media planning tools best suited for you.
We talk in further detail later in this post about some amazing media planning templates your business can use, but there are software tools that can do some of the heavy lifting for you.
To draft, plan, schedule, and collect conversion analytics, your business could benefit from the HubSpot Marketing Hub.
Or if you still want to explore more options, we have a list of 12 essential media planning tools for you to use.
4. Analyze historical data.
You have to know where you began before you can start going forward, look back at your previous media planning strategy and analyze its impact and reach.
For example, if your business was already on Instagram, check your business page insights to see just how far you got on your old posting schedule and content. Look at the posts that got the most engagement, the time period you had the most traffic, and what content helped to turn prospects into customers.
Make note of the effective elements of your previous strategy and let that drive some of your brainstorming for your new media plan.
5. Choose your media mix.
It’s important that you are up to snuff on the most popular marketing channels, along with your buyer personas preferred ones.
According to the 2021 State of Marketing Report, 1,000 global marketing professionals believe that the top marketing channels are:
- Social Media
- Websites/Blogs
- Email Marketing
- Video Marketing
You want an omni-channel media plan to reach your target audience where they are, and by researching your buyer personas most frequented channels, and exploring new channels, you can decide upon the right mix for you.
6. Put your media plan into action.
As you conduct your media plan, track your insights and see how you’re doing in comparison to your SMART goals.
Also, understand that you can adjust your plan as necessary over time. Marketing is a rather volatile industry and knowing when to change your approach is key.
Now that you know what it takes to create a plan, let’s review some resources available to simplify the media planning process.
Media Planning Templates
There are a plethora of media planning templates available online that you can purchase or download for free. The great part about using media planning templates is that you can customize and tailor them to your business’s specific needs and goals.
Depending on the media software your business uses, such as HubSpot’s (free) CRM, Marketing Hub, or Sprout Social, there may be customizable planning templates included (similar to this menu of options from HubSpot).
You may also elect to create templates on your own with the help of Google Sheets.
Either way, how you choose to implement and use media planning templates will be unique to your business and needs — so don’t be afraid to modify your templates over time as your goals evolve or audience grows.
Free Media Planning Template [Download Now]
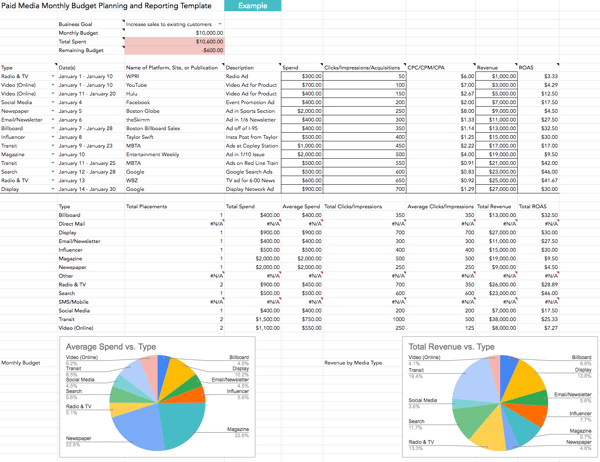
Types of Media Planning Templates
To help get you started, here’s a list of common types of media creation and planning templates. (Click the links to be directed to an associated template resource.)
You might use one or several media templates based on your needs. Remember, there’s no right or wrong answer to which template you should use — it’s about preference and what works best for your business.
- Use a media planning template to organize your paid media efforts and expenses in one visual location.
- Use a social media strategy template to align your media content with your audience in a way that provides value for your business.
- Use a social media calendar template to customize a timeline for when you’ll share your social media posts in a simple, organized, manageable, and effective format.
- Use an editorial calendar template to plan and optimize all of the marketing content you’ll publish and share including blogs, social media, and campaigns.
- Use a blog post template to simply fill-in-the-blanks and begin writing engaging, relevant, and well-optimized blog content for your audience (all while avoiding writer’s block!).
- Use an ebook design template to take the guesswork out of how to make your ebook professional, eye-catching, and beautiful all while saving yourself valuable time.
- Use an infographic template in Powerpoint or Illustrator to quickly customize the way you present data, share insights, and promote offers in a way that looks and feels professional.
- Use an analytics and reporting template for Excel, PowerPoint, and Google Drive to make the processes of pulling, organizing, and sharing data simple no matter which metrics you track.
- Use a budget template to manage and review your spending and budget with Excel or Google Sheets.
- Use an advertising template to help you plan and manage advertising campaigns in a way that’s sure to convert audience members into leads and customers.
We’ve spent a lot of time discussing the ins and outs of media planning, there’s another side that can help marketers on the job — media buying. Let’s get into it.
Media Planning and Buying
Media planning and media buying are closely related and work in tandem with one another. Depending on the size of your business and your budget, your team members who plan your media may also handle the media buying process.
So, what makes these processes unique?
Well, media planning focuses on the strategy behind the media content that’s created, published, and shared among your customers and target audience. The media referred to here is all-encompassing, meaning it doesn’t always include paid ads and paid content.
This is where media planning and media buying differ.
What is media buying?
Media buying is related to paid media — whether that means your business is buying campaign or ad space on various channels, paying to share targeted campaigns and ads, or negotiating with media vendors.
In a world where your business can create and share media and successfully reach your audience for free, media planning can happen without media buying.
However, media buying requires media planning. (It’s like that “a square is a rectangle, but a rectangle is not a square” lesson that baffled us all in elementary school.)
Media planning sets the tone and direction for the buying that needs to occur. Once ad space is purchased or content distribution plans have been negotiated, there needs to be a strategy (or media plan) for getting that media to your audience and customers.
Begin Your Media Planning Process
Media planning is an integral part of your business’s ability to successfully create, publish, and share media content. It’s how you streamline cross-team communication and collaboration around your media as well as ensure it’s shared with your audience in a timely fashion.
So, work through the media planning process steps above and choose which templates you’ll use to begin reaching and converting more audience members.
Editor’s note: This post was originally published in February 2020 and has been updated for comprehensiveness.

20 Blogging Mistakes to Avoid in 2022, According to HubSpot Bloggers
Sometimes, when I tell people that I blog for a living, they roll their eyes. “That’s so easy,” they say. “You get a paycheck for sitting on the internet all day and writing. A monkey could do your job!”
That’s when I roll my eyes. See, people are quick to deem blogging as a no-brainer job. But when they actually sit down to write their first couple of posts, it hits them: This is way harder than I thought. Like any person starting a new job, they mess things up.

That’s okay — it happens to pretty much every new blogger. Luckily, it’s pretty easy to avoid these roadblocks if you know they’re coming.
So for all of you beginner bloggers out there who are looking to get up-to-speed quickly, keep on reading. Below are common mistakes most beginners make and some tips on how to avoid them.
Anyone can start a blog, but many will never give blogging the attention that it needs to be a successful part of a business.
A hobby blog is one thing, but when you want to grow or monetize your blog, there are several things you need to focus on. Namely, you need to identify the goal of the blog, know your target audience and what moves them, build a blog site that is easy to navigate, and choose a writing style that resonates with your audience.
Fear that you’re missing some of these elements? It’s okay! We’re here to help you and your blog become a success. Let’s delve into some common blogging mistakes and the solutions that will help your blog move up the ranks.
Most of a blog’s traffic is driven organically — in other words, consumers will search for something on a search engine and click on your blog if it matches their intended topic. However, there are a lot of organizations competing for your audience’s attention, so it’s important to avoid common blog mistakes to stand out.
Here are the most common blog post mistakes (and their solutions), according to HubSpot bloggers.
1. Create blog posts that serve your larger company goals.
Mistake: You think of ideas that only interest you.
As much as you might read and re-read your blog posts after you publish them, you’re not the only reader, or the intended reader.
When you start blogging, ideas will come to you at random times — in the shower, on a run, while on the phone with your mom. While the ideas may come at random moments, the ideas themselves should never be random. Just because it’s a good idea in general — or something that interests you personally — doesn’t mean it’s a good idea for your company.
“Your blog is a honeypot, not a megaphone. Make it a point to position your content around what your audience wants to discover, not what you want to tell them.”
— Amanda Sellers, Historical Optimization Manager at HubSpot
Solution: Align your blog posts with company growth goals.
The reason you’re blogging is to solve problems for your audience and, ultimately, to grow your business. So, all of your blog post ideas should help serve those growth goals. They should have natural tie-ins to issues in your industry and address specific questions and concerns your prospects have.
Need help figuring out what those goals are and how to address them? Chat with your manager about the larger company goals, and then schedule a meeting with someone on the sales team to hear what questions they get asked most often. After both meetings, you should know which goals you need to achieve and have some ideas on how to achieve them.
2. Identify what resonates with your audience.
Mistake: You forget about your persona.
If you want your blog content to perform well (i.e. generate traffic, leads, and sales), it must resonate with your audience and compel them to take action. One of the biggest mistakes is assuming that your content will perform if you haven’t actually considered your audience or the actions you want them to take.
“Your persona is the basis for everything you create. Writing for yourself won’t always resonate with your intended audience. If you, instead, speak to your persona’s pains, challenges, and goals and they feel like you are speaking to them, they are more likely to stay on the page and convert on your offer.”
— Christina Perricone, Senior Manager, Content Marketing at HubSpot
Solution: Understand your persona’s pain points and solve them.
By defining your buyer persona and the things that matter to them, you can bridge the gap with your content. If you’re not consciously thinking about your persona’s pains, you’re just creating content for content’s sake, which is a waste of resources.
3. Write like you talk.
Mistake: Your writing is too stiff.
Writing a blog post is much different than writing a term paper. But when bloggers first start out, they usually only have experience with the latter. The problem? The style of writing from a term paper is not the style of writing people enjoy reading.
Let’s be honest: Most of the people who see your post aren’t going to read the whole thing. If you want to keep them interested, you have to compel them to keep reading by writing in a style that’s effortless to read.
Solution: Write blogs that feel personable.
It’s okay to be more conversational in your writing — in fact, we encourage it. The more approachable your writing is, the more people will enjoy reading it. People want to feel like they’re doing business with real people, not robots.
So loosen up your writing. Throw in contractions. Get rid of the jargon. Make a pun or two. That’s how real people talk — and that’s what real people like to read.
4. Show your personality; don’t tell it.
Mistake: You think people care about you as a writer.
It sounds harsh, but it’s the truth: When people first start out blogging, they think that their audience will be inherently interested in their stories and their interests … but that’s not the case. It’s no knock against them as a person — it’s just that when you’re new, no one is interested in you and your experiences. People care way more about what you can teach them.
Solution: Infuse your personality without eclipsing the topic.
Even though people don’t really care that it’s you that’s writing the post, you can infuse parts of your personality in your writing to make them feel more comfortable with you. How you do that is entirely up to you. Some people like to crack jokes, some like to make pop culture references, and others have a way with vivid descriptions.
Corey Wainwright, Principal Marketing Manager at HubSpot, is particularly good at this. Here’s an example from the introduction of one of her posts:

To infuse personality into your own writing, try looking for ways to relate to your readers on the topic you’re writing about — then write in the first person as if you’re hanging out with them and chatting about it. Make your tone personal, approachable, and engaging, just like you would in a face-to-face conversation.
5. Make your point again and again.
Mistake: You digress.
Although you are encouraged to let your own personality shine through in your writing, don’t abuse the privilege. It’s one thing to be yourself in the topic you’re covering, but it’s another thing to bring up too many personal experiences, which will bury the point you’re trying to make.
Don’t digress into these personal anecdotes and analogies too much — your readers aren’t sitting in front of you, which means you can’t guarantee that you have their undivided attention. They can (and will) bounce from your article if they lose patience.
Solution: Repeatedly assert your argument.
To prevent your writing from losing its audience, restate your point in every section of the article. The best blog posts commit to an overarching message and then deliver it gradually, expressing it multiple times in small ways from beginning to end.
If you’re writing about how much water a potted plant needs, for example, don’t spend three paragraphs telling a story of how you came home to a dead fern after returning from a two-week vacation. This story offers real evidence of your point, but what is your point? Certain plants can’t go without water for more than 14 days. That’s one possible point, and it should be stated upfront.
6. Start with a very specific working title.
Mistake: Your topics are too broad.
When people start blogging, they generally want to write on really big topics like:
- “How to Do Social Media Marketing”
- “Business Best Practices”
- “How to Make Money on the Internet”
Topics like these are far too broad. Because there are so many details and nuances in these topics, it’s really hard to do a good job answering them. Plus, more specific topics tend to attract smaller, more targeted audiences, which tend to be higher quality and more likely to convert into leads and customers.
So, to get the most short-term and long-term benefits of blogging, you’ll need to get way more specific.
Solution: Begin with a clear, concise idea.
Nailing really specific blog topics is crucial to knocking your first few posts out of the park. Let us help you brainstorm with our Blog Ideas Generator. This tool allows you to enter basic terms you know you want to cover, and then produces five sample blog titles that work for business blogs.
Keep in mind that a working title isn’t final — it’s just a concrete angle you can use to keep your writing on track. Once you nail this stage of the ideation process, it’s much easier to write your blog posts.
7. Specific posts should still tie into the bigger picture.
Mistake: You don’t tie a specific topic into your reader’s broader struggle.
You already know how important it is to resonate with your buyer persona and understand their pain points. However, there’s a reason why they’re experiencing pain points and what is driving them to get it solved.
Solution: Understand the challenges and consequences they’re facing.
You should be asking yourself:
- What is at stake?
- What do they gain by taking action?
- If they don’t take action, what will happen?
All of these things can manifest in the content that you write for your blog post. Doing so will signal to your reader that you understand what they’re going through and that you want to help.
“If you’re uninterested in a particular topic you’re writing about, it’s probably because you haven’t stopped to think about the big picture. Understanding how the topic you’re writing about will fit into a reader’s broader challenges will help you find meaning and value in any post you write, and will enable you to connect with your readers better.”
—Caroline Forsey, Senior Content Strategist at HubSpot
For instance, let’s say you’re tackling a post like “first vs. third-party APIs.” While the topic is dry and allows for little creativity, the big-picture value is huge: to help your readers decide whether they need to shell over the big bucks for an in-house API or whether they can save money and time by asking a third party to develop their API. Essentially, “first vs. third party APIs” is a question that hits at computer security, efficiency, and budget constraints, all of which could have big consequences for your reader.
8. Use a specific post type, create an outline, and use headers.
Mistake: Your writing is a brain dump.
Sometimes when I get a great idea I’m excited about, it’s really tempting to just sit down and let it flow out of me. But what I get is usually a sub-par blog post.
Why? The stream-of-consciousness style of writing isn’t really a good style for blog posts. Most people are going to scan your blog posts, not read them, so it needs to be organized really well for that to happen.
Solution: Structure your blog with a template, outline, and section headers.
The first thing you should do is choose what type of blog post you’re going to write. Is it a how-to post? A list-based post? A curated collection post? A SlideShare presentation? For help on this, download our free templates for creating different types of blog posts. Once you have a template down, it’ll be easier to write your outline.
Writing an outline makes a big difference. If you put in the time up front to organize your thoughts and create a logical flow in your post, the rest becomes easy — you’re basically just filling in the blanks.
Using headers is also critical for the reader experience.
“While it’s nice to imagine that your readers hang on your every word, the reality is that they’re probably mostly skimming your posts. As you write, be sure you’re making your piece skim-friendly: including plenty of paragraph breaks, clearly titled sections, relevant images, and formatting that makes it easy to find the piece of information they came for.”
— Karla Cook, Senior Manager of the HubSpot Blog Team
To write a blog post outline, first come up with a list of the top takeaways you want your readers to get from your post. Then, break up those takeaways into larger section headers. When you put in a section header every few paragraphs, your blog post becomes easier and more enjoyable to read. (And plus, header text with keywords is good for SEO.) When you finally get to writing, all you’ll have to do is fill in those sections.
9. Give your audience something to walk away with.
Mistake: You’re relying on vague concepts instead of concrete information.
One of the first things you’ll do in your blog research is look up how other publications are writing about a topic. If you notice, almost all of the results on the first page of Google are writing about conceptual, vague ideas. How can your blog stick out? You can include concrete, actionable steps for your readers to achieve success.
Solution: Include actionable steps for your readers to follow.
One of the biggest tenets of content creation is that it should be useful, and that means your audience should walk away with something.
“People want to learn how to do things in actuality, not just theoretically. When you’re done with a blog, ask yourself, ‘Will the reader know how to implement this idea?’ or ‘Did I provide steps to achieve success?'”
— Rebecca Riserbato, Former Staff Writer at HubSpot
This might come in the form of a “how-to” as you recommend they implement a particular strategy, or it might simply be a suggestion for a tool or tactic to make a process easier.
10. Use data and research to back up the claims you make in your posts.
Mistake: You don’t use data as evidence.
Let’s say I’m writing a blog post about why businesses should consider using Instagram for marketing. When I’m making that argument, which is more convincing?
- “It seems like more people are using Instagram nowadays.”
- “Instagram’s user base is growing far faster than social network usage in general. In the U.S, Instagram will grow 15.1% this year, compared to just 3.1% growth for the social network sector as a whole.”
The second, of course. Arguments and claims are much more compelling when rooted in data and research. As marketers, we don’t just have to convince people to be on our side about an issue — we need to convince them to take action. Data-driven content catches people’s attention in a way that fluffy arguments do not.
Solution: Use data to support your arguments.
In any good story, you’ll offer a main argument, establish proof, and then end with a takeaway for the audience. You can use data in blog posts to introduce your main argument and show why it’s relevant to your readers, or as proof of it throughout the body of the post.
Some great places to find compelling data include:
11. Use examples to back up why what you’re saying is important.
Mistake: You’re not adding enough context.
Meg Prater, Managing Editor of the HubSpot blogs, shared with us that “When I first joined the HubSpot Blog team, I would consistently get the edit that I wasn’t adding enough examples to support my statements. For example (See what I did there?), I might write ‘SMBs should expand their social media strategies to experiment with newer, cheaper channels.’ Sure, that might be true, but it’s a pretty broad suggestion.”
Solution: Illustrate ideas with examples, visual aids, and additional content.
It’s important to build upon your point with details. Meg says, “A stronger way to share this with an audience might be to say, ‘SMBs should expand their social media strategies to experiment with newer, cheaper channels. For example, you might test running ads on question-and-answer platform Quora, or simply answer industry questions for which your product or service is an answer.’”
“By adding a specific example to my previously broad statement, I’ve made my point easier to understand and more actionable for my readers.”
— Meg Prater, Managing Editor of the HubSpot Blogs
As bloggers, we become experts in our industry. Because of this, it’s easy to forget about specificity when giving advice, explaining examples, or walking through a common process. Even Pamela Bump, HubSpot’s Senior Marketing Manager of Audience Growth, admits that she has been guilty of not going into enough depth in a first draft.
“When you review your blog post, read it from the point of view of a new grad entering a field or someone who’s just learning about a topic for the first time.”
— Pamela Bump, Senior Marketing Manager of Audience Growth at HubSpot
Ask yourself questions like, “Will readers know what this big word means?”, “Will they recognize this acronym?”, or “Can they easily visualize this example, or do I need to add a visual aid?” From there, you can determine where you need to explain something more, or hyperlink potentially confusing words to other blog posts that relate to them.
12. When drawing from others’ ideas, cite them.
Mistake: Your content borders on plagiarism.
Plagiarism didn’t work in school, and it certainly doesn’t work on your company’s blog. But for some reason, many beginner bloggers think they can get away with the old copy-and-paste technique.
You can’t. Editors and readers can usually tell when something’s been copied from somewhere else. Your voice suddenly doesn’t sound like you, or maybe there are a few words in there that are incorrectly used. It just sounds … off.
Plus, if you get caught stealing other people’s content, you could get your site penalized by Google — which could be a big blow to your company blog’s organic growth.
Solution: Give credit where credit is due.
Instead, take a few minutes to understand how to cite other people’s content in your blog posts. It’s not super complicated, but it’s an essential thing to learn when you’re first starting out.
13. Take 30 minutes to edit your post.
Mistake: You think you’re done once the writing’s done.
Most people make the mistake of not editing their writing. It sounded so fluid in their head when they were writing that it must be great to read … right?
Nope — it still needs editing. And maybe a lot of it.
Solution: You’ll never regret time spent proofreading.
Everyone needs to edit their writing — even the most experienced writers. Most times, our first drafts aren’t all that great. So take the time you need to shape up your post. Fix typos, run-on sentences, and accidental its/it’s mistakes. Make sure your story flows just as well as it did in your outline.
To help you remember all the little things to check before publishing, check out our checklist for editing and proofreading a blog post.
14. At a certain point, just publish it.
Mistake: You try to make every post perfect.
I hate to break it to you, but your blog post is never going to be perfect. Ever.
There will always be more things you can do to make your posts better. More images. Better phrasing. Whittier jokes. The best writers I know, know when to stop obsessing and just hit “publish.”
Solution: Better to publish and update than postpone for perfection.
There’s a point at which there are diminishing returns for getting closer to “perfect” — and you’re really never going to reach “perfect” anyway. So while you don’t want to publish a post filled with factual inaccuracies and grammatical errors, it’s not the end of the world if a typo slips through. It most likely won’t affect how many views and leads it brings in.
Plus, if you (or your readers) find the mistake, all of you have to do is update the post. No biggie. So give yourself a break once and a while — perfect is the enemy of done.
15. Blog consistently with the help of an editorial calendar.
Mistake: You don’t blog consistently.
By now, you’ve probably heard that the more often you blog, the more traffic you’ll get to your website — and the more subscribers and leads you’ll generate from your posts. But as important as volume is, it’s actually more important that you’re blogging consistently when you’re just getting started. If you publish five posts in one week and then only one or two in the next few weeks, it’ll be hard to form a consistent habit. And inconsistency could really confuse your subscribers.
Instead, it’s the companies that make a commitment to regularly publishing quality content to their blogs that tend to reap the biggest rewards in terms of website traffic and leads — and those results continue to pay out over time.
To help establish consistency, you’ll need a more concrete planning strategy.
Solution: Schedule and publish blogs consistently.
Use a calendar to get into the habit of planning your blog post topics ahead of time, publishing consistently, and even scheduling posts in advance if you’re finding yourself having a particularly productive week.
Here at HubSpot, we typically use good ol’ Google Calendar as our blog editorial calendar, which you can learn how to set up step-by-step here. Or, you can click here to download our free editorial calendar templates for Excel, Google Sheets, and Google Calendar, along with instructions on how to set them up.
16. Focus on the long-term benefits of organic traffic.
Mistake: You concentrate your analytics on immediate traffic.
Both beginner bloggers and advanced bloggers are guilty of this blogging mistake. If you concentrate your analysis on immediate traffic (traffic from email subscribers, RSS feeds, and social shares), then it’s going to be hard to prove the enduring value of your blog. After all, the half-life for those sources is very brief — usually a day or two.
When marketers who are just starting their business blogs see that their blog posts aren’t generating any new traffic after a few days, many of them get frustrated. They think their blog is failing, and they end up abandoning it prematurely.
Solution: The ROI of your blog is the aggregation of organic traffic over time.
Instead of focusing on the sudden decay of short-term traffic, focus instead on the cumulative potential of organic traffic. Over time, given enough time, the traffic from day three and beyond of a single blog post will eclipse that big spike on days one and two thanks to being found on search engine results pages through organic search. You just have to give it a while.
To help drive this long-term traffic, make sure you’re writing blog posts that have durable relevance on a consistent basis. These posts are called “evergreen” blog posts: They remain relevant, valuable, and high quality year after year with little or no upkeep.
“Your evergreen content is an ongoing asset and in many cases has more potential to perform than a new, unproven post.”
— Amanda Sellers, Historical Optimization Manager at HubSpot
Over time, as you write more evergreen content and build search authority, those posts will end up being responsible for a large percentage of your blog traffic. It all starts with a slight shift in perspective from daily traffic to cumulative traffic so you can reframe the way you view your blog and its ROI entirely.
17. Add a subscription CTA to your blog and set up an email newsletter.
Mistake: You aren’t growing subscribers.
Once you start blogging, it’s easy to forget that blogging isn’t just about getting new visitors to your blog. One of the biggest benefits of blogging is that it helps you steadily grow an email list of subscribers you can share your new content with. Each time you publish a new blog post, your subscribers will give you that initial surge of traffic — which, in turn, will propel those posts’ long-term success.
The key to getting significant business results (traffic, leads, and eventually customers) all starts with growing subscribers.
Solution: Set up a subscription CTA and email newsletter.
First, use your email marketing tool to set up a welcome email for new subscribers, as well as a regular email that pulls in your most recent blog posts. (HubSpot customers: You can use HubSpot’s email tool to easily set up these regular email sends, as well as set up a welcome email for new subscribers.)
Next, add subscription CTAs to your blog (and elsewhere, like the footer of your website) to make it easy for people to opt in. These CTAs should be simple, one-field email opt-in forms near the top of your blog, above the fold. As for where to put these CTAs, we typically place our blog CTAs at the bottom of our blog posts or add a slide-in, which you can learn how to do using a free tool called Leadin here.
You can also create a dedicated landing page for subscribers that you can direct people to via other channels such as social media, other pages on your website, PPC, or email.
18. Refresh old content while writing new content.
Mistake: You are publishing new content while neglecting old content.
Once you start blogging consistently, it’s easy to put all of your effort on publishing new content. However, neglecting old content can hurt your click-through rates and SEO because as time passes, the more outdated and less relevant your content becomes to reader’s current needs. For instance, if you have a blog post about Facebook pages with screenshots from years ago, your content is no longer as helpful and thus will drop in ranking. Updating your old content will show Google your information is valuable, relevant, and fresh.
Solution: Refresh your old content.
Your old content is just as important as your new content. When you refresh the information on your older blog posts, you are ensuring your content is accurate and up to date, thereby improving your rankings and click-through rates. By checking for spelling and grammar, updating information, and linking to newer resources, you’ll enrich the user experience and greatly improve your blog post in Google’s eyes.
19. Vary the mediums where you share your content.
Mistake: You only use one medium to share your content.
Growing your audience is imperative to your business, and using different mediums — such as podcasts, ebooks, and more — to distribute your content will help you do just that. Try experimenting with various mediums to present the same information that’s in your blog post. A 2021 stat says that 56% of Americans aged 12-34 listen to at least one podcast per month. That means that more of your audience is relying on podcasts to get the same information they might get while reading an article. Publishing your article in a text medium only will significantly limit your audience reach.
Additionally, by having different mediums, you also get to produce more content around the same topic, negating the need for brainstorming sessions.
Solution: Try different mediums to reach your audience.
By utilizing different platforms, you will increase audience engagement on your blog. You can generate more ideas on the same subject when you use more than one medium and, consequently, generate a larger audience. Additionally, adding video content can help your blog. 34% of bloggers say they experience strong results after including videos in blog posts. So, if you are trying to increase audience engagement or switch up how you share your information, including different mediums will go a long way in building a successful blog.
20. Promote your content.
Mistake: You are not sharing your content via social platforms.
It is essential to write new posts on a consistent basis to be recognized and scale your audience; however, as much as it is important to write new content, you have to promote the content you’re writing. Posting your content on social platforms like Facebook, LinkedIn, Twitter, and Instagram will help your content get more traffic and can help grow your audience. In 2021, 90% of bloggers used social media to promote their content, while 62% of bloggers used email marketing and SEO to help promote their content.
Solution: Promote your blog on your social platforms.
Over 3.6 billion people use social media, and the number is increasing rapidly. That means that platforms such as Facebook and Twitter are essential to promoting your business. Sharing your content via social media will attract a wider range of people to your content. With the right social media marketing strategy, you can drive hundreds, if not thousands, of qualified visitors to your site.
Feeling overwhelmed? Let’s summarize the blogging mistakes you should avoid.
Blogging Mistakes Are a Thing of the Past
Blogging is more than just writing words on a screen and hitting the publish button. Don’t worry if you read through this list and are now thinking to yourself, Well, this is awkward … I’ve made literally every single one of these mistakes. Remember: I used the word “common” to describe these mistakes for a reason. The more you blog, the better you’ll get at it — and you’ll reap the benefits in terms of traffic and leads in the process.
Blogging as a business is always about setting yourself up for success and knowing and understanding your audience and the content that they want to read and see. Making sure that your grammar, title, and blog is properly organized, staying on brand, connecting with your target audience will only help your business scale into more success.
We hope you’ll use this list of mistakes to step up your blogging game. After all, the benefits of keeping up a healthy business blog will be well worth the time and effort.
Editor’s note: This post was originally published in July 2014 and has been updated for comprehensiveness.


8 Data-Backed Recommendations for Social Media Marketers in 2022 [Insights from 300+ Professionals]
The start of the new year is an exciting time for marketers to re-evaluate their social media marketing strategies and take advantage of new opportunities as social platforms evolve.
From new features to algorithm updates and disruptive social apps, keeping up with these changes can be challenging, but also allows you to tap into exciting new possibilities to help your company grow better in 2022.
To help you get the most of your social media strategy in the new year, I recently published findings from the HubSpot Blog’s Social Media Trends Survey, where I collected data from more than 300 B2B and B2C marketers to answer questions like:
- Which social media platforms are marketers currently leveraging?
- What type of content are marketers posting and which formats do they use most?
- Which platforms, content types, and formats have the best ROI?
- When is the best time and day of the week to post on social media?
- What challenges do social media marketers anticipate in 2022?
- What are marketers’ plans and expectations going into 2022?”
I’ve taken a deep dive through our survey data and made a list of some of the key recommendations social media marketers should consider in 2022. Here are just a few suggestions, based on our data.
![Download Now: Social Media Trends in 2022 [Free Report]](https://no-cache.hubspot.com/cta/default/53/3dc1dfd9-2cb4-4498-8c57-19dbb5671820.png)
8 Data-Backed Social Media Marketing Recommendations for 2022
1. Champion your company values
Content that reflects your brand’s values is the most popular type of content among social
media marketers right now and has the 3rd highest ROI of any content type
This will continue growing in 2022 as 95% of those who leverage this type of content plan on increasing or maintaining their investment, and 21% plan to use it for the first time
This aligns with our previous marketing trends survey, where we found that social responsibility will be a top trend in 2022
Additionally, we found that social media marketers who say their social media strategy has been effective in 2021 are 21% more likely to leverage content that reflects their brand’s values than those who reported an ineffective social media strategy last year
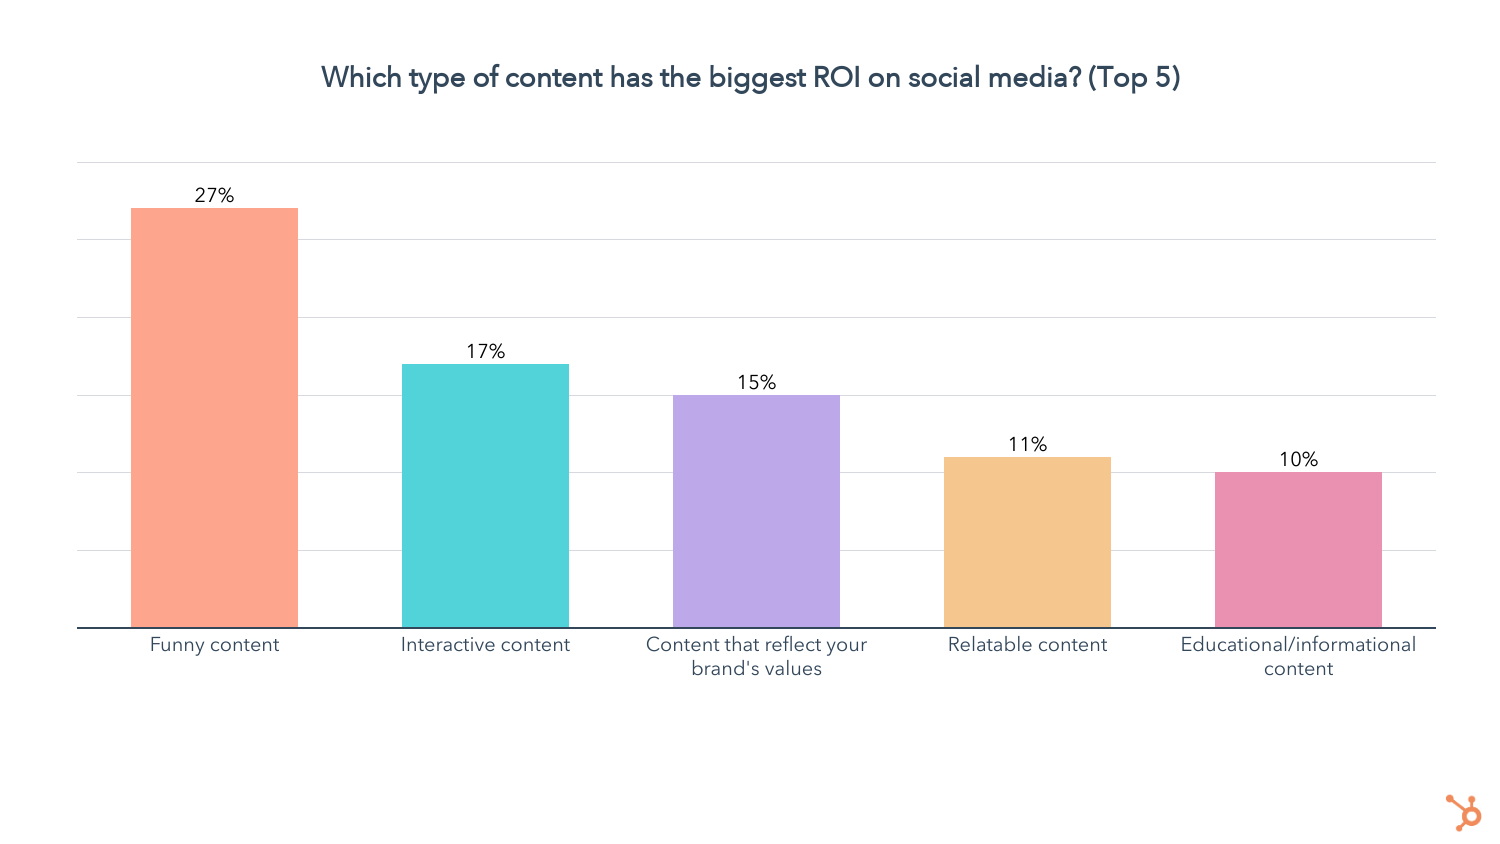
2. Embrace funny, interactive, and relatable content.
Funny content has the highest ROI of any content type and is also rated the most effective by social media marketers
The use of funny content will continue to grow in 2022, with 33% planning to invest more in funny content than any other format.
Additionally, 56% of those who don’t use funny content plan to leverage it for the first time in 2022, while 95% of those who already use it will increase or maintain their investment this year
Interactive content is No. 2 when it comes to usage, ROI, and effectiveness, and will also grow significantly in 2022.
49% of those who don’t leverage interactive content plan to use it for the first time in 2022, while 97% of those who already use it plan to invest more or maintain their investment this year
On top of all that, we found that social media marketers who say their social media strategy has been effective in 2021 are 25% more likely to leverage interactive content than those who reported an ineffective social media strategy last year.
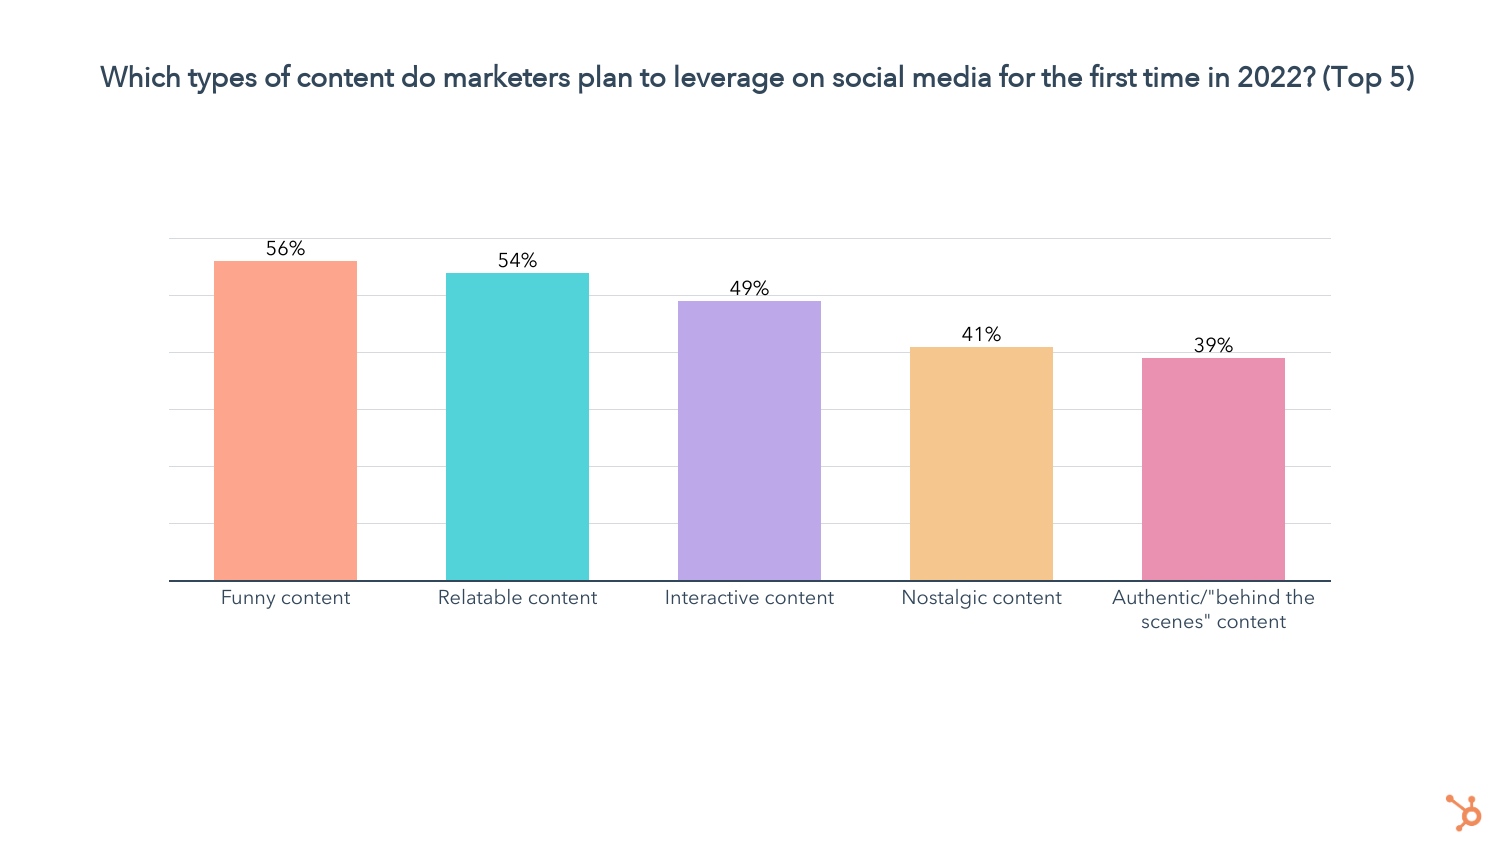
Relatable content will see increased investment among current users as well as first-time users.
54% of social media marketers who don’t leverage relatable content are planning to for the first time this year, while 93% of marketers who already leverage it plan to increase their investment or continue investing the same amount in 2022
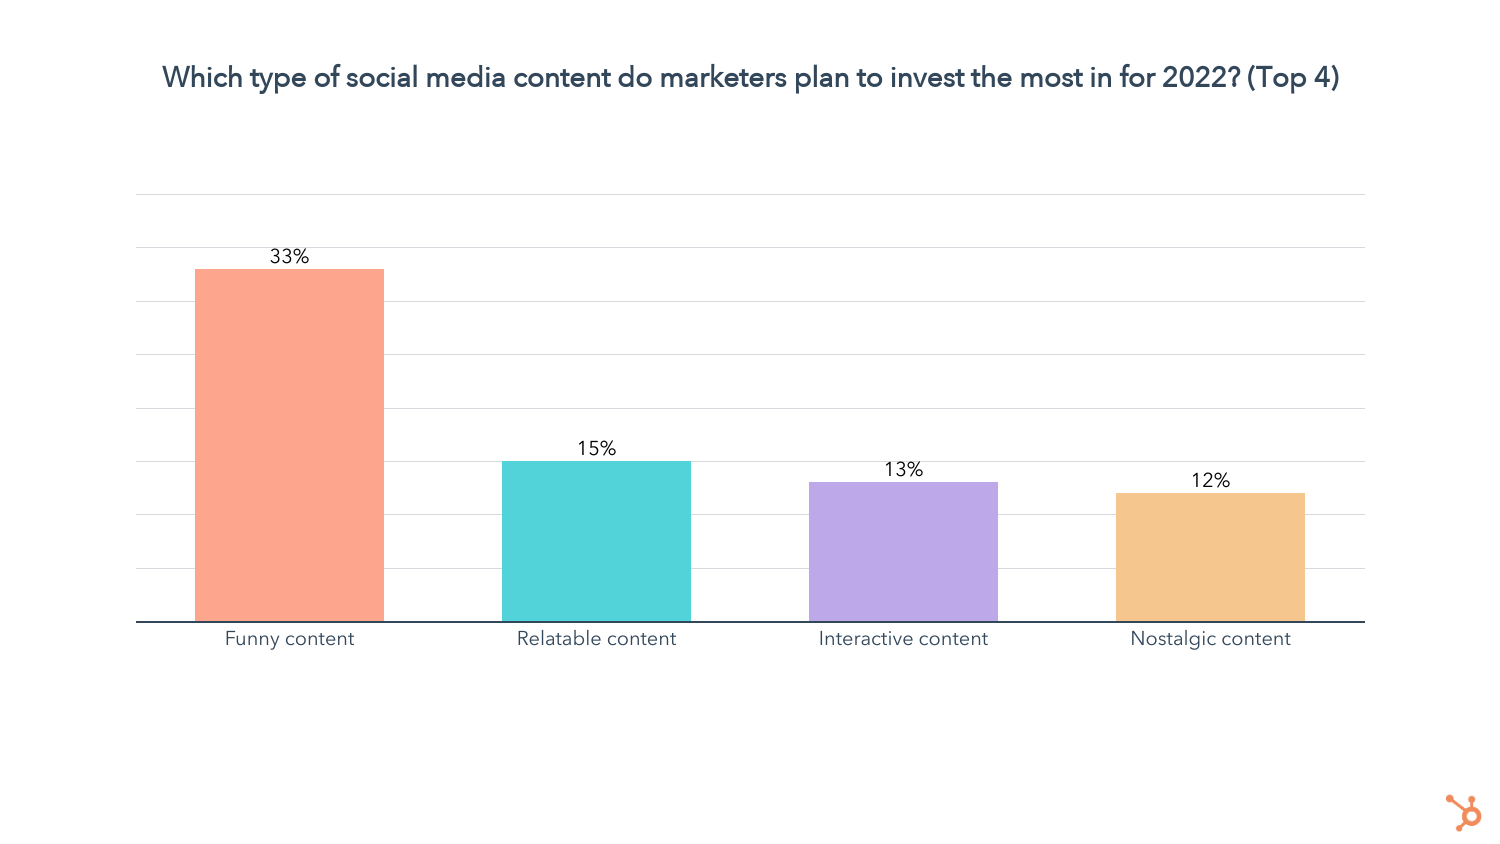
3. Don’t choose influencers based on follower count.
Followers aren’t everything. Influencer marketers are placing an emphasis on quality of content first, then engagement rates, alignment with values, and aesthetic, followed by follower count at #5 on that list.
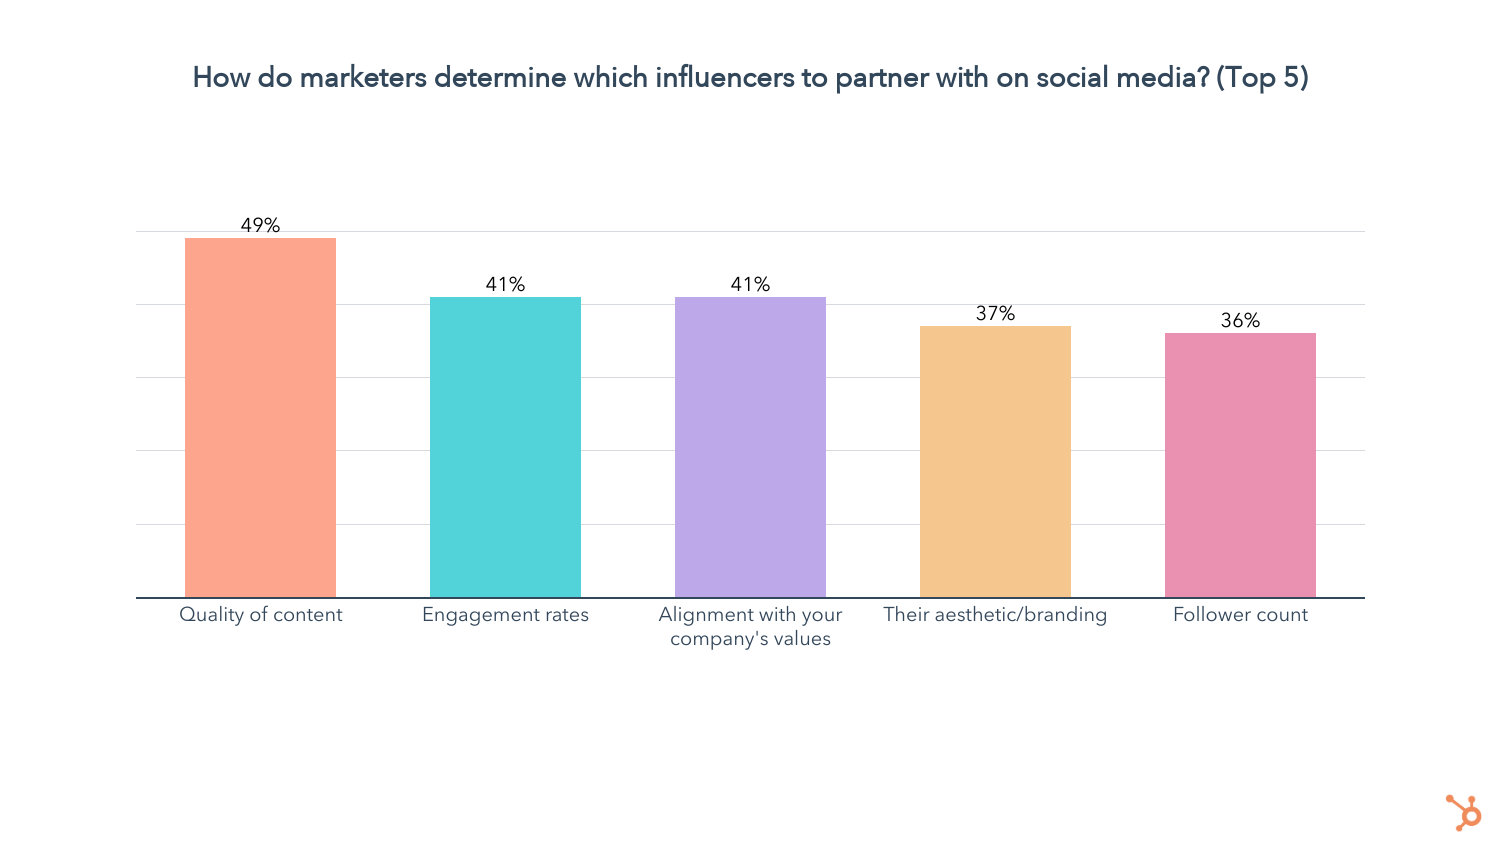
Social media marketers who say their social media strategy has been effective in 2021 are 26% more likely to consider the quality of influencers’ content when determining which influencers to partner with on social media than those who reported an ineffective social media strategy last year
Micro-influencers (10k-100k followers) are the most popular type of influencer marketers work with, but it isn’t necessarily because they are cheaper. The graph below shows that the amount companies pay influencers can vary greatly, even when we account for the size of their following. This supports our finding that follower count is not what marketers are prioritizing when looking to partner with influencers.
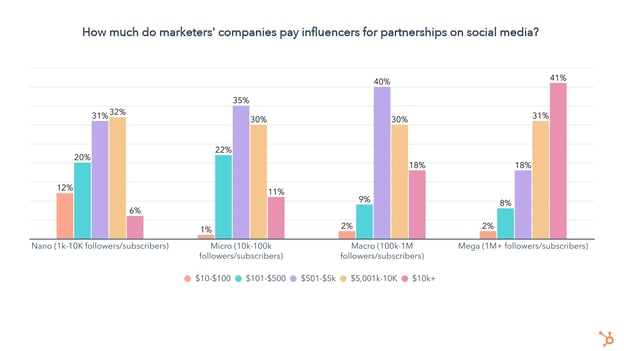
The quality of the influencer’s content, the rate at which their followers engage, and their alignment with your brand can be much more impactful metrics of how much an influencer partnership is worth.
Instagram, Facebook, and Twitter are the most popular platforms marketers leverage when working with influencers.
Facebook has the best ROI for influencer marketing, followed by Instagram, YouTube, Twitter, and TikTok.
4. Explore new or emerging social media platforms and features.
Social media marketers search for new or emerging social platforms to leverage often, with 86% searching at least once a quarter and many searching monthly (29%), weekly (22%) and 20% searching multiple times a week. Just 1% say they never search for new platforms.
The top new or emerging platforms social media marketers are investing in are Twitter Spaces, YouTube Shorts, and Instagram Shops
At the same time, they are pulling their investment in lesser-known live audio platforms (Spoon, Riffr, Discord Stage Channels, Spotify Green Room) as more established ones like Twitter begin to incorporate live audio features.
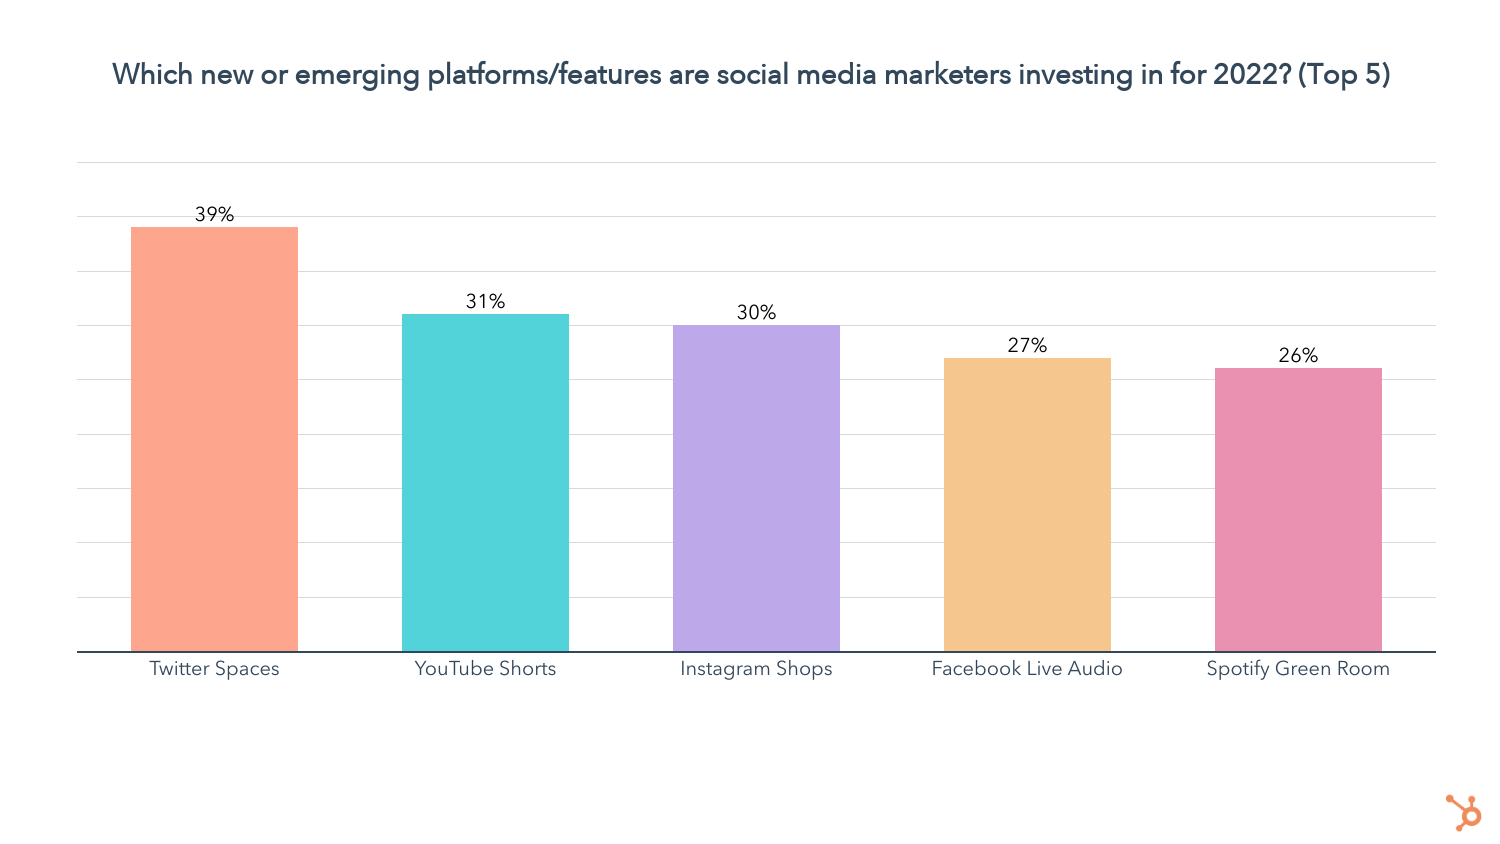
5. Invest in building social media communities.
64% of marketers are leveraging social media communities, and this number will only keep growing, as 30% of those who don’t use social media communities plan to start in 2022.
Additionally, 96% of those who already leverage social media communities plan to invest more or continue investing the same amount this year.
Facebook, TikTok, YouTube, Instagram, and Tumblr are the platforms marketers build communities on most.
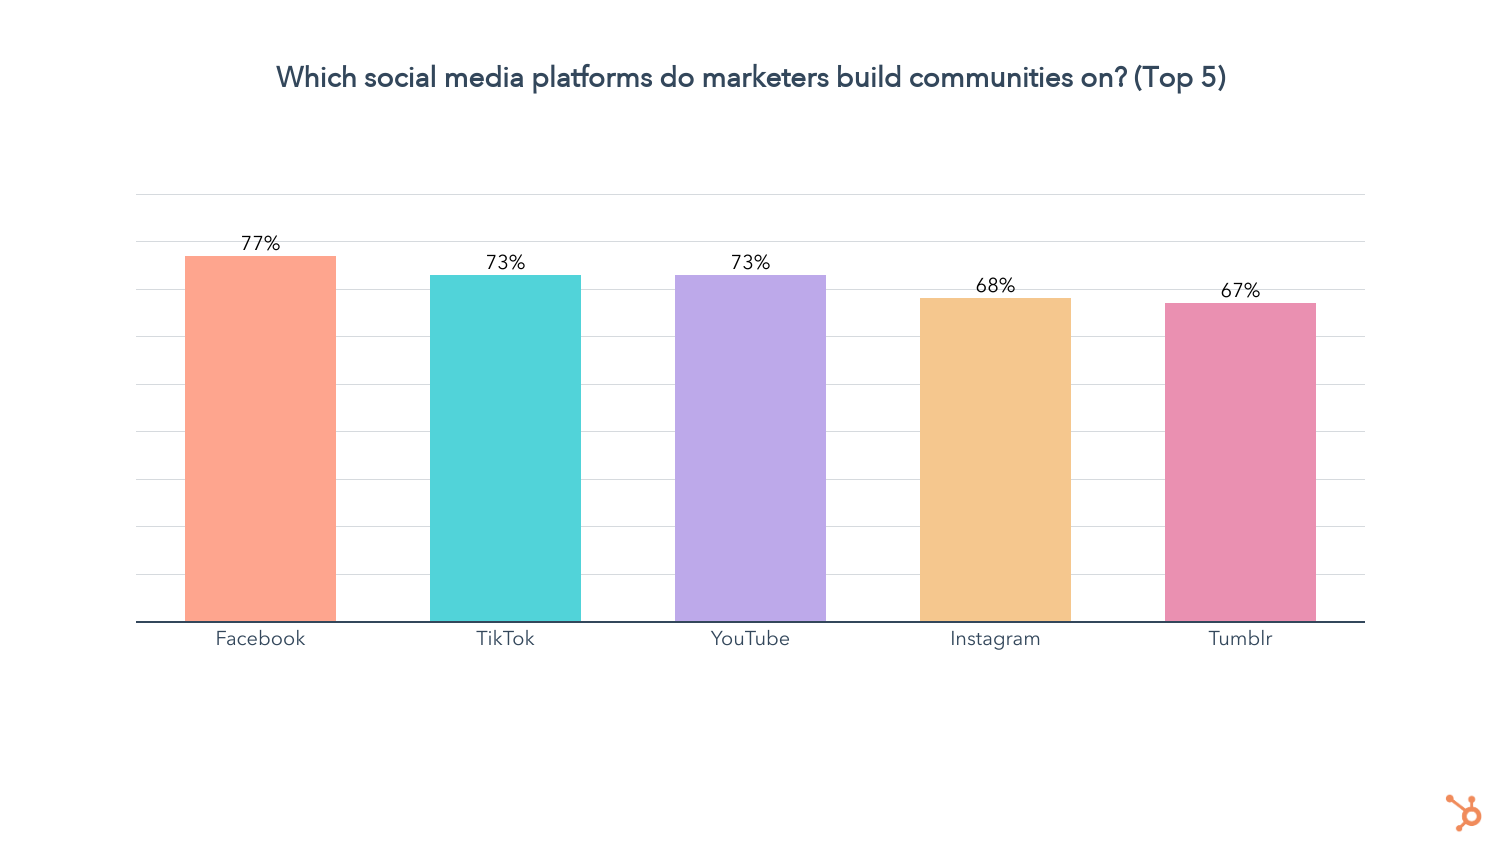
6. Leverage research and data to reach their target audience.
In our survey, we asked marketers how effective or ineffective their social media strategy has been this year. I then examined our data through these two separate groups, the first being those who said their social media strategy was effective, compared to the second which rated their social media strategy as ineffective.
When trying to find their audience on social media, the effective group is:
- 21% more likely to use social listening
- 17% more likely to research the demographics of social media platforms
- 17% more likely to research relevant online communities
- 14% more likely to analyze demographic data their company already has
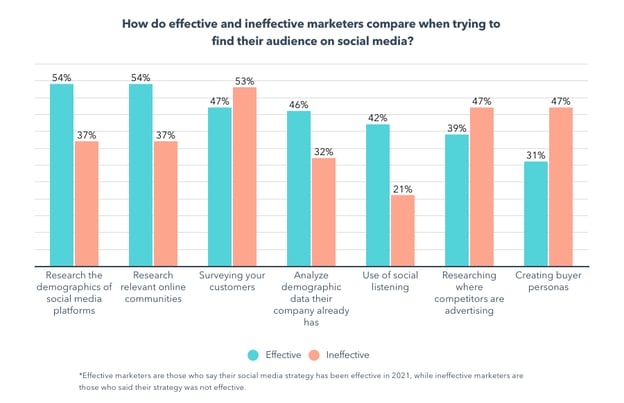
7. To reach younger audiences, create short-form video content that’s funny, trendy, and reflects your brand’s values.
Younger audiences like Gen Z (6-24) and Millennials (25-40) prefer shorter video content that is funny, trendy, and reflects a brand’s values, making platforms with short-form video features like TikTok, YouTube, and Instagram ideal for reaching them.
8. To reach older audiences, leverage interactive/educational content on Facebook.
Gen X (41-56) and Baby Boomers (57-75) prefer interactive/educational content, such as interviews/podcasts/expert discussions and live videos, and Facebook is their platform of choice.
More Data-Backed Marketing Insights
Want even more marketing and social media data? Many of the results from the Social Media Trends survey overlapped with the Blog’s recent Marketing Trends survey, including the dominance of short-form video, the power of influencer marketing, the opportunity presented in “Live” video and audio chat rooms, and the top social media platforms.
Check out our detailed Social Media Marketing Report here or our Marketing Trends recommendations post here for more recommendations on these topics.

Virtual, Hybrid, or In-Person: Business Leaders Weigh In on the Future of Events
In 2019, Microsoft hosted their annual Ignite event in Orlando for one week. It was the most successful Ignite they’d ever had, with well over 27,000 attendees.
That is, until the fall of 2021 — when they hosted over 270,000 attendees in a virtual version of the same event.
A couple of years ago, the majority of businesses hosted in-person trade shows and conferences. Virtual conferences were a rarity.
But, post-pandemic, we’re seeing a major shift towards virtual or hybrid events. In fact, HubSpot Blog Research found roughly 40% of marketers plan to increase their investments in virtual events, webinars, and conferences in 2022, followed by 39% who plan to spend the same amount as they did in 2021. A mere 16% plan on decreasing their investment.
Bob Bejan, Microsoft’s Vice President of Global Events, is unsurprised by this shift towards virtual, and believes it was always destined to be the future of events.
He told me, “The pandemic is really just an accelerator of something that was going to be inevitable anyway, but probably would have taken five or six years instead of just two.”
Here, I spoke with experts across industries to learn more about the surprising future of events — and whether in-person, virtual, or hybrid will become the norm. Plus, what it could mean for your business.
Let’s dive in.
![Download Now: HubSpot's Annual State of Marketing [Free Data Report]](https://no-cache.hubspot.com/cta/default/53/b0f73a5e-16e4-41fd-9511-8564efc560a7.png)
The Future of Events, According to Experts
The Case for Virtual
We all remember the challenges of in-person events: Shuffling from conference room to conference room, running to catch the last bus back to your hotel, feeling overstimulated by exhibition spaces full of businesses competing for your attention.
Simply put, in-person events can be incredibly stressful and frustrating experiences for attendees — particularly with larger gatherings.
As Microsoft’s Bejan puts it, “The dirty little secret of in-person events is you’re all competing for the biggest number — but the bigger the number, the worse the experience for the attendees.”
Bejan adds, “The power and effectiveness of virtual events is just so convincing from a data perspective that it’s hard to imagine they’re ever going away. Virtual events at every dimension are so much more effective than in-person events.”
Nowadays, you’ll be hard-pressed to find a business leader who doesn’t recognize the benefits of virtual events.
Among other things, virtual events can:
- Lower the price of admission, which can increase attendee count and enable businesses with smaller budgets to take part in your conference and offer unique insights.
- Lower the costs your business would typically pay for conference space, on-hand staff, catering, security, and more.
- Enable people across the globe to interact without needing to spend money on flights and hotels.
- Attract high-demand speakers who might not have the time to attend your event in-person, but are happy to share insights via video call or pre-recorded presentation.
- Provide you with the opportunity to create a product (recordings from your conference) that you can repurpose for future lead generation offerings.
And, as we saw in 2020 and 2021 as a result of the pandemic: Sometimes, virtual events are the only option, when unforeseen circumstances makes in-person events impossible.
Virtual events are incredibly powerful opportunities to reach new audiences and increase brand awareness. In fact, 80% of marketers are able to reach wider audiences and increase their ROI by hosting virtual events.

Virtual events have also come a long way since the early days of webinars. Nowadays, brands are upping the game by offering incredibly unique, immersive virtual experiences.
For instance, consider INBOUND 2021, which enabled attendees to network at virtual meetups, interact in real-time with attendees and speakers, and learn from renowned speakers like Oprah and Spike Lee — all from the comfort of their own homes.
For many brands, virtual events will be the only practical option for events well into the future. As Bejan posits, “If you’re a small or medium-sized business and you’re trying to reach people and deliver impressive experiences, our feeling is that there’s no better way to spend your money than in the digital space.”
However, if you’re wary of virtual-only experiences, you’re not alone. Many business leaders are unsure whether it’s a wise idea to take away the in-person component entirely, particularly when so many attendees learn and network best in-person.
Enter: The hybrid event.
Why Hybrid Is a Powerful Alternative
Picture this: You’re sitting on a beanbag chair, an iced coffee at your side, and you’re looking up at a row of huge, circular screens with a variety of sessions happening concurrently.
You put your headphones on and dial into one session, while the person beside you — with whom you connected earlier, at the food station, and traded business cards — sits and listens to a different one.
While it might sound futuristic, it’s not.
Prior to the pandemic, Bejan and his team worked on shifting Microsoft’s event strategy towards one in which the primary offerings were always digital — known as the “digital core”.
“And then,” Bejan told me, “rather than making destinations — which is the way we used to do events — we would distribute that digital core, and simultaneously activate events around that digital core locally and regionally, so that we can deliver those special and unique things that you can only do in-person.”
These spaces, known as ‘hang spaces’, were exactly as described in the example above. People would sit together in a rented conference space, watch Microsoft’s pre-recorded or live digital sessions, and experience the very networking they craved.
If, alternatively, someone wanted to watch from home, they could do that, too.
This is one hybrid example, but there are many in various forms. Consider, for instance, Social Media Marketing World, an annual conference for social media managers.
As of 2022, the conference is now offered in-person at the San Diego Convention Center, or via remote live stream. If you want to attend the three day event in-person, you’ll need to pay upwards of $1,700 (depending on whether you want an extra day and access to live stream, as well). Alternatively, the on-demand conference costs between $597 and $797.
With a hybrid strategy, you’re solving the needs of two different subsets of people — those who actively seek out in-person experiences, and those who’d prefer to learn remotely. Ultimately, a hybrid strategy is a compelling option if you find your audiences’ preferences are split between in-person and remote.
As ON24’s VP of Strategy & Research Cheri Hulse puts it, “Hybrid has presented itself as a good midway point for marketers as they try to navigate global and regional regulations, audience preferences, and contractual obligations with venues.”
Hulse adds, “Hybrid allows marketers to feel their bases are covered for delivering an event — no matter what is thrown at them leading up to the big day.”
Penny Elmslie, Xero’s GM for Brand & Community, told me that hybrid is an option that excites her as we enter a new era for events.
Elmslie says, “The beauty of a hybrid model is it allows our events to scale, while enabling us to connect with those who for physical, financial, or medical reasons may not be able to attend in person.”
Elmslie adds, “In creating the right experience, we also purposefully make the hybrid delivery shorter and sharper to what you’d expect live, ensuring we respect our audience’s time in front of screens.”
Elmslie continues, “We’ve found the current environment has changed people’s expectations, challenging us to ensure we’re providing enough flexibility in our model to cater to all audiences. Fortunately, advancements in event technology and production skills have enabled us to continue to surprise and delight our audiences in new ways — even when they can’t physically be with us.”
Sarika Abraham, Media & PR Manager at Hexnode, is working on putting together her first hybrid event this year, Hexcon 22.
For her, the biggest challenges include the project management skills required to combine an in-person and virtual event into one seamless experience.
Abraham told me, “With twice the benefits comes twice the labor. Hybrid events are complex and require intricate management of both a physical platform and a virtual stream. I believe that managing the increased complexity, cost, and risks associated with integrating different platforms, tools, and technologies is the pivot of successfully conducting a hybrid event.”
If you’re interested in planning a hybrid event in 2022, you’re in luck. Hulse shared her tips for marketers looking to plan their first hybrid event.
She told me, “My one tip for marketers planning hybrid events is to remain flexible and listen to feedback. When ON24 planned a hybrid event last year, we offered lots of options for attendees to select how they wanted to consume the experience: in-person or virtually.”
Hulse adds, “This was critical as we saw attendees change their mind as the date neared and their situations changed. Ultimately, the success of the event was based on audiences consuming content and engaging with the experience — and we left it up to them to decide how they would do that.”
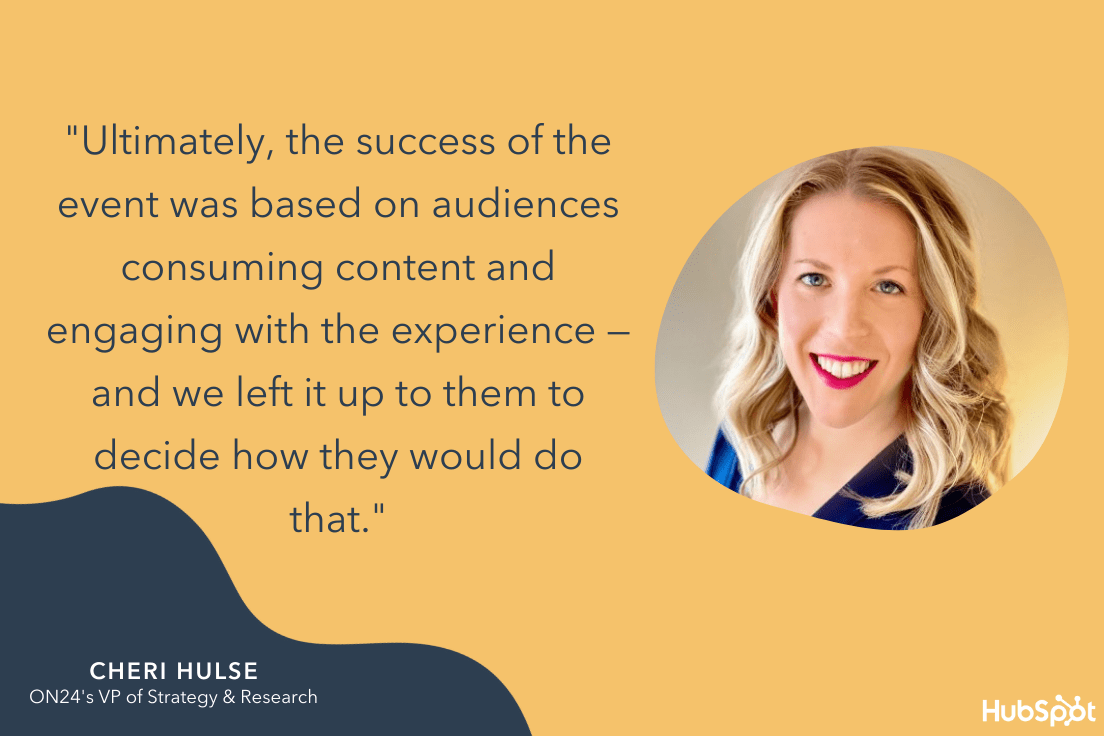
Reachdesk’s Global VP of Marketing Christy Steward also shared some key takeaways for marketers looking to plan hybrid events in 2022.
Steward told me, “The one piece of advice that I’d suggest for any business running their first hybrid event would be to make sure that you pay equal amounts of attention to both in-person and remote attendees. Although both groups will technically be at the same event, they’ll be having very different experiences, so keep this in mind when planning.”
Steward adds, “A smart gifting strategy can help create an equally memorable experience for every attendee. For example, if you’re providing snacks and refreshments for in-person attendees, make sure you send virtual attendees a coffee voucher before the event or even better a box of coffee beans and something to nibble on during the event.”
Additionally, to ensure your in-person and remote attendees feel equally included, consider how you might leverage unique tools.
For instance, Airmeet’s VP of Product, Vikas Reddy, told me, “Plan for opportunities that will make sure your virtual attendees feel heard through polls, bringing them on the stage, etc. Facilitate networking between in-person and virtual attendees through curated sessions like speed networking, breakouts, and 1-1 meetings.”
Reddy adds, “Also, double down on mobile capabilities that will offer your in-person attendees a digital pocket guide, taking care of everything from navigation to networking. Make sure you capture data for both the set of audiences across all the above mentioned touchpoints. This can contribute valuable insights into what matters to each audience segment and thereby lay down the strategy for future hybrid events.”
All of that is well and good … but what about the people who simply crave in-person experiences?
Let’s explore the future of in-person events, next.
For Some Brands, In-Person is Still Most Effective
Over the next couple years (and depending, of course, on health and public safety regulations), we’ll begin to see some businesses return to hosting fully in-person events. And, for certain industries, in-person will always be the most effective.
Brittani Dinsmore, Head of Marketing at Moz, believes the reason 16% of marketers plan on decreasing their investment in virtual events in 2022 comes down to the need for in-person interactions.
Dinsmore says, “I think we’re seeing a shift away from virtual events because there’s a growing demand to return to face-to-face interactions. Zoom fatigue is a real thing. Many individuals are burnt out from conducting professional and personal meetings through a screen.”
Dinsmore adds, “People can’t experience the full scope of some events, like networking or a convention, from their living room. Live events, in particular, have a certain energy that can’t be replicated virtually.”
For instance, while MozCon, Moz’s annual marketing conference, has been held online for the past two years, Dinsmore told me her team is tentatively planning on hosting MozCon 2022 in person again (as long as restrictions subside).
Along with the benefit of face-to-face connection, Dinsmore makes the point that it’s often easier to generate meaningful leads and attract new sponsors in-person compared to virtual.
There’s also real science behind the importance of in-person interactions. Consider, for instance, how 55% of the impact of our communication comes from body language, 38% from tone of voice, and just 7% from the words themselves.
In a virtual world, it can be difficult to pick up on nuances in body language and tone through a computer screen. Which means some meaningful connection will be lost in a world primarily focused on virtual interactions.
“The move back to in-person events will be gradual,” Dinsmore says, “As new COVID variants pop up, companies will continue to hold hybrid events to serve the groups who feel comfortable meeting in-person and those who prefer attending functions from home.”
Dinsmore continues, “But I think companies should consider sponsoring or engaging in smaller networking groups rather than hybrid events to ease back into things. Once the pandemic subsides, I foresee many planning a grand return to in-person events.”
So … What’s right for you?
Ultimately, the choice of in-person, virtual, or hybrid is largely yours. As Hulse points out, “In the future, I expect to see a mix of event types in the B2B space. Between hybrid, physical, and digital events, it will be up to marketing leaders to calibrate the right mix of the three based on audiences needs and preferences, budget, and marketing priorities.”
And if you do lean towards virtual or hybrid events in the future, consider how you might innovate on what’s already been done. There’s unlimited potential in the virtual and hybrid event space — and we’re really just getting started.
As Bejan told me, “We had one big epiphany when we delivered a streaming version of our Las Vegas show, and found that the largest audience of people watching our keynotes watched from their hotel rooms. So that was an insight for us: As long as you make good, interactive television, you’ll find success.”
“And,” Bejan adds, “in my almost 30 years of business … This is the most compelling work I’ve done in my career. It’s really, really fun.”


10 New Instagram Features Marketers Should Be Using in 2022
With TikTok on its heels, Instagram is rapidly rolling out new features to benefit both brands and creators alike.
These upgrades come as no surprise — especially considering the competitive nature of social media. But for marketers, the volume of new features can be overwhelming.
Let’s look at these exciting upgrades and how to leverage them in your 2022 Instagram strategy.
10 New Instagram Features Marketers Should Be Using in 2022
1. Partnership Inbox

Gone are the days of missed opportunities because of a busy inbox. Now, brands and creators can quickly find and manage their communications in one location — partnership messages.
Partnership messages is a sub-folder in the Direct Messages tab. These messages skip the request folder and get priority placement — making it easier than ever to find and manage branded content partnerships.
2. Story Links
Remember when story links were an exclusive feature to those with 10,000+ Instagram followers? Here’s some good news — it’s now available to everyone.

No matter your follower count, you can use a link sticker to direct users to your website, product pages, blog posts, and more. This is a win for marketers who use the platform to increase traffic.
Here’s how it works — after creating an Instagram story, click on the sticker icon, then tap the “Link” sticker. From here, enter the desired URL and voilà — you have a link in your story.
3. Add Yours

You’ve likely seen this feature while browsing Instagram stories — but how does it work, exactly?
Add Yours is a new sticker for Instagram stories. It’s fairly simple — someone writes a prompt and shares it to their story. Then other users can respond to the prompt with their own spin. When you click on the sticker, you can view everyone who has contributed to the thread.
For example, if you create an Add Yours sticker with the prompt “Outfit of the Day,” other users can respond to it with a photo or video of their outfit.
This feature adds another layer of interactivity to the platform. Due to its shareability, it’s known to kickstart trends and challenges. But for marketers, it’s especially useful for sparking conversations and showcasing your brand’s creative side.
4. Find Creators

Instagram is officially playing matchmaker. The platform is testing a new suite of tools to help brands and creators connect.
Let’s start on the creator side — users can add brands to a preferred brand list. Then, when a brand searches for creators to partner with, those who have the brand in their list will appear at the top of search results. This makes it easier for brands to find creators who already show an interest.
Brands can also filter creators by follower count, age, gender, and location — which Instagram believes will help brands “organize shortlists to easily manage multiple campaigns.”
5. Story Auto-Captions

If you’re like me, you rarely watch Instagram stories with audio — which is why the new caption sticker is a game-changer.
This feature automatically converts what someone says in a video into text so that users can watch without sound. For some users, this feature is also available on Reels, its answer to TikTok.
Now, audiences can engage with your videos — with or without sound. This feature also takes a big step in making Instagram content more accessible.
6. Social Fundraising

In response to the effect of COVID-19 on the economy, Instagram launched a new social fundraising feature. Users can create fundraisers for their business or a cause that’s important to them. According to Instagram, it’s seen “a large wave of digital activism responding to the global conversation around racial justice.”
This feature aligns with a simple truth about today’s consumers: they’re belief-driven. These days, consumers are looking for brands that take a stand on the issues that matter to them. Now, it’s easier than ever to create fundraisers directly on Instagram that benefit such causes.
Keep in mind that all fundraisers go through a review process. Once approved, you’re ready to start raising money.
7. Collabs

Instagram is testing a new feature that allows you to co-author content with a fellow Instagram user — meaning, whatever you post will appear on both of your profiles. You share likes, comments, and view counts on these posts.
For brands, the collabs feature opens up a new way to partner with influencers, boost brand awareness, and engage with another community in a meaningful way.
8. Calendar Tool

Here’s some exciting news if you have a business profile — Instagram is planning to double the data tracking period within Instagram Insights from 30 to 60 days.
Social media marketers can finally ditch the third-party apps that provide a longer tracking period. Instead, this information will be readily available within Insights. This is a great example of Instagram listening to feedback from users who have been requesting such an upgrade for months.
9. Subscriptions

Instagram launched Subscriptions just this year – a feature that allows creators to charge a monthly subscription fee in return for exclusive content and benefits.
Here’s how it works — creators set a monthly subscription price of their choice, and a “subscribe” button will appear on their profile. They can offer a range of benefits to subscribers — like exclusive livestreams and Stories.
It’s part of a greater effort to help creators make a living on its platform – thus staying active on it. This also enables creators to develop deeper connections with their followers.
This new feature comes shortly-after Twitter recently announced a similar subscription model — Twitter Blue — and we suspect more social media platforms will follow.
10. Visual Replies on Reels

Instagram recently announced a new way to respond to comments on Reels — with another Reel.
If you create short-form videos on Instagram Reels, you can now make visual replies to comments, which is similar to TikTok’s reply function. It’s a highly engaging and interactive way to engage with both followers and leads, and vice-versa.
Final Thoughts
Instagram has become one of the most popular social media platforms in the world. However, the platform isn’t just growing – it’s also evolving. It only makes sense that your social media marketing strategy also evolves to leverage these new features.

How to Go Live on TikTok + Top Features You Should Use
I fought it for a while but TikTok has me in a chokehold and won’t let me go. At all hours of the day, you can find me singing viral TikTok sounds and saying random phrases from popular videos.
The app has grown considerably since booming in 2020 and its features just keep getting better. While the app has offered a live feature for a while, the short-form video platform recently announced new live features, making it a strong competitor for Instagram and Facebook.
In this article, we’ll dive into the top TikTok LIVE features, the requirements to go live and a few tips to keep in mind before you start your first broadcast.
TikTok LIVE Features
Going live on TikTok allows you to engage with your followers on the platform and build community. The app offers ways to maximize the experience for both creators and viewers when going live.
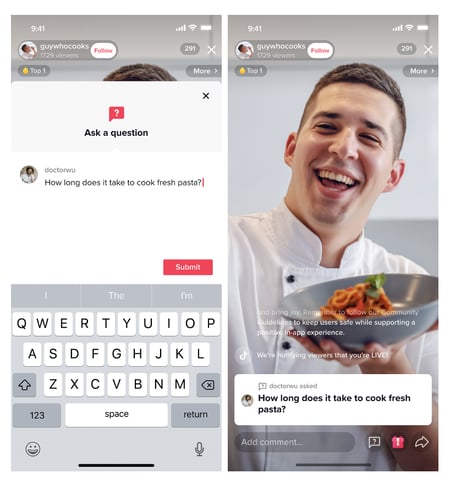
Here are some of the top features:
- Q&A – Viewers can submit questions live during your broadcast.
- Multi-user streams – TikTok’s “Go Live Together” feature allows you to go live with up to three users.
- Live events – To build anticipation around your Live, you can schedule and promote your live ahead of time to your followers
- Gifts – If you are a part of TikTok’s Creator Next Program, viewers can give you badges that hold monetary value during a live stream if they are enjoying your content. Only non-business accounts and users 18 years of age or older can accept these rewards, unless you live in South Korea where the minimum age requirement is 19 or in Japan where it’s 20.)
 Moderators – When going live, you can assign other users to moderate the chatroom to ensure it’s safe and in line with the content you’re sharing.
 - Keyword filters – Another way to protect your live stream is by automatically removing comments that feature words or phrases you’ve flagged.
How to Go Live on TikTok on an iPhone and on Android
1. Open the app and click on the ‘+’ sign.
2. Slide to the ‘LIVE’ tab.
3. Add a title.
4. Click ‘Go Live.’
After your live, you can access the recording for up to 90 days by going to your “settings and privacy” tab and selecting “LIVE replay.” From there, you can download your live video or delete it.
Why can’t I go live on TikTok?
There are several reasons why you may not see the option to go live on TikTok, such as:
- You’re under 16 years old.
- You have less than 1,000 followers.
- You have recently violated one of TikTok’s policies and are under review or suspension.
If you meet the requirements and still can’t go live, you can report this issue to TikTok.
Tips for Going Live on TikTok

1. Know when your audience is most active on the app.
When you go live, you want to make sure you’re reaching your target audience. This means knowing exactly when most are active on the app.
To find this out, check your “Followers” tab in your Analytics. It will tell you what times and days your followers are most active along with other insights, like videos and sounds that are most popular with your followers.
All of this information will be valuable when planning your live.
2. Set the stage.
There’s nothing that makes me click out of a live quicker than bad lighting.
The first thing you want to do is make sure your lighting is arranged ahead of time. This can mean setting up in front of a window that gets great natural light or investing in artificial lights.
The next thing you’ll need is a quiet room. Make sure there isn’t a ton of background noise as that can distract viewers and make it hard to maintain their attention. You can also invest in an external mic to improve your sound quality.
In addition, consider investing in a tripod. This will allow you to move freely as you are on the live.
Lastly, make sure your wi-fi connection is strong. You can quickly lose viewers if they are struggling to hear or see you on the app.
3. Have a clear goal and outline.
Any time you plan on interacting with your audience, you should have a clear goal. It can be building brand awareness, learning more about your audience, leading users to your website, generating leads, etc.
Once you know what your goal is, outline your broadcast. This will ensure you communicate your key points and meet your end goal.
Here’s an example of a simple outline for a brand that’s announcing a new product:
- Welcome audience and shout out specific usernames.
- Announce the new product.
- Dive into product specifics, such as benefits, features, and initial customer reviews
- Share discount code.
- Direct viewers to the website for purchase.
- Answer questions about the new product.
- Direct users to the website and sign off.
4. Have a moderator.
A moderator is a user you assign to make sure the chatroom is a safe and enjoyable space during your broadcast.
Chats are notorious for having bots and trolls that can distract users and keep you from seeing important messages from your audience. The moderator will help you manage the live and allow you to focus on engaging your audience and sharing your message.
Going live on TikTok is a great way to connect your audience and strengthen that brand loyalty. If you’re not yet at 1,000 followers, gather ideas for broadcasts by looking at your competitors and seeing which live strategy will be most effective in meeting your goal.
This way, you’ll be more than ready by the time your account meets the requirements.

What is a Product Marketing Manager? Job Description and Salary
Your research and development team has been working on a new product for months and putting valuable resources into its design and manufacturing. They’ve carefully researched the market and the problem they intend to solve.
They’ve brainstormed and planned out the best possible product, and then meticulously crafted it before testing its functionality to make sure that it does indeed do what it was meant to do.
You are convinced that this is the best addition to the world since chocolate.
With an amazing product ready to go to market, there’s only one question left in your mind. How are you going to announce your product and get it in front of potential customers, i.e. the people who will actually buy it?
![→ Download Now: Free Product Marketing Kit [Free Templates]](https://no-cache.hubspot.com/cta/default/53/08b5e1f4-5d26-405b-b986-29c99bd0cb14.png)
For this step of the process (and ideally since the very beginning of research and development), you’ve got a product marketing manager ready to take the next step with your new creation. Without marketing, your product (no matter how amazing it is), will never be found by the customers whose problem it would solve. This could lead to lackluster sales, a financial failure, and potential customers who are still suffering from their original problem.
From that perspective, you can see how valuable good product marketing managers are. Let’s learn more about this pertinent role.
What is a product marketing manager?
You may be wondering, what is a product marketing manager (PMM) and how essential are they to my product launch? A product marketing manager is an individual who takes ownership of the positioning, messaging, and branding of a product.
To get an even better idea of this role, let’s take a look at this sample product marketing job description.
Product Manager Job Description
A product marketing manager will be responsible for overseeing the creation and distribution of promotional campaigns for key products. This individual will have a keen understanding of the product’s target audience, and in-depth knowledge of relevant product features.
Product Marketing Manager Skills and Qualifications:
- Foundational marketing and campaign management experience
- Project management skills
- Strong organizational and communication skills
- The ability to analyze relevant information and make informed decisions
- The ability to prioritize tasks and responsibilities across projects
For this role, employers look for a minimum of a Bachelor’s degree, ideally in business administration, marketing, or a related field of study. Some employers may seek candidates who hold advanced degrees and have more extensive experience in marketing, sales, or advertising.
While not required, there are certifications available (such as the Certified Product Marketing Manager distinction) that can help better prepare Product Marketing Managers for the responsibilities they are about to take on.
According to PayScale, the base salary for Product Marketing Managers in the U.S. is $92,628 per year though this can vary depending on the company and level of experience.
What does a product marketing manager do?
These individuals are responsible for crafting a story about the product that will entice potential customers to purchase the product, and collecting customer feedback after launch.
When the product is being prepared for launch, the product marketing manager (or team) will be brought into the process to educate the public about the value and benefits of the offering so they can convert potential customers into raving fans.
To do this, the PMM will focus on three levels of the sales funnel:
- Acquisition: Bringing awareness to your product through content such as social media, copywriting, and blogs. This requires the product marketing manager to determine what type of campaign needs to be done, create a budget for the marketing endeavors, craft a project plan to map out when this content will be released, and oversee a team who will create the desired content.
- Engagement: Building trust and creating conversation with potential customers through events, campaigns, and specific calls to action.
- Conversion and Retention: Converting potential customers into paying customers for one-time purchases and keeping existing customers loyal through subscription models or add-on purchases (when appropriate).
It’s worth noting that from one company (or campaign) to the next, the responsibilities and expectations placed on a product marketing manager may differ.
How does a product marketing manager differ from a product manager?
With similar titles, it can sometimes be difficult to understand the different roles available within a company. Many often confuse product marketing managers with product managers, and while there are similarities, the roles carry very different responsibilities.
Both a product marketing manager and a product manager provide a voice for the product. However, the difference is who they are speaking to. A product manager is vocal during the production stage of a product. They speak internally on behalf of the product, communicating with engineers and developers regarding the features and functionality of a product. A product manager is focused on answering the question, “Does this product solve the problem we intend it to solve?”
A product marketing manager, on the other hand, is responsible for speaking to the outside world. They are focused on the question, “How will people know that this product solves their problem?” They will create a launch plan and work with the social media team, the PR team, the marketing team, and the sales team to ensure a successful product launch and to spread the word regarding this new or improved product.
While these individuals will fulfill very different roles, they will find themselves working together at times. Both the product manager and the product marketing manager must have a solid understanding of the buyer persona and will share the research they’ve done to assist the other.
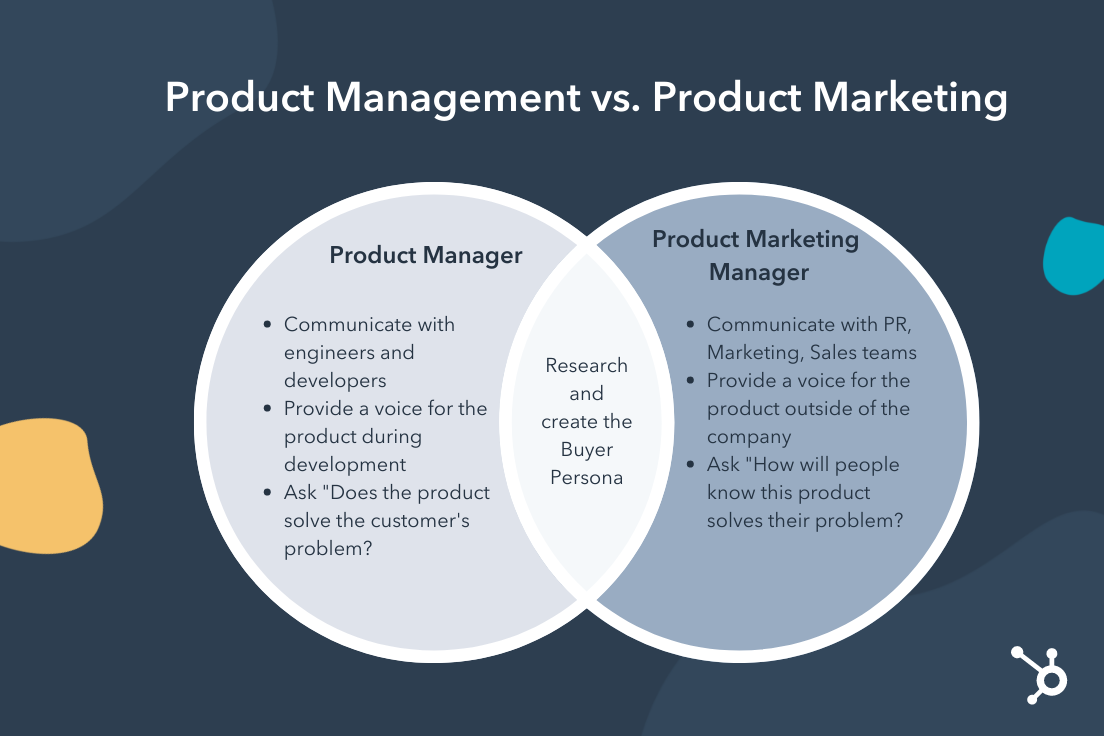 The role of a marketing manager can be confused with a product marketing manager as well. Again, there are similarities and overlap, however, a marketing manager often works on general marketing activities to grow awareness across a company’s user base. They will typically spend less time doing research and developing buyer personas.
Creating a product is only half the battle. In order to succeed with your product launch, make your product wildly profitable, and ensure that it gets into the hands of the individuals you intended to help, you need someone at the marketing helm. When you choose the right product marketing manager, they will lead the right customers to your product.

5 Open Door Policy Examples
Whether they have an issue they want to be resolved or ideas they think would improve the company or better serve clients, employees just want to be heard.
When you don’t create an open line of communication with your team, they may feel discouraged, leading to poor morale and ultimately lower production. Not to mention that employees who feel undervalued are likely to take their time and talents elsewhere.

But an open-door policy can help employees bring fresh ideas to the table and make you aware of small issues before they become major problems that affect everyone. Here’s what an open-door policy entails, how you can create one yourself, and some examples of open-door policies in action.
This workplace standard should foster communication and trust throughout the company, and employees should not have to fear retaliation should they raise issues with the company or their work with any managers. Instead, they should feel heard and supported through an open door policy.
Benefits of an Open Door Policy
There are several benefits to maintaining an open-door policy in the workplace. First, it fosters better communication across the company. It also helps employees speak their minds about workplace issues as soon as possible, which minimizes conflicts.
An open-door policy can help employees feel more supported and valued by management, which boosts morale and ultimately productivity. It may even lower turnover rates.
In one study on employee voice, researchers found that at a national restaurant chain with over 7,500 employees and 335 general managers, turnover decreased by 32% and saved the company $1.6 million per year by allowing employees to voice their concerns.
Why You Need an Open-Door Policy
Without an open-door policy, your team may experience an increase in workplace conflicts if people don’t feel comfortable raising issues sooner rather than later.
Some employees may begin to isolate themselves if they feel they can’t speak to managers about ideas or concerns. Ultimately, these employees may even leave the company in hopes of finding a workplace culture that is more transparent and communicative.
Plus, without an environment that feels open and supportive, you could be missing out on great ideas that improve the company if employees don’t feel that they can share their ideas with you.
When you’re ready to start implementing an open-door policy in your office, follow these five steps to setting up the standard and following it through.
1. Add It to the Handbook
To make your open-door policy official, you want to add it to the company handbook, so employees are able to review the policy at any time. This also adds more accountability for supervisors to follow the policy.
2. Communicate Expectations
If an open-door policy is new to your employees, you should explain what it is, how it works, and what it will look like for your team.
For example, some companies have a pretty literal open-door policy, meaning when a manager’s door is open, employees can pop in to talk. Discuss how the open door policy works, so employees feel comfortable if they need to use it.
3. Set Boundaries
Creating open and direct lines of communication with management is good, but without boundaries, this can also lead to a loss in productivity. Set boundaries that work for you and your team.
Can employees drop by to discuss issues anytime, or should they email you to set up a meeting? Alternatively, you can share times of the day or week that are the best for employees to stop by your office, rather than leaving yourself open all the time, which can prevent you from doing your work.
Also, consider boundaries on discussion topics. Employees should feel comfortable speaking to management if there’s a conflict with another employee, but this shouldn’t become a way for teammates to gossip about one another or undermine co-workers.
4. Actively Listen to Employees
If an employee comes to you with a problem or idea, make sure you are actively listening to the employee. Otherwise, it can come off as if you don’t care. That means stop typing and sending off emails when they are trying to speak to you. Instead, maintain eye contact, ask thoughtful questions, and end the conversation with a recap of what you discussed.
5. Address Concerns In a Timely Fashion
Some workplaces say they have an open-door policy, but when employees voice their concerns, nothing is actually done. Follow through on your open-door policy by addressing issues as soon as possible after an employee comes to you.
Open-Door Policy Examples
Many companies across different sectors have open-door policies for their teams. Here are some top examples of various companies that use open-door policies to boost transparency, communication, and productivity.
1. IBM
IBM, a massive technology company operating in over 170 countries, has had an open-door policy for several years. It allows employees to access higher management to discuss concerns. As an added level of security, IBM also allows employees to speak confidentially and send reports by phone, email, or even snail mail.
In a study on an IBM subsidiary in France, researchers found that the more the open door policy is communicated to employees, the more confident employees feel in the policy, an example that any workplace should consider as they set up their own open-door policy.
2. HP
HP, another major technology company, has a policy that invites employees to raise concerns quickly and opens communication across all levels of the company. As part of its expectations, HP notes that open communication should be part of day-to-day business practices for all employees.
As far as boundaries go, employees should first bring up their concerns within their own chain of command before taking it to the Ethics and Compliance office. Finally, employees should feel comfortable giving or asking for feedback without any fear of retaliation from management or co-workers.
3. Keka
Keka is an HR payroll software company that prides itself on making employees feel safe, inspired, and fulfilled by their job. So it’s no surprise that the organization has its own open-door policy.
For its own policy, Keka uses open doors literally and figuratively, allowing teams to communicate frequently whether in-person or virtually. This company’s policy applies across various levels and departments of the company, so anyone can raise their concerns to any relevant party.
The policy clearly outlines the expectations and boundaries for the policy, including what types of topics, are considered relevant for discussion and how to have the most effective discussion to resolve issues promptly.
4. Saint Louis University
Open door policies are encouraged at higher education institutions, too. At Saint Louis University, the open-door policy is meant to create a more informal conflict-resolution process that is an add-on to other procedures for employee reviews and staff grievances.
The policy notes that employees can bring up questions, suggestions, or concerns, typically to their immediate supervisor, for assistance. If employees do not receive assistance, the policy directs employees to follow the more formal Staff Grievance Policy.
5. Health Information Alliance, Inc.
The Health Information Alliance, Inc. implements an open-door policy designed to foster a positive work environment. In this open-door policy, there are specific issues outlined that are “open-door issues,” including, “disciplinary action, work assignments, interpretation or application of policies and procedures, transfer and nonsupervisory promotions, or other employment issues.”
Other issues, like evaluations or personal conflicts, are notably not included.
This is more of a hybrid open-door policy that also follows a traditional chain of command, where the employee is encouraged to first speak with their direct supervisor. If their complaint is about their supervisor, then they can go up the chain of command to their supervisor’s manager.
Although considered a more informal route of resolving issues, this policy makes an important note that open-door issues should be thoroughly documented in order to best resolve each concern.
Improve Employee Morale and Trust With an Open-Door Policy
The key to any successful relationship is communication, and that certainly applies to workplace employees. If you want your employees to feel supported, supervisors and executives should consider implementing an open-door policy.
With this workplace standard, employees can raise concerns over company procedures, other employees’ conduct, their pay, or any other work-related issues. It also opens the door for employees to share their ideas, which can benefit the entire company by making things run more efficiently or improving productivity.

A Comprehensive Guide to Organizational Development
Imagine it’s 2005, and a small drinkware business opens up in the center of town. Although they have a simple website to provide store information and field online inquiries, their collection of customized mugs, shot glasses, and more continuously grow in popularity due to loyal customers and word of mouth.
Now imagine it is 2015. The small team has done well for itself; however, its online presence is suffering. Underestimating the shift to online shopping, the company cannot handle the influx of questions, feedback, and requests to create an eCommerce platform.

Once they’ve identified this problem, how do they implement changes to field this issue and stop it from happening again?
Successful businesses require systems and processes. If situation A happens, what are the steps in response? Organizational development (OD) enables companies with a systematic approach to identifying issues, implementing changes, and evaluating the success of the process.
What is organizational development?
Organizational development is a systematic process aimed at initiating and implementing changes in the values or operations of an organization to promote long-term growth and efficiency. It equips organizations with the tools to assess themselves and advance their core strategies, processes, and structures in response to internal and external changes.
OD serves to increase communication and productivity, improve products and services, create a workplace culture that embraces advancement and increase profit margins.
Organizational Development and Human Resources
Organizational development and human resource management are both processes centered on people. The two are often confused due to overlap; however, the former is a more holistic approach to organizational change while the latter prioritizes the individual.
Career planning, diversity orientations, and employee assistance programs are all examples of human resource management. While the outcome of HRM affects the overall organizational development of a company, it focuses on managing one individual.
Meanwhile, OD works at all levels within an organization. One person lies at the center of some OD processes, for example, individual interventions and job enrichment, but organizational development functions on individual, group, and organizational levels.
Understanding and explaining the similarities and differences between OD and HRM can be challenging. It helps to understand the following: Human resource management enhances the employee experience and ultimately benefits the organization. Organizational development focuses on aligning employees with the company’s values.
Organizational Development Interventions
OD interventions allow organizations to make successful changes. Interventions are actions taken to improve a situation. Ultimately, these structured processes help enact the changes to advance the values or operations of an organization.
The four organizational development interventions are:
- Human Process
- Technostructural
- Strategic Change
- Human Resource Management
Human Process
Human process interventions aim to improve interpersonal relations at the individual, group, and organizational levels. These take place in response to changes that happen within an organization.
Individual interventions provide employees with coaching on interpersonal skills — conflict management, team building, and body language — in the event of new hires or internal transitions.
Similarly, group interventions affect the structure or process of a group that might be necessary for department changes. Large-scale changes, however, like the introduction of new company goals and vision, are examples of organizational interventions.
Technostructural
Technostructural interventions are programmed changes to revitalize a company’s structure and processes. The initiation of this OD intervention should match the fast pace of the tech and job industries. These types of interventions follow an approach based on improving an organization’s technology and structure through job design, system changes, workplace hierarchy, and more.
Strategic Change
Strategic interventions help increase competitive advantage and how an organization can implement changes to its structure, processes, or policies to make it happen. They are especially effective when companies undergo changes to their function, for example, replacing core products or services with something new, or when they experience trans-organizational changes in the form of mergers or acquisitions.
Human Resource Management
Human resource management (HRM) interventions focus on integrating, developing, and supporting individuals within a company. An example of this is the implementation of diversity programs to ensure employees feel represented and included in the workforce regardless of age, gender, sexual orientation, and race.
Organizations implement the four OD intervention methods in numerous ways ranging from individual or organizational levels. Let’s take a look at a few examples.
Organizational Development Examples
Most organizational development initiatives can fit within one of the four intervention categories mentioned above. Examples of OD include:
Individual Interventions
Individual interventions are an example of human process interventions. They are aimed at behavior modification. This action usually happens in response to issues in the workplace. A well-known example of interventions that we see in pop culture is for alcohol and drug use.
Typically when the use of these addictive substances becomes excessive, the concerned family and friends of the individual confront them with the negative impact of their substance abuse. These interventions often end with a plea to seek treatment. Alternatively, individual interventions in the workplace usually occur in response to situations like lack of communication or workplace errors.
Job Enrichment
Job enrichment enables the management of employees in a way that creates growth opportunities. This techno structural intervention technique involves creating and redesigning jobs that account for the interest and skills of the individual. Its goal at an organizational level is to create a motivating job for employees.
A job enrichment program might include interventions as simple as increasing an employee’s autonomy by allowing them to decide when to take their break. Depending on the industry, another example of job enrichment is job rotation — moving employees from department to department to increase their skill set.
Transformational Change

Transformational change is literally a transformation of the organization at its core. For example, if IHOP decided to focus on burgers instead of the popular breakfast food pancakes, this would be a transformational change for the company. These changes often occur to keep up with changing consumers.
Performance Management
Performance management is a well-known example of HRM. It is a continuous process between an employee and their supervisor that includes setting expectations and goals, providing feedback, and evaluating performance.
Hence, performance reviews fall under this initiative. Both job enrichment and performance management focus on the individual, but the latter supports the individual more than the organization.
Organizational Development Models
After an organization has identified a problem, it is time to address it. Organizational development models provide step-by-step processes to initiate and guide the changes needed to reach the desired outcome. The European Centre for Research Training and Development UK lists the four organizational development models as:
- Lewin’s Three-Stage Model
- Action Research Model
- Appreciative Inquiry Model
- General Model of Planned Change
Lewin’s Three-Stage Model
Proposed by social scientist Kurt Lewin in 1947, the core components of this model are unfreezing, moving, and refreezing. Unfreezing involves loosening the structures around the current system or going against the status quo in preparation for step two.
Moving is when the organization introduces and implements the decided changes. Communication with employees during this stage is especially crucial to facilitate a smooth transition.
During the last step — refreezing — the organization has already integrated the changes. Reinforcement is a significant part of this step. It ensures that the new policies have become the standard among all employees.
Action Research Model
The action research model also credits Kurt Lewin as its creator. According to the social scientist, this model has two purposes — solving problems and generating new knowledge.
The action research model follows a continuous eight-step process: problem identification, consultation with behavioral science experts, data gathering and preliminary diagnosis, feedback to key clients or groups, joint diagnosis of a problem, joint action planning, action, and data gathering. After data gathering, the process returns feedback to key clients or groups and repeats.
Appreciative Inquiry Model
First proposed in 1987, the appreciative inquiry model is also called the ‘positive model.’ Instead of focusing on the negative, it focuses on the successes of the organization. The goal is to equip members with the skills to identify when the organization is running well and optimize these conditions to get better results.
General Model of Planned Change
In 2009, organizational experts and professors Thomas Cummings and Christopher Worley proposed a general model for planned change. The four steps are: entering and contracting, diagnosis and feedback, planning and implementation, evaluation, and institutionalization.
Because organizational change is rarely linear and involves overlap and feedback, the process continues after the final step by returning to a previous one.
Organizational development is a long process.
Organizational development is not a process that happens overnight. It is a long, continuous cycle of initiating, implementing, and evaluating change in an organization.
Whether it is happening at the individual, group, or organizational levels, organizational development has one goal — to promote the long-term growth and productivity of a company.


10 Best Online Payment Methods for Businesses
Online payment solutions are essential for just about any type of business. Booking and making payments online is convenient for many consumers, so it’s important to make sure your business is keeping up.
Small businesses, startups, and even massive corporations can all benefit by offering online payments to consumers, but how can you securely accept different forms of payments? For global businesses, what if you need to accept multiple currencies?

The solution is to find a trusted, reliable online payment method platform that makes the customer experience seamless while giving you more control over and insight into your income.
For many online businesses, payments can be accepted from credit cards, debit cards, or a direct connection to one’s bank account.
Benefits of Online Payments
Taking payments online can help you reach a wider audience, and many online payment methods will also offer data analysis to give you a better idea of what your consumers are most interested in from your business. Online payments can also offer a layer of security for consumers and businesses alike.
Many online payment solutions will offer post-payment workflows, so your business will automatically send emails to follow-up with clients after their purchases. These methods will keep payments together in one spot, which is easier to manage than stacks and files of receipts in an office.
There are many online payment solutions for business owners these days, but you’ll want to work with ones that fit your business needs. Plus, you should consider options that can scale as your business grows and methods that offer security and great customer service.
1. DepositFix
DepositFix makes it easy to integrate other business resources, including HubSpot forms, Stripe, and PayPal. That means you can seamlessly accept payments through HubSpot forms, and the payment information will send directly to your business’ Stripe or PayPal accounts. This technology allows you to create workflows following customers’ payments, so they’ll automatically receive follow-up emails, receipts, upsells, or requests for product or service reviews after their purchases.
DepositFix works best for businesses that sell digital products or services. It also allows you to collect donations or send invoices. It offers top-notch security for peace of mind for you and your clients. If you need to get in touch, this platform offers a Help Library for self-service, or you can reach customer service via phone or email.
In one case study, The Ceramic Tile Education Foundation was able to move from offline, over-the-phone payments to a more secure, streamlined system online thanks to DepositFix. Online payments went from about 10% to over 53% and are still growing after the company implemented the online payment solutions from DepositFix.
2. Stripe
A great payment method for small businesses and large corporations alike, Stripe offers payment processing services for businesses. This comprehensive platform allows both online and in-person businesses to accept payments digitally, all while preventing fraud with its Radar protection. Stripe integrates with popular online shopping systems like WooCommerce and Shopify.
Stripe is popular globally, and it supports over 135 currencies and payment methods. It’s easy to start using, too; you can have it ready to go for your business in about 10 minutes. In addition to robust documentation, you can get 24/7 support from their customer service team.
Slack, a major communication platform for businesses, uses Stripe in 15 countries for payments. Even when it saw a surge in use during the pandemic, Stripe offered 100% uptime and boosted company earnings globally by optimizing online payments.
3. One Page Pay
One Page Pay works with several different CRMs, including HubSpot, as well as different payment platforms like Stripe, PayPal, Take Payments, and GoCardless. It creates a dedicated payment form page and sends sale details straight to email or your CRM. This platform offers bank-level security for your consumers’ data, and you can set up your first payment form in under five minutes.
Choose from a single or two-column form, or work with One Page Pay to create a custom payment form that suits your exact needs. You can generate reports based on the transactions, and because this service integrates with HubSpot, it will automatically follow up with consumers with things like surveys or digital product delivery after their purchases.
4. Square
Square is a popular payment solution and one of the best online payment methods for small businesses. Whether you want to offer appointments, sell physical or digital products, or run a restaurant that takes orders online, Square has you covered. You can send invoices and/or collect payments all from this platform, and it even offers a free eCommerce service to help you get your business up and running.
Square offers everything from hardware for brick-and-mortar retailers to e-gift cards and a dashboard with analytics to track your success. With Square, you can also manage your payroll — from inputting time cards to automatically paying employees — and open a Square checking account without fees for your business. With its online payment solution, you can also easily add shopping cart buttons, purchase links, and QR codes to help direct clients to your products and services.
5. Checkout HQ
Imagine being able to create a searchable database of your products, create personalized payment and quote forms, and access attribution reports to see how your marketing efforts impact revenue. This is all the reality with Checkout HQ, which integrates with HubSpot to make online payments a breeze.
The platform automatically works with your current HubSpot theme, so it’ll fit into your brand right out of the box. It also integrates with Stripe for payments, and you can customize the checkout experience to boost the customer experience.
6. Collect
Start accepting credit card payments online with Collect, which will work right on your HubSpot pages rather than sending clients to a different window. It’s easy to install, requiring no coding knowledge to set it up, and it makes the client experience seamless from the time they visit your site to when they make the purchase.
Take secure payments right on your website, plus add pricing tables, buy buttons, and payment forms. You can even allow customers to make one-time purchases or subscribe to your products or services.
Collect currently integrates with Stripe but also plans to work with other payment services in the future. There’s no per-transaction fee, so you simply pay for the Collect subscription without the added cost for every sale.
7. Authorize.net
Authorize.net has been in the online payments game since 1996, and it’s trusted by nearly 450,000 merchants. The service helps businesses handle over $149 billion in payments each year.
This platform allows your business to collect money via credit card, contactless payment, and even electronic checks to better suit your customers’ needs. Authorize.net handles everything from authorizing, capturing, and settling payments securely.
8. PayPal
PayPal has rapidly become one of the top online payment methods, with the platform seeing an annual payment volume of over $930 billion in 2020. Consumers can pay you via their credit or debit cards, their PayPal balance, or their bank accounts. The platform allows customers to pay quickly with one click, and its innovative Store Cash feature helps convert users that have abandoned their carts into sales.
PayPal integrates with many major eCommerce platforms, so it can work with your existing systems. You can also add shopping cart, buy now, or donate buttons easily, or work with PayPal to create a more robust and custom online payment solution.
9. Intuit
Intuit offers a suite of tools for businesses, including flexible payment solutions for companies that want to accept online payments. You can offer credit cards, debit cards, eCheck, or ACH payments both online and in-person, making payments convenient for clients.
The scheduling tool allows you to schedule automatic, recurring invoices, and the payments are integrated with your Quickbooks account for seamless bookkeeping, quick deposits, receipt capture and organization, bill pay, income, and expense tracking, and more.
10. Dwolla
Dwolla is an online payment solution that is scalable, so you can rely on it to accept payments as your business grows. You can tailor the payment platform to suit your business’ needs and match your branding, and it offers excellent security for sensitive data.
You can send or receive funds, perfect if you need to pay contractors or if you want to receive consumer payments. Payment methods for Dwolla include ACH, balance-to-balance between Dwolla users, real-time payments, push-to-debit, or wire transfers.
Boost Sales By Offering Online Payment Solutions
Offering online payments for consumers makes the shopping experience easier than ever. Plus, when your online payment solution offers extra benefits like automated follow-up emails or scheduled invoicing, you can further boost profits and customer satisfaction.
There are many online payment solutions out there, so find one with robust features that fit your needs, fees that work into your budget, and security and support to give you and your clients peace of mind.