
Welcome to My Blog
Give Your Marketing Videos Maximum Reach With This Distribution Checklist
So you made an incredible video, sent it out to your internal teams, encouraged sharing, uploaded it to YouTube and waited for the marketing fame to roll in.
Unfortunately, each time you obsessively checked throughout the day, your view count wasn’t as impressive as you’d hoped.
First off – don’t stress, we’ve all done it. But after you’ve spent time, energy, and money to make really amazing video marketing, it’s all about actively making sure your videos get in front of your target audience (not just your mom).
Get Your Video The Attention It Deserves
Once you’ve optimized your content with an engaging splash screen, an email gate (where appropriate for late funnel content), and a compelling call to action, it’s time to make sure everyone sees your masterpiece.
Here’s a checklist of key places to share your video marketing content every time you have something new.
Video Distribution Checklist
YouTube
One of the first spots you’ll want to upload to is YouTube. As the second largest search engine, it’s imperative for your brand to use YouTube strategically to showcase your videos far and wide.
Because YouTube alone isn’t a video strategy, your goal should be to use the channel to gain a lot of attention and drive viewers back to your website where they can consume more content free from distraction. As a bonus, once they’re back on your website you’ll also be able to track their behaviour with video engagement data.
When uploading videos to YouTube, however, watch out for cannibalizing your own SEO efforts between YouTube and your website. Instead, change your descriptive title just slightly from the title you use when you embed your video on your own website with metadata. More details on the multi-platform promotion can be found here.
Your Website or Campaign Landing Pages
Because buyers now go through nearly 70% of the buying process independently before ever talking to sales, it’s important to include videos in a guided product tour on your website so that you can be as persuasive as possible and make a more human connection.
Videos embedded on your site can help increase conversion by 80%, and Google recognizes pages where a click leads to longer time spent on a page. This ultimately means that if your viewer’s click and watch a two-minute video, those two minutes will end up making your site content more sticky, and thereby more likely to appear in Google search results because you can hold the attention of interested viewers.
Email Campaigns
In a GetResponse study of nearly a billion emails, those containing video had a 96% higher click-through rate when compared to non-video emails. This staggering increase in engagement with the inclusion of video makes adding an embed link here a no-brainer.
For some best practices for video in email, and some cool examples, check out this post on why video and email is the perfect marketing combo.
Email Signatures
Beyond email campaigns, you send out to promote your video, have your team members change their email signature to include a catchy line with a hyperlink to your video embedded on your site. Our Corporate Communications Manager Sandy does this with her signature and you can switch up your signature every time you release a new video:
Social Networks
When distributing your videos, social channels are your best friend. You’ll want to post on Facebook, Twitter, LinkedIn, and G+ but you’ll also want to consider a clever use of Instagram and Pinterest.
When you have a piece of long-form video content, you can use Instagram video to create a teaser trailer directing everyone to your longer-form content. Just take a look at how Mercedes used this method to promote a full-length video about their F-Cell car:
Other Places to Share
To top off the list, you’ll want to distribute your videos in these locations too:
- Sales assets: Re-use relevant content wherever appropriate
- On your blog: Where you’ll want to use the surrounding text to transcribe your video’s key phrases in order to have the content indexed by search engines
- Press releases
- Partner blogs: Contact your industry partners and ask if they’ll feature your video content on their blog.
So next time you release a video asset, don’t miss out on any opportunities to share it. A great distribution strategy will ensure you see maximum ROI from your video content. Bookmark this blog and use it as a handy checklist to make your content go as far as possible.

How to Create Compelling Instagram Stories: 5 Apps for Marketers
Do you want to create stronger Instagram story content? Looking for tools to help enhance and edit your stories? In this article, you’ll find five Instagram Stories apps for creating an attractive and engaging story. #1: A Color Story Using eye-catching visuals in your Instagram stories helps keep people engaged with your content. A Color Story, […]
The post How to Create Compelling Instagram Stories: 5 Apps for Marketers appeared first on Social Media Marketing | Social Media Examiner.
from Social Media Marketing | Social Media Examiner http://bit.ly/2FABvWq
via socialmediaexaminer
How to Manage Your Entire Marketing Budget [Free Budget Planner Templates]
Let’s say your company decided to invest in a website redesign so you can improve lead generation, and you’re responsible for managing the project. Naturally, one of the first questions you have is, “How much is this website redesign going to cost?”
The answer, of course, is “it depends.” Are you simply switching to a new template and adding some new CTAs, or are you migrating your entire website to a new platform?
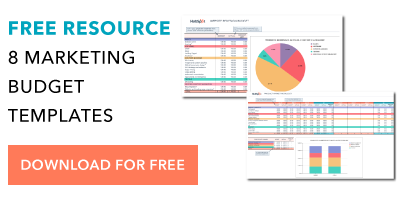
If only there were a way to organize your answers to all of these questions — a place where you could enter in estimated costs for all of your line items, and then compare your projected marketing budget to what you actually end up spending. Good news: Our free marketing budget templates have got you covered. Included in our eight budget templates bundle is a template to manage your website redesign … as well as templates for both Excel and Google Sheets to help you track your content budget, paid advertising budget, event budget, and more.
In this blog post, you’ll find the following content (click a link below to jump to that section):
- How to Create a Marketing Budget
- 8 Free Marketing Budget Templates You Need to Manage Your Expenses
- Sample Marketing Budget
Marketing Budget
A marketing budget outlines all the money a business intends to spend on marketing-related projects over the quarter or year. Marketing budgets can include expenses such as paid advertising, sponsored web content, new marketing staff, a registered blog domain, and marketing automation software.
Marketing budgets can be difficult to establish for both small and large businesses. If you’re a small business, you might wonder which marketing expenses you should start with. If you’re a large business, having multiple marketing teams or operations in play can make it harder to ensure everyone across the department gets what they need.
So, what should you spend your marketing cash on? First, let’s identify a focal point: According to investment agency, Magna, money spent on digital media will increase by 11.8% in 2019, up from $106.6 million in the U.S. alone in 2018. This includes initiatives that cater to audiences on desktop computers, search engines, video streaming platforms, social media, and mobile devices.
Digital media makes up more than half of the country’s total advertising spend. Given the success marketers have seen in it, you might consider spending at least half of your marketing budget on some of the digital channels mentioned above.
How to Create a Marketing Budget
Spreadsheet knowledge, alone, won’t help you understand how you’ll spend your marketing money this year. Creating a sound marketing budget starts with knowing what purpose this budget will serve and which marketing teams it will represent.
1. Align your budget with your marketing goals.
What you spend and where you spend it will depend on what you’re trying to accomplish. So, when starting to create your marketing budget, make sure you’re only spending money on the things required by your current marketing goals. This can include:
- Display ads to promote a new product you’re launching this year.
- Sponsored social media posts to generate followers of your new Facebook page.
- Paid search engine ads to drive traffic (and purchases) to a specific product page.
- Contract bloggers to get more organic search traffic to your company’s website.
HubSpot’s former Demand Generation Marketer and Trello’s current Growth Marketing Lead, Jessica Webb, says this about how your costs can change when focusing on lead generation vs. lead conversion: “The majority of the money you spend on paid efforts is usually calculated based on volume of clicks or impressions. Because of this, you’ll often want to put more budget toward campaigns with higher-volume offers and audiences.”
“For example, a tweet or Facebook ad promoting a lead generation offer that leans more top of the funnel will likely receive more clicks than something that falls more toward the middle or bottom of the funnel,” she explains.
Your paid advertising costs will also change depending on how wide of an audience you are attempting to reach. “You can look at Twitter advertising as an example,” Webb explains. “You have to option to target your campaigns based on users’ interests or keywords searched for. Interests are a much broader category, whereas smaller pockets of users are searching for any given keyword, therefore your interests-based audience is going to be much larger and require a larger budget.”
To keep better track of your paid advertising efforts, download the Paid Advertising Budget Template (included in the8 Budget Templates to Manage Your Marketing Spend).
2. Beware of hidden costs.
One of the great advantages to having and maintaining a budget spreadsheet is that it helps you avoid those end-of-the-quarter or end-of-the-year freak outs when you realize, “Whoa … what did I spend all that money on?”
In many cases, unanticipated costs can force marketers to fork over cash that they didn’t plan on spending. Product marketing offers a perfect example. According HubSpot’s VP of Marketing Meghan Keaney Anderson, it’s easy to forget that successfully marketing your products and services requires more than just promotion.
“When people allocate budget for product marketing, they tend to think in terms of product launches and promotional activities,” Anderson explains. “That’s certainly an important part of it, but another area of focus to remember is setting aside resources to conduct research and message testing long before the product ever goes to market. Having conversations with customers about the pain points your product will ultimately address is critical to shaping the messaging and having a successful launch.”
To better manage your product marketing efforts, download the Product Marketing Budget Template (included in the 8 Budget Templates to Manage Your Marketing Spend).
3. Remember where your priorities lie.
Marketing is overflowing with add-ons and extras, upsells, and “premium” versions. One of the best ways to assess what’s nice to have versus what’s absolutely necessary is to (you guessed it) organize all of your expenses. By keeping tabs on where your budget is being allocated, and cross-checking that spending with the results you’re getting, it will be much easier to figure out what should keep getting budget and what should get kicked to the curb.
For example, let’s look to the world of public relations. In PR, there are countless tools to which you can allocate budget, which could leave you overspending where it doesn’t matter — and underspending where it does.
“Tools abound to help PR practitioners not only create and distribute great content and find and target key stakeholders, but to ultimately measure reach and effectiveness,” says Nathaniel Eberle, HubSpot’s former Director of PR & Brand and LogMeIn’s current Director of Global Brand Management. “The key is making sure you’re laser-focused on who you’re setting out to reach and influence, then ensuring that your budget supports how they’ll most likely want to receive (and share) your key messages.
“As the media and digital landscape evolves at breakneck speed, continually reassessing the tools, services, and programs you’re employing is a great way to determine real-time ROI of your overall spend. Today’s measurement tool may be worthless to you tomorrow.”
To get better at prioritizing your PR line items, download the PR Budget Template (included in the 8 Budget Templates to Manage Your Marketing Spend).
4. It’s not all about the Benjamins.
When you open up these budget templates and check out all the various expenses detailed in them, don’t fret if you can’t tick every box. I’m not advocating for an “always spend more” approach to marketing. I’m advocating for an “always spend smart” approach. The expenses listed out aren’t mandatory — they’re just meant to guide your thinking and to help ensure that you haven’t overlooked any hidden costs.
With that in mind, here’s the full list of budget templates included in the bundle.
8 Marketing Budget Templates You Need to Manage Your Marketing Spend
With the 8 Free Budget Planner Templates to Manage Your Marketing Spend, you’ll be able to manage all of the moving pieces of your budget at a monthly and quarterly level. Use the Excel version of the templates to keep all of your budgets in one place. When you download the zip file, you’ll find a separate file for each marketing team, as well as a Master Budget Template to maintain a high-level view of your overall expenses.
Interested in sharing your marketing budget across a larger team? Try the Google Sheets version of the same eight templates to share access with other Gmail users. For the Google Sheets templates, each team budget is found in a separate tab of the same Google Sheet. No matter which version you choose, each budget is optimized with the same line items, tips, and graphs. Read on to learn how to use each budget template.
1. Master Marketing Budget Template
Download the Master Marketing Budget Template here.
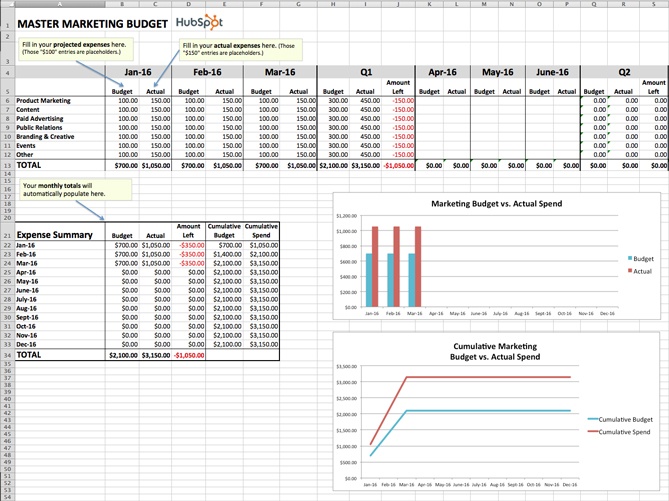
While it’s helpful to have individual budget templates for specific marketing departments and activities, it’s also nice to be able to take a step back and see the bigger picture. The Master Marketing Budget Template lets you do just that: It’s the place where you can collect the totals from the other seven templates in the bundle and see all of your expenses in one place.
2. Product Marketing Budget Template
Download the Product Marketing Budget Template here.
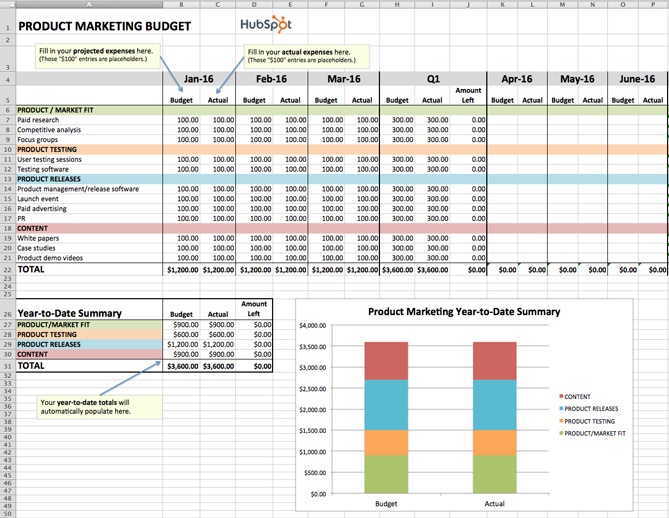
This template will guide you step-by-step through the process of budgeting for a product launch. From determining product/market fit, to running user testing sessions, to promoting your finished product, our Product Marketing Budget Template will help ensure you don’t overlook any important expenses.
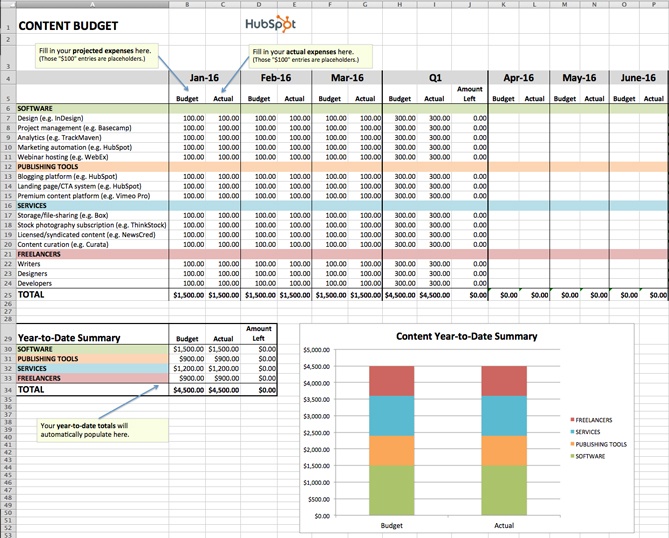
3. Content Budget Template
Download the Content Budget Template here.
The budget required for creating and promoting content can vary greatly from organization to organization. For example, while some organizations keep most of their content operations in-house, others rely more heavily on freelancers and contractors. And while some use many different software products, publishing tools, and services, others take a much simpler approach.
Our Content Budget Template is designed to cover as many content-related bases as possible. So, if you see any expenses listed that don’t apply to your organization, go ahead and delete them. (That’s the beauty of Excel spreadsheets: You can customize them to your specific needs.)
4. Paid Advertising Budget Template
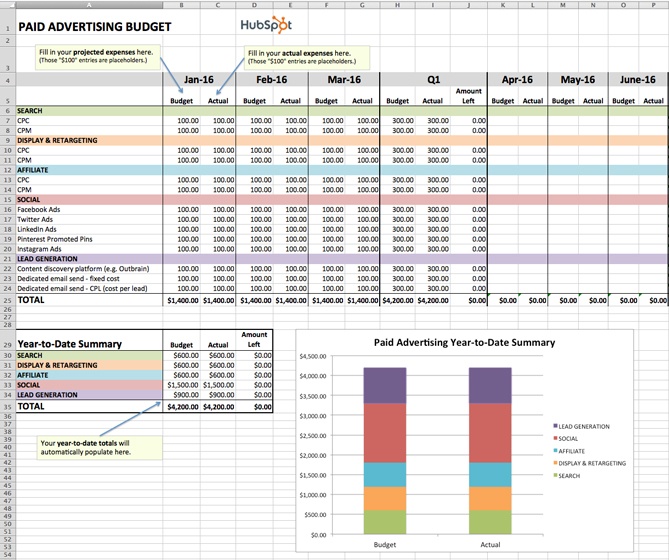
Download the Paid Advertising Budget Template here.
Paid advertising: Does it really qualify as an inbound marketing tactic/channel? That is a loaded question, my friends, and one that I don’t have room to answer in-depth in this post. What I can tell you for sure is that you can do paid advertising in an “inboundy” way — i.e. by targeting specific buyer personas and using paid advertising as a supplement to your organic efforts to help drive awareness and conversion opportunities.
Measuring the effectiveness of your paid advertising campaigns is also paramount to doing things the inbound way. Using our Paid Advertising Budget Template, you can keep tabs on your monthly (and quarterly) ad spending, and then cross-reference the amounts with your lead-generation metrics to determine your cost-per-lead.
5. Public Relations Budget Template
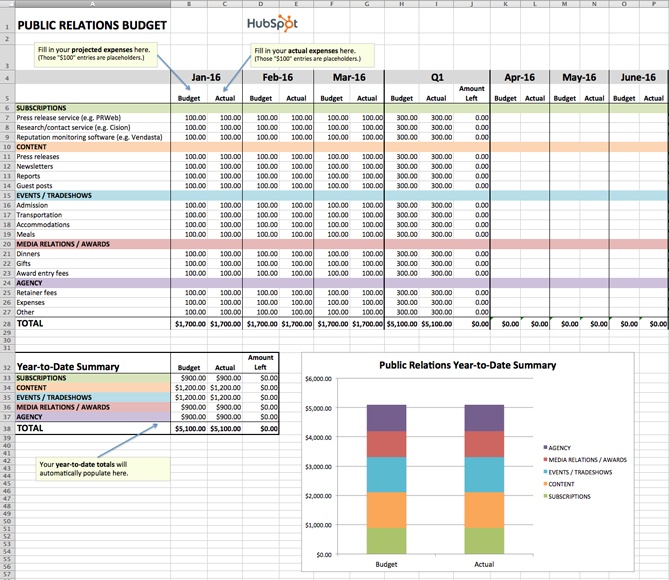
Download the Public Relations Budget Template here.
Public relations expenses amount to more than just paying for press releases. From reputation monitoring software, to traveling (e.g., to events and tradeshows), to applying for awards, there are many PR costs that can be all too easy to overlook.
To ensure you’re accounting for all of your organization’s PR-related expenses, check out our Public Relations Budget Template.
6. Branding & Creative Budget Template
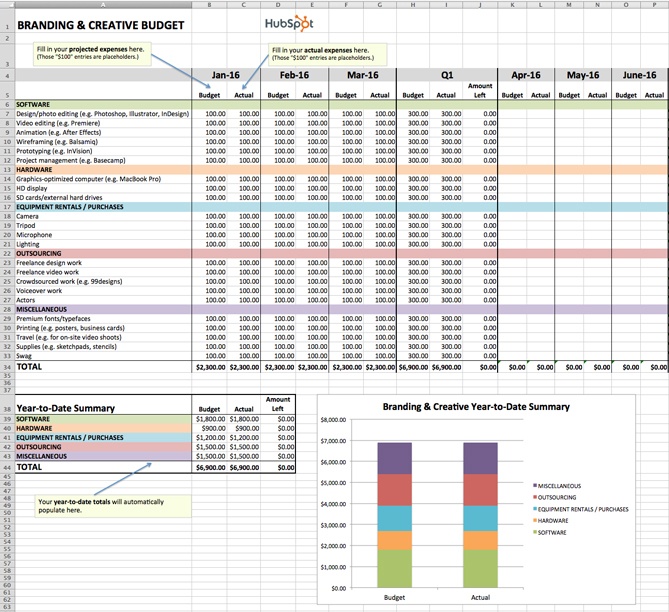
Download the Creative Budget Template here.
In order to produce high-quality, innovative graphics, videos, and other content, the branding and creative teams of today need more than just Photoshop … a lot more. One of the largest — and often most overlooked — expenses is storage.
If your organization is producing a lot of video, storage is especially important. Because as it turns out, when budgeting for video storage, you shouldn’t be thinking on a megabyte (MB) or even a gigabyte (GB) scale, but on a terabyte (TB) scale. FYI: 1 terabyte = 1 trillion bytes. You can keep track of all your storage costs (and other branding and creative costs) using our free template.
7. Website Redesign Budget Template
Download the Website Redesign Budget Template here.
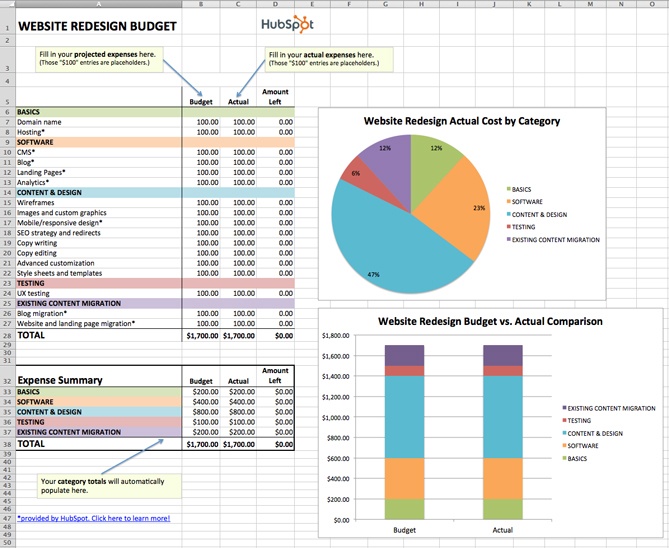
Budgeting for a website redesign can be seriously tricky. With so many moving pieces to consider, there is a lot of room for underestimating or miscalculating costs. We created our Website Redesign Budget Template so you can keep all of your redesign-related expenses in one convenient location.
Unsure if your current website is right for a redesign? Check out this HubSpot research report: Does Your Website Make the Grade? Chances Are, It’s Barely Passing.
8. Event Budget Template
Download the Event Budget Template here.
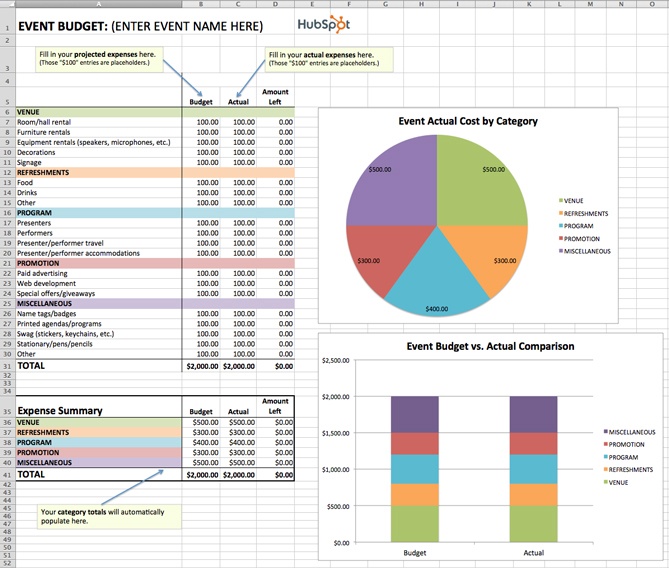
When planning an event, the associated costs can seem obvious at first. There’s the venue to consider, of course. And the P.A. system and microphones. And then the costs associated with booking and bringing in presenters/performers. That’s pretty much it, right?
Wrong.
For example, does the venue come with tables/chairs, or will you have to rent those separately? Do you want your attendees to wear name tags, and if so, will you be printing out the name tags ahead of time or will attendees be writing their own names on blank tags? If the latter, have you factored in the pens or markers you’ll need to accommodate that? As you can see, planning for an event can lead you down many rabbit holes.
Use our Event Budget Template to stay organized.
Sample Marketing Budget
With your chosen template downloaded, it’s time to consider which digital channels to allot a budget for. Hint: There’s no right answer — it’ll depend the market research you do to figure out where your specific audience spends most of its time. If you find your buyer prefers learning and consuming content in the form of video, for example, you might invest more of your money in YouTube advertising.
Alright, enough explanation. Here’s a small, sample budget for a quarter’s worth of expenses by a hypothetical company that has decided to invest heavily in video marketing. This template was created using the Master Budget Template, the first template listed in the section above.
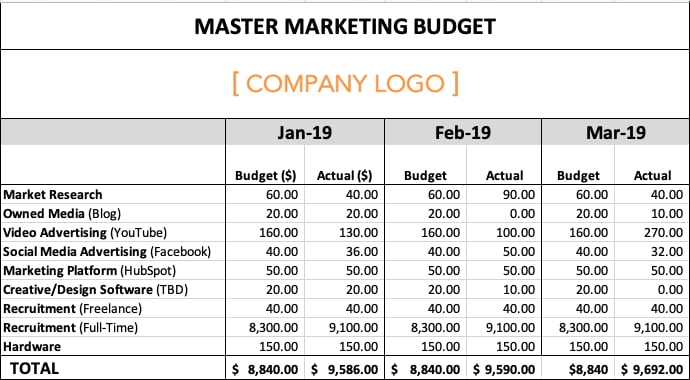
Based on the figures above, video advertising’s total expenses for the quarter exceeded budget by $20, while full-time recruitment’s total expenses exceeded budget by $2,400. This means the company is trending over budget for the first three months of the year. Why might this happen? Perhaps a pay-per-click (PPC) campaign on YouTube received more clicks by viewers than expected, and a sharp video-savvy job candidate negotiated a higher salary.
Based on the difference between this company’s planned spend and actual spend, their budget template produced the following graph: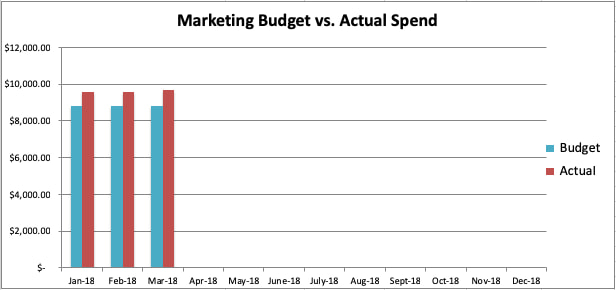
Go now, and plan wisely — your marketing staff is counting on you.


Social Media Best Practices for 2019: Insights and Research From Industry Leaders
Welcome to this week’s edition of the Social Media Marketing Talk Show, a news show for marketers who want to stay on the leading edge of social media. On this week’s Social Media Marketing Talk Show, we explore insights and research to reveal best practices for Facebook, LinkedIn, and more in 2019. Our special guest […]
The post Social Media Best Practices for 2019: Insights and Research From Industry Leaders appeared first on Social Media Marketing | Social Media Examiner.
from Social Media Marketing | Social Media Examiner http://bit.ly/2RPjt9O
via socialmediaexaminer
Form UX: How to Design a User-Friendly Form
Think about a website you frequent — what’s that site’s overall functionality like? How long do the pages take to load? Is the site navigation easy to use? Are you able to quickly find the information you’re looking for? These are all aspects of a website’s user experience (UX).
UX applies to every part of your website, including your web forms, in regards to accessibility, ease of use, and convenience. An online form with great UX is easy for your visitors to work though, simple to understand, and feels professional. When your form has all of these factors, you’re likely to see an increase in your number of conversions. That’s why getting your form’s UX right is critical for your business.
Why does form UX matter?
The point of a web form is to collect certain personal information from your visitor, whether that be an email address or their shipping and payment details. But why would a visitor want to convert and conduct any type of business with you if the form they’re being asked to list their information on is difficult to use, hard to understand, or visually unattractive? Simple answer … they wouldn’t.
There are a number of factors that go into great UX and elements to consider when trying to achieve a fantastic and memorable form design. Form UX matters because you want to leave a good (and lasting) impression on your visitors, create a positive experience for them while on your site, and convert more leads.
UX impacts your web form’s level of accessibility (which refers to how easily your forms can be completed and submitted by many types of people, of various backgrounds) and usability (which refers to how easily someone can accomplish their goal, which in this case means completing a form). Without great UX, you’ll not only have poor accessibility and usability but you’ll also lose out on conversions.
10 Form UX Guidelines and Great Examples to Follow
We’ve curated the following list of guidelines that you can apply to your forms to help you enhance their UX. Each guideline also includes an example that you can follow and learn from to help you create successful and thoughtfully-designed web forms for your own site.
1. Enable autofill and autocorrect
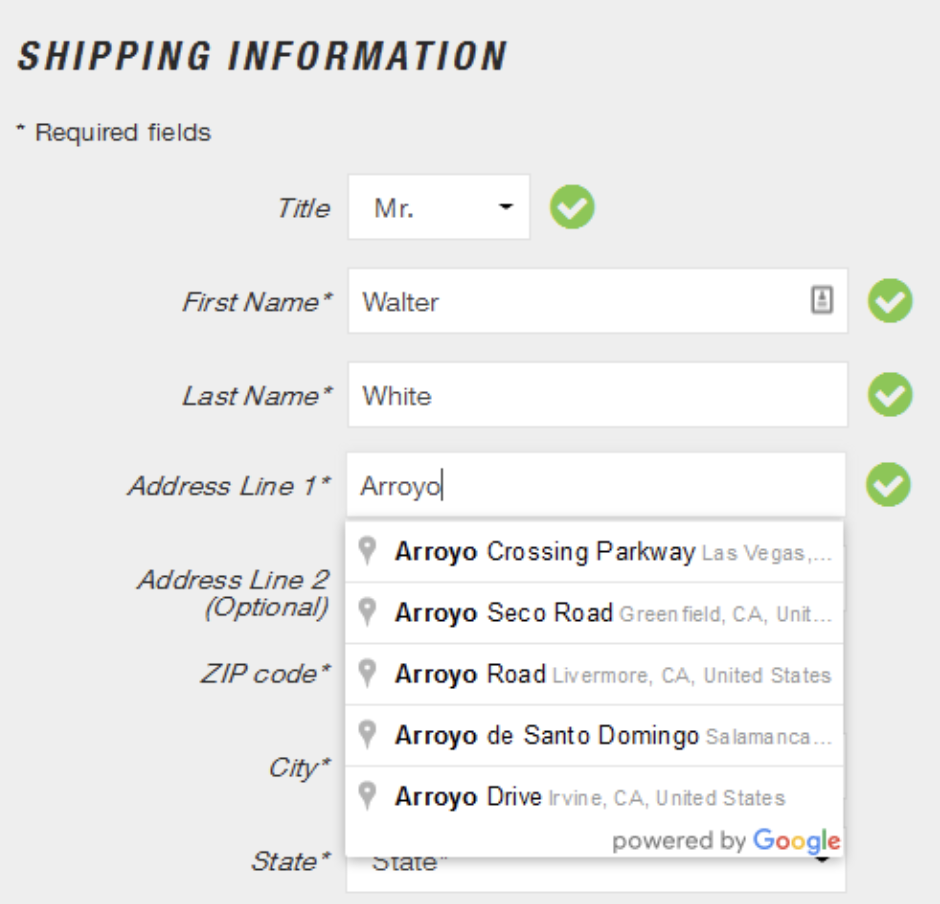
Autofill fills, or completes, form fields based on common attributes or responses, such as name and email, previously provided on the site or in the browser.
Autocorrect corrects, or rectifies, invalid responses visitors may accidentally try entering in the fields. For example, if someone were to enter the incorrect zip code in your form, the form might be able to recommend or fix that error based on someone’s given location or other information they’ve previously submitted.
Autofill and autocorrect are two features that enhance UX because they simplify the form completion process. By enabling these features, you’re not only ensuring valid information is being submitted, but you’re also saving your visitors time, streamlining the form completion process, and helping them remain as efficient and accurate as possible.
2. Exclude all fluff
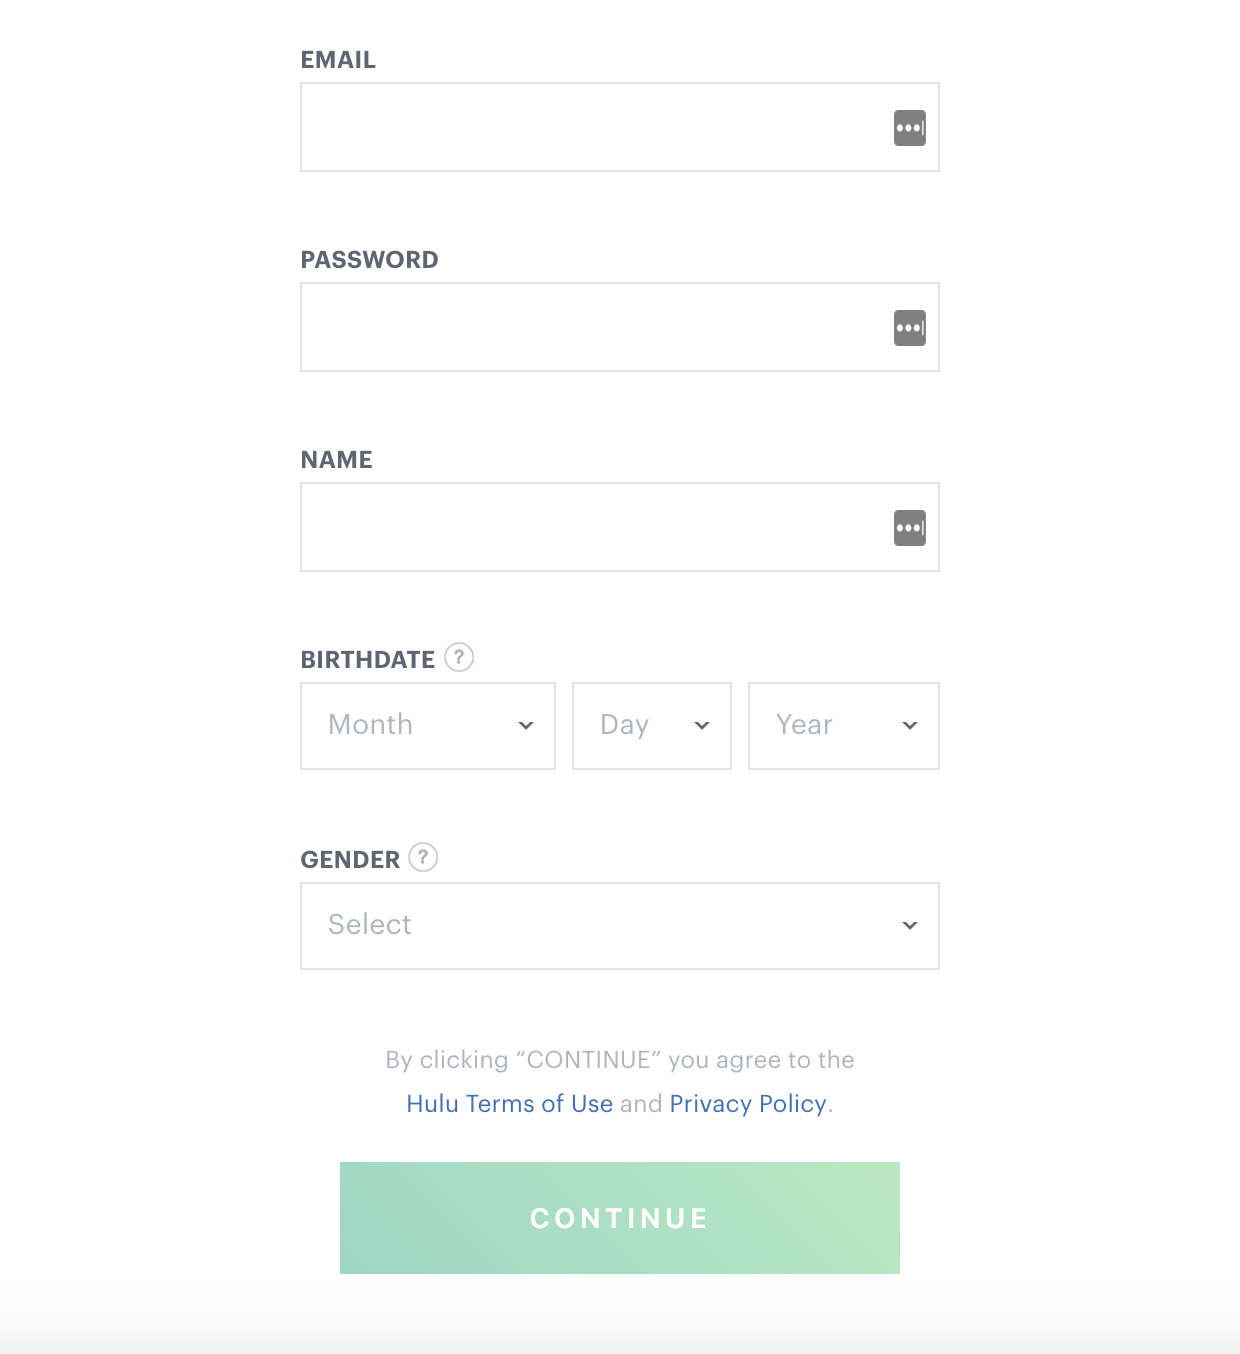
Keep your form as straightforward and easy to understand as possible by excluding all “fluff” — that is any words, images, fields, or characters that aren’t absolutely necessary. By excluding all unnecessary information, you enhance your form’s UX for a couple reasons. First, it removes any confusion for your visitors that could stem from having too much information. Second, users can submit their information with less friction, like scrolling or trying to determine what’s important.
3. Lay out the form in one column
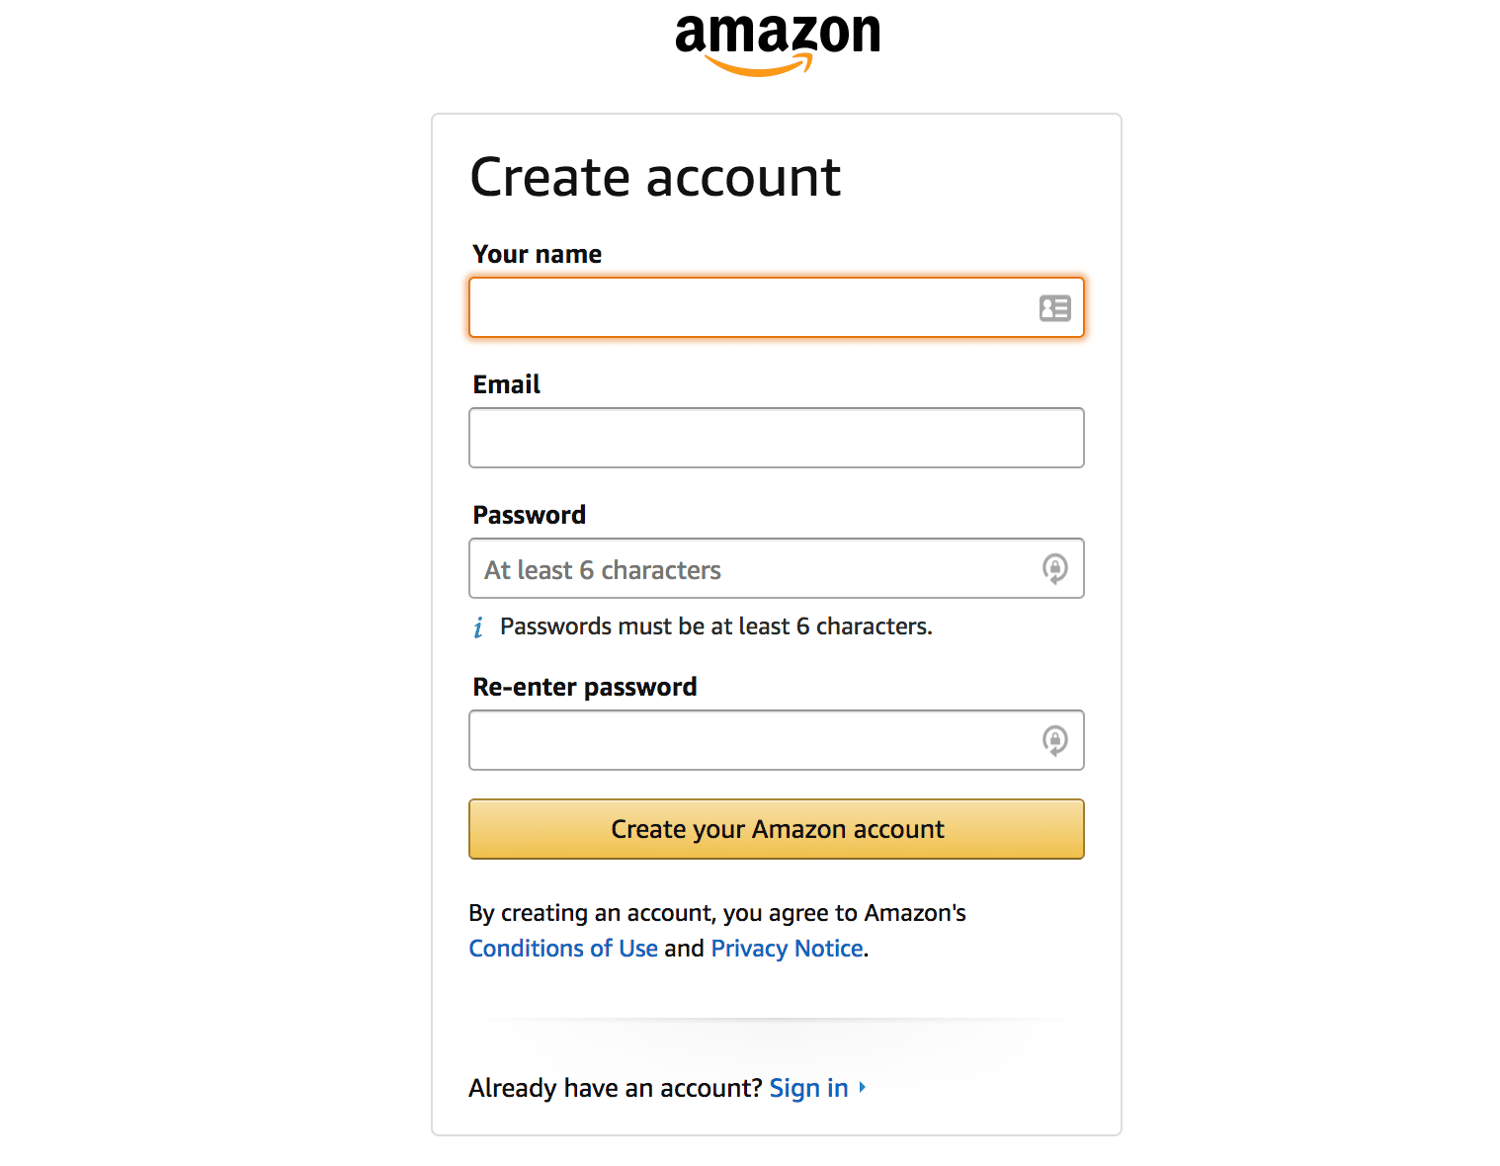
Your form field layout should be organized in a single column versus placing multiple fields in the same row or in various locations. Your visitors will easily see all necessary fields and have the ability to tab down to the next open box if they choose to work through the form that way.
A major aspect of successful UX is ease of use. By laying out all of your form fields in a single column, your visitors will be able to flow through your form naturally, with ease.
4. Don’t forget a mobile-friendly design
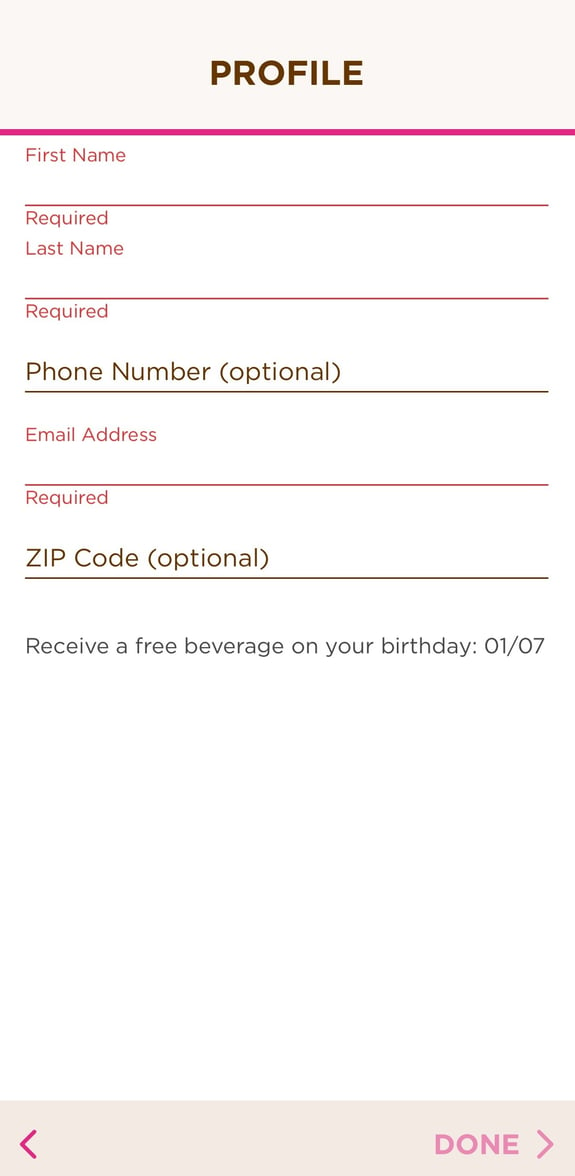
These days, it’s crucial your web forms include a mobile-friendly design due to the number of people who browse sites, sign up for new accounts, and purchase items from a smartphone or tablet. Without a mobile-friendly design, your form won’t fit or function well via one of these devices.
Great UX means a quality end-to-end experience for your visitors. That means your visitors need to have consistent, positive interactions with your website no matter the device they’re on. Without a mobile-friendly design, your forms won’t help you improve UX or boost conversions. This has the potential to be a devastating loss for your business considering how many people carry a mobile device and browse the web via that smartphone or tablet on a constant basis.
5. Provide input constraints
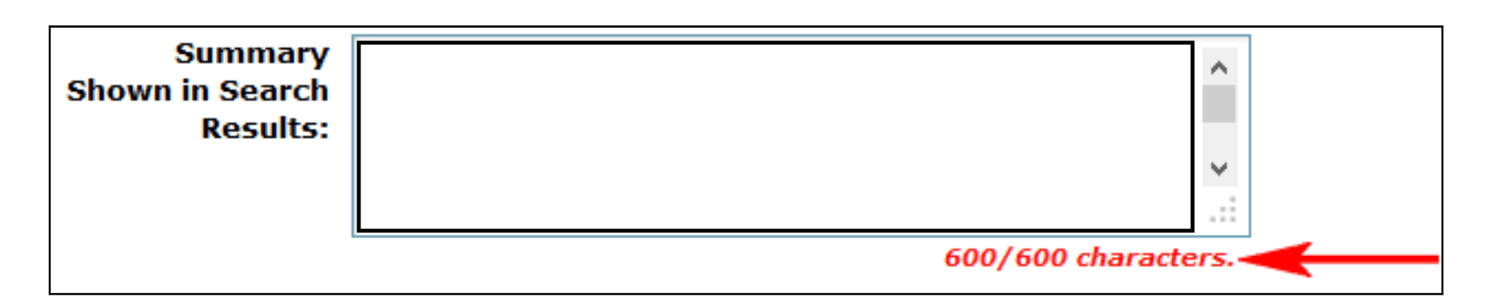
If you have a form on your site with a long-form text entry box (meaning you need a short answer or a paragraph response from your visitors), you should include input constraints. These constraints prevent visitors from writing beyond a certain word count or limit. This is a helpful feature because it provides your visitors with parameters. It also prevents you and your business from having to read through responses that are several paragraphs long.
Input constraints enhance UX because they provide visitors with guidelines that keep them efficient. They ensure your visitors know exactly what’s expected of them, how much information they need to share with you and prevent them from wasting time writing a long, unnecessary response.
6. Use multi-step forms when necessary
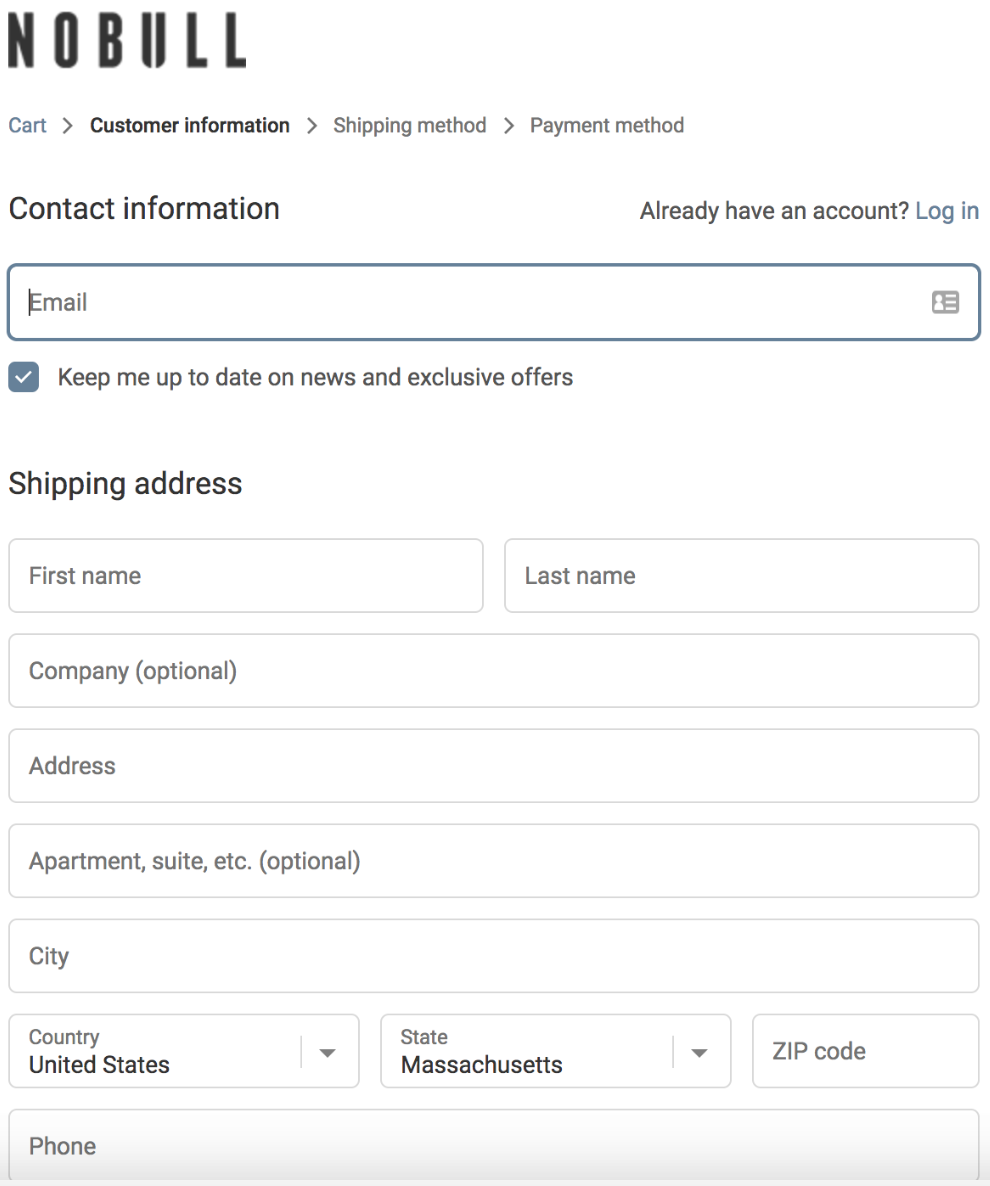
Multi-step forms are used in situations where there are multiple form fields, several of which could be split up into categories (such as “personal”, “shipping”, “billing”, and “payment review”). They improve UX because they increase a form’s usability by making it easier for a visitor to accomplish their goal (completing and submitting the form). With a multi-step form, you split your fields into several shorter forms, each on separate web pages. They help to organize your form fields and make the form appear more manageable for the user.
7. Provide clear and obvious action buttons
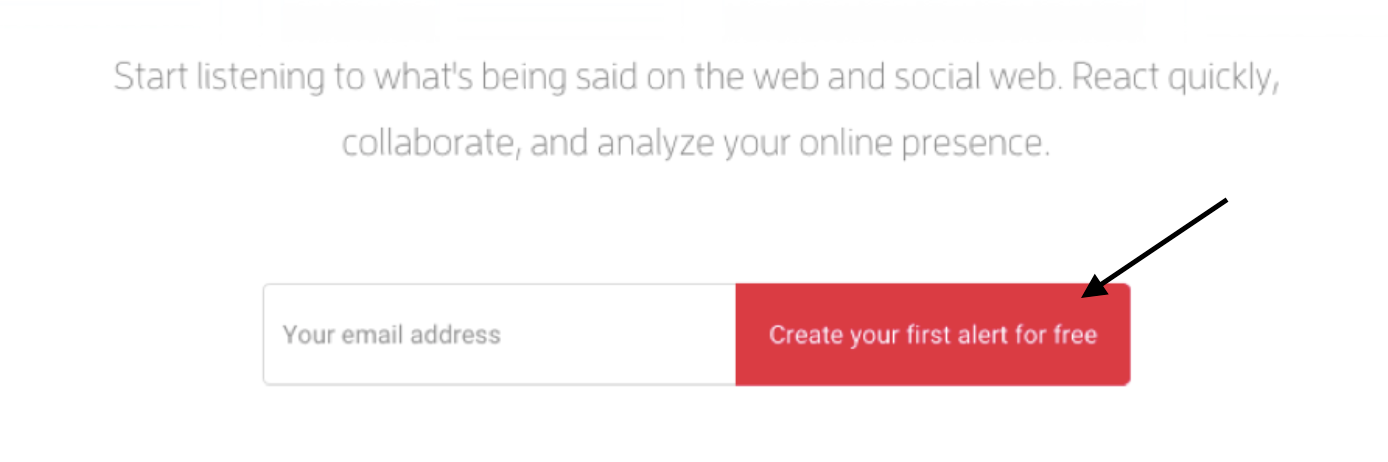
Action buttons are what your visitors click to either move onto the next part of a multi-step form or to submit it. Needless to say, they’re a critical part of your web form, and that’s why you need to make sure they’re bright, bold, and obvious.
Obvious and clear action buttons improve a form’s accessibility because they’re universally recognized as the way to submit information on a form. Also, because they’re so easy to see, you avoid confusing your visitor when they go to submit their information.
8. Create inline field labels
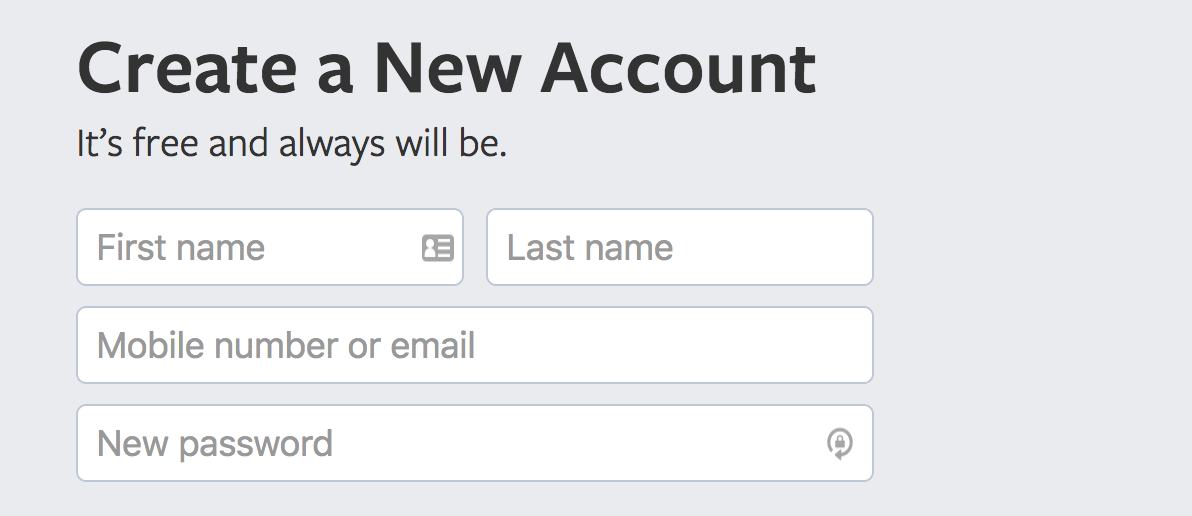
Inline form field labels are form field labels that are located inside the fields themselves. They make your form look sleek and clean. Placing your labels inline with your fields is the most thoughtful way to title your fields for your visitors — doing this improves your form’s ease of use since there’s no question about which label belongs to which field.
9. Add inline error messages
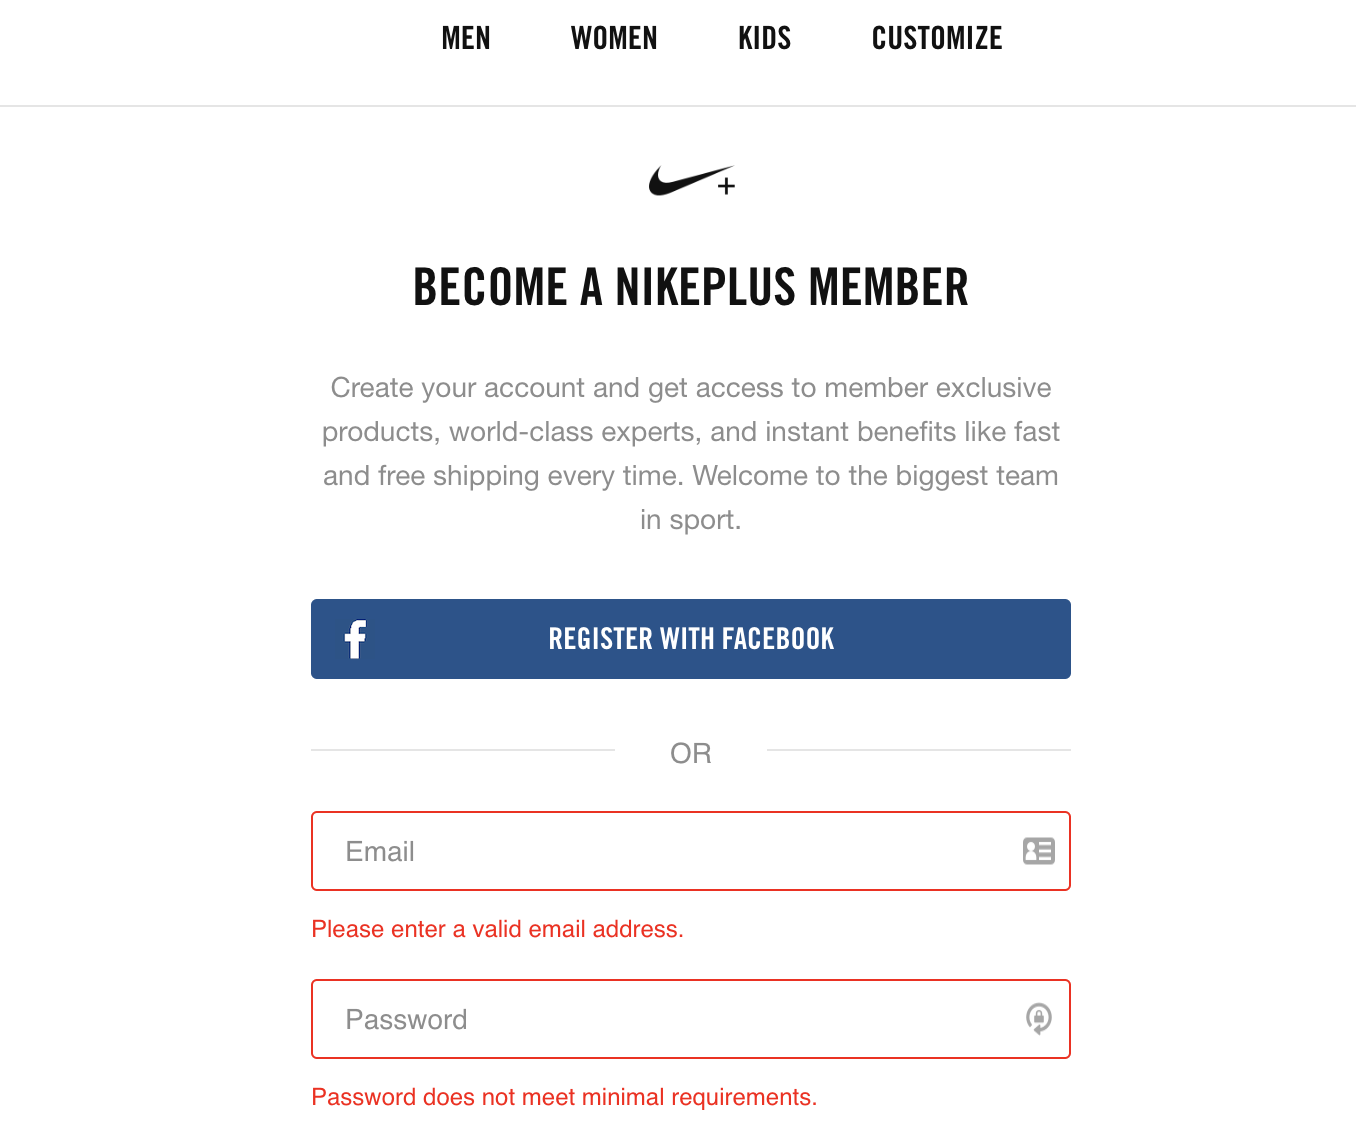
Now that you know what inline form fields are, you can probably guess what inline error messages are — they point a visitor to an error in their form by highlighting the issue in line with the field in which it’s located. These messages ensure there’s no question about which field includes the error. Some of these messages even include a short and clear statement that explains how the visitor can make the necessary correction.
Error messages improve UX by making it as easy as possible for your visitor to correct the error at hand. Inline error messages make your form and company feel professional and thoughtful.
10. Mark required vs. optional form fields
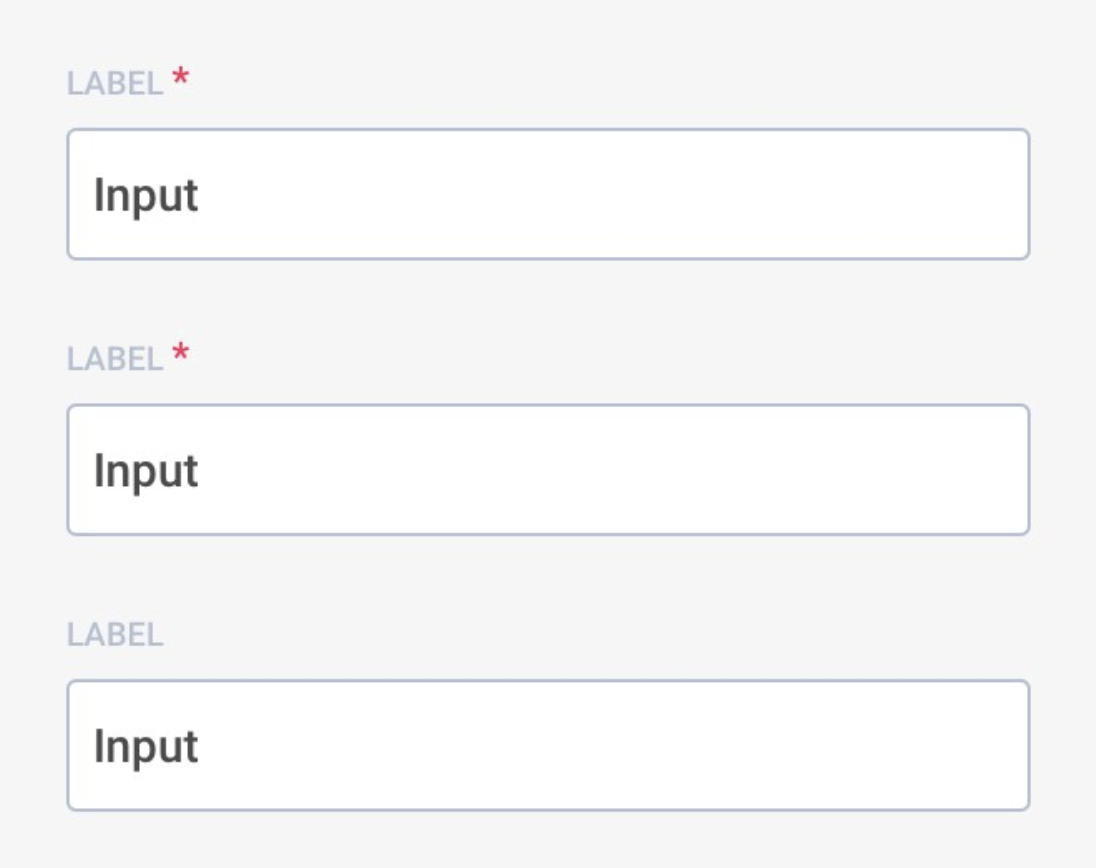
You should always mark your form fields as “required” or “optional”. You can do this by writing “required” or “optional” in a small font next to your field, or by placing an asterisk next to your required fields so there’s no question about what your visitors need to complete.
Marking your form fields as required or optional improves UX by making your form accessible to everyone — you provide your visitors with a set of expectations as they fill out your form. Not only does this ensure all of your visitors are on the same page about the information they need to submit, but it also prevents them from having to waste time submitting and re-submitting your forms to try and determine which fields are the necessary ones.
Back To You
Great UX is how you’ll ensure positive interactions between your site visitors and forms. By taking these UX guidelines and examples into account, you’ll create a great experience for your visitors that’ll keep them coming back to conduct more business with you and your company. Let these examples inspire your own UX design so you can implement the guidelines that fit best with your site, business, and needs to boost conversions and make a great, lasting impression on your visitors.

What Is a Data Breach? A 1-Minute Rundown
On the surface, it might seem like Yahoo, Marriott, and Adult Friend Finder have nothing in common. Surprisingly, though, they actually do. But, unfortunately, what they share common ground on is something no company would ever wish on their worst enemy — a data breach.
Yahoo, Marriott, and Adult Friend Finder experienced the three largest data breaches of all time, all occurring from 2013 and beyond. And between the three of them, almost 4 billion user accounts were compromised.
If you work at a smaller company, however, you might think a data breach will never affect you. Cybercriminals usually only target huge corporations when they try to steal people’s data. But that doesn’t mean data breaches aren’t a possibility at smaller companies.
In 2017, the Identity Theft Resource Center reported a record-high 1,579 data breaches, which is 44.7% more incidents than the previous record high recorded just one year before. Coupled with IBM’s discovery that the average cost of a data breach is a whopping $3.86 million, this prevalent cybercrime could not only plummet consumer trust in your brand but it could also wreak havoc on your bottom line.
Paragraph snippet for Data Breach Definition
A data breach occurs when there’s an unauthorized entry point into a corporation’s database that enables cybercriminals to access customers’ personal data, like passwords, Social Security numbers, credit card numbers, banking information, passport numbers, driver’s license numbers, and medical records. These cybercriminals use this information for fraud and identity theft purposes.
<End snippet>
There are two types of data breaches — breaches of companies that people trust to secure their personal information, like retailers and banks, and breaches of companies that obtain people’s personal information through second-party data partnerships, like credit bureaus and marketing firms.
Unfortunately, most data breaches don’t occur because cybercriminals are leveraging intricate hacking methods to infiltrate companies’ database. They occur because companies are turning a blind eye to patchable rifts in their security, like outdated software vulnerabilities, weak passwords, and malware attacks.
To avoid turning into the next Yahoo, Marriott, or Adult Friend Finder, it’s crucial you prioritize security at your company by focusing efforts on data protection, and giving your security team the resources needed to shield your customers’ and company’s data from malicious cybercriminals at all times.

The Super-Simple Way to Create Your Own Google Forms Templates
Whether you need to collect employees’ take-out orders for a team dinner or create a feedback form for customers, Google Forms is undoubtedly one of the most useful free tools at your disposal.
Google Forms provides 17 pre-made templates, varying in subject from “Party Invite” to “Time Off Request”. However, if you’ve never made a Google Form before, the process can seem complicated.
To ensure you know about all the nifty features on a Google Form and have the knowledge necessary to create your own Google Form in minutes, take a look at our quick tutorial.

How to Create Your Own Google Form
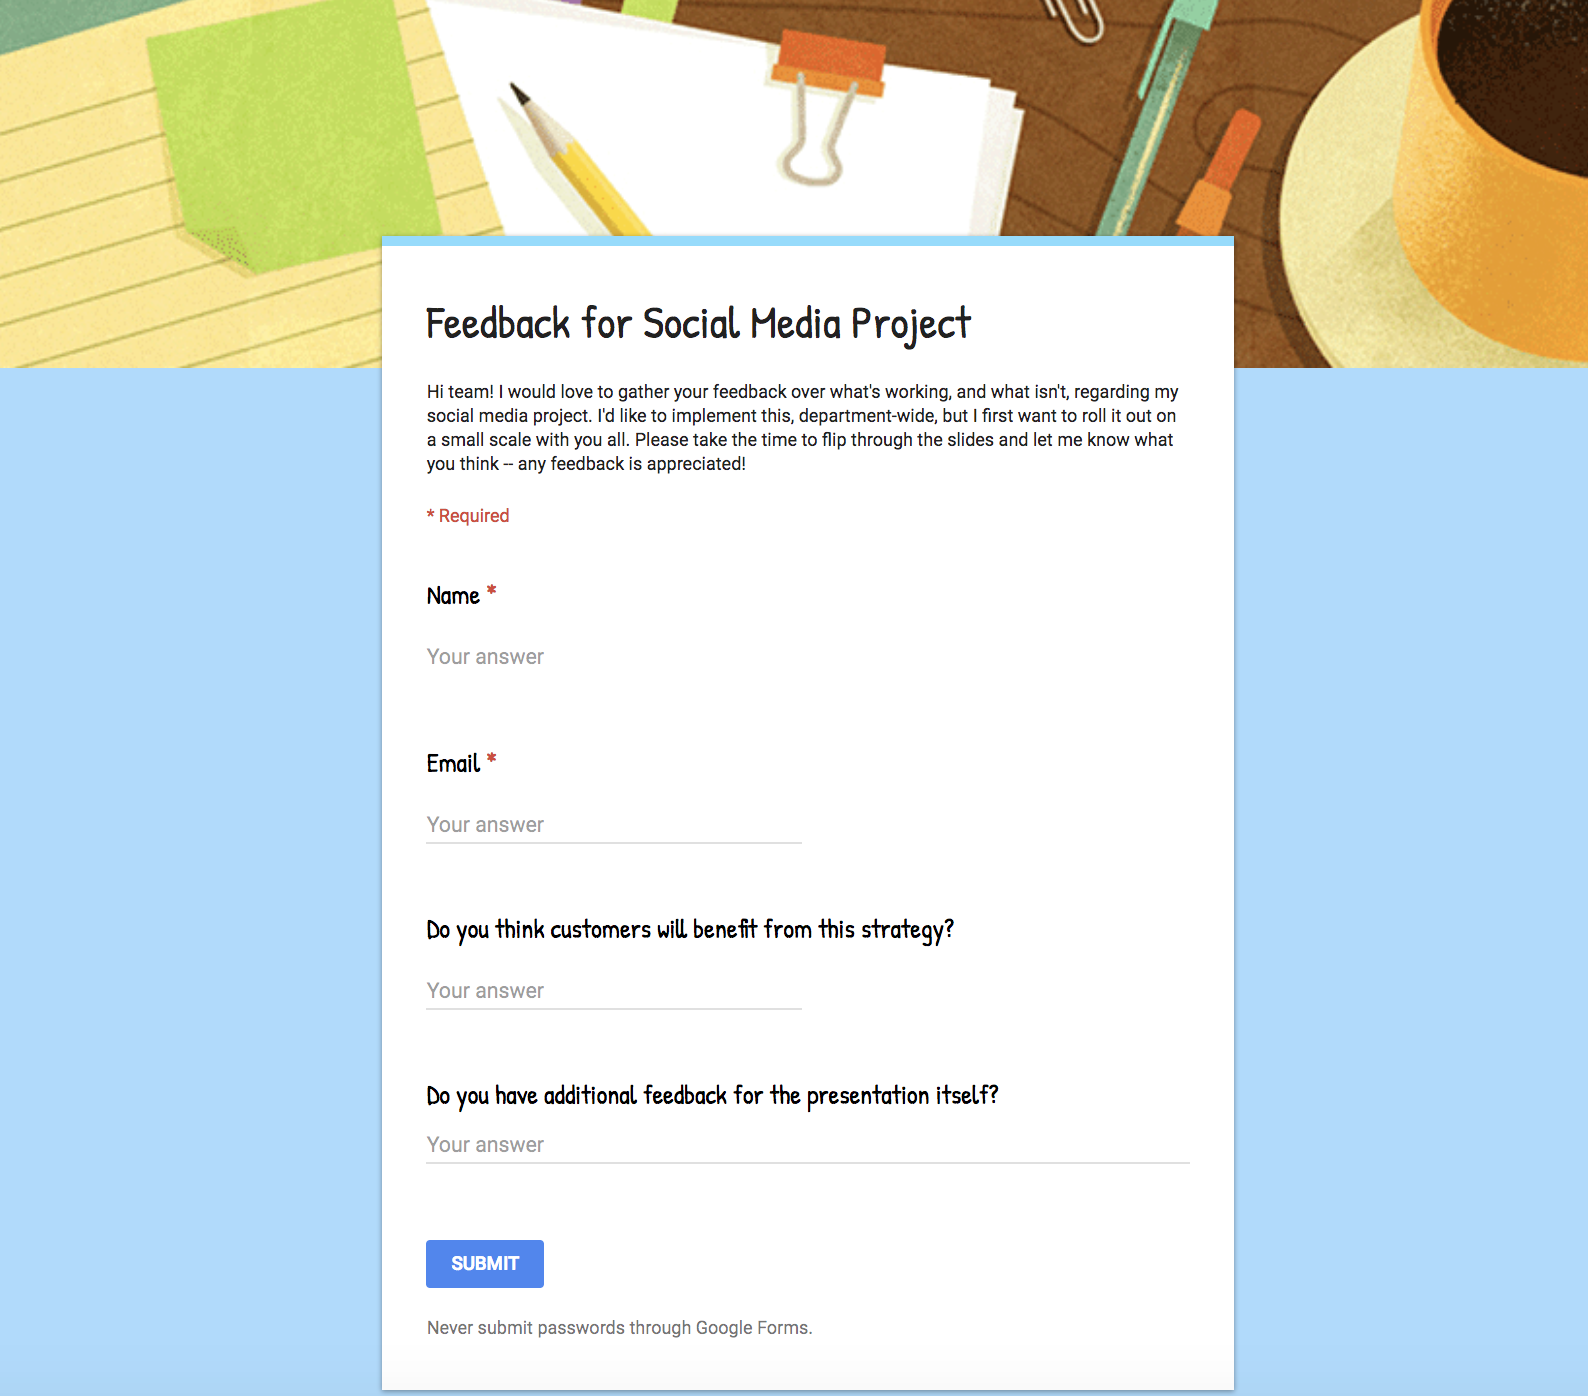
Let’s say you’re in charge of a new social media project and want your team’s feedback on it.
To create a form for collecting feedback (although you can follow these steps to create a form for almost anything), go to Google Forms and click “Template Gallery” to see the full display.
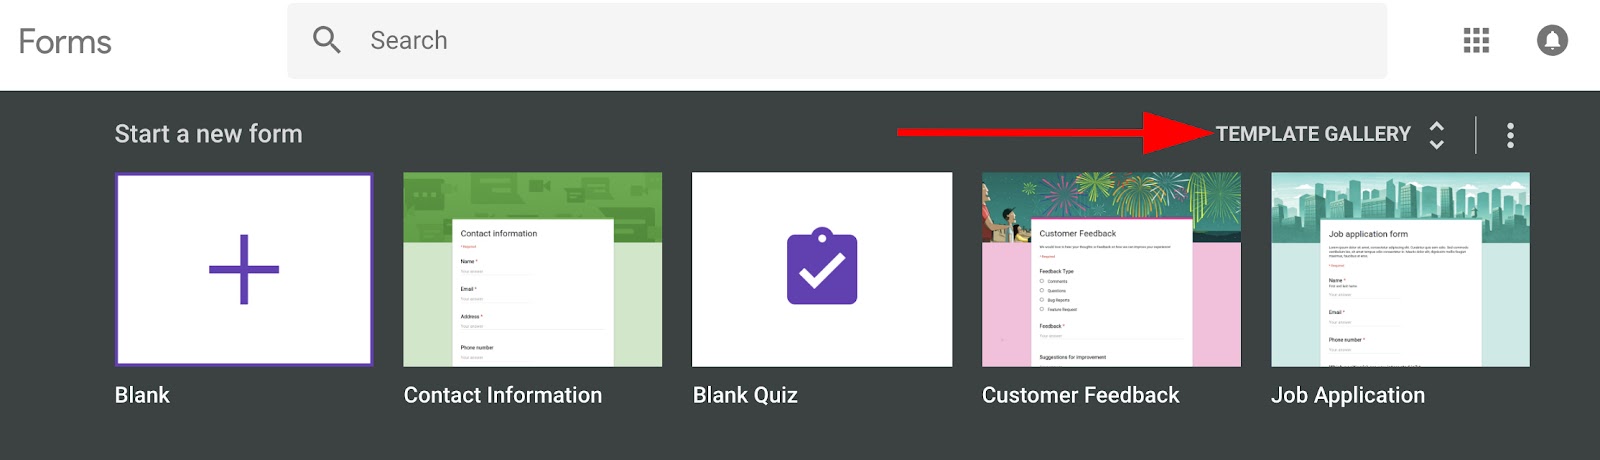
For our purposes, I chose the “Contact Information” template, under the “Personal” category.
Once you choose a template, follow these steps:
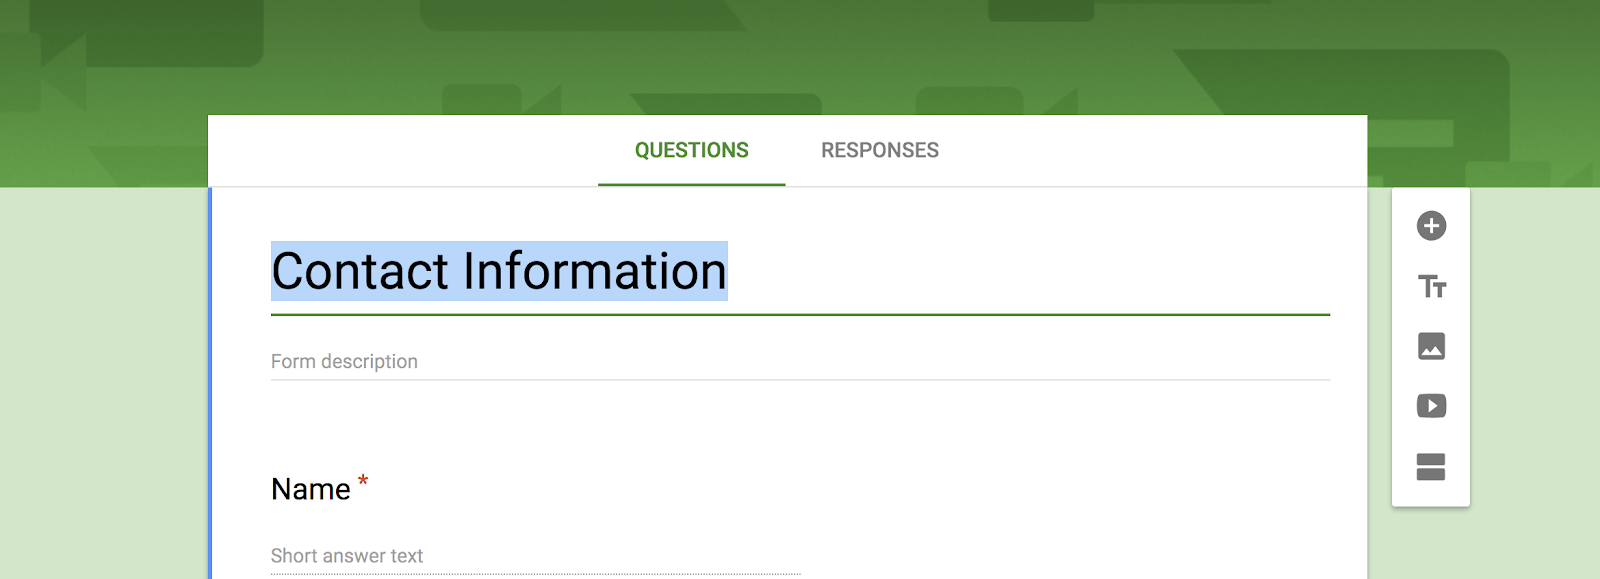
1. Rename your form by clicking “Contact Information” and typing your desired title. Additionally, you have the option to input text in the “Form description” space — this is a good section to include a description of what you’re hoping to get out of this form, and why you’re requiring recipients to fill it out in the first place.
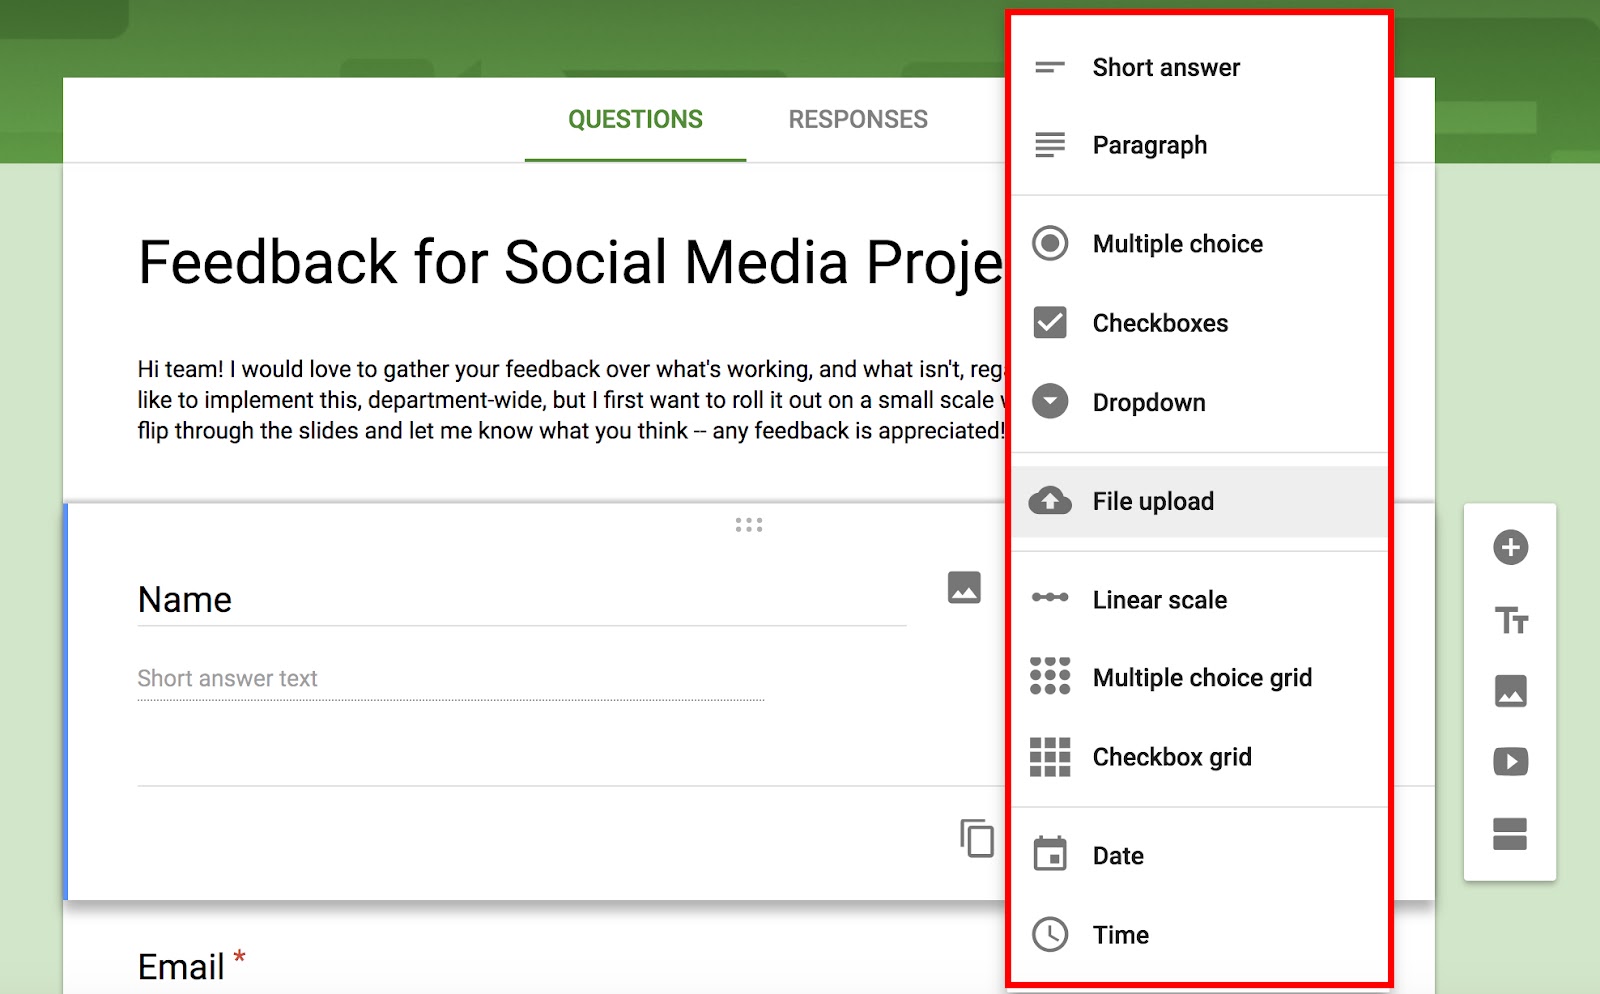
2. There are different features incorporated into each module, or section of the form. For instance, you can click the scroll-down bar on the top right to choose how you want to style each module — including short or long answer, multiple choice, grid, or file upload.
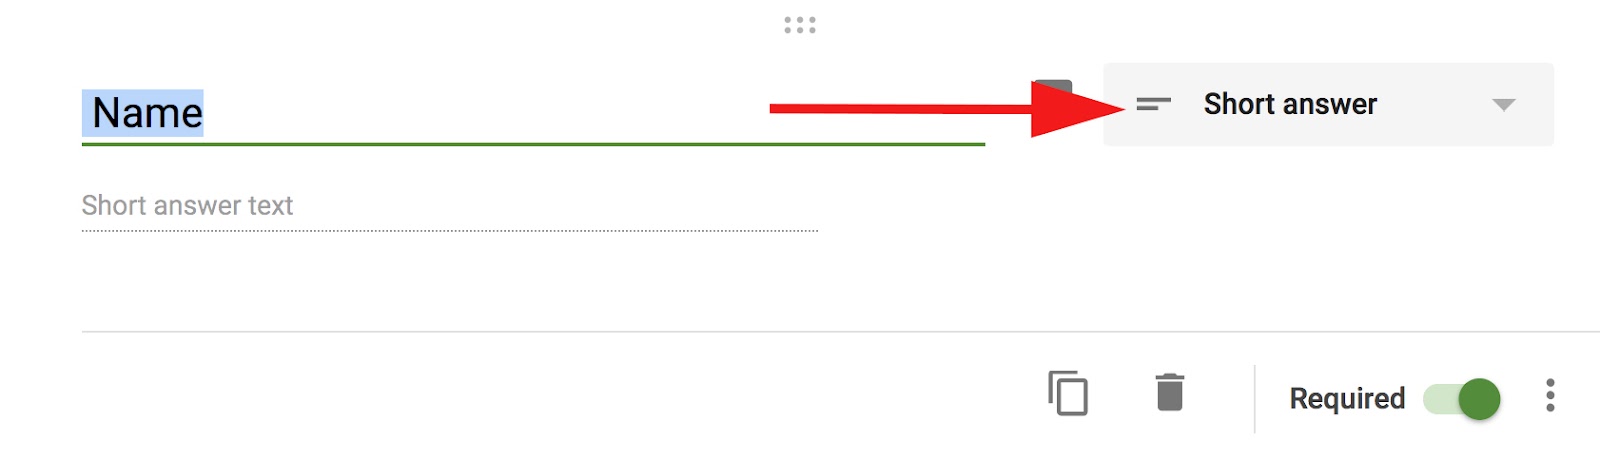
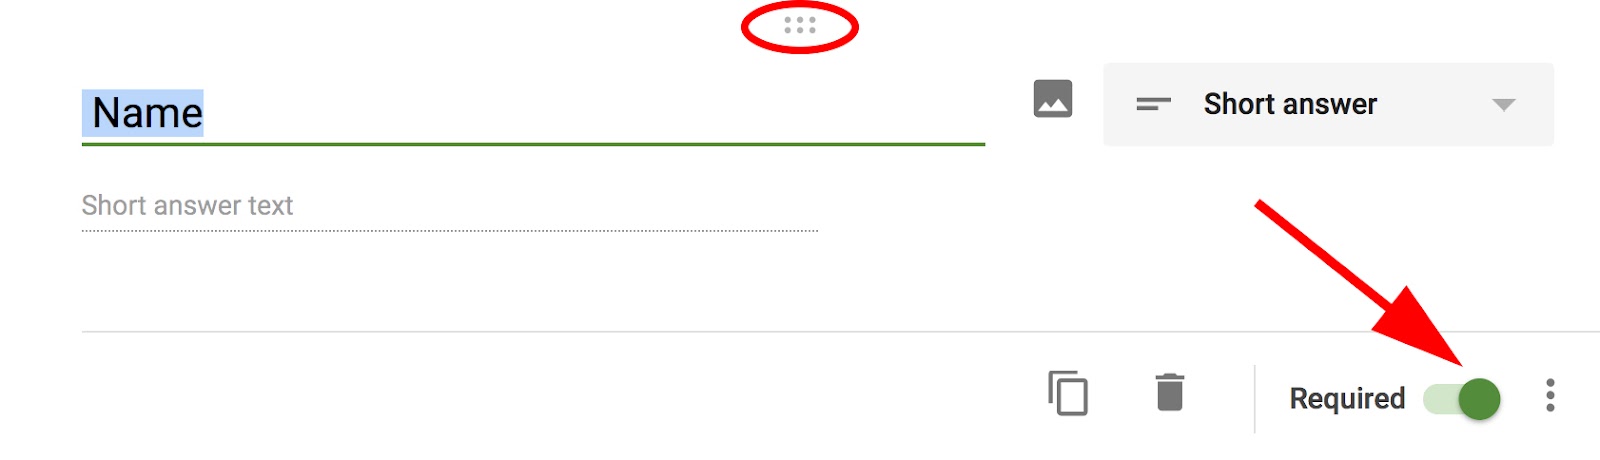
3. Additionally, there’s an icon at the top of each module (six grey dots) — if you click it, you can drag the module to another area of the form.
At the bottom of the module, there’s a “Required” button, with a drag tool beside it. If the tool is dragged to the right (and green), you’re making it a requirement for form applicants to fill out this module. If you drag the circle to the left (and make it grey), it’s no longer required.
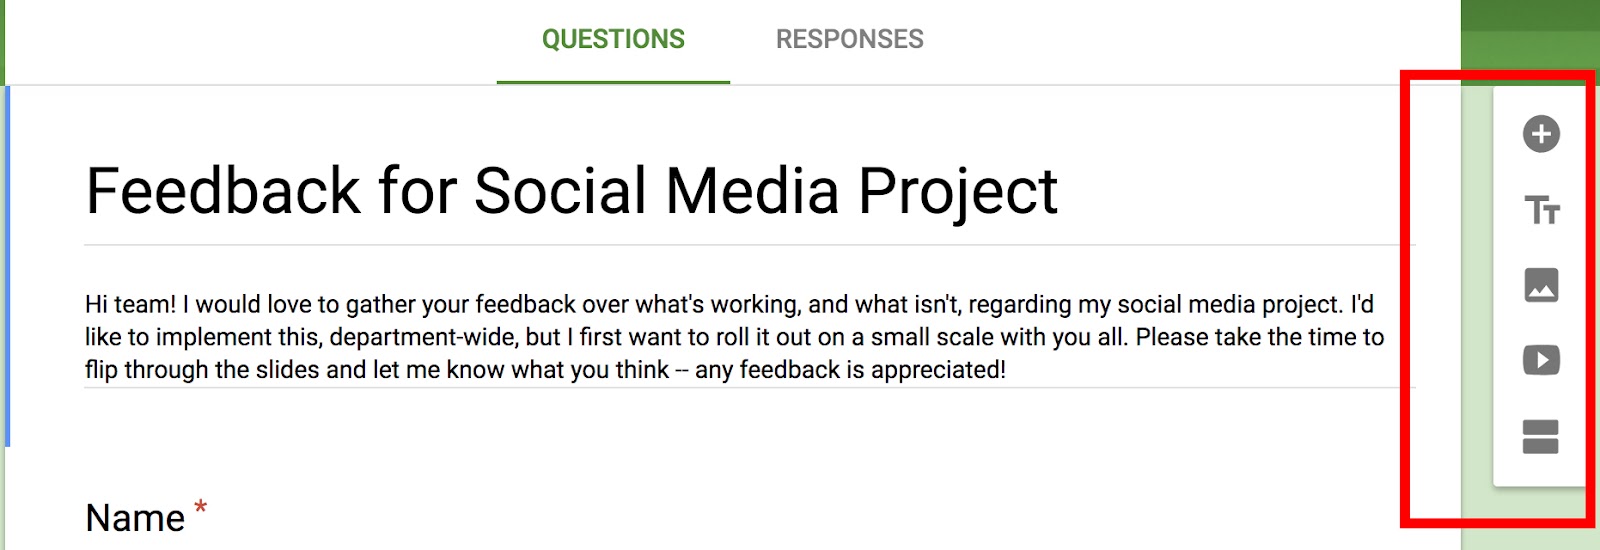
4. It’s important to note, you also have a toolbar on the right side of your screen. At the top, the “+” icon allows you to add a question. Below, the “Tt” icon lets you create another Title and description — if you have a longer form with multiple sections, you might use that tool to separate the sections.
The remaining three icons allow you to add an image, video, or section (respectively).
5. Once you’ve renamed and configured your modules on the form to ensure you’re asking all the questions you want to ask, you can work on the design of the form itself.
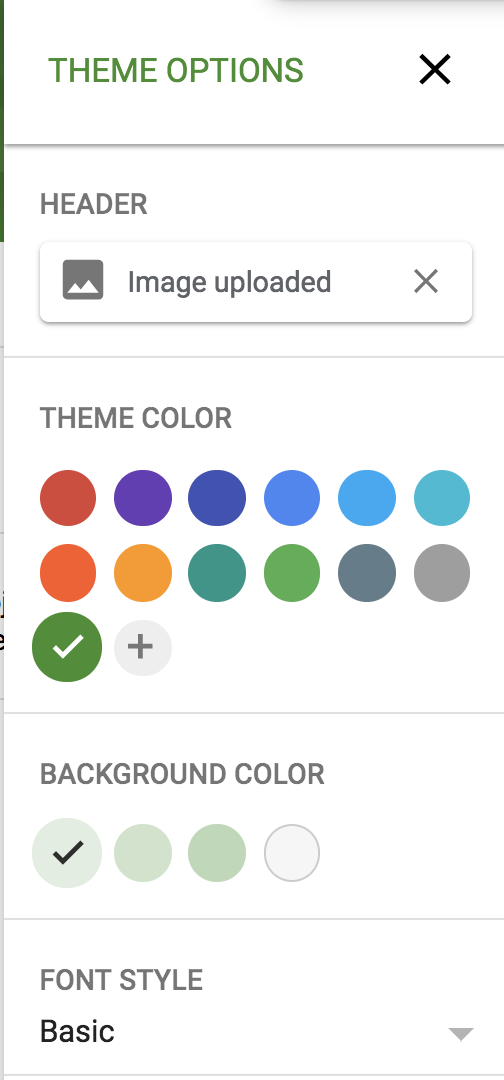
To do this, click the “Customize Theme” paint icon at the top right.

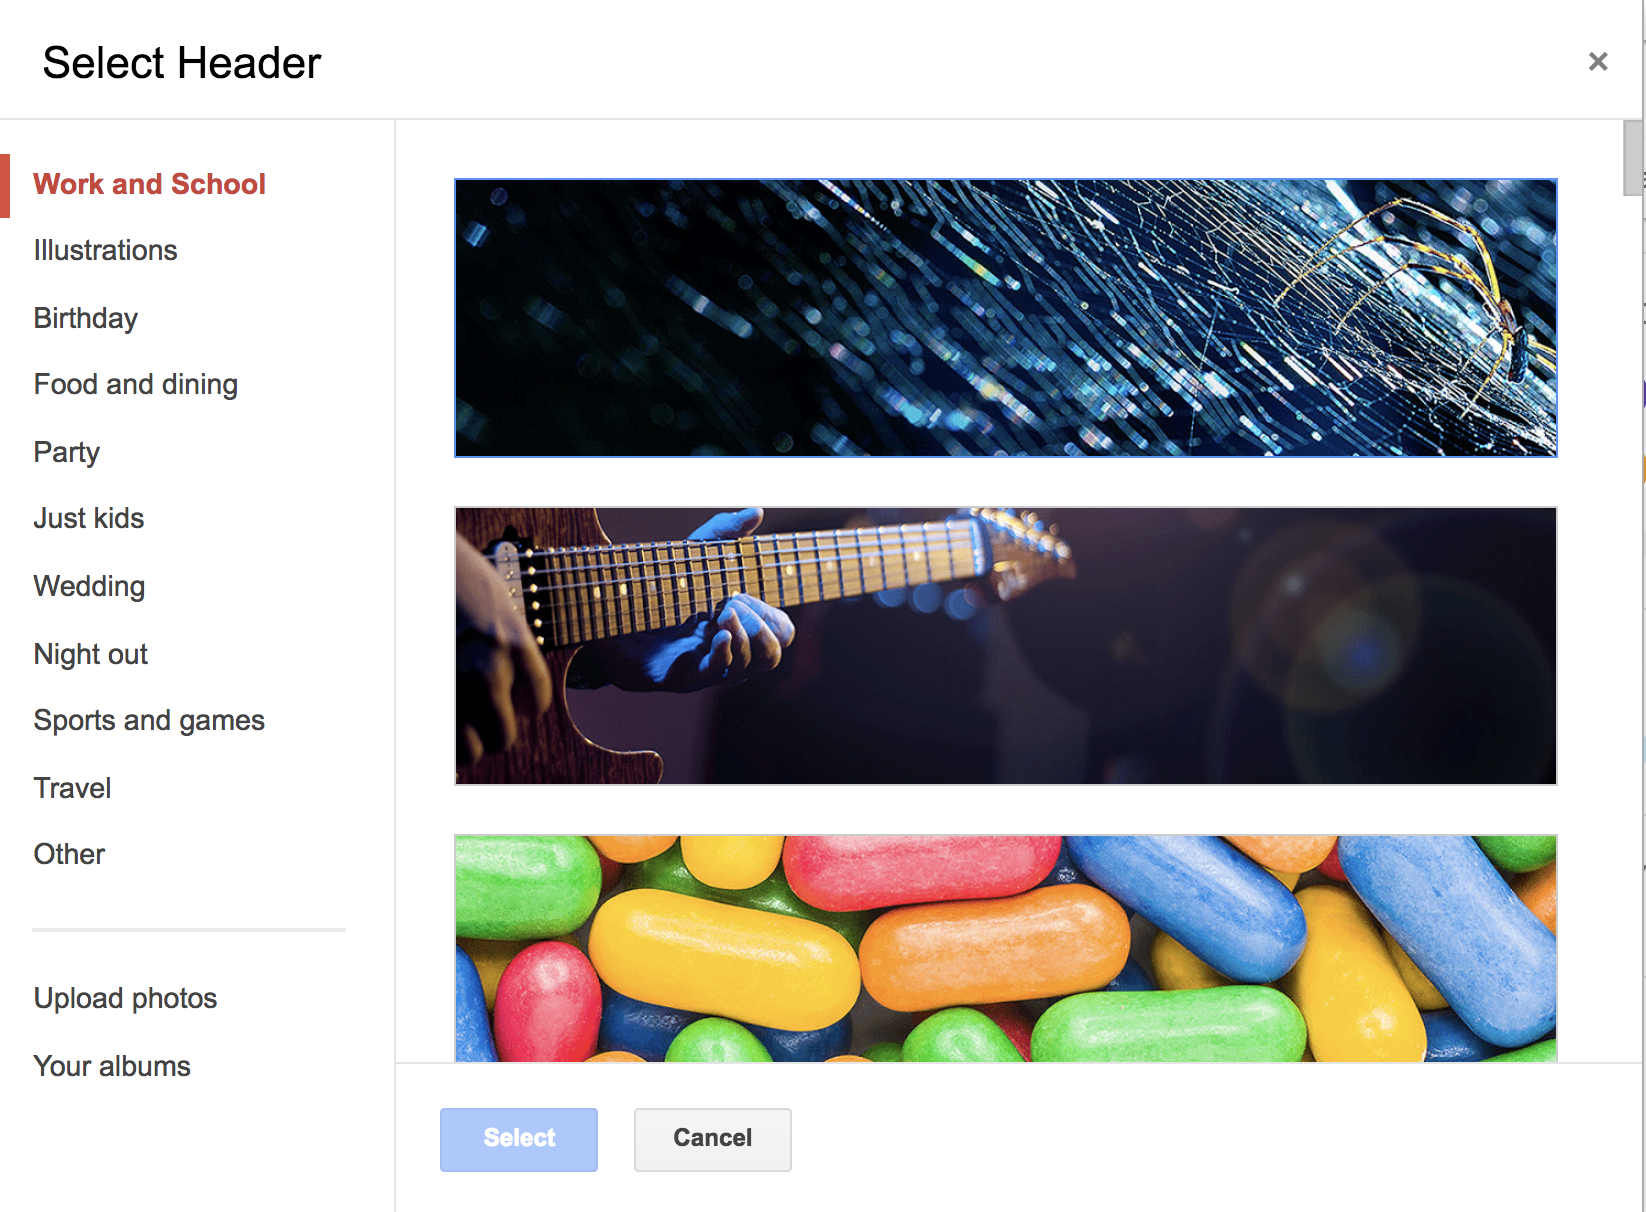
6. Here, you can change the color theme of your entire form, and add an image for the header — you can upload your own image, or use one of Google Form’s header images, found in their library. You can also change the font.
7. When you’re finished, you can “Preview” your form by clicking the eye icon in the top right.

8. When you’re happy with your form, click the “Send” button at the top right.

9. Here, you’ll want to type the email addresses to which you want to send the form. You also have the option to embed the form in the email itself (or provide a link), add collaborators, and include a message. When you’re ready, press “Send” in the bottom right.

And there you have it! In nine easy steps, you’re able to create a personalized, unique form, and send it to recipients. However, this only scratches the surface of what you’re able to do with different Google Form Templates. To learn more about Google Forms’ features, tools, and functions, take a look at our “Ultimate Guide to Google Forms“.

Narrative Storytelling: How to Weave Stories Into Your Marketing
Wondering how storytelling can help you better connect with your fans and customers? Looking for ways to tell more interesting marketing stories? To explore how to weave narrative stories into your marketing, I interview Melissa Cassera. More About This Show The Social Media Marketing podcast is designed to help busy marketers, business owners, and creators […]
The post Narrative Storytelling: How to Weave Stories Into Your Marketing appeared first on Social Media Marketing | Social Media Examiner.
from Social Media Marketing | Social Media Examiner http://bit.ly/2D3lQgV
via socialmediaexaminer
10 Cover Letter Templates to Perfect Your Next Job Application
No one seems to agree on cover letters. How much time do you need to spend perfecting them? Do hiring managers even read them? Is it better to just send in your resume and call it a day?
I’m not in HR, but I’ve been approached by applicants who wondered whether their cover letter would actually be read. My answer is one not many of them wanted to hear: “sometimes.” Sometimes it will be read. Other times, you can get away with just sending in your resume — like when you network your way into applying for a position.

The truth is, you can’t really predict on a case-by-case basis — and you’re better safe than sorry. For the most part, having a cover letter will give you an upper hand in ways your resume doesn’t. It allows you to show off your writing skills, provide details that you couldn’t fit on your resume, demonstrate your passion, and show your willingness to put in as much time and effort as possible.
Application Letter
An application letter is a written document addressed to an employer by a job applicant, explaining why they’re interested in and qualified for an open position. More commonly known as a cover letter, this document can come in the form of an email, MS Word document, or similar application template offered by the employer.
Seems fairly basic, right? Cover letters can hold different levels of importance to an employer depending on the industry you’re in and the job you’re applying for. If you do plan to write a cover letter, keep in mind there are certain qualities it should have that are not included in the definition above.
What to Include in a Cover Letter
So, what should you include? We’ll let the 10 templates below this list do most of the talking. No matter which one you download, pay attention to the following elements — all of which should shine through in the letter you send to your future manager.
Contact Information
Cover letters shouldn’t just carry your contact information, but also that of the company to which you’re applying. Contact info includes your phone number, email address, and any social media accounts you’re willing to share and receive connections to.
Home addresses aren’t required, but they can be a helpful reassurance to the employer that you already live nearby and would have no trouble coming into the office.
Avoid offering phone numbers, email addresses, or actual addresses that belong to your current employer. Using your personal Gmail address over your work email, for example, ensures your correspondence with recruiters remains separate from all of your current work communication.
A Personal Address Line
For as often as you see “to whom it may concern” at the top of cover letters today, do your best to avoid writing this exhausted line.
Address lines that specify a person or company grab your reader’s attention much more quickly, and show the employer that you’ve taken the time to tailor your application letter to them. Don’t have the name of the hiring manager? “Employers at [company name]” will do just fine.
A Hook
A “hook” is a clever introduction that “hooks” your reader into wanting to learn more. Think about yourself as a job candidate — what makes you unique? What about your career might a recruiter be intrigued by that you can package into an interesting first sentence?
Why You’re Qualified
It’s a no-brainer that you should summarize your professional experience in your cover letter. However, today’s best applications describe why this experience qualifies the applicant for the job they’re applying for. For example, don’t just state that you spent three years writing for a company blog. Explain that this type of work lends itself to managing your new potential employer’s content calendar every week.
General Knowledge of the Business
Grammatical errors could mean your application is thrown in the trash, but that’s not the only thing that could get your letter tossed aside. Using a generic “one-size-fits-all” cover letter — especially if you forget to change the name of the company — will also hurt your chances of landing an interview.
So, if you take the time to write a cover letter, take the time to comment on the business itself. Why are you applying to this company? What about their business stuck out to you as a professional?
Now, let’s take a look at an example cover letter template, what makes it effective, along with nine more cover letters you can download or draw inspiration from.
10 Free Cover Letter Templates for Your Next Job Application
Template 1: Basic

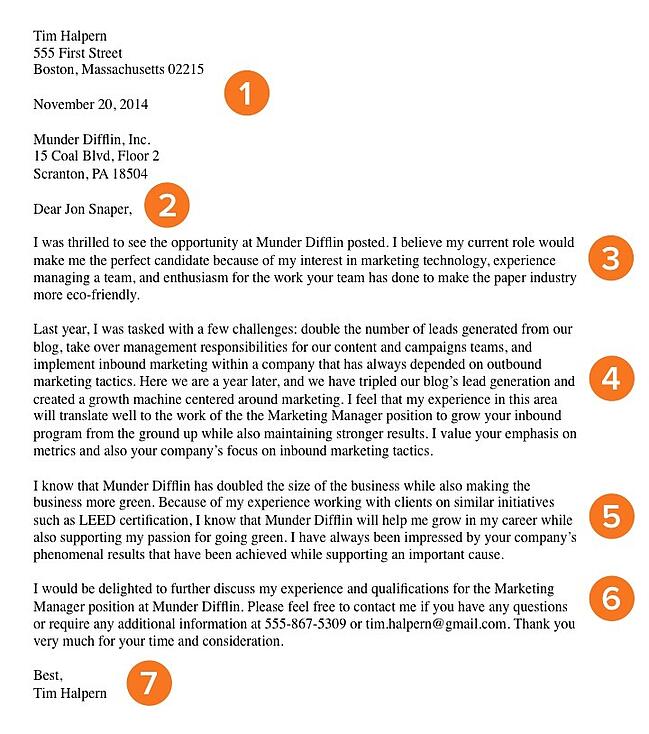
The example above is a basic (but great) cover letter. The numbered sections are explained in more detail below.
Why This Cover Letter Works
1. Header
The level of formality your header has will depend on the company to which you apply. If you’re applying to a formal business, it’s important to use a formal header to open your cover letter, like in the sample above. Put your address, the date, and the company’s address. But if you’re applying to a company that isn’t as formal, you don’t need to include yours and the company’s addresses. You can still include the date, though.
2. Greeting
Using “To Whom It May Concern” is okay, but you may want to take the time to research the name of the recruiter or hiring manager online. If you do your research and aren’t confident you found the right name, then you should definitely use the generic greeting — but if you are sure, then it shows you put in the effort to find their name and it will catch the recruiter’s eye.
If you have the recruiter’s name, do you greet them by their full name, or by their courtesy title (i.e. Mr., Ms., or Mrs.)? Similar to the header, it depends on the company’s level of formality. If you’re applying to a corporate business, you may want to consider using “Mr. Snaper” instead of “Jon Snaper.” If you’re applying to a start-up or a business with a more casual culture, you can use “Jon Snaper,” as shown in the example.
3. Introduction
Your opening paragraph should, in 1-3 sentences, state why you’re excited to apply and what makes you the perfect candidate. Get right to the point, and don’t worry about explaining where you found the posting or who you know at the company. This isn’t a place to go into detail about why you’re a great candidate — that’s for the second paragraph. Here, simply list a few key reasons in one sentence to set up the rest of your letter. Keep in mind that the recruiter may cross-reference your cover letter with your resume, so make sure the two sync up.
4. Paragraph 2: Why You’re a Great Fit for the Job
Next, sell yourself and your experience by choosing one or two concrete examples that show why you’re a great fit for the position. What did you do at a previous company that gave you relevant experience? Which projects have you worked on that would benefit the new company? How will your prior experience help this company grow? Stay humble in your explanation of credentials while still showing that you would be an asset to the team. Use this paragraph to show you’re genuinely excited and interested in the position.
5. Third Paragraph: Why the Company Is a Great Fit for You
While it’s certainly important you’re a good fit for the job, it’s also important that the company is a good fit for you. “A cover letter typically describes why you’re great for a company — but how will you benefit from getting hired?” asks Emily MacIntyre, a Team Development Manager at HubSpot. “We want to know why our company appeals to you, and how it will be a mutually beneficial working relationship.”
In the third paragraph, show you’re serious about growing and developing your career at this new company. What impresses and excites you about the company? Is there something that you feel strongly about that aligns with the company’s goals? For example, the candidate in the sample letter used this space to show his personal commitment to environmental causes aligns with the company’s green initiatives.
6. Strong Closer and Signature
Don’t get lazy in the final few sentences of your cover letter — it’s important to finish strong. Be straightforward about your interest and enthusiasm about the new position, and tell them you’re available to talk about the opportunity at any time. Be sure to include your phone number and email address. At this point, the ball is (rightly) in the recruiter’s court to decide how to follow up.
Last but certainly not least, thank them for their time and consideration. Use a formal sign-off like “Best,” “All the best,” or “Sincerely,” and finish by typing out your full name. You don’t need to sign it with a pen.
Template 2. Data-Driven Marketing Cover Letter
Get it here.
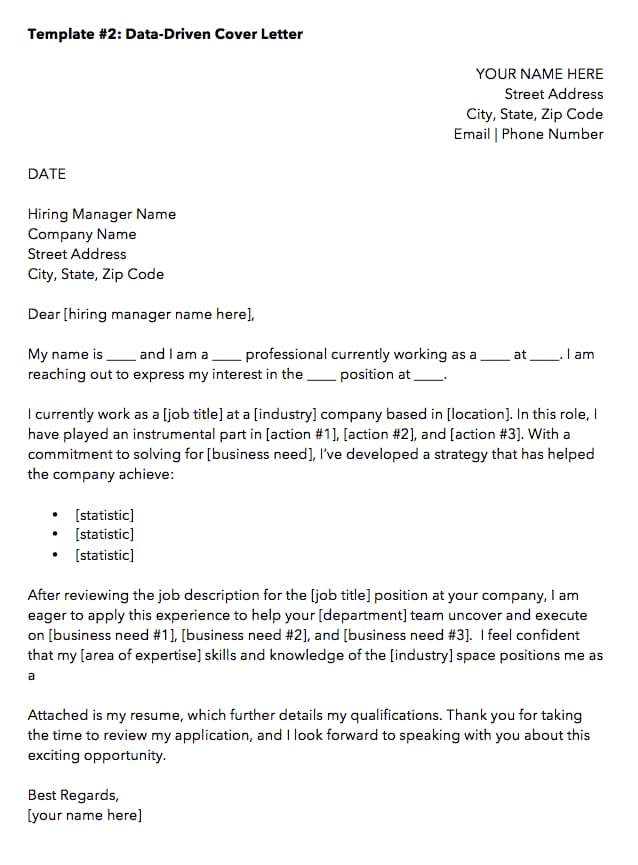
When applying to a data-driven position, it might be tempting to inject your cover letter with, well, the data to describe what you’ve done for other employers. But in an application letter — particularly for the marketing industry — how you convey this data is just as important as the data itself.
The cover letter template above, which we created here at HubSpot, can help you present the data that’s most important to you as a candidate such that it’ll matter to your future employer.
Notice the three bullet points near the center of the letter above, preceded by the statement: “… I’ve developed a strategy that has helped the company achieve …” This setup is important, because while you can add as many statistics as you want to this template, your data points should describe how your current/former business benefited from your work, rather than how you, yourself, benefited.
Template 3. Straight-to-the-Point Cover Letter
Get it here.
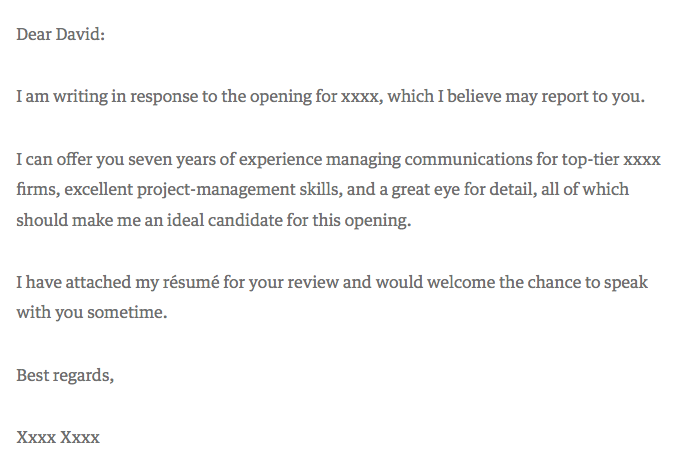
Harvard Business Review contributor David Silverman hailed the above cover letter example as “The Best Cover Letter I Ever Received.” For context, Silverman believes there are only a handful of times when writing a cover letter is actually necessary:
- When you know the name of the hiring manager.
- When you know something about what the job requires.
- When you’ve been referred to the job personally.
Under those three circumstances, a straight-to-the-point cover letter like the one above could be your best bet. Because it’s so concise, however, make a point to add your own letterhead above the message itself. It might be easy for a recruiter to sift through a short and sweet cover letter like the one above, but it’s just as easy for it to get lost in the shuffle of their application list without a unique design or format.
Template 4. Referral Cover Letter
Get it here.
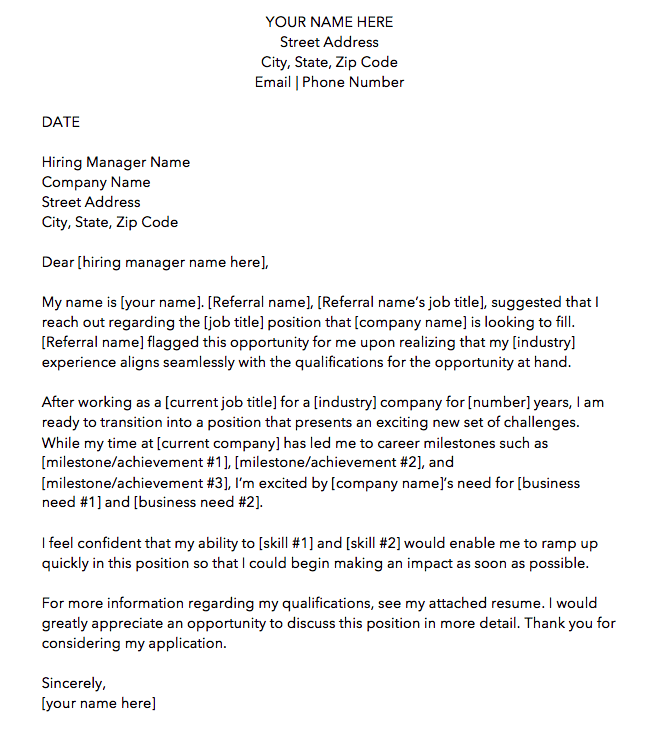
Just because a friend or colleague recommended you for a job doesn’t mean the company is all set to hire you. Therefore, the cover letter template above is written specifically for referrals. We made this one here at HubSpot. Download it here (it comes with four other cover letter templates, too).
As you can see in the picture above, the first paragraph of the cover letter is dedicated entirely to acknowledging the circumstances of your applying: You know someone who works there — no harm in that. But there might be harm in not mentioning it to the hiring manager. Telling the reader about your connection at the company shows you’re aware and confident of the actions you take to get the opportunities you’re interested it.
Ultimately, it’s better than the recruiter hearing about your employee connection from somebody else.
As for the rest of the cover letter, treat your message the same way you would if you had applied with no connection from within. Your skills and successes are no less important because of your internal referral.
Template 5. Photo Letterhead Cover Letter
Get it here.
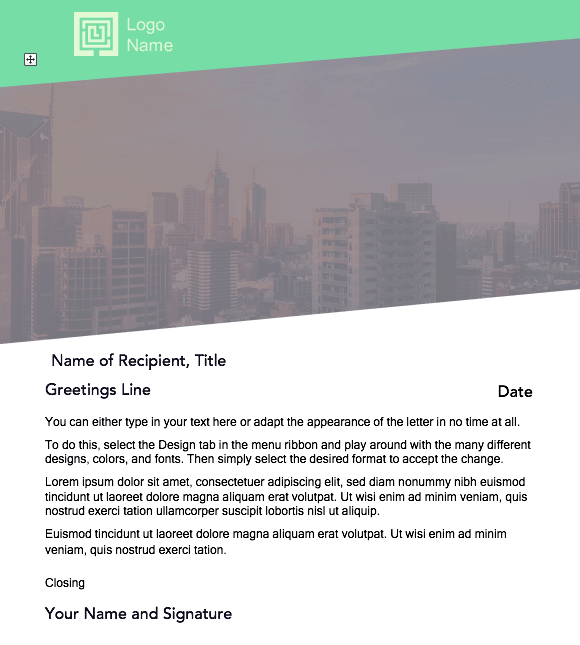
The cover letter template above was designed by Microsoft Office, and as comprehensive as it looks, it’s completely free to download and modify.
As it looks right now, this cover letter contains about half photo, half text. Feel free to shrink (and change) the image to give yourself more room to tell your story. Of course, a nice washed-out image that expresses who you are can be part of that story …
Template 6. Social Media Marketing Cover Letter
Get it here.
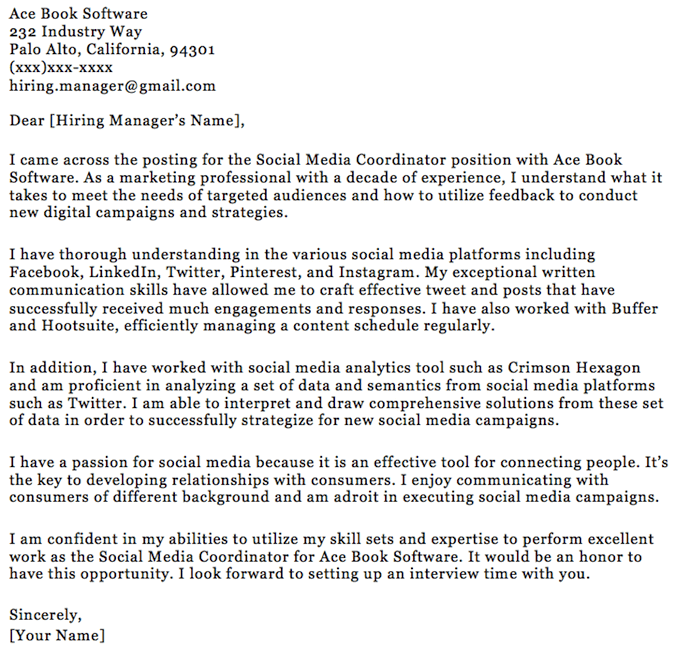
This fourth template gets even more specific within the marketing industry: It’s a cover letter just for social media professionals.
As you personalize this letter with your own experience, make note of the social networks and industry software included in this template. You’ll see that Facebook, LinkedIn, Twitter, Pinterest, and Instagram are all mentioned the letter for your reference, making it easy to write about your focus and expertise in each one.
The fourth paragraph in the above template allows you to express the value that your social media expertise delivers to the larger organization: “It’s the key to developing relationships with consumers.” Businesses use social media in diverse ways, and remarks like the one above help your potential employer imagine how you’ll benefit their marketing campaigns.
Template 7. Marketing Manager Cover Letter
Get it here.
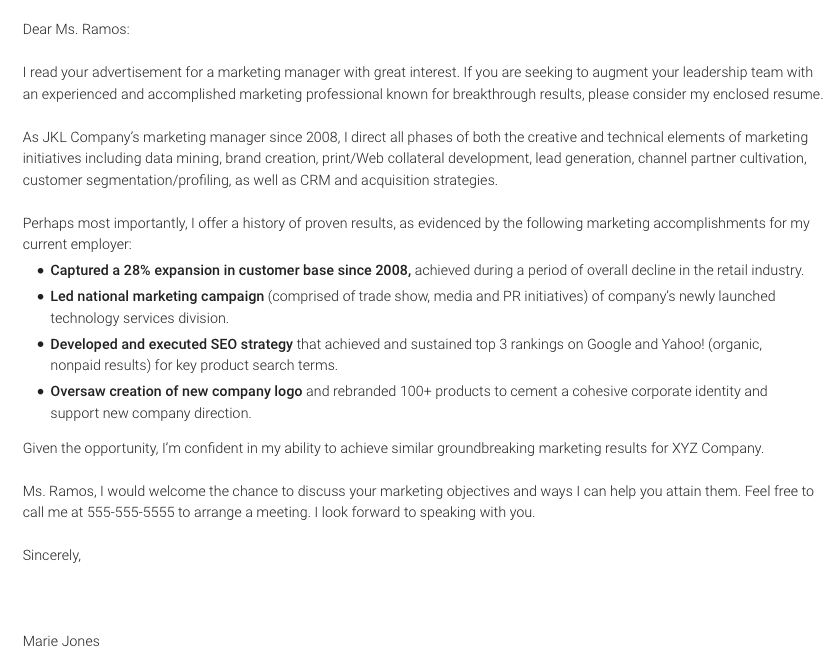
Our fourth cover letter comes from Monster.com. This cover letter, shown above, is focused specifically on a marketing role.
Notice how the writer includes references to important marketing metrics and terminology. If you’re applying to a data-driven role, you might not want to fill the page with a story of your experience in paragraph form, like Template 1 does at the beginning of this article. Instead, consider highlighting three (or four, or five) of your successes that you believe the hiring manager would resonate most with, in bulleted form.
As a marketing professional, breaking up your letter with bulleted details like the ones above shows a respect for the hiring manager’s limited time — a mentality that all marketers must understand when communicating with a brand’s audience.
Template 8: Career Day Follow-Up Cover Letter
Get it here.
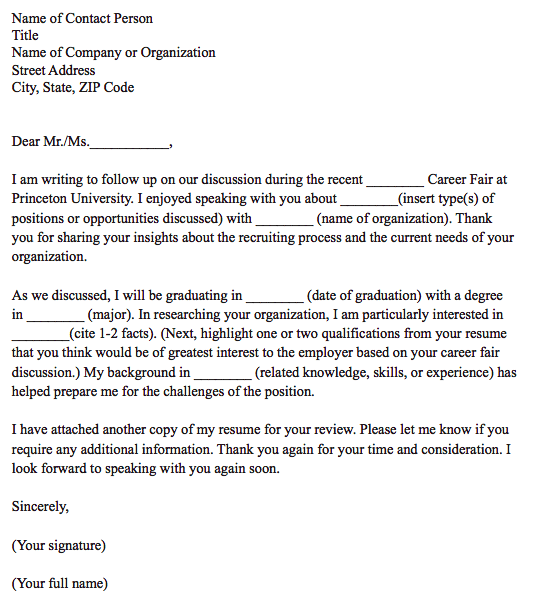
This is a unique kind of cover letter from Princeton University.
CareerBuilder, Monster, and Indeed might take the lion’s share of your job searches online, but still some employment opportunities come out of a trade show, job fair, or similar networking event. For those occurrences, you have the follow-up cover letter template above.
This cover letter has everything you need to help an employer recall a conversation you had with him/her at a career fair. As you can see in the second paragraph, the letter is particularly useful to people who are about to graduate college.
Template 9. Logo and Watermarked Cover Letter
Get it here.
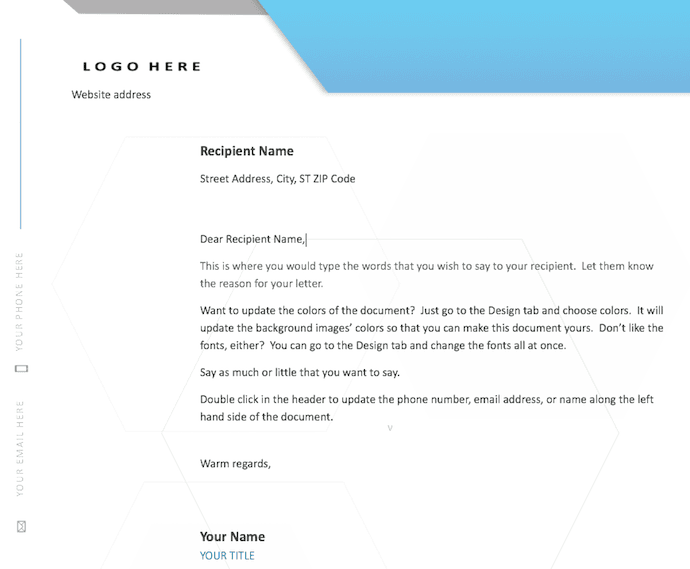
Here’s another cover letter template from Microsoft Office. This one has a light touch of color in the design just above the letterhead, but make no mistake — the template caters to any professional looking to make a good first impression on their future employer.
Don’t let the logo space on the top-right of the page confuse you. This can be the logo of the company to which you’re applying — to quickly get the attention of the recruiter — or your own logo. Perhaps you freelance on the side or simply like branding yourself. This cover letter template is meant for customization.
Template 10. Marketing Assistant Cover Letter
Get it here.
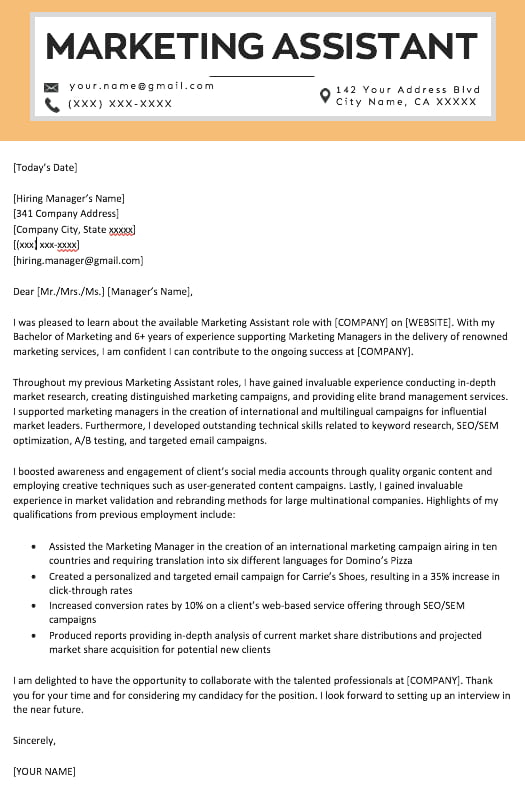 Offered by ResumeGenius, the cover letter template above is perfect for entry- and mid-level marketers who want to show a little extra professionalism in their opening note to a potential employer.
The orange header (you can change the color if you wish) can go quite well with a resume of the same style. If you don’t have enough experience to fill the entire page, don’t worry. Feel free to write to a length you think is representative of who you are and what the hiring manager wants to see.
No matter how long your final cover letter is, the above template is your opportunity to show your attention to detail — from your contact information in the top header, to the personalized address line where you can include the name of the hiring manager. Like we said, “to whom it may concern” is pretty outdated, anyway.
Writing a cover letter is easier said than done. Don’t hesitate to spend a lot of time writing and editing it. Or, ask a friend or family member to read it over and give you feedback. If the recruiter does end up reading it, you’ll be thankful you did.


We’re Hiring: Director of Marketing
Social Media Examiner is hiring a Director of Marketing! We are looking for experienced candidates who are willing to work from our home offices in Poway, California. To apply, you must have at least 7 years of experience directing a team of online marketers. Extensive knowledge of email marketing, Facebook advertising, affiliate marketing, social media […]
The post We’re Hiring: Director of Marketing appeared first on Social Media Marketing | Social Media Examiner.
from Social Media Marketing | Social Media Examiner http://bit.ly/2TEWMCc
via socialmediaexaminer
Form Layouts: 6 Best Practices and Great Examples to Follow
Have you ever tried completing a form on a website and felt confused or lost while doing so? Did the placement of the form field labels and the fields themselves not make any sense? Were the form’s title and submission button not in locations that were easy for you to spot?
These factors, among several others, are major aspects of a web form’s layout that have the potential to either enhance or diminish its user experience (UX). By implementing a successful layout, you’ll create a great experience for your visitors as well as initiate a positive — and hopefully long-lasting — relationship between them and your brand.
In this guide, we’ll review six best web form layout practices as well as examples of each practice to help you get started. But first, let’s review what web form layout actually is and why it’s so important.
Why does web form layout matter?
Almost every website has a web form of some kind. Your web form layout plays a large role in how well your form converts. That’s because a great form layout leads to seamless form completion and improves the submission process for your visitors. Visitors will easily convert since you’ve created a web form that’s hassle-free and feels both professional and thoughtful.
In contrast, a poorly planned layout will lead to a confusing and difficult-to-work-through form that may frustrate your visitors and even cause them to abandon your site entirely, diminishing your conversions.
Now that we understand why getting your web form’s layout right is so important, let’s dive into how to create an optimal layout for your web form. Below are six best practices to follow when arranging your content.
Form Layouts: 6 Best Practices and Great Examples to Follow
We’ve curated this list of best practices, to apply to virtually every type of web form. We’ve also included great examples of each practice to help you better apply the concepts to your own forms.
1. Use a single-column layout
When it comes to your layout, you should keep the location and order of all your fields as straightforward as possible. This means you should use a single-column layout. By organizing your fields this way, your visitors won’t miss a field, they’ll complete the fields in the order that makes the most sense, and they’ll be able to submit your form faster than they would if you used a multi-column form.
Great example:
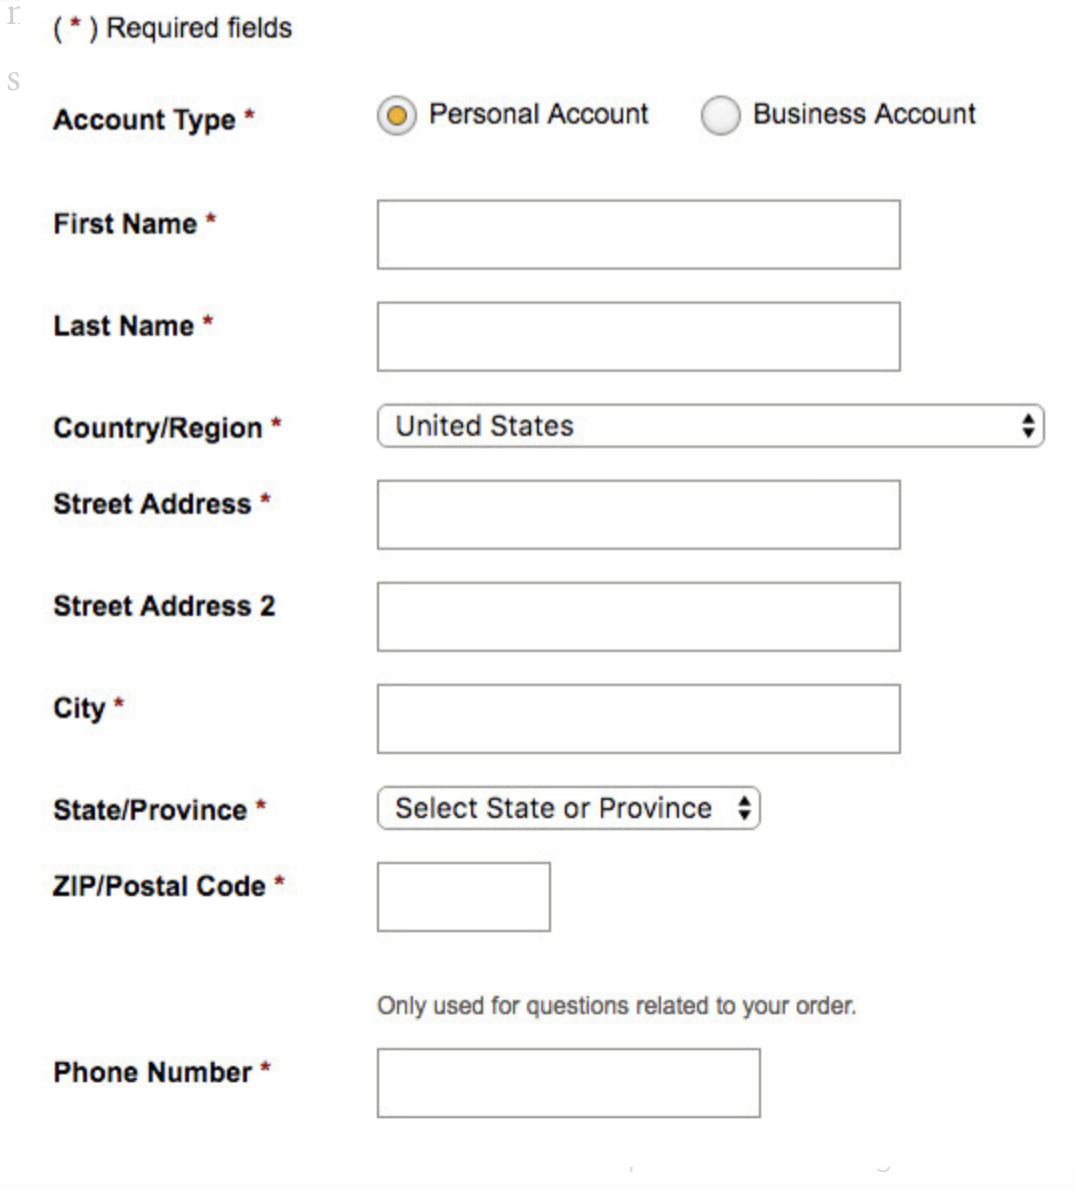
This example shows you what a single-column format should look like. The layout is just about as streamlined, straightforward, and minimalist as it could possibly be, which is exactly what you want. This way, you decrease the amount of time your visitors need to work through your form and there’s no possible cause for error or confusion.
2. Align copy to the left
Align all of your form fields to the left side of the web page. This is the most natural way to lay out your form because it’s how the vast majority of people learn to read content — by moving from right to left. If you aren’t using inline form field labels (which are located directly in the form fields themselves), you should also align your labels to the left. Again, this natural flow will help your visitors complete your form more efficiently without feeling confused about which label belongs to which field.
Great example:
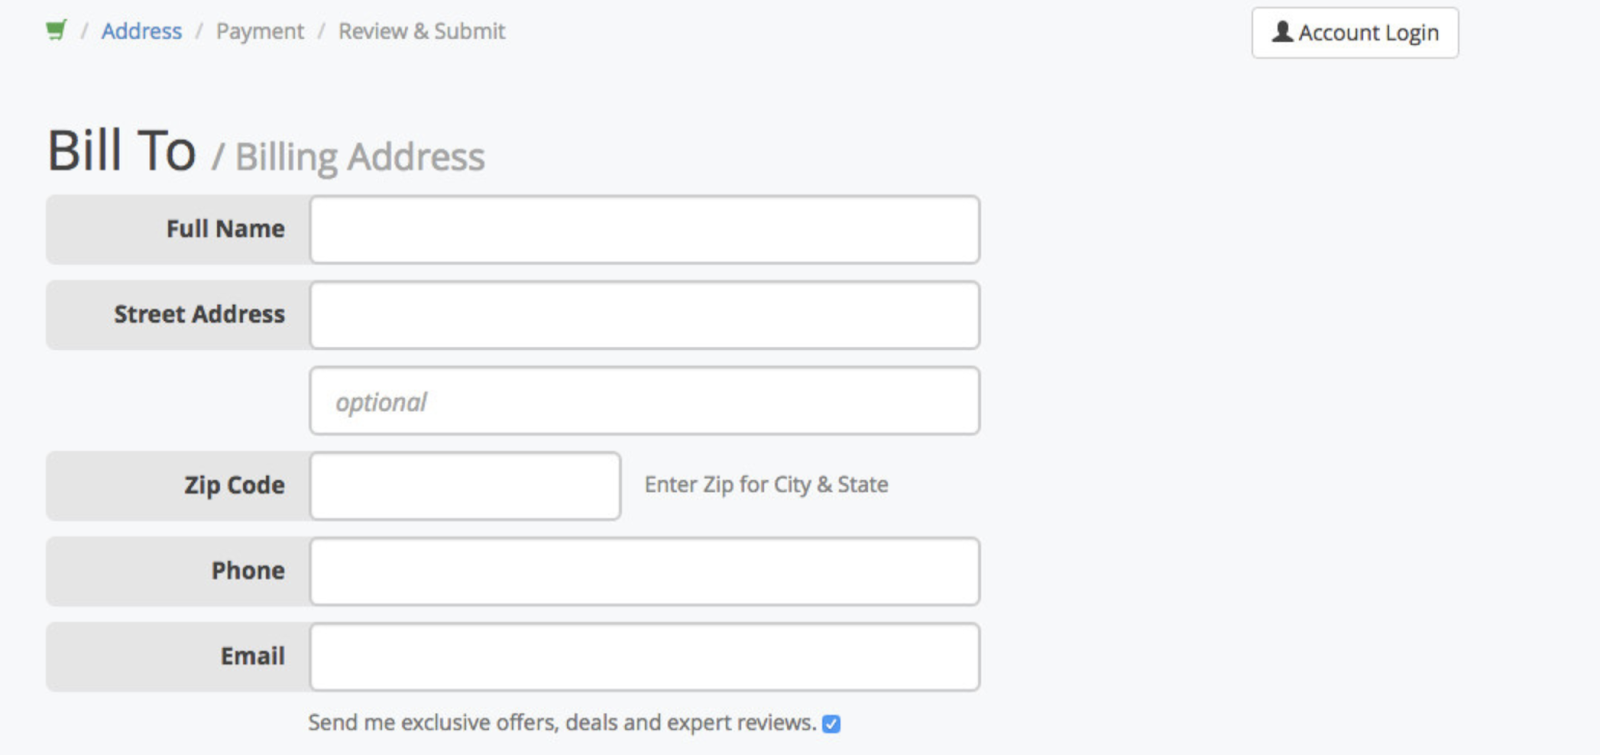
This photo depicts left side alignment for both the form’s fields and labels. The form is organized in a way that makes it clear for visitors and therefore allows for speedy completion and submission processes. There’s no question about which labels belong with which fields and working right to left through the form is both natural and hassle-free.
3. Use a one-page layout
When creating your forms, you should use a one-page layout so there’s only one form located on each page. If you have a short form, everything should easily fit on a single page, making this an easy layout to implement.
If you have a lot of form fields, you should break up them up into a multi-step form. When you do this, there will be multiple web pages with separate portions of the form, making the amount of work your visitor needs to complete appear more manageable. (If you do have a multi-step form, you can also add a progress bar at the top of the page so your visitors know how much longer they’re going to be working through it.)
Great example:
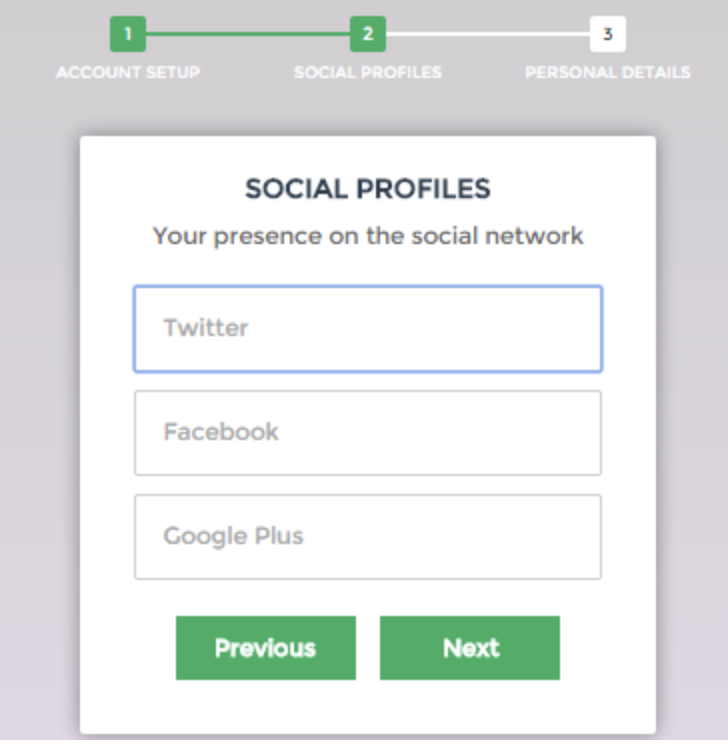
Due to the large number of form fields that visitors are required to complete, this is a multi-step form spread across three separate web pages. By organizing the form this way, reviewing and completing it doesn’t feel like it’ll be a long, tedious process.
Rather than looking at a long list of form fields that need to be completed, seeing only a few fields at a time makes the form feel less overwhelming. (The progress bar at the top of the page also helps with this, especially since it clearly labels the names of the web pages the visitor needs to work through.)
4. Create a mobile-friendly layout
These days nearly everyone carries some type of mobile device with them at all times. No matter if they’re on-the-go, traveling, commuting, or simply sitting in the comfort of their own home, it’s no secret that people are signing up for your newsletter, registering for an account, and buying your products via their smartphones and tablets. That’s why it’s critical your site includes mobile-friendly forms.
Great example:
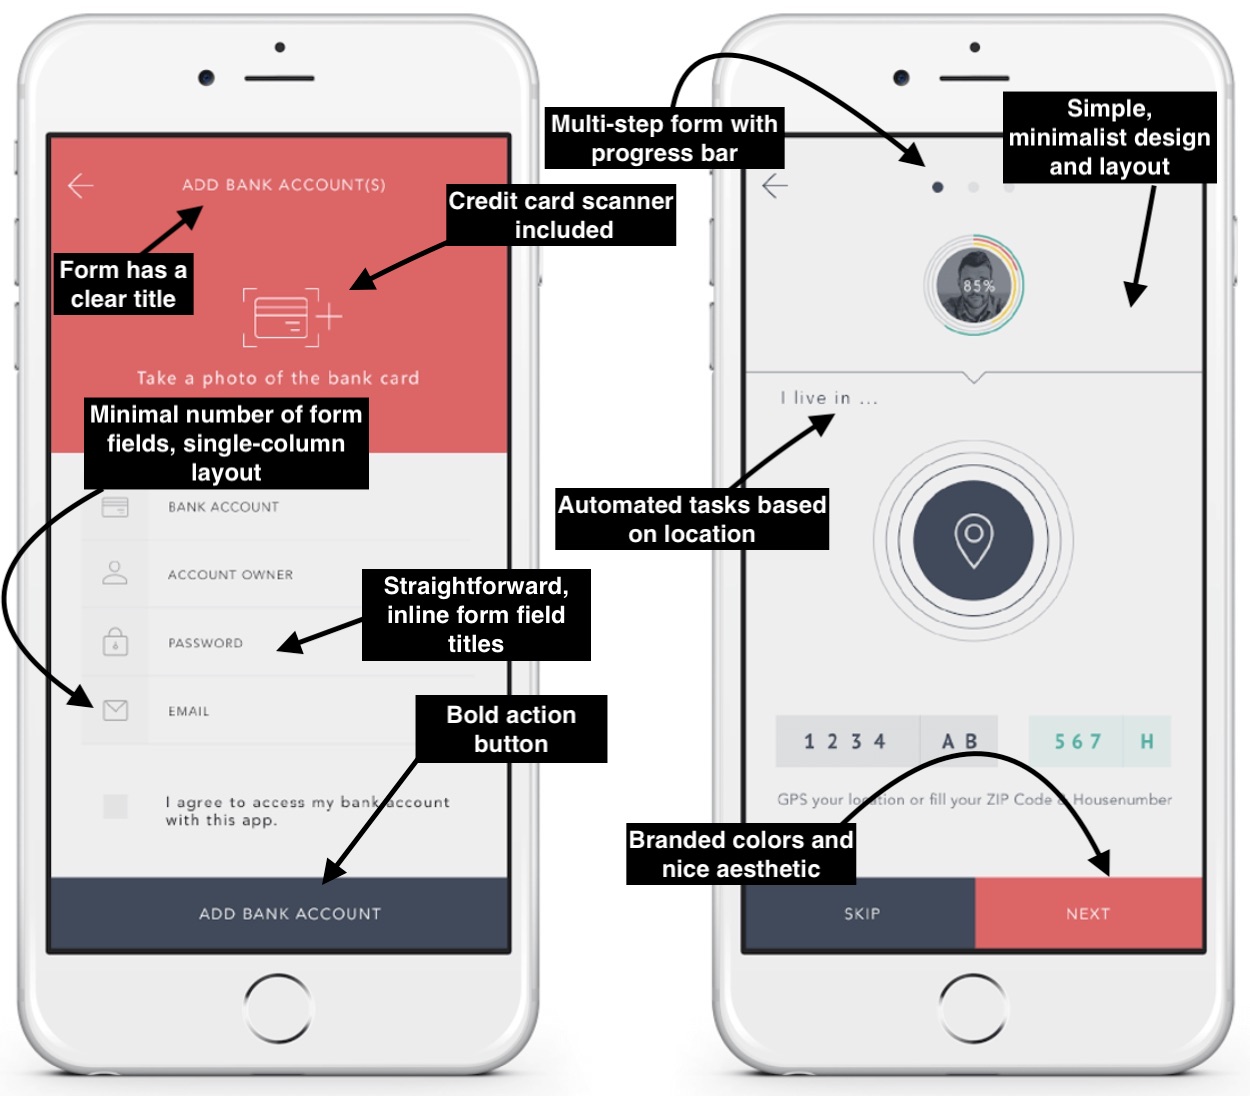
This example displays many important aspects of a successful mobile form layout. The form has a clear title at the top of the small screen, a clear and simplified option to add (or scan) credit card information so a visitor doesn’t have to type our the series of numbers on such a tiny keyboard, a straightforward, single-column, and multi-step layout, minimalist design, and more. This form is laid out in a way that allows users to easily understand and complete it via a mobile device.
5. Add inline form field labels
Inline field labels and text make it exceptionally easy for visitors to understand where they should be placing their responses in your forms. They take the guesswork out of which label belongs to which field, making it simple for visitors to move through the form without hesitation. They also keep your form looking clean, minimalist, clutter-free, and sleek.
Great example:
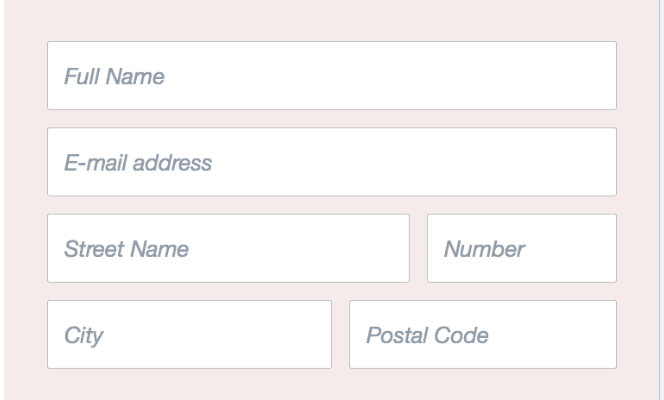
Since these field labels are inline, the form looks simplistic and shorter than it would if the labels were located outside of the entry fields. Visitors will have no issue determining where they need to input their information. Sometimes when the field labels are located above, below, or to the side of the fields, it’s hard to determine which label belongs to which field.
6. Use inline error messages
Using inline error messages in web forms is an effective way to ensure someone understands there’s an issue with a field they tried completing. They also direct that visitor to the exact location of the error so there’s no time wasted determining where the problem is.
Once you create your inline messages, be sure to add some context about why the error exists and how your visitors can correct it. This not only saves your visitors time when fixing the error(s), but it also saves you and your fellow employees from having to work through invalid responses once the form’s submitted.
Great example:
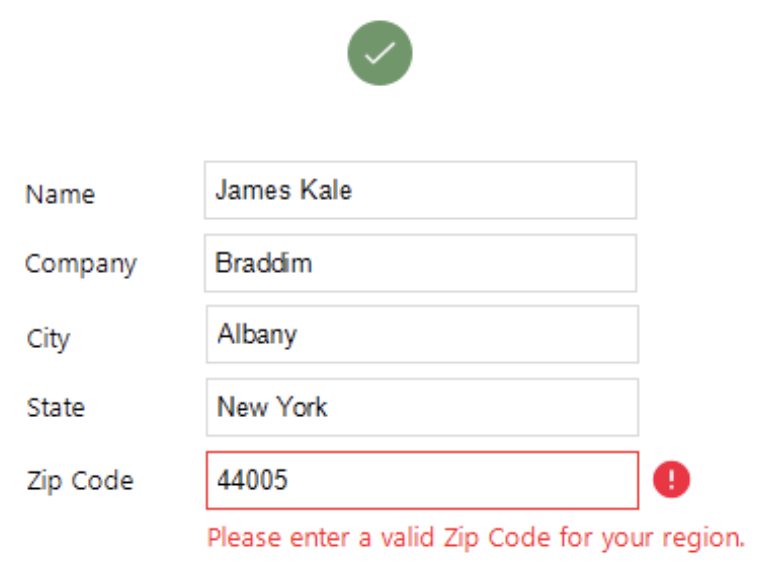
In this form, the error message appears inline, meaning the invalid field is highlighted red. The form includes an error symbol next to the field to further highlight the fact there’s an issue and where the issue is located. Lastly, the message explains why the error exists and how to fix it.
Back To You
With a successful web form layout, you’ll create a great user experience for your visitors that’ll leave a positive, lasting impression on them. Your layout should streamline the form completion and submission processes for your visitors so there isn’t any confusion or uncertainty regarding the form itself. Get started improving your form’s layout today by thinking about these practices and how you can incorporate them into your own forms to enhance UX and boost your conversions.

The Ultimate Guide to Making Your Own App
In 2018, US adults spent an average of three and a half hours on their phone every single day. What were they doing on their phones for nearly half the work day? While texting, surfing the web, and checking email are the top three mobile activities, using apps is the next on the list.
Whether it’s a social media, music, or ride hailing app, apps are specifically tailored for mobile devices, making it easier to connect, work, and stay informed. And the convenience of having access to all your loved ones and endless entertainment and information in your pocket drove more than 200 billion app downloads last year.
Needless to say, as people become more reliant on their mobile devices, developing a well thought-out app can compel your potential customers to interact with your brand more, rocketing you up to the top of their minds. To help you make a thoroughly designed and developed app, check out our ultimate guide to creating one today.
How to Develop an App
- Research your market.
- Determine the challenge your app solves.
- Build your app’s wireframe.
- Design your app.
- Test your design.
- Develop your app.
- Test your app.
- Launch a beta version of your app.
- Launch your app.
1. Research your market.
Odds are, your competitors will all have an app, or the app market you want to penetrate already has a lot players in it. But don’t get discouraged by your market’s competitiveness. You have the last mover advantage, which means you can research each of your competitor’s apps and pinpoint their strengths and weaknesses. This information can potentially enable you to make the best app in your market.
To conduct a full analysis on each of your competitor’s apps, consider downloading and examining each one. You should also read each app’s reviews and uncover what your potential customers like and dislike about them and use this information to drive your app’s design and functionality.
2. Determine the challenge your app solves.
If your app is a solution looking for a problem, it’ll never catch on. So make sure you have a clear understanding of your customers’ challenges and make a concerted effort to develop an app that solves them. These pain and pleasure points should inform exactly what your app does.
To fully grasp your customers’ problems and, in turn, the solutions they need, sit down with some of your most loyal customers and ask them what features would truly differentiate your app from the rest of the crowd.
3. Build your app’s wireframe.
A wireframe is like your app’s blueprint. It’ll display your app’s design and functionality, and help you understand what your app will look like and how it’ll work.
Your wireframe will be tremendously helpful when you actually need to design and develop your app because it will serve as your reference. If you need help building your app’s wireframe, check out the following wireframe tools:
4. Design your app.
Unless you’re a graphic designer, designing an app by yourself isn’t a good idea. Humans are visual beings, so striking the right balance between your app’s colors, fonts, and other design elements can be the difference between creating something that is everyone’s go-to-app and an app people delete within 10 minutes of their download.
Fortunately, there are two common options for working with professional designers:
Hire a freelancer.
Working directly with a designer can help you develop an app that can exceed even your own expectations. You have a vision for your app, and a freelancer has the skills to turn it into a reality. But they also know what’s feasible and what’s not, so they can collaborate with you to develop an app that’s rooted in reality and more user-friendly.
If you need help hiring a freelancer, check out a designer marketplace that connects brands with talent, like 99designs or Dribbble.
Hire an agency.
If your app is complex and needs a lot of expertise to develop, your best option is to hire an agency — they’ll build your app entirely from scratch. Out of all the ways you can develop an app, hiring an agency is the most expensive choice, but they can take care of every step of the app development process, from initial design to launch, which is incredibly convenient.
However, don’t just hand your agency your plans, disappear into the ether, and finally check back in on launch day. Make sure you’re involved in every step of development to ensure the agency is following your direction. Otherwise, they could spend all your resources building an app you don’t even recognize.
5. Test your design.
Before you spend a ton of time and money developing your app, you need to make sure your mockup design is actually usable. Identifying and fixing any early issues gives you the advantage of not having to overhaul the code of a poorly designed app that’s already built. It also allows you to release your app on schedule. If you bypass this step and move straight into development, you’ll most likely waste all your resources on building an app nobody likes.
To determine if your app is user-friendly, recruit colleagues to participate in a usability test. During a usability study, you’ll ask participants to complete a series of tasks while your teammates observes and takes notes. By watching actual users navigate your app and listening to their praises and concerns about it, you can see if people are actually able to complete your intended tasks as well as what they’re enjoying about your app’s user experience, what they don’t like about it, and what confuses them.
6. Develop your app.
After your app design passes a usability test, it’s time to develop it. At this stage of the app development process, you’ll hand over your design to your development team or a freelance developer.
From here, they’ll collaborate with your design team or freelance designer to solve any problems they run into during the development process and keep your app’s intended functionality and design on track.
7. Test your app.
Now that you have a fully functional and visually appealing app, it’s time to conduct a final usability test with another group of colleagues. By discovering any bugs you might have overlooked or some new ways to enhance your app, you’ll be able to make the crucial last tweaks to your final product.
8. Launch a beta version of your app.
Launching a beta version of your app attracts early adopters, which is a crucial step in the taking your app mainstream. Early adopters can provide a lot of helpful feedback about your app’s pros and cons, and their experience with and pending endorsement of your app is vital for determining whether or not the majority of your market will accept it. This potential support and word-of-mouth marketing for your app will bolster its reputation and help you acquire even more users.
9. Launch your app.
You’ve designed, tested, and developed your app. Now it’s time to launch it. If you want to launch your app in Google Play Store, they don’t require any review of new apps, so all you have to do is upload your app file into the store. IOS reviews every new app before they offer it to iPhone users in the app store, but if you follow their guidelines, your app should get accepted.
After you launch your app, the next step is marketing it. If no one knows what your app is, no one will download it. To spread the word about your app and convince people to download it, consider creating videos of your app’s functionality and advertise them on social media with a link to your app. This’ll give people a glimpse of what your app actually does and how it can benefit their lives.

How to Use a Winner’s Mindset to Become a Champion in the Workplace
Welcome to The Science Behind Success — a new blog series that explores the best ways to help our brains perform better at work. With psychological research and interviews with leaders in the field, we’re showing you how psychology can help you overcome workplace obstacles and excel in your career. Because a little mindset change could go a long way.
When you take a look at the major champions of any industry — including sports (LeBron James), music (Taylor Swift), or technology (Elon Musk) — you might have one of two thoughts.
First, you might think, “They are so lucky.”
Alternatively, perhaps you think, “They are so talented.”
To some respect, you’d be right — they are lucky, and talented. But I’m willing to bet you almost never believe their level of success can be cultivated through certain strategies.
What if it could, though? What if, rather than pointing to genetics or favorable circumstances, we questioned the very mindset that brought such stars to the top? While it’s undoubtedly not mindset alone (Taylor Swift can’t just tell herself she’s a good singer — that skill needs to be inherent), it’s also not skill alone — if it was, plenty of singers of similar talent would be headlining global tours.
Undoubtedly, there’s something else at play here — and if we’re able to acquire access to the same “winning” mindset that helps champions become champions, we just might find strategies to perform better at work.
To dig into this theory, I spoke with Simon Hazeldine, a professional speaker, consultant in the areas of leadership, sales performance and applied neuroscience, and bestselling author of five books, including the one I spoke with him about — “The Inner Winner: Performance Psychology Tactics That Give You An Unfair Advantage“.
Hazeldine, who has a Master’s Degree in Psychology, spoke with me about the core elements of a “winner” in any industry, how employees can use performance psychology to perform better in their roles (or, seek new ones), and how you can cultivate an environment in which you’re able to reach your best professional self.
To learn how you can reach the same peak performance that accelerated LeBron James’ career, keep reading.
The Core Elements of a Winner
There are four particular elements of a winner Hazeldine was quick to point out. These are:
- High levels of self-confidence and belief in themselves
- Great goal clarity
- Ability to take personal responsibility (rather than blaming circumstances or other people) for both successes and failures
- A high level of resilience, and a tendency to use techniques to manage their state of mind during challenging situations
I asked Hazeldine which element he believes employees should tackle first to perform better in their roles. He told me, “The thing to tackle first is goal clarity. A comprehensive review of over 100 psychological studies on goal-setting concluded that the beneficial effect of goal-setting on task performance is one of the most robust and replicable findings in the psychological literature.”
There’s certainly truth behind his point — Googling “task performance and goal setting” will produce an abundance of psychological studies and theories, many dating back to the 1940’s and 50’s, when the concept of “goal setting” began gaining substantial credence in the scientific field.
One study, conducted by Mento, Klein, & Locke (1992), assigned three goals of varying degrees (from easy to difficult) to 114 students in undergraduate business courses. There was a fourth group, who were told “do your best.” Then, each participant was asked to list uses (either four, seven, or 12) for common objects in one minute.
Interestingly, as the difficulty of the goal increased, so did task performance. This is likely similar to what happens to your work performance when you’ve set specific, difficult-to-achieve goals that, once achieved, might enable you to get that promotion.
The difficulty of the specific goal doesn’t make you give up — it makes you try harder.
More interesting to note, however, is what happened to the “do your best” group. This group, in comparison to the specific, difficult goals group, performed significantly less well. As Locke and Latham (2002) put it, “When people are trying to do their best, they do not do so. Do-your-best goals have no external referent, and thus are defined idiosyncratically. This allows for a wide range of acceptable performance levels, which is not the case when a specific goal level is specified.”
Mento, Klein, & Locke’s study suggests goal setting in-and-of-itself is not the only important element of a “winner” — additionally, those goals must be strategic, specific, and personally significant.
As an employee, perhaps your first step to performing better is setting more specific and difficult goals — rather than “I want to create a compelling video campaign,” perhaps you can narrow your goal to be, “I want to create a video campaign that gets 10,000 views and has a conversion rate of five percent.”
Additionally, Hazeldine suggests your goal setting must answer three important questions — “First, why do you want to achieve your goal? Second, what is your goal (the more specific and clear your goals are, the more likely you are to achieve them)? And, third, how you are going to achieve your goal?”
The American Society for Training and Development conducted a study and found people are 65% more likely to complete their goals when they commit to someone else. To further ensure you’ll succeed at setting and reaching your workplace goals, it’s important you vocalize them to a manager or mentor.
How You Can Reach Peak Performance at Work
Now that we’ve examined goal-setting and other essential elements of a winner, let’s consider how you might use other aspects of performance psychology to reach higher levels of success in the workplace.
I asked Hazeldine whether people should use performance psychology to help them succeed in roles they already enjoy and at which they want to excel, or as a tool to help them choose a career path in which they’d be most successful. In short, his answer was — both.
“Performance psychology can help people to perform to a higher standard and use more of their potential in any situation or role,” he told me. “However, if people give some in-depth consideration to their strengths, interests and passions, this should allow them to select a role for which they are best suited.”
“When you occupy a role that plays to your strengths and passions, you are far more likely to accelerate your success.”
This makes sense — certainly, Elon Musk excels in his role in part because it’s a role that plays to his strengths. While he might’ve found success elsewhere using similar cognitive methods, he likely wouldn’t have found success to this magnitude.
Alternatively, it’s difficult to perform to your peak performance if you’re simply uninterested in your role.
However, let’s say you’re passionate about your role, and it’s a role that plays to your strengths. Regardless, you’ll still experience stress and other negative emotions in the workplace, which leaves you with an inability to perform at peak levels at all times.
Fortunately, Hazeldine notes, “Performance psychology can [also] help people build stronger levels of resilience or mental toughness, which will support them in coping with the stresses of the modern workplace. Stress management techniques, which are used extensively by elite athletes to cope with the pressures of competition, allow people to change and control how they are thinking and feeling … and can most definitely be used in the workplace.”
Stress management techniques, or techniques used to help control and alleviate negative emotions to improve performance, might include some of the following:
- Positive thinking or self-talk
- Mental rehearsal of a situation before the actual performance (in which you visualize success)
- The practice of developing self-confidence before and during the event
Let’s say you’re anxious before a big marketing presentation, in much the same way an NFL player might get anxious before a big game. You could use positive thinking or self-talk to put yourself in a confident mindset.
For instance (though it might feel silly or unnatural at first), perhaps before the presentation you think, “I am strong. I am brave. I know what I’m doing. I am smart,” or any other variation of motivational phrases. You might need to practice a few to see which feels most true to you.
It’s important to note, you don’t want to use any self-talk that feels dishonest. If you tell yourself “I am relaxed”, when you’re not, this tactic won’t be effective. Instead, replace “relaxed” with “excited” to appropriately re-name the anxiety you’re experiencing.
Another strategy you might use to become less stressed in the workplace is visualization. This strategy involves creating a specific, detailed image when you’re in a peaceful environment, and are relaxed. Oftentimes, you’d pair this initial visualization with physical relaxation techniques — like when you’re getting a massage or doing yoga.
Then, before a big work presentation, imagine the same scene you’ve practiced envisioning in relaxing settings. This tactic can help you in three ways — first, it provides a helpful distraction from the present moment. Second, imagining a peaceful scene can remind your unconscious mind it’s okay to be relaxed. And third, scenes can eventually become a trigger for your body to recall the same sensations it felt when you first imagined the scene.
For instance, if you typically imagine the scene in yoga, when your body is relaxed, and then you visualize it during a presentation, your body might take cues to settle into the sensations it felt during yoga.
Ultimately, there’s no one right tactic that will work for everyone. However, finding strategies to help you build mental toughness, self-efficacy, and a level of confidence in the workplace will undoubtedly bring you closer to experiencing the same “winning” mindset that skyrocketed other champions to the top of their industries.

10 Social Media Marketing Tools to Improve Your Results
Looking for a few powerful tools to improve your social media marketing results? In this article, you’ll discover 10 tools to help with social listening, content creation, and campaign management. Research and Listening Tools Content is nothing without direction. Research and listening tools give you vital information and analysis regarding the best content topics and […]
The post 10 Social Media Marketing Tools to Improve Your Results appeared first on Social Media Marketing | Social Media Examiner.
from Social Media Marketing | Social Media Examiner http://bit.ly/2FjmnNR
via socialmediaexaminer
When Marketing Doesn’t Work: The Journey, Season 2, Episode 16
Ever been in a situation where none of your marketing seems to work? Then watch the Journey, Social Media Examiner’s episodic video documentary that shows you what really happens inside a growing business. Watch The Journey This episode of the Journey explores how Social Media Examiner faces constant challenges. The marketing department wants to target […]
The post When Marketing Doesn’t Work: The Journey, Season 2, Episode 16 appeared first on Social Media Marketing | Social Media Examiner.
from Social Media Marketing | Social Media Examiner http://bit.ly/2QAX5fF
via socialmediaexaminer
61 of the Best Marketing Tools to Build Your Strategy in 2019
In the world of marketing, it seems like there are always new tools, tips, tricks, and trends to discover and incorporate into your marketing strategy. How is it possible to keep up with them all?
As a marketer myself, I often wish I had a better sense of all of the tools available to me — and what sets each of them apart — so I can make more informed decisions on how to create and optimize content.
Luckily, I have the privilege of working on a team of 150+ other marketers who specialize in different functions than I do. And because of that, I was able to curate this list of the top 61 tools every marketer should know about and use in 2019.

I broke up my list of recommended tools into different sections so you can get a better sense of what tools are available for different functions of the job. At the end, you’ll see the whole list of 61 tools that you can skim and bookmark for later.
Enjoy!
Your List of the Best Marketing Tools to Build Your Strategy in 2019
Marketing Automation
Automation is nothing new to marketers. Whether you want to save time doing marketing tasks or simply cut time wasted doing those daily tasks like saving emails and files to spreadsheets, having a tool that makes your life easier and saves you time is ideal.
While there are lots of automation tools out there for specific fields or verticals (for example, the HubSpot workflows tool for marketing automation), there aren’t many tools that allow you to automate the various different tools you use throughout all aspects of your life.
Wouldn’t it be nice to link lots of tasks between different apps together? Like posting your Instagram photos to all your social networks or linking your app reminders together. With IFTTT you can!
IFTTT (IF This Then That) is a service that allows you to create chains of simple conditional statements, called applets. These “if this then that” applets are triggered by a wide range of other web-based services at the choice of the user. Some of the web-based services that work with IFTTT include Gmail, Google Drive, Facebook, Twitter, Fitbit, and much, much more.
Sounds great, right? Check it out.

Data Reporting
Most tools that automate some of your marketing strategy will also provide reports that allow you to see and present your campaigns’ performance to other employees in your company. What if you want a more holistic look at the health of your business?
From the efficiency of your content calendar to the effectiveness of your lead-generation methods, Digital Marketing Tuner offers a helpful overview of all of your latest marketing activities.
Developed by OverGo Studio, an inbound marketing agency and HubSpot Agency Partner, Digital Marketing Tuner guides you through a brief survey where you can submit basic information about your company’s content volume, email open rates, website traffic, and more. The tool then sends you a detailed report in which you can better visualize your team’s strengths and weaknesses so you can make even better decisions for your company moving forward.
Closing Deals and Tracking Relationships
You and your sales team want to sell your product or service — not fight with messy spreadsheets, cluttered inboxes, or clunky tools that slow you down. That’s why using a Customer Relationship Management System — also known as a CRM — is essential. Not only will it help your sales team manage relationships, but a CRM will also give you a place to deliver those leads you generated to your sales team.
CRMs are such an essential part of any good marketing and sales team that we think everyone should have one. That’s why the HubSpot CRM is completely free.
HubSpot CRM automates the tasks salespeople hate and takes minutes to learn — not months. That means doing more deals and less data entry.
Check out the HubSpot CRM Now
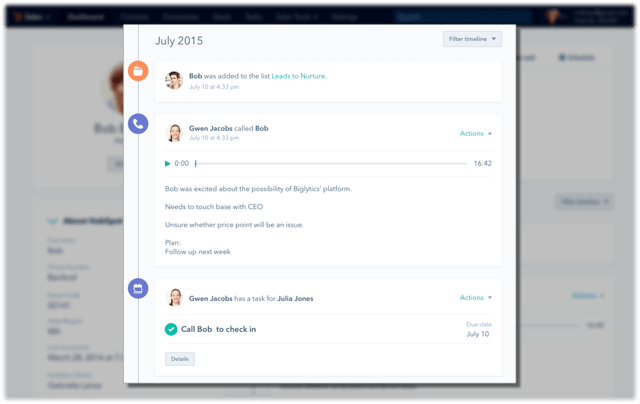

Collaboration
In any marketing team, the inevitable happens: there’s a million files and pieces of content between everyone on your team without one place to keep it all. Organization on any team — let alone a marketing team — is essential. That’s why it’s important to have a collaborative organization tool to keep you sane.
Dropbox is the perfect tool to keep your team organized and your files under control. With cloud-based software to keep your files accessible anywhere at anytime, Dropbox helps your team store all of its files in a central location. Dropbox makes it easy to collaborate, too. With tools like Dropbox Paper, which allows you to write and collaborate in real time on the same doc — and sharing tools for shared folders and files, you’ll be organized and ready for any project that comes your way.
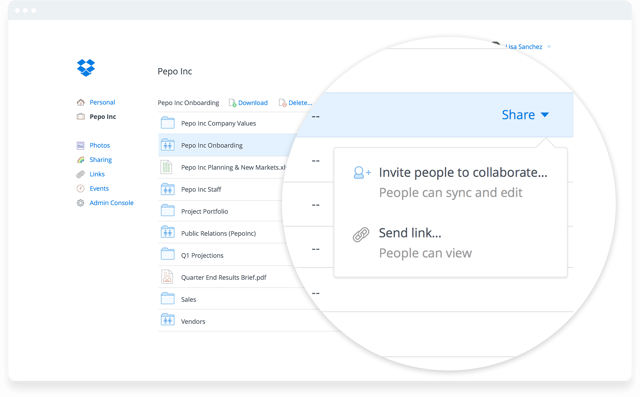

Other Collaboration Tools:
- Google Drive
- Box
- Trello
Content Creation
In the world of content creation, there are admittedly tons of different tools you could use to create various types of content. Whether it’s social images, logos, blog posts, or ebooks — the options and tools are endless.
That said, a newcomer among the Adobe Suite of tools is winning the hearts of many marketers, including this one, for its ease of use to create stunning webpages, awesome videos, and eye-catching graphics. The best part? It’s completely free and impossibly easy.
Adobe Spark is a suite of three web or mobile apps – Spark Page, Spark Post, and Spark Video — that allows marketers to easily create graphics, webpages, and videos in a variety of themes in minutes.
You can completely avoid the hassle of page layout, video editing knowledge, or a CMS and start creating content that looks remarkable immediately. For example, we use Spark Page at HubSpot to create some of our online guides and promote them with Spark Videos and Posts. You can too!
Check out Adobe Spark
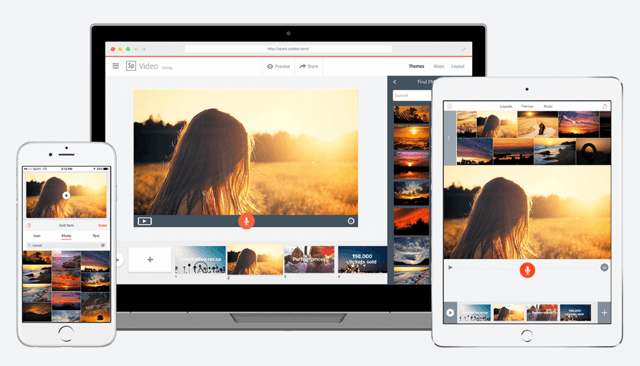

Other Content Creation Tools:
- Venngage
- Piktochart
- Canva
- Recordit
- Kap
- Adobe Color CC
Video Marketing
It’s 2017 — haven’t you heard? Video is the thing everyone is talking about. But how do you actually implement it into your marketing?
Maybe your strategy is just to put a YouTube video embed on one of your blog posts or landing pages. But then what happens? Someone else’s ad plays on your landing page before your video even begins. That’s bad for your conversion rates, brand, and your user. Luckily, there’s a solution.
Wistia is a powerful video hosting platform that allows you to host your videos on your website — ad free — with a guaranteed smooth playback and responsive player. Wistia also helps you prove the ROI of your video efforts by offering you video analytics and key metrics to fine-tune your video marketing efforts over time. Ready to take your video marketing to the next level?
Try Wistia for Free Now

Other Video Tools:
- Vidyard
- Vimeo
- YouTube
Content Distribution and Brand Awareness
While it might seem like a given, when it comes to getting your content distributed online, there really is king that we’d be remiss if we’d different mention:

I know, I know. Google isn’t “exactly” a new or a fascinating tool that you didn’t already know about. That said, within the same parent company is another important distribution channel that many marketers often forget when they’re strategically distributing content for the sake of brand awareness.
YouTube is becoming more and more important to marketers lean more heavily on video-based content. While, of course, you should continue to optimize your text-based content for search engine optimization, don’t forget to consider Youtube as an important channel as well. Not only is YouTube great for hosting your videos and getting them shared across social networks, it’s also important to optimize your videos for search to get found on Youtube as well.
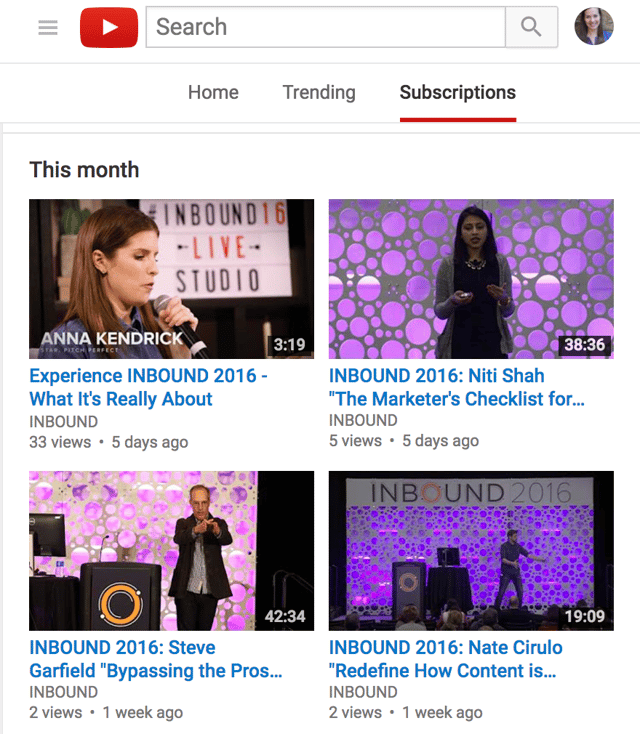

Other Distribution and Brand Awareness Channels:
- Product Hunt
Continuing Education and Learning
A challenge all marketers face is the need for continuous learning over time. With new tools and methods changing all the time, it’s essential to stay on top of the trends and changes. Luckily, there aren’t a shortage of tools and platforms for you to learn new tactics or techniques and take necessary classes.
HubSpot Academy, for example, is a great place to go anytime you need to get up-to-date information on the latest marketing best practices, find answers to your questions, get certified in a new area of expertise, or renew certifications on subjects that you’re a little rusty on.
Bookmark your HubSpot Academy portal today

Other Ongoing Education and Learning Tools:
- Lynda.com
- Udemy
- Codeacademy
- Skillshare
- General Assembly
Conversion Rate Optimization (CRO)
When it comes to your bottom-line goals, you probably want a few tools for not only attracting prospects to dedicated marketing campaigns, but just as importantly, converting those visitors into leads and customers.
Thanks to a drag and drop interface, Unbounce lets you quickly build mobile responsive landing pages without developer assistance. The tool also integrates with a number of different CMS platforms and tools.
With Unbounce Convertables, you can also launch targeted overlays on top of any web page, each with a dedicated call to action. Customizable triggers and targeting rules give you control over who sees your offers and when, so you can serve the most relevant offers to the right audience.
Try Out Unbounce Now
 Other CRO Tools:
- Hotjar
- Optimizely
- Leadpages
- HubSpot Landing Pages Tool (try it below)

Event Marketing
Whether your team holds monthly customer and prospect events, yearly conferences, or just occasional community outreach parties and events, it’s important to have the best event marketing tool up your sleeve when the time comes to use it. After all, in-person events are some of the best ways to interact with potential customers and create a brand experience that prospects, customers, and your community will remember.
Eventbrite is an efficient, easy-to-use tool tons of marketers rely on not only to manage the logistics (like ticketing) of events but also to promote their events. Eventbrite lets you create an event landing page and allows you to set up your ticketing and payment for the event all within the same platform. The best part? Eventbrite is always free if you’re hosting a free event!
Check Out Eventbrite Now

Other Event Marketing Tools:
- Picatic
- AddEvent
Innovation and Efficiency Tools
If you’re on the search for new marketing tools, chances are you’re not just looking for the hammer and the nail in your toolkit. Instead, you might be looking for new and innovative solutions to try out and experiment with in your marketing. Sound about right?
As marketers, you’ve probably used forms — whether on your site or in a survey — more than a few times. But have you ever started to get bored with the same old, robotic form type?
Typeform is the tool you need to try if you’re looking for new ways to interact with your prospects and customers while giving them a positive, human-centered experience. Typeform isn’t just another survey tool. It’s a conversational, interactive typeform that feels more interactive than a standard form. Use it to host survey content, lead forms, or even create content with it by putting together quizzes and more.
Try Using Typeform in your Marketing Today


Other Innovative Tools to Try:
- Giphy
- Todoist
Keeping Up with the Latest Industry News Tools
Reading this post alone won’t end your career-long pursuit for the latest tools, trends, and marketing techniques. That’s why keeping up with the latest industry news is a full part of your job as a marketer.
Product Hunt, a tool meant for finding the latest tools and products, is a must for any marketer trying to stay on top of the industry and find new channels to promote their own product launches. Product Hunt is a daily feed of launched tools, letting people upvote what they think is interesting. Pro tip: when you sign up for Product Hunt, set it as your homescreen in your browser so you’ll always have a reminder to keep an eye out for what’s new. Who knows? You might even decide to use some of the featured tools yourself!
Sign Up for Product Hunt Now

Other News and Timely Tools:
- Your choice of online news sources or magazines
Lead Generation
If you’re in the mood for demand generation, you probably have you eyes on the prize: converting anonymous website visitors into contacts with email addresses that you can successfully nurture. While landing pages are a must for some things, sometimes you want a shorter, simpler user experience to capture lead information.
HubSpot’s free marketing tools can help do just that. The moment a lead shares their email, you’ll know who they are, where they work, and what pages they visited — all in real time. When they view an offer or check your pricing, you’ll be ready to follow up right away.
And with simple but powerful analytics, you’ll learn more about what’s working and what’s not — like which traffic sources or pieces of content are driving the most conversions. It’s a risk-free way to find out what inbound marketing can do for you. No budget necessary.
Try HubSpot’s Free Marketing Tools
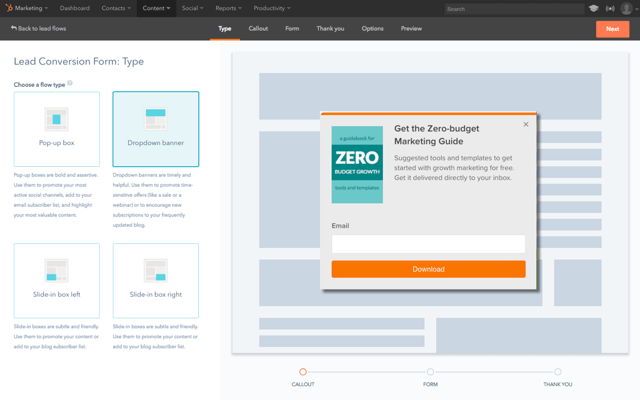

Lead Nurturing
In the world of lead nurturing, the tools and techniques used are constantly involving. While some aspects of nurturing remain the same, like using email to nurture contacts down your funnel, for example, the content and positioning you use is ever-changing. It would be easy for us to introduce a set of standard workflow and automation tools (like HubSpot’s, for example) you can use to nurture your contacts down the funnel. But if you’re looking for something a little more innovative for actually creating nurturing content, we have a new tool for you to try.
Vidyard is a great tool for creating and hosting awesome video content in your nurturing flows and otherwise. At HubSpot, for example, we’ve even started using Vidyard to create unique, customized nurturing videos specific to our audience and product. What makes Vidyard so great is its variety of video tools that you can use to create remarkable content.
From Vidyard’s live feature to its studio content creation products to its free tool – ViewedIt — Vidyard is an excellent tool if you’re a marketer looking to jump on the video bandwagon and start integrating video into all of your content.


Online Advertising
If your team is making investments into PPC ad campaigns on platforms like Google, Bing, Facebook, Twitter, or LinkedIn, it’s probably a bit of a hassle to manage all the different ad campaigns you’re running across each different network. Besides just managing them, you then have to try and report on the results of all of them. What a struggle. Luckily, there’s a tool for that.
AdStage takes the hassle out reporting on all of the PPC campaigns you’re running and puts it all in one place. AdStage helps you automate, create, and manage your campaigns across all of the major PPC platforms, then allows you to report on your results. With visual features and powerful automation tools, AdStage is a must for PPC experts and newbies alike.
Check out AdStage
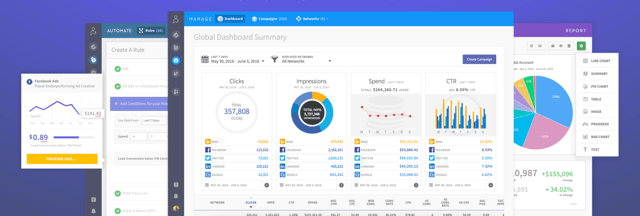
Other Online Advertising Tools:
- HubSpot Ads Add-On
- Perfect Audience
- Google Ads
- AdRoll
Project Management
File management and organization is one thing, but how do you manage all of the moving pieces of a marketing campaign or project? There are many different tools you can use for project management, but only one sticks out when it comes to the number of integrations and features at the price of — oh yeah — free!
Trello is a great project management tool for small teams and individuals. With it’s Kanban-style setup and fun user interface, Trello lets you set up to-do lists and tag individual cards with due dates, members, labels, and more. You can attach files, links, images, and more to your cards and easily get a full-view of any project that you’re working on. At HubSpot, we use Trello daily to manage our team campaigns and individual to-do lists. Want an example of how we do this? Check out our guide to managing marketing campaigns in Trello.
Get Trello — It’s Free!
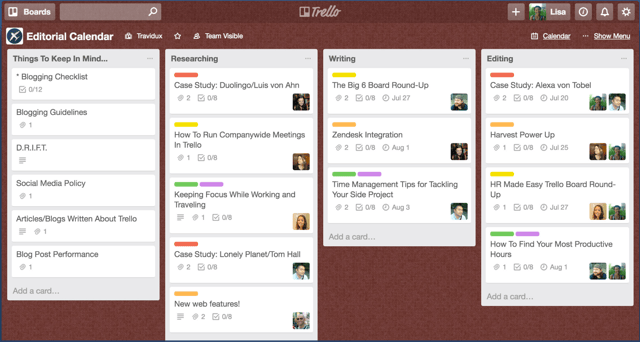

Other Project Management Tools:
- HubSpot Projects Tool (one of many tools in the HubSpot Marketing Platform)
- JIRA
- Asana
- Airtable
Search Engine Optimization
Whether its keyword research, content optimization, or checking your current page rankings, every marketer needs a go-to tool for planning what content to create and how to optimize it for SEO. Google Analytics and SEMrush our great tools for planning which keywords to rank for, but how do you make sure the content you create actually meets your goal once it’s created?
Ryte is the ideal tool marketers can use to make sure their SEO efforts are having a real impact on their marketing strategy.
Check out Ryte now


Other SEO Tools:
- HubSpot Content Strategy Tool
- Google Analytics / Keyword Tool
- Keywords Everywhere Chrome Extension
- Ahrefs
- SEMrush
- Moz
Social Media
Social Media Managers know the pain of posting that perfect social media post only to have a follower find a typo a minute later and call you out. For marketers, using a social media tool to schedule all of your posts (so you catch those typos beforehand) is a must. But it also helps to get the right analytics from your social posts, especially on channels where it can be hard to get that information.
Iconosquare is the perfect tool for marketers to grow their brand on Instagram with easy-to-use analytics. It’s not always easy to know what’s working and what’s not on Instagram. But, as the second most popular social channel and one that’s quickly approaching first most popular among some age groups, it’s a channel that marketers can’t afford to miss out on. Try Iconosquare now to maximize your Instagram analytics and optimize your brand Instagram channel for success.
Try Iconosquare Now


Other Social Media Tools:
- Buffer
- Hootsuite
- HubSpot Social Inbox (one of many tools in the HubSpot Marketing Platform)

Team Communication
Where would your work day be without accessibility and communication between you and your colleagues? Probably pretty frustrating. Marketers can’t shy away from communication when it comes to aligning with team members and across the company, so having the right team communication tools is necessary every single day.
I’d be given a lot of slack if I didn’t make the world aware of this tool.
Slack is a powerful messaging app that allows you and your teammates to quickly message back and forth without the hassle of email. But it’s not just AOL instant messenger 2.0. Slack has powerful features and integrations that make it possible for you to integrate all of your other daily tools — like Trello, Gmail, Giphy, and so many more — right where you’re already communicating. You can start channels between different teams or just chat with specific colleagues. Slack makes remote and in-person work possible and easier than ever.
Get Slack today. Seriously. Do it.

Another tool to mention, though slightly different in purpose, is Shift. If you’re running multiple email account and multiple extensions and applications, this is a great way to organize everything.
A cool part of Shift is that, in addition to compiling your email inboxes, it also allows you to manage other applications, such as HubSpot Sales, Grammarly, and Asana.
Other Team Communication Tools:
- HipChat
- Google Chat
- Join.Me
- Zoom
- Skype
Website Optimization
As marketers, sometimes it feels like we’re constantly making educated guesses about how our site visitors are going to interact with our content. While we might design a page to draw our user’s eye to a spot on a page, how do we ever really know where their focus is so that we can improve that experience?
Hotjar is a new and easy way to truly understand what your web and mobile site visitors are looking at when they interact with your site. WIth its visual heatmap tools, you can understand what users want, care about, and interact with on your site. Hotjar visually represents visitors’ clicks, taps and scrolling behavior, giving you the ability to find hot areas for growth and conversion rate optimization.
Convinced? Try Hotjar. It’s Free!

Other Website Optimization Tools:
- HubSpot Website Platform
- Optimizely
- Unbounce
Get the Full List of Tools
We’ve covered a lot of tools for every part of your job on this page. But sometimes, it’s just helpful to see the full list. Here is our list of the top 58 marketing tools you need to know about.
Top 61 Tools Every Marketer Should Know About |
||
| AddEvent | Hootsuite | Piktochart |
| Adobe Color CC | Hotjar | Product Hunt |
| Adobe Spark | HubSpot Academy | Recordit |
| Adroll | HubSpot CRM | SEMRush |
| Adstage | HubSpot Marketing | Skillshare |
| Ahrefs | Iconosquare | Skype |
| Airtable | IFTTT | Slack |
| Asana | JIRA | To.Doist |
| Box | Join.Me | Trello |
| Buffer | Kap | |
| Canva | Keywords Everywhere | Typeform |
| Codeacademy | Leadpages | Udemy |
| Dropbox | Unbounce | |
| Eventbrite | Lynda.com | Venngage |
| Moz | Vidyard | |
| OnPage.org | Vimeo | |
| General Assembly | Optimizely | Wistia |
| Giphy | HipChat | Youtube |
| Google Ads | Zoom | |
| Google Analytics | Picatic | |
| Google Drive | ||
| Digital Marketing Tuner | ||
You’ve got all the tools you need, but are you looking for a place to start putting them all together? Check out our free marketing blueprint. It’ll walk you through creating your own marketing plan and teach you how to use all of these tools together.

The Ultimate Guide to Real Estate
Real estate is a linchpin industry in our society. People need to buy and sell property, and they need experts to help understand and manage the transactions.
In the past decade or so, software and websites have amended the traditional real estate process. But regardless of how much technology advances, it’ll never replace the real estate middleman — the agent.
Why? Because as important as real estate is to our society, it remains an enigma to most consumers. Between the various laws, paperwork, and best practices, there’s a lot that goes into buying and selling property.

That’s why we’ve compiled this guide, and our reasoning is twofold: to help consumers better understand the real estate process and to equip real estate agents to better market their business. We believe this guide can help both — especially those consumers considering real estate as a career choice.
If you’d like to learn about a specific topic, feel free to use the chapter links below to jump ahead. Otherwise, keep reading to learn more about real estate.
The Four Types of Real Estate
Real estate is defined as the property and buildings on a specific piece of land. It also includes the air and underground rights above and below the land, respectively. The term “real estate” means real, or physical, property.
As a physical entity, real estate includes four different categories of property.
- Residential, which includes new construction and resale homes. You probably know residential real estate as single-family homes. This category also includes condominiums, townhouses, duplexes, and vacation homes.
- Commercial, which mostly includes places of business. This category includes shopping centers, strip malls, hospitals, colleges, hotels, and offices. Apartment buildings are often considered commercial, even though they are technically residential, because they produce income for their owners.
- Industrial, which includes manufacturing buildings and warehouses used for research, production, storage, and product distribution.
- Land, which includes working farms and ranches. It also refers to vacant land, such as undeveloped land and land on which homes or buildings are being assembled.
It’s important to understand the different types of real estate because the sale and purchase of property differ depending on its type. Other processes such as zoning, construction, and appraisal are handled independently, too.
Because these categories and their rules and regulations are so different, real estate agents typically specialize in one specific type. Next, we’ll talk more about real estate agency below.
Who Works In the Real Estate Business?
The real estate industry is complicated, and a lot goes into each transaction. For this reason, there’s a multitude of people involved in the process. If you’ve ever bought or sold property, you’ve likely worked with some or all of these specialists.
The Agent
The real estate agent acts as a liaison between buyers or sellers and the industry itself. They’re responsible for finding potential property, listing property, negotiating prices, and much more. While some agents work with both buyers and sellers, most specialize in one or the other. This is because the responsibilities of each are very distinct.
The Seller’s (Listing) Agent
The seller’s agent works exclusively with people selling real estate, such as a home or office building. They’re also called a “listing” agent because they list property under their name and brokerage for others to find. (We’ll talk about the listing process below.)
Listing agents are responsible for a variety of things:
- Helping determine the selling price of property
- Listing and marketing the property
- Managing open houses and showings
- Answering questions of potential buyers
- Guiding the negotiating of the sale price
- Coordinating the sale and closing process
For residential sales, listing agents typically make 3% of the gross sale price, paid by the seller(s) — who pay another percentage to the buyer’s agent. For example, listing contracts written are for X% with X% offered to the cooperating agent.
The Buyer’s Agent
On the other hand, the buyer’s agent works with people looking to buy real estate. They’re responsible for finding potential property, organizing showings and walkthroughs, negotiating on behalf of their clients, and assisting during the purchase and closing process.
Buyer clients typically don’t pay for working with a buyer’s agent. If they successfully organize a real estate transaction, buyer’s agents make 3% of the gross sale price, also paid by the seller.
The Broker
The real estate broker is considered one step above the agent. (Similar to the square/rectangle analogy … a broker is an agent, but an agent isn’t a broker.) Although the rules vary from state to state, brokers typically have more education and licensing than agents. Because of this, brokers can form their own real estate brokerage and hire agents as salespeople.
The Mortgage Lender
The mortgage lender is a financial institution that gives you money to fund your mortgage loan. When purchasing real estate, it’s encouraged to get pre-approved for a loan before touring and bidding on real estate. Real estate buyers will likely work closely with a mortgage lender before looking at homes or property.
The Appraiser
The appraiser works independently of the buying and selling party to determine the value of property. The appraiser is typically chosen by the mortgage lender as it’s in their best interest to get the fair and accurate value of a home or building. The property must appraise for the agreed-upon contracted sales price in order for the lender to grant the loan.
From conducting a room-by-room walk-through to reviewing exterior and interior conditions, the appraiser does most of their job on-site and reports back to the lender.
The Inspector
Whereas appraisers are hired by lenders to determine the monetary value of a property, inspectors are hired by potential buyers to determine the structure, safety, and possible defects or damage in a home. It’s a lengthy process; inspectors are responsible for reviewing a list of 1,600 things when looking over a building.
The Closing Attorney
The closing, or transactional, real estate attorney is simply an attorney that specializes in real estate law. He or she is sometimes referred to as a “closing” attorney because that’s when most buyers or sellers encounter them — at closing. (We cover the closing process in the next section.)
Real estate attorneys help buyers or sellers understand the legal documents with which they’re presented throughout the real estate process.
The Real Estate Process
Depending on the type of property and people involved, the specific steps within each real estate transaction might fluctuate a bit. But for the most part, the majority of transactions look the same.
For the sake of continuity and simplicity, we’re going to use a residential transaction to outline the real estate process. Commercial and industrial transactions follow a comparable process, but the residential process is likely the most relatable among consumers — given that almost 65% of U.S. families own their residence.
We’ll cover both the seller’s and buyer’s perspectives below.
1. Hiring an Agent
When someone decides to sell their home, the first thing he or she might do is hire a listing agent (unless they decide to sell it themselves as a For Sale By Owner — which we’ll explain later).
Historically, clients have found their listing agents through personal recommendations or a local advertisement in a newspaper or flyer. Nowadays, some sellers find their agents through online means, like social media, online advertisements, or sites like Zillow or Trulia. We talk more about some of these methods in the next section.
Listing agents typically give a listing presentation. This pitch will also highlight how they’d price and market your home, what their commission structure is, and other competitive advantages. This helps clients decide which agent is the best fit.
• • •
When someone decides to buy a home, he or she might do one of two things: secure a buyer’s agent who can help them discover and shop for property, or start shopping for property themselves, choosing to hire an agent after they’ve found a property they like.
There’s no right or wrong way to go about hiring a buyer’s agent, although an agent might introduce you to potential properties you might’ve not otherwise found on your own. Interviewing and securing a buyer’s agent at the beginning of the real estate process can be much more rewarding than simply letting the listing agent take care of both sides. Buyers can benefit from representation, too.
2. Listing or Viewing Property
As a seller, the next step would be listing your property so potential buyers can find it. The steps in this process include …
- … determining the price of your home, which your agent can assist with. This is calculated using your home’s location, condition, amenities and upgrades, and the price of similar properties. Agent’s will compile a comparative market analysis (CMA) to help you understand how and why your home is priced.
- … entering your home into the Internet Data Exchange (IDX), which your agent has access to. The IDX brings together real estate listings from all over the country. It enables members of the multiple listing service (MLS) to share and market their properties to other agents and potential buyers.
- … market your home. Whether they invest in traditional methods or list your home on other real estate websites, these marketing tactics will increase the exposure of your property to other agents and buyers. (We’ll cover some popular ones below.)
- … hosting open houses and showings with buyers. While real estate photos (and investing in a professional photographer) can help homes sell faster, open houses and showings give potential buyers a first-hand look at your home. These in-person experiences also allow buyers to ask questions and express concerns — saving both parties time and energy in the long-run. Some agents may opt to create real estate videos and virtual staging opportunities for your home, too.
Some sellers opt to sell their home themselves, which is referred to as For Sale By Owner (FSBO). FSBOs theoretically save sellers commission money (since seller clients pay both the listing and buyer’s agents), but in turn, they don’t get access to CMAs, the IDX, or any agent knowledge or marketing. In some cases, FSBO sellers may pay a cooperating commission to the buyer’s agent working with whomever buys their home.
• • •
As a buyer, this step would involve researching and viewing property. Some people use sites like Zillow or Trulia to find potential homes within their price range while others rely on their agent to discover property and schedule showings.
Typically, buyers will attend open houses to get a feel for a property and its location, condition, and amenities. Then, they’ll schedule dedicated showings with their agent (or the listing agent) at which they’ll walk through the property and ask more specific questions.
Recall how we mentioned that buyers should be pre-approved for a loan before searching for homes. Why? Because if a buyer views a home they want to buy, they should be prepared to place an offer on the spot … especially in a highly-competitive housing market.
If someone were to view a property they liked then seek out loan pre-approval, the process could take weeks. No seller would wait that long if they have other offers.
3. Buying/Selling and Closing on Property
Let’s say you’re selling your home, and someone wants to buy it. What happens then?
Well, firstly, the potential buyer would place an offer on your home. This offer could be exactly at asking price, below or above, depending on how competitive the market is and how desperate you and/or the seller is. Then, you’d consider the offer, consult with your agent (if you have one), and accept or deny. There could be a little back-and-forth, or both parties could immediately agree and immediately sign a sales contract.
(If you, the seller, had entered into an agreement with a right-of-first-refusal clause, you’d have to let that potentially interested party view and make an offer on your property before any other parties. Right-of-first-refusal clauses are typically written into contracts between family members, tenants and landlords, and in the case of a homeowners association (HOA).)
As the seller, the next few steps don’t directly involve you. At this point, the buyer’s would submit his or her earnest money, order an inspection of your home, and work with their mortgage lender to secure an appraisal and set up their mortgage. You might have to address any concerns or questions during this period, but for the most part, you sit back and wait.
The next time you see the buyers will be at closing. A home closing is basically a fancy term for when the property title is transferred, the down payment is made, and the seller and buyer’s names are signed a bunch of times. After closing, you’d hand over the keys and be on your merry way … albeit thousands of dollars richer.
• • •
Let’s flip the script and say you’re buying a home. (Congratulations!)
We already know you’ve made an offer that’s been accepted, and you’ve signed a sales contract. What happens now? Well, the bulk of this process involves you making sure the house is exactly what you want to purchase — and you have to do all of this within the timeline spelled out in your contract.
First, you’d submit your earnest money. This tells the seller, “Hey, we’re serious about this purchase.” FYI, earnest money is not your down payment — that goes to your mortgage lender. It’s held until closing and is credited to the buyer. Next, you’d order an inspection to see if there are any repairs that should be done before closing. (The party responsible for the repairs is to be negotiated between the sellers and buyers.) At the same time, you’d alert your lender that you’re under contract and begin the paperwork to secure your loan.
After the inspection is complete, you and your lender will order an appraisal to ensure the value of the home matches your offer and mortgage. You’d research and order home insurance (often required by lenders), and schedule your utilities and closing. At closing, you’d bring proof of your mortgage, home insurance, and any required documentation to assume the home title and sign all required documents.
Voila! The home is yours!
Real Estate Marketing Strategies
So, we’ve covered the real estate process from the perspective of both buyer and seller. What about the real estate agent? Agents and agents-to-be, we haven’t forgotten you. This section is dedicated to one of the most important parts of your job — marketing your homes and yourself (and your real estate business).
Pause. What do you mean “myself”?
Well, being a real estate agent is sort of like being your own entity. You may represent a brokerage or larger firm, but for the most part, you have to sell yourself as an agent, knowledge base, negotiator, marketer, financing guru, and industry know-it-all. Your clients will rely on you for one of the biggest transactions (both financially and emotionally) of their lifetime. You have to be, in their eyes, the best.
Better yet, the more you market yourself, the more you inherently market the homes and properties you represent. It’s a win-win!
•••
Real estate is a unique industry when it comes to building a marketing strategy. Some industries and businesses focus solely on digital marketing methods, while others invest in traditional tactics like postcards and billboards.
In real estate, you’ll likely do all the above. For the most part, the majority of agents don’t define a target audience for their marketing strategy — they simply want clients and buyers. The wider the net, the more people they’ll attract, and the more revenue they’ll bring in and homes they’ll sell.
(Note: This target audience strategy is not typical of most businesses. In most cases, defining a targeted buyer persona for marketing is the way to go.)
So, let’s talk about the different ways you can market as a real estate agent. We’ll break it up by type of marketing and discuss both inbound and outbound methods.
Digital Marketing
The world of digital marketing is seemingly endless. Does this mean you should invest in each and every marketing opportunity? Not quite, especially if you’re a new agent. Start out with a few of these strategies and then expand as your commission allows.
Website
A website builds awareness around your personal brand as an agent and markets the homes you have for sale. More buyers and sellers are online than ever before; online leads alone increased by 65% from 2016 to 2017. If you’re not online, you’re missing out on revenue and clients.
Having an online presence as a real estate agent also speaks volumes about your legitimacy and how seriously you take your job. At the minimum, it should have information about yourself (including a stellar bio), how to contact you, and any homes you’re currently selling.
Blog
Running a blog is another way to attract clients, build trust with visitors, and prove your real estate expertise. Also, the mystery and complexity of the industry can play to your advantage. Your visitors and clients will inevitably have questions … and your real estate blog can hold the answers.
Consider making your blog part of your website. This will keep visitors on-site and further market yourself as an agent. When you start your blog, post as often as want … but however often you choose, be sure you can keep a consistent cadence. Need ideas? Pay attention to the questions your clients are asking or perhaps blog about a home that you’re selling.
Social Media
Did you know that over 90% of agents use social media to some extent? Social media is pretty much a non-negotiable in the real estate world, and there are plenty of ways to leverage social media for your marketing. A dedicated page on Facebook can help you connect with potential clients, market your homes, and share your blog content, and an Instagram account gives you a place to share those high-quality real estate photos.
Social media is also a great way to connect with clients personally. As an individual marketing his- or herself, it’s important to create personal, emotional connections in an effort to get business. When it comes to buying or selling a home, clients don’t just need to know that you can do your job; they need to know that they can trust you, too.
Email is another great way to market to clients, regardless of their demographic or stage in the buyer’s (or seller’s) journey. Whether they’re actively looking for a new home or you simply have their email address from an online form, email can help you stay connected and top-of-mind.
One great way to do this is through an email real estate newsletter. Newsletters are easy, templated tactics that also allow you to get creative with your content. In your newsletter, you can include current homes for sale, client testimonials, fun personal facts, and local events.
Paid Advertisements
There are pros and cons to paying for advertisements, whether about your real estate business or your current properties. If you do choose to pay for advertisements, such as social media ads, banner ads, or even native ads, be sure you’re targeting the correct geographical locations (since you’d likely not work with clients hundreds of miles away). Consider paying for ads on local interior design site or family-oriented blogs, or even on your own personal real estate blog. That way, you can know your advertisements are being seen by valuable audiences.
Traditional Marketing
In the real estate world, traditional marketing methods are hardly outdated. This is for a few reasons.
Firstly, real estate is a heavily location-based industry. While it might not make sense for an e-commerce business to market in local magazines or on bus benches, it would for local real estate agents looking to work with people in the area. Secondly, traditional marketing methods can be more cost-effective and produce a greater ROI, especially when marketing locally.
Test out a few of these strategies and see what works best for you.
Business Cards and Postcards
Business cards are another non-negotiable for real estate agents. Between open houses, local events, and simply running into people on the street, you’ll likely always be in need of a business card that has your phone number and email address. Real estate business cards also give you a chance to show your personality and stay top-of-mind with potential clients.
Postcards, on the other hand, are super effective for marketing homes for sale. Not only is there ample space for photos and text, but real estate postcards are also easy to pass out, cheap to mail, and quick to read.
Direct Mail
Direct mailers may seem old-school, but they’re actually quite effective in the real estate industry. In fact, direct mail response rates more than doubled in the past couple years.
Whether you mail postcards, personal flyers, newsletters, or other content, direct mailers are a great way to target a specific neighborhood or area in your city. It’s a tried-and-true method that can work alone or in tandem with other strategies.
Local Advertising
You can advertise locally in a few different ways. For one, you can pay for local advertisements in magazines, newsletters, bus benches, and billboards. Secondly, you can leave your postcards and business cards throughout your target area, or partner with businesses who will advertise for you for free.
On the other (more creative) hand, consider contributing to local magazines or running a column of your own. This follows the same inbound methodology that blogging and guest posting does, except it targets your neighbors and local clients. It also gives you a chance to build trust with readers and potential clients.
Lastly, door-knocking is another way to build awareness and market to people in your area. Door-knocking is another tried-and-true method of drumming up leads and marketing yourself and your properties for sale.
Word-of-Mouth Marketing
Word-of-Mouth (WOM) marketing is the most effective tactic for real estate agents. In fact, 100% of all age groups are most likely to choose their agent based on referrals. That’s why we’ve made this its own section … inspiring and collecting testimonials is crucial to your business and marketing strategy.
Reviews and Recommendations
Whether you’ve worked with one client or 100 clients, always be asking for referrals and recommendations. As you finish with each client, ask for a few sentences about your service and performance as an agent, and request that they submit their testimonials to sites like Yelp, Zillow, and Realtor.com. You can publish these testimonials on your website, too.
How can you ensure solid reviews? Be a great real estate agent. It’s as simple as that. Provide amazing service, do your best work, and make a great impression on clients. Consider going above and beyond with a gift at closing, so your clients will remember you.
Real estate is a prime example of how current and past customers are your very best marketers. By treating each client with exceptional service, you can ensure referrals for years to come.
Real Estate Resources
Whether you’d like to learn more about real estate, you’re interested in becoming an agent, or you’d like to improve upon your business, we’ve got you covered.
If you’d like to learn more about real estate, read …
If you’d like to get into real estate, read…
- The 11-Step Guide to Getting Into Real Estate
- How to Start a Real Estate Business: 8 Essential Tips
- Wondering How Much Money You Can Actually Make as a Realtor? All Your Real Estate Income Questions, Answered
If you’d like to improve your real estate business, read …
- 34 Motivational, Relatable, & Funny Real Estate Quotes Every Agent Should Read
- 21 Real Estate Slogans to Inspire Your Own
- The 17 Best Real Estate Podcasts Every Agent and Broker Should Be Listening To
Over to You
Real estate is a tricky, complex industry, but it’s nonetheless vital to our economy and lifestyle. Whether you’re someone interested in buying their first house or you’re curious about real estate as a career, it’s important to understand the real estate process and the roles both consumers and agents play in each transaction.
Real estate is an industry that plays by its own rules. As technology, incomes, buying habits, and lifestyles change, real estate will only become more complex and exciting. It’s your job to stay on top of it.

The 5-Step Process HubSpot Uses to Optimize Facebook Advertising Costs
When Mark Zuckerberg shocked the digital marketing world with his announcement that Facebook would overhaul its algorithm to let users engage with their friends and family more and less with brands, the social media giant’s CPM skyrocketed 122% — the highest spike in Facebook ad prices over the previous 14 months.
Today, organic and paid reach are still flatlining, causing ad costs to balloon to unprecedented levels. And in a space where advertising has historically been cheap, how can marketers sustain their revenue without having to increase their Facebook ad budget?
One word: optimization. In a nutshell, ad optimization is getting the maximum bang for your buck for every single dollar you spend distributing content. But to do this, you need to constantly test your Facebook ad strategy and use data to course correct it enough to maximize your results every time you send out an ad.
Fortunately, we sat down with Rex Gelb, HubSpot’s paid acquisition team lead, and asked him about his approach to Facebook advertising. Check out his five-step process for running efficient campaigns and start optimizing your Facebook advertising budget today.
The 5-Step Process HubSpot Uses to Optimize Facebook Advertising Costs
1. Choose a campaign objective.
From a fifty-thousand foot view, our paid acquisition team usually pursues two types of Facebook advertising campaigns: direct response and branding.
Direct response campaigns aim to get people to take a desired action, like a download, signup, or purchase. Branding campaigns aim to get as many eyeballs on our content as possible. Clicks aren’t the goal here, exposure is.
Facebook also knows which users are most likely to click on ads and which ones are not, so whatever objective they chose at the start of their campaign, the social media giant will distribute their ads to the right audience.
2. Pick a bid strategy.
On Facebook, there are two main ways to buy advertising space: Cost Per Thousand Impressions (CPM) and Cost Per Click (CPC).
When our paid acquisition team uses CPM bidding, the risk is completely on them. They’re paying for impressions, not clicks, so if their offer or creative isn’t compelling, they’re wasting their money.
When they use CPC bidding, they share the risk with Facebook. They need to craft compelling ads and Facebook needs to distribute them to the right audience. Otherwise, both parties lose.
3. Build out targeting.
One way our paid acquisition team likes to target their ads is by building a custom audience. A custom audience is a list of people who have specific attributes, like being one of HubSpot’s monthly active users or CRM signee, that they plug into Facebook. Facebook then analyzes this list to provide them with more data about these people, like their age, gender, job title, location, and household information.
A couple of years ago, the paid acquisition team used a custom audience to target ads to CMOs who use Google Chrome. They wanted to see if their strategy would decrease their cost per acquisition and cost per click for one of HubSpot’s Google Chrome extensions.
But they also had a hunch they could convince CMOs who use other browsers that HubSpot’s extension was valuable enough to switch browsers for. They ended up being right. When the paid acquisition team broadened their targeting to all browsers, they discovered that they could acquire twice as many users for HubSpot’s Google Chrome extension compared to only targeting Chrome users.
| Experiment | Cost Per Regular User | Cost Per Click |
| Chrome | $19.32 | $3.60 |
| All Browsers | $9.63 | $1.07 |
Another way the paid acquisition team targets their ads and optimizes their spend is by creating lookalike audiences. To do this, there are two relatively easy options they can leverage:
1) Pull lists of people who have specific attributes from HubSpot’s database, like anyone who is a CRM signee or invited additional team members to sign up, and plug them into Facebook.
2) Pixel one of HubSpot’s web pages, like the blog’s homepage, and plug the list of people who visited the page into Facebook. This way, the social media giant can match these people with their Facebook profiles.
Whichever route they choose, Facebook will generate a much larger group of users who “look like” the people in these lists. The paid acquisition team can then distribute ads to a cohort of new prospects who are likely to convert into users.
For instance, during one of their Facebook advertising campaigns that promoted CRM signups, the paid acquisition team found out that creating lookalike audiences based off people who have decision maker titles, are activated users, or are listed as a sales rep in HubSpot’s CRM helped them acquire team registrations at a lower cost than lookalike audiences based off people who visited certain pages on HubSpot’s website.
| Seed List | Cost Per Team Registration |
| Decision Maker Titles | $20.31 |
| Activated Users | $20.48 |
| All Sales Reps In CRM | $23.95 |
| Registered Users | $24.33 |
| CRM Homepage Visitors | $27.66 |
| Sales Exec Same | $28.55 |
| All HubSpot Visitors | $31.48 |
| SB4 Visitors | $33.48 |
| Sales Blog Visitors | $34.14 |
4. Craft compelling ad creative.
When our paid acquisition team sits down to write ad copy, their goal is write something so compelling that it can grab the attention of a distracted millennial slouched in front of the TV, with their smartphone in one hand and a slice of pizza in the other.
So what’s the process for convincing their audience to ignore that pizza and read HubSpot’s content? After testing over 500 ad creatives during the past two years, our paid acquisition team has boiled the art of crafting compelling ad creative into three steps.
1. Pique your audience’s curiosity.
A little intrigue goes a long way in marketing. Humans are biologically driven to investigate our world rather than respond to it. And if you can evoke enough curiosity in your audience so they can’t help but satisfy it, they’ll click on your ad.
For instance, when the paid acquisition team used the tagline “The hidden gem buried within your Google Calendar, brand new from HubSpot”, it produced better results than the tagline “Scheduling meetings just got a whole lot easier with HubSpot’s CRM”.
Why? Without revealing what it actually is, the first tagline describes a new tool that’s right in your email inbox, evoking curiosity and excitement for something that seems valuable yet easily accessible.
On the contrary, the second tagline immediately gives away what the new tool is — a meeting scheduler. This doesn’t evoke enough curiosity or interest to compel people to click on the ad.
2. Blend into the news feed.
Most of your audience’s news feeds are filled with posts from their friends and family, especially after Facebook’s latest algorithm update. To avoid screaming “I’m an ad”, include a photo that actually looks natural.
For instance, the picture below looks like a stock photo. And when people see a stock photo, they’ll immediately know the post isn’t authentic.

However, the next picture looks like a regular picture a friend might post, organically blending in with your audience’s newsfeed and making a genuine first impression with them.

3. Sell a feeling, not a product.
Psychology tells us that emotions drive our behavior, while logic justifies our actions after the fact. Marketing confirms this theory — humans associate the same personality traits with brands as they do with people. Choosing between two alternatives is like choosing your best friend or significant other. The people we decide to live our lives with makes us feel something.
This is also the reason why pitching a product’s features is a lousy attempt at persuasion. Features only appeal to the logical part of your brain, which science suggests doesn’t drive action nearly as well as appealing to the emotional part of your brain does.
To pinpoint the exact emotion that resonated with our audience the most when our paid acquisition team promoted our CRM through Facebook ads, they tested over 30 angles against cost per regular user and click through rate. Here are their best and worst ones.
| Angle | Cost Per Regular User | Click Through Rate |
| Free/Alleviates Frustration | $2.86 | 1.07% |
| Transformation Version 2 | $3.95 | 0.76% |
| Data Enrichment | $4.08 | 0.68% |
| Saves Time | $4.10 | 1.02% |
| Transformation Version 1 | $4.97 | 0.72% |
| 360 Degree View of Sales Process | $9.65 | 0.53% |
| No More Falling Behind On Leads | $10.47 | 0.56% |
| Cuts Down On Stress | $10.57 | 0.64% |
5. Design a simple landing page.
Just because you’ve grabbed someone’s attention with your ad doesn’t mean your work is done. You still need to design a compelling landing page that clearly conveys the value of our offer. To help you do this, here are three principles our paid acquisition team lives by when they design their own landing pages.
1. Again, pique your audience’s curiosity.
Curiosity is the best way to convert an audience. Don’t reveal too much about your offer, but make sure to highlight its benefits.
2. Don’t distract your audience with external links.
Allowing people to exit your landing page through an external link pokes a hole in your funnel — users will leak through, diminishing your conversion rate. If visitors can leave your paid acquisition funnel, there should only be two exits: exiting out the page or signing up for the offer.
3. Test out a video.
Even though videos can explain the value of your offer in a more engaging way than text, they also serve as a distraction. This might lead to a dip in your landing pages’ conversion rates, but our paid acquisition team has noticed that videos actually increased their landing pages’ activation rate, which compensated for their loss in conversions.
| Variation | Cost Per Regular User | Cost Per Activated User |
| Video | $21.56 | $78.37 |
| No Video | $15.76 | $85.32 |
Never stop testing.
Testing your Facebook ads is like gambling — most of the time you’ll fail. But if you can quickly figure out which strategies work and which ones don’t, you can refine your Facebook advertising to the point where you’ll almost always earn the maximum bang for your buck on every dollar you spend distributing content on the social network.
