
Welcome to My Blog
The Secret History of the Google Logo
How many times have you seen the Google logo today? If it’s first thing in the morning, maybe only once or twice. If it’s later in the day, you’re probably up to 15, 20, maybe even 30-plus times.
The design is misleadingly simple. There’s a fascinating backstory to the most well-known logo on the internet, and it starts in 1996.
Google Logo History
1996: First Google Logo
The search engine’s very first logo actually predates the name “Google.” Larry Page and Sergey Brin originally called their web crawler “BackRub.” Luckily for all of us, by 1997 they’d changed to the much less creepy “Google” (a misspelling of googol, or 10100. )

1998: First (real) Google logo
Some sources credit Page with the creation of the first Google logo, while others give the dubious honor to Brin. Whomever it was, their design wasn’t exactly the most polished. An exclamation mark was added to look like Yahoo!’s logo.

1999: Ruth Kedar’s logo designs
A mutual friend introduced Brin and Page to Stanford assistant professor Ruth Kedar. Because they weren’t in love with their logo, they asked Kedar if she’d design a few prototypes.
She started with a mostly black logo using the Adobe Garamond typeface. Page and Brin like this logo because the mark in the middle looked like a Chinese finger trap, Kedar says.

The graphic designer’s next attempt used the Catull typeface (which should look familiar). The logo was meant to evoke accuracy, like a target.

Then Kedar got a bit more playful, experimenting with color and interlocking Os. Those Os ended up becoming the basis for the Os at the bottom of every search engine results page.

Between the cross-hairs and the magnifying glass, Brin and Page thought this design was a little visually overwhelming.

The next few iterations appear more like the Google logo we know and love today.
These designs feel younger and less serious than their precedents.

Kedar makes the letters pop off the page with shadowing and thicker lines.

The eighth design was the simplest yet. Ultimately, Kedar wanted to show Google’s potential to become more than just a search engine (hence the removal of the magnifying glass). She also changed the traditional order of the primary colors to reemphasize how untraditional Google was.

This version’s colors and the slanted angling make it feel youthful and energetic.

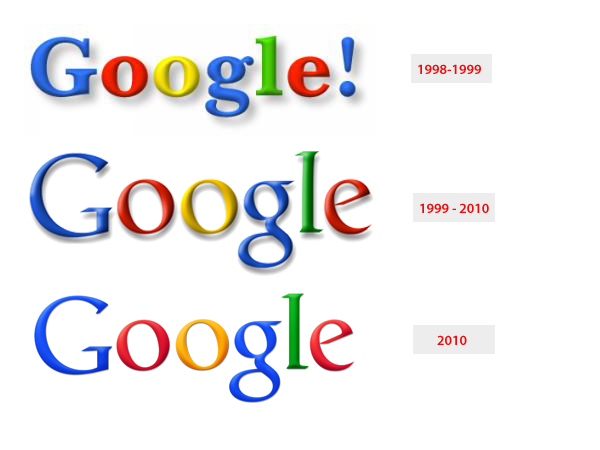
The final design is one of the most minimal. It was Google’s official logo from 1999 to 2010.
On May 6, 2010, Google updated its logo, changing the “o” from yellow to orange and removing the drop shadowing.
2015: A new logo for Google
Google’s logo changed dramatically in 2015. The company preserved its distinctive blue-red-orange-blue-green-red pattern, but changed the typeface from Catull to the custom schoolbook-inspired Product Sans.
At the same time, Google also rolled out several variations on its logo, including the rainbow “G” that represents the smartphone app and the favicon for Google websites, and a microphone for voice search.
The new logo might look simple, but the transformation was significant. Catull — the former typeface — has serifs, the small lines that embellish the main vertical and horizontal strokes of some letters. Serif typefaces are less versatile than their sans-serif typefaces, since letters vary in weight.
Product Sans is a sans-serif typeface. That means it’s easy for Google’s designers to manipulate and adapt the logo for different sizes — say, the face of an Android watch or the screen of your desktop computer. As Google’s product line becomes more and more diverse, an adaptable design becomes essential.
The logo is also meant to look young, fun, and unthreatening (read: “I’m not like other massive tech corporations, I’m a cool massive tech corporation.”) This was a prescient move — since Google unveiled this design in 2015, concerns about data privacy have reached a fever pitch.
A Dynamic Logo
Google’s logo is also now dynamic. When you begin a voice search on your phone or tablet, you’ll see the Google dots bouncing in anticipation of your query.
As you speak, those dots transform into an equalizer that responds to your voice. And once you’ve finished talking, the equalizer morphs back into dots that ripple as Google finds your results.
“A full range of expressions were developed including listening, thinking, replying, incomprehension, and confirmation,” explained While their movements might seem spontaneous, their motion is rooted in consistent paths and timing, with the dots moving along geometric arcs and following a standard set of snappy easing curves.
What’s a Google Doodle?
A Google Doodle is a short-term modification of the traditional Google logo. They’re usually used to commemorate holidays, special occasions, and birthdays of scientists, thinkers, artists, and other important people.
The first Google Doodle originated in 1998 — before the company was technically even a company. Page and Sergey were attending the Burning Man festival. As a kind of “out of office” message, they put a stick figure drawing behind the logo’s second O.

In 2000, Brin and Sergey asked then-intern Dennis Hwang to come up with a doodle for Bastille Day. Users loved it so much that they appointed Dennis “chief doodler.”
The first Doodles tended to mark well-known holidays, like Valentine’s Day, Halloween, and Indian Holi (in India). But as time has gone on, they’ve become more and more global and creative. For example, on September 1 2017 this Doodle celebrated the first day of school (or mourned it, depending on who you ask.)

Google has created more than 2,000 doodles for various homepages around the world.
To decide which events get doodles, a team gets together periodically to brainstorm. Doodle ideas come from other Googlers as well as users. The actual doodles are designed by illustrators and engineers.
To submit an idea for a doodle, email proposals@google.com.
There’s more that meets the eye to Google’s logo. As people and technology evolve, the design has too. At the rate things are changing, we’ll probably see a new version in a few years.

Spotify uses your music tastes to find festival tickets; Apple, please note

How to Maximize Your Exposure With LinkedIn Hashtags
Have you noticed more people using hashtags on LinkedIn? Looking for tips for using hashtags in your own LinkedIn marketing? In this article, you’ll learn how to use the LinkedIn Hashtags You Follow feature to develop a solid hashtag strategy for LinkedIn. #1: Explore the Hashtags You Follow Feature LinkedIn is encouraging users to post […]
The post How to Maximize Your Exposure With LinkedIn Hashtags appeared first on Social Media Examiner.
from Social Media Examiner https://ift.tt/2v1bEjP
via socialmediaexaminer
How to Quit Your Job in the Most Professional Way Possible
I ended my college baseball career over text. Granted, I didn’t really see eye-to-eye with my coach, and at the time, I didn’t exactly feel like giving him the courtesy of an in-person meeting. But, still, I had respect for him: he gave me the opportunity to continue my baseball career after high school, which lead to some of my fondest college memories.
If I could do it all over again, I would have told him face-to-face that I was leaving the team. But even though I quit the team almost four years ago, the thought of facing my coach in person and telling him that I’ve decided to move on from the team still makes me nervous. After all, he invested in my growth as a baseball player, and joining his team was one of the big reasons why I decided to attend my college. We didn’t have the best relationship, but I still felt anxious and guilty about leaving the team.

Regardless of the situation you were in when you left your job, quitting is always nerve-racking. You’ve built relationships with your boss and colleagues, and they’ve invested a lot of time and effort in your development. Their potential reaction to your decision can naturally produce a lot of anxiety: how will they handle the news? What if your manager gets mad or frustrated at you? Will you seem ungrateful for leaving the opportunity they gave you?
Despite all these scary thoughts, you must remember that you’re almost certainly not the first person who has left the company, and you definitely won’t be the last.
Quitting is a standard part of the working world. But just because quitting is normal, it’s still easy to ruffle some feathers during the resignation process. And news can travel fast in professional networks — leaving a wake of ashes out of your old office could taint your reputation at your new job. You don’t want to burn any bridges, so resigning with grace is crucial for maintaining the health of your professional relationships and, ultimately, making your next career move.
How to Quit Your Job in the Most Professional Way Possible
- Don’t tell your colleagues about your plans before you tell your manager.
- Quit in person.
- Give at least two weeks notice.
- Write a two weeks notice letter.
- Finish strong.
- Train your replacement.
- Write a goodbye email to your teammates.
- Express gratitude toward your mentors.
- Don’t blast your manager, team, or the company.
Don’t tell your colleagues about your plans before you tell your manager.
Even if you have a close relationship with your colleagues, telling them you’re moving on before you tell your manager can produce office gossip that she might overhear, passing the news about your future plans to her before you can even set up a meeting about it.
Indirectly discovering your decision could make her feel disrespected, and can lead to an awkward confrontation. If your manager hears about your resignation through the grapevine, you’ll leave your company with a damaged reputation, which can weaken your former colleagues’ references and recommendations of you in the future.
Quit in person.
Quitting with an email, leaving your resignation letter on your manager’s desk, or resigning to human resources instead of your manager could make you seem ungrateful and entitled, especially if your manager has invested a lot of time and effort into your growth.
Facing your manager in person is the most respectful way to leave your job. But you should also try to eliminate the element of surprise a resignation can produce. People don’t like surprises that trigger big changes in their day-to-day workflow, so before you randomly set up a meeting and abruptly tell your manager the unfortunate news, send her an email that simply states that you’d like to discuss your future with her.
This way, she’ll have time to process the thought of you leaving the company and be less reactive to the news when you actually meet.
Give at least two weeks notice.
Most people will tell you that it’s standard practice to give your employer two weeks notice before you leave. But that’s actually the minimum amount of notice you should give them. A three to four week notice before you officially leave for good allows your employer to spend more time finding a best-fit replacement for you.
If your former employer replaces you with someone who ends up being the wrong fit because they had to scramble through the vetting process to help an understaffed team cover your workload, they might blame their hiring mishap on your short notice and think less of your professional prowess.
If you don’t know the optimal amount of notice you should give, follow your company’s policy about resigning, or take note of the amount of notice other employees gave before they left. If you’re a manager, you need to give your employer even more time to find your replacement — management is arguably the most important part of any team and one of the most challenging roles to replace. According to Leonard Schlesinger, a Professor at Harvard Business School, managers should submit their resignation letter four to six weeks before they leave.
Write a two weeks notice letter.
A two weeks’ notice letter is a formality, but sending your resignation information to both human resources and your manager clarifies that you’re leaving the company, solidifies the date of your last day, and prevents the company from making you work longer than intended.
Writing a two weeks’ notice letter is also the only way to officially state that you ended your tenure at a company, not the other way around. Your future employer will most likely request your employment records to find out if you actually left on your own or got fired, so it’s important to put this information in writing.
When you write your two weeks’ notice letter, keep it short and sweet. You don’t need to delve into the reasoning of why you’re leaving or what would’ve made you stay at the company. All you need to do is include three main elements in your resignation letter: the fact that you’re resigning, when you’re last day work will be, and a brief note of appreciation for the opportunity.
You can also include the date of your resignation, so your employer can verify that you gave them an ample amount of notice before you left, and an offer to train your replacement.
Here’s an example of a resignation letter you can follow:
July 24, 2018
Dear Mr./Ms. Manager
I’m writing to let you know that I’m resigning from my position as marketing coordinator at Outbound, Incorporated. My last day will be on August 24, 2018.
This was a tough decision to make. Outbound, Inc. has done great things for my career development. I greatly appreciate the amount of time and effort you invested into my professional growth and all the opportunities you gave me. Without your guidance, I wouldn’t be where I am today.
Please let know how I can help out my replacement. I’m more than happy to train him/her and accelerate their transition period. I wish you and Outbound, Inc. all the best.
Sincerely,
Your Signature
Your Typed Name
Finish strong.
Maintaining your productivity and motivation will prove to your manager and colleagues that you’re a responsible and accountable professional. This will leave a strong lasting impression on your colleagues and make them more likely to refer or recommend you for jobs in the future — humans have a recency bias where they remember and emphasize the most recent observations about people more than the ones in the near or distant past.
If the last thing your colleagues observe about you is that you stay dedicated and engaged at work, even though you knew you’re moving on to a new role in matter of a few weeks, they’ll remember you as the person who was committed to finishing what they started more than the person who wrote a viral blog post during their first month of work.
If you slack off during your final weeks, especially when your team is working on a big project or if you have several important tasks to finish, you’ll leave your team with the burden of completing your unfinished pile of work and a negative last impression of your character.
Train your replacement.
Helping your replacement learn the ropes of your old role and accelerating her transition will not only help your old team gain back some lost productivity, but it will also display your gratitude for the opportunity your former employer gave you.
Training your replacement is an extra step you don’t always need to take (and often times won’t have the opportunity to). But your generosity will leave a mark on your colleagues and pay off in the future.
If you can’t directly help your replacement overcome your old role’s learning curve, write her a comprehensive guide that covers key processes, contacts, and advice.
Write a goodbye email to your teammates.
Out of all your colleagues, you’ll usually grow closest with your teammates. They deserve to know about your future plans directly from you. Seeing your empty desk and connecting the dots themselves will make them feel like your relationship didn’t mean much to you.
Your goodbye email is a reflection of the positive moments you shared with your teammates, so write about the good times, avoid talking about the bad, and express gratitude for the opportunity and privilege of working alongside with them.
You can also give them your personal email address so you can keep in touch.
Express gratitude toward your mentors.
The people who impacted your career the most deserve a personal thank you. Even if you didn’t have the best relationship with your manager, her job was to oversee your growth, so she likely invested a ton of time and effort into you. You probably wouldn’t be where you were today without her guidance.
To express your gratitude, verbally thank her, tell her how much she taught you, and offer some feedback during your exit interview. You could also write a personal thank you note that covers all of these points.
Don’t blast your manager, team, or the company.
Unleashing an emotional burst of criticism toward your manager or human resources might feel great in the moment, especially if you’ve had a rocky relationship with your manager. But your eruption could wound her self-esteem and anger her, changing her opinion of you and ruining the future references that she’ll give you.
During your exit interview, try to focus on the positives of your experience and constructively voice your concerns about the company, team, or your manager. You don’t want to spark any backlash — there’s nothing you can gain from it. You’re already leaving the organization.
Quitting your job is a science and art.
Quitting your job requires a lot of courage and skill. You can feel guilty about leaving your job, especially if your manager has invested a lot of time and effort in your development, but, ultimately, you need to do what’s best for your career.
That said, quitting your job is a delicate process. If you want to do what’s best for your career, you need to transition out of your company in the smoothest way possible.
By not ruffling any feathers, respecting your manager, and appreciating the opportunity of working at your old company, you can leave and join companies with your network and reputation intact.



How to Create an Excel Pivot Table With Medians
As a marketer, you already know that Microsoft Excel is a powerful tool for sorting, analyzing, and sharing data. Trouble is, some of the most beneficial formulas are really tough to figure out — even for us data-crunchers.
For example, we’ve walked through the steps of how to create a pivot table before, but unfortunately pivot tables don’t compute median values, which can be highly useful information with which organizations can analyze their growth.
Luckily, there is a workaround in Excel called the array, where you can use formulas to calculate the median of a data set. We’ll walk you through how to do that in the example below, which features a list of customers along with their company size and sales cycle length. For context, the two tables (average vs. median) look at the typical sales cycle length for each company size.

Ready to see how it works? Download the file here to follow along with the instructions below.
The Excel Pivot Table Alternative for Calculating Median
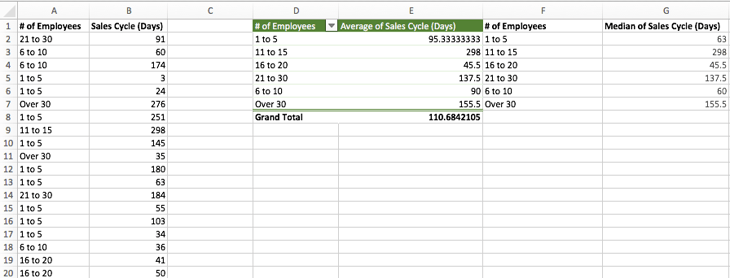
The “Average of Sales Cycle (Days)” table was created with a pivot table. The “Median of Sales Cycle (Days)” table was created by doing the following:
1) Create a column with the six possible “employees” options: 1 to 5, 6 to 10, 11 to 15, etc.
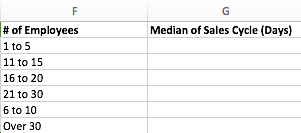
2) In the cell to the right of the “1 to 5” value, type the following: =MEDIAN(IF($A$2:$A$20=D2, $B$2:$B$20))
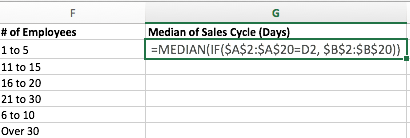
3) When you’ve closed the final parenthesis and while you’re still in the cell, type Control+Shift+Enter (on a PC) or Command+Shift+Enter (on a Mac) to populate the median. This is how you tell Excel that you want to create an array.
Note: Once you do this, you will see curly brackets { } appear around your formula. If you type in the curly brackets yourself or copy/paste the formula above into the cell, Excel won’t understand what they mean.
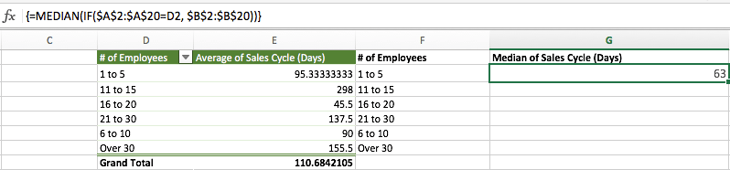
4) Copy the median amount in the first cell (G2 in the example) into the rest of the empty cells in the table (G3-G7 in the example).

Here is a breakdown of what these formula inputs mean:

- This is the column of values for “# of Employees” in Column A
- This is the contents of cell D2: “1 to 5”
- This is the column of values for “Sales Cycle (Days)” in Column B
Translation: First, the IF statement finds all rows where the # of Employees = “1 to 5”; it then stores all of the corresponding “sales cycle” values in an array. The MEDIAN function then pulls the median out of that array of sales cycles for the “1 to 5” customers.
When to Use Median to Analyze Data
Average (or mean) and median are common measures of data, but generally speaking average is more commonly used than median.
While average is a helpful way to determine what a typical member of a data set looks like, in some cases, median actually provides a fuller picture of a data set within its context.
In fact, average can actually be misleading if the data set is highly skewed and a large set of the population is similar with several far-away outliers. In such cases, the median is a better indicator of what a typical member of the data set looks like.
For example, in the United States, household income is commonly measured and referred to in terms of the median. This could be due to the fact that high-income inequality nationwide would make the average a poor representation of a typical American household’s income.
Here’s another scenario: If a business were analyzing sales, it would be important for them to consider the types of data in the sets they were analyzing. For example, calculating the average amount of total monthly sales would be a good indicator of performance because each month has roughly the same number of days and opportunities to sell, so the average would show what a baseline expectation of productivity would be.
However, the average may not be the best measure to analyze each sale’s size that year. If the organization sold products varying in price from $10 to $25,000, then the average sale size might be skewed by the lowest and highest prices. Instead, the median would give the organization an idea of if sales were typically higher or lower in price. See the difference?
Ultimately, analyzing both the average and the median will provide the most full picture possible of your organization’s raw data, and pivot tables in Excel, such as the ones above, can help you analyze both data sets.
Want more Excel tips? Check out this list of Excel shortcuts.


12 Blogging Mistakes Most Beginner Bloggers Make
Sometimes, when I tell people that I blog for a living, they roll their eyes. “That’s so easy,” they say. “You get a paycheck for sitting on the internet all day and writing. A monkey could do your job!”
That’s when I roll my eyes. See, people are quick to deem blogging as a no-brainer job. But when they actually sit down to write their first couple of posts, it hits them: This is way harder than I thought. Like any person starting a new job, they mess things up.
That’s okay — it happens to pretty much every new blogger. Luckily, it’s pretty easy to avoid these roadblocks if you know they’re coming.
So for all of you beginner bloggers out there who are looking to get up-to-speed quickly, keep on reading. Below are 12 common mistakes most beginners make and some tips on how to avoid them.
Blogging for Newbies:
- Come up with ideas for blog posts that will benefit your company.
- Write like you talk.
- Show your personality.
- Start with a very specific working title.
- Create an outline and use headers.
- Blog consistently with the help of an editorial calendar.
- Use data to back up your claims.
- Take 30 minutes to edit your post.
12 Most Common Beginner Business Blogging Mistakes (and tips on how to avoid them)
Mistake 1: You think of ideas in a vacuum.
When you start blogging, ideas will come to you at random times — in the shower, on a run, while on the phone with your mom. While the ideas may come at random moments, the ideas themselves should never be random. Just because it’s a good idea in general doesn’t mean it’s a good idea for your company.
Solution: Your blog posts should all serve larger company goals.
The reason you’re blogging is to grow your business, so all of your blog post ideas should help serve those growth goals. They should have natural tie-ins to issues in your industry and address specific questions and concerns your prospects have.
Need help figuring out what those goals are and how to address them? Chat with your manager about the larger company goals, and then schedule a meeting with someone on the sales team to hear what questions they get asked most often. After both meetings, you should know which goals you need to achieve and have some ideas on how to achieve them.
Mistake 2: Your writing’s too stiff.
Writing a blog post is much different than writing a term paper. But when bloggers first start out, they usually only have experience with the latter. The problem? The style of writing from a term paper is not the style of writing people enjoy reading.
Let’s be honest: Most of the people who see your post aren’t going to read the whole thing. If you want to keep them interested, you have to compel them to keep reading by writing in a style that’s effortless to read.
Solution: Write like you talk.
It’s okay to be more conversational in your writing — in fact, we encourage it. The more approachable your writing is, the more people will enjoy reading it. People want to feel like they’re doing business with real people, not robots.
So loosen up your writing. Throw in contractions. Get rid of the jargon. Make a pun or two. That’s how real people talk — and that’s what real people like to read.
Mistake 3: You think people care about you as a writer.
It sounds harsh, but it’s the truth: When people first start out blogging, they think that their audience will be inherently interested in their stories and their interests … but that’s not the case. It’s no knock against them as a person — it’s just that when you’re new, no one is interested in you and your experiences. People care way more about what you can teach them.
Solution: Show your personality; don’t tell it.
Even though people don’t really care that it’s you that’s writing the post, you can infuse parts of your personality in your writing to make them feel more comfortable with you. How you do that is entirely up to you. Some people like to crack jokes, some like to make pop culture references, and others have a way with vivid descriptions.
HubSpot’s Director of Content Corey Wainwright is particularly good at this. Here’s an example from the introduction of one of her posts:
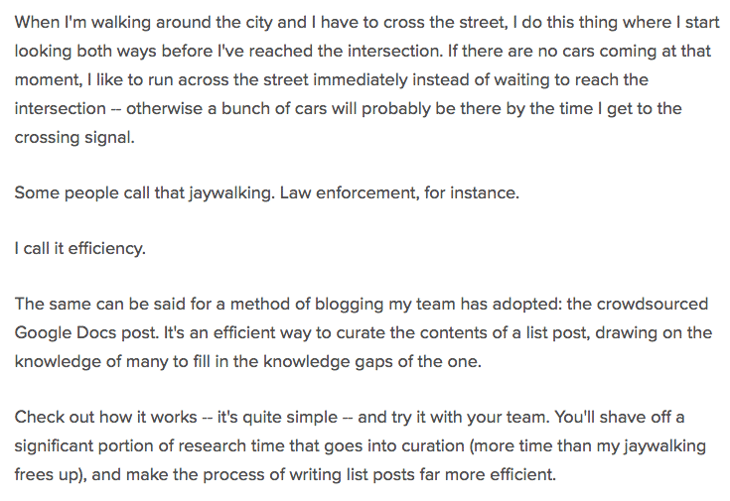
To infuse personality into your own writing, try looking for ways to relate to your readers on the topic you’re writing about — then write in the first person as if you’re hanging out with them and chatting about it. Make your tone personal, approachable, and engaging, just like you would in a face-to-face conversation.
Mistake 4: Your topics are too broad.
When people start blogging, they generally want to write on really big topics like:
- “How to Do Social Media Marketing”
- “Business Best Practices”
- “How to Make Money on the Internet”
Topics like these are far too broad. Because there are so many details and nuances in these topics, it’s really hard to do a good job answering them. Plus, more specific topics tend to attract smaller, more targeted audiences, which tend to be higher quality and more likely to convert into leads and customers.
So, to get the most short-term and long-term benefits of blogging, you’ll need to get way more specific.
Solution: Create very specific working titles.
Nailing really specific topics is crucial to knocking your first few posts out of the park. My colleague Corey wrote another fabulous post on how to do that. Go read it now. Seriously. She’ll tell you how to pick a topic that works for business blogs, and walk you through the process of narrowing it into a working title.
The working title isn’t final — it’s just a concrete angle you can use to keep your writing on track. Once you nail those two things, it’s much easier to write blog posts.
Mistake 5: Your writing is a brain dump.
Sometimes when I get a great idea I’m excited about, it’s really tempting to just sit down and let it flow out of me. But what I get is usually a sub-par blog post.
Why? The stream-of-consciousness style of writing isn’t really a good style for blog posts. Most people are going to scan your blog posts, not read them, so it needs to be organized really well for that to happen.
Solution: Use a specific post type, create an outline, and use headers.
The first thing you should do is choose what type of blog post you’re going to write. Is it a how-to post? A list-based post? A curated collection post? A SlideShare presentation? For help on this, download our free templates for creating five different types of blog posts. Once you have a template down, it’ll be easier to write your outline.
Writing an outline makes a big difference. If you put in the time up front to organize your thoughts and create a logical flow in your post, the rest becomes easy — you’re basically just filling in the blanks.
To write a blog post outline, first come up with a list of the top takeaways you want your readers to get from your post. Then, break up those takeaways into larger section headers. When you put in a section header every few paragraphs, your blog post becomes easier and more enjoyable to read. (And plus, header text with keywords is good for SEO.) When you finally get to writing, all you’ll have to do is fill in those sections.
Mistake 6: You don’t use data as evidence.
Let’s say I’m writing a blog post about why businesses should consider using Instagram for marketing. When I’m making that argument, which is more convincing?
- “It seems like more people are using Instagram nowadays.”
- “Instagram’s user base is growing far faster than social network usage in general in the U.S. Instagram will grow 15.1% this year, compared to just 3.1% growth for the social network sector as a whole.”
The second, of course. Arguments and claims are much more compelling when rooted in data and research. As marketers, we don’t just have to convince people to be on our side about an issue — we need to convince them to take action. Data-driven content catches people’s attention in a way that fluffy arguments do not.
Solution: Use data and research to back up the claims you make in your posts.
In any good story, you’ll offer a main argument, establish proof, and then end with a takeaway for the audience. You can use data in blog posts to introduce your main argument and show why it’s relevant to your readers, or as proof of it throughout the body of the post.
Some great places to find compelling data include:
Mistake 7: Your content borders on plagiarism.
Plagiarism didn’t work in school, and it certainly doesn’t work on your company’s blog. But for some reason, many beginner bloggers think they can get away with the old copy-and-paste technique.
You can’t. Editors and readers can usually tell when something’s been copied from somewhere else. Your voice suddenly doesn’t sound like you, or maybe there are a few words in there that are incorrectly used. It just sounds … off.
Plus, if you get caught stealing other people’s content, you could get your site penalized by Google — which could be a big blow to your company blog’s organic growth.
Solution: Learn how to cite others.
Instead, take a few minutes to understand how to cite other people’s content in your blog posts. It’s not super complicated, but it’s an essential thing to learn when you’re first starting out.
Mistake 8: You think you’re done once the writing’s done.
Most people make the mistake of not editing their writing. It sounded so fluid in their head when they were writing that it must be great to read … right?
Nope — it still needs editing. And maybe a lot of it.
Solution: Take 30 minutes to edit your piece.
Everyone needs to edit their writing — even the most experienced writers. Most times, our first drafts aren’t all that great. So take the time you need to shape up your post. Fix typos, run-on sentences, and accidental its/it’s mistakes. Make sure your story flows just as well as it did in your outline.
To help you remember all the little things to check before publishing, check out our checklist for editing and proofreading a blog post.
Mistake 9: You try to make every post perfect.
I hate to break it to you, but your blog post is never going to be perfect. Ever.
There will always be more things you can do to make your posts better. More images. Better phrasing. Wittier jokes. The best writers I know, know when to stop obsessing and just hit “publish.”
Solution: At a certain point, just ship the post.
There’s a point at which there are diminishing returns for getting closer to “perfect” — and you’re really never going to reach “perfect” anyway. So while you don’t want to publish a post filled with factual inaccuracies and grammatical errors, it’s not the end of the world if a typo slips through. It most likely won’t affect how many views and leads it brings in.
Plus, if you (or your readers) find the mistake, all of you have to do is update the post. No biggie. So give yourself a break once and a while — perfect is the enemy of done.
Mistake 10: You don’t blog consistently.
By now, you’ve probably heard that the more often you blog, the more traffic you’ll get to your website — and the more subscribers and leads you’ll generate from your posts. But as important as volume is, it’s actually more important that you’re blogging consistently when you’re just getting started. If you publish five posts in one week and then only one or two in the next few weeks, it’ll be hard to form a consistent habit. And inconsistency could really confuse your subscribers.
Instead, it’s the companies that make a commitment to regularly publishing quality content to their blogs that tend to reap the biggest rewards in terms of website traffic and leads — and those results continue to pay out over time.
To help establish consistency, you’ll need a more concrete planning strategy.
Solution: Use an editorial calendar.
Use it to get into the habit of planning your blog post topics ahead of time, publishing consistently, and even scheduling posts in advance if you’re finding yourself having a particularly productive week.
Here at HubSpot, we typically use good ol’ Google Calendar as our blog editorial calendar, which you can learn how to set up step-by-step here. Or, you can click here to download our free editorial calendar templates for Excel, Google Sheets, and Google Calendar, along with instructions on how to set them up.
Mistake 11: You concentrate your analytics on immediate traffic.
Both beginner bloggers and advanced bloggers are guilty of this blogging mistake. If you concentrate your analysis on immediate traffic (traffic from email subscribers, RSS feeds, and social shares), then it’s going to be hard to prove the enduring value of your blog. After all, the half-life for those sources is very brief — usually a day or two.
When marketers who are just starting their business blogs see that their blog posts aren’t generating any new traffic after a few days, many of them get frustrated. They think their blog is failing, and they end up abandoning it prematurely.
Solution: Focus on the cumulative potential of organic traffic.
Instead of focusing on the sudden decay of short-term traffic, focus instead on the cumulative potential of organic traffic. Over time, given enough time, the traffic from day three and beyond of a single blog post will eclipse that big spike on days one and two thanks to being found on search engine results pages through organic search. You just have to give it a while.
To help drive this long-term traffic, make sure you’re writing blog posts that have durable relevance on a consistent basis. These posts are called “evergreen” blog posts: They’re relevant year after year with little or no upkeep, valuable, and high quality.
Over time, as you write more evergreen content and build search authority, those posts will end up being responsible for a large percentage of your blog traffic. It all starts with a slight shift in perspective from daily traffic to cumulative traffic so you can reframe the way you view your blog and its ROI entirely.
Mistake 12: You aren’t growing subscribers.
Once you start blogging, it’s easy to forget that blogging isn’t just about getting new visitors to your blog. One of the biggest benefits of blogging is that it helps you steadily grow an email list of subscribers you can share your new content with. Each time you publish a new blog post, your subscribers will give you that initial surge of traffic — which, in turn, will propel those posts’ long-term success.
The key to getting significant business results (traffic, leads, and eventually customers) all starts with growing subscribers. use HubSpot’s email tool to easily set up these regular email sends, as well as set up a welcome email for new subscribers.)
Next, add subscription CTAs to your blog (and elsewhere, like the footer of your website) to make it easy for people to opt in. These CTAs should be simple, one-field email opt-in forms near the top of your blog, above the fold. As for where to put these CTAs, we typically place our blog CTAs at the bottom of our blog posts or add a slide-in, which you can learn how to do using a free tool called Leadin here.
You can also create a dedicated landing page for subscribers that you can direct people to via other channels such as social media, other pages on your website, PPC, or email. (For a list of more simple ways to attract subscribers, read this blog post; for more advanced ideas, read this one.)
Don’t worry if you read through this list and are now thinking to yourself, Well this is awkward … I’ve made literally every single one of these mistakes. Remember: I used the word “common” to describe these mistakes for a reason. The more you blog, the better you’ll get at it — and you’ll reap the benefits in terms of traffic and leads in the process.
We hope you’ll use this list of mistakes as fuel for the fire to step up your blogging game. After all, the benefits of keeping up a healthy business blog will be well worth the time and effort.


How to Create a Marketing Plan With These Free Templates
Do you take a good, hard look at your team’s marketing strategy every year?
You should. An annual marketing plan helps you set your marketing on the right course to make your company’s business goals a reality. Think of it as a high-level plan that guides the direction of your team’s campaigns, goals, and growth.
Without one, things can get messy — and it’s nearly impossible to put a number on the budget you’ll need to secure for the projects, hiring, and outsourcing you’ll encounter over the course of a year if you don’t have a plan.
Keep in mind there are variations to the marketing plan you need, depending on your industry and the goals of your marketing team. To make your plan’s creation easier, we’ve put together a list of what to include in your plan and a few different planning templates where you can easily fill in the blanks.

To start, let’s take a look at what a high-level marketing plan has inside.
Marketing Plan Elements
Marketing plans can get quite granular to reflect the industry you’re in, whether you’re selling to consumers (B2C) or other businesses (B2B), and how big your digital presence is. Nonetheless, here are six elements every effective marketing plan includes:
1. Business Summary
In a marketing plan, your Business Summary is exactly what it sounds like: a summary of the organization. This includes the company name, where it’s headquartered, and its mission statement — all of which should be consistent with the business as a whole.
Your marketing plan’s business summary also includes a SWOT analysis, which stands for the business’s strengths, weaknesses, opportunities, and threats. Be patient with your business’s SWOT analysis; you’ll write most of it based on how you fill out the next few marketing plan elements below.
2. Business Initiatives
The Business Initiatives element of a marketing plan helps you segment the various goals of your department. Be careful not to include big-picture company initiatives, which you’d normally find in a business plan. This section of your marketing plan should outline the projects that are specific to marketing. You’ll also describe the goals of those projects and how those goals will be measured.
3. Target Market
Here’s where you’ll conduct some basic market research. If your company has already done a thorough market research study, this section of your marketing plan might be easier to put together.
Ultimately, this element of your marketing plan will help you describe the industry you’re selling to, an analysis of your competitors, and your buyer persona. A buyer persona is a semi-fictional description of your ideal customer, focusing on traits like age, location, job title, and personal challenges.
4. Market Strategy
Your Market Strategy uses the information included in your Target Market section to describe how your company should approach the market. What will your business offer your buyer personas that your competitors aren’t already offering them?
In a full-length marketing plan, this section can contain the “seven Ps of marketing.” These Ps are product, price, place, promotion, people, process, and physical evidence. (You’ll learn more about these seven sub-components inside our free marketing plan template, which you can download below.)
5. Budget
Don’t mistake the Budget element of your marketing plan with your product’s price or other company financials. Your budget describes how much money the business has allotted the marketing team to pursue the initiatives and goals outlined in the elements above.
Depending on how many individual expenses you have, you should consider itemizing this budget by what specifically you’ll spend your budget on. Example marketing expenses include a marketing agency, marketing software, paid promotions, and events (those you’ll host and/or attend).
6. Marketing Channels
Lastly, your marketing plan will include a list of your marketing channels. While your company might promote the product itself using certain ad space, your marketing channels are where you’ll publish the content that educates your buyers, generates leads, and spreads awareness of your brand.
If you publish (or intend to publish) on social media, this is the place to talk about it. Use the Marketing Channels section of your marketing plan to lay out which social networks you want to launch a business page on, what you’ll use this social network for, and how you’ll measure your success on this network. Part of this section’s purpose is to prove to your superiors, both inside an outside Marketing, that these channels will serve to grow the business.
Businesses with extensive social media presences might even consider elaborating on their social strategy in a separate social media plan template — which you can download below.
Free Marketing Plan Template [Word]
Now that you know what to include in your marketing plan, it’s time to grab your marketing plan template and see how best to organize the six elements explained above. The following marketing plan template opens directly in Microsoft Word, so you can edit each section as you see fit:
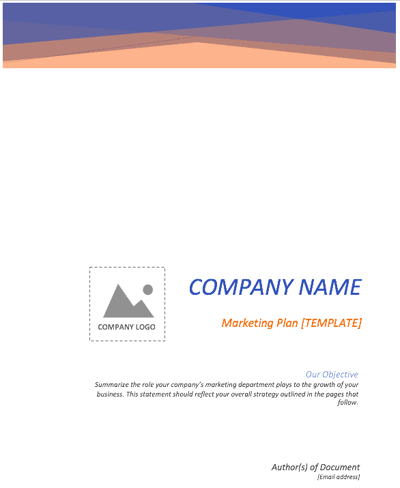
Download your marketing plan template here.
In this marketing plan template, you’ll get to fill in the following contents to suit your company:
Business Summary
- Company Name
- Marketing Leadership Team
- Headquarters, Office Locations
- Mission Statement
- SWOT Analysis
Business Initiatives
- Overarching company initiatives
- Marketing initiatives, goals, metrics
Target Market
- Industry Name
- Buyer Persona(s)
- Competitive Analysis
Market Strategy
- Product
- Price
- Promotion
- People
- Process
- Physical Evidence
Budget
Marketing Channels
Social Media Marketing Plan Templates
As marketing departments grow, so will their presence on social media. And as as their social media presence grows, so will their need to measure, plan, and re-plan what types of content they want to publish across each network.
If you’re looking for a way to deepen your social media marketing strategy — even further than the marketing plan template above — the following collection of social media marketing plan templates is perfect for you:
Download 10 social media reporting templates here.
In the above collection of marketing plan templates, you’ll get to fill in the following contents (and more) to suit your company.
- Annual social media budget tracking
- Weekly social media themes
- Required social media image dimension key
- Pie chart on social media traffic sorted by platform
- Social media post calendar and publish time
Simple Marketing Plan Template
Of course, this type of planning takes a lot of time and effort. So if you’re strapped for time before the holidays, give our new Marketing Plan Generator a try. This tool simplifies yearly planning and lays your strategies, initiatives, and goals out in a simple template so you can identify what’s most important for the coming year.
Try our free Marketing Plan Generator here.
Once you’ve filled in your information, you’ll come away with a plan that helps you:
- Outline your annual marketing strategy
- Identify your most important annual initiatives
- Nix the projects that won’t help you hit your 2017 goals
- Track the right metrics throughout the year
- Align your team through a common mission
Pro Tip: The best way to set up your marketing plan for the year is to start with quick wins first, that way you can ramp up fast and set yourself (and your team) up to hit more challenging goals and take on more sophisticated projects by Q4. So, what do you say? Are you ready to give it a spin?


iPhone: How to toggle Call waiting

One of the great benefits of modern cell phones and carriers is that you’re able to put calls on hold while you’re currently in a phone call. While you could easily create a 3-way call, that’s not always convenient nor appropriate for the case. In comes Call waiting, a feature that lets you have two separate calls and lets you interact with an incoming call. Disabling the feature will force all incoming calls to go to voicemail if you’re currently in a call.
Verizon wants to partner with either Apple or Google as its 5G TV provider, report says

CIRP: Spotify’s high churn rate in the U.S. likely due to increased competition from Apple Music

It’s no secret that the streaming music industry has become incredibly competitive over recent years with the launch of Apple Music. A new report from Consumer Intelligence Research Partners (CIRP) analyzes Spotify’s Q2 2018 performance and the role Apple Music could have…
YouTube testing new ‘Explore’ tab w/ broader personalized video recommendations

In an effort to be more transparent, YouTube announced via a tweet that it is testing a new Explore tab for iOS users, rolling out today.
These are the 18 best iOS apps with dark mode, according to Apple

As part of iOS 11 last year, Apple completely redesigned the App Store with a focus on curation from human editors. As part of this curation, Apple’s editors create lists of the best application in certain categories every day.
One of the more recent lists centers around the the best apps with a dark mode option…
Mac: How to lock screen

Whether you’re new to Mac or just haven’t had a need to set up password protection in macOS before, follow along for how to customize and lock your screen.
9to5Mac Daily: July 23, 2018

Listen to a recap of the top stories of the day from 9to5Mac. 9to5Mac Daily is available on iTunes and Apple’s Podcasts app, Stitcher, TuneIn, Google Play, or through our dedicated RSS feed for Overcast and other podcast players.
Leaked internal Apple videos detail iPhone X, iMac Pro, MacBook Pro repairs

A slew of Apple internal repair videos have leaked, with detailed descriptions and walkthroughs on how to repair everything from the iPhone X to iMac Pro.
9to5Toys Lunch Break: 9.7-inch iPad from $300, ecobee4 HomeKit Thermostat $200, R.B.I. Baseball 18 $5, more

tKeep up with the best gear and deals on the web by signing up for the 9to5Toys Newsletter. Also, be sure to check us out on: Twitter, RSS Feed, Facebook, Google+ and Safari push notifications.
Listen to the new 9to5Toys Daily Podcast:
Philips unveils new ‘completely weatherproof’ outdoor Hue LightStrip with HomeKit

Philips announced a new outdoor lineup of Hue lights this past spring that consists of spot lights, bollard lights, and luminaries. Now the company is expanding its offerings, unveiling an outdoor version of its popular LED LightStrip.
‘Planet of the Apps’ star Gary Vaynerchuk attributes show’s failure to Apple’s bad marketing

Apple officially entered the original content market last year with its ‘Planet of the Apps’ reality TV series, but viewer and critic reactions to the series were less than positive. Now, vocal entrepreneur and star of the series, Gary Vaynerchuk is slamming Apple for the way it marketed the show…