
Welcome to My Blog
Why Apple should make Mac chips: Windows 10 ARM laptops will have multi-day battery life
Industry players, such as Microsoft, have arrived in Hong Kong this week for Qualcomm’s 4G/5G Summit, an annual event to strategize and discuss trends and technology developments.
One of the topics of surefire interest revolves around Microsoft’s upcoming ARM-powered Windows 10 laptop. In a glimpse into its battery life potential, Microsoft’s Principal Group Program Manager for Connectivity Partners, Pete Bernard, told Trusted Reviews that he only needs to “charge it every couple of days or so.”
Having multi-day battery life on a real, full-featured laptop would indeed, as Bernard puts it, be a game-changing innovation. Yet, when you consider how much better Apple’s custom-designed silicon is compared to Qualcomm’s Snapdragon chips, the possibilities for an ARM-powered Mac become all the more desirable. more…
Cardhop for Mac is a seriously intelligent contacts app from the makers of Fantastical
Flexibits, the team behind the excellent calendar app Fantastical, is out with a brand new Mac app that turns your messy contacts database into something completely usable and interactive. Cardhop is a super smart contacts app that lives in the menu bar and makes the built-in Contacts app feel like it was made 20 years ago.
AirBeamTV app now lets you mirror your iPhone to an LG TV
AirBeamTV last week launched an iOS app that let you mirror and iPhone or iPad screen to a Samsung television without the need for an Apple TV box. It’s today announced a separate version that works with LGs televisions …
Twitter targeting creep photos, unwanted sexual advances & more after #WomenBoycottTwitter protest
Twitter has responded to Friday’s #WomenBoycottTwitter protest by revealing new steps it will be taking to tackle abusive posts on the platform.
The protest, in which many women refrained from posting on the social network for 24 hours, led to an 8-tweet response from CEO Jack Dorsey in which he said that he recognized the company was not doing enough, and promised new rules in five areas …
Adobe introduces new cloud-based Lightroom CC, revamped photography plans
Adobe revealed a major update to its popular photo editing tool, Lightroom CC, today with a brand new interface, workflow, and sharp focus on cloud-based editing. The new photography service, previously known as Project Nimbus, coincides with a series of new Creative Cloud photography plans tailored for new and increasingly mobile workflows.
Adobe MAX 2017: New Creative Cloud apps, next generation Lightroom, Sensei updates, more
Adobe announced a flurry of new applications as well as features for existing products today as it kickstarts Adobe MAX 2017, the company’s annual creativity conference. This year Adobe is making a heavy investment in artificial intelligence, with updates powered by Adobe Sensei, a machine learning platform geared towards creative tools that was first launched last year at Adobe MAX. Let’s take a closer look at everything that was announced.
Apple and GE announce partnership to make ‘industrial’ apps for iPhone and iPad
Apple and GE (General Electric) today announced a new partnership to build enterprise ‘industrial’ apps for the iOS platform. This includes a new development SDK focused on the Internet of Things.
Tim Cook said GE is an “ideal partner with a rich history of innovation”. GE will make apps for itself and its business clients, and deploy iPhones and iPad as standard across the organization.
A Beginner’s Guide to SSL: What It Is & Why It Makes Your Website More Secure
Have you ever noticed that some URLs start with “http://” while others start with “https://”? Perhaps you noticed that extra “s” when you were browsing websites that require giving over sensitive information, like when you were paying bills online.
But where’d that extra “s” come from, and what does it mean?
To put it simply, the extra “s” means your connection to that website is secure and encrypted any data you enter is safely shared with that website. The technology that powers that little “s” is called SSL, which stands for Secure Sockets Layer.
In this post, I’m going to break down what SSL is, an updated version of Google Chrome that will soon flag websites which are not secure, and how you can evaluate and get SSL.
What is SSL?
First, let’s start with a definition from SSL.com:
SSL is the standard security technology for establishing an encrypted link between a web server and a browser. This link ensures that all data passed between the web server and browser remain private.”
Let’s break that down.
When you land on a website page that has a form, after that form is filled-in and you hit ‘submit’, the information you just entered can be intercepted by a hacker on an unsecure website.
This information could be anything from details on a bank transaction, to high-level information you enter to register for an offer. In hacker lingo, this “interception” is often referred to as a “man-in-the-middle attack.” The actual attack can happen in a number of ways, but one of the most common is this: A hacker places a small, undetected listening program on the server hosting a website. That program waits in the background until a visitor starts typing information on the website, and it will activate to start capturing the information and then send it back to the hacker. Scary stuff that is no longer just is sci-fi movies.
But when you visit a website that’s encrypted with SSL, your browser will form a connection with the webserver, look at the SSL certificate, and then bind together your browser and the server. This binding connection is secure so that no one besides you and the website you’re submitting the information to can see or access what you type into your browser.
This connection happens instantly, and in fact many suggest is now faster than connecting to an unsecure website. You simply have to visit a website with SSL, and voila: Your connection will automatically be secured.
Everything You Need to Know About Chrome 62 and SSL
Google is getting ready to release a new version of their popular Chrome browser, version 62, which will begin to indicate that a page is not secure if it contains a form, but does not have SSL-enabled. Chrome has approximately 47% browser market share, so when this update is rolled-out a significant number of websites will be affected almost immediately.
According to recent HubSpot Research, up to 85% of people will not continue browsing if a site is not secure. In January 2017, Google rolled out a similar update that only applied to sites collecting sensative information such as passwords or credit card numbers. With that in mind, users are now familiar with seeing this “not secure” warning, and per the research below will often leave a site because of it.
If you utilize incognito mode in your browser, Chrome will always indicate a page is not secure if it does not have a valid-SSL certificate installed. If you use Chrome outside of incognito mode then this “not secure” warning will only display when starting to enter information into a form.
Image credit: 9to5Google
This means that wherever you host content that contains a form, even if it’s just asking for an email address, you should enable SSL. Keep in mind that if you have content hosted in different platforms, it will be important to talk to each of them and ensure SSL is setup before this Google Chrome update is live. In reality, if it’s not cost prohibitive for you, it’s best to enable SSL across your entire website regardless if a form exists on the page because it can have SEO benefits that we’ll cover in the next section.
Is SSL good for SEO?
Yes. While the primary purpose of SSL is securing information between the visitor and your website, there are benefits for SEO as well. According to Google Webmaster Trends Analysts Zineb Ait Bahajji, SSL is now part of Google’s search ranking algorithm:
Over the past few months we’ve been running tests taking into account whether sites use secure, encrypted connections as a signal in our search ranking algorithms. We’ve seen positive results, so we’re starting to use HTTPS as a ranking signal.”
In addition, Google has publicly stated that two websites which are otherwise equal in search results, if one has SSL enabled it may receive a slightly rank boost to outweigh the other. As a result, there is a clear SEO benefit to enabling-SSL on your website, and across all your content.
How can I tell if my website has SSL?
When you visit a website with SSL, there are a few distinct differences that display within the browser.
Check your site for SSL with our free tool.
1) The URL says “https://” and not “http://”.
It looks like this:

2) You’ll see a little padlock icon in the URL bar.
It’ll show up either on the left- or right-hand side of the URL bar, depending on your browser. You can click on the padlock to read more information about the website and the company that provided the certificate.
3) The certificate is valid.
Even if a website has the “https://” and a padlock, the certificate could still be expired — meaning your connection wouldn’t be secure. In most cases, a site that displays as https will be secure, but if you encounter a site that asks for a lot of personal information it may be worth double-checking to be sure the certificate is valid.
To find out whether the certificate is valid in Chrome, go to view > Developer Tools. From there you will need to navigate to the security tab and you can see if the SSL certificate is valid, or expired. If you click the “View certificate” button you will be able to see more information about the SSL certificate and the specific date it’s valid through.
How can I get an SSL certificate for my website?
The first step is to determine what type of certificate you need. For example, if host content in multiple platforms (on separate domains/subdomains) it may mean that you need different SSL certificates.
For most, a standard SSL certificate will cover your content, but for companies in a regulated industry — such as finance, and insurance — it may be worth talking with I.T. because there are specific requirements within your industry that specify the type of SSL certificate you need.
The cost of SSL certificates vary, but you can get a free certificate or pay a few hundred dollars per month to obtain a custom certificate. On the free side — Let’s Encrypt offers certificates at no cost but I would strongly recommend that you have someone knowledgable about the DNS and technical setup of your website to help with this. These certificates will also expire every 90-days, so you’ll need to make sure they stay up to date.
Many other domain providers will sell SSL certificates that generally range from $50 to obtain a certificate for one domain, up to a few hundred dollars for multiple-domains. This process will be easier than using Let’s Encrypt, but does have a cost associated with the certificate.
(HubSpot customers: If you’re hosting content on HubSpot, SSL is available for free within this promotion. To find out more, contact your Customer Success Manager, or visit our SSL page.)
One of the other key considerations is the validity period of a certification. Most standard SSL certificates that you purchase are available for one to two years by default, but if you’re looking for longer-term options, then look into more advanced certificates that offer longer time periods.
WordPress Plugins To Help Install SSL
If you utilize WordPress to host your content and website, depending on your domain provider, you may need to obtain an SSL certificate and then install it. Here are a few plugins that can help you:
- Really Simple SSL. Purchasing your SSL certificate is just the first step. This plugin helps you install it across your all your WordPress content. There are premium versions available to help you install it across sites, and verify there are no warnings on your website. Premium versions run from $20 up to $145 for a full-service configuration and optimization of SSL.
- Insecure Content Fixer. Once you have an SSL certificate and it’s installed, your not quite done yet. If your website is built with any hard-coded references to “http”, such as an image file, then it will show a warning when trying to load that securely. This plugin can help you find and fix anything coded that way so your site displays properly, and securely for visitors.
- WP Force SSL. Ok, now that you’re done obtaining SSL, installing it, and fixing any errors, it’s time to make sure all your traffic sees the secure version of your site. This plugin will force all traffic to HTTPS so it only loads securely. I strongly recommend that you check for insecure content (also known as mixed content) before enabling this. Without checking for mixed content first your site may appear with warnings because of those insecure files.
(HubSpot customers: All files hosted within HubSpot File Manager are automatically encrypted with SSL, and in one-checkbox you can force all visitors to utilize the secure version of your site, no plugins required. To find out more, contact your Customer Success Manager, or visit our SSL page.)
Apple Pay expands in Spain as CaixaBank joins Santander and American Express
Gmail iOS app trialling access to third-party email accounts in beta program
If you prefer the Gmail iOS app to Apple’s Mail app and wish you could use it for non-Gmail accounts too, you may be in luck. Google is currently trialling access to Outlook, Hotmail, Live, Yahoo and others in a new beta …
Delayed messages bug in High Sierra may relate to planned iCloud message syncing
Some macOS High Sierra users are reporting delays in receiving iMessages on their Macs, while also finding that they are no longer receiving iMessage notifications on their iOS devices and Apple Watches …
10 Easy Ways to Measure the Effectiveness of Your Content [Infographic]
The most effective marketers have their content strategies firing on four cylinders:
- Planning
- Content creation
- Content promotion
- Analytics
The list I just presented is the order in which effective content marketing gets done, but it’s NOT a priority list. Each tactic is vital. And they are dependent upon each other for success.
In other words, three out of four won’t do.
Put it down to fear, or laziness, or lack of knowledge, resources or tools, but number four — analytics — is the most neglected.
Need proof? Just take a look at this …
Last year, Orbit Media’s annual blogger research indicated that less than 32% of bloggers always check their analytics. If that number seems low to you, it’s actually a up a few notches from years prior.
Not good.
Content marketing metrics-phobia? Is that an actual thing?
It must be. But here’s another thing …
You can get over it. Easily. Right now. An advanced degree in statistics is not required. As the infographic below — which I developed with Orbit Media — explains: “Let’s stick the calculators in the desk drawer and look at 10 easy ways to detect if your content is cutting it.”
You’ll find no reasons to fear these simple approaches to analytics. And when you get in the habit of evaluating your content marketing efforts, you’ll also find yourself extracting the insights you need to get perpetually better.
LinkedIn Website Demographics: What Marketers Need to Know
Want more information on people who visit your website? Did you know LinkedIn can help? LinkedIn Website Demographics provides professional insights about your website visitors and allows you to remarket to them through LinkedIn ads. In this article, you’ll learn how to set up and use LinkedIn’s Website Demographics for remarketing. #1: Set Up LinkedIn […]
This post LinkedIn Website Demographics: What Marketers Need to Know first appeared on .
– Your Guide to the Social Media Jungle
from http://ift.tt/2gO6Fwi
via socialmediaexaminer
Review: Sonos One pairs hi-fi audio with Amazon’s Alexa for voice-controlled music
Sonos One, the latest Sonos wireless speaker, matches the hi-fi audio of its predecessor, the Play:1, while adding a six far-field microphone array for built-in voice control using Amazon Alexa. All for the same $199 price.
Using a wireless speaker with a built-in voice assistant and high quality audio can be very natural and fun. Just say what you want to hear and Sonos One serves it up. What’s less simple is navigating through which music services work and with what method. There’s also the upcoming arrival of Apple’s HomePod which similarly promises to match hi-fi audio with an intelligent voice assistant.
So while Sonos One is a very impressive piece of technology on its own, there are a few things to consider first.
Qualcomm CEO expects to resolve differences w/ Apple, but there’s no end in sight
Apple and Qualcomm are currently engaged in a well-publicized and increasingly bitter legal battle over patents and licensing, but Qualomm is still hopeful things will work themselves out. Speaking at the Wall Street Journal’s D.Live conference, Qualcomm CEO Steve Mollenkopf touted that Qualcomm has a “long history” of settling issues like the Apple one…
How to Edit Instagram Photos: A Step-by-Step Guide to Using Instagram Filters & More
Have you ever looked through your Instagram feed and wondered how some people make their photos look just so good with just a smartphone and a free app?
Whether I’m looking at mouth-watering photos posted by food brands or adorable photos of cuddly Instagram stars with four legs, I’ve had my share of photo envy.
When it comes to posting on Instagram, photo quality is everything. And if you take great photos and edit them exquisitely, I promise: you will be much closer to amassing the thousands of followers you’re hoping for.
But we have good news for you: Editing photos well on Instagram doesn’t take a whole lot of time, and it doesn’t require you using a fancy camera or software. It’s all about taking great photos and learning which filters work for which types of photos — all within the Instagram app.
In this post, we’ll help you turn unedited photos — like the one on top of a Peruvian desert — into ones that are much more compelling, like the one below:
How To Edit Instagram Photos: A Step-by-Step Guide
1) Start with a great photo.
No amount of editing will fix a photo that wasn’t shot well in the first place. When it comes to posting something awesome on Instagram, it’s all about photo quality — and that starts with a photo that’s great even before you adjust it in the app.
You don’t need to be a photographer to take great photos for Instagram. All you really need is a smartphone and the willingness to learn some key tips for how to use it. Start by reading through these 18 tips for taking great photos with your smartphone. This blog post will teach you how to line up your shots using the rule of thirds, find perspective, and take advantage of symmetry, patterns, and more.
2) Upload your photo to Instagram.
Now that we have a photo we’re ready to work with, it’s time to upload your photo to the Instagram app. To do this, open the Instagram app and click the plus sign at the bottom center of your screen.
From there, select the photo you’d like to edit from your photo album. By default, it’ll go into “All Photos,” but you can click the downward arrow next to “All Photos” at the top of your screen to open a particular album if your photo is located somewhere specific.
Pro Tip: Instagram will crop your photo as a square by default, but if you want to change it to its original width, simply press the “Expand” icon (two outward facing arrows) in the bottom left-hand corner of the photo once you’ve selected it.
Click “Next” to begin editing the photo.
4) Pick a filter.
Here’s where it gets fun. Now that you’re in editing mode in the Instagram app, the first thing you should do is pick a filter. Usually, I click through onto each and every filter, in order, and take note of which ones I like. Then, I’ll go back and forth between the ones I like until I settle on one of them. How’s that for scientific?
While slapping on a filter because it looks good is one way to do it, it is helpful to play around with each filter and get an idea of its specific purpose. From Lark to Crema to Valencia to Nashville, each filter has its own personality and hues that drastically changes the photo — not only how it looks, but how it feels. Take a look at these examples to see what I mean:
Here are a few of my favorite Instagram filters and how they change the look and feel of a photo:
- Lark: A filter that desaturates reds while pulling out the blues and greens in your photos, thereby intensifying it. Great for landscapes.
- Moon: A black-and-white filter with intense shadows that’ll give your photos a vivid, vintage look.
- Crema: A desaturated filter that gives your photos a creamy, vintage look.
- Valencia: A filter that warms the colors of your photo, giving it kind of an antique look without washing out color completely.
- X Pro II: A high contrast filter that makes colors pop and adds vignette edges, giving photos sort of a dramatic effect.
- Lo-Fi: This filter adds high saturation, rich colors, and strong shadows to your photo. Great for photos of food.
- Hefe: This filter adds a vintage look to your photos with a darker border, and the yellow tone makes landscapes appear dramatic and other-worldly.
Everyone has their favorites, so as you use Instagram for marketing more and more, keep experimenting and learning about your own filter preferences for every type of photo you take, whether they’re landscapes, close-ups, portraits, or something else.
Pro Tip: As you begin learning your filter preferences, you can reorder your filters and even hide the ones you don’t use. To do either of these things, scroll to the very far right of your filters options and click “Manage.”
To reorder your filters, simply hold your finger down on the three grey lines on the far right of the filter you’d like to move, and drag it to reorder.
To hide filters you don’t use, deselect them by tapping on the white check mark to the right of the filter.
5) Adjust the lux.
The what? If you’ve ever edited a photo on Instagram, you’ve likely used the lux feature before, even if you weren’t sure what it’s called. It’s a feature that makes your photos more vibrant and brings out the smaller details.
Once you’ve selected a filter, turn lux on by tapping the sun icon above your photo:
Then, use the slider to adjust the lux, which will adjust the contrast and saturation of your photo. I usually slide it up and down until I settle on what looks best. Tap “Done” when you’re finished and it’ll take you back to the filters page.
6) Use the simple editing tools.
Next, open up Instagram’s simple editing tools by tapping the wrench icon below your photo on the right-hand side.
From here, you can adjust a number of settings, including alignment, brightness, contrast, structure, warmth, saturation, highlights, shadows, and sharpness. I usually go through each setting one by one until I’ve adjusted the photo to my liking.
To adjust each of these settings, click on the icon at the bottom of your screen, use the slider to find a “sweet spot,” and then tap “Done” when you’re done. If you adjust the slider and realize you don’t want to make any changes, simply tap “Cancel” and it’ll exit from that setting without saving any changes.
Once you’ve made all the changes in Instagram’s tools that you’d like, click “Next” in the top right-hand corner of your screen.
7) If you’re uploading an album on Instagram, edit each photo individually.
If you’re using Instagram’s handy new feature that allows you to upload up to 10 photos in a single album, make sure to be aware of a quirk that can come up when you start editing your photos.
Say I wanted to post not one, not two, but three photos of my adorable cat. I’d select one to upload to Instagram as usual, and then tap the album icon to select multiple photos at once:
Choose the photos you want to use, then tap “Next:”
You might be tempted to dive in and start picking a filter and editing from the list of filters at the bottom, but wait just a moment — because if you pick a filter from the menu below, you’ll apply it to all of your photos (shown below), and if you’ve learned anything in this blog post, it’s the importance of editing photos individually.
Tap the Venn-diagram icon in the corner of each photo to edit it individually.
From there, you can choose a filter and edit your individual photos using the tools detailed above.
When you’re done with one photo, tap “Done,” and you can choose another photo in your album to edit.
8) Either post your photo immediately, or save it to post later.
At this point, you have two options.
Option 1: Post your photo immediately.
If you’re ready to post your photo now, then go ahead and post it by adding a caption, a geotag, tagging any relevant Instagram users, and clicking “Share.”
Option 2: Save it to post later.
If you’re not ready to post it now, but you wanted to get a head start on editing it so you could post it in a pinch, then you can save the photo with the edits you made in Instagram without posting it — thanks to a little hack.
Ready? To use Instagram as a photo editor without posting anything, all you need to do is publish a picture while your phone is on airplane mode.
First, you’ll have to be sure you have “Save Original Photos” turned on in your settings.
Then, turn on airplane mode. Here’s how to do that:
- To turn on airplane mode on an Android device: Swipe down from the top of the screen. Then, swipe from right to left until you see “Settings,” and then touch it. Touch “Airplane Mode” to turn it on.
- To turn on airplane mode on an iPhone/iPad: Swipe up from the bottom of the screen and click the airplane icon. Or, go to “Settings” and then “Wi-Fi,” and switch “Airplane Mode” on.
Then, go back to your editing screen and press the “Share” button at the bottom. An error message will appear saying the upload failed, but rest assured the photo will be saved automatically to your phone’s photo gallery.
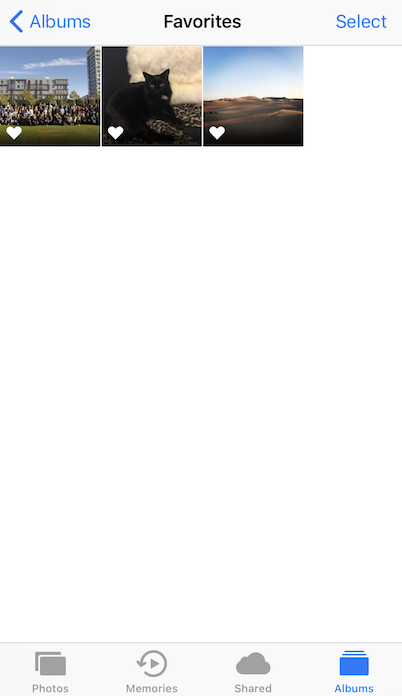
Pro tip: If you want to edit a whole bunch of photos ahead of time so you can upload them later without much effort, one way to organize your edited photos so you can find them easily later is to add them to your “Favorites” folder on your iPhone.
To add photos to “Favorites,” you’ll need to “heart” the photo. Here’s how it works: When you’re scrolling through your photos, tap the heart icon at the bottom of your screen.
The photo will be added to a photo album called “Favorites” in your iPhone’s folders, which you can access easily and at any time. Since Instagram doesn’t let you schedule posts in advance, this is a great place to store edited photos so you can upload them when you need them.
And there you have it! By now, you should be able to edit your Instagram photos on a pretty basic level. For more tips and tricks to take your Instagram game to the next level, check out these 15 hidden hacks and features.
Facebook Live adds new screen sharing option built directly into website
Facebook today has updated its desktop Facebook Live platform with integrated support for screen sharing, a task that previously required the use of third-party software for users. The Next Web first noted of this change with a new “Share Screen” option…
Apple Pay now works with Eftpos cards from ANZ in Australia
Apple Pay in Australia today has expanded to support Eftpos cards from ANZ Bank. The move was announced in a press release from Eftpos, while Apple has also updated the Australian version of its Apple Pay website to indicate the new support for Eftpos cards.