
Welcome to My Blog
How to Use Instagram Insights (in 9 Easy Steps)
It’s no secret that we love data.
Data helps you understand your audience. It tells you how they do things, what they prefer, and who they are.
And when it comes to social media, our love for data doesn’t fade.
That’s why we love analytics and insights. They help you measure the impact of your marketing efforts across different channels to see if there’s something you need to do differently — like target a different audience, post at a certain time of day, or experiment with a new content format.
Instagram Insights are no exception. Here are the analytics on this channel that marketers need to know and understand — and how to use them.
To use Instagram Insights, you must first have a business profile.
If you’re already using a personal account, you can switch to a business profile. In order to have a Business Account, you must also have a Facebook Page for your brand. Instagram will give you the option to create a new one during this process if you don’t already have one. Here’s how to convert your account in a few simple steps.
Once your set up as a Business Account, you can begin to use Instagram Insights. Here’s how to get started.
1. Click the insights icon.
To view insights into your overall Instagram account, start by visiting your profile. Then, at the top, click the icon of a bar chart, which will take you to your overall insights.
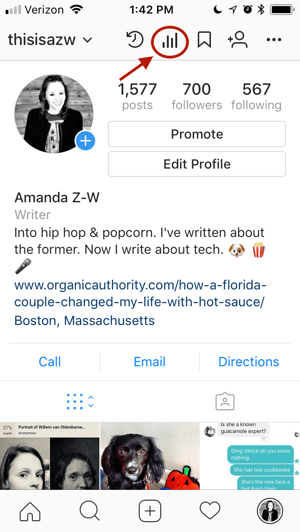
From there, you’ll see some general information about people are engaging with your profile, like how many followers you gained or lost in the past week.
Next, we’ll get into the more specific profile insights you can explore.
2. View your impressions and reach.
This insight represents how many times your ads appeared on users’ screens. Reach reflects the number of unique users that have seen any of your Instagram posts.
3. Determine website clicks.
This insight reflects the number of times any links you’ve included in your business profile have been clicked.
4. Track profile visits and followers.
Profile visits reflects the number of times your profile has been viewed. Followers reflect how many followers you’ve gained or lost over the past week, as well as the average times of day when your followers are using Instagram — data that can be highly beneficial when planning posts. To view insights for a specific Instagram post, start by visiting your profile. Tap on the post you’d like to look into, then click “View Insights” below the image.
5. Click view insights below a post for specifics.
You may have also promoted a certain post — if that’s the case, an arrow icon that looks like this will appear:

For these posts, you can either view insights on the original version of the post, or specific ones from its promotion. For the latter, tap “Promotion.”
Next, we’ll get into the more specific post insights you can explore.
6. View your posts likes, comments, and saves.
Likes speaks for itself, and reflects the number of users who liked your post. As with likes, comments reflects the number of comments left on your post. Saves highlights the number of unique users or accounts who saved your post, or clicked the bookmark-like icon that appeared below it in their feeds.
7. Learn which actions were taken on your post.
These insights indicate the number of actions that users took on your profile as a result of seeing your post — things like visiting your profile, then taking an action like clicking on your website link or following you.
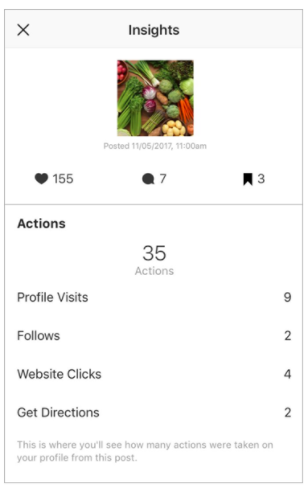
Source: Instagram
8. Use Discover to see where your post showed up in feeds.
As the name might suggest, these insights indicate where your post was seen — or discovered — the most, including how many accounts weren’t already following you when they first saw the post.
This section includes metrics on Impressions, which reflect the number of times your post was discovered from a particular place within Instagram, like the user’s home feed, a search, your profile, a location tag, or a hashtag.
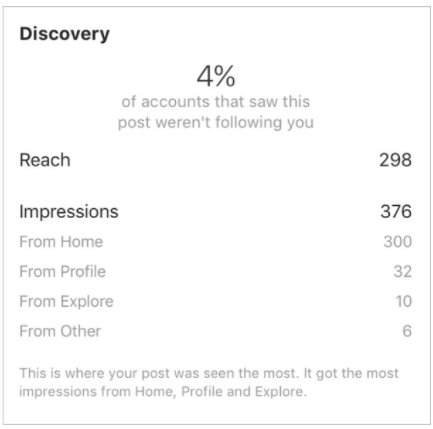
Source: Instagram
Discovery insights also include data on a post’s reach — which reflects the number of unique accounts that saw your post.
9. View Instagram Story Insights
Finally, Instagram users with a business profile are able to view insights into their ephemeral Stories. Instagram does not, however, offer such analytics for live videos.
To view your Story insights, start by visiting your profile. Then, at the top, tap the icon of the bar chart, which will take you to your overall profile insights.
Scroll down to the Stories section, and you’ll be able to see insights for older stories, as well as any that have not yet expired.
Next, we’ll get into the more specific Story insights you can explore.
Impressions
This insight represents how many times your Story was seen.
When viewing these insights, keep in mind that you’re able to add multiple images or videos to your Story. When you do this, every piece of visual content in your Story is counted as a single photo or video in your post.
Let’s say you add six photos to your Story. Whether someone only views one or views all six, Instagram only counts your entire Story having received one impression.
The same goes for Story content that has been viewed by a single user more than once. Instagram still only counts that interaction as the entire Story having received one impression.
Reach
This insight reflects the number of unique users that have seen your Story.
Taps Forward
This insight reflects the number of times a user taps your Story photo or video to skip to the next piece of media.
Taps Back
This insight reflects the number of time a user taps your Story photo or video to go back to the previous piece of media.
Replies
This insight reflects the number of times users send messages through the “Send Message” text box on your Story.

Swipe Aways
This insight reflects the number of times users swipe to skip to the next account’s Story — not to be mistaken for “tap forward,” which reflects users skipping ahead to your next piece of Story media.
Exits
This insight reflects the number of times a user leaves the Stories section entirely to return to the home feed.
Now that you know how to measure the effectiveness of your Instagram strategy using Insights, you can analyze that data and determine what’s working for your audience. From there, creating content that gets a ton of engagement will be a lot easier as you consider those benchmarks.
Editor’s Note: This post was originally published in January 2018 but has been updated for comprehensiveness.

How to Run Facebook Ads: A Step-by-Step Guide to Advertising on Facebook
When setting up a paid Facebook ad, there are a lot of boxes to be checked.
Are you targeting the right people? Are your image dimensions to scale? Are you running the right type of ad? If we’re being honest, it can get a little confusing.
With more than 2.6 billion people using Facebook every month, and nearly 1.7 billion users every day, Facebook offers up a unique opportunity for marketers to augment their organic efforts. The trouble is, with both an investment of time and money on the line, there’s not much room for oversight.
To help, we’ve put together a checklist to help you keep all of your campaign details straight. Or watch this short video on how to increase the effectiveness of your ads and budget. These will help ensure that you’re tapping into the right audience with the right ad at the right time.
Facebook offers a variety of paid ad options and placements, but all ads can be broken down into three elements:
- Campaigns. The campaign houses all of your assets.
- Ad sets. If you’re targeting separate audiences with different characteristics, you’ll need an individual ad set for each.
- Ads. Your actual ads live within your ad sets. Each ad set can hold a variety of ads that vary in color, copy, images, etc.
With that terminology out of the way, let’s dive in to creating an ad.
1. Create an account with Facebook Ads Manager.
Facebook’s Ad Manager is a sophisticated dashboard that provides users with an overview of all their campaigns.
Upfront, the dashboard highlights an estimate of how much you’re spending each day. The dashboard is organized by columns, which makes it easy to filter through your ads so you can create a custom view of your results. Key numbers like reach, frequency, and cost are readily available, making reporting on performance a no brainer.
In order to use the Facebook Ads Manager, you’ll need a Facebook Business Page (learn how to set one up here). This is because you can’t run ads through personal profiles.
Then, follow these steps:
- Navigate to https://www.facebook.com/business/tools/ads-manager.
- Click the button that says “Go to Ads Manager.”
- Confirm your information on the ad account setup page.
- Set up your payment method.
- Save changes.
Once set up, the Ads Manager becomes the control center for your Facebook ads.
2. Start creating an ad through Facebook’s Ads Manager.
Once you log into the Ads Manager, you’ll see a performance dashboard where all of your campaigns, ad sets, and ads will be listed including the results they’ve driven for your Facebook page. Unless you’ve already created an ad for your Facebook page, this dashboard will be empty.
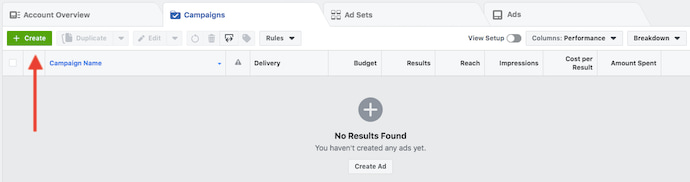
To create a new campaign, ad set, or ad through the Facebook Ad Manager, tab over to the type of ad you want to create and click the green “Create” button to far left of these ad types, as shown below. You can see from this screenshot that we’re currently set to create a new campaign.
3. Choose an objective.
Facebook’s Ads Manager, like many social media advertising networks, is designed with your campaign objective in mind. Before getting started, Ads Manager will prompt you to choose an objective for your campaign:
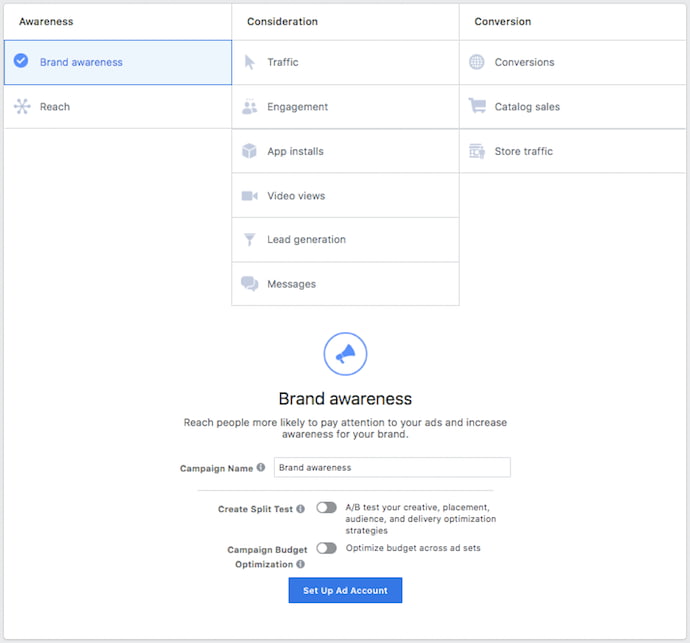
There are 11 different objectives to choose from. The list includes everything from general brand awareness, to getting installs of your app, to increasing traffic to your online store.
By choosing one of these objectives, you’re giving Facebook a better idea of what you’d like to do so they can present you with the best-suited ad options. As shown in the screenshot above, Facebook’s ad options include:
- Brand awareness
- Reach
- Website traffic
- Engagement
- App installs
- Video views
- Lead generation
- Messages
- Conversions
- Catalog sales
- Store traffic
Let’s say, for sake of this blog post, you’re looking to drive more traffic to your website. When you select this option, Facebook will prompt you to enter the URL you’re looking to promote. If you’re using marketing automation software, be sure to create a unique tracking URL with UTM parameters for this to ensure that you’ll be able to keep track of traffic and conversions from this ad. For HubSpot customers, this can be done using the Tracking URL Builder.
Once selected, Facebook will then display the ad option that makes the most sense in terms of achieving this objective.
4. Choose your audience.
Your next step is to configure your target audience — you can do this for each ad set that belongs to the same campaign. If you’re just starting out with paid advertising on Facebook, it’s likely that you’ll have to experiment with several different targeting options until you reach an audience that fits just right.
To help you narrow your focus, Facebook’s targeting criteria are accompanied by an audience definition gauge. This tool — located to the right of the audience targeting fields — takes all of your selected properties into consideration in order to come up with a potential reach number.
If you’re wavering between choosing a specific audience over a broad one, consider your objective. If you’re looking to drive traffic, you’ll probably want to focus on the type of people you know will be interested in your offering. However, if you’re looking to build brand awareness or promote a widely appealing offer, feel free to focus on a more general audience.
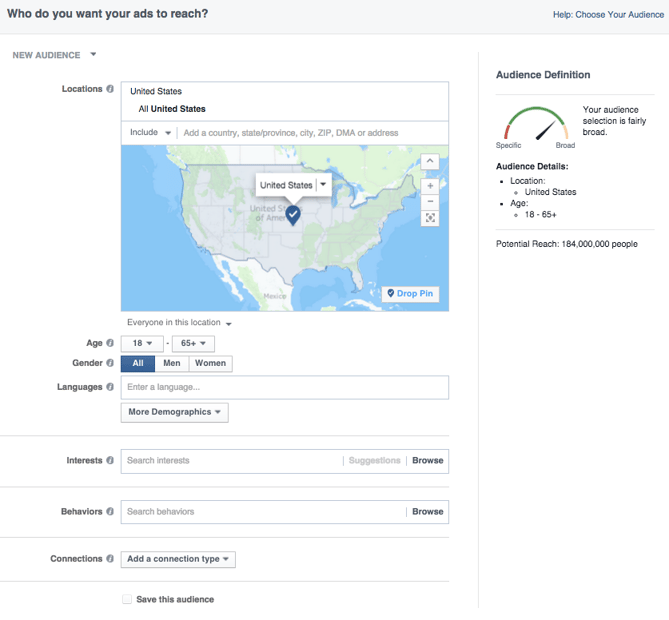
Facebook’s built-in targeting is vast, including options such as:
- Location
- Age
- Gender
- Languages
- Relationship
- Education
- Work
- Financial
- Home
- Ethnic Affinity
- Generation
- Parents
- Politics (U.S. only)
- Life Events
- Interests
- Behaviors
- Connections
You also have the option to select a Custom Audience — this allows you to target people on Facebook who are in your company’s contact database, visited a page on your website that has a tracking pixel, or use your app or game. To learn more about how to set up a Custom Audience on Facebook, check out these instructions. (And for more on the specifics of these criteria, visit this Facebook targeting resource.)
Once you find a group that responds well to your ads, Facebook allows you to save these audiences to be used again later — so you may not need to dive into this step once you’ve been running Facebook ads for a while.
5. Set your budget.
Facebook allows you to set either a daily budget or a lifetime budget. Here’s how they differ from each other:
- Daily budget. If you want your ad set to run continuously throughout the day, this is the option you’ll want to go for. Using a daily budget means that Facebook will pace your spending per day. Keep in mind that the minimum daily budget for an ad set is $1.00 USD and must be at least 2X your CPC.
- Lifetime budget. If you’re looking to run your ad for a specified length of time, select lifetime budget. This means Facebook will pace your spend over the time period you set for the ad to run.
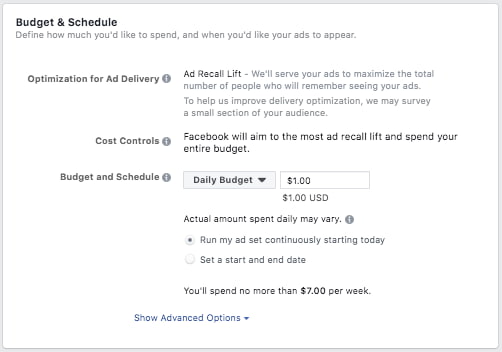
To further specify your budgeting, turn to the advanced options — this option is linked at the bottom of the screenshot shown above. This section allows you to specify a few things:
Schedule
Choose whether or not your want your campaign to run immediately and continuously or if you want to customize the start and end dates. You can also set parameters so that your ads only run during specific hours and days of the week.
Optimization & Pricing
Choose whether or not you want to bid for your objective, clicks, or impressions. (This will alter how your ad is displayed and paid for.) By doing so, you’ll pay for your ad to be shown to people within your target audience that are more likely to complete your desired action, but Facebook will control what your maximum bid is.
If you don’t want Facebook to set optimal bids for you, you’ll want to opt for manual bidding. This option awards you full control over how much you’re willing to pay per action completed. However, Facebook will provide a suggested bid based on other advertisers’ behavior to give you a sense of what you should shoot for.
Delivery
Delivery type falls under two categories: standard and accelerated. Standard delivery will show your ads throughout the day, while accelerated delivery helps you reach an audience quickly for time-sensitive ads (Note: this option requires manual bid pricing).
6. Create your ad.
What do you want your ad to look like? It all depends on your original objective.
If you’re looking to increase the number of clicks to your website, Facebook’s Ad Manager will suggest the Clicks to Website ad options. Makes sense, right?
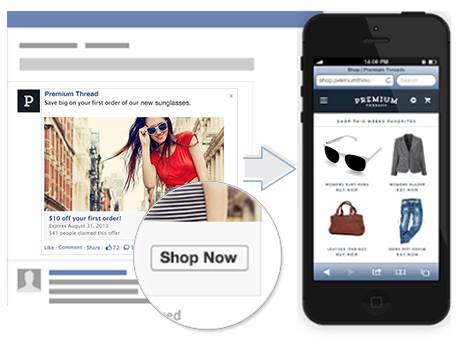
This ad option is broken down into two formats: Links and Carousels. Essentially, this means that you can either display a single image ad (Links) or a multi-image ad (Carousel) with three to five scrolling images at no additional cost.
A Links ad will be displayed like this:
A Carousel ad will be displayed like this:

Once you decide between the two, you’ll need to upload your creative assets. It’s important to note that for each type of ad, Facebook requires users to adhere to certain design criteria.
For single image ads, Facebook asks that users adhere to the following design recommendations:
- Text: 125 characters
- Ad Headline: 25 characters
- Image ratio: 1.91:1
- Image resolution (including CTA): 1080 x 1080 pixels
For multi-image ads — also known as Carousel Ads — Facebook provides the following design recommendations:
- Recommended image size: 1080 x 1080 pixels
- Image ratio: 1:1
- Text: 125 characters
- Headline: 40 characters
- Link description: 20 characters
See how much text is on your image.
Keep in mind that these are the ad options for the “Traffic” objective.
If you selected “boost your posts,” you’d be presented with different ad options like the Page Post Engagement: Photo ad. This ad has a unique set of design recommendations. To explore all of the ad options and their design specifics, refer to this resource.
Once you select an ad type, the Ads Manager will prompt you to identify how you’d like to display your ad. The options they provide are as follows: Desktop News Feed, Mobile News Feed, and Desktop Right Column.
Here’s how each ad would appear:
Desktop News Feed

Mobile News Feed

Desktop Right Column

Be aware if your ad isn’t associated with a Facebook page, you’ll only be able to run Desktop Right Column ads. To leverage all three display locations, you can learn how to create a Facebook Page here.
7. Monitor your ad’s performance metrics.
Once your ads are running, you’ll want to keep an eye on how they’re doing. To see their results, you’ll want to look in two places: the Facebook Ad Manager and your marketing software.
According to Facebook, here are some of the key metrics to look for (and their definitions):
- Performance. Can be customized further to include metrics like results, reach, frequency and impressions
- Engagement. Can be customized further to include metrics like Page likes, Page engagement and post engagement
- Videos. Can be customized further to include metrics like video views and avg. % of video viewed
- Website. Can be customized further to include metrics like website actions (all), checkouts, payment details, purchases and adds to cart
- Apps. Can be further customized to include metrics like app installs, app engagement, credit spends, mobile app actions and cost per app engagement
- Events. Can be further customized to include metrics like event responses and cost per event response
- Clicks. Can be further customized to include metrics like clicks, unique clicks, CTR (click-through rate) and CPC (cost per click)
- Settings. Can be further customized to include metrics like start date, end date, ad set name, ad ID, delivery, bid and objective
Regardless of which of these metrics you use to measure the success of your advertising efforts, you can find the data in the Ads Manager.
As you analyze, you’ll be thinking about your data in four main ways, depending on how granular you need to get:
- The account level
- The campaign level
- The ad set level
- The ad level
The Account Level
This gives a high-level view of performance across all campaigns. You’ll find aggregate data that gives you a bird’s eye view.
Simply navigate to the ads manager and click Account Overview. From there, you’ll be able to customize the metrics you want to see drill down time ranges, and more.
The Campaign, Ad Set, or Ad Level
You can also get far more specific with your analysis by checking the performance of campaigns and even down to individual ads. This can help you figure out which messaging, audiences, and collateral are resonating the best.
All you have to do is navigate to the Campaigns, Ad Sets, or Ads tabs next to Account Overview in the ads manager.
8. Reporting on Facebook ad performance.
You can receive custom reports via email as well. Here’s how to set it up:
- Navigate to Analyze and Report through the upper main menu.
- Choose Ads Reporting.
- Select Create Custom Report.
- Select and open a saved report.
- Choose Save As next to the save icon. Give your report a name and check Schedule Email.
- Follow the prompts to edit and confirm your reporting preferences.
While there are certainly a lot of details to keep straight when planning a paid Facebook ad, it’s important that you don’t lose sight of the big picture. Reporting on clicks and conversions from Facebook is important. However, if you’re using URLs with specific UTM codes, you have an opportunity to measure your ads’ full-funnel effectiveness using your marketing software.
Tracking URLs will help your marketing software keep track of how many leads, or better yet, how many customers you’ve gained from your advertising efforts. This information is useful in determining the ROI of this source, and can also be used to inform your overall Facebook marketing strategy.
If you’re a HubSpot customer using our ads tool, this process is already taken care of for you. You can also create unique tracking codes for your Facebook campaign by navigating to the Tracking URL Builder on the Reports Home page. All you’ll need to do is plug in the URL, attach a campaign, and choose the source you want the URL to be attributed to in your Sources Report. Once your ad launches and you start getting traffic and conversions on your website, you’ll be able to easily track how many visits, contacts, and customers you’re generating.
Now that you know how to set up an ad, it’s time to create one of your own so that you can spread brand awareness on Facebook and generate traffic and leads from your ideal prospects on the platform.
Editor’s note: This post was originally published in September 2019 and has been updated for comprehensiveness.

How 3 HubSpot Managers Found Strong Co-Marketing Partnerships [+How You Can, Too]
A solid co-marketing partnership is one of the better ways to reach a previously untapped audience, generate positive publicity, and create a wealth of valuable marketing collateral. When done right, it’s a mutually beneficial, thoroughly productive way to boost your marketing efforts as a whole.
Aligning yourself with an industry peer can pay off in spades, but these kinds of relationships aren’t easy to start and sustain. Your partner’s interests and qualities need to complement yours, and the companies you work with have to be reliable enough to consistently pull their weight.
Finding a company that fits that bill is hard in its own right, but once you’ve identified one you want to work with, you’re faced with the challenges of successfully contacting them, corresponding with them, and convincing them to work with you.
Those processes can be hard to figure out on your own, so to offer you some help, we spoke with three HubSpot experts about how they found strong co-marketing partnerships and the steps you need to take to do the same.
What do you look for in a co-marketing partner?
When asked about what they look for in a co-marketing partner, our experts all seemed to agree that the number one priority is alignment in audience, messaging, and image. As HubSpot Senior Marketing Manager, Margot Mazur, put it, “We look for partners who speak to similar personas and address their needs. Specifically, we want to make sure our partners have a similar audience and voice — with similar values and goals to meet.”
Though finding a company that checks those boxes is central to a successful co-marketing partnership, there’s still a lot more to the process. You might identify a potential partner that lines up well with your brand identity and appeals to a similar audience, but co-marketing partnerships need to be productive and mutually beneficial — you need to know you’ll get something out of it.
According to HubSpot Marketing Manager, Diego Santos, “Once we are happy with [a potential partner’s] suitability, we classify them according to a co-marketing matrix — one that takes the partner’s popularity, relevance, and objective into consideration. This process helps us to prioritize collaborations and look at the big picture.”
Ideological and objective-oriented alignment isn’t enough. There needs to be hard, quantifiable potential behind a co-marketing partnership. As Mazur said, “We also look at a potential partner’s audience across social and email channels, making sure that our businesses are of a similar size.”
Co-marketing partnerships are, at their core, strategic plays. They can be invaluable assets in targeted marketing efforts. For instance, HubSpot Marketing Manager, Clara Landecy, spoke on how they can be leveraged to target specific areas, “I always look for partners who have a strong presence in targeted regions. Partnering with local partners is essential if your company does business in multiple languages and across the globe.”
Santos succinctly captured all those points when he laid out the key questions to consider when finding co-marketing partners, “We usually ask ourselves the following questions to make sure they are a good fit: Who are they? What is their area of expertise? And who — and how big — is their audience?”
It’s important to have a firm understanding of what you want out of a co-marketing partnership before approaching potential partners. Find a company with similar values that will enhance your ability to effectively reach your target audience — one that will pull its weight, complement your messaging, and ultimately suit your long term goals.
How do you approach and connect with potential co-marketing partners?
Our experts stressed the importance of a personal touch in connecting with potential co-marketing partners. As Santos put it, “A more personal, network-oriented approach is usually much more effective than a cold introductory email or message.”
Co-marketing partnerships are inherently personal, so it’s only fitting that you start your relationship with your partner off on a personal note. But how do you get there?
Well, according to our experts, your best bet is leveraging resources and co-workers from within your own company. Landecy said, “To increase your response rate, ask your colleagues if they have any contacts at the companies you’re looking to partner with, warm outreach always helps.”
Santos agreed, “We always try to leverage the connections we already have in HubSpot. When we are looking for partners in a particular area, we reach out to everyone in the relevant regional team and encourage them to send ideas of potential collaborations.”
Mazur reiterated their points but added some insight about what she does when she can’t reach potential partners through her colleagues, “Generally, I’ll see if anyone at HubSpot already has a connection to someone at the partner company. If not, I’ll reach out to a partnership, BD, or marketing person at the company on LinkedIn, using their InMail tool.” As I mentioned earlier, no matter how you reach potential partners you need to do so with a personal touch.
Do your homework. Make sure you have a firm grasp on the nature of the company you’re contacting, what it might need out of a co-marketing partnership, and what you can do to suit its objectives and interests. Or as Landecy said, “Make sure your outreach is personalized! Showing you did the research before reaching out shows you are invested in the potential partnership and makes their work feel special!”
But let’s say you don’t have the know-how and personal connections to identify and reach potential co-marketing partners. You’re at a loss when it comes to finding interested companies whose size, values, and interests line up with your own.
What can you do? Well, there are certain tools designed to expedite the process. For instance, Crossbeam is a resource that leverages CRM data to help you find and connect with potential co-marketing partners with overlapping customer bases and other complementary attributes.
Ultimately, a solid co-marketing partnership has tremendous potential that’s only seen after tremendous effort. It often takes extensive research and critical thought just to identify the companies that suit your values, goals, and qualities. And actually conducting the necessary outreach and communication to establish one adds a whole new, often exhausting layer to the process.
Still, there’s a lot to be gained from these kinds of arrangements. If your business is looking for a shot of life to your marketing efforts, pursuing a co-marketing partnership is something to consider.

The Plain-English Guide to Data Deduplication
Nowadays, with so much critical information saved on our computer systems, we’ve learned to backup data regularly — including our email inboxes, our Word documents, our photos, and entire folders of old work.
It’s typically a ton of data. And, since we usually backup and save our data on auto-pilot, we might not realize just how much has been re-copied and re-saved, time and time again.
Unfortunately, over time, our data storage becomes unnecessarily burdened with redundant copies of data — this could cost your company money, as data requirements become larger, or time, as processing time becomes slower.
This is where data deduplication comes in.
Andrew Le, an IT Helpdesk Technician at HubSpot, further explains the importance of data deduplication for a business looking to grow — “[Data deduplication] really improves scaling and efficiency when pulling data from one source. If you have lots of the same data in different spaces, your entire system can be slowed down.”
So, you might be wondering, “How does this work?” Let’s dive into it below.
How does data deduplication work?
The data deduplication process might seem intimidating, but it’s actually a simple process.
You can use data deduplication software when you backup your computer. Additionally, some marketing automation software, like HubSpot, might have a deduplication feature to keep track of your marketing contacts.
To ensure you’re optimizing your data backup storage, we’ve cultivated a list of the best data deduplication software you can use to minimize unnecessary data copies, today.
Examples of Data Deduplication Software
1. HubSpot’s Deduplication Feature
If you use HubSpot’s CRM to manage your contacts, you’ll be impressed to find out you can also use HubSpot’s machine learning-powered deduplication feature to keep your contact database clean. HubSpot contacts can be deduplicated by a user token set with a cookie in their web browser or email address — additionally, contacts, companies, deals, and tickets can be deduplicated using a unique object ID.
2. Barracuda Backup Deduplication
With a 9.1 user rating out of 10 on TrustRadius, Barracuda Backup is a good option, offering a robust, secure, fully-integrated data deduplication solution. Their tool can help your business reduce bandwidth requirements and backup costs. Additionally, Barracuda is a good option if your business needs to protect multiple sites, since its cloud storage technology helps distributed networks stay protected.
3. Avamar
Avamar, a solution from Dell EMC, provides variable-length deduplication, which reduces backup time by only storing unique daily changes while simultaneously maintaining daily backups. Avamar is an efficient, secure option and is particularly useful for virtual environments, remote offices, and enterprise applications.
4. HPE StoreOnce
HPE StoreOnce, a solution from Hewlett-Packard Enterprise, offers disk-based backup, deduplication, and secure long-term data storage. Their deduplication software is equipped for virtual backup machines in small remote offices, and equally capable of handling high-performance dedicated applications for larger businesses. Ultimately, this is an impressive tool to help you keep your data secure and efficient as you scale-up.
5. Exagrid EX Series
Exagrid implements a highly efficient approach to data deduplicaton that allows six times the backup performance, and up to 20 times the restore and VM boot performance. With Exagrid, you can backup your data straight onto a disk without inline deduplication processing, enabling a shorter backup window.
If your company stores a lot of data, it’s important to begin the data deduplication process. By using software, you can simply automate this process.
Editor’s note: This post was originally published in April 2019 and has been updated for comprehensiveness.

The Ultimate Online Editing and Proofreading Checklist for Writers
The writing process is a chance to let creativity fly and tell a story with your own words.
Another, less glamorous part of the writing process is editing.
As you may know, proofreading is essential for any blog or ebook. It makes your work look professional, and without editing, it’s unclear to know how many mistakes or readability problems being published.
Remembering every single little grammar and editing rule is nonsense. While many become instincts over time, humans are known to make mistakes. That’s why we’ve created a checklist for you to use while editing so you have a point of reference while proofreading.
This list isn’t just about grammar rules; it also includes tips from topic selection, SEO, to promotion. Essentially, it can take you from beginning to the end of what you write.
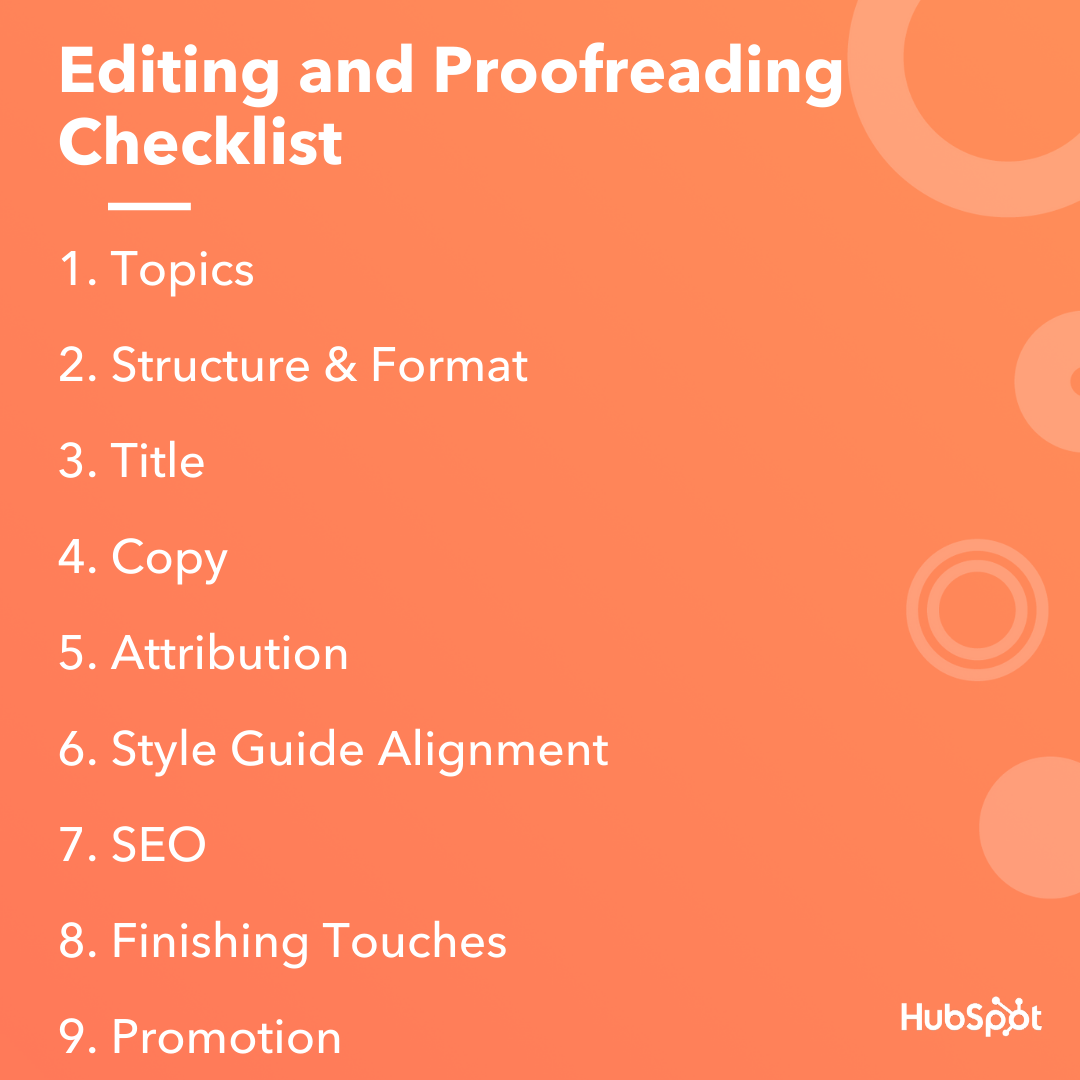 Read on for our complete editing and proofreading checklist — made with the content creator in mind.
The Content Creator’s Editing Checklist
In this checklist, we will go over nine sections, listed below.
Topics
We’ll start at the beginning with topics. Knowing which topic to write about can come from various places, but these tips will double check that what you’re writing about will resonate with your readers and have the chance to rock it with SEO.
buyer personas care about it?
updating and republishing the original draft.
more interesting?
Does this topic have SEO have high potential?
Is this topic relevant to the industry/timely?
Structure & Format
How do you structure your pieces? This section makes sure your content is formatted in the best way for readability. It also provides some room for checking consistency.
Are all major points associated with the topic covered in the post?
high quality and interesting? Have they been resized and compressed so keep page load time short?
Copy
We can’t have an editing checklist without a section to double-check your copy. These are little things to make sure the narrative of your writing is succinct and engaging, as well as minor grammar edits.
Does the introduction capture the reader’s attention? Is it interesting enough to get the reader to keep reading?
compelling, and clear?
Does the tone of the writing align with the content being presented?
Attribution
Any good editor makes sure he/she is giving credit where credit is due. Here’s what to think about.
properly attributed to the original source with a link back?
allowed to use these photos/images?
(Here’s a cautionary tale about internet copyright law.)
Title
Titles are the first exposure most of your readers get to your piece. How are you going to use that to your advantage? Go over some tips for the effectiveness of your title.
(Tip: Keep in mind longer titles will get cut off in search engine results.)
Is the title keyword-conscious without being keyword-heavy and sacrificing user experience and clickthroughs (
see also the section about search engine optimization)?
Style Guide Alignment
Written style guides serve as the commonly acknowledged authority when questions of grammar, punctuation, and style come up in writing. A style guide answers questions like whether you use title case for article titles and headers; whether you capitalize the word internet; or whether you use the Oxford comma.
You can either adopt an already-established style guide, like the AP Stylebook, or create an in-house version that enables you to borrow from different schools of thought and address any nuances specific to your industry or company. The important thing is to be consistent across all content you publish. Here’s the main question you should ask yourself …
(Tip: If you don’t have a style guide, you can download HubSpot’s and customize it as you see fit.)
SEO
One of the most important parts of a post, SEO helps others and search engines find your piece. Are you doing all you can to boost that? Check your work below.
keyword research to identify relevant keywords with which to optimize your content?
on-page SEO best practices?
Finishing Touches
You’re almost there. To make sure your post is excellent rather than mediocre, use this section to do a final run-through.
(It happens. We’ve done it.)
embed codes and adding
Pinterest ‘Pin it’ buttons to proprietary images/infographics/visuals/charts, adding
tweet links,
social sharing buttons, etc.)?
Content Promotion
Now that your piece is complete, you’ve gotta promote it. This section gives you different ideas of how to get your writing out there.
LinkedIn Pulse
or Medium to expose it to other audiences?

Project Administrator Job Description
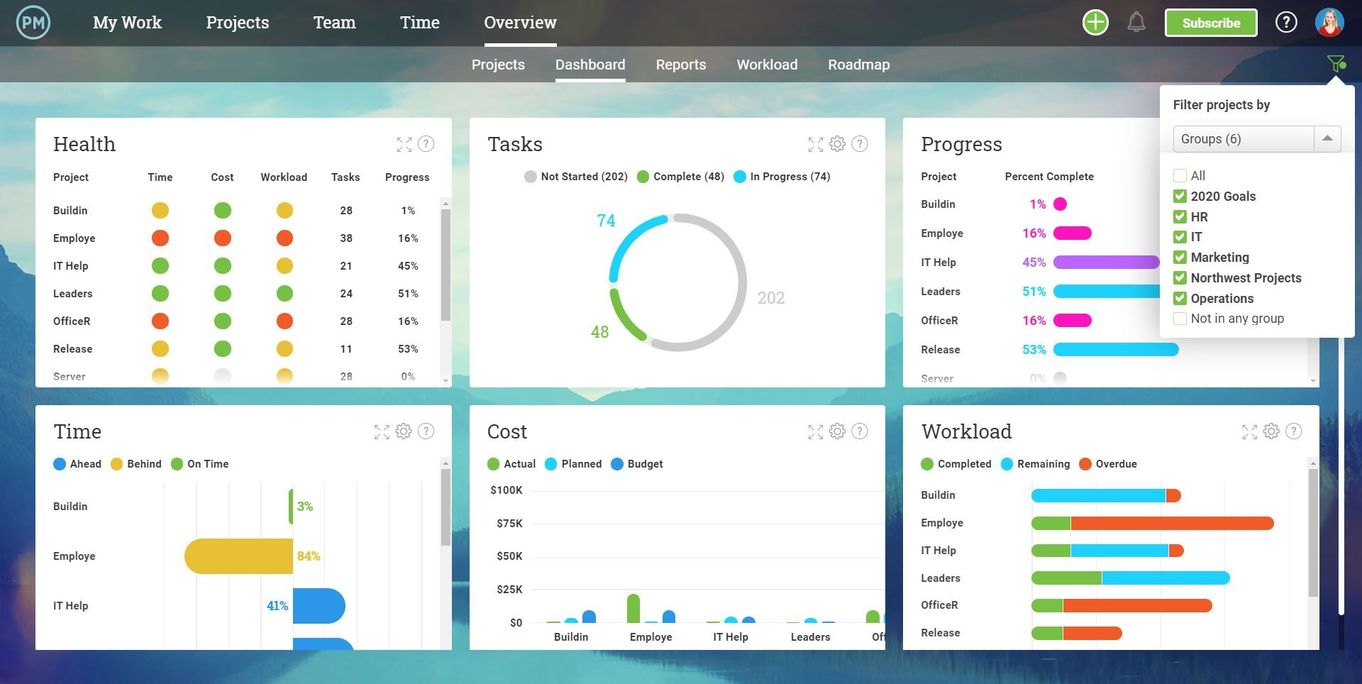
The Ultimate Guide to Social Media Analytics
There are over 3.8 billion social media users across the globe.
As you can probably imagine, that’s a major reason why businesses want to be active on social, too. Businesses use social media to market, sell, and provide support to their target audience and customers as well as learn about and bond with them.
The key is to understand what types of posts on which platforms are most effective in resonating with these audience members and customers.
This will allow your business to consistently produce engaging content that positively impacts your bottom line.
How do you do this? Well, it requires social media analytics and reporting.
What is social media analytics?
Social media analytics is the process of gathering and analyzing data and reports based on metrics from one or multiple social media accounts.
Social media analytics provides insight into a number of important factors that are directly tied to the success of your marketing efforts and your business as a whole.
Here’s a list that explains the importance of social media analytics:
- Develop a deeper understanding of who your target audience is and where they spend their time
- Identify which social platforms receive the greatest amount of traffic
- Determine what type of social content leads to the most conversions, engagements, etc.
- Discover what type of social media post has the greatest reach and resonates best with your audience on certain platforms
- Learn about what is and isn’t working in terms of social media campaigns and ads among your audience while they’re live and after they wrap up
- Develop a stronger social media strategy for your business’s specific goals related to things like your marketing, sales, and service efforts
Social Media Analytics Reports
Social media analytics reports provide an overview of specific metrics and data points — such as engagements and impressions — related to the content you share on various social media platforms. Simply put, reports are how you’ll review your social media analytics.
Social media analytics tools (which we’ll review next) make the creation of reports simple — some of these resources provide reports from one social platform at a time while others provide reports from multiple social platforms.
Either way, social media analytics reporting tools are typically customizable — meaning, you can view and pull the data and reports that matter most to you and your business.
With the tools we’re going to review below, reports can be automatically made and shared for you. But, here are some of the unique aspects of social media analytics reports that you can typically customize:
- Statistics and data points that matter to you and will be displayed in the report
- Time frame (weekly, monthly, quarterly, yearly, campaign start to end)
- Progress growth (i.e. how you’ll share your progress growth over time through a report — typically, either in the form of a snapshot or a comparison of stats in a given time period).
Learn how to create impactful monthly reports to show ROI on your social media efforts.
As stated, your reports will be unique based on the analytics software or tool you use. However, let’s look at some of the most common social media analytics reports that you may come across or create at some point.
Types of Social Media Analytics Reports
To give you an idea of some of the different types of social media analytics reports available in commonly-used tools, let’s look at HubSpot’s social media analytics reporting options.
1. Audience Analytics Report
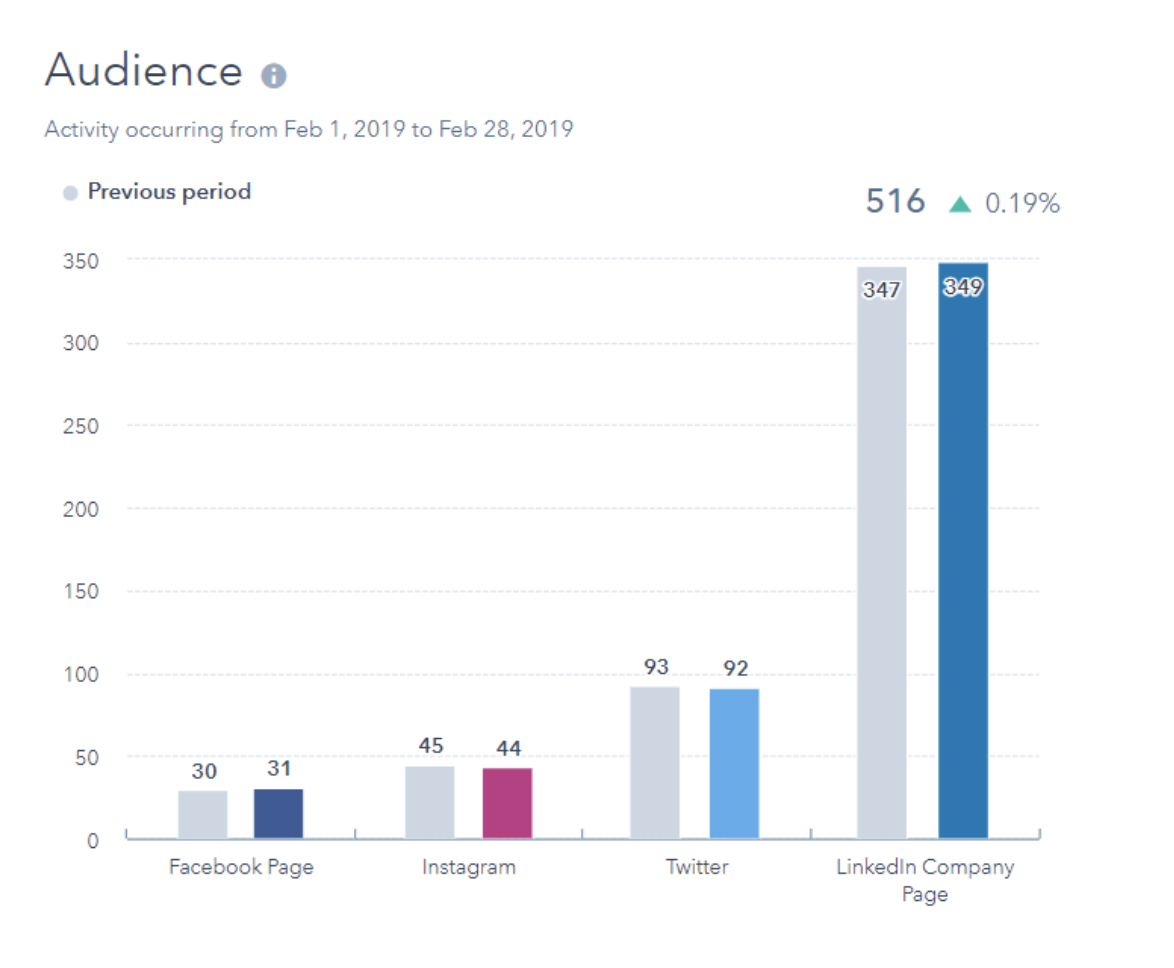
The Audience report displays your current number of followers for each of your social accounts compared to the number of followers you had in a previous time period.
2. Published Posts Analytics Report
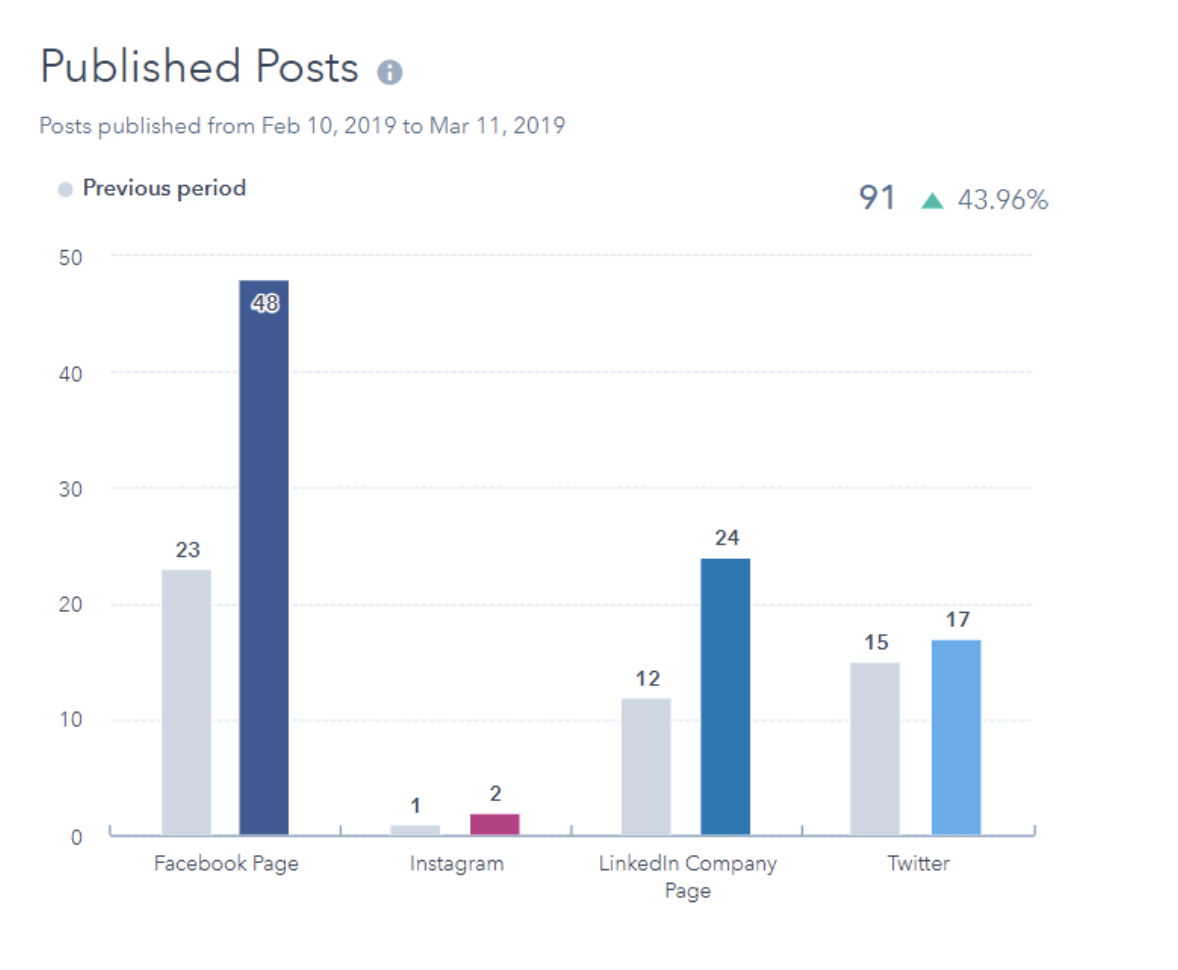
The Published Posts report shows the number of social posts published across your social accounts during a specific time period.
3. Interactions Analytics Report
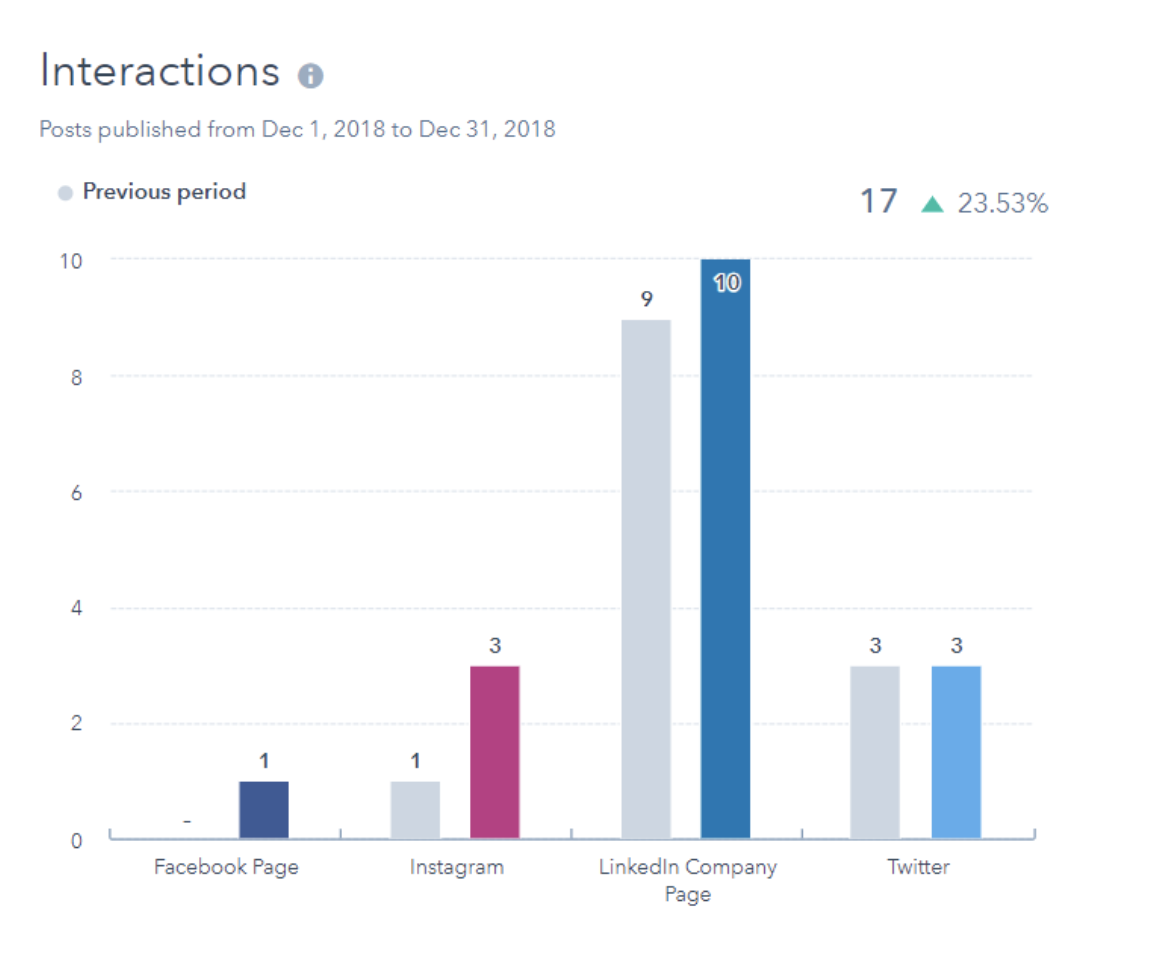
The Interactions report displays the number of likes, reactions, and comments on all of your posts across multiple platforms.
4. Clicks Analytics Report
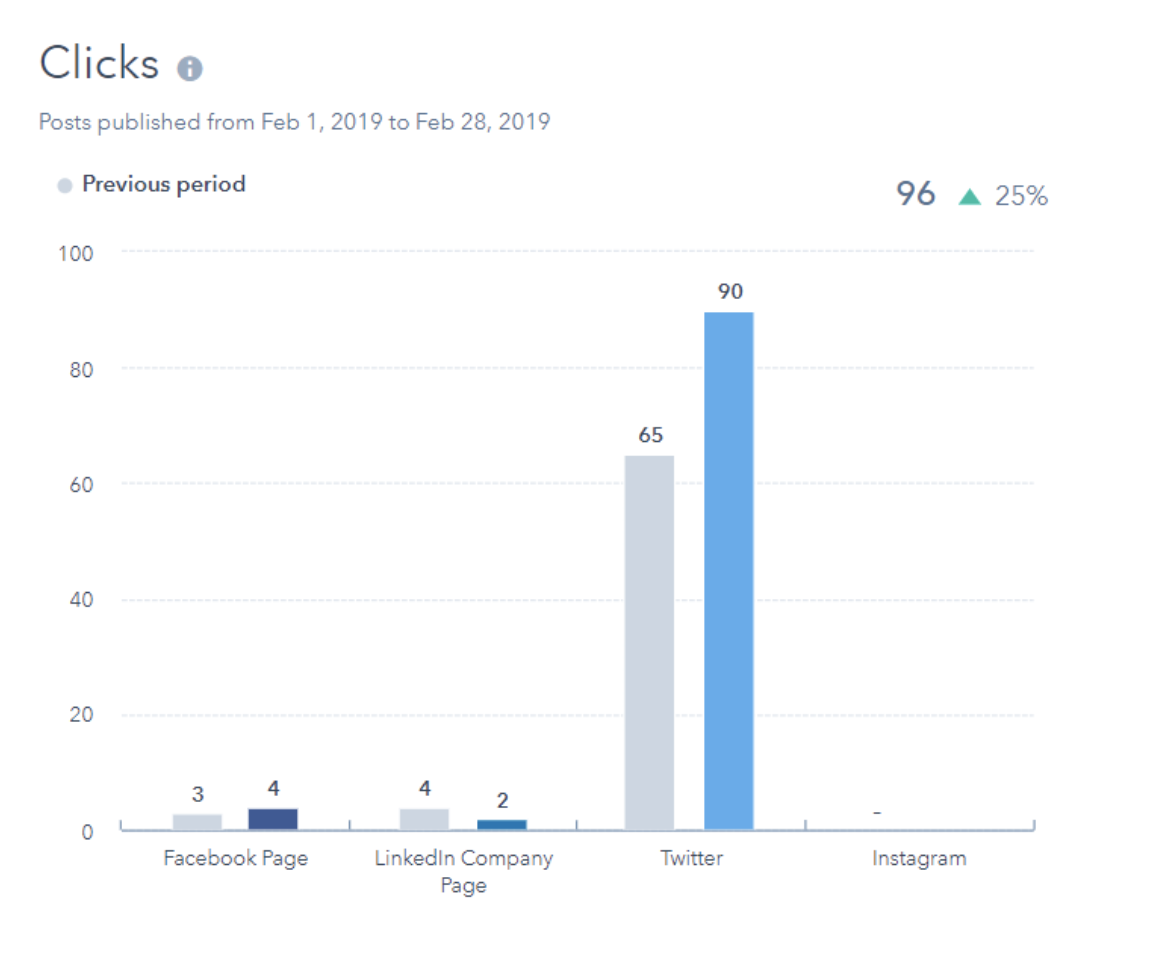
The Clicks report displays how many clicks you get on your social posts published through HubSpot.
5. Shares Analytics Report
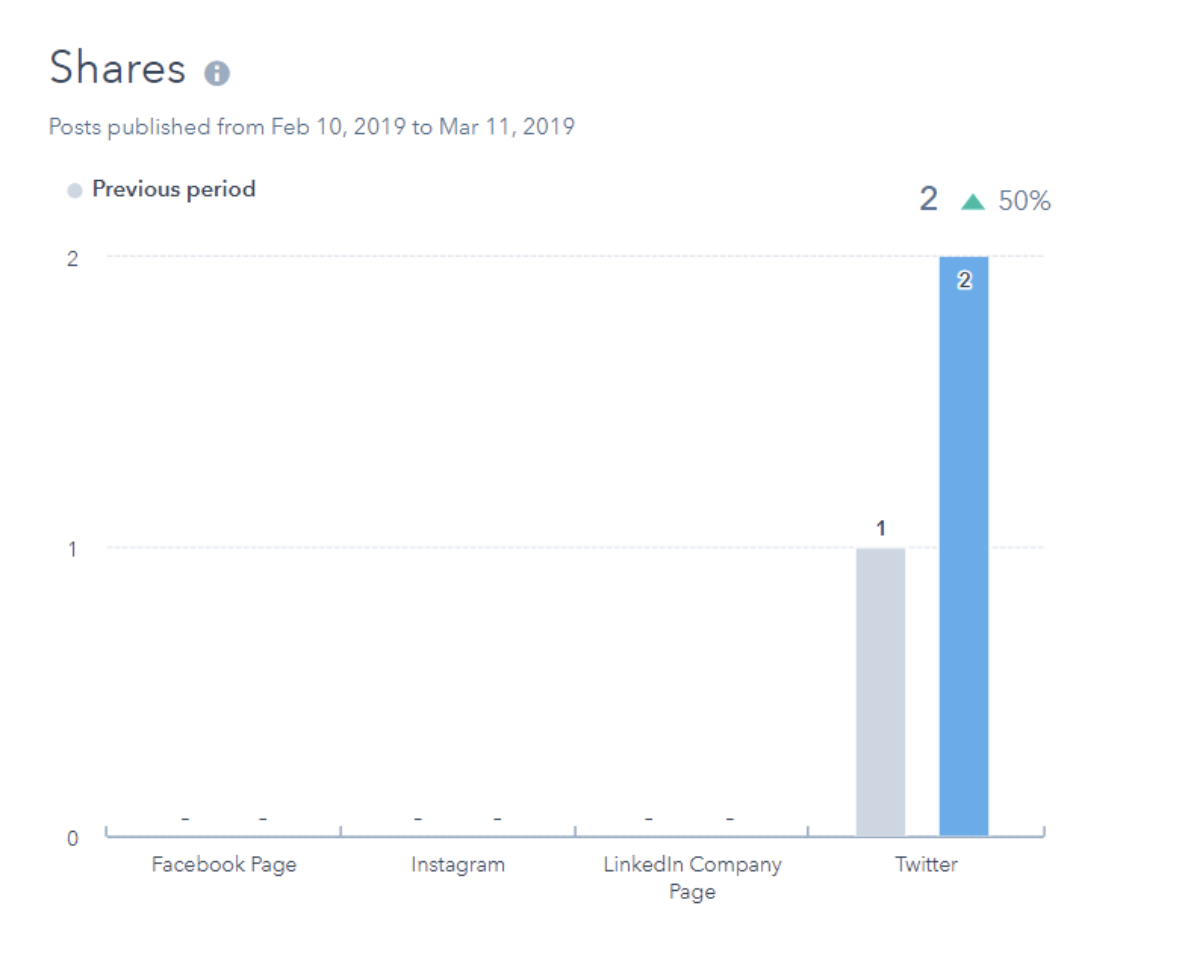
The Shares report displays the amount of your posts that were shared by your audience members.
6. Impressions Analytics Report
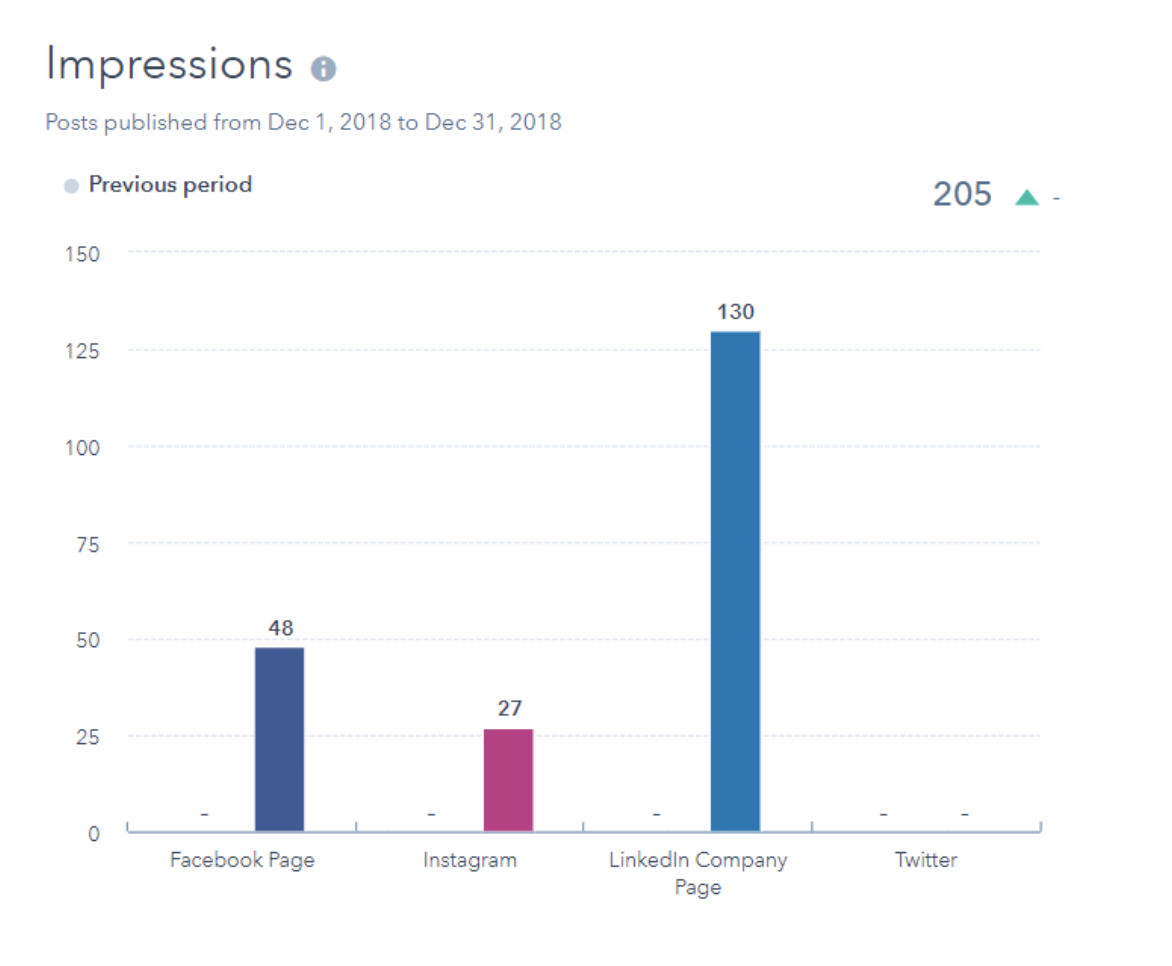
The Impressions report shows the number of views that posts on your LinkedIn, Facebook, and Instagram pages received.
7. Sessions Analytics Report
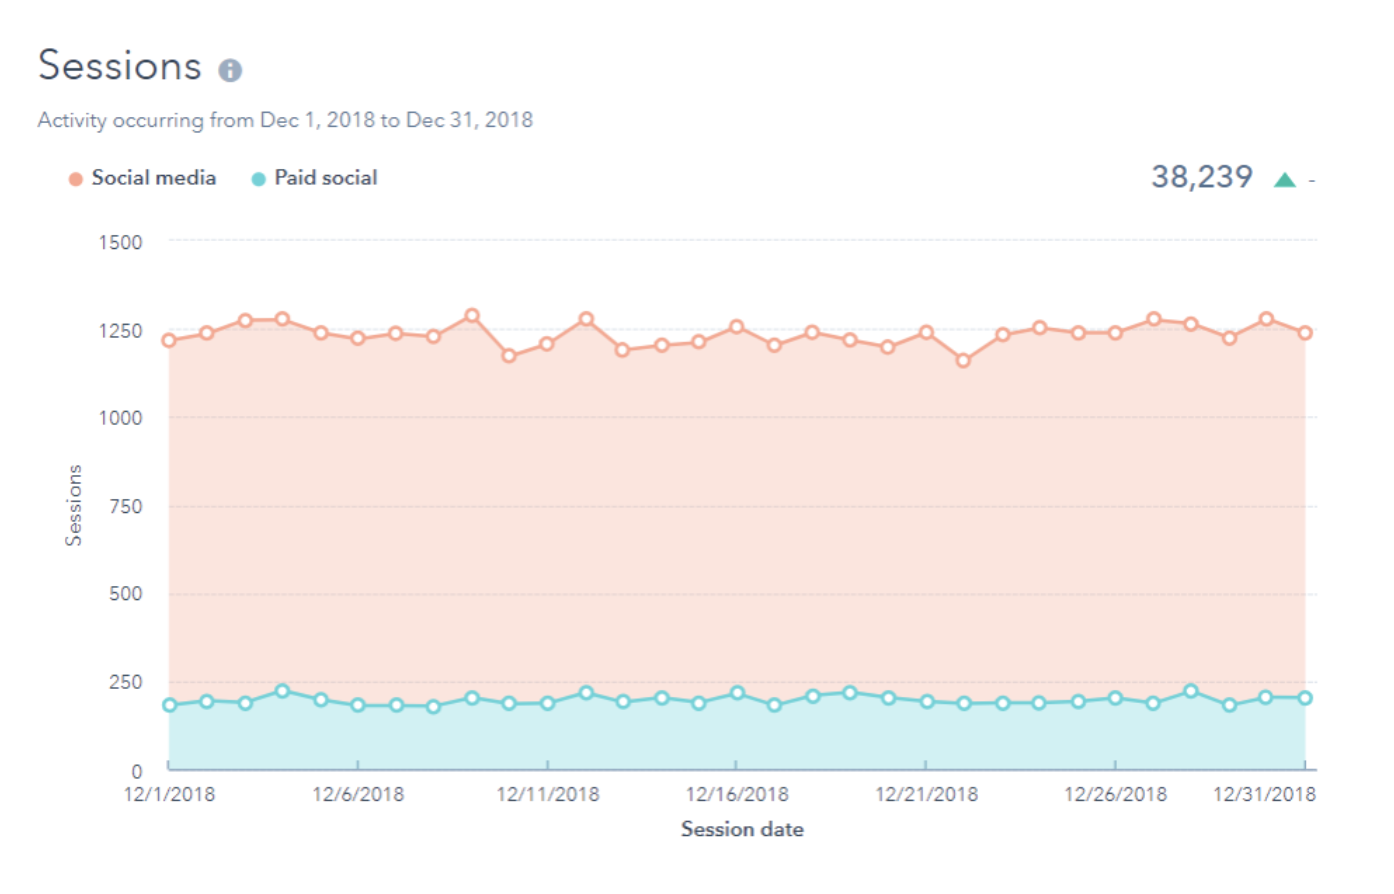
The Sessions report displays how many web sessions took place within a given time period on your site that were driven from social media.
8. New Contacts Analytics Report
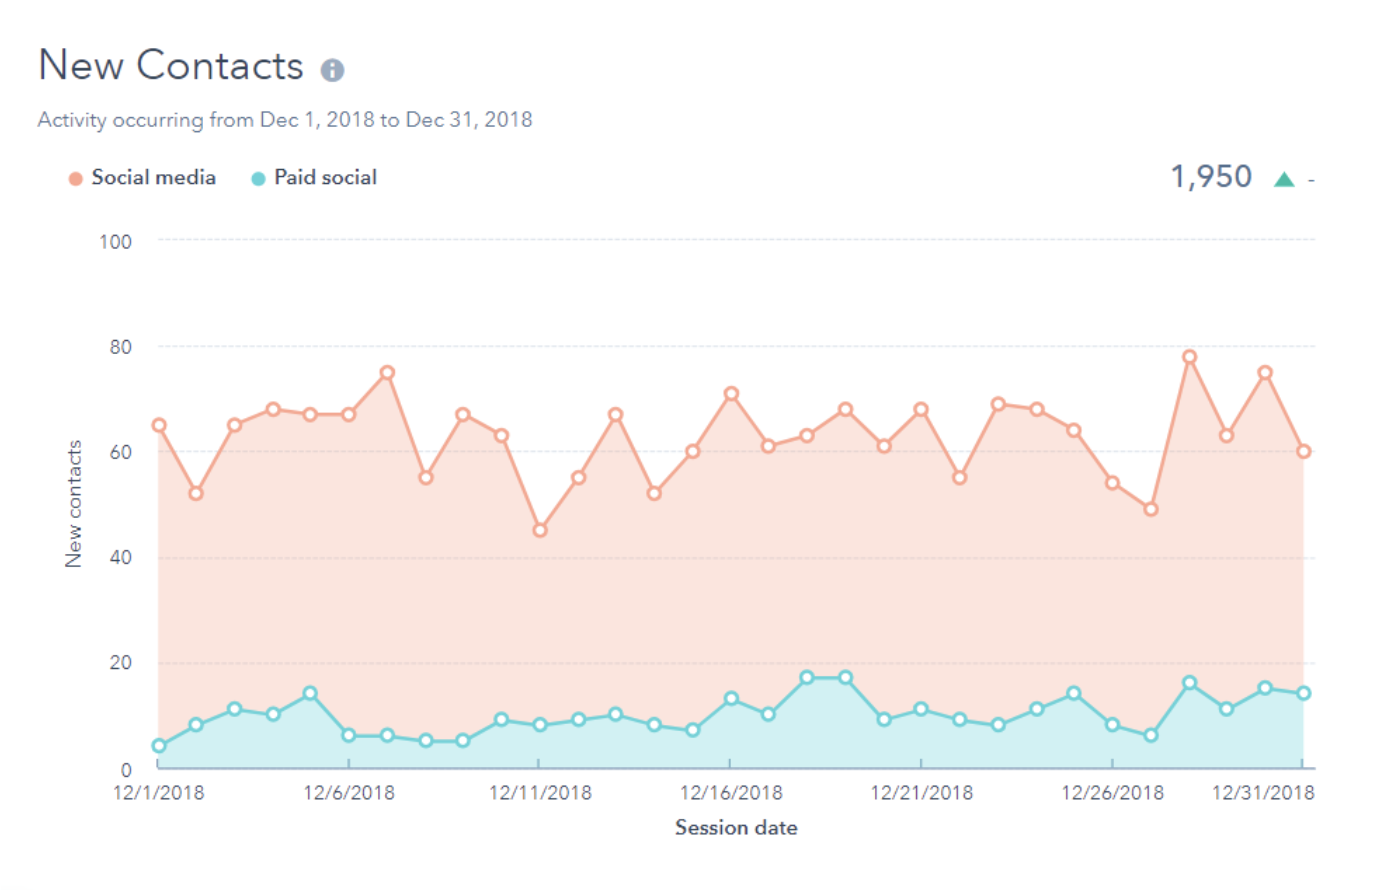
The New Contacts report displays how many new contacts have been created in HubSpot as a result of web sessions driven from social media within the selected time period.
Now you may be wondering what tools are available to help you pull these reports and data — next, we’ll cover some of your options.
Social Media Analytics Tools
There are a plethora of social media analytics tools available today which is why identifying the right one for your business can seem like a daunting task. We’ve compiled the following list of seven of our favorites to help get you started.
1. HubSpot Social Media Software
HubSpot Social Media Software gives you insight into the customer journey through integrated analytics tools. These help you understand which of your marketing tactics are working best among your audience, determine how your marketing efforts are impacting your bottom line, and learn about your search engine optimization (SEO)-related ROI.
Try HubSpot’s social media tools free for 30 days.
In addition to this HubSpot’s Social Media Software, there are a number of resources including social media analytics report templates, free social media analytics tools, and social media courses available for you to implement in your strategy.
Note: HubSpot also integrates with other analytics software, like Oktopost, as well as major social platforms and their respective analytics tools such as LinkedIn, Facebook, Instagram, and Youtube (among many others, which you can learn about in the HubSpot integrations marketplace).
2. TweetDeck
TweetDeck is an analytics tool used for Twitter. It works in real-time to help you view and analyze your Tweet engagement, organization, management, and tracking on the platform.
3. Tweet Reach
Despite what you may think based on its name, Tweet Reach isn’t just used for Twitter. The analytics tool creates snapshot reports to help you efficiently monitor and pull key takeaways from your Twitter, Instagram, and Facebook profiles based on factors you identify as most important to your business.
4. Buffer
Buffer provides an in-depth look at how you can strategize to grow your brand on social media. The software does this by measuring your performance on various social platforms, creating detailed reports about the data points that matter to you, and recommending ways to improve your reach, engagement, and more.
5. Hootsuite
Hootsuite allows you to create customized social media reports using over 200 metrics over any of your social channels and campaigns. These reports are easily shareable with members of your team as well as your clients to keep everyone on the same page and prove ROI.
6. Sprout Social
Sprout Social provides a look into the needs of your customers through the conversations your customers and followers are having on social. The software also measures your specific content and campaign work across various platforms and channels to determine what’s working best among audience members and what should be improved upon.
(Note: Sprout Social is another social media software that integrates with HubSpot.)
7. Mention
Mention is a tool that allows your company to monitor, listen, and analyze your posts as well as your interactions with and among audience members via different social channels and platforms. The software also makes it easy to create automated reports to share this data with fellow employees or clients.
Next, let’s look at how to apply these tools and resources in your day-to-day work by reviewing the steps involved in tracking social media analytics (also known as your social media analytics strategy).
Work through the following steps to begin tracking your social media analytics and gaining a better understanding of which parts of your processes are working and which need to be modified. Again, you can think of this as your social media analytics strategy.
1. Set SMART social media analytics goals.
Create and set SMART goals to help you achieve your social media analytics goals. By ensuring your goals are SMART, they’ll be Specific, Measureable, Attainable, Relevant, and Time-bound — meaning, you’ll be able to focus your strategy to reach or even exceed your expectations efficiently.
To begin, ask yourself, “What do I want to learn from my social media analytics?” Then, dive into each part of the SMART goal. Here’s an example of a SMART goal related to your social media analytics strategy for reference.
Use a free template to help you create SMART goals and achieve them.
- Specific: I want to use social media analytics to identify specific data points related to my marketing tactics to determine which posts and campaigns are working best in reaching and engaging our audience members.
- Measurable: I want to be able to identify some specific data points to accomplish this goal.
- Attainable: I will work to identify three specific data points to help accomplish this goal.
- Relevant: These data points will help my team and I measure our success in reaching and engaging our audience members across social media channels as well as identify any gaps or areas for improvement in our social media strategy.
- Time-bound: I want to identify these specific data points over the course of the next month — this way, in four week’s time, we can begin using them to measure our success in reaching and engaging audience members across social channels and identify gaps and areas for improvement in our social media strategy.
2. Decide which metrics you’ll and focus on and track.
Now it’s time to decide which social media metrics you’re going to track. There are a number of commonly-tracked social media metrics for your consideration. Metrics may vary by social platform as well as which analytics tool you chose. But, here are some all-encompassing metrics applicable to virtually every social channel and analytics tool to get started.
- Reach is the total number of people who have seen your content.
- Engagements are all interactions including shares, likes, and comments.
- Impressions are the number of times or content is displayed on someone’s feed.
- Mentions are the times your business and brand are referenced on social media by audience members or other businesses.
- Social ROI provides insight into whether the investment you’ve put into your social media marketing is resulting in an increase or decrease in customers, sales, brand awareness, and customer loyalty.
- Social listening is when you monitor conversations about your business and brand on social to see what customers and audience members are saying about you.
- Likes are when an audience member taps (or double taps) on your social content to show they’re a fan of your post.
- Retweets/shares/reposts are when audience members post the content your business published on their profiles.
3. Determine which social media analytics tools you’ll use.
Next, determine which social media analytics tools you’ll use — we covered some popular choices above but you can always review other options through a simple Google search.
Before making a decision regarding which tool or tools you’ll use, think about the following questions:
- Do you want a tool or software to help you manage your social media analytics across multiple channels and platforms (e.g. Twitter, Facebook, LinkedIn) or just one (e.g. Twitter)?
- Which metrics did you decide you’re going to track (as we touched on in the above step)?
- What is your budget? Do you need a tool with flexible pricing options and features that you can add to or remove from over time? (To find this information, review the pricing pages like this page on Sprout Social’s website.)
- Which tools and software options are suited to help you achieve the SMART goals you set? (Check out feature pages for this type of information, like this page on Oktopost’s website.)
- Do you want your tool to integrate with the greater software your team uses to run your business (such as HubSpot’s CRM, for example)?
4. Measure the success of your social media analytics efforts.
Once you implement your social media analytics software, you’ll be able to measure the success of your efforts. To do this, you may use the analytics tool you implemented — depending on your software, you might have the ability to create customized reports and dashboards or pull the specific details about data points you care most about.
In addition to applying your tools to help measure your success, you may also consider your answers to the following questions:
- Did you achieve your SMART goals?
- Did the metrics you chose to focus on tell a story that’s helpful for your business?
- Did the software or tool you implemented support your business needs?
5. Make necessary social media analytics adjustments.
Once you measure the success of your social media analytics efforts, you’ll be able to determine whether or not any part of your strategy needs to be changed or updated.
Maybe you realize one of your data points isn’t providing the level of insight into your marketing efforts across social platforms, so you need to identify a new one to measure. Maybe your software doesn’t allow you to customize cross-channel reports the way you want to, so you need to implement a new tool. Or, if you’re happy with the way your social media analytics reporting and strategy is working, be sure to revisit your strategy in the future to ensure it continues meeting your expectations.
Begin Tracking and Applying Social Media Analytics
By tracking and applying the process of social media analytics to your strategy, you’ll be able to more effectively reach your audience. And when you do this, you’ll see improvements in factors that are directly tied to your ROI like engagement, conversions, loyalty, and more.
Consider which tools and software are best for you and determine how you’ll track your social media analytics to create deeper relationships with your customers and followers.
Editor’s note: This post was originally published in March 2020 and has been updated for comprehensiveness.

12 Social Media Tools You Need to Use in 2020
You already know how important social media is to increase brand awareness, generate more leads, and ultimately score more conversions.
The world is on social media — 50% of it, at least — so if you want your product, service, and mission to reach the maximum amount of people, your business needs to be on social media, too.
Social media, however, can be extremely time-consuming. Additionally, it spans so many diverse tasks, ranging from number-based activities like tracking analytics, to creative jobs such as designing graphics.
It can be difficult to find the skills and manpower needed to execute a good social media strategy — which is why you need social media tools to help you out.
Here, we’ll cover the top 12 social media tools you should be using in 2020 to help you save time and increase conversions.
What makes for a good social media tool?
Although the term “social media tool” is very general and can apply to a wide range of services, there are a few key features each social media tool should have.
1. It saves you time.
The goal of a social media tool is to save you time while getting similar — or better — results than you could without it. Look for social media tools that automate a process, but make sure the process still happens correctly, since some shortcuts might be too fast and therefore won’t focus on quality.
2. It helps you increase brand awareness.
One of the biggest benefits of social media is its ability to increase your brand awareness, which is why each social media tool you select should perform its services with brand awareness in mind.
Maybe your tool of choice is an editing platform such as Lightroom, which can help you create images to match the rest of your feed. Or, maybe it’s an Instagram scheduler like Later so you can preview your profile before you post images. Whatever the case may be, social media tools should focus largely on brand awareness.
3. It’s easy to use.
Social media tools are only a time-saver if they’re easy and intuitive. Each tool you select should be super user-friendly so that, if needed, your accounting team could edit photos and your creative, right-brained writers could still use the analytics function to track daily social metrics.
Many social media tools provide tutorials on their websites. Others, such as Kicksta, have top-notch customer service so you can get immediate expert advice if you need help getting off the ground.
4. It’s affordable.
Social media tools should be affordable (and most of them are). Many high-quality social media tools are even free, such as the Unfold app, which is perfect for creating Instagram stories.
With social media tools, there’s no need for you to go back and forth with the accounting department trying to get your budget approved. Most social media tools are already budget-friendly so all you need to do is sign up.
5. It keeps you organized.
One of the ways social media tools save you time is by keeping you organized, so make sure the social media tools you decide to use are efficient and tidy.
For example, HubSpot’s Social Inbox tool helps you prioritize your social media interactions, and graphic design website Canva saves your designs so you can go back and edit them later.
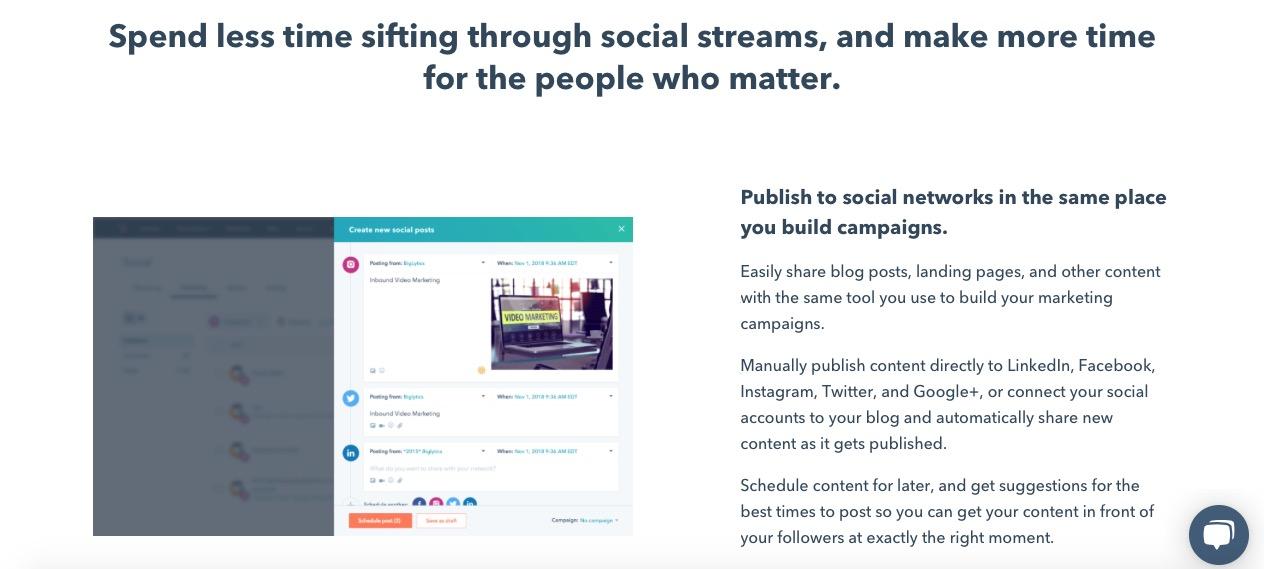
1. HubSpot’s Social Inbox Tool
Price: Starts at $800/month, included in the Marketing Hub Professional tier
HubSpot’s Social Inbox tool saves you valuable time while still optimizing your social efforts. Schedule your posts, integrate your social networks with your blog, and monitor messages and mentions so you can nurture new leads.
HubSpot also integrates all of your marketing with your CRM, so it’s easy to figure out how many leads and customers you’re receiving directly from social media. “HubSpot Marketing Hub … puts the potential of corporate marketing within everyone’s reach,” one customer says.
2. Kicksta
Price: Starts at $49/month for individual creatives
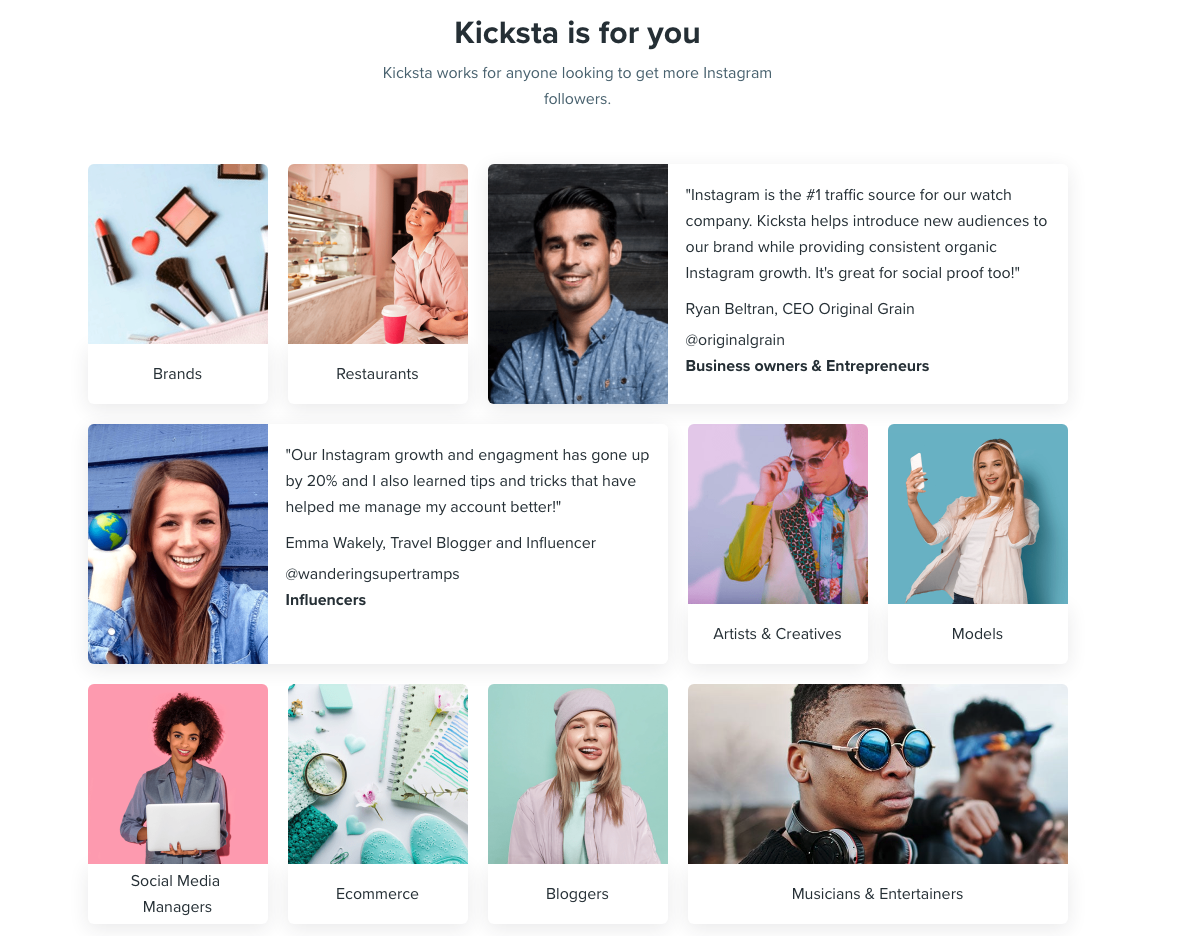
Kicksta is an Instagram growth service that helps you get more organic followers on your Instagram business account. Using your company account, the growth service “likes” around 30,000 photos a month on carefully-targeted accounts. Those users — real people, not spam bots or fake accounts — will begin to follow your account, increasing your brand awareness.
Kicksta is a good fit for any industry and provides a friendly, responsive, and helpful customer success team. “Kicksta helps introduce new audiences to our brand while providing consistent organic Instagram growth,” says Ryan Beltran, CEO of watch company Original Grain. “It’s great for social proof too!”
3. Later
Price: Free, or starts at $7.50/month
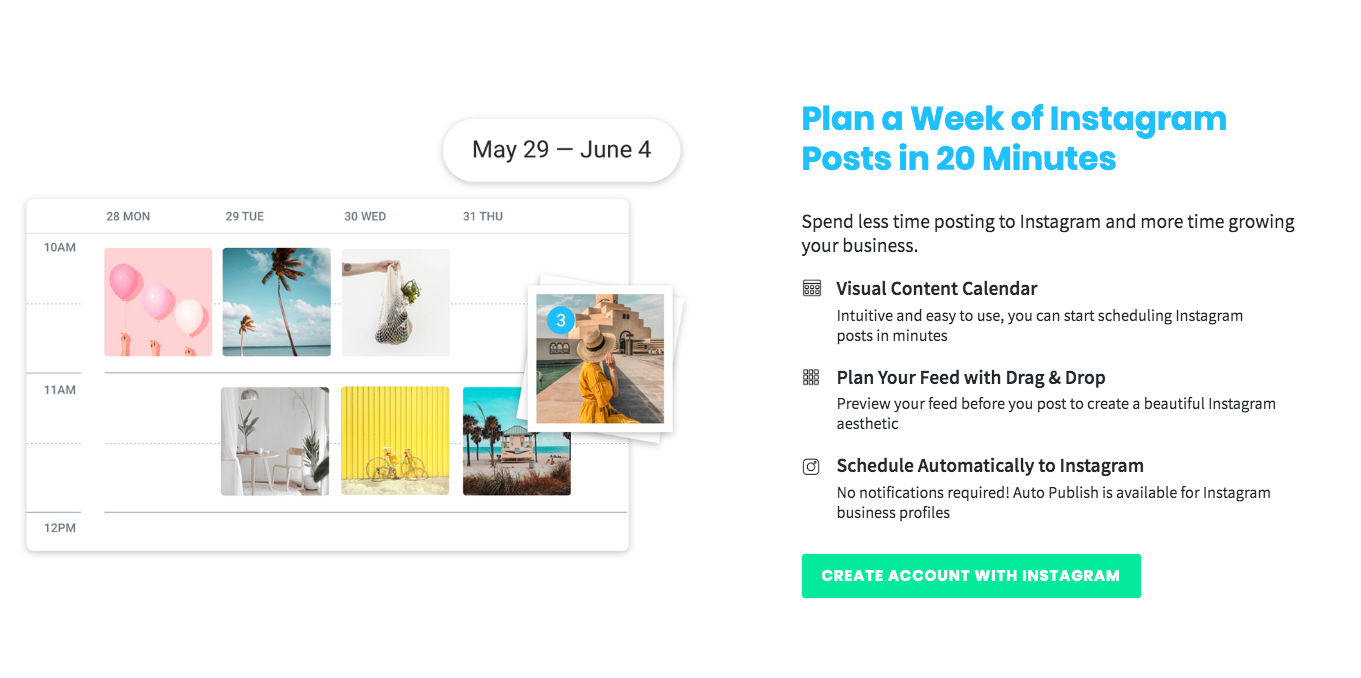
Social media marketing platform Later lets you plan and schedule your Instagram, Twitter, Facebook, and Pinterest posts. The drag-and-drop calendar makes it easy for you to map out your upcoming posts and see at a glance how your feed will look.
You can also track your analytics, which will help you figure out the best time of day to post, and the best hashtags to use. Additionally, the Linkin.Bio feature for Instagram helps your posts become instantly shoppable.
“I love that you can either use it via the website or app on-the-go,” one user remarks. “It is one of those apps that I could not live without … Later is [a] super easy tool to set up.”
4. Lightroom
Price: Starts at $9.99/month
Adobe’s Lightroom product is a tool that lets you organize and edit photos. Since social media is all about visuals, it’s critical your business’s social media accounts showcase vibrant, on-brand photos.
Sliders, filters, and many other features make Lightroom a user-friendly tool to create beautiful photos even if you don’t have much editing experience. Lightroom is available for both mobile and desktop, and best of all, changes made on one device immediately apply to all devices.

5. Canva
Price: Free, or starts at $9.95/month
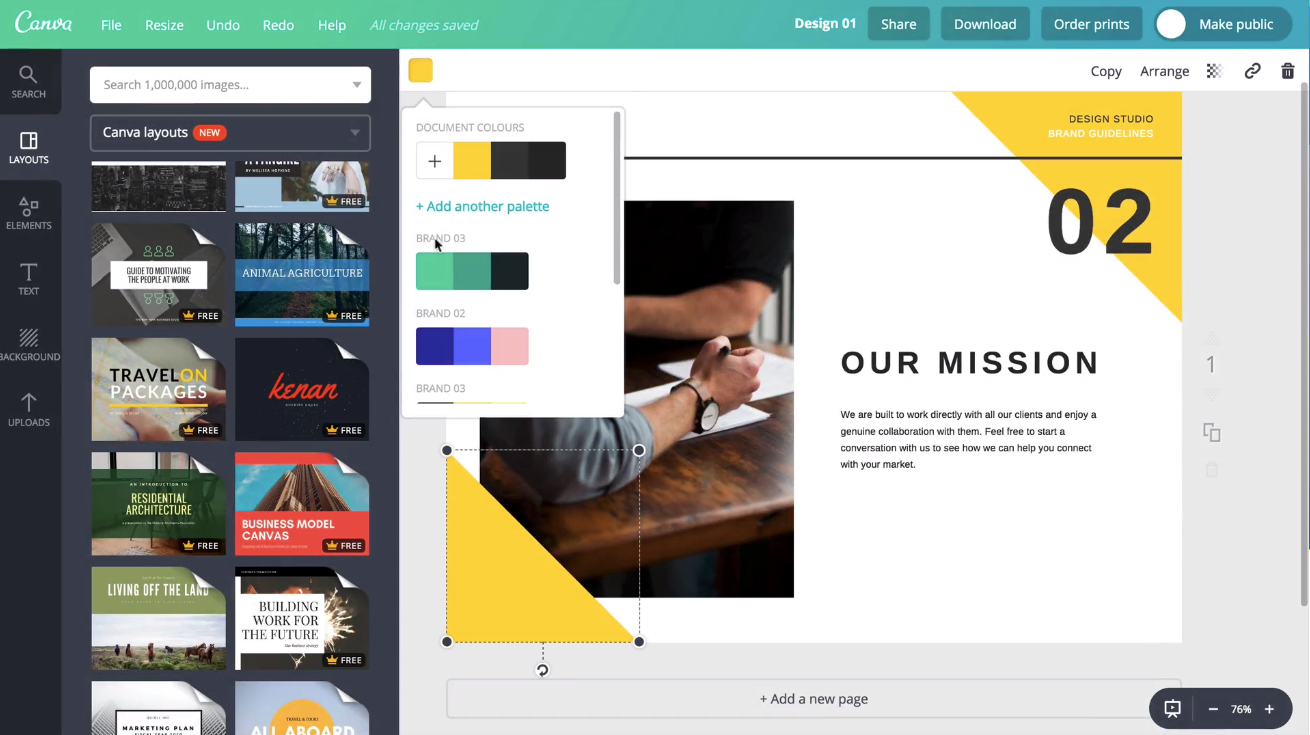
Canva is an easy-to-use graphic design website where you can create custom, on-brand graphics for your company’s social media accounts. The website has dozens of templates — everything from Facebook banners to Instagram stories to Twitter posts — so if starting from scratch to create social graphics seems intimidating, use a template instead.
One user said, “Canva has been a lifesaver to me and my business. No more hours sitting in front of the computer coming up with graphics for social media post[s] or Pinterest post[s].”
6. Unfold
Price: Free
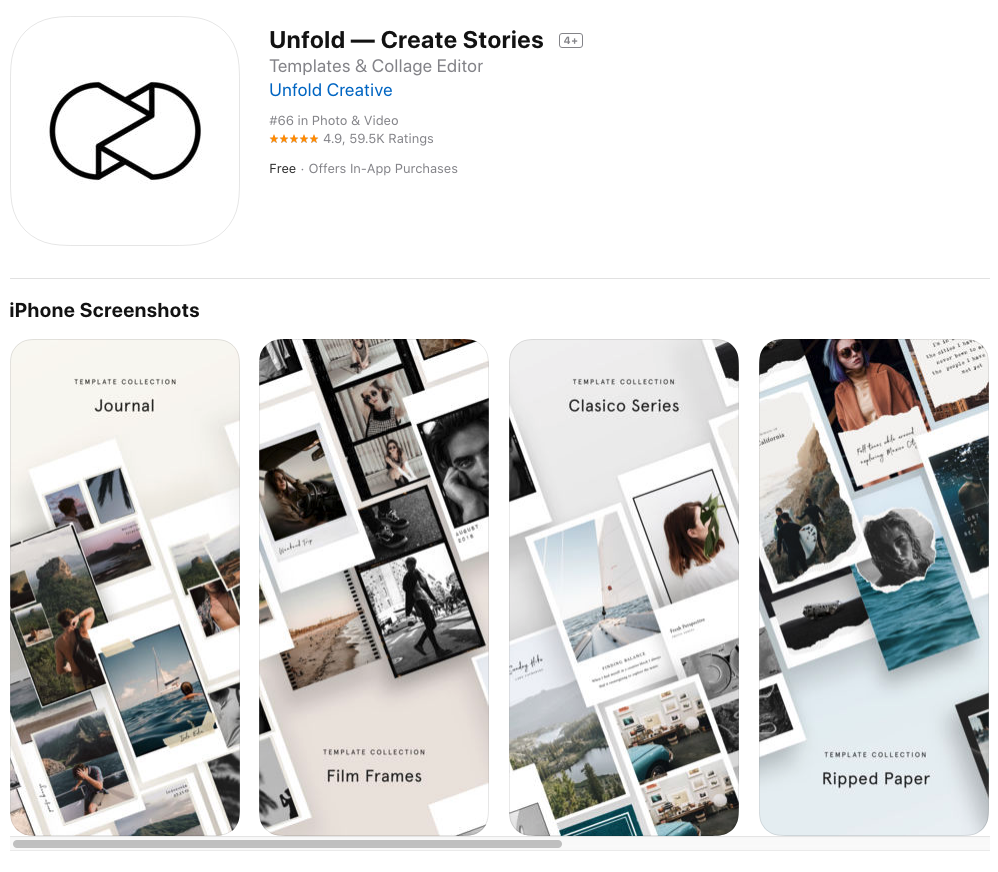
Described as “a toolkit for storytellers”, Unfold is an iOS and Android app that helps you create beautiful templates for Instagram stories. Bringing your creative visions to life is the driving idea behind Unfold. It’s an ideal app for lifestyle brands who want to create stylish collages to keep their social media accounts on-brand and receive the maximum amount of engagement from followers.
7. HypeAuditor
Price: Starts at $200/month for 50 reports
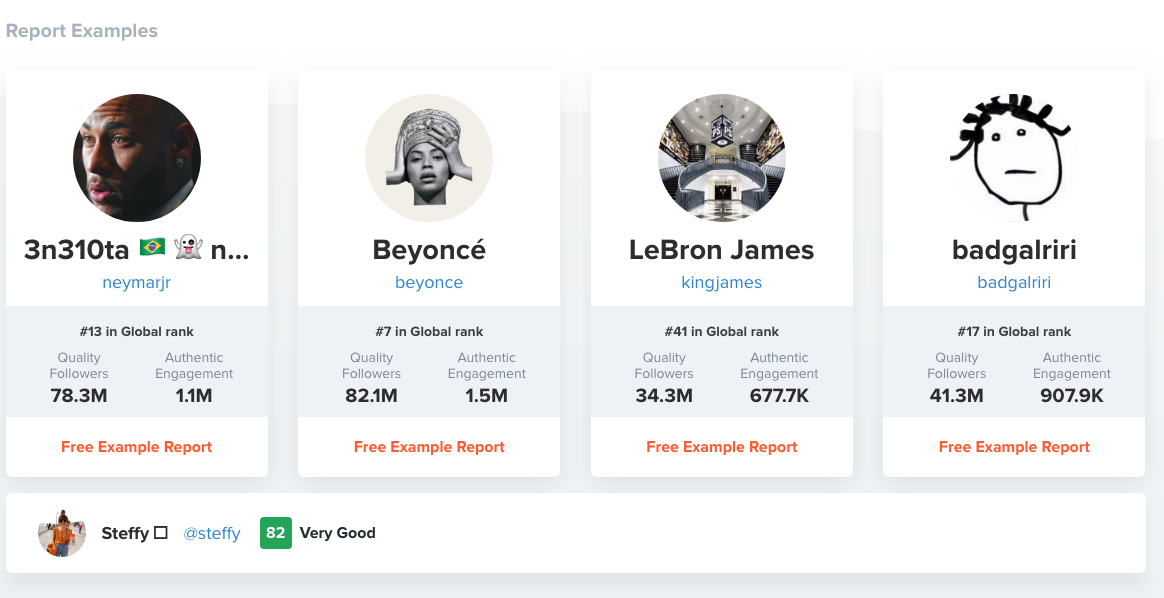
You’ll never earn money from fake followers — they just make your engagement look bad (think millions of followers, but only a few hundred likes per photo) and ruin your reputation. That’s why HypeAuditor weeds out fake followers on your Instagram account to help you determine your organic reach.
Additionally, HypeAuditor analyzes your audience to figure out where they live, their age and gender, and which of your followers are ghosts.
8. Retouchup
Price: Starts at $0.25 per image
The website Retouchup provides an easy way to edit photos for social media, from basic color correction to more advanced Photoshop-like features such as adding or removing people from a photo. With Retouchup, you don’t do the work yourself — instead, just submit a photo and the website’s experts will edit the photo for you within 24 hours.
“You’re making me look like an awesome photographer!” one user gushed. Retouchup can save you time during the editing stage, and make your images appear higher-quality and more compelling.
9. Quuu
Price: Free, or starts at $19/month.
Quuu is a platform that helps its users execute visually stunning social media content. It automates the time-consuming process of properly creating professional, engaging multimedia assets for campaigns.
When using Quuu, you can choose from over 500 interest categories, like marketing or real estate, and receive content suggestions based on those choices. You’ll receive a certain amount of content suggestions per day per profile based on your settings, ensuring you’ll always have relevant posts for your audience.
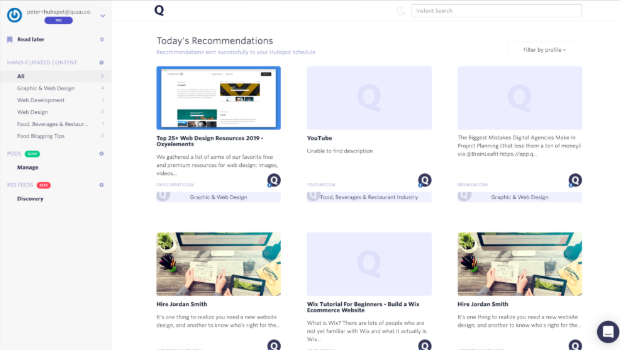
If you’re a HubSpot customer, you can integrate the two platforms. Quuu finds the best content for your social profiles, and HubSpot lets you control those suggestions. You can go to your draft folder via HubSpot and pick which content you want to upload if your Quuu account isn’t automated, which you can change.
Quuu looks for content so you don’t have to. The tool also integrates with Buffer, Hootsuite, and Socialbee.
10. Marketing Video Builder
Price: Free, or starts at $33/month.
Marketing Video Builder by Animoto helps you make professional-tier videos to engage with audiences. Videos can be created in minutes using the online video editor. The best part about the tool is that you don’t even need editing experience to get started.
You can increase brand awareness by making videos for your company, and share them across social channels to grow your audience. Additionally, if you’re a HubSpot customer, you can integrate that account with your Animoto account.
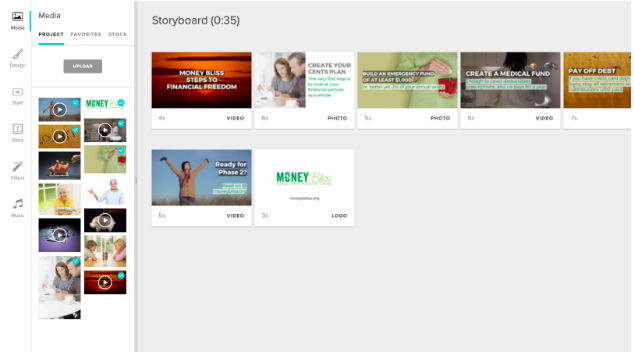
When you create videos, you can use a pre-built storyboard template curated by either Animoto or HubSpot. Alternatively, you can make a video from scratch. When you’re done, you can export the video to your HubSpot file manager with one click and manage it from there.
Animoto also integrates with Getty Images, Facebook, YouTube, Twitter, and LinkedIn, so you can have video tools for a good portion of social media platforms all in one place.
11. Design Wizard
Price: Free, or starts at $9.99/month
This tool lets you create different types of content, like photos and videos, with no professional editing experience required. If you have a limited budget and time on your hands, this free visual content tool is ideal for you.
Design Wizard has a library of over a million multimedia graphics for inspiration and use. Plus, all images are licensed for commercial use, so if you use one from the site, you won’t run into copyright infringements.
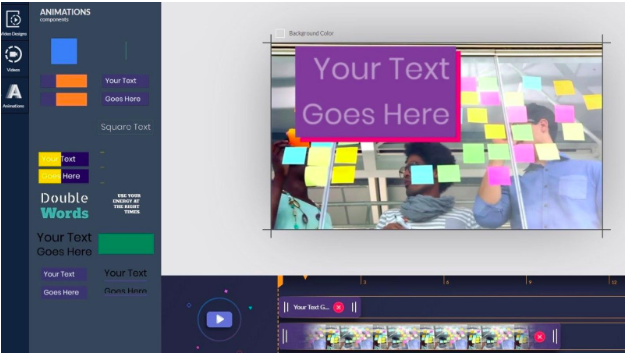
Your beautiful, on-brand images will be able to integrate with HubSpot. You can manage all of the files you create with Design Wizard from your HubSpot account, which you can use for campaign posts.
12. Falcon
Price: $129/mo.
Falcon is a social media management platform that allows you to create posts for social networks on a collaborative content calendar.
It integrates with HubSpot, Microsoft, and Salesforce to help users streamline marketing tasks among teams. For a visual to see how Falcon integrates with other software, refer to the photo below:
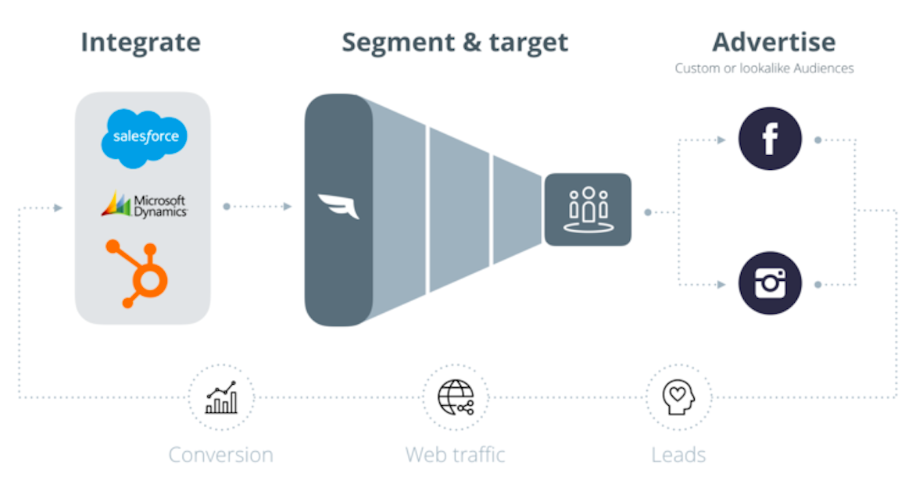
HubSpot customers can use this integration to create audience segments. These segmentations will help you target your customers with social media posts, making sure your content is being seen by the right people. Any changes you make within HubSpot will automatically transfer to Falcon, so you don’t have to worry about manually updating content.
There are numerous choices out there for high-quality social media tools. Ultimately, it’s your job to decide which tool is the best fit for your needs, your budget, and your marketing goals.
Need a painless way to track your social interactions? Try HubSpot’s social inbox tool today.
Editor’s note: This post was originally published in May 2019 and has been updated for comprehensiveness.

A Content Marketing Playbook for Times of Crisis
The COVID-19 pandemic has sent businesses scrambling to pause plans, edit emails, and cancel campaigns. And while everybody seems to know what not to publish these days, many marketers are asking: what should we put out into a world in the throes of a crisis?
It’s a conundrum facing countless creators across the globe.
They’re wondering how to be empathetic without being disingenuous. How to offer value without seeming opportunistic. And how to be there for their audience without adding to the noise.
These are important questions to ask at a time like this. Essential, in fact. But underpinning all of them is a much simpler question that gets to the very heart of what content marketing has always been about. A question that every creator staring at a blank canvas right now should be asking: how can we help?
Because now, more than ever before, audiences are seeking help.
Increasing Engagement Rates
Entire industries have been forced into hibernation in recent weeks, but this does not mean audiences’ appetites for helpful content has gone away. On the contrary. Consumers are increasing searches for valuable information and engaging with businesses at record rates.
According to an analysis of anonymized data from HubSpot’s global customer base, engagement with marketing emails, website traffic, and live chat sessions have all been on the rise, with email open rates an eye-catching 25% higher than pre-pandemic levels.
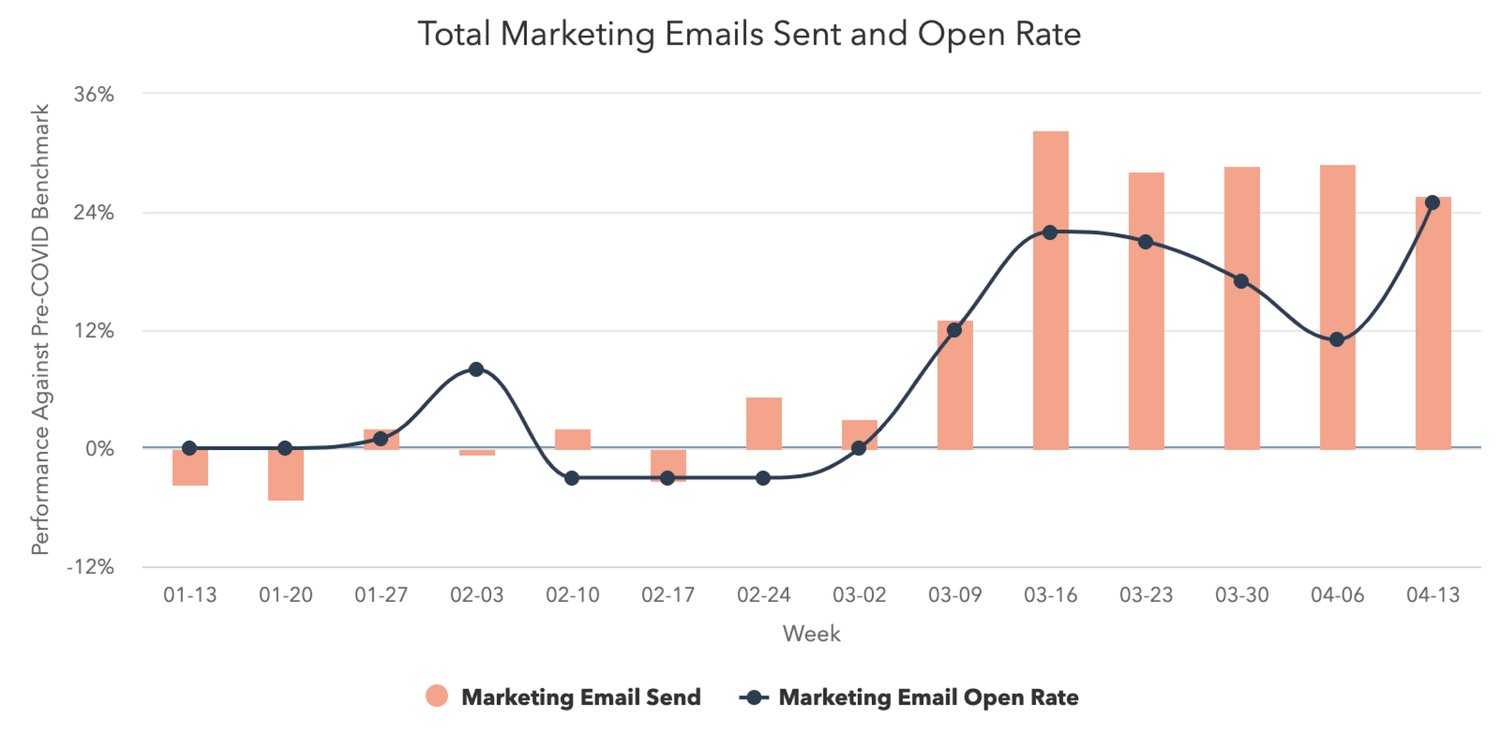
Meanwhile, traffic to HubSpot Academy, our free online training program, has more than doubled in recent weeks, and our Marketing Blog has experienced a 40% increase in weekly organic traffic.
The pandemic has triggered a striking surge in the very thing that many marketers care about most: audience attention. And such a high level of interest in the content companies are sharing, coming at such a sensitive time, places a huge responsibility on marketers to deliver materials that are not only relevant to the current moment, but genuinely impactful, too.
Those that fall short run the risk of doing damage to their reputation — according to Edelman, “71 percent of consumers agree that if they perceive that a brand is putting profit over people, they will lose trust in that brand forever.”
But those that succeed will leave a lasting impression on their audience — according to Gartner, brands that meet consumer’s needs at this time can “re-establish trust through customer-centric actions.”
So, it is not only engagement rates that are high during this crisis. The stakes are high, too. And a situation this unique requires a unique strategy to match.
When a Crisis Descends, Pause Before Planning
When times of crisis strike, the first thing marketers should think about is what not to do. Planned projects, campaigns, and announcements should be reviewed and postponed if possible. For those assets that are released as planned, it’s likely they’ll need a new tone that’s appropriate for the new environment.
Marketers should examine every article, email, ad, and social media post scheduled to be published to ensure that the tone of each asset is empathetic and respectful.
If this sounds like a lot of work, it’s because, in many cases, it is. No one team can manage a company-wide content audit alone.
Communications teams have expertise in developing messaging, social media teams have deep connections to their online community, email marketing teams have a strong understanding of brand tone, and customer-facing teams, including sales to service, have their fingers on the pulse of how customers are feeling — all of these teams should be consulted on content strategy during a crisis to ensure that a consistent and helpful approach is adopted across every touchpoint with the public.
At HubSpot, before we began creating new content for the new environment, we significantly reduced the frequency of our social media posting, dialed back the promotion of a major product launch (CMS Hub), and created a centralized set of guidelines on how we as a company should be communicating during this crisis.
Making such sweeping adjustments on short notice isn’t simple, but for us, two things helped make it easier.
First, we have an established decision-making process for crisis communications that minimizes confusion in the moment.
Second, by centralizing all of our customer interactions in a shared CRM, we’re able to see what communications customers are getting and roll out adjustments quickly to marketing, sales, and service.
Creating New Content in Times of Crisis
When it comes to creating new content during a crisis, marketers’ sole focus should be on delivering work that is genuinely helpful to their audience, without being opportunistic or adding more noise to a topic that has already been widely covered by others.
According to research conducted by Edelman, 85% of people expect companies to use their power to educate their audiences during the COVID-19 crisis. For some companies, that could mean writing in-depth articles that offer expert advice on relevant topics or aggregating publicly available information to make it more accessible for readers.
Intuit, for example, did this well when they teamed up with GoFundMe to create a Small Business Relief Initiative and when they built an interactive tool to help small businesses learn if they are eligible for government-provided financial relief.
We saw similarly helpful content from Care.com, whose team leveraged their deep knowledge of caregiving best practices to share expert advice on the precautions for families and caregivers facing the global health crisis.
These powerful examples directly address the situation at hand. But for other companies, providing helpful content could mean offering an alternative to the cacophony of crisis-centric content flooding feeds all day, every day.
For example, NPR has unsurprisingly witnessed a spike in listenership to its news shows as people seek up-to-date, reliable information as the pandemic evolves. But it has also seen a 120% increase in weekly visits to its Tiny Desk Concerts — an entertainment series — indicating that audiences are not only interested in information directly about the crisis, but are also desiring content that provides an escape from it.
This should make content marketers feel encouraged.
It suggests that help can take many forms in the midst of a crisis and that there are multiple ways creators can add value to the lives of their audiences at this time.
For marketing teams that don’t have the necessary resources to create new content given the trying economic environment, there are still creative ways to adapt to audiences’ needs. Gathering together old content that’s relevant to the current situation, updating it as needed, and presenting it as an easily digestible ebook or content series can be efficient ways of overcoming resource shortages.
At HubSpot, we did just this when we published a new landing page featuring all of our articles about remote work to offer some timely support to companies and employees adjusting to the new normal of working from home.
During times of crisis, there are a number of ways for marketers to approach new content creation — some that directly address the unique environment at hand, others that look to complement the new patterns of behavior that are emerging — but the one thing that should be consistent is an honest effort to help.
Choose Channels Carefully, Distribute Delicately
Marketers have an abundance of options for how they distribute their work, but just because we can publish content on multiple channels doesn’t always mean that we should.
Our research tells us that marketing email send volumes have increased significantly in recent weeks, meaning that subscribers’ email inboxes are even busier than usual. As well-intentioned as a new article or video might be, if it isn’t distributed delicately and at a considerate cadence, it could end up doing more harm than good in a company’s efforts to help audience members.
Marketers should reserve their most intimate communications channels, like email and push notifications, for key content updates during a crisis and adopt more subtle distribution approaches for their more niche materials.
For example, an SEO-optimized article that’s easily discoverable through search may be a more appropriate way to share certain new content offerings than a direct email or paid social media post, both of which could come across as excessively promotional or tone-deaf.
At HubSpot, when the pandemic was declared, we cut our social media posting by approximately 50% in the first week and reduced the number of ads we were sending to avoid overloading our audience with information at a time when there’s already a lot to process.
And when we developed a new educational content series, Adapt 2020, we made clear to potential subscribers what type of content to expect, as well as where and when it would be distributed.
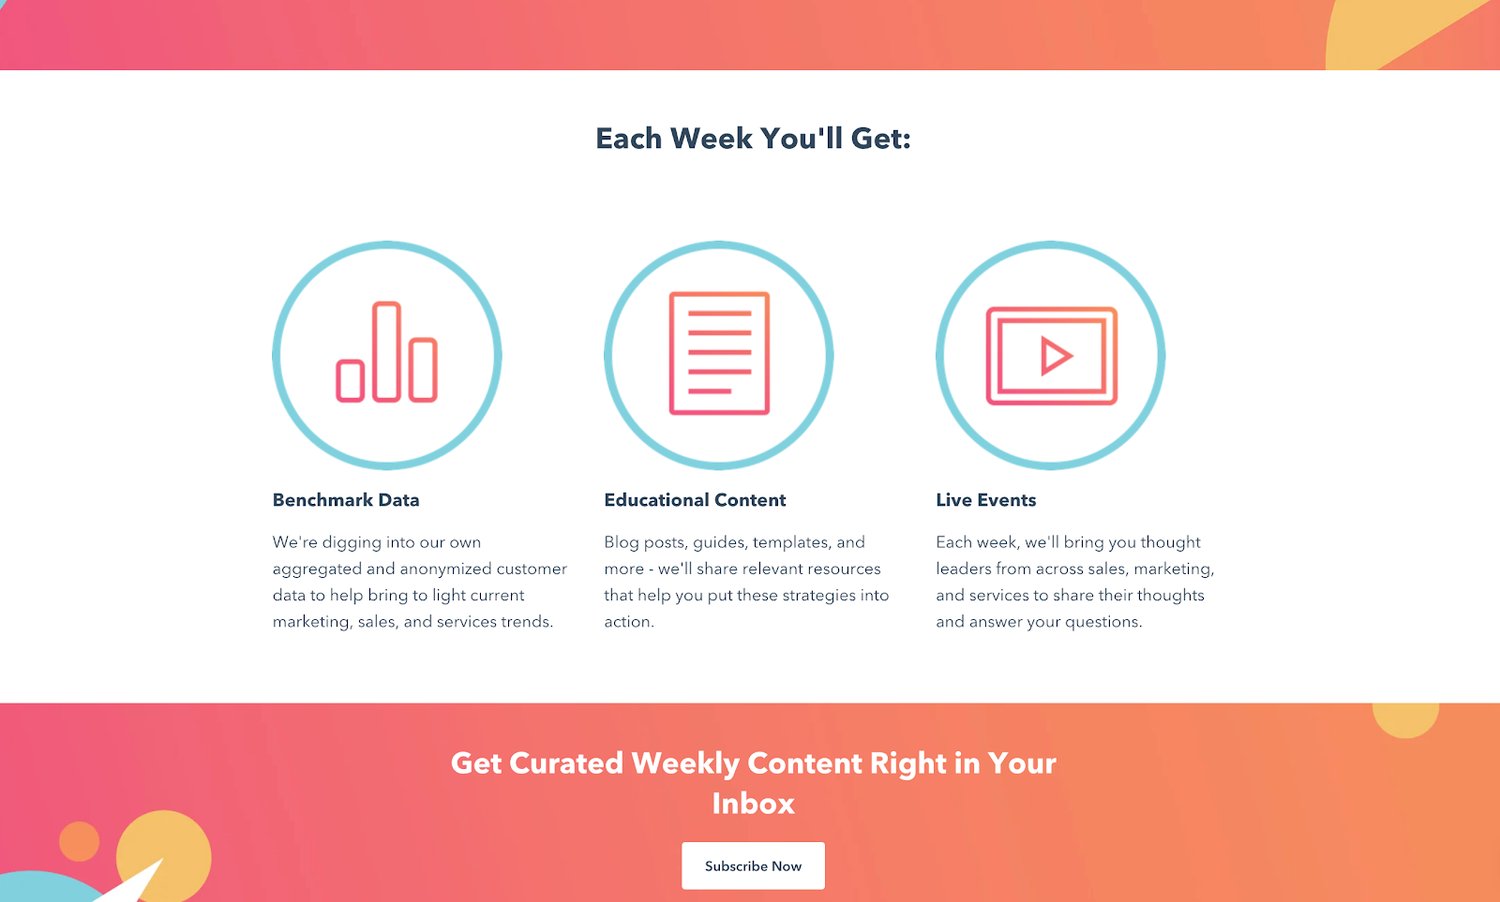
The Adapt series became the cornerstone of our content strategy during the current crisis and provided a powerful proof point of the value of the diverse app ecosystem that’s deeply integrated with HubSpot’s suite of tools.
With Looker we’ve been able to share regular updates on shifting trends in sales and marketing, with Canva we’ve been able to quickly design on-brand assets to promote upcoming webinars, and with Slack we’ve been able to collaborate with confidence on all of the elements that make up the weekly content series.
With distribution channels and cadence established with our subscribers, we have been able to turn our attention towards monitoring how the crisis and the needs of our audience are evolving from week to week.
Adapt Early, Adapt Often
Crises are unpredictable by nature. And what was deeply valuable to audiences last week, may be irrelevant by the next. To provide helpful content for the duration of a crisis, marketers should prepare to continually evolve their strategy in line with their audiences’ shifting needs.
Choosing the right metrics to monitor is key to not falling behind the pace of change. Creators should closely monitor metrics that indicate engagement — such as ‘average time spent on page’ for articles and show-up rates for webinars — to gain an insight into whether or not their new content is resonating with audiences. And from there, they can use those learnings to look for ways to improve the relevance and helpfulness of their next offering.
At HubSpot, we initially focused on delivering content aimed at helping businesses to set up virtual events and adapt to the new normal of remote work.
We then quickly shifted focus to creating content to help businesses take advantage of new relief measures available by publishing the pricing and packaging changes we’ve made along with an overview of the U.S. Stimulus Package.
Following that, we shifted focus to creating content to help businesses adjust their medium- and longer-term strategies and prepare for the post-pandemic economy.
We have never witnessed such sudden and dramatic shifts in what audiences need, and the marketers that are nimble enough to adapt their strategy quickly are the ones most likely to provide meaningful help for the duration of the crisis at hand.
And by doing so, they stand to establish long-lasting levels of loyalty with their audience.
What Content Marketing Has Always Been About
It’s no secret that consumers’ trust in companies has been dwindling in recent years. According to HubSpot Research, 55% of people no longer trust the companies they buy from as much as they used to, and 71% do not trust sponsored ads on social networks.
However, times of crisis create unique environments and unexpected outcomes, one of which can be the recovery of some of that lost trust, and the deepening of long-term relationships between consumers and companies.
Audiences are turning in record numbers to businesses for resources, information, and support. Customers are taking to social media to rally support for their favorite businesses. And content marketers are returning to first principles and re-establishing helpfulness at the heart of their strategies.
There are many challenges facing businesses at this time — content strategy is just one of them — but I am hopeful that marketers adopting the advice outlined here will see their efforts rewarded in the form of closer relationships with the audiences, and the fulfillment of knowing they’ve provided help when it’s been needed the most.
After all, that’s what content marketing has always been about.

15 Essential Social Media Marketing Tips From Beginner to Advanced
One of the most humbling experiences as a marketer is putting out that tweet you just knew would be a home run for your audience.
We’d like to think of ourselves as being able to come up with A+ social media content every day, but the reality is that we’re all human. Sometimes, we hit a wall with planning content that aligns with our company and goals.
If you’re just starting out in social media marketing or are looking for a few tips to get inspiration, we’ve compiled some helpful knowledge to beef up your accounts — no matter your skill level.
1. Sync posts across all social media accounts.
If you’re just starting out, it’s a good idea to invest in a social media management service like HubSpot’s Social Inbox. This tool can help you schedule posts, monitor mentions, track your social analytics, and keep an eye on all your accounts. Similar tools include Later and TweetDeck.
These apps will also let you sync posts across various accounts. Keeping content synced will ensure you post across all of your platforms and introduce followers with multiple accounts to your brand.
2. Republish and update older posts.
If you have a backlog of content that’s outdated, update and republish it with fresh ideas for SEO. This tactic has the potential to draw in new readers and take less time than continuously pumping out new ideas.
This can be blog posts, landing pages, and offers that you have on your website. Your social media strategy exists to put your best foot forward by building engagement, and you don’t have to start from ground zero.
In fact, this exact post is an update from 2017, originally posted in 2013. We regularly update posts to ensure our readers are getting fresh content on our blog, social channels, and emails.
3. Schedule posts for evenings.
Don’t be afraid of weekends either. Scheduling content launches for evenings opens up a door for engagement that isn’t cut off by time zone. That way, even if it’s 3 AM in your geographic location, your tweet about your new app update reaches audiences around the world.
HubSpot Life is a behind-the-scenes look at HubSpot’s culture, posting content from global offices on social media. During what’s considered “off” hours in the US, HubSpot Life features posts during work hours in other countries, like Paris, Bogota, or Dublin.
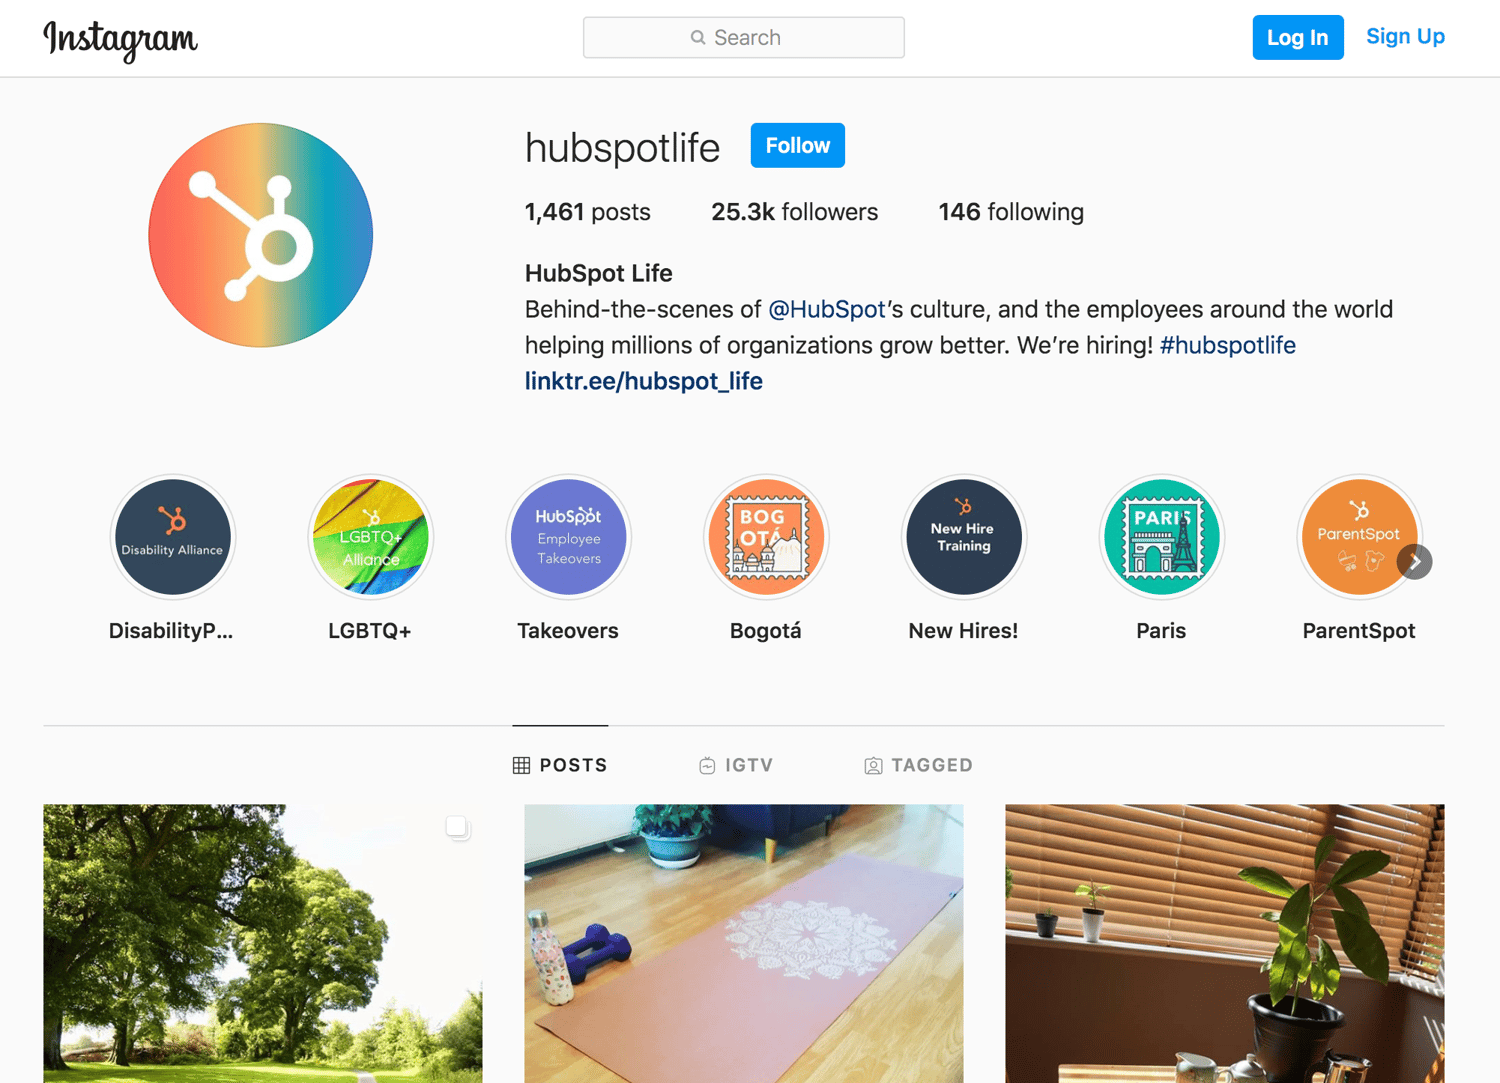
This ensures that global audiences are able to get fresh content during their work days, as well.
When scheduling posts for evenings, avoid content that requires engagement from your team. For instance, an Instagram photo that invites followers to “Comment below!” about something might not be the best idea to post at midnight, when you’re not able to engage.
4. Include hashtags to increase engagement
Hashtags are like a golden ticket to increasing your online reach. Common tags like #SocialMedia and #MarketingGoals are great, but try searching for less-used ones like those of bigger brands (such as Adobe’s #CreateYourStory), or community-based (#BrightonMA). Those are going to be the ones an active audience is checking out.
As well as using existing hashtags, try your hand at creating your own branded hashtags, like Buffer did in the example above (#BufferLove). This allows you to track what your followers and customers are saying about your media presence and product.
5. Use visuals whenever possible.
If you’re getting your feet wet with the social media game, it’s okay not to invest a fortune into visual content. However, it’s always a good idea to include pictures, videos, or graphics in posts whenever you can.
There are a number of free services, like Canva , to help you edit and create content. GIFs are a great way to engage with a younger audience. And never forget the smartphone most likely in your pocket they produce beautiful pictures you can definitely use on socials.
If you’ve tried your hand at social media before and feel comfortable branching out, these intermediate tips are for you. They’re aimed at easing the process of creating uniform content across your channels while increasing clicks.
1. Post multiple times a day.
You don’t need to post every hour, but one to three times a day keeps your brand fresh in your audience’s mind. Reposting user-generated content also counts, so don’t stress about coming up with dozens of new content ideas.
If you’re looking for ways to brush up your content marketing, how about incorporating an infographic or eBook into that Facebook post? For more tips like those, check out our list here.
2. Incorporate your brand into your social strategy.
Your brand should speak for you. Once you’ve established your brand, think of ways to blend it into your social media marketing. This can mean adding your logo to posts, including a company hashtag, or highlighting your employees.
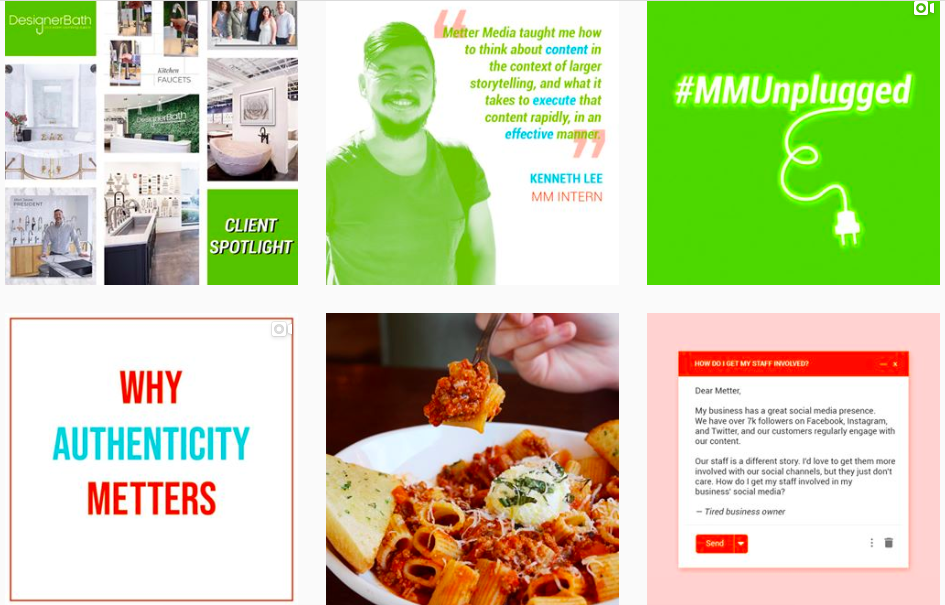
Check out this branding from social media management company, Metter Media. From a quick scroll through their Instagram homepage, you can quickly spot company colors, get a look into their team, and gain an idea of who they represent.
3. Engage audiences with interactive content.
From Twitter polls to Instagram Q&As, there are many ways to engage your audience and make your company’s content diverse. You can use interactive content to educate your audience about your products or to connect with your audience.
Think of ways your audience engages with competitors and how you can add your company into the mix. You can even ask your audience what type of content they prefer to see on an Instagram story, like this example below:

The story of this food blogger begins to recap previous recipes with links to corresponding blog posts. To put this in a B2B perspective, say you wanted to boost clicks on previous blog content. You could poll followers, “Which type of post goes best with your coffee?” and link to two options in the next parts of your story.
4. Invest in more visual content.
As you get into the swing of posting on social media, invest more time into visual content. On average, retweets with pictures gain more clicks and views than text-only posts.
Visual content isn’t just restricted to Instagram. Post infographics about your industry on LinkedIn, tweet a funny meme relating to your office culture, or post a video on Facebook taking viewers on a high-speed tour of your office.
Next up are some advanced tips. These ideas are for social media pros in need of a new direction or options to brighten their feeds.
1. Use new app updates to your advantage.
Have you tried TikTok or IGTV yet? If not, we suggest expanding your strategy to include these channels. After all, you don’t want to miss out on your content having the potential to meet one billion phones.
New apps and app updates add to the ability to diversify your brand and keep things fresh. If you’re looking to show your company’s humorous side, try uploading a little dance video on TikTok. If you want to bring that podcast of yours to visual audiences, upload it to IGTV.
2. Invest in influencers to promote your product or service.
It’s official: young audiences listen to their idols. Four in 10 millennials trust the products their favorite influencers promote on their social channels, so investing in influencers might be an avenue to look into when trying to generate sales.
Download our free ultimate guide to getting started with influencer marketing.
If you have an audience that’s younger, research influencers in your industry and pitch potential partnerships. Or, for a more budget-friendly option, look at how influencers are branding their content — you may be able to incorporate some ideas into your strategy.
3. Diversify content on every social media platform.
You can update and sync content on your accounts like a pro. Now it’s time to make that content unique. Save your high-definition videos for Facebook and meme posts for Twitter.
When diversifying content, make sure they all relate back to your company’s goals and mission. There’s no need to post a recipe for falafel on your marketing company’s Instagram, but an infographic displaying the ‘recipe’ for a perfect caption would be a compelling, spot on example.
If you’re a writer, a filmmaker, or really anyone who’s looking for good career advice, check out this thread from @chrismcquarrie. 🙌 https://t.co/RRCbxoO8kg
— LinkedIn (@LinkedIn)
October 24, 2019
On October 24th, LinkedIn highlighted a blog post on Facebook. On the same day, LinkedIn promoted a Twitter thread aimed at aspiring filmmakers. Threads are a Twitter-specific tool aimed at sectioning off long thoughts, while the Facebook post gives LinkedIn more clicks from their Facebook followers.
4. Start promotions to build audience growth.
Have you run a contest on your Twitter account yet? Totino’s does them well.

Don’t worry, promotions don’t have to be this fancy. Running a promotion can be simple as giving 10% off of your product or service to a lucky winner who retweets. This expands your reach and sparks lead generation among your customers’ followers.
5. Create timely content that resonates with audiences.
As a huge believer in taking advantage in the meme of the moment, creating timely content adds some fun to your channels and can explain the uses of your product in a new way. Memes aren’t the only way to accomplish this, seasons are, as well.
Is it wintertime in your part of the world? Celebrate by snapping a pic of your company’s favorite snowy activity and share it to Facebook. Alternatively, #NationalSandwichDay is November 3rd. Popeye’s used this holiday to announce the comeback of a recent fan favorite.
Y’all…the sandwich is back Sunday, November 3rd. Then every day. 🤯🔥 pic.twitter.com/JDxyCIv0zz
— Popeyes Chicken (@PopeyesChicken)
October 28, 2019
Is it too early to call this genius type of marketing “legendary?”
Keeping content fresh can be difficult, even if you’re a social media pro. The pressure is on nowadays when it seems like the trends are changing every second, and diving in can seem like jumping down a rabbit hole.
These tips will keep you current on ways to organize your page, upgrade your content, and grow your target audience, but don’t stop here. Check out our ultimate guide on social media marketing for more inspiration.
Editor’s note: This post was originally published in 2013 and has been updated for comprehensiveness.

The Move to Ecommerce: How Retailers Can Adapt During a Crisis
Ecommerce is an undeniably powerful opportunity for retail stores to increase sales and reach new customers. And, in 2020 and beyond, it will continue to become an increasingly popular shopping choice for many consumers.
In fact, Statista predicts that ecommerce revenue will surpass $638 billion in the U.S. by 2022.
And, in 2020, amidst the global crisis, ecommerce is fast becoming the go-to model for keeping retail businesses afloat.
Brands that have adopted ecommerce are seeing success, particularly since most shoppers are staying at home.
But, for companies considering how to shift into ecommerce, such a drastic shift can feel like a challenge.
To ease the burden on retailers, we share eight steps you should follow when implementing an ecommerce project management plan.
1. Pick-up and Delivery Services
Due to the current global conditions, consumers have been staying indoors — and, as a result, they have become accustomed to doing most activities from their homes, including shopping.
Retail has been directly impacted by this change in consumer behavior. To stay healthy, people aren’t walking into stores and restaurants to make purchases anymore. Instead, they’re typically making those transactions online.
Additionally, the convenience of having items delivered to one’s home has changed the shopping experience for consumers. People will likely continue to prefer ecommerce even after the global crisis is over.
The same goes for pick-ups — although it requires the customer to leave their home and take precautions, the process has become streamlined and requires little interaction. Ultimately, retailers will need to note these conveniences and how effectively they have drawn customers. This is a model that will need to be implemented post-crisis.
To shift to an ecommerce model, companies need to first research competitive shipping prices to get the best deals. Customers want more items shipped, and prohibitive shipping costs might be a deal-breaker for some of your customers.
The existence of a shipping option also means investing in packaging, which means custom branded boxes and packages will become a mainstay for stores. Brands will also need to be aware of the price and quality of their packaging — they will be expected to invest in sustainable packaging to make for a safer future.
Ultimately, shipping and delivery is a major component of ecommerce and can incentivize customers to become long-term advocates of your brand if implemented successfully.
2. More Health and Safety Measures
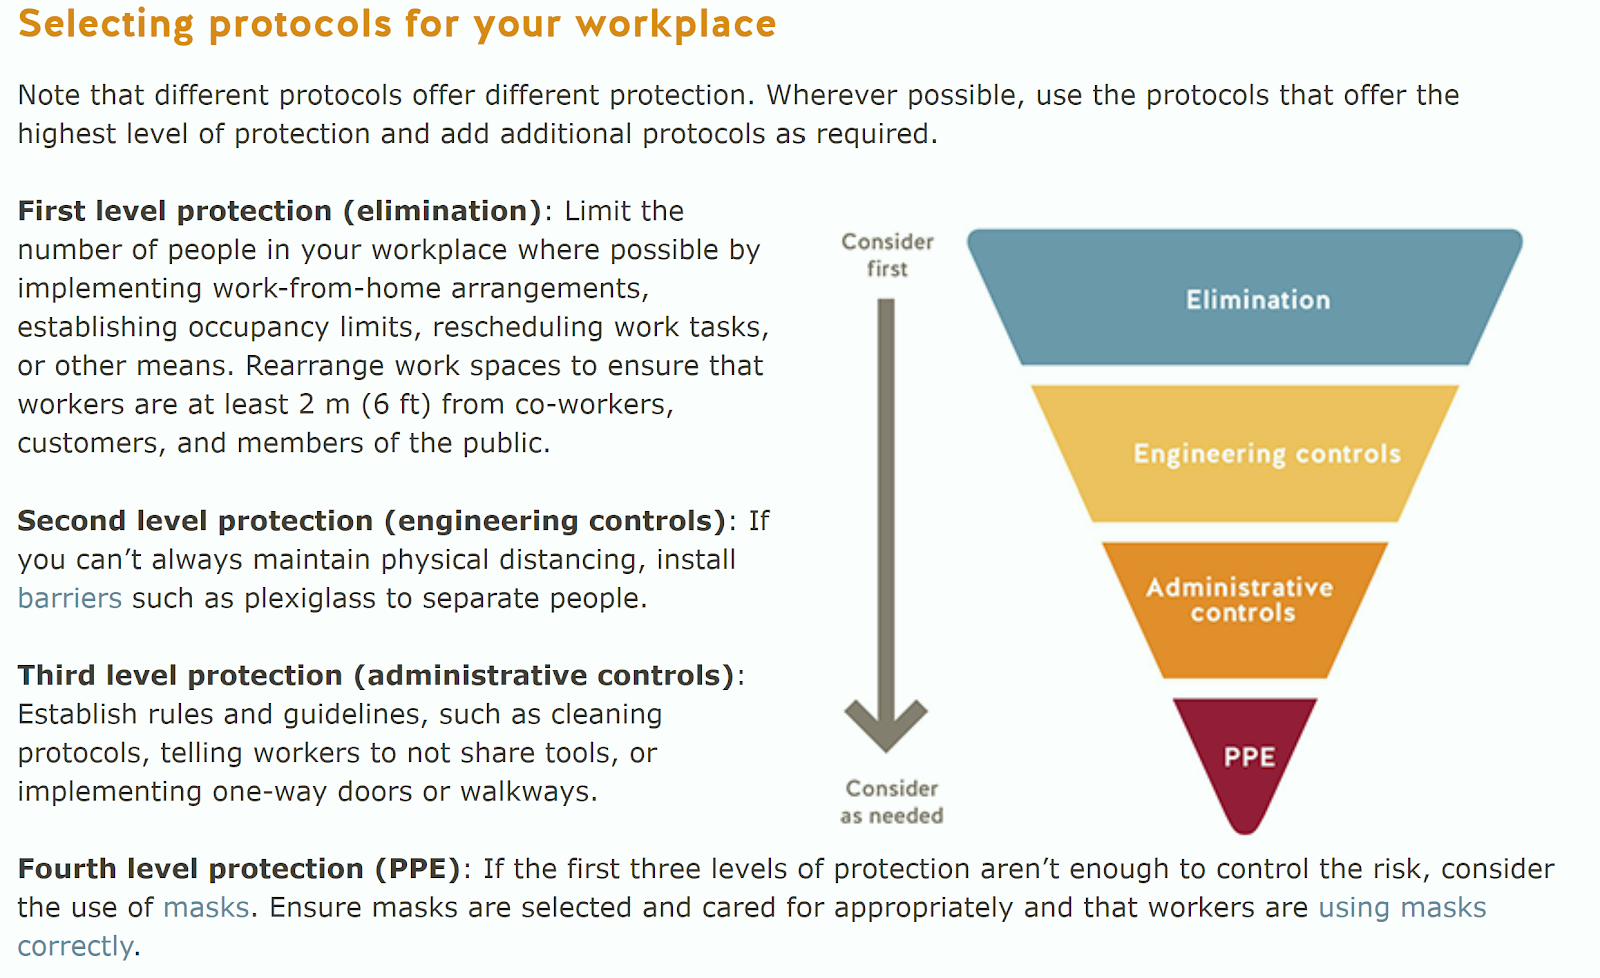
The world has been looking forward to life after COVID-19, but the reality is that we will be adjusting to life with it.
The hygiene practices initiated during the lockdown procedures will need to be maintained, especially as more retailers open up.
Companies need to scout out strategic locations around their stores to add sanitizers. More cleaning crews will need to be brought in regularly to disinfect the premises.
Social distancing measures may have been relaxed in certain parts of the world, but there will be occasional flare-ups. Retailers should prepare to reduce the number of people allowed within their building sites — which could mean a fluctuation in sales and revenue.
As we have mentioned, curbside pickups and home deliveries will become the norm, but brands need to ensure that these items are handled with care.
Current staff members are likely already trained on safety measures, but any new members will need to be on-boarded accordingly. Additionally, businesses will need to work to keep their employees safe within the premises.
The world has changed and we will be feeling the effects for a while after — preparing for a safer working environment can only benefit a business in the long-run.
3. Remote Work
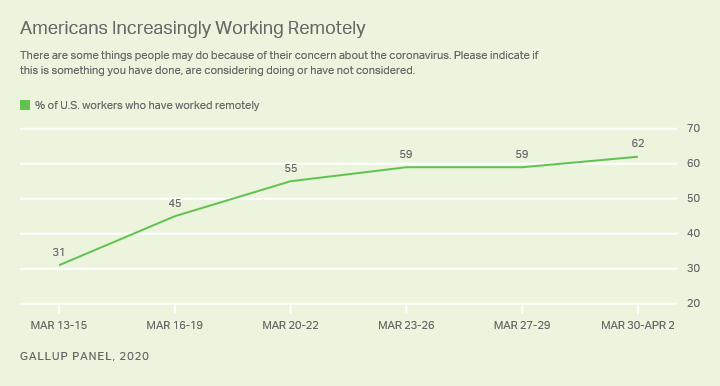
Retailers may not be directly impacted by remote work, but their customers will be — and this needs to be factored in when designing the project plan for shifting into ecommerce.
While stores need their in-store staff to function, a large majority of their customers will continue to work from home for the rest of 2020 and beyond.
Many companies are also considering making a portion of their staff permanently remote, which will impact how they access retail services like food, clothes, and entertainment.
4. Diminished Brand Awareness
The quarantine period put paid to all theories about brand awareness and loyalty.
Consumers were so desperate for products that they bought them from whichever brand was available — despite being patrons of other companies for years before.
And this trend may well continue — the ‘get whatever you can’ mindset has set in quickly and will be difficult to shake, and the impact on brand awareness will be felt for long after.
Since the world has had months of needing specific items and grabbing at whatever was available, consumers will find that supporting a single brand isn’t always a valuable position for them.
With so many consumers dipping into multiple brands, retailers will have to work twice as hard to spread awareness about their business.
Companies would do well to adapt their brand awareness activities to highlight their ecommerce efforts — such as more online shopping options, delivery, and pickup services.
Creating messaging that boosts the business’ ecommerce aspects and opportunities will go a long way in attracting audiences, as it is relevant and timely.
Regular updates about health and safety measures will also reassure customers enough to give them an incentive to visit stores.
Retailers need to accept that competition will be more fraught than before — keep an eye on the gaps that appear in the market and use those as, and when, they appear.
Consumers have an abundance of choices — narrow down their focus by highlighting the added value you can give them in your ecommerce communication plans.
5. Virtual Experiences
With remote work becoming more of a norm across the world, retailers will have to find new ways to create memorable experiences and relationships with customers.
Since consumers won’t be visiting stores as often as they used to pre-pandemic, businesses need to look to online sources to create those experiences.
Social media has become a lifeline for most consumers and this is something that businesses can use to promote their products and services.
Several companies successfully kept their audiences engaged by hosting live streams on YouTube or Instagram Stories of classes, product demos, and expert interviews.
The need to remain socially distanced and safe has led to retailers creating online versions of their in-house experiences, such as virtual dressing rooms and fittings.
Businesses can also create AR filters on Instagram and Snapchat for consumers to try on products like makeup and clothes, as well as for gamification.
The more online a business can be in the future, the better they will be able to engage with their customers.
6. Offer Discounts and Gift Cards
The pandemic has hit a large contingent of consumers very hard — and this hardship is set to continue.
Spending ability and disposable income will decrease as a result, which means businesses will have to work twice as hard to incentivize customers to purchase from them.
Brands should look at a more cohesive customer-centric approach to their marketing — giving customers a reason to consistently engage with the brand.
To mitigate reduced consumer spending, retail brands should offer more discounts, package deals, and special offers.
Employ incentives to encourage customers to use your ecommerce services — it will act as an advertisement for your virtual platforms, which users are more interested in now.
Discounts can also help in amplifying sales of underperforming product categories — they look more lucrative with a smaller price tag and will sell better, reducing inventory.
Gift cards are a great way to assure future business while bringing in immediate revenue.
7. Review Supplier Orders
There is still so much uncertainty around which items will move quickly that having excess inventory as a restaurant or a retailer could lead to revenue losses in 2020.
Retailers should be identifying overstocked items in their warehouses. You’ll want to determine which items aren’t selling well, and order fewer of those.
Of course, it’s important not to be out of stock of popular items, as that will impact sales — there is a delicate balance that has to be reached here.
An inventory management system will help to track items in stock and determine which ones are selling out faster than others.
To ensure inventories aren’t full, retailers should work with their suppliers to slow down the production of certain items — if ecommerce sales pick up, production can be increased.
Also, you’ll want to look into setting up longer payment delivery methods for suppliers — this will help companies retain capital and keep the business afloat until more sales are made.
8. Loyalty Marketing
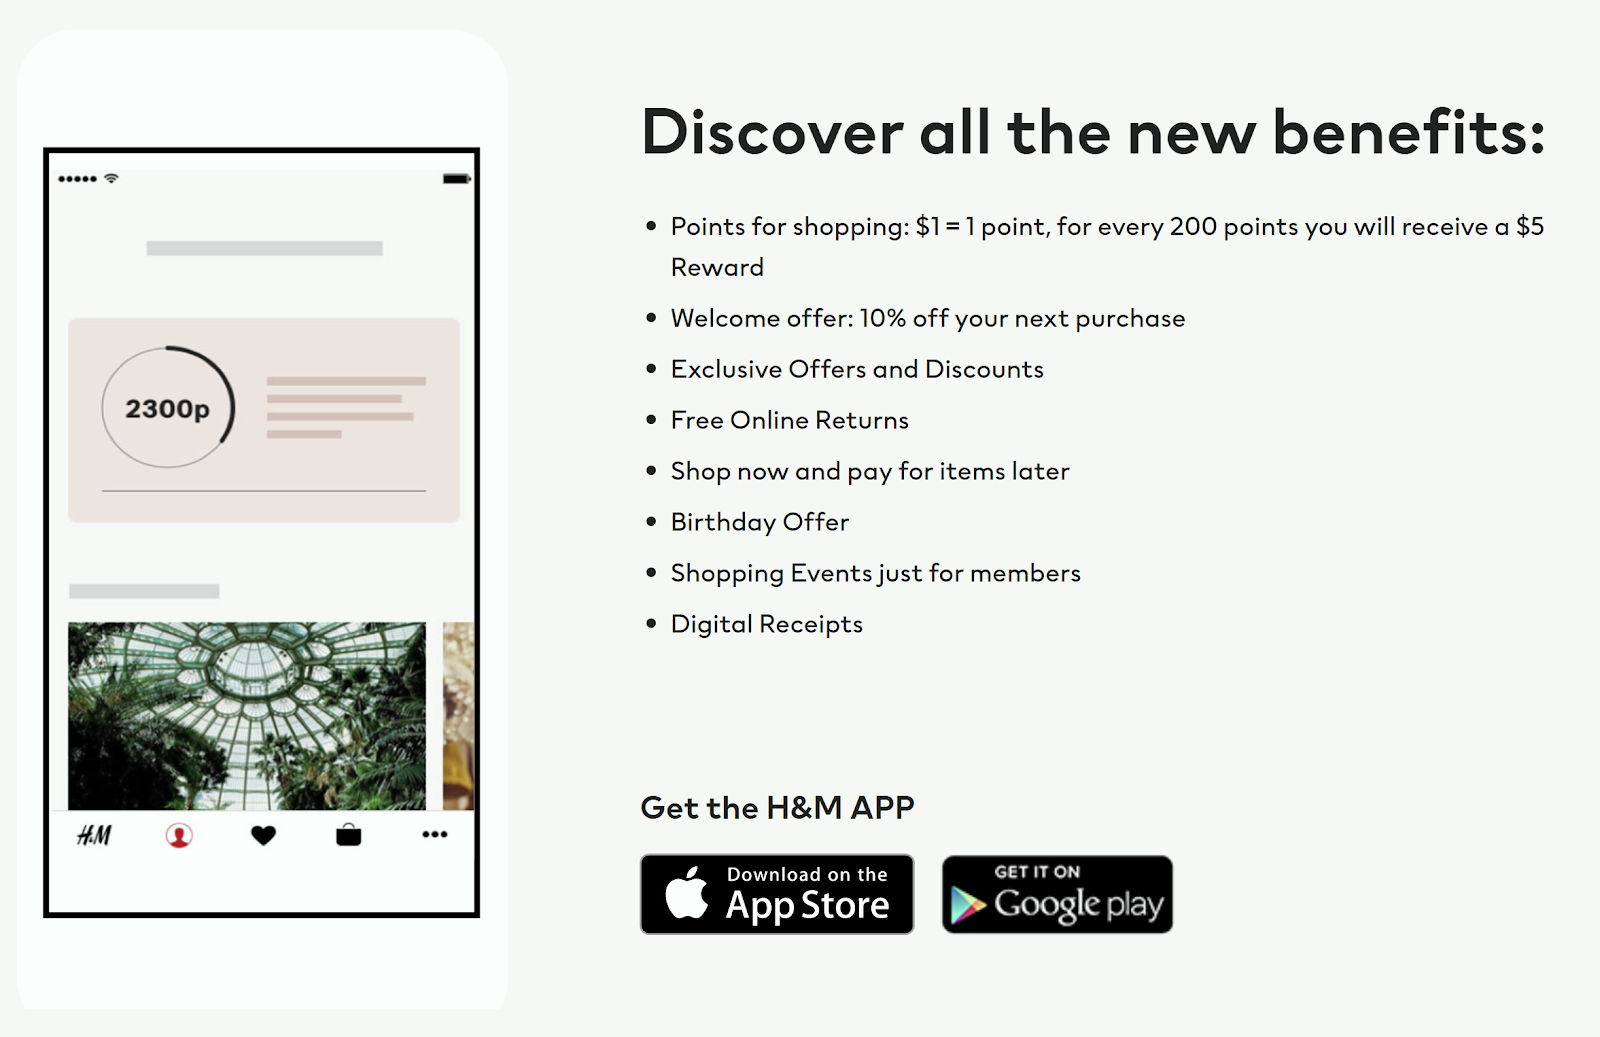
Repeat customers make up the bulk of revenue and profits for most businesses — building a loyal community of customers is thus a priority, especially during such uncertain times.
Focusing the business’ efforts on loyalty marketing will make a difference to the bottom line and should be included in your ecommerce project plan.
For the rest of 2020, brands will need to work on getting more loyal customers — incentives like discounts have been known to work in this area.
But to create genuine brand loyalty, a few discounts here and there won’t make a huge impact.
This is where customer loyalty programs can be a huge draw. A points system that rewards customers for buying improves engagement and repeat sales.
Another way to improve consumer loyalty is through subscription services.
Ecommerce subscriptions have been the basis of many successful business models, in a variety of fields, and they can help businesses boost customer loyalty.
Subscriptions and loyalty programs give brands a database of people to regularly contact to improve sales — for companies that haven’t instituted these, 2020 will be the best time to do so.
The pandemic is changing the way businesses function, but ecommerce is quickly proving to be a safe model of work that companies can adopt.
Since ecommerce isn’t an arena that all companies are familiar with, to prepare for the shift, here are the steps businesses should include in their project scope:
- Investing in pickup and delivery services
- Instituting more health and safety measures
- Acknowledging customers’ remote working needs
- Adjusting for diminished brand awareness
- Creating more virtual experiences
- Offering discounts and gift cards
- Reviewing supplier orders and inventory management
- Focusing on loyalty marketing and subscription services
Following these eight steps will help businesses move safely into an ecommerce environment to improve their sales in the future. Additionally, consider investing in high-quality ecommerce software to get your company up-to-speed quickly.

How to Optimize Your Social Posts for the Visually Impaired
Do you want a larger audience to consume your social media content? Wondering how to create content that’s more accessible to people with impairments? In this article, you’ll discover tips and tools to make your social media content accessible to everyone. Why Accessibility Matters to Marketers A lot of people assume that accessibility is impossibly […]
The post How to Optimize Your Social Posts for the Visually Impaired appeared first on Social Media Examiner | Social Media Marketing.
from Social Media Examiner | Social Media Marketing https://ift.tt/3aiNENa
via socialmediaexaminer
The Social Media Content Calendar Template Every Marketer Needs [Free Template]
“We have a 9 a.m. meeting? Hold on — let me just click around the internet like a maniac to find something for the morning tweet.”
Sound familiar? Scrambling for social content is nothing new. We have meetings. We run late. Things come up. And it’s really hard to get any meaningful amount of work done when you have the next social media update looming over your head every 30, 60, or 90 minutes. It all moves so fast that you might periodically feel a case of the vapors coming on, which is why pre-scheduled social media content should be your new best friend.
To make social media content easier for companies to plan and schedule across the accounts they manage, we created a social media content calendar template. And recently, we updated to be better, faster, stronger, and just generally prettier.
But first…
What is a content calendar?
A content calendar organizes your publishing schedule by date so that you can keep track of deadlines, better manage your content creation team, and create transparency with all parties.
What’s in this content calendar template?
Every content calendar is different and should be adjusted for your unique process. However, in this one, you’ll find a general schedule tab, your monthly planning calendar, a repository for website content, and updates for each of the top social media platforms:
This blog post will walk you through exactly how to use the template to stay on top of your social media content planning for each one.
Note: HubSpot customers can also schedule content through Social Inbox, or use this spreadsheet to organize their content and subsequently upload it to Social Inbox. Detailed instructions for doing this exist in the cover sheet of the template.
How to Use the Social Media Calendar Template to Plan Your Content Schedule
When you open up the social media content calendar template, you’ll notice the bottom of the Excel spreadsheet has several different tabs, most of which are dedicated to a specific social network.

The reason you’ll want a different worksheet for every social network is simply that every social network is a little bit different. You can’t just craft one, single social media update and use it across LinkedIn, Facebook, Twitter, Instagram, and Pinterest.
You can certainly promote the same piece of content across those networks, but that doesn’t mean you’ll craft your update in the same way for every single one of them. (In fact, you may even want to add additional tabs if you’re active on other networks, like Quora or YouTube.)
This following sub-sections will walk you through how to fill out each of the tabs you see in this template — the updates for Twitter, Facebook, LinkedIn, Instagram, and Pinterest. But before we get to that, let’s just walk through the “Monthly Planning Calendar” so you know what that’s for.
Monthly Social Media Schedule
The tab “Monthly Planning Calendar” provides an overall snapshot of your monthly social media campaigns. It’ll help you coordinate better with other stakeholders, not to mention keep all the moving parts straight in your own mind. Here’s what it looks like:

There are three sections to take note of when you edit this template for your own purposes. First, the color-coding key: These are the types of content or campaigns around which you might coordinate, like ebooks, webinars, blog posts, product launches, and so on. Though only some of these might be relevant to you, they’re there to indicate what you may want to put in there — so be sure to edit these categories to align with your own campaigns.
The other two sections you’ll need to edit are the Month and Year at the top of the calendar (duh), as well as the cells below each day of the week. In those cells, you should enter the type of content you’ll be promoting that day and color-code it to align with the campaign it’s supporting.
Instead of deleting all the content in this spreadsheet each month, I recommend copying this worksheet twelve times over, and creating a separate sheet for each month. (If that gets to be too overwhelming, you can always save those tabs as a separate file.)
Planning Your Twitter Content Calendar
Alright, now let’s get to the social media content. This section will be the lengthiest, because all subsequent sections will draw on the instructions we go through here. So if you read one section in this whole post, make it this one.
Let’s say you want to add some tweets to your scheduling template. Skip over to the “Twitter Updates” tab, where you’ll see this:

The first four columns, “Day,” “Date,” “Time,” and “Date & Time” are there for your convenience, and if you choose to use a third-party app for pre-scheduling your tweets (like HubSpot’s Social Inbox), then these columns will be useful. For now, just fill in the date on which you’d like your updates to publish to Twitter, and the time at which you’d like them to go out. The “Date & Time” column will automatically change based on what you input in the previous two columns.
Now, let’s move over to the “Message” column. Here, input the copy you’d like to appear in your tweet, bearing in mind you should cap it at 116 characters to allow enough room for a link, and at 115 characters to allow room for an image. (Read this blog post for a full character count guide.) This spreadsheet will auto-calculate the number of characters you’ve entered to keep you on-point, turning yellow when you’ve reached 95 characters, and red when you’ve reached 116 characters.
After you’ve composed your tweet, paste the URL you’d like to include in your tweet in the “Link” column. Be sure to include UTM parameters so you’ll know whether all of these tweets are actually driving traffic, leads, and customers. This is an important step to remember if you’d like to be able to demonstrate ROI from social. You can also use the “Campaign” column to add an associated campaign, which helps which more robust tracking and reporting.
Finally, in the “Image” column, attach the tweet’s image (if you have one). For Twitter, we recommend images that are 1024 x 512 pixels. (Click here for a full cheat sheet of social media image sizes.) If you’re having trouble attaching your image to the spreadsheet, follow these steps:
Step 1: Right-click the cell in which you’d like your image.
Step 2: Click “Hyperlink,” then click the “Document” button, and finally, click “Select” to choose your image.
Step 3: In the “Choose a File” window, select the image from your computer and click “Open.”
Step 4: You’ll now see the image attached to the “Insert Hyperlink” screen. Feel free to edit the “Display” text to change the file name, then click “OK.”
Note: This process is simply for organizational purposes. If you decide to upload the spreadsheet to your social media publishing software, it will not attach — you’ll have to do that with your marketing software. If you’re a HubSpot customer, details for how to bulk upload your Twitter content to Social Inbox can be found within the downloaded template.
Planning Your Facebook Content Calendar
Now, let’s talk about how to plan your Facebook marketing in advance with the template. Navigate on over to the tab in your template labeled “Facebook Updates.”
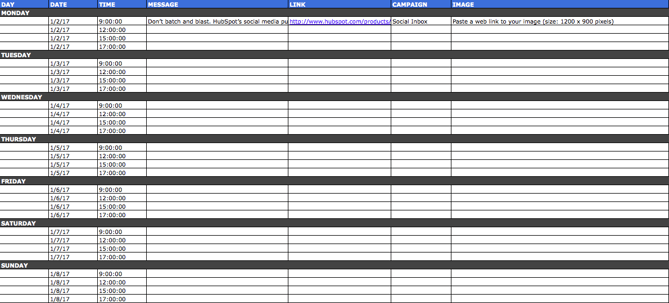
Facebook updates work similarly to Twitter updates, with the exception being bulk uploading your content is not possible in Social Inbox.
The first three columns, “Day,” “Date,” and “Time” are there for your convenience. Head on over to the column labeled “Message” and input the copy you’d like to appear in your status update, corresponding to the days and times you’d like those updates to run. Then, move to the “Link” column and input the link you’ll be, you know, linking to in the update. (Don’t forget that tracking token.) If you’d like the update to be tagged to a certain campaign, include this in the “Campaigns” column. Finally, attach an image just like you did with your Twitter updates — if you’re using one, we suggest you edit it to be 1200 x 900 pixels. (Click here for a full cheat sheet of social media image sizes.)
Planning Your LinkedIn Content Calendar
LinkedIn updates are the most unique, because you have both Company Pages and Groups to consider. To demonstrate the difference between Company Page updates and Group updates, let’s navigate over to the column labeled “Title (For Group Discussions Only).”
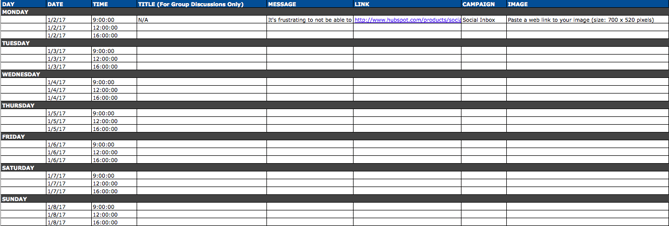
LinkedIn Groups let you post a few kinds of updates, one of which is called a “Discussion.” You will only fill out the “Title (For Group Discussions Only)” column if you’re looking to post a Discussion to your LinkedIn Group — because Discussions are the only update you’ll be posting that requires a title. If you’re not posting a Discussion to a LinkedIn Group, you don’t need to fill out this field, because your update will not have a title.
You’ll fill out the next column, “Message,” for every type of update you post, whether it’s for a Company Page or a Group. Simply input your copy into this column, and then navigate to the next two columns, “Link” and “Campaign” to input the URL to which you’re directing readers with the tracking token you’ll use to track activity, and the associated campaign if one exists. If you’d like to use an image for an update, attach it per the instructions laid out in the “Twitter” section. We recommend editing the image to 700 x 520 pixels.
Planning Your Instagram Posting Calendar
Now, let’s move on to how to set up your Instagram photos and videos in advance with the template. Navigate on over to the tab in your template labeled “Instagram Updates.”
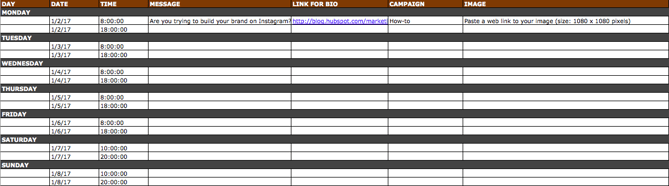
Instagram updates work similarly to Facebook updates, in that content can’t be uploaded in bulk to Social Inbox like it can with Twitter.
The first three columns, “Day,” “Date,” and “Time” are there for your convenience. Head on over to the column labeled “Message,” and input the copy you’d like to appear in your post’s caption, corresponding to the days and times you’d like those updates to run. Keep in mind that although Instagram captions can be up to 2,200 characters long, they cut off in users’ feeds after three lines of text. The exact length of these three lines depends on the length of your Instagram handle. (Read this blog post for a full character count guide.)
Next, move to the “Link for Bio” column and input whichever link you plan to put in the bio when you publish the accompanying Instagram post. (The reason you’d put a link in your bio and not the photo caption itself is because clickable URLs aren’t allowed anywhere except the single “website” box in your bio.) Oh, and don’t forget that tracking token.
If you’d like the update to be tagged to a certain campaign, include this in the “Campaigns” column. Finally, attach an image just like you did with your other social media updates — we suggest you edit it to be 1080 pixels x 1080 pixels. (Click here for a full cheat sheet of social media image sizes.)
Planning Your Pinterest Content Calendar
Alright, now let’s go over how to set up your Pinterest pins in advance with the template. Navigate on over to the tab in your template labeled “Pinterest Updates.”
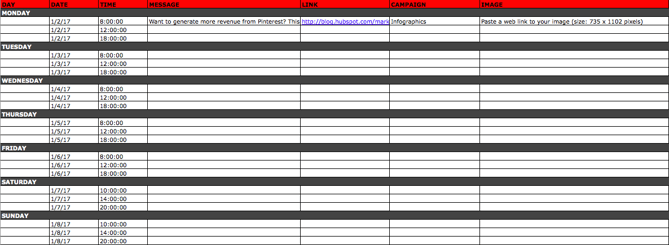
Pinterest updates work similarly to Facebook and Instagram updates, in that content can’t be uploaded in bulk to Social Inbox like it can with Twitter.
The first three columns, “Day,” “Date,” and “Time” are there for your convenience. Go to the column labeled “Message,” and input the copy you’d like to appear in your pin’s description, corresponding to the days and times you’d like those updates to run. Then, move to the “Link” column and input the link you’ll be, you know, linking to in the update. (Don’t forget that tracking token.)
If you’d like the update to be tagged to a certain campaign, include this in the “Campaigns” column. Finally, attach an image like you did with your other social media updates — we suggest you edit it to be 735 pixels x 1102 pixels.
Content Repository (Or, Where to Source Social Media Content)
This template also provides you with a tab called “Content Repository,” which should help you keep track of all your content and maintain a healthy backlog of fodder to make sourcing social media content easier.
As you create more assets, you’ll likely want to resurface and re-promote those pieces down the line, too. To ensure you don’t lose track of all of that content, record it on this tab so you’re never at a loss for what to publish on social. If the content you’re promoting isn’t evergreen, be sure to include an expiration date in the column marked “Expiration” so you don’t promote it when it’s jumped the shark.
This tab will also help you maintain a healthy balance of content: A mix of your own content and others’, a mix of content formats and types, and mix of lead generation content vs. MQL-generating content vs. traffic-friendly content.
Don’t Forget to Interact With Your Followers
Whether you use this spreadsheet to plan your content out in advance or upload to a third-party app, you’ll still need to supplement these updates with one the fly content. Breaking news hits? Whip up a quick update to share it with your network. Someone in your network tweets something interesting? Give it a retweet with some commentary. Got a fascinating comment on one of your updates? Respond with a “thank you” for their interaction or an additional follow-up comment.
Coming up with and scheduling your social media content in advance is a huge time-saver, but it should go without saying that you still need to monitor and add to your social presence throughout the day.
Finally, we encourage you to experiment with your social media publishing. This template provides publishing dates and times for each social network, but you may find those are way too many updates for you to fill, or perhaps too infrequent for your booming social presence. You should adjust your social media publishing frequency as needed.
Editor’s note: This post was originally published in January 2020 and has been updated for comprehensiveness.

Writing for SEO: How to Write Blogs That Rank on Page 1 of Google
If you’ve ever written a blog post before, you know how much time they can take.
From topic selection, to gathering research, to writing the post and pressing “Publish,” the process often demands hours.
That’s why, if your post doesn’t earn the traffic you expected, it can be a major letdown. All that work that goes into a post for less-than-stellar engagement is, no doubt, one of the most frustrating experiences.
Fortunately, there’s a way to combat low traffic and bring eyes to your writing: search engine optimization. SEO is a language that speaks specifically to search engines like Google to tell it your post deserves to be at the top of search engine results pages (SERPs).
As marketers, we’re always aiming to write content that’ll rank highly on Google, and SEO is the bridge that’ll help you get there.
Of course, that begs the question: How do you write in SEO’s language?
For that, don’t worry — we’ve got you covered. In this post, we’re going to dive into 13 ways you can master writing for that high ranking your content deserves.
Ready to get started?
1. Use headings to your benefit.
Headers tell Google what different sections of your blog article will be about. In this post, for example, the header, “How To Write Blog Posts for SEO,” tells the search engine what this section is about.
Users who type search queries like, “writing for SEO” into Google will likely come across this post because of what the header tells Google. Ultimately, search engines are going to look at headers and snippets before they look at body text.
Think of Google as a reader who is skimming your blog. They’re going to focus on the main ideas — and that’s what headers, like H2s and H3s, display. Use headers to accurately convey the main idea of your section, but make sure each header uses accurate, high-intent keywords. When you use the right keywords (using keyword research tools) you have a much higher chance of helping your post rank on the first page.
2. Take advantage of featured snippets.
According to Google, “Featured snippets come from web search listings. Google’s automated systems determine whether a page would make a good featured snippet to highlight for a specific search request.”
Featured snippets on Google are the most direct answers to search queries. For instance, if I were to search, “How do you write a blog post?”, Google might use a featured snippet to show the most sufficient answer:

To earn a featured snippet on Google, you’ll want to answer the questions readers might have when they come to your blog post. For instance, if the search term is “how should I write a blog post?”, answer that question with a list, starting with “How to Write A Blog Post” as the header, accompanied by a list of items that are relevant and actionable.
If you’re wondering how to make list items actionable, a good rule of thumb is to write complete sentences and start each sentence with a verb, like “Write”, “Research”, “Create”. Additionally, make sure each sentence answers the question or challenge. For definitions, or paragraph snippets, make sure they’re succinct, but give enough background to explain the word or phrase.
3. Write to answer questions for customers.
One of the reasons we write blog posts is to diversify the content on our website. Another reason is to boost the credibility of our business. But if “to solve for your audience” isn’t in your list of reasons, you may be losing out on key SEO opportunities.
Google answers countless questions a day. For instance, I must’ve Googled about five questions in the last hour alone. When you frame posts to answer the queries of your audience, Google will see that and push your post to a higher page.
Earlier, we talked about the bells and whistles you can add to posts to boost rankings. But, additionally, you’ll want to ensure the content you’re beefing up is also working towards that goal.
If you’re stuck on trying to figure out what your audience is asking, you’ll want to perform keyword research. Sites like Ahrefs and Woorank crawl search engines for popular search queries. To organize the process, create different topic clusters to write about, such as “Instagram Marketing,” “LinkedIn Advertising” — subjects you can dive into that provide value to your audience.
Still stuck on keywords? Don’t worry — this keyword research guide is perfect for beginners.
4. Use meta descriptions to your advantage.
Are you adding meta descriptions to your post? If your answer is “No,” then you’re probably not giving your post the most exposure possible. Let’s get into why they’re important.
By now, we’ve talked about a couple of the ways a blog post can communicate with Google: with headers, keywords, and snippets. However, that’s not an exhaustive list.
Meta descriptions is another method Google leverages when ranking search results. Meta descriptions are the 1-3 sentence descriptions you’ll find underneath the title of a result.

Use meta descriptions to sum up what your post is about. Remember to keep it short, use keywords, and make sure it’s engaging. After all, there are going to be loads of posts similar to yours, aiming to rank at #1. You’re going to want yours to stand out above the rest.
Most blogging software have meta description boxes built into the toolbar or post formatting options, so you won’t have to look far to use the function. HubSpot and WordPress, for example, point out where to add meta descriptions in the post editor.
5. Add alt text to images.
With any image you add to your post — whether it be the featured image or a body text one — you’ll want to add alt text. Alt text describes what’s happening in the photo. Think of it as a closed caption for images.
Alt text helps Google, as well as those who are visually impaired, understand why the photo is in your post. This improves your article’s rank and accessibility, making it more shareable.
For instance, if you include an infographic about audience segmentation, the alt text should read something like, “A helpful infographic that explains audience segmentation.” Notice how this sentence uses keywords to appeal to Google even further.
Now let’s say you’re using a stock image as a featured photo, but it doesn’t necessarily depict anything that relates to your post’s content. For instance, let’s say your topic is click-through rate, and this is your featured image:

This doesn’t really have anything to do with audience segments, right? But what you can do to remedy the situation is to make a scenario. For instance, “A marketing team discusses audience segmentation strategy.”
This alt text uses keywords to describe a situation that fits into the theme of the post. That way, your image doesn’t bring down the ranking of your post, but works towards improving where it ranks. If Google sees alt text, it’s another box checked for a high position on SERPs.
6. Don’t limit keywords to the body of your post.
Ultimately, keywords should be used in nearly every part of your blog. We’ve talked a little about where keywords can be included in your post: snippets, photos, and headers, for example.
Keywords are so powerful because they’re the jumping off point for SERPs. Google will always take what browsers type into the search bar and search for web pages with those exact words. So it’s important to make sure every element, from the post title, to the calls-to-action, relate to your keywords.
That said, it’s also important not to keyword stuff your post. The goal is to make your page fully optimized, not overbearing. Find natural fits for keyword additions, but don’t force them so your content is illegible.
For example, if your keywords are “account based marketing,” “startups,” and “sales,” your meta description shouldn’t be something like:
“Sales for account based marketing startups.”
Instead, try focusing on one or two phrases to make the description more natural:
“Are you looking for killer strategies to boost your account-based marketing game? Find out our surefire secrets in this post.”
That way, you’re still using keywords, but you’re not oversaturating the post to the point where it’s illegible. Remember, even though Google is a search engine, it still has to comprehend your post in order to recommend it to website browsers. Additionally, a reader’s experience will determine how well your posts rank. If readers bounce from your webpage because it’s confusing to them, that will signal to Google that your post isn’t good enough to rank.
7. Identify highly-effective keywords when looking for post ideas.
Google handles over 40,000 search queries a second. Staggering, right? If you want to cut through search result clutter and outrank your competitors, you need to target the specific keywords and phrases your potential customers are searching. How else will they find your content and website?
To identify those hot keywords, head on over to the social platforms your target audience frequents and see what’s trending. Pay close attention to the exact phrases they use and monitor popular industry terms and topics.
Google Trends can also give you a feel for what keywords are popular at any given time. If you see searches are steadily declining over time for a specific keyword, you know that’s probably not the right keyword to target for your marketing and vice versa for increasing trends.
If you’re ever running low on keyword ideas, get inspiration from your competition. Use tools to see what keywords they’re currently ranking for — if these keywords are relevant to your business, consider using them too! SEMRush lets you enter a competitor and see the keywords they’re ranking for, their position in search results, traffic received for that keyword and other key metrics.
Keep in mind that the most obvious keywords aren’t always the best keywords. Searchers tend to use very specific “long-tail” keywords, keyword phrases and questions when they’re looking for something.
Long-tail keywords comprise up to 70% of all search traffic and can unlock the door to successful SEO. When WPBeginner, the largest WordPress resource site for WordPress beginners, adopted a long-tail SEO strategy, they increased their organic search traffic by 20% in just two months!
Because you face fierce competition for shorter, more general keywords, you often have a better chance of ranking in the top results for long-tail keywords. And, long-tail keywords allow you to zero in on higher quality website traffic that often knows what they’re looking for and may be farther along in the buyer’s journey.
Once you’ve done your research and built a list of what you think are the most valuable, relevant keywords, plug them into a keyword research tool like Google’s Keyword Planner, Moz’s Keyword Explorer, Ubersuggest, Keyword Tool and so on. Many keyword research tools give you the monthly volume for any given keyword. Test out different keyword tools — marketers are drawn to different ones for different reasons.
Depending on your business or industry (or budget or bandwidth for SEO efforts), it may be important to rank for high competition, short tail keywords. Still, try to also optimize for a healthy dose of long-tail keywords that are high in search volume but low in competition. You may find it’s much easier to rank for these words.
Remember that your focus keywords will evolve over time as trends shift, terminology changes or your product/service line changes. Be sure to conduct keyword research periodically to ensure you’re still focusing on the right keywords for your target audience and not missing out on vital ranking opportunities.
8. Naturally integrate those keywords throughout your posts.
Once you’ve decided on a list of target keywords, it’s time to write a blog post focused on one of these keywords. Brainstorm blog topics with your team and decide on a topic that will entice and engage your target audience.
Keep your buyer personas, their motivations, challenges, interests, etc. in mind throughout the brainstorming process. Choose a topic that will emotionally resonate with your potential customers and their needs, desires or pains.
As you write your blog, your keyword and natural variations should be regularly interspersed throughout the post. Your primary keyword should appear in these key places:
- Title
- Headings and subheadings
- URL if possible
- Image alt text (search engines can’t read images)
- Meta description
- Throughout the content
Remember that you’re writing for humans, not search engines. Focus on engaging readers with a natural writing style that takes their needs and interests into account.
9. Link to influential websites.
As you build out your blog post, don’t be afraid to link to other articles or blogs.
Linking to applicable and reputable websites not only offers blog readers additional reading material to expand their knowledge, but it also shows Google and other search engines that you’ve done your research. And the blogger or writer may even return the favor and link to your site.
Nothing strengthens a blog post like hard-to-argue-with, research-backed statistics from influential websites. Compelling stats help you build a more convincing and concrete argument that will get your readers thinking (especially when they’re from trustworthy sites they know and love).
10. Aim for scannable, longer posts.
In an age of short attention spans (average of 8 seconds for humans), you would think shorter blog posts are the way to go. But search engines actually prefer longer, in-depth blog posts.
The longer your blog post, the greater its chance of appearing in the top search engine results. SerpIQ found that the 10th position pages have 400 fewer words than 1st position pages. Longer posts will rank more easily for your target keyword.
Think about it: the more content on the page, the more clues search engines have to figure out what your blog is about. We recommend writing a minimum of 300 words per blog post. This length gives search engines plenty of keywords and text to crawl and helps them understand what your blog is about.
The downside to longer blogs is that they may scare off your readers. We live in a world of skimmers and scanners. In a heat map analysis, CoSchedule learned that only 10-20% of their readers were making it to the bottom of their posts. So, the million dollar question is, how can longer blog posts appeal to today’s online readers?
You can write scannable, readable blog posts that hook online readers by tightening up your sentences and paragraphs. Turn a long-winded sentence into two. Keep your paragraphs to 2-3 sentences max.
Also, take full advantage of bulleted lists and subheadings that grab reader’s attention. By following these tactics, you’ll create blogs that are easier to read (especially on a mobile device!) and less intimidating to the scanner’s eye.
11. Internally link words or phrases to other posts on your site.
Linking to other pages or blog posts on your website helps search engines crawl your website and create a more accurate sitemap. It also helps your audience discover more of your content and get to know you as a trustworthy, credible source of information.
Internal links to other valuable content keep users on your site longer, reducing bounce rate and increasing your potential for a conversion (and isn’t that what it’s all about?).
When linking to any pages on your website, or even outside sources, use natural language for your anchor text. Avoid using spammy or generic text such as “top-rated cheap laptops” or “click here.”
Instead, use descriptive keywords that give readers a sense of what they will find when they click on the hyperlink, such as a search engine optimization guide.
Never force feed links to your top webpages, featured products or discounted items. These types of links will only turn off readers and could lead to search engines penalizing your website.
A word of caution: don’t overdo your internal linking or any linking. We know it’s tempting to link to all of your blogs and webpages, but only choose the ones that best enhance the point or insight you’re writing about in any particular blog. Always think about whether or not these links naturally tie in with the subject matter and if they will offer significant value to your readers.
12. Optimize pictures for the fastest possible page speed.
Google rewards pages with faster page speed and places those that lag lower on its rankings. So, it’s important to make sure your page-load times are as quick as possible.
One of the leading culprits of page lag is large photos. If the photo you uploaded is too big, it will make the page take a longer time to load — even if the image doesn’t seem huge on screen. Luckily, you can keep your posts visually interesting without sacrificing crucial speed.
Once you pick a photo, use a free compression software, like Squoosh.app to make it as small as it can go before it loses any quality. Any removal of excess photo data will speed up loading times so readers won’t have to wait.
If you suspect that your SEO issues are related to low page speeds, Google offers a free tool that can score your page and give you suggestions for speed improvement. Here’s a guide on how to use it and boost your score.
7. Preform link building strategies.
Traffic from places other than Google is crucial to your search rankings. Why? Think of search results like a competition where the winners get the most votes. Each webpage that links back to you is considered a “vote” for your website, which makes your content more trustworthy in the eyes of Google. In turn, this will make you rise farther up on search results.
So, it’s good to write posts that other websites or publications will want to hyperlink within their own posts. You can also write posts on other business’ websites that link back to your website in some way.
To make your website’s blogpost more linkable, include valuable assets or information, such as your own data, original thoughts, infographics, definitions, or other facts that people might not find anywhere else.
Here’s an example of how this mindset could help you. If you write a post titled “How to Make a Video Tutorial,” or “13 Stats about Video Tutorials,” bigger sites that are writing about something similar might hyperlink words like “video tutorials” or “research from [Your Company Name]” to your post so they can give their reader more context without repeating your work.
Once you’ve written the post, you might want to start sending it to other publications or websites that might want to discuss it or link it to their other posts. This outreach lets other publications know of the post and might also help you grow link building alliances with them in the future.
You can also consider doing promotion, such as interviews or guest posts that link to your website’s blog post to further encourage link building.
These strategies can be key to your SEO success, but they can be time consuming. To help you, consider trying out one of these softwares.
How to Title Blog Posts for SEO
Even with a great, SEO-friendly post body, a bad title could hurt you in search engines. To title your post with SEO in mind, draft a clear understandable title that both shows the reader what they’re about to read and integrates the keywords you identified in the first step. As mentioned above, write something that pleases Google’s ranking algorithms, but is also understandable and enticing to humans.
Here are a few examples:
- If you’re a beauty blogger and you see that people are searching “how to wear matte lipstick,” your post could be titled, “How to Wear Matte Lipstick: A 5-Step Guide.”
- On the other hand, if your blog covers artificial intelligence and you see that people are searching a new AI app, you could write a blog post called “How to Use [Insert AI App Name],” or “We Tried the New [Insert App Name] App: Here’s What Happened”
- If you blog about farming or sustainability and find out that “what to buy at farm stands” is a regular search, you might write a listicle titled “What to Buy at Farm Stands This Summer.”
You know how to write content audiences will love. Now, it’s time to write for what Google loves. SEO only heightens the chance of your post getting seen by the right audiences, expanding your reach.
It can sound tricky at first, writing for two audiences, but just remember these takeaways: keywords, snippets, and descriptions. Learning a new language takes time, but luckily, your blogging software can likely remind you of these SEO tips. I can’t wait to see your next blog post at the top of my search results.

Landing Page y Funnel de Ventas: conoce sus diferencias [y herramienta gratis para crearlos]
Cuando decidimos fundar un emprendimiento online, un mundo se abre frente a nuestros ojos. En todo momento nos encontramos con términos nuevos y un sin fin de detalles. En ese sentido, ¿sabes cuál es la diferencia entre la landing page y el funnel de ventas?
En este artículo abordaremos las características de las también llamadas páginas de aterrizaje y los embudos. Incluso si ya conoces ambos términos, te será de utilidad porque explicaremos la estructura para que funcionen mejor.
Toda la información está orientada a aumentar las conversiones, que al final de cuentas es lo que deseamos.
¿Quieres una herramienta gratis para crear un embudo de ventas? Conoce GrooveFunnels
Estrategias para vender: definición de Landing Page y Funnel de Ventas
Cuando abordamos un tema, siempre nos gusta comenzar con las definiciones básicas. Tanto landing page como embudo de venta son dos términos que muchos conocen pero no todos saben realmente a qué se refieren.
¿Qué es una Landing Page?
Para buscar un ejemplo de landing page, navegamos por un sitio de noticias. Nos encontramos con un banner de un supermercado. Al hacer clic, nos mandó a la página de compra. Pulsa en la flecha para ver las dos imágenes

La segunda imagen es una landing page.
El consultor y conferencista Ernesto del Valle define a las landing pages como la página donde aterriza un usuario que hace clic en un enlace o un banner. Por ejemplo, cuando hace clic en un anuncio de Ads.
> > > 8 herramientas de diseño gráfico para crear Ads de impacto
La diferencia entre cualquier otro sitio web es que la landing page está orientada a que la persona realice una conversión (deje su email, se suscriba, haga una descarga o, incluso, compre algo).
No hay que confundirla con la home page, esa es el equivalente a la vitrina de tu negocio. La página de aterrizaje es un vehículo que le da las herramientas al posible cliente para que deje de mirar y se transforme en una persona que comienza una relación con tu marca.
Te comparto el enlace por si quieres leer el artículo completo de Cómo hacer que tus landing pages sean perfecta escrito por Ernesto del Valle. De ahí tomamos la definición de página de aterrizaje.
¿Qué es un Funnel de Ventas?
No es una página sino una secuencia. En realidad es un proceso dentro de un plan de marketing. En el blog de ClickFunnels, un editor online de embudos, lo definen como la estrategia de marketing para ir transformando a personas en clientes.
Se denomina embudo porque se grafica de esa manera, como si fuera una pirámide invertida.

La parte más ancha es a la que acceden la mayoría de tus visitantes y conforme es necesario pasar a un siguiente nivel, cada vez menos personas siguen el camino, por lo que se va haciendo angosto.
Embebimos un video tutorial que hicimos sobre MaxFunnels, una herramienta de creación de embudos de venta. Lo que nos interesa que veas es a partir del minuto 4:32 porque hay una representación de un funnel con sus diferentes etapas.
Un embudo de marketing no siempre se usa para vender. También funciona para captar leads, atraer a personas a la ubicación física de tu negocio, etc. De manera general se divide en tres partes:
#1. Captación de leads
Es la boca del embudo, es decir, la parte más ancha. Mientras más gente entre por aquí, aumenta la posibilidad de que mayor cantidad termine haciendo una conversión.
Una forma de atraer a la audiencia es con anuncios en los que es imprescindible lanzar una “carnada”. Debes seducir con algo a tu potencial cliente: un ebook, cupones de descuento, asesoría, una oferta irresistible, etc. El objetivo final es obtener un correo electrónico o un número de teléfono.
> > > Aprende a hacer anuncios de Google y evitar errores.
#2. Nurturing
Lo usual es hacerlo a través de una campaña de email marketing, de SMS o de Whatsapp. Lo mandas a quienes ya te dejaron sus datos en la fase de captación. El objetivo es eliminar con contenido los frenos que tiene el usuario para comprar.
Aquí se le explica que nuestro producto o servicio no es caro sino valioso, que no se necesitan conocimientos previos, que somos confiables, etc.
#3. Ventas
Es el quid de la cuestión del funnel de venta. Aquí se aplican las estrategias de hard sell. Hay que incluir testimonios, videos y contar la historia del héroe.
Esta parte la explicamos muy simplificada porque en realidad, muchas veces, es necesario hacer procesos de re-venta. Es decir, el hecho de que un cliente no compre ahora no quiere decir que ya lo perdimos.
En este video de Romuald Fons está muy bien explicado el embudo de ventas como estrategia de marketing.
Características de las Landing Page: lo que no debe faltar
Mientras buscábamos ejemplos de landing page, nos sorprendió encontrar Happyfy, un negocio online que vende la fórmula de la felicidad. Con un botón anaranjado hacen un llamado a la acción para “Comenzar el camino”. Al hacer clic te mandan a una página de aterrizaje.
Elegimos compartir esta captura de pantalla porque cuenta con casi todos los elementos que debe tener una landing page que aspire a lograr una conversión.
# 1. Titular de la landing page
Ni el logo de tu marca ni el sitio son un titular. Debes pensar en una frase que resuma el objetivo de esa landing page.
En la captura de pantalla, el título son las letras en azul que preguntan: ¿Listo para aprender a ser más feliz?
Un tip: agrega palabras clave.
# 2. Imagen de la Página de Aterrizaje
Si vendes productos es más sencillo porque agregas una foto y listo. Si vendes servicios, debes buscar una imagen que represente tu valor agregado. En la captura de pantalla que te compartimos, es la fotografía del cerebro con colores.
# 3. Call to Action: invita a hacer
El Call to Action es el rey de la landing page por lo que debe ser imposible que pase desapercibido.
Además, al usuario no le tiene que quedar duda de qué es lo que quieres que haga: compra, suscríbete, haz clic aquí.
# 5. Tu Landing Page debe ofrecer un beneficio
Explica, ya sea con un listado o un breve párrafo, qué ganará el usuario atendiendo a tu llamada a la acción. Te recomendamos que seas conciso.
# 6. Testimonios
Pueden ser citas de compradores satisfechos o lugares donde han mencionado a tu marca. El objetivo es darle credibilidad a tu producto o servicio.
# 7. Red del trapecista
En la landing page de Happyfy no aparece, pero siempre es recomendable darle al usuario otra opción para que interactúe. Tal vez no quiera atender tu Call to Action, pero sí le interese compartir en redes sociales o tener un chat para aclarar dudas.
Añade botones que permitan varias conversiones.
¿Cómo saber si tu Landing Page funciona?
Los negocios online tienen la gran ventaja de que hasta el desinterés es medible. Por lo anterior es importante hacer una buena medición de tu landing page.
Todos tus datos cobrarán sentido en relación al objetivo de la página de aterrizaje, por eso es muy importante que lo tengas claro.
Te damos un tip para tu plan de marketing
El objetivo de tu landing page debe estar sintetizado en tu call to action: “suscríbete aquí”, “comienza la aventura”, “conoce más”.
Hay dos métricas en las que tienes que poner especial cuidado:
# 1. De dónde vienen las visitas: esto te permitirá saber a cuál canal destinar más recursos.
#2. Por dónde se escapan las visitas: aunque es inevitable que un usuario abandone tu página sin hacer nada, debes redoblar esfuerzos para tratar de que sean los menos posibles. Si haces un análisis de tus puntos de fuga tal vez descubras que tu call to action no es atractivo o que la redacción de tu página es confusa.
Aprende técnicas de Copywriting para vender que te ayudarán a escribir mejores páginas de aterrizaje.
Test A/B en una Landing Page
Si todavía no lo tienes interiorizado, es momento de que lo hagas: debes probar todos los elementos de tu negocio online, incluyendo las landing page.
No hay razón para que no diseñes pruebas A/B.
Antes podías hacerlas desde la cuenta de Google Analytics, pero desde agosto de 2019 desactivaron la función de experimentos de contenido.
Actualmente es necesario abrir una cuenta gratuita de Google Optimize. Por si todavía no la conoces, esta es una captura de pantalla para que sepas dónde tienes que comenzar a diseñar tu test A/B.
Nuestra recomendación para que el test sea útil es que te plantees preguntas específicas de acuerdo a tu objetivo.
Evita las preguntas del tipo ¿cuál página funciona mejor la A o la B? Es tan general que corres el riesgo de perderte en los datos.
Es mejor medir aspectos como:
- ¿Cuál capta más suscriptores?
- ¿En cuál hay más tiempo promedio de visitas?
- ¿Hay alguna que tenga menos porcentaje de rebote?
- ¿Desde cuál versión el usuario llega más lejos?
Si quieres ahondar en el tema, en Socialancer publicamos un artículo sobre cómo saber si tu página de aterrizaje es efectiva con Google Analytics. El autor da recomendaciones específicas sobre la forma de sacar conclusiones a partir de los datos.
Características de los Funnel de Ventas
Para empezar a hablar de las características de los funnels de venta, nos gustó una frase del blog de Convertri, un software para construir embudos que cargan rapidísimo.
| “Hay más formas de configurar un embudo de venta que embudos de venta circulando por internet”. |
Esto es por algo que ya te habíamos comentado: los funnels sirven para varias cosas. Desde atraer tráfico, captar leads hasta vender un producto o servicio.
Sin embargo, no entres en pánico. Lo que debes tener claro es que un embudo de ventas es un proceso.
Es decir, debes diseñar el camino por medio del cual tus posibles clientes concreten la conversión.
Debes partir de que tienes algo para ofrecer que satisface una necesidad: una oferta especial, un nuevo curso, un relanzamiento. Ese será el gancho para captar la atención.
Para ello cuentas con varios canales:
- Anuncios
- Campaña de email marketing
- Blog
- Redes sociales
Una squezee page es un buen comienzo de un embudo de ventas porque es una forma de captar leads. Si alguien deja sus datos es muy probable que esté interesado en tu producto o servicio.
Otro punto importante del embudo de ventas es la página en la que el usuario realiza la conversión que deseas; si estás vendiendo es donde hace la compra.
Después de eso tienes que ser certero en el sitio donde se efectúa la facturación. Debe ser limpio y fácil.
Como ejemplo citaremos a GetResponse, una plataforma de email marketing: ellos dejan claro que el proceso de pago le llevará al usuario tan solo 60 segundos.
Hay un aspecto más que nos gustaría que te quede fijo: un embudo de ventas no es un proceso acabado. Siempre tienes que medirlo y ver lo que funciona o, incluso, lo que deja de funcionar.
Software para la creación de Funnels y Landing Page
Más allá de cualquier aspecto tecnológico, un buen funnel de ventas y landing page empiezan en la cabeza del creador. A lo que nos referimos es a que tienes que dedicarle un tiempo a conciencia para diseñarlo.
Ninguna decisión debe ser al azar. Por ese motivo, es importante que nunca pierdas el control y cada elemento sume para que alcances los objetivos.
Retomando la parte técnica, hay algunos software que facilitan la creación de los embudos y las páginas de aterrizaje. Generalmente son intuitivos y con la función de soltar & arrastrar.
3 herramientas para creación de Landing Page y Funnels
#1. GrooveFunnels: como ya te dijimos, tiene una versión gratis. Incluye, además, GrooveSell para carrito de compra y GrooveAffiliate, un programa de afiliados que te da comisiones si vendes GrooveFunnels.
#2. ClickFunnels: además del editor de páginas web, tiene integraciones como herramienta de email marketing, pasarela de pagos y optins.
#3. iGloo: permite agregar recursos interesantes a las landing page, por ejemplo, tiene un creador de concursos. También hay una herramienta para realizar test A/B
Conclusión sobre la Landing Page perfecta
Tanto las landing page como los embudos de venta son imprescindibles en tu negocio online. Para crearlos no es necesario inventar el hilo negro.
Diseña en función de tus objetivos pero también de la audiencia. Escucha a tus clientes, sus necesidades, sus hábitos. Si logras entenderlos encontrarás la ruta más eficiente para vender más.
¿Has realizado alguna prueba en tus funnels y landing page? Nos gustaría saber: según tu experiencia, ¿en qué parte del proceso del embudo los usuarios abandonan más?
from Socialancer https://ift.tt/3gMNBfd
via
Why A Digital PR Specialist Should Always Be Involved in Content Creation
If you’ve been on the creative side of content marketing, you know not every idea is a winner. Sometimes projects gather a few links and then vanish under a pile of other content.
To compete, you have to ensure the content you’re creating, from the idea to the actual execution, is compelling enough to earn the coverage and attention you hope it’ll achieve.
And there’s one really excellent way to do this: involve a digital PR specialist from the get-go.
I work in digital PR and have consulted on hundreds of content projects.
Below, let’s review what I’ve learned about how content creators and digital PR professionals can successfully work together to create engaging, newsworthy content.
1. Recognize viral ideas.
Digital PR specialists are responsible for interacting and building relationships with the media, so they likely spend around 70% of their workday online.
Typically, they’re reading new studies, picking apart articles, and getting to know writers. It’s only natural that after experiencing the nuances of the news cycle, PR specialists are able to recognize which ideas make it big.
If that kind of market research already exists in the brains of the outreach specialists on your team, why not utilize it?
Getting feedback from the birth of a project means the trajectory of the content will be aimed for top-tier coverage. From the idea stage, it may make sense to create a ranking system with your team.
Outreach specialists can categorize each idea by newsworthiness, relevance, and promotional viability to get a better understanding of where your projects stand.
From there, you can go back to the drawing board or work with your best concepts.
Using your PR pros will help expand creative ideas from using only what the creative team thinks is interesting to using what publishers think is interesting. Who knows? A single tip from an outreach specialist could turn a mediocre campaign into a huge win for a client.
For example, at Fractl, one of our biggest recent wins in the career vertical involved pivoting an idea about millennial work/life balance to a survey packed with “would you rather” questions.
This new formatting allowed the creative strategist to ask more hard-hitting questions and challenged millennials to give concrete information about how much they’d be willing to sacrifice in their personal lives in order to get ahead in business. Some of the notable takeaways included:
- More than two in five millennials are willing to end a relationship if it meant getting a promotion at work.
- One in three would dump their S.O. for a raise.
- Millennials put their career before marriage: most are willing to postpone marriage for another seven years if it means they’d land a promotion.
2. Keep data human.
In a recent study from BuzzStream and Fractl, consumers ranked data analysis and index as the most authoritative form of online content.
Those who work in content production are exceptional at analyzing these numbers to reveal their hidden insights. However, it can be easy to get lost in the data while exploring every perspective and lose sight of the most compelling pieces.
Outreach specialists can help bridge the gap between data and human interest. If there isn’t a cohesive narrative weaved throughout your data, a digital PR specialist can pull from their experience in studying what kind of stories emotionally resonate, and can help identify the true story in the data.
While analyzing data, touch base with your outreach team to develop a storyline. Be sure they identify the simplest ways to digest the information you’re trying to get across. If it takes longer than 60 seconds to understand the information in a graph, you’re going to lose your audience.
Oftentimes, content creators become attached to their data and believe every aspect is essential to the piece. While this may be true in some cases, oftentimes slimming down excess information can be beneficial to the narrative as a whole.
Don’t be afraid of feedback, and remember that outreach specialists spend a lot of time dissecting stories online. They’re likely a trustworthy editor for your work.
For example, when presenting repetitive information, it’s important to provide interesting visuals to accompany data. When creating infographics about dangerous tools for a home improvement client, our team at Fractl decided to spice up statistics that would otherwise be mundane by placing the information within a tool shed.
This project ended up being a winner within the home and garden vertical and I owe the promotional viability to the engaging way the information was presented.

If your data tells a story your audience wants to hear, graphs and images become as essential as the words on the page. Using industry knowledge from your outreach specialist’s tool belt, you can elevate data-driven content to make it worthy of top-tier press.
3. Extract the juiciest takeaways.
You have a great idea, you research it, pull all the data, and it falls flat. Sometimes the stories you thought would be told through data don’t come to fruition. But this doesn’t mean your project is DOA, your outreach specialist may be able to revive it.
Having an eye on the media means that outreach specialists may be able to extract something from a project that would have otherwise been overlooked. Digital PR pros can draw up some ideal headlines or takeaways to increase the project’s chances of appealing to particular publishers and audiences.
Whether it means tying the data to a trending story or pitching a vertical not initially intended to be a match for your content, there’s usually always a way to distill data into a highly promotable headline.
Chris Lewis, account manager and creative strategist at Fractl, said he incorporates feedback from media specialists into his projects.
“Outreach specialists are my secret weapon in creating compelling data-driven story content,” he said. “More than anything, they help me get out of my own way by always finding the promotable and most interesting parts of content and finding ways to highlight them.”
4. Create better content.
Incorporating feedback from several team members throughout the life of a project can mean improved results from your content marketing efforts.
Consider hosting collaborative meetings every once in a while or implementing edits from your outreach specialists if an idea falls dry.
Ultimately, using a digital PR specialist in your content creation will help you create promotable content because of the work with the media and interaction online.

How to Make Digital Credentials Your Most Impactful Marketing Tool
Marketing can have an enormous, positive impact on both revenue and brand recognition. Which is why organizations spend so much time, energy, and resources trying to reach their target audience.
And yet, from billboard ads and radio slots to the roughly 300 billion emails sent each day, it’s hard to boost your brand amidst all the noise.
Fortunately, there are innovative ways to cut through the crowded market and build brand awareness: and one of those opportunities is through digital credentials.
Digital credentials have emerged as an impactful marketing tool across a variety of industries including corporate training, associations, professional development and certifications, and higher education. If your organization issues digital credentials, there are several things you can do to make the most of their marketing power.
Here, we’ll cover four areas where incorporating digital badges can help your brand stand out.
1. Social
With over 3.4 billion active users, there’s no denying social media is a modern marketing powerhouse. If your brand doesn’t already have a social strategy in place, you’re potentially losing out on the opportunity to engage with millions of customers.
Incorporating digital credentials into your social media strategy can drive brand awareness, increase engagement with the individuals who earn your badges, and strengthen the reputation of your company online.
To incorporate digital credentials, try using keywords and hashtags to search for individuals sharing your digital credentials online and interact with them — give them a “Like”, a re-tweet, or congratulate them on their achievement. You’ll build stronger connections and create new engagement opportunities with your badge earners.
For instance, anyone who’s earned a HubSpot certification could post it on their LinkedIn, like the example below:
Connecting with these users over social media in a meaningful way provides an opportunity for every single one of them to become an evangelist for your brand.
Another way to leverage digital credentials in this way is for employees to share their certifications socially. Think of this as employees promoting company news or recent awards. By sharing achievements on their social channels, your employees are promoting your brand among users you may not have had the chance to get in front of otherwise.
2. Email
We’ve already established there is an inordinate number of emails exchanged each day, which means the average person receives multiple emails every hour. Even so, email marketing is still one of the most important and effective ways for your business to connect with customers and build meaningful relationships.
Since your team is sending emails to people outside your organization, putting digital credentials in employee email signatures drives brand awareness and validation from the moment an email is opened. When your employees’ certifications are on display, they work alongside your company logo to reinforce your brand every time an email is sent, forwarded, or replied to.
Likewise, encourage your external badge earners to add digital credentials to their professional email signatures, too. Credentials help them establish credibility from the moment they hit “Send”, allows email recipients to instantly verify the digital badge, and helps them learn more about your products and organization in the process.
3. Online
As a marketer, driving quality traffic to your company’s site is a core focus. It’s the reason there’s such importance placed on including backlinks to a website in emails, social media posts, and content.
The beauty of digital credentials is they’re meant to be seen and shared. Developing a dedicated landing page for your digital credentials where potential earners can see the badge associated with the skill is a great way to get visibility for your credentials and is a great place for new earners to start the trial or purchase process. The more people visiting the page, the more recognition you’ll have for your initiative.
4. Events
Events are a critical marketing initiative because they offer the opportunity to build relationships with key customers and prospects. In an increasingly digital world, many marketers believe face-to-face interactions at events are crucial to generating pipeline. In fact, 68% of B2B marketers agree that live events help generate the most leads.
Since events place a significant focus on generating brand awareness in a sea of industry solutions, you have to ensure your brand stays top-of-mind for attendees.
Whether it’s a job fair or conference, including digital badges at your booth is a great way to encourage conversation and spark questions about your organization’s products and programs, as well as your commitment to employee development.
The visual representation of competencies allows key audiences to see your expertise before they even engage with your team.
Today, having a great product or service is only half the battle. Making sure people know about your organization and how to engage with it is a huge challenge, but also a huge part of brand success. Creating brand awareness won’t happen overnight. Using these ideas can help carve out your place in the market and help your brand stand out in no time.

How to Manage Your LinkedIn Presence in 10 Minutes a Day
Want a better return for the time you spend on LinkedIn? Looking for a LinkedIn engagement plan to follow? In this article, you’ll find a plan for making the most of your time on LinkedIn to stay visible, build your network, nurture contacts, and find new opportunities. #1: Define Your End Goal for Using LinkedIn […]
The post How to Manage Your LinkedIn Presence in 10 Minutes a Day appeared first on Social Media Examiner | Social Media Marketing.
from Social Media Examiner | Social Media Marketing https://ift.tt/3acPsHs
via socialmediaexaminer