
Welcome to My Blog
The Anatomy of a Perfect Instagram Profile
With 500 million daily users and more than 80 percent of Instagram accounts following a business account, it’s crucial that marketers include Instagram as a part of their social media marketing strategy.
It all starts with your Instagram profile.
The best Instagram profiles have a few things in common, including easily identifiable usernames, a recognizable profile picture, a steady stream of Instagram Stories and photos, an informative yet delightful bio, a link to a relevant landing page or campaign, and more.
Keep reading to learn how to customize your Instagram profile so it looks good, tells your potential followers who you are, and gives them a reason to follow and engage with you.
The Anatomy of a Perfect Instagram Profile
1. Public (Not Private) Profile
By default, your Instagram profile will be public — meaning anyone in the world can view your profile and posts on Instagram.
If you’re creating an Instagram profile for business, then that’s what you want: You want anyone to be able to view your posts and follow your brand if they want to. (Otherwise, if you keep your profile private, anyone who visits your profile won’t be able to view your photos, which could deter them from following you.)
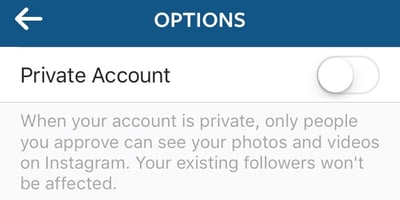
To ensure your profile is public: Open “Options” (the gear button on iOS, or three dots on Android) and make sure “Private Account” is turned off.
2. Recognizable & Searchable @Username (i.e., Handle)
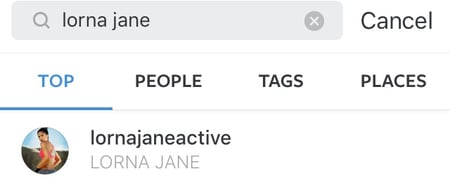
Start by making sure your username is recognizable and easily searchable, like your business name. If your business name is already taken as a username, try keeping your business name as the first part of your username so that people searching for your business are more likely to come across your account. For example, the Australian activewear line Lorna Jane uses the username @lornajaneactive.
To edit your @username: Go to your profile page and click the “Edit Profile” button to the right of your profile photo.
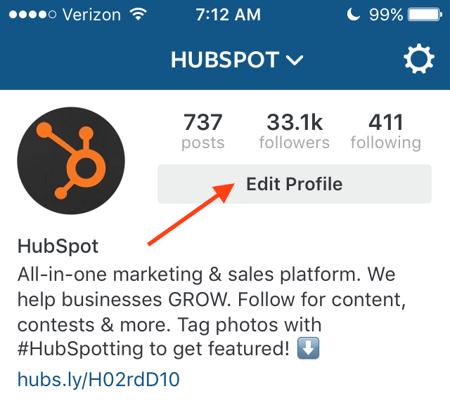
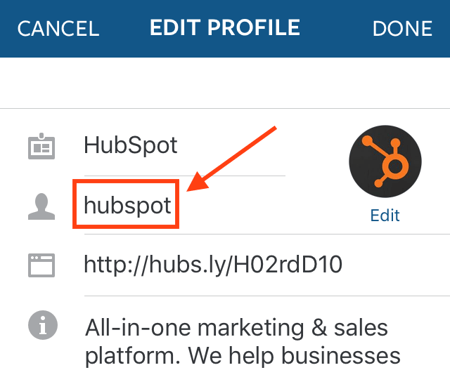
Next, click on the text or open space to the right of the person icon and enter your desired username.
3. Easily Searchable Business Name
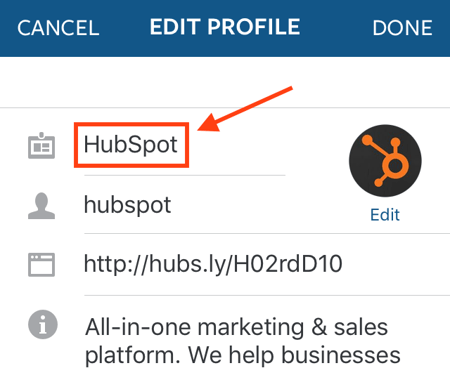
Next, make sure to add your full business name to the “name” section of your profile. This will appear under your profile picture and under your username in search.
To edit your business name: Go to your profile page and click “Edit Profile.” Then, click on the text or open space beside the clipboard icon at the top and enter your desired business name.
Instagram Profile Picture
4. An On-Brand Instagram Profile Picture
Your profile photo is one of the first things people see when they visit your Instagram profile, as it’s displayed prominently in the top right-hand corner. It should be something easily recognizable — something that’s on-brand with your other social networks.
For most companies, this will be your company logo.
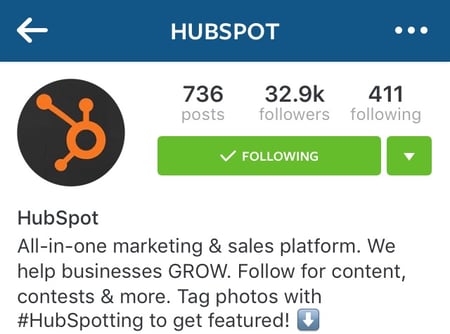
Now, notice that HubSpot’s profile photo in the image above is a circle. That wasn’t our choice; Instagram actually crops your profile photo into a circle (110 pixels in diameter) when you upload it to the app.
You don’t have to create the circle image yourself. In fact, since you’ll have to crop your photo into a circle in the app, you’ll ideally want to upload a square photo with your logo in the center, placed so that the corners of the photo can be cut off without a problem.
For reference, keep in mind the minimum profile picture size for Instagram is 110 x 110 pixels — a perfect square. Don’t deviate too far from this minimum; staying below 200 x 200 is encouraged so users don’t see a blurry or stretched photo when visiting your profile page.
In the example below, you’ll see the corners are shaded, meaning Instagram will cut them off in the actual profile photo:

You can move that circle around or pinch-to-zoom until it’s cropped just the way you like it.
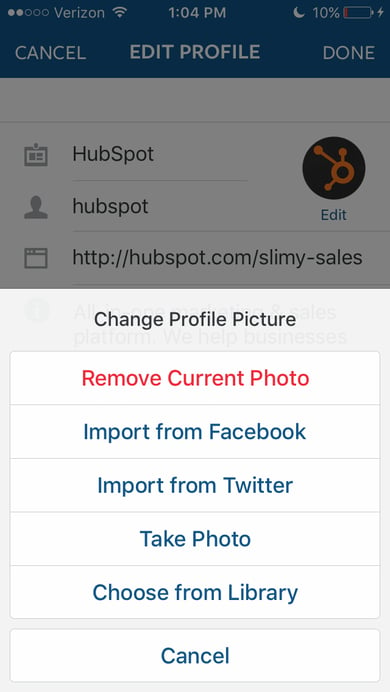
To add or change a profile photo: Go to your profile page and click “Edit Profile.” Then, tap “Edit” in the top right. (This will appear under your current profile photo if you have one.)
From there, you can import a photo from Facebook or Twitter, or choose one from your library. (We don’t recommend taking a new one on the spot.)
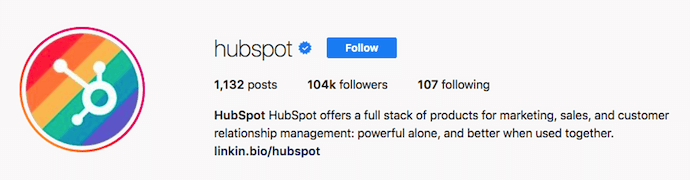
Also consider the seasonal trends that take place over the course of the year, and don’t be afraid to alter your image temporarily to honor a monthly theme. For example, because June is Pride Month, we gave our logo a temporary color change. Here’s what it currently looks like on desktop:
Cool Instagram Profile Pictures
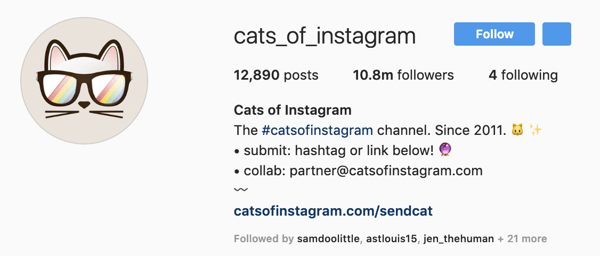
@Cats_Of_Instagram
This Instagram, which highlights different cats on Instagram, hosts a profile picture which looks like that of a hipster cat.
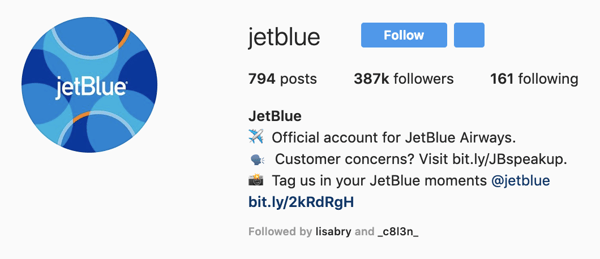
@JetBlue
Unlike most brands on Instagram, JetBlue shares a unique, but on-brand, color pattern rather than just their logo.
@KylieCosmetics
Kylie Cosmetics, which has a logo that features lipstick dripping off of voluminous lips, shook up its main image with some added holiday flair for. By simply added a Santa hat to the lips, the company instantly looked more festive.

5. Delightful, Actionable, Informative Bio
Like your profile photo, your “bio” (i.e., the description at the top of your profile) is one of the first things visitors to your profile will see.
You have a max of 150 characters: Use them to let people know what you’re about and give them a reason to follow you. Include who you are and what you do, and be sure to add a hint of personality.
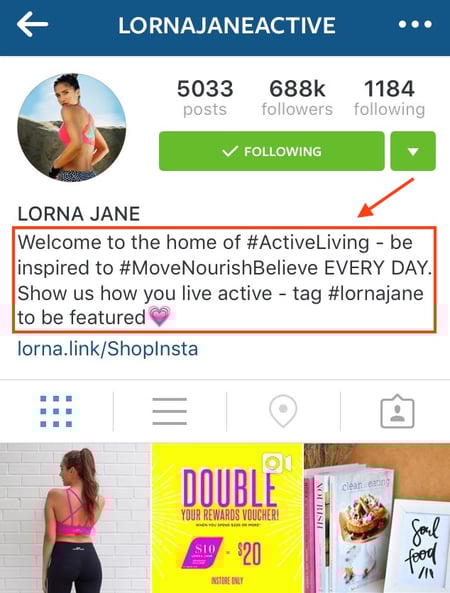
Here are a few examples for inspiration:
- WeWork: “WeWork provides you with the space, community, and services you need to make a life, not just a living.”
- Oreo: “See the world through our OREO Wonderfilled lens.”
- Califia Farms: “Crafting, concocting and cold-brewing up a delicious, plant-based future. Califia Farms Loves You Back”
- Staples: “We make it easy to #MakeMoreHappen”
You can also use this space to encourage some action, like using a certain hashtag or clicking a link in your bio. Here are two examples:
- Lorna Jane: “Welcome to the home of #ActiveLiving – be inspired to #MoveNourishBelieve EVERY DAY. Show us how you live active – tag #lornajane to be featured 💗”
- HubSpot: “All-in-one marketing & sales platform. We help businesses GROW. Follow for content, contests & more. Tag photos with #HubSpotting to get featured! ⬇️”
6. Trackable Link in Your Bio (That You Change Regularly)
One of the biggest frustrations people have with Instagram — especially businesses — is that it isn’t exactly a great platform for driving traffic away from the app to a website, a Twitter page, or somewhere else. That’s because clickable URLs aren’t allowed anywhere except the single “website” box in your bio.
That’s why you’ll want to add a link to the “website” box in your business’ Instagram bio. This makes it easy for people to go straight from Instagram to your website, blog, or a specific campaign.
One sneaky way to get people to click the link in your bio? By referring to that link in individual photo captions. Ever seen captions that say something like “Link in bio”? They’re trying to direct you to their profile page so you click the link in their bio.
Engage users by updating that URL frequently to point to your latest blog content, YouTube video, product, or offer. For example, are you running a contest, or want to increase subscribers to your blog? Just change the link, and then post a photo that mentions the new link in its caption.
To change the link in your bio: Go to your profile page and click “Edit Profile.” Then, simply insert the URL of your choosing into the URL box.
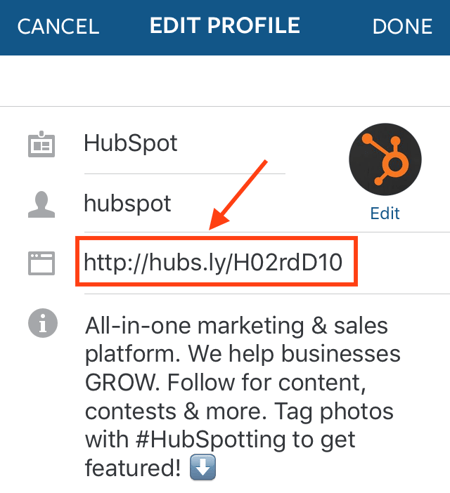
You can change the URL on your profile page as often as you’d like.
Note: I’ve read before that shortened links often get blocked by Instagram, but we haven’t had that problem at HubSpot. In fact, we recommend using shortened links that include UTM tracking codes so you can see how much of your traffic came from your Instagram page. (Learn how to create UTM codes to track your URLs here.)
Once you’ve changed the URL, simply publish a photo related to the URL with a caption that references the link in your bio. Here’s an example below, where we wrote in the caption, “FMI about Grow With HubSpot, visit the link in bio.”
7. Enabled Notifications
Before you call it a day, check your “Options” settings to make sure notifications are enabled so you can see when people share or comment on your photos. This’ll let you engage with them more quickly and easily, just like a lot of companies do on Twitter.
To enable notifications: Go to “Options” and then “Push Notification Settings.”
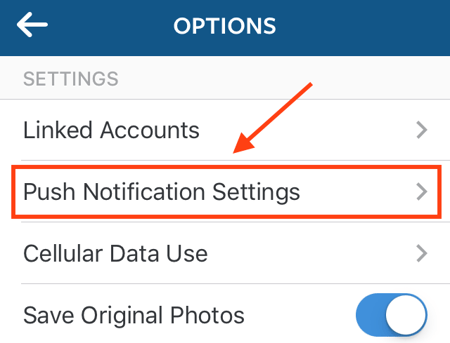
Select “From Everyone” for every category. (Except perhaps “Friends on Instagram,” which automatically sends a friend request to your Facebook friends who also have Instagram, and “Instagram Direct Requests,” which accepts photos sent from individual accounts. That could get a little spam.)
8. High-Quality Photos
High quality photos are a huge part of an optimized Instagram profile. When people visit your profile, chances are, the first thing they’ll do is scroll through the first ten or so photos in your feed. The quality of those photos will be a big factor in whether or not that person follows you or not. Your Twitter followers might forgive a few bad tweets, but you do not want bad photos on your Instagram account.
So, always be thinking of your Instagram photos this way: If you don’t have anything beautiful to post, don’t post anything at all.
The ingredients for a beautiful Instagram photo are threefold: an interesting and relevant subject, a well framed and well shot photo, and a solid editing job.
Ingredient #1: An Interesting & Relevant Subject
When you’re picking a subject, think about your buyer persona. What would they find interesting in a photo? Coca-Cola’s target market includes young people who value fun, friendship, and sports, for example. That’s why they post pictures of young people doing fun, adventurous things — like DJing at a concert, or snowboarding on a beautiful day. (With bottles of Coke in hand, of course.)




Image Credit: Coca-Cola Argentina
Another great way to garner Likes, comments, and followers? Make people laugh. Sometimes, funny photos are the most memorable and the most shareable.


Image Credit: Baddie Winkle; Jeremy Veach
Check out this list of 16 of the best brands on Instagram for more photo inspiration.
Ingredient #2: A Well Framed, Well Shot Photo
Don’t worry … you don’t have to have a background in photography to take really awesome Instagram photos. All you really have to do is take some time to learn the best practices, like lining up your shots, finding interesting perspectives, and taking advantage of symmetry, patterns, “leading lines,” and more.
What are these best practices? Start by reading this blog post on tips for taking great pictures on your smartphone.
Ingredient #3: A Solid Editing Job
Instagram has some basic editing capabilities, but oftentimes, they aren’t adequate to make a picture really, really great. Most of your photos should go through at least one or two other photo editing apps on your mobile phone before you open them in Instagram for the first time.
But don’t worry: Once you have the right apps downloaded, editing the photos isn’t that complicated. It just takes a little bit of practice. (Trust me, it’s well worth it.)
Start by reading this blog post for a step-by-step tutorial on editing your Instagram photos. That post will teach you how to take advantage of Instagram’s best editing tools, and it also lists the two or three essential photo editing apps you’ll need to take your photos from good to great.


For a list of more advanced editing tools, read this blog post for a list of the 11 best photo and video editing apps for mobile devices. These apps will let you do everything from sharpening specific parts of a photo to brightening certain hues to make your photo look fresher.
9. Consistent, Regular Posts
An optimized Instagram profile is an active one. Because photo quality is so important, you don’t need to worry about posting to your Instagram account multiple times a day like you do for most other social media networks. Instead, focus on creating high quality content — and then posting them at the right times for your specific audience.
To make sure you’re posting consistently, download this social media content calendar template and start planning out your Instagram posts. Over time, you’ll want to build up a backlog of photos for times of need, like the weekends or when you go on vacation.
So, what time of day is the best time to post to Instagram? Because Instagram is primarily an app for use on mobile devices, users tend to use the network all the time, any time — although research shows that many users engage with content more during off-work hours than during the workday.
The very best times to post on Instagram were Mondays and Thursdays at any time except between 3:00–4:00 p.m. for the time zone of your target persona. (For a United States audience, your best bet is to combine Eastern and Central time zones, as they represent almost 80% of the U.S. population. For audiences located outside the U.S., use whichever time zones your target audience uses.)
However, you’ll want to experiment with these to see if they work with your audience.
Editor’s Note: This blogpost was originally published June 5, 2018, but was updated in November 2019 for comprehensiveness.

9 AI Tools to Streamline Your Social Media Strategy
Did you know that more than 42% of the world population is on social media?
With a growing number of people connecting to social networks, having a social media strategy is vital to your digital marketing success in 2019.
You probably already know that a lot of time and effort comes with successful social media management. It’s not uncommon for digital marketers to spend hours a week just on drafting content; monitoring, analyzing, creating reports; and managing paid social ads.
As you focus on some of the more mundane tasks related to social media, you might find that you’re losing valuable time that you could use to plan out enticing multimedia campaigns or work on bigger, more productive marketing projects.
But, what if a machine could take over some of your tasks and free you up to dive deeper into the more creative areas of social media strategy?
In 2019, there are a number of artificial intelligence-driven programs that can vastly improve how we use social media for marketing. And, they’re actually somewhat affordable to implement.
As the Director of Marketing AI Institute and a senior consultant at PR 20/20, I’ve frequently written and spoken about AI implementation. I’ve also worked with marketers to understand, adapt, and pilot artificial intelligence to increase revenue and reduce costs.
Throughout my career, I’ve learned a great deal of where marketing and AI can intersect. I’ve found that social media is one area where this technology can be implemented in many marketing strategies.
First of all, most of the social media platforms we know and love already use AI to improve our experiences as users. For example, Facebook uses machine learning to recognize your face in photos, Snapchat hosts AR filters, and LinkedIn uses AI to parse mountains of data and recommend jobs you might be interested in.
But you don’t have to be the CEO of a major social platform to implement AI. As marketers, we too can use AI software to dramatically speed up and streamline our social media strategies. There are also three prominent use cases where AI is especially valuable: Creating basic content, data analysis, and ad management.
In this post, I’ll walk through each use case and the tools that can help you with each.
3 Ways to Implement AI in Your Social Media Strategy
1. Use AI software to create basic post content.
Struggling to make time to film viral videos or create detailed Instagram Stories because you’re using all of your brainpower to write basic filler posts that stay under a certain word count?
While robots can’t write a full blog post just yet, artificial intelligence can still help social media marketers create the content they share online.
So how can AI craft and suggest a tweet for you? One subset of AI is called natural language generation (NLG). It can be trained to create written narratives out of data, like simple reports or fact sheets.
So let’s say your department produced a huge, data-driven report and you want to create a few high-impact social shares from it. Here’s an AI-driven program that can help you do that.
Lately
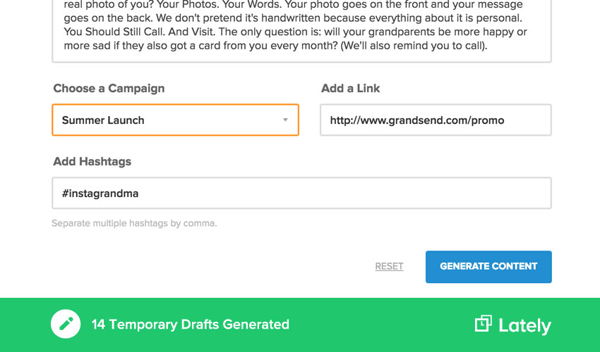
Some AI tools can also recognize context from a larger piece of content and create social media posts to help promote it. Lately is a tool that does just that and also offers a dashboard of other social tools related to scheduling and social media project management. It also analyzes the historical metrics of your social pages to recommend the best posting times for maximum impact.
Within the Lately dashboard, you can use a simple form to generate a number of tweets at once related to a URL, document, or information posted in the form’s text box. When you fill out this form, you can also include campaign information and hashtags that you’d like to work into your social posts. When you click “Generate Content” the tool will search through the URL, document or text and create tweets related to it. From there, you can schedule the tweets or tweak them in case they need additional information.
While Lately pricing may vary, the company says that it starts at $129 per dashboard per month when billed annually.
Sprout Social
If you use your social platforms to execute on community management, Sprout Social’s automated technology can also help you generate tweets that can be used to reply to fans, customers, or followers.
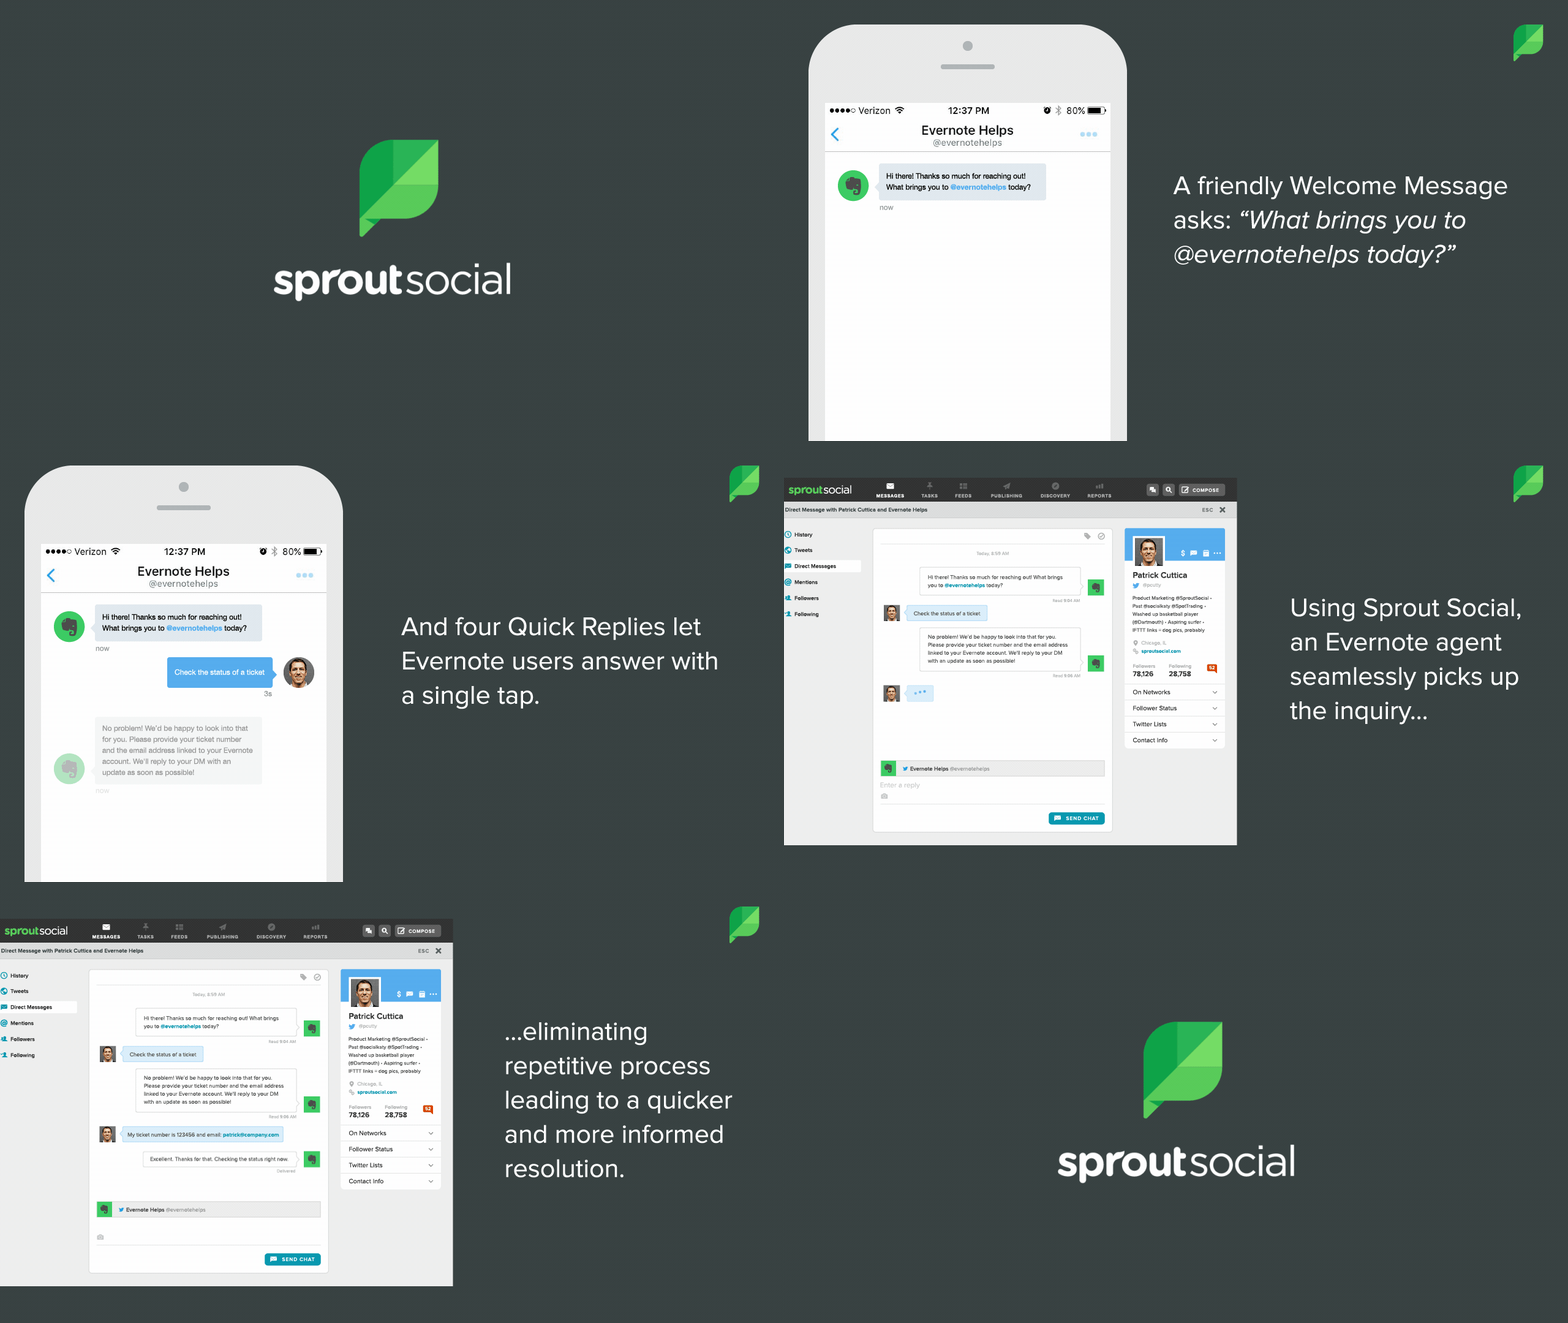
From the Sprout Social dashboard, you can see and respond to tweets directed at your company. Some Sprout admins also have the power to manage direct messages through the platform. In both the dashboard and direct message view, Sprout will be able to analyze the wording and sentiment of a tweet or message and suggest an auto-response that you can use or tweak. Although AI is not having a full conversation with all of your followers, this automation still may quicken up the process related to sending quick messages or tweets to respond to people.
Here’s a GIF where Sprout Social demonstrates how this works in Twitter’s messenger.
Source: Sprout Social
Sprout Social’s pricing starts at $99 per month for its Standard plan. However, companies can get expanded features in its $149 Professional plan.
HubSpot
I can’t ignore HubSpot, either: HubSpot’s social media software automatically creates social posts based on the metadata of the link you copy and paste, saving you a ton of time.
Anyone subscribed to HubSpot’s Marketing Hub or higher can use the tool, which can be found in the platform’s Social section.
Click “Create Post” and choose a social channel. Once the text box opens, attach a URL from your own site or another location.
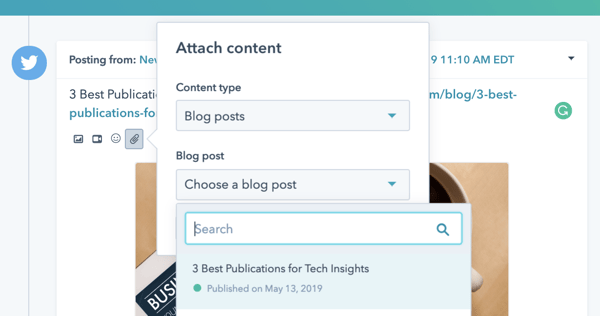
Once you insert post attachments, like the URL, you’ll either see a short headline or a meta description of the page along with its link and a photo.

After the post copy is pulled and generated into the text box, you can tweak the copy to fit your social voice or to add more depth or comprehensiveness to the overall post.
HubSpot’s pricing varies depending on how many users you’ll have and whether you want to purchase just the Marketing Hub or other Hubs within the HubSpot suite. However, HubSpot’s Starter pack begins at $50 and includes Marketing Hub functions plus the free features of HubSpot’s CRM.
2. Monitor and analyze your social media channels with AI.
Writing content and responses is only half the battle of social media management. A huge portion of social media marketing is managing and monitoring social channels. Luckily, I’ve found that AI can shoulder a good portion of that work and help you make better marketing decisions in the process. That’s because AI is capable of collecting data from millions of posts, at scale, and using that data to make predictions and decisions.
“Managing” a channel is a pretty loaded term, but a few of those tasks, like discovering high-impact influencers and completing audience analysis, can be handled by tools like Socialbakers.
Socialbakers
Socialbakers is an AI-driven social media management platform that provides advanced audience insights, an influencer marketing discovery and tracking dashboard, a unified content feed that allows you to see posts on all of your platforms, an analytics dashboard, and smart scheduling tools that can suggest optimal post times.
If you’ve found that it takes too much time and resources to find, vet, track, and keep up relationships with influencers, Socialbakers’ AI-driven influencer dashboard might streamline some of your processes.
When you click into the influencer dashboard tool, you can toggle between different social media platforms and categories, like “Food” or “Health” and be shown influencers that match the most with your audience, which Socialbakers continuously analyzes. This might take time out of your discovery phase and in determining whether the person you’re hiring is a good match for the audience you’re targeting.
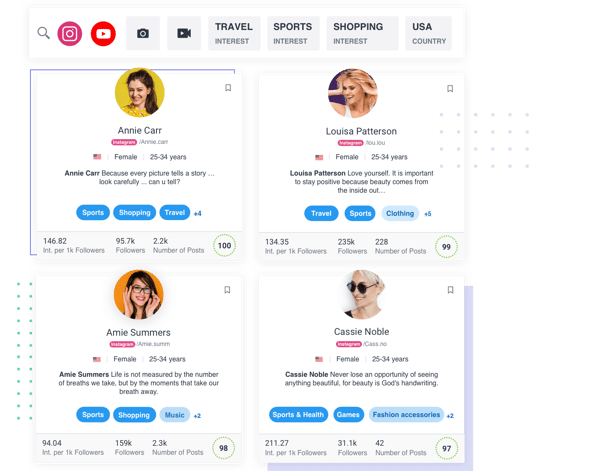
Source: Socialbakers
Those who are interested in the tool can try it for free before purchasing the software. Socialbakers’ Essential package costs $200 per month with a 10 profile limit. If you’d like to run 20 platforms, you can subscribe to Essential’s second tier for $400 a month. The Complete Socialbakers Solution, which includes influencer tools, does not have transparent online pricing. However, you can request a demo here.
Cortex
When it comes to sharing content, you can use a tool like Cortex to receive recommendations on when and how often to post based on all of your historical metrics. Cortex can also generate detailed analyses of your competitors.
Cortex has a dashboard with a similar interface to other social media management platforms which shows off your posts and your social schedule. When you go to create a post, Cortext will use historical post data to suggest when you should post. If you upload one or more photos, the software will also note colors that are most engaging to your audience to help you pick the correct image for the post.
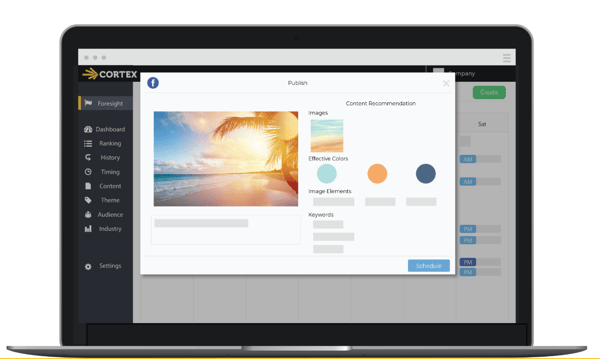
Source: Cortex
Pricing for this service is not transparent on its website, but you can request more information on Cortex’s homepage.
Linkfluence Radarly
You can also use something like Linkfluence‘s Radarly software to assess the mountains of data that social media audiences are producing every day. That means measuring your brand impact, detecting trends online, and pulling specific insights on your most important target audience.
With Radarly, you are able to log on and see a dashboard that connects data from all of your accounts. In the first column, you can see a live feed of posts and tweets that acknowledge your brand name or handle in some way. Then in the next columns, you can see scoring that explains how negatively and positively people are talking about you on social, which platforms people are discussing you most on, and data about your audiences such as interests, languages or hashtags they’re using.
Here’s a quick demo that gives you a full look at the dashboard:
Pricing for this software is done by a quote process, but some websites suggest the starter pack is roughly 500 euros or $554 per month.
3. Create, optimize, and manage paid social media advertising.
As I mentioned above, AI is capable of developing social media posts—the same can be said for ad copy that resonates with different audiences. It’s optimized for the highest possible clicks and conversions using AI’s predictive technology.
Phrasee
Phrasee has developed technology that does this for short-form ad copy across Facebook and Instagram. Phrasee pulls data from past marketing assets including emails, social media copy, and other online posts to determine which is most and least effective. From there, Phrasee can show you what copy-related aspects of past ads were weak or strong. You can then draft prospective ad copy and test its effectiveness with the software or use ad copy that the software suggests to you.
Here’s a quick video that explains Phrasee’s process and how it might lead to more ad conversions.
Phrasee does not include pricing information on its site, but its product page does note that major companies like Virgin and Domino’s have benefited from its services.
Pattern89
Once your stellar ad is written, AI can tackle some of the nitty-gritty ad management tasks, like optimizing bids, divvying up a budget, and recommending channels most likely to help your ad perform. Pattern89 is an AI marketing tool that provides recommendations on almost every aspect of your ads, including recommendations for adjusting your spend and audience targeting to massively increase performance.
When you log into the tool, you can see a screen filled with alerts and suggestions related to how you can improve the effectiveness of your ad. If you’d like to follow the platform’s suggestions, you can click “Show me how.” to learn how to make ad adjustments. It the platform shows you a “Do this automatically” button next to a suggestion, you can click that to have the platform make the adjustment.
Here’s a look at what the dashboard looks like:
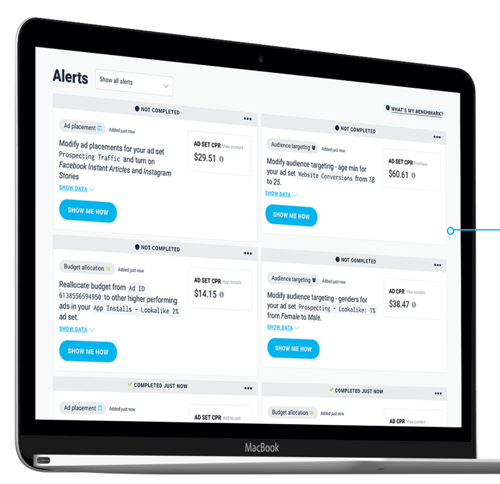
Source: Pattern89
Aside from allowing you to monitor live and completed ads, the tool also offers a Creative Ads Manager. This allows you to search and analyze past ads with filters including ad set, campaign objective, audience, and other ad targets. Here’s a quick walkthrough of this process in Pattern89:
Pattern89 doesn’t provide pricing, but you can contact the company for a demo.
WordStream Advisor
WordStream also enhances ad performance by using machine learning to assess PPC ads across Facebook and Instagram, then offering data-driven recommendations. The company offers software catered to agencies, advertisers, and online sellers to help them learn more about the effectiveness of their PPC ads and help them make better decisions which might return a solid ROI.
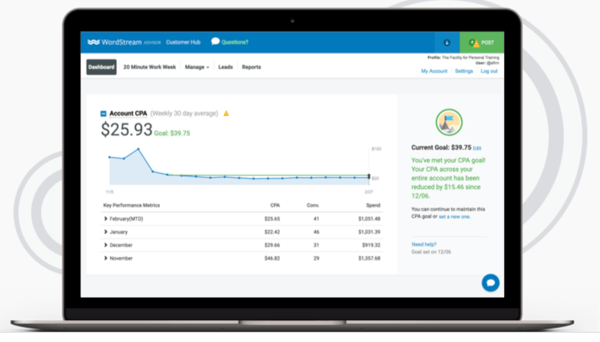
WordStream advisor specifically allows small to medium-sized business marketers to track ads on major platforms including Facebook and Instagram. The program configures all of your ad data into one simple dashboard and offers a 20-Minute Work Week feature which allows you to streamline your ad decisions.
As part of the 20-Minute Work Week feature, WordStream will send you advertising updates as well as suggestions to make your ad more effective. Instead of analyzing your own ads and determining adjustments yourself, you can simply read and follow WordStream’s suggestions.
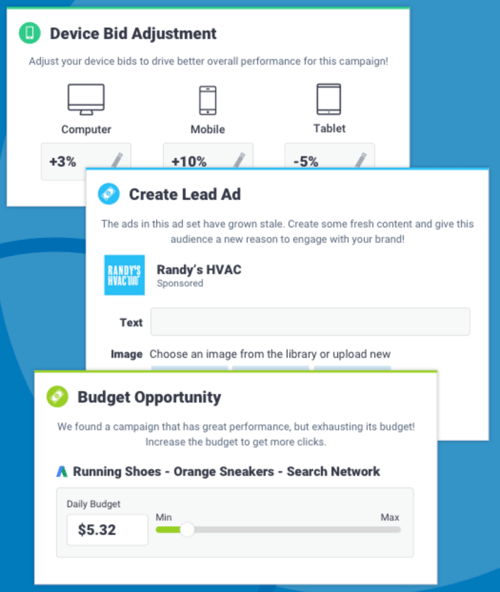
Source: WordStream
WordStream Advisor’s 12-month membership starts at $264 per month, or $2,928 if prepaid all at once.
AI is for Every Social Media Marketer
If artificial intelligence still seems like an overwhelming topic, you’re not the only one who might be intimidated by it. After all, we’re marketers, not data scientists.
Good news: You don’t need to be a data scientist to understand, start using, and make a massive impact with the help of AI. You just need to start learning about tools that could help you.
If you’ve developed a great AI strategy related to social media, you might also want to look at your overall strategy to make sure you’re making the most of automation. This post will walk you through the more strategic elements of automating your strategy, including knowing when to schedule, when to diversify content based on social platforms, and how to better interact with your community with the help of automation.
You can also learn more about where social media and AI intersect in the HubSpot Academy course, “Artificial Intelligence and Machine Learning in Marketing: Live from MAICON.” It’s an introduction to AI and machine learning that offers how-tos for applying it in marketing through a holistic framework and piloting AI in your company. It was filmed live at the Marketing Artificial Intelligence Conference (MAICON).

Ecommerce Conversion Rates Across Industries (And How to Raise Yours)
Ecommerce is the ultimate optimization puzzle — from individual product pages to filtering mechanisms to your checkout sequence, every choice you make has the potential to have a massive impact on the sale of a given product.
But when you’re making changes all over your site, how can you know that, overall, those changes are adding up to customer and revenue growth?
Ecommerce conversion rate is the ultimate top-line metric for online store owners looking to understand if the changes they’re making to their site are positively or negatively impacting the number of visitors who eventually become customers.
Here, let’s explore what ecommerce conversion rates are, why they matter, and how to raise yours.
For example, if you had 1,000 visitors to your online shop yesterday and 30 of them made purchases, you’d calculate your ecommerce CVR by taking the total number of people who completed checkout (30) and divide that by the total number of site visitors in the same time frame (1,000). In this case, your ecommerce CVR would be 30/1000 = 0.03 = 3%.
One complicating factor is the fact that many ecommerce retailers today are selling across multiple platforms. Even if you aren’t using a tool that aggregates your product page or site visits and conversions in one place, you can leverage a tracking spreadsheet to keep a pulse on your ecommerce across platforms over time.
We’ve put together a free ecommerce conversion rate tracker that you can download here along with an ecommerce marketing and sales plan template in our Ecommerce Planning Kit.
Featured Resource: Ecommerce Conversion Rate Tracker
.png)
Why is your ecommerce conversion rate important?
Your ecommerce conversion rate is crucial to the success of your online shop. You could bring in 50,000 views per month to your website through ads, but if the user experience on your website is poor, your ads are misleading, or your product descriptions aren’t effectively communicating the value of your products, you might only end up with a small percentage of that traffic converting into customers.
Since an ecommerce site can be expensive to maintain and complicated to organize, you need to check routinely that your online presence is driving a significant amount of customers and sales for your business.
Ecommerce CVR is also a useful metric to track over time to see how the improvements that you’re making to your website, product categorizations, product descriptions, checkout process, or any number of other aspects of your online store are actually impacting your business’s bottom line.
What’s a good ecommerce conversion rate?
It’s not worthwhile to compare your ecommerce CVR to an overall benchmark that aggregates CVRs across industries. Frankly, CVRs vary wildly across ecommerce, and if you’re going to compare your own site’s conversion rate to anyone else’s, you should try to find common conversion rates for your category.
If you’ve done a cost-benefit analysis and proven that you make more money than you spend by selling your products online, you’re at a good starting point. From there, we advise focusing your time on optimizing your site beyond where it currently stands.
If you have one category of items with an excellent conversion rate, you can also aim to bring all categories up to that standard. With that approach, you can at least count on the fact that the CVR benchmark is reflective of your specific target persona, not anyone else’s.
If you’re starting from scratch, here are industry-specific benchmarks backed by recent research that we’ve compiled from a variety of sources.
Ecommerce Conversion Rate Benchmarks By Industry
The numbers below come from IRP Commerce, which constantly collects data from across many industries, and ShippyPro. The numbers have been most recently updated in September 2019.
Agriculture: 0.62% – 1.41%
Arts and Crafts: 3.84% – 4.01%
Baby and Child: 0.71% – 0.87%
Cars and Motorcycling: 1.35% – 1.36%
Electrical and Commercial Equipment: 2.49% – 2.70%
Fashion, Clothing, and Accessories: 1.01% – 1.41%
Food and Drink: 0.90% – 1.00%
Health and Wellbeing: 1.87% – 2.02%
Home Accessories and Giftware: 1.46% – 1.55%
Kitchen and Home Appliances: 1.61% – 1.72%
Pet Care: 2.51% – 2.53%
Sports and Recreation: 1.18%
1. Put explainer videos on your product pages.
You might try adding videos that show your product from a variety of angles and allow people to see them in action. It can be difficult to get a sense of sizing, fit, and material quality from photos, and video tends to demonstrate more detail. You also want to solve for the increasing number of people who prefer to consume video rather than text.
2. Give your visitors a clearer set of product images.
There’s nothing more frustrating than wanting to look at the small details of the item you’re considering buying online … only to find out that you can’t zoom in. Let your prospective buyers zoom in on the images of your products. This ensures they have a truer sense of your product before purchase. Use higher resolution photos and provide photos from more angles, too.
3. Tighten your copy.
Ensure that product descriptions are grammatically correct, intuitively structured, and prominently accessible. When it comes to getting creative with your descriptions, know your buyer persona.
In some cases, retailers might have 10 essentially identical products that are differentiated only by their size, for example. While the product specifications should reflect the different product dimensions, it’s most likely okay to leave the copy describing the product’s use case as is.
On the other hand, if you’re selling something like body care products, you might write a completely new set of copy to describe who each product is right for, the different sensory elements of the product, and the look and feel of the product.
At a baseline, always include product measurements, material specifications, warranty information, and any other information that would be crucial for making a buying decision about your product to avoid losing prospective customers who are wondering about a key detail.
4. Add chat to your website to allow customers to ask product questions while they’re interested in your product.
You simply can’t answer every question that anyone has ever had in your product description. Since you want to do everything you can to convince someone to buy your product while they’re already on your site, consider chat as another avenue.
Chat can be a powerful tool for bridging the gap between your product descriptions and specifications and the information that an individual needs in order to buy. It also enables people to ask questions about your brand, shipping and return policies, and anything else non-product-specific without leaving the web page of the product they’re close to buying.
5. Test different call-to-action (CTA) placements, options, and wording.
Altering your CTAs is a classic website conversion rate optimization strategy, and the results can sometimes be small. However, switching up the copy within your CTAs, the options that people have for the next place they can go, or the prominence of those CTAs can be low-effort, high-impact ways to encourage people to click to buy.
Studies have found that while the majority of CTA tests don’t produce statistically significant results, the ones that do create enormous impact, with on-page conversion lifts averaging 49%. You won’t know what conversion rates you might be able to see until you start experimenting with each little aspect of your site.
6. Add social proof with stellar customer reviews.
It’s becoming increasingly easy for companies with cheap, low-quality products to deliver comparable on-site experiences and images — thus convincing buyers that their products are the same as the others in the market, just less expensive.
The one element of an ecommerce site that’s hard to fake, however, is customer reviews. Allow your customers to leave reviews of your products to prove that they’re truly high-quality. If you’ve got great reviews, consider moving them higher on the product pages to see if the social proof impacts prospective customers’ buying decisions.
If you don’t have a solution that allows customers to leave reviews automatically, collect quotes from people who’ve bought from you before and add several to each of your product descriptions. A/B test a set of product pages, including testimonials on the variant only.
7. Offer free shipping.
We’ll admit this one isn’t the cheapest option to implement, but the ROI can be enormous. Many people choose to go to a local store that could fulfill the same need rather than shopping online because it would be significantly cheaper to drive 15 minutes to the store than pay $5-10 for shipping.
Free shipping reduces the perceived barriers to ordering something online. That means that you’ll likely end up with a greater number of people making purchases, and the revenue from those additional customers may compensate for the losses incurred by paying for their shipping.
8. Tweak your checkout process.
There are dozens of small changes you can make to the user experience of your checkout process. Two of our favorites are eliminating any unnecessary fields, and adding a progress bar.
While it’s tempting to collect additional information about your buyers during the checkout process, additional questions lengthen the amount of time it takes to buy — and everyone is short on time.
Progress bars can have two advantages. First, they can reduce buyers’ concern that they don’t have the time to complete the checkout process at the moment. Second, they give people a sense of accomplishment after each step they’ve completed, building positive momentum toward completing their purchase.
9. Allow guest checkout.
Allowing people to create an account and save their information for future purchases makes a lot of sense for repeat buyers. But if you require people to make an account in order to make their first purchase, you may lose potential customers because they don’t yet trust your brand. Additionally, some people are averse to saving personal information online.
In fact, Trustpilot reports that requiring account creation at checkout is the second-biggest reason why people abandon carts, coming in just below having to pay for shipping.
Those who become repeat buyers will create an account eventually if they feel comfortable saving their information. In the meantime, don’t add extra steps to the checkout process for people who are ready to buy.
10. Add additional payment options.
Finally, consider running a survey to better understand your customers’ preferred payment methods and add the one that’s most convenient for them. A study from the Merchant Payments Ecosystem revealed that 50% of consumers will end a transaction if their preferred payment method isn’t available.
By meeting your customers where they are, you’re potentially removing a nuisance (i.e. walking to another room to get a different credit card) or a complete blocker (i.e. not having access to any of the available payment methods). It will create an easier user experience and, if you select a payment method that your customers truly prefer, you’ll increase your conversion rates.

How to Use Facebook Ads to Promote Limited-Time Offers
Do you want to promote limited-time offers this holiday season? Wondering how to create an automated Facebook ad sequence to deliver daily specials? In this article, you’ll learn how to set up a multi-day Facebook ad campaign to automatically deliver time-sensitive offers. Prepare Your Holiday Campaign Assets in Advance The holiday shopping season in the […]
The post How to Use Facebook Ads to Promote Limited-Time Offers appeared first on Social Media Marketing | Social Media Examiner.
from Social Media Marketing | Social Media Examiner https://ift.tt/34eIJci
via socialmediaexaminer
What Is Content Seeding & How Does It Work? [Examples]
Every summer, I start a vegetable garden. I purchase seeds, plant them in various places in my backyard, tend to them, and with the help of the right weather conditions, help them grow. Why am I talking about gardening on a marketing blog?
Content seeding. But instead of planting zucchini seeds, marketers plant content to grow brand awareness and leads.
Let’s get into the specifics of what content seeding is and how it works.
Content seeding allows brands to highlight their content in places target audiences will see and engage with it. Influencers are a prime choice for content seeding because they usually have large audiences. These audiences have been proven to trust influencers more than their friends.
For instance, lifestyle subscription box FabFitFun has a target audience of women “ages 18-34, who love a good deal [and] want to hear about the latest and greatest trends in beauty, fitness, nutrition, and style.” When they work with influencers on content seeding, they choose platforms their target audience is interested in, like my favorite podcast, True Crime Obsessed (TCO).
When I heard ads for FabFitFun on TCO, I was immediately interested in the brand and what it offers, so I followed the link in the podcast subscription. The added bonus of hearing high praises from hosts I’ve come to connect with and trust solidified my interest and ultimately drove me to subscribe. That’s content seeding in motion.
Part of the reason content seeding is so successful is that the content shared by influencers or partners is relevant to the target audience. Market research shows brands, like FabFitFun, where their audience is and gives them clues as to where to seed content.
Having industry leaders promote a brand through their social platforms or other networks increases the reach of the business, because they’ve built trust with their own audiences.
However, influencers aren’t the only way to facilitate content seeding. You can also contact an agency that specializes in seeding, or reach out to thought leaders for a partnership on a blog post or email newsletter.
If you’re starting to think of ways you can get into content seeding, which platforms to use, and what content to share — don’t worry, we’re going to look at more great examples of content seeding next.
Content Seeding Examples
1. Claire Saffitz x Coveteur
Cooking magazine Bon Appetit has a wildly popular YouTube channel (4.7 million subscribers strong) due to their charismatic test kitchen chefs who produce recipe videos. Claire Saffitz, host of series “Gourmet Makes,” has become a food influencer because of how much she connects with fans of the channel. Recently, Saffitz collaborated with magazine Coveteur on her Instagram.
This is a great example of content seeding because Coveteur’s partnership with Saffitz brought recognition to their magazine. Her Q/A with the lifestyle magazine could closely appeal to Saffitz’s fans: people who are interested in cooking and health. The closely running avenues of the publisher’s audiences mean a potential 400,000 new readers from Saffitz’s Instagram.
2. Mandy McEwen x LinkedIn Marketing
Founder of marketing company Mod Girl Marketing, Many McEwen, recently partnered with LinkedIn Marketing’s Thought Leadership campaign. This partnership aligns with McEwen’s following — professionals who are interested in working with thought leaders — and LinkedIn’s audience — professionals looking for workplace connections and advancements.
McEwen also gains new engagement from the partnership, while building her credibility as a marketer. This is a great example of how content seeding can work both ways to build brand awareness.
3. Lin-Manuel Miranda x Reddit
Social platform Reddit recently had actor Lin-Manuel Miranda (Hamilton, In the Heights) run an Ask Me Anything (AMA) on the site. The thing about AMAs is that you must have an account to participate. Fans had to sign up for an account to ask Miranda a question, then notice social communities for Miranda’s line of work, like Broadway and television.
Reddit, I’m coming over to your / of the woods tomorrow… https://t.co/JmSiBs7RmJ
— Lin-Manuel Miranda (@Lin_Manuel)
November 18, 2019
Having Miranda post this on Twitter to three million followers is great exposure for Reddit. If the platform wanted to grow its theatre-based threads and community, this AMA was a perfect seed to plant.
4. Louis Tomlinson x Twitter
Musician Louis Tomlinson recently collaborated with Twitter to run a Q&A on YouTube. Tomlinson and Twitter each have incredibly large audiences, but most probably had no idea Twitter had a YouTube channel (myself included). However, with Tomlinson’s 33 million followers, Twitter saw a way to grow their presence on the video platform.
Twitter partnering with Tomlinson to promote another channel of theirs is a smart way to attract potential subscribers. If fans find that more of their favorite artists have similar videos on Twitter’s YouTube channel, they might tune in and share their finds to their own Twitter audience.
5. Sara Blakely x Masterclass
Founder and CEO of Spanx, Sara Blakely, worked with MasterClass on an entrepreneurship course. MasterClass is an online education platform offering courses in various industries. Learn tennis from 23-time title holder Serena Williams or get a crash course in fashion from Vogue Editor-In-Chief Anna Wintour.
Blakely’s partnership with MasterClass is an invitation for fans of the entrepreneur to get a look into how she built her empire. If 300,000 of Blakely’s followers are interested in her story, the website could benefit greatly from dropping their branded content on her Instagram.
My vegetable garden thrives every year because of a combination of work from my end, the right soil, and favorable weather conditions. The same is true for content seeding. A perfect content seeding strategy is built from a combination of brands finding the right partners, a great platform, and a favorable product or service to promote.
You don’t have to invest huge amounts of money into content seeding. Choosing micro-influencers or guest bloggers and podcast interviews are more cost-effective ways of content seeding as well.

Facebook Lets Advertisers Control Where Ads Appear
Welcome to this week’s edition of the Social Media Marketing Talk Show, a news show for marketers who want to stay on the leading edge of social media. On this week’s Social Media Marketing Talk Show, we explore Facebook’s new brand safety controls and transparency tools for advertisers, upcoming Facebook ad updates, and more with […]
The post Facebook Lets Advertisers Control Where Ads Appear appeared first on Social Media Marketing | Social Media Examiner.
from Social Media Marketing | Social Media Examiner https://ift.tt/2OecVik
via socialmediaexaminer
The Ultimate Guide to Google Docs
Everything Google touches seems to turn to gold.
Not only has the brand helped online businesses generate billions of dollars through its search engine, but it’s also — and continues to — branch out and create other products.
One of these products is Google Docs, a free word-processor and alternative to Microsoft Word that allows anyone to easily create and edit their own shareable document.
Google Docs is a behemoth. The tool is so multi-faceted and multi-functional; it’s easy to get overwhelmed when learning your way around. That’s why we wrote this guide — to teach you about how to use Google Docs to create awesome content and collaborate with your team. We’ll also tap into some tips and tricks that will make this process even easier.
What is Google Docs?
No software downloads. No payments. No specific browser or computer necessary. Is there really any product out there these days that is this simple to obtain and use?
The answer is yes.
Google Docs is a completely free, cross-platform (syncs documents across phones, tablets, and desktops) word processor that works both online and offline. All you need is a Google account, the same free account that you use for your G Suite or Gmail.
The cloud-based tool includes a clean layout and unique features for users, such as the ability to work, share, and collaborate from anywhere. The platform even automatically syncs and saves all of your work, so you don’t even have to worry about pressing Save.
With these features, it’s clear why millions of users prefer Google Docs over other word processors.
Google Docs vs. Microsoft Word
Let’s not forget about Microsoft Word, however. Microsoft Word been around longer than Google Docs and remains exceptionally popular today. Millions of individual users and companies still pay big money to use Word. So, how do Google Docs and Word compare?
For one, Google Docs is free with a Google account. Microsoft Word must be purchased as part of a Microsoft Office package, which includes other Microsoft products such as PowerPoint, Excel, and Outlook.
The Home and Business packages run from $69.99 (for an individual user at home) up to $150 (for an individual user at work) for an annual membership. Google Docs, on the other hand, allows you to collaborate with any number of people, anywhere in the world, for free.
Another differentiating factor is that, with Google Docs, all of your work is saved to the Cloud. That means you won’t lose your 20-page report … even if your laptop croaks. (Whew!) With Microsoft Word, your documents live on your computer; your coworkers can’t check them out unless you save and share them via email or the like.
Whether you choose Google Docs or Microsoft Word, it’s not difficult to sync the two. You can create a new Google Doc by simply uploading an existing Word file. Here’s how.
Open your Google Drive and click New.
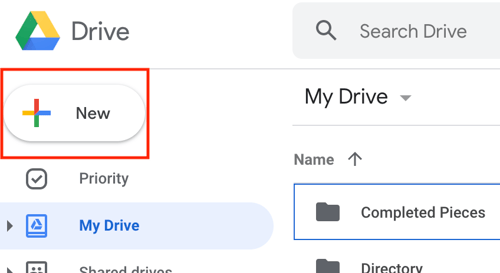
Tap File upload to access the files saved on your computer.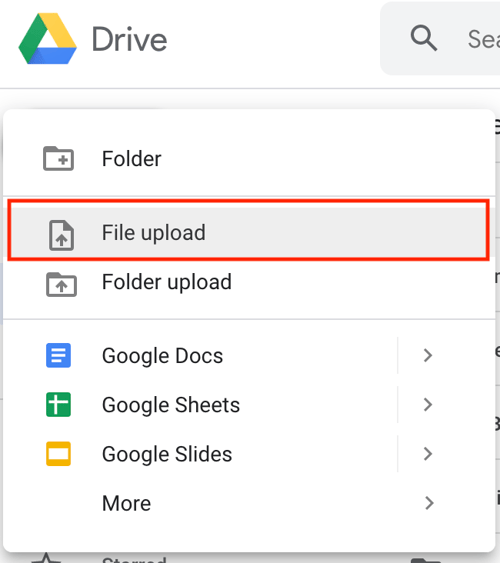
Choose your Word file from your computer and click Open. This will upload your file to your Google Drive. Once uploaded, double-click it to open. Once open, click Google Docs from the drop-down menu at the top.
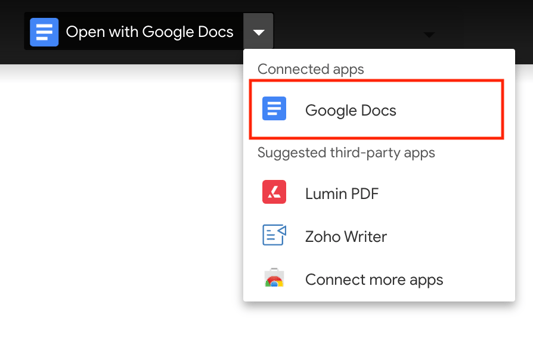
Voila! That’s how you convert a Word doc to a Google Docs file. Now, let’s dig a bit deeper on how to use Google Docs.
There are a plethora of tips and tricks that users can take advantage of while using Google Docs — whether working as an individual or with a team.
Google Docs allows multiple people to work, collaborate, and edit within a single document in real-time through any web browser. Here’s how.
Sharing Your Google Doc
Individuals can share their document with as many people as they want, as well as edit their permissions to limit what they can do.
To get started sharing, click File > Share.
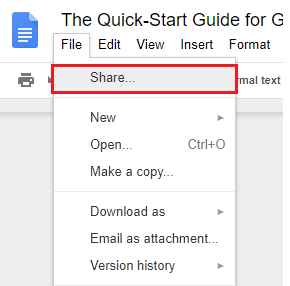
There are four sharing options — the one you pick is totally your choice.
1. Create a shareable link.
The simplest way to share a Google Docs page is to generate a shareable link. This allows anyone to click a unique URL and view your document.
After clicking Share, tap the Get Shareable Link button in the top right corner.
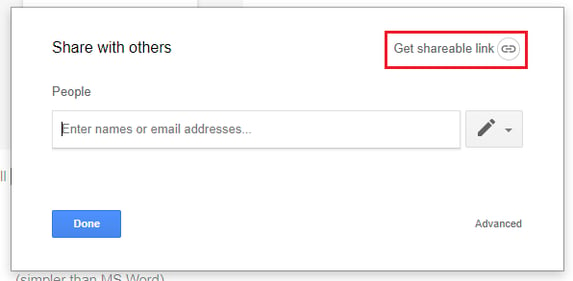
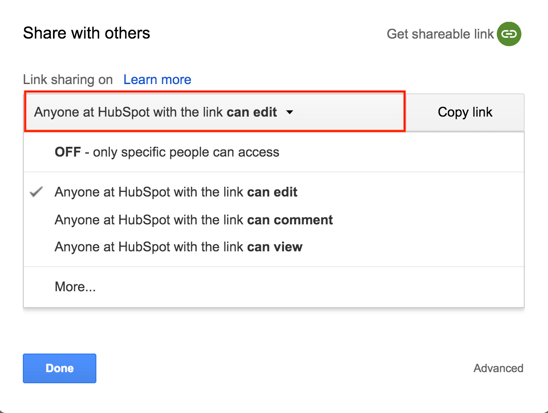
Select a sharing permission for your document.
 After defining permissions, press Copy link.
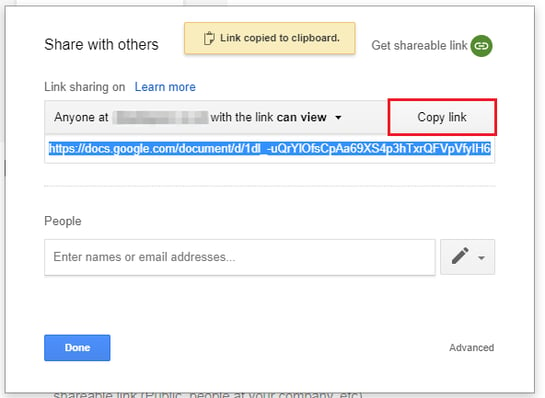
The URL will then be copied to your clipboard for you to send to anyone who wishes to view the document.
2. Share via email address.
You also have the option to share your document with an email address. This will send an invite to that person’s inbox, and add the document to their Google account.
To do this, head back to the sharing box.
Enter the email address of the person you’d like to share your document with and select an option from the drop-down to edit their permissions.
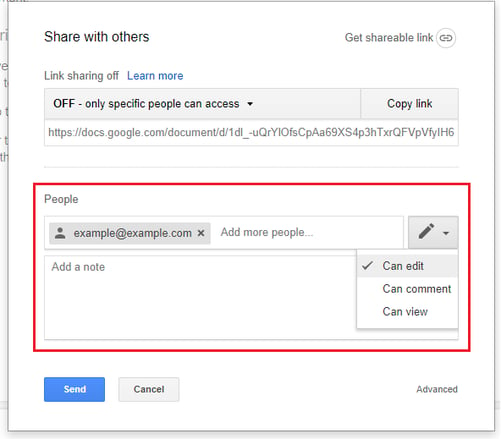
If you add a note to this invite, it will be displayed in the email invitation.
3. Choose the advanced sharing options.
Head back to your sharing box and hit Advanced.
Here, you can see all sharing settings — including who has access to your document, their permission settings, and the option to invite more people or remove others.
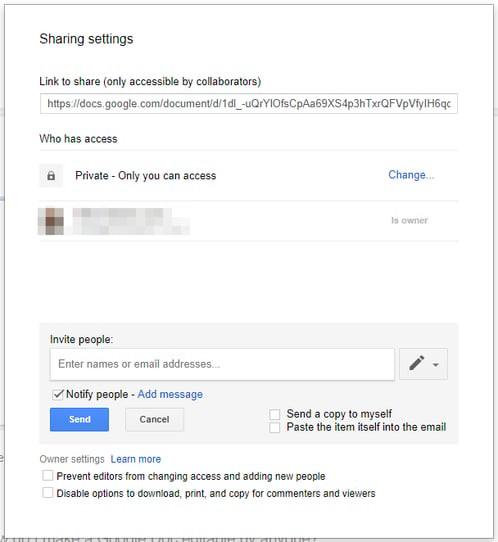
4. Make your document editable by anyone.
Want to grant anyone permission to edit the contents of your document? Hit File > Share to get your shareable link.
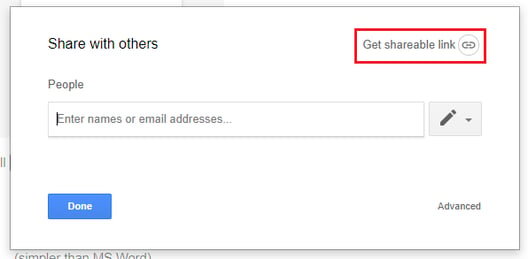
In the drop-down menu displayed, click More…
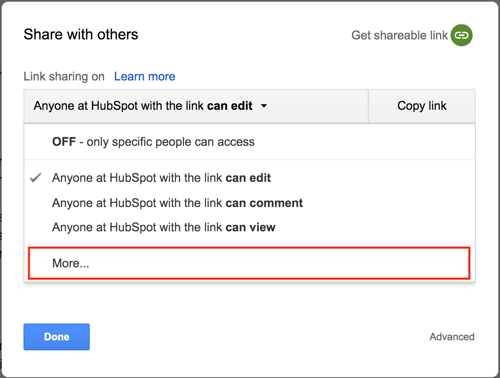
After that, choose On — Anyone with the link and set the permissions in the bottom drop-down menu.
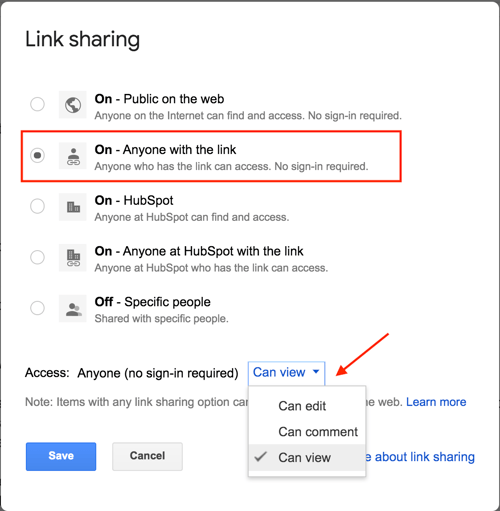
As this option clearly states, anyone with your unique URL will be able to make changes, edit, and even delete your document … so be careful about who you’re sharing it with.
Using Google Docs Shortcut Keys
There are a number of shortcut keys to help increase your productivity while working in Google Docs. Review the following chart to learn some of the most popular shortcuts.
| actions | mac shortcuts | pc shortcuts |
| Copy | ⌘ + c | Ctrl + c |
| Paste | ⌘ + v | Ctrl + v |
| Cut | ⌘ + x | Ctrl + x |
| Paste without formatting | ⌘ + Shift + v | Ctrl + Shift + v |
| Undo | ⌘ + z | Ctrl + z |
| Redo | ⌘ + Shift + z | Ctrl + Shift + z |
| Insert/edit link | ⌘ + k | Ctrl + k |
| Open link | Option + Enter | Alt + Enter |
| Show common keyboard shortcuts | ⌘ + / | Ctrl + / |
| Save (Google Drive automatically saves to Drive) | ⌘ + s | Ctrl + s |
| ⌘ + p | Ctrl + p | |
| Open | ⌘ + o | Ctrl + o |
| Find | ⌘ + f | Ctrl + f |
| Insert page break | ⌘ + Enter | Ctrl + Enter |
| Hide menus (compact mode) | Ctrl + Shift + f | Ctrl + Shift + f |
For a complete list of Mac, PC, Android, iPhone, and iPad shortcut keys, check out this page.
Creating and Writing in Google Docs
Which Google Docs features will help you and your team create powerful documents, no matter your location? Here are some options for you to try.
Work Offline
A bonus to using Google Docs is that you’re able to edit, save, and create documents through your web browser even when you’re not connected to the internet. This might come in handy if you need to get some work done while traveling. The changes you make are still saved and will sync when you go back online.
But, this isn’t an automatic feature. You’ll need to set-up offline connections in your account.
To do this, visit the Google Docs homepage and locate the menu button on the left-hand side.
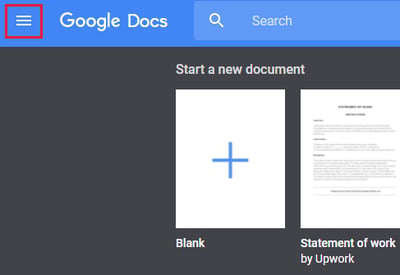
Then press Settings.
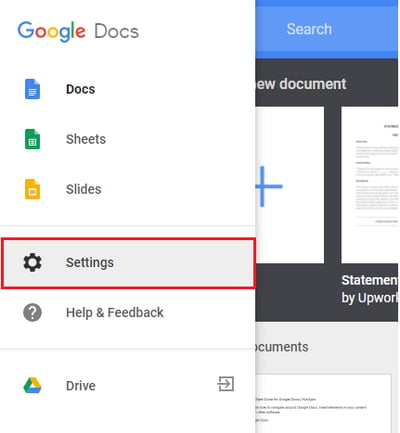
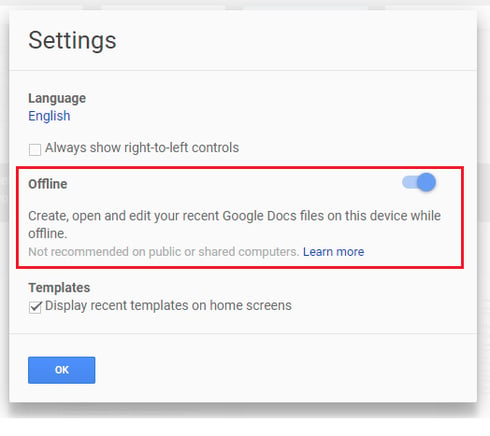
A pop-up box will then be visible on your screen. To set up offline editing, toggle the Offline button to On. (This should turn the button blue, rather than gray.)
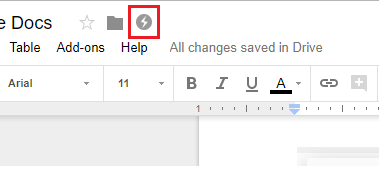
Your browser will then adjust to offline editing and you’ll see the following icon when editing your document without internet.
Voice Typing
Voice technology is a growing industry, and Google has been at the forefront of this trend. You can speed up your writing process by using voice typing in Google Docs.
To use the feature, begin by checking your device settings to confirm that your microphone works.
Then head to Tools > Voice Typing. You’ll see a microphone icon.
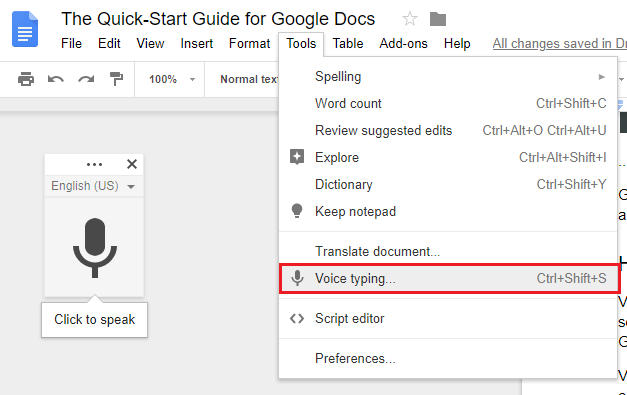
Click it and start speaking. Google will convert your spoken words into text, which you’ll see appear on the page.
Google Docs App
With the Google Docs app, users can continue to edit, share, collaborate in real-time, add images, and create content all while on-the-go.
The free app even works offline once you’ve turned on that setting — the same way you did on your laptop or desktop — and it automatically saves your work to the Cloud.
Explore
Have you ever been writing about a topic and stopped to think, “Wow, I could use a suggestion or two on how to improve my piece.”
Google Docs has you covered.
The Explore feature — found by clicking Tools > Explore — Google Docs will scan the content you provide and suggest information that you could add to your piece.
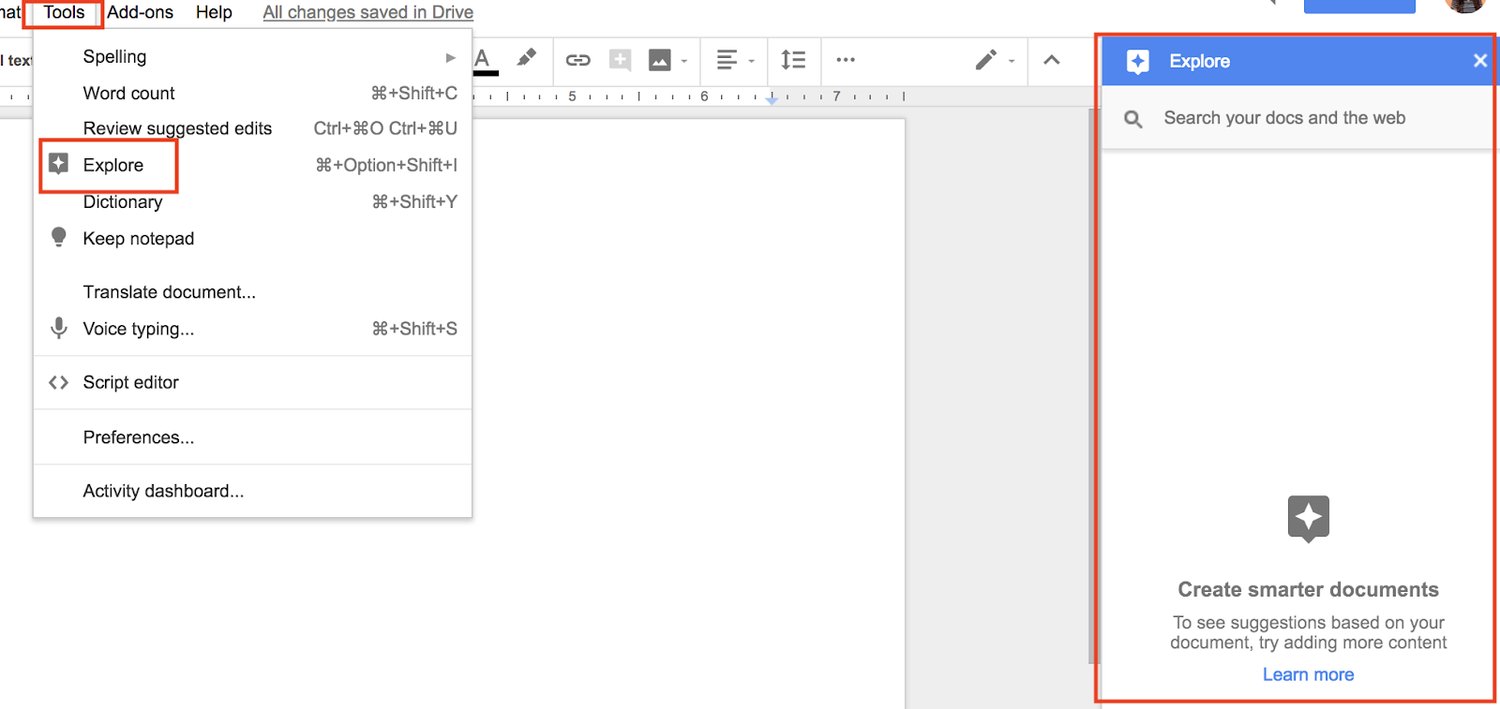
These suggestions might include details you may have forgotten, images to enhance your piece, or possible research that you could include to back your points and claims.
Formatting Your Document in Google Docs
Google Docs empowers you to create a document that works for you and the content you’re creating. Whether it’s the page orientation, images, or page numbers, these tips will help you format your document any way you want.
- Changing page margins
- Changing page orientation
- Adding a text box
- Adding page numbers
- Creating a hanging indent
- Inserting an image
- Creating a table of contents
Changing Page Margins
If you’re looking to make the most of the blank space in your document or format your document for printing, you might need to change the margins.
Before doing this, you’ll need to make sure the ruler is visible above your document.
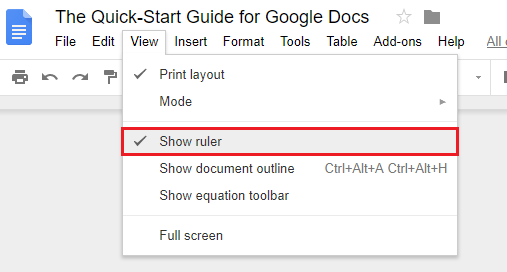
Simply head to View > Show Ruler.
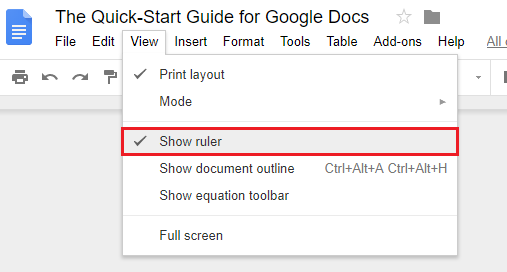
You should see a ruler below the formatting bar in your document.
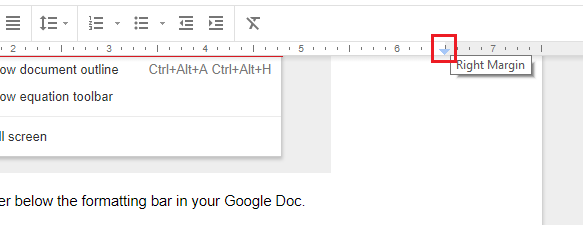
Then, to change the margins of your page, locate the small blue button on the left-hand side of the ruler and slide the button to alter your left margin.
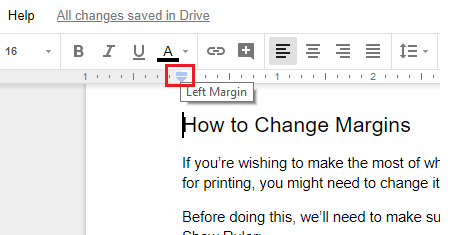
To change your right margin in Google Docs, repeat this process using the blue button on the right side of your ruler.
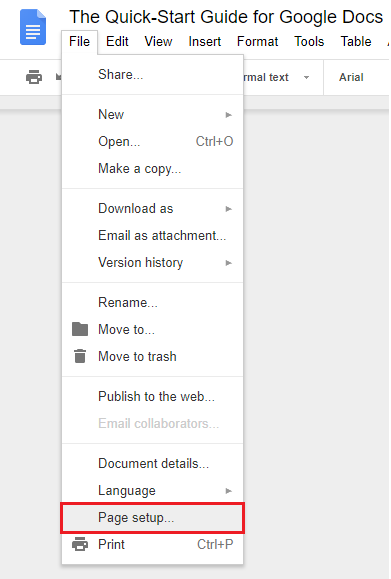
If you need strict margins in your document, click File > Page Setup.
You’ll then see the following pop-up box where you can change the margins.
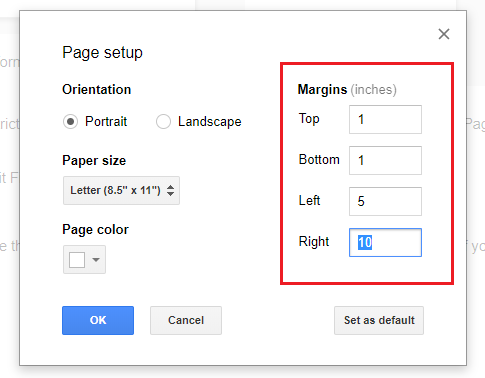
If you need the same margins in every document you create, save time and hit Set as Default. This will automatically copy your margin set-up to all new documents.
Changing Page Orientation to Landscape
Looking to change the orientation of your document? Head to File > Page Setup.
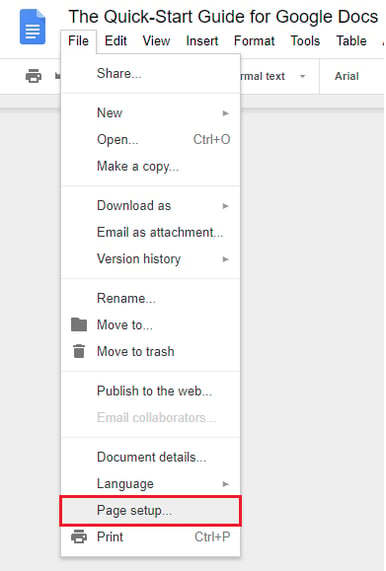
Then, select Landscape under Orientation.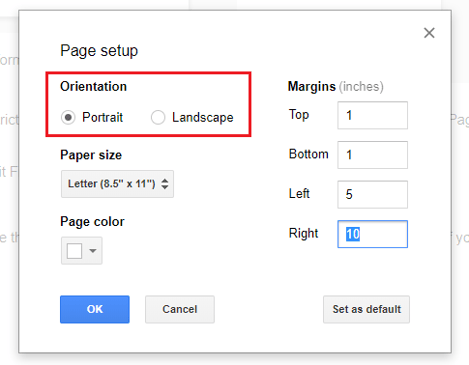
If you want all of your documents to have the same orientation, press Set as Default.
Adding a Text Box
Text boxes are a great option if you’re looking to add an extra visual element to your document. They allow you to position additional text anywhere on your page without altering the format of your existing document.
In Google Docs, text boxes are classified as drawings. You can insert one by clicking Insert > Drawing.
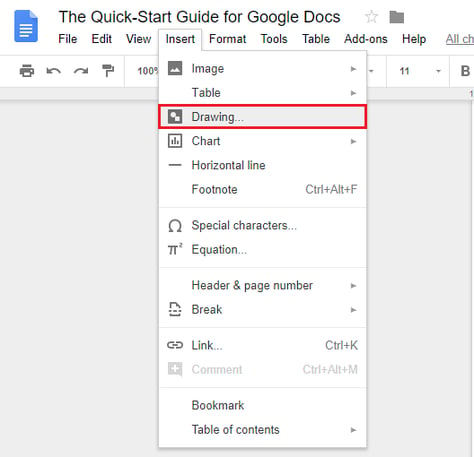
This will open the Drawing feature. Next, press Text Box.
Drag your cursor into the drawing space to create a box that fits your requirements
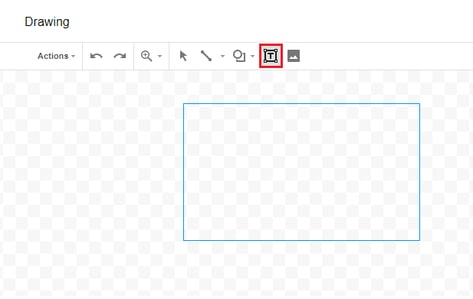
Once your box has been created, it’s time to enter your text.
You can change the font, color, and alignment of the text in your box by using the navigation bar in the pop-up window.
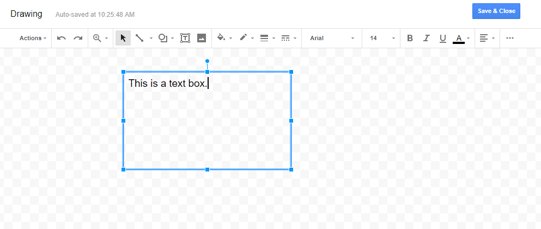
Happy with your text box? Hit Save & Close to insert it into your document.
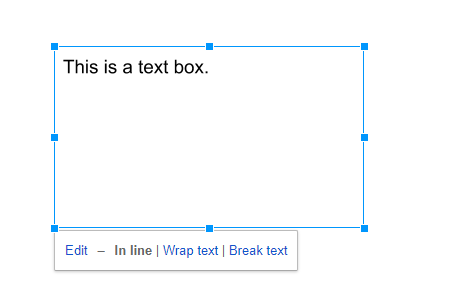
From here, treat your text box as an image. Select the image to change the alignment or move the box around your document for ideal placement.
Adding Page Numbers
Page numbers make your document easy to navigate and allow for better organization when printed — you’ll avoid asking yourself, “Does this page go here … or there?”
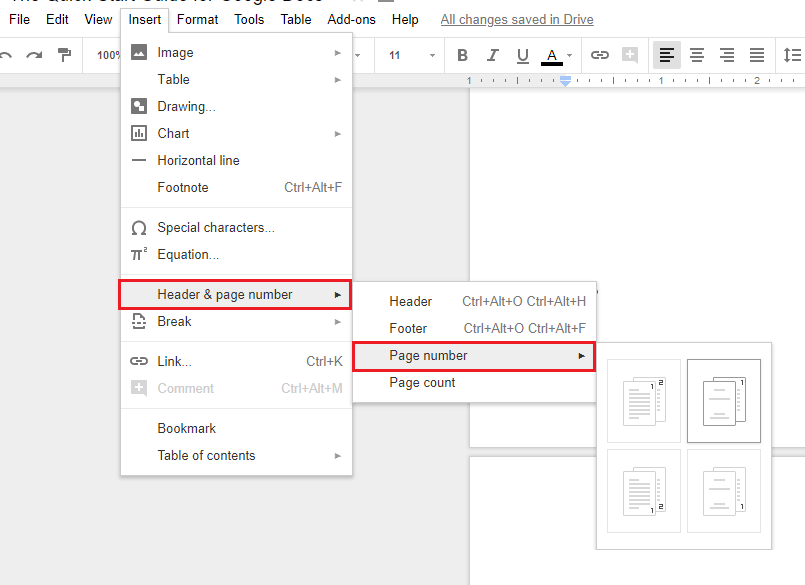
Add page numbers to your document by clicking Insert > Header > Page Number. Then choose the option of your choice.
Creating a Hanging Indent
Hanging indents are indents that automatically change the margin of a paragraph without interrupting the format used elsewhere on your page.
Here’s an example:

To add a hanging indent in Google Docs, make sure your ruler is visible by pressing View > Show Ruler.
Then, head back to your main document and highlight the text you want to format.
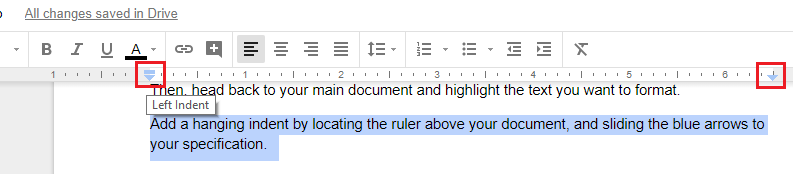
Add a hanging indent by locating the ruler above your document and sliding the blue arrows to your specification.
Slide the arrow on the left side to alter the left indent, and the arrow on the right side to change the right indent.
Inserting an Image
To add an image to your document, simply put your cursor wherever you want to insert the image.
Scroll up to the top of the page and click Insert > Image.
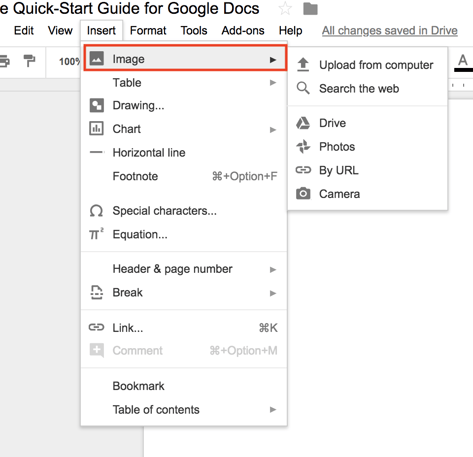
Choose the image location — there are multiple options that include your computer, the web, Google Drive, or by URL.
Select your image, click Open, and voila! Your image should appear.
For more on this process, check out this page.
Creating a Table of Contents
If you’re writing a presentation or whitepaper, a table of contents is a great way to display each section you’re creating and the page number that it can be found on.
You can insert a table of contents in your Google Doc by ensuring all subheadings are formatted with a heading tag. To do this, highlight your subheading and press the appropriate tag in your formatting bar.
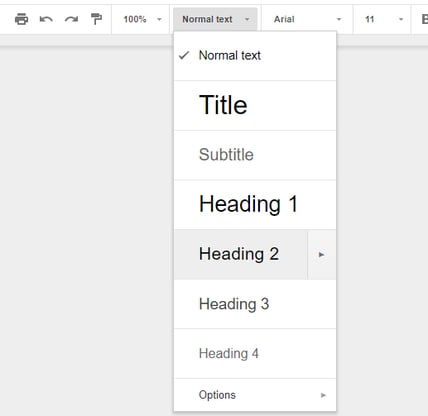
As a general rule of thumb, the Heading 1 tag should be your main title. Heading 2 tags should be subheadings, and Heading 3 tags should be sections below a subheading.
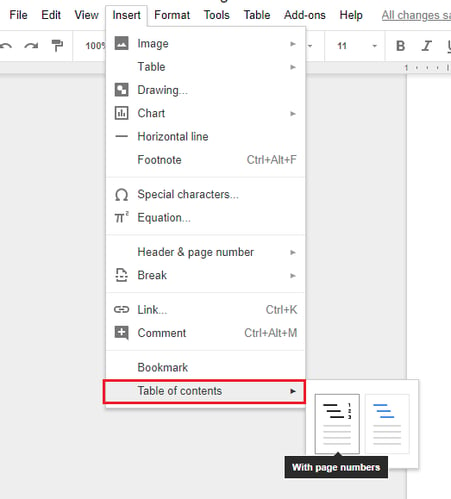
Now you’re ready to create a table of contents. Hold your cursor where you’d like to insert it and click Insert > Table of contents to choose an option based on your preference.
Editing Your Document in Google Docs
Google Docs offers a variety of editing features to ensure your work reaches full potential.
Tracking Changes
If you’re working with another person on your document, you can ask them to track their changes and edits. This will show you who made the edits, when they made those edits, and what the text was prior to their edits.
You can track changes in Google Docs by changing Editing to Suggesting in the top right-hand corner of the page.
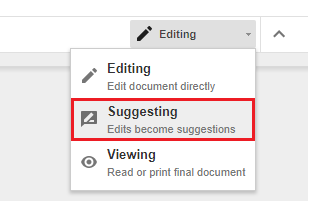
Then, when someone edits your document, any changes will show up in a different color, with a box on the right-hand side to show their name, photo, and editing details.

You can then browse the tracked changes and accept or reject them as necessary.
Adding Comments
With Google Docs, you and your team can leave comments in any document for each other to view. These are often used as reminders to come back to a specific section, leave more detailed revision ideas, or add URLs to other sites and images for reference.
To do this highlight the word, sentence, or paragraph you want to comment on and click the Add Comment button (the text box with the plus sign inside).
You can then write a comment — or paste a URL — in the comment box. Click Comment when you are ready to post your box.
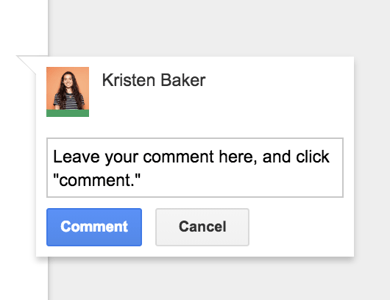
To edit the information in the box, click the three dots on the right and select Edit. You can also thread comments beneath the original comment by typing in the Reply box.
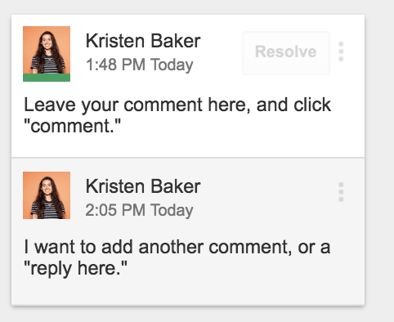
To get rid of a comment box you can either delete it or resolve the comment. Click the three dots on the right and select Delete to delete the box. Click Resolve in the top right of the box when the issue has been resolved and you no longer need the comment.
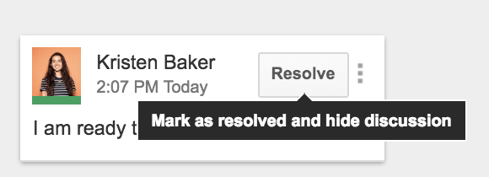
If you are looking for more in-depth information on adding and resolving comments in Google Docs, look at this page.
Finding Word Count
Have you ever struggled while writing a paper, report, or blog post because of a required word count that you were trying to reach?
Although reaching a required word count may not always be easy, Google Docs makes the count itself simple.
Once you’re in your document, click Tools > Word Count. (You can also use the shortcut ⌘ + Shift + c.)
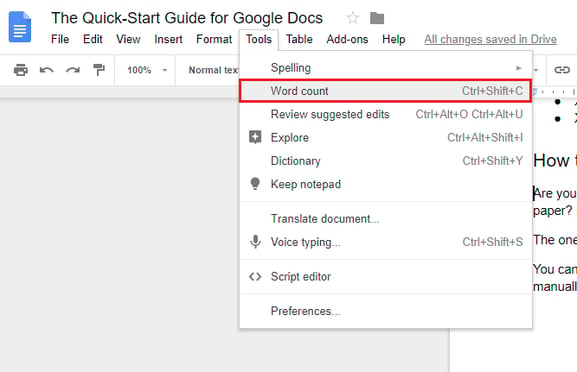
Google will then display the total number of words (along with the total number of pages, characters, and characters excluding spaces).

To count the words within a specific sentence, paragraph, or page, highlight the text you want to include and follow the same steps above.
Running Spell Check
It’s not uncommon even for professional writers to make an occasional spelling mistake. Google Docs can help all writers with this dilemma.
Run a spell check to locate and correct any errors you may have missed. Think of it as your personal proofreader or editor.
To run a spell check in Google Docs, click Tools > Spelling > Spell check.
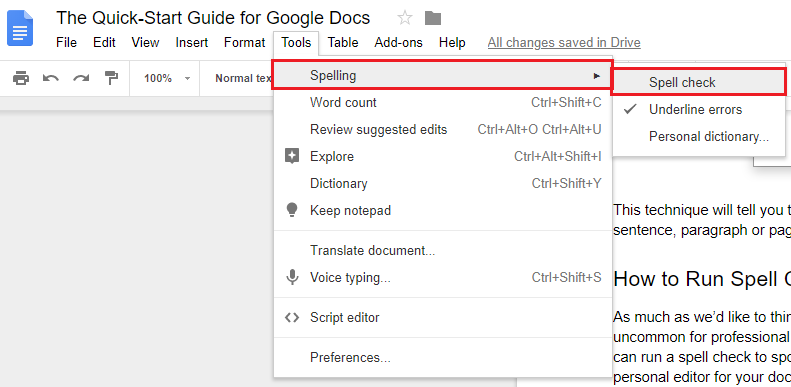
Google Docs will then scan your entire document for misspelled words and grammatical errors. You’ll be given the choice to accept or ignore Google’s suggestion.
If you find that you’re frequently using a word that Google doesn’t recognize, you can add it to your dictionary. This will prevent Google Docs from highlighting the word in future spell checks.
Adding a Strikethrough
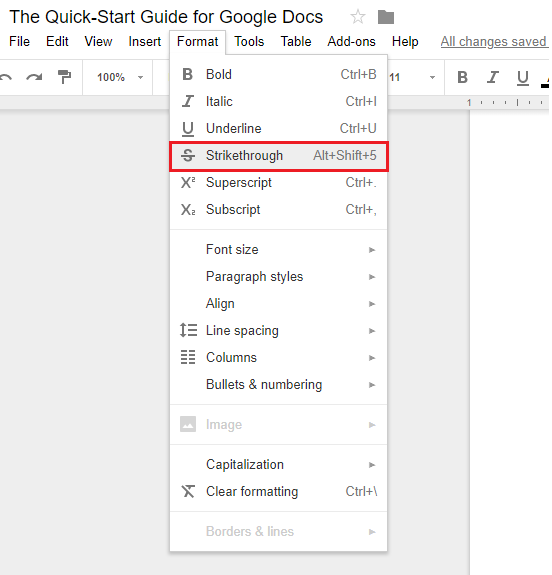
In Google Docs you can add a strikethrough by highlighting the text you want to strike and clicking Format > Strikethrough.
Using Google Docs Add-Ons
You can add third-party tools, or add-ons, to your documents. These add-ons contain unique features to help you improve your work in various ways.
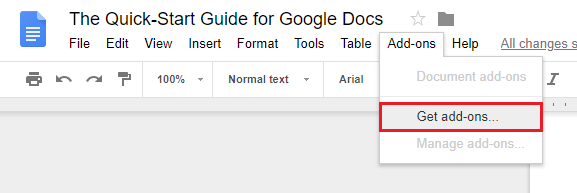
You can find these add-ons by clicking Add-ons > Get add-ons…
Here are a few popular add-ons you may find helpful.
Google Keep
Writing a document that needs supporting data? Install Google Keep to your browser to collect notes, case studies, and references you’re planning to cite. Then, use the add-on to pull them in as needed. You can also edit the notes you’ve saved with Google Keep.
Extensis Fonts
Consistent branding is important, but that can be tricky when you’re using unique fonts. The Extensis Fonts add-on imports thousands of fonts from the Google Fonts library into your document to enhance your piece’s overall aesthetic.
HelloSign
Writing a contract, agreement, or any other paperwork that requires a signature? The HelloSign add-on will help you collect electronic signatures in an easy and secure way.
Translate
Need a translator? Install the Translate add-on to easily translate your content into another language.
Lucidchart
The Lucidchart add-on allows you to add unique diagrams to your document that are easy to design and edit. It’s perfect for anyone working with data or looking for a fun way to display information.
Language Tool
Language Tool makes proofreading easy in over 20 languages. You won’t have to wonder about your spelling or grammar anymore. This add-on catches errors and mistakes no matter the language.
EasyBib
EasyBib is an automatic bibliography generator with over 7,000+ style options, including MLA, APA, and, Harvard-style.
Using Google Sheets and Google Forms with Google Docs
With Google Docs, it’s easy to integrate with other useful tools such as Google Sheets and Google Forms. If you create a spreadsheet or chart in Google Sheets, you can insert that information directly into Google Docs.
With Google Forms, you can create surveys that are automatically saved to your Google Drive for easy access and review from Google Docs.
Google Sheets
Google Sheets is a great option for anyone who needs to build any type of chart, list, plan, or spreadsheet. It is a spreadsheet generator — similar to Excel — and it’s free.
Once you’ve opened Google Sheets and created your chart, you can easily insert it into your document.
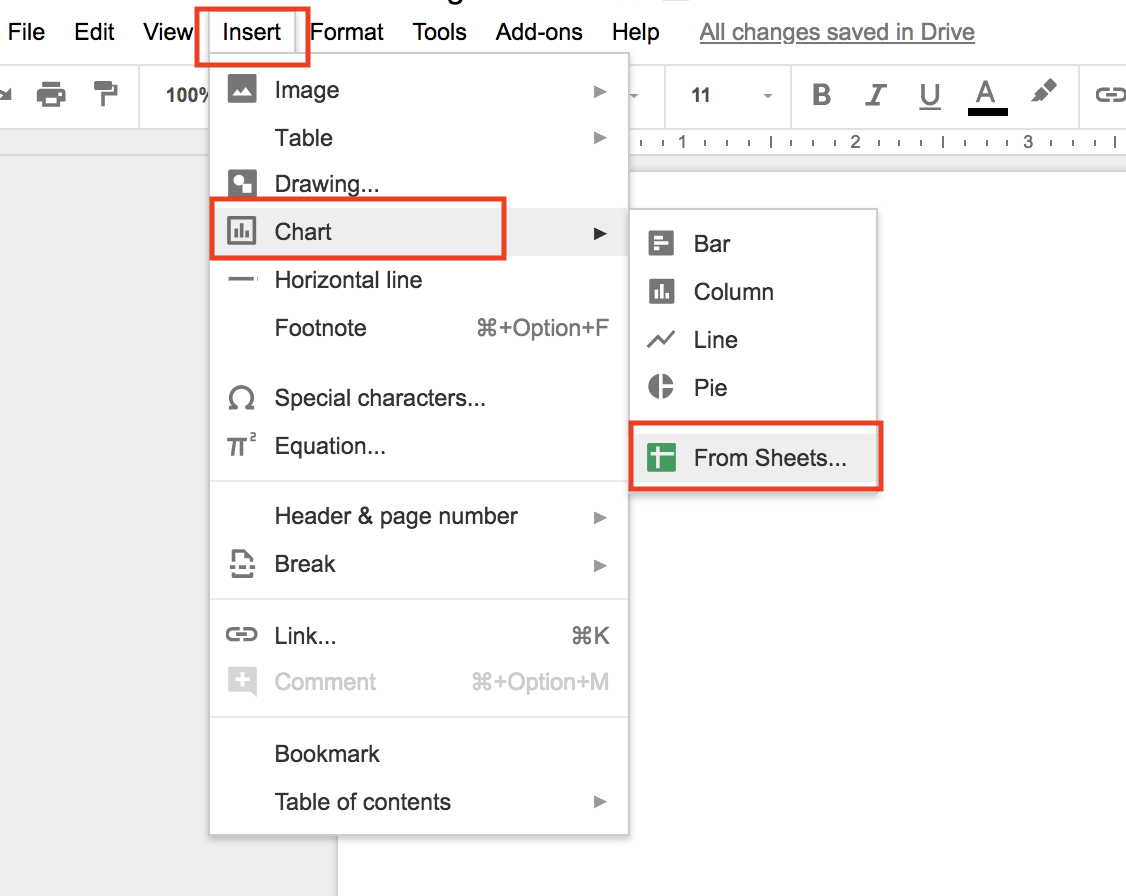
Do this by heading up to the toolbar and clicking Insert > Chart > From Sheets. You should be able to view and select the chart you want to add to your document.
Google Forms
Google Forms is a great way to collect information and survey responses. Just go to the Google Forms site and begin creating your form or survey in a matter of seconds.
You and your team can collaborate and select a template from Google’s gallery — or create a unique template from scratch to style it to your taste.
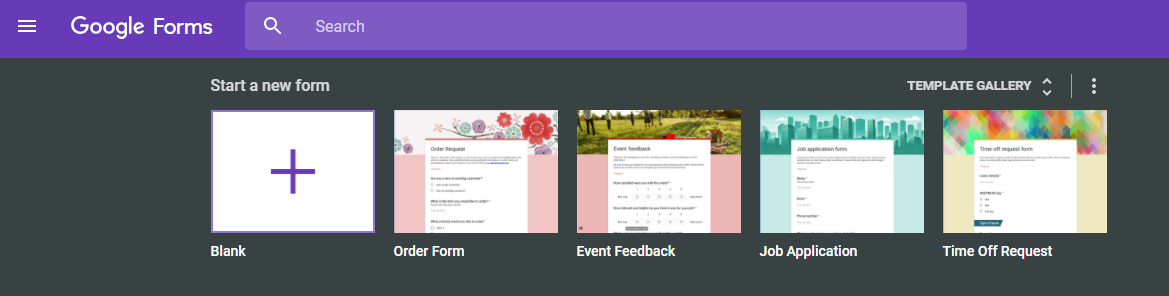
Google Forms is also free to use and can integrate with software like Asana and HubSpot.
Additionally, all of your Google Forms documents and responses are automatically saved to your Google Drive so you can easily access them while in your Google Docs page.
To do this, click on the Apps icon when you open Google Docs. Scroll down to Forms to find the form or survey you want to open.
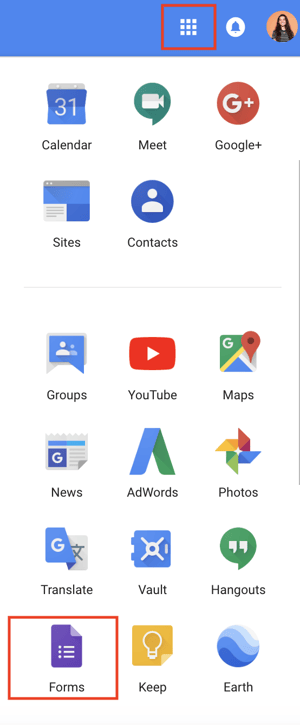
One last feature to note is that the people responding to your form or survey can do so on any type of device, making Google Forms a convenient option for everyone.
Get Started with Google Docs
Congratulations! You’re now a Google Docs pro. Whether you’re a marketer or CEO, these tips will allow you to take advantage of Google’s software and create incredible documents of any kind, no matter your professional background.
Google Docs gives you the ability to share your work with as many people as you want, whenever you want, making it a great tool for collaborative teams. It also keeps your life simple by automatically saving any changes to your document to the Cloud … meaning no more stress about losing your work. Lastly, you can work on your documents from anywhere — whether or not you have internet.
With all of these features, you can see why so many people have jumped on the Google Docs bandwagon. Plus, it’s free! Why not give it a try?

Magical Words That Sell: How to Build Trust in Your Marketing
Do your marketing messages make you trustworthy? Are you using the right words and phrases? To explore how words can build trust with customers, I interview Marcus Sheridan on the Social Media Marketing Podcast. Marcus is a renowned keynote speaker and the author of They Ask, You Answer. He also runs a digital sales and […]
The post Magical Words That Sell: How to Build Trust in Your Marketing appeared first on Social Media Marketing | Social Media Examiner.
from Social Media Marketing | Social Media Examiner https://ift.tt/2OzAyAT
via socialmediaexaminer
Social Media Impressions vs. Reach: What’s More Important?
Let’s talk about social media metrics.
When counting engagement, there are two terms you should know: reach and impressions.
Reach is used to define who sees content. It’s the total number of people who see a tweet you make, an Instagram story you post, or a Facebook event page.
Let’s say you have an ad that was displayed 500 times on social media pages. If 200 people clicked on your ad, your reach would be 200.
Impressions are the total number of times social media browsers have been showed your content. Impressions are different than reach because it doesn’t count people who click or engage with your content, just those who are exposed to it.
If your ad was displayed 500 times on social media, your impressions would be 500.
While both metrics are pretty similar, there are a few key patterns to note. In most cases, impressions will be higher than reach. This is because impressions count exposure, and reach counts interaction. Impressions, then, can oftentimes be close to the number of followers your accounts have.
Easy enough to understand, right? Impressions count exposure, reach counts clicks. Even though these two terms are pretty cut and dry, different social media sites have their own rules for how they count impressions and reach, and if you want to measure one over the other, it’s important to know what you’re looking at.
First up: Facebook.
Facebook Impressions
Facebook for Business defines impressions as “the number of times your ads were on screen,” and goes on to explain what they measure.
Facebook impressions break down like this: If I see an ad on Facebook, or scroll past an ad initially but change my mind and scroll back up to it, that counts as one impression. If I check Facebook again within 24 hours and scroll by the same ad again, that is counted as two impressions.
This differs from industry standards for ads. Generally, if an ad appears on a user’s timeline, it’s an impression. Facebook gets a little more specific. Further, impressions are counted the same way for video and image ads.
What that means is that a video doesn’t need to be played in order to be counted as an impression. To see if users have viewed the content you post, look under the “Viewed Impressions” section of Facebook for Business.
Now that you know about Facebook impressions and reach, let’s go over the impressions for other social media apps.
As stated before, different apps count impressions and reach in their own way. If you’re using a social media analytics tool to keep track of your metrics, be cogniscent of the small changes from app to app. This will improve your analysis of your results reports.
The way impressions are counted for each app relates to the main function of the apps, or how they work.
I love how Twitter gives you analytics for free. If you’re already logged in, results are presented immediately. Anytime a user sees a tweet you’ve made, you’ve earned an impression.
Threads own individual impressions. If an initial tweet earns 400 impressions, and a reply to that tweet earns 200, your total impressions for that thread are 600. Those are all presented on the site.
If you click on the “Tweets” tab on the site, you can see a bar graph of your impressions. Note that reach isn’t a trackable metric. Below is a screenshot of my Twitter analytics.
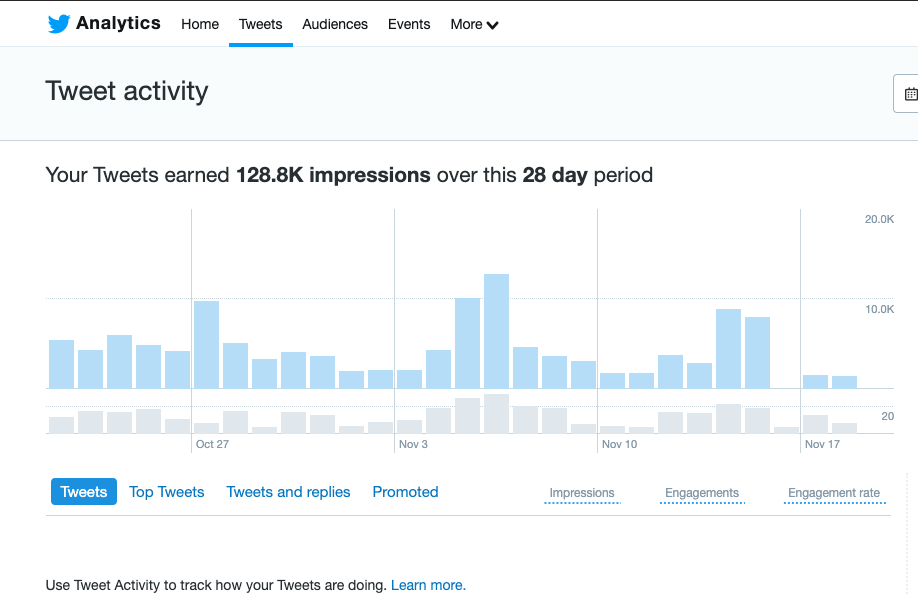
By hovering over any bar in the graph, you will see the number of tweets you’ve created and the number of organic impressions you’ve earned. Twitter counts engagement — clicks that happen on a tweet — and are presented in a line graph on the same page.
Reach and impressions on Instagram are separate entities and are defined that way. Instagram impressions are earned from the number of times a user sees a story, IGTV video, or post. Reach is defined by the number of unique users that interact with your posts.
“Unique” in this case means a mix of followers and people who your content is surfaced to based on common interests. For instance, because I like and follow posts from women-owned businesses, my timeline is populated with suggestions of women-owned businesses. I am a unique user in that category.
Social media metric apps, like Sprout Social, calculate Instagram impressions, pictured below.
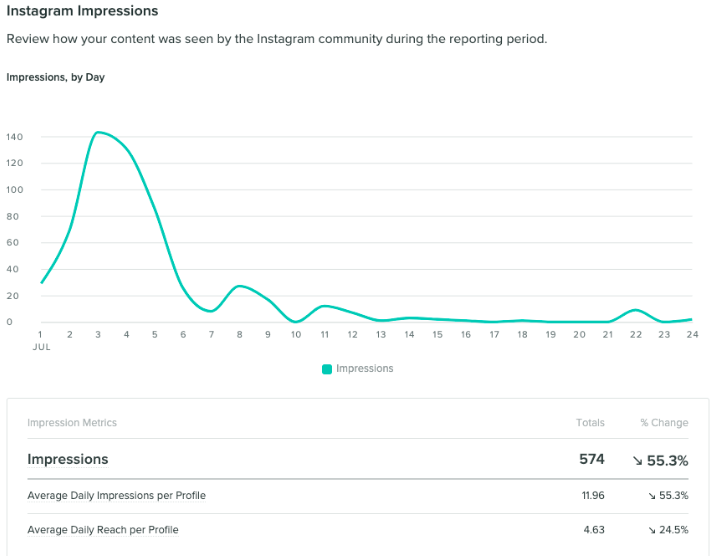
style=”font-family: ‘times new roman’, times; font-style: italic;”>Image Source
If impressions are higher than reach, it’s likely that your followers or audience are looking at your posts multiple times, say, every couple of times they open the app.
Which is more important?
When deciding which metric is more important to track, think about your business goals. While both metrics are valuable, if ads are something you want to pay super close attention to, close in on impressions. This is because all of your promoted and sponsored content is measured by the number of people seeing your ad.
For instance, if you pay for a promoted tweet on Twitter, the site will give you those numbers in your analytics report. This is also an indicator that Twitter and Facebook might be the apps for you to focus on, because they’re driven by impressions.
If raising brand awareness and engagement is your main priority, reach might be the metric you want to focus on the most. These numbers provide a weather report of how many leads you are gaining by providing the details of how many are interacting with your brand. Instagram might be your home base for that.
Tracking engagement is an important way to figure out total ROI with your business accounts. When in doubt, impressions and reach are key metrics to focus on, giving you numbers about leads and who is seeing posts.
For more tips on social media analytics, check out 9 essentials you should be tracking here.

23 Witty Grammar Jokes & Puns to Satisfy Your Inner Grammar Nerd
Have you ever cringed at a “Got Milk?” ad? Feel a strange sense of pride when you find a typo in a reputable book? Did you secretly (or not-so-secretly) love making syntax trees in school?
Then you might just love these grammar jokes as much as we do. Here are a few of our favorites — share yours with us in the comment section!
(Note: A few of them could be considered inappropriate in some work environments … )
Download our free writing style guide to learn how to eliminate grammar mistakes from your writing.
23 Humorous Grammar Jokes & Puns
1. The streets were oddly desserted that night.


2. The Case of the High Apostrophe Intelligence
#Funny pic.twitter.com/uUbW7Kvrp6
— Grammarly (@Grammarly)
November 29, 2014
3. The past, the present, and the future walked into a bar.


4. I’ll never date another apostrophe.


5. Correct grammar makes me sound dry.


6. 10 Items or Fewer


Image from Bakersfield College Writing Center
7. Knowing Your Sh*t vs. Knowing You’re Sh*T


8. Squids, Not Squad


9. The door is alarmed.
“This door is alarmed!” #funny pic.twitter.com/LqP9gJVhos
— Grammarly (@Grammarly)
December 7, 2014
10. A Tense Situation


11. Name two pronouns.


12. Stop clubbing.


13. We better just stop right now.


14. What do you call Santa’s elves?


15. Let’s eat Grandma!


16. When English Majors Marry


17. When Grammarians Grill


18. Eye Before Flea
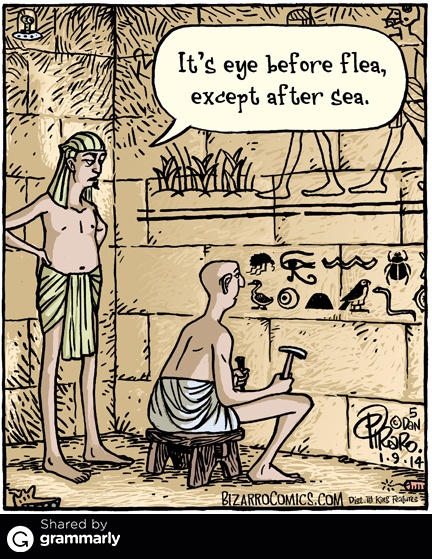

19. Blade named Sting


20. Dork is the preferred nomenclature.


21. To Funny


22. That’s a classy owl.


23. Ancient Grammar Police


Want to learn more about grammar mistakes? Check out 20 of the Worst Typos, Grammatical Errors & Spelling Mistakes We’ve Ever Seen.
Editor’s Note: This post was originally published in December 2014 and was updated in November 2019 for accuracy and comprehensiveness.


5 Ways Visual Search Will Change the Way You Market
Hubspot’s recent List of Marketing Statistics for 2019 identified an unmistakable trend — the importance of visual content on social media.
One of the highlighted studies found that the average person has the ability to recall 65% of the visual content they see almost three days later.
Given that the average person sees about 5,000 ads per day, that level of picture recollection is incredibly impressive, and should be a wake-up call to marketers everywhere.
Visualization is certainly vital to social media marketing, but it’s equally critical for every touchpoint in the customer journey. This is especially true for the product discovery process, where customers are developing a growing impatience for wading through irrelevant searches.
This is why visual search technology has become so important.
Visual search is expected to have a huge impact on ecommerce marketing, not only by transforming the way customers shop for visual products online, but also for the way it will increase customer experience expectations. In this article, I will explain visual search technology, how it works, and why it will impact your marketing team in the future.
What Exactly is Visual Search?
Visual search is an artificial intelligence technology that allows users to conduct an internet search using a picture, rather than keywords.
This is different than conducting an “Image Search”, in which the user types a text-based query into Google, clicks on the “Images” tab, and scrolls through pictures which the search engine has compiled as the best visual matches.
Instead, a visual search actually starts with a picture and uses deep neural networks to decipher what is in it, taking into account shape, color, and size. The user is then served with the exact object or place being searched, or whatever is most similar to it.
Unsurprisingly, visual search works best in visual mediums. If you’re searching for the right college to go to, which tax guy to use, or what type of editing software to buy, visual search is unlikely to help. However, if you are looking for the right style of home décor, a dress for a special event, or data on a location you’ve found yourself in, visual search is the most efficient tool you can use.
Remember that 90 percent of the information received by our brain is visual. Sometimes words fail us when we’re trying to accurately describe something we see. That is why visual search is so powerful, and why the world’s biggest enterprises are investing in it.
Who is Using Visual Search?
A quick (text-based!) Google search will show you that quite a few high-profile companies are using visual search and talking about it a lot. The most major one is Google itself.
Over the last couple of years, Google has rolled out visual search capabilities which it calls “Google Lens,” which can perform an array of mind-blowing actions that integrate technology even more seamlessly into your everyday life.
For example, say you’re exploring a new city and come across a restaurant you might want to try. You can’t clearly see the name or address of this place from across the street, so you simply scan a picture of it into Google Lens. Within seconds, you are served its name, address, menu, Yelp ratings, reviews, and even alerts if friends of yours have eaten here before.

Besides Google, there’s also Pinterest, whose visual search is on the verge of transforming online advertising as we know it.
Pinterest is a visual business, so visual search was a no-brainer for their product roadmap. With their technology, users can snap a picture of an outfit they like, upload it to a Pinterest visual search, browse all similar styles, and instantly buy from those retailer sites.
Pinterest is also working on technology that allows you to build upon the outfits you create. For example, if you buy a pair of shoes, visual search can be used to find an outfit to match.
It is predicted that soon, visual search will become the crux of Pinterest’s offering to advertisers.
Companies like Pinterest have been able to provide this technology as a core part of their business. Retailer brands also want to get in on the action directly.
For example, at my company Syte, we developed a Visual AI technology trained specifically for fashion and home décor. Companies like Tommy Hilfiger, Farfetch, and other global brands are using our Visual AI to improve their on-site customer experience.
Through working with these brands, we have found that retail customers are often looking for inspiration, meaning they visit the site of the brands they love with an image of a look that inspires them. They are not necessarily looking for an exact match — they use the image as a starting point.
Fashion and home décor are both natural applications for visual search, but many other industries are using it — including home improvement and real estate.
However, even if you don’t work in a visual industry, visual search will still impact the way you market, specifically in the following five ways.
5 Ways Visual Search Will Change the Way You Market
1. Raising digital transformation expectations.
Think back to the best digital experience you’ve ever had. Maybe you were shopping on an ecommerce site and found a great product for an incredible price and paid using your thumbprint.
Alternatively, perhaps you checked into your hotel room online, bypassed the concierge, and used your phone as a digital key.
Whatever it was, you remember it. And now you compare every business’ digital experience to it. That is exactly what visual search is going to do for your business, whether you use it or not.
It is astounding how quickly customer expectations change, isn’t it?
Today, visitors expect to be able to find products using images. According to Accenture, 69% percent of young shoppers prefer to purchase based on visual-oriented searches.
The main reason for this is that visual search allows customers to find exactly what they are looking for
five times faster than text-based searches.
For example, in a study we conducted we found that customers using a text-base search took two minutes, 37 seconds to find the right style of dress, whereas those using visual search discovered the right product within 27 seconds.
This experience supports the trend of growing customer impatience and caters to it. Soon, this level of speed will become the norm across numerous industries.
2. Social influencer optimization.
Today, the use of influencers within the retail industry is prevalent. In fact, according to Retail Dive, 91% of luxury brands reported using influencers, followed by activewear at 84%, and beauty brands at 83%.
But influencers have not yet reached their full potential — and visual search can help.
At the moment, social influencers tend to post about a specific piece they are wearing and prompt users to buy that single piece on the retailers site.
Visual search can prompt customers to buy more from the retailer in two new ways.
First, visual search can scan the picture of the influencer and tag the pieces of her outfit by type. Users can then search each piece of the outfit to get the full look.
To put it simply, you could invest in influencer marketing to sell one piece to a customer, priced at $60. Or you could make her whole outfit shoppable and sell $250 worth of products.
Secondly, users may like the outfit she’s wearing, but want other similar options. Visual search can allow them to search in the same genre of outfits, opening customers to a much wider array of buying options.
3. The rise of shoppable content.
Reflect for a second on the archaic act of buying ad space in the hard copy of a magazine. You ask the salesperson how many people will see this ad and they respond with how many copies they sell or distribute, but they can’t exactly be sure.
This seems ridiculous in a landscape in which we can buy an online ad and accurately track how many visitors saw it, clicked on it, and purchased a product as a result the ad.
Ten years ago, companies spent millions of dollars on physical ads they couldn’t truly track, but marketers got wise and found a way to get a better ROI. And history is about to repeat itself.
Today, companies are pouring millions of dollars into content marketing, without a great way of understanding the true ROI. Sure, you can track how many people viewed the webpage, how long they stayed on it, and what page they clicked on next – but unless it converted into a sale, how can you track the value of your content?
This is why all content needs to be shoppable.
By embedding elegant images into the content that direct users to the products they want to buy, your content literally comes to life. Ultimately, visual search will help your team see the true impact of the content you produce.
4. The impact on SEO.
SEO is painstaking work, mostly because of all the tagging. Visual search helps marketers work smarter, not harder, on their optimization.
The technology features deep tagging, an image-to-text feature that tags images automatically and makes them interpretable for search engines like Google, as well as textual search engines on websites. Deep tagging can create a rich set of tags for an image within just a few milliseconds.
This makes textual search much more robust.
Up until now, search engines were not able to decipher what actually appeared in an image, and needed real people to create tags for every image. This was limiting in a lot of ways.
For one, different people can write different tags for the same image. Additionally, because manual tagging is laborious, it’s easy for marketers to only write what they feel are the most important tags and forego the elaborate tags.
Using the power of visual search, your images are now SEO-ready, can be interpreted by textual search engines, and most importantly, can be discovered by customers easily.
5. Giving customers what they didn’t know they want.
When talking about his invention of the car, Henry Ford famously said “If I had asked people what they wanted, they would have said faster horses.”
This quote, while over a hundred years old, has never been more relevant than in today’s innovative landscape.
As mentioned earlier in this piece, customers are using visual search because they are looking for inspiration. This means they want to be told what they want. Doing so comes in the form of truly analyzing what customers are searching for and using AI to serve up the most similar products — or even complementary ones.
This scenario beautifully sums up the future of marketing. As Jeff Bezos said, “Customers are divinely discontent.” As marketers, we have to continue to cater to their evolving desires through creative sources.
Like all meaningful innovations, visual search will have an impact that goes well beyond what it was originally designed to do. Whether or not visual search is right for your marketing roadmap, I hope that these insights about the technology will inspire you to use more visual, shoppable content in your customer journey — and continue to perfect and re-perfect your customer experience.

How to Write an Ecommerce Business Plan [Examples & Template]
You know the feeling of having a great idea, a brilliant view of how it’ll work, but no idea of where to begin to execute it?
If you have a promising idea for an online ecommerce business, that’s great. But it’s important to know how you’ll transform your idea into reality. That’s what business plans are for.
An ecommerce business plan is especially important, with an increasing number of shoppers conducting their business online. It’s estimated this number has reached 1.92 billion. Having an ecommerce business plan keeps you organized and is useful when seeking investors who need to understand your company.
So, let’s dive into some examples of ecommerce business plans and what goes into writing one using our free template.
Ecommerce Business Plan Examples
1. Maple Ecommerce Plan
This sample plan, provided on LinkedIn, is for a fictional company called Maple, an online store that sells exclusive Apple products. Maple’s sample plan is great because it provides easy-to-follow charts and graphics while highlighting the most important information. For example, their market analysis included a SWOT plan for the business.
Outlining the strengths, weaknesses, threats, and opportunities of Maple in this format is easy for potential investors to follow. Notating each value with a letter keeps the format consistent, which is carried throughout the plan. For businesses that find their information is best presented in graphics, Maple is a good plan to follow.
2. Nature’s Candy Ecommerce Plan
Nature’s Candy is an online retailer that provides nutritional supplements. Their business plan is available online and is helpful in seeing how businesses go from planning to execution. Below is a preview of their plan, in the financial forecasting section.
This example shows who will be on payroll in a yearly view giving investors an idea of how their investment will work in the long-term. Planning ahead also shows stakeholders dedication to starting up your business.
3. NoHassleIsReturn Ecommerce Plan
Fictional company NoHassleIsReturn’s sample ecommerce plan is an expansive, detailed version of how ecommerce would translate to a completely online store. The company itself is structured to offer a way to make returning items bought from an online store a simple process, and the steps to do that are featured below.
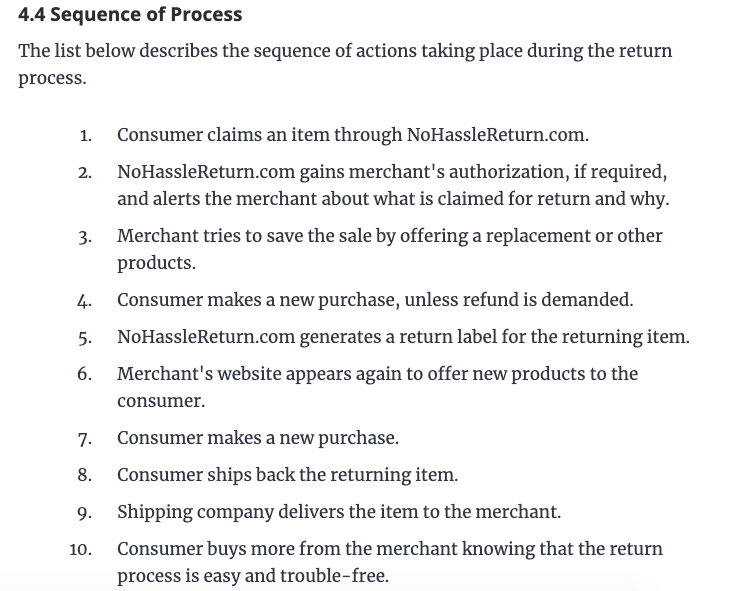
Having a sequence of processes like this is useful if your company is a niche idea. Investors and stakeholders need to have an idea of how your business will be new and unique for the market.
Even though writing out a business plan seems like a painstaking process, we have a step-by-step guide to help. This will keep you organized and keep you on track when structuring your business.
How to Write an E-Commerce Business Plan
HubSpot’s template provides clear steps to structuring one for your ecommerce business. Throughout this section, I’ll use the example of a photography company specializing in online photo editing.
1. Give an executive summary.
An executive summary is a one-to-two page overview of your business. The purpose of an executive summary is to let stakeholders know what the business plan will contain. HubSpot’s free template offers some tips on how to write one as I’ve done below:
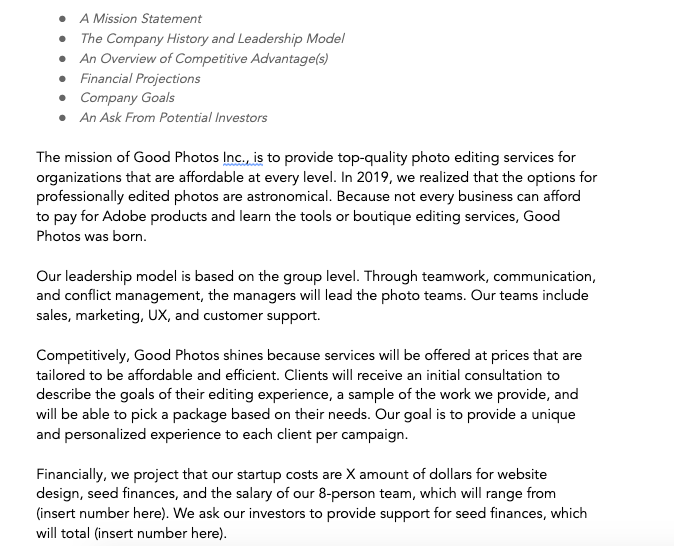
It’s important to provide an executive summary so that an investor or executive, who doesn’t have the time to read your full plan, can quickly see the most important highlights about your business.
2. List and describe your business.
This is the section that needs the most detail because it highlights what you’re selling. To begin, provide an overview of your product or service. For instance, a photography company would probably list their photo packages arranged by price and services, like I did below:
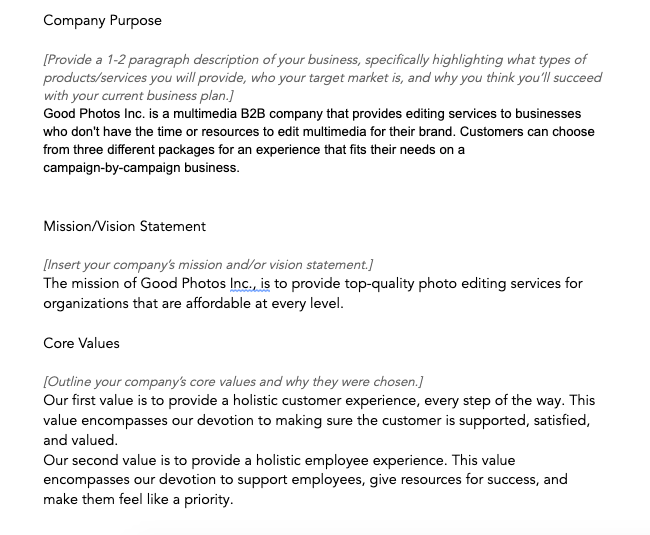
HubSpot’s template also provides direction on how to describe the purpose of your company and break down values. It also advises businesses to include team structure, if applicable. Below that, you should go into detail about your product and service lines.
3. Conduct a market analysis.
For the market analysis, provide the operational climate of the industry you’re in. To illustrate, at this step, the photography company would need to analyze their position in a world of rival companies like Adobe or online services like Canva. Below, I’ve done a quick competitor analysis, available in the template:
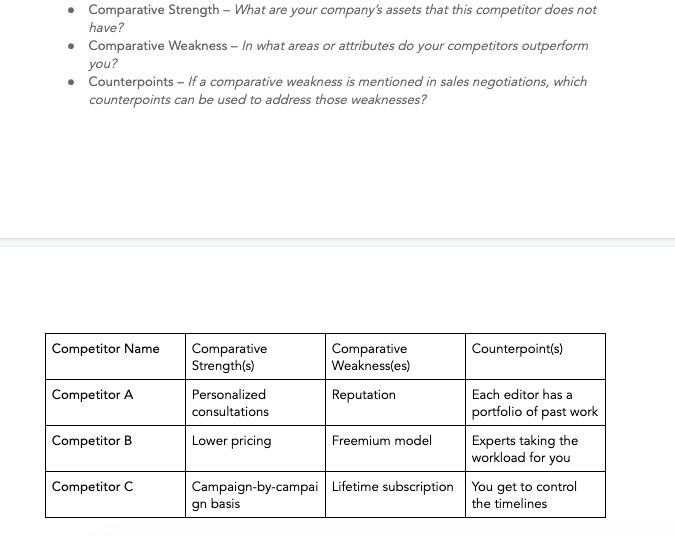
Using directions in the template as a guide, I was able to come up with more selling points of the company and how it stands out from competitors.
Filling out the market analysis section of the business plan assists with providing the framework of future campaigns. You are able to define your target market and ideal customer. Refer to my example below for how to structure this analysis in your ecommerce plan.
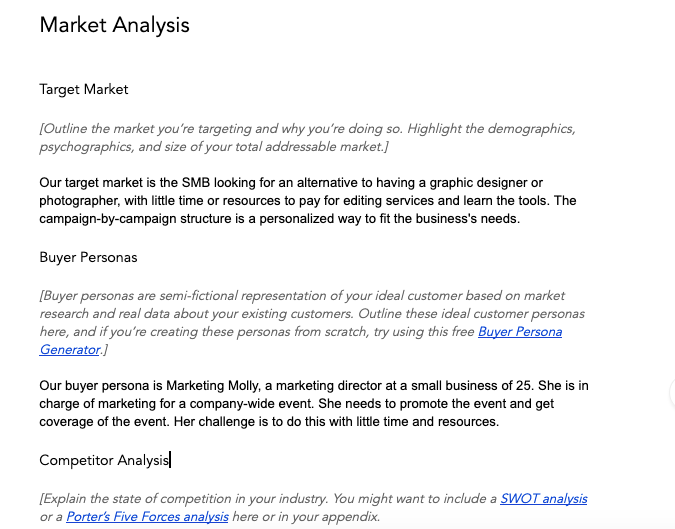
A good market analysis includes your target audience, projections of your company’s goals, and a breakdown of the competition’s goals and weaknesses for a counterpoint of how your business improves upon those weaknesses.
For a complete guide on how to create a market analysis, we have one here.
4. Outline legal notes and financial considerations.
In the next two sections of your business plan, describe legal and financial structures. The photography company should provide detail on the legal considerations like online safety rules and e-commerce regulations. Further, the costs of the company.
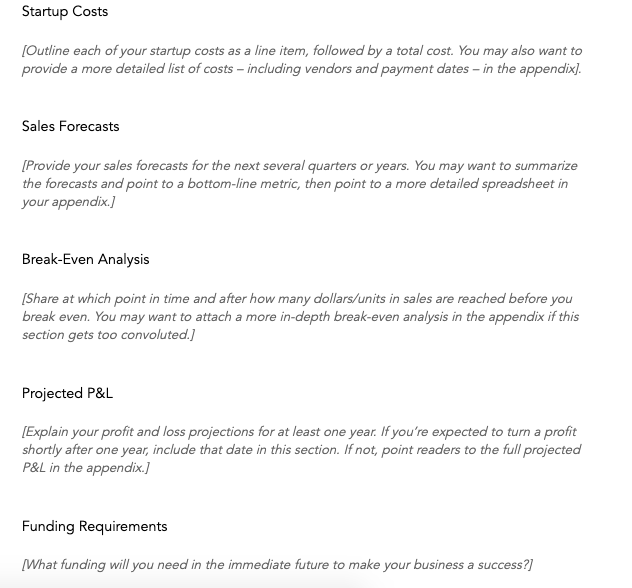
Listing legality and every cost needed to start e-commerce is crucial information for investors and stakeholders. In this section, it’s important to be honest and thorough in order to give partners a realistic idea of how to contribute.
Follow these steps and create a strong foundation for your eCommerce business. An extra tip to keep in mind? Provide a table of contents and appendix. These few additions will boost the professional look of your business plan and make it presentation-friendly. For more information about e-commerce, check out our ultimate guide.

The Key Difference Between Multivariate Testing & A/B Testing
There’s seemingly no end to the things you can test in your marketing, and if you’ve laid a solid framework for your inbound marketing programs, now’s a great time to start optimizing and making what works pretty well work amazingly well . And the best way to get started is to conduct some A/B tests !
Or…multivariate tests? What’s the difference between A/B tests and multivariate tests? Will it affect my results if I choose the wrong one?
Yes, there is a difference, and yes, it will affect the integrity (and thus usefulness) of your results if you choose the wrong test. But no fear! We’re going to break down the difference between A/B tests and multivariate tests in this post, and tell you exactly when to use each so your tests can run smoothly and make your inbound marketing rock even harder than it already does.
What Is an A/B Test?
When you perform an A/B test , you create two different versions of a web page, and split the traffic evenly between each page. You can also perform an A/B/C test that tests three different web page versions, an A/B/C/D test that tests four different web page versions, and, well, you get the picture. In an A/B test, you can change literally any variable you want from page to page, and it is in fact a testing best practice to create two (or three, four, whatever) radically different pages for your test.
When you perform a multivariate test, you are not testing a different version of a web page like you are with an A/B test. You are performing a far more subtle test of the elements inside one web page . The point of the multivariate test is to give you an idea of which elements on a web page play the biggest role in letting you achieve the objective of that page. The multivariate tests is more complicated and best suited for more advanced marketing testers , as it tests multiple variables and how they interact with one another, giving far more possible combinations for the site visitor to experience.
This is a tricky concept, and a visual usually helps clarify complicated ideas. Luckily, Search Engine Land shared an image on its site from Yam Designs that visually illustrates what a multivariate tests looks like.
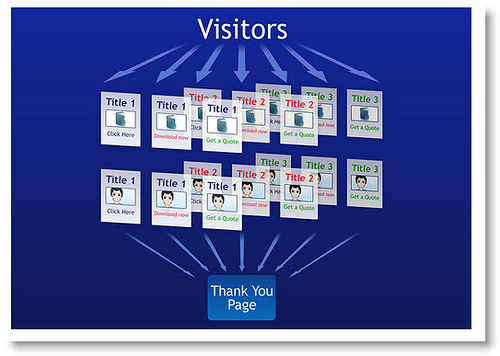

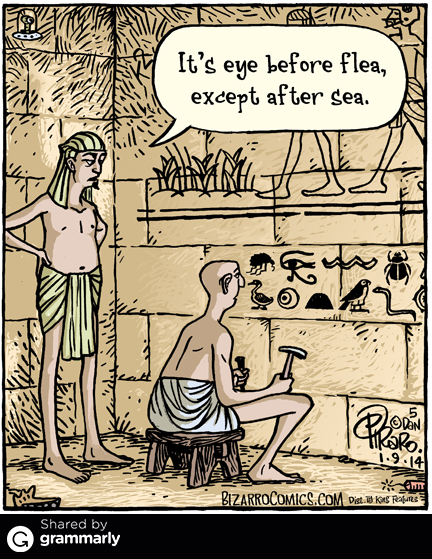

A/B testing is a great testing method if you need meaningful results fast. Because the changes from page to page are so stark, it will be easier to tell which page is most effective. It is also the right method to choose if you don’t have a ton of traffic to your site. Because of the multiple variables being tested in a multivariate test, you’ll need a highly trafficked site to get meaningful results with MVT.
If you do have enough site traffic to pull off a successful multivariate test (though you can still use A/B testing if you’re testing brand new designs and layouts!) a great time to use the testing method is when you want to make subtle changes to a page and understand how certain elements interact with one another to incrementally improve on an existing design. You can also use multivariate testing to perform a test that will give you results you can extrapolate out and apply to a larger site redesign.
Just remember that, in order for the multivariate and A/B tests to give meaningful results, it’s not enough to have site traffic overall; the pages being tested also need to receive substantial traffic! Make sure you select pages that people can find and visit regularly so your test actually yields some data to analyze.
Have you performed A/B tests or multivariate tests on your website? Did the results of the tests cause you to make any changes to your site?
Image credit: Guudmorning!

12 Traits of Webinars That Convert (& Turn Leads into Sales)
While webinars might sound old school, most B2B marketers still say that they are the most effective form of content marketing for their companies.
While a jam-packed webinar is a beautiful thing, you know what’s better than filling your funnel with webinar leads? Converting those leads into customers.
The key to turning webinar leads into sales is giving your prospects a clear path forward. Too often, we focus on creating great webinar content and hosting an engaging webinar, which are both important, but we don’t spend enough time on the next step.
According to research from InsideSales.com, 73% of marketing and sales leaders say webinars are one of the best ways to generate high-quality leads. With this in mind, you don’t want to let these valuable leads languish in post-webinar purgatory. Here are nine simple ways to convert more webinar leads into sales.
How to Host Webinars That Convert
1. Pick a topic that’s relevant to your industry.
Is there a problem point, trend, or other topic that people in your industry are particularly buzzing about or reaching out to you for guidance on? If so, this could be a great topic that drives in webinar signups, attendees, and possibly conversions.
If your business offers solutions or services related to the topic or pain point discussed in the webinar, that’s even better. This will give you a platform where you can inform the audience about the topic, demonstrate your expertise in it, and then promote the product or service that corresponds in it. People who feel that your brand is knowledgeable about a certain pain point might trust that you’ve created a great solution that can help them/
2. Consider letting a thought leader or credible customer host.
By having a thought leader host, you can also demonstrate knowledge, expertise, and credibility in your industry. If people follow the thought leader, promoting the webinar and noting that this person is a host might also drive sign ups and attendees.
If you have a customer with a large amount of credibility in your industry who can talk about strategies they’ve used related to a certain topic while possibly intertwining mentions of your product in the webinar, this is a definite bonus. This way, listeners are getting the knowledge and advice that they’re craving, but they’re also getting a trustworthy endorsement of your product directly from someone who’s used it.
3. Make the webinar interactive.
As you and your host plan the webinar, come up with ways to make it interactive for the customer. Interactivity adds to the experience and can also be valuable to the listener.
For example, if your webinar system allows listeners to submit comments, consider including points in your webinar where you ask the listeners to reply with their strategies. Then read and discuss the best ones. You could also allow time at the end where webinar listeners could ask questions and the host could answer two or three of the best ones.
If your webinar system doesn’t allow questions, you could include this as a piece of the promotion. For example, if you post a link to the webinar signup page on your social channels, ask those interested to comment on your promotional post with a question for the host. Then similarly ask the best ones and give a shout out to the person who asked the question.
Another way you can get more interactive is by polling the audience, if that feature is available on your webinar system. This, again, makes the experience more interactive and entertaining for your audiences. But, additionally, they can view and learn from the results of other peers watching the webinar.
All in all, an interactive experience will create value and potentially please the prospect into signing up for more webinars or even investing in your product.
9 Easy Ways to Convert Webinar Leads into Sales
1. Poll your audience to see who’s ready to buy.
At GoToWebinar, we always use multiple polls during our webinars. They grab attendees’ attention and prompt them to take part in the action. Poll responses provide handy insights you can use to segment your audience by need, interest level, industry, and more, too.
Polling your attendees during the webinar will also help you find out if they’re interested in learning more about your company or talking to a sales representative. Bear in mind, this technique is not suited for top-of-the-funnel webinars that are unrelated to your product. You don’t want to hit attendees with a “buy now” message when they are still in the discovery phase.
Additionally, polling your attendees during the webinar — rather than polling them in a post-webinar email — will yield a much higher response rate. If attendees respond in the affirmative, pass them to your sales team for follow-up.
If you get a lot of positive poll responses, take time at the end of your webinar to demo your product or show your attendees how they can purchase it. Those who aren’t interested can hop off and those who are interested will appreciate the extra info.
2. Send a post-webinar survey.
Sending attendees a quick survey right after the webinar is a great way to see if your content resonated with them, capture additional attendee insights, and gauge attendee interest in your product.
If you didn’t ask them these questions during the webinar, ask them who’s ready to take the next step in a post-webinar survey. You can also use survey responses to segment your webinar attendees and tailor your follow up marketing messages.
3. Involve your sales team in the webinar.
Collaboration between marketing and sales sounds like a no-brainer, but it’s easy to overlook. To involve the sales team in your webinars, make sure they know what webinars are on the calendar and what topic they’ll cover. This will help the sales team prepare more thorough follow-up communication with webinar leads and keep your marketing efforts aligned with your company’s sales goals.
At GoToWebinar, we recommend going a step further and having sales reps join the webinar. They can even help run the webinar, fielding and answering attendee questions.
By taking part in the webinar, sales reps will get familiar with the topic. They’ll also notice that most attendees are engaged, which will make them all the more motivated to follow-up. This sets the groundwork to seamlessly pass the top webinar leads from marketing to sales.
4. Follow up within 24 hours.
While it’s still fresh in their minds, send out your first email follow-up to webinar attendees and no-shows within 24 hours of the webinar. Your audience expects to receive the webinar recording and presentation slides, regardless if they showed up or not.
Prospects also love when companies include a link to a follow-up blog post that summarizes the webinar content and answers some of the top attendee questions. Sure, it takes extra planning and a quick turnaround to do this, but you’re fostering a relationship with these prospects — this type of targeted content is key to converting your audience down the line.
5. Identify hot, warm, and cold leads.
You don’t have to use all three lead categories, but at the very least, divide your leads into hot leads that are ready for sales and ones that need to be nurtured.
We’ve already discussed two ways to identify hot leads — using a poll or survey — but you also have access to a lot of other data that can help you pinpoint where leads are in their buyer’s journey.
Look at data like:
- Registration responses: go beyond only asking for name and email on your webinar registration form. Ask more probing questions that will help segment and personalize your marketing.
- Attendee interest rating: if you’re using a solution like GoToWebinar or Zoom Video Webinar, you will have webinar reports that display your attendees’ engagement level over the course of the webinar.
- Previous marketing engagement: this includes web behavior, content downloads, and prior webinar activity.
6. Send personalized follow-ups to hot leads.
Passing on your sales-ready webinar leads with specific instructions for how to follow up will increase the odds your sales team will close these prospects. You could also go a step further and provide your sales reps with a customizable email template. The easier you make their job, the more likely they’ll hit it out of the park.
This follow-up messaging should relate to the webinar content, provide value, and offer help. It’s also effective to personalize these messages as much as possible based on what you know about each prospect.
7. Nurture warm and cold leads.
Even if some of your webinar leads aren’t ready to buy today, you don’t want to waste the opportunity of closing them when they do become ready to buy. Putting warm and cold webinar leads into your existing nurture tracks based on your usual segmentation will boost the chances that they’ll contact your company when they’re thinking about purchasing your solution.
Alternatively, you can create a webinar-specific nurturing track for these leads, if you have the resources. As you develop your nurturing content, think about what stage of the buying cycle the various segments of your attendees are in and identify other key content assets you can offer in your nurturing stream that build on your webinar content.
The length of the nurturing stream will depend on your sales cycle, but four to six weeks is a good place to start.
8. Retarget your webinar leads.
Creating retargeting campaigns for your webinar leads will keep your brand top of mind. Again, you can segment these audiences based off their responses, interest level, and previous marketing engagement, but the point is to keep your leads warm and move them through each stage of the journey.
Remember, retargeting ads should complement your other marketing tactics. You don’t want to email webinar leads with a discount offer and retarget them with an awareness ad at the same time.
9. Always empower leads to take action.
It’s always better to make it easy for your prospects to take the next step in their buyer’s journey. Even if your leads aren’t quite ready to become customers, give them the ability to keep learning with additional resources and ways to engage. Whether it’s during the webinar or in your follow-up emails, including a clear call to action and highlighting its benefit will entice your audience to take the next step with your business.
Webinar leads are some of your best leads.
A recent GoToWebinar study on content engagement revealed that people are willing to spend more time with a webinar than any other type of content. These are some of your most engaged leads, so make sure you have a plan to convert them. If you’re not ready for all these tactics, just start with a couple and you could see your webinar conversions gradually take off.
Editor’s Note: This blog post was originally published in November 2017 but was updated in November 2019 for comprehensiveness.

How to Customize Facebook Ads for the Customer Journey
Are you targeting cold, warm, and hot audiences with Facebook ads? Wondering what types of ads work best with each audience? In this article, you’ll discover how to use six types of Facebook ads to move people further along the customer journey. 2 Facebook Ad Types That Work With Cold Audiences Cold audiences contain new […]
The post How to Customize Facebook Ads for the Customer Journey appeared first on Social Media Marketing | Social Media Examiner.
from Social Media Marketing | Social Media Examiner https://ift.tt/2OxBpSF
via socialmediaexaminer
Email Background Images: a How To Guide (with Examples)
A couple of months ago, I got an email from HubSpot Academy about the different courses available. I remember this part of the email specifically because I loved the use of a background image. I’m a huge fan of how companies find great ways to maximize their email content — and one way to do that is with a background image.
-7.png)
Rather than an image being used as the star of the email, background images are kind of like supporting characters. They tend to have the capability to be layered so you can add multimedia on top of them. Applying HTML to background images is crucial because they make your image — and the content on top of it — fit into the reader’s view of the email.
Check out this email I received from JetBlue, below. Their background images are simple, high-quality destination photographs, with a caption, hyperlink, and text detailing the destination. All of these factors are components of a great background image.
-6.png)
Note the text below background images is often an offer or exclusive. They’re great to use in this way because the image captivates the reader and the offer encourages them to click, raising that precious CTR for you.
Now, we’re going to go over how to create an email background image using HubSpot’s marketing tools.
1. Create a new email module
In your HubSpot dashboard, head over to the Marketing tab, then hover over “Files and Templates” and click “Design Tools.” This will take you to space where you can create new modules, like CTA buttons or new additions to your website.
From there, click on “File,” > “New file,” > “Module” from the popup box.
-1.png)
After selecting “Module,” a popup box should open. All you need to do in this popup box is check the box that says Email templates under “Where would you like to use this module?”
Make sure it’s a local file, and name your file appropriately. In the image below, I’ve named the file, “Background Image Email.” Then, click the orange “Create” button.
.png)
2. Create and name editable fields
Editable fields are components of your email that you can update and change once the module is created. We’re going to create rich text, so you can edit the text of your emails and the image. To do this, look to the right toolbar under “Fields.”
Click the “Add field” command and type in the search bar, “Image,” and name it “Background Image.” Then type in “Rich text” and name it “Content.” These names will help you notate what you’re working with (it really helps).
-2.png)
Your toolbar should now look like this.
To save time, let’s customize the fields now. Edit the “Background Image” field and add your image. I used a stock photo I had saved in HubSpot’s File Manager. You’ll be able to find all the photos you’ve uploaded into HubSpot clicking the Image space.
-4.png)
After you’ve added your image, time to add the text of your email. In the rich text editor, you can add a CTA, different fonts, and really jazz it up with your brand. I went very basic.
-3.png)
A good tip to note here is to make sure your text is white when you’re done; it’ll look better over the image if that image is dark. I highlighted my text because it was already white.
3. Add social links
You’re going to need some code. Web developer Stephanie O’Gray Garcia has sample code available to use for background image creation. You can find it here, and copy and paste it into the coding section. This is just the middle of the screen; think of it as a workspace.
When you open “Preview,” you should be able to see your text and background image.
In the code, there are sections where you can insert social links to your content. They’re in lines 27-34. When you see href=”#” or src=”#”, you can insert your social links in between the quotations. For the sake of the walkthrough, I took out this section.
4. Preview and publish
Your background image should look something like this. I’m sure it looks way more spruced up than mine, but this is a general idea.
-5.png)
This is a template for background image emails, which not only saves time creating emails but makes them look uniform. When customers open your emails, they should know who they’re receiving the message from and why. Email background images are a chance to add personality to business emails.
When I get emails from HubSpot Academy, I know, due to the background images and branding, that I’m looking at an email from HubSpot.
When I get emails from JetBlue, the background images and fonts are a clear indicator of the company’s brand. Email background images enhance your marketing strategy. Give them a try on your next email today.

How to Make a Stakeholder Management Plan
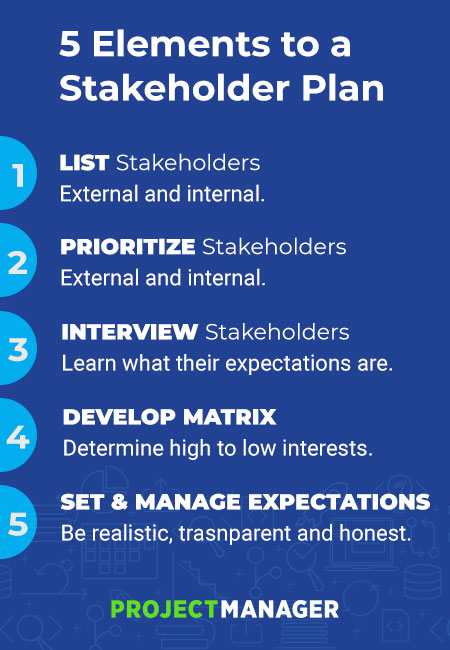
Top Ten Cities in Europe for Graduates to Start Their Careers [Interactive Graph]
When I graduated college, I was extremely interested in living abroad for a while.
I thought about living in the UK, or Switzerland, or Italy.
But then I thought — who knows if I’d have the money to live comfortably in any of these places? Even if I got a job abroad, would they pay me enough to eat Italian food on the weekends or zip-line in Switzerland?
I wish I’d had the interactive guide, below, at the time.
If you’re interested in kickstarting your career abroad but aren’t sure which cities are best for recent graduates, you’re in luck — Resume.io has put together the following guide on the 10 best cities for graduates to live. You’ll find information related to rent, cost of living, and even sports and fitness satisfaction.

Editor’s note: This post was originally published in August 2018 and has been updated for comprehensiveness.