Welcome to My Blog
The Ultimate List of Email Marketing Stats for 2019
Nowadays, marketers put a lot of emphasis on chatbots, Instagram influencers, and other new opportunities to reach their customers.
But your contemporary communication methods shouldn’t distract you from one of the oldest and yet most effective messaging channels — email.
You might be wondering if email is still a worthwhile marketing strategy. In fact, email generates $38 for every $1 spent, which is an astounding 3,800% ROI, making it one of the most effective options available.
If you’re still hesitant, keep reading — we’ve cultivated a list of email marketing statistics for 2019 to demonstrate just how powerful email can be.

Email marketing stats
- 93% of B2B marketers use email to distribute content.
- Active email accounts are expected to hit 5.6 billion by 2019.
- 83 percent of B2B companies use e-newsletters as part of their content marketing program.
- 40 percent of B2B marketers say email newsletters are most critical to their content marketing success.
- It’s estimated that the U.S. will spend over 350 million dollars on email advertising in 2019.
- Mobile opens accounted for 46 percent of all email opens.
- 35% of business professionals check email on a mobile device.
- Apple iPhone is the most popular mobile client for reading emails with 29 percent of all opens occurring on this platform. Gmail is a close runner-up at 27 percent.
- 73 percent of millennials prefer communications from businesses to come via email.
- More than 50 percent of U.S. respondents check their personal email account more than 10 times a day, and it is by far their preferred way to receive updates from brands.
- 99% of consumers check their email every day.
- 80% of business professionals believe that email marketing increases customer retention.
- 59% of respondents say marketing emails influence their purchase decisions.
- The most opened emails relate to hobbies, with an open rate of 27.35 percent.
- >59% of marketers say email is their biggest source of ROI.
- 56% of brands using an emoji in their email subject line had a higher open rate than those that did not.
- Marketers who use segmented campaigns note as much as a 760% increase in revenue.
B2B Email Marketing Statistics
1. 93% of B2B marketers use email to distribute content. (Content Marketing Institute, 2017)
2. Active email accounts are expected to hit 5.6 billion by 2019. (Statista, 2018)
3. 83 percent of B2B companies use enewsletters as part of their content marketing program. (Imaginepub.com, 2017)
4. 40 percent of B2B marketers say email newsletters are most critical to their content marketing success. (Content Marketing Institute, 2017)
5. It’s estimated that the U.S. will spend over 350 million dollars on email advertising in 2019. (Statista, 2019)
Mobile Email Marketing Statistics
6. Mobile opens accounted for 46 percent of all email opens. (Litmus.com, 2018)
7. 35% of business professionals check email on a mobile device. (Convince & Convert, 2018)
8. Apple iPhone is the most popular mobile client for reading emails with 29 percent of all opens occurring on this platform. Gmail is a close runner-up at 27 percent (Campaign Monitor, 2018)
Demographic Email Marketing Statistics
9. 73 percent of millennials prefer communications from businesses to come via email. (Adestra, 2016)
10. More than 50 percent of U.S. respondents check their personal email account more than 10 times a day, and it is by far their preferred way to receive updates from brands (Campaign Monitor, 2017).
11. 99% of consumers check their email every day. (DMA Insights, 2017)
B2C Email Marketing Statistics
12. 80% of business professionals believe that email marketing increases customer retention. (Emarsys, 2018)
13. 59% of respondents say marketing emails influence their purchase decisions. (SaleCycle, 2018)
14. The most opened emails relate to hobbies, with an open rate of 27.35 percent. (MailChimp, 2018)
15. 59% of marketers say email is their biggest source of ROI. (Emma, 2018)
Email Marketing Best Practices Statistics
16. 56% of brands using an emoji in their email subject line had a higher open rate than those that did not. (Forbes, 2017)
17. Marketers who use segmented campaigns note as much as a 760% increase in revenue. (Campaign Monitor, 2019)

Google Ads vs. AdSense: We Break Down the Differences
When most people think of advertising on Google, they picture the text ads that show up at the top of Google’s search engine results pages. But Google actually has another advertising program that they released three years after Google Ads’ inception. It’s called Google AdSense.
Below, we’ll go over the main differences between Google Ads and AdSense, from whom they’re geared toward, how their bidding works, and how much money they can make and cost you. Read on to learn more.

Ads (Formerly AdWords) vs. AdSense
The difference between Google Ads and Google AdSense is that Google Ads is a program that lets advertisers display their cost-per-click advertisements on relevant Google search results pages and a network of their partner sites. Google AdSense is a program that lets web publishers open up small portions of their website for the same advertisers to display their ads on. While the Google Ads program is geared toward attracting advertisers, the Google AdSense program is geared toward attracting publishers.
How Does Google Ads Work?
With over 3.5 billion search queries on Google everyday, Google Ads is one of the most popular and effective types of online advertising.
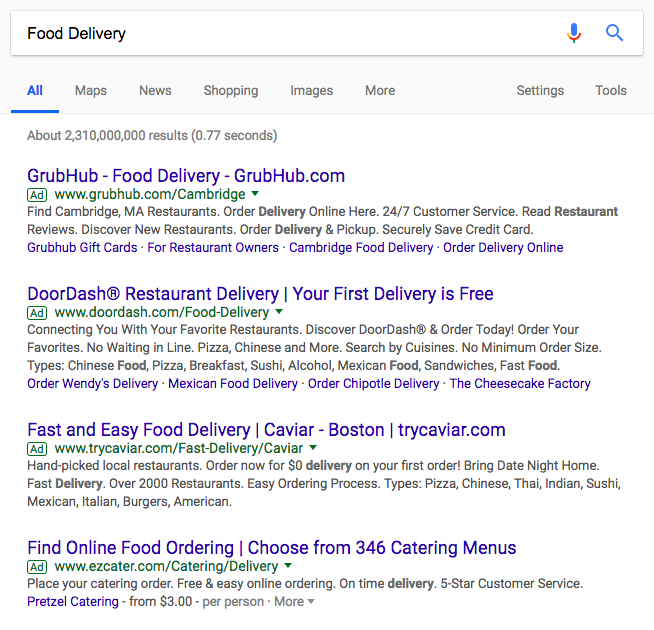
Naturally, there’s enormous demand for the top ad rankings, so Google triggers an auction anytime there are at least two advertisers bidding for keywords that are related to search queries that users consistently enter into Google.
-16.png)
Image Credit: WordStream
Advertisers can then categorize keywords and their corresponding ad copy and web page into groups, pick the group they want to bid on, and choose their maximum bid. Next, Google will select a keyword from the advertiser’s ad group that they deem most relevant to users’ search queries and enter it into the auction.
A Google auction isn’t like your typical auction for antiques, though. They want to level the playing field when it comes to leveraging the size of their reach, so instead of the highest bidder always winning the auction, the bidder with the highest Ad Rank always wins.
AdRank is calculated by multiplying your maximum cost-per-click bid with the quality score of your ad, which is calculated by measuring your page’s relevance to the keyword, user experience, and click-through-rate. This means organizations can’t acquire the top ranking for any keyword they want just because they have the biggest ad budgets. Their content has to be engaging.
-13.png)
Image Credit: WordStream
Google AdWords wants to incentivize the best advertisers to advertise the best content on their search engine results pages, so they reward ads that have high quality scores with higher ad rankings and lower cost-per-clicks.
In the same vein, they also want to discourage bad advertisers from advertising bad content, so advertisers with low quality scores will usually only acquire a high ad position if they pay a huge cost-per-click bid. If they want to pay lower a cost-per-click, they have to settle with stooping at the bottom of the ad rankings.
If you win a Google auction, your actual cost-per-click is calculated by the second highest ad rank divided by your quality score, plus one cent. The only time you’ll pay your maximum bid is if you’re the only bidder in the auction or if you make the highest bid in the auction, but you have the lowest ad rank. In this case, you’ll acquire the last ad rank.
-12.png)
Image Credit: WordStream
How Does Google AdSense Work?
Just like Google Ads, advertisers bid on publishers’ ad space in the Google Ads auction. They bid on certain keywords, and if a publisher’s content has the same or similar keywords, Google will sell their ad space to the highest bidder and pay the publisher a small portion of the bid whenever people click the ad on their website.
-11.png)
Image Credit: Google AdSense
However, AdSense doesn’t optimize the ads that they display on publishers’ website for a maximum return on investment like Google Ads does for its advertisers when they want to optimize their ad campaigns. So, essentially, the amount of money a publisher can earn with AdSense hinges on how well advertisers can craft their ads.
Publishers do have control over the types of ads that display on your website, though. They can choose from text ads, display ads, rich media ads, and more. They can also customize their ad’s style or create their own, which gives them the ability to change the size, color, textual, background, and border details of the ads that display on their website. Additionally, they can only place three content ads, three link ads, and two search boxes on each of their web pages.
If you want to sign up for the Google AdSense program, submit an application here.

How to Promote Your Live Event on Facebook
Are you planning a live event? Wondering how to use Facebook marketing to reach and stay in touch with attendees? In this article, you’ll discover how to promote your live event or conference on Facebook before, during, and after the show. #1: Design a Facebook Frame for Your Event Facebook allows you to upload your […]
The post How to Promote Your Live Event on Facebook appeared first on Social Media Marketing | Social Media Examiner.
from Social Media Marketing | Social Media Examiner https://ift.tt/2TjqlIU
via socialmediaexaminer
How to Use VLOOKUP in Excel 2013 and 2016 [+ Video Tutorial]
This post was inspired by the video series, 4 Essential Microsoft Excel Skills Every Marketer Should Learn. If you want to become a master of the almighty spreadsheet, watch the full video series here.
I know, “VLOOKUP function” sounds like the geekiest, most complicated thing ever. But by the time you finish reading this article, you’ll wonder how you ever survived in Excel without it.
As was the case with pivot tables, Microsoft Excel’s VLOOKUP function is easier to use than you think. What’s more, it is incredibly powerful, and is definitely something you want to have in your arsenal of analytical weapons. What does VLOOKUP do, exactly? Here’s the simple explanation: The VLOOKUP function searches for a specific value in your data, and once it identifies that value, it can find — and display — some other piece of information that’s associated with that value.
VLOOKUP Example
You could use the VLOOKUP formula to transfer revenue data from a separate spreadsheet and match it with the appropriate customer based on a common identifier like a customer ID or email address. In this example, VLOOKUP enables you to easily see revenue by customer without searching, copying, and pasting for each individual cell.
In practical terms, this means you can take the revenue data from your second spreadsheet and integrate it with the customer data in your first spreadsheet in order to reveal the bigger picture about your business’s performance.
Below, you’ll see a five-step guide to performing this VLOOKUP example, followed by a video tutorial for using VLOOKUP to organize a list of blog posts.
How does VLOOKUP work?
VLOOKUP stands for “vertical lookup.” In Excel, this means the act of looking up data vertically across a spreadsheet, using the spreadsheet’s columns — and a unique identifier within those columns — as the basis of your search. When you look up your data, it must be listed vertically wherever that data is located.
The formula always searches to the right.
When conducting a VLOOKUP in Excel, you’re essentially looking for new data in a different spreadsheet that is associated with old data in your current one. When VLOOKUP runs this search, it always looks for the new data to the right of your current data.
For instance, if one spreadsheet has a vertical list of names, and another spreadsheet has an unorganized list of those names and their email addresses, you can use VLOOKUP to retrieve those email addresses in the order you have them in your first spreadsheet. Those emails addresses must be listed in the column to the right of the names in the second spreadsheet, or Excel won’t be able to find them. (Go figure … )
The formula needs a unique identifier to retrieve data.
The secret to how VLOOKUP works? Unique identifiers.
A unique identifier is a piece of information that both of your data sources share, and — as its name implies — it is unique (i.e. the identifier is only associated with one record in your database). Unique identifiers include product codes, stock keeping units (SKUs), and customer contacts.
Since CRMs like HubSpot use email addresses to uniquely identify the contacts in their databases, HubSpot customers can use “email address” as their unique identifier to execute a VLOOKUP.
How to Use VLOOKUP in Excel
- Identify a column of cells you’d like to fill with new data.
- Select ‘Function’ (Fx) > VLOOKUP and insert this formula into your highlighted cell.
- Enter the lookup value for which you want to retrieve new data.
- Enter the table array of the spreadsheet where your desired data is located.
- Enter the column number of the data you want Excel to return.
- Enter your range lookup to find an exact or approximate match of your lookup value.
- Click ‘Done’ (or ‘Enter’) and fill your new column.
Take the VLOOKUP example above. Let’s say you’re looking through your HubSpot data and are checking out which of your site pages your contacts have viewed. You’re also paying attention to whether or not any of those contacts have converted into customers.
Then it hits you: In addition to knowing which of those contacts have closed, you want to know how much MRR (monthly recurring revenue) each of them brings in. That way, you can tie your revenue back to your site pages and do some analysis to see which pages are having the biggest impact on your bottom line.
There’s only one problem: Your MRR data lives in your CRM. And while you could manually look up each and every contact in your CRM to find their MRR, and then manually match those values to their corresponding contacts in your HubSpot data, the whole process would be ridiculously time-consuming and impractical.
That’s where the VLOOKUP function comes in. For your reference, here’s what a VLOOKUP function looks like:
VLOOKUP(lookup_value , table_array , col_index_num , range_lookup)
In the steps below, we’ll assign the right value to each of these components, using customer names as our unique identifier to find the MRR of each customer.
1. Identify a column of cells you’d like to fill with new data.
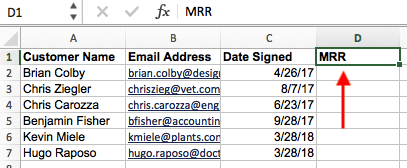
If this data is coming from a pivot table made in Excel, copy the data into a new spreadsheet so the VLOOKUP function can freely read this data.
Then, label a column next to the cells you want more information on with a proper title in the top cell, such as “MRR,” for monthly recurring revenue. This new column is where the data you’re fetching will go.
2. Select ‘Function’ (Fx) > VLOOKUP and insert this formula into your highlighted cell.
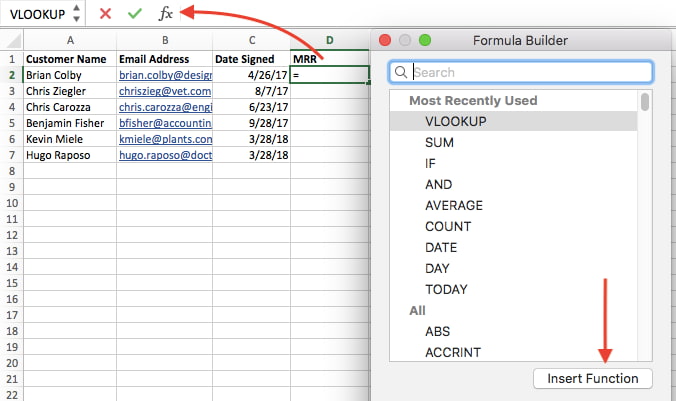
To the left of the text bar above your spreadsheet, you’ll see a small function icon that looks like a script “Fx.” Click on the first empty cell beneath your column title and then click this function icon. A box titled “Formula Builder” will appear to the right of your screen.
Select “VLOOKUP” from the list of options included in the Formula Builder. Then, select “Insert Function” at the bottom of this list. The cell you currently have highlighted in your spreadsheet should now look like this: “=VLOOKUP()“
You can also enter this formula into a call manually by entering the bold text above exactly into your desired cell.
3. Enter the lookup value for which you want to retrieve new data.
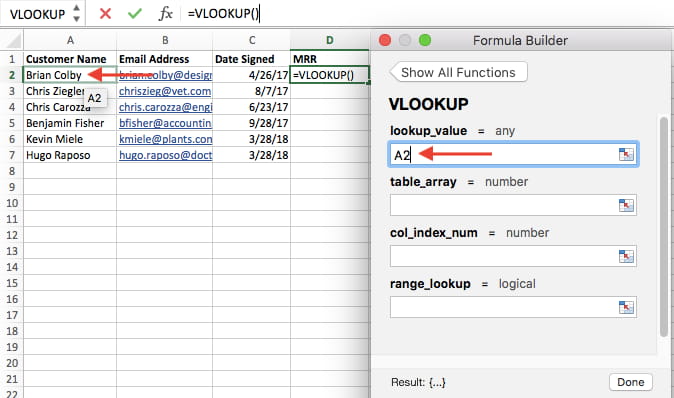
With the =VLOOKUP text entered into your first cell, it’s time to fill the formula with four different criteria. These criteria will help Excel narrow down exactly where the data you want is located and what to look for.
The first criteria is your lookup value — this is the value of your spreadsheet that has data associated with it, which you want Excel to find and return for you. To enter it, click on the cell that carries a value you’re trying to find a match for. In our example, shown above, it’s in cell A2. You’ll start migrating your new data into D2, since this cell represents the MRR of the customer name listed in A2.
Keep in mind your lookup value can be anything: text, numbers, website links, you name it. As long as the value you’re looking up matches the value in the referring spreadsheet — which we’ll talk about that in the next step — this function will return the data you want.
4. Enter the table array of the spreadsheet where your desired data is located.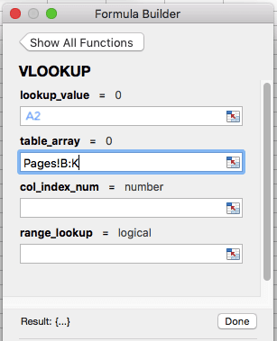
Next to the “table array” field, enter the range of cells you’d like to search and the sheet where these cells are located, using the format shown in the screenshot above. The entry above means the data we’re looking for is in a spreadsheet titled “Pages” and can be found anywhere between column B and column K.
The sheet where your data is located must be within your current Excel file. This means your data can either be in a different table of cells somewhere in your current spreadsheet, or in a different spreadsheet linked at the bottom of your workbook, as shown below.
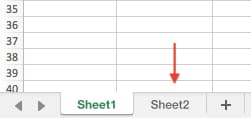
For example, if your data is located in “Sheet 2” between cells C7 and L18, your table array entry will be “Sheet2!C7:L18.”
5. Enter the column number of the data you want Excel to return.
Beneath the table array field, you’ll enter the “column index number” of the table array you’re searching through. For example, if you’re focusing on columns B through K (notated “B:K” when entered in the “table array” field), but the specific values you want are in column K, you’ll enter “10” in the “column index number” field, since column K is the 10th column from the left.
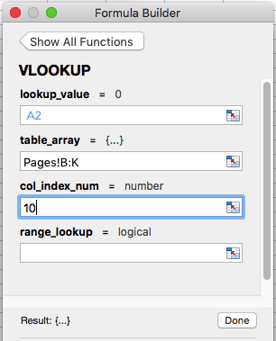
6. Enter your range lookup to find an exact or approximate match of your lookup value.

In situations like ours, which concerns monthly revenue, you want to find exact matches from the table you’re searching through. To do this, enter “FALSE” in the “range lookup” field. This tells Excel you want to find only the exact revenue associated with each sales contact.
To answer your burning question: Yes, you can allow Excel to look for an approximate match instead of an exact match. To do so, simply enter TRUE instead of FALSE in the fourth field shown above.
When VLOOKUP is set for an approximate match, it’s looking for data that most closely resembles your lookup value, rather than data that is identical to that value. If you’re looking up data associated with a list of website links, for example, and some of your links have “https://” at the beginning, it might behoove you to find an approximate match just in case there are links that do not have this “https://” tag. This way, the rest of the link can match without this initial text tag causing your VLOOKUP formula to return an error if Excel can’t find it.
7. Click ‘Done’ (or ‘Enter’) and fill your new column.
In order to officially bring in the values you want into your new column from Step 1, click “Done” (or “Enter,” depending on your version of Excel) after filling the “range lookup” field. This will populate your first cell. You might take this opportunity to look in the other spreadsheet to make sure this was the correct value.
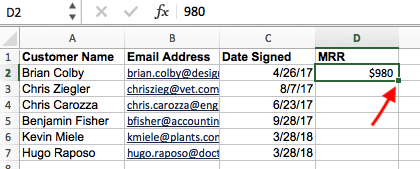
If so, populate the rest of the new column with each subsequent value by clicking the first filled cell, then clicking the tiny square that appears on the bottom-right corner of this cell. Done! All your values should appear.
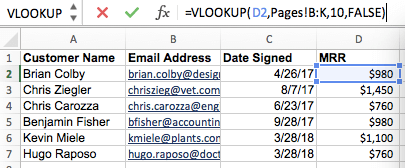
Alright, enough explanation: let’s see another example of the VLOOKUP in action!
In the video below, we’re taking the pivot table we made in video #2, pasting the values into a new sheet, and using it as an example report. We then use the VLOOKUP function to match blog post authors (from our second data source) to their corresponding post titles. In this instance, we’re using post title as our unique identifier.
Author’s note: There are many different versions of Excel, so what you see in the video above might not always match up exactly with what you’ll see in your version. That’s why we encourage you to download the written instructions and demo data so you can follow along.
Download demo data | Download instructions (Mac) | Download instructions (PC)
Want to learn to do more in Excel? Download the full video series, 4 Essential Microsoft Excel Skills Every Marketer Should Learn.

How to Use Google Calendar: 18 Features That’ll Make You More Productive
Some things you think will be simple actually end up getting really complex. Google knows this all to well, which is why it recently rolled out a brand new Google Calendar — and plenty of nifty features to go with it.
While a few features in the latest Google Calendar aren’t new, they have changed somewhat. Still other features you might not know exist at all. Let’s go over all of them to make your life a little easier.
Your Google Calendar comes with your personal Gmail address, and you won’t believe how simple it is to use and set up. But if you work at a company that uses its own Google Calendar, you suddenly have to find out how best to integrate your personal calendar with your weekly meeting schedule.
 Google Calendar can start to feel a lot less simple the more events you have on your agenda. Luckily, there are some cool hacks and under-the-radar features you can use to make your life in Google Calendar much easier to organize.
Below are 18 of our favorite tips, tricks, and features available in Google Calendar.
18 Google Calendar Features That’ll Make You More Productive
1. Create new calendars for different parts of your life.
When you first start out on Google Calendar, you’re given one calendar to start with — it’s the one with your name under “My calendars,” as shown in the screenshot below.
So, if you want to use your calendar for multiple purposes — like managing your actual schedule, planning periods of focused work time, and scheduling repeating reminders — you only have one place to do it. But when you’re only working with one calendar, all of those things get treated equally — meaning you can’t quickly and easily pull up the non-repetitive, important tasks you have for the day.
To combat this, just create a new calendar for each part of your life you’d like to keep track of on your Google Calendar.
How to Use This Feature
To create a new calendar, click the little plus sign (+) next to “My calendars,” and you’ll see the option, “New calendar.” Select this option, name your new calendar, give it a description and time zone, and voilà — you’ve got yourself another calendar.
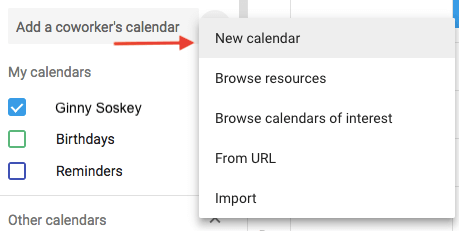
Pro Tip: You can even color-code each calendar to make it easy for you to pick out what you’ve got to do each day.
2. Schedule meetings with groups using “Find a time” or “Suggested times.”
Do you ever need to arrange a meeting with several people who have busy schedules? It can be really annoying to try to figure out when you’re all free. Thankfully, Google Calendar actually has two features that can do the heavy lifting for you: “Suggested times” or “Find a time.”
How to Use This Feature
To use either of these two options, first make sure you’ve added everyone to the event who needs to attend. Then, if you’d like Google to suggest a time for you to meet, simply select the “Suggested times” link below your guests’ names. A dropdown window will appear with a list of times when every meeting guest, including you, is available with no conflicts.
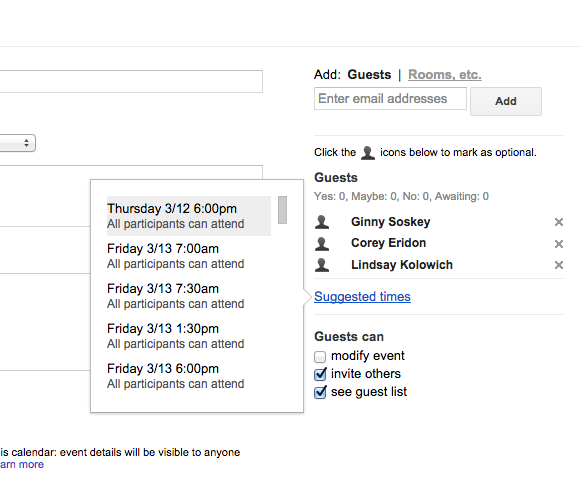
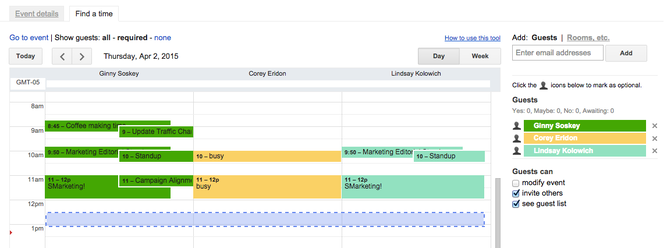
“Find a time” is the other way to quickly find a time that works for every guest included on the meeting invitation. To use this feature, choose the tab next to “Event details” called “Find a time,” and you’ll see everyone’s schedules side-by-side for the day of your intended meeting. When you see a time when none of your guests have conflicts, click this line of the calendar to highlight the time and press “Save” at the top of your Calendar.
Pro tip: you can also use a free product like HubSpot Meetings to easily schedule meetings without back-and-forth emails.
3. Hide your event details.
Sometimes, the meetings you host or attend are sensitive in nature. Keep in mind, however, that a closed door isn’t the only way for others to know what’s going on inside. The event’s details in Google Calendar can also reveal more to the rest of the office than you’d like.
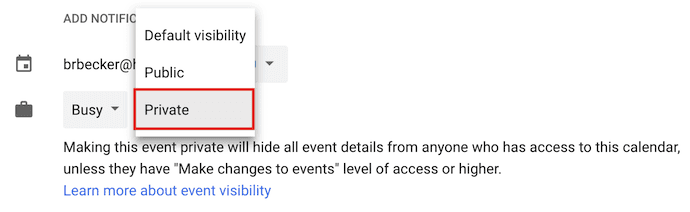
To ensure you have as much privacy as you need during more sensitive meetings, set your event to “Private.” This makes it so nobody viewing your weekly schedule sees the details of the event — meeting name, attendees, attachments, and so forth. By default, the public label on the event block will simply be, “Busy.”
How to Use This Feature
To privatize the details of certain events on your calendar, click the event from your calendar view and select the pencil icon to edit the event’s details. In the window that appears, find the briefcase icon just above the event description field.
With the first field set to “Busy,” click into the second field and select “Private” from the dropdown, as shown below. Hit the blue “Save” button at the top of your screen and you’ll be all set.
4. Add a Google Hangout to your event.
Need to easily set up a face-to-face remote meeting? Just click the link to “Add video call,” and Google will set up hangout for your event attendees to use. (Learn more about Google Hangouts here.)
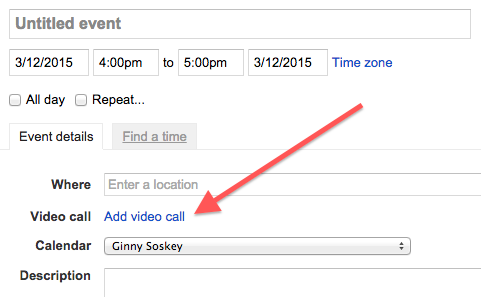
5. Add attachments.
I don’t know about you, but I often find myself attending meetings that require me to reference a relevant document. Maybe we’re all working off one Google Doc, or perhaps we’re pouring over an intricate spreadsheet.
Regardless, it’s best to make sure all meeting attendees have the materials they need before the meeting begins so they don’t have to go hunting in their inboxes for it. Google Calendar can help you do this, allowing you to attach documents directly to the event for guests to open and review.
How to Use This Feature
To attach a document to your event, click on your event block from the calendar view and select the pencil icon to edit the event, as shown below.
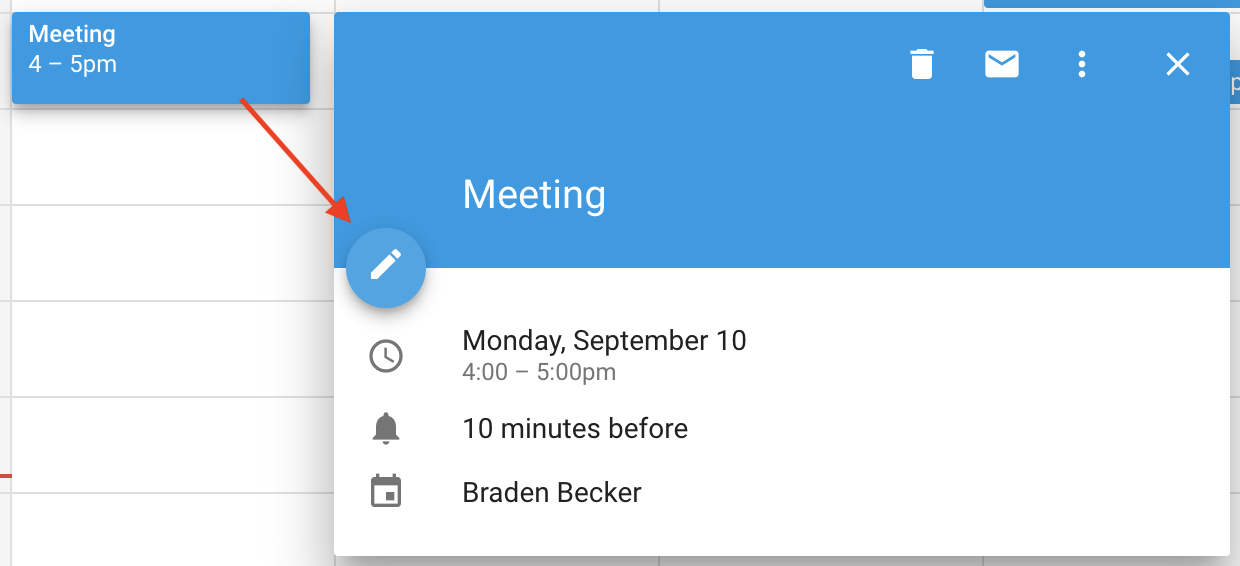
Once you’re in the event’s edit screen, look for a paper clip icon right above the description section, as shown in the screenshot below. Click this icon and a large window will appear where you can upload files to attach directly from your Google Drive.
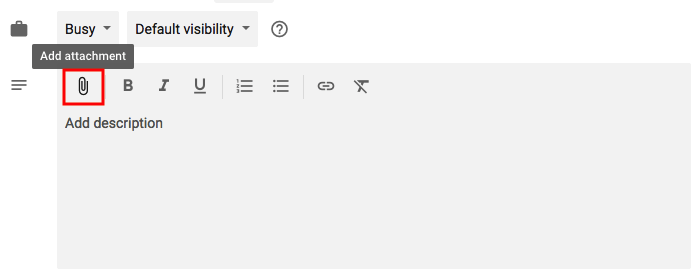
Pro tip: When you reach the upload window, you can toggle to the “My Drive” tab to attach Google Docs, Sheets, and Slides that already exist in your Google Drive. Or, you can click the “Upload” tab on the far left of the window to attach offline files from your computer.
6. Enable your world clock.
Do you work with teammates who live around the world? You might find it’s difficult to figure out what time is appropriate to schedule meetings with them. Fortunately, you can — by enabling “World Clock” in your Google Calendar settings.
How to Use This Feature
To quickly check multiple time zones when arranging meetings, click the gear icon on the top-righthand corner of your calendar view. These are your settings. Then, navigate to the “World clock” section, check the first blue box, and select the time zones you want to see from your calendar view.
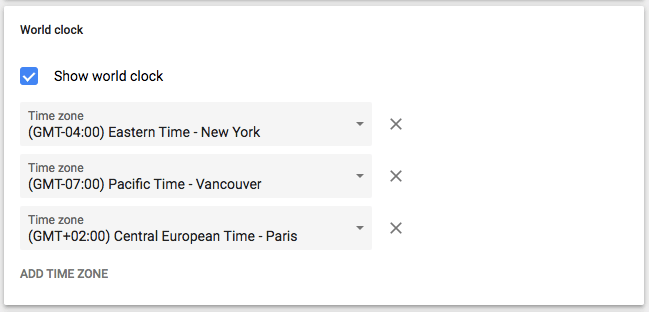
Once you’ve chosen the time zones you want, return to your calendar view and you’ll see the following on your Google Calendar’s lefthand sidebar:
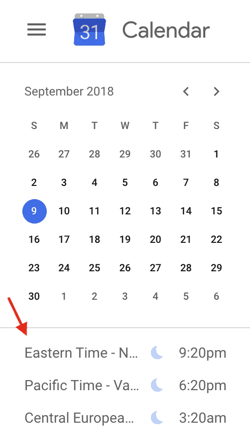
7. Enable working hours.
Not everyone is a 9-to-5 worker, but they might work quite a bit with those who are. If you have an unconventional work schedule that none of your colleagues seem to remember, this feature is for you.
“Working Hours” is a setting that alerts people if they try to add you to a meeting that lies outside a range of hours set by you in Google Calendar. Hey, it beats having to hit “Decline” and then follow up with the meeting organizer to remind them you’re unavailable during that time.
How to Use This Feature
To enable specific working hours on your Google Calendar, click the gear icon from your calendar view to access your settings. Navigate to the “Working Hours” section, as shown below. Here, you’ll be able to specify when you’re in and out of work each day of the week.
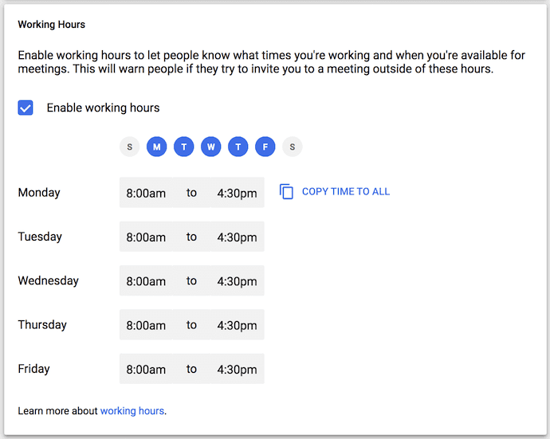
8. Email event guests.
Remember the time you tried to email a large group of people about an event? Maybe you were trying to coordinate a team outing — or just let everyone know they should bring their laptops to the all-hands meeting. Regardless, I’ll bet it was annoying to figure out who was actually going to the event and ensure you didn’t forget anyone.
Well, this Google Calendar feature will come in handy next time.
How to Use This Feature
As long as you’ve added everyone to the event that needs to go, you can easily email everyone in the group by clicking on the event block from your calendar view and clicking the envelope icon.
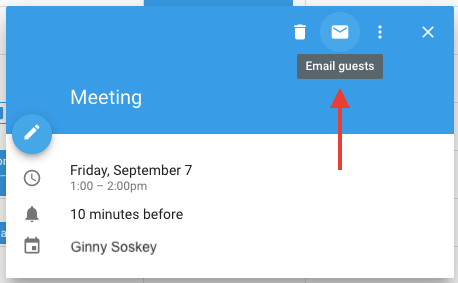
Once you click on the envelope icon inside the event block, an email compose box will appear. Simply type in your message, type in the email addresses of the people you want to receive it, and hit send.
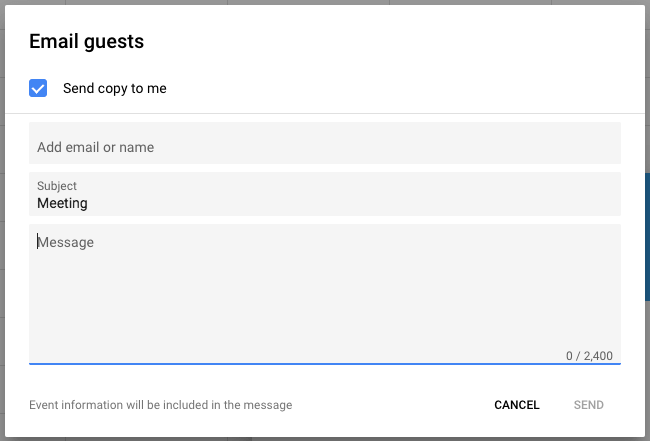
9. Add specific meeting locations.
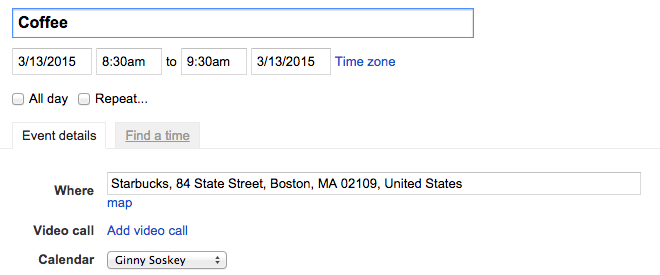
I wish I’d known about this feature the last time I got coffee with a someone in downtown Boston. We agreed to meet at Starbucks … but thanks to the multitude of Starbucks locations in Boston, our conversation went something like this:
“Okay, so let’s meet at the one on State Street,” I said.
“Oh, the one by the Court House?” he asked.
“Well, it’s kinda by the Court House, but further down State Street,” I replied.
“Oh, you mean the one by Downtown Crossing?” he clarified.
How to Use This Feature
The logistics of a meeting can get fuzzy without a specific address or conference room. Thankfully, Google Calendar has a feature that’ll fix all that. Instead of having the back-and-forth, I could’ve just sent my friend a calendar invitation with the specific address in the “Where” box. It integrates with Google Maps so it’s super easy to figure out where you’re meeting and how to get there.
10. Use desktop notifications.
As you probably can tell by now, I love Google Calendar … but there is one feature of which I am not a fan.
If you have your Google Calendar open as a tab in your browser when it’s 10 minutes before your next event, the 10-minute warning interrupts everything you’re doing and takes over your screen. Forget about what you were working on — Google Calendar will suddenly surface its tab with a big pop-up alert coupled with an annoying sound. It’s the worst.
Luckily, there’s a setting in Google Calendar that you can use to make notifications much less annoying: “Desktop notifications.” Rather than interrupting your work, you’ll see a much gentler box slide in from the top-righthand corner of your computer screen, displaying the name of the event that’s 10 minutes away.
How to Use This Feature
To enable “Desktop notifications” in Google Calendar, click into your settings using the gear icon on the top-righthand corner in your calendar view. Scroll down to “Event settings” and click the “Notifications” box, as shown below.
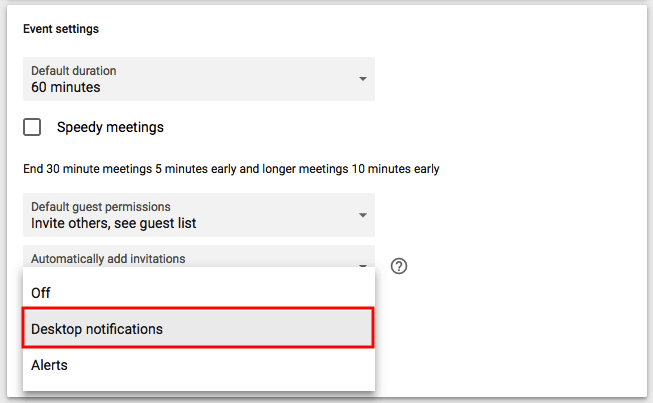
By default, your notifications might be set as “Alerts,” causing each event’s 10-minute warning to hijack your computer screen. Instead, select “Desktop notifications,” return to your calendar view, and you will have successfully enabled gentler meeting notifications.
11. Change the event notification time.
In the previous tip, you learned how to soften the notifications you receive in advance of a meeting. But did you also know you can change the number of minutes before the event you want to be notified?
How to Use This Feature
By default, Google will notify you 10 minutes before the event’s start time. To change this warning time for a particular event, click on the event from your calendar view, and select the pencil icon to edit the event’s settings.
In the event details, find the bell icon just below the video conferencing line. Hover your cursor over the box listed “10” and toggle up and down using the small arrow keys that appear to the right to change the number of minutes in advance you want to be notified. As you can see below, you can tell Google to notify you hours, days, or weeks in advance, too.
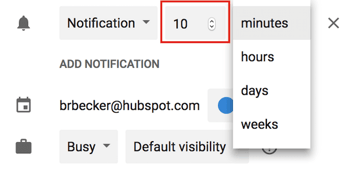
Pro tip: To the left of the “10,” you can change “Notification” to “Email” if you’d rather be told about upcoming meetings via email instead of a desktop notification.
12. Arrange appointment slots.
Ever thought about incorporating “office hours” so other folks in your company can book time with you? Maybe you’re a part-time consultant with limited hours to book meetings, or want to limit the times your team can book time with you to certain times of day.
If any of the above scenarios resonate with you, think about using Google’s Appointment slots.
Google’s Appointment slots allow you carve out specific times of day on your calendar and then share these times with select people via a private calendar link. When these people click the link, they can schedule meetings with you at any of the times you carved out for them.
If your link recipients find a time they like, all they have to do is select it to book a private event with you, including all the information they’d need for the meeting.
How to Use This Feature
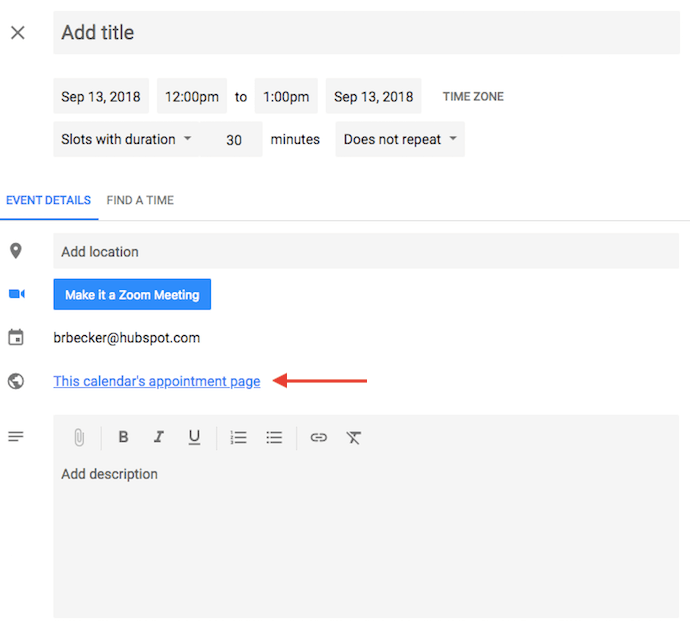
To set up your own Appointment slots, start by clicking anywhere in your calendar view to create an event. When the event options appear, click “Appointment slots,” as shown below at the very top of the window. Set the date range of the slots you’d like to open up for appointments, as well as how long each appointment should be by default next to “Slots with duration.”
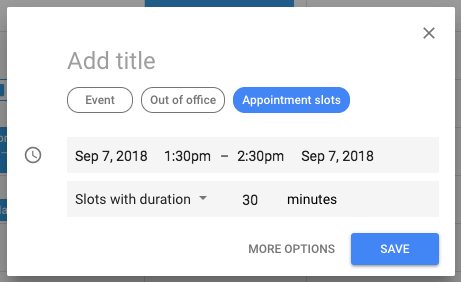
If you’d like more control over your Appointments, click “More Options,” and you’ll be taken to the window shown below. Click “This calendar’s appointment page” for the link you can then share with those whom you’re willing to arrange appointments.
13. Browse calendars of interest.
Want to make sure you’re keeping track of holidays in other countries, your favorite sports team’s schedule, or just the time the sun rises and sets each day? You’ll find these calendars (and more) on your Google Calendar’s lefthand sidebar.
How to Use This Feature
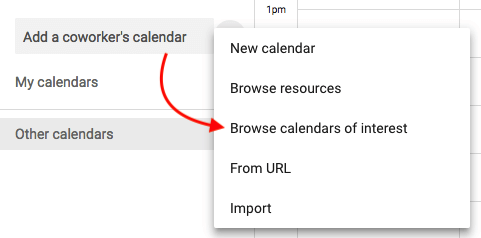
To browse and add interesting calendars, click the plus sign (+) next to “Add a coworker’s calendar.” Then, choose “Browse calendars of interest.” From there, choose the calendars you’d like to subscribe to.
14. Implement a custom view.
When you first set up your calendar, you’ll have the option to view it as a week, month, the next 4 days, or as an agenda. That “4 days” option? You can switch that out with a different interval in your “Custom view” options.
How to Use This Feature
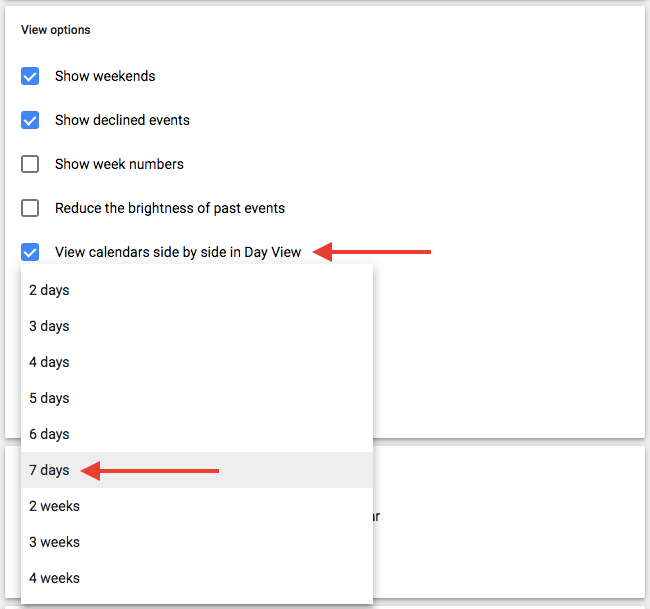
To adjust the number of days you see in your calendar view, click into your settings using the gear icon on the top-righthand corner of your screen. Scroll down to “View options.” Click “Set custom view” and select how many days you want to see at one time from your calendar view, as shown below.
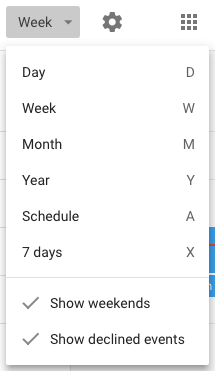
You can also make quicker, more general adjustments to your user interface right from your calendar view. Next to your settings’ gear icon, you’ll see a box that, by default, might say “Week.” Click it to reveal a dropdown menu where you can customize your view further, as shown below.
15. Share your calendars with others.
If you’re using Google Apps for your company, you can also control who sees your calendar, what they see, and whether they have permissions to edit it. (If you have an assistant, this tip will be very important to remember.) You can also make your calendar public, if you wish.
How to Use This Feature
To change your sharing settings, click on the plus sign (+) next to the preferred calendar and choose “Settings and sharing,” as shown below.
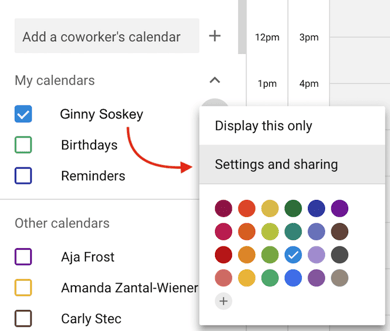
Then, you’ll be taken to the page shown below. Here, you can choose to do any of the following:
- Make the calendar public.
- Choose to show event details to everyone in your company, or just free/busy information.
- Add someone to your calendar and choose their individual permissions (see all details, make changes to events, hide all details, etc).
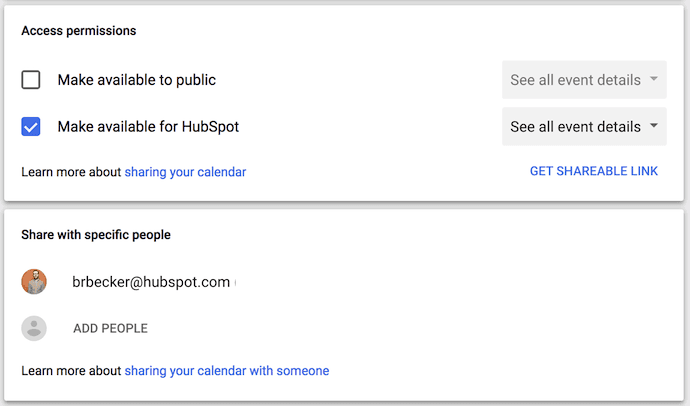
When you’re done, click the back arrow on the top-lefthand corner of your screen to return to your calendar view. Google will automatically save your new calendar settings.
16. Use keyboard shortcuts.
Are you looking to really streamline your Google Calendar efforts? Google Calendar’s got a ton of keyboard shortcuts to use, such as:
- t = Move your calendar view to today
- c = Create an event
- q = Quick Add an event
17. Sync meetings with your CRM.
Use a CRM daily? It can be annoying to back and forth between your Google Calendar and your CRM. Instead, dive into your CRM settings to see if there’s an existing integration with Google Calendar.
HubSpot CRM users, you’re in luck — it’s quick and easy to set up this integration. Learn how to do this here.
18. Sync your calendar with your marketing software.
And if you want to make your Google Calendar align even more with your marketing activities, you can even integrate it with your marketing software.
For HubSpot customers, you can use Zapier to set up some pretty nifty workflows, such as creating a social media message every time an event starts. Check out this page for more on how you can set up that integration, as well as some ideas for ways you can integrate the two.


The 12 Best Graphic Design Portfolios We’ve Ever Seen, & How to Start Your Own
Whether you’re a full-time graphic designer or simply someone who’s interested in dabbling in design as a side project in her free time, it’s critical you create a sleek graphic design portfolio to showcase your work to potential clients.
A graphic design portfolio is typically the only element a client needs to see when choosing a graphic designer — which means a portfolio is vital for proving your skill as a designer.
Additionally, a graphic design portfolio, much like a resume, provides necessary contact information, and any case studies you care to include from past employers.
Simply put, a graphic design portfolio can establish your legitimacy as a designer worth hiring.
With all that said, you’re probably thinking — gee, thanks, no pressure or anything.
Fortunately, we’ve cultivated a list of 12 impressive graphic design portfolios, followed by instructions on how you can create your own. Keep reading to get all the tips you need to curate the perfect space to showcase your work.

Graphic design portfolio website examples
- Heather Shaw
- MDZ Design
- Nicolas Paries
- Gleb Kuznetsov
- Chris Tammar
- Stefanie Brueckler
- Mingfei Yang
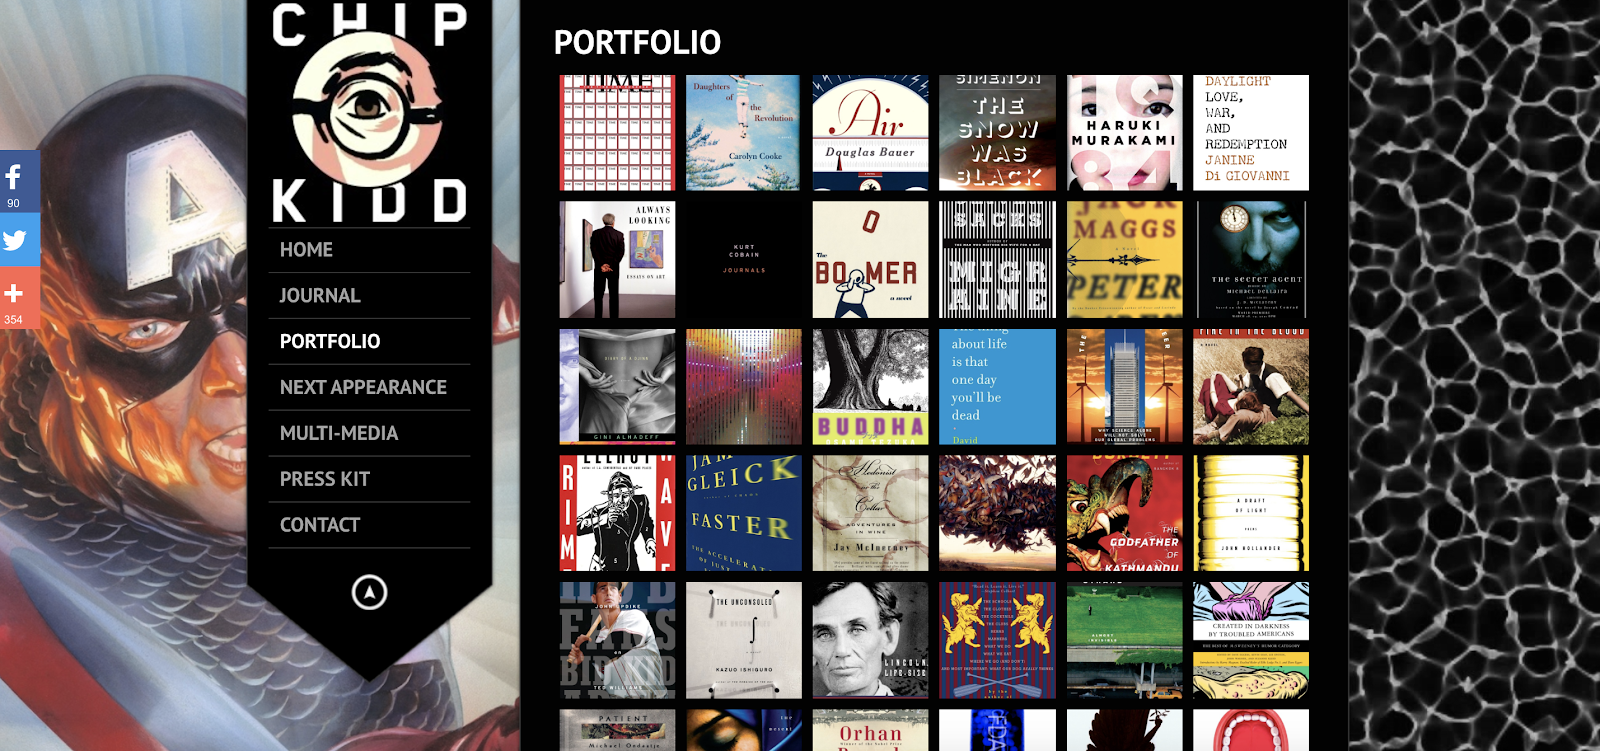
- Chip Kidd
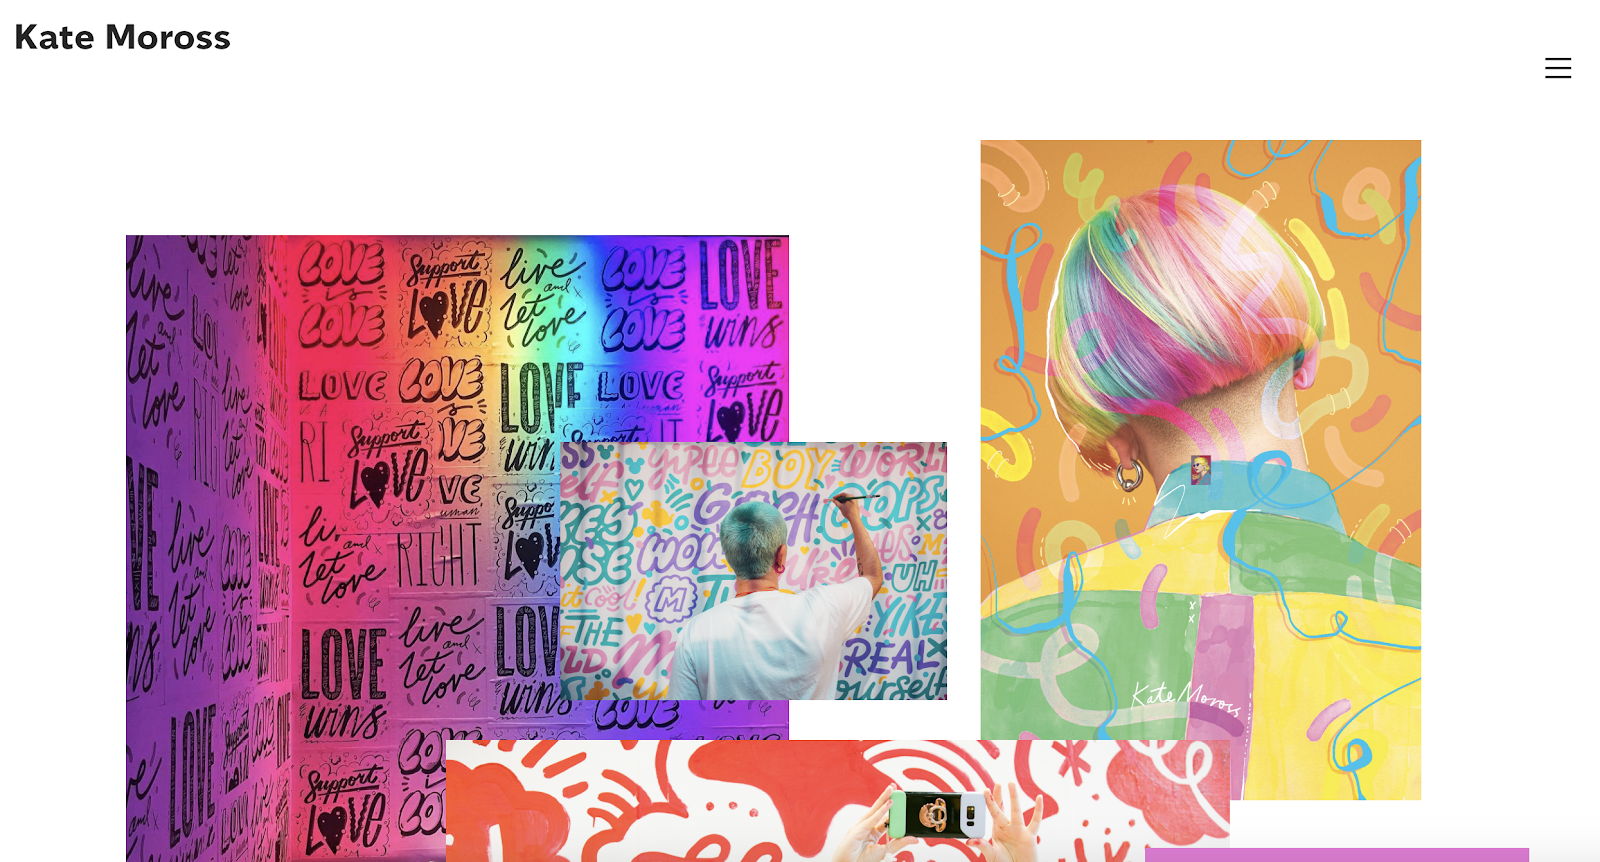
- Kate Moross
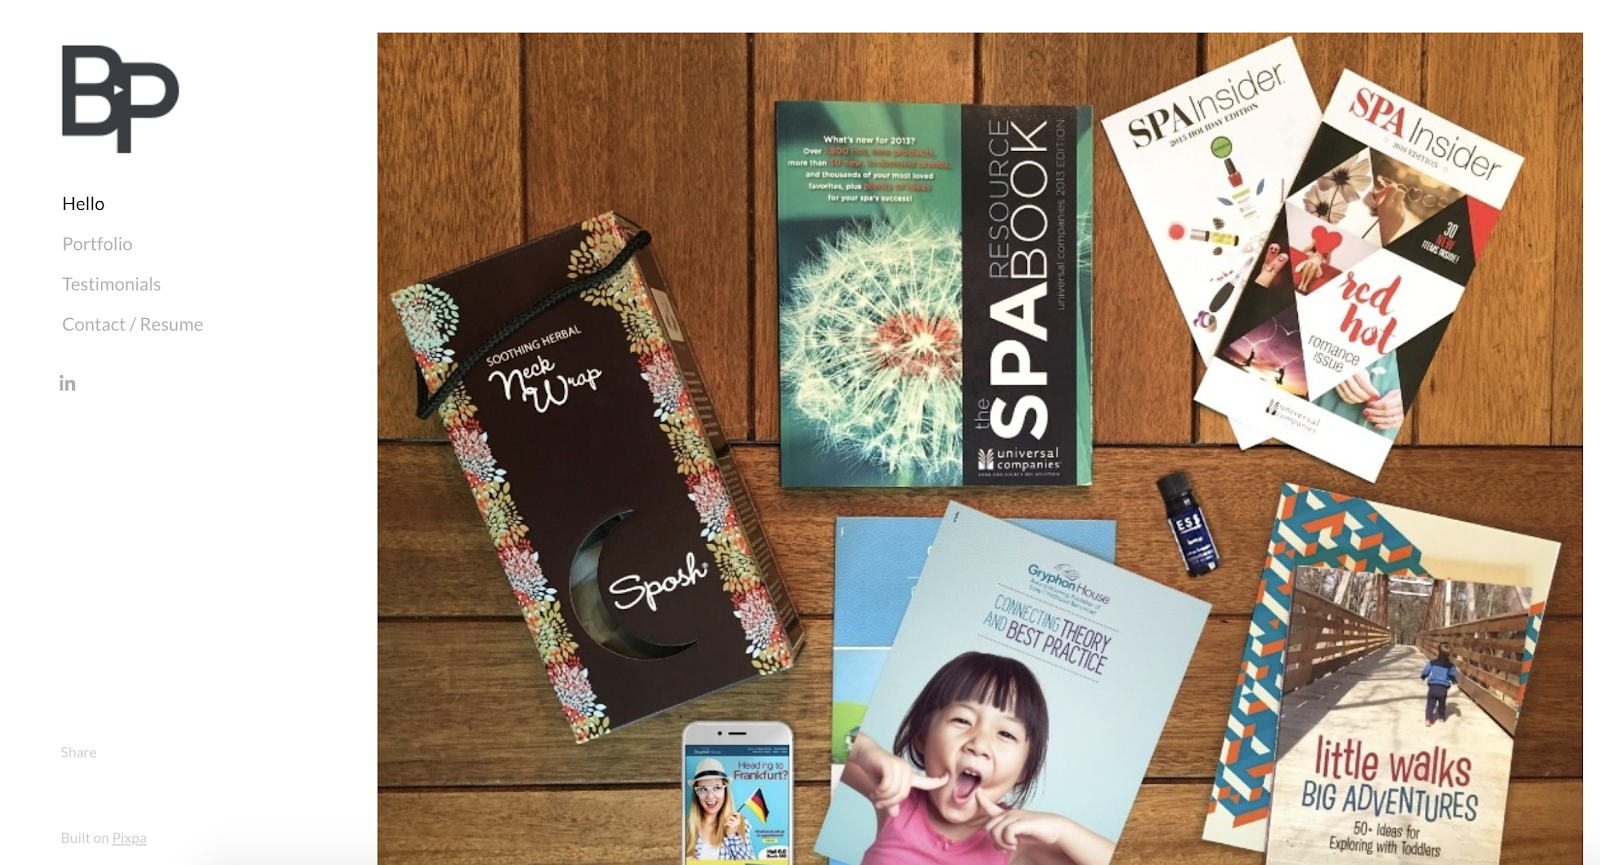
- Brook Perryman
- Tobias van Schneider
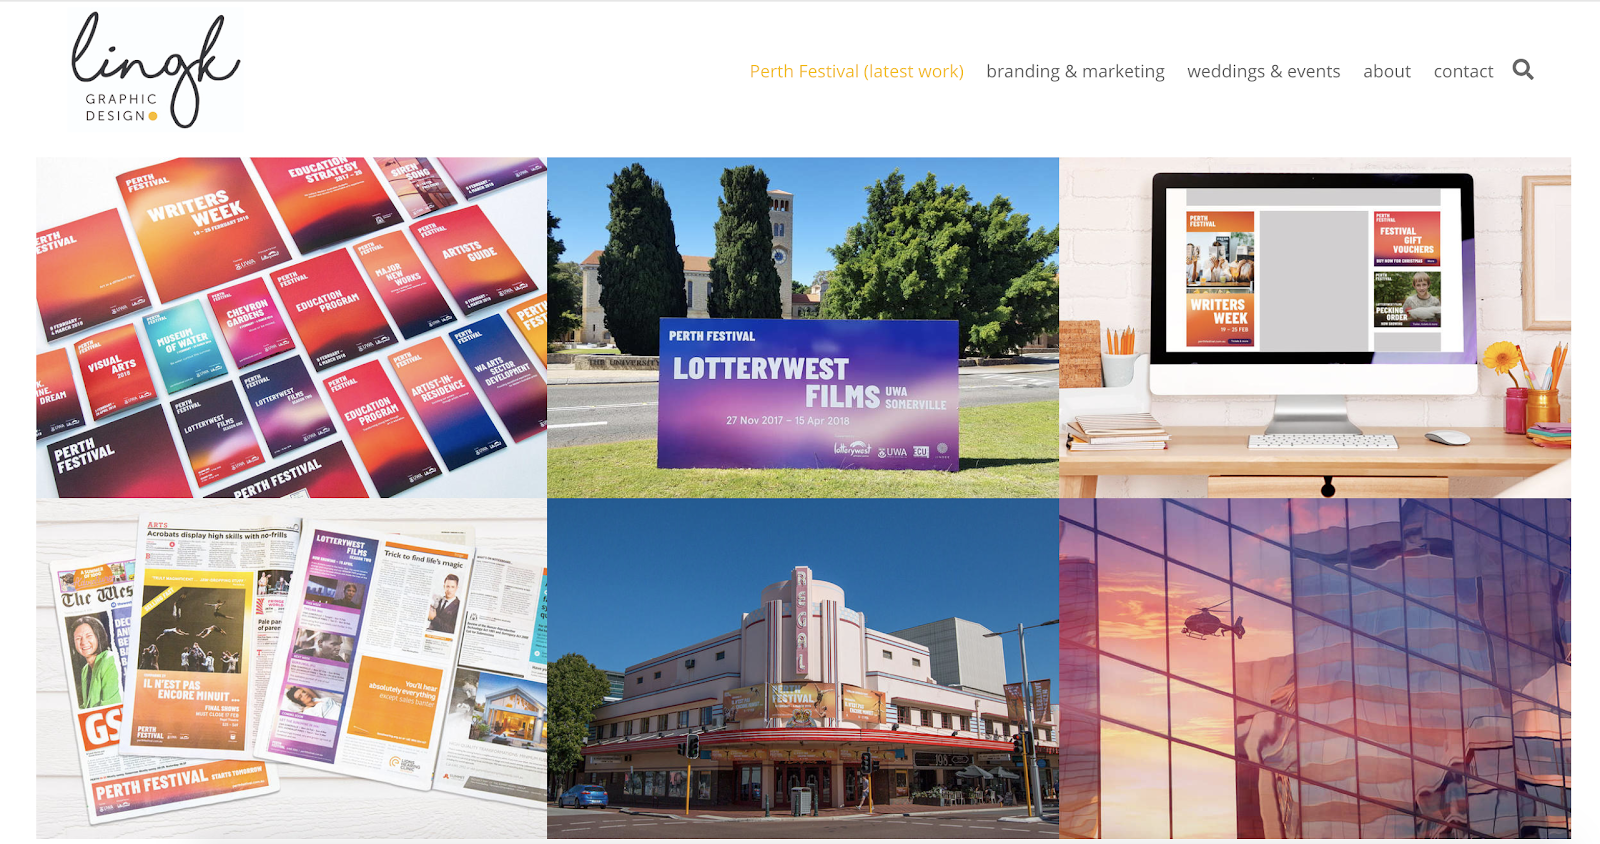
- Ling K
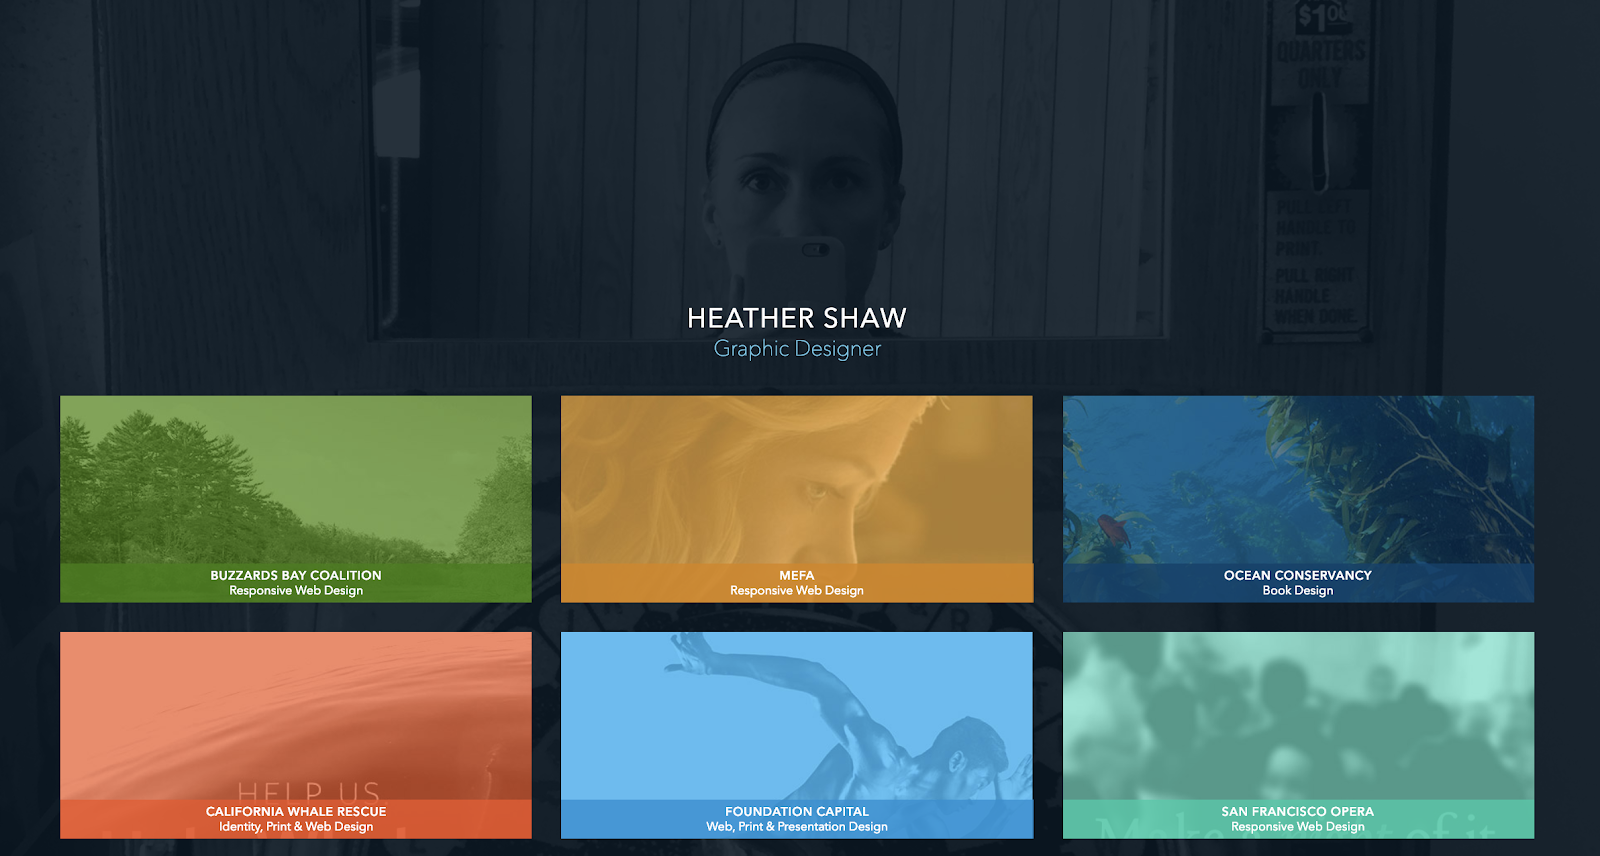
1. Heather Shaw
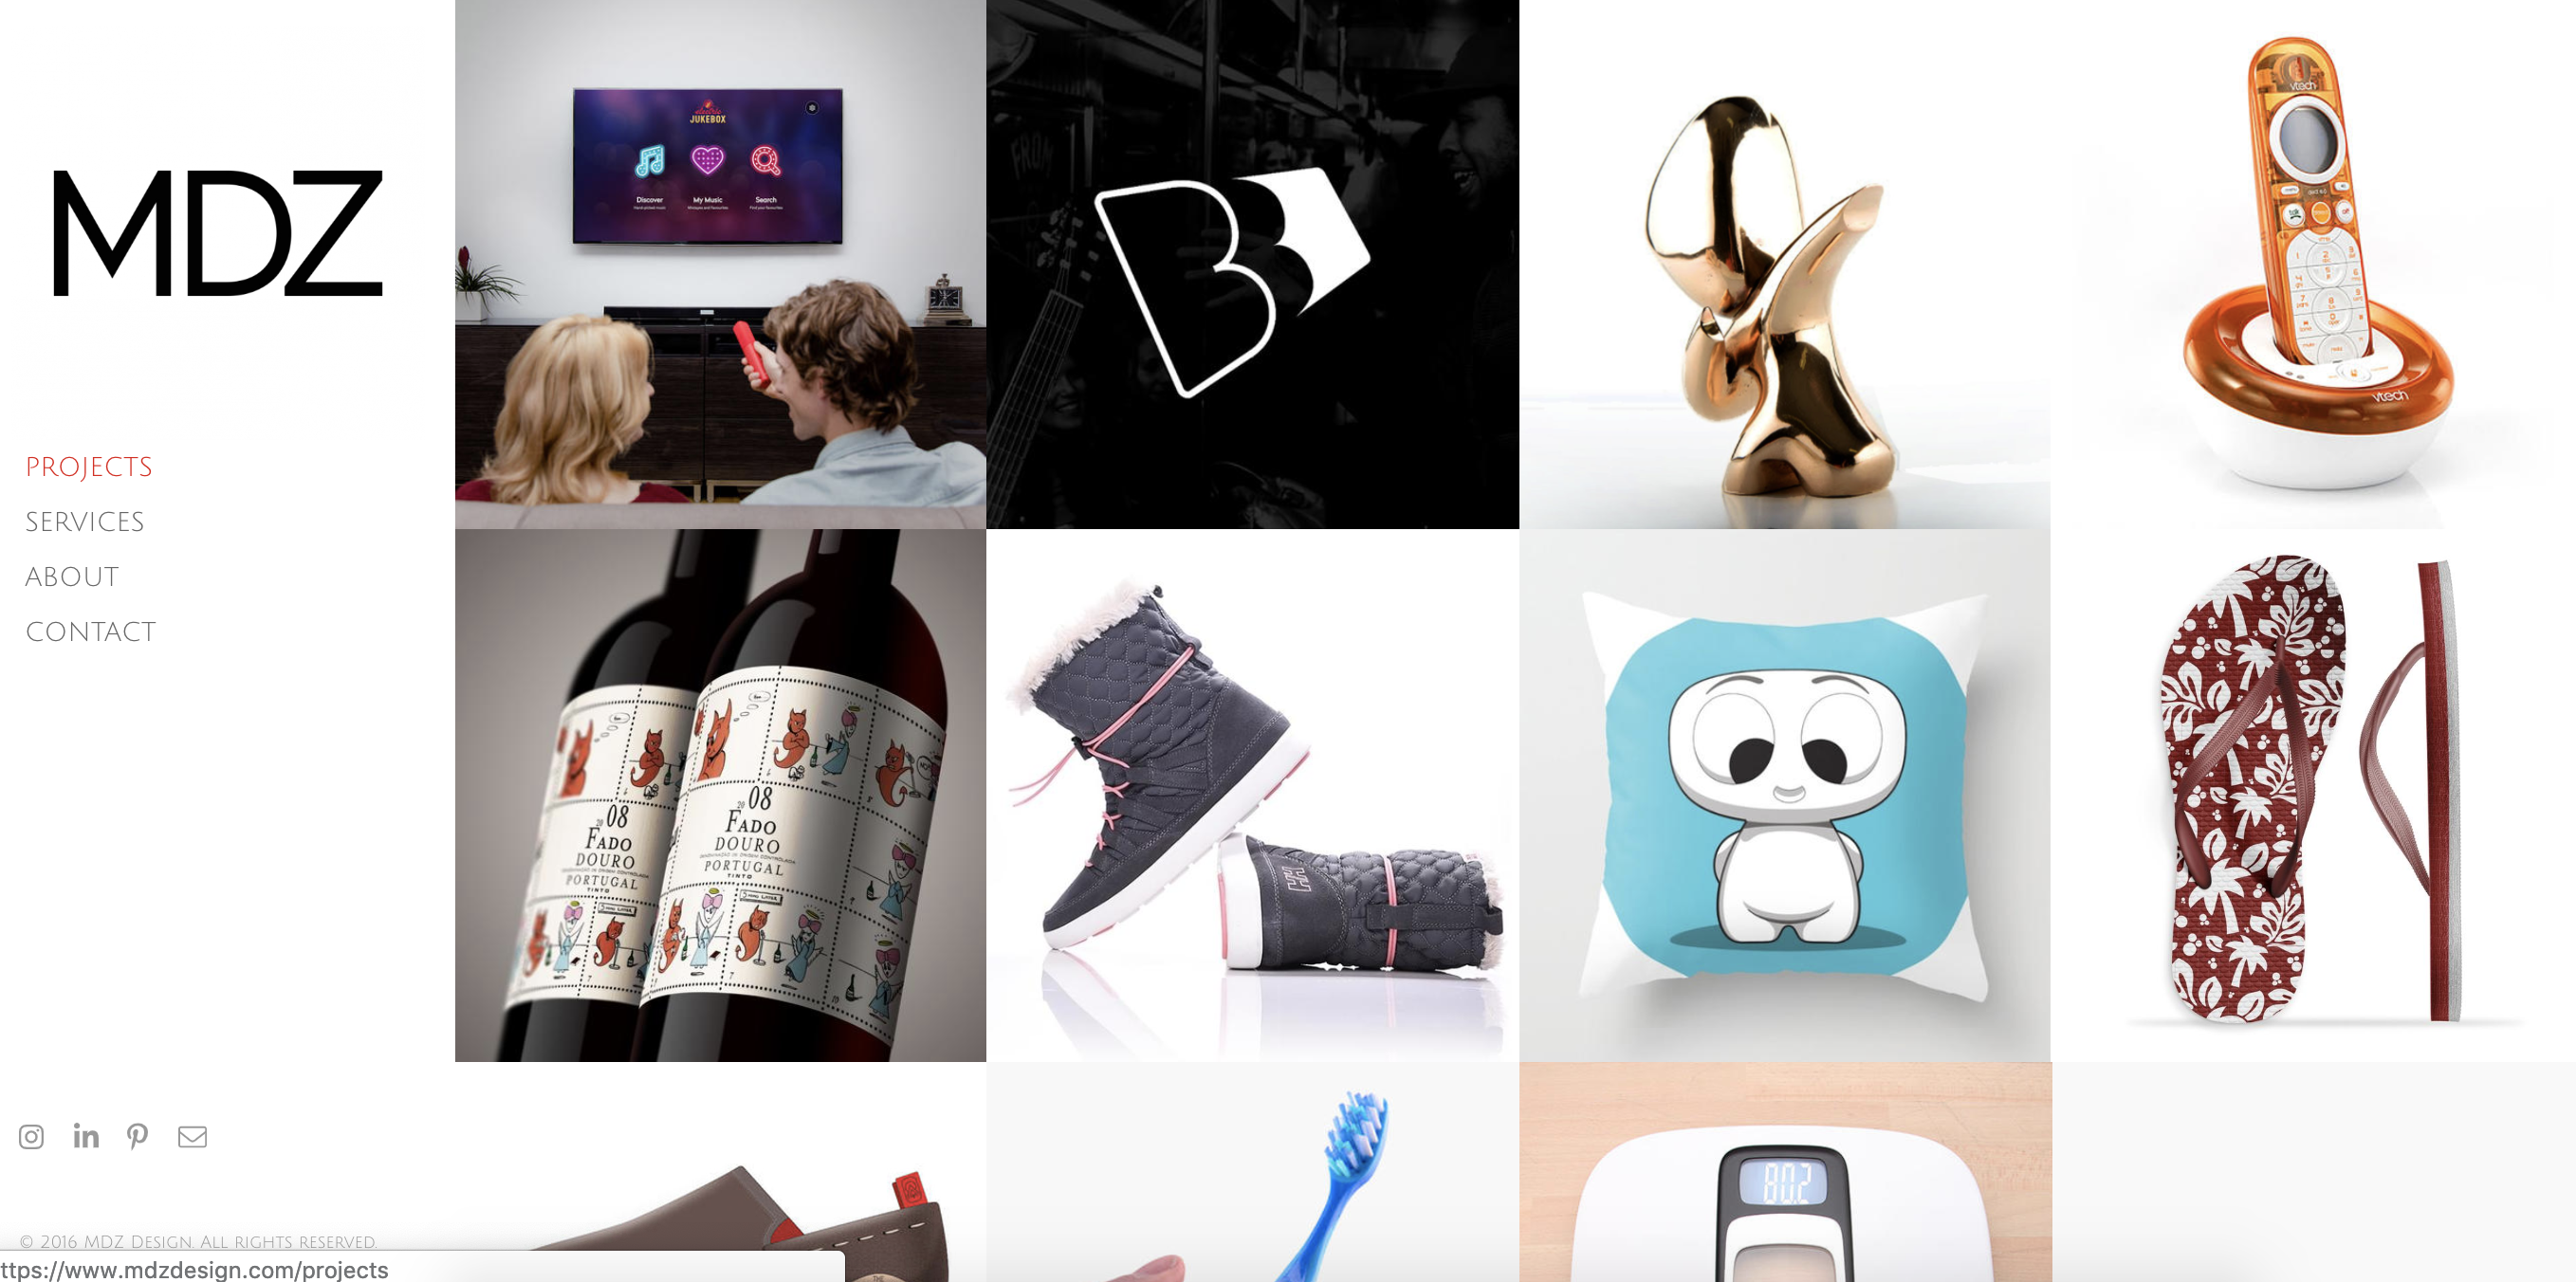
2. MDZ Design

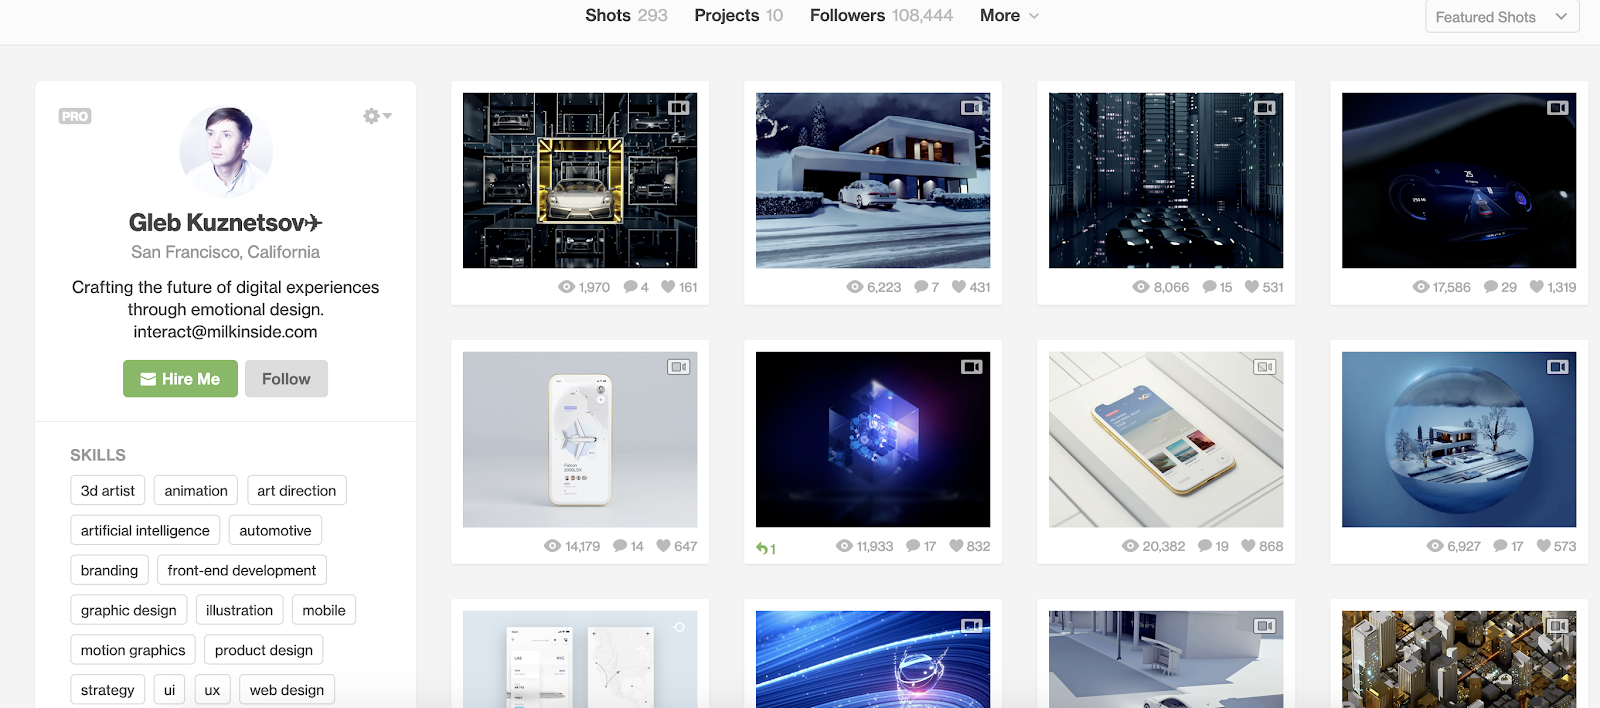
5. Chris Tammar

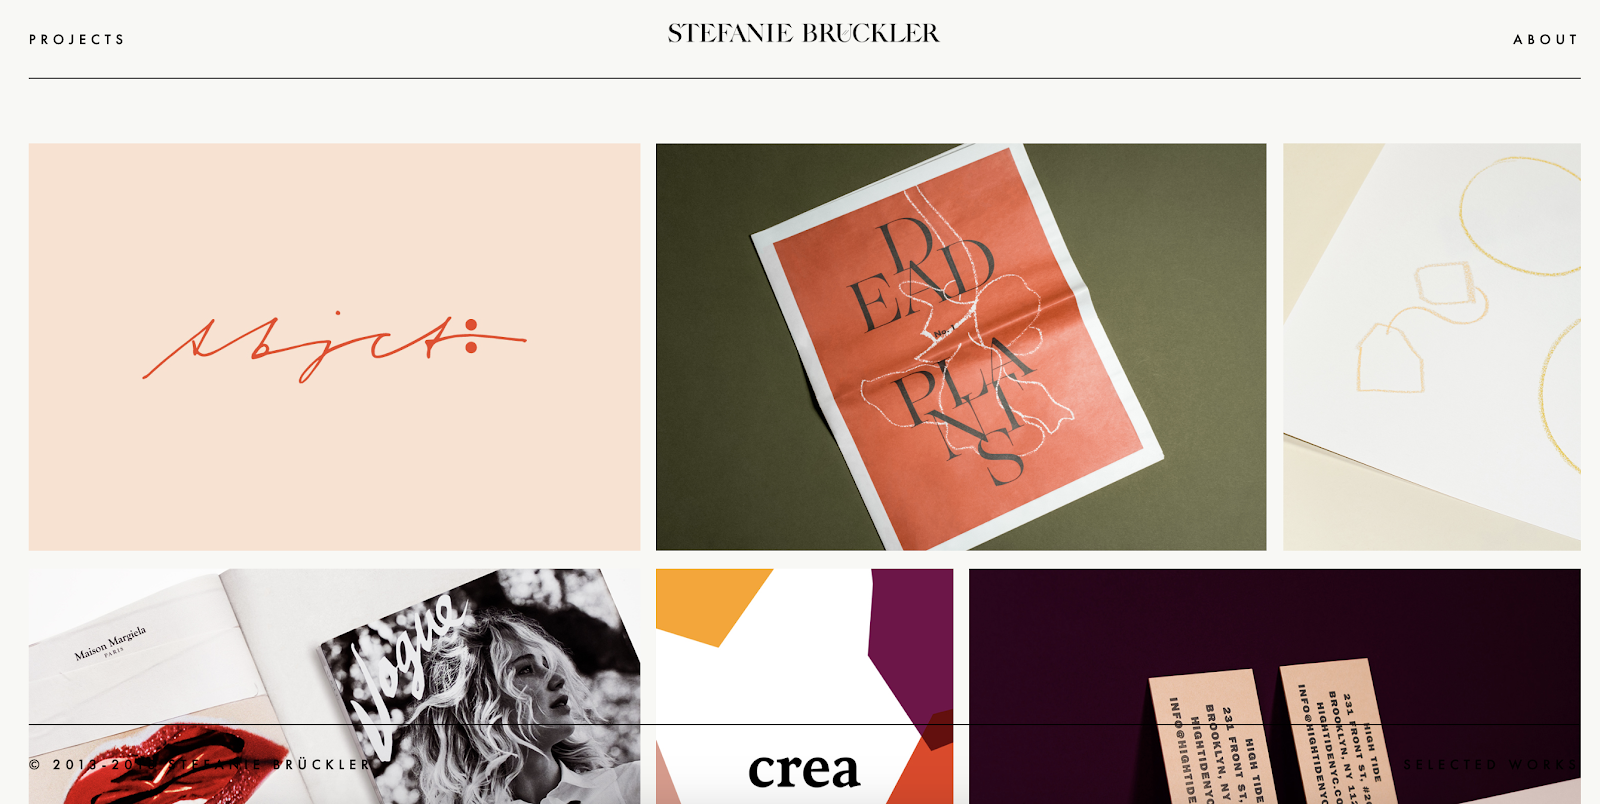
7. Mingfei Yang

8. Chip Kidd
9. Kate Moross
10. Brook Perryman

12. Ling K
How to make a graphic design portfolio
- Curate your best work, and show a wide breadth of skill.
- Choose the right platform to showcase your work.
- Include a professional case study, or client recommendations.
- Integrate your personality.
- Describe the creative process.
- Show non-client work, or side projects.
1. Curate your best work, and show a wide breadth of skill.
Lindsay Burke, a HubSpot Product Designer, emphasizes the importance of quality over quantity when it comes to curating a graphic design portfolio. She says, “I recommend selecting your strongest projects and making these the primary focus of your portfolio website.”
Ideally, your portfolio will feature your sharpest, most impressive 10-20 designs — undoubtedly, someone pursuing your portfolio won’t have the time to look at more, and if your first couple projects are impressive enough, they shouldn’t need to. However, it’s equally critical you show potential clients your versatility. If you’ve dabbled in logo design as well as video animation, it’s good to include both kinds of projects in your portfolio.
2. Choose the right platform to showcase your work.
Investing in a quality website with a custom domain URL will pay-off in the long run by demonstrating your professionalism to potential clients. Having your own website helps you organize your portfolio to suit all your business needs — for instance, perhaps you’ll include ‘Projects’, ‘About Me’, and ‘Contact Me’ sections, so visitors can peruse your content and then contact you without ever leaving the site.
Take a look at 7 of the Best Website Builders for 2019 if you need help choosing the best platform for your portfolio.
3. Include a professional case study, or client recommendations.
Lindsay Burke told me it’s incredibly valuable to write out a case study to complement any website visuals — “Through a written case study, your site visitors can get a sense of your project’s background, the problem you were aiming to solve through design, and the process you took to arrive at a final deliverable. A lot of time, effort and iteration goes into design solutions, and a written case study will help communicate your unique process.”
To cultivate a strong case study, consider including the background of the project, the problem, the process, your deliverable, and any next steps. In the process section of your case study, Burke suggests including research, experience mapping, persona development, wire-framing, sketching, usability testing, and iteration.
For further inspiration, check out one of the case studies Lindsay Burke uses for her personal website.
Additionally, it will impress future clients if you can include recommendations from prior employers, which allows you to demonstrate a level of professionalism.
4. Integrate your personality.
As the examples above indicate, each portfolio is drastically different depending on the artist’s unique style. Someone checking out Tobias van Schneider’s portfolio will expect something vastly different than someone looking at Ling K’s site. Ensure your portfolio — including layout, background, and website title — reflect who you are as a designer.
5. Describe the creative process.
Each designer has a unique process when working with clients — and the sooner a potential client can learn about your process, the better. It’s important you include context, so visitors can get a sense for how you handle challenges, and how your designs solve real-world problems.
Plus, including a description of your creative process can help a potential client determine whether you’re capable of handling the scope of their project. For instance, they might be unsure of your ability to handle graphic designs for mobile until they read how you single-handedly brainstormed and created the designs for another client’s mobile site. In this case, context is critical.
6. Show non-client work, or side projects.
Amanda Chong, a HubSpot Designer, says, “side projects are a great way to demonstrate your will to take initiative and your ability to balance multiple things at once. They’re also a great way to show some of the more experimental, creative ideas that you might not be able to show through your day-to-day work.”
If you’re just starting out, it’s acceptable to include side projects or non-client work so potential customers can get a sense for your ability and style. Consider incorporating school work, a logo you designed for your aunt’s company, or an internal design you created for your current company — ideally, your designs will negate any concerns potential clients have over your lack of career experience.
Ideas for graphic design portfolio projects
- Reach out to local businesses or start-ups and ask if they need help with a marketing campaign or packaging materials.
- Create content for your own personal brand, and ensure that your content is cohesive across all your personal marketing materials.
- Implement a mock website redesign for a brand you love.
- Put together a creative brief for a fake website, and create graphic design materials for the fictitious company.
- Design a logo for a brand you love.
- Create a stock theme for WordPress.
- Participate in a design challenge.
1. Reach out to local businesses or start-ups and ask if they need help with a marketing campaign or packaging materials.
One of the easiest ways to begin building your client base is by reaching out to non-profits or local businesses in your area. Consider implementing mock-ups or sketches in advance, so you can give these businesses a sense for your skill and vision. Perhaps you think a local restaurant needs a new menu logo, or want to help a gift shop with their online marketing materials. Ideally, in exchange for your services, these businesses will offer to leave a testimonial on your portfolio.
2. Create content for your own personal brand, and ensure that your content is cohesive across all your personal marketing materials.
Take the time to ensure your own marketing materials are cohesive and sleek. Create a unique design for your website, and implement that same design or logo across various materials, including your business card and resume. A client is more likely to work with you if they can see the type of high-quality work you’re able to create for yourself.
3. Implement a mock website redesign for a brand you love.
If you’re still waiting for the day LuLuLemon gives you a call to redesign their website, well … why wait? Consider creating a complete website redesign for a well-known brand to demonstrate your skills to future clients. This is a well-known strategy already implemented by plenty of designers — just take a look at some of the impressive Behance mock-ups for designers like Michael Kors.
Additionally, Amanda Chong told me, “If you’re creating mockups for established brands to use as part of your portfolio, it’s important to pair this with a case study or description of the process that helped you arrive at your proposed design. Talk about what you think wasn’t working with the existing design, some of the constraints that you think the designers were working with, and why you made the decisions that you did.”
Chong added, “Mockups are great at showing your visual design skills, but don’t necessarily demonstrate your ability to work in a real-world context, so you’ll want to take the time to explain how you would have approached it in a true business setting.”
4. Put together a creative brief for a fake website, and create graphic design materials for the fictitious company.
If your designs are impressive enough, potential clients won’t necessarily care whether you created them for a fictitious company — and, in fact, they could be impressed with your innovativeness and creativity. Consider demonstrating your skills by putting together a creative brief for a fake company, complete with wireframes and sketches. In due time, real companies will take notice.
5. Design a logo for a brand you love.
Stick to the type of content you enjoy designing. If you’re particularly adept at creating logos, and are often inspired by the logos used by real brands, consider designing an alternative logo for a brand you like. Just take a look at some of these inspiring potential Uber logos — while they ultimately weren’t used by Uber, they’re nonetheless good examples of the designers’ skills.
6. Create a stock theme for WordPress.
WordPress, a popular content management system, allows users to develop stock themes for WP — best of all, if your theme is approved, you can sell it as a premium theme for extra cash. Begin by studying WordPress’s most popular themes, and considering how you can create an impressive alternative. Take a look at WordPress’s Theme Review Requirements to learn more.
7. Participate in a design challenge.
To get inspired, practice your skills, or interact with other designers in a community and build your portfolio at the same time, you might consider participating in a design challenge. Design challenges can also help you uncover skills you didn’t know you had by forcing you to step outside your design comfort-zone. There are various daily, weekly, or monthly challenges which will send you prompts on things to design — for instance, try checking out Daily UI Design Challenge.
Graphic design portfolio tips
- Show your versatility.
- Quality over quantity — display your best work.
- Include case studies.
- Make it clean and easy-to-navigate.
- Prominently display contact information.
- Display your unique personality.

How to Convert With Psychology: 4 Design Levers To Pull
Users, visitors, prospects, leads, and customers.
What do all these words have in common?
They’re how we, as marketers, classify the people who engage with our brand — humans with needs and desires. Yet, as we lump them together in analytics dashboards, based on view time, country of origin, bounce rate, and countless other attributes, it’s easy to forget that they’re just like you and me.
Human needs and desires create demand for your business. They’re what your product or service aims to fulfill. But, in order to fulfill these needs and desires, your business needs more than just a good product. You also need a solid grasp of design.
Design, more than anything else, is understanding what drives people’s behavior. What do they want? How do they want to receive it? And how can you deliver it to them? In other words, you need a firm grasp of psychology.
Fortunately, when you optimize your website design for conversion, you can leverage psychology everywhere: in colors and numbers, shapes and taglines, and even the serifs of letters. And knowing how psychology and design intersect is key to guiding prospects toward conversion.
Below, we’ll take a look at four foundational principles that will help you marry psychology with design, as well as some little-known phenomena that can give you an edge in your design and conversion rate optimization efforts.

How to Convert With Psychology: 4 Design Levers To Pull
1. Beat the curse of knowledge.
From the moment you set out to design any form of marketing collateral — an ad, email, or landing page — you’re cursed. Cursed with knowledge, that is.
To explain further, you obviously know your product well. Your audience, however, does not. So, even if you’ve created a new and innovative product, its benefits won’t register with your audience if you can’t explain it in simple terms. This phenomena isn’t limited to new and complicated products, either. A lot of times, simpler products require the simplest descriptions.
Take bed sheets, for example. Bed sheets are an ubiquitous product that everyone knows how to use. We don’t need to read a manual to understand how to stretch them over our mattresses.
All bed sheets aren’t created equal, though. For instance, you could sell bed sheets with microfibers, high thread counts, or distinct material types. And when you’re writing descriptions of your bed sheets’ features and benefits, it’s natural to think everyone else has the same knowledge about microfibers and thread counts as you do.
What you may not realize, however, is that most of your target audience won’t have your level of product expertise. Consequently, in your attempt to convey a unique selling proposition, you could’ve filled your product description with jargon, which actually makes its selling point harder to understand.
This is the reason the curse of knowledge is so hard to beat — even if you know it’s impacting your ability to write clear, concise, and compelling copy, you can’t really pinpoint the curse’s degree of affect on you. Try all you want, but it’s almost impossible to truly imagine what it’s like to be in your prospects’ shoes. You can’t “unknow” what you know.
So, how do you beat the curse of knowledge?
Consider testing your ad, product listing, email, or landing page on members of your target audience who haven’t been exposed to your product yet.
During your test, try to figure out if they can immediately understand why your product is better than your competition. If they can’t, ask them to explain why, and use their feedback to optimize your marketing collateral in the future.
2. Channel your inner city planner.
Nowadays, attracting attention is a huge challenge and retaining it is even harder. But, in order to convince a visitor to convert on your website, you must be able to do both.
To help you attract and retain your target audience’s attention, let’s go over some findings from a branch of social science founded in the early 1900s — Gestalt Psychology.
Most people are familiar with Gestalt psychology through the phrase, “The whole is greater than the sum of its parts,”, which, today, can be translated to “Rather than perceiving all things equally, we perceive them in the context of their whole.”
For example, image you’re driving through a bustling city. When you’re behind the wheel, what are you paying attention to? Most likely your surroundings, like the cars around you, lights, signs, pedestrians, and bikers, right?
Well, that’s not because there’s nothing else to pay attention to. There’s much more to pay attention to in a busy city. Your brain is just focusing your attention on the most relevant stimuli in your specific situation, like other drivers, pedestrians, and signals, instead of irrelevant stimuli, like restaurants and barber shops (unless you’re looking to grab a bite to eat or get a haircut).
Now, this isn’t happening just because of your amazing prioritization skills. It’s also happening because most cities are designed relatively well. For instance, one way signs show you which streets you can’t turn on, yellow lights warn you to slow down, and red octagons tell you to stop. These indicators have been reinforced as important signals in your mind ever since you started driving.
In regard to digital marketing, a similar process takes place when visitors consume a web page. Our visitors are like drivers in a city, and as marketers and designers, we need to effectively guide them toward the most important parts of our web pages. To learn how to do this, check out the following principles from Gestalt psychology:
The Law of Similarity
Humans tend to group similar things together. Due to this tendency, we also notice things that stand out from the crowd. For example, in the image below, clustering the yellow flowers around the red one makes it stand out.

When it comes to guiding visitors toward certain elements of your web page, the law of similarity is the most important principle to leverage. Any contrast in size, motion, color, and weight will attract people’s attention.
Eye tracking studies also show that we “enter” web pages through its largest elements, like its image or headline. Then, we consume the smaller elements, like its subheadings, bullets, bolded and italicized words, and then finally its copy.
In a nutshell, if an element is larger than its surroundings, like a headline or featured image, it will draw more attention than its surroundings. If an element is a different color than its surroundings, like a call-to-action button or a form, it will also draw more attention than its surroundings. And if elements look different, like bolded or italicized words, they will draw more attention than the text around them. These are some principles to keep in mind when you’re designing content for consumers who have a fleeting amount of attention.
The Law of Past Experience
The Law of Past Experience states that visual stimuli, under certain circumstances, will be categorized according to past experiences. For instance, consider the standard website design. The internet has been around long enough that certain designs have become so common that they’re an industry standard now.
Navigation bars will always be at the top of websites. Site links will be at the bottom. And since humans have been reading for such a long time, a headline will lead to a subheading, which will then lead to body copy. Breaking this fundamental structure by aligning your text to the right or moving your navigation bar to the left sidebar will only create confusion.
The Law of Pragnanz
Our brains prefer simplicity. Whenever possible, we will simplify complex visuals to comprehend them in an easier, quicker fashion. So don’t over-complicate your web pages. Unless you’re writing for industry insiders, eliminate jargon from all your content. You should also stray away from huge blocks of text. If you need to write longer body copy, separate it into digestible chunks of information, like small paragraphs or bullet points.
The Law of Proximity
When perceiving a group of visual stimuli, we group things that are close together. For example, below, you see two groups of dots, one set of 18 and another set of 12, as opposed to one set of 30 dots.

So whether you’re labeling form fields or creating icons with descriptive text, your visitors should instantly understand what belongs where.
3. Leverage the decoy effect.
If your landing page features two pricing options, and your goal is to subtly guide visitors to choose one option over the other, consider including a third, decoy option, which is an asymmetrically valued option that taps into our natural desire to get the best deal possible.
One of the most well-known examples of the decoy effect comes from a famous pricing experiment conducted by Dan Ariely, a behavioral economics professor at MIT.
In his study, he asked 100 MIT students which of the following subscriptions they’d rather purchase.

The print-only subscription was the decoy option, since it was the same price as the print & web subscription but offered significantly less value. After he took his poll, he discovered that 84% of the participants selected the print & web subscription, 16% of them selected the web-only subscription, and none selected the print-only subscription.
According to these results, The Economist would have generated $11,444 in revenue from these students.
In another poll given to 100 different students at MIT, Ariely removed the “print only” option and asked them which subscription they would rather purchase. This time, the results were the complete opposite of the first experiment — a measly 32% of the participants chose the print & web subscription and a whopping 68% of them chose the web-only subscription.
Without the decoy option, which made the most expensive option seem like a better deal, significantly less people bought the priciest subscription and significantly more people bought the cheapest subscription.
According to these results, The Economist would’ve only generated $8,012 in revenue from these students, which was nearly $3,500 less than the experiment with the decoy option.
In sum, to successfully use the decoy effect, you have to make sure that your third option is asymmetrical in value to the other two options. Put simply, the decoy should make the option you want to nudge your visitors toward look like the best deal.
In the experiment above, most participants choose the print & web subscription because they thought they were getting something that was worth $185 for only $125. But, if you think about it, is the print-only subscription really worth $125? Most likely not.
When the print & web subscription was priced this way, though, the participants thought they were buying a print subscription and getting a free web subscription. As a result, they perceived this subscription to be the best deal and couldn’t help but choose it.
4. Minimize user stress as much as possible.
Imagine you’re trying to register for an account on a popular discussion forum so you can post a pressing question. However, there’s an issue with your form.
You’ve hit “Register” twice already, but the page has reloaded with an error message at the top of the form that says “Sorry, there was a problem with your registration. Please make sure all fields are accurate.” This form is also fifteen fields long, and there’s no indication of what you’ve exactly done wrong.
Needless to say, you’re frustrated. And this stress greatly impacts your biology, triggering the release of the stress-inducing hormone, cortisol. In a blog post for ConversionXL, Alex Birkett elaborates on cortisol’s effect on your target audience:
When users feel frustrated, they get stressed and cortisol starts to build up. If it hits a certain threshold, users will give up and go to your competitor’s site. Life is too short to go crazy trying to deal with crappy form design as well as unhelpful error handling.
Most of us can relate to this kind of experience — attempting to solve a problem once or twice and then giving up and going somewhere else.
This is an unforgivable way to lose conversions. Think about it — these visitors want to convert. In fact, they’re so eager to convert that they’re trying to do so a second time. But, unfortunately, you weren’t clear about the error they made. So they left to find another website that didn’t make converting so hard.
To combat this issue, you should write descriptive error messages next to the field where the error was made. And make sure these messages don’t just say “Error”. They should describe the exact steps the user must take to correct the problem.

An even better thing you can do is to clearly label each form field. This will decrease the likelihood of user error because, sometimes, designers overestimate their user’s ability to remember things.
For instance, imagine you’ve arrived at a form that has placeholder text inside each field, like, “Enter age here” and “Enter email address here”. You begin to fill it out, and once you’re four out of six fields through, one of your co-workers walks up to your desk.
A few minutes of small talk later, you return to the form. But you’re having trouble recalling the information you’re supposed to enter in the current field. Even though you just have to delete the text in the field, it still frustrates you, triggering the release of cortisol in your brain.
Brands need to consider this small yet potent problem when building their forms. And according to Katie Sherwin of Nielsen Norman Group, it’s especially important they do so because of how distracted people are today.
If the user forgets the hint, which people often do while filling out long forms, he has to delete what he wrote and, in some cases, click away from the field to reveal the placeholder text again. In an ideal world, users would be entirely focused when filling out a form. But in reality, users multitask. They have different tabs open, or they might be pulled away by an email or phone call. For complex tasks, they might have to stop and go retrieve a document or order number. From our research on mobile usability, we know that mobile users are also frequently distracted and interrupted while using their devices. So, it’s important to help users pick up where they left off.
The best way to help users pick up where they left off is by placing clear, permanent labels above or next to each field, like this:

And for those wanting to remove nearly all friction from form completion, consider a one-click sign-up through Google or Facebook.
Converting With Psychology
The list above is just a few examples of the countless psychological phenomena that impact user behavior. When you better understand how the human brain operates, you can apply some proven principles in all aspects of web design to win conversions.
Now the only question is, will you?

How to Grow Your Instagram Following: A Strategic Plan
Want to quickly grow your Instagram audience? Looking for a strategy that attracts the right kind of connections? In this article, you’ll discover how to combine an Instagram growth strategy with an ad sequence that can turn followers into customers. How This Instagram Growth Strategy Works On average, Instagram users share “more than 95 million […]
The post How to Grow Your Instagram Following: A Strategic Plan appeared first on Social Media Marketing | Social Media Examiner.
from Social Media Marketing | Social Media Examiner https://ift.tt/2ucvpVk
via socialmediaexaminer
Facebook Ad Relevance Metric Updates

Welcome to this week’s edition of the Social Media Marketing Talk Show, a news show for marketers who want to stay on the leading edge of social media. On this week’s Social Media Marketing Talk Show, we explore updates to Facebook ad relevance metrics with special guest Amanda Bond. Watch the Social Media Marketing Talk […]
The post Facebook Ad Relevance Metric Updates appeared first on Social Media Marketing | Social Media Examiner.
from Social Media Marketing | Social Media Examiner https://ift.tt/2VWWDvc
via socialmediaexaminer
The 47 Best Instagram Captions for Every Type of Post
If you’re anything like me, you take about four minutes choosing a filter for your Instagram photo, and about four hours deciding on a caption.
Worst of all, after much creative effort and advice from friends, I’m usually barely able to write a caption that goes beyond, “Had a fun day with friends!”
And I’m a writer — go figure.

Next time you’re contemplating a caption to go with your Instagram photo, take a look at our complete list of captions for any mood you need to evoke or audience you want to connect with.
You can incorporate many of them into an Instagram business strategy (just make sure your audience would indeed find your caption funny, clever, or the right amount of savage.)
Click one of the following links to jump to a section:
- Funny Instagram Captions
- Clever Instagram Captions
- Savage Instagram Captions
- Song Lyrics for Instagram Captions
- Business Instagram Captions
Funny Instagram Captions
- [Employee]’s favorite exercise is a cross between a lunge and a crunch … S/he calls it lunch.
- I need a six-month holiday, twice a year.
- We tried to be normal once. Worst two minutes of our lives!
- There are 16-year-olds competing at the Olympics and some of us still push on “pull” doors.
- Namast’ay in bed.
- That awkward moment when you’re wearing Nike’s and you can’t do it.
- I’m just a girl, standing in front of a salad, asking it to be a cupcake.
- What if we told you … you can eat without posting it on Instagram?
- We know the voices in our heads aren’t real, but sometimes their ideas are just too good to ignore.
Clever Instagram Captions
- Patience — what you have when there are too many witnesses.
- Maybe she’s born with it, maybe it’s the Clarendon filter.
- “Life is short.” False — it’s the longest thing you do.
- Happy Sunday! There may be no excuse for laziness, but [I’m/we’re] still looking.
- Better an “oops” than a “what if.”
- You have stolen a pizza our hearts.
- The world is changed by your example, not your opinion.
- Seven billions smiles, and these are our favorite.
Savage Instagram Captions
- What’s a queen without her king? Historically speaking, more powerful.
- Be a little more you, and a lot less them.
- We’re an acquired taste. If you don’t like us, acquire some taste.
- Well-behaved people don’t make it into history books.
- Be sunshine mixed with a little hurricane.
- Sometimes you just need to do a thing called “what you want.”
- It’s not called being bossy, it’s called having leadership skills.
Song Lyrics for Instagram Captions
- “I’m gonna live like tomorrow doesn’t exist.” — Sia, “Chandelier”
- “I live for the nights that I can’t remember, with the people that I won’t forget.” – Drake, “Show Me a Good Time”
- “I hope you never lose your sense of wonder.” — Lee Ann Womack, “I Hope You Dance”
- “You may say I’m a dreamer, but I’m not the only one.” – John Lennon, “Imagine”
- “Feeling good living better.” — Drake, “Over My Dead Body”
- “Say oh, got this feeling that you can’t fight, like this city is on fire tonight” — OneRepublic, “Good Life”
- “Time makes you bolder” — Fleetwood Mac, “Landslide”
- “If I fail, if I succeed, at least I’ll live as I believe” — Whitney Houston, “The Greatest Love of All”
- “The rest of the world was in black and white, but we were in screaming color.” — Taylor Swift, “Out of the Woods”
- “Lightning strikes every time she moves” — Calvin Harris, “This Is What You Came For”
- “We aren’t ever getting older” — Chainsmokers, “Closer”
- “Sing with me, sing for the years, sing for the laughter, sing for the tears” — Aerosmith, “Dream On”
Business Instagram Captions
- Good evening, [city]! We’re in town for [event] at Booth [#]. Stop by and say hi!
- Our [#]-person squad completed the [road race name]! And we did it all for the post-run sneaker selfie. 👟
- We got product in the pipeline … check back for an exciting announcement on [date]!
- Spot the CEO. 😉
- At [company name], our best asset is our people.
- We had a great time with our customers at [meeting/event]! @[client/partner], you guys rock.
- [Company name] is off for [holiday]! We hope you all have a safe long weekend.
- “It is better to fail in originality than to succeed in imitation.” -Herman Melville
- How many [company name] employees does it take to spell “TEAM”?
- Want to work with these awesome people, working on a lot of awesome things? We’re hiring! Click the link in our bio to see our current openings.
- Check, check, one, two … is this thing on? [Company name] is now on Instagram! Follow us to learn about our (awesome) culture, product, and (awesome) people.


The 47 Best Instagram Captions for Every Type of Post
If you’re anything like me, you take about four minutes choosing a filter for your Instagram photo, and about four hours deciding on a caption.
Worst of all, after much creative effort and advice from friends, I’m usually barely able to write a caption that goes beyond, “Had a fun day with friends!”
And I’m a writer — go figure.
Next time you’re contemplating a caption to go with your Instagram photo, take a look at our complete list of captions for any mood you need to evoke or audience you want to connect with.
You can incorporate many of them into an Instagram business strategy (just make sure your audience would indeed find your caption funny, clever, or the right amount of savage.)
Click one of the following links to jump to a section:
- Funny Instagram Captions
- Clever Instagram Captions
- Savage Instagram Captions
- Song Lyrics for Instagram Captions
- Business Instagram Captions
Funny Instagram Captions
- [Employee]’s favorite exercise is a cross between a lunge and a crunch … S/he calls it lunch.
- I need a six-month holiday, twice a year.
- We tried to be normal once. Worst two minutes of our lives!
- There are 16-year-olds competing at the Olympics and some of us still push on “pull” doors.
- Namast’ay in bed.
- That awkward moment when you’re wearing Nike’s and you can’t do it.
- I’m just a girl, standing in front of a salad, asking it to be a cupcake.
- What if we told you … you can eat without posting it on Instagram?
- We know the voices in our heads aren’t real, but sometimes their ideas are just too good to ignore.
Clever Instagram Captions
- Patience — what you have when there are too many witnesses.
- Maybe she’s born with it, maybe it’s the Clarendon filter.
- “Life is short.” False — it’s the longest thing you do.
- Happy Sunday! There may be no excuse for laziness, but [I’m/we’re] still looking.
- Better an “oops” than a “what if.”
- You have stolen a pizza our hearts.
- The world is changed by your example, not your opinion.
- Seven billions smiles, and these are our favorite.
Savage Instagram Captions
- What’s a queen without her king? Historically speaking, more powerful.
- Be a little more you, and a lot less them.
- We’re an acquired taste. If you don’t like us, acquire some taste.
- Well-behaved people don’t make it into history books.
- Be sunshine mixed with a little hurricane.
- Sometimes you just need to do a thing called “what you want.”
- It’s not called being bossy, it’s called having leadership skills.
Song Lyrics for Instagram Captions
- “I’m gonna live like tomorrow doesn’t exist.” — Sia, “Chandelier”
- “I live for the nights that I can’t remember, with the people that I won’t forget.” – Drake, “Show Me a Good Time”
- “I hope you never lose your sense of wonder.” — Lee Ann Womack, “I Hope You Dance”
- “You may say I’m a dreamer, but I’m not the only one.” – John Lennon, “Imagine”
- “Feeling good living better.” — Drake, “Over My Dead Body”
- “Say oh, got this feeling that you can’t fight, like this city is on fire tonight” — OneRepublic, “Good Life”
- “Time makes you bolder” — Fleetwood Mac, “Landslide”
- “If I fail, if I succeed, at least I’ll live as I believe” — Whitney Houston, “The Greatest Love of All”
- “The rest of the world was in black and white, but we were in screaming color.” — Taylor Swift, “Out of the Woods”
- “Lightning strikes every time she moves” — Calvin Harris, “This Is What You Came For”
- “We aren’t ever getting older” — Chainsmokers, “Closer”
- “Sing with me, sing for the years, sing for the laughter, sing for the tears” — Aerosmith, “Dream On”
Business Instagram Captions
- Good evening, [city]! We’re in town for [event] at Booth [#]. Stop by and say hi!
- Our [#]-person squad completed the [road race name]! And we did it all for the post-run sneaker selfie. 👟
- We got product in the pipeline … check back for an exciting announcement on [date]!
- Spot the CEO. 😉
- At [company name], our best asset is our people.
- We had a great time with our customers at [meeting/event]! @[client/partner], you guys rock.
- [Company name] is off for [holiday]! We hope you all have a safe long weekend.
- “It is better to fail in originality than to succeed in imitation.” -Herman Melville
- How many [company name] employees does it take to spell “TEAM”?
- Want to work with these awesome people, working on a lot of awesome things? We’re hiring! Click the link in our bio to see our current openings.
- Check, check, one, two … is this thing on? [Company name] is now on Instagram! Follow us to learn about our (awesome) culture, product, and (awesome) people.
What Is Demographic Segmentation, & How Do You Do It?
Before you dive into this blog post, I want you to watch this video.
Now, if you laughed at this ad because Danny Tanner’s obsession with cleanliness ruined Uncle Jesse’s romantic moment, then this commercial is just for you. But if you have no idea what I’m talking about, then you’re not in Dannon’s target audience.
You see, Danny Tanner and Uncle Jesse were two of the main characters in Full House, a hugely popular family sitcom that aired from the late 1980s to the mid 1990s. And it gained even more popularity when its reruns were syndicated during the mid-to-late 2000s.
When the creatives at Dannon were brainstorming their Oikos Greek Yogurt commercial that would air during the Super Bowl in 2014, they knew they had to resonate with as much of their their target market as possible, which was most likely young-to-middle aged adults.
So, to avoid bombing on the biggest advertising stage of the year, they decided to sneak a bit into their commercial from one of the most beloved TV shows that their target market watched as kids — Full House.
Now, if Dannon’s target market consisted of young kids or older adults, they probably wouldn’t have went this direction. But since their target market was packed full of Full House fanatics, Dannon was able to craft one of the best Super Bowl commercials in 2014.
Dannon’s Oikos Greek Yogurt ad was such a hit because they were able to figure out which age groups comprised most of their target market. In order to uncover this information, though, they had to do a lot of market research. Fortunately, they had a powerful tool at their disposal — demographic segmentation.
Demographic Segmentation
Demographic segmentation separates your target market into specific, accessible groups of people based on personal attributes like geography, age, education, occupation, and income. By leveraging demographic segmentation, you can create personalized marketing campaigns for each slice of your target market.
Demographic segmentation can also optimize your resources and time because distributing personalized marketing messages to each slice of your target market will resonate with more people and lead to more conversions than spraying a generic message to your entire target market.
To learn how most brands segment their target market, check out the five main demographic attributes they use.
1. Geography
Geographic segmentation slices up your target market based on their geographic location. Since people have different needs and interests across geographies, like the need for cold weather outerwear in Minnesota or the demand for swimwear in South Florida during the winter, it’s important to understand exactly how your target market’s different climates, landscapes, and cityscapes impact their preferences.
2. Age
Age segmentation slices up your target market by specific age ranges or generations, like Generation Z, Millennials, and Baby Boomers. The people in each of these groups grew up during the same time, encounter comparable experiences today, and share similar traits, habits, and opinions, so it’s crucial to distribute personalized campaigns catered for each generation.
For instance, targeting Gen Xers with a nostalgic ad about The Princess Bride might receive an outpour of praise, but targeting the same ad to Gen Zers might not even get a mention on Twitter.
3. Education
Education segmentation slices up your target market by school, area of study, and degree. A lot of brands target by education because most people have deep feelings of loyalty for their alma mater.
In fact, BuzzFeed leverages education segmentation to write articles about a specific college’s tidbits that only their alumni would know. And by writing these types of articles about almost every college in the United States, they can relate to the majority of people who went to college in the country.
4. Occupation
Occupation segmentation slices up your target market by job function, job seniority, and job title. A lot of B2B brands target their audience by occupation because they need to attract specific types of professionals who have the authority to make buying decisions on their team or at their company.
5. Income
Income segmentation slices up your target market by income range. By knowing how much discretionary income your potential customers have, you can market to the people who can actually afford your product or service, set your prices according to their income, and design pricing tiers for each slice of your target market.
Getting Personal
Nowadays, generic, spray-and-pray marketing campaigns don’t fly with consumers anymore. If you can’t relate to each segment of your target market, then you might as well pause all your campaigns.
However, if you can harness the power of demographic segmentation, you can create personalized marketing campaigns for each slice of your target market and resonate with them as much as Danny Tanner and Uncle Jesse did with Dannon’s target market.

What’s a Website Title (Title Tag) & Why Does It Matter for SEO?
To consider what a title tag is, and why it matters for SEO, let’s start with an example.
Let’s say I’m a true beginner in the marketing industry, and I don’t even have a firm grasp on what marketing is — so I turn to Google, and I type in my question, “What is marketing?”
With my question, I’m likely not looking for “marketing best practices” or “10 best marketing campaigns of 2018”. Sure, both of those titles have my keyword “marketing” in them, but they won’t answer my direct question.
So Google, understanding my intent, serves me this:
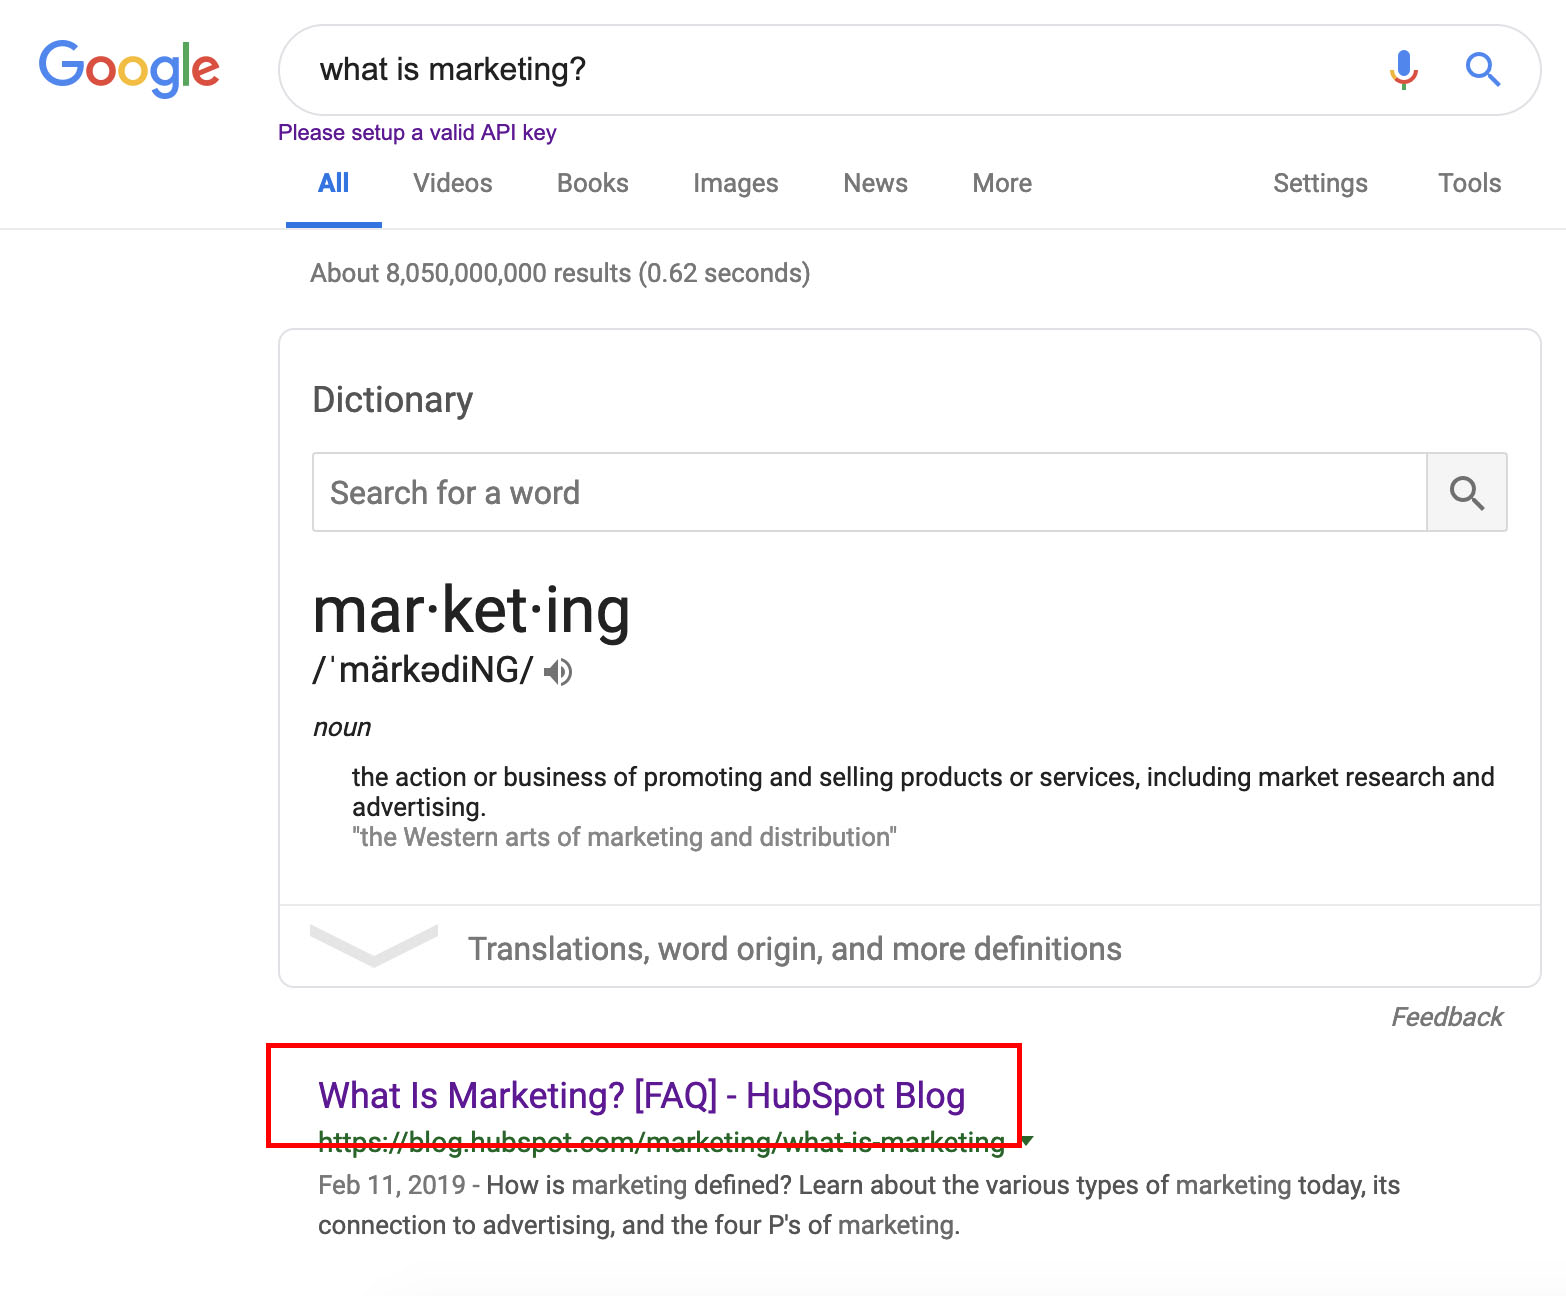
Undoubtedly, you can see how a title benefits both a user and a search engine.
While HubSpot’s “What Is Marketing? [FAQ]” piece needs to be compelling — and follow other SEO tactics — to land on page one of Google, it will never reach its desired audience with the wrong title.
A title, then, enables users to see what a web page’s content is about — and, equally importantly, tells search engines how it should rank the page.

What is a website title?
A website title, or title tag, is an HTML element that specifies the content of a web page. A website title is helpful for both users and search engines. An internet user needs a website title so they can see an accurate and concise description of a page’s content before clicking on a link in the SERPs. Alternatively, search engines need to determine the relevancy of a web page, so it can surface the content as a result for the correct search query.
A search engine knows the title of a web page by finding a title tag in the code — for instance, on “What Is Marketing? [FAQ]”, a search engine will find this in the HTML:

Along with being helpful for search engines and users, a title tag is also useful when someone has multiple tabs open. For instance, let’s say a user is researching marketing extensively, and using your resource as one of many (or, procrastinating on Facebook … ).
When the user needs to return to your web page, she can find the correct tab via your page’s title:

Now that we’ve covered why website titles matter, here are a few best practices when it comes to creating a good title tag:
- Keep it short, ideally under 60 characters
- Don’t use caps
- Don’t overdo keywords in the title — for instance, don’t title your piece, “What Is Marketing? Marketing Tips, Marketing Facts, Marketing General Information”
- Write compelling copy that would make you want to click on the link
- Make it relevant to the page itself
- Make your <h2> keywords different from the title tag
- Include your brand in the title, i.e. “Best Advertising Campaigns – Advertising Age“
To further strengthen your titles, take a look at How to Write Catchy Headlines and Blog Titles Your Readers Can’t Resist.
Website title examples
- 10 Best Nike Sneakers in 2019 [Buying Guide]
- Top 15 Ad Campaigns of the 21st Century – Advertising Age
- The Ultimate Guide to Instagram Hashtags for 2019
- 34 Essential Things to Know Before You Visit China – Y Travel Blog
- A Novel Way to Boost Client Satisfaction – Harvard Business Review
- SEO Is Back. Thank God. – New York Magazine
- Reflecting on My Failure to Build a Billion-Dollar Company – Medium
1. 10 Best Nike Sneakers in 2019 [Buying Guide]

2. Top 15 Ad Campaigns of the 21st Century – Advertising Age

3. The Ultimate Guide to Instagram Hashtags for 2019 – HubSpot Blog
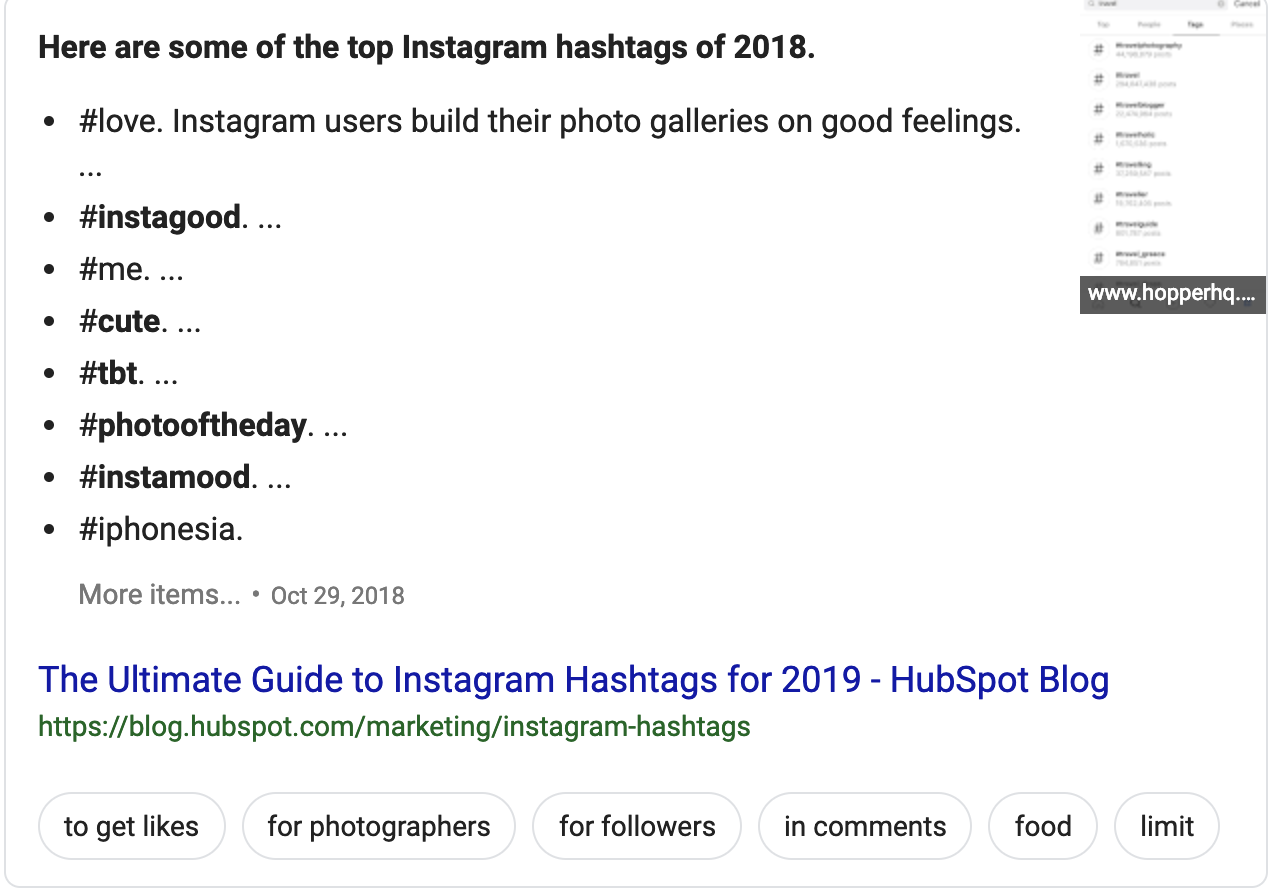
4. 34 Essential Things to Know Before You Visit China – Y Travel Blog

5. A Novel Way to Boost Client Satisfaction – Harvard Business Review

6. SEO Is Back. Thank God. – New York Magazine

7. Reflecting on My Failure to Build a Billion-Dollar Company – Medium



Daily Vlogging: How to Tell Video Stories
Wondering how to tell better stories with video? Wondering how to create interesting stories from mundane events or topics? To explore how to tell fascinating stories with video, I interview Cody Wanner. Cody is a classically trained filmmaker who specializes in telling compelling video stories. He’s also the founder of No Small Creator. You’ll learn […]
The post Daily Vlogging: How to Tell Video Stories appeared first on Social Media Marketing | Social Media Examiner.
from Social Media Marketing | Social Media Examiner https://ift.tt/2TQ24yu
via socialmediaexaminer
The Best Time to Post on Instagram, Facebook, Twitter, LinkedIn, & Pinterest
Social media is one of the best ways to amplify your brand and the great content you’re creating. But it isn’t enough to just post content to social whenever you feel like it. Some times are better than others.
So, what are the best hours to post on each social media channel?
Unfortunately, there’s no perfect answer. People browse each social network differently, and businesses may find different days and times work best for them. For example, while Twitter sees tweets perform well at hours like 6 PM, Pinterest sees certain posts perform well as late at 2 AM.
These aren’t your only (or best) times, though. Good post timing depends on the platform you’re using, as well as on how your target audience interacts with that platform, the regions and corresponding time zones you’re targeting, and your marketing goals (e.g., clickthroughs versus shares).

However, there is ample data out there on the best time to post on Instagram, Facebook, Twitter, LinkedIn, and Pinterest. The great folks at CoSchedule recently looked at a combination of its own original data and more than a dozen studies on this very topic — from the likes of Buffer and Quintly, just to name a couple — and created a helpful list of ideal posting times based on industry trends across today’s most popular social networks. The industries they analyzed include:
- B2C
- B2B
- Software
- Healthcare
- Media
- Higher Education
Bookmark this post as a go-to set of guidelines, and refer to it next time you need to find the optimal posting times for your business.
Best Times to Post on Social Media
The best times to post on social media are different with every social network and what type of audience you want to engage with. Facebook and Twitter both see high engagement at 9:00 AM, whereas one of the best times to post on Instagram is 5:00 PM. LinkedIn caters to B2B audiences, with an ideal posting time of 10:00 AM to 12:00 PM. Pinterest sees high engagement as late as 4:00 AM.
With many businesses facing a growing global audience, varying time zones have become a growing concern, especially when it comes to the best times to post.
To start, let’s take a look at the U.S. About half of the country’s population is in the Eastern Time Zone, and combined with the Central Time Zone, that accounts for over 75% of the total U.S population.
Given that sizable share, if you’re targeting a U.S. audience, try alternating posting times in Eastern and Central Time Zones — we’ll get into those specific times in a bit.
If you’re targeting users outside of the U.S., conduct some research to find out where they live and which social media channels they’re using. That kind of data is available through studies like Smart Insights’ Global Social Media Research Summary, or We Are Social’s annual Digital Global Overview.
1. Best Time to Post on Instagram
Instagram is meant for use on mobile devices. Approximately 60% of its U.S. users use the app daily, though it would appear that many engage with content more during off-work hours than during the workday.
- On average, the best times to post on Instagram across industries are 1:00 PM and 5:00 PM, during lunch and the end of the typical work day, respectively.
- B2B organizations have the most times of high-clickthrough rates to choose from: 12:00 – 1:00 PM, 5:00 – 6:00 PM, and even as late as 8:00 – 9:00 PM when people are winding down for the day.
- The best day to post on Instagram is Friday.
2. Best Time to Post on Facebook
People log in to Facebook on both mobile devices and desktop computers, both at work and at home. How it’s used depends heavily on the audience.
- On average, the best time to post across industries is 9:00 AM, when people are just starting work and going online for the first time.
- Facebook sees another increase in clickthrough rates between 11:00 AM – 12:00 PM, when folks are take their lunch break.
- The hours of 3:00 PM – 4:00 PM are also promising posting times for B2C, B2B, software, and higher-ed organizations.
- The best days to post on Facebook are Thursday to Sunday.
3. Best Time to Post on Twitter
Like Facebook, people use Twitter on both mobile devices and desktop computers, both at work and at home. How it’s used also depends heavily on audience — but people often treat it like an RSS feed, and something to read during downtimes in their day, like commutes, work breaks, and so on.
- Good times to tweet average around 8:00 – 10:00 AM, as well as 6:00 – 9:00 PM — which makes sense, given that it correlates with both morning and evening commutes.
- B2C companies have the most hours to choose from where they would see heightened clickthrough rates on their content: 8:00 – 10:00 AM, 12:00 PM, and then 7:00 – 9:00 PM.
- If your goal is to maximize retweets and clickthroughs, aim for noon or 5–6 p.m.
- For B2C companies, the best days to tweet are weekends. For B2B companies, the best days to tweet are weekdays. Coincidence? Not really. If you think about it, people shop for business needs when they’re working (weekdays) and personal needs when they’re off work (weekends).
4. Best Time to Post on LinkedIn
Roughly 25% of U.S. adults use LinkedIn, largely for professional purposes, during weekdays and the work hours. It’s used with slightly less frequency than some of the other channels on this list.
- Aim to post on LinkedIn between 10:00 AM – 12:00 PM.
- B2C, media, and higher-ed organizations have the narrowest windows for when to post for maximum performance: 12:00 PM, 8:00 AM, and 10:00 AM are their best times, respectively.
- The best day to post on LinkedIn is Wednesday.
5. Best Time to Post on Pinterest
Pinterest users skew heavily female, and 29% of users are active on this channel on a regular basis.
- The best times to post on Pinterest are 8:00 – 11:00 PM and, interestingly, 2:00 – 4:00 AM. This could indicate some interest in the platform in non-North American time zones, which means global content is all the more important here.
- Contrasting many of the other channels we’ve listed here, evening commutes tend to be some of the worst times to post to Pinterest. That could be due to the fact that it’s not as “browseable,” with many pins requiring navigation away from the channel.
There you have it, folks. Keep in mind that although each social network sees its engagement and clickthrough rates increase at specific hours and days of the week, your how much engagement you get depends on your audience and content you publish for them. Perhaps you’ve established a weekly video series that your audience always expects to see on Friday morning. In this case, don’t listen to the data above — you have an agreement with you followers, and this day and time works just for you.
Happy posting, tweeting, and pinning.


How to Set & Achieve Marketing Objectives in 2019
In the content marketing industry, setting objectives can be a double-edged sword. On the one hand, constantly raising the bar can incentivize your team to sustain your growth rate over long periods of time. But on the other hand, it can also incentivize your team to prioritize your company’s needs over your customers’ needs.
You might be thinking that this is the nature of content marketing today — in order to grow, you need to stay laser-focused on hitting your numbers. And, sometimes, to hit your numbers, you need to do what’s best for the business, even if it’s not the best move for your customers.
But contrary to popular belief, solely focusing on the results doesn’t actually produce results. Focusing on serving your customers is what produces results. Tim Cook, Apple’s CEO, is famous for sparking this customer-centric movement. In 2015, he spoke at Goldman Sach’s Technology and Internet Conference in San Francisco, and a reporter asked him what were some of Apple’s biggest accomplishments from the past year. He responded, “We’re not focused on the numbers. We’re focused on the things that produce the numbers.”
In content marketing, one of the most influential things that produce the numbers is a passion for your craft. But, sometimes, we can get so obsessed with optimizing for results that we forget what actually generates the views and leads we desperately desire — compelling content.
In this blog post, we’ll show you how to set realistic marketing objectives that will help you craft audience-centric content, prioritize your customers’ needs, and hit your numbers, all at the same time. Read on to learn how to identify your marketing objectives’ purpose and process and why it’s just as important as the numbers you aim to hit.
What are marketing objectives?
Marketing objectives are the goals your team wants to achieve during a certain period of time. They’re usually a hard number or metric that serve as metaphorical finish line for your team to sprint towards. However, setting marketing objectives isn’t just limited to determining what you want to achieve. You also need to specify how you’re going to reach your goals and why you want to reach them.
In his insightful blog post about setting goals, Jay Acunzo, the founder of Unthinkable Media, reveals a subtle yet potent problem that has pervaded the content marketing industry over the years — traditional goal setting lets you measure what you do, but it doesn’t lend itself to gauging how you do it or why, which is what ultimately gives your work meaning and pushes you to hone your craft.
In marketing, you obviously need to aim for concrete targets. But, like we said earlier, only focusing on the results can sometimes incentivize you to take a course of action that prioritizes your organization’s needs over your customers’ needs.
To help you focus more on your purpose and process instead of just your results, Jay recommends considering two other things when setting a marketing objective — your hunger and aspirational anchor.
Your hunger is your current dissatisfaction with your work today or why you want to achieve your goal. Your aspirational anchor is your vision of your work in the future or how you’ll achieve your goal. These two things drive your motivation and keep you on track to create work that better serves your customers. And when you add your goal to the equation, you’ll be able to simultaneously produce customer-centric work and hit your number.
To learn how to set objectives that help you focus on the “why” and “how” behind your marketing initiative, check out the following example.
Marketing Objective Example
Hunger (Why) – Our blog educates our audience well but it doesn’t resonate emotionally with them enough.
Aspirational Anchor (How) – Run a blog that consistently resonates with our audience and that people look forward to reading every time they receive our email digest.
Goal (What) – Increase blog subscribers by 25% month over month this year.
With this goal setting framework, you can see how the “why” and “how” behind a goal incentivizes behavior that better serves customers and hits numbers at the same time.
For instance, in the example above, this blog team refuses to just do whatever it takes to boost their blog subscription. They want to craft emotionally resonant stories that their audience actually values, or content that’s worth subscribing to, and this is what will lead to their growth in subscribers and create long-term value for their business.
If this blog team didn’t identify their hunger or set an aspirational anchor, however, the only thing that would guide them toward the finish line is the finish line itself. And that could incentivize short-sighted behavior that helps them achieve their goal at the expense of prioritizing their audience’s needs over their own.
Setting Realistic Marketing Objectives With the SMART Goal Framework
Now that we understand the “why” and the “how” behind setting marketing objectives, let’s go over how you can root the “what” in reality with the SMART goal framework.
SMART goals are realistic, quantifiable, and focused targets that you can easily aim for. If you’re wondering what SMART means, it’s an acronym that helps you clearly define your goals. Check out the framework below to learn more.
Specific
In terms of marketing, you should choose the particular metric you want to improve upon, like visitors, leads, or customers. You should also determine what each team members will work on, the resources they’ll have, and their plan of action.
Measurable
If you want to gauge your team’s progress, you need to quantify your goals, like achieving an X percentage increase in visitors, leads, or customers.
Attainable
Make sure that X-percentage increase is achievable in your specific situation. If your blog traffic increased by 5% last month, try to increase it by 8-10% this month, not 30%. It’s crucial to base your goals off of your own analytics, not industry benchmarks, or else you might bite off more than you can chew.
Relevant
Your goal needs to relate to your company’s overall goal and account for current trends in your industry. For instance, will growing your Facebook following lead to more revenue? And is it actually possible for you to significantly boost your organic reach on Facebook after their most recent algorithm change? If you’re aware of these factors, you’ll be more likely to set goals that are realistic, achievable, and beneficial to your company.
Time-bound
Attaching deadlines to your goals puts pressure on your team to accomplish them. And this helps you make consistent and significant progress in the long-term. If you don’t give yourself a deadline, accomplishing your goal will take too long to achieve long-term success. For example, which would you prefer? Increasing leads by 5% every month, leading to a 30-35% increase in half a year? Or trying to increase leads by 15% with no deadline and achieving that goal in a year?
Blending Hunger, Aspirational Anchors, and SMART Goals
By analyzing two different goal setting frameworks, we’ve learned how to identify the “why”, “how”, and “what” behind your marketing objectives . Now, we can blend the two frameworks to set a realistic goal that fulfills our customers needs first and helps us hit our numbers at the same time. Check out this example for more detail.
Specific (Include your hunger and aspiration)
Our blog educates our audience well, but it doesn’t resonate emotionally with them enough. Let’s start running a blog that can consistently resonate with our audience, that people look forward to reading every time they receive our email digest, and can attract more subscribers.
Measurable
Increase month-over-month blog subscribers by 25% this year.
Attainable
Last year, we increased month-over-month blog subscribers by 15%.
Relevant (Include your hunger and aspiration)
If we can craft emotionally resonant stories that our audience actually values, we can build deeper relationships with them, attract more subscribers who we can also build deep relationships with, and hopefully do business with them in the future.
SMART Goal
By crafting stories that consistently resonate with our audience and is worth subscribing to, we can increase our month-to-month subscribers by 25% this year.

6 Instagress Alternatives (That Won’t Shut Down Anytime Soon)
With one billion monthly active users, Instagram is undoubtedly one of the most popular social media platforms today. But the sheer volume of users can make the tool feel intimidating — how is your business supposed to stand out?
It can feel difficult to validate your brand on Instagram, particularly when there’s eight million other business accounts on the platform. If you’re a small business, you know the struggle of growing an audience and engaging with your followers.
Ultimately, when you spend time and effort curating the perfect Instagram presence, it can be frustrating when you don’t see an immediate return. For some, this is when buying followers or using a growth service becomes an option.
Here, we’re going to explore what a growth service is, options of growth services you can use to increase your follower count on Instagram, and alternative ways to boost your audience and engagement without using a third-party service.

What is a Growth Service?
A growth service is a third-party tool that can be purchased to grow followers and engagement on social media. Growth services can be organic or automated, and can sometimes violate a social media platform’s Terms of Service.
Purchasing followers is becoming more common as influencers rise and followers become a sort of currency. But your audience — your real audience — knows better. Buying followers is a tactic that is easy to see through, doesn’t impact long-term engagement, and can actually lower your brand’s reputation.
For a long time, the place to purchase followers was Instagress. Instagress was a growth service that used automation to artificially engage users through likes and follows.
The fall of Instagress can’t be pinpointed to one specific thing, but could be attributed to Instagram’s Terms of Service updates that make using a third-party service risky business, especially if it involves automation. If Instagram senses your followers are bots, or bots are engaging with users on your behalf, your account can be temporarily or permanently banned.
With that warning in mind, if you’re looking to increase your following, here are some Instagress alternatives you can use to increase your follower count, followed by ways to boost your following and engagement without relying on a third-party service.
Instagress alternatives
- SocialSteeze
- Magic Social
- Kicksta
- Combin
- Upleap
- Jarvee
1. SocialSteeze
SocialSteeze is a growth service that uses machine learning to engage followers by targeting accounts through usernames, location, and hashtags. SocialSteeze assigns you a dedicated account manager to build growth in engagement and increase followers over time. Since there is a real human behind this growth service, it complies with Instagram’s Terms of Service — therefore your account is safe from deactivation.
Pricing:
- Regular plan: $15/week or $38/month. Includes a targeted audience, a guarantee of real followers, and a fully managed service.
- Elite plan: $25/week, $99/month, and has the option of one payment annually of $449. Includes everything in the Regular plan, plus priority support and double the engagement.
2. Magic Social
Magic Social also connects your account to a dedicated growth manager, who engages with people on Instagram for you. Magic Social also uses targeting to connect you with relevant followers.
Like SocialSteeze, Magic Social is a low-risk alternative to Instagress and has great reviews for their services, plans, and pricing.
Pricing:
- Regular plan: $15/week or $38/month. Includes a targeted audience, a guarantee of real followers, and a maintained service.
- Professional plan: $25/week, $99/month, and has the option of one payment annually of $420. Includes everything in the Regular plan, plus priority support and double the engagement.
3. Kicksta
Kicksta uses human outreach to connect with Instagram users through likes, comments, and follows. You provide Kicksta with Instagram accounts that have followers with whom you’d like to attract. Then, via your account, Kicksta likes photos from those individual users to spark engagement. The hope is that since these accounts have similar interests to your brand, it will increase the chance that they’ll follow your business.
This service is similar to having an Instagram Community Manager liking pictures for you all day. And for less than $1.65 a day, it’s extremely affordable. But Kicksta only provides likes from your account, and cannot contribute to discussion via messages or comments — a vital point of the inbound marketing strategy you’ll be missing.
Pricing:
- Moderate Growth plan: $49/month. Includes up to 1,000 engagements a day, video onboarding, and 10 unique targets. This plan is marketed towards Instagram savvy influencers or entrepreneurs.
- Maximum Growth plan: $99/month. Includes up to 1,500 daily engagements, 40 targets, premium support, and more.
4. Combin
Combin is a follower engagement app that you can download on Windows, Mac OS, or Linux. The app provides you with an easy-to-use set of tools to organically boost your following. The tools it offers are focused on growing your followers and fostering relationships. With search tools and machine learning, you can find users who are already engaged with similar accounts and prioritize the users that are most likely to become your new loyal followers.
The interface itself is pretty easy-to-use. This is more of a self-management tool than a growth service. You aren’t paying someone else (or a bot) to do the work for you. It requires brand knowledge and time to input searches and discover potential followers.
Pricing:
- Starter plan: Free. This is a good way to try out the functionality of the application before purchasing.
- Personal plan: $10/month. Includes management of one account, 1,000 instant search results for posts and users, and in-app actions.
- Business plan: $30/month. Includes management of five accounts and everything in the Personal plan.
5. Upleap
Upleap pairs you with an account manager who is dedicated to growing your account. You can also sign up for a trial period to test if this growth service is right for your Instagram goals. Upleap uses targeting to find users who will want to engage with your content. Upleap guarantees that it will only interact with real users, which will hopefully help your engagement in the long-term.
Pricing:
- Lite plan: $39/month or $349/year. This plan is best for personal accounts and upcoming influencers.
- Standard plan: $69/month or $579/year. If you are looking for faster growth, this plan is for larger influencers and businesses.
- Premium plan: $99/month or $709/year. The fastest option for businesses and influencers.
6. Jarvee
Jarvee is Instagram marketing automation software. With Jarvee, you can automate responses to new followers — such as direct messages, likes, and comments — to engage with your audience. Instead of spending hours interacting with users yourself, Jarvee automates this process. The software also includes audience targeting based on hashtags and location. This growth service works across multiple platforms, not just Instagram, and you have the ability to set different automation settings for each account, including time between interactions and when to deliver messages.
With this service, you are managing your own accounts instead of giving an external agency access. You can also schedule your posts directly from Jarvee, a feature that is hard to find on other Instagress alternatives. Jarvee is currently only available on Windows.
Pricing:
- Starter plan: $29.95/month. Includes all scheduling and automation features, allows you to connect 10 accounts with premium customer support.
- Personal plan: $69.95/month. Includes all scheduling and automation features, allows you to connect 70 social accounts, and also includes premium customer support.
- Premium plan: $99.95/month. Includes everything on the other two plans, but allows connection to 150 social accounts.
Now that we’ve explored Instagress alternatives, here are some ways to grow an engaged, real following without a third-party service.
1. Implement an Instagram Ad Campaign
If you have the money to spend on followers who won’t actually increase your engagement in the long run, why not put that money behind a paid promotion? Start a campaign with the intent of brand awareness, and target an audience that is likely to be interested in your account.
You’ll have to create a high-value visual ad to ensure it performs well. Take a look at other ads from companies your target audience is following. Instagram ads are becoming more and more popular, so you’ll want to strike a balance between advertised content and content that your audience regularly interacts with, so your paid campaign isn’t disruptive.
To create your campaign, you’ll need to use Facebook Ads Manager. Ads Manager lets you choose your target audience through various demographics, your ad objective, and analyze your campaign’s performance.
2. Experiment with Content
When do you post to Instagram? How many hashtags are you using? Are you sticking to a certain aesthetic when you could be branching out?
If you post at the same time every day, you may be missing some of your target audience. Instagram best practice recommends posting between 2 p.m.- 3 p.m. on weekdays. While that’s the case for most accounts, best practice can be individual. Maybe your target audience is more active on their morning commute than during lunch. Try testing different posting times to see if your engagement increases.
Another thing to experiment with is the type of content you’re posting. If your account consists of only product photos, try a graphic quote or a meme. The posts that stick out from your usual content tend to capture attention. Who knows — maybe you’ll find a new content execution that you’ve never considered before.
3. Interact with Followers
One sure-fire way to increase engagement is to interact with your followers regularly. It may seem simple, but a lot of business accounts drop the ball on this.
Interacting with your audience shows them that you care about what they have to say, and that makes them more likely to stick around. If someone uploads a photo and tags your account, like and comment on it. Reply to comments on your posts. You don’t have to reply to everything, but your customers will notice the effort. This makes your brand feel more personable, and therefore easier for people to engage with.
At the end of the day, Instagram is an incredible marketing tool. It’s important to build a following, but following means nothing if your audience isn’t taking action.
Bots and unengaged followers may look good on the surface, but customers who are interacting with and buying your products are what grow your business.
4. Establish a Story Strategy
Instagram Stories can drive engagement and value, and are a great way to connect with your audience daily. You can use stories to grow brand awareness, increase traffic to blogs or newsletters outside of Instagram, and share sponsored content.
One-third of the most viewed Instagram Stories are from businesses, so make sure you aren’t neglecting this engagement tool. Try posting about industry news and using engagement tactics like polls or questions. Just like your feed, your Stories should consist of a good mix of promotional content and lighthearted, entertaining content.
When establishing your Instagram Stories strategy, you should look back at your brand and social media goals. This will help you focus on the right content to post.
Because of the ephemeral nature of Stories, there isn’t any danger in posting a few every day. Your completion rate may start to dwindle after seven to eight frames, though. And unlike feed posts, there isn’t an optimal time for you to be posting. Stories are a great way to get creative and stay current.
To increase the discoverability of your stories, be sure to add a location tag and hashtags. Users have the ability to search for Stories by hashtag and location, and if your engagement is high you might end up on the Explore page — which will bring new users to your content.
While using an Instagress alternative is an easy option for quick Instagram growth, there’s no better way to ensure your audience is engaged than targeting and attracting them yourself. Ultimately, if you’re not managing your own brand voice and engaging with followers directly, you aren’t going to be able to turn those followers into long-term customers.

Everything You Need to Know About Writing Meta Descriptions
Meta descriptions — sounds complicated, right? If someone asked me about a meta description two years ago, I would’ve assumed they were trying to talk nerdy to me. It sounds like code, and way over a marketer’s head.
I’m happy to report that’s not the case.
Meta descriptions, despite their reputation, can be broken down in a fairly simple way. The more content you create and the further you dig into inbound marketing, the more you’ll discover how important meta descriptions are to the traffic and leads you expect your content to generate.
A meta description is basically what helps the searcher decide whether or not to click the link to an article or webpage. A meta description helps convince or persuade readers to choose your site. Oh, and the bolded words within a meta description — as shown in the screenshot below — indicate which words match those in the search query. Nothing too complicated, right?
Do I Really Need a Meta Description?
Now that we’re on the same page and you know what a meta description is, let’s answer another common question: Do you really need one? The short answer is yes. Here’s why:
1. Increases Clickthrough Rates & Visits from Organic Search
There might be 10 blue links per search engine results page (SERP), but they don’t all get clicked by an equal number of people. The higher up the result ranks, the more people who will see it and, in turn, click on it. To get your result to rank well, however, you need people to start clicking on it. Meta descriptions are your opportunity to entice people to click on your link instead of someone else’s.
2. Give the Right People the Right Information at the Right Time
Although meta descriptions do not directly influence your website’s rank on Google, they can benefit you when people conduct an Advanced Search. These types of searches allow searchers to enter more criteria for what words they want the results that follow to include. These criteria are known to affect your meta description, and can therefore determine if your webpage shows up at all.
3. Increase Visits from Social
Google isn’t the only website that displays your meta description when you publish a piece of content. Social networks like Facebook use what’s called an “open graph” to present the most important data on your webpage when you share it with your followers. This open graph includes a meta description. In other words, your meta description doesn’t just drive search engine traffic (also known as organic traffic) — it drives social media traffic, too.
Meta Description Length
The ideal length of your meta descriptions is, well, not so lengthy: no more than 160 characters, including spaces. But that ideal length has also changed somewhat in the last few years.
In December of 2017, SEO experts all over the world noticed something different about how much meta text Google’s search results were producing on each results page. Results were increasingly showing upwards of 300-character meta descriptions. Marketers took notice and began to adapt, but not before Google’s Danny Sullivan confirmed a retraction from the change it originally made:
Our search snippets are now shorter on average than in recent weeks, though slightly longer than before a change we made last December. There is no fixed length for snippets. Length varies based on what our systems deem to be most useful.
— Danny Sullivan (@dannysullivan)
May 14, 2018
To echo Sullivan’s insight, above, there is no perfect length to meta descriptions because the length displayed depends on how “useful” Google considers each description. However, staying within 155-160 characters will ensure your meta description isn’t cut off with a mysterious ellipsis (learn more about that in the following section).
Meta Description Examples
Just as there isn’t a perfect length for meta descriptions, there isn’t a perfect meta description, either. What you write in your meta description depends entirely on the topic of your article, blog post, or webpage.
Of course, just because there isn’t such a thing as a perfect meta description doesn’t mean there aren’t good models for how to write your own. Here are a few meta description examples — the good and the bad.
Good Meta Descriptions
1. The entire keyword is included in the meta description.
Keyword: “how to plant a tree”

Meta descriptions are not an official ranking factor in Google search results, which means what you put here doesn’t directly affect your ranking. However, they do affect how many clicks you get, which does affect your ranking. Including your entire keyword in the meta description can tell people right away that your webpage answers their question.
2. The meta description teases the answer to a question.
Keyword: “best time to plant a tree”

While some good meta descriptions incorporate the entire keyword to get people’s attention, others can do so by adding an element of mystery to entice their audience to learn more. In the example above, readers know the answer is related to seasons, but they don’t yet know which season is best for planting.
Bad Meta Descriptions
1. The meta description is too hard to follow.
Keyword: “how to plant a tree”

Meta descriptions like the one above simply don’t use time wisely — the short time they have to convince a reader to click on their content. In the example above, the text opens with an “old axiom,” but it’s hard to immediately understand the connection it’s making with how to plant a tree.
2. The meta description is too long to appear in full.
Keyword: “best time to plant a tree”

This is one of the most common misfortunes in SEO, and many times it’s out of our control. If your meta description is deemed too long for Google’s liking, it may get cut off, and the tail end of a sentence can get replaced with an ellipsis (“…”) that can cost you a searcher’s interest in clicking through. Remember, 155-160 characters (including spaces) or less is best.
Picking an SEO-Friendly Meta Description
For every blog, webpage, and piece of copy we write, we follow the best practice of creating a corresponding meta description. Now that you know why you should write a meta description, here’s the how.
1. Write compelling content.
Write a short sentence previewing the content or telling the searcher why they should read your post. Give them a clear benefit of clicking through and reading your post, if necessary. This is your chance to sell them on what you have to offer: informative, valuable content.
2. Use one or two keywords in your meta description.
You might already include keywords in a webpage’s body copy and title. But the meta description should also include keywords that help describe the content of the webpage. Focus on one or two unique keywords in the meta description of each webpage you publish. Don’t stuff these keywords anywhere you can — make sure they fit naturally and help explain what people can expect to see if they click on your link.
3. Aim for 155-160 characters.
I know I said the number of characters that make up your meta description is important, and it is. But when actually displaying this meta data, Google doesn’t measure by characters — it measures by pixels. That is, it’ll cut off a meta description after a certain width. The reason we say 155-160 characters is to give marketers a benchmark to abide by.
4. Eliminate “non-alphanumeric” characters.
Ampersands (&), plus signs (+), em-dashes (—), and other special characters might appear just fine on your computer screen, but search engines can’t read these symbols as easily. These are known as “non-alphanumeric” characters, and you should avoid using them in your meta descriptions. Some of them don’t appear in search results the way you intend for them to. Others can ruin the entire snippet: Any time double quotation marks are used in a meta description, for instance, Google removes it from the search result.
To sum up the makings of a truly powerful meta descriptions, I’ll leave the final words to Google:
“Use quality descriptions … make sure your descriptions are truly descriptive. Because the meta descriptions aren’t displayed in the pages the user sees, it’s easy to let this content slide. But high-quality descriptions can be displayed in Google’s search results, and can go a long way to improving the quality and quantity of your search traffic.” – Google
The Exception
As I get older — and wiser, hopefully — I find there is an exception to every rule. Meta descriptions are no different. As I’ve noted above, conventional logic agrees it’s wise to write a good meta description for any given page.
But for webpages that are targeting three or more major keywords, according to Moz, your best bet might be to let Google’s artificial intelligence extract the text it thinks is most relevant for a meta description. After all, you can’t address all three keywords in the same meta description, and there is always some risk that Google doesn’t care what you put in your content management system‘s meta description box.
If you have a page that lists several articles (think a blog or newsletter archive, or something like “your cart” if you’re ecommerce), it might be okay to forego the meta description. When in doubt, spend time writing an engaging sentence or two, and feel confident the right people will find the right information from you, at the right time.