
Welcome to My Blog
5 Strategies for Selling Your Products at Fairs, Trade Shows, & Festivals
In a world where retail eCommerce sales surpassed $2.3 billion this year, touting your products at fairs, trade shows, and festivals might seem like an outdated tactic to grow your business.
However, showcasing your product or service in real life still has high sales potential today. 82% of trade show attendees are directly involved in their teams’ purchasing decisions, so setting up shop at fairs, trade shows, and festivals is one of the best ways to connect with your target accounts’ key decision makers. Trade shows can also help you connect with other players in your industry, market your brand to a large audience, and gather feedback about your products.
To help you get the most out of your next trade show, we’ve compiled five effective strategies for selling your products at your booth. And hopefully, they can help you instantly attract your visitors’ attention and convince them to buy on the spot.
5 Strategies for Selling Your Products at Fairs, Trade Shows, & Festivals
1. Attract attendees with eye-catching merchandise or engaging entertainment.
In a venue full of generic trade booths screaming for everyone’s attention, you really only have a few seconds to catch someone’s eye. Fortunately, offering interesting swag, giveaways, food, videos, and music can entice them to check out your booth.
For instance, at Agritechnica 2017, a leading trade fair for agricultural technology, SIP set up a booth where people could take a look at their agricultural machinery. But to initially attract them to their booth, they knew asking every single passerby to check out their products would repel them faster than a door-to-door salesman could. So they decided to set up a concert in front of their booth, where visitors would enjoy live music from a few row of seats.
SIP’s clever marketing tactic created a fun environment for attendees who wanted to take a break from the trade fair, and the large crowd attracted even more people to their booth. The live music also warmed up most attendees to SIP’s sales representatives when they talked to them and even prompted some visitors to approach the representatives themselves.
2. Target the companies in attendance.
Another way you can instantly grab people’s attention at trade shows is designing your booth to attract specific target accounts in attendance. For example, at Salesforce’s Dreamforce conference one year, HubSpot used the Marketing Grader Tool to grade the marketing programs of companies we know would be in attendance.
We then displayed a leaderboard of the top-ranked companies on one of our television sets, which captivated the attendees who saw their company on the leaderboard and, in turn, lead to a lot of conversations with our representatives about how they could improve their marketing programs.
3. Sell an experience, not your product.
Most people cherish experiences over material possessions. Why? Because we’re the sum of our experiences, so they’re ingrained in our identity and will always be a part of our story, allowing us to bond with other people who’ve shared similar experiences.
If your booth can provide attendees with a delightful, memorable experience, you’ll make much more of an emotional impact than selling them a product ever would. These experiences also make for a compelling story that visitors will be more than happy to share with other attendees.
Charity Water, an organization that creates clean water sources for remote villages in developing nations, gave attendees at a trade show an experience they will always remember. The company had a booth where guests could carry two 40 pound jugs of water across a 50 yard platform, which African villagers do for miles every single day.

Picture Credit: Huffington Post
This experience helped attendees realize how challenging it is for villagers in developing nations to access something that most people can obtain with the twist of a faucet, boosting the odds that attendees would donate more money to the cause.
4. Make sure your credit card machine works.
As someone who has had to manually enter customers’ credit card information into a point-of-sale system, I know how horrifying it is to see a long line of impatient customers eventually trickle out of your store.
Nowadays, 77% of consumers prefer using credit or debit cards as their main form of payment. So only accepting cash and check or manually entering people’s credit card details could cause you to lose money and loyal customers in the long-run, even though you have to pay credit card companies processing fees to accept their cards.
Before you set up shop at your fair, festival, or trade show, strongly consider purchasing a credit card machine and make sure it works properly.
5. Treat everyone who visits your booth like a paying customer.
The first impression your brand makes on potential customers is arguably the most important interaction in the buyer’s journey. Studies show that good first impressions lead to connection, while bad ones lead to bias and prejudice. And as the old saying goes, you never get a second chance at first impressions.
Acting aloof toward curious attendees who want to learn about your product but might not seem like the best fit for your solution can spark a ripple effect that could hurt your business down the road. You never know when an unqualified prospect could get a new job and turn into a coveted lead. Losing a deal over a bad first impression is infuriating, so treat every visitor like a paying customer — answer all their questions and give them a thorough product demo if they ask for one.

Unriddled: Another Try for Snap Spectacles, Amazon’s New Machine Learning University, and More Tech News You Need
“Unriddled” is HubSpot’s weekly digest of the tech headlines you need to know. We give you the top tech stories in a quick, scannable way and break it all down. It’s tech news: explained.
Unriddled: The Tech News You Need
1. Snap Gives Spectacles Another Shot
Cheddar recently reported that Snap Inc. — the parent company of social media app Snapchat — will launch a second generation of its camera-equipped Spectacles glasses before 2019. The move follows the company’s original Spectacles release in 2016, which ended with $40 million in unsold units. This time, the glasses will be built with two cameras that can create augmented reality video overlays, as well as three-dimensional photo effects — all for the price of $350. Read full story >>
2. Class Is in Session at Amazon’s Machine Learning University
At its annual AWS re:Invent event, Amazon announced this week that the same machine learning courses used to train its own engineers will now be available to all developers. The courses, which will be made available through Amazon Web Services, seek to democratize machine learning, taking it from “something which had previously been only available to the largest, most well-funded technology companies” to something that’s “in the hands of every developer.” The courses are available — for free — here. Read full story >>
3. Meanwhile, Amazon Also Has New Plans for Alexa
Alexa, the voice assistant used to equip such Amazon smart devices as its Echo speakers, is getting a news anchor gig. According to The Verge, the company will roll out new vocal styles for the assistant, including one that some might liken to a newscaster — for reading, of course, news items aloud. Read full story >>
Meanwhile, Amazon is also hoping for Alexa to get some advertising air time, mostly to encourage users to leverage the voice assistant’s online shopping capabilities. According to Recode, the company has been pitching Alexa to consumer packaged goods companies with requests for it to be included in ad campaigns — preferably, in the form of showing people prompting Alexa to buy more of a certain product. But there’s a catch: Amazon wants this advertising to be done “essentially for free.” Read full story >>
4. Time Management Tools (Finally) Arrive on Facebook
Following last week’s news that Instagram has officially added time management tools to its dashboard, the app’s parent company, Facebook, has finally launched its own. The social media giant originally announced these tools over the summer, slating the integration of a new dashboard to show users how much time they spent on both Instagram and Facebook. According to TechCrunch, these tools are officially live on Facebook, where users can set daily time limits for using the app, among other settings. Read full story >>
5. We Tested out the Google Home Hub so You Don’t Have To
As the season of gifting approaches, we had to ask: Where does the Google Home Hub fall on the list? Here’s what happened when we took it for a spin. Read full story >>
6. Ecommerce Wars: Who Are the Top Online Retailers This Holiday Season? [New Data]
And speaking of the holiday shopping season, there’s been a shake-up in the top three online retailers. Here’s a look a the leading contenders for this year’s ecommerce wars. Read full story >>

The Ultimate Guide to Website Development (for Marketers)
Since the 1990s, few things have remained timeless societal staples like Friends, Pokémon, Britney Spears, and the internet.
Seriously. Lots of things have come and gone, but these guys have stuck around, rolled with the Y2K punches, and integrated themselves into our society. (Pokémon Go or a new Britney Spears Vegas residency, anyone?)
Yet nothing has said “I’m here to stay” like the internet. From dial-up and AOL everything to Chrome and IoT, the ~*interwebs*~ have completely infiltrated our lives.
Learning about web development is kind of like drinking from a fire hose. Google “coding,” and you’ve turned the hose on full blast. This guide serves as a slow drip to get you acquainted with and intrigued by the world of web development. It’s by no means a comprehensive manual.
In this guide, we’ll cover the bare-bone-basics of web development, the process of creating a website, and additional resources for those who want to learn more about development — or become a developer themselves.
Keep reading to dive into website development or use the chapter links to jump around the guide.
While web development typically refers to web markup and coding, it includes all related development tasks, such as:
- Client-side scripting (writing front-end code)
- Server-side scripting (writing back-end code)
- Server and network security configuration (setting up security for browsers and networks)
- E-commerce development (building e-commerce websites and online stores)
- Content management system development (writing and building websites)
Web Development Terms to Know
Before I dive into the web development process, let’s review a few web development terms you might see throughout this piece.
Website
Websites are files stored on servers, which are computers that host (fancy term for “store files for”) websites. These servers are connected to a giant network called the internet … or the World Wide Web (if we’re sticking with 90s terminology). We talk more about servers in the next section.
Browsers are computer programs that load the websites via your internet connection, such as Google Chrome or Internet Explorer. Your computer is also known as the client.
Internet Protocol (IP) Address
Internet Protocol is a set of standards that govern interaction on the internet.
To access a website, you need to know its IP address. An IP address is a unique string of numbers. Each device has an IP address to distinguish itself from the billions of websites and devices connected via the internet.
The IP address for HubSpot is 104.16.249.5. You can find any website’s IP address using Command Prompt on Windows or Network Utility > Traceroute on MacBooks or by visiting a site like Site 24×7..
To find your device’s IP address, you can also type “what’s my IP address” into your search browser.
While you can access a website using its IP address, most internet users prefer to use domain names or by going through search engines.
HyperText Transfer Protocol (HTTP)
HyperText Transfer Protocol connects you and your website request to the remote server that houses all website data. It’s a set of rules (a protocol) that defines how messages should be sent over the internet. It allows you to jump between site pages and websites.
When you type a website into your web browser or search for something through a search engine, HTTP provides a framework so that the client (computer) and server can speak the same language when they make requests and responses to each other over the internet. It’s essentially the translator between you and the internet — it reads your website request, reads the code sent back from the server, and translates it for you in the form of a website.
Coding Language
Coding refers to writing code for servers and applications. It’s called a “language” because it’s comprised of vocabulary and grammatical rules for communicating with computers. They also include special commands, abbreviations, and punctuation that can only be read by devices and programs.
In a sense, developers are translators, too.
All software is written by at least one coding language, but they all vary based on platform, operating system, and style. There are many different types of coding languages … all of which fall into two categories (written by two different types of developers) — front-end and back-end.
Front-End
Front-end (or client-side) is the side of web development that you see and interact with as an internet user. When website information is transferred from a server to a browser, front-end coding languages allow the website to function without having to continually “communicate” with the internet.
Front-end code allows users like you and me to interact with a website and play videos, expand or minimize images, highlight text, and more. Web developers who work on front-end coding work on client-side development.
We’ll cover some front-end coding languages in the next section.
Back-End
Back-end (or server-side) is the side that you don’t see when you use the internet. It’s the digital infrastructure, and to non-developers, it looks like a bunch of numbers, letters, and symbols.
Back-end developers work in systems like servers, operating systems, APIs, and databases and manage the code for security, content, and site structure.
There are more back-end coding languages than front-end languages. That’s because of browsers — at the front-end — only understand JavaScript, but a server — at the back-end — can be configured to understand (pretty much) any language. We’ll cover some back-end coding languages in the next section.
Content Management System (CMS)
A content management system is a web application or a series of programs used to create and manage web content. (Note: CMSs aren’t the same as site builders, like Squarespace or Wix.)
While not required to build a website, using is CMS is certainly easier. It provides the building blocks (like plugins and add-ons) and lets you create the structure with your code. CMSs are typically used for e-commerce and blogging, but they’re useful for all types of websites.
Why Learn About Web Development?
You might be a business owner hiring a freelance developer to build your website, a marketer pitching a vision to your development team, or a student learning about development as a career. Regardless of who you are or why you’re reading this guide, understanding the basics of website development can be helpful in this technology-driven world.
The internet isn’t going away anytime soon. In fact, it’s become a portal and primary method of research, connection, education, and entertainment in the world.
As of 2018, there are 4.2 billion global internet users. That’s more than half the world’s population, and these folks are using the internet for a vast variety of reasons.
What’s the one thing those reasons have in common? They require a website, and each website requires a skilled web developer.
Web development is also a rapidly expanding industry. Between now and 2026, the employment of web developers is expected to grow by 15%. That’s much faster than most other technology careers.
Whether you’re looking to hire a web developer or become one, it’s good to know the career path offers high-demand, high-value positions. Continue reading to learn more about the web development process, and don’t forget to check out the resources for developers below.
Website Development Process
The process of creating a website isn’t as easy as 1-2-3. Each development path is different based on the type of website, coding languages, and resources.
The following section serves as a brief overview of the web development process and a short introduction into the most common languages and CMS options.
Planning Your Website and Creating a Sitemap
All websites start with a plan. Developers call this plan a wireframe or sitemap (not to be confused with sitemap.XML, which is a file that helps SERPs crawl and find your site). It doesn’t have to be an official document; it’s simply a vision for your site that’ll give both you and your developer(s) direction and a place to start. You can draw it on a whiteboard or use a tool like Invision, Slickplan, or Mindnode.
Just like a business plan gives a potential investor insight into your goals and deliverables, a sitemap gives a developer an idea of what you’re picturing and the information needed to meet your vision. You can create your sitemap on your own or work with your developer(s).
Here are a few questions to ask yourself when planning your site.
- What individual pages do you want? What content will be on those pages?
- How can you organize those pages into categories? (These categories might represent your homepage menu — if it helps to think about it like that.)
- What is the hierarchy of pages on your site?
- How will the pages link together?
- What pages and categories are essential to your site and user experience, and which ones could be removed or combined?
Writing Your Website Code
The next step in the web development process is writing the code.
Developers will use different coding languages for the front-end and back-end of websites, as well as for different functionalities of the site (such as design, interactivity, etc.) These different languages work together to build and run your site.
Let’s start with the most commonly-used languages. Almost every website uses these three together, and yours probably will, too.
HTML
HyperText Markup Language (HTML) has been used since the 1990s. It’s the foundation of all websites and represents the bare minimum of what’s needed to create a website. (Yes, you can create a website with only HTML. It wouldn’t look too pretty, though.)
Languages like CSS and JavaScript enhance and modify the basic site structure built by HTML. HTML5 is the most recent version and supports cross-platform browser functionality, making it popular in mobile application development.
CSS
Cascading Style Sheets (CSS) was developed in the late 1990s. It adds design elements like typography, colors, and layouts to websites; it’s the cosmetic code.
CSS allows developers to transform your website to match the aesthetic you envisioned for your site, and like HTML5, CSS is compatible with all browsers.
JavaScript
JavaScript is the cherry-on-top of coding languages. Created in the mid-90s, JavaScript is used to add functionality to websites. Developers use it to add animations, automate tasks within certain pages, and add interactive features that enhance user experience.
JavaScript is rapidly evolving. Once considered a “toy” language, JavaScript is now the most widely used coding language in the world. With the help of Node.Js, it’s now a back-end coding language. It’s the first language to be understood by browser, and some have even discussed applying machine learning to it, too.
HTML, CSS, JavaScript are the “big three” of web development. Almost every website uses them in some capacity. There are plenty of others, such as server-side languages like Java, C++, Python, and SQL, but understanding these three is foundational to your website development knowledge.
Building the Back-End of Your Website
Writing code might be one of the more complicated parts of web development, but it’s hardly the only component. You also have to build your back-end and front-end site structures and design.
Let’s start with the back-end.
The back-end handles the data that enables the functionality on the front-end. For example, Facebook’s back-end stores my photos, so that the front-end can then allow others to look at them. It’s comprised of two major components:
- Databases, which is responsible for storing, organizing, and processing data so that it’s retrievable by server requests
- Servers, which is the hardware and software that make up your computer. Servers are responsible for sending, processing, and receiving data requests. They’re the intermediary between the database and the client/browser. The browser will, in effect, tell the server “I need this information”, and the server will know how to get that information from the database and send it to the client.
These components work together to build the foundation for each website.
As for building your website, back-end developers will establish three things.
- Your logic code, which is essentially a set of rules for how your website will respond to certain requests and how objects of your website will interact.
- Your database management, which is how your website will organize, manage, and retrieve its data. Read more on SQL vs. NoSQL here.
- Your infrastructure, which is how your site will be hosted. Hosting your own site will give you greater control, but it’s much more expensive and requires you to maintain your own server health and security.
With these components and decisions in place, your website will be ready for front-end development.
Note: The back-end is slightly tangential to web development because you don’t always need a back-end if you’re not storing any data. “Data” in this context means any user-entered information that you need to save and persist. Think about logging in to a website. If they don’t have a back-end, how could they remember your login information? Or what your profile settings are? To get this information, you need a back-end.
Facebook, as an example, needs to know what people are in your Friends list, what events you have joined, what posts you have created, and more. This is all “data” that lives in a database. If they didn’t have a back-end with a database, none of that data would be accessible to them.
On the other hand, a website that’s purely informational and doesn’t require the users to enter any data wouldn’t need a back-end.
So, if you have no data, you don’t necessarily have a need for back-end development. But that’s not saying you shouldn’t learn the basics. You never know when you might need it.
Building the Front-End of Your Website
If you’ve ever dabbled in web design or toyed with a website in WordPress or Squarespace, you’ve touched front-end web development.
The front-end stuff is important — it’s what your visitors, customers, and users see and how they’ll use your website.
Front-end (or client-side) development includes a combination of JavaScript, HTML, and CSS. It also controls components such as typography, navigation, positioning, and browser compatibility and responsiveness. This part will reflect more of your initial site vision and what you included in your wireframe.
As technology and consumer preferences change, client-side coding tends to become outdated … a lot faster than back-end development does. This is where coding resources (like the ones we’ve included below) come in handy.
Working with a CMS
Why would someone choose a CMS over coding “by hand” or “from scratch?” Well, a CMS — like WordPress or HubSpot — is easier to use (you have to write less code), and it often has tools around hosting the site. On the other hand, it’s less flexible and, therefore, gives you less control over your front-end.
CMS options also often include plugins that remove the need to write a backend. For example, there are WordPress plugins for e-commerce so that, instead of building a complicated back-end to charge customers’ credit cards, you can just use an existing plugin and avoid the need to deal with databases and server-side code at all.
Popular content management systems include HubSpot, Joomla, Magento, and WordPress — which has almost 60% market share. (In this case we’re talking about open source WordPress software, not the WordPress site builder.)
Acquiring a Domain Name
At this point, your website will have an IP address. It also needs a domain name that your visitors can use to find your site.
Perhaps you’ve heard of sites like GoDaddy and Hover. These services help you purchase a domain name and register with ICANN (Internet Corporation for Assigned Names and Numbers). Most domain registrations are good for a year before you’re required to renew.
Site builders and hosting services, like WordPress and Squarespace, also allow you to purchase a domain name.
Website Development Resources
Interested in learning more about development and coding? Outside of connecting and networking with other developers, there are plenty of resources you can tap into to further your understanding or web development.
Web Development Courses and Classes
Whether you want to explore back-end, front-end, or full-stack coding, here are a few online courses and classes recommended by our own HubSpot developers.
TutorialsPoint
All content and resources on TutorialsPoint are free. Between tutorials, ebooks, and videos, TutorialsPoint provides many different ways to learn.
egghead
According to their website, “egghead is a group of working web development professionals and open source contributors that provide you with concise, information-dense video courses on the best tools in the industry.” Users can take courses, listen to podcasts, or take lessons on a wide variety of web development topics.
Khan Academy
Khan Academy is a well-known free educational resource. Users can learn anything from macroeconomics to linear algebra to US history, as well as a handful of computing topics.
freeCodeCamp
freeCodeCamp is a non-profit organization (like Khan Academy) that helps people learn to code for free. With thousands of articles, videos, and interactive lessons, as well as worldwide study groups, freeCodeCamp helps thousands of developers and engineers learn about programming and land development jobs.
Treehouse
Team Treehouse is a subscription-based online learning program. Users pay a monthly fee and gain access to hundreds of courses on over 20 different topics. From JavaScript to Python to PHP, Treehouse can teach you all you need to know about web development.
Web Development Communities
Web developers are masters of the internet, so it makes sense that they’d hang out on there.
According to Code Condo, developers join these communities for:
- Up-to-date information and problem solving
- Insightful answers, new perspectives
- Tips and tricks for all-level programmers
- Links to resources, talks and research papers
- Meeting new friends, code buddies, and potential partners
Here are a few online communities recommended by our own HubSpot developers.
Stack Overflow
Stack Overflow was introduced ten years ago and has since become one of the most popular programming communities in the world. According to co-founder Jeff Atwood, “[Stack Overflow] is by programmers, for programmers, with the ultimate intent of collectively increasing the sum total of good programming knowledge in the world.”
Stack Overflow is a great place to go with questions because most of the time, other developers have asked and answered the same ones. The forums in Stack Overflow keep you connected to other developers while also keeping you informed.
Mozilla Development Network (MDN)
Mozilla Development Network is known to be more thorough and accurate than other online resources. It’s not as much a community as a comprehensive resource and library of documents for coding languages. It’s useful when learning how certain functions work and staying up-to-date on coding and development news.
Reddit is a forum-based community where developers of all levels gather to ask and answer questions. It’s incredibly interactive and includes people from all over the world. You can also join “subreddits” based on topic, such as web design, JavaScript, or freelancing.
Over to You
The internet is here to stay. It’s getting better every day, and web developers are on the front lines of these innovations and improvements. From this blog to your favorite social network to the apps you use on your phone, web development touches almost every part of your day — and your business. Take the time to understand coding and programming to improve not only your life but the lives of your customers, too.

6 Instagram Lead Generation Tactics

Do you have an engaged audience on Instagram? Want to convert your Instagram followers into leads? In this article, you’ll discover how to combine calls to action with Instagram features to capture more leads for your business. #1: Link Your Profile Bio to a Lead Generating Landing Page To best capture leads on Instagram, you’ll […]
The post 6 Instagram Lead Generation Tactics appeared first on Social Media Examiner.
from Social Media Examiner https://ift.tt/2FMHcSX
via socialmediaexaminer
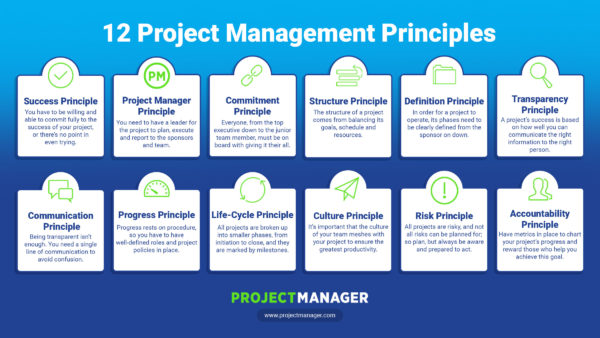
12 Key Project Management Principles & How to Use Them
The Professional Writer’s List of Transition Words & Phrases
Talking to someone who constantly jumps from one unrelated topic to the next is a strange experience. The entire conversation seems random and unfocused, which makes it hard to stay engaged, and easy to say, “I gotta go”.
Needless to say, it’s annoying to talk to people who try to engage you with choppy conversations — and it’s just as irritating in writing. If you abruptly hop from one point to another, you’ll throw your readers off and confuse them, increasing the likelihood that they’ll abandon your piece.
To avoid losing your audience’s attention when moving from one point to another, you need to weave your ideas and thoughts together with transitions. These logical connections between different sections in your writing give your audience a train of thought to follow, boosting the odds that they’ll pay their undivided attention to your piece.
To help you thread your writing together and better engage an audience, we’ve compiled a list of the best transition words and phrases to include in your pieces. Whether you want to know the best transitions for linking separate paragraphs together or ending paragraphs with an emotional punch, we’ve listed some effective options below.
The Professional Writer’s List of Transition Words and Phrases
Additional Evidence
To bolster your ideas with additional support or information, consider using the following transitions:
- Also
- Too
- And
- As well as
- Another
- In addition
- Even more
- Equally
- Let alone
Here’s an example of this type of transition in use:
“Early adopters can provide a lot of helpful feedback about a product’s or technology’s pros and cons. They also inject these companies with revenue that funds the research and development needed to enhance the product or technology enough to gain widespread adoption.”
Comparison
To compare multiple thoughts or ideas, consider using the following transitions:
- Similarly
- Just like
- Likewise
- By the same token
- In a similar fashion
Here’s an example of this type of transition in use:
“Just like Facebook Instant Articles, which lets users read articles without leaving Facebook’s mobile app, Google will host AMP pages on its own servers and serve up the content directly on its site.”
Contrast
To contrast multiple ideas or thoughts, consider using the following transitions:
- On the other hand
- At the same time
- Although
- Albeit
- Even though
- Even so
- In spite of
- Despite
- That said
- Granted
- Regardless
- Admittedly
- Instead
- But
- However
- Though
- Still
- Yet
- While
- Whereas
- Otherwise
Here’s an example of this type of transition in use:
“As jobs become more specialized in today’s workforce, it seems logical to hone a specific skill set, especially during school. But only learning the skills that match the exact requirements of a job today might not prepare you for your job tomorrow.”
Time
To describe something that happened, happens, or will happen during a certain time frame, consider using the following transitions:
- Previously
- Back then
- Nowadays
- Today
- Sometimes
- Once
- This time
- During
- Immediately
- Next
- Then
- Following
- Soon
- While
- Meanwhile
- Simultaneously
Here’s an example of this type of transition in use:
“Nowadays, writing a letter can seem completely archaic. I mean, do people even send mail anymore? Or do they only communicate through email and messaging?”
Concurrent
To describe two things happening at the same time, consider using the following transitions:
- While
- Meanwhile
- Simultaneously
Here’s an example of this type of transition in use:
“Clifford sat alone and depressed in detention. Meanwhile, his friends were having a blast playing football at the common ground.”
Clarification
To spell out a complicated concept, consider using the following transitions:
- In other words
- To clarify
- To rephrase
- To put it another way
- That is
- Actually
Here’s an example of this type of transition in use:
“The term “Bitcoin mining” is really just a clever metaphor for the intricate proof-of-work system that gives people bitcoins in exchange for validating the cryptocurrency’s transactions. In other words, the reason why people mine Bitcoin and how they actually do it is complicated.”
Exemplification
To help your readers grasp an abstract concept, try using the following transitions to provide them with a concrete example:
- To illustrate
- To demonstrate
- For instance
- For example
Here’s an example of this type of transition in use:
“Even if experiences end like your relationships with material objects do, they’ll always be a part of your story, allowing you to bond with other people who’ve shared similar experiences. For instance, who do you think you’ll connect with on a deeper level — someone who also studied abroad in Scotland during college or someone who wears the same Apple Watch as you?”
Identification
To highlight a distinct attribute of your idea or thought, consider using the following transitions:
- Specifically
- Especially
- Particularly
- Including
Here’s an example of this type of transition in use:
“If brands truly want to rise from the ashes of the retail apocalypse, they must stay laser-focused on adapting to the evolution of this technology and their customers’ preferences. More specifically, they need to embrace change and prepare for the upcoming trends that will transform their industry in 2019.”
Emphasis
To emphasize a thought or idea you just previously stated, consider using the following transitions:
- In fact
- Of course
- Surely
- Certainly
- Indeed
- Even
- Truly
- More importantly
Here’s an example of this type of transition in use:
“When the World Wide Web launched in 1991, most people thought it would fizzle out in a few years. Experts considered it to be a shiny, new fad that no one was really using. In fact, only six countries in the world had more than one internet user per 100 people that year.”
Cause
To spotlight the root cause of something happening, consider using the following transitions:
- Because
- Due to
- Since
- As
Here’s an example of this type of transition in use:
“Strong call-to-actions are a crucial element of a persuasive business letter — because if you don’t tell your reader what to do next, you might as well have never written your letter in the first place.”
Effect
To call attention to the consequence of the root cause of something, consider using the following transitions:
- So
- As a result
- Therefore
- Subsequently
- Consequently
Here’s an example of this type of transition in use:
“A lot of professionals overlook the importance of writing high-quality business letters because they seem outdated. As a result, most people don’t actually know how to write one.”
Reference
To flow from one related topic to another, try referencing the previous topic by using the following transitions:
- With this in mind
- As for
- On the subject of
- Considering
- Concerning
- Regarding
Here’s an example of this type of transition in use:
“Inlinking with clear, concise, and relevant anchor text can reinforce the topical connection between certain posts in Google’s eyes and help all of those posts rank better. With this in mind, anchor text is nothing to gloss over, so let’s learn more about what exactly anchor text is, why it’s important, and the different types of anchor text.”
Summary/Conclusion
To summarize or conclude a paragraph, consider using the following transitions:
- In a nutshell
- In sum
- To put it briefly
- Altogether
- After all
- Ultimately
Here’s an example of this type of transition in use:
“Traveling make you more open to new experiences, which increases your willingness to try new things in the future. It also increases your brain’s capacity and attentiveness in future situations that are new and challenging. In a nutshell, traveling strengthens your desire and ability to learn new skills.”

How to Use LinkedIn Dynamic Ads
Have you heard of LinkedIn dynamic ads? Wondering how to include a person’s name or profile picture in your LinkedIn ad creative? In this article, you’ll learn how to set up a LinkedIn dynamic ad campaign to deliver highly personalized offers. What Are LinkedIn’s Dynamic Ads and Why Do They Matter? LinkedIn’s ad system allows […]
The post How to Use LinkedIn Dynamic Ads appeared first on Social Media Examiner.
from Social Media Examiner https://ift.tt/2ByLGZd
via socialmediaexaminer
What’s a Finsta? We Explain This Confusing Instagram Trend
I first heard the term “Finsta” from my 16-year-old cousin. She had just taken a ridiculous selfie of herself, and had declared it “Finsta-worthy”.
When I asked what she meant, she explained a “Finsta” is a fake Instagram, or a “Finstagram” (shortened for cool factor, probably).
“But … Why do you need a fake Instagram account? Isn’t one enough?” I asked her.
She showed me her real Instagram account — a perfect, edited collage of great moments with high school friends, her prom date, and vacation shots with family.
“My real Instagram account is kind of fake — like, only pictures of my ‘best’ life,” My cousin explained. “I use my Finsta to share funny, inside jokes with my closest friends. My real Instagram has like, 400 followers. My fake one only has like, eight.”
As you probably already know, Instagram is often used as an opportunity to present an “ideal” life to your followers — even if that life is, in fact, a poor representation of reality. It’s not the place to post embarrassing photos, or unedited “I just woke up” selfies.
However, Instagram’s mirage of perfect, well-filtered lives doesn’t always lend itself to happiness. For instance, one recent study found a correlation between the amount of strangers you follow, and depressive symptoms including fearfulness, loneliness, or fatigue. Unfortunately, Instagram can lead users to feel their lives aren’t good enough, compared to everyone else’s (edited) ones.
Which is why Finsta’s might not be such a bad idea. Ultimately, a Finsta is a chance to share a goofier, less-edited version of yourself with a trustworthy group of friends — and for those friends to see less ‘perfect’ posts, and more real ones.
Ironically, a “Fake Instagram” just might be a solution to feelings of inadequacy on the platform, as friends learn to share more honest stories about their lives — the good, and the bad. If you want to learn how to make a Finsta for yourself, keep reading.
What’s a Finsta?
A Finsta is a shortened term for Fake Instagram, which is an Instagram account used by teens and young adults to document more real, candid posts they share with only close friends. Oftentimes, an Instagram account is used to curate a public collage of edited images for upwards of hundreds or thousands of followers. By contrast, a Finsta is a private account only followed by 10-20 people. A Finsta allows users to post more funny, unedited snapshots of their daily lives, or share inside-joke moments with friends.
How to Make a Finsta
Creating a Finsta is a simple process. However, before you begin adding an additional account, you’ll want to brainstorm a unique username that doesn’t use your real first or last name — additionally, you’ll want to make sure you don’t use a real photo of yourself as your profile picture. Remember, your Finsta should be impossible to find unless you share the username with friends.
To create a Finsta, follow these easy steps:
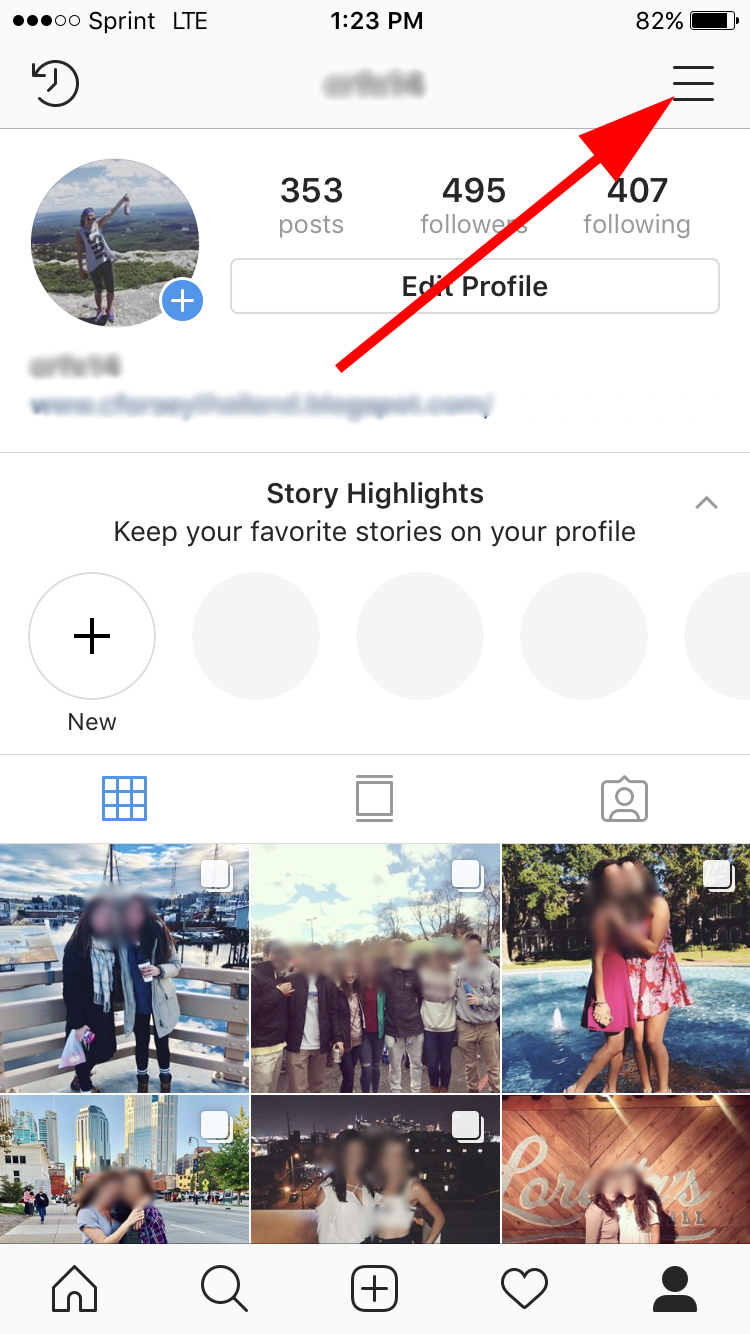
1. Open your Instagram account, and click the three-line icon in the top right.
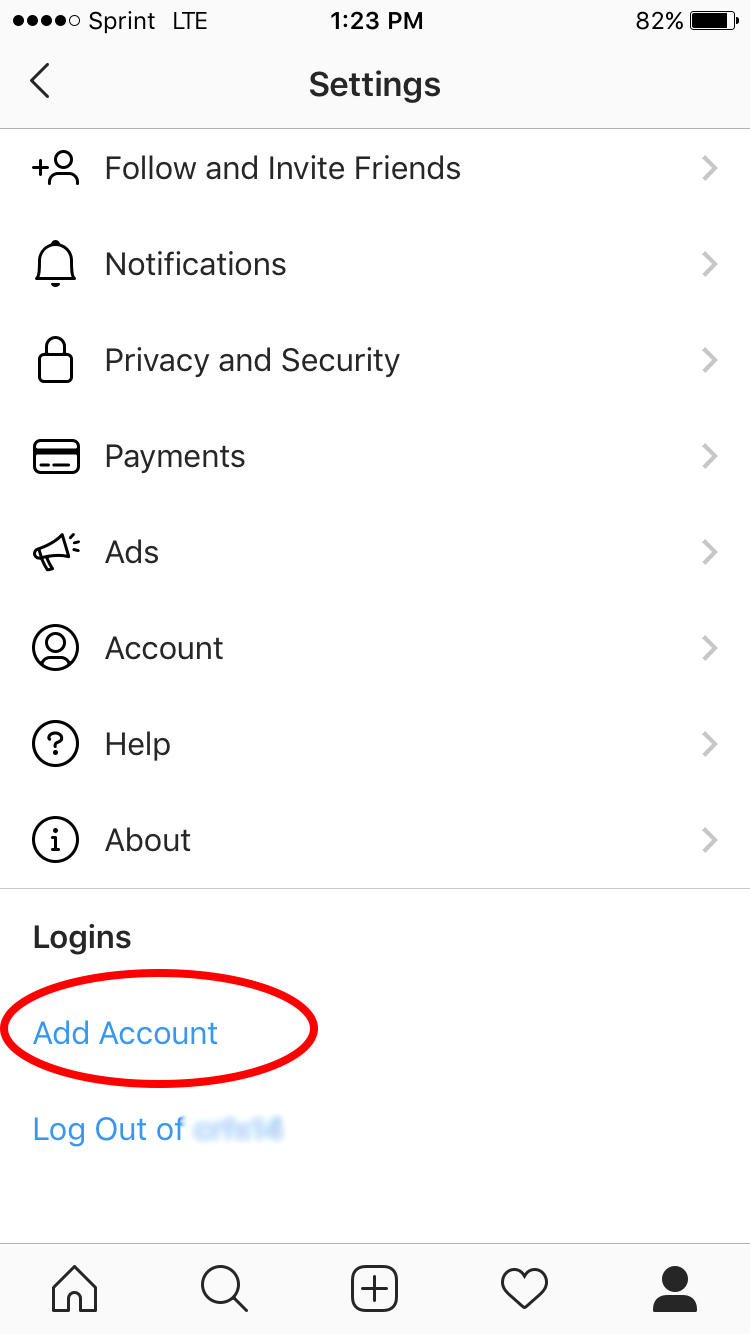
2. At the bottom of “Settings”, click “Add Account”.
3. At the bottom of the next page, click “Sign Up” to create your new account.
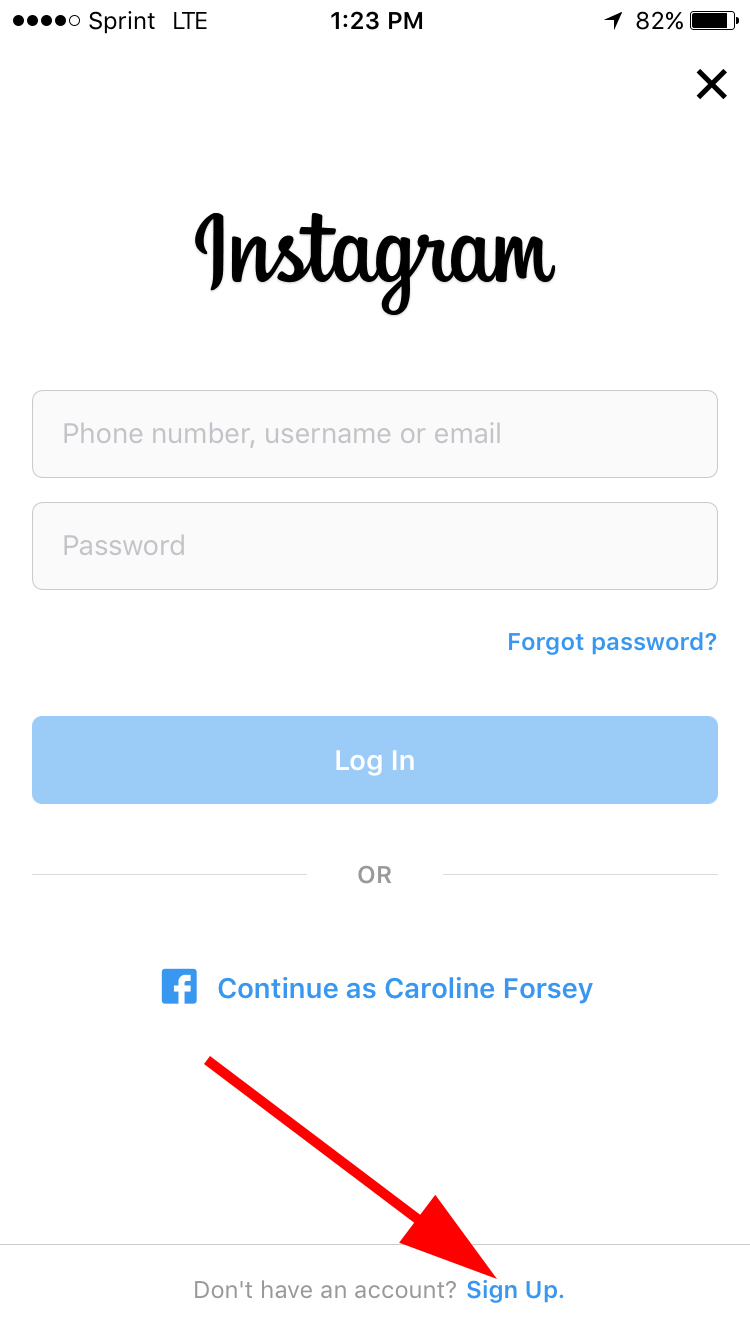
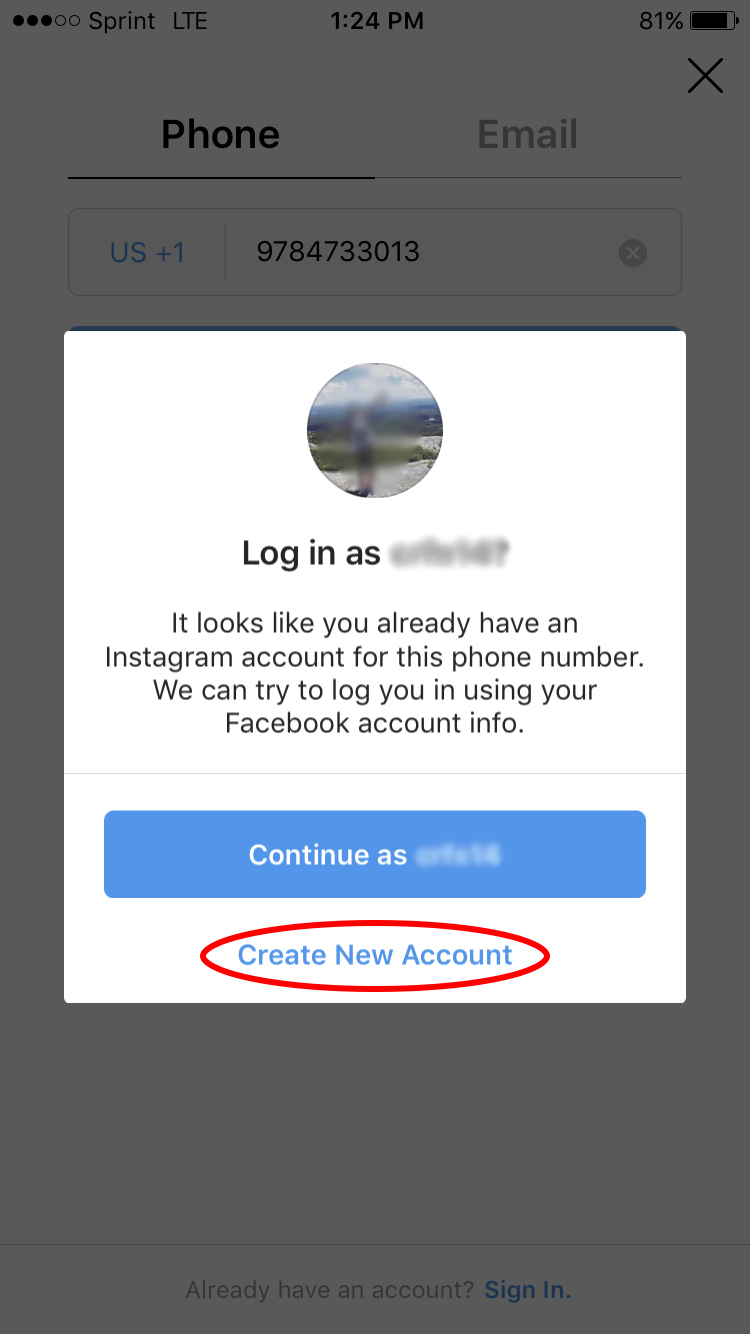
4. Next, input your phone number.

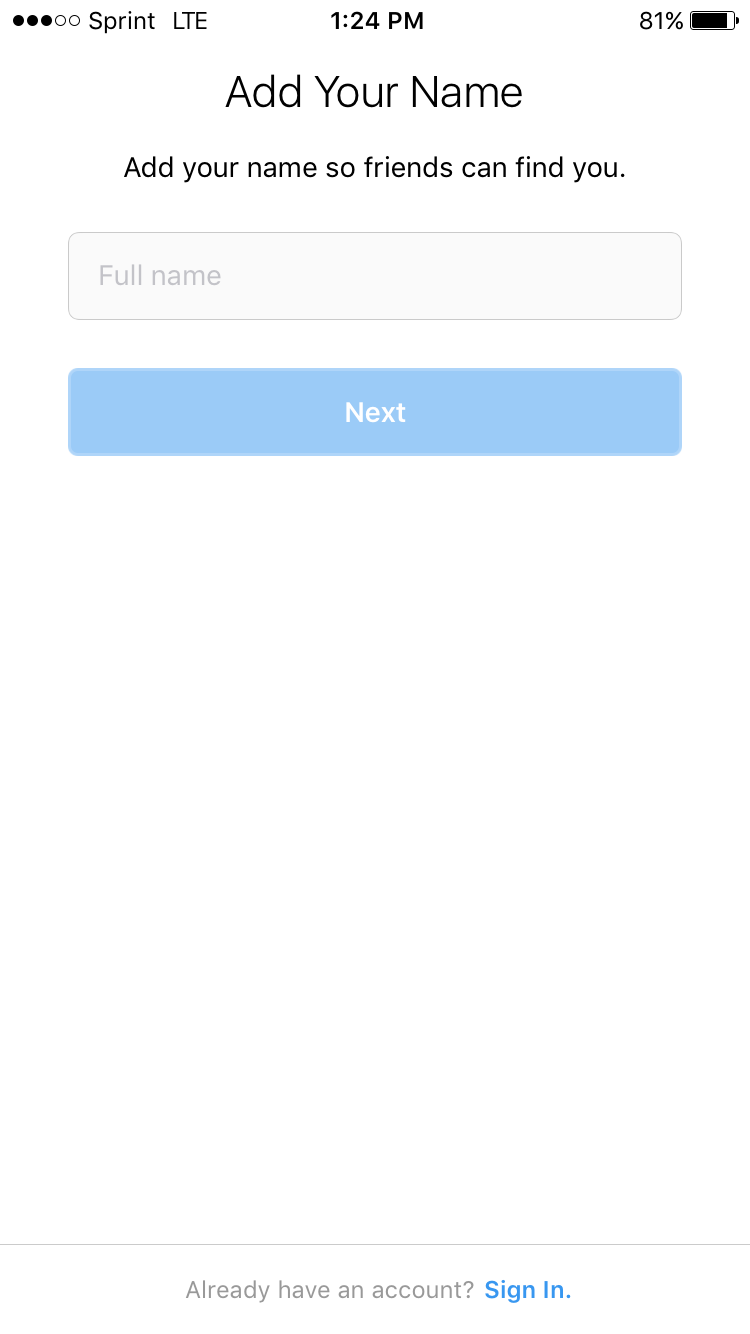
5. Once you input your phone number, a box will pop-up to ask whether you’d like to log into the account you already have. Click “Create New Account” to continue creating your Finsta.
6. Next, add your username. Remember, you don’t want to use your real first and last name here. Instead, consider coming up with a clever username only good friends will understand.
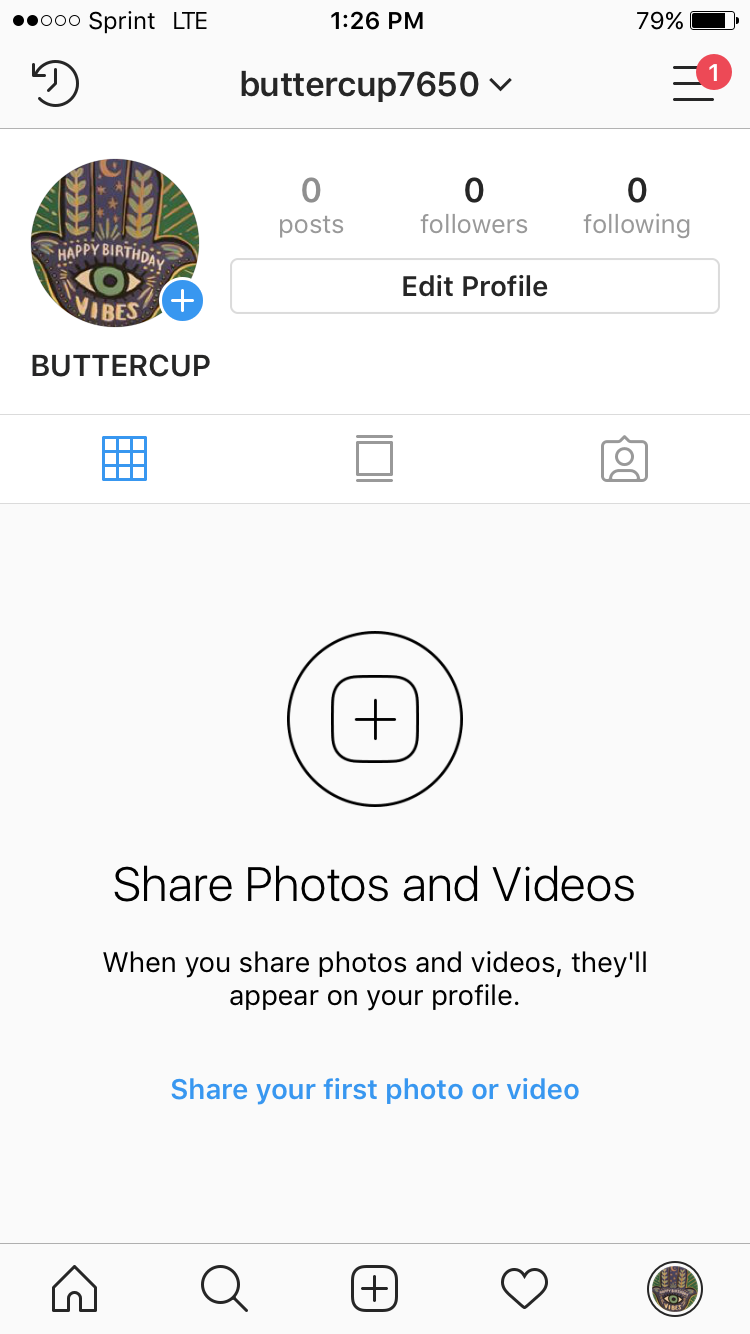
7. Skip the option to link your Finsta to your Facebook account (which could make it easier to link the Finsta to you). Add a profile picture, then click “Next”.

8. Voila! Your Finsta is ready. You can now post pictures and videos, and invite your closest friends to follow you.
Finsta Names
To ensure random followers can’t find your Finsta, and to keep it private amongst close friends, you’ll want to create a fake name for your Finsta account.
A website called SpinXO offers a free tool that helps generate potential Finsta names based on your name or nickname, hobbies, interests, or other random words or numbers.
For instance, without inputting any of my own information, SpinXO initially offered these random Finsta names:
- JavaPerfect
- ChellFalls
- KinGambit
- RadiantEnjoy
- VividGiggly
- SimpleEye
- Airbiosav
Alternatively, you might brainstorm a unique Finsta account name by considering inside jokes you share with your friends, or TV shows or movies only your good friends know you like. You’ll want to avoid using any abbreviation of your first or last name, and try to be as obscure as possible.
For instance, if I were making a Finsta (which, trust me, I’m not), I might call it “Buttercup”, the name of my cat (on second thought … a lot of people have heard me talk about Buttercup. So, scratch that).

Instagram Stories: What They Are and How to Make One Like a Pro
These days, social media is all about documentation.
Where you go, what you eat and drink, who you see, and what’s most memorable: These are the typical fodder of Instagram Stories — seconds-long glimpses of people’s lives, shared on Instagram for only 24 hours.

Below, we’ve created a guide for you to learn what Instagram Stories are, how to share them with your followers, and how to make sure those Stories are exactly what your audience wants to see. In this post, we’ll cover the following. Feel free to click on a bullet point below to jump to that section of the article.
- What are Instagram Stories?
- How do Instagram Stories work?
- How long are Instagram Stories?
- How to view Instagram Stories
- How to Make an Instagram Story
- How to Use Instagram Stories for Business
- Instagram Stories Tricks and Hacks for Awesome Instagram Stories
What are Instagram Stories?
Instagram Stories allow Instagram users to share photos and videos to their “Story” — which is visible to followers of the user’s Instagram account — and to specific users the Story’s sender follows. Like in Snapchat, Instagram Stories are ephemeral, meaning they disappear after 24 hours.
Your Instagram Story is published separately from the photos and videos found in the tiled gallery of one’s Instagram profile. And although you might know the basics of sharing them, there are hidden tools within the app that can make the photos and videos you add to your Story more creative and engaging.
How Do Instagram Stories Work?
Instagram Stories can drive a ton of engagement and value — whether you’re sharing a Story from a brand account or your own personal profile.
Since launching back in August 2016, a total of 250 million Instagram users have started sharing disappearing content on Instagram Stories — contributing to the huge jump in time spent in-app every day from 24 minutes to 32.
What’s more, a lot of brands have already seen success publishing content to this platform. Instagram Stories have fueled the growth of brands like Teen Vogue, Insider, and Bustle. Whether publishers are trying to grow brand awareness, grow traffic to videos or newsletter outside of Instagram, or share sponsored content, publishers are flocking to Instagram to publish fun disappearing content that infuses brand voice and personality without taking up too much of the average techie’s dwindling attention span.
What’s more, Instagram Stories are credited with fueling the massive growth of Instagram Direct — private one-to-one messaging between users within the app. Instagram Direct has grown into one of the most popular messaging apps in the world with a staggering 375 million users.
Even more impressive, TechCrunch reports that one in five Instagram Stories shared by a brand receives a Direct reply — giving brands a direct line to connect with their audience and learn more about them.
How long are Instagram Stories?
Instagram Stories last 24 hours on your profile before disappearing, but a video inside your Story can be up to 15 seconds long before cutting to the next piece of content. You can also use a third-party app to segment a longer video into 15-second increments to add to your Story.
Just as Instagram Stories only last 24 hours before disappearing, the photos and video themselves have a time limit when users view and play them.
As a blanket rule, the individual videos you add to your Instagram Story each have a maximum roll time of 15 seconds. If you add a video to your Instagram Story, for example, it’ll play for up to 15 seconds, regardless of how long the original video was, and then end.
Despite Instagram Stories’ 15-second runtime limit, there are ways to play longer videos in your Story. Specifically, you can split a video that’s longer than 15 seconds into 15-second segments and add each segment to your Instagram Story so they play one after another. Here are some mobile apps that can help you make it happen:
- Continual (iOS only)
- Storeo (iOS only)
- Story Cutter for iOS
- Story Cutter for Android
- CutStory (iOS only)
How to View Instagram Stories
Instagram Stories appear at the top of your screen when you’re on the Instagram mobile app. Because they’re often the first pieces of content users see when they open Instagram, these Stories can get a ton of engagement and help you advertise your regular Instagram photo gallery to more users.
1. Open Instagram and navigate to the home screen.
To start viewing Instagram Stories, open your Instagram mobile app and tap the home icon on the bottom-lefthand corner of your screen. Instagram Stories are not available for viewing on the desktop site.
Once you’ve navigated to Instagram’s home screen, you’ll see a series of circular icons along the top, each of which represents the active Stories posted by the users you follow. These icons are highlighted inside a red square in the screenshot below. As you can see, your own Story is available for viewing (and adding to) on the far left of the Stories you follow.

2. Tap on a circular icon to view that user’s Story.
Each circular icon you see at the top of your home screen shows you a small preview of the Story that user has posted. Tap on it to expand the user’s Story — it’ll either be a photo or a video, and the latter will play automatically once you tap on the Story.
3. Tap to navigate between a Story’s photos and videos.
A single Instagram Story can contain numerous individual photos and videos strung together in order of when the user posted them. The first piece of content you’ll see will be the most recent one. Tap your mobile device’s screen to cut to the next photo or video that user has posted to their Story.
4. Swipe to navigate from one Instagram Story to another.
Swiping left and right while viewing an Instagram Story will allow you to shuffle between Stories from different users. When you first open an Instagram Story, you’ll see the following menu:
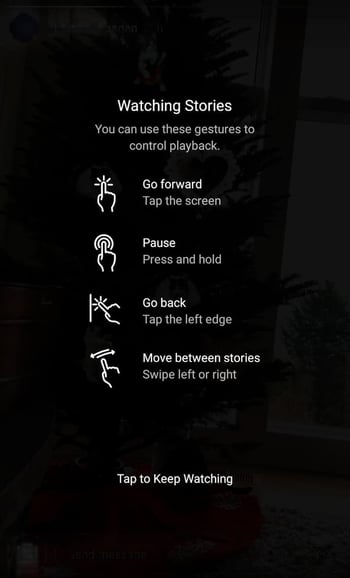
Use the above screenshot as a reference for viewing the Instagram Stories of the accounts you follow.

How to Make an Instagram Story
- Open Instagram, and tap the camera icon in the upper left-hand corner of your phone.
- Share a photo or video you’ve already captured by swiping up on your screen to browse your gallery.
- Or, choose a camera lens to capture a photo or video in the app.
- Once you’ve edited your photo or video, tap “Your Story,” or tap “Next” to share it to your Story and to other friends at the same time.
You can make Instagram Stories this successful too — but it requires a few more hacks and tips to make them look like the Stories big brands and influencers share. (Some of my favorite Instagram Stories are shared by chef Chloe Coscarelli, actress Busy Phillips, mattress brand Casper, and interior design app Hutch — and don’t forget to check out HubSpot‘s Instagram Stories, either.)
But first, let’s review the basics of how to share an Instagram Story:
1. Open Instagram, and tap the camera icon in the upper left-hand corner of your phone.

2. Share a photo or video you’ve already captured by swiping up on your screen to browse your gallery.
Disclosure: Yes, I did a photoshoot featuring my cats. Can you blame me though?

3. Or, choose a camera lens to capture a photo or video in the app.

You have a few different options to choose from:
1. Live
If you toggle your screen to the “Live” option, you’ll start filming and broadcasting live on Instagram. Like Facebook Live, friends can follow along and leave comments, and when you’re done with the broadcast, you’ll have the option to let the video disappear, save it, or share it Instagram Stories for an additional 24 hours.
2. Normal
It means what it says: Tapping once will capture a photo, and holding down will record a video. Instagram Stories can be 15 seconds in length, so if you want to share a video that’s longer, film in 15-second stints, or use CutStory to split your longer clip into 15-second installments.
3. Boomerang
Boomerang mode films looping GIFs up to three seconds in length.
4. Superzoom
Superzoom is, on the surface, a video recording lens that zooms in closer and closer on your subject. But turn up the volume, and you can use Superzoom to create a dramatic soundtrack to accompany your video.
As my friend Marissa put it, “It’s like it’s BUILT for cats.”
I will forever be in love with this Insta lens!!!! pic.twitter.com/HvU6rarmNa
— Sophia Bernazzani (@soph_bern)
November 17, 2017
5. Rewind
Use the rewind lens to film a video in reverse.
6. Stop Motion
Use this lens to film cool stop-motion videos: several different still images woven together in one seamless video. Think of it like the video version of a flip book (like this example below):
Stop-motion artist Alex Unger spends months creating incredibly detailed pieces. pic.twitter.com/m6R4MNLIQj
— Business Insider UK (@BIUK)
November 14, 2017
7. Hands-Free
Use hands-free mode if you want to set up your camera to film a video for you. Make sure you prop it somewhere stable before you call “Action.” We’ll talk more about this feature in a minute.
4. Once you’ve edited your photo or video, tap “Your Story,” or tap “Next” to share it to your Story and to other friends at the same time.
You can also save your edited photo or video to your gallery by tapping “Save” in the lower left-hand corner.

How to Use Instagram Stories for Business
- Post footage of an office event.
- Post breaking news about your industry.
- Demonstrate your product.
- Promote a company event.
- Preview one of your company’s blog posts.
- Mention other companies who follow or work with you.
Knowing how to post to your Instagram Story is one thing, but knowing what to post is a different … well, story. For businesses looking to tell their Story on Instagram, it’s important to know who your ideal followers are and what they’d be interested in seeing on Instagram. Remember, Instagram is a visual platform, but that doesn’t mean you can’t teach or promote something in the process.
Here are a few ideas for using Instagram Stories to attract followers and build a customer base.
1. Post footage of an office event.
Sometimes, the best thing a business can do on Instagram is be as human as possible. One way to do this is to post a brief video of a company function. Whether it’s an office holiday party or an award banquet, posting footage of it to your Story is easy and in-the-moment entertainment for your followers. This content also shows people you’re a relevant and friendly voice in your market.
2. Post breaking news about your industry.
Just as you might on your company blog, you can use your Instagram Story to report on the latest happenings in your industry. With the right design work, you can turn small news breaks — that don’t merit an entire article — into a Story on your Instagram account. This keeps users coming back to you to stay abreast with market trends. You can even ask users what they think, as shown in the Instagram Story by HubSpot below. We’ll explain how Instagram “stickers” can help you do this in just a minute.

3. Demonstrate your product.
Your product might not be the simplest or sexiest product in the eyes of the layperson. Well, your Instagram Story is the perfect format for showing potential customers how that product is used. Post a long video, segmented into 15-second clips that show users what your product or service does and how it helps your customers.
If you sell software, for example, you might record a video of your computer screen, using a recording tool like Loom, that shows people how to log in, use the software’s dashboard, and navigate to the various functions included in the product.
Just remember to modify your video’s dimensions before uploading it to your Instagram Story. Remember, Instagram Stories’ image dimensions are 1920px high and 1080px wide, with an aspect ratio of 9:16.
4. Promote a company event.
Does your organization host a trade conference or attend a big one every year? Use your Instagram Story to promote the event and tell your followers to look for you there. Work with a graphic designer, or do some artwork yourself, to illustrate an event flier with all the information one would need to find you. Most of this you can do directly in Instagram. For example, use the native text options in your Story to add:
- The event’s name.
- Where the event is located.
- Dates you’ll be attending.
- Your booth number.
- The event’s official hashtag.
5. Preview one of your company’s blog posts.
Your blog posts need all the exposure they can get. Even if social media isn’t your blog’s primary source of traffic, your Instagram Story can help readers discover that blog for the first time and find it later.
In the screenshot below, Google used its Instagram Story to preview an article it published on six extraordinary young women involved in water technology. When you tap all the way to the end of the Story, Google prompts you to swipe up with your finger, where it then links you to the full blog post.

6. Mention other companies who follow or work with you.
As your Instagram following grows, you’ll eventually pick up other business accounts who want to follow you as well. Whether those accounts are your business partners or simply fans of yours, consider giving them shout-outs on your Instagram Story. This is a passive but effective way to nurture your relationships with the users that matter most to your business’s growth. We’ll explain how to link to other accounts in an Instagram Story in the tips below.
Now that you know the basics, let’s run through tips and hacks for producing high-quality, clickable Instagram Stories.
11 Instagram Story Tricks and Hacks
1. Use stickers.
Once you’ve captured a great photo or video, it’s time to jazz it up with some fun stickers. You can access these by tapping the smiling sticker icon in the upper right-hand corner of your screen once you’ve captured a photo or video — or swipe up from the bottom of your screen.
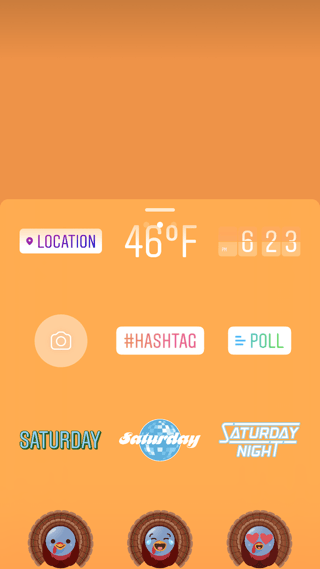
Change the size of your stickers.
You can pinch the sticker once you’ve added to your story to increase or decrease its size. You can also tap and drag it around the frame to change its position.

Check stickers every day for new and unique ones.
Instagram releases unique Story stickers often — whether it’s Monday, a holiday, or a season. Check this section every day for new and timely stickers to add to your Story.

Add location, hashtag, poll, and selfie stickers.
Boost the engagement on your Instagram Story by opening it up to other people doing the same things you are. Open up the stickers section, and tap any of these buttons to customize your story:
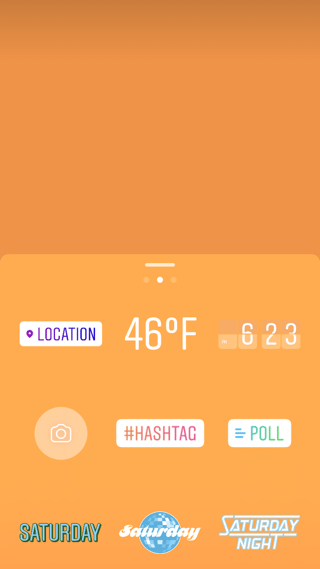
Location Stickers
Start typing in wherever you are, and you’ll be able to pull in a geographically-specific sticker to show where you are.
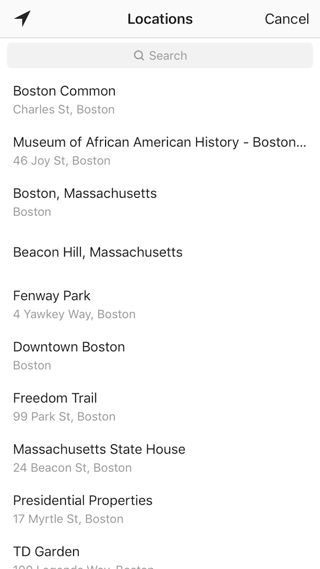
When people view your Story, they’ll be able to tap the location sticker and see other photos and Stories happening around the same place.

Hashtag Stickers
Same concept here: If you add this sticker and type in a hashtag, your Story will appear in searches for that hashtag, and viewers will be able to click it and see who else is using it. #MotivationMonday, amirite?
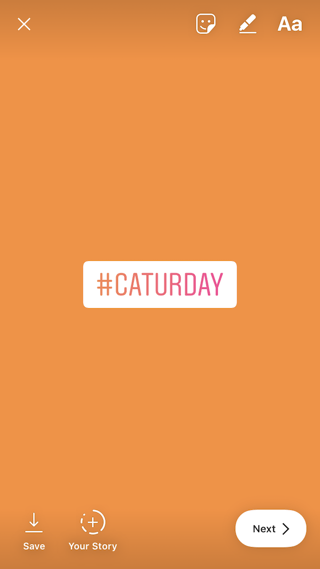
Poll Stickers
You can add a two-option poll to your Instagram Story, and you can even customize the possible answers so they’re more unique than “Yes” or “No.” Use a poll sticker to gauge if people are really engaging with your content.

Selfie Stickers
Open up the Stickers menu, and tap on the camera icon.

Then, take a selfie — or take a picture of anyone else’s face (that will work too). Then, you can use that face to decorate your Instagram Story. Somewhat creepy, but very memorable and funny, too.

2. Record a hands-free Instagram video.
If you’re a frequent video-recorder on Instagram, you know you need to hold your thumb against the record button for as long as you’re recording. This can make it tedious when attempting dynamic and interesting videos that require more hand mobility.
But did you know you can record these videos “hands-free“?
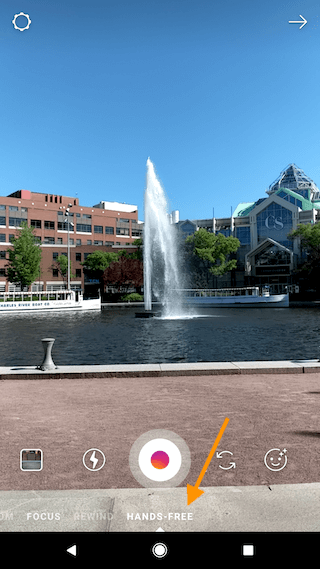
The hands-free video feature can be found in the carousel of camera lens options beneath the record button, as shown above. Simply tap the record button once to start the video, and again to stop it after you’ve gotten the footage you want.
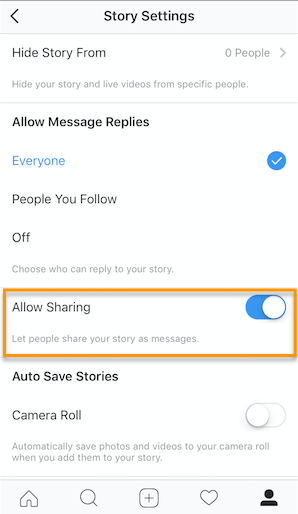
3. Let viewers share your Stories.
Increase engagement and views of your Instagram Story by letting viewers share them with their friends — as Direct Messages.
Go to your profile, tap the gear icon, and navigate to “Story Settings.”
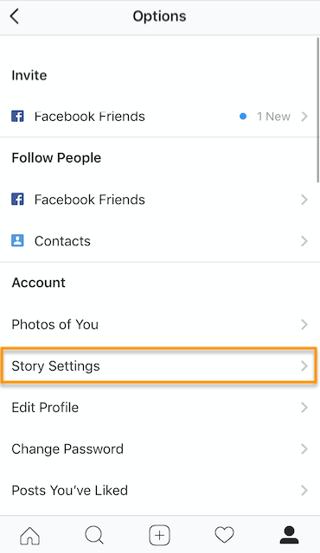
Toggle on “Allow Sharing” so viewers can DM your Story to friends to increase your audience reach. Voila!
4. Use the pen.
Use the pen to add embellishment, symbols, or more text to your Story. If you tap the pen icon in the upper right-hand corner of your screen once you’ve captured a photo or video, you’ll open up your options.

From there, you can adjust the thickness of your pen stroke or change the color you’re writing with (more on that later).
I like using the highlighter pen (the third option) to add emphasis to words — or even the highlight of my photo or video.

5. Add a background color.
If you want to share a Story with a background color — like the images I’ve shared above — you can actually select it from the color palette.
Take a picture (it doesn’t have to be a picture of anything in particular), and then tap the pen icon to open up the color palette. (Here’s Leela again — my unwitting cat model.)
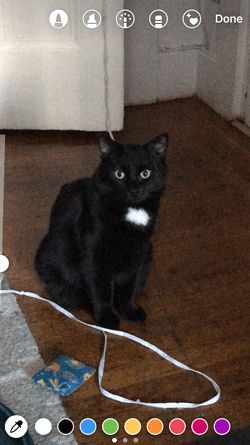
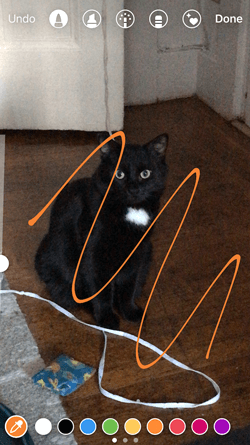
You can choose one of the colors from the three available menus, or if you want a specific shade of one of those colors, you can open up the full color spectrum by pressing and holding one of the colors.

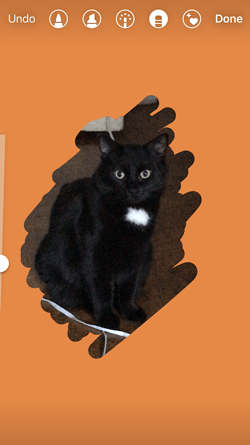
Then, scribble anywhere on the screen, and hold your finger down until you get the background color you want to appear.

If you want to get really crazy, you could use the eraser tool (the fourth option) to create new words or shapes from the background, too.
6. Mention another Instagram account in your Story.
Sometimes, it’s just not enough to send an Instagram Story to a particular person — you need to give them a shoutout in the photo or video itself. In these cases, Instagram allows you to tag up to 10 specific handles directly in your Story’s photo or video.
To mention an Instagram account in your Story, shoot a photo or video and then tap the square “A” icon in the upper righthand corner of the screen. Enter the account you’d like to tag, starting with the “@” symbol and the account’s first letter. Scroll through the suggested accounts that appear below your cursor until you find the account you have in mind, and tap it. See what these options look like below.
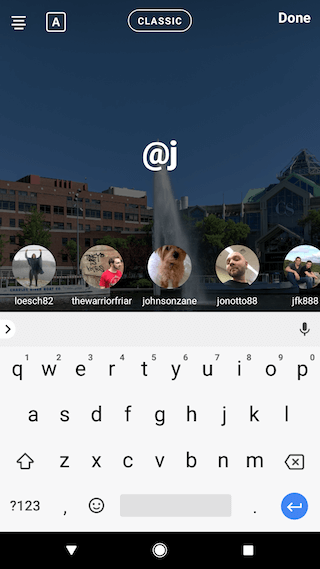
Once you post this Story, the person or account you’ve tagged in the photo or video will receive a notification of your shoutout, regardless of whether or not you send the Story to them.
7. Make your text funkier.
The text on Instagram Stories is pretty basic — jazz it up with these tricks.
Customize your colors.
If you’re unsatisfied with the color palette Instagram offers, create your own from one of the colors in the photo or video you’ve captured.
Open up the text icon, and tap the eyedropper icon in the lower left-hand corner of your screen.
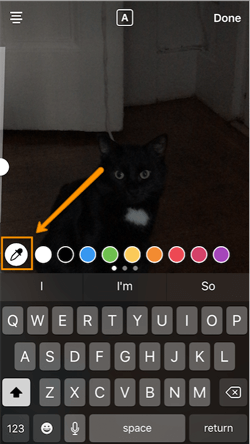
Use the dropper to sample a color from somewhere in the image you’ve captured, and use it when typing out text or using the pen tool.

Add a drop shadow to your Story’s text.
If you want to add some extra drama to your text, add highlighting or shadowing by retyping or rewriting your text in a different color. I recommend choosing black or white to add emphasis to a bright color you’ve picked. Then, move the text above or underneath the brighter text to add some drama to your words.
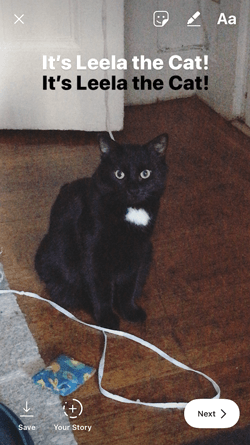

Turn your text into a rainbow.
This one’s tricky, but you can actually turn your text into a gradient rainbow.
Tap the text icon, and type out your message to add to your Story. Then, highlight your text.
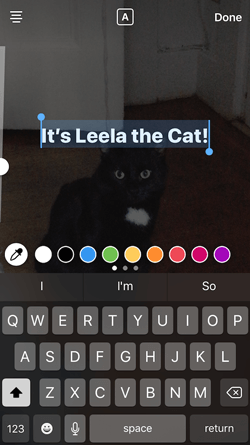
This is where it gets tricky: Turn your phone to the side so you can hold one finger down on the right side of your text, and with another finger, tap on a color and hold until the color wheel pops up.
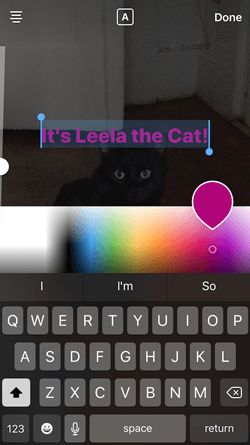
Then, slowly drag both fingers across both the text and the color wheel from right to left to create rainbow text. Go slowly, letter by letter until you’ve created a rainbow. (This one took me several tries before I nailed it, and I succeeded using both thumbs to highlight the text and the color wheel.)
I wonder if Leela knows she is my model for when I write step-by-step instructions in blog posts pic.twitter.com/OgcKhmIdNV
— Sophia Bernazzani (@soph_bern)
November 19, 2017
Gradually add text to a Story.
Sometimes, you might want to add text or stickers to an image to build on it — perhaps to promote a content offer or event, or to encourage viewers to swipe up to read a link you’ve shared (this is only available to verified accounts).
Start editing the photo you want to share, post it, and save it to your camera roll. Then, swipe up on your screen to add the screenshot to the next installment of your Story — adding new text or stickers on top of the first photo. Keep doing this for as long as you want the Story to last — just make sure to keep taking screenshots of your latest photo so you can add to it.



8. See who has viewed your Instagram Story.
Snapchat users have always been able to see which of their friends have viewed their snapped Stories over the 24-hour period that the Story is visible. Well, Instagram Stories can do the same thing — in exactly the same way.
To see who has viewed your Instagram Story, navigate to the homepage of Instagram on your phone and click on the circular icon denoting your Story. See what this looks like in the screenshot below.
 Image by Mari Smith
Click on “Your Story” from the Instagram home screen and swipe up from the bottom of your open Story. This will pull up a list of all the accounts that have viewed this content.
Seeing who’s viewed your Story might be an ego boost to personal Instagrammers, but business users can learn a lot about what their followers are interested in this way. By looking at which users view which Stories, you can figure out which types of photos and videos you should keep posting.
9. Center your text and stickers.
When you’re moving around text and stickers on your story, you’ll see blue lines appear vertically or horizontally in the frame. These are guiding lines you can use to make sure you’re keeping everything centered.
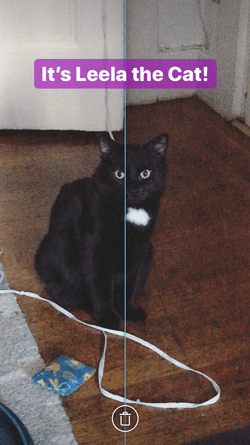

Don’t put your text too high or too low on the screen.
That said, make sure you don’t add anything to your Story too high or too low in the frame — or it will be cut off when viewers scroll through your Story, when Instagram adds things like your name and how long ago your story was posted that could block out your carefully-crafted text.
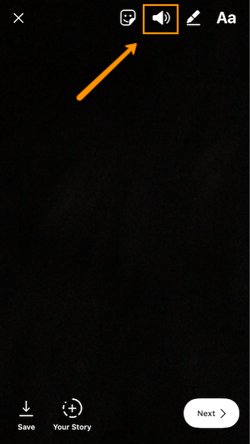
10. Add music to a Story.
This one’s easy: Turn on music using your phone’s native streaming app, and record a video Story. Once you get ready to edit and share, make sure the sound icon isn’t muted so your viewers can jam with you.
Alternatively, if you’d rather your video be muted, tap the sound icon so an “X” appears over it.

11. Upload Instagram Stories from your phone’s camera roll.
Great Instagram Stories aren’t just created through the Instagram app. You can also upload photo and video content from your mobile device’s native camera roll.
To upload a photo or video for use as an Instagram Story, open your Instagram Story’s camera lens and tap the little square icon on the bottom lefthand of the screen. See what this looks like below.

Tapping the icon shown above will call up your phone’s native media gallery, where you can select any photo or video to publish as an Instagram Story. It’s that easy.
We hope these tips help you post killer Instagram Stories your audience won’t be able to stop following. There are lots of hidden ways to take your Stories to the next level — some we may not even have covered here. Our best advice? Keep clicking around and see what you can do with the latest updates from the app. Happy ‘gramming!

Ecommerce Wars: Who Are the Top Online Retailers This Holiday Season? [New Data]
Here in the U.S., today marks “Cyber Monday”: an unofficial holiday observed on the Monday after Thanksgiving that celebrates and encourages online shopping with special deals and sales.
Online holiday shopping, however, is far from limited to just one day of the year. In fact, it began early, with online spending seeing record amounts on this year’s Thanksgiving Day.
But when it comes to the battle of online retailers, who’s at the top? As it turns out, there’s been a shakeup in the ecommerce leaderboard.
Here’s how the ecommerce wars are shaping up, and who’s taking the lead in this year’s holiday season.
Walmart Overtakes Apple
Most people might not think of Apple as an online retailer. It has brick-and-mortar locations that offer its branded, on-site “Genius” consultants that help customers pick products and troubleshoot technical issues.
But enough people purchase Apple products from the company’s website, it seems, to rank it as the #3 online retailer in the U.S., according to eMarketer.
.jpg?t=1543269737239&width=560&name=570af53a-62ea-4381-8e38-79d69d5773a1%20(1).jpg)
Source: eMarketer
That’s changed in 2018, though. This year, eMarketer has projected that Walmart will overtake Apple’s #3 position on the top five list of online retailers, bumping the latter to #4.
There are a few reasons for this projection, but according to eMarketer‘s report, many of them point to disparities in growth. Whereas Walmart has been identified as having one of the fastest-growing business in the ecommerce landscape, Apple’s growth has slowed — dropping 18% from last year’s 26.1%.
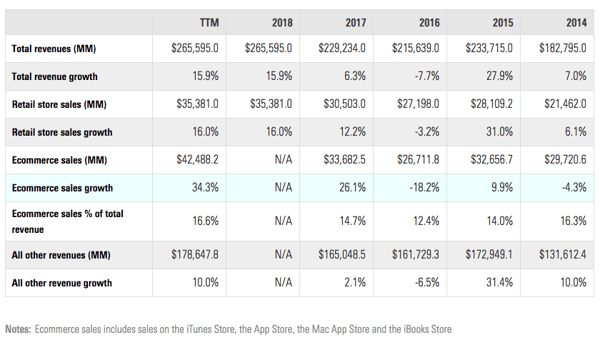
Source: eMarketer
Walmart, meanwhile, is eyeing 2018 ecommerce sales growth of 39.4% — more than 2X as much as Apple’s.
Again, a few factors could be contributing to this disparity, ranging from missed expectations on demand for Apple’s latest iPhones (to the point where the company cut production on all three models announced in September) to Walmart’s online business diversification by way of acquisitions.
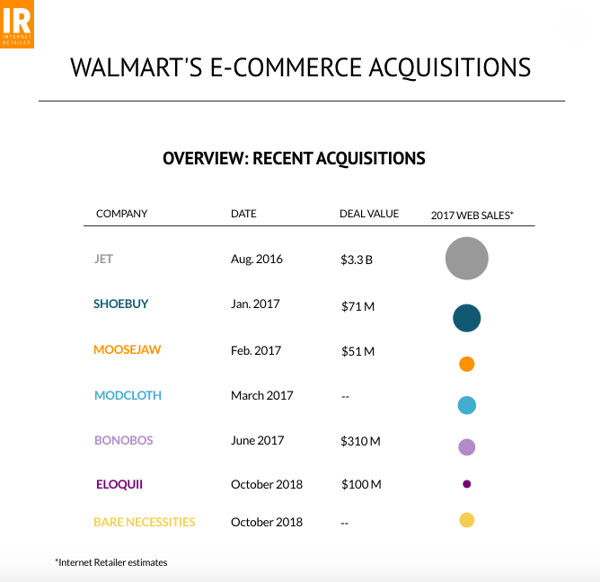
Source: Digital Commerce 360
eBay, meanwhile — which has maintained its #2 spot on the list in 2018 — is seeing its share of ecommerce sales slipping, dropping .4% from 2017.
But all three — Apple, eBay, and Walmart — have quite a way to go in the road to #1.
Amazon Continues to Take the Lead
Amazon has not only maintained its #1 position on the list, as well as its lead lead over the other top four online retails on the list — but has actually increased its lead over others on the list.
This growth possibly underscores Amazon’s competitive edge in the area of digital ads, as well — — especially given that one of Amazon’s advertising competitors, Facebook, experienced a glitch on its platform that made creating new campaigns a challenge for some marketers.
Before 2020, eMarketer also predicts that ads spend on the leading online retail site will increase by about 3%, slightly eating into the current “duopoly” held by Facebook and Google.

Source: eMarketer
But where there is more online buying behavior, there could be more motivation to spend on ads. Consider, for instance, that Amazon recently reached a deal with Apple to sell new iPhones and iPads on its site — which carries the potential to increase Amazon’s market share of ecommerce sales while continuing to chip away at Apple’s.
And as Amazon’s physical presence, too, continues to grow — between its cashierless brick-and-mortar stores and two new slated HQ locations — it raises the questions of what additional selling partnerships the ecommerce giant could form with other online retail leaders.
Have a look at this list of the top ten:
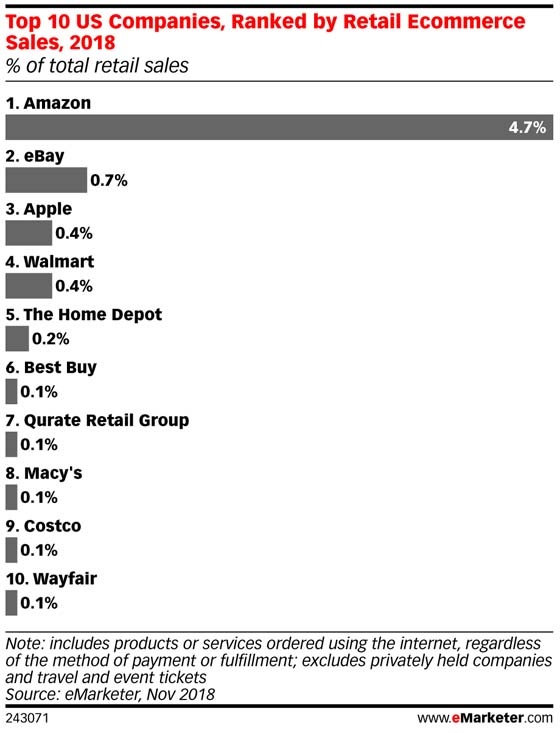
Source: eMarketer
Given Amazon’s existing history of such deals — as well as its acquisition portfolio — it might not come as a huge surprise should Amazon acquire or strike similar agreements with other companies on this list. That would lead to further growth of Amazon’s ecommerce sales market share and, in turn, perhaps encourage more ad spend.
What Marketers and SMBs Should Do Now
In any case, ecommerce is growing, presenting new opportunities for marketers and small-to-midsize businesses (SMBs) alike — when approached with caution.
In its annual Holiday Predictions report, Adobe highlights a few key takeaways for navigating the holiday marketing (and shopping) landscape.
Be Mobile-Friendly
Over half of online transactions this season will take place on smartphone.
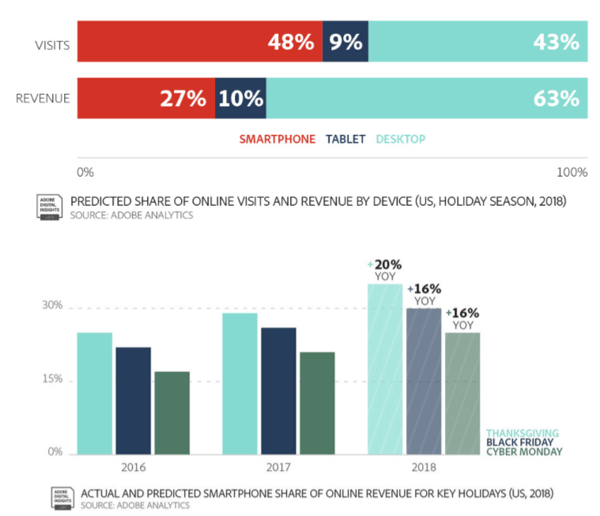
Source: Adobe
Get Appy
Also within the realm of mobile, start to think about ways your business could create and make use of an app — as app users are twice as likely to convert into customers.
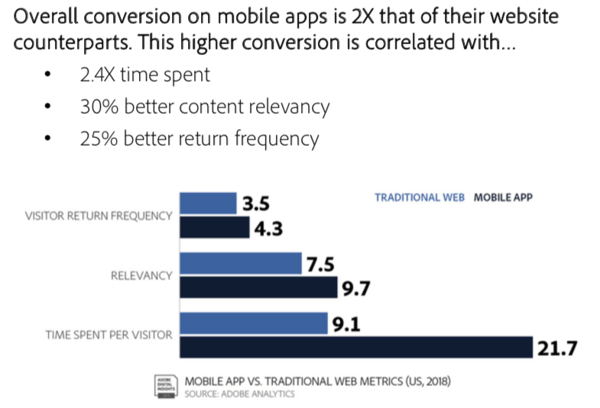
Source: Adobe
Lean Into New Customers
According to Adobe’s report, businesses with $100 million or less in annual online revenue see more value from new customers — with only a small portion of that revenue coming from recurring customers.
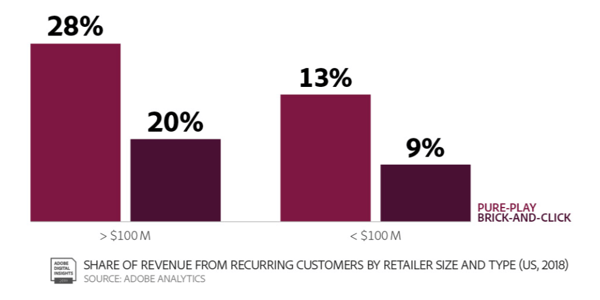
And Here’s One From Us
Any time of year — especially during the frenzied holiday season — make it easy for people to reach you and, in turn, become customers. For example, advises HubSpot VP of Marketing Jon Dick, for those who prefer to use messaging to reach you, build a way for them to do that (through apps, for example, like Messenger or WhatsApp).
“More B2B buyers are communicating with their sales reps through messaging, because more B2B buyers connect with their friends through SMS and messaging,” says Dick. “If you’re an SMB B2B company, you need to be implementing a buying process that is easy and is aligned with how people like to communicate, shop and buy today.”
Good luck out there. And, of course — happy holidays.

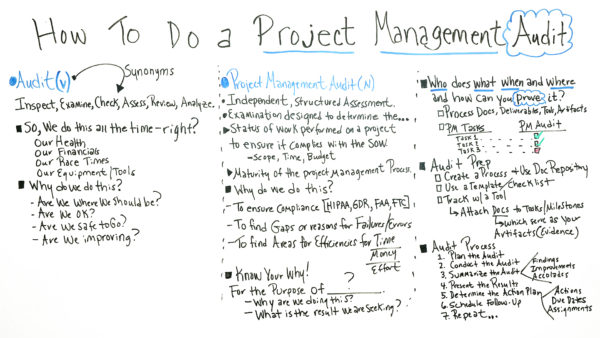
How to Do a Project Management Audit
9 Royalty-Free Music Sites to Help You Make the Perfect Video Soundtrack
In video marketing, choosing the right soundtrack can be the difference between a video that grips your audience from start to finish and one that they can barely get halfway through.
Play a fitting soundtrack or jingle in your video, and you can grab your audience’s attention and evoke the specific emotions and feelings you want them to associate with your brand. Neglect the musical aspect of your video, and people will think less of your brand.

In a 1994 study that tested music’s effect on brand attitudes, half the participants watched an apple juice commercial with music while the other half watched it without music.
23% of participants who saw the apple juice commercial with music reported that one of the beverage’s benefits was “drinking a natural drink”. But out of the participants who watched the commercial without music, only 4% reported the same belief about the apple juice brand.
Music can make your videos much more captivating, impactful, and, in turn, convincing. Whether you’re creating fun social media videos, persuasive product videos, or even serious training videos, music can separate your video from the rest of the pack.
In the video marketing world, though, you usually don’t have a team of musicians you can tap into whenever you need a hit soundtrack for your next video. You have to rely on music websites that provide stock songs. But a lot of these websites charge a royalty fee for each track they offer, which most small video marketing teams don’t have the budget for.
Fortunately, we found the nine best royalty-free music sites that provide high-quality music and can help you make the perfect soundtrack for your next video.
9 Royalty-free Background Music Websites for Videos
1. PremiumBeat

Owned by Shutterstock, PremiumBeat offers one of the most diverse and sizable collections of royality-free music on the internet. With the help of their own music industry experts, they’ve curated over 10,000 tracks that you can segment by genre, mood, artists, instruments, beats per minute, and duration. Their music experts also curate an Editor’s Pick playlist that has 857 of PremiumBeat’s best tracks to help you make the best possible soundtrack for your videos.
2. Epidemic Sound

By collaborating with some of the most talented musicians in the industry, Epidemic Sound’s tracks are featured on YouTube and Facebook videos that rack up over 20 billion views each month. Epidemic Sound has curated over 725 albums of royalty-free music, spanning from genres like “Corporate” to “First Snow”, allowing you to create diverse and high-quality soundtracks.
3. Artlist

Artlist partners with some of the best indie artists to create original tracks, helping companies like National Geographic, Microsoft, and Toyota make video soundtracks. They offer thousands of tracks that you can filter by mood, theme, genre, instrument, tempo, and duration. Artlist also curates themed collections of their partner artists’ tracks and spotlights their albums, too.
4. Music Vine

Music Vine collaborates with over 160 independent musicians to produce more than 2,500 tracks that you can segment by style, mood, energy, vocals, and duration. They also curate collections for particular themes in filmmaking and video production. You can filter them by vibe, theme, genre, and environment. Additionally, Music Vine dedicates a section of their website to their artists, letting people follow them and explore their music.
5. Soundstripe

Soundstripe partners with over 80 artists to produce songs that you can filter by mood, genre, pace, instruments, key, vocals, duration, and beats per minute. They’ve also curated over 50 playlists that span from genres like action & sport to weddings.
On Soundstripe, you can also create an account, follow artists, playlists, like songs, and create your own playlists. If you need sound effects for your video, Soundstripe offers 29 categories of sound effects, ranging from construction to sci-fi.
6. Filmstro

Filmstro not only offers royalty-free music that spans over 65 different categories, like mood, film & video genre, music genre, and instrumental palette, but they also let you customize each track by its momentum, depth, and power. This gives you infinite creative possibilities to choose from when you create your video’s soundtrack.
7. Pond5

Pond5 offers one of the largest royalty-free music libraries in the world. With over 500,000 tracks in 36 different genres spanning from Hawaiian to action, you can make music tracks for almost any video project.
8. ccMixter

ccMixter has one of the most thorough processes for creating free music out of any royalty-free music website. They collaborate with musicians who upload original samples of their instrumentals, singers who upload original acapella recordings, and producers and DJs who mix the music together to create free tracks for your videos. With over 120 original tracks for film & video, commercial projects, and video games, ccMixter can help you make a truly creative video soundtrack.
9. Bensound

With over 300 tracks in the genres of acoustic, folk, cinematic, corporate, pop, electronica, urban, groove, jazz, rock, world, and more, Bensound provides plenty of musical options for your video’s soundtrack.


13 Facebook Engagement Tactics for Your Business Page
Do you want more organic visibility in the Facebook news feed? Wondering what types of posts and content are working for others? In this article, you’ll find 13 ways to create Facebook posts that generate meaningful interactions and improve organic news feed visibility. Why Is Facebook Engagement So Important? First, let’s recap why engagement is […]
The post 13 Facebook Engagement Tactics for Your Business Page appeared first on Social Media Examiner.
from Social Media Examiner https://ift.tt/2KxsdLq
via socialmediaexaminer
How to Use Ideation Sessions to Develop Your Best Ideas Yet
Albert Einstein, a master at great ideas, once said, “If at first the idea is not absurd, then there is no hope for it.”
Ideation sessions are critical for generating ideas and brainstorming creative and unique solutions to some of your business’s biggest challenges. If done correctly, an ideation session can be a safe space for your team members to suggest some of their most absurd ideas — which, as Einstein pointed out, just might be your most successful, as well.

But a productive ideation session isn’t easy for a leader, or participant. A good ideation session requires trust, creativity, openness, and a certain level of positive energy — none of which is easy to foster. So how can you prepare an ideation session that enables your team members to develop their best ideas yet?
Whether you’re a team member anxious about participating in an ideation session, or a leader interested in cultivating one, don’t worry — here, we’ll explore the best techniques to get the most out of your next ideation session.
Creative Ideation Techniques
- Facilitate an open, judgment-free environment.
- Go for quantity, not quality, with your list of ideas.
- Suspend all judgment and analysis of the ideas offered.
- Encourage wild, crazy, insane ideas.
- Ask productive questions to guide the conversation in the right direction.
- Set a short time limit, like 15-25 minutes.
- Try some ideation activities to loosen team members up and get ideas flowing.
1. Facilitate an open, judgment-free environment.
Management professor Leigh Thompson conducted a study in which one group shared embarrassing stories about themselves, while another group shared a time they felt proud. Then, both groups were instructed to brainstorm for ten minutes.
Interestingly, the group who told embarrassing stories generated 26 percent more ideas in 15 percent more categories than the one instructed to boast about prideful moments.
Ultimately, openness and candidness among your participants could help foster a stronger, more creative brainstorm.
To set the tone, consider asking each participant to share an embarrassing or funny story about themselves in the first five minutes of a brainstorm. An ice-breaker like this could help foster openness, trust, and a sense of silliness — which are all critical ingredients for increased creativity.
2. Go for quantity, not quality, with your list of ideas.
For an ideation session to work properly, it’s critical you focus on quantity over quality with your ideas. This is the time to cast your net wide — urge your team members, and yourself, to offer as many different ideas as possible.
At the end of the session or in the next session, you can refine and limit your list. However, for now, asking participants to brainstorm a few “quality” ideas might cause them to hold back on ideas they don’t believe are worthy — when, in fact, those ideas might be the best ones. So it’s critical you refrain from limiting your list.
3. Suspend all judgment and analysis of the ideas offered.
If participants begin offering judgment or criticism when someone voices an outlandish idea, you’ll quickly ruin any trust you’ve established during your session. Plus, those wild ideas prove your participants are thinking creatively, and out-of-the-box solutions could end up being your most successful.
Ultimately, it’s impossible for participants to gain momentum on their ideas if each idea is being judged. Urge each participant to avoid offering any feedback during your ideation session — there’s plenty of time to debrief and analyze afterwards.
4. Encourage wild, crazy, insane ideas.
“No idea is a bad idea” — we hear that a lot, but we often don’t believe it. Help foster creativity and innovation in your ideation session by creating an atmosphere in which participants believe this to be true. For instance, perhaps you can begin each ideation session with an example of a crazy, insane idea that actually became successful — like Gary Dahl’s Pet Rock idea, which earned him $15,000,000.
Alternatively, you might consider changing the atmosphere in which you host an ideation session to stimulate new, fresh ideas. Consider taking your team to a nearby restaurant or coffee shop — along with potentially stimulating original ideas, this method could help your team bond.
5. Ask productive questions to guide the conversation in the right direction.
You can’t facilitate a successful ideation session if participants don’t have a clear mission in mind. Begin by clarifying the problem you’re trying to solve — if possible, put it on a whiteboard as a visual reminder for your team to stay on-track.
Additionally, as participants begin offering ideas, you might ask productive questions to ensure you’re guiding the conversation in the right direction. A “How can we” question can help remind participants of your ultimate goal — for instance, during a pause, you might say, “How can we add value to our customer’s current marketing strategy?” or “How can we better create content that aligns with user’s goals?”
6. Set a short time limit, like 15-25 minutes.
A short time limit could prevent participants from over-thinking. Additionally, it puts pressure on them to offer ideas quickly. This type of rapid-fire brainstorming could prove most successful for your team.
Plus, in 15-25 minutes, no one expects a team member to offer the world’s greatest idea — the time-limit creates a more relaxed, casual atmosphere.
If you’re planning on implementing an ice-breaker, you could make the meeting closer to 30-45 minutes, but ensure the ideation session itself doesn’t stretch on too long.
7. Try these ideation methods to loosen team members up and get ideas flowing.
To spark innovation and creativity, as well as team connection, you might try implementing a fun brainstorming activity at the beginning or end of your ideation session. Here are a few to get you started:
Pass The Parcel: Identify a problem, then have each participant write down a ridiculous, bizarre idea that could solve that problem. Pass each piece of paper around, and have a participant write another crazy idea based on the first idea she receives. Then pass it again. Once a participant receives two ideas, require her to write a potential solution based on the two ideas. Finally, share all the ideas with the group.
Reverse Brainstorming: Identify a problem, and then ask each participant questions like, “How can we make the problem worse?” This forces team members to firmly understand the problem and highlight potential solutions — for instance, let’s say you tell your team, “We’re losing readers to our blog. How can we lose even more?”
Your participants might say, “We could write content that doesn’t align with SEO goals,” “We could create a confusing navigation page,” and, “We could create terrible email campaigns so no one wants to subscribe.” After a few minutes, you’ll see solutions come quicker than you think — for instance, someone might say, “Well, we could start aligning our content closer to our SEO goals, and we could work on optimizing email.”
SCAMPER: This method helps you come up with new, innovative solutions by using an acronym to force participants to think outside-the-box.
Here’s the acronym:
- S, which stands for Substitute, requires participants to brainstorm alternative materials, processes, or techniques to which you’re currently using.
- C, which stands for Combine, asks participants to combine processes or products that are currently separate.
- A, which stands for Adapt, requires participants to brainstorm how to adapt to something you already have to solve your problem.
- M, which stands for Modify, asks participants to consider what areas of your process you can modify to get closer to your ideal result.
- P, which stands for Put to other use, requires participants to think of alternative uses for your product or service.
- E, which stands for Eliminate, asks participants to get rid of inefficiencies in your current system or product.
- R, which stands for Rearrange, requires participants to figure out how you might rearrange how things currently work to reach a new solution.
Ultimately, it might take some trial and error to learn which ideation session techniques work best for your team. However, it’s critical you remember the importance of fostering an open and trusting environment — a welcoming atmosphere is critical for participants to feel safe offering their craziest (and potentially best) ideas.

20 of the Best Free Stock Photo Sites to Use in 2019
Best Stock Photo Sites
- Negative Space
- Death to Stock
- Picjumbo
- Stokpic
- Kaboompics
- Startup Stock Photos
- Freerange
- LibreShot
- Fancy Crave
- Unsplash
- StockSnap.io
- SplitShire
- Life of Pix
- HubSpot
- Pexels
- Gratisography
- Jay Mantri
- ISO Republic
- New Old Stock
- Pixabay
I got the image above for free on Unsplash.
Yet for some reason, many publishers continue to push out cheap (and usually cheesy) stock photography to serve as a representation of their brand.

The truth is, high-quality stock photos don’t have to come hand-in-hand with a hassle or high price tag. To prove it, we’ve compiled a list of 20 awesome resources for free, high-quality stock images for websites, blogs, and similar online properties.
From enviable office spaces to stunning scenery, we’re certain you’ll find exactly what you’re looking for with the help of this roundup.
.png?t=1543200609704&width=600&name=Free%20Download_%20Facebook%20Live%20Guide%20for%20Business%20(3).png)
20 of the Best Free Stock Photo Websites for Royalty-Free Images
1. Negative Space

Negative Space offers up new free stock photos every week. All of its photos are shared without copyright restrictions, meaning you’re free to use them however you please.
From architecture to technology, Negative Space’s continuously growing collection of images is one you’ll find yourself tapping into again and again. The best part? It’s easy to filter through the gallery of photos, which are sortable by category, copy space position, and color.
Click here to view the full license details.
2. Death to Stock

When founders and photographers, Allie and David, noticed how challenging it was for businesses, bloggers, and creatives to find free high-quality images that fit their “vibe and tribe,” they stepped in.
As a result, Death to Stock was born. Simply submit your email and enjoy a new batch of photos delivered to your inbox every month.
If you do have some extra budget to spend, Death to Stock also offers a Premium membership for $15/month or $180/year. The cool part about the paid membership is that a percentage of the profit is used to fund photography trips and other creative projects to keep the resource moving forward.
Click here to view the full license details.
3. Picjumbo

Need free images for your next website design or blog post? Look no further than picjumbo.
With new photos added daily, there is a wide selection of high-quality images to fit a variety of different topics.
The photographer, Vicktor, also offers unique paid packages for bloggers, designers, and agencies (starting at $10/month), as well as a handy plugin for Photoshop and Sketch for just $7.99.
Click here to view the full license details.
4. Stokpic

Photographer Ed Gregory generously dishes up 10 new photos every two weeks that you can use on your website, as part of a template, in an ad, and … well, pretty much anywhere.
You can check out his latest 100 pictures here, or browse through categories like landscapes, people, and technology until you find the perfect fit.
Click here to view the full license details.
5. Kaboompics

Karolina, a web designer from Poland, is the creative eye behind this awesome resource for high-quality photos. From fashion to food to landscapes, her images cover a variety of different scenarios. And users have the freedom to use them for anything they’d like — commercial or not.
While there are no formal attribution requirements, Karolina does ask that you include photo credit with a link back to the site when possible. This request will help her grow the website, and in turn, provide even more awesome photos for everyone to use.
Click here to view the full license details.
6. Startup Stock Photos

“Take ’em, these things are free. Go. Make something.”
With a Twitter tagline like this, it’s tough not to scoop up what Startup Stock Photos has to offer.
While the name is specific to startups, there are plenty of professional options to use no matter what industry you’re operating within.
Click here to view the full license details.
7. Freerange

All of the photos on the Freerange website come from a pool of both in-house photographers, as well as a growing community of external contributors.
Not only is there a lot to choose from, but the photos are good quality, too: “Images provided directly (in-house) by Freerange Stock originate one of two ways. They are either digitally photographed on Canon DSLR cameras or they are a high resolution (4000 dpi) Nikon scan of an original 35mm slide,” according to the site’s ‘About Us’ section.
Click here to view the full license details.
8. LibreShot

Photographer and SEO Consultant Martin Vorel is the creative force behind the stunning photos available on this site.
From crisp architectural shots to vibrant florals, Vorel’s collection of photos contains some of the most unique selections we’ve come across.
Click here to view the full license details.
9. Fancy Crave

Not only are the photos on Fancy Crave free of copyright restrictions, but they’re also pretty remarkable. (Can’t you practically taste those green grapes?)
All the photographer asks is that you never advertise the photographs as your own, and provide attribution when and if you can.
With two new photos uploaded daily to keep things feeling fresh, this is a bookmark-worthy resource for great photos if we’ve ever seen one.
Click here to view the full license details.
10. Unsplash

Unsplash serves up 10 new “do whatever you want” photos every 10 days.
What we love most about this resource is the uniqueness of the photos. With pages upon pages to choose from, you won’t run into any cheesy, “Smiling Boss Shaking Hands With Male Employee” shots.
Not to mention, every photo published on Unsplash is licensed under Creative Commons Zero, which provides users with the freedom to copy, modify, distribute, and use all of the photos without permissions or attribution.
Click here to view the full license details.
11. StockSnap.io

StockSnap.io proudly claims that it’s “not your typical crappy stock photo site.” And we couldn’t agree more.
In fact, its selection is so interesting and versatile that it’s almost too easy to “fall down the rabbit hole” and come to fifty-something scrolls later.
Click here to view the full license details.
12. SplitShire

SplitShire offers a ton of awesome free photos for you to use without commercial restrictions. Powered by Italian photographer Daniel Nanescu, all of the images available on the website are “made with love” — and it shows.
From stunning portraits to sleek work stations, we’ve got a feeling you won’t have any trouble finding the perfect photo for your next project or blog post.
Click here to view the full license details.
13. Life of Pix

Brought to you by Leeroy Advertising Agency in Montreal (and its network of talented photographers), Life of Pix is home to some awesome high-resolution photos.
All of the images are donated to the public domain, and are available for personal and commercial use.
As if that wasn’t enough, Life of Pix also has a counterpart, Life of Vids. According to its website, Life of Vids serves up free footage videos, clips, and loops, weekly. Like the images, the video content contains no copyright restrictions, and can be easily downloaded on its Vimeo account.
Click here to view the full license details.
14. Pexels

These photos are carefully handpicked from a variety of free image sources to ensure that you’re getting only the best of the best.
All of the photos that make the cut are under the Creative Commons Zero license, meaning that they are free for personal and commercial use with no attribution required. And thanks to its search functionality, turning up the right photo for your next project is super easy.
Click here to view the full license details.
15. HubSpot

You didn’t think we’d leave you hanging, did you?
When we noticed there was a shortage of high-quality free stock photos available to marketers and creatives, we decided to whip up some of our own.
Check out the following collections to get your fix:
16. Gratisography

With new photos added weekly, Gratisography is another awesome website serving up high-resolution photos covered under the Creative Commons Zero license.
All of the photos are taken by Ryan McGuire, a “whimsically creative visual artist, based in Ithaca, NY.” And while these photos are a bit more quirky (we’re talking everything from monster feet slippers to Vespas to bananas), they are entirely usable for the right project.
Click here to view the full license details.
17. Jay Mantri

Designer Jay Mantri has built up an impressive gallery of professional, quality images just for you and me … and everyone else.
If I had to describe Mantri’s photos in one word, it’d be “scenic.” But don’t just take my word for it. Go see for yourself.
Click here to view the full license details.
18. ISO Republic

ISO’s Republic’s mission is to “provide high-quality images to be used by designers, developers, bloggers, marketers, and social media teams.”
And all it takes is one quick scan of the website to know that it is succeeding in doing just that. (So much so that it’s hard to believe the images are free)
For those looking for access to more exclusive free photos, ISO Republic invites you to sign up for its email list and receive photos right to your inbox.
Click here to view the full license details.
19. New Old Stock

Who can resist a good black and white photo?
This collection of vintage photos comes from the public archive via Flickr Commons. According to the website, the photos are free of any known copyright restrictions.
That said, while it’s likely that they are safe to use for things like blog posts and hero images, you’ll want to read up on the rights and usage below before you use them for any type of commercial project.
Click here to view the full license details.
20. Pixabay

Pixabay serves as a repository for a ton of quality photos that released under Creative Commons CC0 into the public domain. The site is clean and intuitive, making it easy to navigate your way through the 780K+ free photos, vectors, and illustrations.
The main search bar even allows you to filter your query down by factors like media type, orientation, color, and minimum dimensions.
Click here to view the full license details.
Want to see a deeper dive into some of these stock photography galleries? Check out the following video and download some free photos from HubSpot below.



The 15 Best WooCommerce WordPress Themes for 2019
WooCommerce is a free, open-source e-commerce plugin built for WordPress websites. The plugin allows you to easily sell almost any type of product all while giving your visitors an intuitive and seamless on-brand buying experience.
You can create your customized buying experience by utilizing one of the dozens of WooCommerce themes. These themes have features that provide a wide variety of layouts, formats, images, fonts, styles, and more. They work like your regular WordPress themes — but they’re used specifically to customize your WooCommerce store.
Let’s dive into some of the WooCommerce theme options. These options will help you how you want to design your e-commerce experience to enhance your user experience, attract more visitors, and simplify the browsing and shopping on your site.
15 of the Best WooCommerce Themes
Each WooCommerce theme is different. Below, you’ll learn about their distinctive features and a few key takeaways from each to help you determine the best option for your website, business, and customers.
1. StudioPress Outfitter Pro Theme

Outfitter Pro is a StudioPress theme built for WooCommerce integration. It’s ideal for displaying products on both your website’s homepage as well as specific product pages. The theme includes an easy-to-follow customer checkout system that’s also mobile-friendly.
Outfitter Pro gives you the opportunity to customize your theme’s content, colors, and headers. If you are just starting out, there’s also support for text-based logos so you can ensure your logo looks professional.
Note: If you’re already a WP Engine user, StudioPress themes automatically come with all plans.
Key Takeaways:
- Attractive product display options
- Intuitive checkout system
- Logo support available
2. Pearl Business
Pearl Business is a multi-purpose e-commerce business theme with options for all kinds of companies. The theme offers over 250 different templates tailored towards a variety of business needs. No matter your level of WooCommerce experience, the dozens of demo videos Pearl Business provides will help you learn how to customize your website.
Key Takeaways:
- Multi-purpose business theme
- Over 30 demo videos to get you started
- 250 theme templates
3. Jupiter
Jupiter is a multi-purpose theme by Artbees ideal for business and e-commerce sites. The latest version of the theme, Jupiter V6, allows you to completely customize your WooCommerce store. The theme makes customization easy with their Visual Page Builder. With this feature, you can build and view your page in real-time. Jupiter offers 100+ elements and features to match your site’s design with your company’s branding and aesthetic.
Key Takeaways:
- Customizable WooCommerce store
- Visual Page Builder feature
- 100+ elements to customize your pages
4. ThemeX
ThemeX integrates with WooCommerce for a completely customizable online storefront. The theme includes four different “Stacks” for you to choose from — these have multiple designs for different business needs in terms of function and appearance. These Stacks make customization a quick process as a lot of the work is already done for you. ThemeX provides you with a list of demo sites that you can visit to ensure you choose the perfect Stack for your own website.
Key Takeaways:
- Four Stacks to choose from tailored to different needs
- Quick and easy customization
- Selection of demo sites
5. Enfold

Enfold is a business and e-commerce theme that offers a quick two-minute installation. With one click, you can install one of their dozens of template demos based on your website and business needs and begin customizing your theme to your liking. Enfold does not require you to have any previous coding knowledge, and they offer an admin area where you can easily build and style your pages from the backend of your site. Enfold’s WooCommerce integration makes managing your entire e-commerce store simple no matter what products you sell.
Key Takeaways:
- Two-minute installation
- Dozens of demos and template options
- Admin area to build pages from the backend of your site
6. BeTheme
BeTheme is a lightweight business and e-commerce theme, meaning it takes up less storage. This allows your website to be as quick and responsive as possible. With nearly 400 pre-built websites suited for a wide range of industries, you can spend less time designing your website and more time selling your products. BeTheme’s customizable headers and menus have minimalist designs to ensure great user experience and an intuitive shopping experience.
Key Takeaways:
- Lightweight theme
- 390+ pre-built websites
- Minimalist headers and menus
7. The7
The7 is an e-commerce theme that lets you determine how much time and effort you want to spend customizing their templates. They give you the option to choose from over 1,000 themes to customize on your own or use one of their dozens of “Dummy Sites” that are pre-built and only require you to click “Install” prior to adding your company’s content. Additionally, if your business sells in different parts of the world, then you’re in luck. The theme is multi-lingual and is already translated into over ten different languages.
Key Takeaways:
- 1,000 customizable theme options
- Dozens of “Dummy Sites”
- Already translated into 10+ languages
8. Salient
Salient is an e-commerce theme that allows you to display and sell your products in unique ways with their gallery display options. These displays can be used on product pages or on Fullscreen Rows, which are pages where you only want one photograph to take up your entire page with or without text. The theme also includes Ajax Cart, a WooCommerce-compatible checkout plugin popular because of its functionality and seamless user experience.
Key Takeaways:
- Product page gallery options
- Fullscreen Rows
- Ajax Cart feature
9. Nitro
Nitro is a theme specifically made for WooCommerce with features versatile enough to work for all types of e-commerce businesses. The theme gives you options to include mega-menus for companies who sell many items in different categories, pop-up promotion and discount forms, live product search, and many other unique options to enhance user experience. All of Nitro’s templates include a simple design to ensure for simple browsing and buying processes.
Key Takeaways:
- Specifically made for WooCommerce
- Mega menus, promo pop-up forms, and live product search features
- Simple design for great user experience
10. Massive Dynamic

Massive Dynamic is an e-commerce theme with an easy-to-use page builder. This feature allows you to drag and drop different features so you can see what they look like with your real-time content. With the theme’s Live Space Editor, you can swap out layouts and move, remove, or duplicate sections within layouts to achieve the vision you have for your website. You can do the same with your text and fonts, as well as change the color and style of your font with the Live Text Editor feature.
Key Takeaways:
- Easy-to-use page builder
- Live Space Editor feature
- Live Text Editor feature
11. Ultra
Ultra is a multi-purpose Themify theme with WooCommerce integration — you can buy the WooCommerce Builder add-on so your shop pages match the rest of your Ultra theme pages. With Ultra, you can use the theme to organize and design your entire site and then add a WooCommerce module with your product categories and different shop page layouts. This way, you can create a great buying experience for your visitors that also works for the type and number of products you sell.
Key Takeaways:
- WooCommerce page integration
- Versatile theme works for almost any business type
- Customizable product categories and page layout
12. Hugo
Hugo is a WooCommerce theme built for WordPress. The theme is meant for high-end e-commerce sites and offers a variety of ways to display beautiful photos of your products. With the option to use one of Hugo’s three-page builders for your site’s layout and format or none at all, the theme works well for people of all levels of web development.
Key Takeaways:
- Built for WordPress websites
- Meant for high-end businesses
- Three optional page builders
13. Arcade
Arcade is a WooCommerce theme created for video game e-commerce websites. The theme’s homepage offers a layout with space to display multiple different products. It’s modern and sleek look works well for organizing a lot of content in a way that makes sense for your business — all while enhancing user experience. Because this is a WooCommerce theme, it’s also automatically compatible with all other versions of WooCommerce and its extensions.
Key Takeaways:
- Best for video game e-commerce sites
- Organizes lots of photos and content in a simple format
- Sleek and modern design
14. Shop Elite

Shop Elite is a multi-purpose WordPress theme with WooCommerce integration. The theme has a minimalist and clean look so you can completely customize your online store in any way you want. The theme also has a mobile-friendly, responsive design so your customers can easily continue you their shopping experience while on the go.
Key Takeaways:
- Multi-purpose WordPress theme with WooCommerce integration
- Minimalist design
- Mobile-friendly, responsive design
15. CupCake
CupCake is an e-commerce theme created specifically for bakeries and food blogs. The theme has WooCommerce integration so you can easily display the baked goods and other food products you are selling. This WooCommerce integration also allows you to organize your latest and featured products in separate sections and pages.
Key Takeaways:
- Best for bakeries and food blogs
- Layouts to display food products
- Latest and featured product displays
Back To You
WooCommerce themes are an easy way to design and customize your e-commerce store. By using a WooCommerce theme, your online shopping experience will be simple, branded, and tailored for your customers. With WooCommerce themes, you can achieve virtually any look you desire all while creating a positive and professional experience for your website visitors and customers.

We Tested out the Google Home Hub so You Don’t Have To
“What do you get for the friends and family who have everything?”
Ah, yes. Nothing screams, “Happy holidays!” quite like the annual conundrum of figuring out what to get for our loved ones. As someone who writes about tech, that question, for me, usually comes in the form of, “But what is my mother going to do with this [insert-name-of-newly-launched-gadget-here]?”
This year has been no exception to the flurry of newly-released products from the all-star lineup of tech companies. Some released new phones. Others released new video calling devices. And some seemed determined to position virtual reality headsets as the gift to give this holiday season.

But there was one device in particular that caught my attention more than others, and that I was particularly curious to try. And that device, ladies and gentlemen, was the Google Home Hub.
So, to help tackle your tech-gifting-to-do-list, I took the Google Home Hub for a spin. Here’s how it went, and my verdict of where it stands on this year’s list of tech gifts.
A Bit of Background on the Google Home Hub
One of the first things I had the Home Hub was make a phone call to my Dad — who, when I explained to him all the things the device could do, likened it to a circus juggler.
But evidently, Dad had beaten me to the punch, and already did some of his own research on the Home Hub. There was just one problem, he said: “Everything I read assumed that I understood all of the technical vocabulary, and I still don’t understand what it does.”
So, it might be worthwhile to take a few steps back.
The Home Hub is one of the latest hardware products released by Google. It’s one the company’s “smart” devices; that is, it uses artificial intelligence (AI) to voice commands that are spoken to it by users.
That AI is often named as a branded voice assistant: the digital persona that powers many smartphones, for example, to answer user questions. On Apple devices, for example, it’s Siri. On Google hardware, it’s simply named Assistant.

Google Assistant
A few years ago, these voice assistants made the leap from smartphones to smart speakers — one of the first of which was the Amazon Echo, a smart speaker powered by Amazon’s voice assistant named Alexa.
From there, many other companies began making smart speakers powered with their own voice assistants — such as the Google Home, powered by Assistant, and Apple HomePod, powered by Siri. (Here’s what happened when I tried using all three.)
The next step was to add video capabilities to these smart speakers, most of which were already equipped to do things like set alarms, play music and podcasts, answer questions, and complete online shopping transactions. Now that these smart speakers would be built with screens, they could also do things like play videos, show photos, and visually display the user’s calendar.

The Google Home Hub, on display in my kitchen
The Google Home Hub is one such video smart speaker — and the one that this piece will focus on.
What the Google Home Hub Can Do
A (Home) Chef’s Life
Once I finished the rather quick process of setting up the Home Hub, I wasn’t sure what to do with it. It was a Sunday morning. I was pre-coffee. And I was hungry.
“OK, Google,” I said. “Show me some vegan recipes.”
Ta da! And show me recipes, it did — not all of them vegan, however.
For a search like this one, the Home Hub only appears to display recipes for which it’s able to dictate a list of ingredients one-by-one — and recite the instructions step-by-step, pausing after each one and resuming only when the user tells it to.
That might limit the quantity of recipes it can display, however, as most of my searches had less than a dozen results. Still, the technology is helpful — and prevents the user from having to navigate a screen-displayed recipe with, say, flour-covered hands.
Another plus: Let’s say you’re easily distracted (no judgement here) and decide you want to navigate away from the recipe to do something else, like play music on the Home Hub. Should that happen, the home screen displays the recipe you were last following, so you can pick up where you left off.

About the Music
One of the most important things I look for in any device equipped with a speaker is the sound quality. As a former music writer and singer, I often ask questions like, “How high up can the volume go?” and, “When that volume is cranked, is the sound distorted?”
I decided to put the Google Home Hub’s speaker quality to the test.
Here’s a video of what happened when I had it play some music from Migos, how it sounded when I put the volume on the highest setting (which can be done by swiping up from the bottom of the screen, or using a button on the back), and how well the sound carried when I walked a little further away from the speaker.
Not bad — but the real test, of course, will be seeing how well the sound carries when the house is full of holiday party guests.
But what if I wanted to listen to music and listen to the Home Hub’s guided instructions while cooking? After all, I can’t help it if I enjoy dancing and stirring at the same time — could this magical device help me do that, too?
Survey says: Yes.
Although I prefer to use Spotify, the Home Hub will connect with a variety of music streaming services, including Pandora, Google Music, and YouTube.
Building an Ecosystem
When Google first unveiled the Home Hub in October, I wrote about how this device was just one of many in the company’s branded ecosystem.
An ecosystem is usually the result of a company that started out known for one, core product or service — like a search engine — expanding its product portfolio to develop items that all work best when connected to each other.
Google, for instance, uses its Assistant voice AI to power numerous pieces of “smart” hardware: phones (the Pixel), accessories to support smart TVs (the Chromecast), and smart speakers (the Home and Home Hub) — just to name a few.
Want to switch from playing a song on your smart speaker to your smart TV? Using the Google Chromecast — a small piece of hardware you can plug into most smart TVs to “cast” video from other devices onto its screen — Assistant can do that.

 Playing music across various Assistant-powered devices
What’s more, Google has also acquired companies that also work in tandem with its hardware, such as YouTube and Nest. The former makes it easy to watch, for instance, a how-to video on cutting a pineapple while you’re trying to perform said task.
As for the latter — I also happen to own Nest security cameras, and now, I can display them on a number of different screens just by speaking a command to any of my Assistant-powered devices.
Does that mean that having a Home Hub without any other Assistant-powered devices will diminish its experience? Not necessarily. It can still execute the same tasks I noted earlier, and it’s my general impression that it wasn’t built to function any less optimally for users who don’t own other Google hardware products.
The Verdict
Every user has different priorities for what she might want a Smart Speaker to do, however. Where music- and cooking-related capabilities might be the most important to me, for others, a different video smart speaker might be different.
But after experimenting with the Home Hub’s various capabilities and features, I was sold on the amount of convenience — not to mention, a bit of the “cool factor” — the device provided. (Did I mention that it also makes phone calls?)
Making a phone call on the Home Hub
That said, the Home Hub still has a few kinks to iron out. There are times when it claims not to recognize my voice, misunderstands names of albums in my Photos collection (e.g., confusing “four” with “for”), and has some work to do on contextualizing commands. For example, here’s what happened when I asked it to show me relaxing Hawaiian landscapes:
But all in all, I would say that the Home Hub would make a nice addition to most holiday gift lists. At $149, it’s a bit cheaper than some of its peers in the smart speaker space, while still carrying most of the same, or at least similar capabilities.
And to answer my own earlier question — “But what is my mother going to do with this?” — the truth is, she’ll probably use it for many of the same things I would. She’ll use it to follow recipes, make phone calls, and listen to music, all at the same time.
Well, okay — maybe with a little less Migos.


LinkedIn Video: How Marketers Can Create Videos People Watch on LinkedIn
Looking to connect with an audience that has buying power? Wondering how to reach LinkedIn users with video? To explore how LinkedIn video marketing works, I interview Goldie Chan. More About This Show The Social Media Marketing podcast is designed to help busy marketers, business owners, and creators discover what works with social media marketing. […]
The post LinkedIn Video: How Marketers Can Create Videos People Watch on LinkedIn appeared first on Social Media Examiner.
from Social Media Examiner https://ift.tt/2DCvWGd
via socialmediaexaminer