
Welcome to My Blog
The Simplest Explanation of a 502 Bad Gateway Error & How to Resolve It
Troubleshooting a 502 Bad Gateway Error is like solving a mystery. You don’t know what exactly happened or why — all you know is that something’s wrong and you need to fix it.

To guide you through the hassle of fixing the dreaded 502 Bad Gateway Error, let’s go over what it exactly is and its most common causes and solutions.
What Is a 502 Bad Gateway Error?
A 502 Bad Gateway Error is a general indicator that there’s something wrong with a website’s server communication. Since it’s just a generic error, it doesn’t actually tell you the website’s exact issue. When this happens, your website will serve an error web page to your site’s visitors, like the photo below.
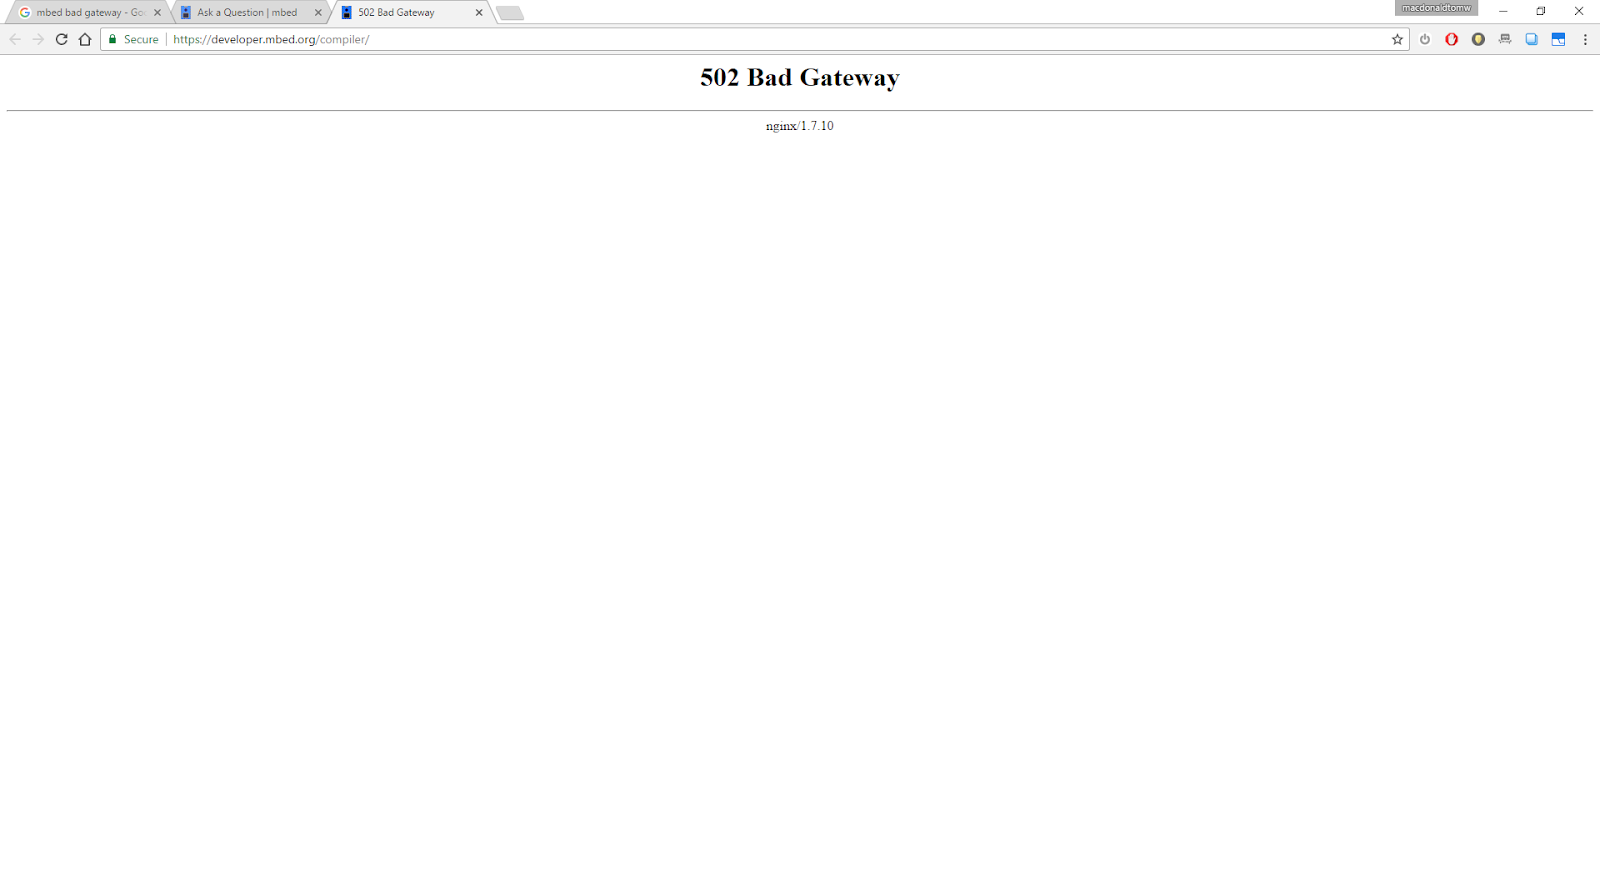
Picture Credit: Arm Mbed OS
Fortunately, there are five common and effective solutions for fixing most of the causes of a 502 Bad Gateway Error.
How to Fix a 502 Bad Gateway Error
- Look for server connectivity issues.
- Check for any DNS changes.
- Sift through your logs.
- Fix faulty firewall configurations.
- Comb through your website’s code to find bugs.
1. Look for server connectivity issues.
Most websites live on multiple servers or third-party hosting providers. If your server is down for maintenance or any other reason, your website could serve visitors a 502 Bad Gateway Error page. The only way to troubleshoot this issue is to wait for your server to finish maintenance or fix the problem causing the error.
2. Check for any DNS changes.
If you’ve recently changed host servers or moved your website to a different IP address, it’ll make changes to your website’s DNS server. This could cause your website to serve its visitors a 502 Bad Gateway Error page. Your website won’t be up and running until these DNS changes take full effect, which can take a few hours.
3. Sift through your logs.
Server logs will provide details about your server’s health and status. Sift through them to uncover any alarming information.
4. Fix faulty firewall configurations.
Your firewall is your website’s gatekeeper, protecting your site from malicious visitors or distributed denial-of-service (DDoS) attacks. Sometimes, a faulty firewall configuration will cause your firewall to deem requests from a content delivery network as an attack on your server and reject them, resulting in a 502 Bad Gateway Error. Check your firewall configuration to pinpoint and fix the issue.
5. Comb through your website’s code to find bugs.
If there’s a mistake in your website’s code, your server might not be able to correctly answer requests from a content delivery network. Comb through your code to find bugs or copy your code into a development machine. It’ll perform a thorough debug process that will simulate the situation that your 502 Bad Gateway Error occurred in and allow you to see the exact moment where things went wrong.

9 Ways to Be a Lucky Project Manager
WordPress SEO: The Ultimate Guide
Imagine you own a delicious gluten-free cafe in Boston. If someone were to search “gluten-free cafe near [insert a neighborhood in Boston]” on Google, it’s safe to assume you’d want your WordPress website to come up at the top of the search results, right? This way, the people who are searching for gluten-free cafes in Boston are more likely to see your site, click on your information, and become customers (whether that’s online or in-store).
Having your website appear at the top of a search engines results page (SERP) is something you can achieve if you spend some time on your search engine optimization.
What is SEO?
SEO (search engine optimization) is the process of increasing your website’s free, organic traffic by improving your ranking and visibility on search engines such as Google. Your content is more likely to appear near the top of the SERP for specific inquiries you’ve optimized.
Now that you understand what SEO is, let’s talk more about why it’s so important.
Why is SEO Important?
When you optimize your WordPress website and content, you’re more likely to reach the people who are actively searching for information about services and products related to yours. This is done organically, meaning you are not paying Google or other search engines to place your content at the top of the results page.
Creating organic, ranking content is also beneficial because your website and information are more likely to seem more reliable and trustworthy for visitors (versus a paid advertisement located at the top of the SERP). Anyone with a business and website should look to improve their SEO as it is a simple and effective way to increase traffic and notability, as well as your number of leads, conversions, and more.
A Guide to WordPress SEO: 12 Ways to Improve
The following guide provides you with 12 ways you can drastically improve your WordPress website’s SEO, boost your organic traffic, and increase your authority on search engines so you can get more visitors and customers.
1. Check Your WordPress Visibility Settings
Check your visibility settings in WordPress. The software actually has a setting that allows you to hide your website from search engines. This can come in handy when building or rebuilding your site and don’t want visitors to see your work in progress.
The feature is found in your WordPress dashboard under “Settings” and “Reading”.
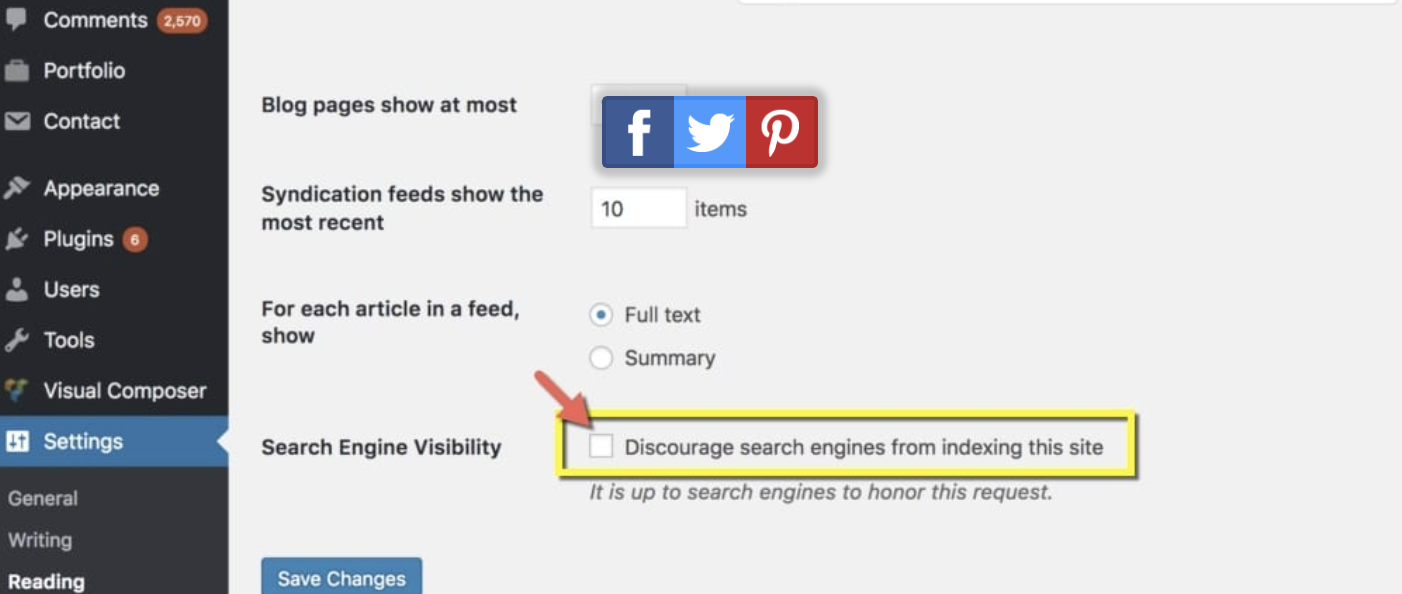
Double check that you haven’t accidentally turned on this feature, or left it on after completing your website. If it’s on, your SEO won’t work.
2. Change Your Permalinks
A permalink is a permanent URL or link to a specific post, page, or blog on your website. Permalinks clearly state what your post, page, or blog actually is (in the URL itself) so visitors know what they are clicking on. You should change your permalinks to not only improve user experience, but to also improve your SEO — search engines read permalinks to determine whether or not your website has answers to certain search queries.
For example, in the case of your gluten-free cafe, if you had a page dedicated to shared gluten free recipes your permalink might look something like this: https://ift.tt/2S83EHs.
To change your permalinks to include an accurate description of your content, head to your WordPress dashboard, click “Settings” and then “Permalinks”.
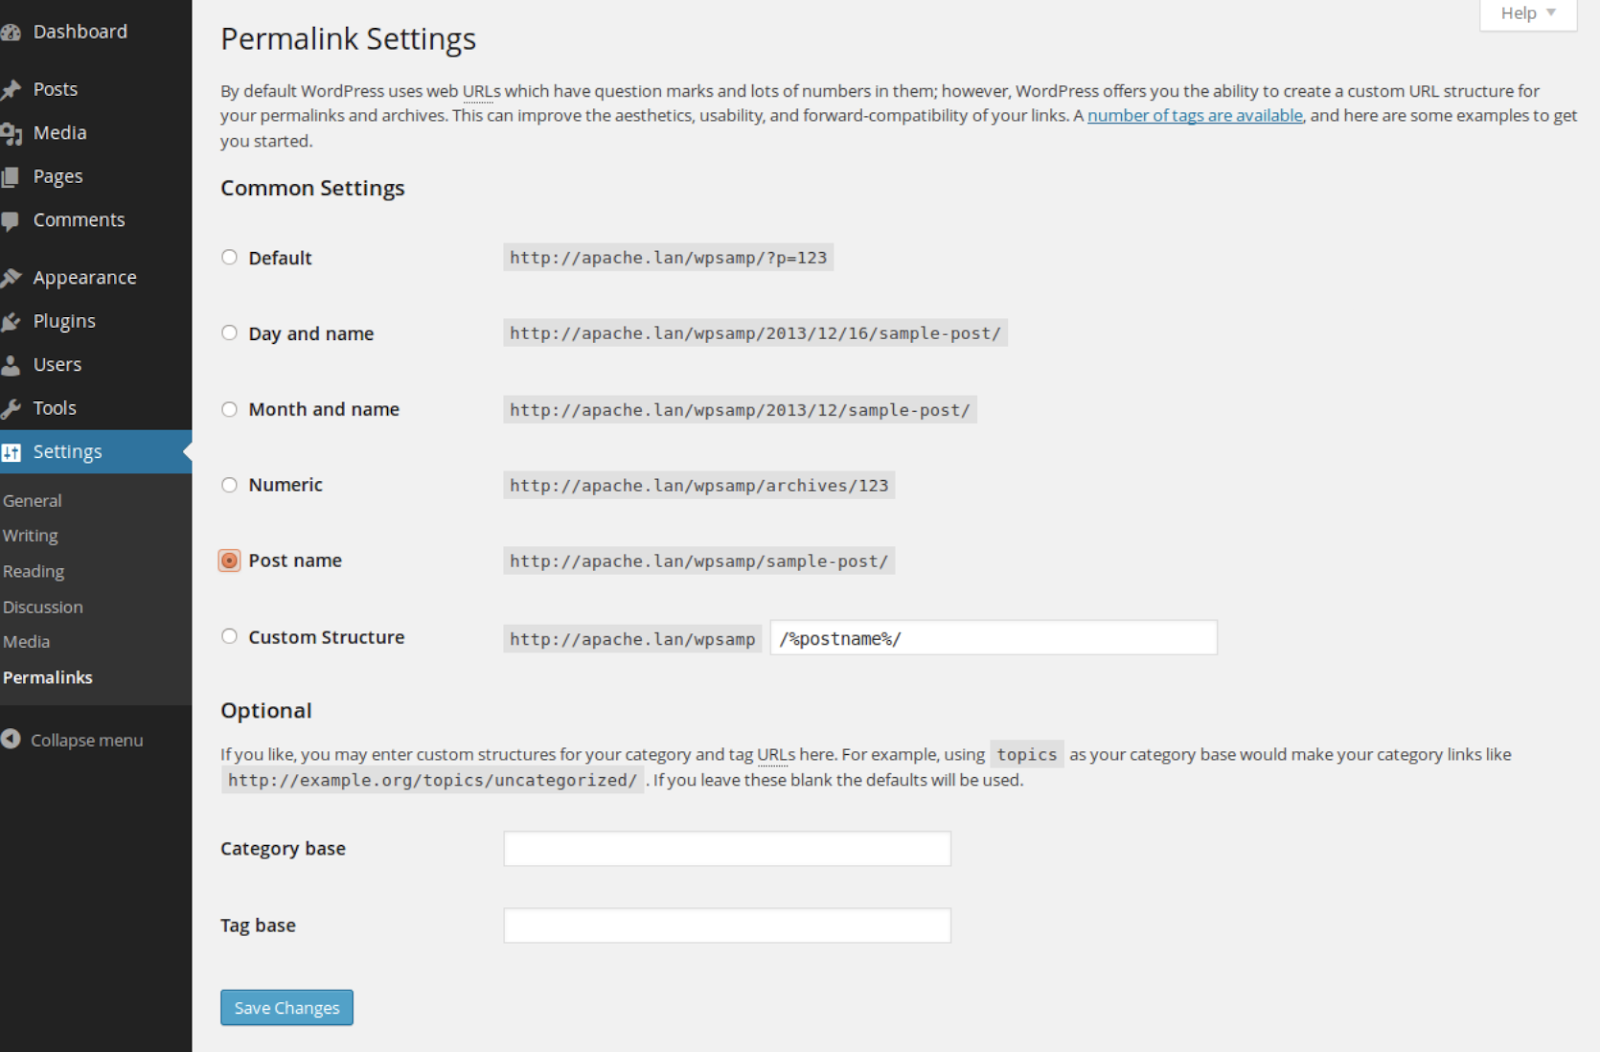
Click “Save Changes” when you are done.
3. Use Tags and Categories
Tags and categories allow you separate your website’s pages and blog posts into specific and broad groups, respectively. This improves your SEO because it allows search engines to understand your website’s structure and the content your website actually contains.
Added bonus: Tags and categories also improve user experience by allowing visitors to quickly find the content they’re searching for and make it easier for you to manage all of your website content..
Tags
Tags are like keywords that you can use to describe what a specific page or post is about. For example, if we think about your gluten-free cafe’s website, the tags on one of your pages may include “muffins”, “tea”, or “cookies”.
To add a new tag or view your current tags, go to your WordPress dashboard and click “Posts” and “Tags”.
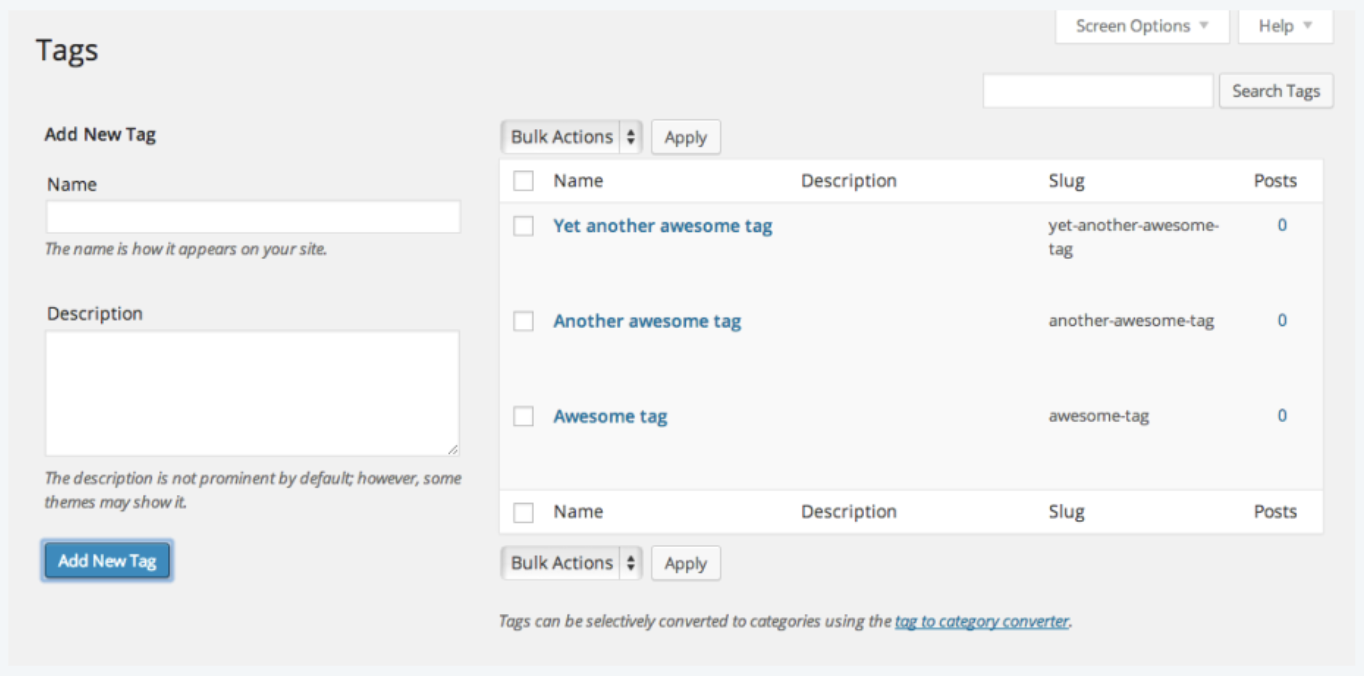
You can view current tags or “Add New Tag” here. For more information on tags, check out this list of tips.
Categories
Categories are how to you broadly group your posts and pages. In the case of the gluten-free cafe, your categories may include “gluten-free”, “cafe”, and “allergy”.
To create a category, go to your WordPress “Settings” and click “Writing”. Here you’ll see your current categories as well as an “Add New Category” button.
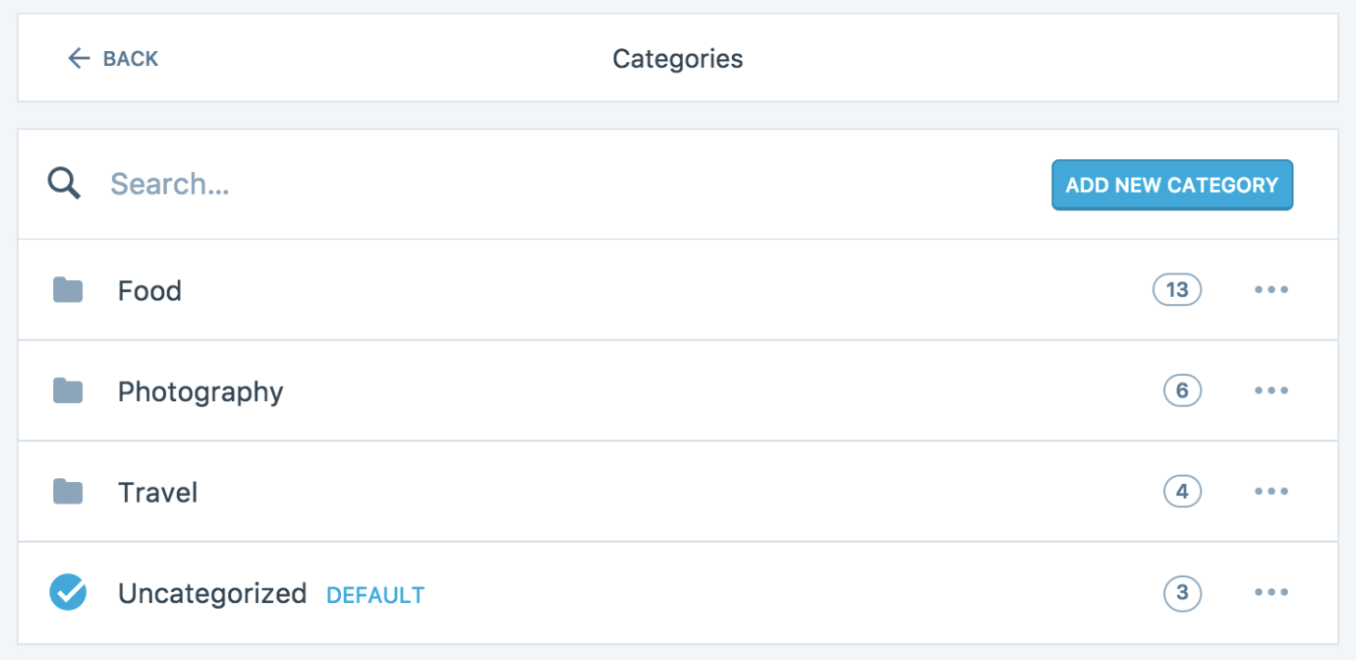
For details on other ways to create categories, check out this page.
4. Choose an SEO Plugin
WordPress plugins enhance the functionality of your website by adding features that don’t come standard with the software. There are tens of thousands of plugins available, many of which can help you improve your SEO. If you are unaware of which plugin you want to implement on your site, you can search the WordPress plugin library for options that fit your needs.
SEO plugins, such as Yoast SEO, All In One SEO Pack, and The SEO Framework offer features to help you build XML sitemaps, implement tags and categories, optimize your titles and content with the use of key phrases and keywords, control your site’s breadcrumbs, and take advantage of Google Analytics support.
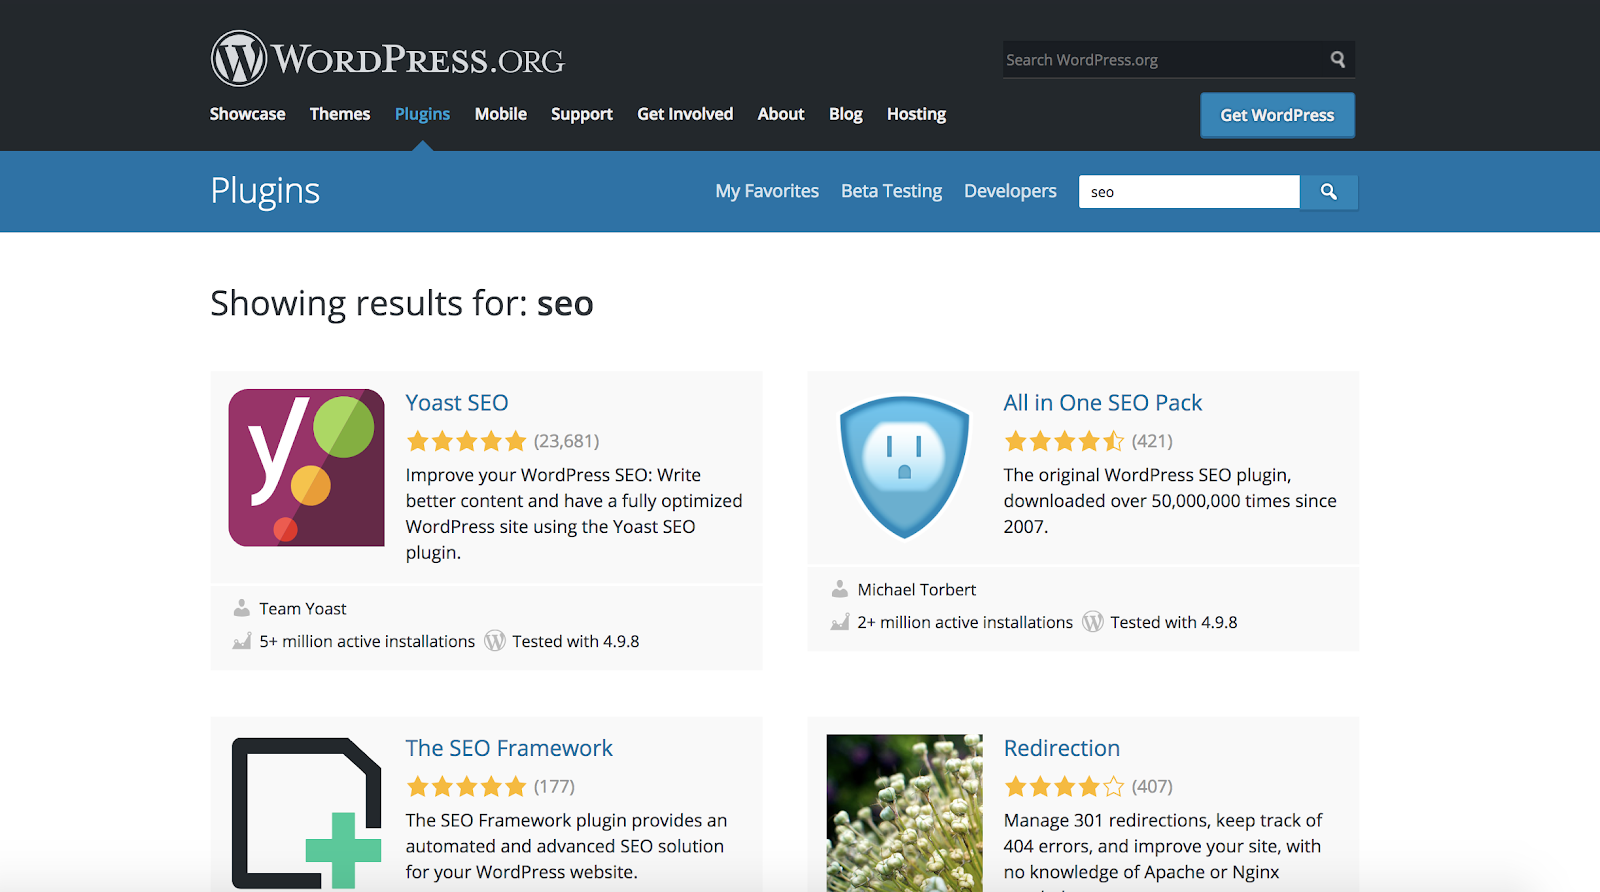
You can then simply download and install your WordPress plugin of choice to begin improving your SEO immediately.
5. Use XML Sitemaps
An XML sitemap is a file of code on your web server that includes each page of your website. XML sitemaps are used to help search engines find, evaluate, and rank the content on your site.
Unless you’re someone with extensive coding knowledge and want to manually create your XML sitemap, the easiest option is to install an SEO plugin, such as Yoast SEO, or one dedicated to creating sitemaps, such as Google XML Sitemaps, that creates your sitemaps for you automatically.
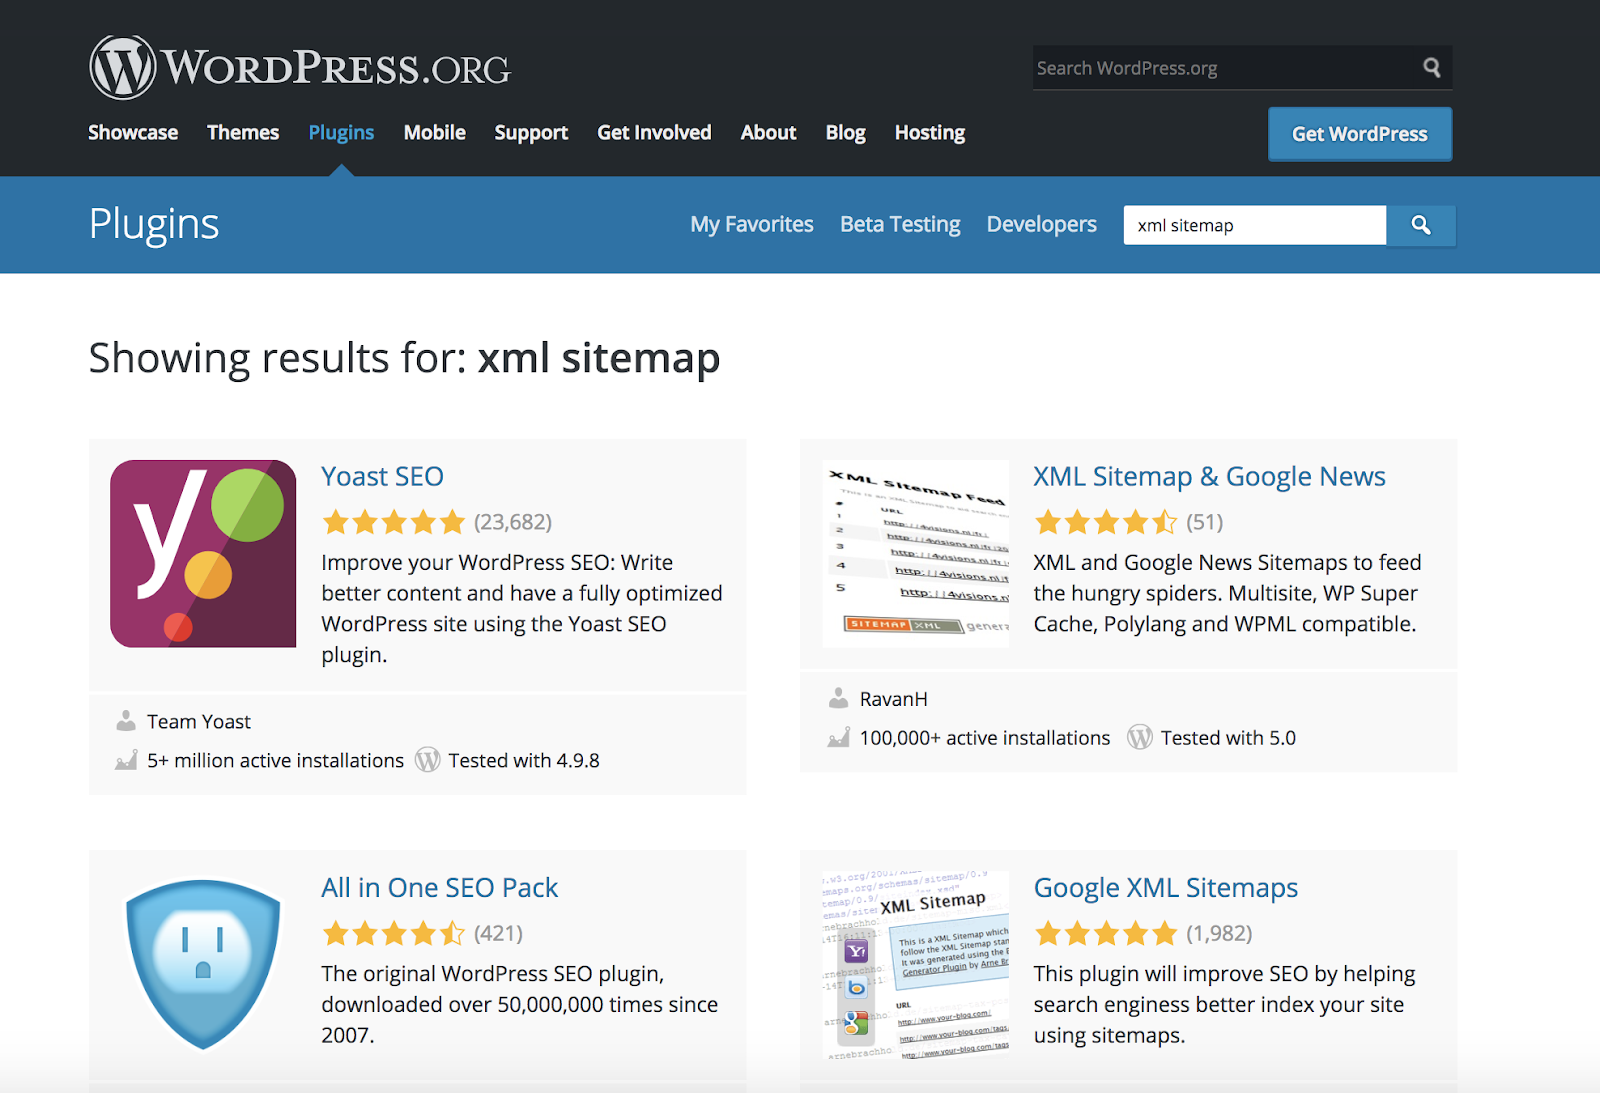
For more details on why WordPress recommends using a sitemap, check out this page.
6. Internally Link Your Site
To improve your SEO, you’ll need to increase your website’s authority. One of the main ways search engines determine your site authority is by the amount you internally link to your pages, posts, blogs, and other content.
To link to other content, you can highlight the words on your page where you want to insert the link, click the link button in the WordPress toolbar, and copy and paste the URL you want to link to. Once you do this, you’ll notice your linked words turn blue and contain the URL you want to redirect your visitors to.
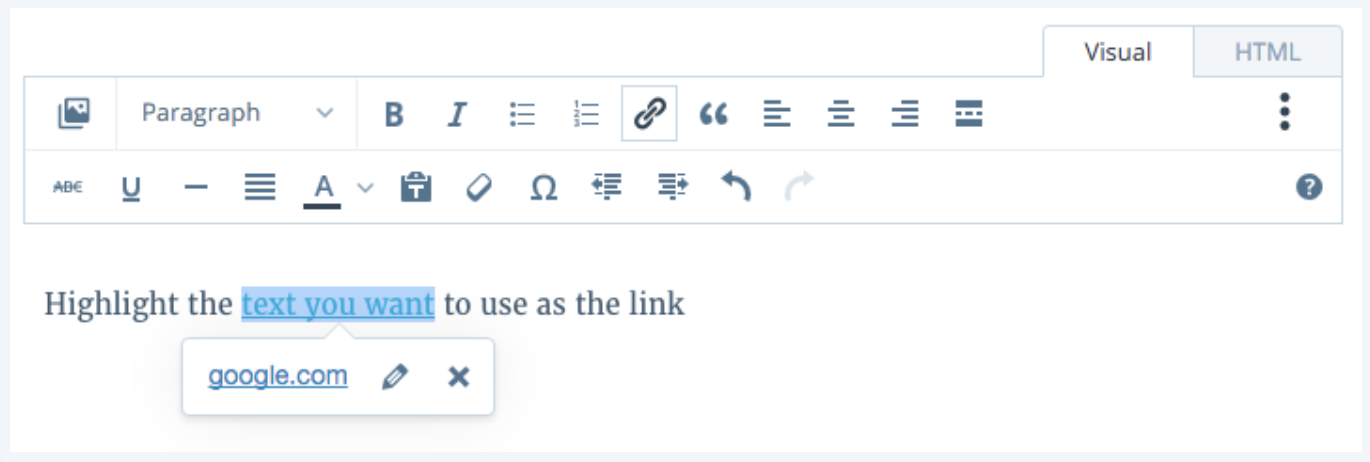
For other ways to internally link your WordPress website, check out this page.
7. Optimize Your Images
You can optimize pretty much everything on your WordPress website, including your images. To optimize images, use Image-Alt-Text. Search engines read Image-Alt-Text, which are descriptions of your images, to rank your site and determine whether or not your images have the information being searched for by users.
The easiest way to add Image-Alt-Text to your images is through an SEO plugin, such as SEO Optimized Images. You can also always read through the list of your current plugins’ features to ensure they allow you to add Image-Alt-Text.
No matter which plugin you install, the area in which you enter your Image-Alt-Text will look something like this:
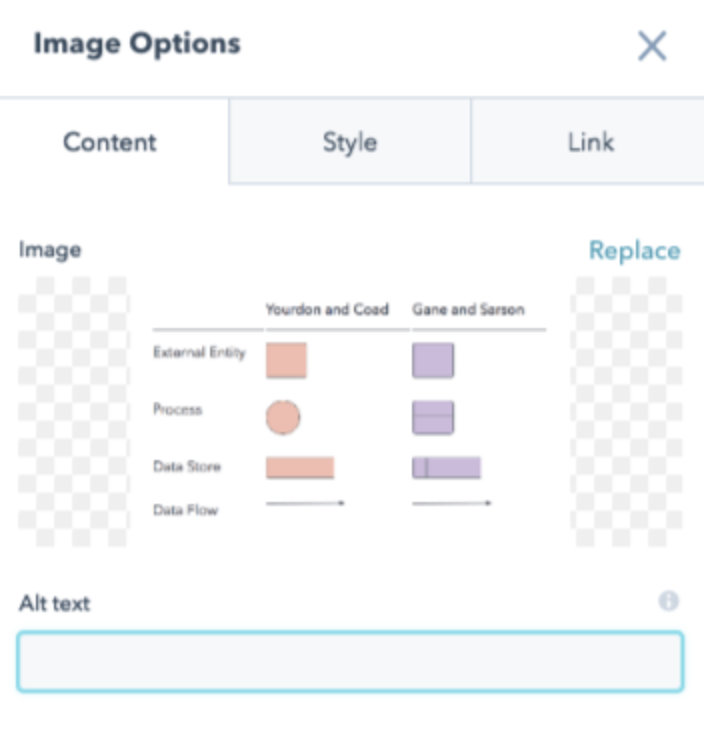
You should enter your description in the “Alt text” section. When you are adding Image-Alt-Text and you have a description that is multiple words long, use dashes to separate the words. This tells the search engines that you’re writing multiple different words.
For example, if you’re describing a picture of HubSpot’s WordPress Contact Form Builder plugin, your Image-Alt-Text should look something like this: “WordPress-Contact-Form-Builder”, not “WordPressContactFormBuilder” or “WordPress_Contact_Form_Builder”. If you do this, WordPress will read your description as one word.
8. Use SSL
SSL, or Secure Sockets Layer, is a standard security technology that manages an encrypted link between a server and browser. SSL is how information shared between your website and visitors remains secure.
For example, if someone completes your order form and lists all of their credit card information, SSL is how businesses ensure that information is not intercepted by a hacker along the way.
SSL improves SEO because search engines, such as Google, look for “secure and encrypted” connections when determining a website’s ranking. So, if there were two identical sites but one had SSL and one did not, Google would be more likely to rank the site with SSL.
These days, WordPress.com automatically adds SSL to your site so you won’t need to manually do anything. If you have a different type of account, such as a WordPress.org site that requires you to take care of all of your website’s security individually you can install an SSL plugin such as Real Simple SSL.
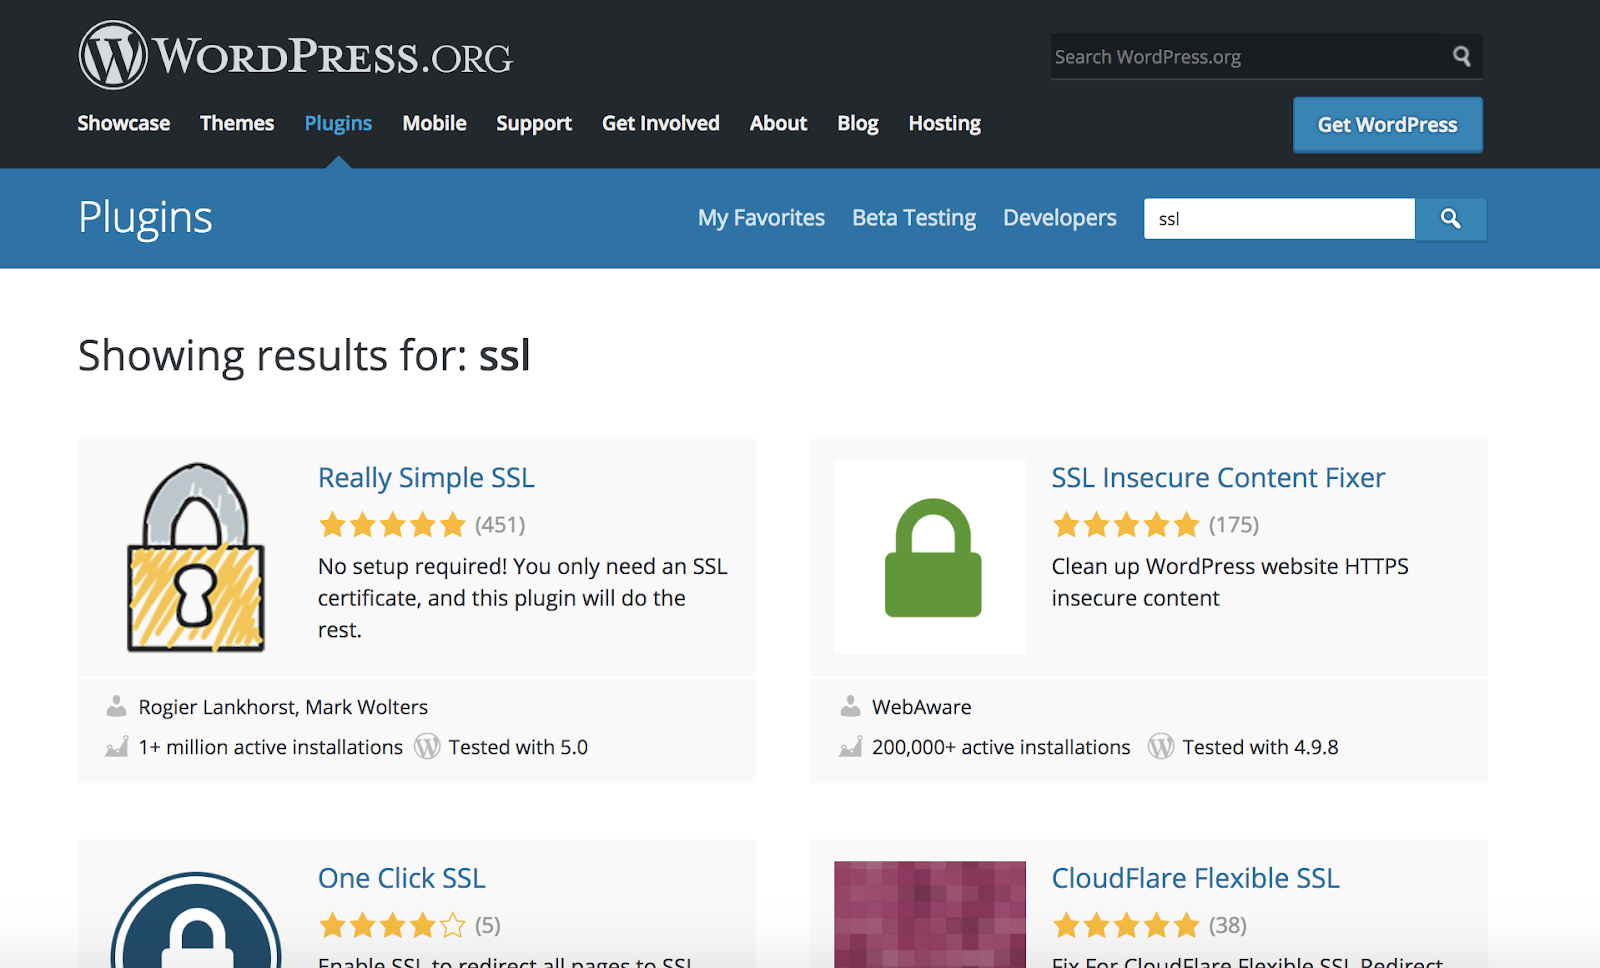
Check out this page for more details on WordPress SSL.
9. Use Nofollow External Links
When you internally link to the pages on your site, you are giving yourself authority. When you externally link to your sources or other pieces of content you believe your visitors should read or experience, you are also helping them gain authority, or giving those websites “link juice”. So you could say externally linking is a good thing for your own SEO, but it also improves the SEO of those pages you are mentioning on your website.
Enter: Nofollow external links.
These links not only prevent content spam on your WordPress website, but they also prevent search engines from being able to follow those URLs to the sites you are linking to on your website so you are only improving your own site’s ranking and authority.
You can manually add a Nofollow link to your WordPress site, or you can simply add “nofollow” in the “Link Relationship” form field when you add a hyperlink to your keywords or phrases.
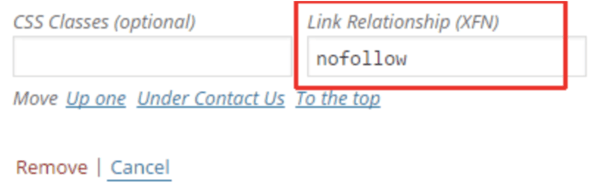
There are also a number of Nofollow plugins available for your WordPress site in the plugin library.
10. Manage Your Security
As mentioned in our discussion about SSL certificates, search engines love secure websites — meaning your website’s authority and ranking will improve if your site is secure.
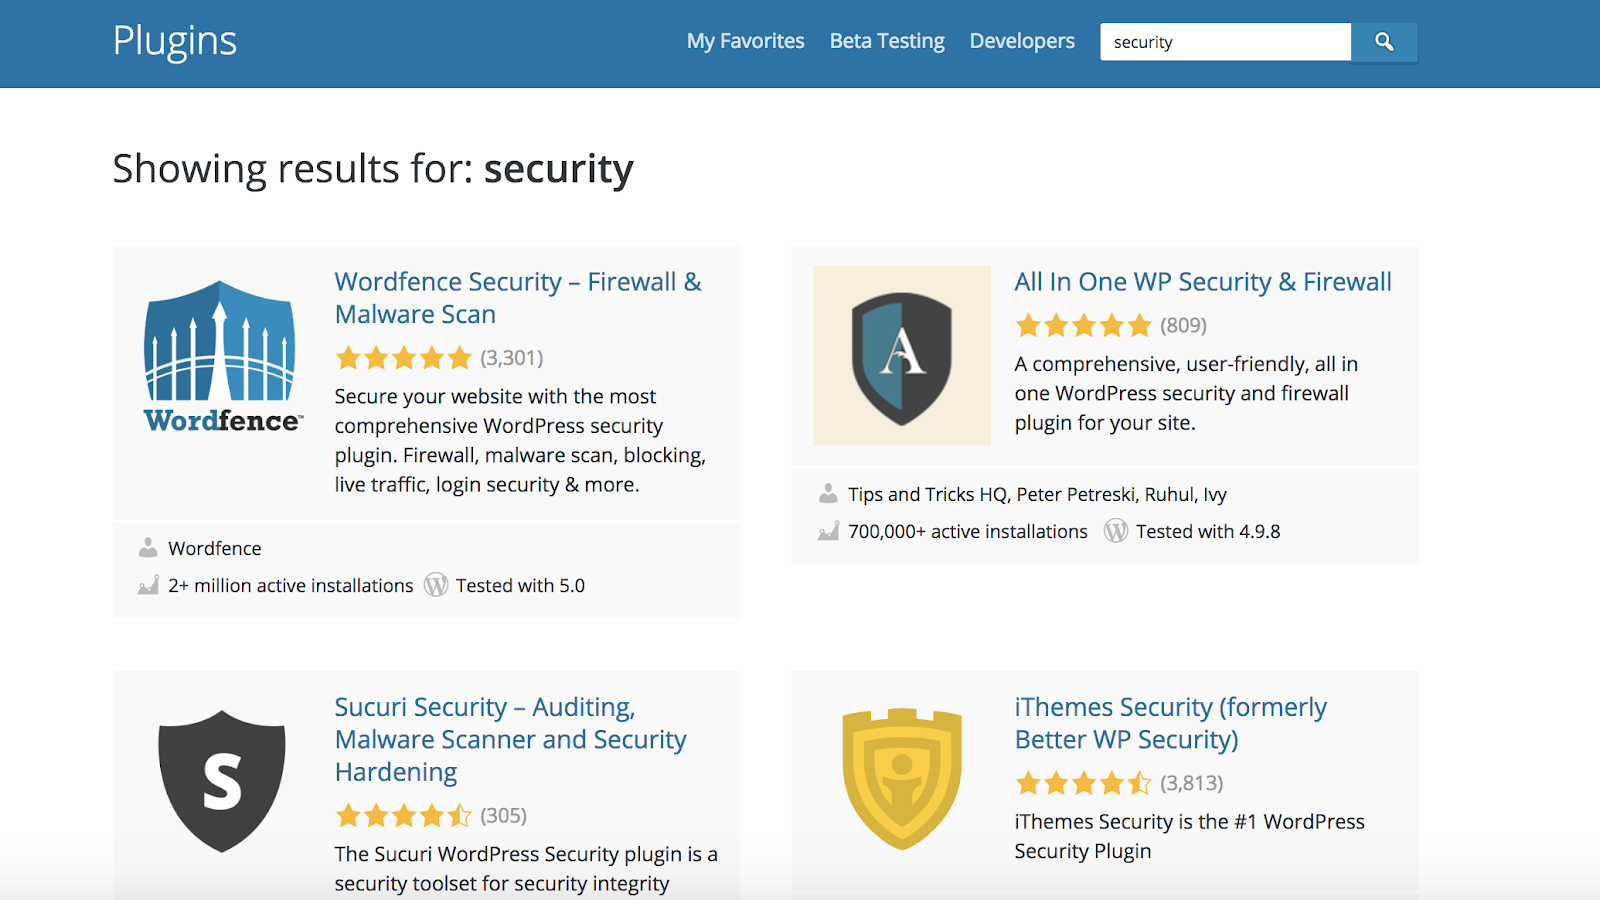
Depending on your WordPress plan, you may or may not have security taken care of for you. No matter what, you can always install plugins, such as Wordfence Security or iThemes Security, to enhance your site’s protection.
11. Optimize Your Comments
Comments on posts are a great way to boost engagement on your website. Engagement typically means more traffic, link sharing, and interaction, and therefore, improved SEO. However, spam in your comments could ruin your SEO and ranking. That’s why you need to ensure you are only receiving real comments from real people.
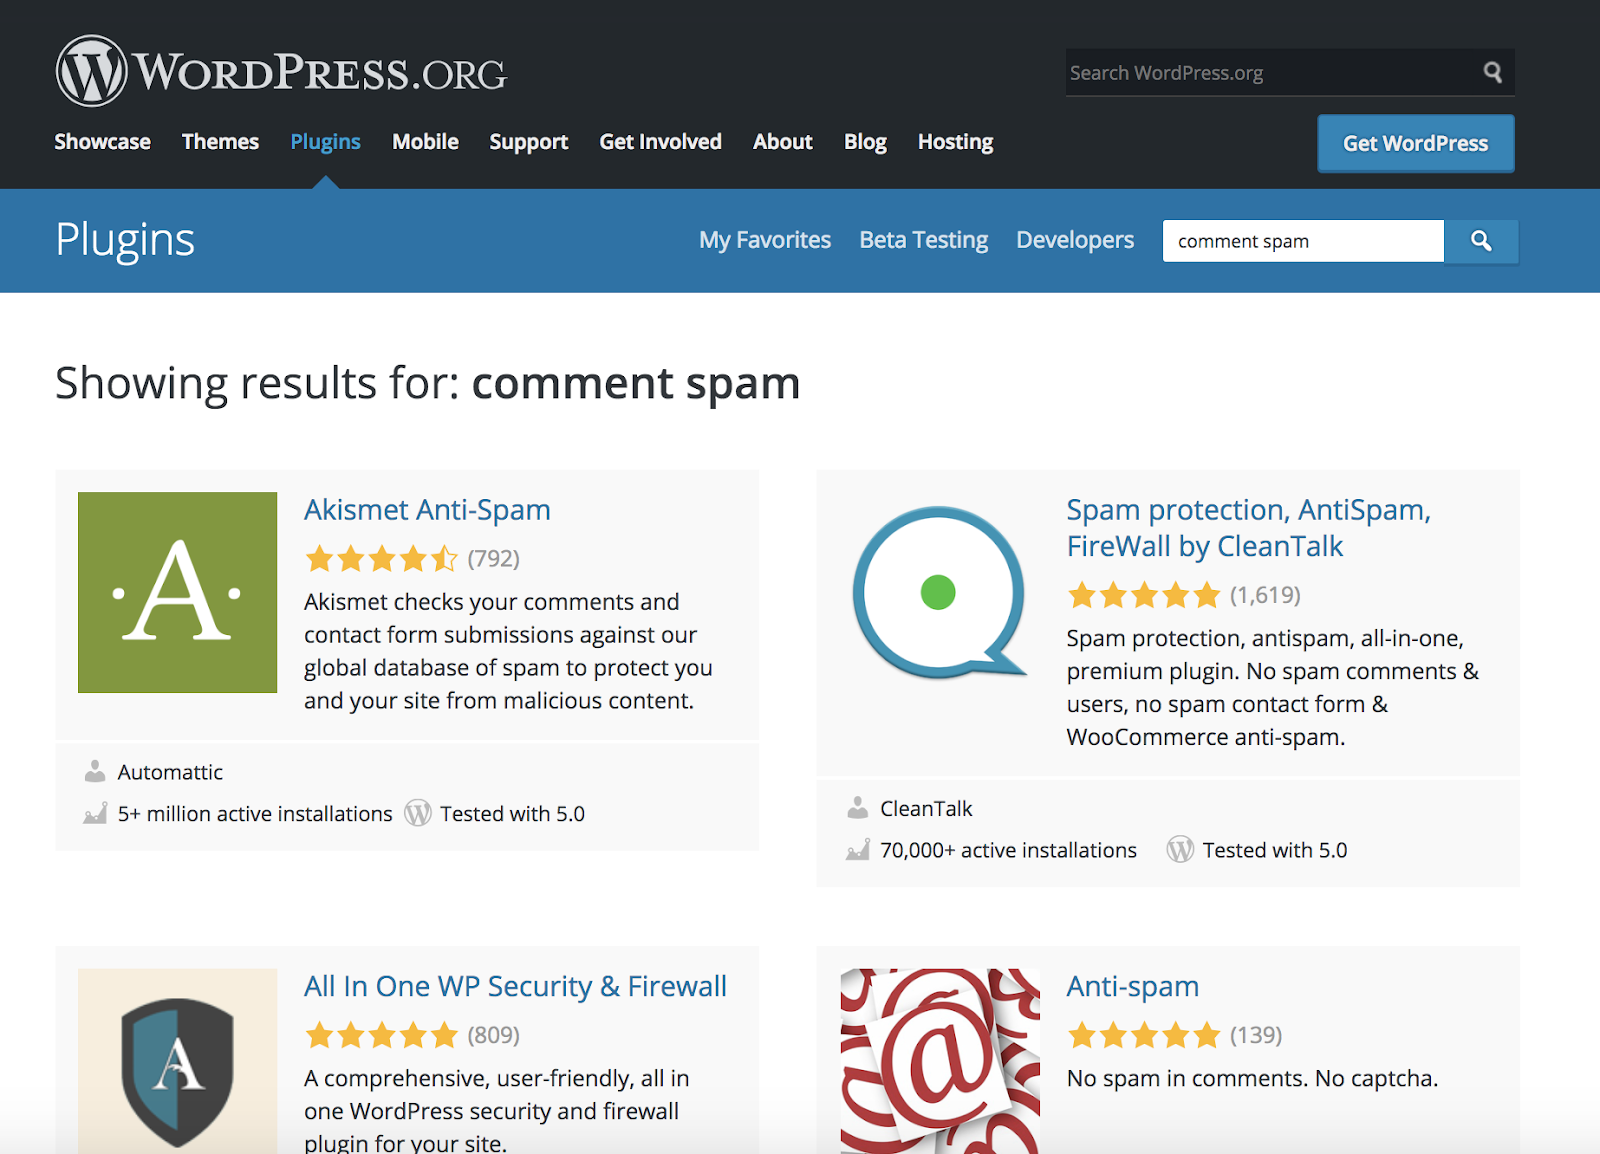
WordPress plugins such as All In One WordPress Security & Firewall and Spam Protection, Anti Spam, Firewall by CleanTalk will block comments containing spam and stop other forms of spam such as faulty form submissions, subscriptions, orders, and more. Many of these plugins also have features that completely block the known spammers so they can’t return to your site again.
12. Choose WWW or non-WWW
There are two main ways to access websites by URL — you can either search with the ”www” (so your search would look like this: www.mysite.com) or without the “www” (so your search would look like this: mysite.com).
Search engines see these two different URLs, or official domain names, as completely different websites … which is why you need to pick one. There’s no good or bad option and your decision will not impact your SEO — it’s just a preference.
Once you do pick an option, you’ll want to stick with it so you can then begin improving your site’s SEO. You can do this by linking to your official domain name internally as well as externally on social media and email. When you are consistent with your domain and link to it often, search engines are likely to give you more authority and therefore a higher chance at ranking. Not to mention this makes things a lot simpler for your visitors.
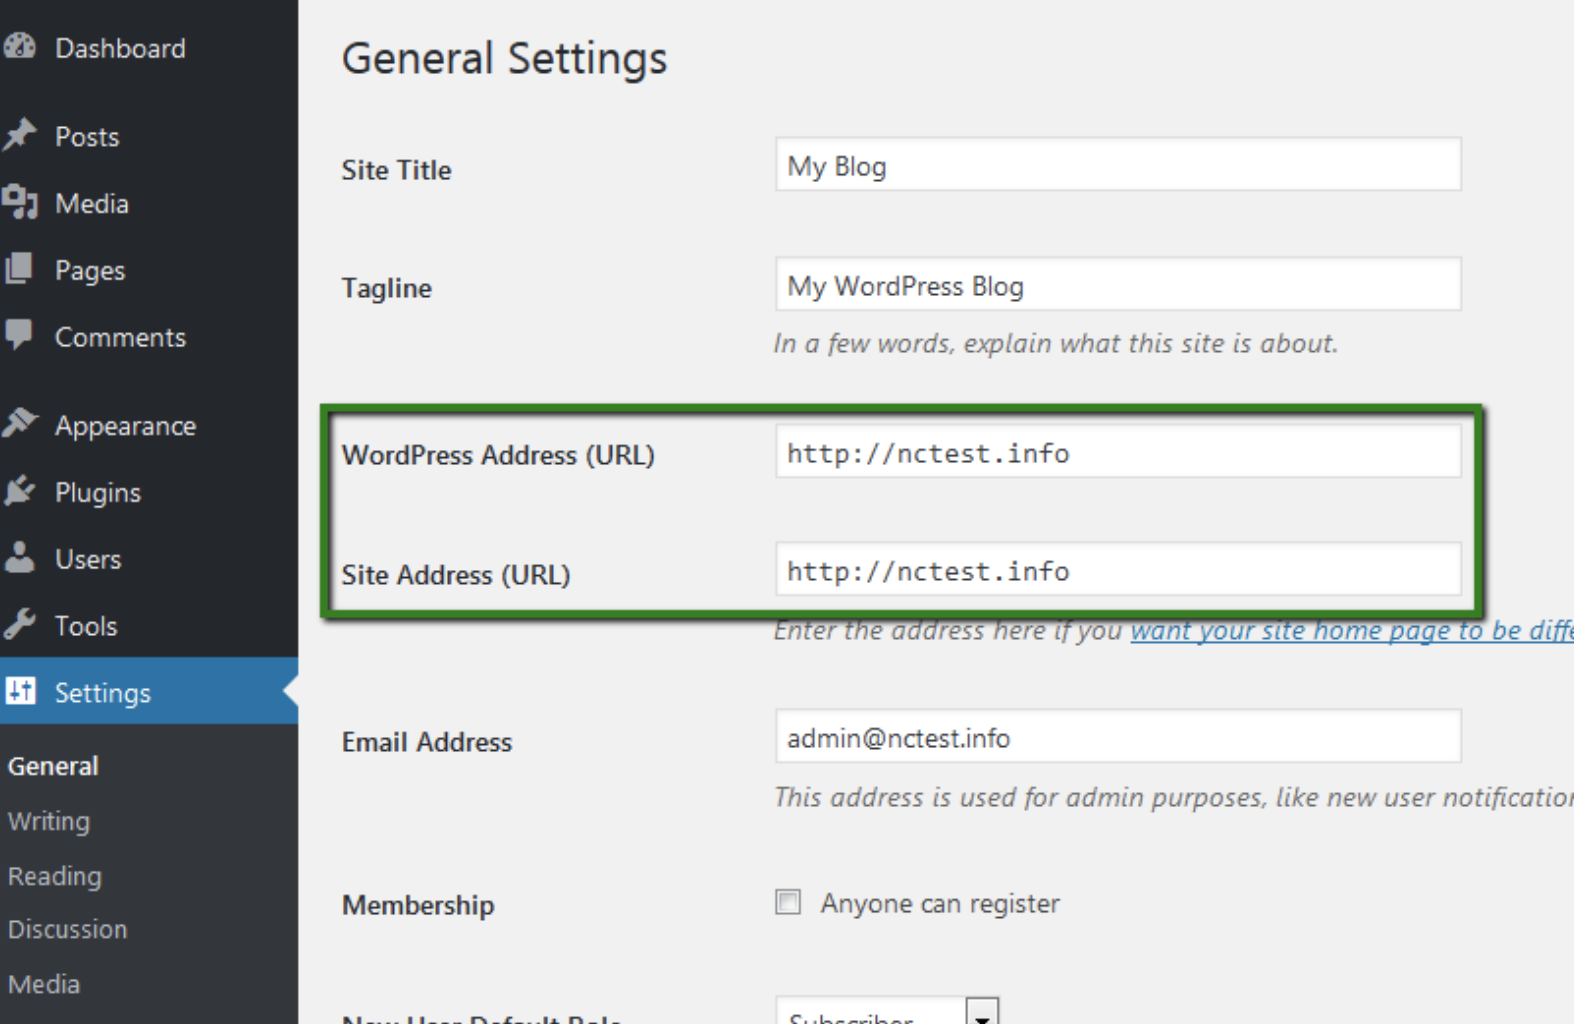
To pick an option, head to your WordPress dashboard, click “Settings” and under “General Settings” you’ll see the form fields for your URL.
Back To You
Anyone can improve their WordPress website’s SEO. By implementing some or all of the simple tips from this guide, you will increase your website’s authority and ranking on all search engines — and when you achieve this, you’ll experience an increase in website visitors, leads, and conversions.

How to Make Your LinkedIn Company Page Stand Out
Want to create a stronger presence for your company on LinkedIn? Wondering how others are using company pages to support their business goals? In this article, you’ll discover how 10 prominent businesses are making the most of LinkedIn and 4 key components of an engaged LinkedIn company page. #1: Recruit Talent Tesla is on a […]
The post How to Make Your LinkedIn Company Page Stand Out appeared first on Social Media Examiner.
from Social Media Examiner https://ift.tt/2DT9F82
via socialmediaexaminer
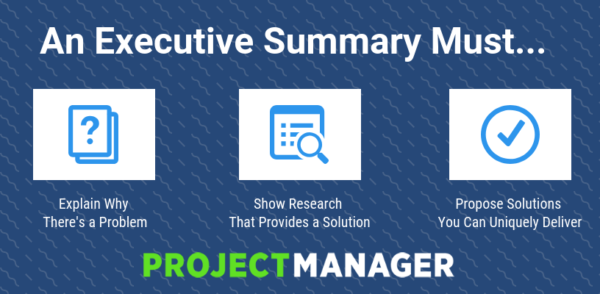
How to Write an Executive Summary: A Quick Guide
Unriddled: Free Movies (!) From YouTube, Facebook Makes the Unsend Feature Official, and More Tech News You Need
“Unriddled” is HubSpot’s weekly digest of the tech headlines you need to know. We give you the top tech stories in a quick, scannable way and break it all down. It’s tech news: explained.
Unriddled: The Tech News You Need
1. YouTube Subtly Adds Free(ish) Movies to Its Collection
AdAge reported late last week that YouTube added free films to its Movies collection in October, allowing users to watch full-length features with commercial breaks. The ad-supported model creates an alternative to other feature-film-for-pay options online, like iTunes or subscription-based streaming services like Netflix and Amazon Prime. The latter two services haven’t yet introduced the option to view movies for free with commercials. Read full story >>
2. Messenger Makes Its Unsend Feature Facebook Official
Last week, we covered a story that Messenger would imminently roll out an unsend feature to all users — a feature that was previously (and controversially) only available to Facebook CEO Mark Zuckerberg. Now, according to TechCrunch, the feature has officially become available to users in Poland, Bolivia, Colombia and Lithuania, with hopes of global rollout “as soon as possible.” Read full story >>
3. Instagram Launches Its “Time Well Spent” Tools
Over the summer, Instagram and its parent company Facebook both announced they would integrate new tools to show users how much time they spent on each app.
There was no clear timeline for this rollout when the announcement was made, but last week, Instagram officially launched its “Your Activity” dashboard — which not only gives users a visual time management display, but also helps them set daily limits for using the app and mute notifications. TechCrunch has more on how to find and use the new feature. Read full story >>
4. How Do People Really Feel About Amazon’s Big Announcement? Here’s What We Found Out.
News of Amazon’s geographical selections for its second headquarters has received mixed responses. We asked hundreds of people to weigh in on the news — here’s what we learned. Read full story >>
5. Instagram Cracks Down on Fake Followers
Instagram has started removing followers from user accounts that have gained a following through automated apps that leave comments, follow, and then later unfollow other accounts on their behalf. Although these apps were made to help users build an audience, Instagram considers this behavior (and many of the new followers gained) to be “inauthentic.”
With these changes, Instagram accounts that have used these apps to build a following might see that following shrink — an occurrence of which Instagram has warned users with an in-app message. Read full story >>
6. LinkedIn Might Be Adding New Social Tools
According to a report from Social Media Today, LinkedIn might be testing social tools such as emotion-driven “reactions” to posts — similar to Facebook’s Like, Love, Laugh, Wow, Sad and Angry post reactions. The possible new feature, which the company has yet to confirm, was first discovered by computer scientist Jane Manchun Wong, who tweeted that LinkedIn’s versions of reactions appear to include “Like,” “Clap,” “Insightful,” “Hmm,” and “Support.”
If LinkedIn does roll out these reactions, it could be the latest in a series of moves by other social networks to emulate and potentially provide alternatives to Facebook’s business and social tools (see below). Read full story >>
7. Why the New Google My Business App Makes for a Pivotal Marketing Moment
Google has built a new place for businesses to build a profile and connect with customers. Find out why it represents a pivotal moment in marketing. Read full story >>
8. Self-Driving Cars Will Hit the Road in a Few Weeks. Are We Ready?
In a matter of weeks, self-driving car company Waymo is rumored to pilot a commercial, driverless car-hailing service. But are people ready for autonomous vehicles to hit the road? Read full story >>
9. Google Used Search Data to Create This Report to Help You Navigate the Holidays
Data nerds and holiday enthusiasts alike, rejoice: Google has compiled historical search data to help users navigate Thanksgiving this year. Here are the report’s highlights. Read full story >>
10. Is Gamification the Key to Better Video Engagement? [New Data]
App and video developers all over are creating a new type of video: the kind that invites the user to participate and interact with it, a la a digital game show. But is that truly the key to better video engagement? Read full story >>


Recruiters Reveal the 7 Best Fonts for Your Resume in 2019
Studies have shown recruiters typically scan a resume for only about six seconds before making a decision on whether an applicant is fit for a role.
With only six seconds to demonstrate your qualifications for a position, every detail counts. To evoke a sense of style, professionalism, and uniqueness, it’s critical you put effort and consideration into your font choice.
But, besides Times New Roman, which fonts pass the six-second resume scan? Additionally, which fonts should you avoid to ensure your typeface isn’t distracting the recruiter from the content itself?

Here, we’ve asked HubSpot recruiters to reveal the seven best fonts for your resume in 2019, as well as what they consider in terms of design in general, so your resume can stand out in the pile.
Best Fonts for Resume
- Times New Roman
- Arial
- Calibri
- Helvetica
- Cambria
- Georgia
- Garamond
- Avenir Next
- Muna
When speaking with recruiters, it quickly became clear that classic fonts are still the best options — when in doubt, you want to make your resume as clear and easy-to-read as possible, even if it means forsaking your favorite script font.
For instance, Johanna Fleming, a Services Recruiter at HubSpot, told me, “I’m a big fan of the ‘classics’ for resumes — Times New Roman, Arial, Calibri, Helvetica, and Cambria. I’m a little old school, but I think they are the cleanest and exude professionalism.”
Additionally, when asked which font size is best, Johanna said, “12 is ideal — nothing less than 10.5.”
Riley Kundtz, MBA Campus Recruiter at HubSpot, further noted, “I find the classic formatting and Times font to be helpful when reading a dense resume from an experienced MBA candidate.”
Another HubSpot recruiter, Rich Lapham, concurred, saying, “I would stick with the classics like Times New Roman or Arial. My personal recommendation would be Garamond — I think it makes it look that much more professional. Recruiters have an idea of the skills they are looking for on a resume, so if you try a new style or format it can be tougher for recruiters to find the information they are looking for. Keep it clean and simple.”
Holly Peterson, a Senior Recruiter at HubSpot, also supports more traditional fonts — “I really like Arial, Tahoma, and you can’t go wrong with Times New Roman! Anything that is cursive (or too bubbly) is too hard to read. For instance, I’d stay clear of Comic Sans.”
Despite the preference of Times New Roman by some of the recruiters I spoke to, not all recruiters prefer it. For instance, Glory Montes, Associate Campus Recruiter at HubSpot, told me, “For me it’s all about legibility and cleanliness. This means I prefer sans-serif fonts like Helvetica, over serif fonts like Times New Roman. Overall, I would just stay away from a font like Times New Roman. It’s overused and reminds me of long nights writing course papers in college.”
Ultimately, you’ll want to consider the position for which you’re applying when you’re choosing a font. To Glory’s point, certain more creative roles might benefit from a more unique font than Times New Roman.
Paulina Valdez Franco, a Senior Recruiter at HubSpot, also supports fonts other than Times New Roman. She mentioned, “My two favorite fonts for 2019 are Helvetica, if you’re looking for a clean and classic look, and Georgia, if you’re going after a more modern and fun look. The latter is also designed to read well on screens.”
Additionally, Paulina added, “Arial and Calibri are great choices if you want to play it safe.”
Bridget LeMon, a Technical Campus Recruiter at HubSpot, agrees that “it’s totally acceptable (and becoming more common) for candidates to stray away from the resume-norms of Times New Roman and Calibri. Avenir Next and Muna are two great options if you are looking to break the status quo.”
However, it’s important to note most recruiters I spoke with were hesitant to even offer a font at all.
For instance, Heta Patel, a HubSpot recruiter, said, “I typically don’t pay too much attention to font. I’m more concerned about whether the resume is formatted in a clean way — submitting a PDF is helpful with this, so your formatting doesn’t shift.”
Kelsey Freedman, a Sales Recruiter at HubSpot, concurred — “Honestly, I don’t care much about the font of a resume, as long as it’s clear and in PDF format. I typically only review a resume for 20-30 seconds, so a traditional font is good. I would advise avoiding script font or bubble font, or something distracting like that.”
Ultimately, and as expected, your content still matters most — however, a clean, clear font will help avoid any irritability you might cause a recruiter with a distracting, messy design.
Ashley Hodder, a Technical Recruiter at HubSpot, seconds this notion — “I think a resume shouldn’t have distracting font, and it should be easy to read. [But] what I get most excited about is the content. Depending on the role, I look to see that candidates are sharing direct and compelling snapshots of their work. I look for indicators that show data orientation, autonomy, and thoughtfulness about business impact.”
Resume Font Size
Regular font size for resumes is 12 points, typically in Times New Roman or another classic, easy-to-read font. Larger fonts are acceptable for headings, your name, or titles of sections. If you’re having trouble fitting your content on one page, you might try making your font 10.5 points, but don’t go lower than that.

3 Social Media Tools to Jumpstart Your Influencer Marketing
Are you interested in working with influential social media personalities? Not sure where to start? In this article, you’ll find three tools to help you manage influencer relationships and campaigns. #1: Partner With Legitimate Influencers Using HYPR One of the biggest risk factors in influencer marketing is fraud, where fake influencers buy followers in order to […]
The post 3 Social Media Tools to Jumpstart Your Influencer Marketing appeared first on Social Media Examiner.
from Social Media Examiner https://ift.tt/2DQBfmu
via socialmediaexaminer
20 YouTube Tricks, Hacks, and Features You’ll Want to Know About This Year (de-de)
When people talk about today’s most popular social sharing websites, YouTube often gets left out of the conversation in favor of sites like Facebook and Twitter.
But don’t be fooled: YouTube has a lot going for it. Although Facebook might be the largest social networking site, YouTube has the second greatest reach after Facebook in terms of general usage. It’s also the second biggest search engine behind its parent company, Google.
And there are a ton of cool things you can do with YouTube that you might not know about, whether you use YouTube to watch videos, post them, or both. For example, did you know YouTube has its own virtual reality (VR) setting to view any video in 360 degrees? Or that you can create a YouTube time link that brings viewers to a specific moment in the video? 
Mind-blowing stuff, people. To help you make the most out of the still very popular platform, we’ve put together a list of 20 of the lesser-known hacks, tips, and features YouTube has to offer.
YouTube Tricks, Hacks, and Features
- Turn any video into a GIF.
- Create a YouTube time link to start a video at certain points.
- See the written transcript of a video.
- Get found in search by uploading your own written transcript.
- Use YouTube to make a written transcript.
- Create, share, and collaborate on video playlists.
- Save videos to watch later.
- Create your own custom YouTube URL.
- Add an end screen or cards to promote similar content.
- Browse and download from YouTube’s free sound and music library.
- Add creative effects with YouTube Enhancements.
- Play videos in the background on mobile devices.
- Live stream videos to YouTube.
- Upload and watch videos in 360 degrees and VR.
- Watch for a new YouTube ads algorithm.
- Remove ads from YouTube videos for $10/month.
- Use Google Trends to explore popular YouTube search terms.
- Turn on a ‘safer’ YouTube for your kids.
- Clear your watch history.
- Learn about YouTube’s copyrights in a new way.

20 YouTube Tricks, Hacks, and Features You’ll Want to Know About
1. You can turn any YouTube video into a GIF using the URL.
Everyone loves GIFs, but knowing how to make them isn’t common knowledge. Well, it should be, because all it takes is a little YouTube URL trick.
To create a GIF from a YouTube video: Select a video to watch on YouTube and find the URL at the top of your browser. Add the word “gif” right before the domain name so it reads, “www.gifyoutube.com/[your-video-tag].”
This will bring you to gifs.com, with your video already uploaded and ready for editing. Here, you’ll find a menu of options to the left-hand side with a timeline bar along the bottom of your video. You can set the GIF duration, crop its frame, add captions, and more.
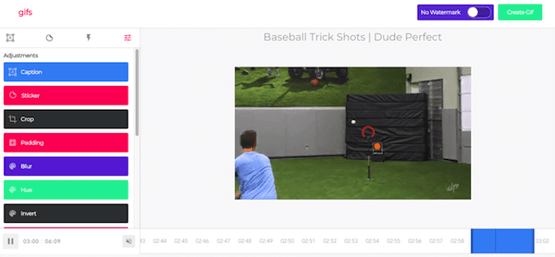
Click “Create GIF” on the top-right and it’ll prompt you for a GIF title and set of tags. Then click “Next,” and you have a handy landing page from which to share your newly minted GIF. Keep in mind you can only download this GIF to an offline file by signing up with gifs.com.
2. You can create a link that starts a YouTube video at a certain time.
Ever wanted to send someone a YouTube video, but point them to a specific moment? Let’s say you’re trying to recruit your friends to learn the dance in Justin Bieber’s “Sorry” music video with you.
Instead of sending your friends the general YouTube link and instructing them to fast-forward to the 0:50 minute mark, you can actually send them a specific YouTube time link that starts the video at whichever time you choose. Click here to see what I mean.
Alright, here’s how to do it:
To create a link that starts a YouTube video at a certain time: Open up the video and click “Share” to the far right of the video title. Then, in the window of options that appears, check the box next to “Start at:” and type in the time (in hours:minutes:seconds) you want. Alternatively, you can pause the video at the time you want it to start and that field will autofill.
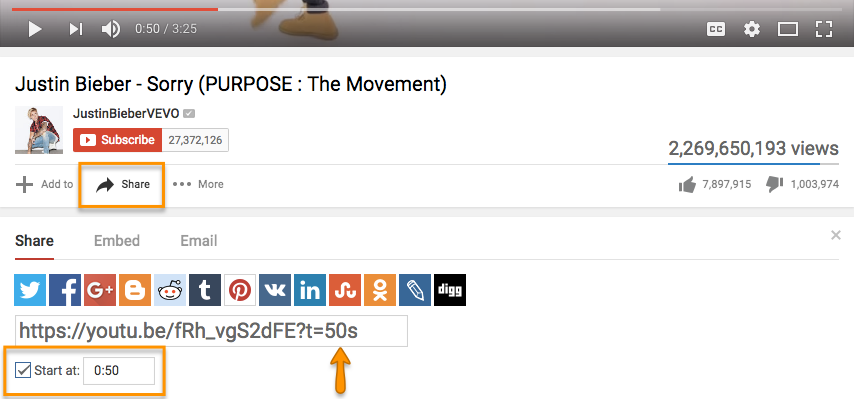
After a few moments, you’ll see a tag add itself to the end of the generic YouTube link (in this case, ?t=50s). Simply copy that link and paste it wherever you’d like.
It’s worth noting that you can’t embed a video so it starts at a certain time; you can’t only link to it.
3. You can easily see the written transcripts of people’s videos.
Did you know YouTube automatically generates a written transcript for every single video uploaded to its website? That’s right — and anyone has access to that transcript unless the user manually hides it from viewers.
I can think of a number of different situations where video transcripts can come in handy. For example, maybe you want to write down a quote from a video, but the tedium of pausing-and-typing, pausing-and-typing would drive you up a wall. Or perhaps you need to find a specific section of a video, but don’t want to rewatch the whole thing to find it. With a transcript in hand, you can find information like this without doing it all by hand.
To see a video’s transcript: Open the video in YouTube and press the “More” tab underneath the video title. Choose “Transcript” from the drop-down menu.
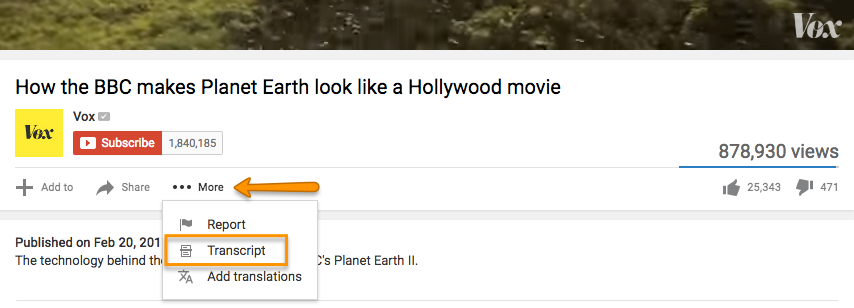
(If you aren’t seeing this option, it’s because the user chose to hide the transcript.)
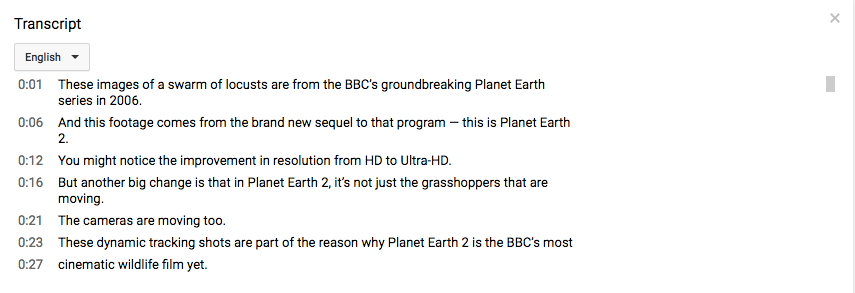
This transcript will appear as a new module in the same window. In many cases, the user who uploaded the video will not have gone back and manually polished the transcript, so it won’t be perfect. But it’ll certainly save you some time and pain.
4. You can help your video get found in search by editing or uploading a transcript.
Both YouTube and its parent company Google look at a number of factors when ranking videos in search to determine what your video is about, and your transcript is one of them. (An even bigger ranking factor is your video’s description, which is why Digital Marketing Consultant Ryan Stewart suggests that you actually paste your transcript right into the description box, too.)
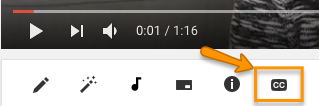
To add a transcript to your video: Open the video on YouTube, and you’ll see a row of icons just below the play button. Click the icon on the far right for “Subtitles/CC.” (CC stands for “Closed Captions.)
Set your language if you haven’t already. Then, you’ll then be prompted to choose among three different ways to add subtitles or closed captions to your video …
- Upload a pre-written text transcript or a timed subtitles file. (Learn more about the file types you can upload and more here.)
- Paste in a full transcript of the video, wherein subtitle timings will be set automatically.
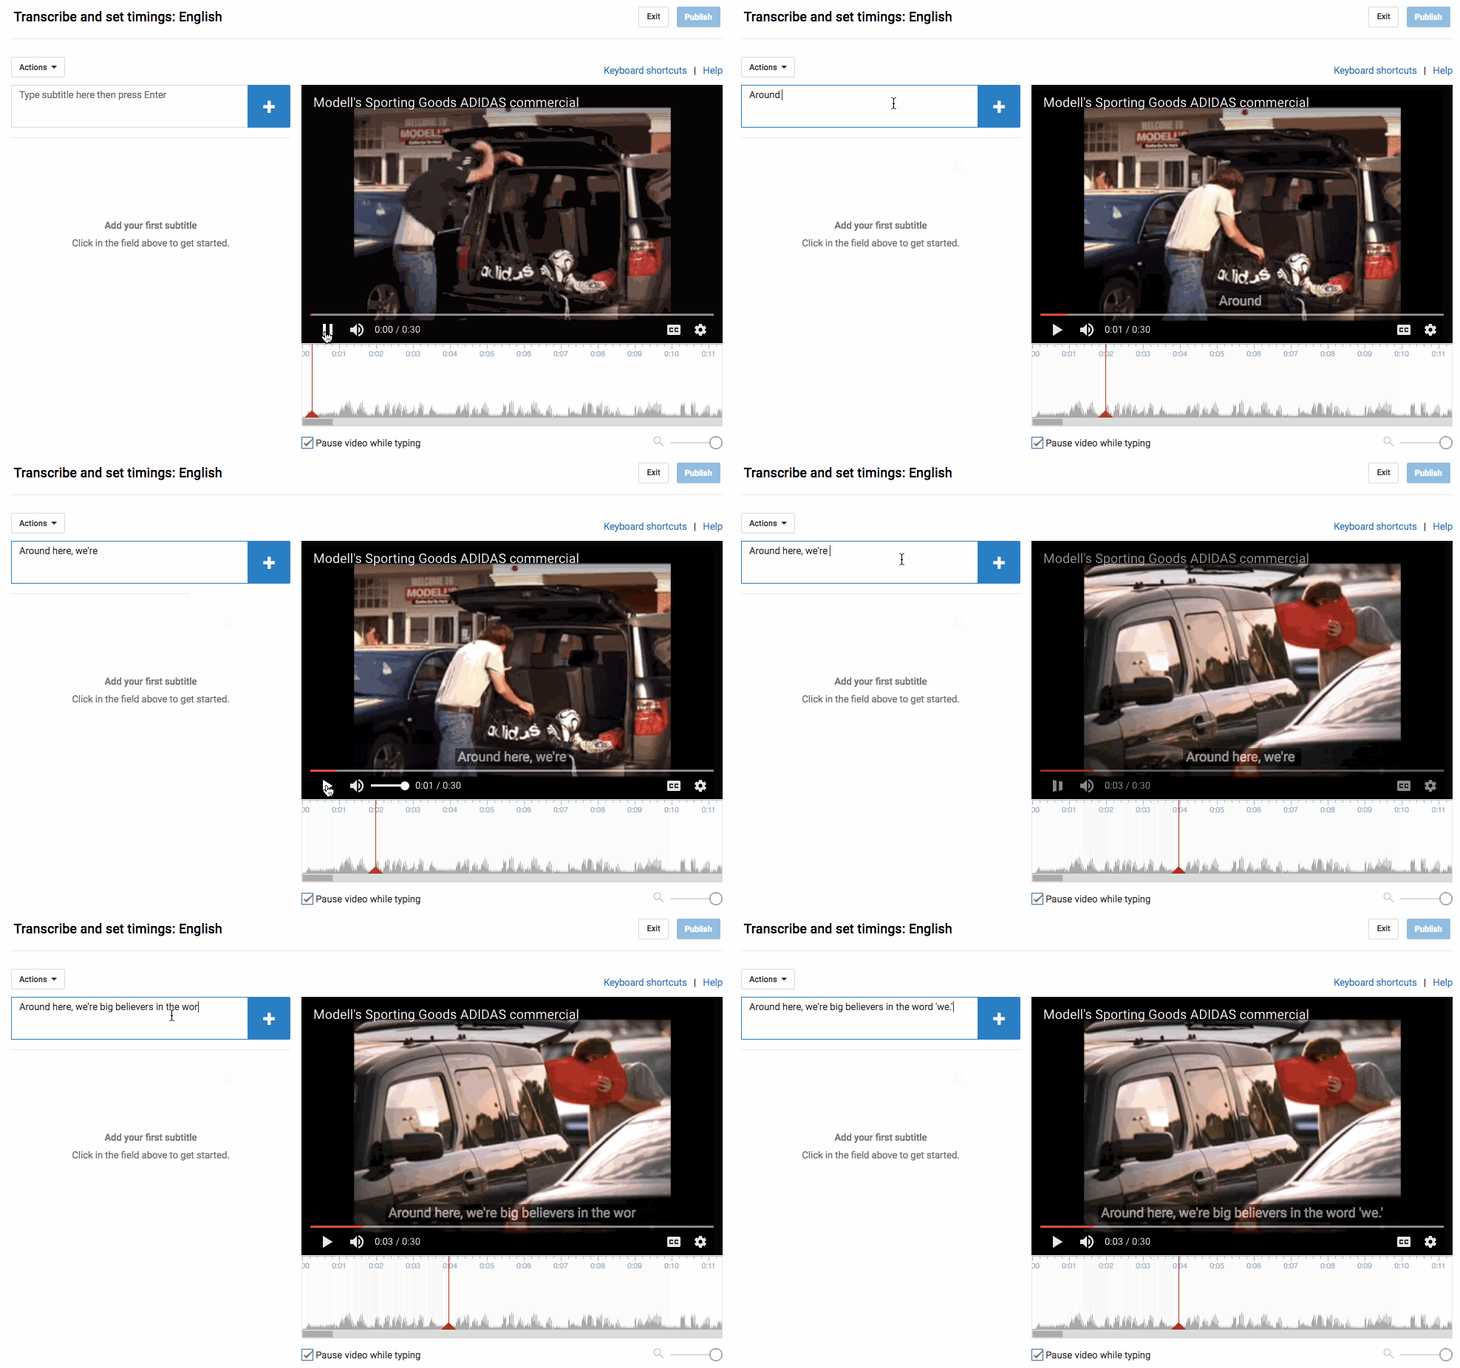
- Type them in as you watch the video.
The folks at YouTube have done some great things to make that third option (typing as you watch) as painless as possible. For example, if you check a box next to “Pause video while typing,” it’ll make the whole process a lot faster. Here’s a GIF showing that in action:
Learn more about optimizing your YouTube videos for search in the below video.
5. You can use YouTube to easily get free transcriptions of your videos and audio files.
This is the last one about transcripts, I promise — but I’ll bet you never thought about them this way. As you know from #3, YouTube automatically adds a transcript to every video. But if you’re looking for a one-off transcription of an audio or video file and don’t want to pay for a service, YouTube’s built-in captioning system isn’t a bad place to start. You can always clean it up later.
To get an automated transcription for a video: Simply upload your video to YouTube, open it on YouTube’s website, press the “More” tab underneath the video title, and choose “Transcript” from the drop-down menu. The transcript will appear as a new module in the same window. If you want to clean it up, follow the steps outlined in #3 for a user-friendly experience.
To get an automated transcription for an audio file: You’ll need to upload your audio recording to YouTube using a service like TunesToTube. It’ll take anywhere between 2–30 minutes for YouTube to upload it. Then, follow the instructions for getting an automated transcription for a video, outlined above.
6. You can create, share, and collaborate on video playlists.
Just like on your other favorite media sharing sites like Spotify and iTunes, you can create a “playlist” on YouTube — which is really just a place to store and organize the videos (your own and others’). You can keep playlists private, make them public, or even share them directly with others.
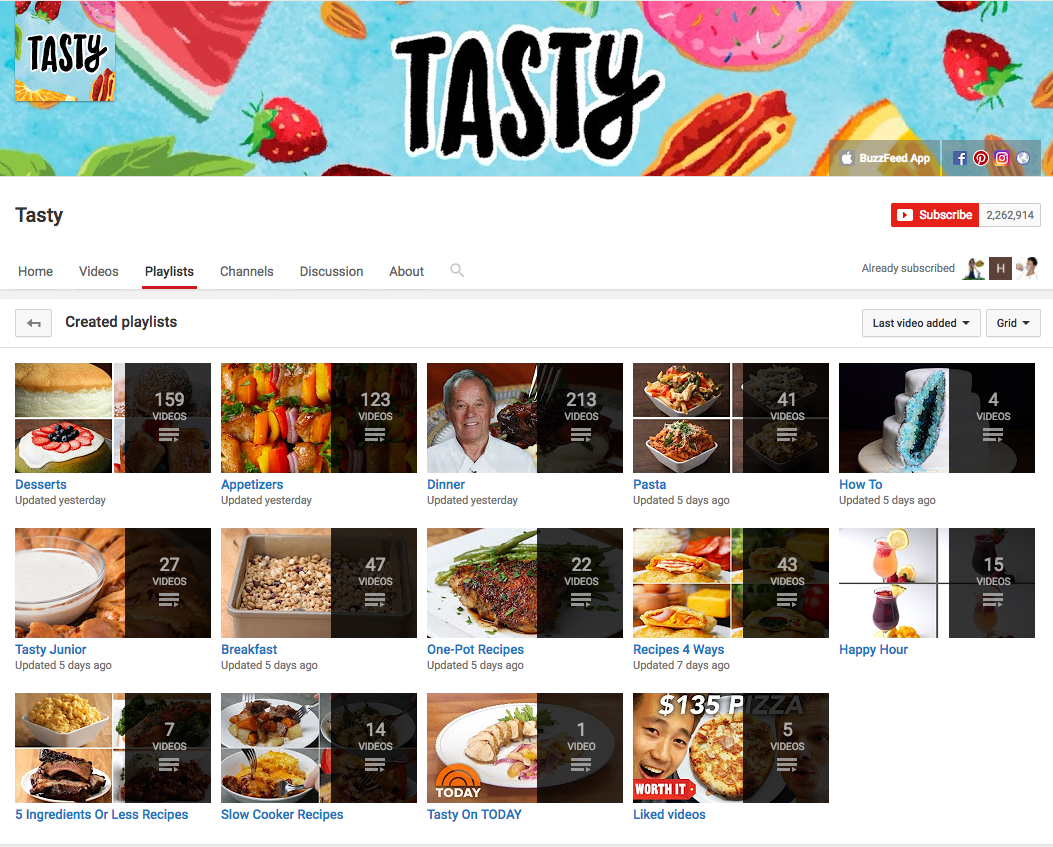
Playlists are useful for many different types of users, from an individual collecting cooking videos for their upcoming dinner party to a brand that’s segmenting its YouTube video content by topic. For example, Tasty’s YouTube playlists break up recipes by meal type, making it easier for people to browse and find what they’re looking for:
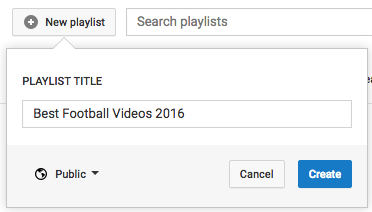
To create a playlist on desktop: Go to your Playlists page by clicking here or clicking your account icon in the top right, choosing “Creator Studio,” clicking “Video Manager” on the left, and choosing “Playlists.” Then, click “New Playlist” on the top right and choose whether you’d like to keep it private or make it public.
To create a playlist on mobile: Click here for instructions explaining how to create new playlists using your iOS or Android mobile devices.
To add a video to a playlist: If you’re adding a video to a playlist while you’re watching it, click the “Add to” icon below the video title and check the box next to the playlist to which you’d like to add it.
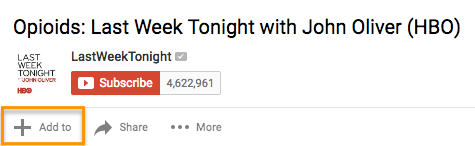
If you want to add a video to a playlist right from your Playlists page, simply click “Add Video” and either paste in a video URL, choose a video from your uploads, or search for a video on YouTube. Once you find the video you want to add, select the “Add to” menu from that video and add it to the playlist.
Your friends can contribute to your playlists, too. All you have to do is turn on the ability to collaborate on playlists. Once you turn it on, anyone you share a playlist link with can add videos to that playlist. (They can also remove any videos they’ve added, too.)
To add friends to a playlist: Go to your Playlists page again and open the playlist you want to collaborate on. Click “Playlist Settings” and choose the “Collaborate” tag. Toggle on the setting that allows collaborators to add videos to the playlist, and from there, you can send them a link where they can add videos to the playlist.
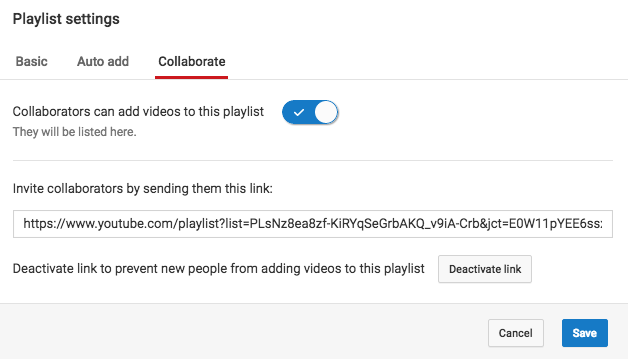
Once your friend’s been invited to a playlist, they’ll be able to add new videos to it and remove videos they’ve added in the past. They just have to follow some on-screen instructions first to confirm they want to be a contributor and to save the playlist to their own account.
When you add a video to a playlist you’re collaborating on, your name will appear next to the video in the playlist, and everyone who’s been invited to collaborate on that playlist will get a notification that a new video has been added.
(To learn more about how to manage contributors, stop accepting contributions to a playlist, and so on, read this YouTube Support page.)
7. You can save videos to watch later.
Ever seen YouTube videos you wished you could bookmark for later? Maybe you aren’t able to turn the sound on at the moment, or perhaps you just don’t have time to watch it. Well, YouTube took a page out of Facebook’s … book … by adding something very similar to Facebook’s “Save for Later” feature. On YouTube, you can save videos to a “Watch Later” playlist to access whenever you want.
The “Watch Later” playlist operates just like a normal playlist, so the instructions are identical to the previous step (except you can’t invite others to collaborate on your “Watch Later” playlist).
To add a video to your “Watch Later” playlist: Open the video on YouTube and click the “Add to” icon below the video title and check the box next to the playlist you’d like to add it to, just like you did in the previous step. The steps are very similar on mobile, but click here if you want the full instructions from YouTube’s Support page.
To access those videos: Simply go to your YouTube homepage and choose “Watch Later” from the menu on the upper left-hand side of your screen.
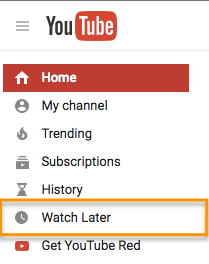
From there, you can watch the videos you were saving, as well as easily remove videos from that list that you’ve already watched.
8. You can create your own custom YouTube URL.
Want to give people an easy-to-remember web address to get to your YouTube channel? You can actually create a custom URL, which you can base on things like your display name, your YouTube username, any current vanity URLs that you have, or the name of your linked website. HubSpot’s, for example, is https://www.youtube.com/hubspot.
Important Note: Before you do this, make sure you’re positive this is the custom URL you want — because once it’s approved, you can’t request to change it, nor can you transfer it to someone else. Keep in mind that it’ll be linked to both your YouTube channel and your Google+ identity, too.
Unfortunately, not everyone’s eligible for a custom URL. To get one, you have to have 100 or more subscribers, be at least 30 days old, have an uploaded photo as your channel icon, and have uploaded channel art. If that sounds like you, keep reading.
To claim your custom URL: Open up your YouTube account settings and click “Advanced” in your name section.
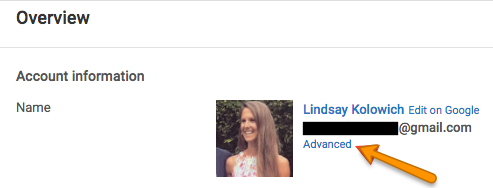
If you’re eligible for a custom URL, you’ll be prompted to claim yours by clicking a link.
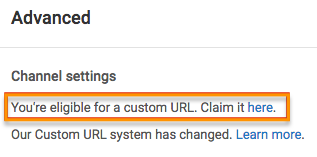
Select the box next to “I agree to the Terms of Service.” Then, once you’re absolutely sure it’s the URL you want (since you can’t ever change it), click “Change URL” to make it final.
9. You can add an end screen or cards to promote content.
In 2008, YouTube began allowing clickable links YouTube called “annotations” that you could insert into your videos. These annotations worked kind of like call-to-action buttons for directing people to subscribe to your channel, see merchandise or a fundraising campaign, visit another resource to learn more, and so on.
In order to make them more natural parts of the viewing experience, YouTube has replaced annotations with end screens, where you can display more visually pleasing call-to-action cards in the last 30 seconds of your content.
How to Add an End Screen
Do your favorite YouTube creators have a fancy closing screen that encourages you to keep watching their videos? For example, here’s one from Saturday Night Live:
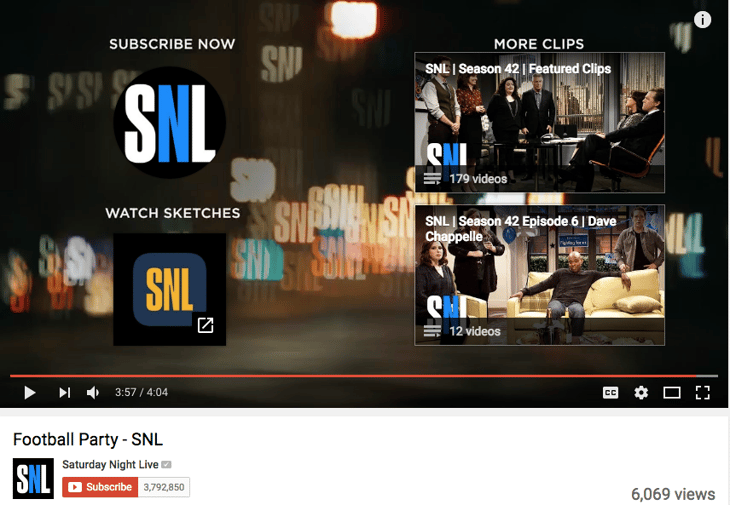
You can create a customized end screen, too. They help keep viewers on your channel by suggesting other videos and sites they can check out. Here’s how to do it:
Navigate to your Video Manager, tap “Edit,” and select “End screen & Annotations” from the drop-down menu:
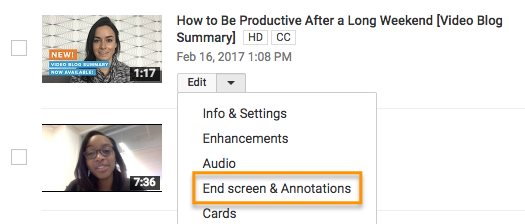
From there, you’re taken to the End screen creator studio, where you can play around with different templates and background to determine how you want your end screen to appear. Then, click the “Add element” menu to decide where you want to send viewers from your end screen.
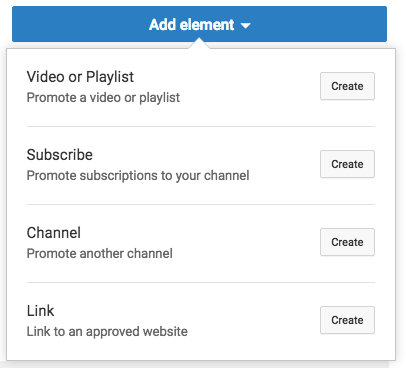
Any YouTube creators can add an end screen to customize their channels. Here’s an explainer article with more details and inspirational ideas.
How to Add a Card
You can use cards to advertise products used in your videos or links on your website you want to market on YouTube. If viewers tap the “i” in the upper-right hand corner of a video, the cards expand, as in the example below:
To add a card to a YouTube video, head to your Video Manager, tap “Edit,” and select “Cards” from the drop-down menu.
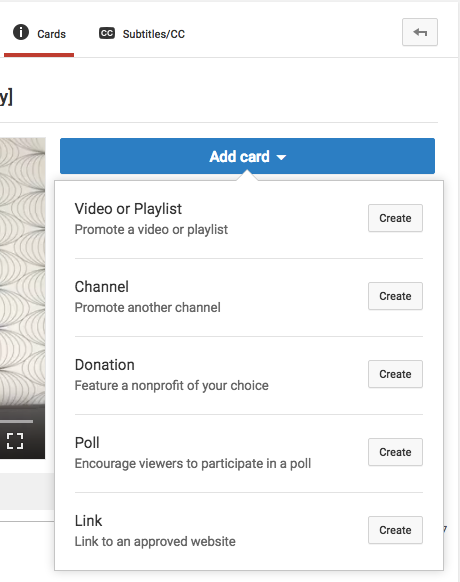
Then, choose where in the video you want cards to appear, and tap the “Add card” drop-down menu to choose what you want the card to promote. From there, customize the content that will appear to viewers when they tap the “i” while viewing your video:
10. YouTube has a big library of high-quality, royalty-free sound effects and music you can browse and download.
Want to add some cool sound effects or music to your YouTube video (or any video)? YouTube is there for you. It has a whole library of high-quality, 320kbps audio tracks and sound effects that you can download royalty-free and add to your videos. (Or listen to in your free time. We won’t judge.)
To add music or sound effects to your video: Open YouTube’s Audio Library by clicking here or opening your Creator Studio, clicking “Create” in the menu on the left-hand side, and choosing “Audio Library.”
Now, the fun begins. By default, it’ll start you on the “Sound effects” tab. Here, you can search sounds using the search bar, like I did in the screenshot below for motorcycle sounds.
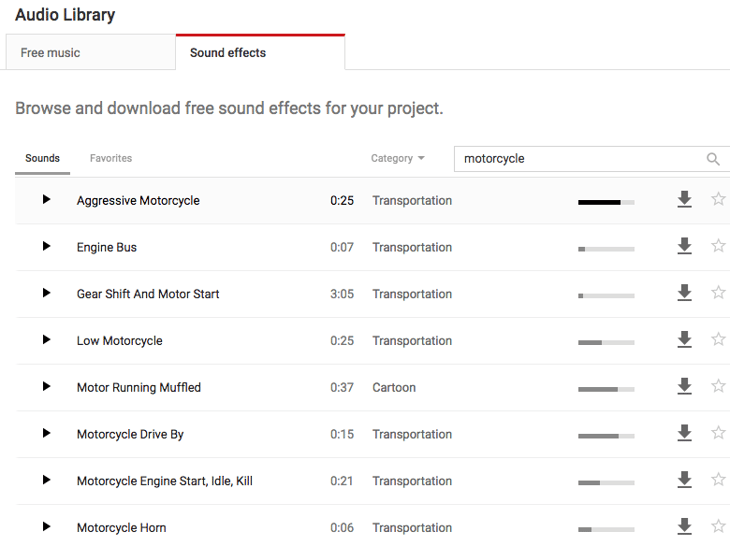
You can also toggle by category (everything from human voices to weather sounds) or scroll through favorites that you’ve starred in the past. For easy access in the future, select the star to add the track to your Favorites. The bars next to the songs show how popular a track is.
If you switch over to the “Music” bar, you can browse through all of its royalty-free music. You won’t find the Beatles in here, but you will find some good stuff — like suspenseful music, uplifting music, holiday music, jazz, and more. Instead of toggling by category, you can toggle by genre, mood, instrument, duration, and so on.
(Note: Some of the music files in there may have additional attribution requirements you have to follow, but those are pretty clearly laid out on a song-by-song-basis. You can learn more on YouTube’s Support page here.)
Once you’ve found a track you like, click the arrow to download it and it’ll download directly to your computer as an MP3 file. Then, you can do whatever you want with it.
If you want to source sounds for your videos outside of YouTube, you’ll just have to make sure to you’re following all the rules for sourcing them. Refer to this YouTube Support page for best practices for sourcing audio, and this one to learn YouTube’s music policies.
11. Add adjustments and creative effects with YouTube Enhancements.
YouTube has faded a number of features it experimented with at one time — including annotations and a not-so-popular slideshow creator — but one editing tool that remains quite handy is Enhancements. Nine effects you’d normally find on third-party video editing software, you can now take advantage of natively through YouTube:
- Auto-fix lighting and color
- Stabilize shaky camera motions
- Apply slow motion
- Apply time lapse
- Trim out parts of your video
- Rotate the view
- Apply filters
- Custom blurring
- Blur faces
To make enhancements to an existing video: Click into your Video Manager and find a video you’d like to edit. Select the drop-down icon next to “Edit” to the right of the video, and select “Enhancements.”
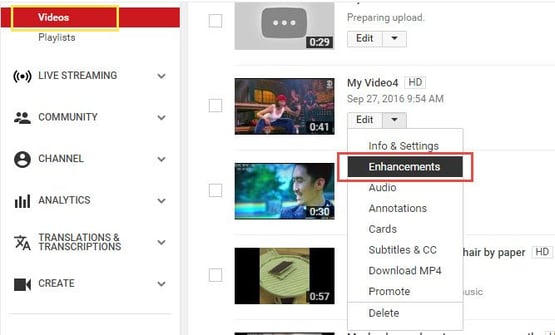
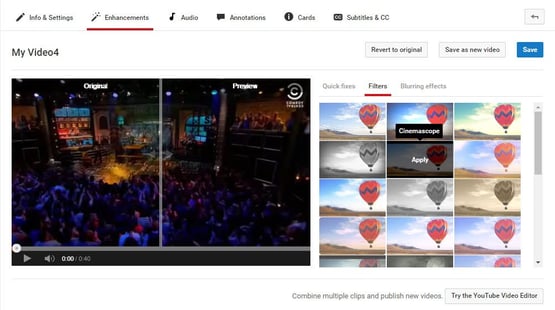
Images via filmora
If you’re editing on a computer, this button will open all nine tools to the right of your video, where you can add various fixes, filters, and blurring effects and see how they change the final product in real time.
Note that not all enhancements are available on mobile devices. On Apple and Android smartphones and tablets, you can only trim, add music, and apply filters. Read this article to learn more about YouTube enhancements.
12. Play YouTube videos in the background on mobile devices.
Sometimes, your own music playlist just isn’t cutting it. Or maybe you want to listen to your favorite artist’s performance at an awards show.
Either way, if you’ve tried listening to music on YouTube via your mobile device, you may have noticed one thing: You can’t navigate out of the app. You have to keep YouTube open, and you can’t use your phone for anything else, in order to listen to something on YouTube. Kind of frustrating if you’re trying to multitask on your commute home, right?
Now, there are hacks so you can listen to YouTube content in the background while still using your mobile device. Here’s what you do:
How to Watch YouTube Videos in the Background: iOS
Open Safari on your mobile device, and navigate to a video you want to watch on https://www.youtube.com. Start playing the video you want to listen to, then tap the Home button to close out of Safari. (I chose Katy Perry.)
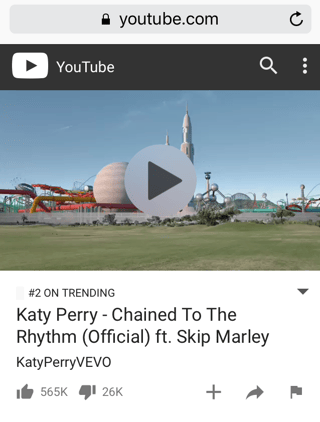
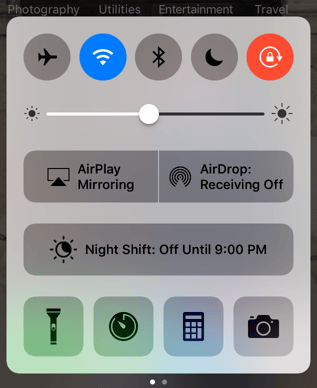
Then, swipe up on your home screen to reveal the Action Center.
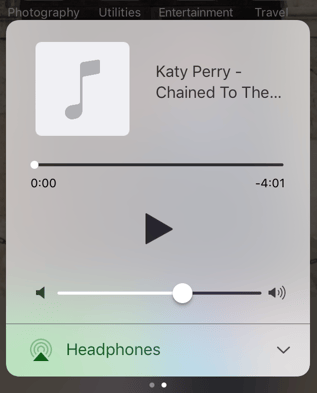
Then, swipe left to reveal the second screen on your Action Center. The details of the video you selected on YouTube should appear, and from there, simply tap Play to keep jamming.
How to Watch YouTube Videos in the Background: Android
Launch Firefox or Chrome on your mobile device, and navigate to a video you want to play on https://www.youtube.com. Then, tap the “Settings” menu in the upper right-hand corner (the ellipses) and select “Request Desktop Site.”
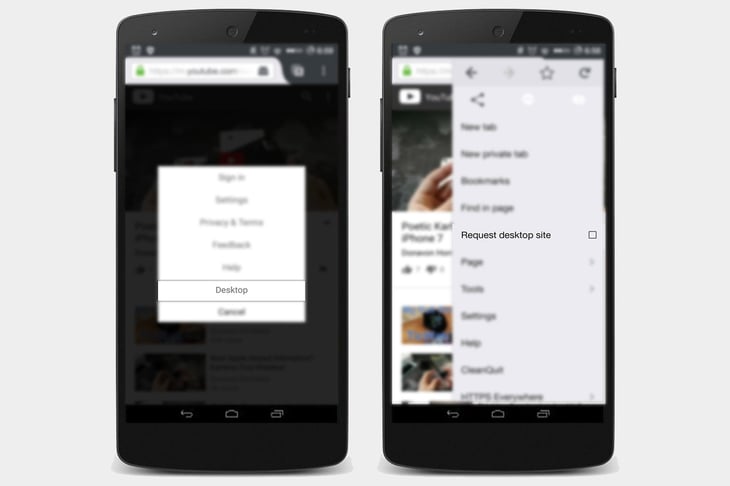
Image via DigitalTrends
Then, start playing the video on YouTube, and tap the Home button to return to your home screen. The audio will keep playing in the background as you use other apps.
13. You can live stream videos to YouTube.
Live streaming video has been a big topic of conversation for the past few years. It’s seen massive growth, especially in the past few years with the advent of Twitter’s Periscope, Facebook Live, and Instagram live videos.
Learning how to go live on YouTube is a little more complex (and confusing) than live streaming using similar platforms. On YouTube’s easier streaming option, there’s no simple “start” button; instead, you actually have to download encoding software and set it up to use live streaming at all. YouTube has identified 13+ encoders that are Live Verified.
If you’re streaming a live event, though, all you need is a webcam. We’ll get to that in a second.
Live Stream From Your Desktop Computer
Log in to YouTube and click the “Upload” button at the top-right of your screen. Normally, this is where you’d upload a pre-existing video — but instead, you’ll want to find the “Live Streaming” module on the right-hand side of your screen. Click “Get Started” in that module.
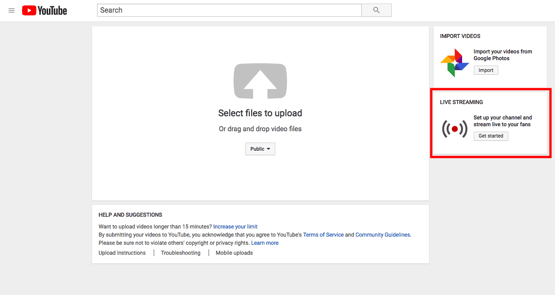
Before you go live, YouTube will first confirm that your channel is verified and that you have no live stream restrictions in the last 90 days. Once that’s all set, you have two options for streaming: “Stream now” and “Live Events.”
Stream Now
Stream Now is the simpler, quicker option for live streaming, which is why it’s YouTube’s default for live streaming. You’ll see a fancy dashboard like the one below when you choose “Live Streaming” on the left-hand Creator Studio menu:
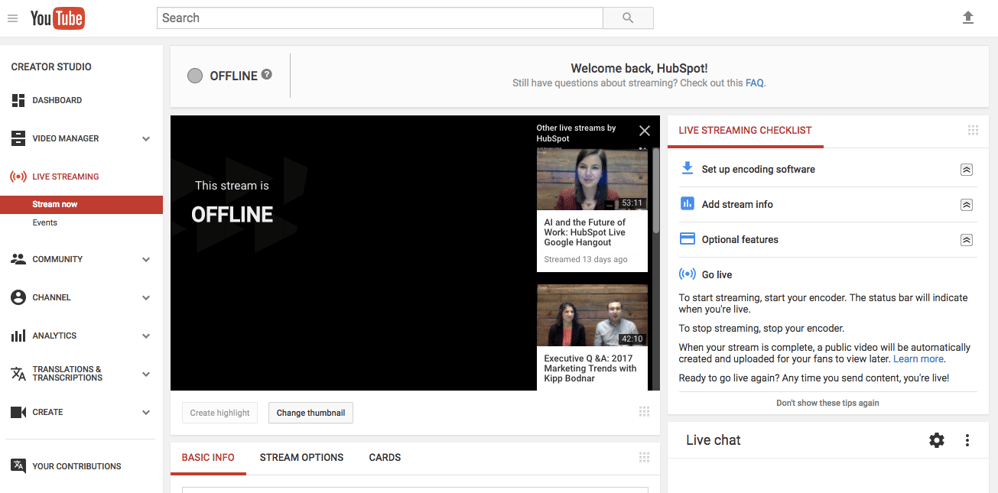
Again, you’ll notice there’s no “start” button on the dashboard. This is where you’ll need to open your encoder and start and stop your streaming from there. Here’s YouTube’s Live Streaming FAQ page for more detailed information.
Live Events
Live Events gives you a lot more control over the live stream. You can preview it before it goes live, it’ll give you backup redundancy streams, and you can start and stop the stream when you want.
Choose “Live Events” from your live streaming dashboard once you’ve enabled it. Here’s what the events dashboard looks like, and you can learn more about it here.
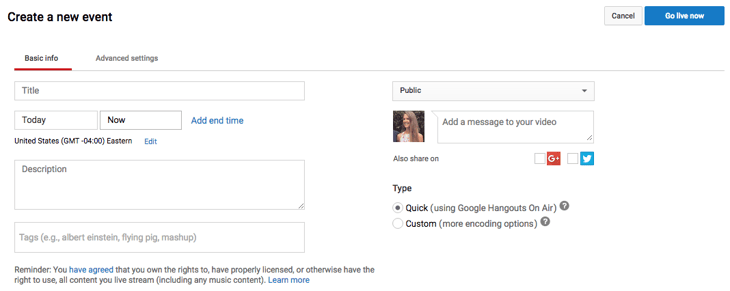
When you stop streaming, we’ll automatically upload an archive of your live stream to your channel. Note that your completed live stream videos are automatically made public on your channel by default as soon as you’re done recording. To make them disappear from the public eye once you’re done, you can select “Make archive private when complete” in the “Stream Options” section of your live dashboard.
Live Stream From Your Mobile Device
YouTube has also rolled out live streaming from mobile devices for YouTube creators with 10,000 or more subscribers (as of the date of this posting — that will be available to all creators soon, according to YouTube’s blog post).
Live streaming is more intuitive from mobile devices than on desktop computers. Qualified creators can simply open their YouTube app on mobile, tap the camera icon at the top of the screen, and choose “Go Live.”
From there, creators can enter details about the broadcast before immediately recording live for their subscribers, as shown below:
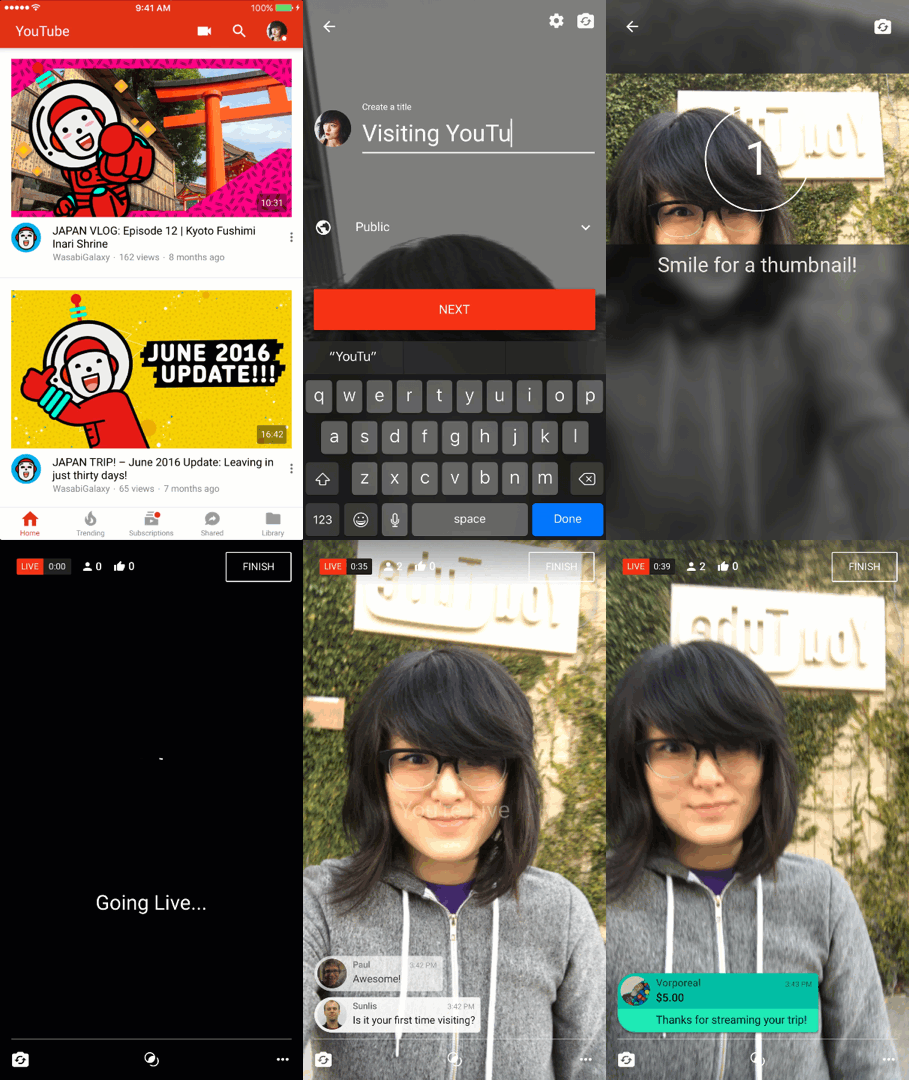
Image via YouTube
For more instruction on how to go live on YouTube across devices, YouTube published a Help article here. Want to see what live videos others are recording on YouTube? You can browse popular YouTube videos that are live right now by clicking here.
14. You can upload and watch 360-degree videos (live and pre-recorded) — and in VR.
YouTube first announced its support for 360-degree videos back in March 2015, and it was a total novelty — not to mention a game-changer. Since then, brands, athletes, and other users have created some awesome 360-degree content, like this video from Samsung:
As you can see, the experience as a viewer is really, really cool. On desktop, you can click around the video to see all the different angles while the video plays. On mobile, it’s even cooler: You can move your camera around to change the angle. You can browse the trending 360-degree and VR videos here.
How to Create a 360-degree Video on YouTube
For this, you’ll need some serious equipment. Cameras with 360-degree capability that are compatible with YouTube are listed here on YouTube’s Support page, along with how to create and upload a 360-degree video file.
What about live video in 360 degrees? That announcement would come a year after the first one, in April 2016 — the very same week Facebook announced its own design for a 360-degree camera. Luckily for the folks at YouTube, it beat out Facebook by supporting both live video and 360-degree footage all at once.
How to Watch Any YouTube Video in VR
The Verge called 360 live-streamed videos “the gateway drug to virtual reality” for YouTube. Other than the YouTube website or app, you don’t need any fancy equipment to be able to watch a 360-degree live video and feel like you’re basically there.
That doesn’t mean a headset isn’t an option — and an awesome one at that, since YouTube released its Cardboard feature. Cardboard is available on any YouTube video you watch or upload, and works with Google Cardboard (an actual VR headset by Google) and several other VR headsets available today.
To use Cardboard while watching a YouTube video via mobile: Select any video in your YouTube mobile app, then tap the three dots in the upper-right hand corner of the video. In the drop-down, select “View in Cardboard.” You may already see this option visible in the bottom-right of 360-degree videos.
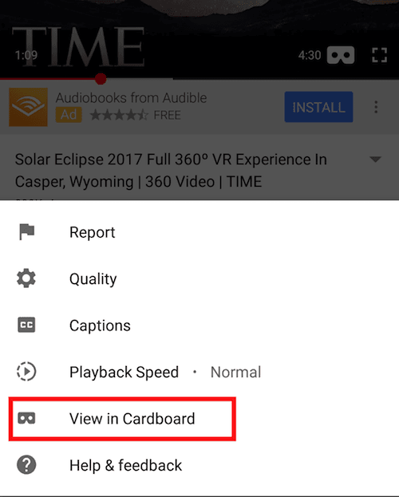
This will prompt you to connect your mobile device to a compatible VR device. Once you do, prepare for a stellar experience, and just imagine what this could mean for the content with which you populate your own YouTube channel.
15. YouTube ads target you based on an algorithm similar to Google and Facebook.
How does the YouTube algorithm decide which ads play on the videos you watch?
Turns out it works a lot like Google and Facebook ads do. Like on other free sites, the advertisers help fund the YouTube experience in return for exposure to ads. You’ll see certain ads over others because of your demographic groups, your interests (which is judged in part by what you search on Google and YouTube) and the content you’ve viewed before, including whether or not you’ve interacted with the advertiser’s videos, ads, or YouTube channel.
YouTube’s algorithms also try to make sure people aren’t overloaded with ads while watching videos — so it actually sometimes won’t show ads on monetizable videos, even when there’s a demographic match.
Here are the five ad formats you can expect to see on YouTube, and how they work:
A. Display ads, which show up next to the video and only appear only on desktop and laptop computers. The advertiser gets paid when you see or click on the ad, depending on their selection.
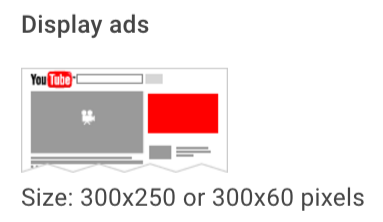
Image via YouTube’s Creator Academy
B. Overlay ads, which appear across the bottom 20% of the video window and currently only appears only on desktop and laptop computers. You can X out of the ad at any time.
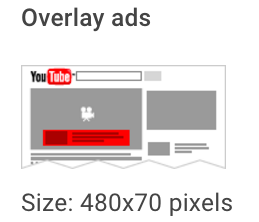
Image via YouTube’s Creator Academy
C. TrueView in-stream, skippable video ads, which are most common ads. These are the ones you can skip after watching for five seconds. Advertisers can put it before, during (yikes!), or after the video plays, and they get paid only if you watch at least 30 seconds of the clip or to the end of the video ad — whichever comes first.
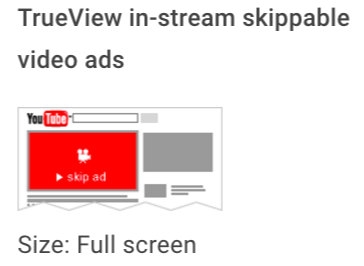
Image via YouTube’s Creator Academy
D. Non-skippable video ads, which are those longer, 15-or-more-second ads you see before plays and can’t skip after any period of time, no matter how much you shout at your screen.
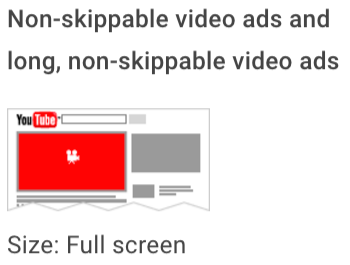
Image via YouTube’s Creator Academy
E. Midroll ads, which are ads that are only available for videos over 15 minutes long that are spaced within the video like TV commercials. You need to watch the ad before continuing through the video. How the advertiser gets paid depends on the type of ad: If the midroll is a TrueView ad, you’d have to watch 30 seconds of the end or the entire ad — whichever is shorter. If it’s a CPM-based ad, you have to watch the entire ad no matter how long it is.
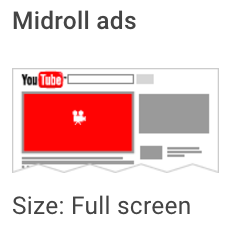
Image Credit: YouTube’s Creator Academy
F. Bumper ads, which are short, non-skippable ads up to six seconds long that play before the video the viewer has selected. Bumper ads are optimized for mobile devices and must be watched in their entirety before viewers can progress to the video they want to view.
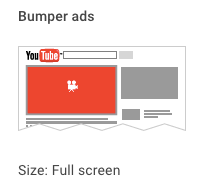
16. You can remove ads from YouTube videos (and watch videos offline) for 10 bucks a month.
Video ads are the reason you can watch videos for free on YouTube. It’s a fact many of us have come to accept. But with YouTube’s subscription service YouTube Red, that doesn’t necessarily have to be true anymore.
For $9.99 a month, you can watch YouTube videos … without any ads. And, in addition to ad-free videos, you can save videos on your mobile device and watch them in the background and/or offline, and you can use YouTube’s Music App (on iOS and Android) in the background, offline, and/or on audio mode. This is not a drill.
You’d think the lure of ad-free videos would have caused more of an uproar since its launch in late 2015, especially given YouTube’s domination in the music space. Surprisingly, I haven’t heard much noise about it. But YouTube hasn’t disclosed subscriber numbers (the service reportedly has around 1.5 million subscribers) so it’s hard to tell how well it’s doing. Either way, it’s good to know about — especially if you like collecting songs and music videos like I do, but don’t like when they get broken up by ads.
17. You can use Google Trends to explore and compare popular YouTube search terms over time.
You might already use Google Trends to look at the popularity of specific search terms over time. (It can be a great marketing tool for making smarter keyword choices, for instance.) But did you know you can use it to compare the popularity of YouTube search queries, specifically?
All you have to do is open Google Trends and type a search term into the “Explore topics” search bar at the top. Once that page opens up, click on “Web Search” to open a drop-down menu, and choose “YouTube Search” so it filters by YouTube searches specifically.
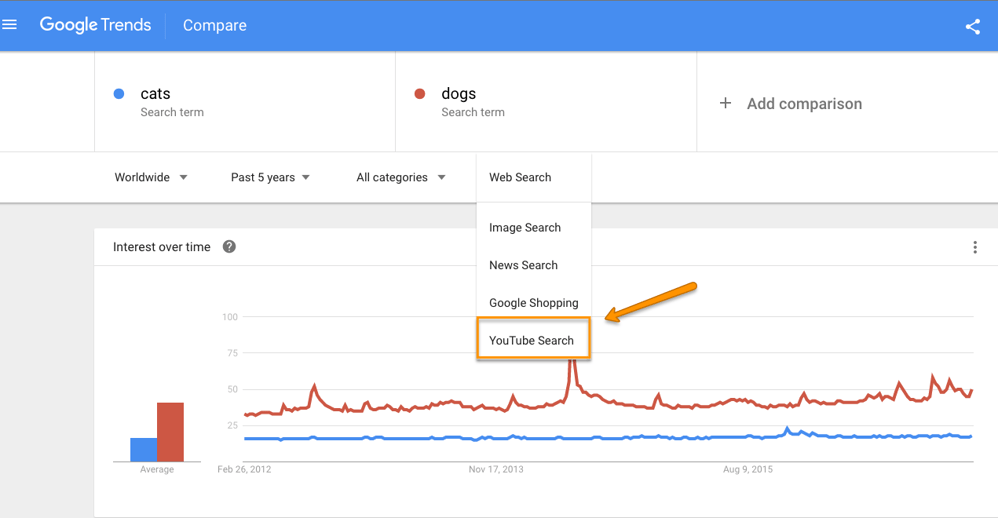
You might find that, for some search terms, the search trends are very different on Google (above) than on YouTube (below).
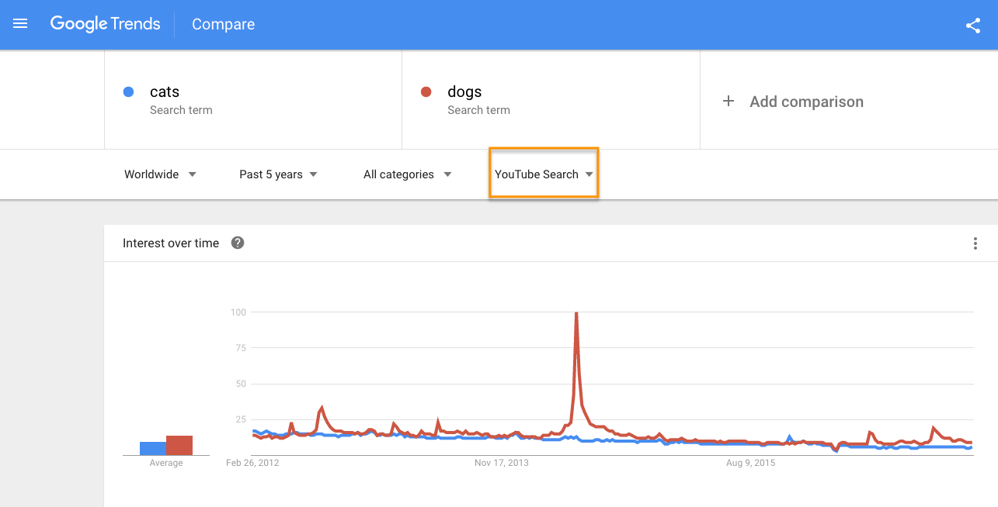
18. There’s a ‘safer’ version of YouTube available for your kids.
Any parent will tell you how scary it is for their kids to theoretically have access to everything public on the internet. But for your younger kids, there are ways to curb that access and have more control of what they’re watching and finding — including a kids’ version of YouTube called YouTube Kids.
The folks at YouTube call YouTube Kids “a safer version of YouTube.” It’s not a wide-open library of online videos like YouTube is; instead, it uses filters powered by algorithms to select videos from YouTube that are safe for kids to watch. It’s also totally free, thanks to ads (which are regulated as carefully as possible).
You can either turn the search feature on or off, depending on whether you’re cool with your kids searching for videos themselves — or if you’d rather limit them to a certain set of videos selected by the app, along with those the app recommends based on what they’ve watched already. You can set a timer to limit how much time a child spends on the app, which is music to many parents’ ears.
The algorithm is darn good — remember, Google is YouTube’s parent company — but, as it warns in its parents’ guide, “no algorithm is perfect.”
19. You can now clear your YouTube History.
You might eventually want to delete items from your YouTube search or watch history. YouTube lets you completely clear your history, pause your history so it stops recording what you search for and watch from that point forward, or go through your history and delete certain videos.
To delete your history on your desktop or mobile device: Navigate to the “Watch History” menu. Here’s where it lives on your desktop browser homepage and in your mobile app, respectively:
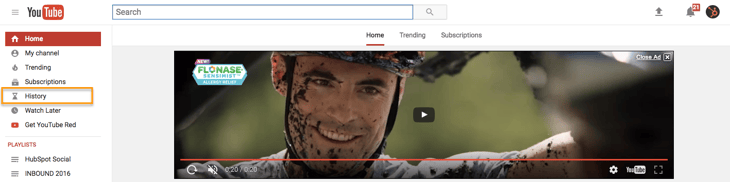
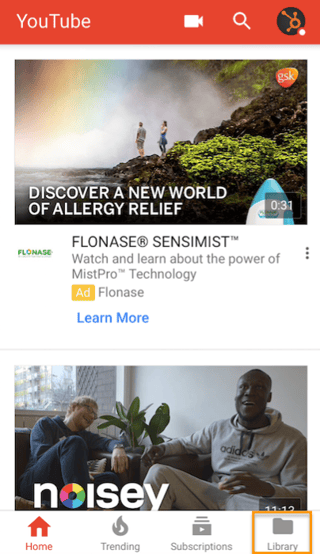
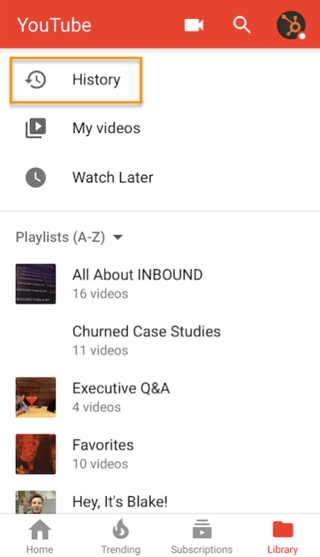
From there, you can “clear all watch history” (permanently delete the record of everything you’ve watched), “pause watch history” (stop recording the videos you watch going forward), or individually remove videos from your history by tapping the X or ellipses next to videos. Here’s what it looks like on desktop and on mobile, below:
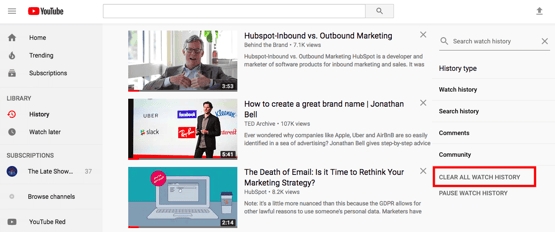
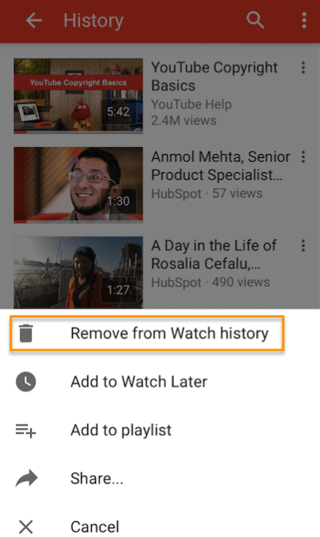
YouTube published a Help article if you need more instruction for deleting items from your YouTube watch history, too.
20. You can learn about YouTube’s copyrights terms from a cast of ridiculous puppets.
Made it this far? Here’s a little reward: YouTube’s “Copyrights Basics” FAQ page, which is, fittingly a YouTube video — and features a pretty colorful cast of characters. It’s actually super informative, and it looks like YouTube’s video team had a lot of fun making it.
My favorite line is probably, “You know there are links on this webpage, right? You don’t have to watch this.” Although the chorus of gorilla puppets was pretty great, too.
Enjoy.
We hope we’ve opened your eyes to some of the more awesome YouTube hacks, tips, and features out there that you may not have known about. Now log on to YouTube and do some exploring yourself. The platform certainly isn’t going anywhere.

Treat Me Like a Person, Not a Persona [The Customer Code Series]
Editor’s note: This is the third post in an 11-part series on the HubSpot Customer Code. You can subscribe to the full series here.
Businesses need customer personas.
Personas are a powerful tool to help align vectors. When everyone understands who your customer is, what their problems are, and how your business can help them you find that making decisions about hiring, budgeting, and even specific tactics becomes much easier. We’re big fans of personas at HubSpot, and even built a tool to help people make personas.
But while a business sells to a persona, people sell to other people.
A person has fears, hopes, and dreams.
A person is unique.
Not only is treating your prospects and customers like people the right thing to do, it’s also the smart thing to do. Here’s one story that demonstrates this pretty well:
Our email marketing team is always tweaking our email process to improve engagement. By early 2017, they had tried some clever ways to segment and promote content to our list:
Segmenting by the topic of the first offer downloaded (i.e., social media, email marketing) — showed some positive results.
Segmenting by business goals of the first offer downloaded (i.e., generating leads, improving sales pipeline) — showed even better results.
Then they thought of something so simple, it was truly revolutionary. What if, instead of guessing what someone cares about based on the content they downloaded, we just asked them?
In other words, instead of trying to bucket people by persona, we treat them like a unique individual and say, “What do you what to learn more about?”
The result was a 1000% (yes, that’s the right number of zeroes) improvement in our clickthrough rate.
Our email team calls this approach the “pick-your-own-adventure” strategy. I like that.
Turns out, it works for sales teams too.
A few years ago, we switched from the classic BANT (Budget, Authority, Needs, Timeline) approach to sales to our own qualification matrix: GPCT (Goals, Plans, Challenges, Timeline).
Notice a pattern here?
Once again, we’re starting with the goals of a unique individual. Like our email marketing team, the sales team also starts by asking: What are you trying accomplish? What does success look like for you.
They’re selling to people, not personas.
The second tenet of The Customer Code is: Treat me like a person, not a persona. We gave ourselves an 8 out of 10 here.
We’re doing quite a few things right here. In addition to the stories mentioned above:
We’re making it easier for prospects/customers to contact us how they want to contact us: Phone, email, chat, or a knowledge base that allows them to help themselves.
We’re making it easier for prospects/customers to contact us when they want to contact us by offering 24-hour support.
But we’re not where I want us to be yet.
One area we’re focusing on that will help us get closer to a 10 is what we call the Nth user experience. When we onboard the first user of HubSpot, we once again use the GPCT method to understand that person’s priorities. We go deep with them to understand who they are and how we can help them get the most possible value out of the product. As a result, NPS for our first users is very high.
But as additional users are added–Nth users–we see their NPS begin to slip. We’re not doing that deep “get to know me as a unique person” work. In many ways, that first user becomes the “persona” that we expect all users from that company to adhere too. But people are unique, even people who work for the same company. They might even be solving the same problem (increase revenue), but be focused on unique angles of that problem (increase brand awareness vs. increase MQL to SQL conversion rate).
Nth users represent tens of thousands of people. There is no way we can give them the high-touch, human-led onboarding that happens for our first user in the first 90 days. So our product team is experimenting with more automated onboarding flows that orients additional users to a busy portal while also putting their unique goals front and center.
Today, we onboard accounts. In the near future, we want to onboard individual people.
Businesses should always look for patterns: Finding patterns is how we grow. And personas are powerful patterns to find broad similarities and direct our efforts. But we need to remember when we send an email, pick up the phone, or respond to a chat message that we are never communicating with a persona. We are communicating with a person. Respecting that individuality and uniqueness is how companies grow better.
This post is part 3 of 11 in a series on HubSpot’s Customer Code. You can find more info on The Customer Code and how we score ourselves here, and watch my INBOUND talk on this topic here:

Is Gamification the Key to Better Video Engagement? [New Data]
In June of this year, Facebook announced that it would add new features to its platform to make video more interactive.
The social network would accomplish this video interaction in part, it said, “with polling for both Live and on demand videos, as well as gamification for Live.”
Video creators on the Watch platform — Facebook’s long-form, TV-esque video hosting and viewing destination — would now be able to “add a range of new interactive features to videos such as: polls, quiz questions, challenges, and more.”
At the time, many believed that this move was an attempt by Facebook to emulate the success of HQ Trivia: a live, game-show-esque, social trivia app, which had peaked as the number one trivia game in the Apple app store early in 2018.
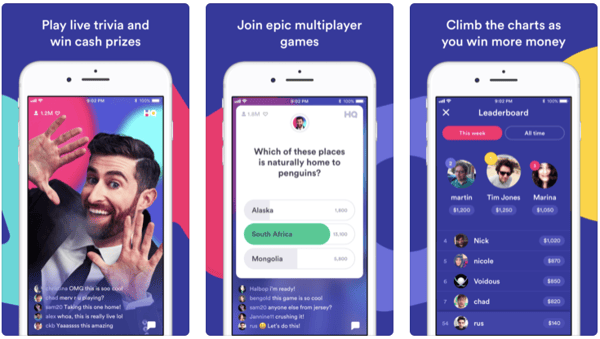 Source: Apple
A differentiating factor of HQ Trivia was the ability of users to not just play to win cash, but interact with each other as the game took place.
But are gamification and interactive elements really the key to making video more engaging? To find out, we had a look at what others are doing to permeate this visual content market, and surveyed over 4,000 on their video format preferences.
Here’s what we found.
The State of Gamified Video
The HQ Audience
While HQ Trivia once found itself dominating the trivia app market, by August, it had fallen to position 196 in the app store.
.png?t=1542715221380&width=600&name=HQ-Trivia-Rank%20(1).png) Source: TechCrunch
Source: TechCrunch
But despite what Recode calls HQ Trivia’s “shrinking audience,” it seems that others are still attempting to emulate its success, and vendors are working to build more tools to help creators produce similarly interactive video content.
New Players Entering the Market
On the creator side, there’s Socialive, for example: a live video creation and distribution platform. As the name suggests, its purpose is to add more of a social element to live videos with such tools as real-time comments and polls.
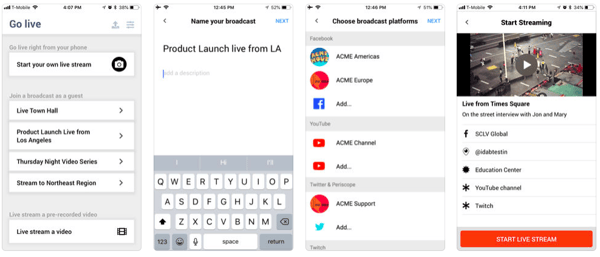 Source: Apple
Then, on the consumer or viewer side, there’s the case of Ripkord.tv: a new type of entertainment network that produces video content with combined elements from predecessors HQ Trivia and Facebook Watch, such as mobile gaming and social interaction.
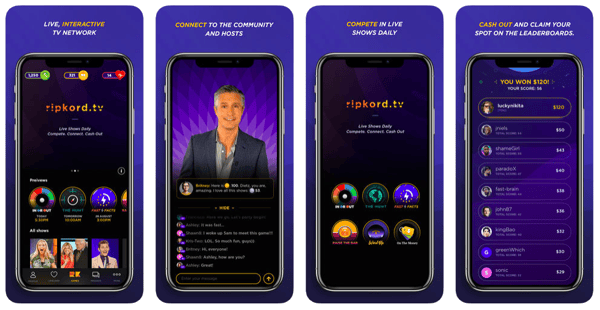 Source: Apple
But there’s a key element of programming that exists on the likes of Facebook Watch and Ripkord.tv that differentiates them from HQ Trivia: Both add these gamified, interactive elements to longer-form video content that’s more likened to traditional television programming.
Interaction + Long-Form
Earlier this month, we ran a survey to determine if users prefer short-form video content to those that are on the longer side, up to 75 minutes.
What we found surprised us. Not only do most people consume video on mobile devices (a good sign for apps like Ripkord.tv), we found, but they also aren’t particularly enamored with short videos. Most respondents, it turned out, indicated that a video length of 75 minutes or more was most likely to hold their attention.
.png?t=1542715221380&width=600&name=Not%20including%20streaming%20TV%20and%20movies,%20what%20would%20you%20estimate%20is%20the%20longest%20online%20video%20length%20that%20could%20hold%20your%20attention_%20(1).png)
I asked one of Ripkord.tv’s founders, Todd Peterson: Why is it that long-form, online video consumption seems to be gaining in popularity?
“Long-form continues to grow based on the ‘studio level’ quality of the show,” Peterson said, pointing to the likes of original programming from companies like Netflix. “We kind of see ourselves in the middle of long-form and short-form video consumption … taking the high-quality characteristics of long-form, and the mobile characteristics needed from short-form, for highly-consumable content.”
Where Users and Viewers Weigh In
Our previous findings indicated that, yes — there does seem to be a preference among consumers for long-form video content that can be viewed on a mobile platform.
But when we asked more detailed questions about how users had engaged with some of the early actors in interactive and gamified video — it seems that awareness might be a challenge that all players in this market, established and new, will need to tackle.
Awareness of Early Interactive and Gamified Video Platforms
First, it seems that our survey sample was largely unaware of (or at least unable to attach a name to) HQ Trivia and Facebook Watch: two of the earliest actors in the realm of gamified and interactive video content.
Over half of respondents said they had never heard of HQ Trivia, for example, and 45% indicated they were unfamiliar with Facebook Watch.
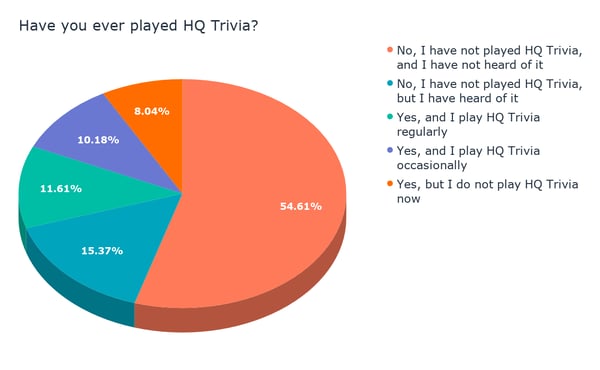
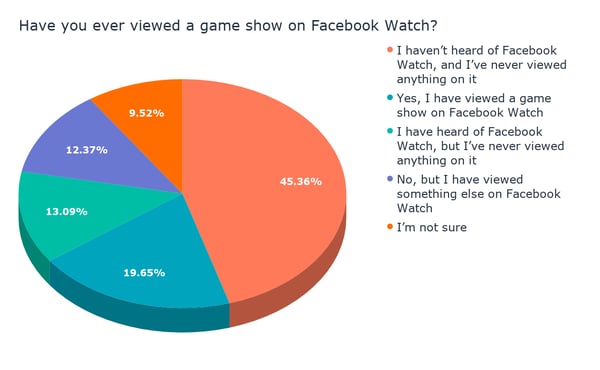
Those responses were reinforced by those we received for the question, “Have you ever interacted with a video that involved some sort of real-time interaction or gamification?” where over half of participants answered “No.”
.png?t=1542715221380&width=600&name=Have%20you%20ever%20interacted%20with%20a%20video%20that%20involved%20some%20sort%20of%20real-time%20interaction%20or%20gamification_%20(2).png)
Emerging Curiosity in Gamified and Interactive Video
We also wanted to measure how interested consumers are in watching this type of video content — and if they find it more engaging than traditional video content.
First, we found that users do indicate that video with game-like or interactive elements might be of interest, with 28% saying this type of content would engage them more traditional video would.
.png?t=1542715221380&width=600&name=How%20does%20your%20experience%20with%20interactive%20or%20gamified%20video%20content%20differ%20from%20that%20of%20your%20experience%20with%20traditional%20video%20content_%20(1).png)
However, when presented with both options — traditional video, or gamified/interactive video — most respondents said they’re more interested in viewing the former.
.png?t=1542715221380&width=600&name=Are%20you%20more%20interested%20in%20watching%20interactive%20or%20gamified%20video%20content%20than%20traditional%20video%20content_%20(2).png)
But notice that over a third of respondents to the first question regarding engagement said that they’re “not sure.”
That again points to a possible lack of awareness among some users as to what, exactly, gamified or interactive video content looks like — perhaps because they have yet to engage with it at all.
Again, that points to the success of video content developed for the likes of something like Ripkord.tv, where traditional programming is essentially enhanced by these interactive elements.
That’s a similar goal to many creators developing similar content for Facebook Watch, such as trivia game Confetti — which was developed specifically for Facebook watch by a production company known for traditional, classic televised game shows like “Family Feud.”
Source: Facebook
So perhaps that’s where the success lies: This seeming hybrid of traditional television content with some sort of interactive feature, especially one with a competitive edge.
And with interaction, there comes a community-building aspect.
“This content is purpose-built for mobile due to the added layer of interactivity. The ‘gamification’ of how we’ve blended traditional TV-style game shows with this mid-form format allows us to build a community,” says Peterson. “When millions of people can engage with each other, and even the host, the entertainment experience is just better.”

How to Find and Report Stolen Pins on Pinterest
Do you add pinnable images to your blog posts? Are others using your images to drive traffic to their own content? In this article, you’ll learn how to identify and report copyright infringement for your pins on Pinterest. What Are Stolen Pinterest Pins? Have you ever discovered one of your pins in your Pinterest feed, […]
The post How to Find and Report Stolen Pins on Pinterest appeared first on Social Media Examiner.
from Social Media Examiner https://ift.tt/2FyxBiC
via socialmediaexaminer
Anchor Text: The Short & Sweet Guide
When’s the last time you thought about the specific text you hyperlink in order to direct readers to another page on your website? This text, known as anchor text, doesn’t get much attention. But if done right, it can bolster your SEO efforts.
Optimizing your anchor text, the clickable, hyperlinked text on your website, might sound like a trivial tactic. But linking internally — also called “inlinking” — to related pages on your website can actually boost your rankings on Google if you anchor these links to words and phrases that relate to the pages you’re linking to.
“Inlinking with clear, concise, and relevant anchor text can reinforce the topical connection between certain posts in Google’s eyes and help all of those posts rank better,” says Braden Becker, HubSpot’s Historical Optimization Lead.
With this in mind, anchor text is nothing to gloss over. It’s a small detail that’s easy to overlook, but it’s still important in today’s SEO landscape. If you want to learn more about what exactly anchor text is, why it’s important, and the different types of anchor text, read on.
What Is Anchor Text?
Anchor text is the clickable, hyperlinked text on a website that links to other web pages on or off that domain. It tells search engines and users what the hyperlinked page is about. An example of anchor text is the following link to HubSpot’s homepage.
To clearly inform search engines and users about the topic of the page you’re linking to, your anchor text should be succinct, specific, pertinent to the destination page, and in close proximity to a keyword you want your pages to rank well for on Google.
That’s right — anchor text doesn’t have to include a keyword — it can just sit in a sentence that includes your target keyword. We’ll talk more about this in a minute.
When you anchor links to descriptive words and phrases, Google’s bots can instantly understand what the linked page is about. A clear connection between your page’s topic to the linked page’s topic can also help both pages rank for queries related to the topic.
But stuffing keywords or using the same exact keywords in all your anchor text will make Google suspect that you’re just trying to rank for those keywords, rather than linking internally to relevant information, and they’ll penalize you for it.
Anchor Text Examples
Some types of anchor text are better than others. Here are the four most common types, ranked by quality.
Partial-match
Anchor text is a partial match if it includes a variation of the keyword that describes the linked page’s topic. It clearly informs Google about the page’s topic, especially if there are keywords related to the page’s topic in the anchor text. Not having to worry about getting an exact match with your anchor text and a page’s topic also allows you to write your content as naturally as possible.
An example of anchor text that’s a partial match is “Every SEO should know the importance of domain authority” — the linked page covers what domain authority is, why it’s important, and how to improve it, and the anchor text can convey that message, without explicitly stating it.
Exact-match
Anchor text is an exact match if it includes the exact keyword that describes the linked page’s topic. Just like a partial-match, exact matches also clearly inform Google about the linked page’s topic. But if you anchor your internal links to too many keywords that are exact matches, Google could suspect you’re just trying to rank for those exact keywords rather than providing value to your readers.
An example of anchor text that’s an exact match is “Check out this comprehensive guide about Google Search Console” — the linked page is called the “Ultimate Guide to Google Search Console in 2018”.
Generic
Generic anchor text is a common word or phrase, like “This blog post” or “Read more”. Google actually reads text surrounding anchor text when its bots crawl your web pages, so even if you anchor a link to a generic word or phrase, the surrounding text can still tell Google what the linked page is about. But Google can only know what the link is about if your generic anchor text is surrounded by text that clearly describes the linked page’s topic.
Spammy
Spammy anchor text links to a webpage that has no relation to its hyperlinked keyword. These types of anchor text mislead users into thinking what the linked page is actually about, providing zero value to the user. The sole reason why people use spammy anchor text is to briefly rank for highly competitive keywords like insurance, loans, or mortgage and siphon traffic from those keywords’ SERPs.
People will also use spammy anchor text to hamper their competitors’ public perception on Google. For instance, a company could hyperlink their competitor’s website to the keyword “worst company to work for in 2018” in one of their blog posts, and their competitor’s website could potentially rank for “worst company to work for in 2018” on Google.
Even in 2018, Anchor text is still important.
Anchor text might be at the end of your to-do list when you’re polishing your blog post, but intentionally anchoring links to clear, concise, and relevant keywords can bolster your SEO efforts. Google will seamlessly understand the topic of each linked page on your website and grasp the topical connection between your posts, boosting your rankings.

How to Write a Blog Post: A Step-by-Step Guide [+ Free Blog Post Templates]
You’ve probably heard how paramount blogging is to the success of your marketing. But it’s important that you learn how to start a blog and write blog posts for it so that each article supports your business.
Without a blog, your SEO can tank, you’ll have nothing to promote in social media, you’ll have no clout with your leads and customers, and you’ll have fewer pages to put those valuable calls-to-action that generate inbound leads.
So why, oh why, does almost every marketer I talk to have a laundry list of excuses for why they can’t consistently blog?
Maybe because, unless you’re one of the few people who actually like writing, business blogging kind of stinks. You have to find words, string them together into sentences … ugh, where do you even start?

Well my friend, the time for excuses is over.
What Is a Blog?
A blog is literally short for “web log.” Blogs began in the early 1990s as an online journal for individuals to publish thoughts and stories on their own website. Bloggers then share their blog posts with other internet users. Blog posts used to be much more personal to the writer or group of writers than they are today.
Today, people and organizations of all walks of life manage blogs to share analyses, instruction, criticisms, and other observations of an industry in which they are a rising expert.
After you read this post, there will be absolutely no reason you can’t blog every single day — and do it quickly. Not only am I about to provide you with a simple blog post formula to follow, but I’m also going to give you free templates for creating five different types of blog posts:
- The How-To Post
- The List-Based Post
- The Curated Collection Post
- The SlideShare Presentation Post
- The Newsjacking Post
With all this blogging how-to, literally anyone can blog as long as they truly know the subject matter they’re writing about. And since you’re an expert in your industry, there’s no longer any reason you can’t sit down every day and hammer out an excellent blog post.
Want to learn how to apply blogging and other forms of content marketing to your business? Check out HubSpot Academy’s free content marketing training resource page.

How to Write a Blog Post
1. Understand your audience.
Before you start to write your first blog post, have a clear understanding of your target audience. What do they want to know about? What will resonate with them? This is where creating your buyer personas comes in handy. Consider what you know about your buyer personas and their interests while you’re coming up with a topic for your blog post.
For instance, if your readers are millennials looking to start their own business, you probably don’t need to provide them with information about getting started in social media — most of them already have that down. You might, however, want to give them information about how to adjust their approach to social media from a more casual, personal one to a more business-savvy, networking-focused approach. That kind of tweak is what separates you from blogging about generic stuff to the stuff your audience really wants (and needs) to hear.
Don’t have buyer personas in place for your business? Here are a few resources to help you get started:
- Create Buyer Personas for Your Business [Free Template]
- Blog Post: How to Create Detailed Buyer Personas for Your Business
- MakeMyPersona.com [Free Tool]
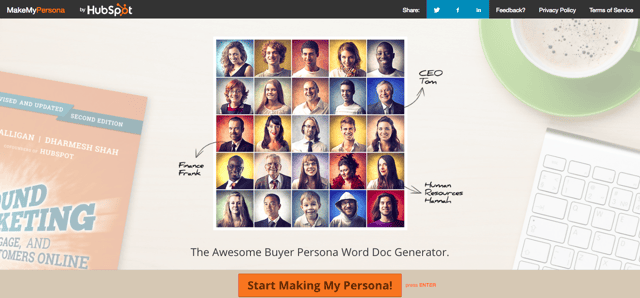
2. Create your blog domain.
Next, you’ll need a place to host this and every other blog post you write. This requires choosing a content management system (CMS) and a website domain hosting service.
Sign Up With a Content Management System
A CMS helps you create a website domain where you’ll actually publish your blog. The CMS platforms available for you to sign up for can manage domains, where you create your own website; and subdomains, where you create a webpage that connects with an existing website.
HubSpot customers host their website content through HubSpot’s content management system. Another popular option is a self-hosted WordPress website on WP Engine. Whether they create a domain or a subdomain to start their blog, they’ll need to choose a web domain hosting service after choosing their CMS.
This is true for every blogger seeking to start their own blog on their own website.
Register a Domain or Subdomain With a Website Host
Your own blog domain will look like this: www.yourblog.com. The name between the two periods is up to you, as long as this domain name doesn’t yet exist on the internet.
Want to create a subdomain for your blog? If you already own a cooking business at www.yourcompany.com, you might create a blog that looks like this: blog.yourcompany.com. In other words, your blog’s subdomain will live in its own section of yourcompany.com.
Some CMSs offer subdomains as a free service, where your blog lives on the CMS, rather than your business’s website. For example, it might look like “yourblog.contentmanagementsystem.com.” However, in order to create a subdomain that belongs to a company website, you’ll need to register this subdomain with a website host.
Most website hosting services charge very little to host an original domain — in fact, website costs can be as inexpensive as $3 per month. Here are five popular web hosting services to choose from:
3. Customize your blog’s theme.
Once you have your blog domain set up, customize the appearance of your blog to reflect the theme of the content you plan on creating.
Are you writing about sustainability and the environment? Green might be a color to keep in mind when designing the look and feel of your blog, as green is often associated with sustainability.
If you already manage a website, and are writing your first blog post for that website, it’s important that your blog is consistent with this existing website, both in appearance and subject matter. Two things to include right away are:
- Logo. This can be your name or your business’s logo, either one helping to remind your readers who or what is publishing this content. How heavily you want to brand this blog, in relation to your main brand, is up to you.
- “About” page. You might already have an “About” blurb describing yourself or your business. Your blog’s “About” section is an extension of this higher-level statement. Think of it as your blog’s mission statement, which serves to support your company’s goals.
4. Identify your first blog post’s topic.
Before you even write anything, you need to pick a topic for your blog post. The topic can be pretty general to start with. For example, if you’re a plumber, you might start out thinking you want to write about leaky faucets.
Then, as you do your research, you can expand the topic to discuss how to fix a leaky faucet based on the various causes of a faucet leak.
You might not want to jump right into a “how-to” article for your first blog post, though, and that’s okay. Perhaps you’d like to write about modern types of faucet setups, or tell one particular success story you had rescuing a faucet before it flooded someone’s house.
If a plumber’s first how-to article is about how to fix a leaky faucet, for example, here are four other types of sample blog post ideas a plumber might start with, based on the five free blog templates we’ve offered to you:
- List-based Post: 5 ways to fix a leaky faucet
- Curated Collection Post: 10 faucet and sink brands you should look into today
- SlideShare Presentation: 5 types of faucets that should replace your old one (with pictures)
- News post: New study shows X% of people don’t replace their faucet on time
Find more examples of blog posts at the end of this step-by-step guide.
If you’re having trouble coming up with topic ideas, check out this blog post from my colleague Ginny Soskey. In this post, Soskey walks through a helpful process for turning one idea into many. Similar to the “leaky faucet” examples above, she suggests that you “iterate off old topics to come up with unique and compelling new topics.” This can be done by:
- Changing the topic scope
- Adjusting the time frame
- Choosing a new audience
- Taking a positive/negative approach
- Introducing a new format
5. Come up with a working title.
Then you might come up with a few different working titles — in other words, iterations or different ways of approaching that topic to help you focus your writing. For example, you might decide to narrow your topic to “Tools for Fixing Leaky Faucets” or “Common Causes of Leaky Faucets.” A working title is specific and will guide your post so you can start writing.
Let’s take a real post as an example: “How to Choose a Solid Topic for Your Next Blog Post.” Appropriate, right? The topic, in this case, was probably simply “blogging.” Then the working title may have been something like, “The Process for Selecting a Blog Post Topic.” And the final title ended up being “How to Choose a Solid Topic for Your Next Blog Post.”
See that evolution from topic, to working title, to final title? Even though the working title may not end up being the final title (more on that in a moment), it still provides enough information so you can focus your blog post on something more specific than a generic, overwhelming topic.
6. Write an intro (and make it captivating).
We’ve written more specifically about writing captivating introductions in the post, “How to Write an Introduction,” but let’s review, shall we?
First, grab the reader’s attention. If you lose the reader in the first few paragraphs — or even sentences — of the introduction, they will stop reading even before they’ve given your post a fair shake. You can do this in a number of ways: tell a story or a joke, be empathetic, or grip the reader with an interesting fact or statistic.
Then describe the purpose of the post and explain how it will address a problem the reader may be having. This will give the reader a reason to keep reading and give them a connection to how it will help them improve their work/lives. Here’s an example of a post that we think does a good job of attracting a reader’s attention right away:
7. Organize your content in an outline.
Sometimes, blog posts can have an overwhelming amount of information — for the reader and the writer. The trick is to organize the info so readers are not intimidated by the length or amount of content. The organization can take multiple forms — sections, lists, tips, whatever’s most appropriate. But it must be organized!
Let’s take a look at the post, “How to Use Snapchat: A Detailed Look Into HubSpot’s Snapchat Strategy.” There is a lot of content in this post, so we broke it into a few different sections using the following headers: How to Setup Your Snapchat Account, Snaps vs. Stories: What’s the Difference?, and How to Use Snapchat for Business. These sections are then separated into sub-sections that to go into more detail and also make the content easier to read.
To complete this step, all you really need to do is outline your post. That way, before you start writing, you know which points you want to cover, and the best order in which to do it. To make things even easier, you can also download and use our free blog post templates, which are pre-organized for five of the most common blog post types. Just fill in the blanks!
8. Write your blog post!
The next step — but not the last — is actually writing the content. We couldn’t forget about that, of course.
Now that you have your outline/template, you’re ready to fill in the blanks. Use your outline as a guide and be sure to expand on all of your points as needed. Write about what you already know, and if necessary, do additional research to gather more information, examples, and data to back up your points, providing proper attribution when incorporating external sources. Need help finding accurate and compelling data to use in your post? Check out this roundup of sources — from Pew Research to Google Trends.
If you find you’re having trouble stringing sentences together, you’re not alone. Finding your “flow” can be really challenging for a lot of folks. Luckily, there are a ton of tools you can lean on to help you improve your writing. Here are a few to get you started:
- Power Thesaurus: Stuck on a word? Power Thesaurus is a crowdsourced tool that provides users with a ton of alternative word choices from a community of writers.
- ZenPen: If you’re having trouble staying focused, check out this distraction-free writing tool. ZenPen creates a minimalist “writing zone” that’s designed to help you get words down without having to fuss with formatting right away.
- Cliché Finder: Feeling like your writing might be coming off a little cheesy? Identify instances where you can be more specific using this handy cliché tool.
For a complete list of tools for improving your writing skills, check out this post. And if you’re looking for more direction, the following resources are chock-full of valuable writing advice:
- The Marketer’s Pocket Guide to Writing Well [Free Ebook]
- How to Write Compelling Copy: 7 Tips for Writing Content That Converts
- How to Write With Clarity: 9 Tips for Simplifying Your Message
- Your Blog Posts Are Boring: 9 Tips for Making Your Writing More Interesting
- Your Blog Posts Are Boring: 9 Tips for Making Your Writing More Interesting
9. Edit/proofread your post, and fix your formatting.
You’re not quite done yet, but you’re close! The editing process is an important part of blogging — don’t overlook it. Ask a grammar-conscious co-worker to copy, edit, and proofread your post, and consider enlisting the help of The Ultimate Editing Checklist (or try using a free grammar checker, like the one developed by Grammarly). And if you’re looking to brush up on your own self-editing skills, turn to these helpful posts for some tips and tricks to get you started:
- Confessions of a HubSpot Editor: 11 Editing Tips From the Trenches
- How to Become a More Efficient Editor: 12 Ways to Speed Up the Editorial Process
- 10 Simple Edits That’ll Instantly Improve Any Piece of Writing
When you’re ready to check your formatting, keep the following advice in mind …
Featured Image
Make sure you choose a visually appealing and relevant image for your post. As social networks treat content with images more prominently, visuals are now more responsible than ever for the success of your blog content in social media. In fact, it’s been shown that content with relevant images receives 94% more views than content without relevant images.
For help selecting an image for your post, read “How to Select the Perfect Image for Your Next Blog Post” — and pay close attention to the section about copyright law.
Visual Appearance
No one likes an ugly blog post. And it’s not just pictures that make a post visually appealing — it’s the formatting and organization of the post, too.
In a properly formatted and visually appealing blog post, you’ll notice that header and sub-headers are used to break up large blocks of text — and those headers are styled consistently. Here’s an example of what that looks like:
Also, screenshots should always have a similar, defined border (see screenshot above for example) so they don’t appear as if they’re floating in space. And that style should stay consistent from post to post.
Maintaining this consistency makes your content (and your brand) look more professional, and makes it easier on the eyes.
Topics/Tags
Tags are specific, public-facing keywords that describe a post. They also allow readers to browse for more content in the same category on your blog. Refrain from adding a laundry list of tags to each post. Instead, put some thought into a tagging strategy. Think of tags as “topics” or “categories,” and choose 10-20 tags that represent all the main topics you want to cover on your blog. Then stick to those.
10. Insert a call-to-action (CTA) at the end.
At the end of every blog post, you should have a CTA that indicates what you want the reader to do next — subscribe to your blog, download an ebook, register for a webinar or event, read a related article, etc. Typically, you think about the CTA being beneficial for the marketer. Your visitors read your blog post, they click on the CTA, and eventually you generate a lead. But the CTA is also a valuable resource for the person reading your content — use your CTAs to offer more content similar to the subject of the post they just finished reading.
In the blog post, “What to Post on Instagram: 18 Photo & Video Ideas to Spark Inspiration,” for instance, readers are given actionable ideas for creating valuable Instagram content. At the end of the post is a CTA referring readers to download a comprehensive guide on how to use Instagram for business:
See how that’s a win-win for everyone? Readers who want to learn more have the opportunity to do so, and the business receives a lead they can nurture … who may even become a customer! Learn more about how to choose the right CTA for every blog post in this article. And check out this collection of clever CTAs to inspire your own efforts.
11. Optimize for on-page SEO.
After you finish writing, go back and optimize your post for search.
Don’t obsess over how many keywords to include. If there are opportunities to incorporate keywords you’re targeting, and it won’t impact reader experience, do it. If you can make your URL shorter and more keyword-friendly, go for it. But don’t cram keywords or shoot for some arbitrary keyword density — Google’s smarter than that!
Here’s a little reminder of what you can and should look for:
Meta Description
Meta descriptions are the descriptions below the post’s page title on Google’s search results pages. They provide searchers with a short summary of the post before clicking into it. They are ideally between 150-160 characters and start with a verb, such as “Learn,” “Read,” or “Discover.” While meta descriptions no longer factor into Google’s keyword ranking algorithm, they do give searchers a snapshot of what they will get by reading the post and can help improve your clickthrough rate from search.
Page Title and Headers
Most blogging software uses your post title as your page title, which is the most important on-page SEO element at your disposal. But if you’ve followed our formula so far, you should already have a working title that will naturally include keywords/phrases your target audience is interested in. Don’t over-complicate your title by trying to fit keywords where they don’t naturally belong. That said, if there are clear opportunities to add keywords you’re targeting to your post title and headers, feel free to take them. Also, try to keep your headlines short — ideally, under 65 characters — so they don’t get truncated in search engine results.
Anchor Text
Anchor text is the word or words that link to another page — either on your website or on another website. Carefully select which keywords you want to link to other pages on your site, because search engines take that into consideration when ranking your page for certain keywords.
It’s also important to consider which pages you link to. Consider linking to pages that you want to rank well for that keyword. You could end up getting it to rank on Google’s first page of results instead of its second page, and that ain’t small potatoes.
Mobile Optimization
With mobile devices now accounting for nearly 2 out of every 3 minutes spent online, having a website that is responsive or designed for mobile has become more and more critical. In addition to making sure your website’s visitors (including your blog’s visitors) have the best experience possible, optimizing for mobile will score your website some SEO points.
Back in 2015, Google made a change to its algorithm that now penalizes sites that aren’t mobile optimized. This month (May 2016), Google rolled out their second version of the mobile-friendly algorithm update — creating a sense of urgency for the folks that have yet to update their websites. To make sure your site is getting the maximum SEO benefit possible, check out this free guide: How to Make a Mobile-Friendly Website: SEO Tips for a Post-“Mobilegeddon” World.
12. Pick a catchy title.
Last but not least, it’s time to spruce up that working title of yours. Luckily, we have a simple formula for writing catchy titles that will grab the attention of your reader. Here’s what to consider:
- Start with your working title.
- As you start to edit your title, keep in mind that it’s important to keep the title accurate and clear.
- Then, work on making your title sexy — whether it’s through strong language, alliteration, or another literary tactic.
- If you can, optimize for SEO by sneaking some keywords in there (only if it’s natural, though!).
- Finally, see if you can shorten it at all. No one likes a long, overwhelming title — and remember, Google prefers 65 characters or fewer before it truncates it on its search engine results pages.
If you’ve mastered the steps above, learn about some way to take your blog posts to the next level in this post. Want some real examples of blog posts? See what your first blog post can look like, below, based on the topic you choose and the audience you’re targeting.
Blog Post Examples
- Listicle
- Thought Leadership
- Curated Collection
- Slideshare Presentation
- Newsjack
- Infographic Post
- How-to Guide
1. Listicle
Example: 10 Fresh Ways to Get Better Results From Your Blog Posts

The word “listicle” is a mix of the words “list” and “article,” and describes posts that deliver information in the form of a list. A listicle uses subheaders to break down the blog post into individual pieces, helping readers skim and digest your content more easily. According to ClearVoice, listicles are among the most shared types of content on social media across 14 industries.
As you can see in the example from our blog, above, listicles can offer various tips and methods for solving a problem.
2. Thought Leadership
Example: What I Wish I Had Known Before Writing My First Book
Thought leadership blog posts allow you to indulge in your expertise on a particular subject matter and share firsthand knowledge with your readers. These pieces — which can be written in the first person, like this post by Joanna Penn, shown above — help you build trust with your audience so people take your blog seriously as you continue to write for it.
3. Curated Collection
Example: 8 Examples of Evolution in Action
Curated collections are a special type of listicle blog post (the first blog post example, described above). Rather than sharing tips or methods of doing something, this type of blog post shares a list of real examples that all have something in common, in order to prove a larger point. In the example post above, Listverse shares eight real examples of evolution in action among eight different animals — starting with the peppered moth.
4. Slideshare Presentation
Example: The HubSpot Culture Code
Slideshare is a presentation tool owned by the social network, LinkedIn, that helps publishers package a lot of information into easily shareable slides. Think of it like a PowerPoint, but for the web. With this in mind, Slideshare blog posts help you promote your Slideshare so that it can generate a steady stream of visitors.
Unlike blogs, Slideshare decks don’t often rank well on search engines, so they need a platform for getting their message out there to the people who are looking for it. By embedding and summarizing your Slideshare on a blog post, you can share a great deal of information and give it a chance to rank on Google at the same time.
Need some Slideshare ideas? In the example above, we turned our company’s “Culture Code” into a Slideshare presentation that anyone can look through and take lessons from, and promoted it through a blog post.
5. Newsjack
Example: Ivy Goes Mobile With New App for Designers

“Newsjacking” is a nickname for “hijacking” your blog to break important news related to your industry. Therefore, the newsjack post is a type of article who’s sole purpose is to garner consumers’ attention and, while offering them timeless professional advice, also prove your blog to be a trusted resource for learning about the big things that happen in your industry.
The newsjack example above was published by Houzz, a home decor merchant and interior design resource, about a new mobile app that launched just for interior designers. Houzz didn’t launch the app, but the news of its launching is no less important to Houzz’s audience.
6. Infographic Post
Example: The Key Benefits of Studying Online [Infographic]
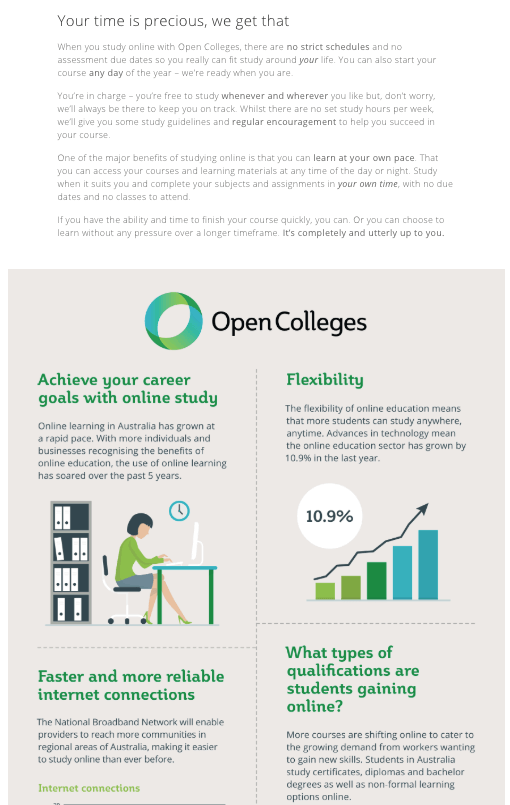
The infographic post serves a similar purpose as the Slideshare post — the fourth example, explained above — in that it conveys information for which plain blog copy might not be the best format. For example, when you’re looking to share a lot of statistical information (without boring or confusing your readers), building this data into a well-designed, even fun-looking infographic can help keep your readers engaged with your content. It also helps readers remember the information long after they leave your website.
7. How-to Guide
Example: How to Write a Blog Post: A Step-by-Step Guide
For our last example, you need not look any further than the blog post you’re reading right now! How-to guides like this one help solve a problem for your readers. They’re like a cookbook for your industry, walking your audience through a project step by step to improve their literacy on the subject. The more posts like this you create, the more equipped your readers will be to work with you and invest in the services you offer.
Ready to blog? Don’t forget to download your five free blog post templates right here.



Google Used Search Data to Create This Report to Help You Navigate the Holidays
Ah, the holidays. It’s a holly, jolly time of year that’s full of egg nog, seasonal foods, and — in a word — chaos.
Here in the U.S., the November holiday of Thanksgiving marks the start of the holiday season, with millions of people hitting the road and airports to visit relatives and partake in turkey feasts, parades, Black Friday shopping deals, and similar merriment.
To help us navigate it all, Google has released a study using (none other than) its very own search data.
Leveraging Google Maps data from the time surrounding last year’s Thanksgiving holiday, Google compiled a report designed to help guide users on holiday-specific ins and outs — the most popular travel destinations, the best times to visit them, and the most optimal (or sub-optimal) times to be on the road this year.
Below you’ll find our favorite tidbits from the seasonal study.
Holiday Search Trends
Gaming Galore
First, let’s have a look at the U.S. national search trends in the days leading up to and following Thanksgiving.
The data shows a pattern of shopping for video games during this time period, suggesting many people take advantage of seasonal sales leading up to December holidays — with particular enthusiasm for gaming.
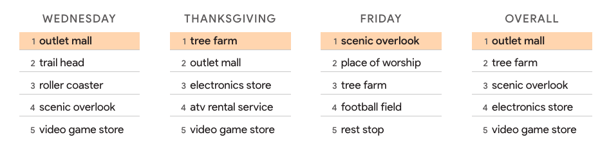
What specific category of video games people might be shopping for is another story. However, it’s worth noting that virtual reality (VR) headset manufacturer Oculus is launching a major, star-studded ad campaign in the days leading up to Thanksgiving. Perhaps the trend toward video game shopping signals a major step in the direction of the company’s lofty goals to make VR a mainstream technology.
Localized Search Trends
It wouldn’t really be a true-blue Google study if it didn’t drill down into micro search trends, too. That’s why the report also features an interactive tool that allows viewers to see searches by state.
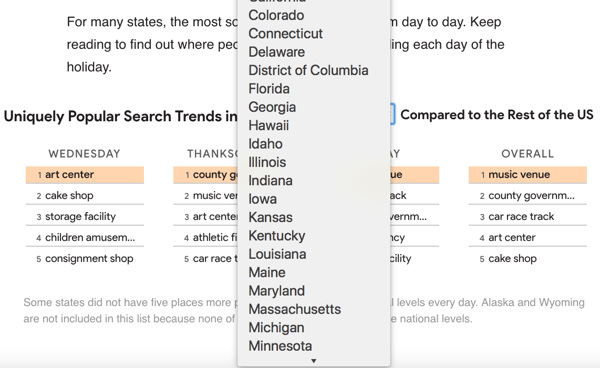
Google also rendered a visual representation of the most popular Maps searches according to each state during the Thanksgiving holiday period. Here in Massachusetts, the trend points toward “cultural center,” whereas in California, the most popular search seems to be for “city courthouse.”
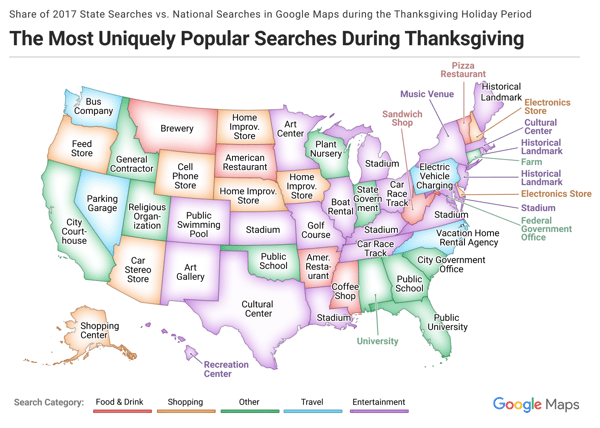
The Hottest (Holiday) Spots
Solving for the user first, if you’re Google, also means letting users know how to avoid crowds and traffic.
To address that first item, Google looked at Maps search data to determine the most popular business categories during the Thanksgiving holiday season, and when those establishments are the busiest.
Food and drink reign supreme here, with bakeries and grocery stores topping the charts on the afternoon and evening before Thanksgiving.
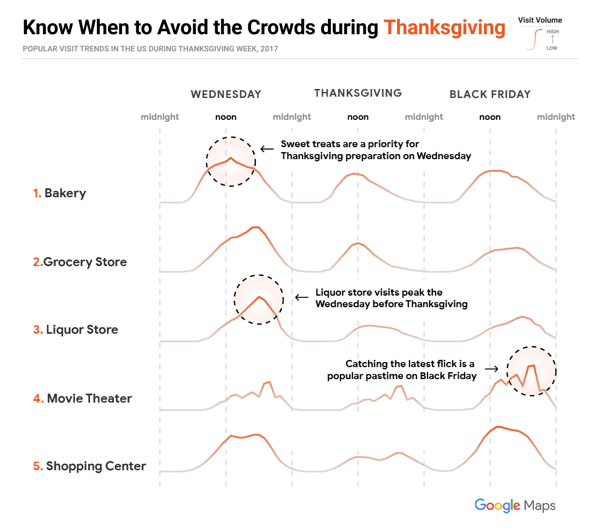
Then, there’s road traffic, where Google again provides a general chart breaking down when traffic congestion peaks during the Thanksgiving holiday in select metropolitan areas. The company’s findings also incorporate a localized, drop-down menu to help users determine the best times to hit the road.
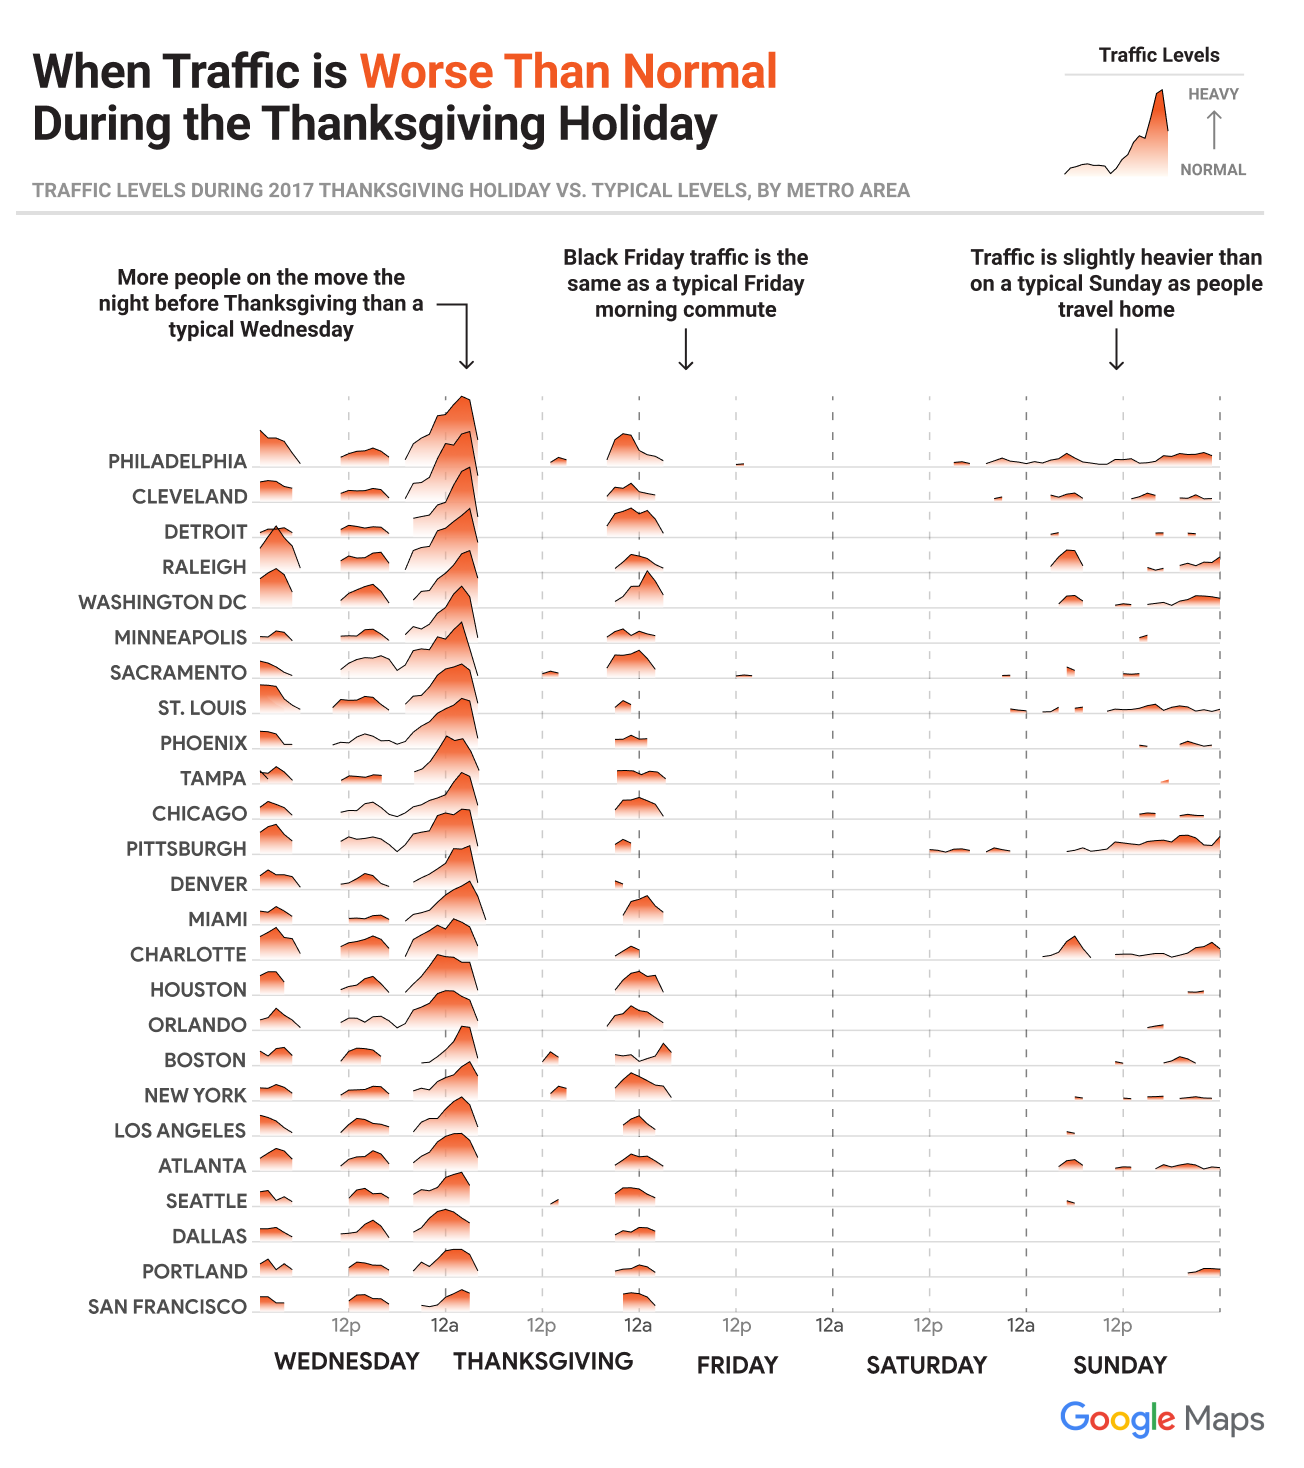
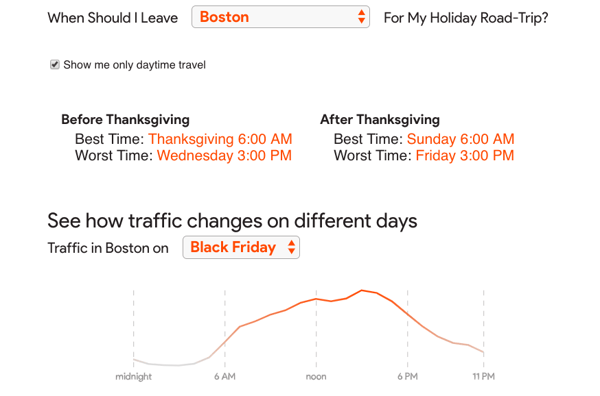
So, why do these search trends matter to the rest of us — like marketers or small-to-midsize businesses?
Well, as is the golden rule with creating quality work, having this information can help marketers plan and develop content that pertains to these seasonal trends, and adapting them in a way that makes them relevant to your key audiences.
Go forth and get festive with your strategy. And from our little, data-nerd family to yours, we hope all those celebrating Thanksgiving have a wonderful holiday.

What Is SIPOC? How to Use a SIPOC Diagram
The Ultimate Guide to Communication
The key to any relationship is communication.
This includes romantic relationships, of course, but it also applies to friendships, coworker relationships, manager-team relationships, and even brand-customer relationships.
Any scenario that requires you to convince, inform, entertain, or engage with another involves communication.
The topic of communication is quite broad, right? I mean, it encompasses an entire college major at most universities. But we won’t be covering everything about communication in this guide.
Below, you’ll be reading about communication as it applies to the workplace and to your customers — two pretty important topics, right? We’ll also be sharing ways to improve your communication and learn how your colleagues and customers communicate, too.
Keep reading to get started, or use the chapter links below to jump around.
In simpler terms, communication is said to be the “creation and exchange of meaning.” Communication is also a process … a series of actions. It’s not a single phenomenon, and it varies based on method, channel, and person.
As a partner, friend, coworker, boss, and brand, you have a responsibility to learn how to best communicate. Let’s talk about how to communicate effectively.
How to Communicate Effectively
Not all communication is good communication. In fact, not communicating at all is better (in some circumstances) than communicating poorly.
Not adhering to effective communication practices can exacerbate or worsen a communicative environment, break trust, and make messages harder to receive.
Effective Communication Skills
Effective communication isn’t just speaking clearly and honestly. It also involves creating a safe, comfortable space for communication — even if you’re not the one talking. Employ these effective communication skills to give and receive information successfully.
1. Listening Actively
Effective communication is less about talking and more about listening. Active listening isn’t just hearing what the other person has to say; it also involves understanding their emotions and point-of-view.
The goal of effective communication is to empathize and understand the person or party with whom you’re communicating. Here’s how:
- Focus on the other person. Don’t look at your phone, look around the room, or begin speaking to someone else. You can’t pick up on voice inflection or nonverbal cues if you’re not paying attention.
- Show interest in what the other person is saying by nodding your head or saying “yes.”
- Try not to judge or assume as the other person speaks. We talk more about these barriers in the next section.
- Ask questions and provide reinforcing feedback, such as “What I’m hearing is…” or “Is this what you mean?”
When you practice active, engaged listening, you becoming fully in-sync with what the other person is saying and feeling. That’s the point of effective communication.
2. Asserting Yourself
Being assertive means considering your thoughts, opinions, and feelings and communicating them in a clear, respectful way. It doesn’t mean being demeaning or aggressive. (We talk more about the different communication styles in the next section.)
Asserting yourself can help you stay clear on your own goals while empathizing with others. Here’s how:
- Get clear on your own values and opinions before you engage with someone else so that you don’t get confused or change your mind to make a conversation easier.
- Positively express negative thoughts or opinions. Try to avoid outright anger or demeaning language or attitudes.
- Be comfortable enough to say “no” or “I don’t agree.”
Although effective communication is about understanding the other person, it doesn’t mean we should forget about our own perspectives.
3. Minimizing Stress and Communication Barriers
Whether you’re speaking or listening, minimizing stress in communication helps create a healthy, effective environment. Here’s how:
- Stall or pause to collect your thoughts. This can help you avoid outbursts or speaking before you think … and saying something you might regret.
- Make one point at a time so that you or the other person don’t get confused or overwhelmed.
- Don’t interrupt or make unnecessary comments or noises while the other person is speaking.
- Try to stay objective and upbeat as you speak and listen. Keep the mood and tempo of the conversation elevated.
It’s also important to recognize and remove any communication barriers like the ones we describe below. Anyone with a perceived “upper hand” in a relationship — like managers, executives, or parents — should especially keep these in mind.
Common Barriers to Communication
Here are a handful of common communication barriers that may be hindering communication in your relationships. I’ve also included an example of how these might apply in the workplace.
Language/Cultural Communication Barriers
Language or cultural barriers occur when two parties don’t speak the same language or perhaps have different understandings of the same language.
Example: An international intern is shirking his duties to coworkers. The team lead gives feedback by saying “You’re passing the buck.” The intern doesn’t understand the jargon. He isn’t sure how to improve in his role and continues making his mistake, further frustrating the team and team lead.
Today’s workplace environments are more diverse than ever, meaning collaboration happens among all kinds of cultures. The best way to remove cultural or language barriers is by choosing common, clear phrases that are universally understood. If you’re speaking with someone who speaks a different language, try to use a translator or a verified translation tool.
Psychological / Attitudinal Communication Barriers
Psychological barriers happen when one or both parties carry cultural assumptions or are restricted by emotional hurdles or taboos. They also happen when there’s a lack of trust, attention, or empathy.
Example: A female employee is returning from maternity leave and needs a place to pump breast milk. In her previous job, her male manager wasn’t accommodating to her needs as a new mother, so when she approaches her current male superior with her request, she’s defensive and nervous … thus creating a tense, tough conversation.
In this specific case, if the male superior was aware of her previous experience, he’d be able to inject more empathy and patience to make the employee more comfortable. Otherwise he might be uncomfortable with her defensiveness. While the female employee can’t help her previous experience, she could try to approach the new manager without any assumptions.
Everyone’s mind is different, as is their upbringing. When it comes to psychological and attitudinal barriers, the responsibility falls on both parties to set aside expectations and prejudices and prioritize empathy, patience, and understanding.
Physical Communication Barriers
Physical barriers refer to anything that physically stands in the way of clear communication. These barriers typically exist through email, social media, text, or phone communication (anything that isn’t face-to-face) or when hearing or speaking handicaps are present.
Example: A remote employee is awaiting important feedback on a new project. His superior replies, via email, in a way that could be construed as cold or harsh — even though she was quite happy with the results. The remote employee assumes she’s unhappy with the project and loses confidence in his ideas and progress.
In today’s world, digital and text-based communication is very common, especially with remote work.
Receivers can avoid these barriers by not assuming the meaning behind a message or by simply asking for clarification. Also, senders can make their messages easier to receive by adding clarifying punctuation or words when communicating nonverbally.
Lastly, always be aware of personal handicaps with which others might be dealing.
The Four Communication Styles
Personality tests, like DiSC and Myers-Briggs, help others better understand your needs, strengths, and weaknesses.
The same goes for communication styles. Understanding the different styles below gives you a better understanding of how and why others communicate the way they do.
Passive Communication Style
Passive communicators act indifferent and often yield to others. On the outside, they may seem meek, quiet, or flexible. They likely aren’t good at saying “no” or dealing with conflict, but they’re easy to get along with as they typically “go with the flow.”
Phrases you might hear from passive communicators are:
- “It doesn’t matter to me.”
- “This isn’t worth fighting over. Let’s just keep the peace.”
Aggressive Communication Style
Where passive communicators are meek and quiet, aggressive communicators are loud, brash, criticizing, and physically aggressive. Their communication style reverberates through their behavior, volume, and wording. Aggressive communicators issue commands, interrupt, and often talk down to people.
Phrases you might hear from aggressive communicators are:
- “You’re wrong.”
- “This is your fault. Fix it.”
Passive-Aggressive Communication Style
The passive-aggressive style displays a mixture of both. On the surface, this type of communicator might seem passive, but they probably harbor an aggressive side underneath. Behaviorally, they might seem agitated and display facial expressions or nonverbal cues that don’t match what they’re saying.
Phrases you might hear from passive-aggressive communicators are:
- “Whatever, but don’t blame me if the team doesn’t agree.”
- “That’s fine.” (and then proceeds to do the opposite)
Assertive Communication Style
Assertive communicators are said to follow the most effective and healthiest communication style. These communicators can express their own needs, opinions, and commands while also considering the needs and opinions of others. They typically communicate to reach a compromise or win-win situation, and will often employ “I” statements to take ownership of feelings while still expressing a need or desire.
Phrases you might hear from assertive communicators are:
- “I respect your opinion, but I disagree and here’s why …”
- “I feel frustrated when you miss deadlines.
Understanding your own communication style, as well as your team’s and colleagues’, can be helpful when conversations get tough. It can also alert you to ways in which you can improve your own communication skills and challenge others to do the same.
The Four Types of Communication
Communication isn’t limited to face-to-face speaking conversation; it applies to any exchange of information. Below, we walk through the four main types of communication and how you might see them in the workplace.
Verbal Communication
This type of communication is exactly what it sounds like: verbal conversation that includes sounds, words, and language. Verbal communication is said to be the most effective way to express emotions, feelings, opinions, and needs. If used correctly, words can help you be very straightforward and concise while leaving little room for question or assumption.
There are four types of verbal communication.
- Intrapersonal, which is when we communicate to ourselves through our thoughts or out loud.
- Interpersonal, which is when we communicate one-on-one with someone else.
- Small group, which is when two or more people are involved. Team meetings, small presentations, and press conferences are examples of small group communication.
- Public, which is when one person communicates to a large group. Public speeches, company-wide meetings, and TV commercials are examples of public communication.
Nonverbal Communication
Nonverbal communication happens when messages are sent and received without words. It typically applies to body language, tone of voice, inflection, facial responses, and other gestures.
It also includes creative or aesthetic means of communication such as dance, painting, and pottery. (Note: Nonverbal isn’t the same as visual, which is explained below.)
Some examples of nonverbal communication include:
- Making eye contact (or lack thereof)
- Shaking hands
- Crossing or uncrossing legs
- Folding or unfolding arms
- Fidgeting
- Hugging
- Moving eyebrows
- Smiling or frowning
Written Communication
Written communication is any message sent through written words or text. This form unique because, unlike verbal or nonverbal communication, written communication can be edited and changed before messages are sent.
Written communication also encompasses components of visual communication when sent through electronic means, such as phones or computers.
Examples of written communication include memos, emails, letters, reports, articles or blog posts (like this one!), social media posts, and print advertising.
Visual Communication
Visual communications involves sending and receiving a message with the help of visual aids. While visual communication encompasses some written communication, it mostly refers to symbols, images, and video.
Movies, TV shows, video, and plays are all visual communication as receivers need to watch them to receive their messages. Icons and emojis are also considered visual communication. The most common form of visual communication, though, is the internet, which sends us messages using a combination of text, colors, images, symbols, and design.
Communication in Business
Whether you know it or not, you’re communicating right now by reading this guide. You’re the recipient of this message that I’ve written and transmitted via blog post.
Communication happens all around us, and it’s especially important in business. Not only are we communicating non-stop with colleagues and teammates, but through marketing, advertising, sales, and support efforts, we’re also sending and receiving messages with our customers and consumers.
Communication in the Workplace
This section is about internal communication, meaning communication that happens within the workplace. This communication can refer to conversations with your boss, project collaborations with teammates, or perhaps reading your company’s internal wiki to learn about another team’s updates.
Regardless, here are some tips on communication in the workplace.
Communication as a Manager
As a manager or team lead, you’re dealing with a lot, right? Not only do you have your own responsibilities, but you also have to oversee and organize those of your team.
One of the hardest parts of managing can be figuring out how to systematize and catalog important communications happening within and around your team.
Building an internal communications strategy can help you manage this. Here’s how.
1. Assign a communication medium for specific types of communication.
It’s hard to speak up at work. People aren’t always sure who to trust. They also aren’t sure which information will stay private, and which information will come with consequences if shared.
This is where it’s up to you, as a manager, to create a safe, healthy environment for effective communication. One way to do that is to “assign” specific media or channels for specific types of communication.
For example, constructive criticism or feedback should take place in-person and privately. Instead of sending random emails or criticizing employees during team-wide meetings, consider scheduling one-on-one feedback sessions every quarter. This reassures your employees that hard conversations will remain private, and it also builds trust by showing your employees that you respect them enough to speak in-person.
Here are some other types of communication that might need their own medium or channel.
- Praise
- Collaboration or Project Updates
- Strategies or Processes for Cross-Team Collaboration
- Concerns or Questions
- Important Business Updates
2. Encourage your team (and other teams) to adhere to these processes.
Once you define these communication processes, write them down and share them with your team. Encourage your team — and other teams — to adhere to the processes in respect of themselves and their colleagues.
Where appropriate, record your communication. This creates a record for others to reference and makes it easier to review and improve your processes … which is the next step.
3. Review every six months to see how you can improve.
Twice a year or so, survey your team and colleagues to make sure your internal communications strategy is working for everyone. Carve out time to receive feedback from your own employees. Remember, communication is a two-way street.
Communication Across Generations and Cultures
Whether you’re a brand new employee or a CEO, it’s crucial to understand that we all communicate differently. In the beginning of this guide, we reviewed some common communication barriers, namely cultural barriers.
The vast diversity of today’s workplaces (something to be celebrated!) means that people of all backgrounds, upbringings, and ages are collaborating. It also means that workplaces will have a myriad of communication styles and preferences.
Here’s how to prepare and stay aware of those differences.
- Educate yourself on how others communicate. Based on our upbringings and education, we all prefer to receive praise, feedback, and instruction in different ways. Take the time to ask your employees and colleagues how you can best communicate with them.
- Define communication as it applies to each culture. What does silence mean to each employee? How do they prefer to collaborate? What does disagreement look like? How do they like to receive praise? Start the discussion and foster an open environment within your team and company. Stay diligent and work to meet everyone’s preferences.
Communication to the Consumer
This section is about external communication, which refers to communication that your business has with consumers and customers. This communication includes marketing and advertising efforts, sales pitches, support conversations, and any public relations and crisis communications.
When it comes to any communication you have with the consumer, it’s wise to have a strategy to keep your business functions aligned and keep brand communication strong. Whether your posting on social media, publishing a press release, or building a new marketing campaign, all communication to the consumer — whether words, images, or video — should be consistent in tone, personality, and overall branding.
Over to You
Communication really is the key to any relationship. It may be a broad, vague topic, but it’s still able to be mastered in the workplace. Prioritizing communication among your team and company can help resolve conflict, strengthen collaboration, clarify strengths, and prepare you to do the same with your customers and clients.

7 Fitness Challenge Ideas to Get Your Team Moving
According to the Centers for Disease Control and Prevention, almost 80% of American adults don’t get the recommended amount of exercise per week. Unfortunately, this number could ultimately affect the productivity and long-term success of your company.
Mid-day exercise has proven to effectively boost performance and productivity in the workplace — in fact, a study presented to the American College of Sports Medicine found employees who exercised for 30-60 minutes during their lunch break reported an average performance boost of 15 percent.
While it’s undoubtedly important to achieving company long-term goals, fitness in the workplace can seem expensive and difficult to implement, particularly if you can’t afford to build an office gym or offer employee discounts to nearby sports clubs.
Fortunately, there are plenty of fitness challenges that are relatively cheap and easy to incorporate into your workplace. Along with improving your employees’ health and productivity, a fitness challenge is a fun opportunity to strengthen coworker bonds, create a more inclusive culture, and promote a healthy level of competition between departments — a win, win.
Here, we’ll explore seven different fitness challenge ideas that could get your team moving. Choose the one that best fits your team’s culture (or, better yet, try a few).
Fitness Challenge Ideas
- Create a plank or push-up challenge.
- Plan a team-bonding outing that incorporates exercise.
- Create an office “step” challenge.
- Make walking meetings a regular occurrence.
- Use a fitness app like Tribe, or YouTube videos.
- Encourage employees to sign up together for a 5K or team obstacle course race that raises money for charity.
- Use the Charity Miles app.
1. Create a plank or push-up challenge.
I’m starting with this one because it’s likely the easiest and cheapest in our list. In fact, we already do plank and push-up challenges at HubSpot — which I didn’t know, until I was grabbing a coffee one day and stumbled across a team who had formed a small circle on the floor, heads in the center, in plank positions.
I watched as they counted down the final seconds in a three-minute challenge. After they’d collapsed on the floor, I approached one woman and asked what they were doing. “A plank challenge,” she told me, “We make it harder and harder each week. We started with one minute, and now we’re up to three.”
You can’t tell me you don’t have the one-to-three minutes it takes to implement this easy fitness challenge. In-between meetings or during your lunch break, encourage your team to take part in plank or push-up challenges to strengthen both muscles and team connection.
Ideally, this is just a starting point for your team — as they improve in their ability to hold a plank, they’ll hopefully become more confident to try other fitness activities, as well.
2. Plan a team bonding outing that incorporates exercise.
Ryan Holmes, CEO at Hootsuite, has made exercise and health a priority at Hootsuite. Along with an office gym, “Groups [at Hootsuite] set out from our office for lunchtime runs and evening hikes. Over the years, we’ve had a hockey team, a road biking team and even a Quidditch team that does battles on broomsticks in the park.”
There are plenty of fun team bonding outings you can plan that incorporate exercise. Perhaps your team can go on a hike. As the winter approaches, you might plan an ice skating or sledding outing, or find a nearby trampoline park. Additionally, you could simply walk to a nearby restaurant with your team for dinner.
Try taking a team poll to figure out what your employees want to do. Ultimately, team bonding outings don’t have to solely revolve around food — in fact, a healthy level of exercise or competition could help foster deeper connections among your team members.
3. Create an office “step” challenge.
These days, plenty of people are obsessed with meeting their daily step goal via a fitness tracker. To leverage this trend, you might consider creating a “step” challenge across departments, with the opportunity to cash-in steps for incentivizing rewards, like a half-day of work or a catered lunch.
While many of your employees likely already own a wearable fitness tracker like an Apple watch or FitBit, it’s okay if they don’t — there are plenty of free apps that can track steps, such as Step Counter for Android or Stepz for iPhone.
To implement, you might tell teams you’ll measure their collective steps at the end of the week, and whichever team walked the most, wins a prize. Alternatively, you could offer a specific number — like the first team to hit 100,000 steps, wins.
4. Make walking meetings a regular occurrence.
Some meetings, like those in which you need to display a Powerpoint presentation, aren’t conducive to walking — but I’m willing to bet you can get creative, and find ways to transform other meetings into outdoor exercise.
For instance, perhaps you can transform your monthly brainstorming session into a brisk walk. Additionally, you might create walking meetings in conjunction with a department “step” challenge, like the one described above.
To make walking meetings a challenge, you could ask all departments to plan as many walking meetings as possible — at the end of the month, the team with the most walking meetings wins a prize.
5. Use a fitness app like Tribe, or YouTube videos.
With today’s technology, you don’t need a fancy office gym to encourage employees to workout together. Instead, you could just use a fitness app, like Tribe.
Tribe allows sports and fitness influencers and celebrities, including big names like NFL players Corey Liuget and Jahleel Addae, to engage with an audience and provide fun workout challenges for app users. Encourage your team to participate in a challenge together, or take classes at the same time.
Alternatively, you could simply pull up a free challenge on YouTube, like the 15 Day Fit Body Challenge by IdealFit. Perhaps you can block off an hour at lunch each day for team members who want to partake in the challenge, to ensure meetings won’t get in the way.
6. Encourage employees to sign up together for a 5K or team obstacle course race that raises money for charity.
What better way to kill two birds with one stone than to organize an exercise event that helps your company raise money for charity at the same time?
Start by researching 5Ks or obstacle course races in your area, and encourage team members to sign up together. To provide further incentive, your company could offer prizes to everyone who participates, or just top-finishers in each race.
Ideally, by enabling employees to give back to the community, you’ll incentivize more team members to join.
7. Use the Charity Miles app.
It’s likely that each employee on your team has different charities they’d like to support. Allow your team members to raise money for their preferred charities, while simultaneously promoting exercise, with the free Charity Miles app.
Here’s how it works — each employee downloads the app and chooses a charity. Then they can move however they want, whether that means biking, running, dancing, or walking. Every mile your employees move will be turned into money for their chosen charities — fantastic incentive to move more, both during and after work hours.
Additionally, you can sponsor people on the app, allowing you to create healthy competition within your department by encouraging different teams to sponsor different people, and different causes.
